

Page 1

DO IT YOURSELF
Instructions
Smart Homes Security System
Feel confi dent in your decision to join the thousands
of homeowners who have made the transition into
secure and connected homes.
- Every 14.6 seconds a burglary takes place in
the U.S.
- 65% of burglaries are residential.
- Industry statistics show signifi cant interest in
connected homes that are controllable by smart
devices.
- Customers with security systems can save up
to 20% on their home insurance premiums.
Smartphones CONNECTED to Smart Homes!
Page 2

Comtronics Smart Homes
Welcome to Comtronics Smart Homes
Thank you for choosing Comtronics for your security needs.
We are confi dent that your new system will provide you with
the security, peace of mind, and convenience that your family
deserves. At Comtronics, we pride ourselves on providing
fl exibility and integrity in the products we offer to our customers.
We are thrilled to offer you the protection that is:
Multi-path and redundant alarm communications
While other companies provide only one connection path,
Comtronics values your security and provides redundant
connections via cellular and Wi-Fi. This provides a virtually
undefeatable security pathway to Comtronics’ Five Diamond
UL Certifi ed Central Station and the redundancy that experts
recommend.
We are the Alarm Company
Many so called “alarm companies” do not monitor their own
customers. At Comtronics, you can sleep peacefully knowing
Flexible, yes we mean it!
The Comtronics Smart Homes Security System was designed
with fl exibility in mind and can accommodate the largest home
or the most automation–savvy individual! Your system comes
ready to support video cameras, door locks, garage door
opening and closing, lamps, thermostat and MORE! Start small
or go big - either way, you have the fl exibility to choose.
Congratulations on joining the thousands of customers that
have chosen a fl exible, secure and reliable system that’s easy to
install and fun to use.
Welcome to the Comtronics family!
LYNX 5200 CONTROLLER
that the product you chose is monitored 24/7/365 by the same
company that provided it. No third parties, no call centers to
multi-level call systems, and your personal information is safe
and secure as well.
Simple setup
We made it easy for you! No wiring, no drilling, just a quick
and easy setup and you will have a secured home. Need
help? Comtronics provides support and if needed, an on-site
technician to help with installation.
TRANSFORMER
MOTION SENSOR
DOOR CONTACTS
KEY FOB
2
Page 3

Instructions
1
2
3
Unpack Your Control Panel, Desk Mount and Transformer
1) Mount control panel to desk mount using the pre-aligned notches on the back.
2) Place mounted control panel in a convenient location for you and your family.
3) Plug transformer into wall socket and the system will start up.
Door/Window Contacts
1) Select transmitter and magnet locations as suggested below:
2) See photo on the right for proper magnet and transmitter alignment.
3) Peel and stick tape is included. Use alcohol swab to prepare surface.
When clean and dry, apply contact with even pressure for 15-20 seconds.
Motion Sensor
1)
Peel and stick tape is included. Use an alcohol swab to prepare the surface.
When clean and dry, apply contact with even pressure for 15-20 seconds.
2) Determine a location at least eight inches down from the ceiling, no closer
than seven feet from the fl oor, and mount with the lens facing down.
Magnet
Spacer
Transmitter
Locate the two raised indicators on the
side of the transmitter and make sure the
magnet and transmitter are within 1/4” of
each other. The magnet height may need
to be raised to align with the transmitter
depending on your door/window frame.
Use the included spacer under the
magnet and/or screws, if needed.
4
5
6
7
3) Motion sensor has a 40° view and can detect up to 35 feet away.
4) Do not mount directly near or over a heat source, A/C unit, ceiling fan, or
facing a large window. See below for suggested mounting locations:
Install Additional Purchased Devices
• See insert for smoke and/or carbon monoxide detectors’ suggested
locations from the National Fire Protection Association.
• Additional purchased devices or accessories will have instructions included
for mounting and/or setup.
Set Up User Codes and WiFi on your Lynx 5200 Panel
See page 4 for USER CODES and page 6 for WIFI
Set Up Total Connect on your Computer, Smartphone and/or Tablet
See page 8 (Total Connect activates separately. An email with your login
information will be sent within 24-48 hours.)
Call COMTRONICS to test your system 800-DIY-4757
Select Option #3 to activate your system.
The Motion Sensor can be mounted in a
corner or fl at wall mount location. Make
sure the sensor is mounted as shown in the
photo above, with the lens facing down.
For Help:
800-DIY-4757
(800-349-4757)
www.comtronicsDIY.com
3
Page 4
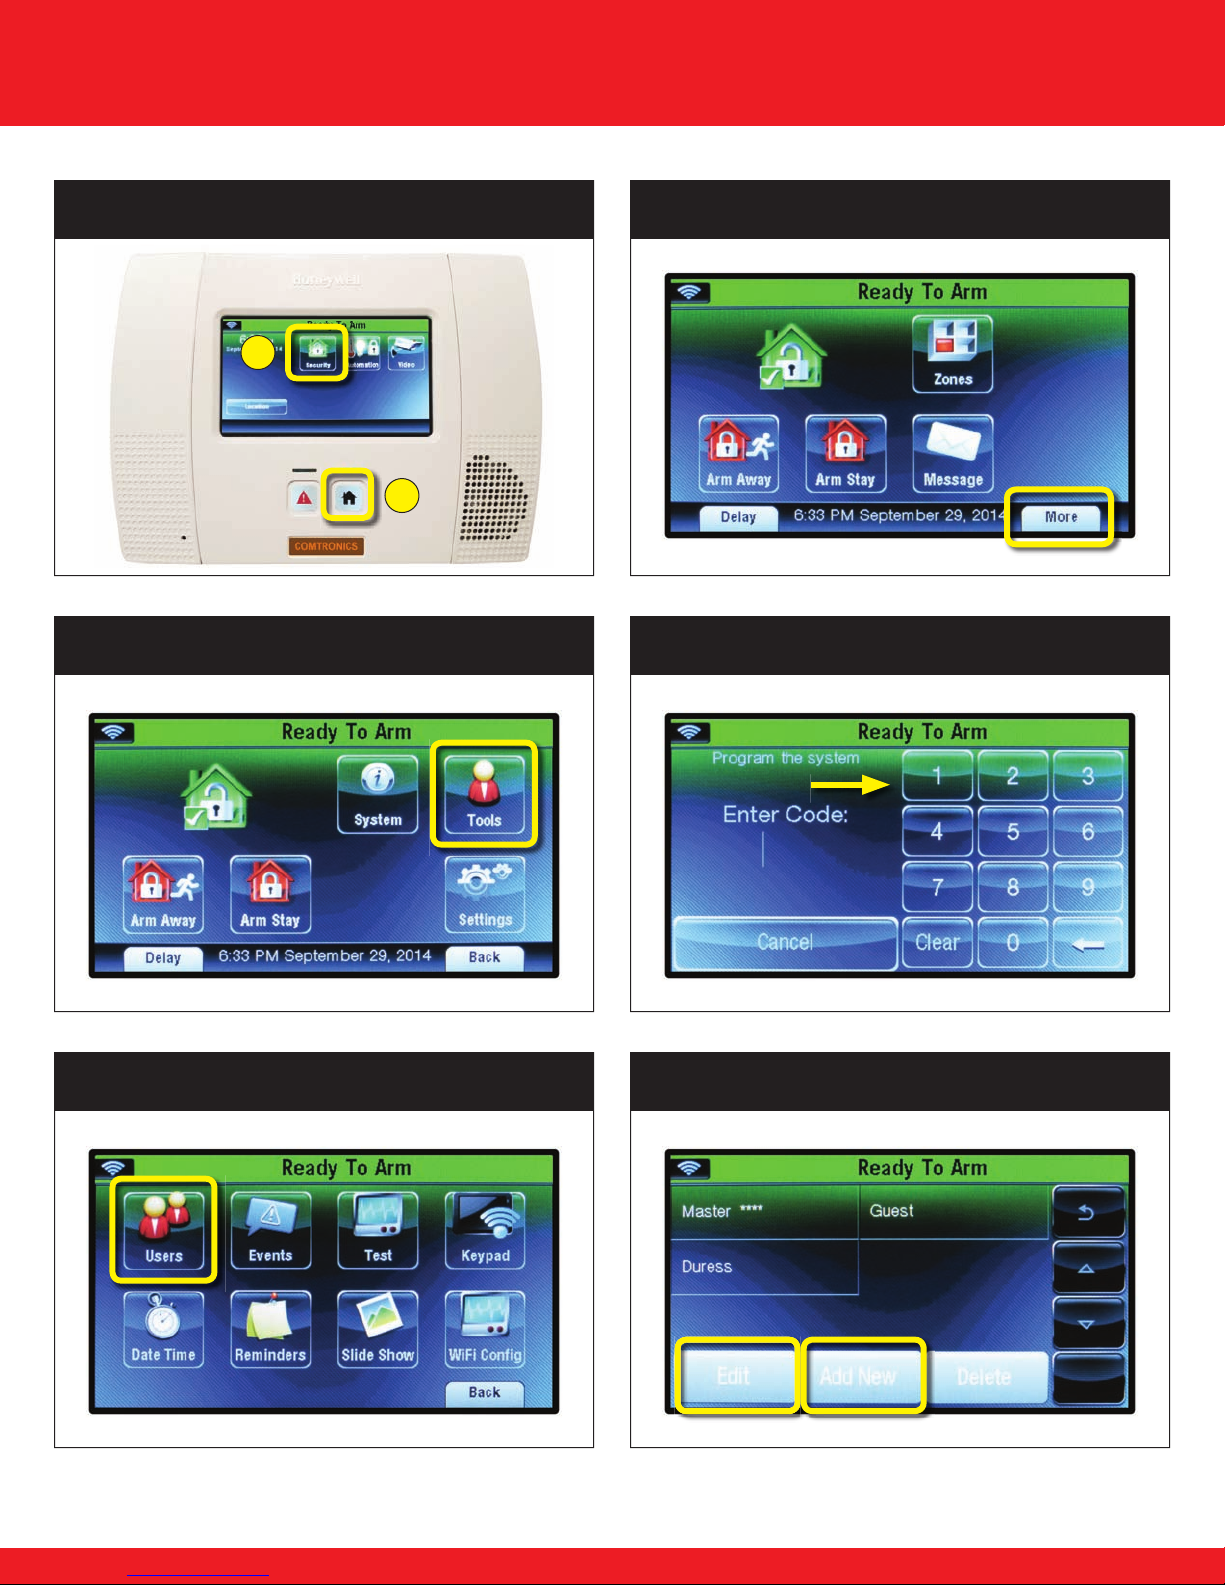
Setting Up Your User Codes
STEP 1
Push Home then select Security
B
STEP 3 Select Tools
STEP 2 Select More
A
STEP 4 Type 1234 (Master Code*)
STEP 5 Select Users
*Change Master Code to main user’s code (see “EDIT USER” on next page).
STEP 6
To edit an existing user, see “EDIT USER” on next page.
To add a new user, see “ADD NEW USER” on next page.
4
Select either Edit or Add New
Page 5

Edit User
Add New User
STEP 1 Select Master **** then select Edit
A
B
STEP 2 Select User Code
STEP 3
Enter 4 Digit Code then select Done
STEP 1 Select Add New
STEP 2 Select Name
STEP 3 Enter User Name then select Done
A
STEP 4 Select Save
For Help:
A
B
STEP 4 Select User Code
STEP 5
Enter 4 Digit Code, select Done then Save
A
B
C
800-DIY-4757
(800-349-4757)
www.comtronicsDIY.com
B
5
Page 6

Setting Up WiFi
STEP 1 Select Home STEP 2 Select Security
STEP 3 Select More STEP 4 Select Tools
STEP 5 Type in Master Code STEP 6 Select WiFi Confi g
6
Page 7

STEP 7 Select Scan Access Points
STEP 8 Select WiFi Network, then Edit
A
B
STEP 9 Select Key (Field will be blank) STEP 10 Type in WiFi Password
STEP 11 Select Join STEP 12 Select OK
(Faint Wi Password will appear under Key)
7
Page 8

Setting Up Total Connect on Your PC
Navigate to www.TotalConnect2.com
1.
If plugins are installed correctly, you should be presented with the following login screen:
If plugins are not installed, your computer may need QuickTime and Adobe Flash Player installed.
Both are free programs and can be downloaded from the websites listed below.
2.
Enter Username and Password then select Connect.
Internet Explorer Users:
3.
Click the yellow bar at the top and select Run Add-On.
4.
In the next popup, select Run.
Additional Information
Browsers: All three major web browsers are supported, however, Google Chrome is recommended.
Google Chrome
www.google.com/chrome/
Internet Explorer
http://windows.microsoft.com/en-us/internet-explorer/download-ie
Mozilla Firefox
http://www.mozilla.org/en-US/fi r
You must allow the add-ons to run on the website.
efox/new/
Plugins:
QuickT
http://www.apple.com/quicktime/download/
Adobe Flash Player
get.adobe.com/fl ashplayer/
Two plugins are required for the Total Connect website.
ime
8
Page 9

Setting Up Total Connect on
Setting Up Total Connect on
Android
1. Navigate to Play Store in the application list.
2. In the Play Store
Search icon and type in Total Connect 2.0.
3. Select Total Connect 2.0
from the drop down menu
4. Click Install.
5. Click Accept.
(Read through the Terms
and Conditions)
, click on the Magnify or
.
iOS
1. Locate and select App Store icon.
2.
In the top right, click on the Search
icon and type in Total Connect 2.0.
Select Total Connect 2.0
the drop down menu
3. It may be necessary to switch
from iPad and iPhone app if your
device is an iPad.
You should see the Total
Connect 2.0 application along
with FREE. Click FREE.
5. Click Install. You will be
prompted for your Apple ID
credentials. Enter these and
continue to the next step.
from
.
6. After downloading the application,
you can fi nd the app in the application
list. Find and select TC 2.0.
7. Type the username & password
you provided to Comtronics. If
you want the application to
remember your login credentials,
select Remember Me.
Select Login.
8. You should be presented with
a screen similar to this which
shows the current status of the
alarm system.
You are now fully logged in and
able to send commands to your
alarm system.
6. After downloading the application,
you can fi nd the app on the home
page. Find and select TC 2.0.
7. Type the username & password
you provided to Comtronics. If
you want the application to
remember your login credentials,
select Remember Me (ON).
Select Login.
8. You should be presented with
a screen similar to this which
shows the current status of the
alarm system.
You are now fully logged in and
able to send commands to your
alarm system.
Call COMTRONICS to test your system 800-DIY-4757
Select Option #3 to activate your system
9
Page 10

Suggestions
- Two-sided tape works well when all surfaces are clean and dry. Mounting screws are in the bottom of the box if homeowners
want a more permanent attachment.
- Your system has many capabilities that may be off or unusable at installation. Please contact Comtronics if you have any
questions on these great features.
- Your controller has a battery backup but must remain plugged in to charge and power the device. Do not plug in to a GFI
outlet or ‘switch controlled’ outlet.
- If you install a sensor in a different area than what was indicated, please call Comtronics to rename your device location.
- Contacts and sensors have a range that varies but should work within 100 feet of the Lynx 5200 panel. Some
construction types, or obstructions, can reduce that distance.
- Motion sensors are pet resistant but false alarms may still occur. Call Comtronics if you need help with your sensors.
- Comtronics recommends you test your system monthly. Please call 800-DIY-4757 (800-349-4757) to test your system.
For Help:
In an effort for continual Home Security System
800-DIY-4757
(800-349-4757)
www.comtronicsDIY.com
improvement, we welcome your suggestions and
feedback.
www.comtronicsDIY.com/survey
NOTE: If you move your DIY Security System to a new residence, you must notify
COMTRONICS at 800-349-4757. Failure to report the new location may
result in fees and/or lack of Police or Fire response.
10
Page 11

Expand Your Smart System
Enjoy connected living by adding on any of these great integrated products:
Indoor/Ourdoor IP Cameras
• Enjoy up to 6 cameras on Total Connect
• Incredibly easy to install and confi gure
• Compact and portable design allowing you to move them whenever needed
• Low Light Infrared, outdoor and pan/tilt models also available
Honeywell Thermostats
• Adaptive intelligent recovery “learns” how long to reach programmed temperatures
• Keypad lockouts to limit temperature setting changes from children
• Reminders to alert homeowners to change air fi lters
• Energy savings, save up to 33% on annual heating and cooling costs
Lamp Modules
• Easily control lighting with your mobile device, tablet, or computer
• Side-plug design does not block lower outlet or obstruct placement of furniture
• Features one always-on pass-through AC outlet and one Z-Wave enabled outlet
• Control multiple lights or turn on/off within ambient interior lighting scenes
Smoke/Heat Detectors
• Smart Check sends a signal to the control panel when the detector requires cleaning
• Drift Compensation virtually eliminates nuisance alarms from long-term dust build-up
• Easy-to-install Mounting Base
• Utilizes one long-life 3V lithium battery, included
Carbon Monoxide Detectors
•
Electrochemical Sensing Technology for the most accurate carbon monoxide measurement
• Six-year lifespan from the date of manufacture and includes an End of Life Timer
•
Dual LED Status Indicators–including normal operation, alarm, low battery, trouble and end-of-life
• Versatile ceiling or wall mounting
KwikSet Door Locks
• Available in Polished Brass, Satin Nickel and Venetian Bronze
•
Remotely check the door lock status, lock/unlock the door, and receive text/email alerts
•
SmartKey® re-key technology w/ BumpGuard™ lets you re-key your existing locks quickly and easily
• BHMA Grade 2 certifi ed with 20 Minute fi re rating – UL certifi ed
Visit www.comtronicsDIY.com or your retailer for ordering information.
11
Page 12

800-DIY-4757 (800-349-4757)
www.comtronicsDIY.com
 Loading...