

Page 1

Honeywell Avanza SE.40B1
LED LCD FULL HD TV - User Manual
Model Number: SE.40B1
Page 2

COMPLIANCE WITH FCC REGULATIONS
Attention:
This device complies with Part 15 of the FCC Rules. Operation is subject to the following two
conditions: (1) this device may not cause harmful interference, and (2) this device must accept
any interference received, including interference that may cause undesired operation.
IMPORTANT SAFETY PRECAUTIONS
Always be careful when using your television. To reduce the risk of re, electrical shock and
other injuries, keep these safety precautions in mind when installing, using, and maintaining
your television.
- Read these instructions and keep them in a safe place.
- Do not block any of the ventilation openings.
- Do not install the television near any heat sources such as radiators, heat registers, stoves,
or other apparatus (including ampliers) that produce heat.
- Protect the power cord from being walked on or pinched, particularly at plugs, power
receptacles, and the point where it exits from the television.
- Only use the attachments and accessories specied by the manufacturer.
- Refer all servicing to qualied service personnel. Servicing is required when the television
has been damaged in any way, i.e. if the power supply cord or plug is damaged, liquid has
been spilled, loose objects have fallen into the unit, the television has been exposed to rain
or moisture, the television does not operate normally or if the television has been dropped.
Version: 1.122011
FOR YOUR RECORD
The model and serial numbers are located either at the side of your carton or the
rear of the TV. Please ll in the information in the spaces below. Your customer
service representative will request this information whenever you call regarding this
TV.
Model:
Serial Number:
1
SE.40B1 User Manual
Page 3

TABLE OF CONTENTS
2
© Copyright 2012 Sonitronix Corporation
The Honeywell Trademark is used under license from Honeywell International Inc.
Honeywell International Inc. makes no representations or warranties with respect to this product.
SE.40B1 User Manual
GETTING STARTED
Unpacking
Wall Mounting Your HDTV
Remote Control
TV Controls
Rear Panel Connections
Connecting an HDMI Device
Connecting a Component Device
Basic Operation
On Screen Menu
Using Picture Menu
Advanced Picture Settings
Using Sound Menu
Using Channel Menu
Scanning for Channels
Using Parental Control
Using Setup Menu
Using Others Menu
USING THE MENU
TROUBLESHOOTING
Troubleshooting
ADDITIONAL INFORMATION
Technical Specications
3
4
5
7
8
9
10
12
14
14
17
18
21
24
25
28
29
32
31
Page 4

Congratulations on purchasing your Honeywell Avanza™ Television. To enjoy the full experience of your Honeywell Avanza™ TV, please make sure
you have access to HD programming.
Carefully remove your new TV and all other items from the box.
NOTE: We strongly recommend that two people perform the unpacking,
setup and assembly of the television due to its weight and size.
Inside the box you will nd:
- LED LCD FULL HD TV and Removable TV Stand
- Remote Control and (2) AAA 1.5VDC Batteries
- User Manual
- Quick Start Guide
- Registration Card/Warranty Card
ATTACHING THE TV STAND
NOTE: If you wish to wall mount your TV, please advance to pg. 4.
1. Place your TV face down on a clean at surface. To avoid scratches, we
recommend using a blanket or a soft surface such as a bed or couch.
2. Remove all plastic lm on the base and pedestal. Slide the pedestal
cover over the pedestal, aligning the holes on the cover with the notches
on the bottom of the pedestal.
3. Place the base ring over the bottom groove of the pedestal cover. (as
pictured)
4. Attach the base and insert the included screws (6x) on the bottom of the
base then tighten. (as pictured)
5. Place TV in the upright position.
CAUTION: Avoid applying pressure to the front panel or bezel of the TV.
This may severely compromise the integrity of the television. The warranty
does not cover abuse or improper installation.
3
UNPACKING
SE.40B1 User Manual
Page 5

WALL MOUNTING YOUR HDTV
Mounting the TV to a wall creates a new experience in the enjoyment of a
at panel HDTV. As this process may require electrical and signal
connections to be altered, we encourage you to hire or consult with a
trained professional.
1. Please be certain when purchasing a wall mount that the mount is
certied to handle the weight of the TV – listed on page pg. 31.
2. Please also select a wall mount that has the correct VESA hole
alignment to exactly match the TV. Please see pg. 31 for TV VESA hole
measurements. NOTE: some wall mounts allow for a variety of hole
alignments.
3. Please note the VESA hole thread pattern and hole depth. Do NOT use
screws in attaching the mount that exceed this depth as you may cause
damage to the TV.
4. Please refer to the installation procedures that accompany the wall
mount.
NOTE: Prior to attaching the wall mount to the TV, remove the pedestal
and pedestal bracket by removing the 7x screws in the image above.
Please retain the pedestal, pedestal bracket and base including hardware
for potential future use.
4
400mm
400mm
VESA Holes
Base Screws
SE.40B1 User Manual
Page 6
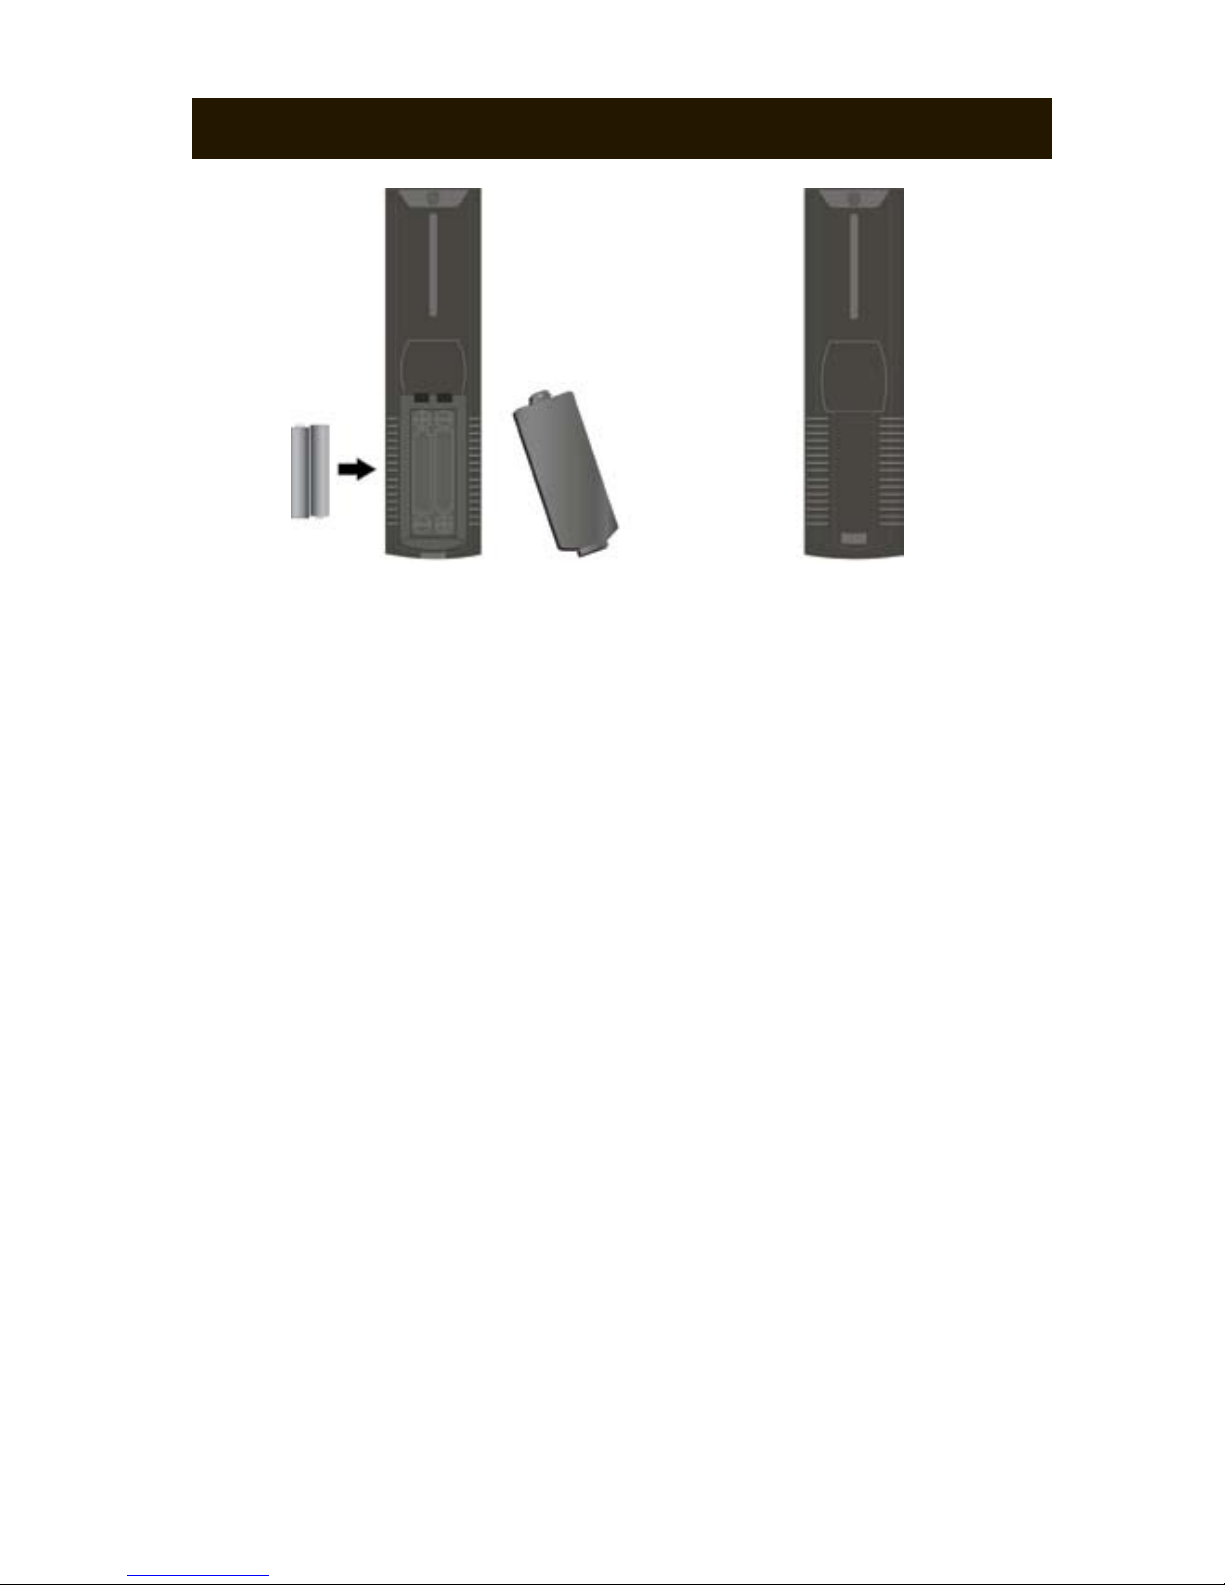
1. Press the release and lift the cover up to open the battery compartment.
Insert two AAA batteries (included), being careful to match the correct
polarity (+ with +) and (- with -).
2. Replace the cover by sliding the compartment until you hear an
audible click.
BATTERY DISPOSAL
Please ensure used batteries are disposed of safely. Never dispose of the
batteries in a re or with household waste. Check with your local authorities
for disposal regulations. The batteries should never be exposed to exces-
sive heat such as sunshine, res or the like.
CAUTION
- Do not attempt to recharge, short-circuit, disassemble, expose to
excessive heat or throw the batteries into a re.
- Do not mix alkaline, standard (carbon-zinc), rechargeable (nickel cadmium) or other battery types in the remote control as this may result
in damage to the batteries and the remote control.
1. 2.
5
REMOTE CONTROL
SE.40B1 User Manual
Page 7
REMOTE CONTROL FUNCTIONS
BASIC BUTTON FUNCTIONS
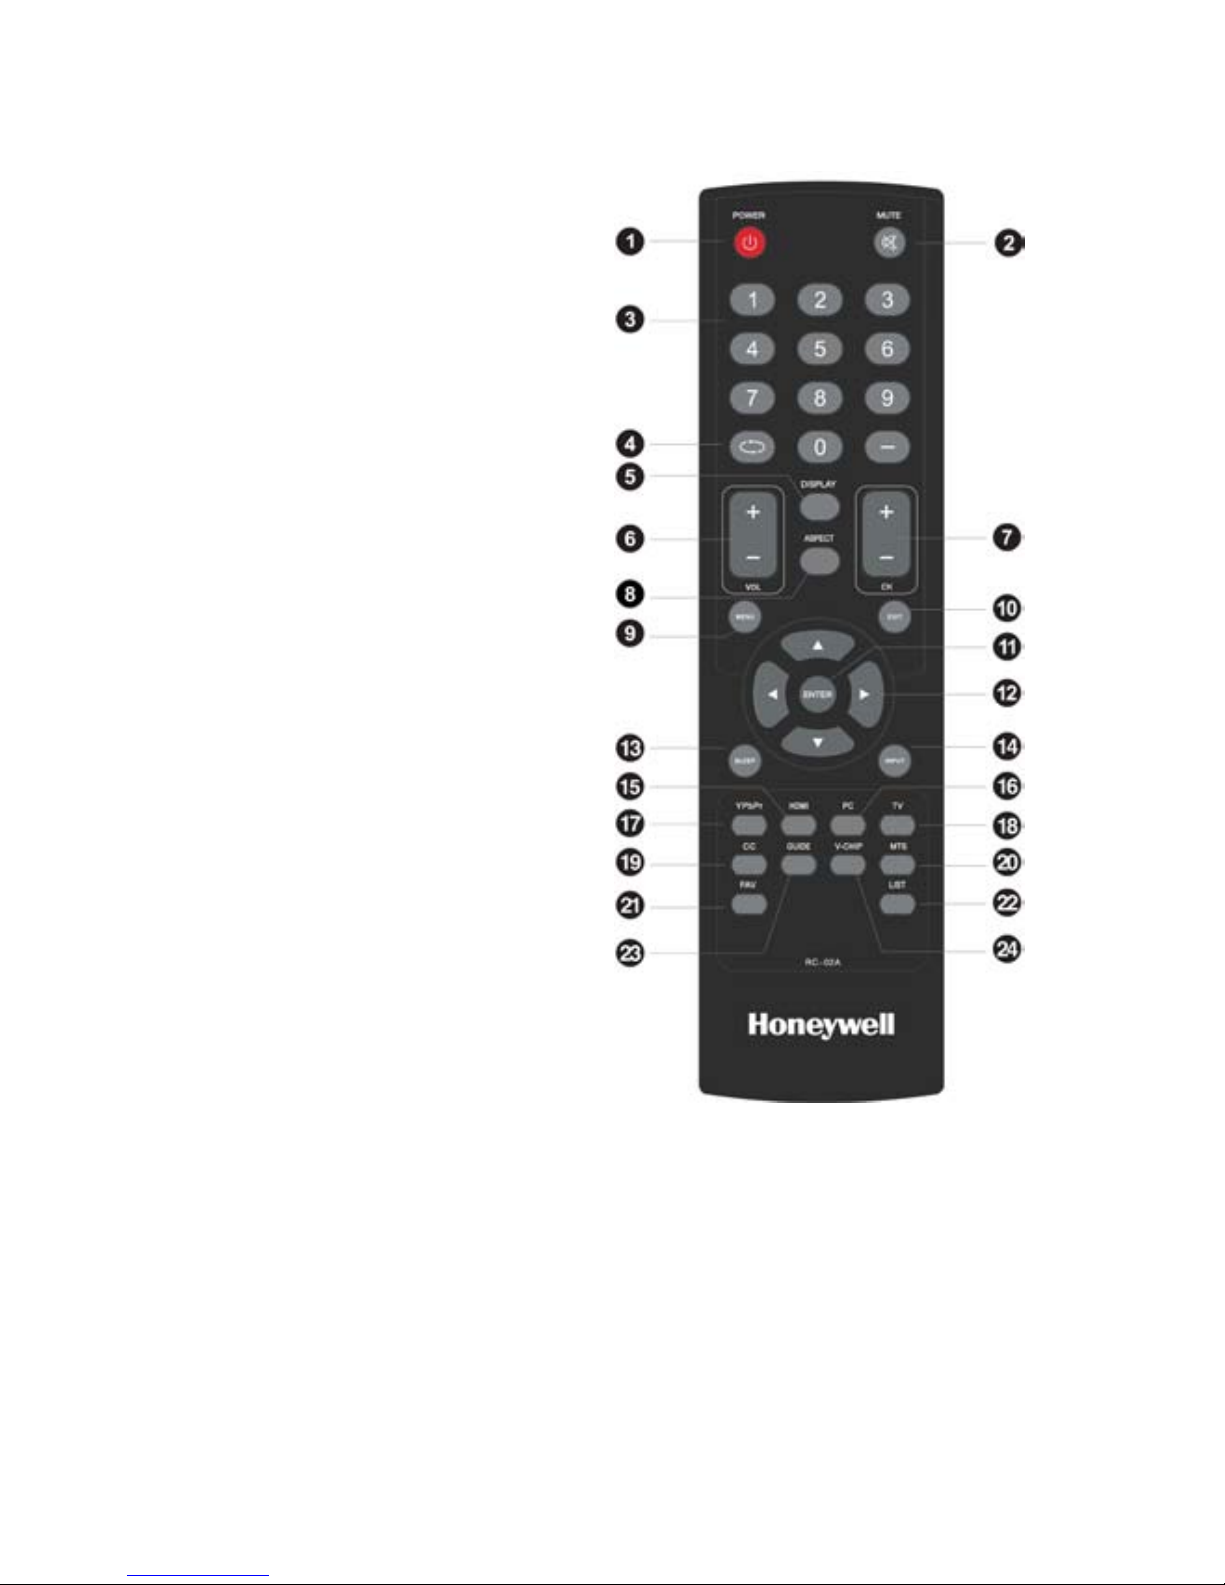
1. POWER: Turns the TV on or off.
2. MUTE: Turns the audio on or off.
3. Numeric Keypad: Select individual
channels using the 0-9 buttons while
on the TV source.
4. Previous Channel: Returns to the
previous channel.
5. DISPLAY: Will bring up the current
input source information.
6. VOL+/VOL-: Increases/decreases
the volume of your TV.
7. CH+/CH-: Navigates up/down
through the channels.
8. ASPECT: Quick access to preset
Aspect ratios. (Normal, Wide, Zoom,
Cinema).
9. MENU: Displays the setup menu or
when in the setup menu, goes back
to an upper menu level.
10. EXIT: When in the menu,
pressing this button will close the
on-screen menu.
11. ENTER: Conrms your selection.
12. Navigational Arrows: Used to
scroll through Main and Sub-menus.
13. SLEEP: Turns the sleep timer on or
off.
14. INPUT: Displays the source menu.
15. HDMI: Quick access to HDMI
inputs.
16. PC: Quick access to the PC input.
17. YPbPr: Quick access to the
component input.
18. TV: Quick access to the TV source.
19. CC: Turns on or off closed caption.
6
20. MTS: Quick access to available
audio channels.
21. FAV: Displays your favorite
channels list.
22. LIST: Displays the TV program list.
23. GUIDE: Displays the electronic
program guide.
24. V-CHIP: Displays the V-Chip
settings menu.
SE.40B1 User Manual
Page 8
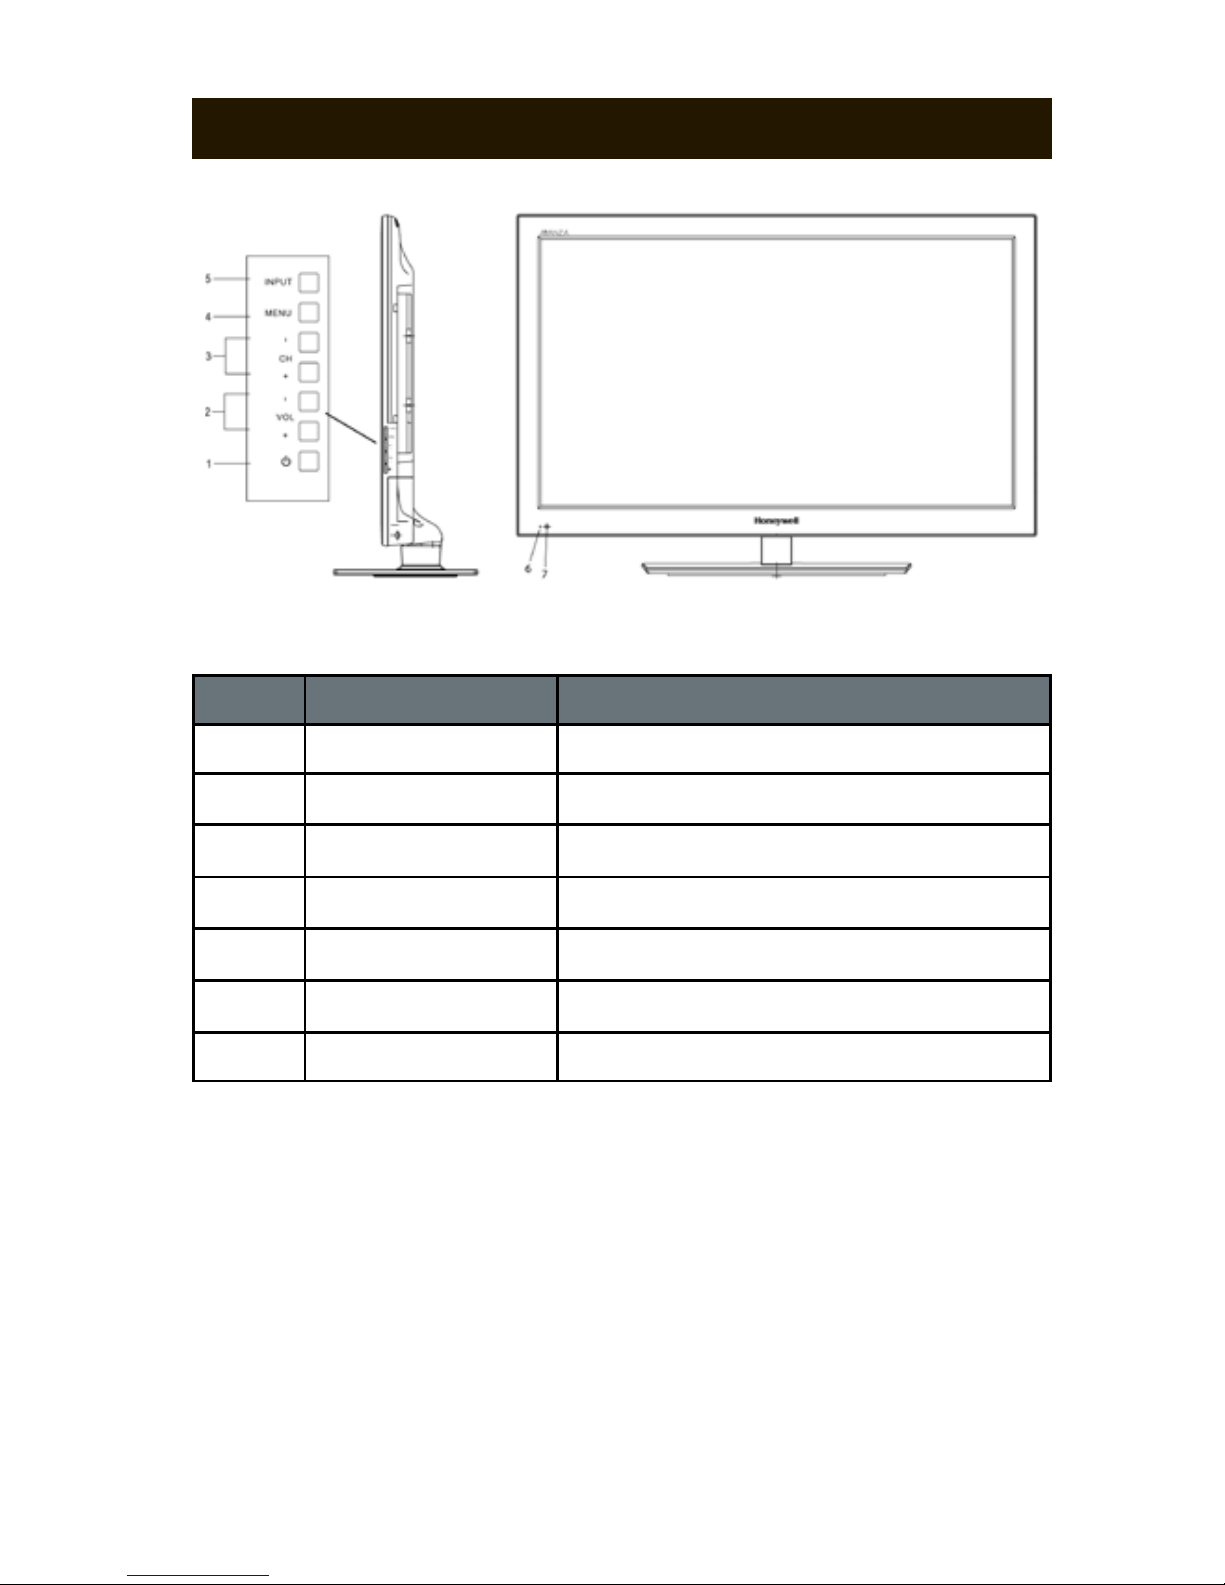
ITEM
DESCRIPTION FUNCTION
1
2
3
4
5
6
7
Power
VOL+/VOL-
CH+/CH-
MENU
INPUT
Power Light
Remote Sensor
Turns the TV on or off
Adjusts volume level up and down
Changes the channel up and down
Displays on-screen menu
Changes the input source
LED indicator for power (red and green)
IR Receiver for the remote control
7
TV CONTROLS
SE.40B1 User Manual
Page 9
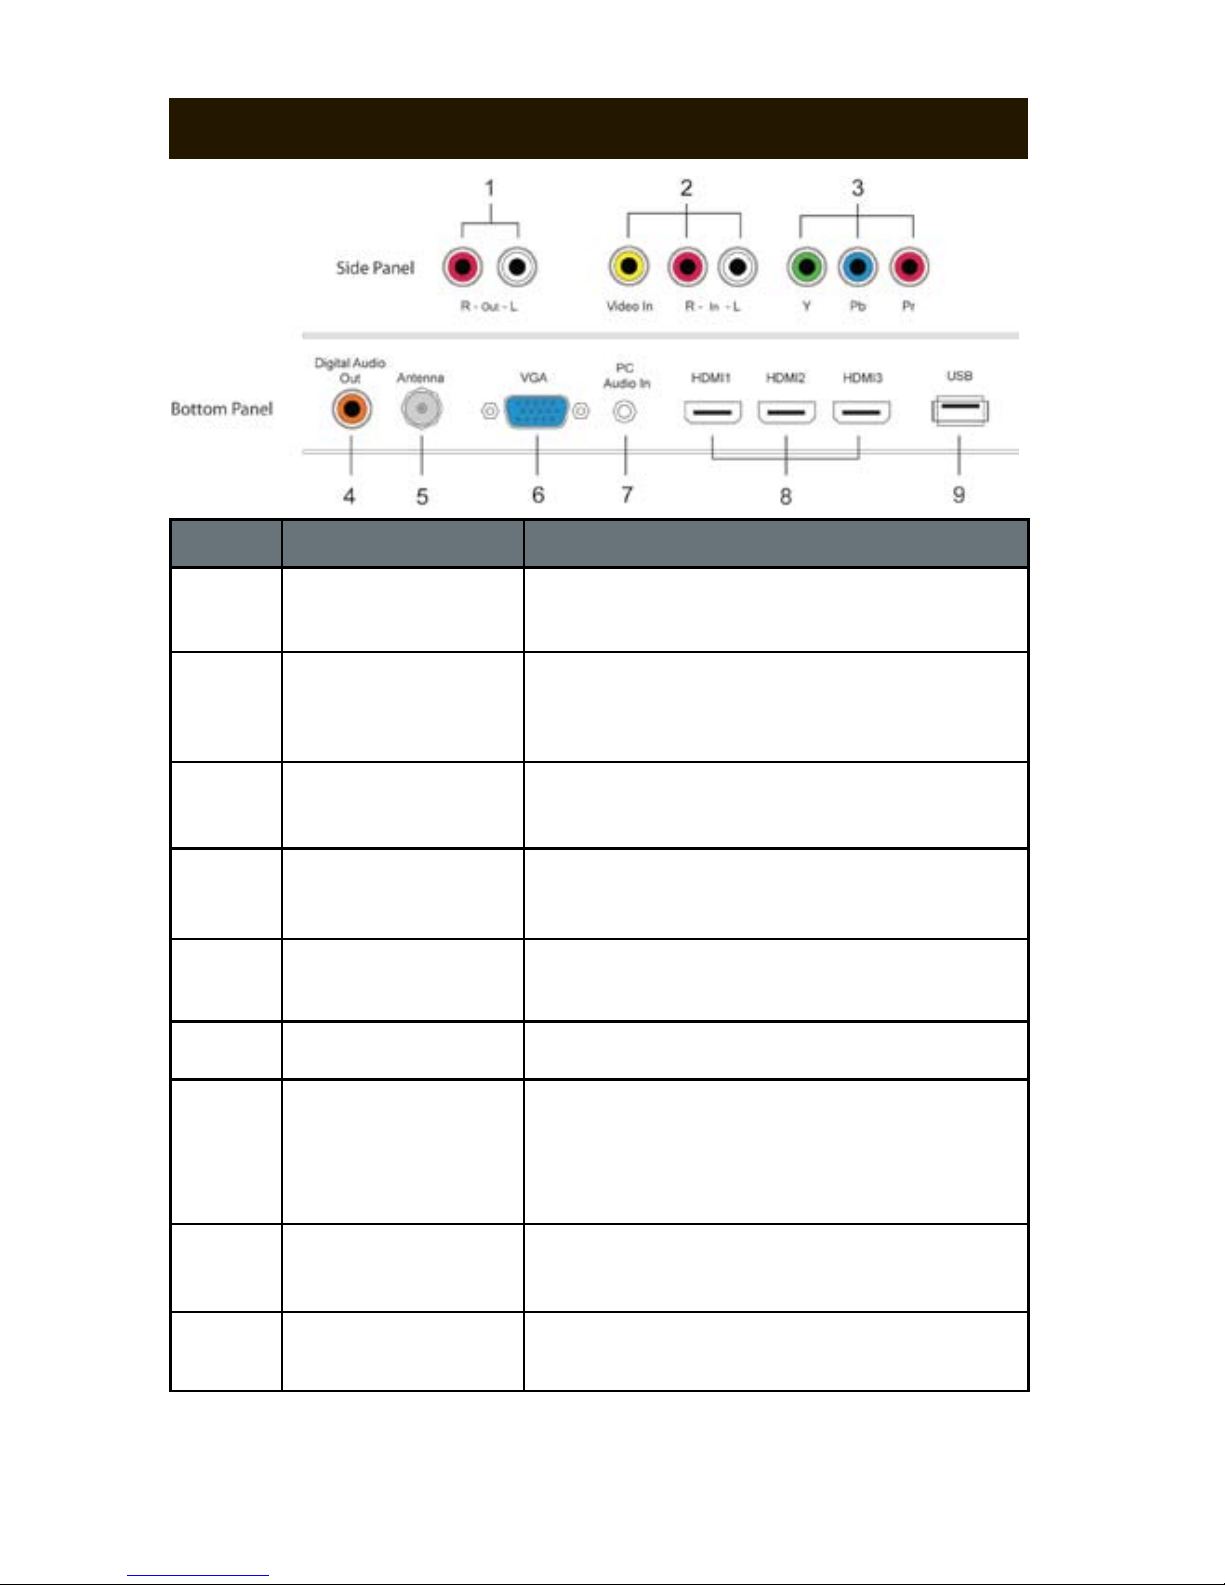
ITEM
DESCRIPTION FUNCTION
1
PC Audio Input
Firmware upgrades can be performed through
a standard USB ash drive.
USB Input*
Provides High Denition connectivity from
digital audio and video sources with one cable.
HDMI(1-3)
Direct audio input from your PC via 3.5mm mini
jack. PC Audio can be used in conjunction with
the VGA input or a DVI adapter on an HDMI
input.
Provides video input from your PC.
Provides High Denition connectivity from
analog video sources.
Component Inputs
(YPbPr)
Audio Output
Output your Audio Signal to any speaker
source (i.e. Honeywell Soundbar)
Connect your digital antenna or coaxial cable
to watch TV programming.
AV Input
Antenna/Cable Input
Analog input for video sources. Analog audio
input for either (component) YPbPr or
(composite) video inputs.
2
3
4
5
6
7
8
9
Digital Audio Output
(Coaxial)
Use the digital audio output to connect to your
AV receiver or surround sound processor.
8
PC Video (VGA)
*USB drives must be formatted to FAT32 format in order to be detected by your TV. Note: All
existing les on your USB drive will be erased during a format.
REAR PANEL CONNECTIONS
SE.40B1 User Manual
Page 10
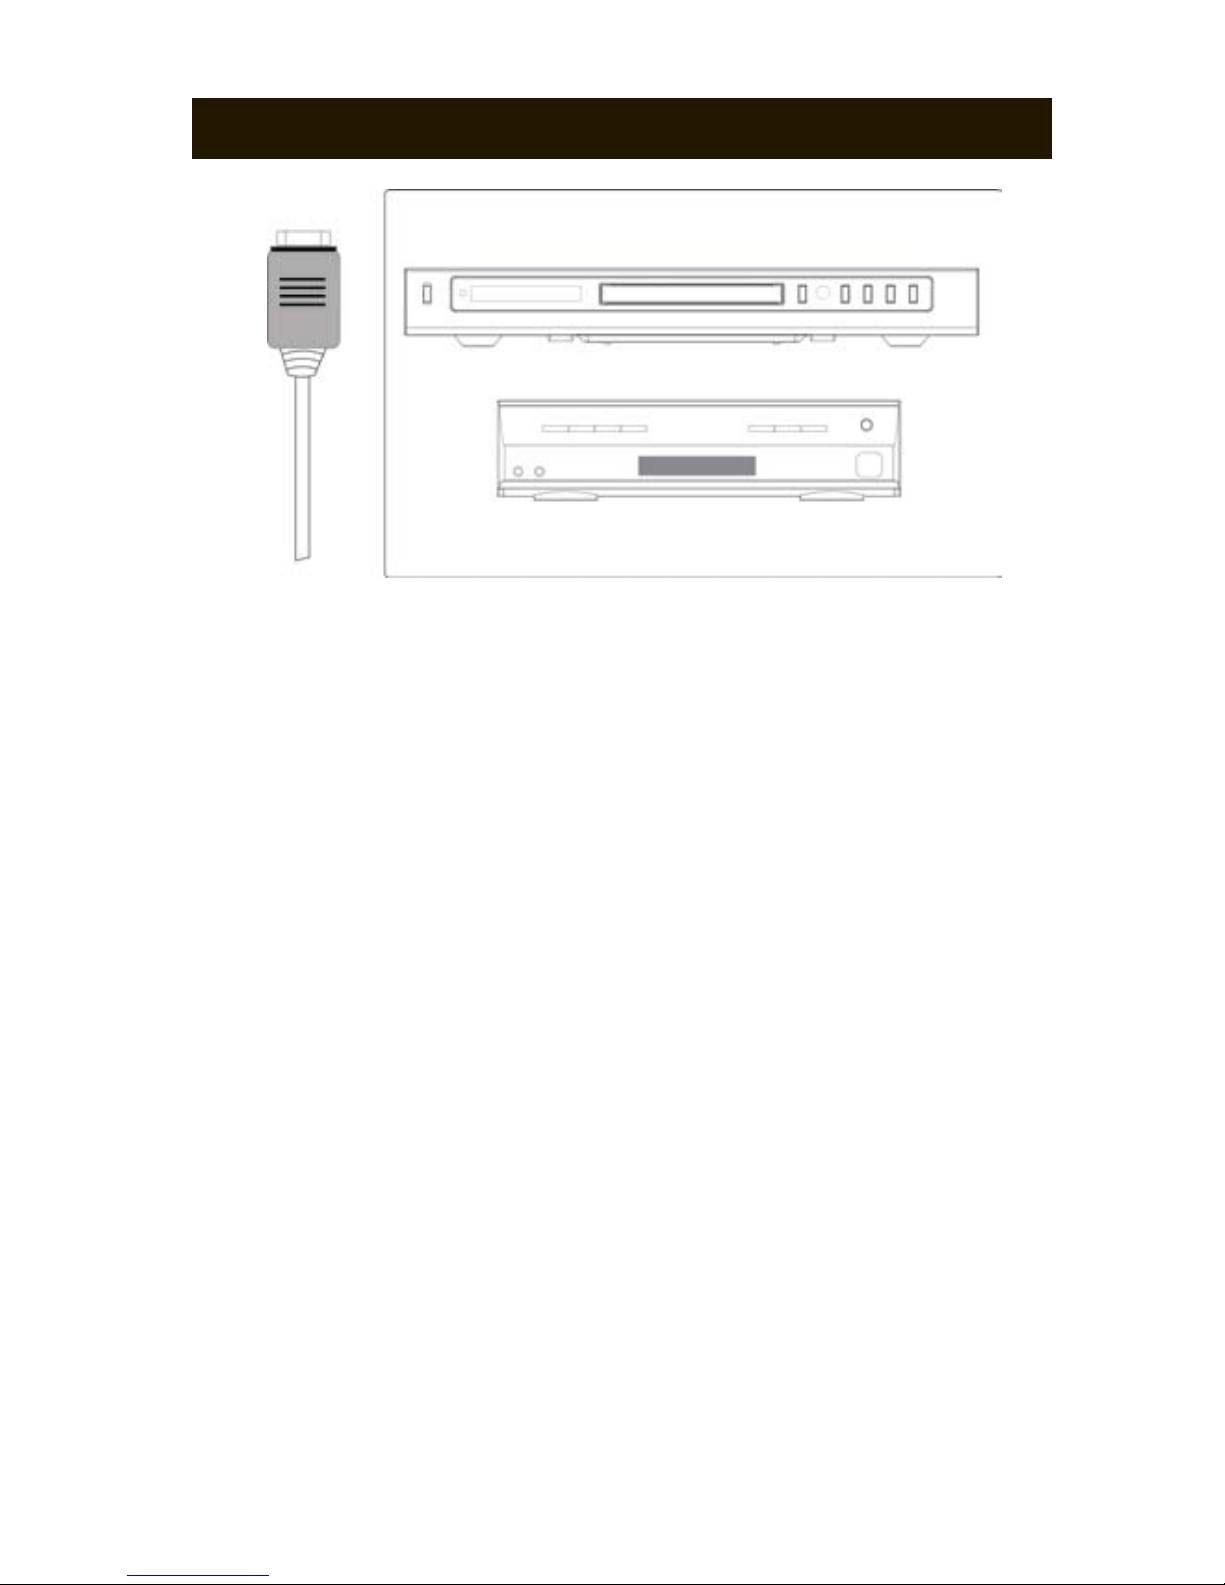
BLU-RAY™ PLAYER
To connect your Blu-Ray Player to your TV using an HDMI cable, please
follow these steps:
1. Connect an HDMI cable to the HDMI output of your Blu-Ray Player.
Connect the other end of the cable to the HDMI1 input (or any available
HDMI input) on the rear of your TV.
2. Select the HDMI1 source by pressing the INPUT button on your remote
control and selecting “HDMI1.” This can also be done by pressing the
“HDMI” button on your remote.
NOTE: When connecting some Blu-Ray Players, the Blu-Ray Player may
display its on screen menu on the TV automatically. Should this occur,
please follow the instructions that came with the Blu Ray Player.
CABLE/SATELLITE BOX
BLU-RAY™ PLAYER
HDMI
CABLE/SATELLITE BOX
To connect your Cable/Satellite Box to your TV using an HDMI cable,
please follow these steps:
1. Connect an HDMI cable to the HDMI output of your Cable/Satellite Box.
Connect the other end of the cable to the HDMI2 input (or any available
HDMI input) on the rear of your TV.
2. Select the HDMI2 source by pressing the INPUT button on your remote
control and selecting “HDMI2.”
9
CONNECTING AN HDMI DEVICE
SE.40B1 User Manual
Page 11
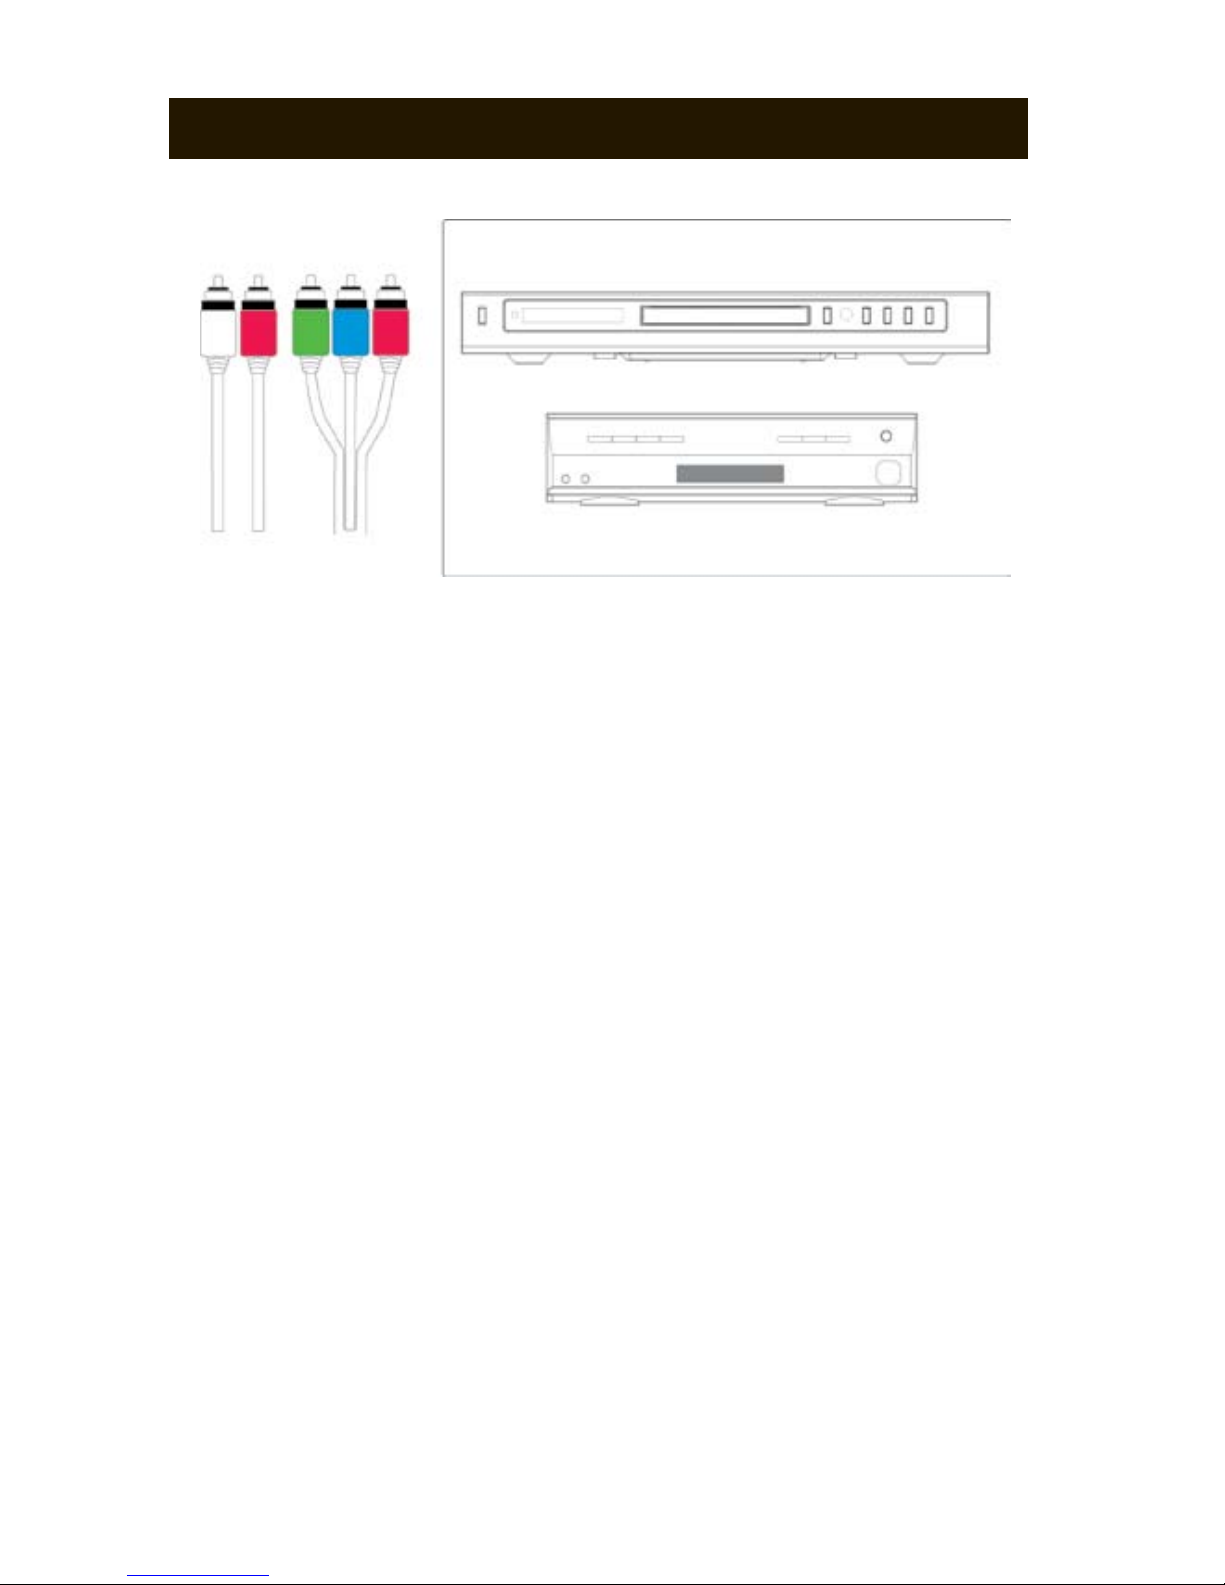
CABLE/SATELLITE BOX
BLU-RAY PLAYER
COMPONENT
(YPbPr)
DVD PLAYER
To connect a device such as a DVD Player to your TV using Component
cables, please follow these steps:
1. Turn off the power to your TV and your DVD player.
2. Connect the Component cables (green, blue, red) from your DVD
player to the Component inputs on the side of your TV.
3. Connect the Audio Cables (red and white) from your DVD player to the
adjacent Audio Inputs on the side of your TV.
3. Turn on the power to your TV and your DVD player.
4. Select the YPbPr source by pressing the INPUT button on your remote
control and scrolling down to ‘YPbPr.’ Or for quick access, press the
YPbPr button on your remote.
NOTE: The above steps can also be applied to connect your Cable and
Satellite Box to your TV using component cables by substituting the DVD
player for your Cable and Satellite Box.
For instructions on other popular devices, please refer to the connection
diagram on the next page.
10
CONNECTING A COMPONENT DEVICE
Audio Video
SE.40B1 User Manual
Page 12

CONNECTION DIAGRAM
11
SE.40B1 User Manual
Page 13

SE.40B1 User Manual
Please make sure all necessary devices and cables are connected before
turning on the power.
POWERING ON AND OFF
Press the power button to turn on your TV. The LED indicator will turn
green when the power is on and red when your TV is off. To turn your TV
off, press the power button again.
12
BASIC OPERATION
INITIAL SETUP
The rst time you turn on your TV, you will be greeted with an Initial Setup
screen. This will help you quickly scan for available channels. To navigate
through this menu use the up and down arrows on your remote. To change
settings, use the left and right arrows on your remote. To exit the initial
setup, press the MENU or EXIT button on your remote.
NOTE: This is only required if you have connected your cable or antenna
directly to the Antenna input (noted as Item 2 on pg. 7 of this manual). If
Auto Channel Search is inadvertently interrupted please refer to pg. 23 of
this manual for Channel Search instructions.
MENU LANGUAGE
Please choose your language preference for the On Screen Menu. There
are three languages to choose from (English, Spanish, French).
Page 14

SELECTING CHANNELS
While in TV mode, the following can be used to select and navigate
channels:
1. Press CH+ or CH- on your remote to navigate up or down through
channels.
2. Use the numeric buttons (0-9) to input channel numbers directly.
3. Press the channel return button to go back to the previous
channel that was selected.
NOTE: If no channels appear, please refer to pg. 11 to run a channel scan.
ADJUSTING THE VOLUME
To adjust the volume on your TV, press the VOL+ to increase the volume
and press the VOL- button to decrease. To mute your TV, press the MUTE
button on your remote. To unmute, press the MUTE button again.
SELECTING AN INPUT SOURCE
To display this input source menu, press the INPUT
button on your remote.
Once the menu is displayed, use the up and down
arrows to navigate through the menu. When you
have highlighted the correct input, press the
ENTER button to select that input.
13
SIGNAL TYPE
Depending on the equipment you have attached, select either Cable (with
or without a Cable Satellite box) or Air (Antenna).
AUTO CHANNEL SEARCH
Press Enter on your remote to begin scanning for available channels in
your area. This may take several minutes.
SE.40B1 User Manual
Page 15

SE.40B1 User Manual
USING THE MENU
To display the on-screen menu press the MENU button on your remote.
To navigate through the categories, use the left and right arrow buttons.
Once you have highlighted the desired category, press the ENTER button
to enter the corresponding sub-menu.
In the sub-menu, use the up and down arrows to navigate.
To return to the previous menu, simply press the MENU button.
Press the EXIT button to close the on-screen menu.
In the PICTURE menu, changes can be made to customize your display.
14
ON SCREEN MENU
USING PICTURE MENU
Page 16

PICTURE SETTINGS
PICTURE SETTINGS
There are ve available picture settings: Power Saving, Movie, User,
Dynamic, and Standard. Power Saving, Movie, Dynamic, and Standard
settings are preset for quick accessibility.
In the User mode, adjustments can be made to the Brightness, Contrast,
Tint, Color, and Sharpness settings using the left and right arrow buttons.
15
SE.40B1 User Manual
Page 17

SE.40B1 User Manual
SCREEN SETTINGS
SCREEN SIZE
There are four preset screen settings: Normal, Wide, Zoom, and Cinema.
To navigate the menu, use the up and down arrows on your remote. To
change the settings, use the left and right arrows on your remote.
16
COLOR TEMPERATURE
COLOR TEMPERATURE
The Color Temperature feature changes the “warmness” and “coolness” of
the white areas in your picture. There are three preset modes: Warm, Cool,
and Normal. Adjust to you lighting environment and preference.
To change the Color Temperature, highlight the Color Temperature in the
PICTURE MENU using the navigation arrows on your remote. Press the
ENTER button to open the Color Temperature menu. Use the left and right
arrows on your remote to change the modes.
Page 18

DYNAMIC CONTRAST
Dynamic contrast can be used to increase the details of dark images.
This not only adjusts the static contrast of the display but also dynamically
changes the contrast depending on the image content. Available settings
are: Off, Low, Med, High.
FILM MODE
This feature will enhance picture quality for 24fps lm signals, such as from
DVD discs. Available settings are: Off and On.
NOISE REDUCTION
This feature reduces analog picture noise. Available settings are: Off, Low,
Med, and High.
MPEG NOISE REDUCTION
MPEG is commonly used when viewing signals from the antenna connection. This feature can analyze the output from the MPEG decoder to reduce
distortions that are found when compressing and decompressing digital
video. Available settings are: Off, Low, Med, High.
17
ADVANCED PICTURE SETTINGS
SE.40B1 User Manual
Page 19

SE.40B1 User Manual
In the SOUND Menu, adjustments can be made to further enhance the
audio settings of your HDTV. To navigate through the menu, use the up
and down arrows. To select the submenu, press the ENTER button on your
remote.
SOUND SETTING
SOUND SETTING
There are four available Sound Modes: User, Dynamic, Standard, and Soft.
The preset modes are for quick, convenient adjustments. Additional ne
tuning enhancements (Bass, Treble, Balance) can be made in the User
mode.
18
USING SOUND MENU
Page 20

SURROUND MODE
To turn on the simulated surround mode, press the ENTER button on your
remote to check mark the Surround Mode box. Once the box is check
marked, the simulated Surround Mode feature will be turned on.
SURROUND MODE
ANALOG SOUND
To adjust the Analog sound setting on your TV, please use one of the three
available preset modes (Stereo, Mono, or SAP).
DIGITAL SOUND
Select digital channels broadcast in multiple audio languages. Please
choose English, Spanish, or French.
ANALOG AND DIGITAL SOUND
19
AVL
The ‘Auto Volume Leveling’ feature will average out differences between
station and advertisement volume increases. This will present an even
volume level from each station and commercial transition. An ‘On’ setting
means the AVL feature is currently activated.
AUTO VOLUME LEVELING
DIGITAL AUDIO OUTPUT
DIGITAL AUDIO OUTPUT
Select your digital audio output encoding format (PCM or Raw). If you are
unsure of this setting, please leave it on PCM.
SE.40B1 User Manual
Page 21

SE.40B1 User Manual
EQUALIZER SETTINGS
EQUALIZER
There are ve equalizer settings modes: Pop, User, Rock, Jazz, and Off.
Each different mode highlights customized frequencies to create a unique
listening experience.
For more advanced users, the equalizer setting’s frequencies can be customized in the ‘User’ mode.
The frequency range is from 100Hz - 10kHz where values above 0 will
boost the frequency and values below 0 will reduce the frequency.
20
Page 22

In the CHANNEL Menu you will nd access to your Channel List and Favorite List. Channel scanning can also be conducted through this menu.
CHANNEL LIST
Once you have scanned for your local channels, those channels will now
appear in your Channel List and can be selected by using the up and down
arrows on your remote.
FAVORITE LIST
For added convenience, you can add your favorite channels to a Favorite
List for quick access. You can then navigate through your Favorite List and
avoid unwatched channels.
21
USING CHANNEL MENU
SE.40B1 User Manual
Page 23

SE.40B1 User Manual
CHANNEL SETTINGS
The CHANNEL SETTINGS sub-menu will display properties for the current
channels in your Channel List.
CHANNEL
The rst column depicts whether or not the current channel is on the Channel List.
SKIP
To remove a channel from the channel list, press the Enter button on your
remote to check the box in the Skip column next to the channel.
NOTE: Channel and Favorite Lists are available via the TV’s remote control
only for channels found after performing a channel scan. These features
may be available from your cable or satellite provider. Please contact your
provider for information.
ADDING AND REMOVING FROM YOUR FAVORITE LIST
- To add channels to your Favorite List, use the ADD/ERASE
button on your remote. Once a channel has been added to your
Favorite List, a (FAV) icon will be added next to the channel
number on the display graphic.
- Press the ADD/ERASE button again to remove this channel from
your Favorite List.
NOTE: A channel can be added to the Favorite List through the CHANNEL
SETTING sub-menu as well.
22
Page 24

LABEL
Each channel carries a seven character label that is defaulted to the station
ID. This can be changed to your liking by using the LEFT and RIGHT
arrows on your remote to change the letters up and down respectively.
Press the ENTER button to move on to the next character.
FAVORITE CHANNEL
To add the current channel to your Favorite List, press the ENTER button to select the check mark in the box. You can now access this channel
through your Favorite List.
SIGNAL TYPE
SIGNAL TYPE
Depending on the equipment you have attached to the TV input, select
either Cable (with or without a Cable Satellite box) or Air (Antenna).
23
SE.40B1 User Manual
Page 25

SE.40B1 User Manual
24
AUTO CHANNEL SEARCH
To automatically scan for TV channels that are available in your area, begin
by entering the Channel Menu.
1. Select your appropriate Signal Type dependent on what is connected to
your Antenna/Cable Input.
A. Air for devices such as a Digital Antenna
B. Cable for direct cable connections (with or without a Cable
Satellite box)
2. Select ‘Auto Channel Search’ in the CHANNEL menu. Once it is
highlighted, press the ENTER button on your remote to begin scanning.
Your TV will now scan for available analog and digital channels. Once
the scanning is complete, all detected channels will be added to your
Channel List.
NOTE: If your HDTV is connected to a cable or satellite box through the
HDMI or component inputs, you will not need to scan for channels.
SCANNING FOR CHANNELS
Page 26

USING PARENTAL CONTROL
If you would like to restrict certain channels, programs, or sources, you can
accomplish this by turning on the Parental Control feature. Once Parental
Control is enabled, selected programs, movies, channels and/or sources
will only be available by an authorized password that you set.
To select the Parental Control options, enter the set password. If you have
not set a password yet, the default password is 1 1 1 1.
V-CHIP
In the V-Chip submenu, selections can be made to restrict channels, programs or movies dependent on ratings.
USING PARENTAL CONTROL
25
SE.40B1 User Manual
Page 27

US TV-RATING
Press the ENTER button on your remote to lock (block) or unlock (allow)
television shows according to the following US TV Ratings:
TV-Y - All children
TV-Y7 - Older children
TV-G - General audience
TV-PG - Parental Guidance Suggested
TV-14 - Ages 14 or over
TV-MA - Mature audience
Restrictions can also be made according to US TV Program Ratings:
D - Sexual dialog
L - Adult language
S - Sexual situations
V - Violence
FV - Fantasy Violence
US MOVIE RATING
Press the ENTER button on your remote to block or allow programs by the
following US Movie Ratings:
G - General audience
PG - Parental guidance suggested
PG-13 - Recommended for children 13 years or older
R - Mature audiences
NC-17 - No one under 17 years of age
X - No one under 17 years of age
CANADIAN ENGLISH RATING
Press the ENTER button on your remote to block or allow programs by the
following Canadian English Ratings:
C - Children
C8+ - Children 8 years or older
G - General audience
PG - Parental guidance
14+ - Viewers 14 years or older
18+ - Adult programming
26
SE.40B1 User Manual
Page 28

CANADIAN FRENCH RATING
Press the ENTER button on your remote to block or allow programs by the
following Canadian English Ratings:
G - General Audience
8 ans+ - General - not recommended for young children
13 ans+ - Not suitable for children under 13 years of age
16 ans+ - Not suitable for under 16 years of age
18 ans+ - Adult programming
BLOCK UNRATED SHOW
To block programming that does not have a rating, select ‘Block UnRated
Show.’
CHANGE PASSWORD
CHANGING YOUR PASSWORD
To change your password, use the numeric keypad on your remote to enter
in the following:
1. Old password (if never set, default is 1 1 1 1)
2. New desired password
3. Conrm the New password
NOTE: If you forgot your password, 1 4 7 0 can be used universally to
unlock the menu. Once the menu has been unlocked, please enter a new
password.
BLOCKING SOURCES
SOURCE LOCK
In addition to restricting channels, programs, and movies, individual sources can be locked (blocked) from being used as well. Once locked, sources
can only be used by entering an authorized password.
FRONT PANEL LOCK
To lock the panel buttons on your TV from being used, enable this feature.
27
SE.40B1 User Manual
Page 29

SE.40B1 User Manual
The following can be accessed in the Setup Menu:
CLOSED CAPTION
Closed Caption can be turned on and off through this submenu. Changes
can also be made to the text size and styles.
MENU LANGUAGE
There are three available languages: English, Spanish, and French.
CLOCK
Auto Clock will automatically set the time according to your DTV time. The
clock can also be set by the user. To the set the clock manually, use the
UP/ DOWN arrows to change digits, and the LEFT/RIGHT arrows to move
to the next setting. To have the clock automatically adjust for Daylight Savings Time, check the box by using the ENTER button on the remote.
OSD TIMER
The duration that the on screen menu stays on can be customized in this
setting. Available time settings are: 5, 10, 20, 30, 40 or 60 seconds.
28
USING SETUP MENU
Page 30

The following can be accessed in the Others Menu:
BLUE BACKGROUND
Turns on and off blue background on TV mode.
This TV is designed to allow the user to have better
control of advanced power management options,
while also providing the opportunity to improve
energy savings. We refer to this as e-manage+.
This comprises the following four selections in the
Others Menu.
DPMS
(Display Power Management Signaling) An advanced power management
technology allowing this TV to be turned on instantly from host devices
connected via HDMI or VGA. Examples of host devices include Satellite
or Cable set top boxes, DVD players, Computers or other devices that are
connected to the TV through HDMI or VGA. This is referred to as the Fast
Wake option.
USING OTHERS MENU
29
SE.40B1 User Manual
Page 31

SE.40B1 User Manual
30
When choosing this option, you will need to select how long you prefer the
TV to remain on after you power down the host device (60, 120, or 300
seconds). This is for your convenience as you may inadvertently turn off
the host device, or you may wish to keep the TV on for example, when
rebooting a computer.
NOTE: As the Fast Wake option uses nominal power, you may choose to
keep DPMS in the OFF position for increased Energy Savings.
NO SIGNAL POWER OFF
This TV monitors whether or not there is an incoming signal. If it senses
no signal for a period of 10 minutes, it will shut off to conserve energy.
Available settings are ON/OFF.
NO OPERATION POWER OFF
This TV monitors whether or not it receives any operational command,
such as through the remote control or through the command buttons on the
TV. If it does not receive any commands within a 3 hour period, it will shut
off to conserve energy. Available settings are ON/OFF. A pop up notication
will appear on the screen if the 3 hour period is about to expire. To avoid
auto power off, press any button on the remote to resume use.
POWER ON PLUG
Provides a convenience option should you plug your TV into a power strip
(recommended). When the checkmark is selected in the menu, the TV will
turn on when the power strip is turned on. You may opt to turn on the TV
independently from the power strip, or you may not use a power strip, in
which case you would uncheck the setting in the menu.
RESET
Resets all menu settings to the factory default. A warning screen will ap-
pear to conrm.
Page 32

ITEM
Screen Size
Resolution
Pixel Pitch
Brightness
Dynamic Contrast Ratio
Response Time
Colors
Connectors
40” Diagonal
1920 x 1080
.461225 x .15375 (H x V)
400 cd/m²
100,000:1
6.5ms
16.7M
SE.40B1
For more complete specications for your product, please visit
www.honeywellce.com
1
3
1
1
1
1
1
1
1
USB Inputs
HDMI Inputs
PC Audio Input
PC Video (VGA)
Component Inputs (YPbPr)
Antenna/Cable Input
AV Input
Digital Audio Output (Coax)
Audio Output
Wall Mount Specs
TECHNICAL SPECIFICATIONS
31
SE.40B1 User Manual
- VESA Standard 400mm(H) x 400mm(V)
- Screw Size: M6
- Screw Length: 8mm
- TV Weight without Base: 35.3 lbs
Page 33

SE.40B1 User Manual
32
General Problems
Possible Solution
Receive the message
“No Signal”
- Press the input button on your remote to select a
different input source.
- Make sure all cables from your devices are
securely connected.
- If you are on the TV source, scan for channels to
conrm there is data in your Channels List
No Power
- Make sure the power button is On. (Power Light
should be green)
- Make sure the power cord is securely connected.
- Test a separate device to verify the power outlet is
working properly.
No Sound
- Press the VOL+ button.
- Press the MUTE button on your remote to verify
that it is not ON.
- Check the OTHERS menu to verify that AUDIO
ONLY is not checked.
- Make sure that headphones are not connected.
Remote Control does
not work
- Make sure the remote control is pointed directly at
the remote sensor.
- Remove any obstacles that maybe blocking the
remote sensor.
- Replace the batteries.
There is a distorted
picture or unusual sound
- You may be experiencing interference from other
electrical appliances, cars, or uorescent lights.
Please try moving your TV to another location.
The TV has dark or
colored pixels (dots)
- Your Honeywell TV is manufactured to the highest
possible level of precision, however, sometimes
some pixels may not display. Pixel (dots) defects
within industry specications are inherent to this
type of product and do not warrant a defective
product.
TROUBLESHOOTING
Need some help?
Call our toll free customer service number: (888) 441-0121
Hours of operation: Mon - Fri 9AM - 7PM EST
Sat & Sun 9AM - 5PM EST
Page 34

Behind every Honeywell Consumer Electronic Product is a network of
qualied service professionals able to provide factory certied service, and
knowledgeable customer service representatives waiting to answer your
products questions.
Product questions?
Contact customer service at
info@honeywellce.com
Or call us Toll Free: (888)441-0121
Monday - Friday: 9AM - 7PM EST
Saturday & Sunday: 9AM - 5PM EST
Page 35

 Loading...