

Page 1

Intelligent Power Supply
AMPS-24/E
Manual
Document 51907
02/26/2014 Rev:
P/N 51907:J2 ECN 14-0161
J2
Page 2

Fire Alarm & Emergency Communication System Limitations
While a life safety system may lower insurance rates, it is not a substitute for life and property
insurance!
An automatic fire alarm system—typically made up of
smoke detectors, heat detectors, manual pull stations, audible
warning devices, and a fire alarm control panel (FACP) with
remote notification capability—can provide early warning of a
developing fire. Such a system, however, does not assure
protection against property damage or loss of life resulting
from a fire.
An emergency communication system—typically made up
of an automatic fire alarm system (as described above) and a
life safety communication system that may include an autonomous control unit (ACU), local operating console (LOC), voice
communication, and other various interoperable communication methods—can broadcast a mass notification message.
Such a system, however, does not assure protection against
property damage or loss of life resulting from a fire or life
safety event.
The Manufacturer recommends that smoke and/or heat
detectors be located throughout a protected premises
following the recommendations of the current edition of the
National Fire Protection Association Standard 72 (NFPA 72),
manufacturer's recommendations, State and local codes, and
the recommendations contained in the Guide for Proper Use of
System Smoke Detectors, which is made available at no
charge to all installing dealers. This document can be found at
http://www.systemsensor.com/appguides/. A study by the
Federal Emergency Management Agency (an agency of the
United States government) indicated that smoke detectors
may not go off in as many as 35% of all fires. While fire alarm
systems are designed to provide early warning against fire,
they do not guarantee warning or protection against fire. A fire
alarm system may not provide timely or adequate warning, or
simply may not function, for a variety of reasons:
Smoke detectors may not sense fire where smoke cannot
reach the detectors such as in chimneys, in or behind walls, on
roofs, or on the other side of closed doors. Smoke detectors
also may not sense a fire on another level or floor of a building.
A second-floor detector, for example, may not sense a firstfloor or basement fire.
Particles of combustion or “smoke” from a developing fire
may not reach the sensing chambers of smoke detectors
because:
• Barriers such as closed or partially closed doors, walls,
chimneys, even wet or humid areas may inhibit particle or
smoke flow.
• Smoke particles may become “cold,” stratify, and not reach
the ceiling or upper walls where detectors are located.
• Smoke particles may be blown away from detectors by air
outlets, such as air conditioning vents.
• Smoke particles may be drawn into air returns before
reaching the detector.
The amount of “smoke” present may be insufficient to alarm
smoke detectors. Smoke detectors are designed to alarm at
various levels of smoke density. If such density levels are not
created by a developing fire at the location of detectors, the
detectors will not go into alarm.
Smoke detectors, even when working properly, have sensing
limitations. Detectors that have photoelectronic sensing
chambers tend to detect smoldering fires better than flaming
fires, which have little visible smoke. Detectors that have ionizing-type sensing chambers tend to detect fast-flaming fires
better than smoldering fires. Because fires develop in different
ways and are often unpredictable in their growth, neither type
of detector is necessarily best and a given type of detector
may not provide adequate warning of a fire.
Smoke detectors cannot be expected to provide adequate
warning of fires caused by arson, children playing with
matches (especially in bedrooms), smoking in bed, and violent
explosions (caused by escaping gas, improper storage of
flammable materials, etc.).
Heat detectors do not sense particles of combustion and
alarm only when heat on their sensors increases at a predetermined rate or reaches a predetermined level. Rate-of-rise
heat detectors may be subject to reduced sensitivity over time.
For this reason, the rate-of-rise feature of each detector
should be tested at least once per year by a qualified fire protection specialist. Heat detectors are designed to protect
property, not life.
IMPORTANT! Smoke detectors must be installed in the
same room as the control panel and in rooms used by the system for the connection of alarm transmission wiring, communications, signaling, and/or power. If detectors are not so
located, a developing fire may damage the alarm system,
compromising its ability to report a fire.
Audible warning devices such as bells, horns, strobes,
speakers and displays may not alert people if these devices
are located on the other side of closed or partly open doors or
are located on another floor of a building. Any warning device
may fail to alert people with a disability or those who have
recently consumed drugs, alcohol, or medication. Please note
that:
• An emergency communication system may take priority
over a fire alarm system in the event of a life safety emergency.
• Voice messaging systems must be designed to meet intelligibility requirements as defined by NFPA, local codes, and
Authorities Having Jurisdiction (AHJ).
• Language and instructional requirements must be clearly
disseminated on any local displays.
• Strobes can, under certain circumstances, cause seizures
in people with conditions such as epilepsy.
• Studies have shown that certain people, even when they
hear a fire alarm signal, do not respond to or comprehend
the meaning of the signal. Audible devices, such as horns
and bells, can have different tonal patterns and frequencies. It is the property owner's responsibility to conduct fire
drills and other training exercises to make people aware of
fire alarm signals and instruct them on the proper reaction
to alarm signals.
• In rare instances, the sounding of a warning device can
cause temporary or permanent hearing loss.
A life safety system will not operate without any electrical
power. If AC power fails, the system will operate from standby
batteries only for a specified time and only if the batteries have
been properly maintained and replaced regularly.
Equipment used in the system
may not be technically compatible with the control panel. It is essential to use only equipment listed for service with your control panel.
Telephone lines needed to transmit alarm signals from a
premises to a central monitoring station may be out of service
or temporarily disabled. For added protection against telephone line failure, backup radio transmission systems are recommended.
The most common cause of life safety system malfunction is
inadequate maintenance. To keep the entire life safety system
2 AMPS-24 Manual — P/N 51907:J2 02/26/2014
Page 3

Installation Precautions
Adherence to the following will aid in problem-free installation with long-term reliability:
WARNING - Several different sources of power can be
connected to the fire alarm control panel. Disconnect all
sources of power before servicing. Control unit and associated equipment may be damaged by removing and/or inserting cards, modules, or interconnecting cables while the unit is
energized. Do not attempt to install, service, or operate this
unit until manuals are read and understood.
CAUTION - System Re-acceptance Test after Software
Changes: To ensure proper system operation, this product
must be tested in accordance with NFPA 72 after any programming operation or change in site-specific software. Reacceptance testing is required after any change, addition or
deletion of system components, or after any modification,
repair or adjustment to system hardware or wiring. All components, circuits, system operations, or software functions known
to be affected by a change must be 100% tested. In addition,
to ensure that other operations are not inadvertently affected,
at least 10% of initiating devices that are not directly affected
by the change, up to a maximum of 50 devices, must also be
tested and proper system operation verified.
This system meets NFPA requirements for operation at 0-49º
C/32-120º F and at a relative humidity . However, the useful
life of the system's standby batteries and the electronic components may be adversely affected by extreme temperature
ranges and humidity. Therefore, it is recommended that this
system and its peripherals be installed in an environment with
a normal room temperature of 15-27º C/60-80º F.
Verify that wire sizes are adequate for all initiating and indicating device loops. Most devices cannot tolerate more than a
10% I.R. drop from the specified device voltage.
Like all solid state electronic devices, this system may
operate erratically or can be damaged when subjected to lightning induced transients. Although no system is completely
immune from lightning transients and interference, proper
grounding will reduce susceptibility. Overhead or outside aerial
wiring is not recommended, due to an increased susceptibility
to nearby lightning strikes. Consult with the Technical Services Department if any problems are anticipated or encountered.
Disconnect AC power and batteries prior to removing or
inserting circuit boards. Failure to do so can damage circuits.
Remove all electronic assemblies prior to any drilling, filing,
reaming, or punching of the enclosure. When possible, make
all cable entries from the sides or rear. Before making modifications, verify that they will not interfere with battery, transformer, or printed circuit board location.
Do not tighten screw terminals more than 9 in-lbs. Overtightening may damage threads, resulting in reduced terminal
contact pressure and difficulty with screw terminal removal.
This system contains static-sensitive components.
Always ground yourself with a proper wrist strap before handling any circuits so that static charges are removed from the
body. Use static suppressive packaging to protect electronic
assemblies removed from the unit.
Follow the instructions in the installation, operating, and programming manuals. These instructions must be followed to
avoid damage to the control panel and associated equipment.
FACP operation and reliability depend upon proper installation.
Precau-D1-9-2005
FCC Warning
WARNING: This equipment generates, uses, and can
radiate radio frequency energy and if not installed and
used in accordance with the instruction manual may
cause interference to radio communications. It has been
tested and found to comply with the limits for class A
computing devices pursuant to Subpart B of Part 15 of
FCC Rules, which is designed to provide reasonable
protection against such interference when devices are
operated in a commercial environment. Operation of this
equipment in a residential area is likely to cause interference, in which case the user will be required to correct
the interference at his or her own expense.
Canadian Requirements
This digital apparatus does not exceed the Class A limits
for radiation noise emissions from digital apparatus set
out in the Radio Interference Regulations of the Canadian Department of Communications.
Le present appareil numerique n'emet pas de bruits radioelectriques depassant les limites applicables aux appareils numeriques de la classe A prescrites dans le
Reglement sur le brouillage radioelectrique edicte par le
ministere des Communications du Canada.
HARSH™, NIS™, and NOTI•FIRE•NET™ are all trademarks; and Acclimate® Plus, FlashScan®, NION®, NOTIFIER®, ONYX®, ONYXWorks®, UniNet®,
VeriF ire® , and VIEW® are all registered trademarks of Honeywell International Inc. Echelon® is a registered trademark and LonWorks™ is a trademark of
Echelon Corporation. ARCNET® is a registered trademark of Datapoint Corporation. Microsoft® and Windows® are registered trademarks of the Microsoft
Corporation.
©Wednesday, February 26, 2014 by Honeywell International Inc. All rights reserved. Unauthorized use of this document is strictly prohibited.
AMPS-24 Manual — P/N 51907:J2 02/26/2014 3
Page 4

Software Downloads
In order to supply the latest features and functionality in fire alarm and life safety technology to our customers, we make
frequent upgrades to the embedded software in our products. To ensure that you are installing and programming the latest
features, we strongly recommend that you download the most current version of software for each product prior to
commissioning any system. Contact Technical Support with any questions about software and the appropriate version for
a specific application.
Documentation Feedback
Your feedback helps us keep our documentation up-to-date and accurate. If you have any comments or suggestions about
our online Help or printed manuals, you can email us.
Please include the following information:
•Product name and version number (if applicable)
•Printed manual or online Help
•Topic Title (for online Help)
•Page number (for printed manual)
•Brief description of content you think should be improved or corrected
•Your suggestion for how to correct/improve documentation
Send email messages to:
FireSystems.TechPubs@honeywell.com
Please note this email address is for documentation feedback only. If you have any technical issues, please contact
Technical Services.
4 AMPS-24 Manual — P/N 51907:J2 02/26/2014
Page 5

Table of Contents
Section 1: Introduction.............................................................................................................7
1.1: Features..........................................................................................................................................................7
1.2: Specifications.................................................................................................................................................7
1.2.1: CPS-24 Board......................................................................................................................................7
1.2.2: AMPS-K2 Board .................................................................................................................................8
1.3: Installation Standards and Codes...................................................................................................................9
1.3.1: UL 9th Edition Compliance.................................................................................................................9
1.4: Related Documentation ...............................................................................................................................10
1.5: Notes, Cautions, and Warnings ....................................................................................................................10
1.6: Board Layout ...............................................................................................................................................11
1.7: LED Indicators.............................................................................................................................................12
Section 2: Installation ............................................................................................................14
2.1: In a CAB-4 Series Backbox.........................................................................................................................14
2.2: In an EQ Series Backbox.............................................................................................................................15
2.3: In a BB-25 Cabinet ......................................................................................................................................16
2.4: In a BB-100 Cabinet ...................................................................................................................................16
2.5: In a BB-200 Cabinet ....................................................................................................................................17
2.6: Cabinet Wiring Examples............................................................................................................................18
2.7: Wiring the AMPS-24/E ..............................................................................................................................20
2.7.1: Overview ...........................................................................................................................................20
2.7.2: Connecting TB1 MAIN 24V .............................................................................................................21
2.7.3: Connecting to the AUX 24 Output....................................................................................................23
2.7.4: Connecting to the SLC ......................................................................................................................23
2.7.5: Connecting the Trouble Bus ..............................................................................................................24
2.7.6: Connecting the Accessories Output on the CPS-24 ..........................................................................24
2.7.7: Connecting the Power Supply to AC Power .....................................................................................24
2.8: Installing and Connecting the Batteries .......................................................................................................25
2.8.1: Setting the Charger ............................................................................................................................26
2.8.2: Connecting the Power Supply to Two Batteries:...............................................................................26
2.8.3: Connecting the Power Supply to Four Batteries: ..............................................................................26
2.8.4: Connecting Multiple Power Supplies/Products (Separate Batteries) ................................................28
2.8.5: Connecting Multiple Power Supplies/Products (One Set of Batteries) .............................................29
Section 3: Configuring the AMPS-24 ....................................................................................30
3.1: SLC Addressing...........................................................................................................................................30
3.1.1: Determining Address Consumption .................................................................................................30
3.1.2: Setting the Base Address (SLC Enabled) .........................................................................................31
3.2: Programming the AMPS-24 ........................................................................................................................32
3.2.1: Installing the Configuration Software ...............................................................................................32
3.2.2: Establishing the Hardware Connection .............................................................................................33
3.2.3: Working Offline ................................................................................................................................33
3.2.4: Working Online .................................................................................................................................34
3.2.5: Downloading to the AMPS-24 ..........................................................................................................34
3.2.6: AMPS-24 Configuration ...................................................................................................................34
3.3: Configuring the Network Annunciator ........................................................................................................37
3.3.1: Programming .....................................................................................................................................37
3.3.2: Display...............................................................................................................................................37
3.4: Configuring the FACP .................................................................................................................................37
3.4.1: Programming .....................................................................................................................................37
3.4.2: Software Type ID Codes ...................................................................................................................38
3.4.3: Panel Display.....................................................................................................................................38
Section 4: Power Supply Calculations..................................................................................41
4.1: Calculating the System Current Draws........................................................................................................41
4.1.1: How to Use the Calculating Tables ...................................................................................................41
AMPS-24 Manual — P/N 51907:J2 02/26/2014 5
Page 6

Table of Contents
4.1.2: Calculation for Main Supply Current ................................................................................................42
4.1.3: Calculating the Maximum Secondary Power Non-Fire Alarm Current Draw ..................................43
4.1.4: Calculating the Maximum Secondary Power Fire Alarm Current Draw ..........................................43
4.2: Calculating the Battery Requirements .........................................................................................................44
4.2.1: Calculating the Battery Capacity .......................................................................................................44
4.2.2: Calculating the Battery Size ..............................................................................................................45
Appendix A: Compatibility with Other Systems .................................................................. 46
A.1: XLS3000 .....................................................................................................................................................46
A.1.1: Power Supply Calculations...............................................................................................................46
A.1.2: Calculation for Main Supply Current ...............................................................................................47
Index ........................................................................................................................................48
6 AMPS-24 Manual — P/N 51907:J2 02/26/2014
Page 7

The AMPS-24/E is an intelligent power supply and battery charger with one 5VDC and three 24
VDC outputs. It can connect directly to a CPU2-3030*, NCA-2 or DS-DB via a harness cable with
EIA-485 connections. For other systems it can operate in FlashScan or CLIP (Classic Loop
Interface Protocol) mode and reside on the SLC. The AMPS-24 includes a battery charger capable
of charging up to 200 AH batteries.
*Note that the CPU2-3030 must connect to the SLC as well to get correct trouble status reporting. Refer to “SLC Addressing” on
page 30.
The AMPS-24/E may be installed remotely from an ONYX Series panel, connected as an SLC
device in either FlashScan or CLIP mode to provide system supervision. In this configuration, it
can simultaneously charge batteries and power remote devices. (See block diagram Figure 2.12 on
page 22.)
1.1 Features
• SLC Addressable by any CLIP or FlashScan Fire Alarm Control Panel (FACP)
• Remote charger/general purpose power supply
• Charges 7 to 200 AH batteries
• Isolated Signaling Line Circuit (SLC) interface
• Brownout detection
• Battery/battery charger supervision
• Disconnect of deeply-discharged battery (low battery disconnect)
• Selectable charger current
• AC loss detection and AC loss delay reporting
• Five-point trouble reporting
• Two models available: AMPS-24 (120 VAC, 50/60 Hz) or AMPS-24E (220-240 VAC, 50/60
Section 1: Introduction
Hz)
1.2 Specifications
The AMPS-24 is comprised of two boards; the CPS-24 board (the smaller front board), and the
AMPS-K2 (the larger rear board). See Figure 1.1.
1.2.1 CPS-24 Board
AC Power - TB1
120 VAC 50/60 Hz input, 5.0 A maximum
220 - 240 VAC 50/60 Hz input, 2.5 A maximum
Maximum 12 AWG (3.31 mm
Fuse: 8 amps, 250V, 5 x 20 mm, Fast-Acting, ceramic. Notifier P/N 12117
Secondary Power 5V and 24V AUX outputs - TB2
Power-limited (Class 2): 24V @ 0.5A, 5V @ 0.15A
Utilizes wire sizes 12-18 AWG (3.31 mm
Secondary Power (Battery) Charging Circuit - TB3
Sealed lead-acid battery charger which wll charge 7 - 200 AH batteries
Utilizes wire sizes 10-14 AWG (5.26 mm
2
) with 600 VAC insulation
2
- 0.821 mm2 )
2
- 2.08mm2 )
AMPS-24 Manual — P/N 51907:J2 02/26/2014 7
Page 8

Introduction Specifications
Charging current: 1.0A, 2.0A, 5.0A, or OFF (Software selectable)
Based on battery size programming (See “Outputs Current Settings” on page 35)
Charging voltage: 27.6 VDC (nominal)
To calculate expected standby operating times, see Section 4 on page 41.
When AC power is lost, the deeply-discharged battery cutoff protection will be invoked at 17 volts.
The power supply will be disconnected from the batteries. The power supply’s normal operation
will be restored when AC power returns.
1.2.2 AMPS-K2 Board
Main 24V Output Circuit - TB1
Main 24V output provides filtered power-limited (Class 2) power when set for 3A. Otherwise it
provides filtered, non-power limited power. Refer to Table 1.1 below for maximum current settings
for the various configurations.
Aux 24V Output Circuit - TB3
Auxiliary 24V output provides filtered power-limited (Class 2) power when set for less than
5A.Otherwise, it provides filtered, non-power limited power. Refer to Table 1.1 below for
maximum current settings for the various configurations.
Charger
Setting/Battery Size
1A / 7 - 26AH Batteries 5A 3A
2A / 12 - 60AH Batteries 5A 3A
5A / 55 - 200 AH
Configuration 1 5A OFF
Configuration 2 3 A 1 A
Disabled 5A 5A
Main 24V (TB1 on
AMPS-K2 board)
Maximum Current
Total AUX 24V (TB3 on
AMPS-K2 board plus
TB2 on CPS-24)
Maximum Current
Table 1.1 Output Current for Each Configuration
NOTE: The AMPS-24 can provide up to 3A for releasing applications, limited
by the FCM-1-REL.
SLC Circuit - TB2
Average SLC current is 1.0 mA. The maximum resistance of the SLC wiring from any device to the
FACP should not exceed 50 ohms.
Utilizes wire sizes 12-18 AWG (3.31 mm
2
- 0.821 mm2 ).
Trouble Bus - TB4
Trouble bus input is designed to receive trouble signals from any normally-open dry contacts or
open-collector circuit.
Utilizes twisted-pair wire sizes 12-22 AWG (3.31 mm
2
- 0.326 mm2 ).
Full Speed USB 2.0 - J3
USB Type B connector for programming installation parameters.
8 AMPS-24 Manual — P/N 51907:J2 02/26/2014
Page 9

Installation Standards and Codes Introduction
1.3 Installation Standards and Codes
The AMPS-24/E complies with the following standards:
NFPA 72 National Fire Alarm Code
Underwriters Laboratories:
• UL 864 Standard for Control Units and Accessories for Fire Alarm Systems
• UL 2572 Standard for Mass Notification Systems
Underwriters Laboratories of Canada (ULC):
• ULC-S527-99: Standard of Control Units for Fire Alarm Systems
• ULC-S524: Standard for the Installation of Fire Alarm Systems
In addition, the installer should be familiar with the following standards:
• NEC Article 300 Wiring Methods
• NEC Article 760 Fire Protective Signaling Systems
• Applicable Local and State Building Codes
• Requirements of the Local Authority Having Jurisdiction
• The Canadian Electrical Code, Part 1
1.3.1 UL 9th Edition Compliance
This product has been certified to comply with the requirements in the Standard for Control Units
and Accessories for Fire Alarm Systems, UL 864 9th Edition.
The following products have not received UL 864 9th Edition certification and may only be used in
retrofit applications. Operation of the AMPS-24/E with products not tested for UL 864 9th Edition
has not been evaluated and may not comply with NFPA 72 and/or the latest edition of UL 864.
These applications will require the approval of the local Authority Having Jurisdiction (AHJ).
• NFS-3030 Fire Alarm Control Panel
• AMG-1 Audio Message Generator
•ICM-4/E
•NCA
AMPS-24 Manual — P/N 51907:J2 02/26/2014 9
Page 10

Introduction Related Documentation
!
!
1.4 Related Documentation
To obtain a complete understanding of specific features of the AMPS-24, or to become familiar
with functions in general, make use of the documentation listed in Table 1.2.
Title Document Number
NFS2-3030 Installation, Operation, and Programming Manuals 52544, 52546, 52545
NFS-3030 Installation, Operation and Programming Manuals 51330,51344, 51345
NCA-2 Network Control Annunciator Manual 52482
NCA Network Control Annunciator Manual 51482
DS-DB Manual 53622
DVC/DAA Manual Manual 52411
ACM Series Annunciators Manual Manual 15842
LDM Series Lamp Driver Modules Manual 15885
SCS Series Smoke Control Annunciators Manual 15712
UDACT Manual 50050
UZC Universal Zone Coding Installation & Programming Manuals 15216, 15976
BB-100/200 Cabinet Installation Instructions 51981
CAB-3/CAB-4 Series Installation Instructions 15330
EQ Cabinet Series Installation Instructions 53412
Heat Dissipation Calculation Document for Cabinets with Digital
Audio Products
BB-25 Cabinet Installation Instructions 50898
NFS-LBB Cabinet Installation Instructions 50295
PK-PPS Power Supply Programming Utility Installation CD PK-PPS Power Supply
VeriFire™ Tools Online Help VeriFire-TCD
SLC Wiring Instruction Manual 51253
Device Compatibility Document 15378
53645
Programming Utility CD
Table 1.2 Related Documentation
NOTE: Unless otherwise indicated, when used in this manual, NFS2-3030 refers to both the NFS-
3030 and NFS2-3030E and AMPS-24 refers to both the AMPS-24 and AMPS-24E.
1.5 Notes, Cautions, and Warnings
This manual contains notes, cautions, and warnings to alert the reader as follows:
NOTE: Supplemental information for a topic, such as tips and references.
CAUTION: A brief identifier stating the nature of the hazard.
Information about procedures that could cause programming errors, runtime errors, or equipment
damage.
WARNING: A brief identifier stating the nature of the hazard.
Indicates information about procedures that could cause irreversible equipment damage, irreversible loss
of programming data or personal injury.
10 AMPS-24 Manual — P/N 51907:J2 02/26/2014
Page 11
Board Layout Introduction
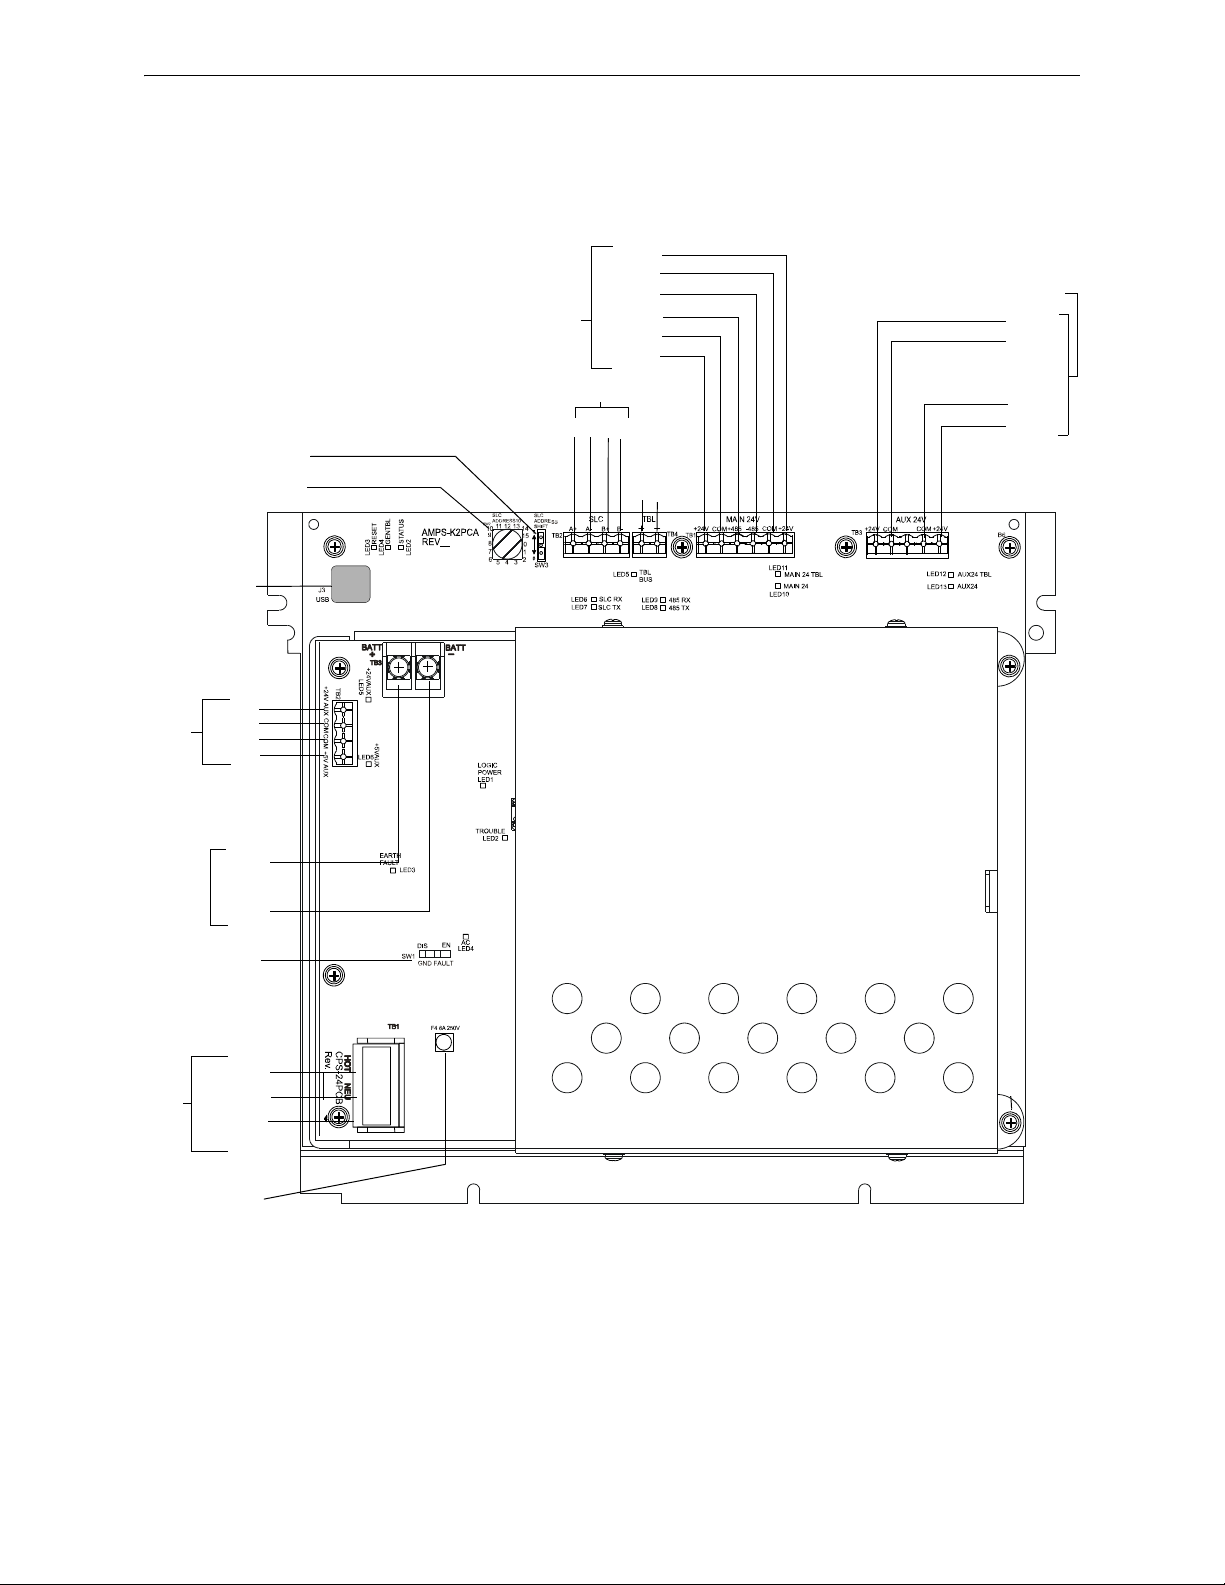
Rotary Switch SW2
A
–
+
–
+
BAT
BAT
amps24_CPS24andMaina.wmf
Slide Switch SW3
AC Fuse F4
HOT
NEUT
EARTH
GROUND
+ 24V
COM
COM
+ 5V
Ground Fault
Switch SW1
Accessories
Outputs (TB2)
USB Port J3
Type B
–
+
B
–
+
TBL
BUS
(TB4)
MAIN 24
(TB1)
AUX 24
TB3
+24V
COM
+485
-485
COM
+24V
+24V
COM
COM
+24V
SLC (TB2)
Battery
Connections
(TB3)
AC (TB1)
Use supplied
harness cable for
direct connection to
CPU2-3030, NCA2, or DS-DB.
1.6 Board Layout
The AMPS-24 is comprised of two boards; the AMPS-K2 (the larger rear board), and the CPS-24
(the smaller front board). Figure 1.1 below illustrates the layouts for these boards. Figure 1.2
illustrates the positions of the LEDs.
Figure 1.1 The AMPS-24 Board Layout
AMPS-24 Manual — P/N 51907:J2 02/26/2014 11
Page 12
Introduction LED Indicators
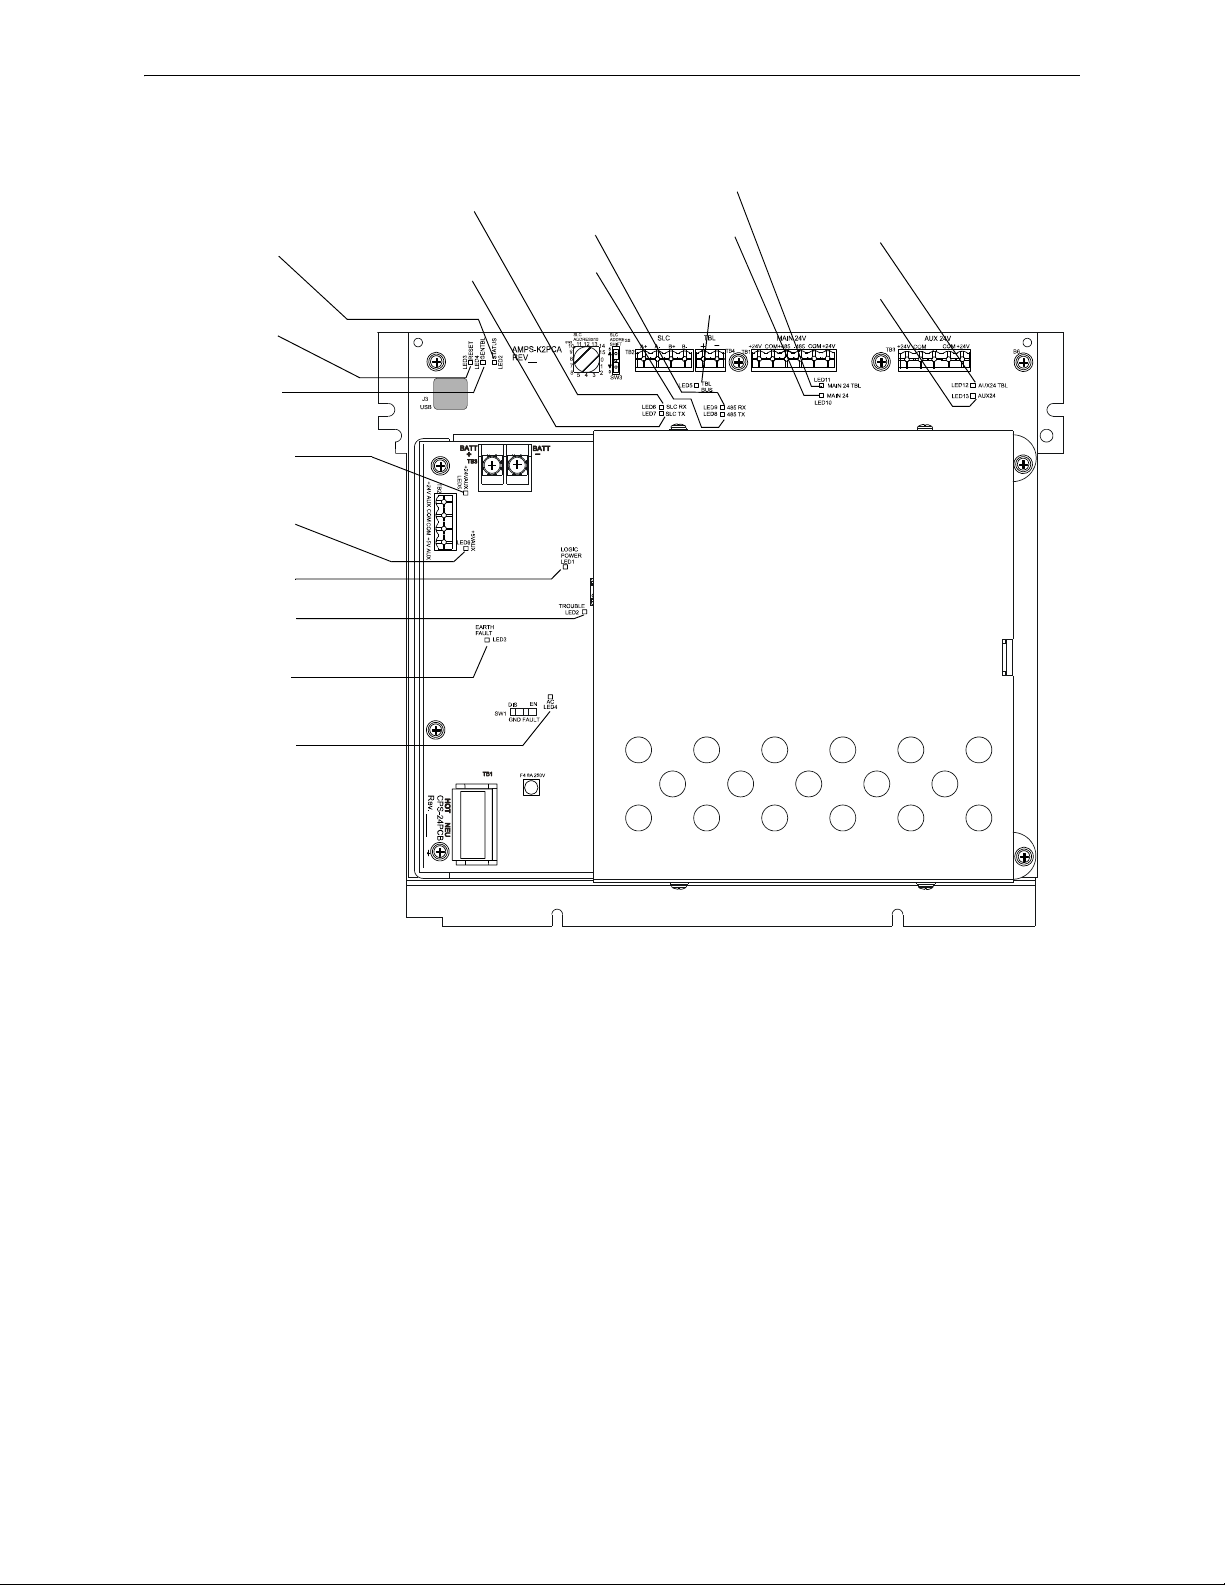
amps24_CPS24andMain.wmf
SLCRX
LED 6
SLCTX
LED 7
485RX
LED 9
485TX
LED 8
TBL BUS
LED 5
MAIN 24 TBL
LED 11
MAIN 24
LED 10
AUX 24 TBL
LED 12
AUX 24
LED 13
STATUS
LED 2
GEN TBL
LED 4
RESET
LED 3
+24V AUX
LED 5
+5V AUX
LED 6
LOGIC POWER
LED 1
TROUBLE
LED 2
EARTH FAULT
LED 3
AC
LED 4
1.7 LED Indicators
Figure 1.2 Locations of LED Indicators
12 AMPS-24 Manual — P/N 51907:J2 02/26/2014
Page 13

LED Indicators Introduction
There are eighteen LEDs that indicate various conditions and troubles. The following table lists and
describes each.
Reference LED Name Color Description
•
+5V logic power and software indication
2 STATUS Green
• Normally slow blink (1 blink/sec)
• Off in self-test failure or SLC address = 0 (bootloader)
• Steady on memory Flashing and POR (+5V check)
3 RESET Yellow
4 GEN TBL Yellow
RESET active.
Slow blink (1 blink/sec) if SLC address = 0 (bootloader)
•
• Blinks once then pause in CPS communication failure
• Fast blink (5 blinks/sec) in self-test failure or programming
• Steady in any other trouble, POR and memory Flashing
Steady when external trouble bus signal received (trouble bus shorted)
SLC incoming data
485 outgoing data
485 incoming data
+24V at Main output
Steady if in current-limit
•
• Fast blink (5 blinks/sec) in hardware failure
AMPS-K2
Board
5 TBL BUS Yellow
6 SLCRX Green
7 SLCTX Green SLC outgoing data
8 485TX Green
9 485RX Green
10 MAIN 24V Green
11 MAIN 24V TBL Yellow
• Steady on memory Flashing, or RAM self-test failure
• Medium blink (3 blinks/sec) on application code CRC self-test failure
Steady if in current-limit
12 AUX 24V TBL Yellow
•
• Fast blink (5 blinks/sec) in hardware failure
• Steady on memory Flashing, PCB rev test failed
• Medium blink (3 blinks/sec) on application code CRC self-test failure
13 AUX 24V Green +24V at AUX output
+5V logic power
Coded trouble indicator: 1 blink = AC failure; 2 blinks - high battery; 3
blinks = low battery; 4 blinks = charger failure
AC is on
+24V Auxiliary power
+5V Auxiliary power
CPS-24
Board
1 LOGIC POWER Green
2 TROUBLE Yellow
3 EARTH FAULT Yellow Ground fault detected
4 AC Green
5 +24V AUX Green
6 +5V AUX Green
Table 1.3 LED Indicators
AMPS-24 Manual — P/N 51907:J2 02/26/2014 13
Page 14
Section 2: Installation
!
!
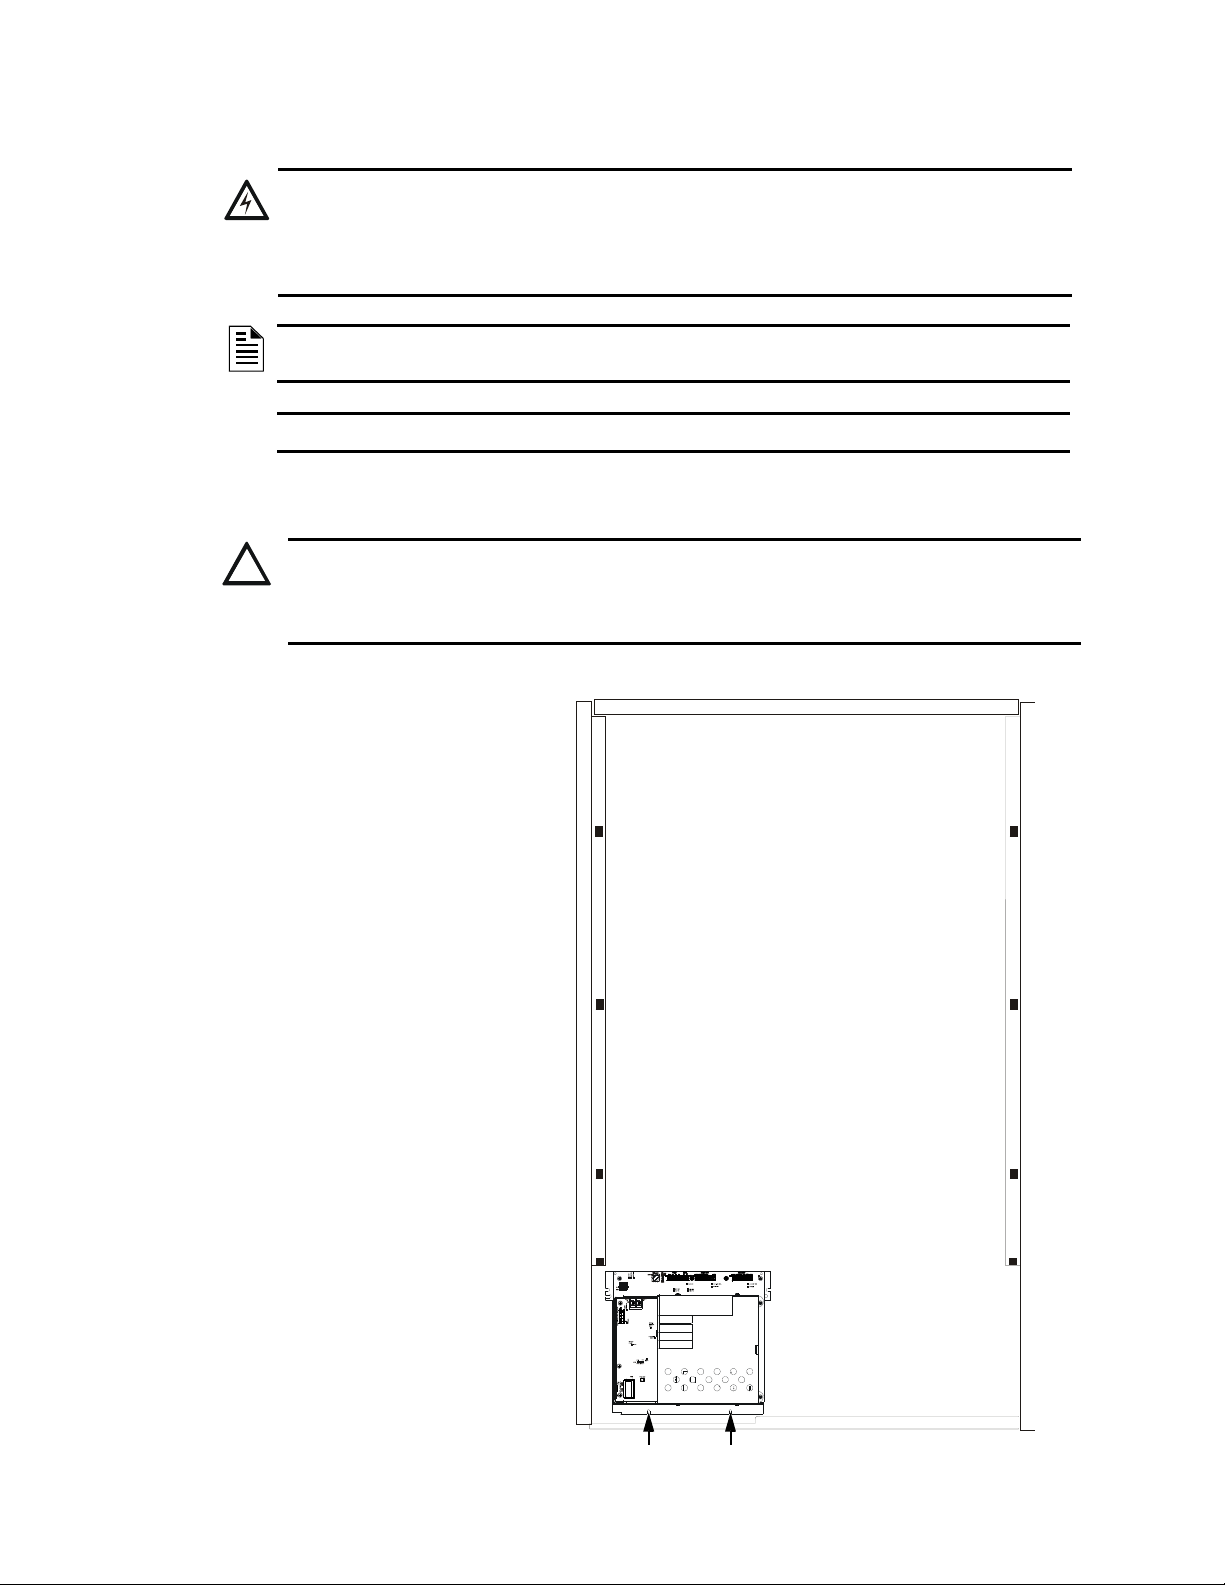
Figure 2.1 CAB-4 Series Backbox
Install the AMPS-24 in the lower
left of any CAB-4 Series cabinet.
Lower the power supply over the
cabinet’s support brackets and
fasten to the backbox with two
self-threading #6-32 screws, at the
indicated positions.
The AMPS-24 may also be
installed in a CHS-6 chassis in a
CAB-4 Series cabinet. (Refer to
Figure 2.2 on page 15.)
amps24cab3b.wmf
WARNING: High Voltages Present!
Use extreme caution when working with the AMPS-24. High voltage and AC line-connected circuits are
present in this power supply. Turn off and remove all power sources. To reduce the risk of electric shock,
make sure to properly ground the AMPS-24.
Install the snap-on cover for TB1 after wiring.
NOTE: A surge suppressor, model EDCO HSP121BT-1RU (for 120VAC operations) is required when using the
FCM-1-REL for releasing applications. The AMPS-24E power supply is not suitable for releasing applications.
NOTE: Test wire to wire faults with 0 ohm impedance.
2.1 In a CAB-4 Series Backbox.
WARNING: Risk of equipment damage!
Due to heat dissipation, total battery capacity must not exceed 26 amp-hours when the AMPS-24 is
charging in a CAB-4 series cabinet. Refer to the Heat Dissipation PID to determine the acceptable
heat dissipation in the cabinets when digital audio products are present.
The AMPS-24 mounts in the lower left of a CAB-4 Series enclosure.
14 AMPS-24 Manual — P/N 51907:J2 02/26/2014
Page 15
In an EQ Series Backbox Installation
!
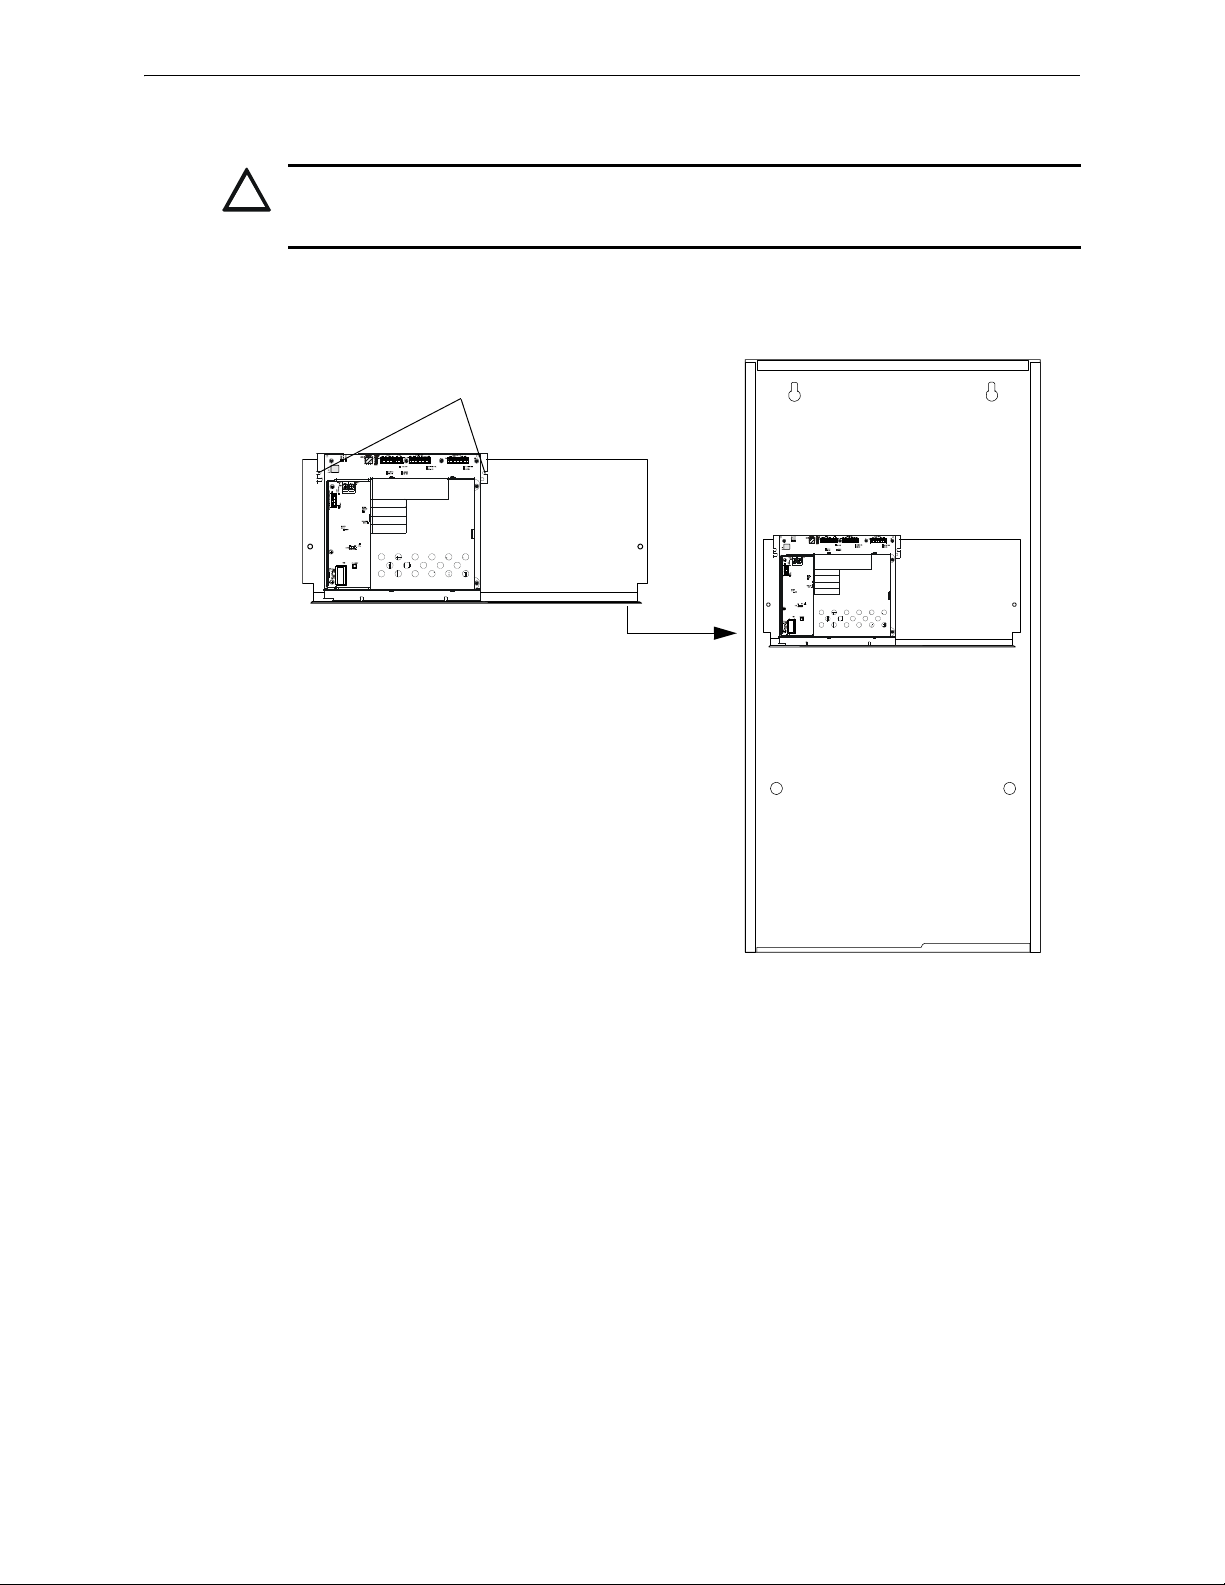
Figure 2.2 EQ Series Backbox
Fasten the power supply to the chassis
with two # 4-40 hex nuts, included.
(P/N 36045) at these positions.
CHS-6 Chassis
EQ Series Cabinet
2.2 In an EQ Series Backbox
WARNING: Risk of equipment damage!
Refer to the Heat Dissipation Calculation Document to determine the acceptable heat dissipation in
the EQ Series cabinets when digital audio products are present.
The AMPS-24 mounts on a CHS-6 chassis into any EQ Series cabinet row. It will require the left
two of the three chassis spaces.
AMPS-24 Manual — P/N 51907:J2 02/26/2014 15
Page 16

Installation In a BB-25 Cabinet
Figure 2.3 BB-25 Cabinet Mounting
Fasten the power supply to the backbox with (2)
#8-32 self-threading screws (p/n 38132) at the
indicated positions.
amps24_bb25b.CDR
Figure 2.4 BB-100 Mounting
BB100_AMPS24_2Batta.wmf
Fasten the AMPS-24 chassis to the backbox using the two
supplied #4-40 keps nuts (p/n 36045) at these positions.
!
2.3 In a BB-25 Cabinet
The AMPS-24 mounts in the left side of a BB-25 cabinet. Two 26 amp-hour batteries fit into the
right side of the cabinet. A BB-100 or BB-200 cabinet is required for batteries larger than 26
amp-hour.
2.4 In a BB-100 Cabinet
The AMPS-24 mounts in a BB-100 cabinet. Two 55 or 100 amp-hour batteries fit into the bottom of
this cabinet under the AMPS-24. The power supply is fastened directly to the the backbox using the
two provided keps nuts.
WARNING: Heavy Load!
The total weight of a fully loaded BB-100 will exceed 175 pounds. Additional support may be required
when mounting this cabinet to a wall.
See BB-100/200 Cabinet Installation Instructions for more information.
16 AMPS-24 Manual — P/N 51907:J2 02/26/2014
Page 17

In a BB-200 Cabinet Installation
BB200_AMPS24_4Battb.wmf
Figure 2.5 BB-200 Mounting
Fasten the AMPS-24 chassis to the backbox using the two
supplied #4-40 keps nuts (p/n 36045) at these positions.
!
2.5 In a BB-200 Cabinet
The AMPS-24 mounts in a BB-200 cabinet with four 100 amp-hour batteries (two on the top shelf
and two on the bottom). The power supply is fastened directly to the unpainted section of the
backbox with two keps nuts.
WARNING: Heavy Load!
The total weight of a fully loaded BB-200 will exceed 300 pounds. Additional support may be required
when mounting this cabinet to a wall.
See BB-100/200 Cabinet Installation Instructions for more information.
AMPS-24 Manual — P/N 51907:J2 02/26/2014 17
Page 18

Installation Cabinet Wiring Examples
TB1: AC Primary Power
Wiring Nonpower-limited and
supervised
TB1: Main 24V Wiring Power-limited (Class 2) and filtered.
(See page 21.)
amps24_BB25_pwrlmtdb.wmf
When the BB-25 cabinet contains batteries
only, it must be located within 20 feet (6.1
m) of the enclosure housing the power
supply, and all connections must be
contained in conduit.
TB3: AUX 24V Wiring Power-limited (Class 2) and filtered
TB2: SLC Circuit Wiring Power-limited (Class 2) and supervised
Grounding Wire
TB4: Trouble Bus Wiring Power-limited (Class 2) and
non-supervised
TB2: Accessories Output Wiring (5V,
24V) - Power-limited (Class 2) and
filtered. (See page 24.)
Affix battery cables as
necessary to maintain
appropriate distance between
nonpower and power-limited
(Class 2) wiring.
Power-li
mited
(Class 2)
circuits
Grounding Wire
TB1: AC Primary
Power Wiring Nonpower-limited
and supervised
TB2: Accessories
Output Wiring (5V,
24V) - Power-limited
(Class 2) and
filtered. (See
page 21.)
TB1: Main 24V
Wiring Power-limited
(Class 2) and
filtered. (See
page 24.)
TB3: AUX 24V Wiring
-Power-limited (Class
2), supervised, filtered
NFS2-3030
AC
Side-View
Affix battery cables
as necessary to
maintain appropriate
distance between
nonpower and
power-limited (Class
2) wiring.
2.6 Cabinet Wiring Examples
The terminal block and pin connections are illustrated in Figure 1.1. Power-limited (Class 2) wiring
must remain separated from nonpower-limited wiring by at least 0.25 in. (6.4 mm), and must enter
an enclosure through different knockouts. TB1 (Main 24V) and TB3 (AUX 24) on the AMPS-K2
board are power-limited (Class 2) when set for 3A maximum current in the programmed database.
Install tie wraps and adhesive squares to secure the wiring. Figures 2.6 through 2.9 show samples
of power-limited (Class 2) and nonpower-limited wiring configurations in different cabinets.
Figure 2.6 BB-25 Cabinet: Power-limited (Class 2) Wiring Example, with Two Battery
Wiring
Figure 2.7 CAB-4 Series Cabinet: Power-limited (Class 2) Wiring Example
18 AMPS-24 Manual — P/N 51907:J2 02/26/2014
Page 19

Cabinet Wiring Examples Installation
The BB-100 cabinet must be
located less than 20 feet (6.1
m) from the enclosure
housing the control panel and
all connections must be
contained in conduit.
TB3 - Nonpower-limited
and supervised
TB3 - 24V Auxiliary power.
Power-limited (Class 2).
TB2 - Secondary Power 5V and
24V Auxiliary outputs.
Power-limited (Class 2).
Grounding
Wire
TB1 - AC Primary
Power Wiring Nonpower-limited and
supervised
TB1 - Main 24V power to panel.
Power-limited (Class 2).
TB2 - SLC Circuit Wiring - Power-limited
(Class 2) and supervised.
TB4 - Trouble Bus Wiring - Power-limited
(Class 2) and non-supervised.
BB100_AMPS24_PowerLimitedd.wmf
TB1 - Main 24V power to panel. Power-limited (Class 2).
TB2 - SLC Circuit Wiring - Power-limited (Class 2) and
supervised.
TB4:Trouble Bus Wiring - Power-limited (Class 2),
non-supervised.
Grounding
Wire
TB1 - AC Primary
Power Wiring Nonpower-limited
and supervised.
TB2 - Secondary Power
5V and 24V Auxiliary
outputs. Power-limited
(Class 2).
The BB-200 cabinet must
be located less than 20
feet (6.1 m) from the
enclosure housing the
control panel and all
connections must be
contained in conduit.
TB3 Nonpower-limite
d and
supervised.
TB3 - 24V Auxiliary
power. Power-limited
(Class 2).
Figure 2.8 BB-100 Cabinet: Power-limited (Class 2) Wiring Example with Two Battery Wiring
Figure 2.9 BB-200 Cabinet: Power-limited (Class 2) Wiring Example with Four Battery Wiring
AMPS-24 Manual — P/N 51907:J2 02/26/2014 19
Page 20

Installation Wiring the AMPS-24/E
!
!
2.7 Wiring the AMPS-24/E
WARNING: Risk of electrical shock!
Remove all power sources to equipment while connecting electrical components. Leave the external,
main power breaker OFF until installation of the entire system is complete.
WARNING: Risk of equipment damage!
Several sources of power can be connected to the control panel and/or power supply. Before servicing
the control panel, disconnect all sources of input power including the battery. While energized, the control
panel and associated equipment can be damaged by removing and/or inserting cards, modules, or
interconnecting cables.
2.7.1 Overview
Complete all mounting procedures and check all wiring before applying power. Electrical
connections are listed below and are detailed in the following paragraphs:
AMPS-K2 (rear board)
TB1 - MAIN 24V
Main output, 5 A, 24VDC (nominal), output.
•5A
1) with 5A charger and AUX 24V output disabled, or
2) with 1A charger and 3A AUX 24V, or
3) with 2A charger and 3A AUX 24V,
OR
• 3A (with 5A charger and 1A AUX 24V)
These values are described in table format in Table 1.1 on page 8.
TB3 - AUX 24V
Auxiliary 24V output provides filtered power-limited (Class 2) power for additional components.
• 5A (charger disabled)
• 3A (1A/2A charger)
• 1A (5A charger and 3A Main 24V output)
These values are described in table format in Table 1.1 on page 8.
TB2 - SLC Wiring
Connect to panel Signaling Line Circuit. This terminal is not used when the AMPS-24 is connected
to a panel or DS-DB via the EIA-485 connection.
TB4 - TBL BUS
Trouble bus input is designed to receive trouble signals from any normally open dry contacts or
open collector circuit.
J3 - USB
USB Type B connector for Power Supply configuration using a PC.
CPS-24 (front board)
TB1 - AC
Primary AC Power Source - 120 VAC, 50/60 Hz, 5A (AMPS-24E uses 220-240 VAC, 50/60 Hz,
2.5 A) from line voltage source.
20 AMPS-24 Manual — P/N 51907:J2 02/26/2014
Page 21

Wiring the AMPS-24/E Installation
COM — Black Wire
COM — Black Wire
24V — Red Wire
24V — Red Wire
485– — Orange Wire
485+ — Brown Wire
}
P/N 75637 only
+24V
+24V
COM +485
- 485
COM
TB1
MAIN 24V
TB2 - Accessories Output
Power-limited (Class 2); 24V @ 0.5A, 5V @ 0.15A.
TB3 - Secondary Output Source (Batteries)
24VDC from batteries installed in the appropriate enclosure. Secondary (battery) power is required
to support the system during loss of primary power.
2.7.2 Connecting TB1 MAIN 24V
To a Control Panel, Network Annunciator, or DS-DB
This output provides filtered, power-limited (Class 2)(when set for less than 5A) 24VDC power to
a control panel, network annunciator, or DS-DB. Use a four-wire harness (P/N 75591) when
connecting the power supply to a CPU-3030. Use a six-wire harness (P/N 75637 — supplied panel,
network annunciator, and DS-DB) when connecting the power supply to a CPU2-3030, NCA-2, or
DS-DB. (All six wires must be connected, even if SLC trouble reporting is selected in
programming.) If not installed in the same enclosure as the control panel; the power supply must be
located in the same room, total wire length must be less than 20 feet (6.1 meters), and all external
connections must be in conduit. Do not splice or otherwise extend P/N 75591 or P/N 75637.
Connect wiring with all power sources off.
Figure 2.10 Connecting to the Main 24 Output TB1, Example 1
As General Purpose Power
When used as general purpose power, this output provides filtered, power-limited (Class 2) (when
set for less than 5A) 24VDC general purpose (non-NAC) power. If not installed in the same
enclosure as the devices it powers; the power supply must be located in the same room, total wire
length must be less than 20 feet (6.1 meters), and all external connections must be in conduit.
Examples of devices that may utilize this power provided by an AMPS-24 mounted remotely from
the fire alarm control panel include:
AMPS-24 Manual — P/N 51907:J2 02/26/2014 21
• All current Notifier annunciators including
- ACM Series annunciators
- LDM Series lamp driver modules
- SCS Series annunciators
- UDACT
• Remote LEDs or incandescent lights supported by an LDM series annunciator
• 4-wire smoke detector (requires external reset control relay)
• 2-wire smoke detectors connected to FZM-1 module
• Solenoids (refer to the Device Compatibility Document for acceptable models)
Page 22

Installation Wiring the AMPS-24/E
+24V
+24V
COM
COM
+24V
+24V
COM +485
- 485
COM
TB1
MAIN 24V
ONYX
Panel
SLC
Battery
Battery
Non-charging
device such as
DAA-75 or
AA-Series
AC power
AMPS-24
24 VDC
General
Purpose
Power
AC power
• DVC Series
•NCM-W/F
• DS-DB Digital Series board (+/- 485 terminals must be connected).
Figure 2.11 Connecting to the Main 24 Output TB1, Example 2
Figure 2.12 is a block diagram representing an application where an AMPS-24 is used as a general
purpose remote power supply and battery charger.
Figure 2.12 AMPS-24 as Battery Charger/General Purpose Remote Power Supply
22 AMPS-24 Manual — P/N 51907:J2 02/26/2014
Page 23

Wiring the AMPS-24/E Installation
+24V
+24V
COM
COM
+24V
+24V
COM
COM
TB3
AUX 24V
To SLC
Interface
+
–
+
–
SLC B
SLC A
Optional 4-wire
Return Loop
Style 6 (Class A)
A+ B-A- B+
TB2
SLC
2.7.3 Connecting to the AUX 24 Output
TB3 - This output supplies one non-resettable, power-limited (Class 2) (when set for less than 5A),
filtered 24VDC circuit available to power external devices. It may be used to power the DS-DB when
connected to TB24 on the DS-DB. This application requires that the AMPS-24 be monitored by an
FACP.
The output can be configured to provide 3A or 5A maximum current, or it can be disabled. Refer to
Section 3.2.6 on page 34.
Figure 2.13 Connecting to the AUX 24V Output TB3
2.7.4 Connecting to the SLC
TB2 - Supervised and power-limited (Class 2). With all power sources off, connect the power
supply from TB2 to the SLC interface.
NOTE: Do not connect the AMPS-24 to the SLC if the AMPS-24 is communicating via 485
trouble reporting. (Refer to “Trouble Reporting” on page 36.)
See
“SLC Addressing” on page 30.
Refer to the SLC Wiring Manual for more information.
Figure 2.14 Connecting to the SLC Interface TB2
AMPS-24 Manual — P/N 51907:J2 02/26/2014 23
Page 24

Installation Wiring the AMPS-24/E
Figure 2.15 Trouble Bus Connection
+
TB4
TBL BUS
COM — Black Wire
24V — Brown Wire
COM — Green Wire
5V — Red Wire
AMPS24_TB2access.wmf
+24V AUX
TB2
COMCOM +5V AUX
2.7.5 Connecting the Trouble Bus
Trouble bus input is designed to receive
trouble signals from any normally-open dry
contacts or open-collector circuit.
2.7.6 Connecting the Accessories Output on the CPS-24
TB2 - Supplies one (1) non-resettable, power-limited (Class 2) 24 VDC circuit and one
non-resettable power-limited (Class 2) 5 VDC circuit available to power external devices. UZC
applications on the 5V connection to the Accessories Output must be within 10 feet (3.658 meters)
of the power supply and should use the supplied cable, P/N 75595. Do not splice or otherwise
extend P/N 75595. Refer to the “Wire Requirements” section of the panel installation manual for all
applications requiring a 24V connection. The wiring must remain within the same enclosure, or it
must be in conduit. Connect wiring with all power sources off.
• 24 VDC (nominal) @ 0.5 A max.
• 5 VDC (nominal) @ 0.15 A max.
Refer to the Device Compatibility Document for compatible devices and notification appliances.
Figure 2.16 Connecting to the Accessories Output TB2 on CPS-24
2.7.7 Connecting the Power Supply to AC Power
TB1 (CPS-24) - Primary AC power source - 120 VAC, 50/60 Hz, 5.0A (AMPS-24E uses 220-240
VAC, 50/60 Hz, 2.5A) from line voltage source.
The AMPS-24 requires connection to a separate dedicated AC branch circuit. Follow these
24 AMPS-24 Manual — P/N 51907:J2 02/26/2014
guidelines when connecting the AC branch circuit:
• Label the branch circuit “Fire Alarm”.
• Connect the branch circuit to the line side of the main power feed of the protected premises.
• Do not power other equipment from the fire alarm branch circuit.
• Run the AC branch circuit wire continuously, without any disconnect devices, from the
power source to the power supply.
Page 25

Installing and Connecting the Batteries Installation
Figure 2.17 AC Power Connection
cps24_ac.cdr
!
!
!
Figure 2.18 Terminal Bolt Installation
• Overcurrent protection for the AC branch circuit must comply with Article 760 of the
National Electrical Codes, as well as local codes.
• Use 12–14 AWG (3.31 mm
2
– 2.08 mm2) or larger wire with 600 VAC insulation for the AC
branch circuit.
Connect primary power as follows:
1.Turn off the circuit breaker at the main power
distribution panel.
2.Connect the earth ground terminal (TB1-
EARTH) to a solid earth ground (a metallic, cold
water pipe may be suitable in some installations).
This connection is vital in reducing the panel’s
susceptibility to transients generated by lightning
and electrostatic discharge.
3.Connect the primary power neutral line to
terminal marked
AC line to terminal marked
NEUTRAL and the primary power
HOT.
2.8 Installing and Connecting the Batteries
WARNING: Risk of severe burns!
Batteries contain sulfuric acid which can cause severe burns to the skin and eyes, and can destroy
fabrics. If contact is made with sulfuric acid, immediately flush skin or eyes with water for 15 minutes
and seek immediate medical attention.
WARNING: Risk of equipment damage!
Do not connect the battery interconnect cables (P/N 75560, 75561, or 71070) at this time. Leave the
battery interconnect cables disconnected until after initial system power-up.
WARNING: Risk of equipment damage!
To avoid contact with metal cabinet, always install terminal bolts towards the center of the battery. See
Figure 2.18.
AMPS-24 Manual — P/N 51907:J2 02/26/2014 25
Page 26

Installation Installing and Connecting the Batteries
cps24_2batt.wmf
TB3
Certain system designs may require connecting two or four batteries to the power supply,
connecting multiple power supplies to each other, or connecting one set of batteries to multiple
power supplies. Always use wire size 12-18 AWG (3.25 mm
2
– 0.75 mm2), and install the power
supply and the batteries in the appropriate enclosures, as described in Sections 2.4 and 2.5.
2.8.1 Setting the Charger
The AMPS-24 battery charger will charge 7 to 200 AH lead-acid batteries. Use PK-PPS to select
the appropriate battery charger current for the system’s battery capacity from these settings:
5A, or DISABLE CHARGER. Select 1A to charge 7 to 26 AH batteries. Select 2A to charge 12 to 60
1A, 2A,
AH batteries. Set the charger to 5 A when the power supply will be charging a system that requires
55 to 200 AH. Select
DISABLE CHARGER when the batteries will be charged by an external charger.
See Section 3.2, “Programming the AMPS-24”, on page 32 for more information on programming
via PK-PPS. Refer to Section 4.2, “Calculating the Battery Requirements”, on page 44 for more
information on determining your system’s battery capacity.
2.8.2 Connecting the Power Supply to Two Batteries:
1. Use PK-PPS to set the charger to the appropriate current for the system’s battery capacity.
2. Connect one cable from TB3 (
one battery.
3. Connect another cable from TB3 (
of the other battery.
4. Only after initial system power-up, connect a battery interconnect cable between the
negative (-) terminal on the first battery to the positive (+) terminal on the second battery.
BATT IN +) on the power supply to the positive (+) terminal of
BATT IN -) on the power supply to the negative (–) terminal
To determine battery requirements, refer to Section 4 of this manual.
Figure 2.19 Connecting Two Batteries to the Power Supply
2.8.3 Connecting the Power Supply to Four Batteries:
1. Use PK-PPS to set the charger to the appropriate battery charger current for the system’s
battery capacity.
2. Continue the connection from the occupied positive (+) battery terminal to the positive (+)
terminal of the next unconnected battery.
3. Continue the connection from the occupied negative (–) battery terminal to the negative (–)
terminal of the remaining unconnected battery.
4. Only after initial system power-up, connect the two pairs of batteries. Use two battery
interconnect cables to tie each unoccupied negative (–) terminal to an unoccupied positive (+)
terminal, as shown in Figure 2.20.
26 AMPS-24 Manual — P/N 51907:J2 02/26/2014
Page 27

Installing and Connecting the Batteries Installation
TB3
cps24_4Batt.wmf
To determine battery requirements, refer to Section 4 of this manual.
Figure 2.20 Connecting Four Batteries to the Power Supply
NOTE: Use a ring terminal to attach two cables to one battery terminal.
AMPS-24 Manual — P/N 51907:J2 02/26/2014 27
Page 28

Installation Installing and Connecting the Batteries
!
AMPS-24
Compatible UL/ULC–Listed
Power Supply/Product
To Batteries
To Batteries
acps-610_MultiPS.wmf
2.8.4 Connecting Multiple Power Supplies/Products (Separate Batteries)
Follow these guidelines when connecting multiple power supplies and products that use batteries
(such as the DS-AMP and DAX):
• Disable Ground Fault detection on all products except one power supply. See Figure 1.1 on
page 11.
For proper supervision the power supply with the enabled ground fault detection must be
connected to the SLC or to the EIA-485.
• Connect common bond wire between these products.
• All connections must be in conduit and the total battery connection must be less than 20 feet
(6.1 meters) from the enabled power supply.
• Confirm that enabled chargers have the capacity to charge the total load of the selected
battery configuration.
• Connect battery interconnect cables only after initial system power-up. Refer to
“Installing and Connecting the Batteries” on page 25.
To determine AMPS-24 battery requirements, refer to Section 4.2 on page 44 in this manual.
Refer to the specific product manual(s) and/or Device Compatibility Document for further
information and instructions.
CAUTION: Risk of possible equipment damage.
To maintain proper supervision, auxiliary supplies used to power Panel Circuits, such as the ICM-4/E,
must be connected to the same batteries as the main power supply. Failure to do so may result in
equipment damage.
Figure 2.21 Connecting Multiple Power Supplies/Products with Common Bond Wire
28 AMPS-24 Manual — P/N 51907:J2 02/26/2014
Page 29

Installing and Connecting the Batteries Installation
!
AMPS-24
Internal Charger enabled
Refer to “Outputs Current Settings”
on page 35.
Compatible
UL/ULC–Listed
Power
Supply/Product
Internal Charger disabled
AMPS24_MultiPS-BAT.wmf
Internal Charger disabled
Compatible
UL/ULC–Listed
Power
Supply/Product
2.8.5 Connecting Multiple Power Supplies/Products (One Set of Batteries)
Certain system designs may require connecting multiple power supplies and products that use
batteries (such as the DS-AMP and DAX) to one set of batteries. Follow these connection
guidelines:
• For proper supervision, enable only the charger directly connected to the batteries. Disable
all other chargers.
• Confirm that the enabled charger has the capacity to charge the total load of the selected
battery configuration.
• Use PK-PPS to set the charger to the appropriate battery charger current for the system’s
battery capacity.
• Disable Ground Fault detection on all power supplies/products except the one that is
charging the batteries. See Figure 1.1 on page 11.
For proper supervision the power supply with the enabled ground fault detection must be
connected to the SLC, or to the EIA-485 to the CPU2-3030, NCA-2 or DS-DB.
• All power supply to power supply connections must be in conduit and the total battery
connection must be less than 20 feet (6.1 meters).
• Connect battery interconnect cables only after initial system power-up. Refer to
“Installing and Connecting the Batteries” on page 25.
To determine battery requirements, refer to Section 4.2, “Calculating the Battery Requirements” in
this manual.
Refer to the specific power supply manual(s) and/or Device Compatibility Document for further
information and instructions.
CAUTION: Risk of possible equipment damage.
To maintain proper supervision, auxiliary supplies used to power Panel Circuits, such as the
ICM-4/E, must be connected to the same batteries as the main power supply. Failure to do so
may result in equipment damage.
Figure 2.22 Connecting Multiple Power Supplies/Products (One Set of Batteries)
AMPS-24 Manual — P/N 51907:J2 02/26/2014 29
Page 30

Section 3: Configuring the AMPS-24
!
3.1 SLC Addressing
NOTE: An AMPS-24 communicating over the EIA-485 protocol will not require an SLC address
block. See Section 3.3, “Configuring the Network Annunciator” for more information.
When the AMPS-24 communicates via the SLC, the installer must reserve sequential SLC
addresses (an address block) equal to the number of addresses that will be consumed by the
AMPS-24. Determining the size of the address block and setting the SLC base address is
described in this section.
3.1.1 Determining Address Consumption
CAUTION:
Always select “SLC Trouble Reporting” when connecting the AMPS-24 to an NFS2-3030.
Software determines the AMPS-24 address consumption. An AMPS-24 can occupy either one or
five addresses on an SLC. The AMPS-24 will consume five addresses on the SLC if configured for
five-point trouble reporting. If trouble reporting is not selected, the AMPS-24 will only consume
one address. Table 3.1 details address consumption.
AMPS-24
Addresses
PK-PPS Setting
Monitor General
Monitor AC Fail
Monitor Battery
Monitor Earth Fault
Monitor Charger
Fault
EIA-485 or SLC
Five Point
Trouble Reporting
NOT SELECTED
“SLC” Interface Type “EIA-485” Interface Type
??
Total: 1 Address No address when SLC is
EIA-485
Trouble Reporting
SELECTED
disabled.
SLC
Trouble Reporting
*
SELECTED
†
SLC
Address
• “SLC” Interface Type
• “Five-Point Monitoring”
Trouble Reporting
‡
B
?
?
?
?
Total: 5 Addresses
Assign 5 sequential SLC
addresses for this
configuration.
B + 1
B + 2
B + 3
B + 4
Table 3.1 SLC Address Consumption
* Required for use with NCA-2
† Required for use with NFS2-3030 and when used as a remote power supply.
‡ B = SLC Base Address
30 AMPS-24 Manual — P/N 51907:J2 02/26/2014
Page 31

SLC Addressing Configuring the AMPS-24
rotarysw.CDR
acps-610_SW3.wmf
3.1.2 Setting the Base Address (SLC Enabled)
The base address is the first address used in an SLC address block. Combine rotary switch (SW2)
and address switch (SW3) settings to determine the base address (B). The base address will be a
number that ends in zero or five and the rest of the address block will progress sequentially from
that number until all the addresses in the block are consumed.
NOTE: The lowest base address for the AMPS-24 is 05. Do not use FACP addresses 00 through 04
for the AMPS-24.
The Rotary Switch
The rotary switch SW2 determines the address decade. Each number on the dial represents the ten
addresses of a decade. Turning the arrow until it points at a number selects that number’s decade.
For example:
Pointing the arrow at the 1 selects the “one” address decade, beginning at 10.
Pointing the arrow at the 12 selects the “twelve” address decade, beginning at
120.
The SLC Address Slider Switch (SW3)
Use the slider switch, SW3, to further define the SLC base address. While an address’ decade is
defined by the rotary switch, the slider determines whether the base address (B) will end in a zero
or a five. Sliding the switch towards the 0 selects a base address that ends with a zero. Sliding the
switch towards the 5 selects a base address that ends with a five.
For example:
Slide the switch towards the 0, as shown in the illustration to the left, to select
an initial address that ends in zero. Since the rotary switch defines the decade, if
the rotary switch were to point at 8, the base address in this address block would
be 80.
Slide the switch towards the 5, as shown in the illustration to the left, to select
an initial address that ends in five. Since the rotary switch defines the decade, if
the rotary switch were to point at 8, the base address in this address block would
be 85.
AMPS-24 Manual — P/N 51907:J2 02/26/2014 31
Page 32

Configuring the AMPS-24 Programming the AMPS-24
ROTARY
SWITCH
SETTING
SW3
SLIDER SWITCH
POSITION
acpsaddrot1.CDR
acpsaddrot3.CDR
SLC
BASE
ADDRESS
5
120
SLC ADDRESSES
SELECTED
with
five AMPS-24 Addresses
5-9
120-124
acps610_sw32.wmf
acps610_sw31.wmf
Figure 3.1 below gives two examples of setting the base address with both rotary and slider switch
settings.
Figure 3.1 SLC Address Selection
3.2 Programming the AMPS-24
Use PK-PPS to program the charger current and trouble reporting. With PK-PPS, the AMPS-24
database can be configured and downloaded, and firmware updated. The power supply’s
configuration can be modified online, while the PC is connected to the power supply; or offline, on
a database that can be downloaded at a later date.
3.2.1 Installing the Configuration Software
Minimum Requirements
• Windows XP Professional with SP2, or Windows 2000 with SP4.
• PC or Laptop with USB 2.0 port.
Installation
1. Log in. The user must have Administrative privileges.
2. Exit out of the NFN Gateway if it is running in the system tray.
3. Insert the CD into the PC’s CD drive.
4. Double click on the file PPS.exe on the CD.
5. Follow the instructions of the PPS installation wizard to completion.
6. Connect the AMPS-24 to the PC via the USB cable. (See Section 3.2.2.) Wait for the
operating system to detect the new hardware.
7. Follow the set of steps in Table 3.2 below that are specific to your operating system.
32 AMPS-24 Manual — P/N 51907:J2 02/26/2014
Page 33

Programming the AMPS-24 Configuring the AMPS-24
!
!
Figure 3.2 The AMPS-24 USB Interface (J3)
AMPS24_USBa.wmf
.
Windows XP Professional with SP2 Windows 2000 with SP4
1. On the Found New Hardware Wizard window, select “No,
not this time”. Click Next.
2. Select “Install from a list or specific location”. Click Next.
3. Select “Search for the best driver in these locations”.
Clear the check box next to “Search removable media”
and set the check mark next to “Include this location in the
search”. Click Browse.
4. On the Browse For Folder pop-up window, select the
folder C:\ProgrammingKit\PowerSupply\USB Drivers.
Click OK.
5. Click Next.
6. On the Hardware Installation window that warns “The
software has not passed Windows Logo testing...”, click
Continue Anyway.
7. Click Finish.
Table 3.2 Operating System Instructions
WARNING: Power Supply Disabled!
The power supply is out of service during database/firmware upload and downloads.
WARNING: Risk of Irreversible Loss of Programming Data!
Steady STATUS, GENERAL and OUTPUT TROUBLE LEDS indicate that a database/firmware
download is STILL in process. Do not disconnect power or the USB cable during this time!
Disonnect USB cable only after programming is complete.
1. On the Found New Hardware Wizard window, click Next.
2. Select “Search for a suitable driver for my device”. Click
Next.
3. Under optional search locations, select “Specify a
location”. Clear all other check boxes. Click Next.
4. On the window that pops up, click the Browse button and
select the file
C:\ProgrammingKit\PowerSupply\USB Drivers\HfsUsb.inf.
Click Open.
5. Click OK on the pop-up window.
6. Click Next. This will install the driver.
7. Click Finish.
3.2.2 Establishing the Hardware Connection
NOTE: Before connecting PK-PPS to the power supply, exit out of the NFN Gateway if it is
running in the system tray.
Connect a standard USB cable from the
PC’s USB port to the AMPS-24’s USB
interface (J3). When the download is
complete, the unit automatically reboots
and returns to normal operation.
3.2.3 Working Offline
If the PC is not connected to a power supply, it can be used to create or edit AMPS-24 databases.
These databases can be saved and downloaded at a later date.
AMPS-24 Manual — P/N 51907:J2 02/26/2014 33
Page 34

Configuring the AMPS-24 Programming the AMPS-24
Select AMPS-24
from drop-down
menu.
To create a new database, select NEW from the FILE menu, then select AMPS-24.
To edit an existing database, select
OPEN from the FILE menu, then select AMPS-24.
Refer to Figure 3.3 below.
Figure 3.3 Power Supply Selection
3.2.4 Working Online
NOTE: Before connecting PK-PPS to the power supply, exit out of the NFN Gateway if it is
running in the system tray.
In addition to creating and opening databases on the PC’s local drive, modifications may be made
to any AMPS-24 that is directly connected to the PC with the PK-PPS programming utility. When
PK-PPS is open and the PC is connected via the USB to a power supply, that power supply is
represented by the icon in the left window. Click on this icon to see the power supply’s current
configuration and version information.
Right-clicking on the AMPS-24 icon provides three work options:
SAVE Select this option to save the power supply’s current configuration as a database file
(*.pdb) on the PC’s local drive.
MODIFY Select this option to edit the power supply’s current configuration. When all changes
are made, the new database will overwrite the one in the AMPS-24. The new database can also
be saved to the local drive.
DOWNLOAD Select this option to download a database, application, or bootloader file to the
power supply. See Section 3.2.5.
3.2.5 Downloading to the AMPS-24
1. Check to make sure that the PC is connected to the AMPS-24 (Section 3.2.2).
2. Right click on the AMPS-24 icon, select
you wish to download or select Download from the Operation menu.
You may download a program database file (*.pdb), an application file (*.hex), or a
bootloader file (*.hex).
3. Use the Browse button to navigate to the file you wish to download.
4. Open the file to download it to the AMPS-24.
5. Disconnect USB cable AFTER programming is complete.
DOWNLOAD and choose the type of application
3.2.6 AMPS-24 Configuration
PK-PPS sets parameters for the AMPS-24, outputs/charger current and trouble reporting type.
Selections must be made in order shown below. Lower level options will not be available until
upper level options have been selected.
34 AMPS-24 Manual — P/N 51907:J2 02/26/2014
Page 35

Programming the AMPS-24 Configuring the AMPS-24
PKPPS Label.bmp
PKPPS Charger.bmp
The worksheet’s summary section displays all selections. When programming is complete, PK-PPS
displays the SLC address consumption that is the result of your selections.
Figure 3.4 PK-PPS: Label
Label
For greater ease of identification, you may create a label for each power supply. Labels may have a
maximum of 40 characters.
Figure 3.5 PK-PPS: Battery Charger/Outputs Current Setup
Outputs Current Settings
Choose the appropriate battery charger current for the system’s battery capacity. Refer to
Section 4.2, “Calculating the Battery Requirements”, on page 44 for more information on
determining your system’s battery capacity.
There are three charger current options. Select
to 26 AH batteries. Select
5A CHARGE to charge 55 to 200 AH batteries. Select DISABLE CHARGER
1A CHARGE for 7 to 26AH, 2A CHARGE to charge 12
when the batteries will be charged by an external charger (See “Setting the Charger” on page 26.).
NOTE: The charger current option “1A CHARGE” is not approved for ULC applications.
AMPS-24 Manual — P/N 51907:J2 02/26/2014 35
Page 36

Configuring the AMPS-24 Programming the AMPS-24
PKPPS Interface.bmp
PKPPS Trouble.bmp
Figure 3.6 PK-PPS: Interface Type
Interface Type
Select the interface type.
SLC: This must be selected when the AMPS-24 is used as the power supply for a CPU2-3030 or as
a remote power supply.
EIA-485: This must be selected when the AMPS-24 is used with an NCA-2.
Figure 3.7 PK-PPS: Trouble Reporting
Trouble Reporting
Select the trouble reporting option.
Five Point Monitoring: When the power supply is configured for Five Point Monitoring
(trouble reporting over the SLC), the panel will report a trouble message beginning at the base
SLC address. This selection must be made if the power supply is being used to power a CPU23030 or as a remote power supply. Reporting at the base address (“Monitor General”) includes
current limit, hardware failure, trouble bus active, and CPS communication trouble. Refer to
“SLC Addressing” on page 30.
When the power supply is configured for Five Point Monitoring, the panel displays a specific
trouble message for AC Fail, Battery, Earth Fault, and Charger Fail addresses (See Table 3.1).
In CLIP mode, the labels for the “Base + x
” addresses must be entered manually. In FlashScan
mode, device labeling is automatic.
36 AMPS-24 Manual — P/N 51907:J2 02/26/2014
Page 37

Configuring the Network Annunciator Configuring the AMPS-24
PK-PPS Summary.jpg
!
US AC Fail Delay time: Make a selection (0, 2 HOURS, 8 HOURS, or 16 HOURS) from the dropdown menu.
Figure 3.8 PK-PPS: Summary
Summary
The Summary screen displays all of your previous selections and the resulting SLC address
consumption. Review this summary screen before downloading and ensure that the proper
number of consecutive addresses are reserved. You may use the
your selections. Click the
FINISH button to save your changes to the database.
BACK button to edit any of
3.3 Configuring the Network Annunciator
3.3.1 Programming
Because the AMPS-24 communicates with an NCA-2 through the use of 485 trouble reporting, it
does not require an SLC address block. Supervision and addressing for the AMPS-24 is assigned at
the network annunciator. Note that the AMPS-24 can connect to the NCA-2 via TB1 (dedicated
connection) or TB3 (remote connection) on the AMPS-K2 board.
See the NCA-2 manual for more information.
3.3.2 Display
When the power supply is configured for 485 Trouble Reporting, the NCA-2 displays a system
trouble for each specific trouble message for each AMPS-24.
CAUTION:
485 Trouble Reporting must be selected when an AMPS-24 is connected to an NCA-2.
3.4 Configuring the FACP
3.4.1 Programming
Assign the main power supply’s AC Fail address at the Panel Program submenu, Supervision; or at
the VeriFire Tools System Programming worksheet, General II. The Autoprogram command will
show the assignments of the four remaining AMPS-24 addresses according to the rotary and slider
AMPS-24 Manual — P/N 51907:J2 02/26/2014 37
Page 38

Configuring the AMPS-24 Configuring the FACP
!
switch selection and in the order given in Table 3.3. Each SLC address may also be programmed
manually at the panel or through the VeriFire Tools utility. Note that either one or five addresses
can be associated with the power supply depending on the configuration.
3.4.2 Software Type ID Codes
When manually programming AMPS-24, each address point on the AMPS-24 should carry the
module type, “MONITOR”; the Type Code Label, “POWER MONITR”; and the FlashScan Code
Label “PS MON.” Refer to the panel programming manual or VeriFire Tools Online Help for
further instructions.
Order of AMPS-24
Address Assignment
*
B
B+1 Monitor AC Fail POWER MONITR PS MON
B+2 Monitor Battery POWER MONITR PS MON
B+3 Monitor Earth Fault POWER MONITR PS MON
B + 4 Monitor Charger Fault POWER MONITR PS MON
* B = Base Address
NOTE: AMPS-24/E revisions previous to the AMPS-K2 revision do not have the extra monitor
point for Charger Fault. When replacing a previous revision AMPS-24 with an AMPS-K2 version,
remember to program the monitor point.
AMPS-24 Addresses Type ID
Monitor General POWER MONITR PS MON
3.4.3 Panel Display
When the power supply is configured for Five Point Monitoring, a specific trouble message for
each AMPS-24 address will display. Five Point Monitoring must be selected for proper AC Fail
reporting. See Section 3.1 for further information.
FlashScan Code
Label
Table 3.3 Addressing
CAUTION:
SLC Trouble Reporting must be selected when an AMPS-24 is connected to an NFS2-3030.
38 AMPS-24 Manual — P/N 51907:J2 02/26/2014
Page 39

Notes
AMPS-24 Manual — P/N 51907:J2 02/26/2014 39
Page 40

Notes
40 AMPS-24 Manual — P/N 51907:J2 02/26/2014
Page 41

Section 4: Power Supply Calculations
Calculations must be done to determine standby and alarm DC current loads. Ampere-hour
requirements must be calculated as well to determine battery size.
The AMPS-24 provides filtered 24VDC (nominal) power that may be used for operating external
devices. The power for operating external devices is limited. Use Table 4.1 to determine if external
loading is within the capabilities of the power supply.
4.1 Calculating the System Current Draws
When used as the main power supply, the AMPS-24 must be able to power all internal system
devices (and several types of external devices) continuously during non-fire alarm conditions. Use
column 1 in Table 4.1 to calculate the Non-Fire Alarm Load on the power supply when applying
primary power. The main power supply must also provide a finite amount of additional current
during a fire alarm condition. Use column 2 in Table 4.1 to calculate the additional current needed
during fire alarms. The requirements for non-fire alarm and fire alarm current loads cannot exceed
the capabilities of the power supply as listed below.
4.1.1 How to Use the Calculating Tables
In the following section, the term “secondary” refers to the AMPS-24’s backup batteries: the term
“primary” is reserved for the AMPS-24’s primary source of power, 120 VAC 50/60 Hz power
(240 VAC 50/60 Hz for the AMPS-24E). The term “standby” refers to the output current required
when no fire alarm is present. The term “alarm” refers to the output current required when a fire
alarm is present.
The Primary Non-Fire Alarm Current and Fire Alarm Current columns are DC current calculations.
Use these calculations to confirm that the AMPS-24 can provide enough current to support the
system during Primary Non-Fire Alarm and Fire Alarm conditions.
Quantities List the number of devices powered by the MAIN 24V Main Output (TB1), AUX 24
Output (TB3), and the AUX 24V Accessories Output (TB2 on the CPS-24). Devices powered by
the Accessories Outputs draw current directly from the AMPS-24. Devices powered by the Main
Output draw current through the fire panel’s connection to the power supply. Use these quantities to
calculate total current draw of each set of devices in calculation columns 1, 2, and 3.
Calculation Column 1 (Primary, Non-Fire Alarm Current in amps) Add the contents of
Column 1 to get the current drawn from the AMPS-24 during a non-fire alarm condition, with AC
power applied. See Section 2.7.1.
Calculation Column 2 (Primary, Fire Alarm Current in amps) Column 2 lets the system
designer determine the current load that the AMPS-24 must support during a fire alarm. See
Section 2.7.1.
Typically, a system should contain capacity to activate all output circuits and relays, and support
fire alarms on no less than 10% of Initiating Device Circuits, subject to the requirements of the
Authority Having Jurisdiction (AHJ).
If the system provides power for Notification Appliance Circuits, refer to the Device Compatibility
Document for 24 VDC notification appliances that are UL/ULC-listed for fire alarm systems.
Calculation Column 3 [Secondary (Battery) Non-Fire Alarm Current] Column 3 lets
the system designer calculate the non-fire alarm current drawn from the secondary source in a nonfire alarm condition during AC power loss. The non-fire alarm current is required to complete the
standby battery calculations. After summing all current draws, insert the total in Table 4.2.
AMPS-24 Manual — P/N 51907:J2 02/26/2014 41
Page 42

Power Supply Calculations Calculating the System Current Draws
4.1.2 Calculation for Main Supply Current
Quantities
TB3
AMPS-24 Terminal Blocks:
CPU-3030, CPU2-3030
Keyboard/Display Option
LCM-320 (refer to Doc. 51330,52544)
LEM-320 (refer to Doc. 51330,52 544)
†
SLC Loop
NCA, NCA-2 (Backlight ON)
NCA, NCA-2 (Backlight OFF)
NCM-W, NCM-F
HS-NCM-W/MF/SF/MFSF/WMF/WSF
‡
DPI-232
DVC components (Refer to DVC manual)
DVC-RPU components (Refer to DVC-RPU
manual)
DS-DB (Refer to the DS-DB manual) [ ] [ ] x [ ]= x [ ] x [ ]=
ICM-4RK, CRM-4RK
ICE-4
CRE-4
DCM-4RK
VCE-4
VCM-4RK
IZM-8RK
IZE-A
ARM-4 Auxiliary Relay [ ] [ ]
FSD-751RPL (Duct Detector) [ ] [ ] x [0.025]= x [0.087]= x [0.025]=
ACM-24AT
ACM-48A
AEM-24AT
AEM-48A
Maximum number of LEDs illuminated on
these annunciators during non-fire conditions:
AFM-16AT, AFM-3 2A
ACM-16AT, ACM- 32A
AEM-16AT, AEM-32A
TM-4
SCS-8 (refer to Doc. 15712)
AFM-16A
LCD-80
ACM-8R (refer to Doc. 15342)
LDM (refer to Doc. 15885)
UZC-256
AMG-1, AMG-E, ATG-2
FFT-7, FFT-7S
RM-1
FZM-1, MMX-2 [ ] [ ] x [0.0094]= x [0.090]= x [0.0094]=
XPIQ (Refer to Doc. 51013) [ ] [ ] x [ ]= x [ ]= x [ ]=
RPT-W, RPT-WF, RPT-F
RPT-485W, RPT-485WF
RFX [ ] [ ] x [ ]= x [ ]= x [ ]=
UDACT Communicator
UDACT-2 Communicator
VEC-25/50
with optional FC-AAM25
Four-Wire Smoke Detectors
Power Supervision Relay
(EOLR-1)
Compatible Devices not listed above
Main Output (MAIN 24, TB1) Sub-totals
††
AUX Output (AUX 24, TB3) Sub-totals
††
AMPS-24 [ ] x [0.13]=
Accessories Output (TB2 on CPS-24).
Enter 0.5 A in all white boxes if TB2 is in use.
Leave blank if not in use.
Local Energy Municipal B ox [ ]x [ ]=
Sum each column for totals Primary,
TB1
*
(MAIN 24)
(AUX 24)
1
N/A
1
N/A
[ ]
N/A
[ ]
N/A
[ ] N/A
[ ]
[ ]
[ ]
[ ]
[ ]
[ ]
[ ]
[ ]
[ ]
[ ]
[ ]
[ ]
[ ]
[ ]
[ ] [ ] x[ ]= x[ ]= x[ ]=
[ ]
N/A
[ ]
N/A
[ ]
N/A
[ ]
N/A
[ ]
N/A
[ ]
N/A
[ ]
N/A
[ ]
N/A
[ ]
[ ]
[ ]
[ ]
[ ]
[ ]
[ ]
[ ]
[ ] [ ] x [0.0054]= x [0.0054]=
[ ]
[ ]
[ ]
[ ]
[ ]
[ ]
[ ]
[ ]
[ ]
[ ]
[ ]
[ ]
[ ]
[ ]
[ ]
[ ]
[ ]
[ ]
[ ]
[ ]
[ ]
[ ]
[ ]
[ ]
[ ]
[ ]
[ ]
[ ]
[ ]
[ ]
[ ]
[ ]
[ ]
[ ]
[ ]
N/A
[ ]
N/A
[ ]
[ ]
[ ]
[ ]
[ ] [ ]
[ ]
[ ]
[ ]
[ ]
**
Calculation Column 1
Primary, Non-Fire Alarm
Current (amps)
X [current
draw]=
x [0.120]=
x [0.220]=
x [0.130]=
x [0.100]=
x [0.200]= 0 x [0.200]= 0 x [0.200]= 0
x [0.400]=
x [0.200]=
x [0.110]=
x [0.400]=
x [ ]
x [ ]=
x [ ]=
x [0.007]=
x [0.001]=
N/A
x [0.008]=
x [0.001]=
x [0.007]=
x [0.047]=
x [0.004]=
x [0.016]=
x [0.016]=
x [0.002]=
x [0.002]=
x [0.040]=
x [0.040]=
x [0.002]=
x [0.110]=
x [ ]=
x [0.025]=
x [0.100]=
x [ ]=
x [ ]=
x [0.035]=
x [0.060]=
x [0.060]=
x [0.020]=
x [0.017]=
x [0.049]=
x [0.040]=
x [0.052]=
x [0.215]=
x [0.245]=
x [ ]=
x [ ]=
x [0.020]= x [0.020]= x [0.020]=
x [ ]=
x [ ]=
Primary,
non-alarm:
Primary,
non-alarm:
non-alarm:
Tota l o n :
TB1
(MAIN 24)
0.12
0.2200
TB3
(AUX 24)
0
0
0
0
0
0
0
0
0
0
Calculation Column 2
Primary, Fire Alarm
Current (amps)
X [current
draw]=
x [0.120]=
x [0.220]=
x [0.130]=
x [0.100]=
x [0.400]=
x [0.200]=
x [0.110]=
x [0.400]=
x [ ]=
x [ ]=
x [ ]=
x [0.072]=
x [0.065]=
x [0.065]=
x [0.080]=
x [0.040]=
x [0.040]=
x [0.047]=
x [0.003]=
x [0.146]=
x [0.070]=
x [0.070]=
x [0.056]=
x [0.056]=
x [0.056]=
x [0.056]=
x [0.018]=
x [0.175]=
x [ ]=
x [0.065]=
x [0.100]=
x [ ]=
x [ ]=
x [0.085]=
x [0.060]=
x [0.120]=
x [0.020]=
x [0.017]=
x [0.049]=
x [0.100]=
x [0.087]=
x [1.215]=
x [2.215]=
x [ ]=
x [ ]=
x [ ]=
x [ ]=
Primary,
alarm:
Primary,
alarm:
Primary,
alarm:
Tota l o n :
TB1
(MAIN 24)
0.12
0.2200
TB3
(AUX 24)
0
0
0
0
0
0
0
0
0
0
Calculation Column 3
Secondary, Non-Fire Alarm
Current (amps)
X [current
draw]=
x [0.120]=
x [0.220]=
x [0.130]=
x [0.100]=
x [0.400]=
x [0.200]=
x [0.110]=
x [0.400]=
x [ ]=
x [ ]=
x [ ]=
x [0.007]=
x [0.001]=
N/A
x [0.008]=
x [0.001]=
x [0.007]=
x [0.047]=
x [0.004]=
x [0.016]=
x [0.016]=
x [0.002]=
x [0.002]=
x [0.040]=
x [0.040]=
x [0.002]=
x [0.110]=
x [ ]=
x [0.025]=
x [0.050]=
x [ ]=
x [ ]=
x [0.035]=
x [0.060]=
x [0.060]=
x [0.020]=
x [0.017]=
x [0.049]=
x [0.040]=
x [0.052]=
x [0.215]=
x [0.245]=
x [ ]=
x [ ]=
x [ ]=
x [ ]=
Secondary,
non-alarm:
Secondary,
non-alarm:
Secondary,
non-alarm:
Tot al on:
TB1
(MAIN 24)
0.1200
TB3
(AUX 24)
0
0
0
0
0
0
0
0
0
0
0
Table 4.1 System Draw Current Calculations
* Devices powered by the Main Output (MAIN 24, TB1) draw current through the fire panel’s connection to the power supply.
† Value represents an SLC’s maximum current draw. Refer to device datasheets for individual current draws. Total device current cannot exceed 200mA.
‡ Current consumption of the DPI-232 is dependent upon the baud rate selection (via slide switch on the DPI-232). See DPI-232 manual for details.
** Refer to manual and/or Device Compatibility Document.
†† Refer to Table 1.1, “Output Current for Each Configuration,” on page 8 to determine the maximum current for your configuration.
42 AMPS-24 Manual — P/N 51907:J2 02/26/2014
Page 43

Calculating the System Current Draws Power Supply Calculations
4.1.3 Calculating the Maximum Secondary Power Non-Fire Alarm Current Draw
Use the table below to determine the maximum current requirements of the secondary power
source during non-fire alarm conditions. The result obtained is the amount of current that the
batteries must be able to supply to the fire alarm system. Use the result in Table 4.4 to determine the
size of the batteries needed for the fire alarm system.
Results taken from the table below assume that, while in a non-fire alarm condition, batteries must
feed the AMPS-24 (and any additional supplies) with the maximum rated power each supply can
provide.
Alarm
Device Quantity
Current
(in amps)
Alarm Current, from Table 4.1, col 3 =
Additional Load [ ] X =
Sum Column for Secondary Non-Fire Alarm Load =
Tota l
Current/Type
Table 4.2 Maximum Secondary Power Non-Fire Alarm Current Draw
4.1.4 Calculating the Maximum Secondary Power Fire Alarm Current Draw
Use the table below to determine the maximum current requirements of the secondary power
source during fire alarm conditions. The result obtained is the amount of current that the batteries
must be able to supply to the fire alarm system. Use the result in Table 4.4 to determine the size of
the batteries needed for the fire alarm system.
Results taken from the table below assume that, while in a fire alarm condition, batteries must feed
the AMPS-24 (and any additional supplies) with the maximum rated power each supply can
provide.
Alarm
Device Quantity
Current
(in amps)
Alarm Current, from Table 4.1, col 2 =
Additional Load [ ] X =
Sum Column for Secondary Fire Alarm Load =
Table 4.3 Maximum Secondary Power Fire Alarm Current Draw
Tota l
Current/Type
AMPS-24 Manual — P/N 51907:J2 02/26/2014 43
Page 44

Power Supply Calculations Calculating the Battery Requirements
4.2 Calculating the Battery Requirements
4.2.1 Calculating the Battery Capacity
Use this table to determine the battery capacity needed for the system:
Current (amps) X Time (hours) = _________AH
Secondary Non-Fire
Alarm Current (from
Table 4.2)
Required Secondary Non-Fire Alarm
Standby Time (24 or 60 hours)
________________
Secondary Fire Alarm
Load (from Table 4.2)
________________ X
Sum Column for Total Secondary Amp Hours calculated = _________AH
Multiply by the derating factor x 1.2 (See Note 7) = _________AH
Battery Size – Total Secondary Amp Hours Required = __________AH
* Following are decimal conversions for standard numbers of minutes:
5 minutes
10 minutes
15 minutes
30 minutes
60 minutes
120 minutes
0.084
0.167
0.250
________________ = _________AH
X
Required Fire Alarm Standby Time:*
________________
= _________AH
0.5
1.0
2.0
Table 4.4 Secondary Power Standby and Fire Alarm Load
The following notes apply to Table 4.4:
1. NFPA 72 Local, Proprietary, Central Station, Auxiliary and Remote systems requires 24 hours
of standby power followed by 5 minutes in alarm.
2. Older NFPA standards and certain jurisdictions require 60 hours or standby power followed by
5 minutes in alarm. Verify this requirement with the AHJ.
3. Batteries installed in a system powered by an automatic starting engine generator need to
provide at least 4 hours of standby power.
4. Factory Mutual requires 90 hours of standby for deluge-preaction systems.
5. Emergency voice/alarm communications systems require 2 hours of operation in the alarm
condition. Due to the sporadic nature of voice operation, however, NFPA 72 permits 15
minutes of operation at a maximum connected load to equal 2 hours of normal use.
6. If the total exceeds 200 AH, an Uninterruptable Power Supply with sufficient amp-hour
capacity is needed. The Uninterruptable Power Supply must be UL-listed for Fire-Protective
Signaling.
7. The following battery derating factors must be used for Canadian installations using an
AMPS-24 charger:
• For 7 AH capacity, use derating factor of 1.1
• For 12 AH capacity, use derating factor of 1.2
• For 26 AH capacity, use derating factor of 1.2
• For 55 AH capacity, use derating factor of 1.8
• For 100 – 200 AH capacity, use derating factor of 2.5
44 AMPS-24 Manual — P/N 51907:J2 02/26/2014
Page 45

Calculating the Battery Requirements Power Supply Calculations
4.2.2 Calculating the Battery Size
Use this table to choose the battery size, in amp-hours, needed to support the fire alarm system. The
AMPS-24 can charge batteries from 7 to 200 AH. Select batteries that meet or exceed the Total
Amp-Hours calculated in Table 4.4 and that are within the acceptable battery charger range. Write
the amp-hours requirements on the Protected Premises label.
Battery Size
7 AH 12 volts two BAT-1270 CABS-PS1, SBB-A4, SBB-B4,
12 AH 12 volts two BAT-12120 CABS-PS1, SBB-A4, SBB-B4,
26 AH 12 volts two BAT-12260 SBB-A4, SBB-B4,
55 AH 12 volts two for 55 AH
100 AH 12 volts two for 100 AH
Voltage
Rating
Number Required
four for 110 AH
four for 200 AH
Our Part
Number
BAT-12550 BB-55, NFS-LBB
BAT-121000 BB-100
*
Backbox
(Order Part Number)
SBB-C4, SBB-D4, EQBB-B4,
EQBB-C4, EQBB-D4, BB-25
SBB-C4, SBB-D4, EQBB-B4,
EQBB-C4, EQBB-D4, BB-25
SBB-C4, SBB-D4, EQBB-B4,
EQBB-C4, EQBB-D4, BB-25
BB-100
BB-200
Table 4.5 Selecting the Battery Size
* Manufactured to our specifications by PoweSonic.
† Red version available for non-EQCAB models; add “R” to part number listed here.
†
NOTE: Battery size is limited to 7 AH minimum and 200 AH maximum using the internal AMPS-24
battery charger.
AMPS-24 Manual — P/N 51907:J2 02/26/2014 45
Page 46

Appendix A: Compatibility with Other Systems
A.1 XLS3000
The AMPS-24 is UL/ULC-listed for use with the XLS3000.
Installation, programming, and operation of the AMPS-24 with the XLS3000 is as described in this
manual.
Refer to the XLS3000 Installation manual (P/N 52509) for more information about connecting to
this power supply.
A.1.1 Power Supply Calculations
Table A.1 on the following page provides Honeywell-specific current draw calculations for
devices powered by the AMPS-24. This table replaces Table 4.1 on page 42 when AMPS-24 is
used to power XLS3000 systems.
46 AMPS-24 Manual — P/N 51907:J2 02/26/2014
Page 47

XLS3000 Compatibility with Other Systems
A.1.2 Calculation for Main Supply Current
Quantities
TB1
AMPS-24 Terminal Blocks:
XLS3000-CPU,
Keyboard/Display Option
XLS-ELCM-320, LCM-320 (refer to Doc.
52509)
XLS-ELEM-320, LEM-320 (refer to Doc.
52509)
SLC Loop†
XLS-NCA, XLS-NCA-2 (Backlight ON)
XLS-NCA, XLS-NCA-2 (Backlight OFF)
NCM-W, NCM-F
HS-NCM-W/MF/SF/MFSF/WMF/WSF
DPI-232‡
XLS-DVC components (Refer to manual)
DVC-RPU components (Refer to DVC-RPU
manual)
DS-DB (Refer to the DS-DB manual) [ ] [ ] x [ ]= x [ ] x [ ]=
TC806D1059 (Duct Detector) [ ] [ ]
ACM-24AT
ACM-48A
AEM-24AT
AEM-48A
Maximum number of LEDs illuminated on
these annunciators during non-fire
conditions:
TM-4
SCS-8 (refer to Doc. 15712)
AFM-16A
LCD-80
ACM-8R (refer to Doc. 15342)
LDM (refer to Doc. 15885)
UZC-256
AMG-1, AMG-E, ATG-2
FFT-7, FFT-7S
RM-1
TC841A1000, XLS-MM-Z [ ] [ ] x [0.0094]= x [0.090]= x [0.0094]=
XPIQ (Refer to Doc. 51013) [ ] [ ] x [ ]= x [ ]= x [ ]=
RPT- W, R PT- WF, RP T-F
RPT-485W, RPT-485WF
RFX [ ] [ ] x [ ]= x [ ]= x [ ]=
UDACT Communicator
UDACT-2 Communicator
VEC-25/50
with optional FC-AAM25
Four-Wire Smoke Detectors
Power Supervision Relay
(A77-716B)
Compatible Devices not listed above
Main Output (MAIN 24, TB1) Sub-totals
††
AUX Output (AUX 24, TB3) Sub-totals
††
AMPS-24
Accessories Output (TB2 on CPS-24).
Enter 0.5 A in all white boxes if TB2 is in
use. Leave blank if not in use.
Local Energy Municipal Box
Sum each column for totals Primary,
**
TB3
*
(AUX 24)
(MAIN 24)
1
N/A
1
N/A
[ ]
N/A
[ ]
N/A
[ ] N/A x [0.200]= 0 x [0.200]= 0 x [0.200]= 0
[ ]
[ ]
[ ]
[ ]
[ ]
[ ]
[ ]
[ ]
[ ]
[ ]
[ ]
[ ]
[ ]
[ ]
[ ] [ ] x[ ]= x[ ]= x[ ]=
[ ]
[ ]
[ ]
[ ]
[ ]
[ ]
[ ]
[ ]
[ ] [ ] x [0.0054]= x [0.0054]=
[ ]
[ ]
[ ]
[ ]
[ ]
[ ]
[ ]
[ ]
[ ]
[ ]
[ ]
[ ]
[ ]
[ ]
[ ]
[ ]
[ ]
[ ]
[ ]
[ ]
[ ]
[ ]
[ ]
[ ]
[ ]
[ ]
[ ]
[ ]
[ ]
N/A
[ ]
N/A
[ ]
[ ]
[ ]
[ ]
[ ] [ ] x [0.020]= x [0.020]= x [0.020]=
[ ]
[ ]
[ ]
[ ]
Calculation Column 1
Primary, Non-Fire Alarm
Current (amps)
X [current
draw]=
x [0.120]=
x [0.220]=
x [0.130]=
x [0.100]=
x [0.400]=
x [0.200]=
x [0.110]=
x [0.400]=
x [ ]
x [ ]=
x [ ]=
x [0.025]= x [0.087]= x [0.025]=
x [0.016]=
x [0.016]=
x [0.002]=
x [0.002]=
x [0.110]=
x [ ]=
x [0.025]=
x [0.100]=
x [ ]=
x [ ]=
x [0.035]=
x [0.060]=
x [0.060]=
x [0.020]=
x [0.017]=
x [0.049]=
x [0.040]=
x [0.052 ]=
x [0.215]=
x [0.245]=
x [ ]=
x [ ]=
x [ ]=
x [ ]=
Primary,
non-alarm:
Primary,
non-alarm:
non-alarm:
Tot al on:
TB1
(MAIN 24)
0.12
0.2200
TB3
(AUX 24)
0
0
Calculation Column 2
Primary, Fire Alarm
Current (amps)
X [current
draw]=
x [0.120]=
x [0.220]=
x [0.130]=
x [0.100]=
x [0.400]=
x [0.200]=
x [0.110]=
x [0.400]=
x [ ]=
x [ ]=
x [ ]=
x [0.070]=
x [0.070]=
x [0.056]=
x [0.056]=
x [0.175]=
x [ ]=
x [0.065]=
x [0.100]=
x [ ]=
x [ ]=
x [0.085]=
x [0.060]=
x [0.120]=
x [0.020]=
x [0.017]=
x [0.049]=
x [0.100]=
x [0.087]=
x [1.215]=
x [2.215]=
x [ ] =
x [ ] =
x [ ]=
x [ ] =
Primary,
alarm:
Primary,
alarm:
[ ]x [
]=
Primary,
alarm:
Tot al o n :
TB1
(MAIN 24)
0.12
0.2200
TB3
(AUX 24)
0
0
Calculation Column 3
Secondary, Non-Fire Alarm
Current (amps)
X [current
draw]=
x [0.120]=
x [0.220]=
x [0.130]=
x [0.100]=
x [0.400]=
x [0.200]=
x [0.110]=
x [0.400]=
x [ ]=
x [ ]=
x [ ]=
x [0.016]=
x [0.016]=
x [0.002]=
x [0.002]=
x [0.110]=
x [ ]=
x [0.025]=
x [0.050]=
x [ ]=
x [ ]=
x [0.035]=
x [0.060]=
x [0.060]=
x [0.020]=
x [0.017]=
x [0.049]=
x [0.040]=
x [0.052]=
x [0.215]=
x [0.245]=
x [ ]=
x [ ]=
x [ ]=
x [ ]=
Secondary,
non-alarm:
Secondary,
non-alarm:
[ ] x
[0.13]=
Secondary,
non-alarm:
Tota l o n :
TB1
(MAIN 24)
0.1200
TB3
(AUX 24)
0
0
0
Table A.1 System Draw Current Calculations
* Devices powered by the Main Output (MAIN 24, TB1) draw current through the fire panel’s connection to the power supply.
† Value represents an SLC’s maximum current draw. Refer to device datasheets for individual current draws. Total device current cannot exceed 200mA.
‡ Current consumption of the DPI-232 is dependent upon the baud rate selection (via slide switch on the DPI-232). See DPI-232 manual for details.
** Refer to manual and/or Device Compatibility Document.
†† Refer to Table 1.1, “Output Current for Each Configuration,” on page 8 to determine the maximum current for your configuration.
AMPS-24 Manual — P/N 51907:J2 02/26/2014 47
Page 48

Index
Numerics
24VDC 41
unsupervised output
485
21
20, 21
A
AC loss detection, delay 7
Address block
address block
address decade
Addressing
Rotary switch, setting address with
SLC addresses
SW3,setting address with
30, 31
30
31
30
30
31
B
Base address 30
last digit 0 or 5
lowest for AMPS-24
Base address, Setting the
Batteries
Battery calculations
Battery charger
Battery/battery charger supervision
BB-25 Cabinet
Board Layout
Brownout detection
7, 16, 17, 25
supervision
31
31
31, 32
7
41, 43–45
7, 26, 45
10, 16, 18
11
7
C
CAB-4 Series Backbox 10, 14, 18
Charge Selection Switch (SW4)
CLIP (Classic Interface Protocol)
26
D
DS-DB 21, 22, 23, 42, 47
DVC-RPU
42, 47
G
General purpose power 21
Ground fault detection
grounding the AMPS-24
28, 29
14
H
Heat Dissipation Calculation Document 10
I
Installation
31
in a BB-100 Cabinet
in a BB-200 Cabinet
in a BB-25 Cabinet
in a CAB-4 Series Backbox
in an EQ Series Cabinet
Installation Standards and Codes
16
17
16
14
15
9
K
keps nuts 16
L
LED Indicators 12
7
7
M
Monitor AC Fail 38
Monitor Battery
Monitor Charger Fault
Monitor Earth Fault
Monitor General
38
30, 38
38
N
NCA-2 21, 30, 42
Network Annunciator
network annunciator
NFS2-3030
NFS-LBB Cabinet
21, 30, 38, 42
37
10
38
21
E
EIA-485
and address consumption
Electrical connections
EQ Cabinet Series
10
20
30
F
Five-point trouble reporting 7
FlashScan
AMPS-24 Manual — P/N 51907:J2 02/26/2014 48
7
P
Panel Display 38
Panel Programming
Panel Addressing
SLC addresses
Software Type ID Codes
Power
AC Power
DC Power
Installation steps
Power specifications
24
25
37
37
38
38
20
20
Page 49

Index R–X
Power supply calculations 41, 43–45
see also XLS3000
R
Rotary Switch 31
setting address decade
31
S
Selectable charger current
see also Charge Selection Switch
self-threading screws
SLC
23
Address Selection
determining address block size
Wiring
20
Snap-on cover
Specifications
AC power
AUX 24V output circuit
Main 24V output circuit
Primary Power
Secondary Power (Battery) Charging Cir-
Secondary Power AUX outputs
SLC Circuit
Trouble bus
USB
8
SW3
31
System current draws
14
7
7
cuit
14
32
30
8
8
7
7
7
8
8
41, 43–45
T
Trouble Reporting 34, 36, 38
Types
30
Type ID Codes
38
U
USB
cable
32, 33
V
VeriFire Tools 37
W
Wire size 7, 8
Wiring
18–29
Nonpower-limited
Power-limited
18
18
X
XLS3000 46
XLS-3000-CPU
XLS-NCA-2
47
47
AMPS-24 Manual — P/N 51907:J2 02/26/2014 49
Page 50

X–X Index
50 AMPS-24 Manual — P/N 51907:J2 02/26/2014
Page 51

Manufacturer Warranties and Limitation of Liability
Manufacturer Warranties. Subject to the limitations set forth herein,
Manufacturer warrants that the Products manufactured by it in its
Northford, Connecticut facility and sold by it to its authorized
Distributors shall be free, under normal use and service, from defects
in material and workmanship for a period of thirty six months (36)
months from the date of manufacture (effective Jan. 1, 2009). The
Products manufactured and sold by Manufacturer are date stamped at
the time of production. Manufacturer does not warrant Products that
are not manufactured by it in its Northford, Connecticut facility but
assigns to its Distributor, to the extent possible, any warranty offered
by the manufacturer of such product. This warranty shall be void if a
Product is altered, serviced or repaired by anyone other than
Manufacturer or its authorized Distributors. This warranty shall also
be void if there is a failure to maintain the Products and the systems in
which they operate in proper working conditions.
MANUFACTURER MAKES NO FURTHER WARRANTIES, AND
DISCLAIMS ANY AND ALL OTHER WARRANTIES, EITHER
EXPRESSED OR IMPLIED, WITH RESPECT TO THE PRODUCTS,
TRADEMARKS, PROGRAMS AND SERVICES RENDERED BY
MANUFACTURER INCLUDING WITHOUT LIMITATION,
INFRINGEMENT, TITLE, MERCHANTABILITY, OR FITNESS FOR
ANY PARTICULAR PURPOSE. MANUFACTURER SHALL NOT BE
LIABLE FOR ANY PERSONAL INJURY OR DEATH WHICH MAY
ARISE IN THE COURSE OF, OR AS A RESULT OF, PERSONAL,
COMMERCIAL OR INDUSTRIAL USES OF ITS PRODUCTS.
This document constitutes the only warranty made by Manufacturer
with respect to its products and replaces all previous warranties and is
the only warranty made by Manufacturer. No increase or alteration,
written or verbal, of the obligation of this warranty is authorized.
Manufacturer does not represent that its products will prevent any loss
by fire or otherwise.
Warranty Claims. Manufacturer shall replace or repair, at
Manufacturer's discretion, each part returned by its authorized
Distributor and acknowledged by Manufacturer to be defective,
provided that such part shall have been returned to Manufacturer with
all charges prepaid and the authorized Distributor has completed
Manufacturer's Return Material Authorization form. The replacement
part shall come from Manufacturer's stock and may be new or
refurbished. THE FOREGOING IS DISTRIBUTOR'S SOLE AND
EXCLUSIVE REMEDY IN THE EVENT OF A WARRANTY CLAIM.
Warn-HL-08-2009.fm
AMPS-24 Manual — P/N 51907:J2 02/26/2014 51
Page 52

World Headquarters
12 Clintonville Road
Northford, CT 06472-1610 USA
203-484-7161
fax 203-484-7118
www.notifier.com
 Loading...