

Page 1
ALL-SPEC_Unit_HON.doc 07/2011 1/9
Installation Instructions for
Honeywell ALL-SPEC Air Sampling Smoke Detection System
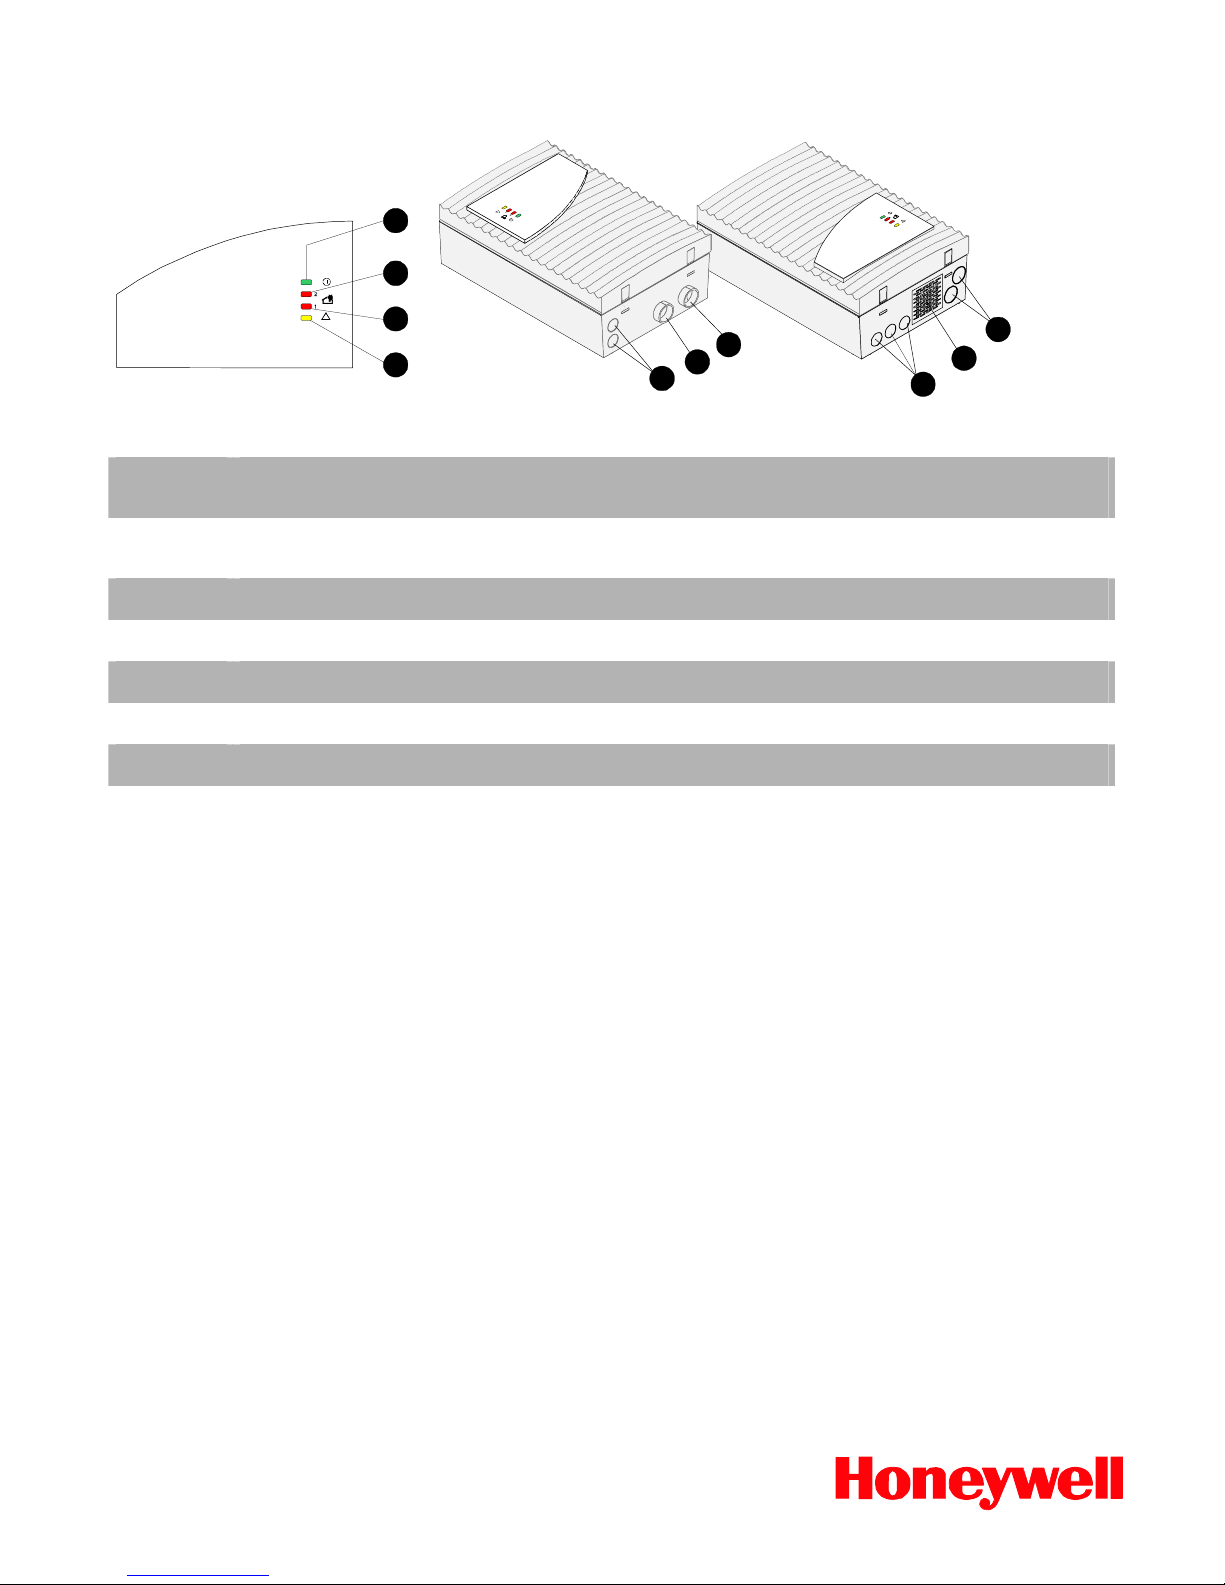
1 Operating indicator light
2 Alarm indicator light for detector
module II
3 Alarm indicator light for detector
module I
4 Indicator light for common fault
5 Pre-punched cable entries for connection to the central fire panel or power supply (input/output)
6 Connection pipe system I
7 Connection pipe system II
8 Connection for air return
8
5
5
1
2
6
7
5
3
4
Page 2
ALL-SPEC_Unit_HON.doc 07/2011 2/9
Installation of the Detector Module
Please note:
Only the detector modules of the type ASD-TP-05, ASD-TP-01 and ASD-TP-001 that have been approved by the VdS-certification authority with the
approval number G 202064 may be used.
1. Carry out the following works only if the device is powered down.
2. Open the device by carefully unlocking the housing snap-in closures by means of a screwdriver. Then lift the housing lid a little bit.
3. Carefully pull the connection cable of the display board off and remove the housing lid.
Note:
Shall the device only be provided with one detector module, please skip to point 6. Shall the device however be provided with two modules please
follow the following instructions.
4. If you want to install a second detector module you have to recover carefully the ventilator cover for the second air sampling duct (self-adhesive
plastic cover). Take for this if necessary a screwdriver.
5. Break carefully the clasp for the connection of the second pipe system (predetermined breaking point, marked by “II“) with a screwdriver from the
housing.
Note:
The knocked clasp is to removed completely from the device.
6. Make the required settings at the detector module by setting the contacts of switch S1 accordingly (see also “Settings of the detector module”).
7. Carefully spread a bit the support clamps used to fix the detector module in the corresponding mounting position.
8. Carefully place the detector module in between them until it audibly snaps in and thus is fixed by the support clamps.
Note:
Make sure that the inserted detection module is fixed tight and save by the brackets by pressing the brackets additional by hand.
9. Connect the detector module via the ribbon cable with the connection “Head 1” (detector module I) or “Head 2” (detector module II) to the base
board. Note the labelling of the base board.
10. Reconnect the display board to the base board. Note the connections and labelling of the base board.
9
S1
8
10
7
6
5
8
4
4
Page 3
ALL-SPEC_Unit_HON.doc 07/2011 3/9
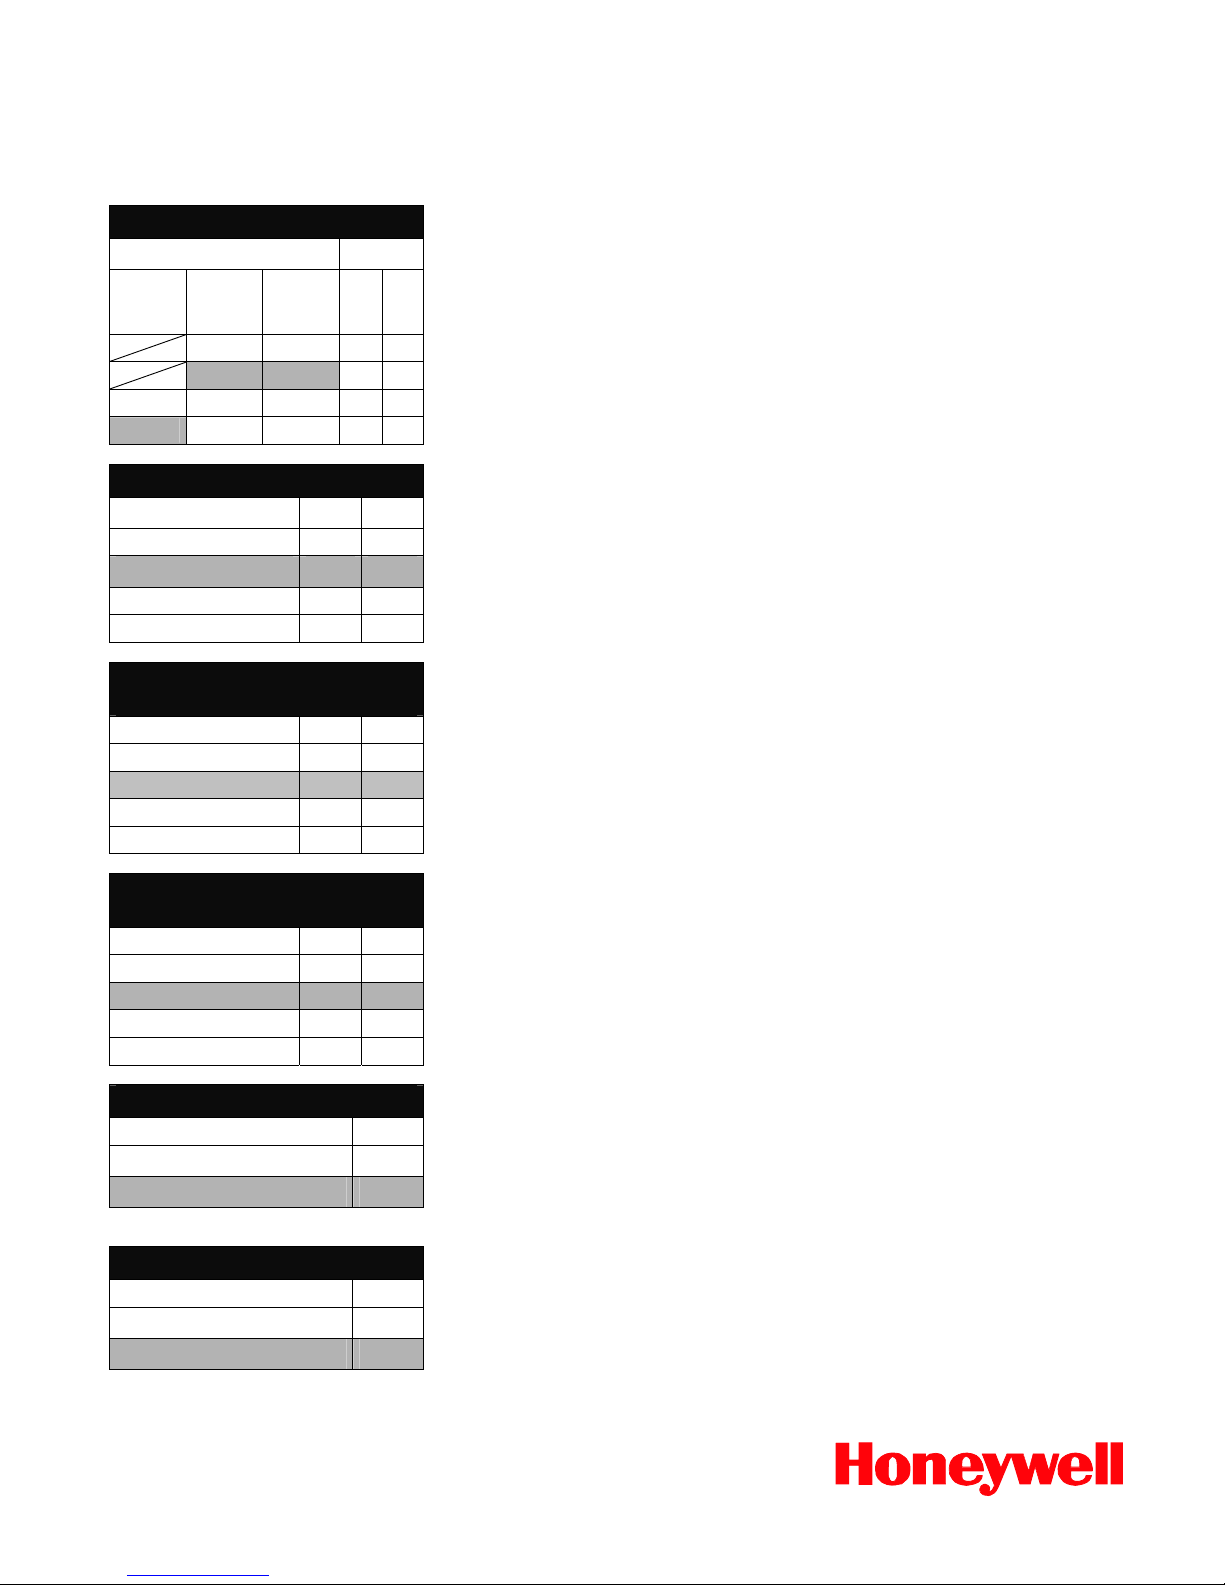
Detector Module Settings
In the following tables the switch S1 has two positions:
on off
The standard settings have a grey background.
Setting the response sensitivity
detector module
DM-TP-
50
DM-TP-
10
DM-TP-
01
S1. 1
S1. 2
0,8 %/m 0,12 %/m
on on
0,4 %/m 0,06 %/m
off on
1,0 %/m
0,2 %/m 0,03 %/m
on off
0,5 %/m 0,1 %/m 0,015%/m
off off
Setting the alarm delay
S1. 3 S1. 4
0 seconds off off
10 seconds on off
30 seconds off on
60 seconds on on
Setting the activating threshold
“air flow fault”
S1. 5 S1. 6
I on off
II off on
III off off
IV on on
Setting the delay
“air flow fault”
S1. 7 S1. 8
0.5 minutes off on
2 minutes on off
15 minutes on on
60 minutes off off
Setting the fault signal
S1. 9
non-latched off
latched on
Setting LOGIC
⋅
SENS
S1.10
off off
on on
Page 4

ALL-SPEC_Unit_HON.doc 07/2011 4/9
12
JU2
3
JU2
12
JU3
3
JU3
HEAD 1 HEAD 2DIAG DISPLAY
X5
21
JU2
JU3
213
JU2
213
X1 X2 X3 X4
JU4
12
JU1
JU1
12
JU4
JU4
Choose number of the detector modules
The number of fitted detector modules are chosen with the jumper JU4. The following table shows, whether the jumper must be put or not:
X = pin pair bridge
O = pin pair open
The standard settings have a grey background.
Choose number of the detector
modules
Jumper
Pin No.
JU4,
1+2
1 detector module X
2 detector module O
Setting the ventilator voltage
Jumper JU1 allows to set the ventilator voltage on the base board. The following table shows whether the jumper is set or not:
X = pin pair bridged
O = pin pair open
The standard setting has a grey background.
Setting the ventilator voltage
Jumper
Pin No.
JU1,
1+2
6,9 V X
9 V O
Page 5

ALL-SPEC_Unit_HON.doc 07/2011 5/9
Setting the function of the fault contact
The contact type (break contact or make contact) of the collective fault is set using the jumper JU 2 and JU 3.
Fault contact detector module I = Jumper JU2
Fault contact detector module II = Jumper JU3
The following table shows the positioning of the jumpers:
X = pin pair bridge
O = pin pair open
The standard settings have a grey background.
Setting the collective fault contact
Jumper
Pin No.
JU2/3
1+2
JU2/3
2+3
break contact X O
make contact O X
AB
Device Supports
A
B
Support type MT-1
horizontal installation
Support type MT-1
vertical installation
Page 6

ALL-SPEC_Unit_HON.doc 07/2011 6/9
Installation of the device
General information:
- When choosing the installation location make sure the displays of the device are clearly visible.
- Screw the air sampling smoke detection system either directly to the wall with its bottom casing or mount it by means of a special support (type
MT-1). This support allows to mount the device also to racks for example.
- The air outlet of the device must not be blocked. (The distance between the air outlet and adjacent objects (e.g. wall) is to be at least 10 cm.)
- The air sampling smoke detection system can be mounted with the air sampling pipe connector(s) pointing upwards or downwards (If necessary,
turn the housing-lid by 180° ). If the air sampling pipe connector(s) point downwards make sure no impurities enter the air outlet which then
points upwards.
Procedure:
1. First, clearly mark the fixing points for mounting the device. If necessary, use the provided drilling jig. Fix the device using four screws (max. ∅
of 6 mm for wall mounting and max. ∅ of 4 mm for mounting by means of the device support MT-1) in order to guarantee a safe fixing and to
limit vibrations which occur.
2. Fix the device by means of four screws in accordance with the mounting type to the wall or the device support. Make sure the device is not fixed
under mechanical tension or the screws are not tightened too much. Otherwise the device might be damaged, or unintended. secondary noise
may arise.
Note:
To balance unevenness and/or to avoid vibrations vibration dampers need to be installed.
3. Carefully break out of the housing the required cable entries (max. 5 x M20 und 2 x M25). If required, use a screwdriver.
4. Carefully equip the cable entrie(s) according to requirements with M20 or M25 glands (2x M25, 1x M20 included in the delivery) by inserting
them into the corresponding cable entry/entries.
5. Pass the connection cable(s) (max. 1.5 mm²) required to wire the device through the suitable cable entry/entries into the device and cut it to the
required length within the device.
6. Wire the device according to the following connection diagram.
Page 7

ALL-SPEC_Unit_HON.doc 07/2011 7/9
X6
0V
+24V
9
8
7
6
5
4
3
2
1
1
2
3
4
5
6
7
8
9
internal connection base board
9
8
6
11
_
+
24 V
_
+
_
+
DJ 1191
or
DJ 1192
0V
+24V
X7
1
2
3
4
5
6
7
8
9
_
+
connection to central fire panel
DJ 1191
or
DJ 1192
2
1
7
6
5
4
3
connection to central fire panel
connection to central fire panel
connection to central fire panel
Connection
X6, 1
X6, 2
X6, 3
contact of the first alarm relay (make contact)
centre tap of first alarm relay
contact of the first alarm relay (break contact)
X6, 4
X6, 5
+ external response indicator for
first detector module
– external response indicator for
first detector module
X6, 6
X6, 7
+ 24 V reset input
0 V reset input
X6, 8
X6, 9
+ 24 V supply voltage
0 V supply voltage
X7, 1
X7, 2
fault contact 2nd detector module
(connection 1)
fault contact 2nd detector module
(connection 2)
X7,3
X7, 4
X7, 5
contact of the 2
nd
alarm relay
(make contact)
centre tap of 2
nd
alarm relay
contact of the 2
nd
alarm relay
X7, 6
X7, 7
+ external response indicator for 2nd
detector module
– external response indicator for 2nd
detector module
X7, 8
X7, 9
fault contact first detector module
(connection 1)
fault contact first detector module
(connection 2)
Page 8

ALL-SPEC_Unit_HON.doc 07/2011 8/9
S2
Flow-Init
Commissioning
1. Make sure first that the device has been in operation for at least 30 minutes prior to the air flow initialization in order to reach the operating temperature.
2. In order to initialize the connected pipe system, press the Flow-Init-button S2 (see figure) of the corresponding detector module until the green
operating indicator light of the device starts flashing. The initialization is terminated
after approx. 5 seconds. After a successful initialization the operating indicator light is lit permanently.
3. During and after initialization the pipe system must no longer be changed. Even the ventilator voltage of the device must no longer be modified
after initialization. Otherwise the initialization must be carried out again:
Page 9

ALL-SPEC_Unit_HON.doc 07/2011 9/9
Conformity certification pursuant to EU Construction Products Directive 89/106/EEC
• The conformity of the „air sampling smoke detector for fire detection and fire alarm systems in buildings“ according to DIN EN 54-20
has been established by a test at the VdS laboratory.
• The EC certificate of conformity has been issued by notified product certification body (ID no. 0786, VdS).
• The CE designation according to DIN EN 54-20 has been carried out.
0786
WAGNER Group GmbH
Schleswigstrasse 1 - 5 30853 Langenhagen
09
Nr. 0786 – CPD – 20685
EN 54-20: 2006
Air sampling smoke detector for fire detection
and fire alarm systems in buildings
0,015 % light obscuration/m
Class: A, B and C
0,1 % light obscuration/m
Class: A, B and C
0,5 % light obscuration/m
Class: A, B and C
Honeywell Life Safety Systems
140 Waterside Road
Hamilton Industrial Park
Leicester
LE5 1TN
Tel (+44) 116 246 2000
 Loading...