


11
Wireless WAN Communications with GSM/GPRS
Overview
Dolphin 7900 terminals can be configured with Wireless Wide Area Network (WWAN) via an integrated Siemens® GSM/GPRS
tri-band radio module.
GSM - GSM stands for Global System for Mobile communications. It is an open, non-proprietary wireless wide area networking
system that is constantly evolving and growing. One of its great strengths is international roaming capability, which provides
standardized dialing in more than 170 countries.
GPRS - GPRS stands for General Packet Radio Service. It is a non-voice value added service that allows packet switched data
and information to be instantly sent and received across a mobile telephone network.
Powering Up the GSM/GPRS Radio Driver
When the mobile computer is first initialized, the radio driver for the GSM module is installed. Before using the radio, make sure
that the GSM radio is powered up. For more information,
Tri-Band Antenna
Dolphin 7900 terminals configured with a GSM/GPRS
radio feature a tri-band antenna that supports 900,
1800 and 1900 MHz frequencies for worldwide mobile
applications.
see The Radio Manager on page 4-8.
Requirements
Using GMS/GPRS on a Dolphin 7900 terminal requires:
• a network subscription to a GSM/GPRS network (you need to know what service providers are in your geographic area), and
• a SIM card installed on the terminal.
Capabilities
Dolphin 7900 computers with integrated GSM/GPRS WWAN radios are optimized for the following two-way voice and data
communications:
• GSM voice data ("dial-up")
• SMS (Short Message Service) text messages
• GPRS Class 10 - data transmissions average. 40-60 Kbps (wireless network carrier dependent)
Dolphin® 7900 Mobile Computer User’s Guide - Prelim. Draft Rev (a) 11 - 1

SIM Card Installation
SIM stands for Subscriber Information Module. A SIM card stores the subscriber's personal information, GSM/GPRS radio
settings, security key, contacts, etc. SIM cards can be installed and removed from compatible mobile devices, enabling you to
switch devices without losing your personal information. SIM cards are obtained and activated by the network provider that
supports your GSM/GPRS network.
Requirements
Before installing the SIM card:
• The SIM card must be activated by the service provider.
• The terminal must be powered down.
To Install a SIM Card:
On the Dolphin 7900 terminal, the access door is located on the left, side panel; see Side Panel Features on page 3-6.
Note: The access door on the left side panel is not user-accessible in the field. A special Torx T8 tool from HHP is required to
loosen the screws; HHP part number 100001024.
1. Obtain HHP part number 100001024.
2. Power down the terminal and lay it down on a flat surface.
3. Unscrew the faceplate of the access door.
4. Insert your SIM card.
5. Place the SIM card door over the secured SIM card.
6. Secure the faceplate.
7. Power on the terminal to verify that the SIM card is working.
Note: If the SIM card is not installed properly, the Dialler screen will indicate that no SIM card is installed.
Do NOT power on the device with the SIM card installed and the access door still open. You must secure the faceplate
before you power on the device. Failure to do so will could result in damage to the terminal and will void the warranty.
!
11 - 2 Dolphin® 7900 Mobile Computer User’s Guide - Prelim. Draft Rev (a)
Using uPhone
The uPhone Application Suite contains three programs that function together to provide a complete voice, data, and text
messaging solution for a mobile device fitted with a radio modem:
• Dialler emulates a mobile phone and is used to make and receive telephone calls - Using the Dialler, page 11-6.
• Call Log enables you to view and manipulate a list of the most recent calls - Call Log, page 11-14.
• SMS Manager provides a text message handler similar to many email programs - SMS Manager, page 11-16.
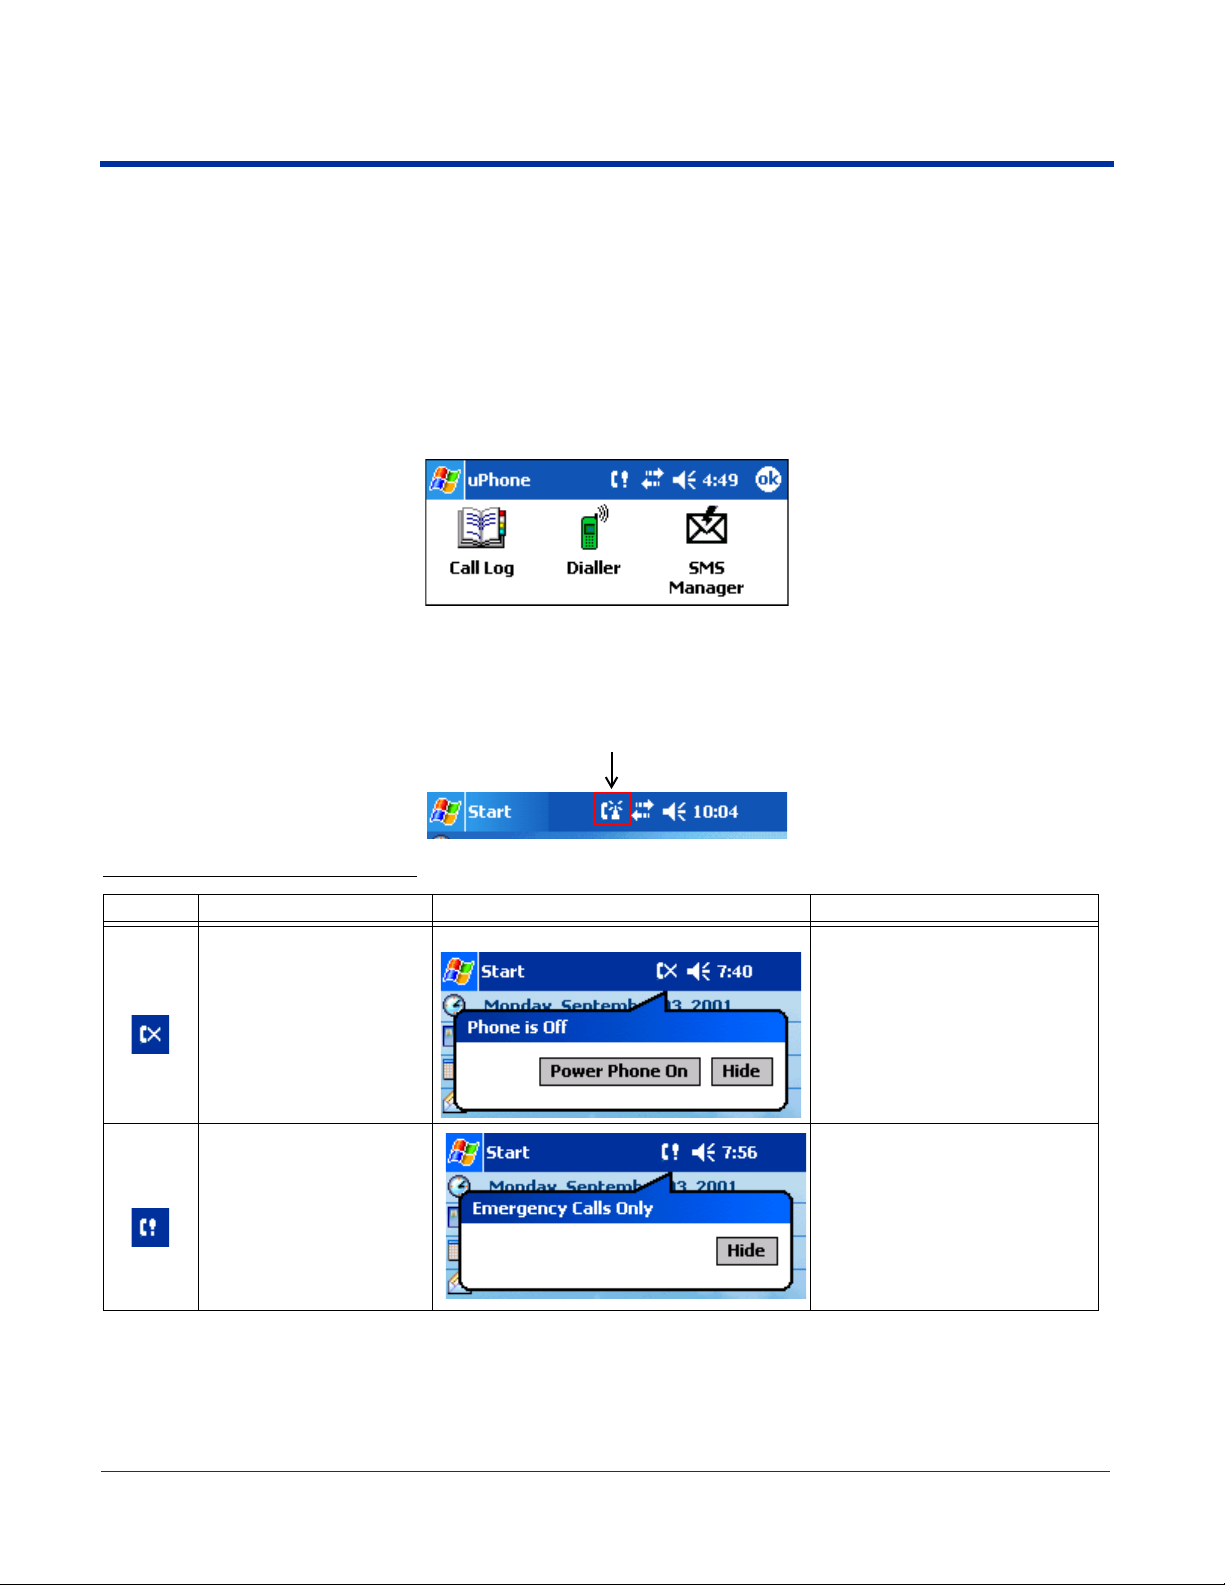
Accessing uPhone
Go to Start > Programs > uPhone. Tap one of the icons to launch the program.
Navigation Bar
When the Dialler or SMS Manager applications are not open, the icons in the Navigation bar at the top of the screen indicates
the status of the phone and messaging system. Each icon indicates s specific action and, when tapped, displays a bubble window
that lets you know what is happening.
Status Icons and Bubble Options
Icon This icon means… Tapping this icon displays this bubble: Bubble Options
The phone is off.
The phone can only make
emergency calls. This
usually means there is no
SIM card installed or PIN
number established.
Tap Power Phone On to turn the
phone on and close the bubble.
Tap Hide to leave the phone off
and close the bubble.
Tap Hide to dismiss the bubble.
This icon will appear in the
Navigation bar until a SIM card is
installed or a PIN is entered.
Dolphin® 7900 Mobile Computer User’s Guide - Prelim. Draft Rev (a) 11 - 3
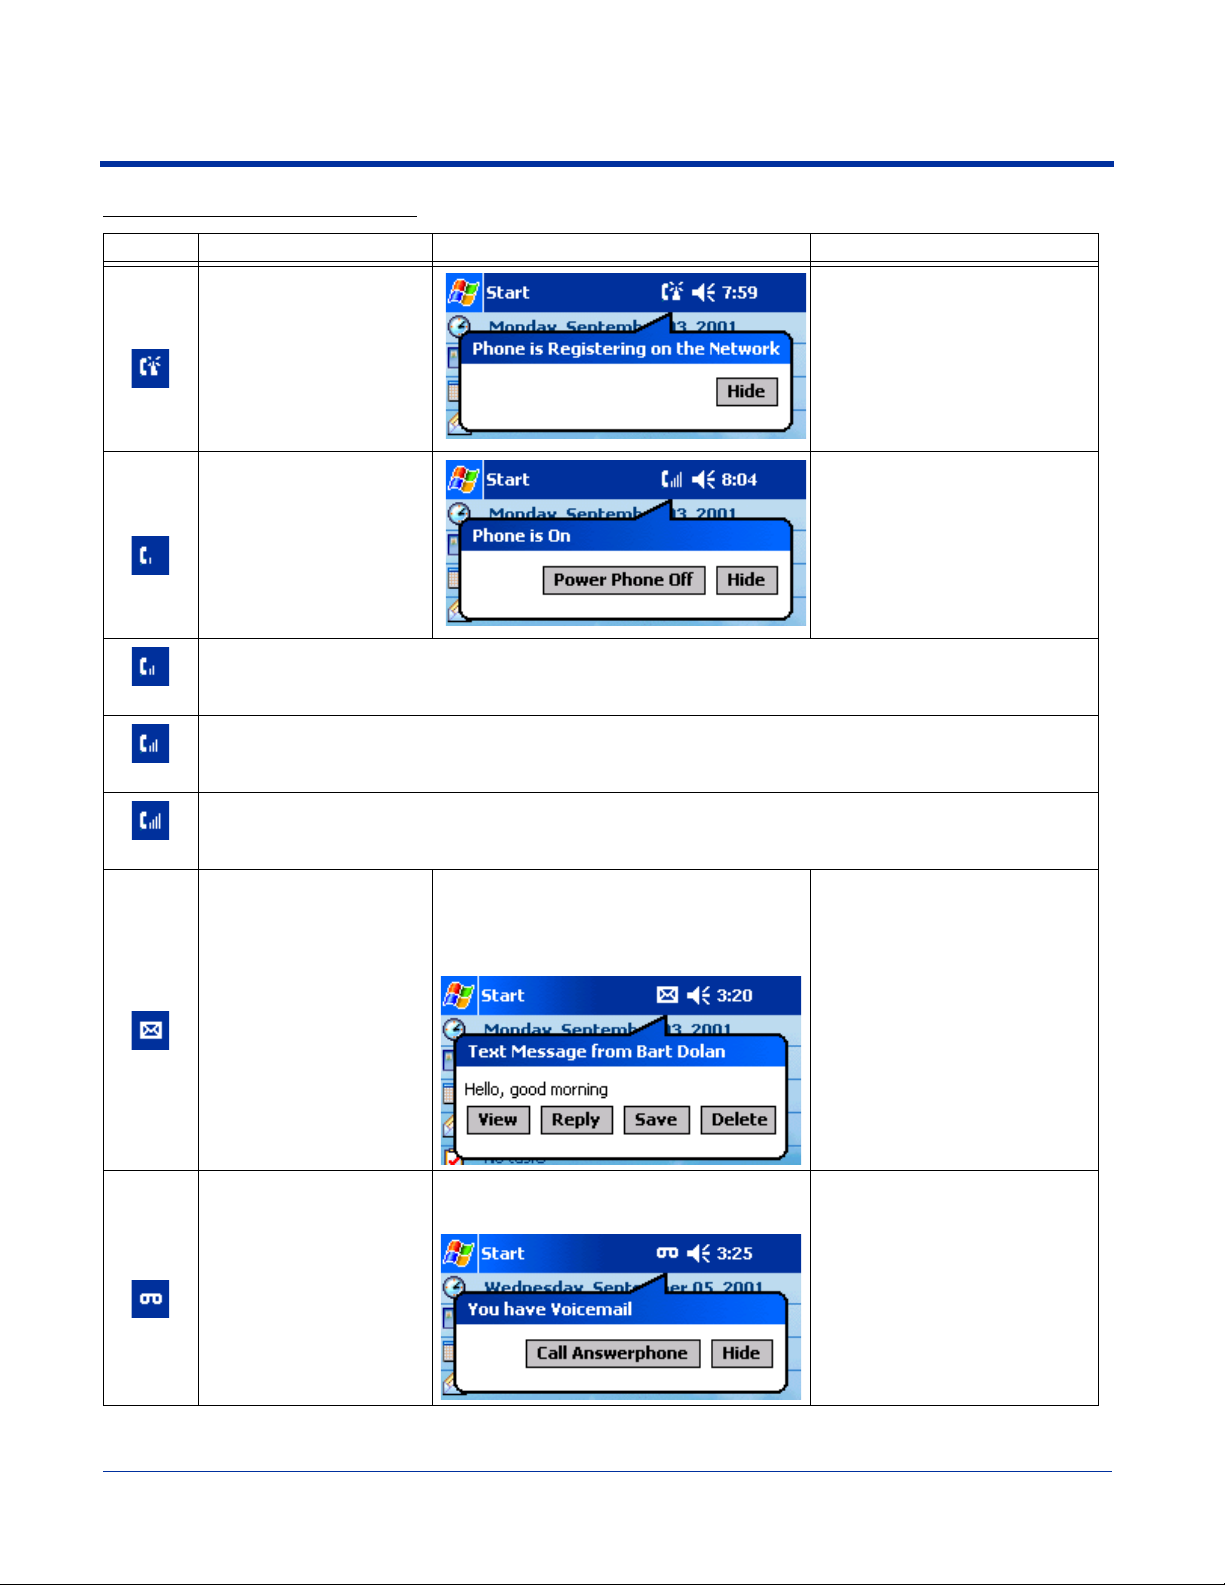
Status Icons and Bubble Options
Icon This icon means… Tapping this icon displays this bubble: Bubble Options
Tap Hide to dismiss the bubble.
The phone is registering
on the network.
The phone is on and
registered.
To the right of the phone is
a bar that indicates signal
strength.
Indicates medium signal strength.
Indicates good signal strength.
Indicates full signal strength.
This bubble appears automatically when a
new SMS message is received. It contains
the sender’s information and the first line of
the text message.
Incoming SMS message
available.
This is a temporary state. This
icon appears only until the phone
is registered on the network.
Tap Hide to dismiss the bubble.
Tap Power Phone Off to turn off
the phone. The icon in the
Navigation bar changes to
indicate the phone is now off.
Tap View to display the full
message in SMS Manager.
Tap Reply to switch to the SMS
Manager Compose screen. The
'To:' field is auto-filled with the
sender’s address.
Tap Save to put the message in
the SMS Manager Inbox.
Tap Delete to delete the
message.
Tapping each button closes the
bubble.
This bubble appears automatically when a
voicemail notification is received.
A new voicemail message
is available.
11 - 4 Dolphin® 7900 Mobile Computer User’s Guide - Prelim. Draft Rev (a)
Tap Call Answerphone to dial
the Answerphone service and
retrieve voicemail messages. To
set up Answerphone, see,
uPhone Configuration, General
Tab, page 11-21.
Tap Hide to close the bubble.
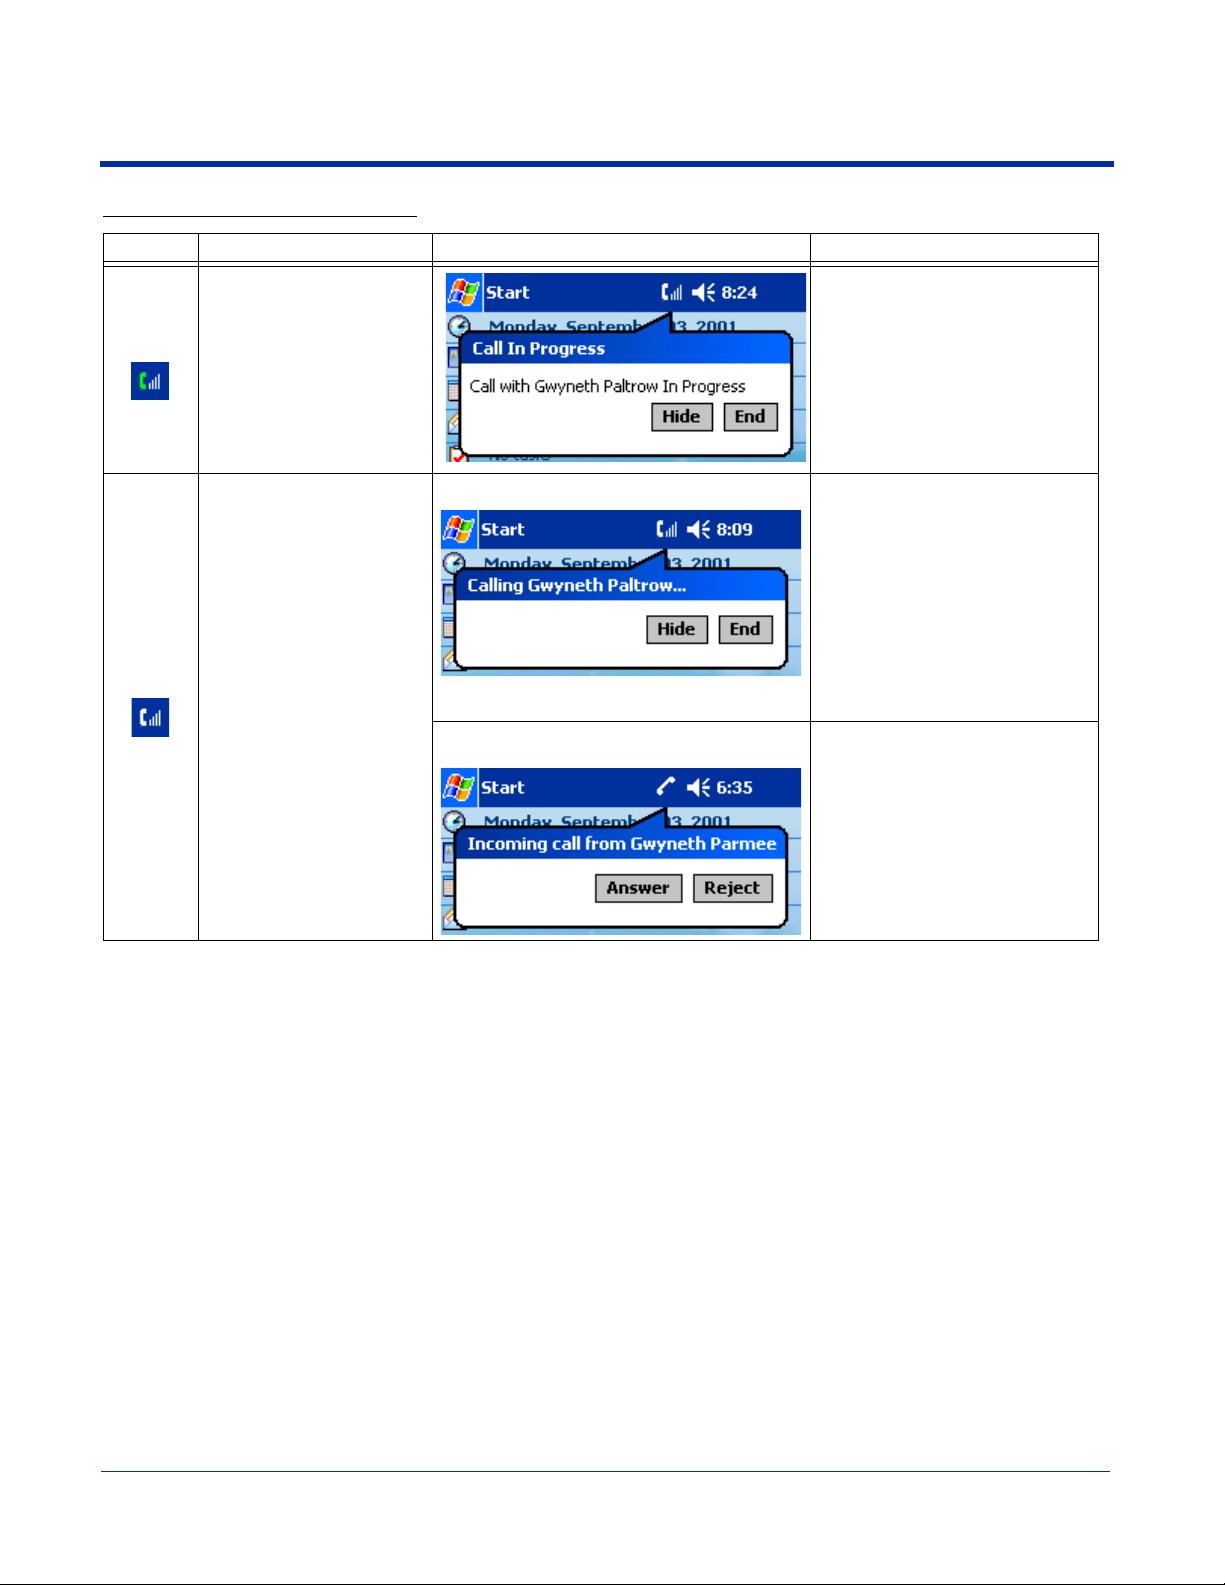
Status Icons and Bubble Options
Icon This icon means… Tapping this icon displays this bubble: Bubble Options
There is a call in progress
to the name or number
shown in the bubble.
(This icon is showing full
signal strength; the icon
will change according to
the current signal
strength.)
This icon appears when
there is a call coming in or
going out.
A different bubble displays
for each circumstance.
If the incoming call is a
conference call, a different
bubble displays.
For a call going out
When a call is coming in, this bubble displays
while the ringtone sounds.
Tap Hide to close the bubble.
Tap End to end the call.
Tap Hide to close the bubble.
Tap End to end the call.
If the caller is in the Phonebook,
the name displays. If not in the
Phonebook, the caller’s number
displays; if the number can’t be
read, “no number” displays.
Tap Answer to answer the call;
this places any current call on
hold.
Tap Reject to reject the call.
Dolphin® 7900 Mobile Computer User’s Guide - Prelim. Draft Rev (a) 11 - 5
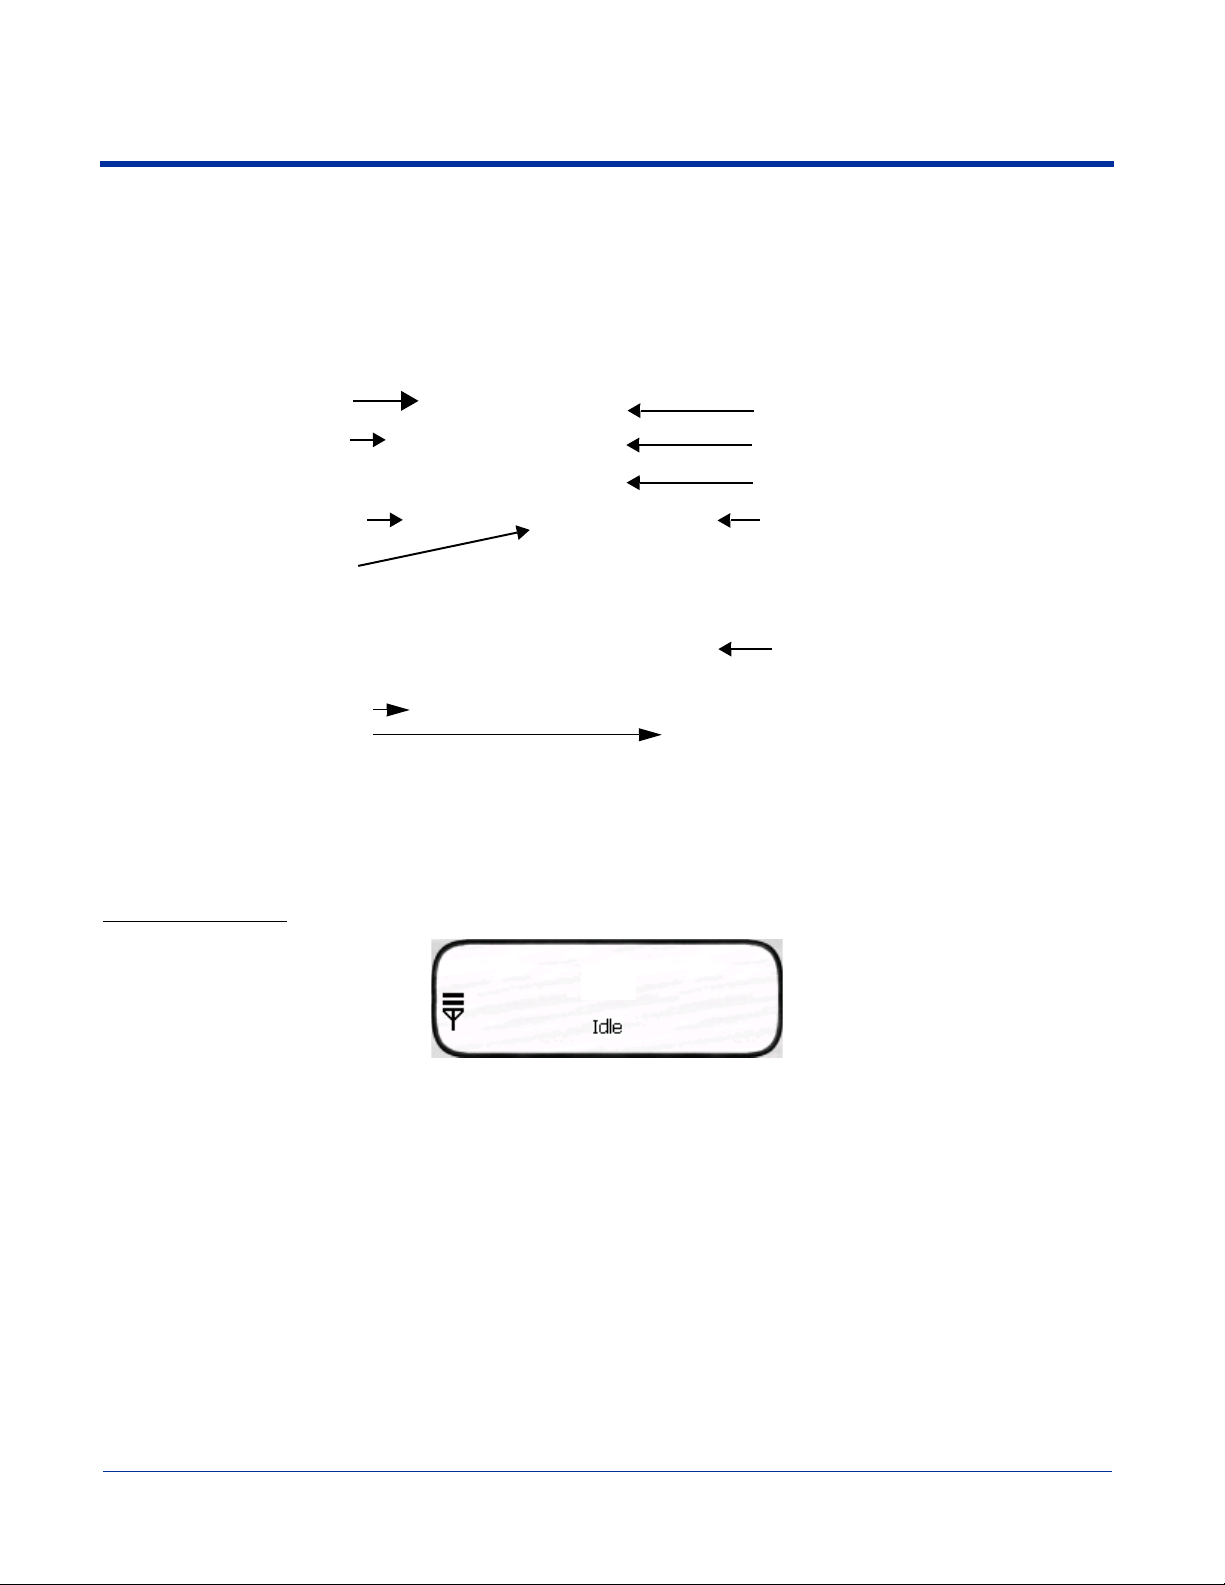
Using the Dialler
The Dialler is the is the program that manages your GSM/GPRS cell phone calls.
To launch the Dialler, tap Start > Programs > uPhone > Dialler. The program launches and the uPhone Dialler screen opens:
Three information lines:
Dialler screen
Signal Strength -
Four bars is optimal.
Tap to send (make) a call or
accept an incoming call
Tap to clear the Dialler
Network Operator - name of service
provider.
Number/Name - number/ name of dialed,
incoming, and outgoing calls.
Status - displays the status of the phone.
Tap to end a call
Phone keypad - tap the numbers to dial
interactive voice systems; also
Tap * and # buttons for
known as touchtones.
Making a Call
To Enter a Number
Cingular
You can:
• Enter the numbers manually using the phone keypad on the Dialler screen, the SIP, or the Dolphin keyboard.
As you enter each number, the digits appears on the Dialler screen in the Name/Number line. If a contact matching the
entered number is found in the Phonebook, the name of the contact appears in the Name/Number line as you type;
tapping on the name enters the rest of the number automatically.
• Use the Phonebook - Phonebook, page 11-10 - to
• Select an existing contact.
Tap Tools > Phonebook, select a name or number in the list, and tap OK (you can also tap and hold on the entry).
The number is automatically entered in the Dialler and appears on the screen.
• Use speed dial.
Tap and hold on the list to see a popup menu of speed dial numbers.
• Use the Call Log - Call Log, page 11-14.
When the phone is in Idle status, you can tap the Send button on the screen , press the OK key, or tap Tools
> Call Log to see a list of the last 20 calls made or received. Tap and hold on an entry in the list and select Dial.
Pressing the Send button or OK key performs this function only when the phone is in an Idle Status.
11 - 6 Dolphin® 7900 Mobile Computer User’s Guide - Prelim. Draft Rev (a)

To Send a Call To a Dialed Number
You can:
• Tap the Send button .
• Press the OK key on the keyboard.
• Press the appropriate key combination on the keyboard - Keyboard Combinations for Calls, page 11-8.
When the call is connected, the three information lines display the following:
Joe Smith
Network Operator Displays the name of the service provider you are using.
Name/Number Displays the name and/or number you called. If the number is from your Phonebook, that entry
Status The status of the call.
0:00 The numbers in the lower, right corner display the minutes:seconds that have elapsed.
displays in the Number/Name (2nd) line.
Idle - means no calls are incoming or outgoing.
In Call - means a phone call is in progress.
Incoming Call - means that a a call is coming in.
Receiving a Call
When the Dialler screen is open and an incoming call is detected, text is displayed on the Dialler screen. If the Dialler is not visible
at the time of the incoming call, a Navigation Bar notification appears;
When a call is coming in, the ringtone sounds and the three information lines on the Dialler screen display the following:
Network Operator Displays the name of the service provider you are using.
Name/Number Displays the name and/or number calling in. If the number is in your Phonebook, that entry displays.
Status Incoming Call.
see Status Icons and Bubble Options on page 11-3.
To Answer a Call
To answer a call, you can:
• Tap the Send button .
• Press the OK key on the keyboard.
• Press the appropriate key combination on the keyboard - Keyboard Combinations for Calls, page 11-8.
To Reject a Call
You can:
• Tap the End button .
• Press the appropriate key combination on the keyboard - Keyboard Combinations for Calls, page 11-8.
Dolphin® 7900 Mobile Computer User’s Guide - Prelim. Draft Rev (a) 11 - 7
Call Waiting
If call waiting is enabled, a second incoming call can be received while a first call is in progress. The second incoming call uses
a different ringtone but displays the same incoming call notification.
If a second call is coming in, answering it (see To Answer a Call on page 11-7) automatically places the first call on hold. You
can also reject the second call; see To Reject a Call on page 11-7.
Ending a Call
To end or reject a call, you can:
• Tap the End button .
• Press the appropriate key combination on the keyboard.
Call Waiting If two calls are in progress, the above options end the active call and place the other on hold.
To activate the call on hold, tap Send or press OK or the key combination to send calls.
To end the call on hold, tap End or press the key combination to end calls on the keyboard.
Conference Call If a conference call is in progress, tap End or the key combination to end calls.
Keyboard Combinations for Calls
Each keyboard option contains a key combination to send and end a call using the Red modifier key.
Keyboard To Send, Press… To End (reject), Press…
25-key keyboard
36-key keyboard
Call Waiting
The uPhone Dialler supports call waiting functionality. This means that you can receive a second call while on a first call.
Placing a Current Call on Hold
When a second call is coming in, to place the current call on hold
• Tap the Send button .
• Press the OK key on the keyboard.
• Press the key combination for sending calls on the keyboard.
The Status line of the first call changes to Call on Hold.
Tapping Send again restores the call on hold.
Making a Second Call To make a second call, place the current call on hold, then dial the second number. When there are
Switching Between Calls To switch between the active and held call, tap Send , press OK, or the appropriate key
two calls (one active and one held) the status line displays In Call, Call on Hold.
combination to send calls. The display is updated to show the active call details, and that the other
call is on hold.
11 - 8 Dolphin® 7900 Mobile Computer User’s Guide - Prelim. Draft Rev (a)

Making Conference Calls
In addition to supporting call waiting functionality, the uPhone Dialler enables you to join two calls into a conference call.
When two calls are in progress, tap the phone icon on the Navigation bar. This opens a bubble dialog that enables you to
conference both calls into one.
Button Tapping this button…
Swaps between the currently held and active calls.
Hold Active and Accept Held
Tapping Send , or pressing OK performs the same function without opening this
bubble dialog.
End Active and Accept Held Drops the current active call and connects the held call.
Connects the held call and the currently active call in a three-way conference call.
Join Held in Conference Call
End Held Drops the held call, and continues with the currently active call.
Hide Closes the bubble.
More than three parties can join a conference call via networking; each of the other
parties can add another call to the conference, and so on.
Touchtones
To transmit touchtones for interactive voice systems while in a call, you can
• Tap the 0-9, *, and # buttons on the uPhone Dialler screen.
• Press 0-9 keys on the Dolphin keyboard; use the uPhone Dialler screen buttons for * and #.
Volume Control
Use the Dolphin keyboard to manually adjust the speaker volume.
To raise the volume, press the Blue modifier key + Up arrow.
To lower the volume, press the Blue modifier key + Down arrow.
Dolphin® 7900 Mobile Computer User’s Guide - Prelim. Draft Rev (a) 11 - 9
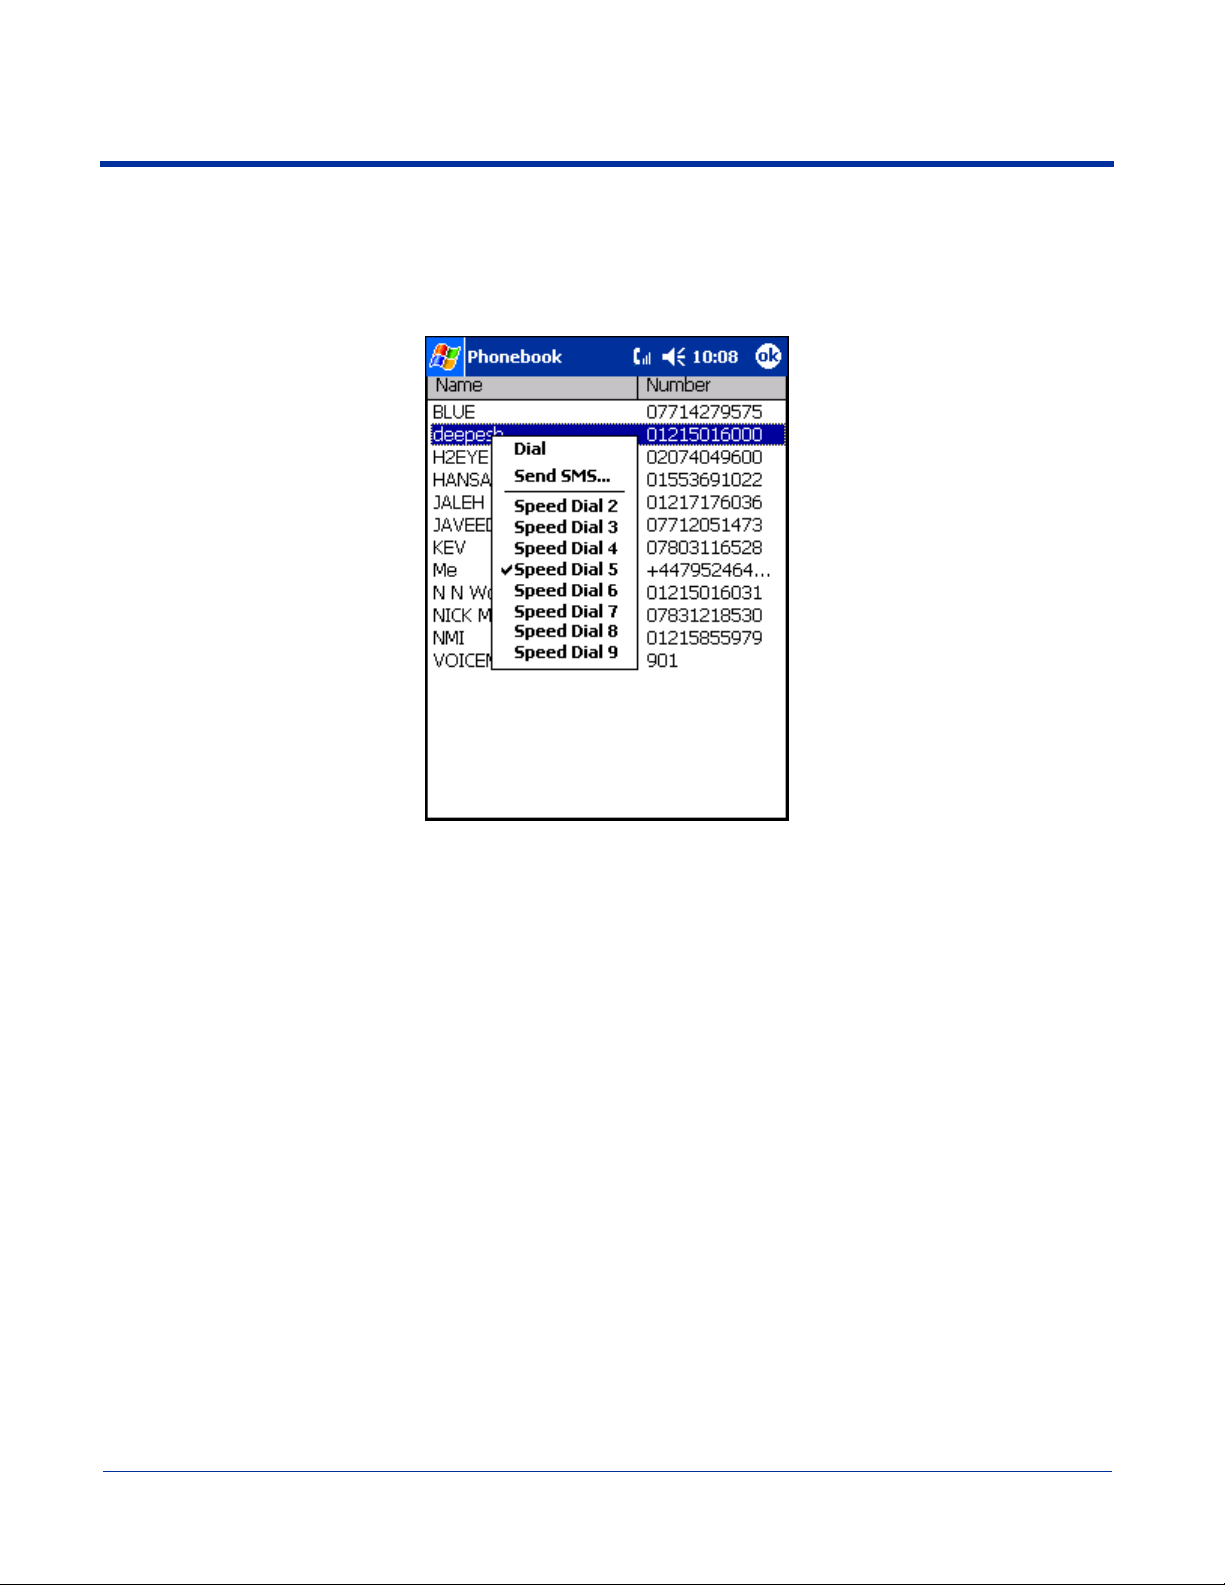
Phonebook
The Phonebook contains the contacts from the SIM card and Pocket Contacts. If fixed dialing is set in the SIM, then only those
numbers in the fixed dialing list are shown in the Phonebook, and only these numbers can be called from the Dialler.
You can access the Phonebook manually by opening the Dialler and going to Tools > Phonebook. When you tap and hold on
an entry, a popup menu displays.
Dial Opens the Dialler with the number entered ready for dialing.
Send SMS Opens the SMS Manager in the Compose screen with the 'To:' field populated with the number.
Speed Dial 2-9 These eight slots are used to assign the Dialler Speed Dial keys. To assign a number to a Speed Dial
slot, tap on an entry to assign the number.
Tapping and holding the associated button when in Dialler will automatically dial the assigned
contact.
11 - 10 Dolphin® 7900 Mobile Computer User’s Guide - Prelim. Draft Rev (a)

Tools Menu
The Tools menu provides the following options:
Select this item To…
Phonebook Display the Phonebook.
Call Log Switch to the Call Log.
SMS Manager Switch to the SMS Manager Inbox.
Select Skin Allow selection of a new skin for the uPhone Dialler application.
Configuration Open the uPhone Configuration control panel
Ringtones Switch to the ring tone selection control panel.
Exit Exit the uPhone Dialler.
Settings Menu
The Settings menu provides the following options:
Speakerphone Toggles speakerphone mode on and off. When an audio plug (for a headset) is inserted into the audio
Mic mute Toggles microphone mute on and off (the other party cannot hear a private conversation when the
A checkmark to the left of the entry indicates that the mode is active. When the entry is grayed-out, it is unavailable and cannot
be selected.
jack (2.5mm), Speakerphone is inactive on this menu.
microphone is muted). This mode is active only during a call and automatically cancelled at the end
of a call.
Dolphin® 7900 Mobile Computer User’s Guide - Prelim. Draft Rev (a) 11 - 11

Audio Modes
The back panel of the Dolphin 7900 contains both a speaker and a microphone that you can use to send and receive audio
signals over the GSM network. For details about the microphone and speaker on the back panel of the Dolphin 7900,
Panel Features on page 3-4.
There are three audio modes:
1. Handset
2. Headset
3. Hands-free (speakerphone)
Handset
Handset mode is when you use the use the back panel of the terminal just as you would a cell phone, holding the speaker to your
ear to receive audio information and the your mouth over the microphone to send audio information.
This is the default audio mode.
Headset
Headset mode is when you plug a headset into the audio jack and speak into the microphone. You must use a 2.5mm plug; no
other audio plug will fit.
Hands-Free
Hands-free mode is when you use the back panel of the Dolphin 7900 as a speakerphone.
To switch the back panel to speakerphone, in the Dialler, tap Settings > Speakerphone. The audio levels adjust appropriately
for speakerphone use. For more information,
see Settings Menu on page 11-11.
see Back
11 - 12 Dolphin® 7900 Mobile Computer User’s Guide - Prelim. Draft Rev (a)
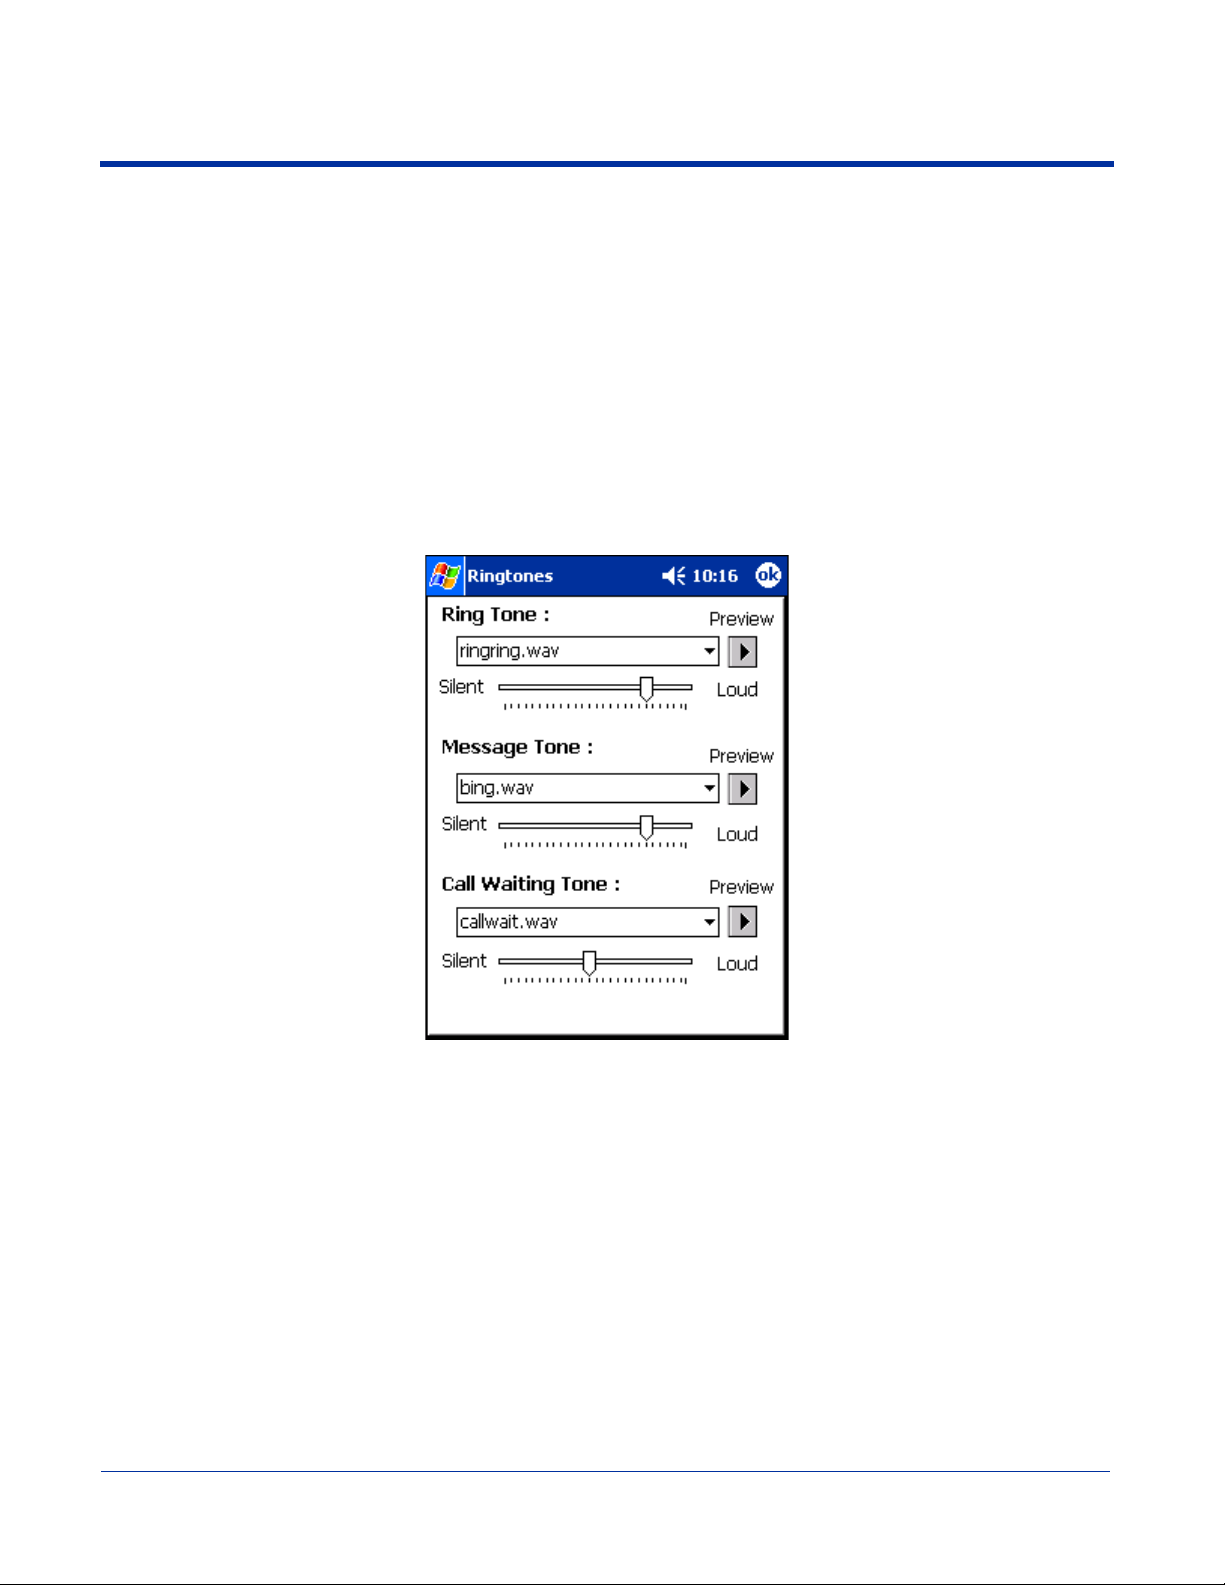
Ringtone Configuration
Different ringtones, with individual volume settings, can be set for the following:
Ring Tone Sounds on an incoming call.
Message Tone Sounds on an incoming SMS or Voicemail notification.
Call Waiting Tone Sounds to indicate an incoming call while you are already on a voice call.
Accessing Ringtone Configuration
You can access Ringtones two ways:
1. Go to Start > Settings > Personal tab > Ringtones icon OR
2. Open the Dialler (tap Start > Programs > uPhone > Dialler) and go to Tools > Ringtones.
The Ringtones screen opens displaying the current settings.
Select the desired ringtone for each type of tone in the drop-down lists. Tapping OK saves any changes. Opening another screen
without tapping OK discards any changes.
WAV Files
You can customize your ringtones with *.wav files installed on your terminal. To appear here, *.wav files must be stored in the
Programs Files > uPhone >Ring Tones folder.
Previewing Tones
You can preview each tone by selecting the *.wav file in the drop-down list and tapping the Preview button. Use the slider to set
the volume for each tone.
While the tone is playing, the Preview button changes to a Stop button; tap it to stop the preview.
Dolphin® 7900 Mobile Computer User’s Guide - Prelim. Draft Rev (a) 11 - 13

Call Log
The Call Log maintains a list of the last 20 calls made or received in each of the following categories:
• Voice Calls In
• Voice Calls Out
• Voice Calls Missed
• GPRS Data
Voice Call In is the default display whenever the Call Log is opened.
Call Log Options
Voice Calls Out and Voice Calls Missed are available from the drop-down list. Select the option you want to view.
To see everything, select All Calls.
Opening the Call Log
You can access the Call Log two ways:
1. Go to Start > Programs > uPhone > Call Log) OR
2. Open the Dialler (go to Tools > Call Log).
The Call Log opens displaying the last few Voice Calls In; the most recent call always appears at the top.
11 - 14 Dolphin® 7900 Mobile Computer User’s Guide - Prelim. Draft Rev (a)
This column Displays the …
Name The phone number or the name if the call was from or to a matching entry in the Phonebook.
Time Time and date the call started. This is the local time and date.
Duration Duration of the call (hours:minutes:seconds). The clock starts when the call connects, not when
dialed.
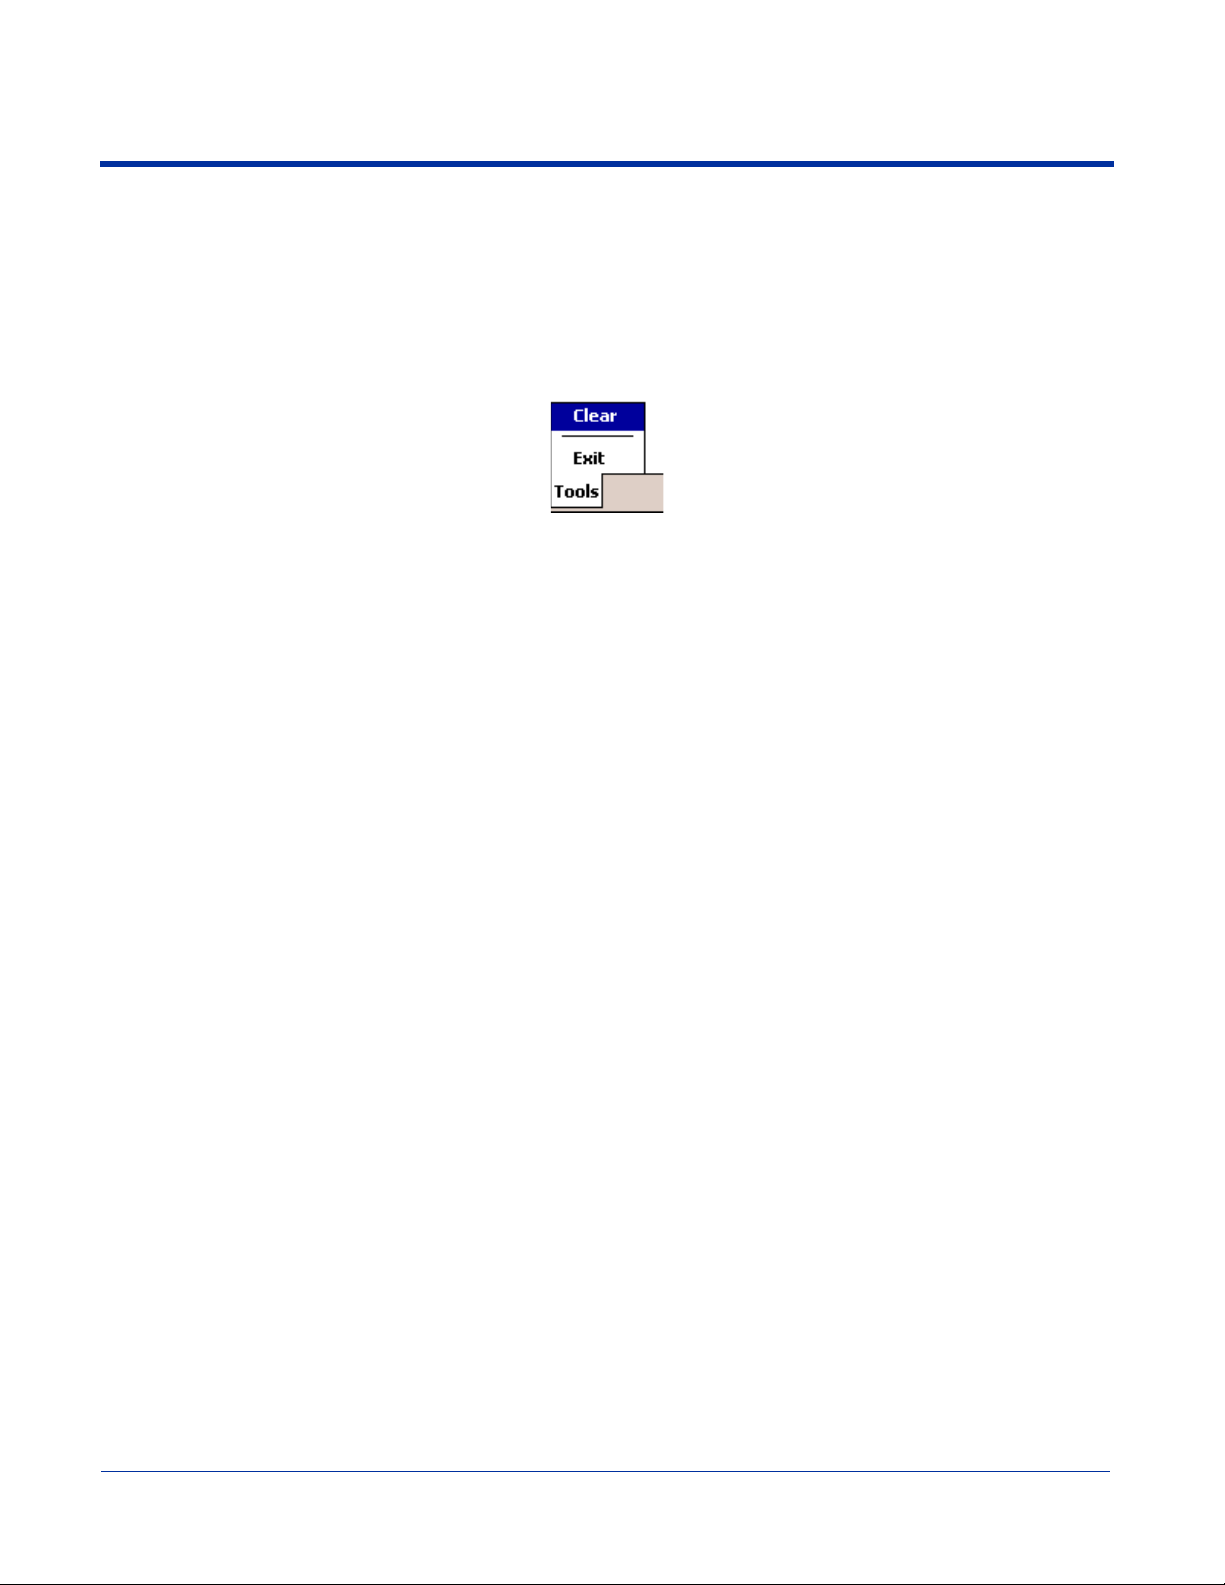
Tools Menu
The Tools menu in the Call Log provides the following options:
Select this menu option To…
Clear Delete the entire Call Log.
Exit Close the Call Log.
Dolphin® 7900 Mobile Computer User’s Guide - Prelim. Draft Rev (a) 11 - 15

SMS Manager
Abbreviated for Short Message Service, SMS enables the transmission of short messages (140-160 characters) to and from a
cell phone. SMS messages travel over the system's control channel, which is separate from the voice channel.
The SMS Manager on the Dolphin 7900 supports creation, sending, receiving, and storing of SMS text messages. Text
messages sent or received can be up to 160 characters long.
Opening the SMS Manager
You can access the SMS Manager two ways:
1. Go to Start > Programs > uPhone > SMS Manager, OR
2. Open the Dialler (Start > Programs > uPhone > Dialler) and go to Tools > SMS Manager.
The SMS Manager opens displaying a list of your most recent text messages. Tap the Inbox and the SMS folders drop-down.
Tap here
Three folders are available from the Inbox menu:
Select this folder To see…
Inbox Received text messages.
Sent Sent text messages.
Outbox Text messages waiting to be sent (messages are moved to the Sent folder automatically after
11 - 16 Dolphin® 7900 Mobile Computer User’s Guide - Prelim. Draft Rev (a)
transmission).
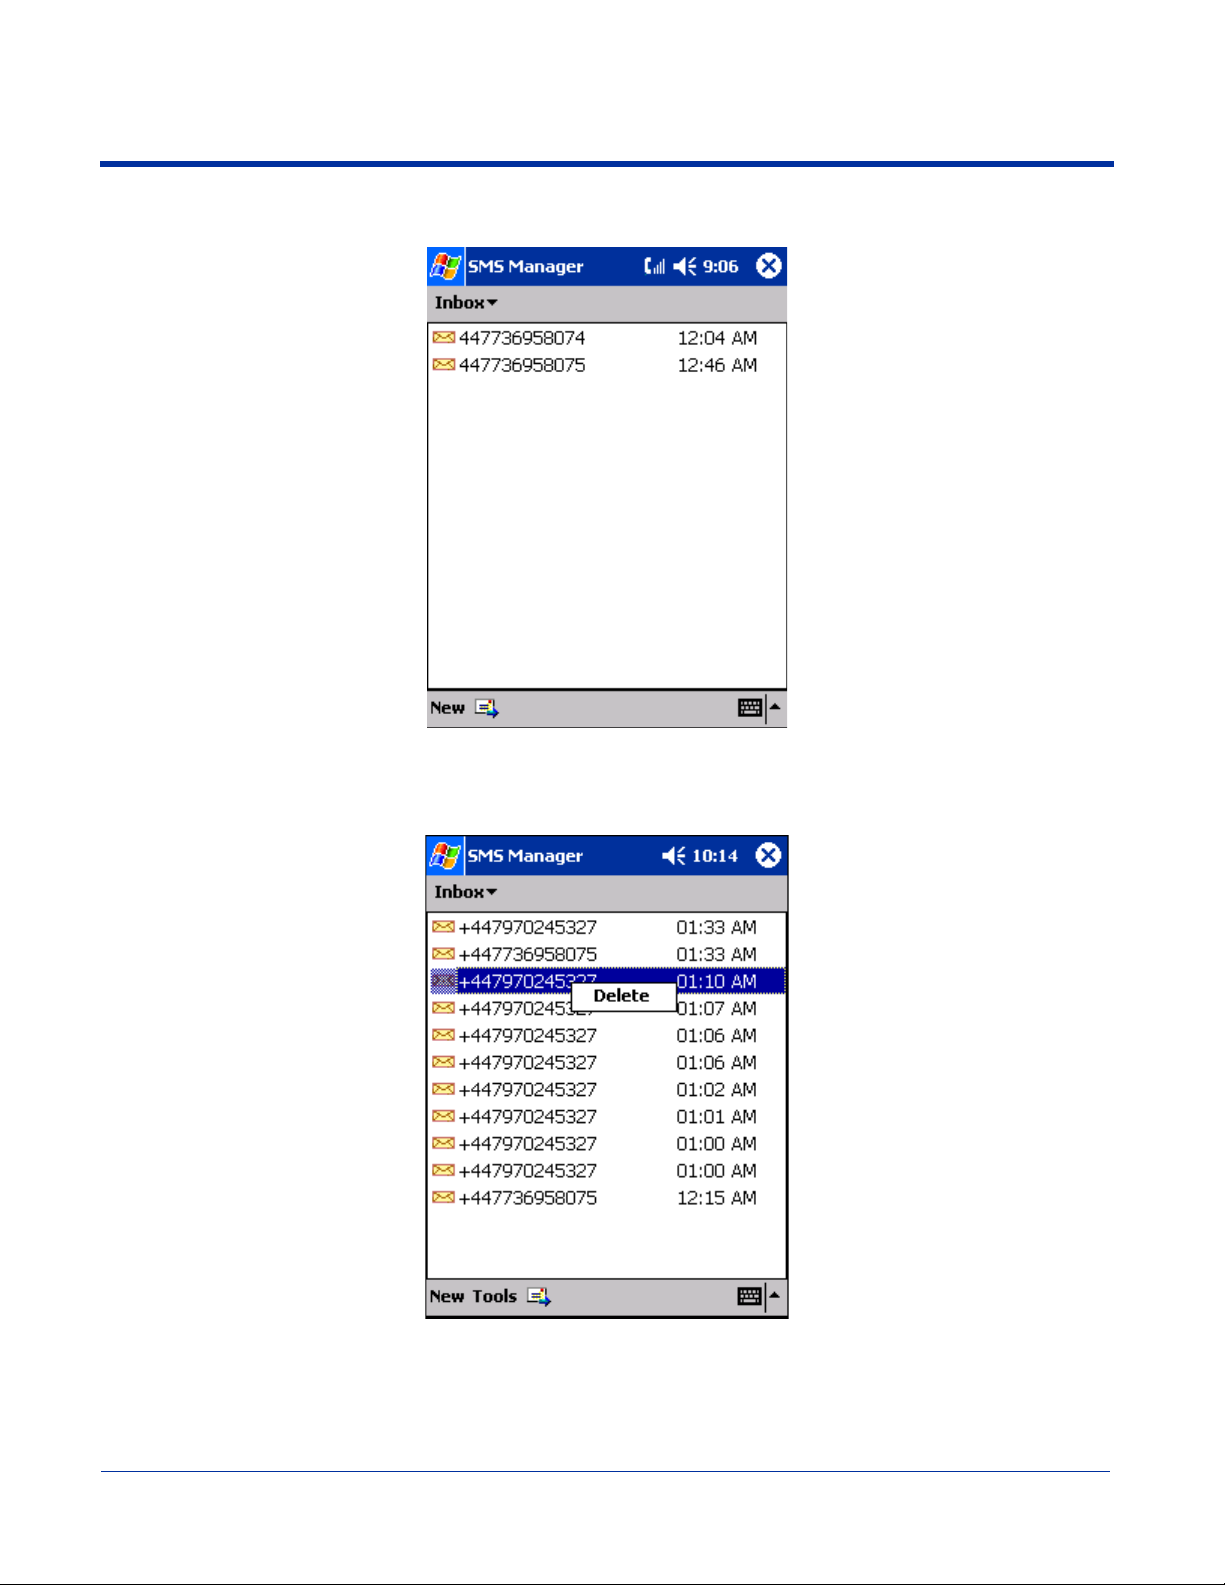
When the folder is selected, the messages in it appear in the list. The name of the folder appears in the gray bar just under the
title bar.
To Do this…
Open a message Tap on it in the list.
Delete a message Tap and hold on it in the list. A popup menu appears that enables you to delete the message.
Dolphin® 7900 Mobile Computer User’s Guide - Prelim. Draft Rev (a) 11 - 17
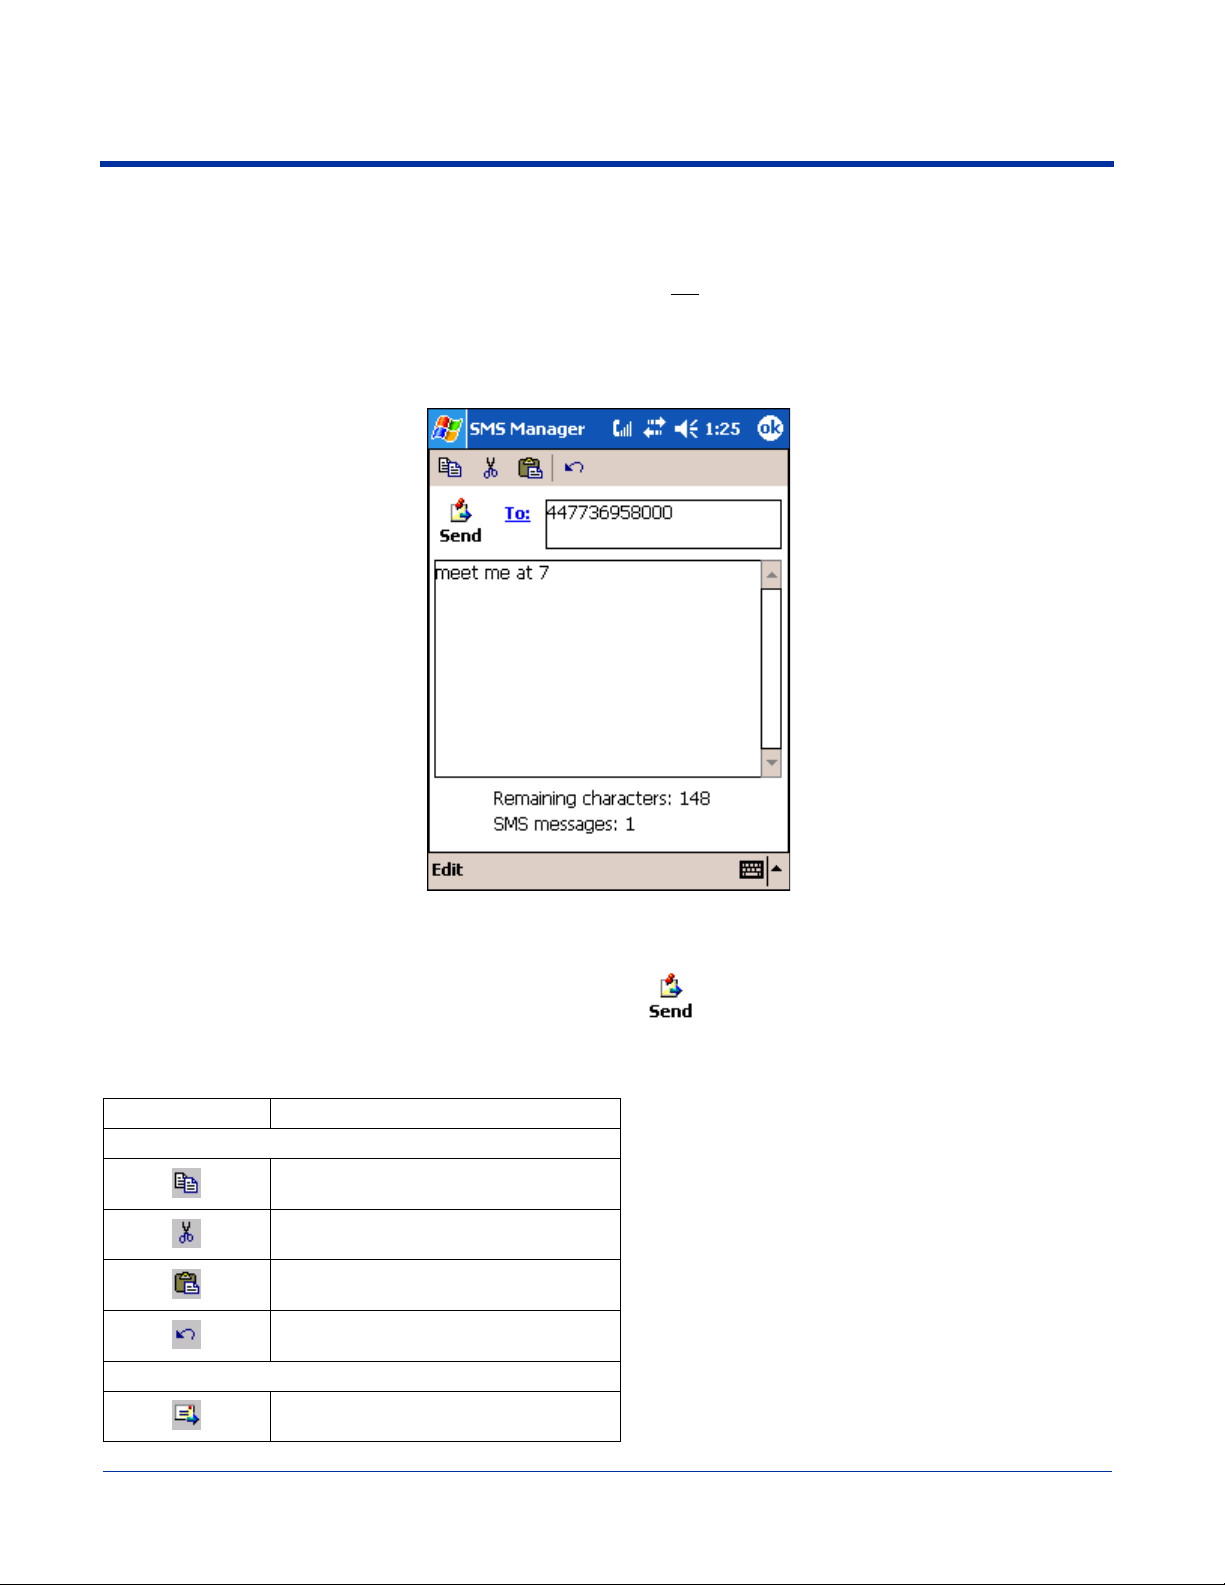
Sending an SMS Message
1. In the task tray at the bottom of the screen, tap New. The new message screen opens with the cursor active in the text area.
2. Tap inside the To: field. To add the number, you can type it in or tap To: to select an entry from your Phonebook.
• You must type a number that is in the appropriate international ISDN format for the country you are dialing. However,
you can dial a local number without the country code.
• Destination numbers can start with a “+” sign.
3. Tap inside the text area. To write a message, you can use the SIP or the keyboard.
The Remaining characters field displays how many characters you can type. It counts backwards from 160 as you type each
character.
4. When finished typing, tap the Send icon to transmit the message .
If you tap OK before tapping send, the program requests confirmation before discarding the message.
Icons at the Top of the Screen
Tap this icon To…
At the top of the window:
Copy selected text.
Cut selected text.
Paste text.
Undo the previous action.
In the task tray at the bottom of the window:
Send all messages in the Outbox.
11 - 18 Dolphin® 7900 Mobile Computer User’s Guide - Prelim. Draft Rev (a)
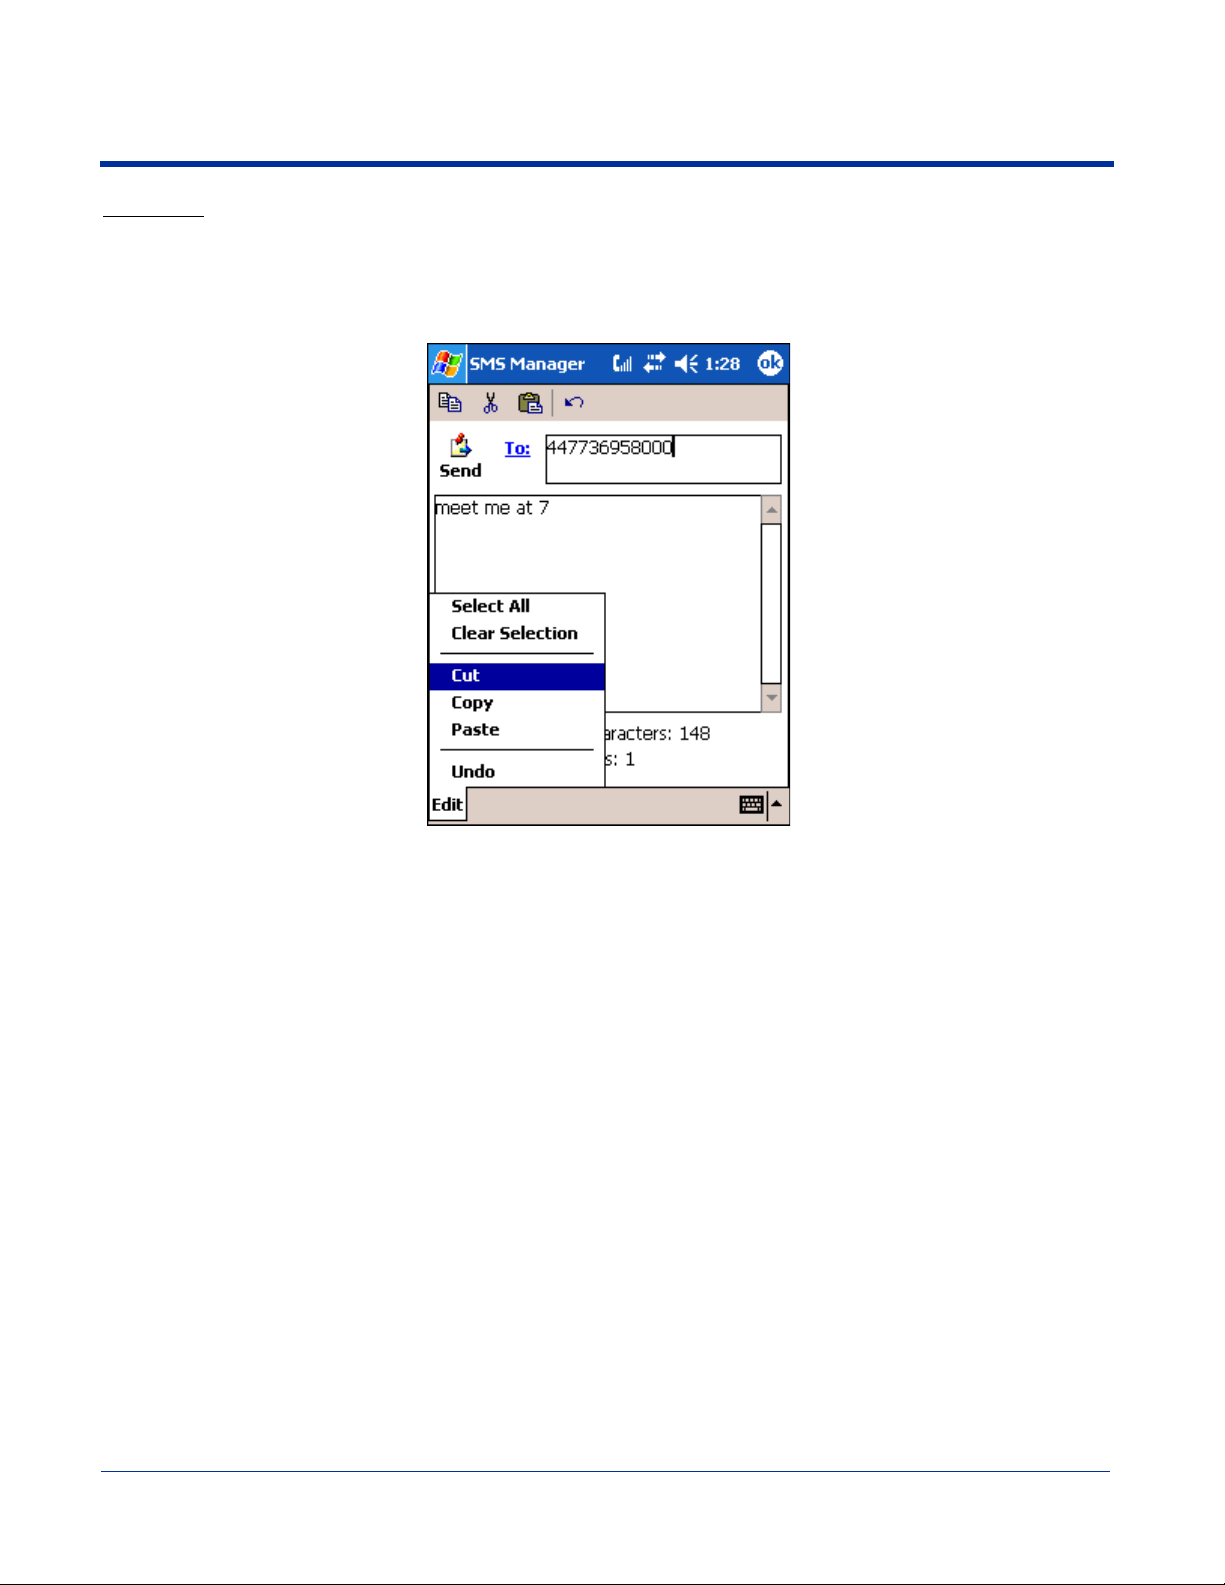
Edit Menu
The Edit menu in the command bar provides the same options as the icons at the top of the screen, with the following additional
options:
Select All Selects all text in the active message section.
Clear Selection De-selects all text in the active message section.
Online Help
Tapping Help > About provides information about the uPhone applications.
Dolphin® 7900 Mobile Computer User’s Guide - Prelim. Draft Rev (a) 11 - 19

uPhone Configuration
uPhone Settings enable you to establish the normal operating parameters for uPhone applications.
Accessing
You can access uPhone Settings two ways:
1. Go to Start > Settings > System tab > uPhone icon .
2. In the Dialler application, selecting Tools > Configuration.
Requirements
Because this control panel adjusts network settings, the GSM radio must be powered up, and a SIM must be installed for it to
open correctly. If not, you will receive a notification message when you try to open the control panel.
If the radio is powered up and a SIM installed, an animated wait icon displays the following message while the system accesses
the network: “Settings on the Network are being accessed. Please wait…”
If there is no response from the network within 60 seconds, this message times-out and the control panel closes. Otherwise, the
uPhone Settings screen displays; the General tab appears first by default.
11 - 20 Dolphin® 7900 Mobile Computer User’s Guide - Prelim. Draft Rev (a)
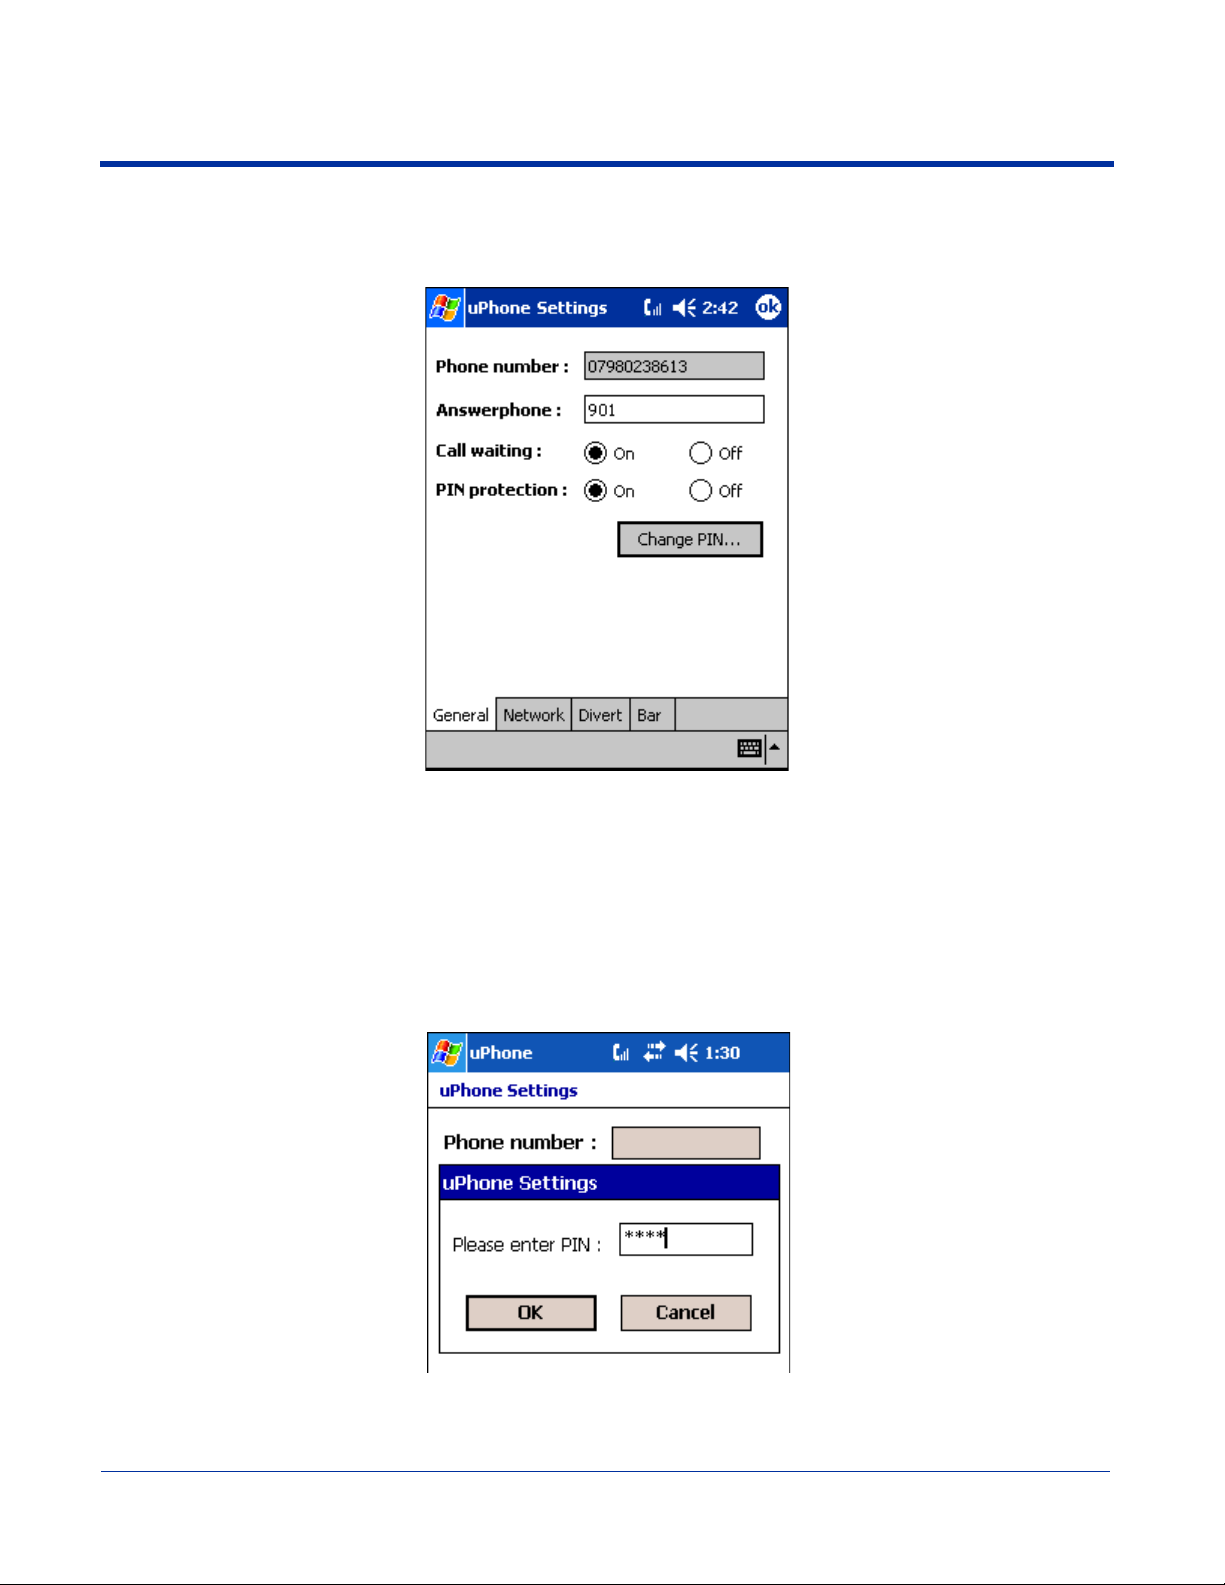
General Tab
uPhone Settings consists of four tabs: General, Network, Divert and Bar. The tabs move up the screen if the SIP is opened for
text or number entry. Tapping OK accepts any changes and exits the control panel.
Field Description
Phone Number This is the phone number stored on the SIM. It is displayed here for information only.
Answerphone This is the number to dial to retrieve voicemail messages. To enter a new number, tap on this field
Call waiting Select On or Off to enable or disable call waiting functionality. Call waiting must be set to On for
PIN protection Select On or Off to enable or disable PIN protection. If enabled, a PIN number is requested when the
Change PIN This button is active only if PIN protection is set to On. Otherwise, the button is grayed-out.
and enter the digits.
conference calls.
phone is switched on.
If you tap Change PIN, a dialog box appears enabling you to change the PIN.
In the Old PIN field, enter the current PIN, then enter the new PIN in the New PIN and Confirm PIN
fields. Tap OK to save the change. If you do not tap OK, the old PIN remains in effect.
While typing, the numbers appear as asterisks to protect the number from observation by third
parties.
Dolphin® 7900 Mobile Computer User’s Guide - Prelim. Draft Rev (a) 11 - 21
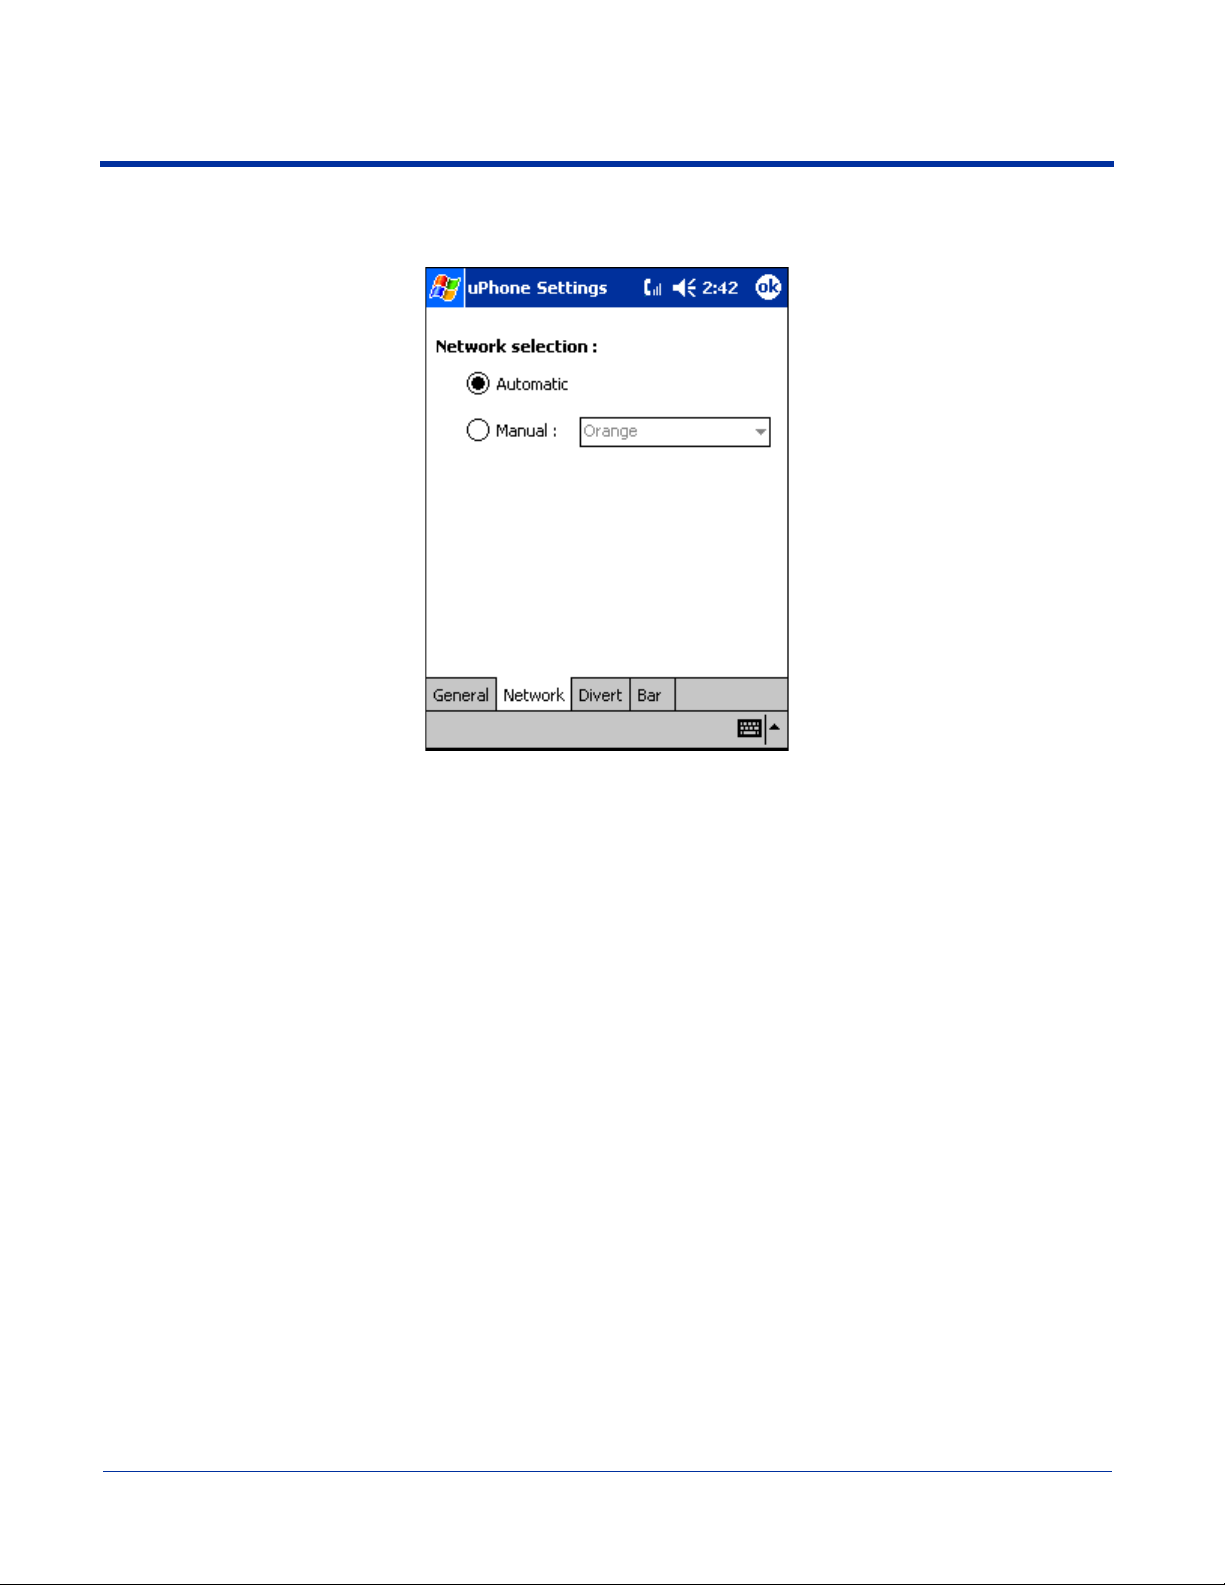
Network Tab
The Network tab provides the ability to choose between Automatic and Manual network selection.
If you choose Manual network selection, the drop-down list of available networks activates. Choose a network from this list and
tap OK. A wait icon appears while the system accesses the selected network.
11 - 22 Dolphin® 7900 Mobile Computer User’s Guide - Prelim. Draft Rev (a)
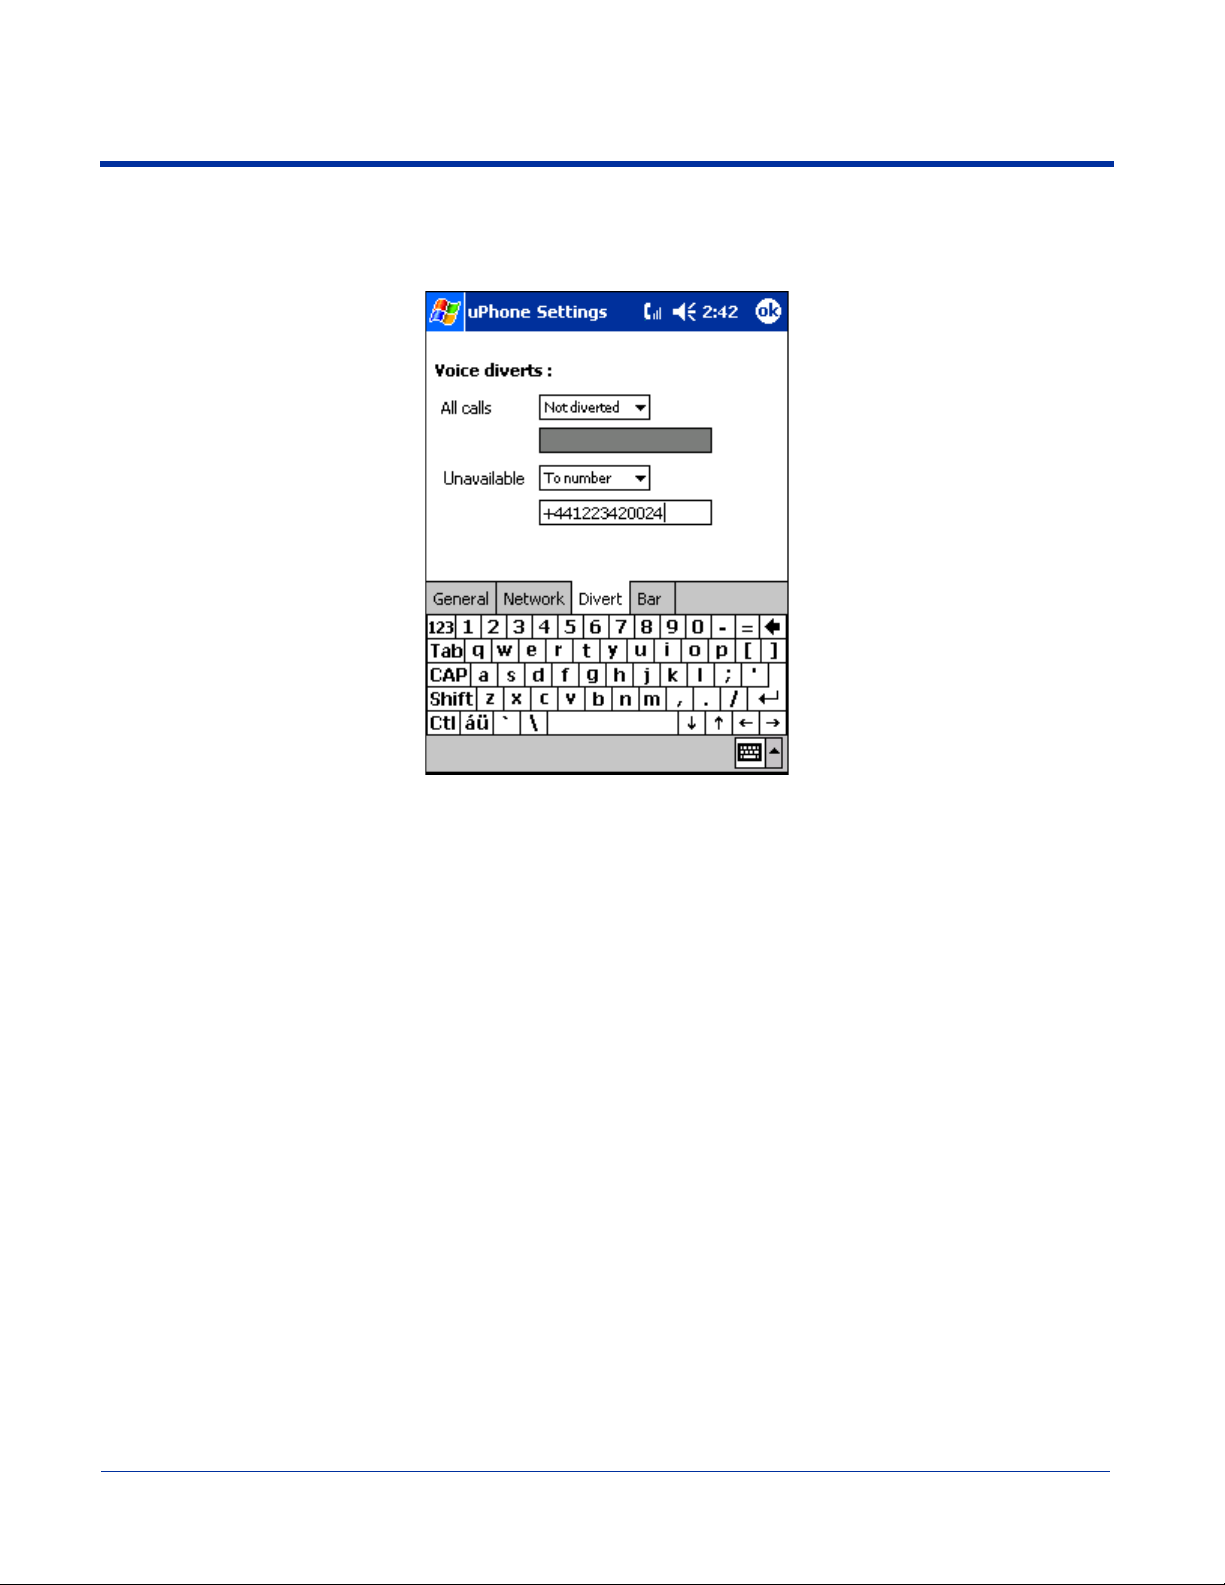
Divert Tab
The divert tab enables you to select divert options for incoming calls when you are unavailable to answer; e.g., when the phone
is off, you are out of network coverage, busy, or not able to answer.
Select an option from the All Calls drop-down list to divert all incoming calls automatically.
Select an option from the Unavailable drop-down list to divert incoming calls when you are unavailable.
The options in both lists are as follows:
Not Diverted Select this option to not divert calls. This is the default setting.
Answerphone Select this option to divert calls to voicemail.
To number Select this option to forward incoming calls to another number. Enter that number in the field below
the drop-down list.
Dolphin® 7900 Mobile Computer User’s Guide - Prelim. Draft Rev (a) 11 - 23
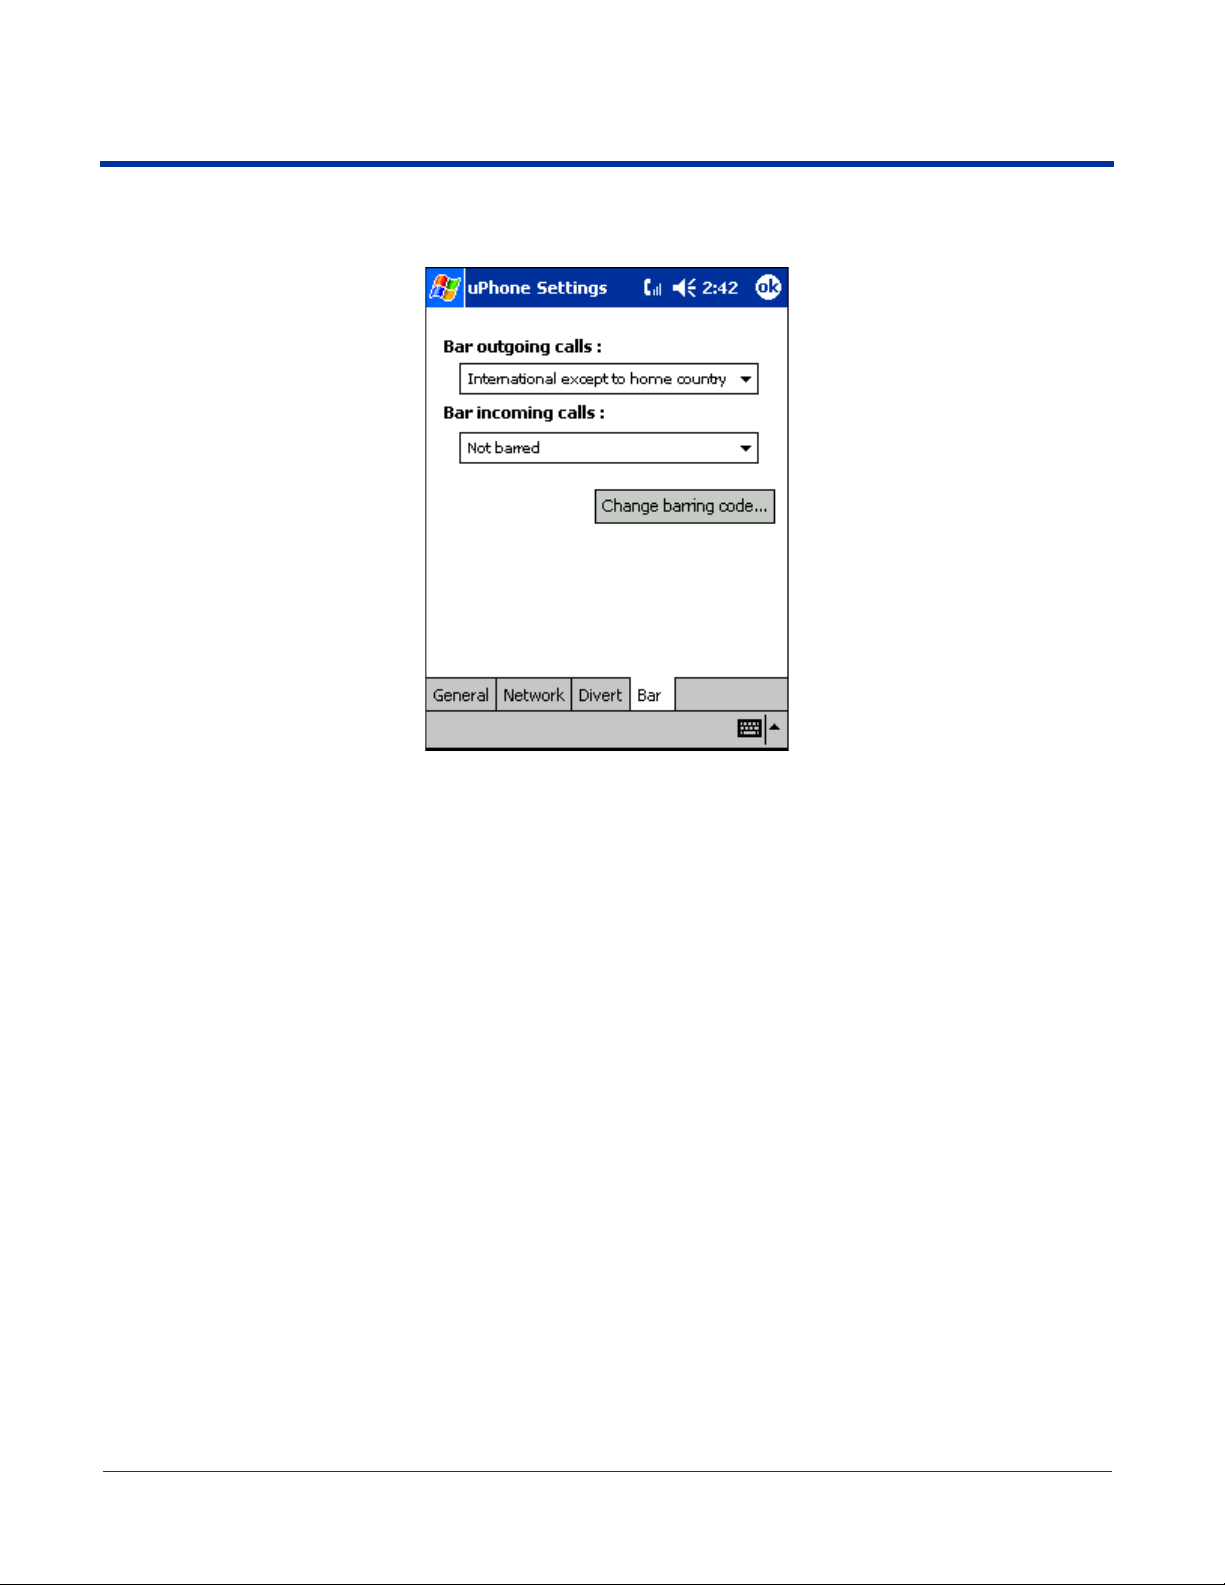
Bar Tab
The Bar tab sets enables you to bar both incoming and outgoing calls.
Bar outgoing calls Select one of the following options from the drop-down list:
Not barred No restrictions on outgoing calls.
International calls Bar international calls.
International except to
home country
All outgoing calls Bar all outgoing calls.
Bar incoming calls Select one of the following options from the drop-down list:
Not barred No restrictions on incoming calls.
Incoming calls when
roaming
All incoming calls Bar all incoming calls.
Only international calls to the home country designated on the SIM
card can be made.
Bar incoming calls when the network coverage is in roaming status.
11 - 24 Dolphin® 7900 Mobile Computer User’s Guide - Prelim. Draft Rev (a)
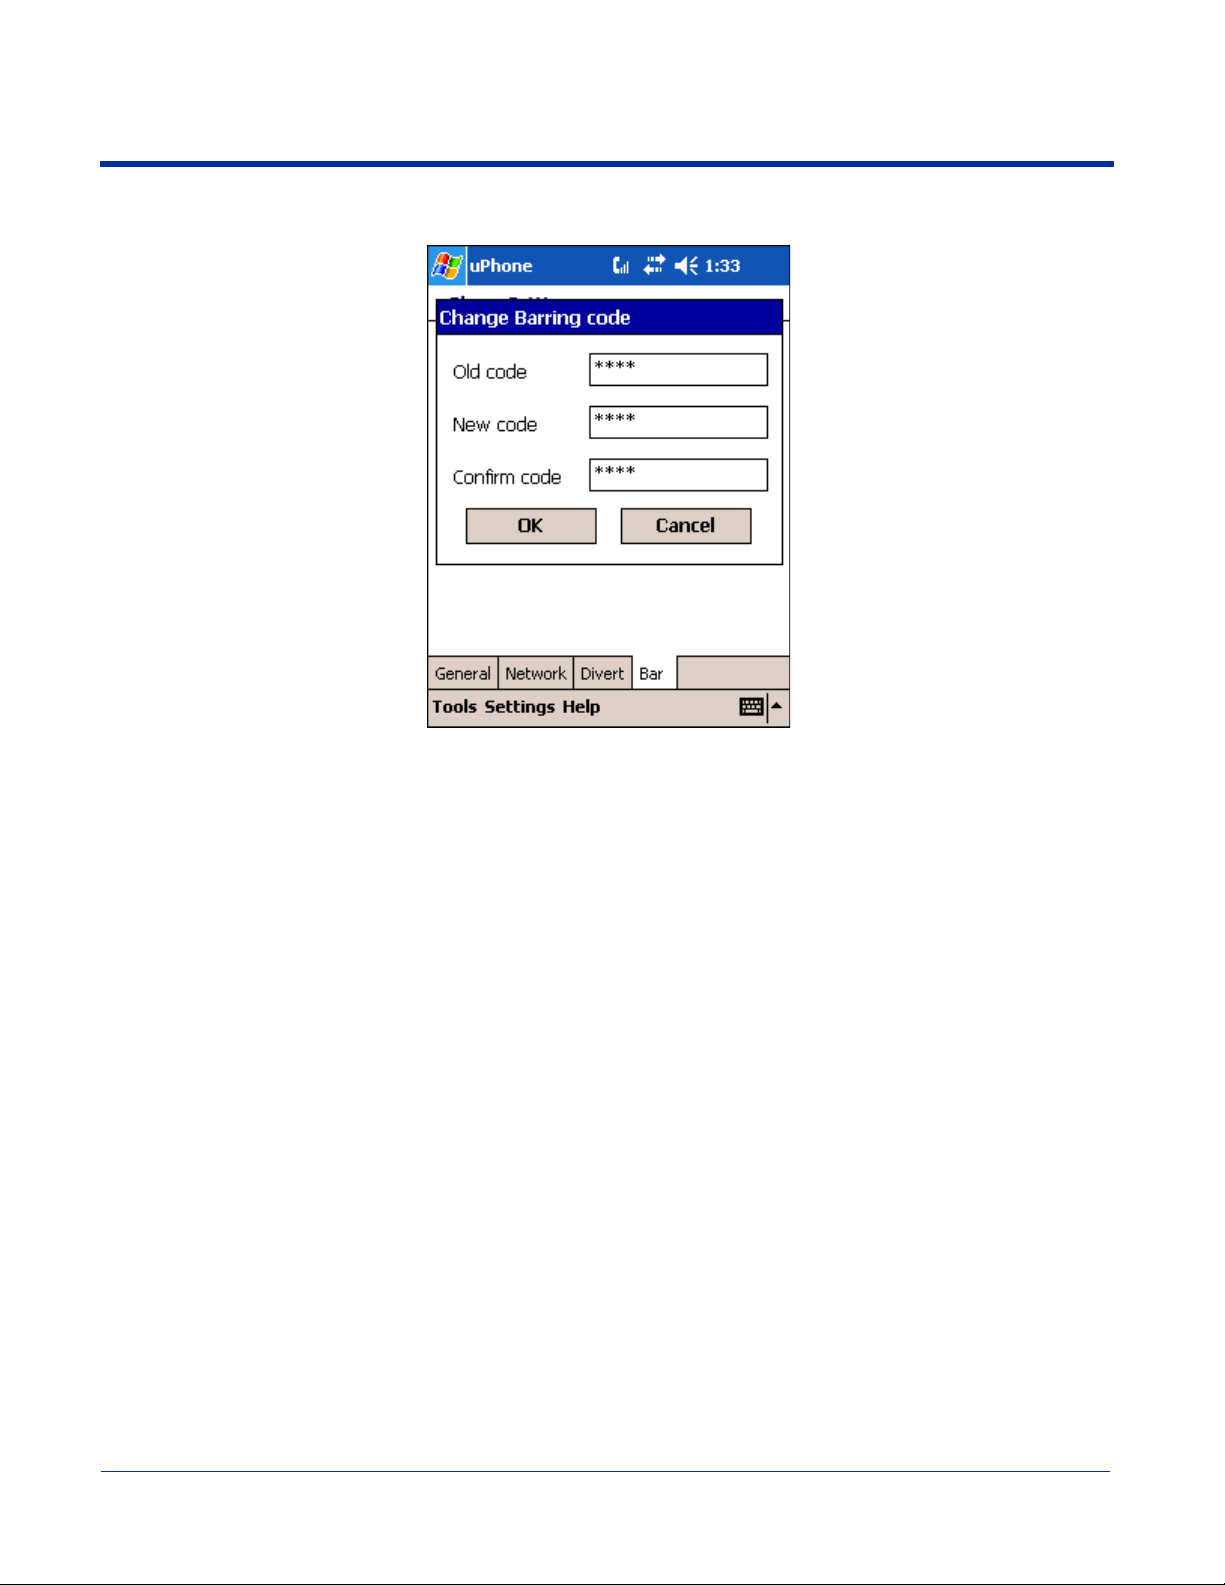
Change barring code Tap this button to change the barring code. A dialog box appears that enables you to change the
barring code.
In the Old code field, enter the current code, and enter the new code in the New code and the
Confirm code fields. Tap OK to save the change.
While typing, the numbers appear as asterisks to protect the number from observation by third
parties.
To save the barring options, tap OK. The system displays a dialog requesting the barring password before sending the updated
settings to the network. Type in the password and tap OK.
Dolphin® 7900 Mobile Computer User’s Guide - Prelim. Draft Rev (a) 11 - 25
GPRS Settings
After subscribing to a GPRS network and installing your SIM card, you can load the parameters of your GPRS subscription into
the terminal. However, some subscriptions load automatically when you install your SIM card. If the GPRS settings do not load
automatically, you must enter them manually.
uPhone includes a pre-configured GPRS connection in Internet Settings. You need to select or create GPRS settings prior to
making a GPRS call for the first time. You can also configure GPRS settings for browsing the web via a VPN or Proxy Server.
Requirements
Make sure that you are not using ActiveSync when configuring the connection settings.
To establish a GPRS connection, you need to review the information from your network service provider. Given that there can
be so many different configurations, such as VPN or Proxy Server connections, see
about how to set up each kind of connection.
Because GSM/GPRS technology uses a network connection, you need to configure those settings in the Connection Manager.
For details,
see Connections Tab on page 7-20.
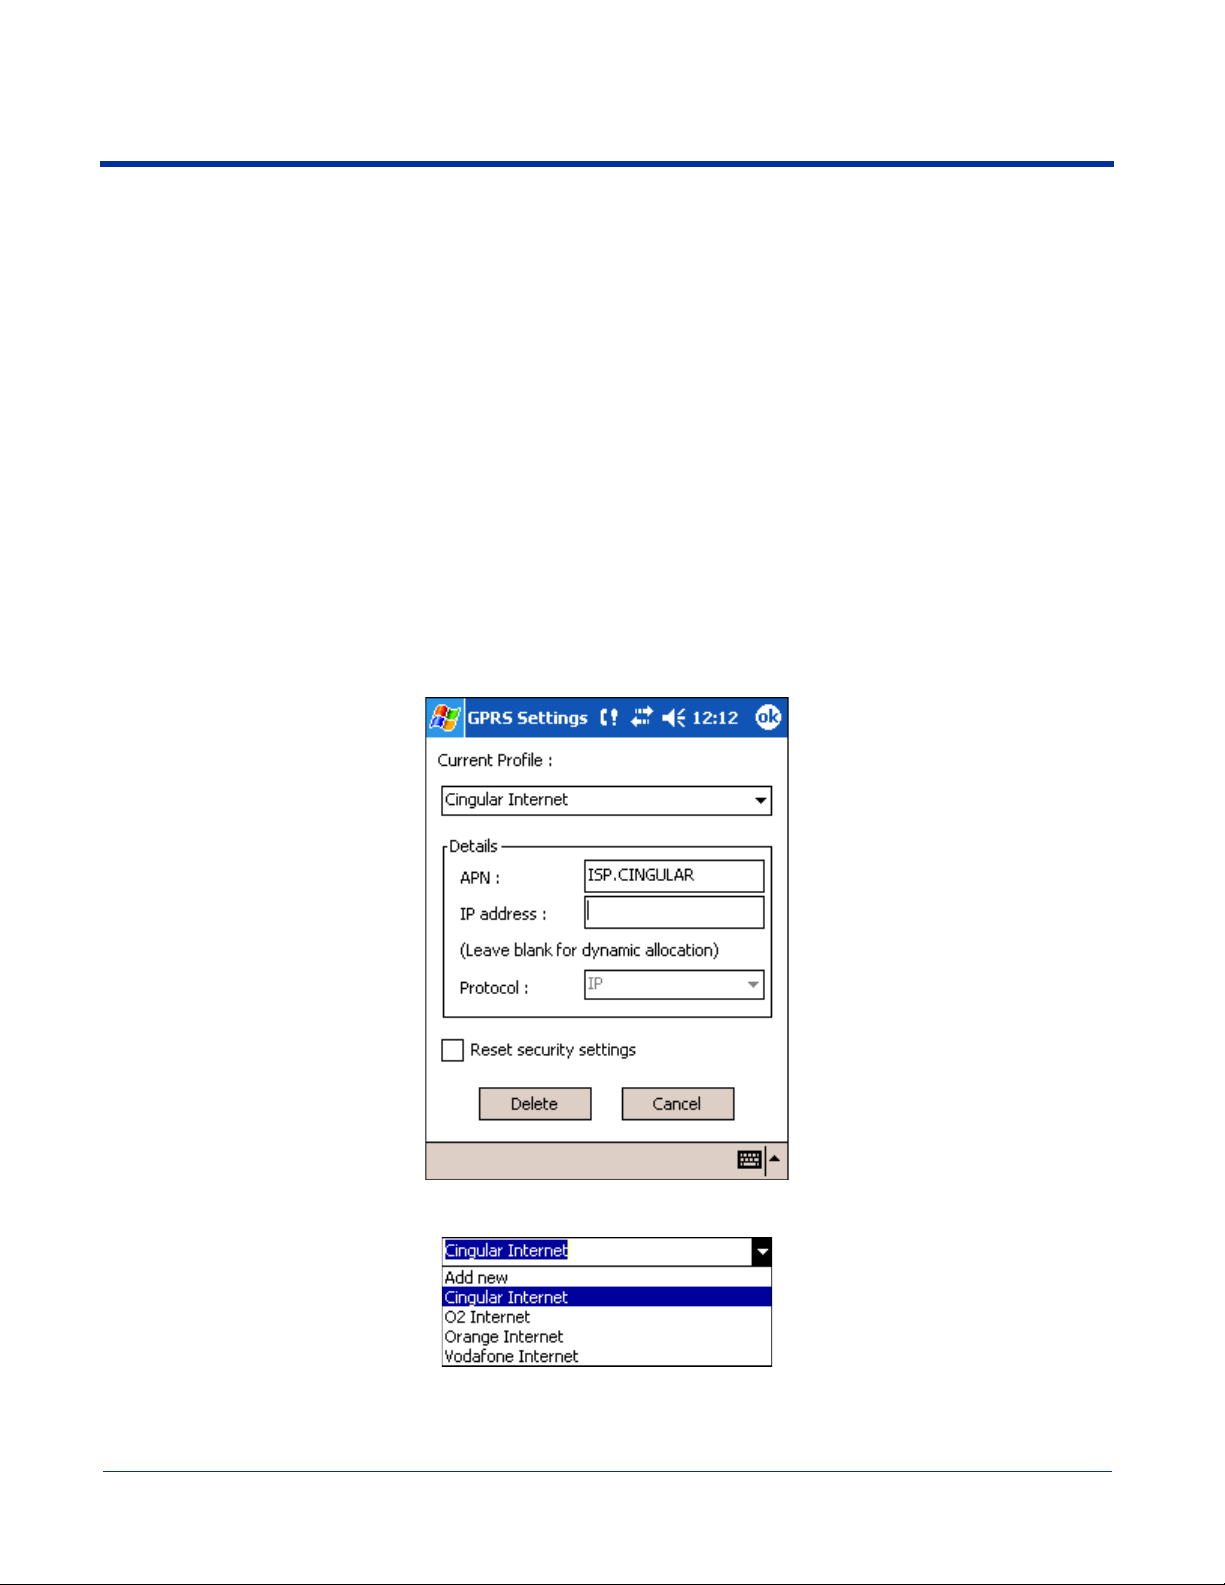
To Select Pre-Configured GPRS Settings
1. Go to Start > System > Connections tab > uPhone GPRS. The GPRS Settings screen appears displaying the default
settings.
Connections Tab on page 7-20 for instruction
The Current Profile drop-down list contains a number of pre-configured connection profiles.
2. If the profile associated with your account appears in the list, select it. If it does not appear in the Current Profile list, you need
to create one. For details, see To Add a GPRS Setting on page 11-27.
11 - 26 Dolphin® 7900 Mobile Computer User’s Guide - Prelim. Draft Rev (a)
3. In the Details section
• Type in the APN number
• Type in the IP address
• Select the Protocol
4. Tap OK to save.
Note: Select Reset security settings to reset the username and password, see To Add a GPRS Setting on page 11-27..
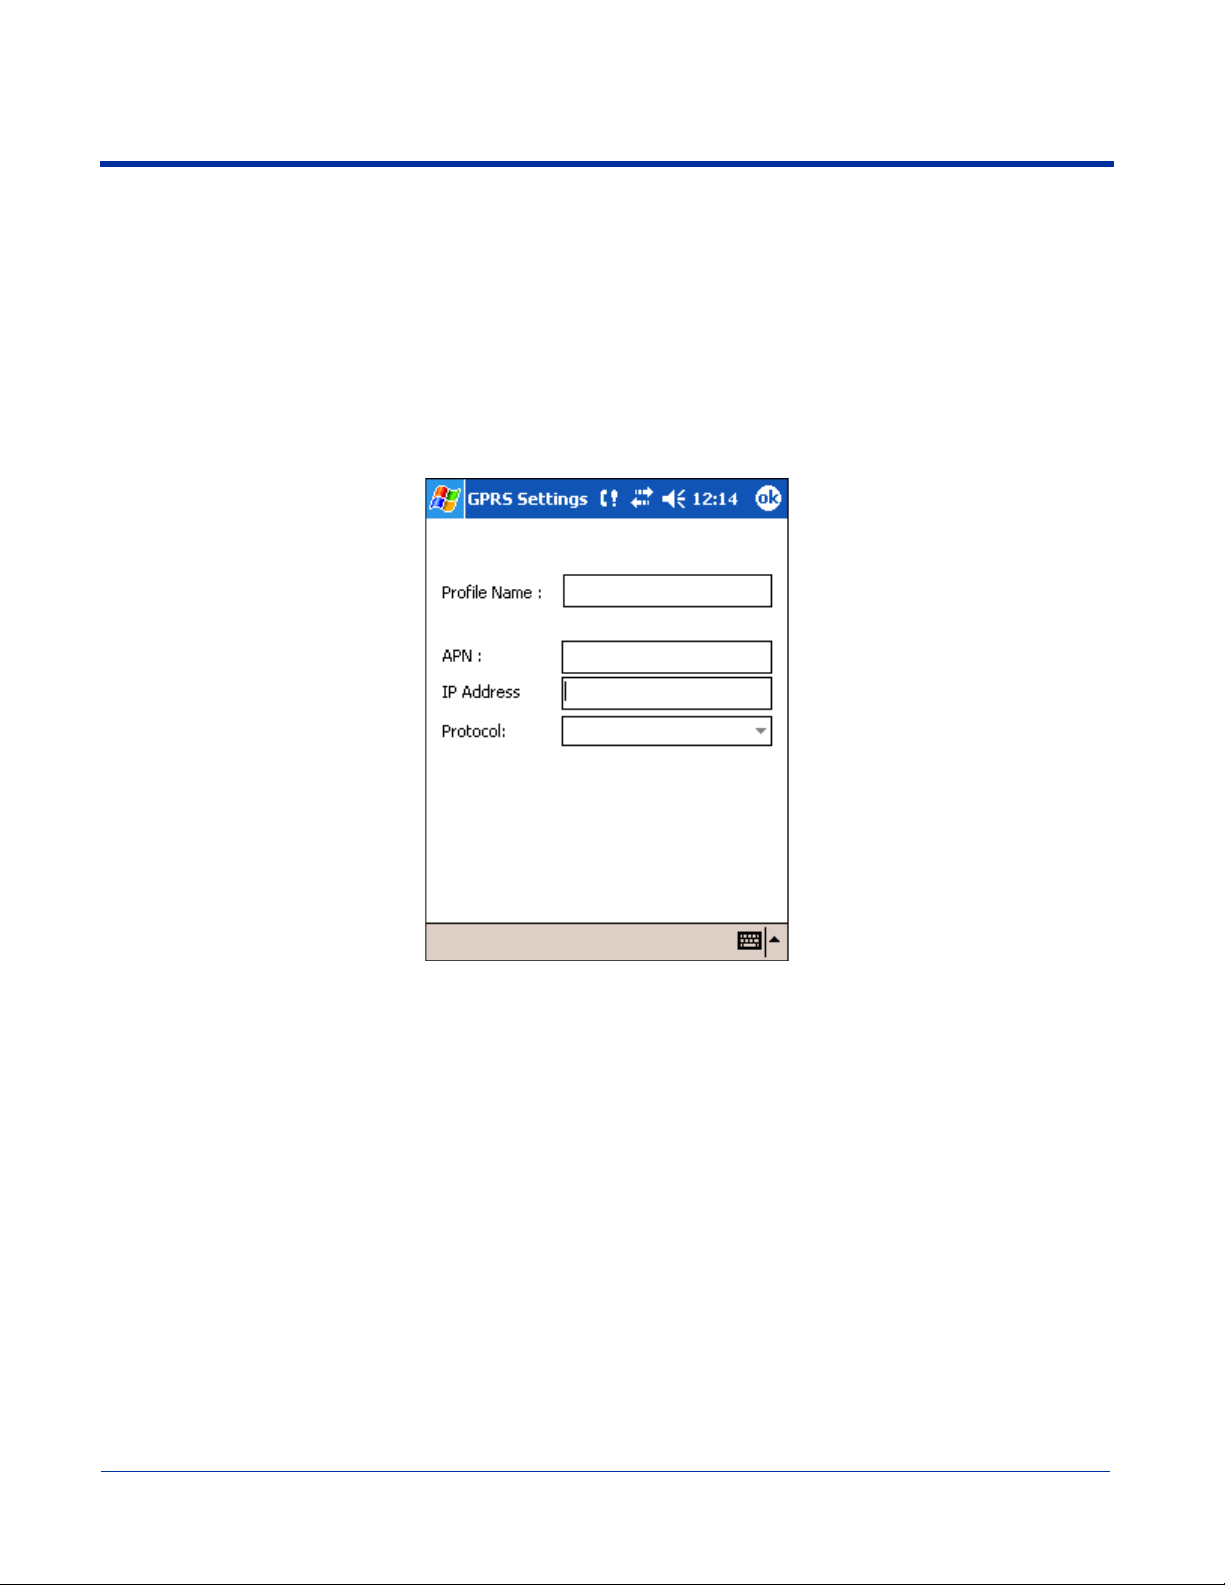
To Add a GPRS Setting
1. On the GPRS Settings screen, in the Current Profile drop-down list, select Add new.
2. Type in the Profile Name, APN, IP Address, and select the Protocol.
3. Tap OK. You return to the settings screen. The Profile Name you selected now appears in the Current Profiles list.
Dolphin® 7900 Mobile Computer User’s Guide - Prelim. Draft Rev (a) 11 - 27
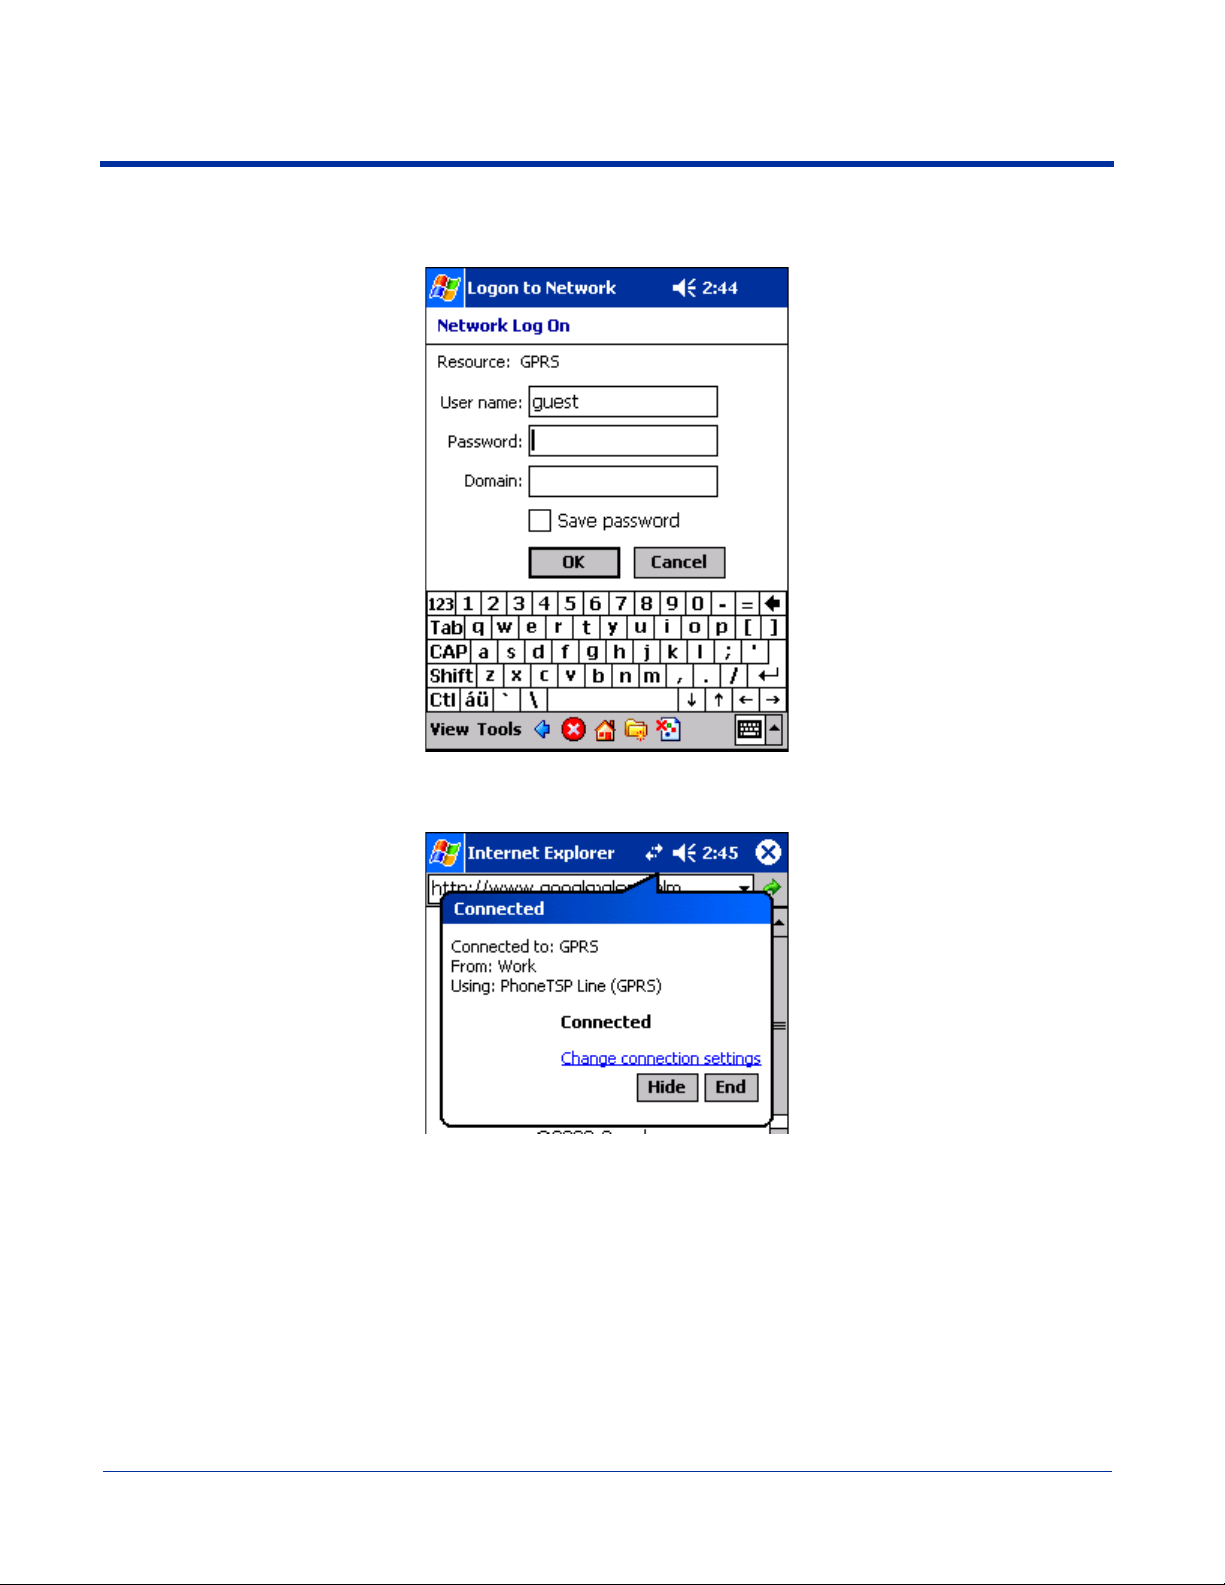
GPRS Connection
When a GPRS connection is required - e.g., by navigating to a web site - a Network Log On screen is automatically displayed.
Enter the Password and Domain, then tap OK to connect.
You have the option of disconnecting by tapping on the GPRS connection icon in the navigation bar and tapping End.
11 - 28 Dolphin® 7900 Mobile Computer User’s Guide - Prelim. Draft Rev (a)
12
Applications
Dolphin 7900 terminals ship with the following Microsoft applications installed:
• Calendar
• Contacts
• Tasks
• Notes
• Messaging
• Pocket Internet Explorer
• Pocket Word
• Pocket Excel
• Windows Media Player for Pocket PC
• MSN Messenger
• Pictures
Note: Microsoft® Money, Microsoft® Reader are NOT installed on the Dolphin 7900 when shipped but may be installed from the
Microsoft Companion CD.
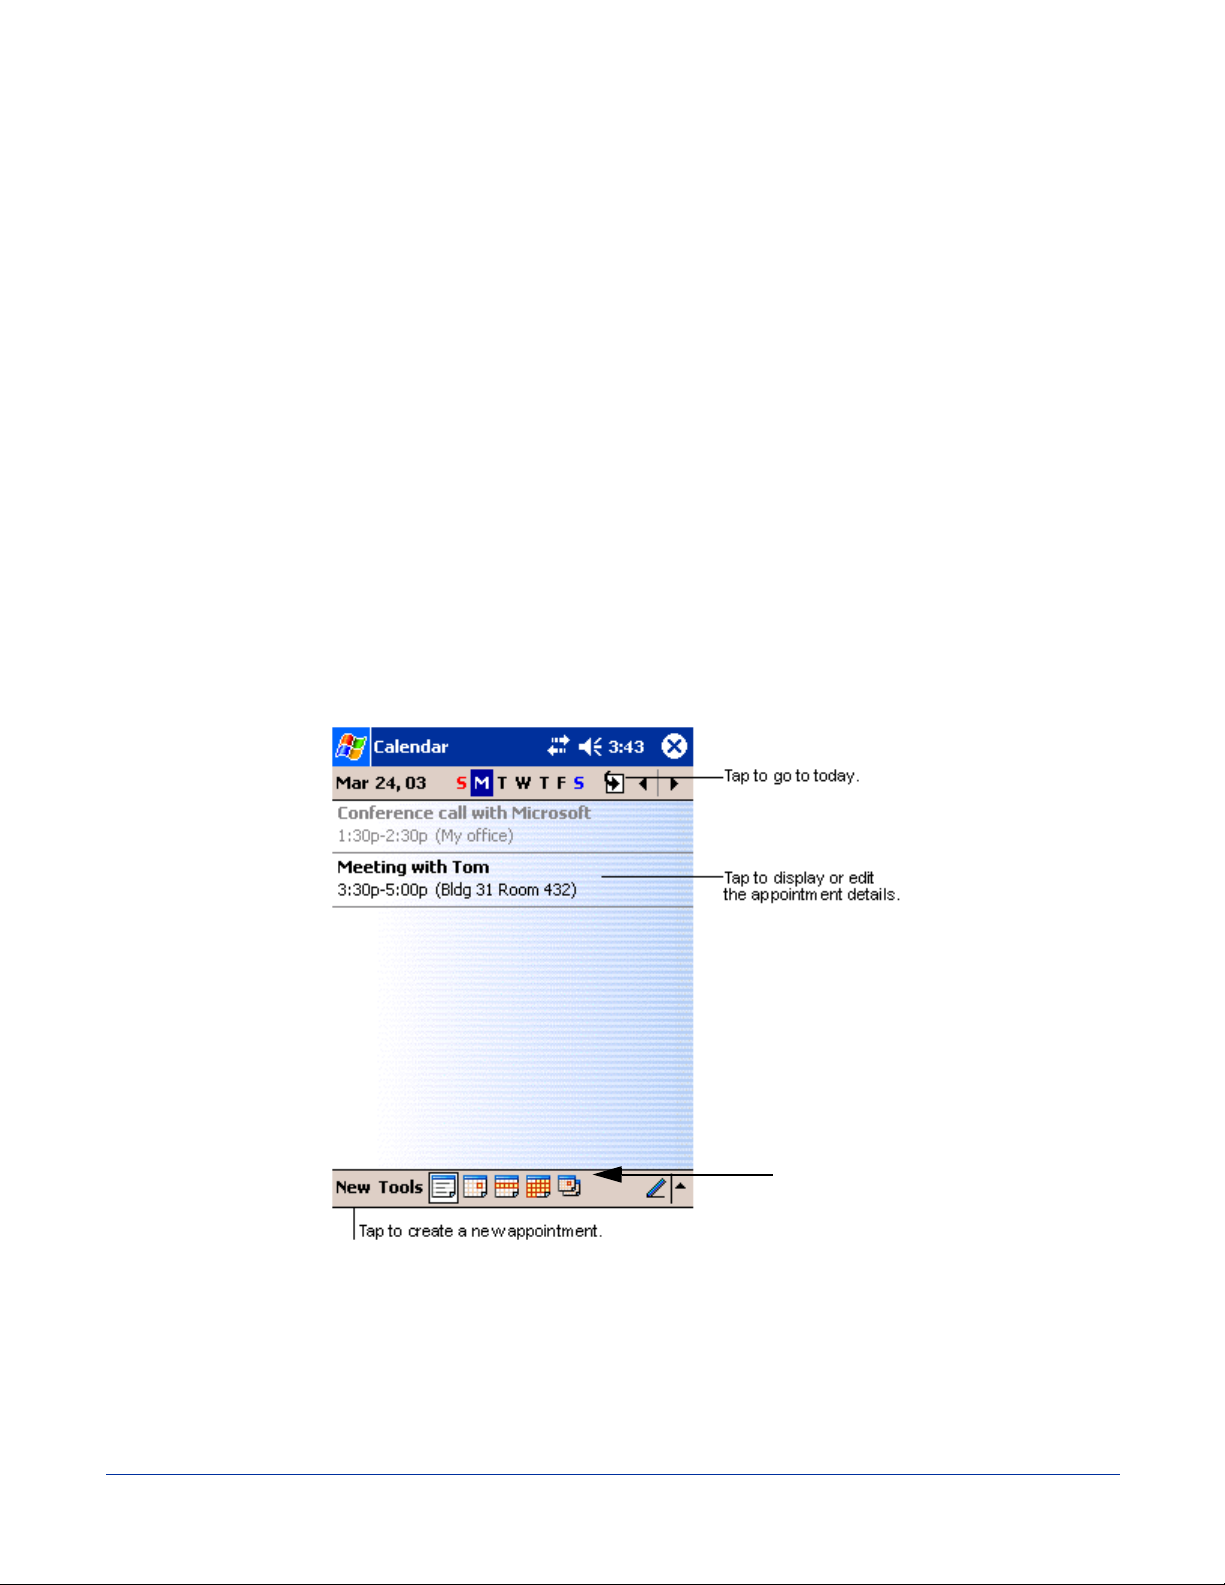
Calendar
Use Calendar to schedule appointments, including meetings and other events. You can check your appointments in one of
several views (Agenda, Day, Week, Month, and Year) and easily switch views by using the View menu.
Tap these buttons to see the
Calendar in day, week,
month, and year views.
Note: You can customize the Calendar display, such as changing the first day of the week, by tapping Options on the Tools
menu.
Creating an Appointment
1. If you are in Day or Week view, tap the desired date and time for the appointment.
2. Tap New.
Dolphin® 7900 Mobile Computer User’s Guide - Prelim. Draft Rev (a) 12 - 1
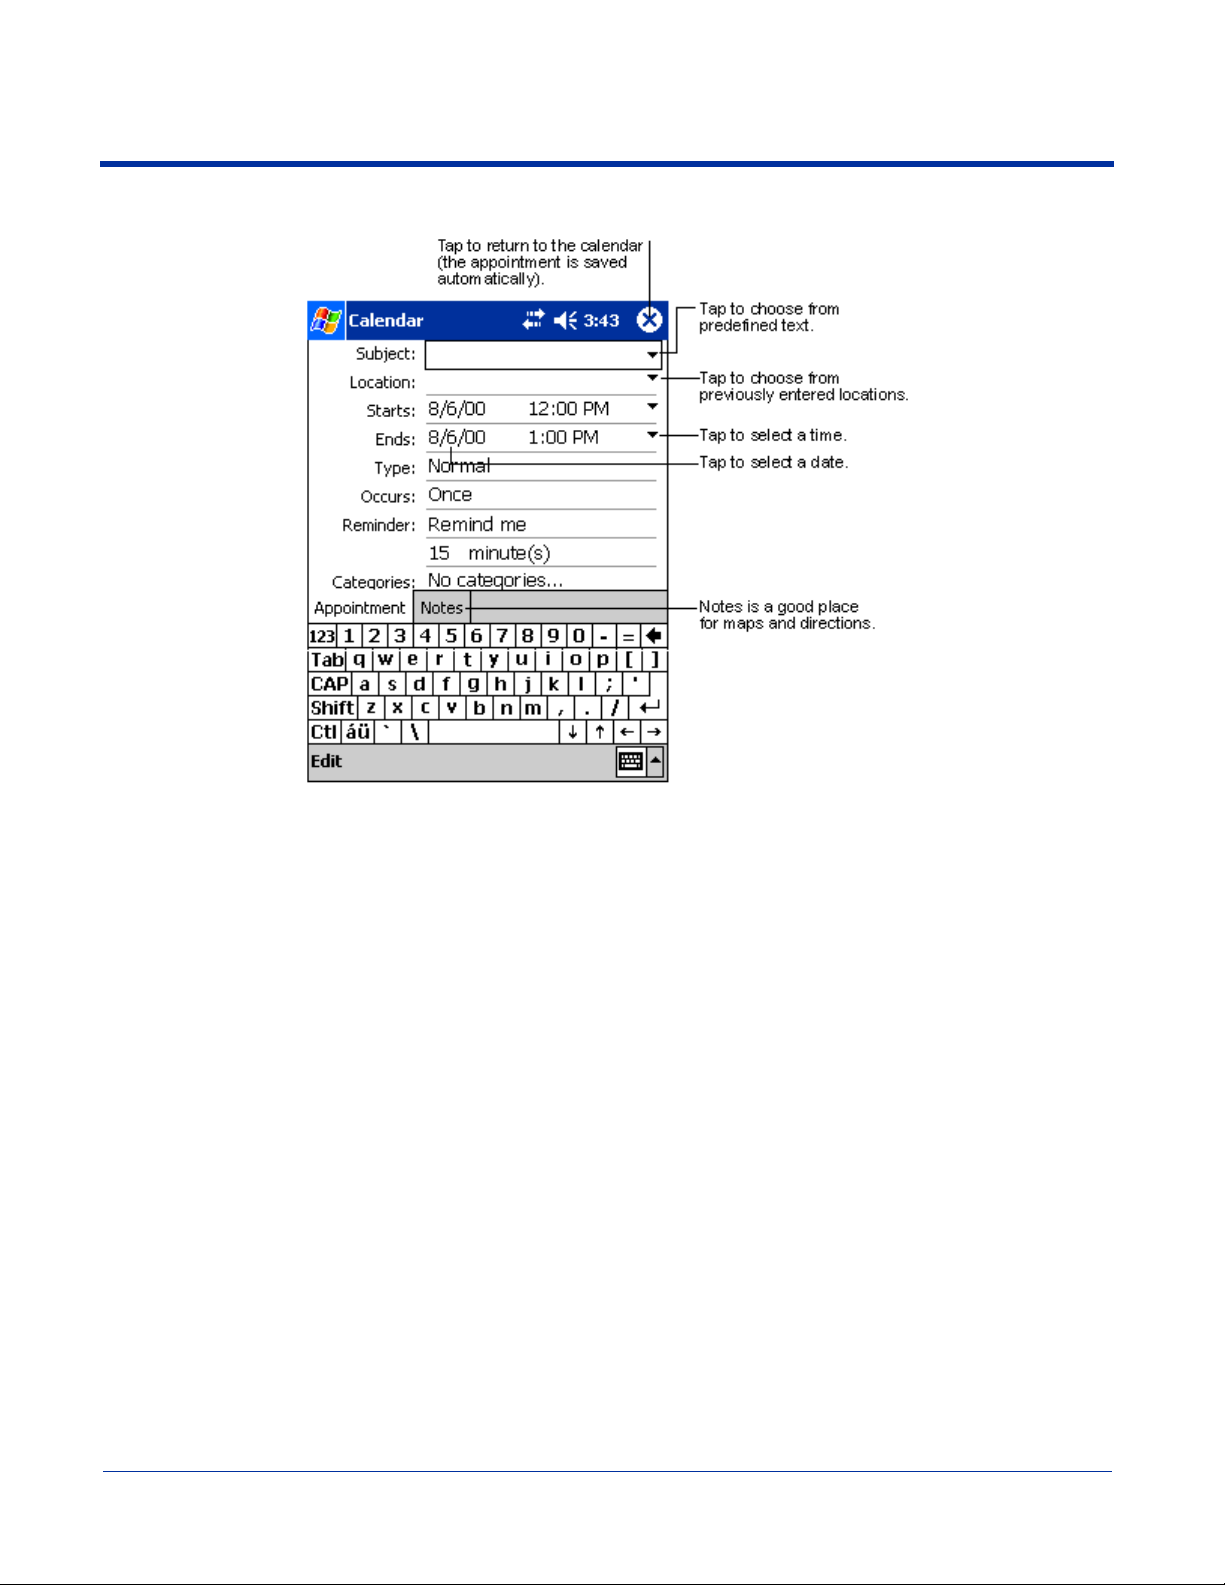
3. Using the input panel, enter a description and a location. Tap first to select the field.
4. If needed, tap the date and time to change them.
5. Enter other desired information. To see all available fields, hide the input panel.
6. To add notes, tap the Notes tab. You can enter text, draw, or create a recording.
For more information on creating notes, refer to Notes on page 12-10.
7. When finished, tap OK to return to the calendar.
Note: If you select Remind me in an appointment, you will be reminded according to the options set in Start > Settings >
Personal tab > Sounds & Reminders.
12 - 2 Dolphin® 7900 Mobile Computer User’s Guide - Prelim. Draft Rev (a)
 Loading...