

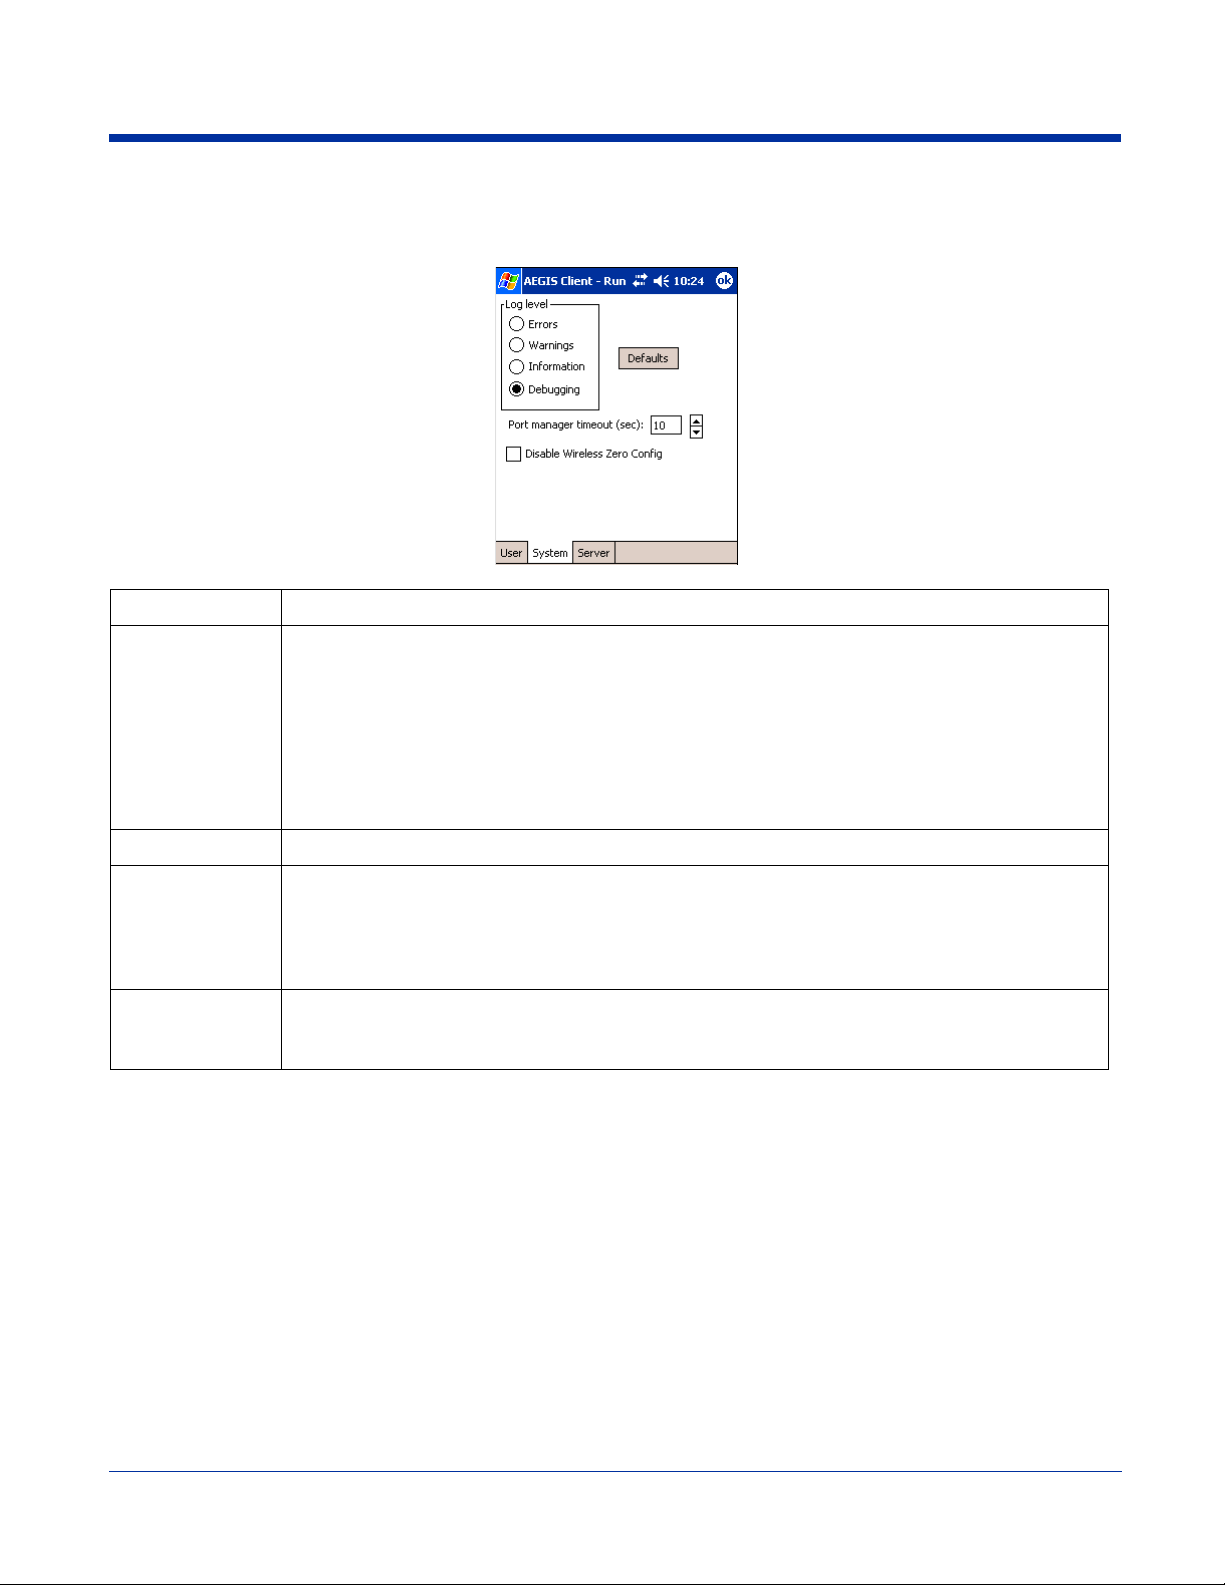
System Tab
The System Settings tab controls logging and the port manger timeout period.
Field Description
Log Level These settings control the detail of the log messages generated by the Client. Each level is cumula-
tive. By default, all errors, w arnings, and information events are logged. Each entry records a severity
code (of one [debug message] to four [error] asterisks), a time stamp, and a message.
• Errors - only the most severe conditions are logged.
• Warnings - less severe conditions are logged.
• Information - all errors, warnings, and information events are logged. This is the default setting.
• Debugging - creates a log message each time the Client detects or reacts to an event. Be advised
that log entries fill memory quickly if the Debugging level is chosen. Do not use the Debugging
option for a significant length of time because most internal operations generate messages.
Defaults Tap this button to return log settings to the default settings.
Disable Wireless
Zero Config
Port Manager
Timeout
Use this option only as directed by technical support.
Selecting this option disables other wireless utilities whether the Client is running or not. If not
selected, other wireless utilities cannot apply their settings to the wireless card while the Client is run
ning (although their status displays are usually unaffected). You will need to perform a soft reset
whenever this setting is changed.
The interval at which the client polls the ports. This is used under different circumstances, for instance
after physical changes such as card removal or insertion have been detected. This value should not
be changed from the 10-second default unless so advised by technical support.
-
Dolphin® 7900 Series User’s Guide–
Preliminary
Rev (e) 9 - 17

Server Tab
The Server identity tab defines the credentials the client uses to authenticate the server during TLS/TTLS/PEAP authentication
message exchange. The Client uses this information to verify that the Client is communicating with a trusted server.
Field Description
Do not validate server
certificate chain
Certificate issuer
must be
Allow intermediate
certificates
Server name must be This is either the server name or the domain the server belongs to, depending on which option
Must match exactly When selected, the server name entered must match the ser ver name found on the certificate
Must contain domain
name
If this option is selected, the server certificate received during the TLS/TTLS/PEAP message
exchange is not validated.
This is the certificate authority used during TLS/TTLS/PEAP message exchange. Any Trusted
CA is the default selection and means that any certificate authority can be used during authen
tication.
Both trusted intermediate certificate authorities and root authorities whose certificates exist in
the system store are available for selection in the drop-down list.
This option is selected by default and enables unspecified certificates to be in the server certificate chain between the server certificate and the certificate authority selected in the Certificate
issuer must be field.
When selected, this option allows the server certificate received during negotiation to be issued
directly by the certificate authority or by one of its intermediate certificate authorities.
If disabled, then the selected Certificate issuer must have directly issued the server certificate.
is selected below the text field.
During authentication, this name will be compared to the server certificate’s Subject: CN field.
exactly.
When selected, the server name field identifies a domain and the certificate must have a server
name belonging to this domain or to one of its sub-domains (e.g., zeelans.com, where the
server is blueberry.zeelans.com).
Configuring the Port
-
On the main screen, tap and hold on a port, and select Configure on the popup menu. The Port Settings Configuration screen
opens displaying the Wireless Networks tab.
9 - 18 Rev (e) Dolphin® 7900 Series User’s
Guide–Preliminary
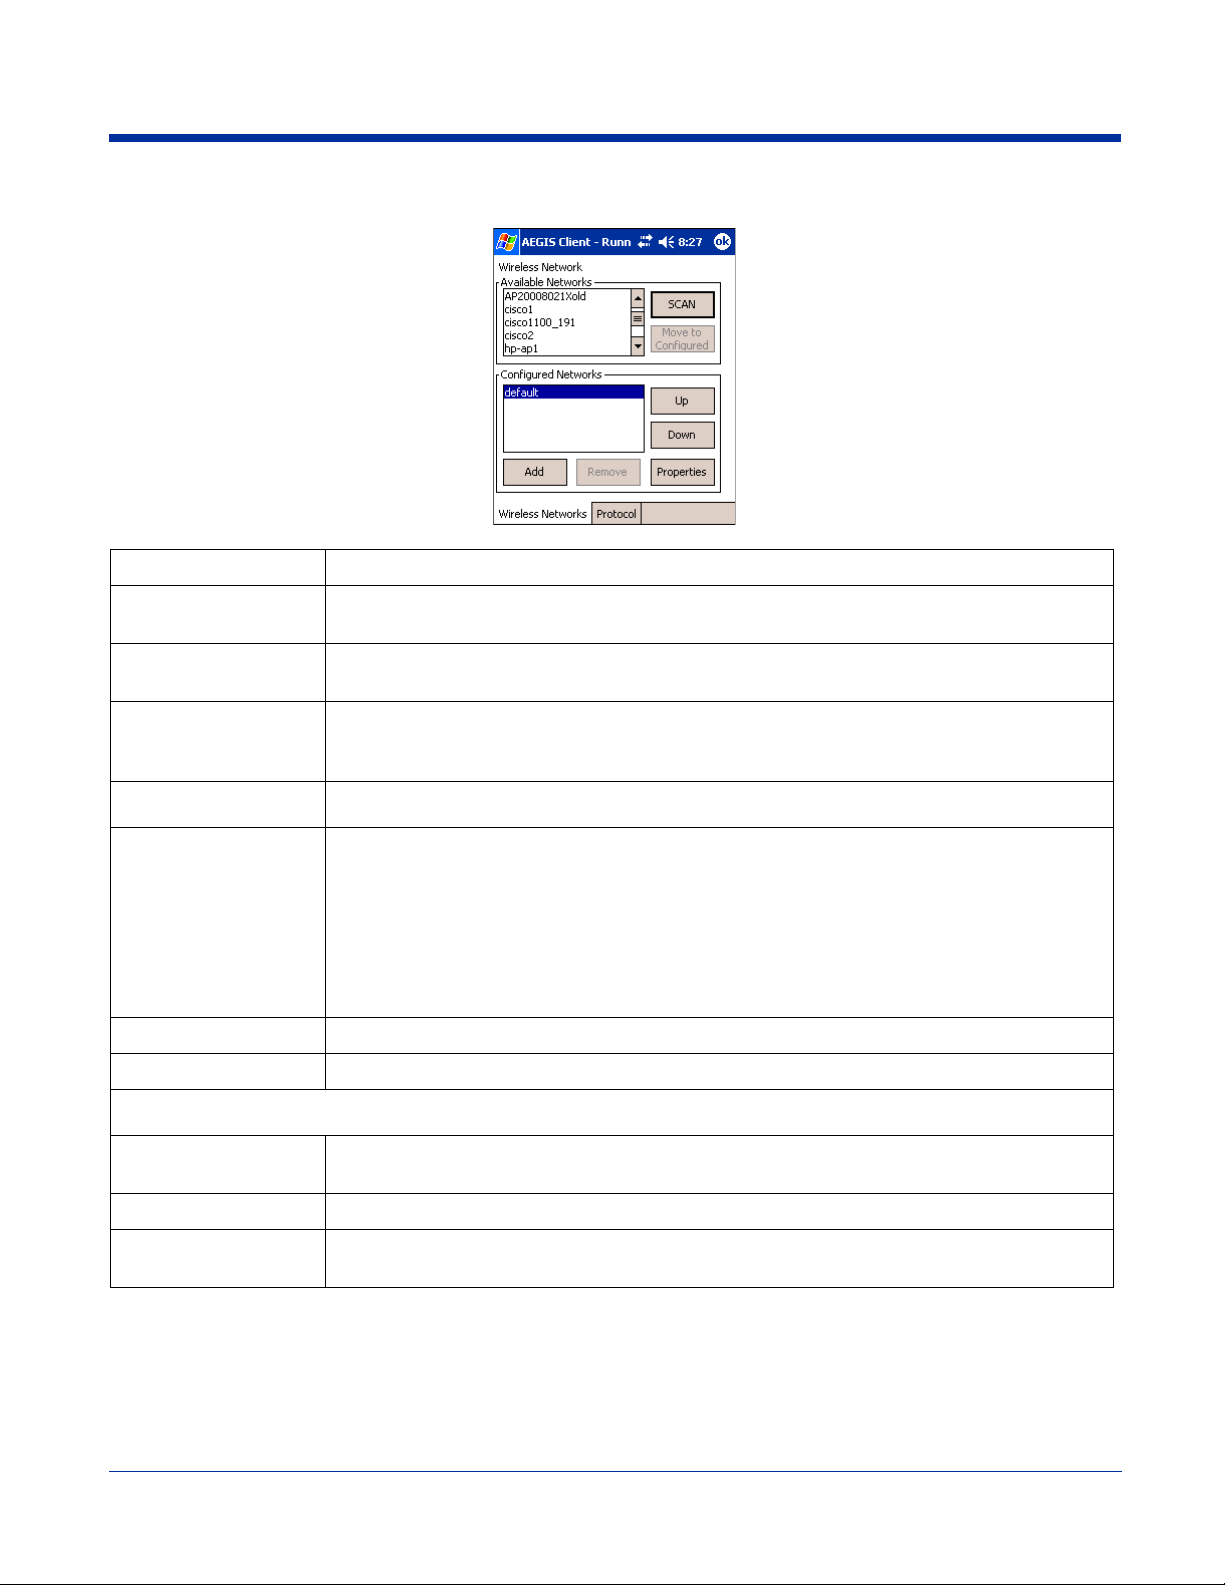
Wireless Networks Tab
Field Description
Available Networks Displays the networks the terminal recognizes as available to connect to. When the Client is first
installed, there are no entries in the Available Networks list.
Scan Displays a list of networks broadcasting their availability.
You can also attach to networks who are not broadcasting.
Move to Configured Activates after Scan has been tapped and the available networks have been retrieved. In the list
of networks retrieved, select the network you wish to connect to, and tap Move to Configured.
This selects the network.
Configured Networks
Default When the Client is first installed , th ere is a C o nfigured Network named "default" in the list. This
Displays the networks your terminal is connected to. This section adds and removes networks as
well as reviews and edits the properties of existing configured networks.
profile has Associate with any network selected in its Properties selection screen.
If you are going to be in a location with only one AP (or more than one AP that attaches to the
same network), the default profile may be sufficient for you needs, without necessitating the
selection of a specific network or networks.
If default is last in the list, it can act as a wildcard should you be out of the range of your primary
networks (which are listed first). Do not place default at the top or middle of the list because, if it
is, connection to the other list entries will never be attempted.
Up Moves a selected network up one place in the list.
Down Moves a selected network down one place in the list.
Note: The order of the networks in this list is the exact order that connections will be attempted. The network listed first will
be attempted first and so on. Place your primary networks first.
Add Manually adds a network to the Configured Networks list if the AP does not broadcast its SSID or
you are pre-configuring the client for an AP that is not currently in range.
Remove Removes a selected network in the list.
Properties Displays the properties of the network selected in the list. This button opens the same network
configuration screen as the Add button does; use it to edit network configuration properties.
Dolphin® 7900 Series User’s Guide–
Rev (e) 9 - 19
Preliminary
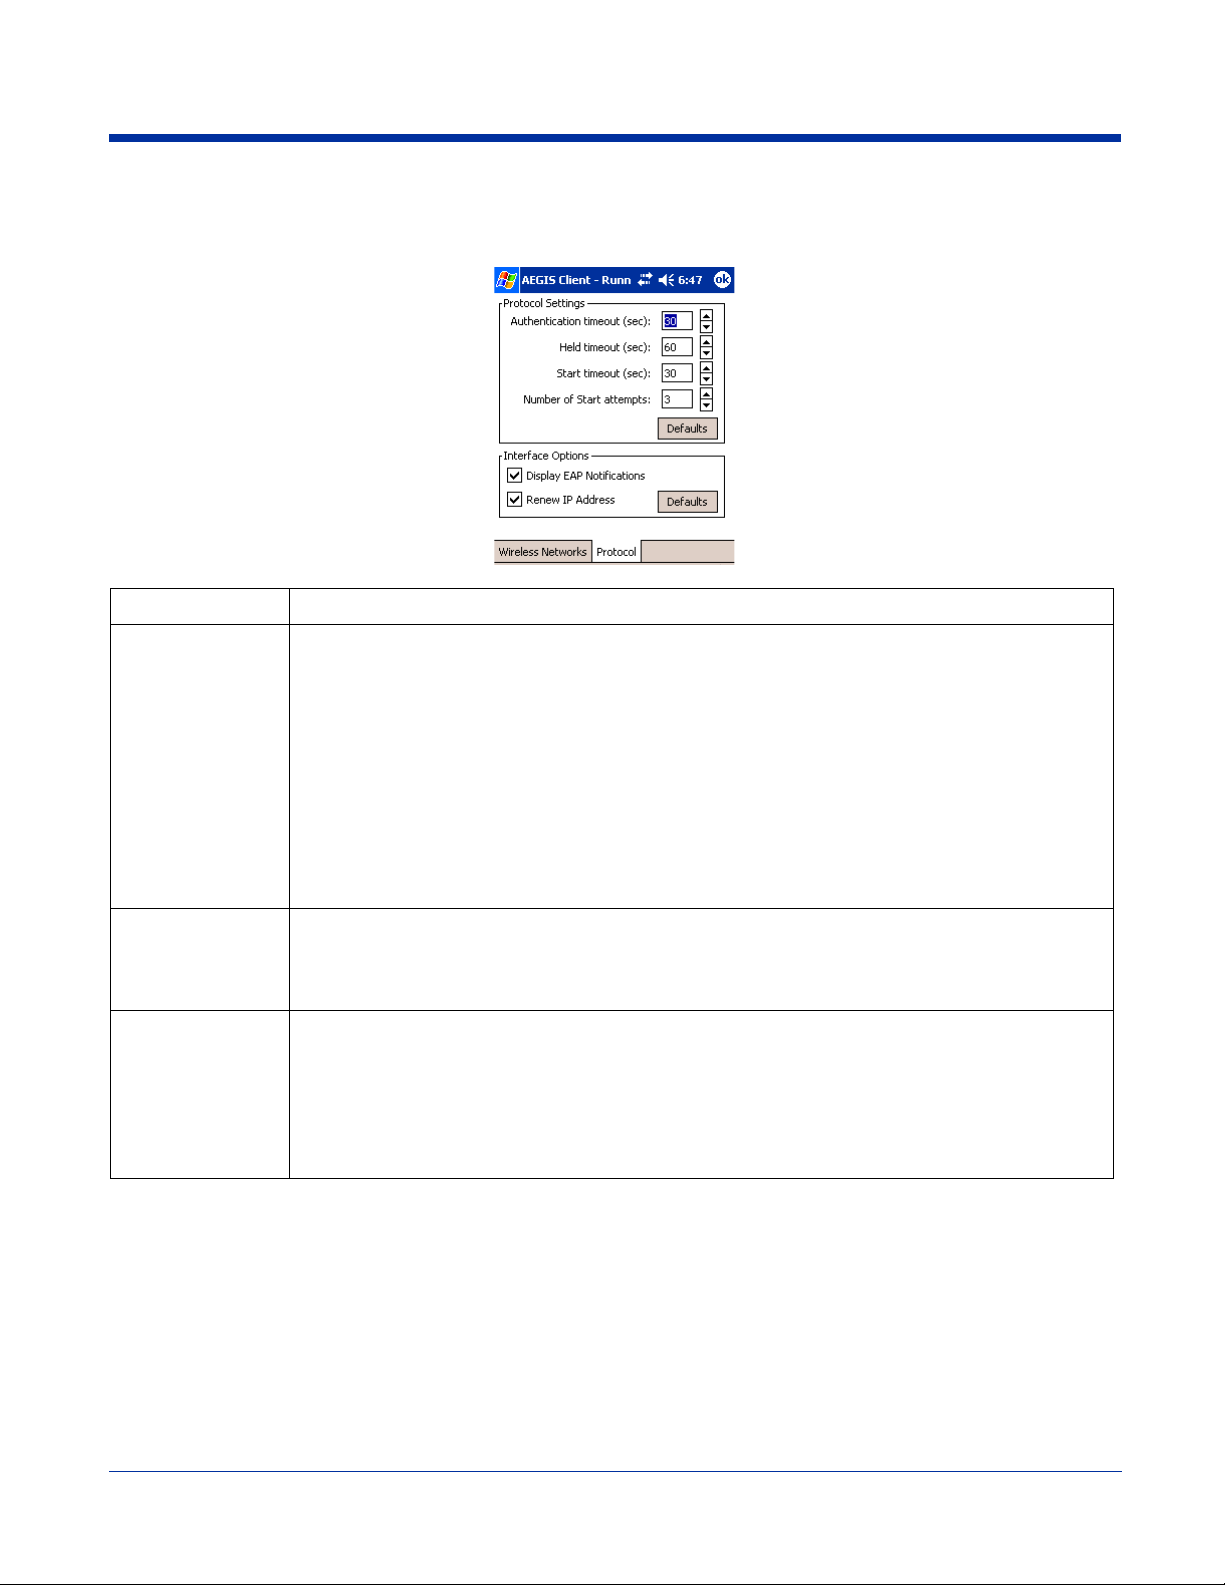
Protocol Tab
The Protocol tab configures parameters that apply to all the networks the selected port connects to.
Field Description
Protocol Settings These are the timer intervals and retry settings defined in the 802.1X standard. They determine how
long the supplicant state machine will wait in a given state. These parameters shouldn’t be modified
without an understanding of the supplicant state machine. For more information about the supplicant
state machine, obtain its 802.1X protocol specification.
The parameters are:
• Authentication Timeout - The period of time the Client remains in the authenticating or acquired
state without receiving a response from the AP or switch.
• Held Timeout - The period of time the Client remains in the held state after failing authentication.
• Start Timeout - The period of time the Client remains in the connecting state before restarting when
there is no response.
• Number of Start Attempts - The number of times the Client restarts before giving up. At that point,
the Client then defaults to the authenticated state, but there will be no network connectivity because
the protocol exchange was never completed.
Display EAP
notifications
Renew IP address Initiates a DHCP request to obtain a dynamic IP address after a successful authentication, but only if
Specifies that the EAPOL notification message will be displayed to the user. An authenticator may
use such notification to inform you, for example, about a near password expiration. However, some
authenticators send chatty and annoying notifications that may, for the convenience of the user, be
suppressed. Note that all notifications are written to the event log even if they are not displayed.
the client detects that the connected network (the SSID) has changed. The result is that renewal
should not occur upon re-authentication, but does occur at boot or when connecting to a different net
work.
If you have a slow authenticator, you may wish to enable this option when configuring the service
because a slow authenticator may prevent you from getting a DHCP-assigned IP address upon bootup. This option is ignored if the given adapter has a static IP address.
-
9 - 20 Rev (e) Dolphin® 7900 Series User’s
Guide–Preliminary
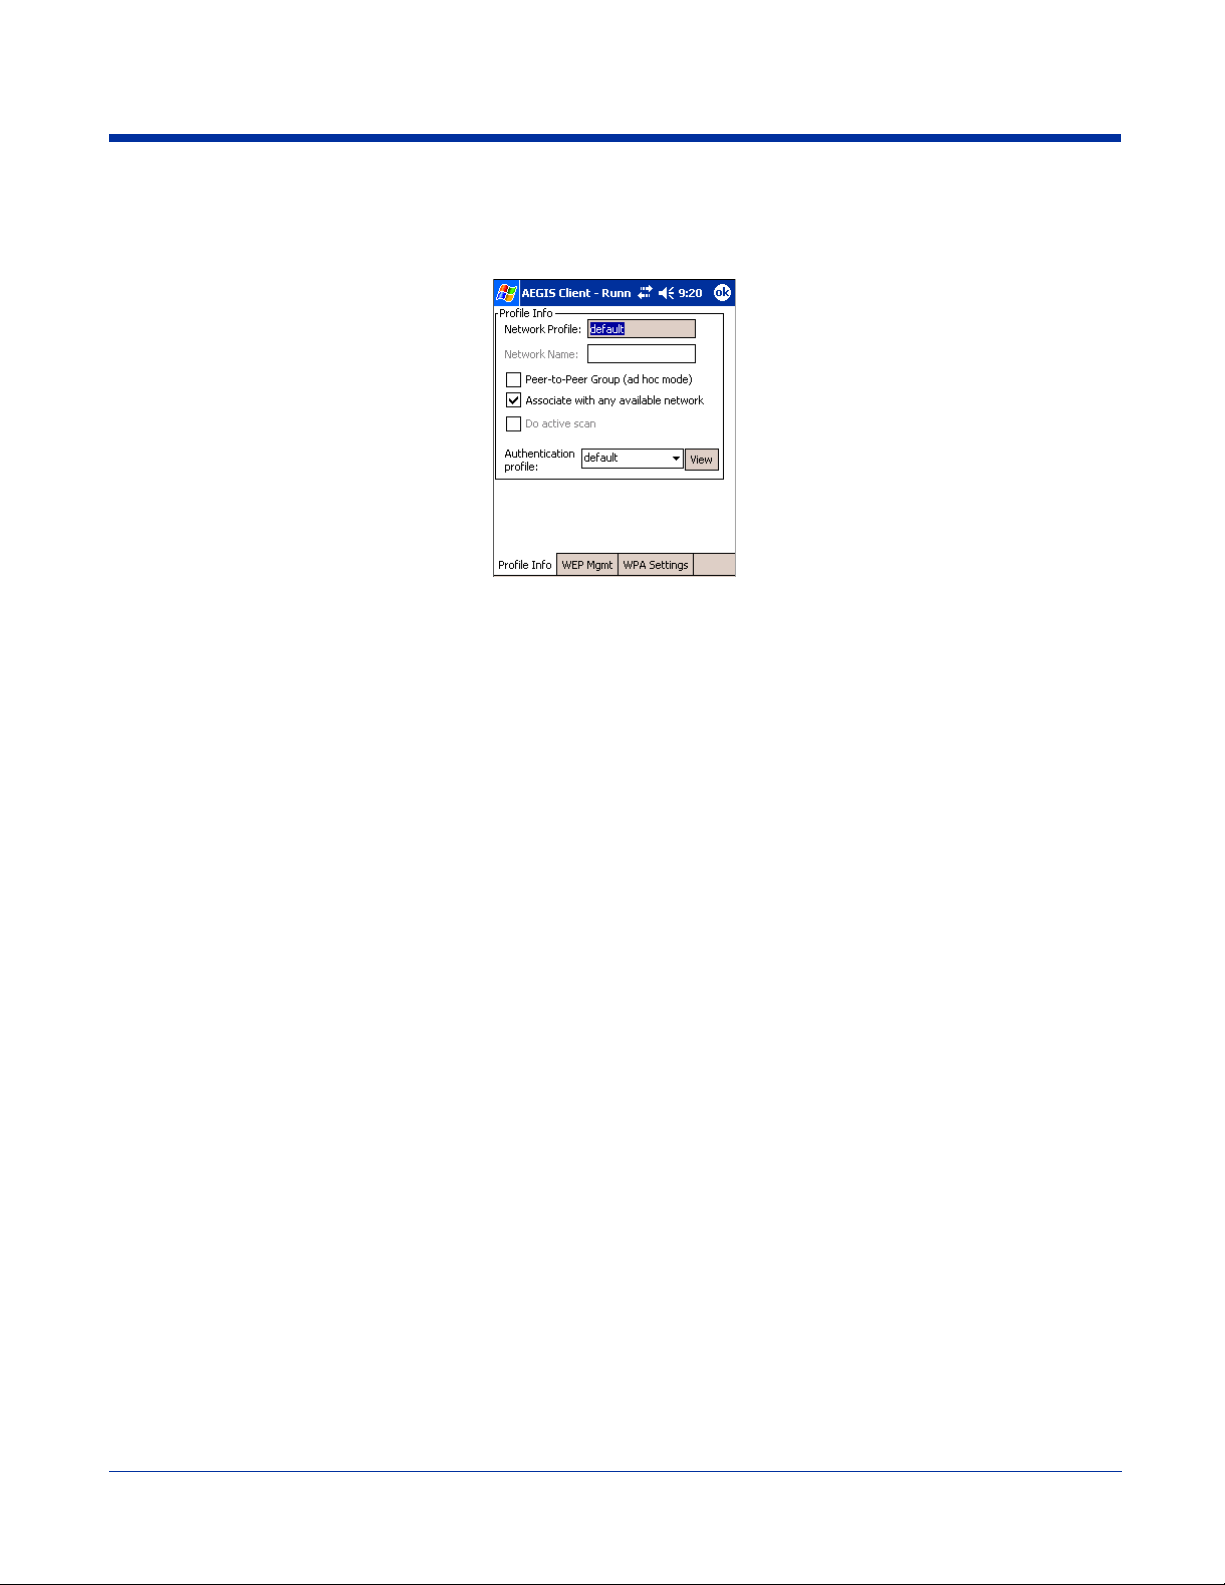
Configuring a Network Profile
To configure a network profile, on the main screen, tap and hold on the port, tap Configure, then tap Add. The Network Profile
screen opens displaying the Profile Info tab.
Note: The settings on these tab windows are interrelated. This means that selecting one may disable access to others.
Dolphin® 7900 Series User’s Guide–
Preliminary
Rev (e) 9 - 21
Profile Info Tab
Field Description
Network Profile Enter the name of this record. This is the name that appears in the Configured Networks list and, by
default, is the same as the broadcast SSID. Note that there is nothing special about the name "default".
You could configure any other record similarly and it would behave the same way.
Network Name This is the SSID of the AP. If the AP broadcasts its SSID, then this value may be derived from the Avail-
able Networks list. If the SSID does not broadcast, then you must manually enter the value here.
Peer-to-Peer
Group
Do active scan Select this option whenever the AP (or client, for ad hoc mode) is not broadcasting its SSID.
Authentication
Profile
Select this option to have two or more client workstations communicate with each other without the benefit of an AP. You should also select Do Active Scan and, in the WEP Management page, enable Use
key for data encryption while entering a common key for both sides.
WPA is not supported in this mode.
Select the Client Configuration (user) profile associated with this network. The drop-down list contains
the profile names created onn the User tab of the Client configuration area.
To open the selected profile, select it in the drop-down list and tap View. The User tab opens displaying
the profile details. If you tap OK (to save changes) or Cancel, you are returned to the Profile Info tab.
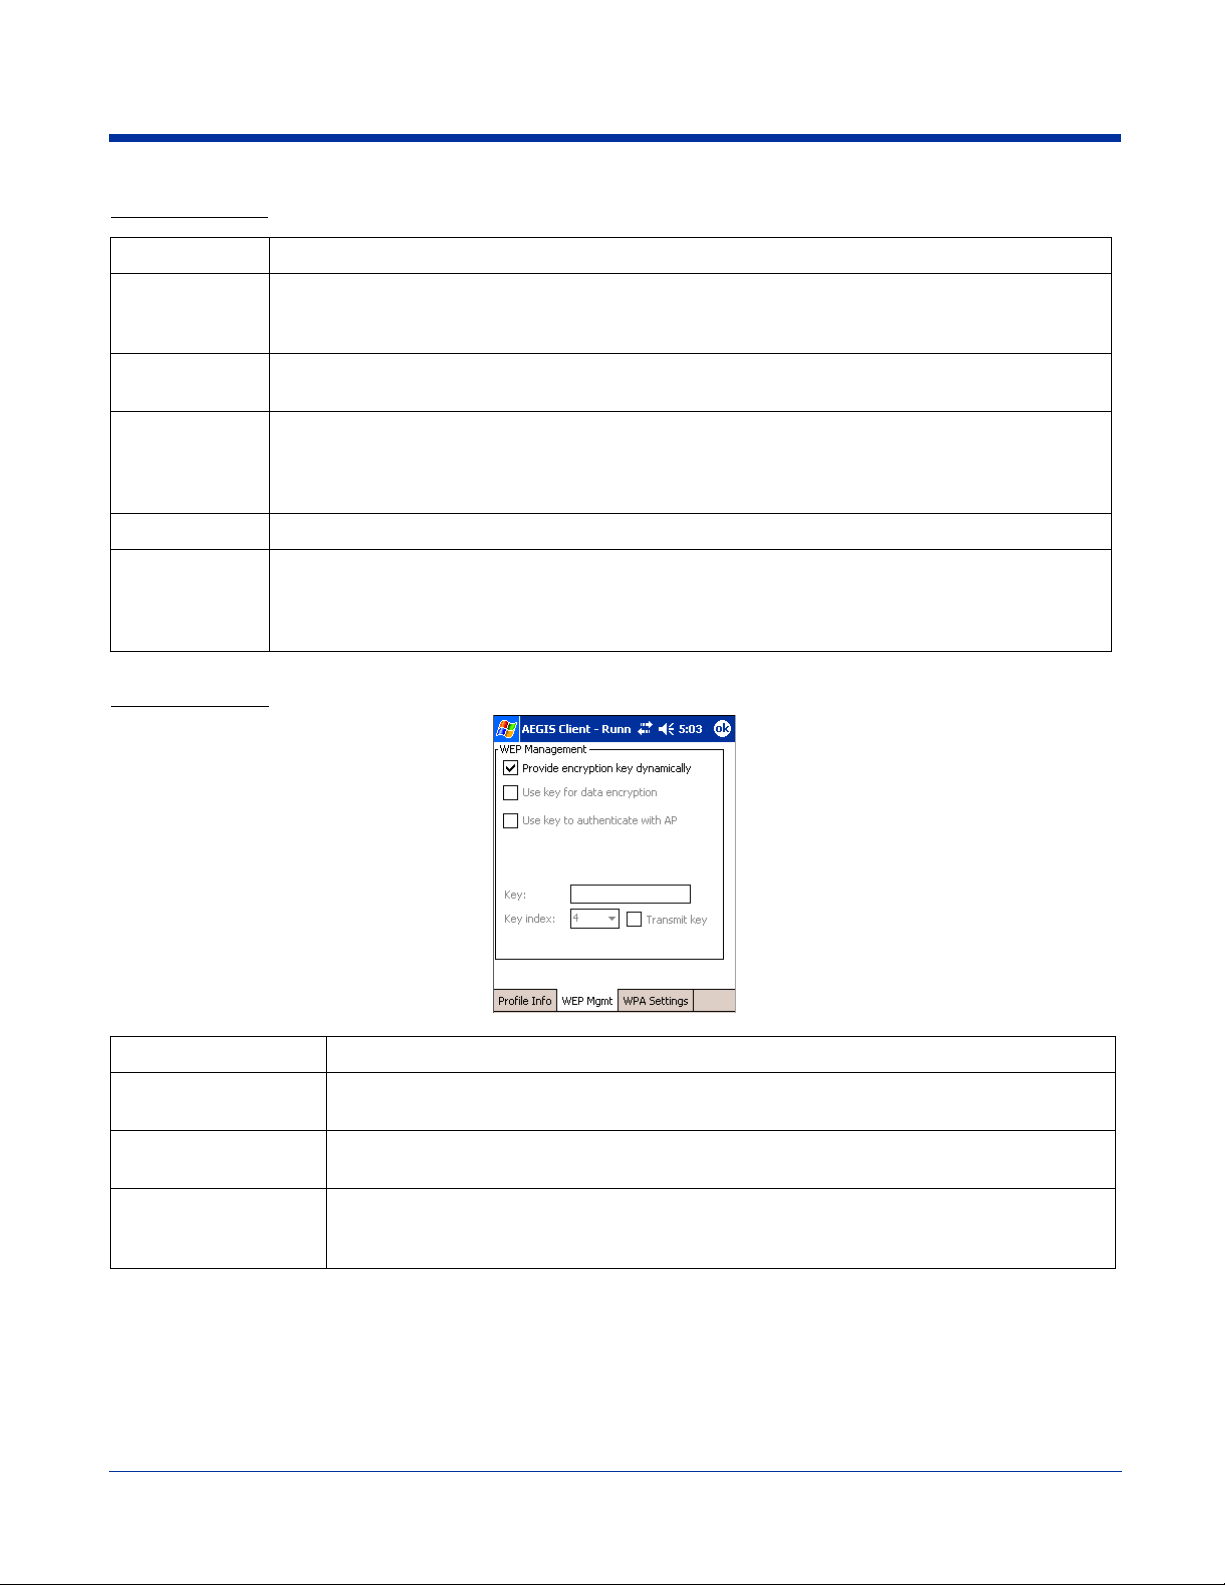
WEP Mgmt Tab
Field Description
Provide encryption
key dynamically
Use key for data
encryption
Use key to
authenticate with AP
This option is selected by default. If this option is selected, the other WEP settings on this page
are disabled. To enter a custom WEP, de-select this option. The other fields become active.
Select this option to manually enter a WEP key to encrypt your data to the AP. Y ou enter that key
in the Key field below.
Select this option if your network does not support 802.1x authentication and you need to connect to the AP without username and password authentication. The key entered below is used to
authenticate instead.
9 - 22 Rev (e) Dolphin® 7900 Series User’s
Guide–Preliminary
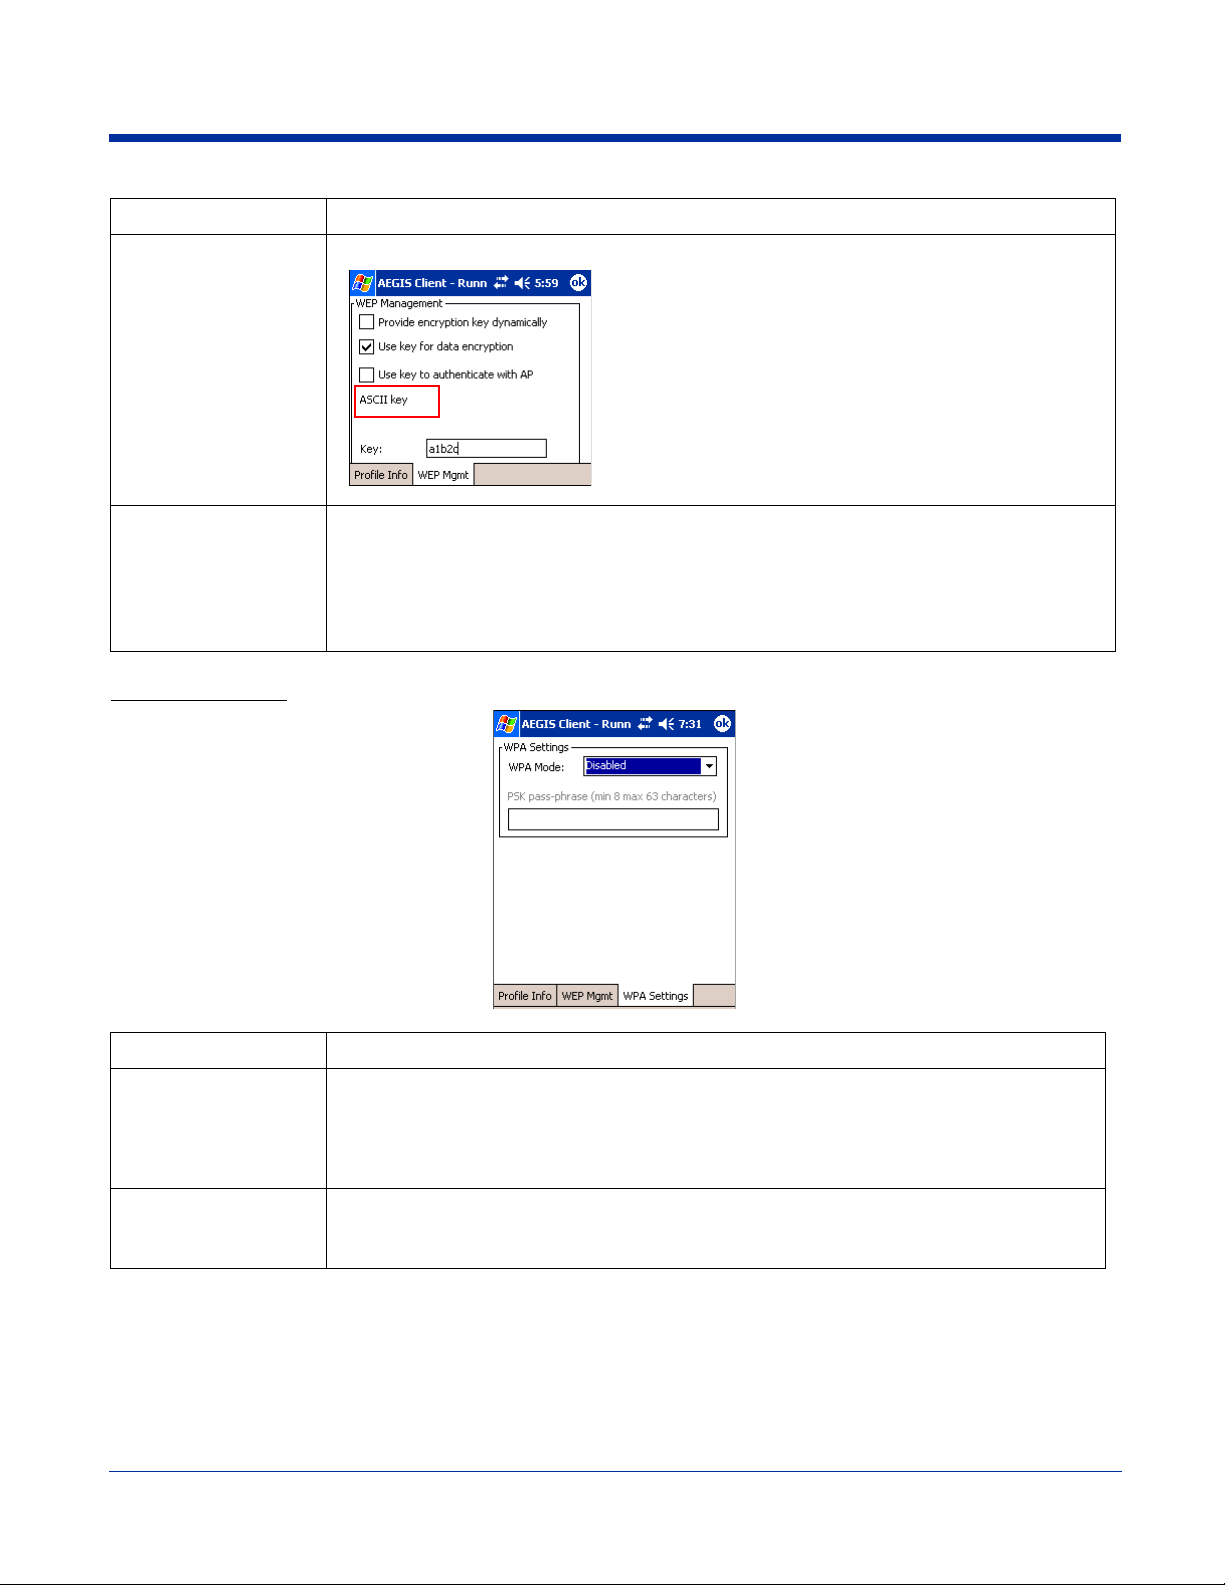
Field Description
Key In this field, enter the WEP key.
ASCII: 5 or 13 characters
Hexadecimal: 10 or 26 characters.
When the key entered is in the correct format, the screen
changes to display the type - ASCII or Hexadecimal.
Key Index/Transmit
Key
The Key Index drop-down list contains the available keys. You may enter up to four keys for
reception; the Client will try all four to find one that works with the AP.
From the drop-down list, select the key to be used for transmission as well. If the key selected is
the transmit key, the Transmit key box is checked.
To change the transmit key, select another key and check the Transmit key box. The check box
of the original transmit key will be automatically de-selected.
WPA Settings Tab
Field Description
WPA Mode This drop-down list contains the following options:
• Disabled - Do not enable WPA mode. This is the default selection.
• WPA 802.1x - Enable WPA and obtain key information through the 802.1x protocol.
• WPA PSK - Enable WPA with Pre-Shared Key (PSK) information entered in the field below.
This mode is used if the 802.1x protocol is not bein g used for authentication.
PSK pass-phrase This field activates if you select WPA PSK in the WPA Mode drop-down list.
Enter a Hexadecimal value that is 64 characters long. Asterisks appear as you type for
increased security.
Logging
The event log is an ASCII text file named “LOG8021X.TXT” located in the directory defined by the WINDIR environment variable
(usually the Windows directory). The information the log records is determined by the log settings on the System tab.
The format of the entries is
Time Stamp Message Text
Dolphin® 7900 Series User’s Guide–
Preliminary
Rev (e) 9 - 23
The Refresh button at the bottom of the screen is used to update the log file while you are reading it. If the file gets too large, old
entries are automatically deleted.
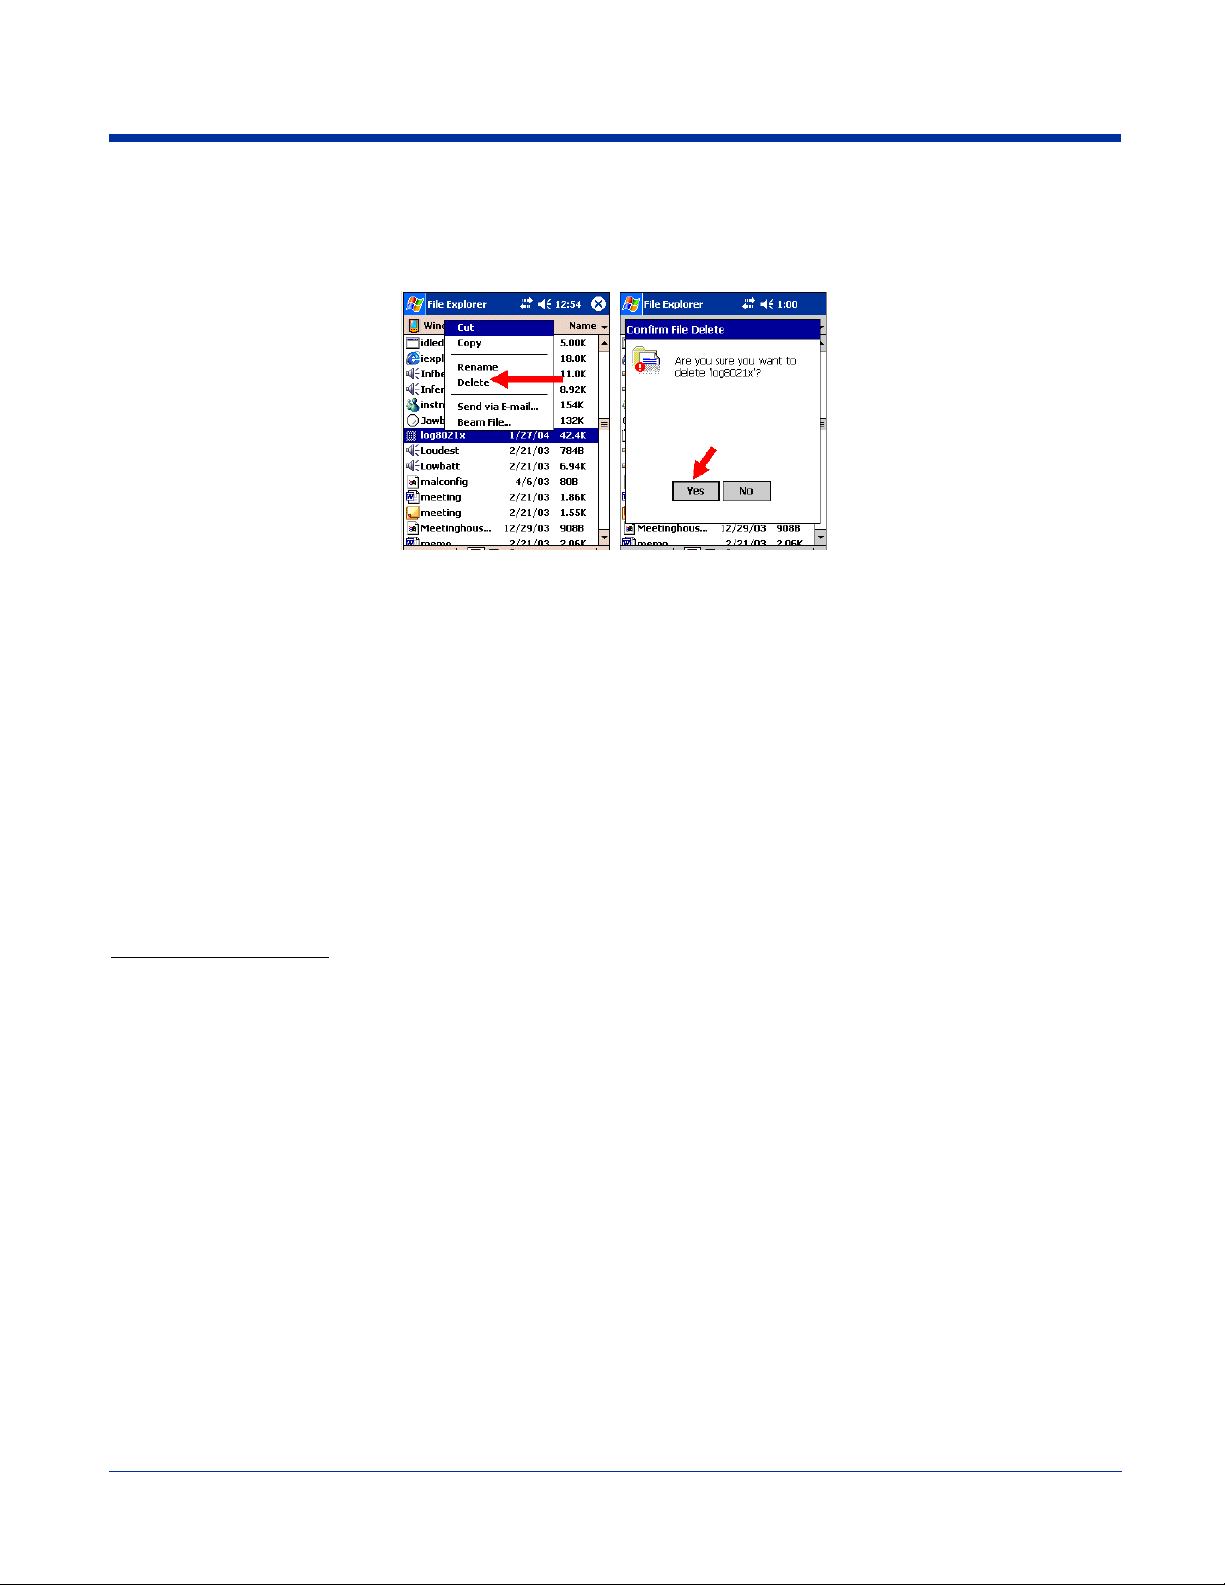
If you wish to start with a blank file, exit from the Client (so the icon no longer appears at the lower right of the screen) and delete
the log file (log8021x) in File Explorer; see Using Find on page 4-11.
When you restart the Client, a new log file is created.
Installing Certificates with CertAdd
Certificate Requirements
During configuration, you may have specified one or two certificates to use during the authentication process. The specified
identity should match the Issued to field in the certificate and should be registered on the authentication server (i.e., RADIUS
server) that is used by the authenticator. In addition, your certificate must be valid on the authentication server. This requirement
depends on the authentication server and generally means that the authentication server must know the issuer of your certificate
as a trusted Certificate Authority (CA).
If the selected certificate does require a password or pass phrase to decode the private key, enter this value in the “Certificate
Pass Phrase” field. This value will be encrypted when the configuration is saved. However, on some systems, there may not be
a certificate. If that is the case, you can use the section below as a primer on OS X certificate management.
About CertAdd
CertAdd is a standalone utility that allows certificates to be selected and installed on a Windows Mobile device.
Installing Certificates
Client or CA certificates can be imported from *.cer (same as *.der), *.p7b, or *.pfx files.
1. Download the certificate file to the My Documents folder. The location isn’t critical, although you may want to create a
standard folder for consistency.
2. Go to Start > Programs > Meetinghouse Certificate Installer. All valid certificate file types located in the My Documents
folder appear in the list.
3. Tap and hold on a certificate in the list. A pop-up appears asking if you want to install the certificate.
9 - 24 Rev (e) Dolphin® 7900 Series User’s
Guide–Preliminary

4. Tap OK. The certificate is loaded into the correct certificate store.
Advice and Workarounds
Issue Possible Causes and Solutions
The Client will not start on the device with an
error message about missing files.
The wireless network interface (port) does not
appear in the main AEGIS screen.
The wireless network interface appears, but
when I select it and tap Configure, the Scan
button is disabled.
The client is not attaching to the correct AP.
The Client is failing authentication even though
all my information was entered correctly.
My AP does not broadcast its SSID. Even
though I have manually configured an AP with
that name, the Client won't associate with it.
I am authenticated, but I don't get an IP
address through DHCP.
I cannot attach to my old network that does not
support 802.1x authentication, but is using
WEP encryption.
I made changes, but they do not appear to have
taken effect.
Perform a soft reset.
• The license is not valid (If you have entered a time-limited license, is
your clock on the device correct?).
• Restart the client - on the main screen tap Client > Restart.
• Perform a soft reset.
• If the radio is turned off or the radio card is not present, this will
sometimes cause the port name to not appear.
• If the radio driver is very old and does not support NDIS 5.1
commands, the Client may not be able to detect it.
Enable the radio; Start > Settings > Connections tab > Radio Man-
ager.
The default network profile instructs the client to attach to the first
available AP. On the Wireless Networks window, select a network, move
it to Configured Networks, and then move it above default in the list.
1. Verify that the network profile for the AP corresponds to the
authentication profile you created for it.
• Select the network profile in the Configured Netwo rks list.
• Tap Properties. The Profile Info tab opens - see page 9-22.
• In the Authentication profiles drop-down list, select the profile
you want to review.
• Tap View. The User tab appears displayin g the profile’s
information.
2. Verify that you have configured the identity and password into the
correct fields on the User tab in the authentication profile. If you are
using PEAP or TTLS, the username and password are entered in
the Tunneled authentication section.
• Make sure that the desired SSID is listed as the Network Name, not
the Network Profile (which is a screen label).
• Verify that Do Active Scan is selected on the Profile Info tab. If not
selected, the Client will not attempt to find the AP.
On the main screen, tap and hold on your AP, tap Configure on the
popup menu, and select the Protocol tab. Verify that Renew IP Address
is selected.
• Verify that you can see your SSID in the Available Networks list on the
Wireless Networks tab. Move the SSID to the top of the Configured
Networks list so that it is accessed first. If the SSID is not there, you
can add it manually and enter the SSID as the network name.
• Select the SSID and tap Properties.
• On the Profile Info tab, select Do active scan if your AP does not
broadcast its SSID.
• On the WEP Mgmt tab, select Use key for data encryption and Use
key to authenticate with AP.
• Enter the WEP Key.
• On the Protocol tab, select Renew IP Address (unless you have
entered one manually separate from the Client)
• Note that the port status indicator in the main screen reads
"Associated," not "Authenticated" when the connection is complete;
although the log file will indicate "Entered AUTHENTICATED state."
Always tap OK before exiting a screen you have changed. Then restart
the Client from the Client menu on the main screen.
Dolphin® 7900 Series User’s Guide–
Preliminary
Rev (e) 9 - 25
Advice and Workarounds
Issue P o ssible Causes and Solutions
How do I enable peer-to-peer (ad-hoc) mode to
have two clients communicate without an AP?
• On the Wireless Networks tab, add a new profile to the Configured
Network list.
• On the Profile Info tab, give each side the same network name (SSID).
• Select Peer-to-Peer Group (ad hoc mode) and Do active scan.
• On the WEP management section, select Use key for data encryption
and enter an identical key for both clients.
• Verify that this network profile is the first (or only) one in the
Configured Network list and try to restart both clients at roughly the
same time.
9 - 26 Rev (e) Dolphin® 7900 Series User’s
Guide–Preliminary
10
Wireless PAN (WPAN) Communications with Bluetooth
Overview
Dolphin terminals are available with a Bluetooth radio for WPAN (Wireless Personal Area Network) usage. When the Dolphin is
first initialized, the *.cab file and module for Bluetooth are installed.
Enabling the Bluetooth Radio
Before using the radio, make sure that the Bluetooth radio is enabled. When the radio is enabled, the Bluetooth icon appears in
the task tray on the Today screen.
Note: Radios are enabled in the Radio Manager; tap Start > Settings > Connections tab > Radio Manager.
Setting Up Your Bluetooth Card
Note: If you use the Get Connected! Wizard, which is recommended for normal usage, then this step is not necessary. This step
would be used to change the friendly name of your device.
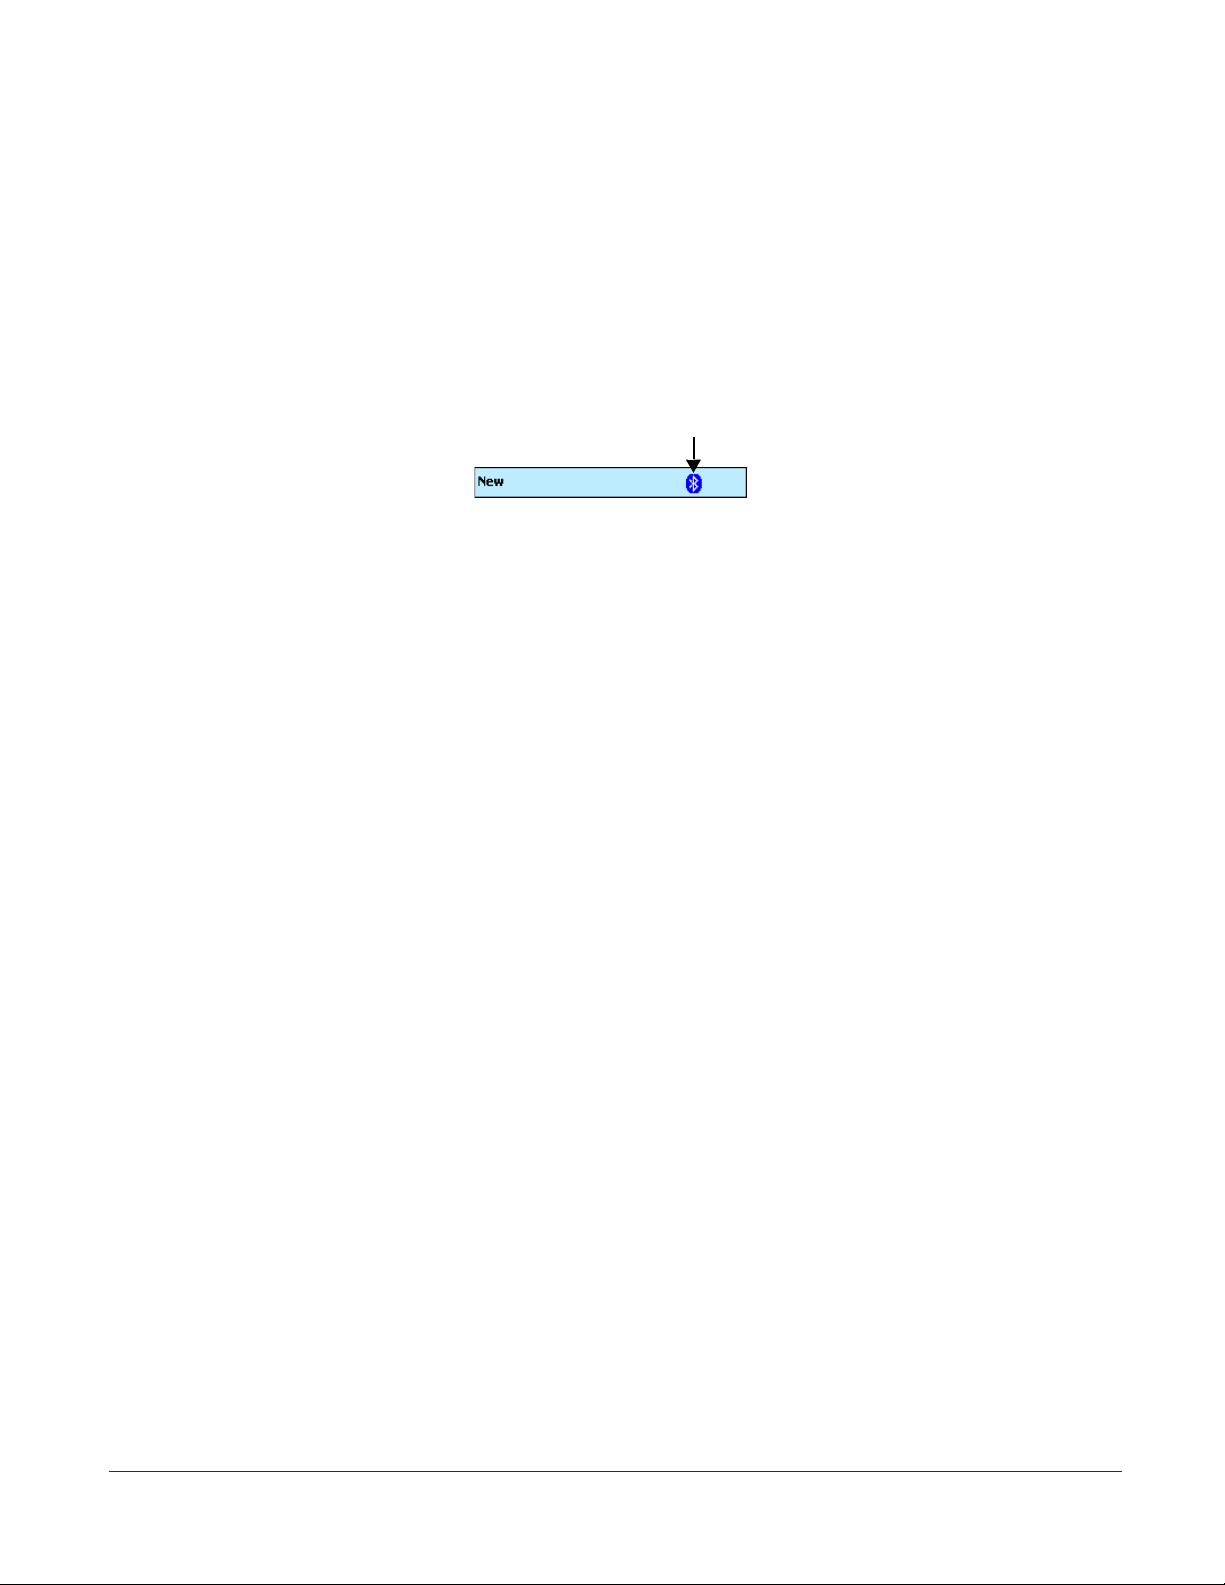
1. Tap the Bluetooth icon that appears in the task tray on the Today screen.
2. In the pop-up menu, select Advanced Features, then My Bluetooth Device. (If you installed OBEX, the menu also lists
Transfer via Bluetooth.)
3. In the My Bluetooth Device screen, you can modify the Friendly Name and make any desired configuration changes.
When done, tap OK.
• In normal phone connect operation, Discoverable mode is not needed and should be disabled.
• If you do enable Discoverable mode (e.g., for ActiveSync), note that it does not shut off by itself. To save power, remember
to disable it when not needed.
• Connectable, Use Authentication, and Use Encryption are also not required for printing or dial-up networking applications.
• Check Use Authentication to enable the Use Encryption option.
Assign COM Ports
Follow these steps to view and/or modify the Bluetooth COM ports.
Dolphin® 7900 Series User’s Guide–
Preliminary
Rev (e) 10 - 1

1. Tap on the Bluetooth icon on the Today screen. Select Advanced Features then My Bluetooth Device.
Note: If you installed OBEX, the menu also lists Transfer via Bluetooth.
2. The My Bluetooth Device screen appears. Tap on the COM Ports tab.
3. As needed, view and/or enable/disable the Bluetooth COM port assignments. Tap OK.
You can also disable the IrDA port to free up a port for Bluetooth devices. Tap Start > Settings > Connections tab > IrDA and
select Disable IrDA Port.
Note: The Bluetooth Phone port cannot be disabled.
Discover Bluetooth Device(s)
Follow these steps to discover other Bluetooth devices nearby, including non-phone devices. The Device Discovery Wizard is a
more detailed alternative to using the Bluetooth “Get Connected!” Wizard or Bluetooth ActiveSync or Bluetooth LAN Access
options. The Device Discovery Wizard allows you to discover any type of Bluetooth device.
1. If not open, launch the Bluetooth Devices folder. Tap on the Bluetooth icon on the Today screen. Select Advanced
Features then Bluetooth Devices.
2. In the Bluetooth Devices Folder, tap on the Device Discovery icon. Or you can tap on Tools. In the pop-up menu, select
Device Discovery.
10 - 2 Rev (e) Dolphin® 7900 Series User’s
Guide–Preliminary

3. Follow the Bluetooth Device Discovery Wizard to search for Bluetooth devices nearby. When prompted , select the device
type you seek.
4. When the search is complete, a screen reports the discovered Bluetooth devices. Check the box next to any device you
wish to save information about, (i.e., any devices you wish to connect to). Tap Next.
5. A service discovery phase begins, 5-10 seconds per chosen device.
6. In the next screen, tap Finish.
Bond With Discovered Device(s)
Follow these steps to bond with an already discovered Bluetooth device. In most cases, bonding is for establishing secure
communications with a Bluetooth-enabled phone. This is a more detailed alternative to using the Bluetooth “Get Connected!
Wizard.”
Important!
• Do not try to bond with a Motorola Timeport 270C or Nokia 6310!
• Do not use this method to bond with a printer! The third-party printing software included on th e installation CD also handles
bonding.
1. If not open, launch the Bluetooth Devices folder. Tap on the Bluetooth icon in the Today screen. Select Advanced
Features, then Bluetooth Devices.
Dolphin® 7900 Series User’s Guide–
Preliminary
Rev (e) 10 - 3

2. Tap and hold your stylus on the Bluetooth device you want to bond with. In the pop-up menu, select Bond.
3. Alternatively, after selecting a device, tap on the Bond icon. Or tap on Device, then select Bond.
4. The Bluetooth Device Bonding Wizard launches. Follow the wizard to bond with your selected device.
5. As prompted, make sure the Bluetooth device that you want to bond with is in Bondable mode.
10 - 4 Rev (e) Dolphin® 7900 Series User’s
Guide–Preliminary

6. If the remote device is set up to accept bonding, a Bluetooth Passkey screen appears. To contin ue bonding, enter the
correct passkey and tap Reply.
7. When you have successfully bonded with the other device, tap Finish.
View Device Properties
Follow these steps to view the properties of an already discovered device.
1. If not open, launch the Bluetooth Devices folder. Tap on the Bluetooth icon on the Today screen. Select Advanced
Features then Bluetooth Devices.
2. Select a device. Tap on the Properties icon, or tap on Device then select Properties. Alternatively, you can tap and hold
your stylus on the Bluetooth device you want to view information about. In the pop-up menu, select Properties.
3. Use the General and Services screens to research device properties. If needed, assign a new device type icon by tapping
on the arrow buttons in the General screen. You can also use the Device name field to rename the device. When done, tap
OK for the setting to take effect.
Set Up Your Favorite Device
Follow these steps to set up default devices in the Bluetooth Devices folder. Please note that the Get Connected! Wizard
automatically assigns the favorite phone.
1. Tap Tools > My Favorites.
Dolphin® 7900 Series User’s Guide–
Preliminary
Rev (e) 10 - 5

2. Tap on the tab for the type of device you would like to set a favorite for. If needed, use the arrow buttons to scroll and find
the tab you need.
Note: Tabs appears only for COM ports you have enabled. To enable a port, refer to the “Assign COM Ports” section earlier in
this chapter.
3. To select a favorite device, select Use the favorite selected above. In the drop-down list, select your device. Tap OK.
4. After setting a device as your favorite, its icon appears in the Bluetooth Devices folder with a heart next to it.
Change Views
You can switch between the Large Icons or Details views for the Bluetooth Devices folder.
1. In Bluetooth Devices, tap on View.
2. In the pop-up menu, choose between Large Icons or Details.
Large Icons Details
Note: In Details view, you can see the Device Class and scroll right to see the current Bonded status.
Delete a Device From the Folder
If you no longer plan to connect with it, you can delete a device from the Bluetooth Devices folder.
1. If not open, launch the Bluetooth Devices folder.
10 - 6 Rev (e) Dolphin® 7900 Series User’s
Guide–Preliminary

2. Tap and hold your stylus on the device you wish to delete. In the pop-up menu, select Delete.
Turn Radio Transmitter ON/OFF
You may want to turn off the radio transmitter to save power or if you are entering an area with radio restrictions (e.g., an airplane).
1. Tap on the Bluetooth icon in the task tray on the Today screen.
2. In the pop-up menu, select Turn Transmitter OFF.
3. The Bluetooth Card radio transmitter shuts off. The Bluetooth icon and menu options becomes gray.
4. To turn the radio transmitter back on, tap on the gray Bluetooth icon. In the pop-up-menu, select Turn Transmitter ON.
Bluetooth ActiveSync
This section explains how to quickly and easily ActiveSync to a notebook or desktop computer with Microsoft ActiveSync.
1. Tap on the Bluetooth icon. In the pop-up menu, select Bluetooth ActiveSync.
2. The next screens varies depending on if your Bluetooth Devices folder contains any computers, and if one is chosen as your
favorite. Please refer to the appropriate scenario:
SCENARIO #1: Your Bluetooth Devices folder contains a favorite desktop computer.
(a) When you tap Bluetooth ActiveSync, your device automatically tries to connect to your favorite computer.
(b) The Connect To screen appears, reporting that it is trying to connect to Wireless ActiveSync.
(c) After a successful connection is made, the status screen reports Connected. Now you are ready to synchronize files, if
desired.
SCENARIO #2: Your Bluetooth Devices folder contains no favorite desktop computer.
Dolphin® 7900 Series User’s Guide–
Preliminary
Rev (e) 10 - 7

(a) When you tap on Bluetooth ActiveSync, a screen appears that allows you to choose which computer to connect to in
your Bluetooth Devices folder. Choose a computer from the list and tap Select, or tap Find to search for another computer.
Note: If the computer you want to connect to is not listed, tap Find to begin a search. Proceed as described in Scenario #3 on
page 10-8.
(b) Your device attempts to connect to your selected computer.
(c) After a successful connection is made, the status screen reports Connected. Now you are ready to synchronize files, if
desired.
SCENARIO #3: Your Bluetooth Devices folder contains no computers.
(a) When you tap on Bluetooth ActiveSync, a Bluetooth Device Search automatically begins.
Note: You can also start the device search by tapping Find in the Bluetooth Devices screen.
(b) After the search is complete, select the computer you wish to ActiveSync with and tap Select. If the computer is not listed,
make sure the computer is discoverable and tap Refresh to search again.
(c) After you tap Select, a service discovery phase begins.
10 - 8 Rev (e) Dolphin® 7900 Series User’s
Guide–Preliminary

(d) The Connect To screen appears, reporting that it is trying to connect to Wireless ActiveSync.
(e) After a successful connection is made, the status screen reports Connected. Now you are ready to synchronize, if desired.
Bluetooth LAN Access
This section explains how to use the Bluetooth LAN Access feature to quickly and easily connect to a Bluetooth-enabled LAN
access point.
1. Tap on the Bluetooth icon. In the pop-up menu, select Bluetooth LAN Access.
2. The next screens varies depending on if your Bluetooth Devices folder contains any access points, and if one is chosen as
your favorite. Please refer to the appropriate scenario:
SCENARIO #1: Your Bluetooth Devices folder contains no favorite access point.
(a) When you tap Bluetooth LAN Access, a screen appears that allows you to choose which access point to connect to in
your Bluetooth Devices folder. Choose an access point from the list and tap Select.
Note: If your access point is not listed, tap Find and proceed as described in Scenario #3.
(b) Your device tries to connect to the selected access point.
(c) If your LAN requires a passkey, a screen appears asking for the passkey. Enter the passkey, then tap OK.
(d) After a successful connection is made, the status screen reports Connected.
(e) Now you are ready to access your LAN for Internet access, files, etc.
SCENARIO #2: Your Bluetooth Devices folder contains a favorite access point.
Dolphin® 7900 Series User’s Guide–
Rev (e) 10 - 9
Preliminary

(a) When you tap Bluetooth LAN Access, the device automatically tries to connect with your favorite access point.
(b) If your LAN requires a passkey, a screen appears, asking for the passkey. Enter the passkey, then tap OK.
(c) After a successful connection is made, the status screen reports Connected.
(d) Now you are ready to access your LAN for Internet access, files, etc.
SCENARIO #3: Your Bluetooth Devices folder has no access points.
(a) When you tap Bluetooth LAN Access, the device automatically begins to search for new Bluetooth devices.
Note: You can also start the device search by tapping Find in the Bluetooth Devices screen. See Scenario #2.
(b) After the search is complete, select the access point you wish to connect to. Tap Select. If the access point is not listed,
tap Refresh to search again.
(c) After you tap Select, a service discovery phase begins.
(d) If the LAN requires a Passkey, a screen appears, asking for the Passkey. Enter the passkey, then tap OK.
(e) After a successful connection is made, the screen reports Connected.
(f) Now you are ready to access your LAN for Internet access, files, etc.
10 - 10 Rev (e) Dolphin® 7900 Series User’s
Guide–Preliminary
OBEX
This section explains how to use the OBEX (object exchange) application to trade business cards, contacts or files with another
Bluetooth device that supports OBEX.
Bluetooth OBEX application supports five operations:
• Exchange Business Cards
• Send a Contact
• Send a File
• Browse Remote Device
• Receive Contact or File
• Enable File Sharing
The first four operations - exchange business cards, send a contact, send a file, and browse remote device - are client-oriented.
They involve initiating an object exchange.
The last two operations - receive contact or file and enable file sharing - are server-oriented. They involve accepting objects in
an exchange initiated by another Bluetooth device.
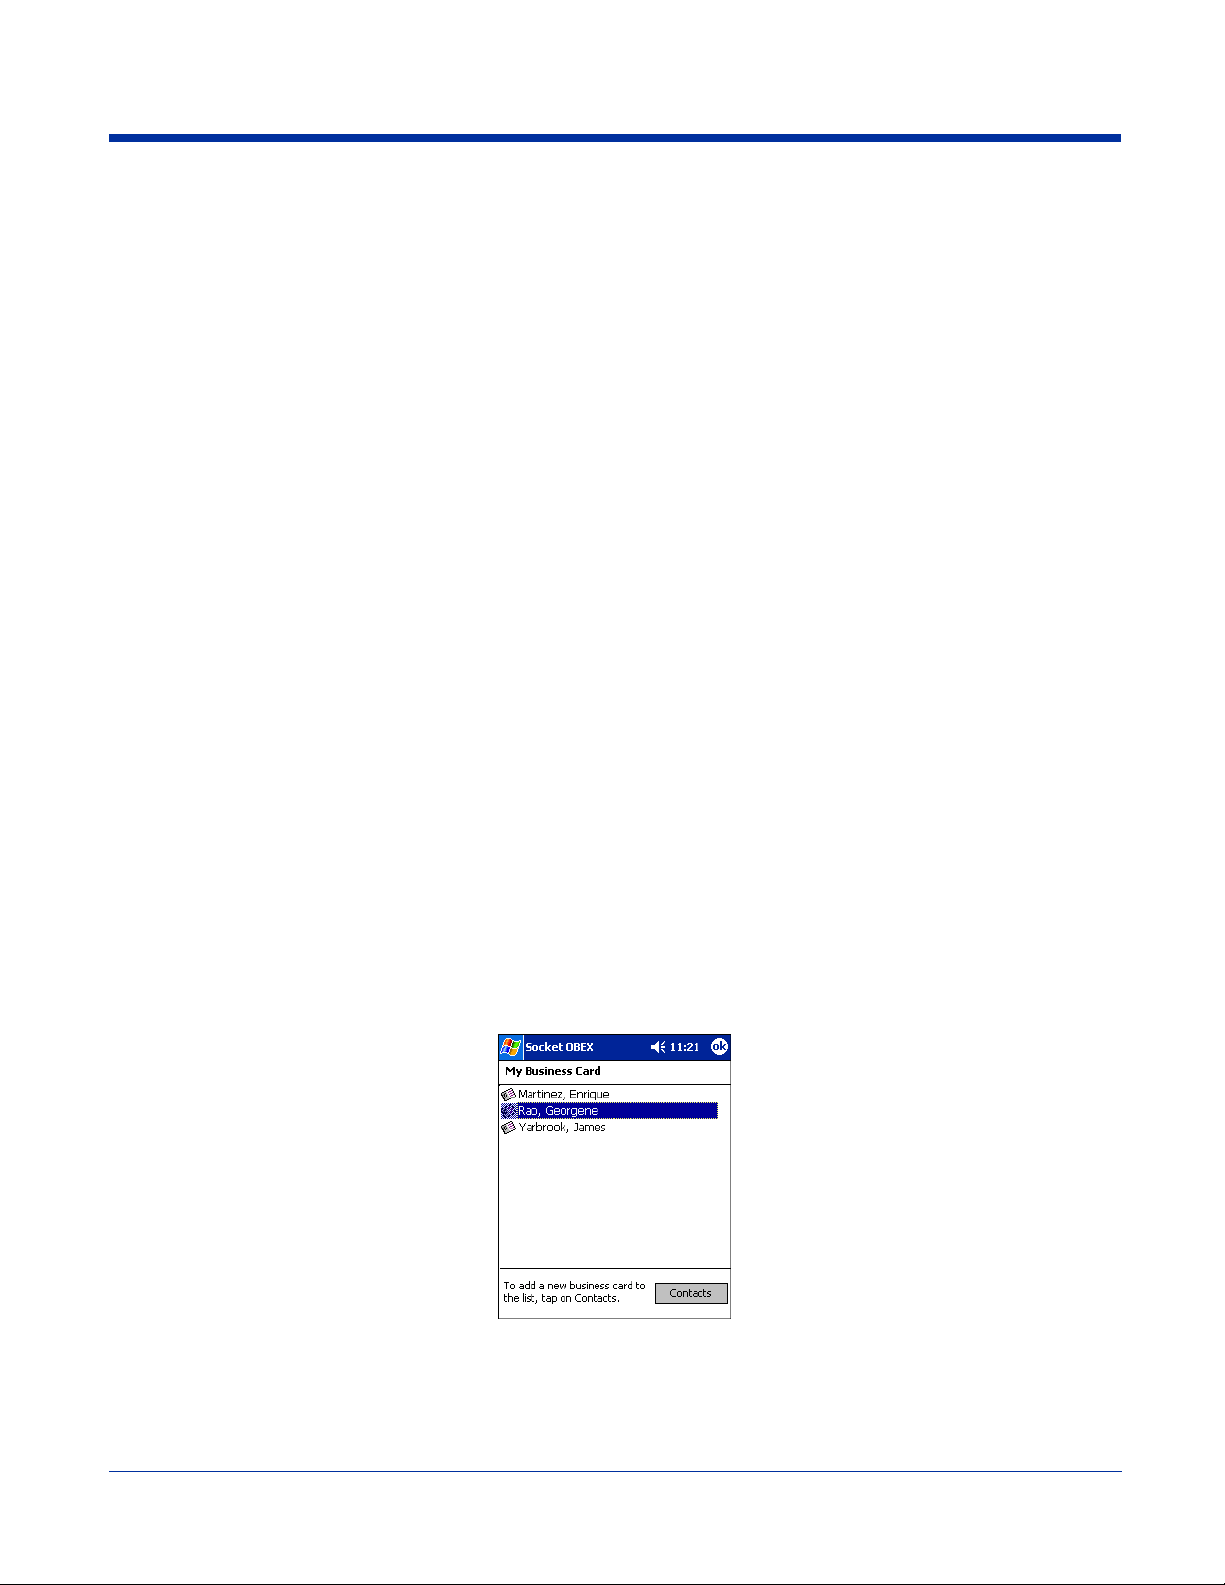
Exchange Business Cards
1. Make sure both Bluetooth devices have a business card assigned to them.
If each device does not have a business card assigned to it, you cannot exchange business cards.
To assign a business card to your device, do the following:
• Tap on the Bluetooth icon. In the pop-up menu, tap Advanced Features > My Bluetooth Device.
• Tap on the Object Sharing tab. Under My business card, tap Assign
• In the next screen, select your business card and tap OK. If your business card is not listed, tap Contacts to create one.
When you return to the Object Sharing screen, tap OK.
2. Make sure the other Bluetooth device is set up to receive a contact. The device must support the OBEX Object Push profile.
Note: If the other device is also using the Bluetooth Connection Kit, you can set it up to receive a contact by tapping the Bluetooth
icon. In the pop-up menu, tap Transfer via Bluetooth > Receive Contact or File.
Dolphin® 7900 Series User’s Guide–
Rev (e) 10 - 11
Preliminary

3. Now you are ready to exchange business cards. Tap on the Bluetooth icon. In the pop-up menu, tap Transfer via
Bluetooth > Exchange Business Cards.
4. If your device has no devices in the Bluetooth Devices Folder, then it begins to search for Bluetooth devices nearby.
5. Select the Bluetooth device you wish to exchange business cards with. If the device is not listed, tap Find.
6. Your device begins exchanging business cards. After the exchange, the new business card should appear in your Contacts
Send a Contact
1. Make sure the other Bluetooth device is set up to receive a contact. It must support the OBEX Object Push server profile.
Refer to the documentation that came with the device for instructions.
Note: If the other device is also using the Bluetooth Connection Kit, you can set it up to receive a contact by tapping the Bluetooth
icon. In the pop-up menu, tap Transfer via Bluetooth > Receive Contact or File.
2. Now you are ready to send a contact. Go to your Contacts folder.
3. Tap and hold your stylus on the contact(s) you would like to send. In the pop-up menu, select Send Via Bluetooth.
10 - 12 Rev (e) Dolphin® 7900 Series User’s
Guide–Preliminary

4. If your device has no devices in the Bluetooth Devices Folder, then it begins to search for Bluetooth devices nearby.
5. Select the Bluetooth device you wish to send the contact(s) to. If the desired device is not listed, tap Find.
6. Your device processes and sends the contact(s).
Send a File
1. Make sure the other Bluetooth device can receive a file; that device must support the OBEX Object Push server profile.
Note: If the other device is also using the Bluetooth Connection Kit, you can set it up to receive a file by tapping the Bluetooth
icon. In the pop-up menu, tap Transfer via Bluetooth > Receive Contact or File.
2. Now you are ready to send a file. Tap the Bluetooth icon. In the pop-up menu, tap Transfer via Bluetooth > Send a File.
3. If your device has no devices in the Bluetooth Devices Folder, then it begins to search for Bluetooth devices nearby.
Dolphin® 7900 Series User’s Guide–
Preliminary
Rev (e) 10 - 13

4. Select the Bluetooth device you wish to send a file. If the desired device is not listed, tap Find.
5. In the next screen, tap on the file you wish to send. You can use the Folder and Type drop-down menus to search for your
file. Also, you can scroll horizontally to view the folder, date, size, type, and location of each file.
6. Your device sends the file.
Browse Remote Device
The Bluetooth File Explorer lets your device share files with another Bluetooth device. The other device must support the OBEX
File Transfer server profile.
This section covers the following file transfer operations:
• Prepare for file transfer
• Send/receive file(s) or folder(s)
• Create a folder
• Delete file(s) or folder(s)
• Refresh remote view
• Connect/disconnect
• Exit the program
Note: “Local device” refers to the device you are running the OBEX from. “Remote device” refers to the Bluetooth device you
are trying to transfer files with.
Prepare for File Transfer
1. Make sure the remote device has file sharing enabled. It must support the OBEX File Transfer server profile.
Note: If the other device is also using the Bluetooth Connection Kit, you can enable file sharing by tapping the Bluetooth icon.
In the pop-up menu, tap Transfer via Bluetooth > Enable File Sharing.
10 - 14 Rev (e) Dolphin® 7900 Series User’s
Guide–Preliminary

2. Now you are ready to browse the remote device. Tap on the Bluetooth icon. In the pop-up menu, tap Transfer via
Bluetooth > Browse Remote Device.
3. If your device has no devices in the Bluetooth Devices Folder that supports OBEX File Transfer, then it begins to search for
Bluetooth devices nearby.
4. Select the Bluetooth device you wish to browse. If the desired device is not listed, tap Find.
5. Your device begins to establish a file sharing connection.
6. After the devices successfully connect, the Bluetooth File Explorer appears. Half of the screen shows contents of the remote
device, while the other half shows contents of your device (the local device). The very bottom of the screen reports the
connection status.
Dolphin® 7900 Series User’s Guide–
Preliminary
Rev (e) 10 - 15

Send/Receive File(s) or Folder(s)
• Single-tap items to select them for transfer.
• Double-tap on a folders to open it and see its contents.
1. Select the file(s) or folder(s) that you wish to transfer. You can select items from only one device per transfer session.
2. There are two different ways to initiate the transfer:
• Tap File > Send to remote or Get from remote, as applicable. The inappropriate option should be gray.
• Tap on the Send to remote icon or Get from remote icon, as applicable. The inappropriate icon should be gray.
3. A screen reports the status of the transfer.
4. After the transfer, a copy of each selected item should appear in the other device.
Create a Folder
1. Tap on the File menu. Select Remote device or Local device, wherever you want to create a folder, then tap Create
remote folder or Create local folder, as applicable.
2. You can also tap and hold your stylus on an item in either the remote or local device that you wish to put in a new folder. In
the pop-up menu, select Create folder.
3. In the next screen, enter a name for your new folder. Tap OK.
4. The new folder should be listed under the appropriate device.
10 - 16 Rev (e) Dolphin® 7900 Series User’s
Guide–Preliminary
Delete File(s) or Folder(s)
1. Select the items you wish to delete. You can only delete items from one device at a time.
2. Tap on the File menu. Select Remote device or Local device, wherever the items are located, then tap Delete remote
item(s) or Delete local item(s), as applicable.
3. Tap and hold your stylus an item in either the remote or local device that you wish to put in a new folder. In the pop-up
menu, select Delete folder.
4. In the Confirm screen, tap Yes.
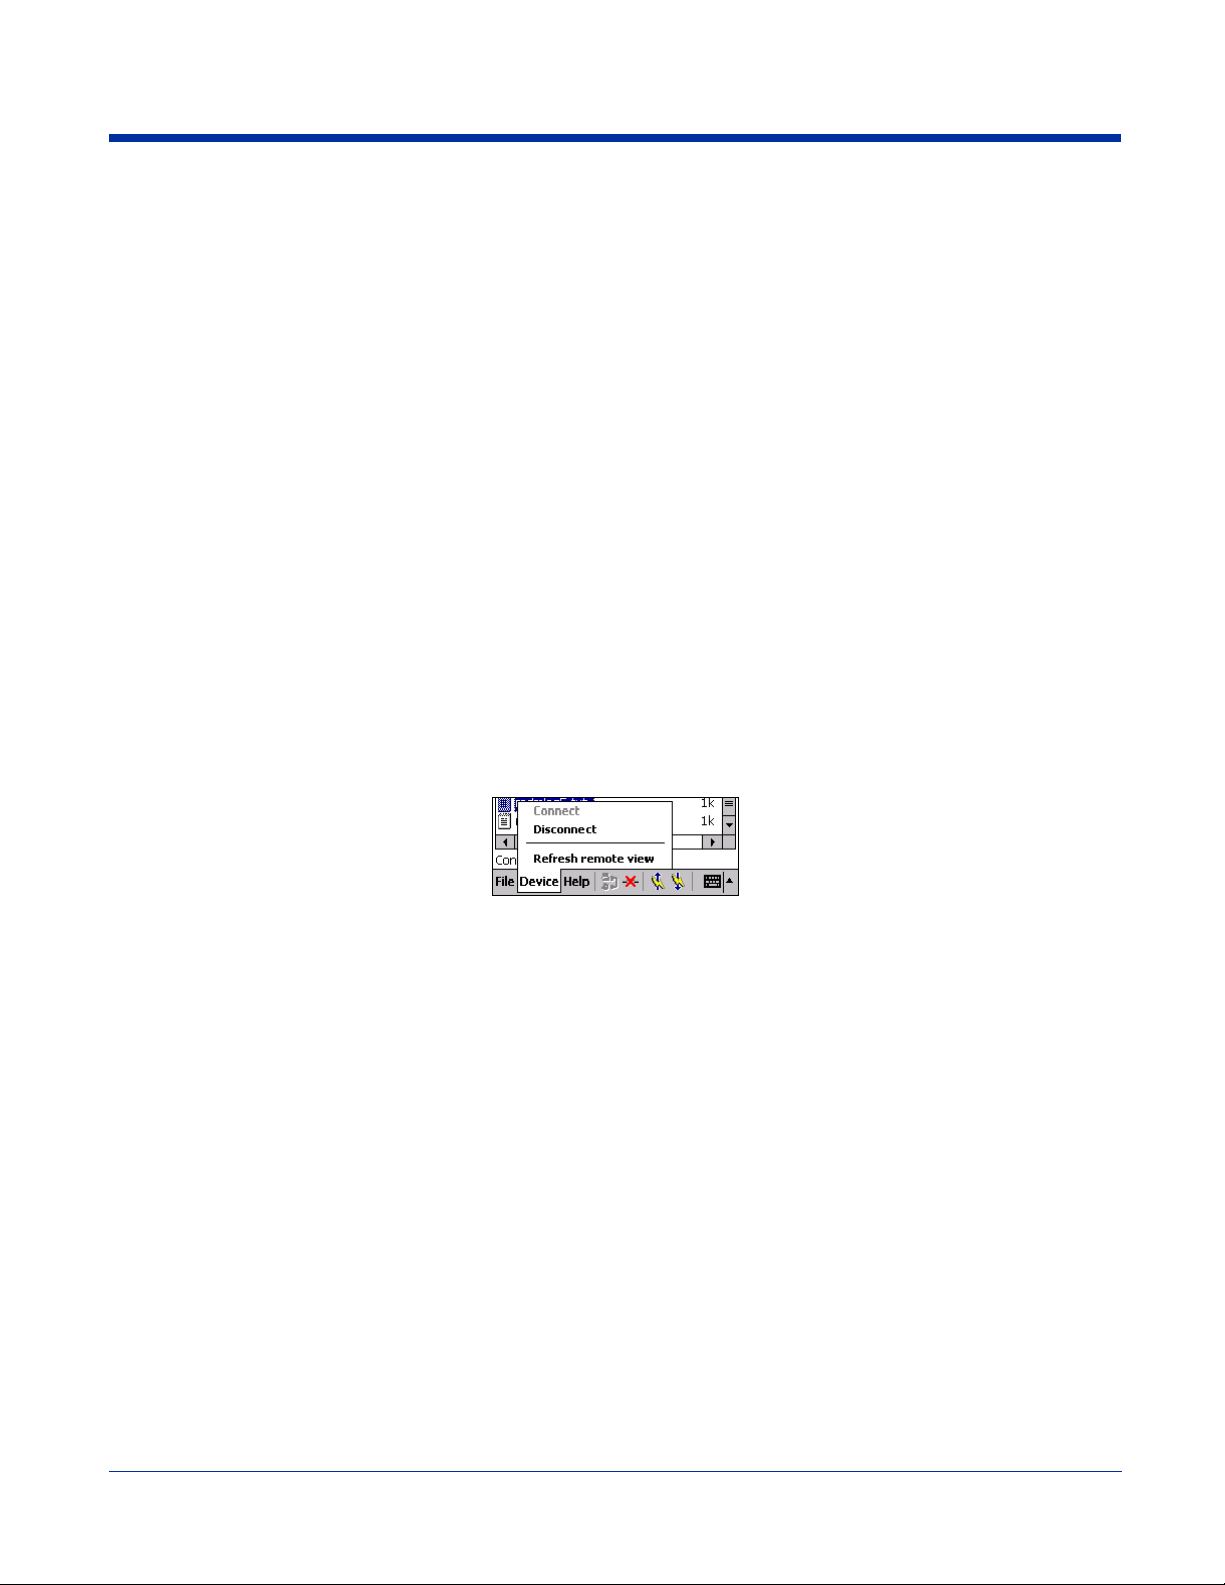
Refresh Remote View
1. Tap on the Device menu. Select Refresh remote view.
2. Your local device begins to read the contents of the remote device.
3. After a few seconds, the contents view of the remote device is refreshed.
Connect/Disconnect
To connect to the remote device, do the following:
1. Make sure the remote device has file sharing enabled.
2. Start the connection process by either of two methods:
• Tap Device > Connect.
• Tap the Connect icon.
3. On the next screen, select the device you wish to connect to and tap Select. Your device attempts to connect to the
selected device.
To disconnect from the remote device, do the following:
1. Start the disconnection process by either of two methods:
• Tap Device > Disconnect.
• Tap the Connect icon.
2. Your device disconnects from the remote device. Afterwards, no contents are listed for the remote device.
Dolphin® 7900 Series User’s Guide–
Preliminary
Rev (e) 10 - 17

Exit Bluetooth File Explorer
To exit the Bluetooth File Explorer, tap File > Exit.
Receive Contact or File
1. Tap on the Bluetooth icon. In the pop-up menu, tap Transfer via Bluetooth > Receive Contact or File.
2. The Receive Contact or File status screen appears. Your device waits two minutes for the contact or file.
3. After successfully connecting to the remote device, the screen reports Connected then disappear. The new contact or file
should now be on your device.
4. If two minutes passes before you receive the item, tap Wait Again.
5. After you receive the file or contact, the “Receive Contact or File” feature is automatically disabled.
Enable File Sharing
1. Tap on the Bluetooth icon. In the pop-up menu, tap Transfer via Bluetooth > Enable File Sharing.
2. The Enable File Sharing status screen appears. Your device waits two minutes for the remote device to connect.
3. After successfully connecting to the remote device, the screen reports that you are connected.
4. If two minutes passes before you connect, tap Wait Again.
5. File sharing is enabled until you end it by tapping Cancel.
Using the Dialer
This section explains how to assign a dialing prefix and use the Dialer to dial a number directly from your Contacts list. The Dialer
makes it quick and easy to perform dial-up networking.
Note: The Dialer has been verified to work with Nokia and Ericcson phones and is known not to work with the Motorola 270c,
NTT Docomo Paldio 633S or Sony au C413S phone. Results may vary with other phones that are not listed as being
supported by the Bluetooth system.
10 - 18 Rev (e) Dolphin® 7900 Series User’s
Guide–Preliminary

Assign a Dialing Prefix
If you have not already assigned a dialing prefix during the install process, you can do so by following these ste ps:
1. Tap Start > Settings > System tab > Dialer.
2. Select the appropriate Dialing Prefix, then tap OK.
Using the Dialer
1. To use the dialer, the device must already be connected to the Bluetooth phone. You can use the Get Connected! Wizard to
do this. Also, the Bluetooth phone must be selected as your favorite.
2. Tap Start > Contacts.
3. Tap and hold your stylus on the contact you wish to dial to. In the pop-up menu, select Dial Contact. Alternatively, you can
tap on Tools and select Dial Contact.
4. If you have multiple phone numbers for a contact, a screen appears listing them, including any dialing prefix you may have
assigned. Select the phone number you wish to dial.
Dolphin® 7900 Series User’s Guide–
Rev (e) 10 - 19
Preliminary

5. Your device connects to your phone and begins dialing.
The Dialer can dial a phone number containing any of the following non-numeric characters:
*#+./!@-\space A B C D T P W
The following string can also be included in a phone number: (',')
The Dialer cannot dial a phone number containing non-numeric characters other than those listed above. HHP recommends that
you follow the standard Microsoft Outlook format for phone numbers.
Get Connected Wizard
The Get Connected! Wizard guides you through a one-time setup process that prepares the device and phone for Bluetooth
connections. The wizard varies depending on what phone you want to connect to.
Ericcson, Nokia 6210, NTT DoCoMo, Sony Phones
1. Tap on the Bluetooth task tray icon. In the pop-up menu, select Get Connected!
2. Follow the Bluetooth “Get Connected!” Wizard. In the second screen, use the drop-down list to select your Bluetooth phone.
The wizard provides tailored instructions based on your selection.
3. Follow the next screen(s) to prepare your specific phone for Bluetooth connections. You may need to do 1, 2 or all of the
following steps:
(a) Naming your Bluetooth phone
(b) Setting your Bluetooth phone in Discoverable mode
10 - 20 Rev (e) Dolphin® 7900 Series User’s
Guide–Preliminary
 Loading...