

Page 1

K0315 12/02 Rev. D
INSTALLATION AND SETUP GUIDE
GENERAL INFORMATION
The ADEMCO 269R/270R Holdup Switch (Figure 1) is a fingeroperated switch for activating the holdup signal at the control
and/or any other security application. The 269R adds a protective
steel cover. The Holdup Switch is typically mounted under a
counter for inconspicuous operation. The device comes standard as
a latching type switch that is easily converted to a non-latching
type.
If the switch is used as a latching type switch, the supplied reset
key is used to reset the device. Additional reset keys may be
obtained separately by ordering ADEMCO part number K4563.
PROGRAMMING
For Honeywell controls, program the unit like any other zone,
according to the control’s installation and setup guide. Enter the
following information when prompted for in zone programming:
“ZONE TYPE” = “06”
“INPUT TYPE” = “01”
For other manufacture controls, refer to the controls instructions
for specific programming instructions.
MOUNTING
Refer to the steps and figures that follow for typical mounting
installation. If required, convert the latching device to a nonlatching device as shown in figure 2.
RESET KEY
(K4563 SUPPLIED)
COVER
ATTA CH
HOLE
MOUNTING
HOLE
COVER
+
COVER
SCREW
Figure 1
COVER
SCREW (2)
No. 6x7/8
+
PROTECTIVE
STEEL
COVER
(269R ONLY)
MOUNTING
SCREW (2)
No. 6X1 3/4
269R-001-V1
TRIGGER
CIRCUIT
BOARD
MOUNTING
HOLE
COVER
ATTACH HOLE
ADEMCO 269R/270R
Holdup Switch
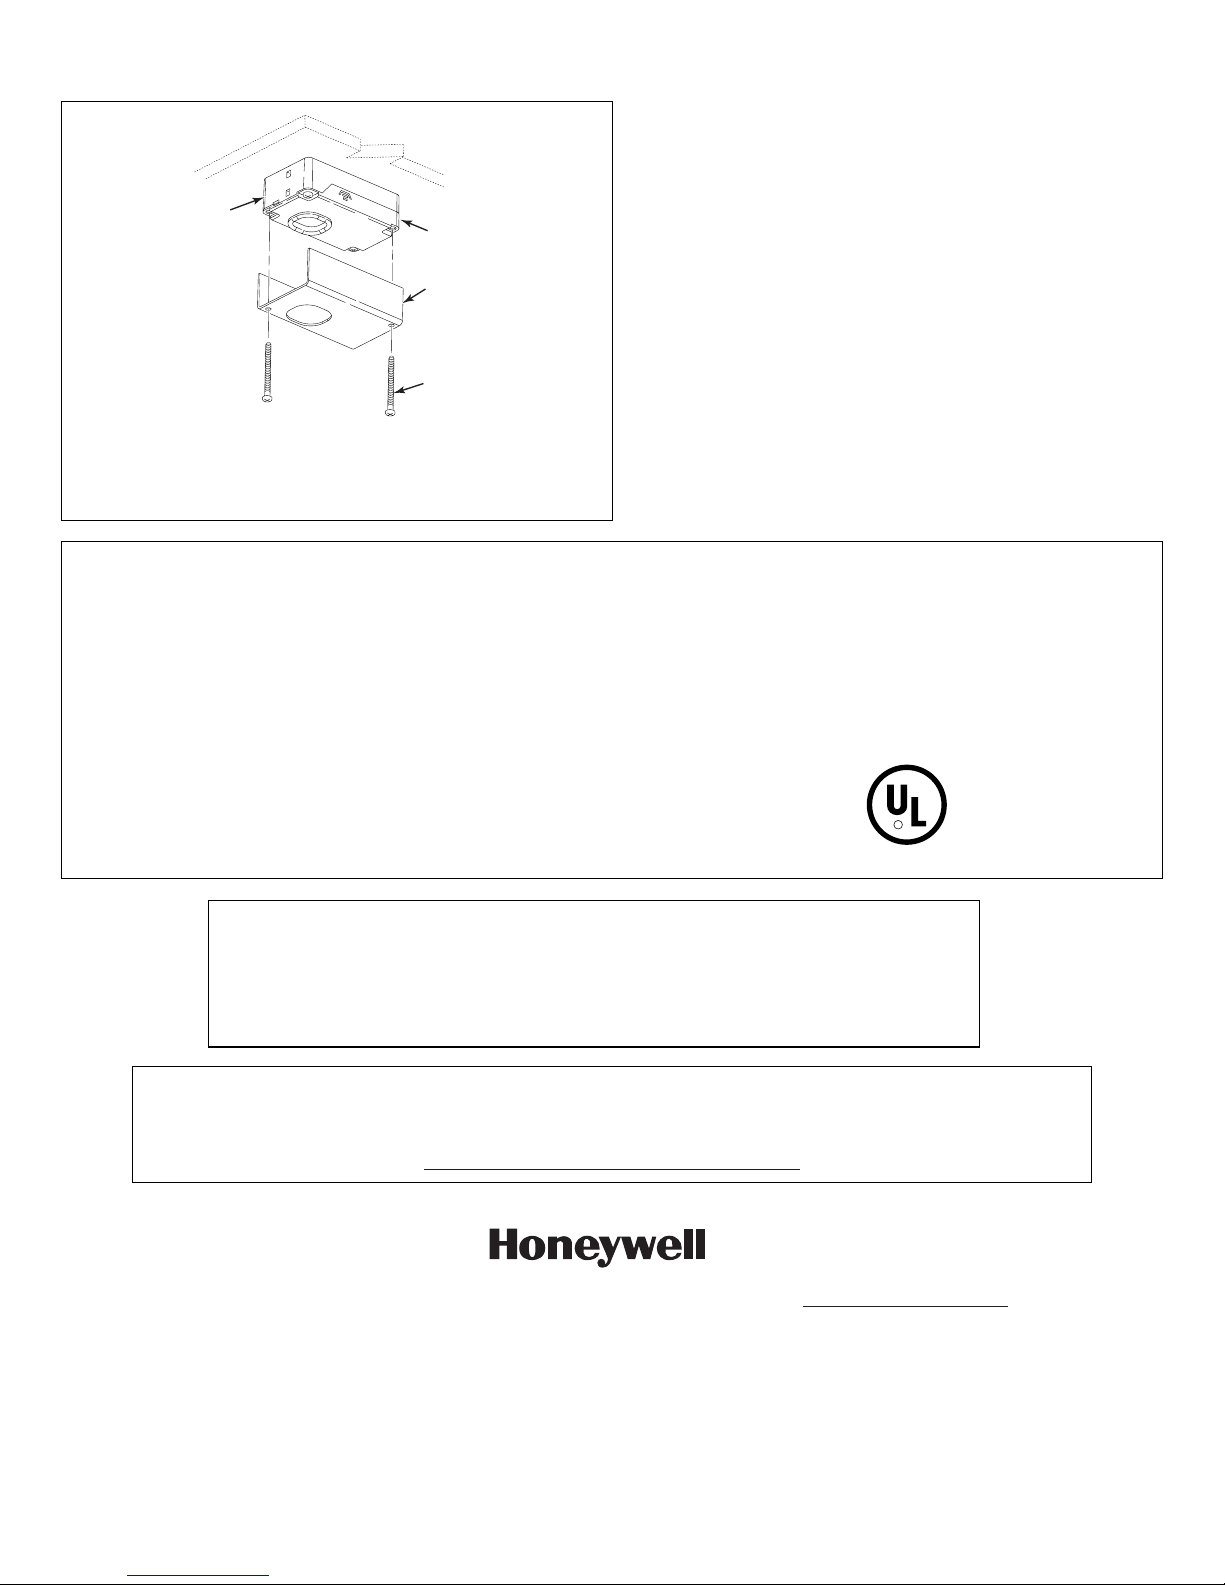
1. Run the wiring from the control panel to the device, through
the opening in the case back as shown in Figure 3.
2. Wire the device for a normally closed or a normally open loop
with no EOL resistor or for a normally-closed or a normally
open loop with an EOL resistor as shown in figure 3, detail A
and B, respectively. Where Form C wiring is required,
providing full supervision of the loop refer to figure 3, detail C.
3. Secure the cover to the case with two screws (No. 6 x 7/8) as
shown in figure 1. Note the cover screws are noticeably
shorter than the mounting screws. Be sure to use the correct
holes. The holes opposite these are used to secure the device to
the counter.
IMPORTANT: To prevent damage to the case do not
over tighten the cover screws.
4. Peel the backing from the double stick tape strips on the back
of the device and position the device in its mounting location.
IMPORTANT: The double stick tape is provided to
temporarily hold the assembly in place while drilling
the pilot holes. The device must be permanently
mounted with the screws supplied.
5. Using the case as a drill template, drill a 1/16” diameter pilot
hole at the two case mounting holes (Figure 1).
6. Secure the assembled case with the protective cover (if
required) to the counter with two screws (No. 6 x 1-3/4)
supplied. (Figure 4).
ARROW
(CUT POINT)
TRIGGER
ASSEMBLY
TO CONVERT TO MOMENTARY (NO LATCHING) SWITCH
OPERATION, REMOVE THE TRIGGER ASSEMBLY FROM THE
CASE. USING A PAIR OF CUTTERS, CUT THE TRIGGER LATCH
AT THE POINT THE "ARROW" IS STAMPED ON THE CASE.
Figure 2
TRIGGER
LATCH
269R-004-V0
DETAIL A
WIRE AS SHOWN FOR
A NORMALLY-CLOSED
LOOP WITH NO EOL
RESISTOR.
NO
C
NC
EOL
EOL
NC
C
NO
WIRE AS SHOWN FOR
A NORMALLY-OPEN
LOOP WITH NO EOL
RESISTOR.
269R-007-V1
DETAIL B
WIRE AS SHOWN FOR
A NORMALLY-CLOSED
LOOP WITH AN EOL
RESISTOR.
NO
C
NC
EOL
EOL
NC
C
NO
WIRE AS SHOWN FOR
A NORMALLY-OPEN
LOOP WITH AN EOL RESISTOR.
NOTE THAT THE EOL
TERMINAL IS NOT USED
IN A NORMALLY OPEN LOOP.
Figure 3
269R-008-V1
DETAIL C
FORM "C"
WIRING PROVIDES
FULL SUPERVISION
OF THE LOOP
CONTROL PANEL
ZONE TERMINALS
NO
C
NC
EOL
EOL
NC
C
NO
269R-012-V1
Page 2
MOUNTING
HOLE
MOUNTING
HOLE
PROTECTIVE
STEEL COVER
(269R ONLY)
HOLDUP SWITCH SHOWN MOUNTED
IN TYPICAL UNDER COUNTER APPLICATION
SPECIFICATIONS
Physical:
Electrical:
Contact
Rating:
Operating
Temperature:
Agency:
Reset Key:
Regular maintenance and inspection (at least annually) by the installer and frequent testing by the user are
vital to continuous satisfactory operation of any alarm system.
The installer should assume the responsibility of developing and offering a regular maintenance program
to the user, as well as acquainting the user with the proper operation and limitations of the alarm system
and its component parts. Recommendations must be included for a specific program of frequent testing (at
least weekly) to insure the system's operation at all times.
ÊK0315ÈŠ
K0315 12/02 Rev. D
IMPORTANT:
THIS DEVICE MUST
BE PERMANENTLY
MOUNTED WITH THE
SCREWS SUPPLIED
MOUNTING
SCREW (2)
No. 6X1 3/4
(SUPPLIED)
269R-010-V0
Figure 4
2"W x 3-1/2"H x 1-1/4"D
(51mm x 89mm x 32mm)
0.2 A @ 30 VDC (MAX)
WARNING: Observe contact rating limitations.
Do not use to switch Line Voltage AC current.
14°F to 140°F
-10°C to 60°C
UL 636 – Holdup alarm units and systems
Supplied, Part Number K4563 to order separately
TO THE INSTALLER
WARRANTY INFORMATION
For the latest warranty information, please go to:
www.honeywell.com/security/hsc/resources/wa
R
C
LISTED
US
2 Corporate Center Drive, Suite 100
P.O. Box 9040, Melville, NY 11747
Copyright © 2010 Honeywell International Inc.
www.honeywell.com/security
 Loading...