

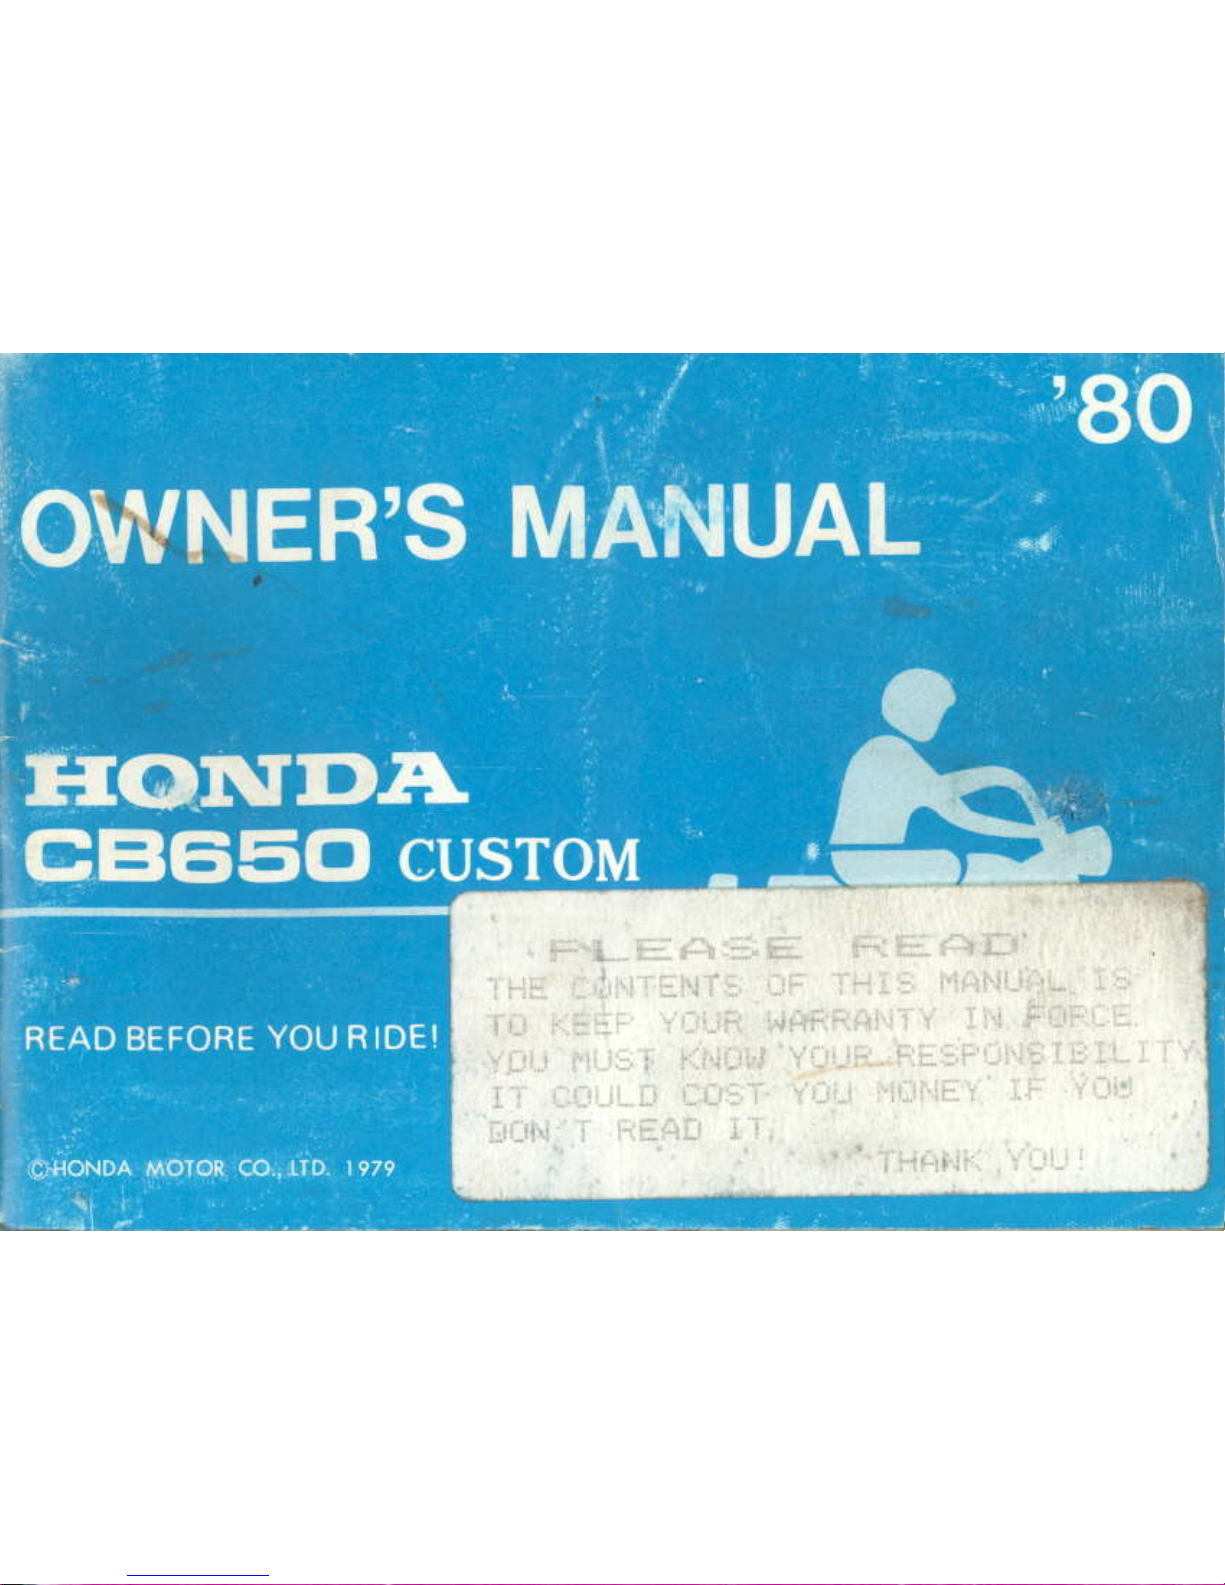
Honda cb650 Owner's Manual
.
OPERATOR AND
PASSENGER
This
motorcycle is designed
to
ca.ry the
operaror
and one
pasengei.
Neve.
exceed the
vehicle
capacity load.
as shown on
the tjre inforftalion
label.
.
ON.ROAD USE
This
motorcycle b not
equipped e h a
sldk
arester and
is desiened to be used
only on the road. Operalion
in
forest.
brush
or
g.ass
.overed
areas may be
illesal. Obey local
laws and
resulalions
.
RtAD
oI4NER.s MANUAL
CARIFULLY
Pay special
attention
nr sratements
preceded
by
the following wordsl
EEM
Ik.ticat.s
a sttuhs
posibitit,
of sevet.
pe^onal
injury ot ros
oJ ltfe t ins"uc
tiont arc notfo
owe.l.
Indicatcs
a
po$ibility
of
peaonal
iniut\
ar equrynent
danase
i.f insttutti.as
NOTEI
Gives
helpful information.
This nanual
should
be considered a
permlnent pa.t
of rhe lehicle
and should
remain with the vehicle
when resold
I
IMPORTANT
NOTICE
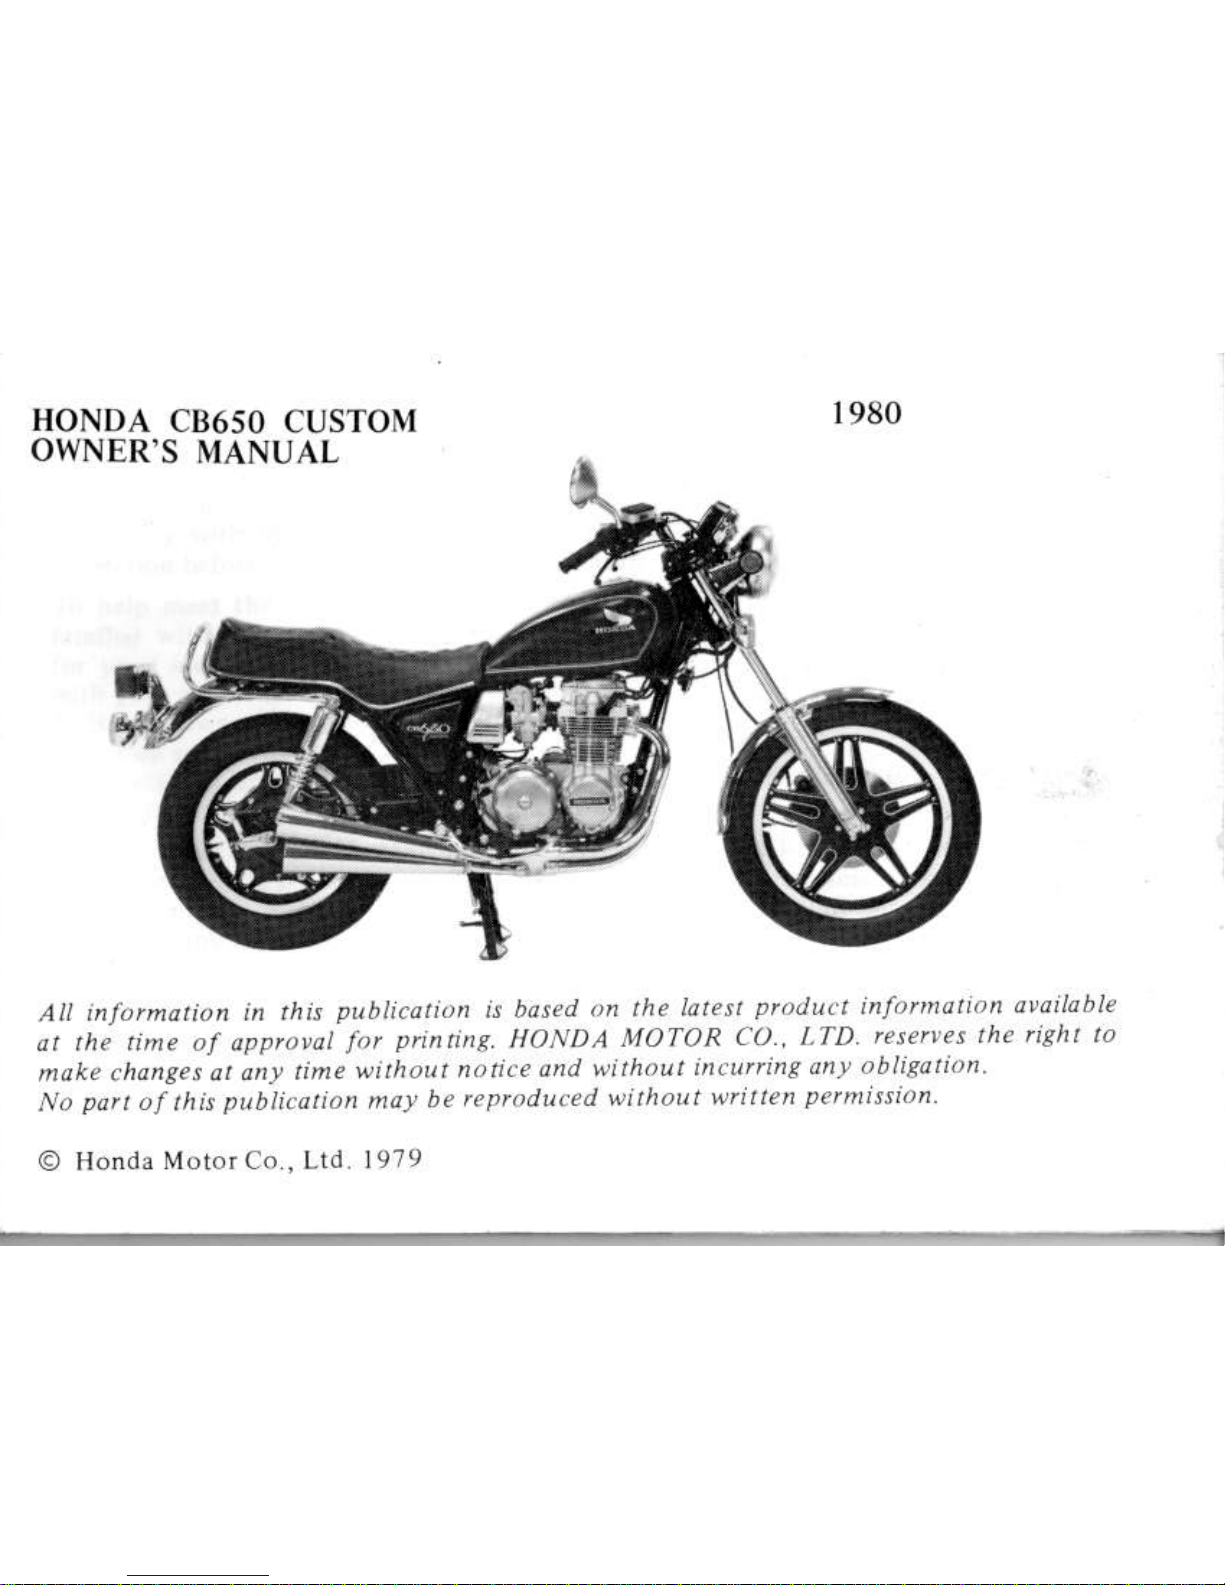
IIONDA
CI]650 CUSTONI
OWNER'S
N{ANUAL
1980
All tnl.,natian 1t t116
pu[]t.n!o.
r!
hts'id tnl th.
lnt.r!
pt)tluLt lnt)rnlatt'n
t\atdh!?
a! t]r.
ti,i.
.f urrrrrai
I't lrtntr,t
IIO\'l)a JtOTa)R
(O
I fD r.ik\ttt
th' nght tt'
ntdkt
rhdn!.!dt an) ti,tr||Illottn.r..tn.lrtlh.utittrtrtntai)it)bttt4tktn
.\'.
pat!
oi thi!
t)tblrntt.tr
trnt
b.
t.rr)drltl r"tth.rr
nrJr/t"r
p./tlrriItn
O
llondr Nlotor
(
o,ltd l')l()
WELCOME,
Your new nolorcyolc
presenls you
with
dn invitation
to
adlenture and i
chrllense
to master
the
machine
Your
tlfetv
.lepends not
onlv on
vour
own
alertness and
familjarily
with
the
nachrne,
but also the
nracbine
\ mechanical
condition A
pre{ide
inspe.tnrn before
every
oulinS anJ
resula!
mainl.n,nce
!re essenlDl
lo help dcet
the
challcnge\
\afelv and enrov the
advenlure
fullv.
becone
thoroughlv
familia;
wirh this
Osner's
l\'lanual
BF.FORE YOU RIDE
TIIF. MoIORCYCLE
AI!)
for
your
o*n
and
your
Honda s eke.
tlease
read
all lhe wriilcn
nraterdl which came
with
your
ncw
Ilonda
Thcsc items
include
'
Hondi Owner\
Identrficrtion
Card
1
set'up.nd
Predelive.v
Chccklin
.
Honda
Motd.ycle
rmission Control Sysle . Distributor's
wirantv
*
Honda
Motorcy.le,
Distributor'\
Limited wrrrantv
Wh.n
se.vice is requred,
renetrher that
your
llonLla deahr knows
whrt rl takas to
kecp
your
Honda
goins
\ronc. Il
y.u
hrve
the
requircd
me.hanical know
how and
looh.
your
d.alcr
(an
supply
you
wrlh an offr.ial
Hon,l! Shop
Manual to help
vou
pcrlorn
n,ny daintenJn.c.nd
tePrn
12skt
Pltrent tidrngand lhank
you
lor.hoosilgr
Hondil
CONTENTS
MOTORCYCLLSAFETY
.........
Safe Riding
Rules
Protecliv€ Appar€l
Loading
and Acce$ories . .......
Tires......
Modifications
DESCRIPIION
Parts Locatlon
Serial
Nudbere
Parts Functlon
Fuel .......
EnsineOil
..................
OPERATION
Pre'ride Inspection. . . .... ....
Stalting
the Enejne .
Break
in . . . . . . . . . . . . . ... ...
Ridin8.......
Brakine....
Parkrng ....
Anti theft Tips
SPLCIAL
?ROCEDTJRES
.. .....
ToolKrl
..........
FrontWheelRemoval
..........
page
Rear
Wheel Removal .. .,
j9
FuseRepLacem€nt....
...
4l
MAINTENANCE ... ..........
42
Mainlenance Schedule
... ....44
Maintenance
Record . . ..
..46
EnsineOil... ...........
....
47
Oil
Filtd ....... ............ 48
SparkPluss.................
Idle Speed . . . . . . .
. . . . . . . . . . .
An
Cleane!
.. .. . .. . . . ..,...
Crankcase Breather -...
...
Clutch..........
FrontBiake....
Rear Brake . .
Drive Chain
....
Side Stand . . . . . . . . . . . . . . ...
Brtte.y
CLEANI\G..,
STORACE..
EMISSION CONTROI-
SYSTEM.....
CONSUMF,R I\FORMATION,
SPECIFICATIONS.
I
I
2
3
5
7
8
t2
l4
23
25
21
21
28
3t
35
.15
3ar
31
38
5l
52
53
55
57
59
62
63
65
65
69
72
50
MOTORCYCLE
)
s!!@
*
Mototcycle
idins
rcguires
sPeciat
effotts
thev rcqunemen$
beforc
rou
ri.te.
SAFE RIDING
RULES
L Always
make
a
Pre
ide rlspecuon
(pase
27)
berore
vou
stalt tl'e
englne.
You may
prevent an acc'dent
or equrp
on
lour
pQtt
to
enerc
tout
nfet!. Kno\|
:1.
Obey aU federal, state and local laws
and regulations.
.
Fxcessile
speed is a
factor
jn
many
a.cid€nts.
Obey
the speed linrrts,
and NEVER travel l!\ter than con
.
Sicnal bciorc
you
m.ke a turn or
lane change.
Your
size and nincu-
verrbility
can surp.ise
othcr
monr.-
5 Don t let other nrotorists surprise
you.
Use
extra
cautio. !t interscclions,
aa.king
lot
entralccs
ard
exns,
and
6. Keep both hrnds on the handlebr.s
!nd both f.et o! thc
f.otpegs
shile
ridrns.
A
passenser
should
hold on
t{l
the
motorcy.le or the operdLor with
borh
hands
aid
kcep
both
fcct
on the
pa\senger
lootpeSs.
1
Many
accidents
involve
rnexpenenced
ride.s. Most states
requi.e
a
special
motorcycle rjding
lest
or license Make
sure
you
are
qualiiied beiorc
you
ride.
NEVER lend
you!
notorcycle to
an
lltany
automobiler'motorcycle
a..ide!ts
happen becluse the
automobile d.iver
does not
se€ the
molorcyclist.
Make
youself
conspicuous
lo help oloid
the
accidenr thal wasn t
your
Iault:
.
Wear
bright
o. reflectivc clothing.
.
Don't drive in anothcr
rnolorist\
PROTECTWE APPAREL
1. Most motdcycle
accident fatauti* are
due to head iAjuri€s: ALWAYS
w.ar a
helmet.
You
should
also w€ar a face
shicld
or
goSSlca
as vtell a! boob,
tlov$,
tnd
protectiv€ clothinS. A
passcng€r
ncedr the
lams
Protection.
2.
The exhaust system
becomcs vcry hot
during op.ration,
and it remains hot
aft€r op€ration.
Never touch any
pait
of thc hot €xhawt system.
Weat cloth-
ins that
fuuy covqs
your
legs.
3. Do
not w€ar loo$c clothing which could
qtch
on the control lders,
footpcgs or

LOADTNG AND ACCESSORIES
E&@
*
To
prevefll
an
acci.lent,
ue
extreme
carc wher odalits
and
nding vth
acce$ones anat
caryo-
A.lditio, of
occetsoies an.!
.4r8o
cdn
feduce
a
motorclcle
\ ttabil
itt,
perfown.4
ahd
sale opelating
sPeed.
Never ride a,
a.cessory-equipped
motorclcle 4t
speeds above
80
nqh.
And r.membet
that this 80
mph
limit ,ra! be
reduced
b! installLtion of
aotuflon.la
accesrories,
imprcpet loadi
c,
\'otn
tiresard overa
motorcrcle
cokdition,
poor
roa.l or
weather
conditions,
etc. These
Seneral
sui.lelines
nat hetp
rou
decide whether
ol how
to equip
lour
motorclcle,
dnd
how to loo.t it
safeu.
The conbined
weisht
of the rider,
passens-
eri cargo and all accesso.ie. must
not ex'
ceed
460 lbs,
lhe
vehicle capacity load.
Carso weight alone should
not exceed
60
lbs.
l.
Keep careo and accessory
weieht low
and close to
the cent€r of the motor'
cycle.
Load weight equatly on both
sides to
minimize imbalance. As weieht
is located fdther from the motorcyclek
ce.ter
of
siarity,
han{Uing is
propor-
2.
Adjust tire
pressure
(TIRES,
paeps
5-6)
and shock absorber
spiings
(SHOCK
ABSORBERS.
pase
22)
to suit load
3. Lugsase racks
de for light weieht items.
Do not cady more than
30 lbs.
of
carso
on a lussage
rack behind the seat. Bulky
items
too
fd behird the
rider
may
cause
wind tubulence that
impans handlins.
4. All cargo a.d
accesso.ies must be secure
for stable handlins. Re{heck
cargo
security and accessory
nounts frequent-
ly.
5. Do not altach large,
healy items to the
handlebars,
front foiks. or fender.
Unstable handling or slow steering
fesponse may result.
3
Genuine Honda accessories have teen
specifically designed
for
and tesied
on
Because the facto.y
cannot test all other
accessories,
you
are
penonally
responsible
for
proper
s€lection,
installation and
use
of accessories. Alwaysfollow
the
euidelines
under Loading above, and
these:
l. Carefully inspect the
acces$ry to mske
sue
it
does
not obscure any lishts.
reduce
sround
clearance
and
bankins
angle or limit
suspension
travel,
steering
travel or control operaiion.
2. Lalge fork-rnounied
fairinss or wind-
shields, or
poorly
designed or imp.oper-
ly mounted fairings can
produce
aero-
dynamic
forces
that
cause unstable
handling. Do not install fairings that
decrease cooling air flow to the engine.
3. Accesories which alter
your
riding
position
by moving hards or feet away
Jrom corfols may increase
.eaction
time in an emergency.
4. Do not add
electrical
equipment
that
will
exceed the
motorcyclet electrical
system
capacity.
A blown
fuse
could
quse
a dangerous
loss
of lietrts
or
engine
power
at nisht
or in traffic.
5.
This
motorcycle was
not deslgned to
puU
a sidecar or tiailer.
Handline
1nay
be serioudy
inpaired if so
equipped.
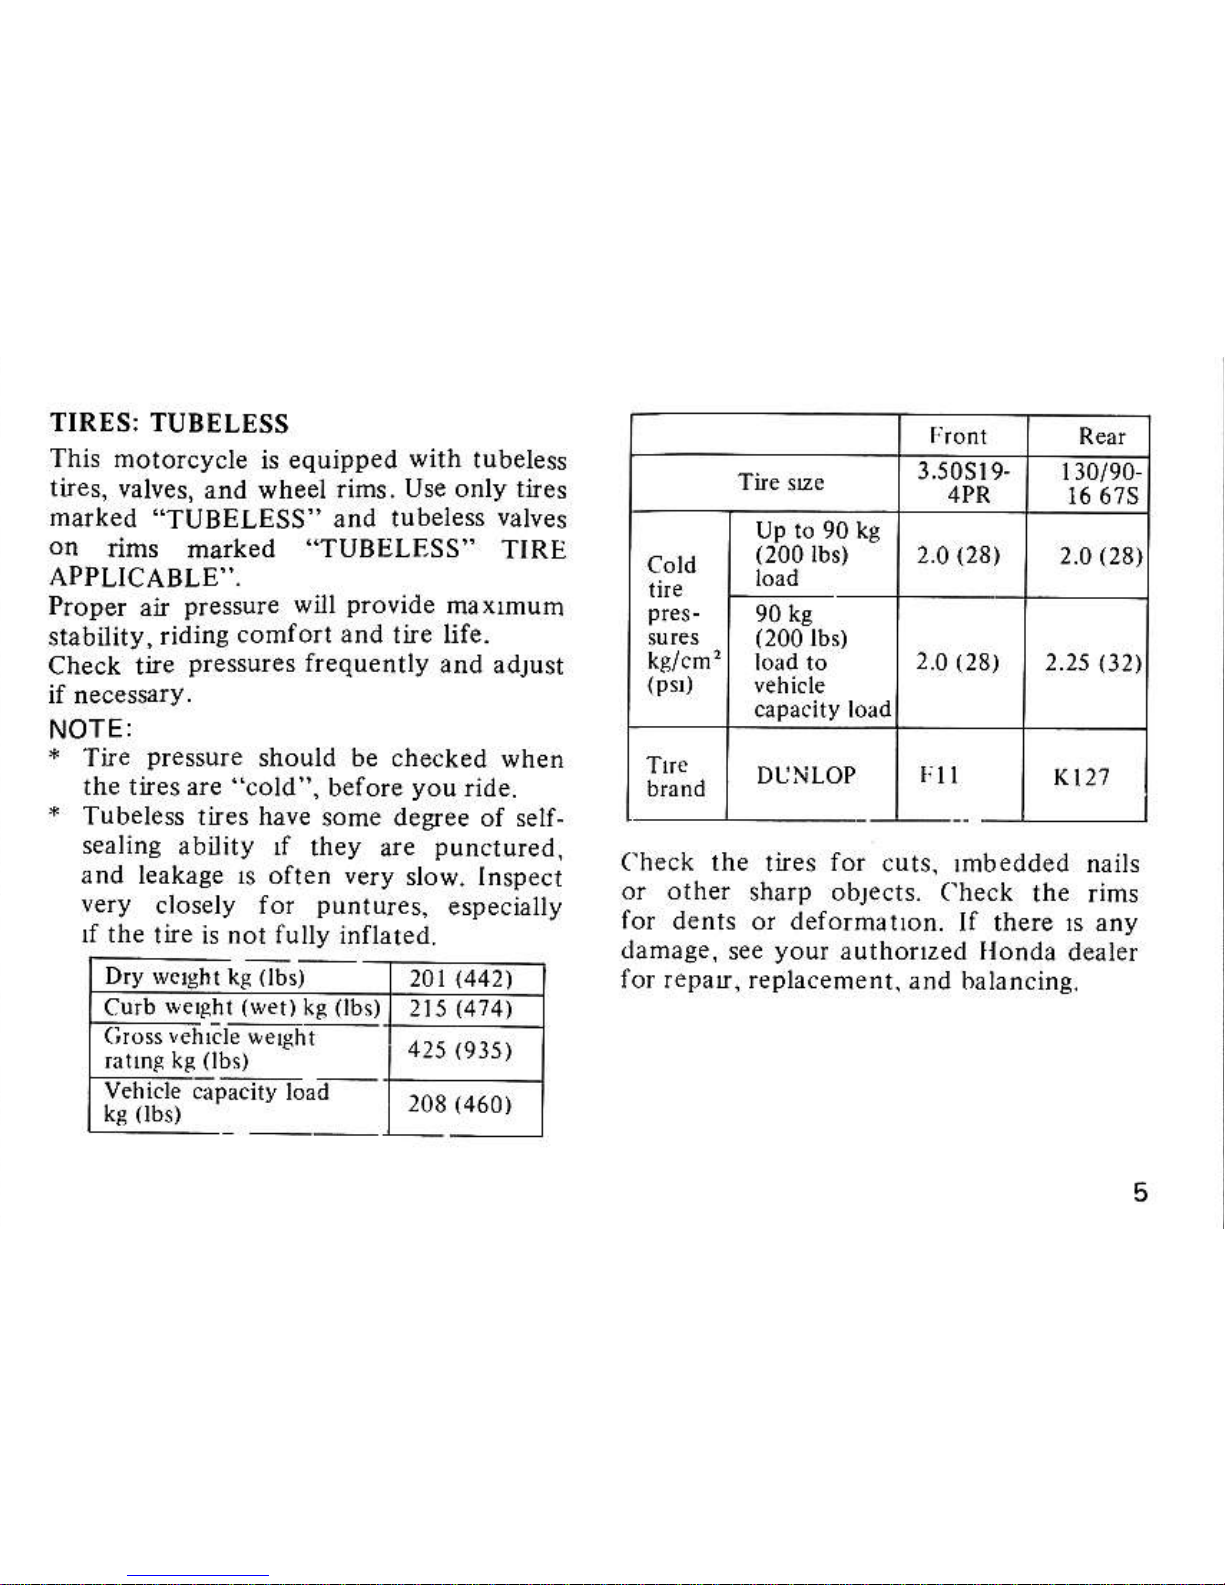
TIRES: TUDELESS
This
motorcycle is equipped
with
tubeless
tires, valves,
and wheel rifts.
Use only tires
marked
"TUBELESS"
and tubeles
valves
on
rims
marked
'TUBELESS"
TIRE
APPLICABLE''.
Proper
an
pressue will
provide
inaxmum
stability,
ridine
comfon and lire life.
check tne
presues
frequently
and adtust
NOTE:
*
Tire
pressure
should be checked
when
ihe ines a.e
'cold '.
before
you
ride.
*
Tubeles tires have
some desee of ser-
sealing
ability f
they are
puncrured,
and leakaee 1s oflen very
slow. Inspect
very
closely for
puntures.
especially
f the
!ne is nor fully intlared.
('heck
the
lires
for
cuts. rnbedded nails
or othe.
sharp objects.
('heck
the.ims
for dents
oi
deformarron.
If there B any
damase,
s€e
you
autholzed llonda
dealer
for repatr. replacement.
and balancing.
3.50Sr9-
4PR
ll0/90
t6 67S
(200lbt
2.0
(28)
2.0
(28)
90 ks
(200lbt
2.0
(28)
2.25
\321
DL'NLOP
r
ll
l(t21
Curb
Ne'Ahl
(wet)
kg
(lbs)
clffhrile
krBhr
VehGl-e
ap-eny loa-
208
(460)
1.,,
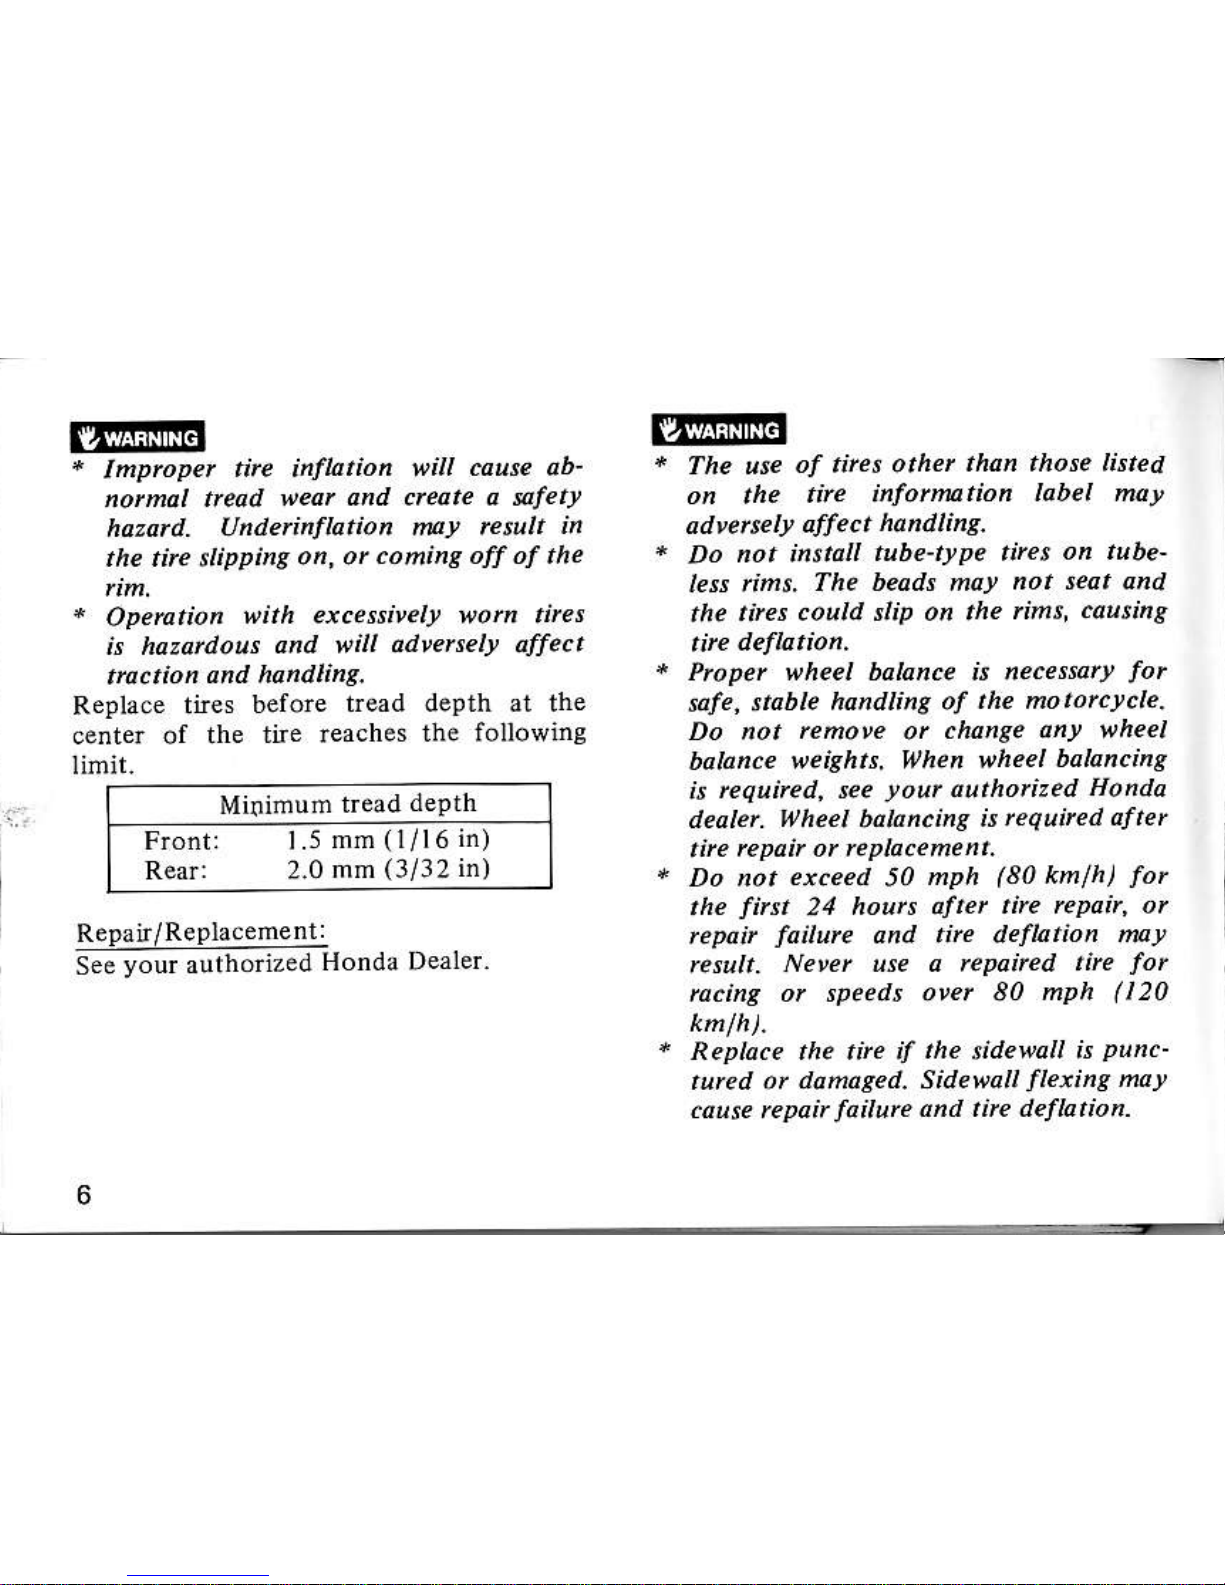
EE@
*
The use
of tir.s othet
than thos. lbted
EE!@
*
Imptupet
nrc inflrtion taill
Muse ab'
hotmol tfead
|'ear an.I oeate a sfet!
hozotd- Undennflation
nfl! rctult
in
the tte slipping
on,ot
conins olf of the
"
Op.rution
vith etce$ivel! $'om .ires
X hazatdous
and irill
adt)qselt
affect
ttt. tio
n on.l hand ling.
Rellace
tnes before
tread depth a1 the
certer of ihe
tne reaches
the fotlowine
iimit.
Minimum
tread
depth
Fiont: 1.5
mn
(l/16
in)
Rear: 2.0
mm
(3/32
in)
ReDair/ReDlacement:
See
your
authorized
Honda Dealer.
on the
tire ikfortution
label may
ad'e$e
ty affe c t
ha
n.l lins.
Do
not install
tube-ttpe tires
on tube-
les rins.
The bea.ls mat
not seat an.l
the ties
coul.l slip on the
rims, cdusins
Prcper wheel bolance is e.essarr
for
safe, {toble
hon.llin8 of
the mto/c!.|e.
Do not
renoe.
or
.hange akt vheel
bolance
weishts. When \ah.el
balancine
X
rcquire.l, see
yout
duthotized
Hottda
dealel.
tltheel
bdlancins
is tequte.l
aJter
,irc
repair or replo.enent.
Do ot
ercee.t
50
ftph
(80
kn/h)
for
the
fi$
24
houts altet
tirc rcpat, or
rcpat
failure
and tite defl4tion
tar
tzsult. Neeet
use a rcanirc.l
tte
for
tu.ins ot speeds over 80
mph
(l2O
Replace the tit. il
the
sidewa
is
punc'
ture.l or
rtamdse.!. Side\9a4
fteriis
tut
cduse rcpail
failute
dkd tirc.leflation.

cauflor{:
*
Do
not
try to
rcmove tubeles nres
wthout
specidl
tools antl rim
protec-
tors.
You
mat
ddmage
the nm
sealins
sutface
or
ditfisurc the
ritu
MODIFICATIONS
w@
*
MoclrTication of the motorrcle,
ot
rcnoval of orisinal equipnent
na!
rc
d.r the ,ehicle unfufe or i esal.
Obet o
fedetul,
state and local
equip-
DESCRIPTION
PARTS
LOCATION
Headlight
dimmer switch
(10)
Warning and indicator
lights
(12)
F'ront b.ake
fluid resenon
(13)
Engine stop swilch
(
l4)
Fiont biake lever
(l5)
Throttle
Srip
(16)
Starler
bution
(l7)
ISitiition switch
I
2
3
5
7
8
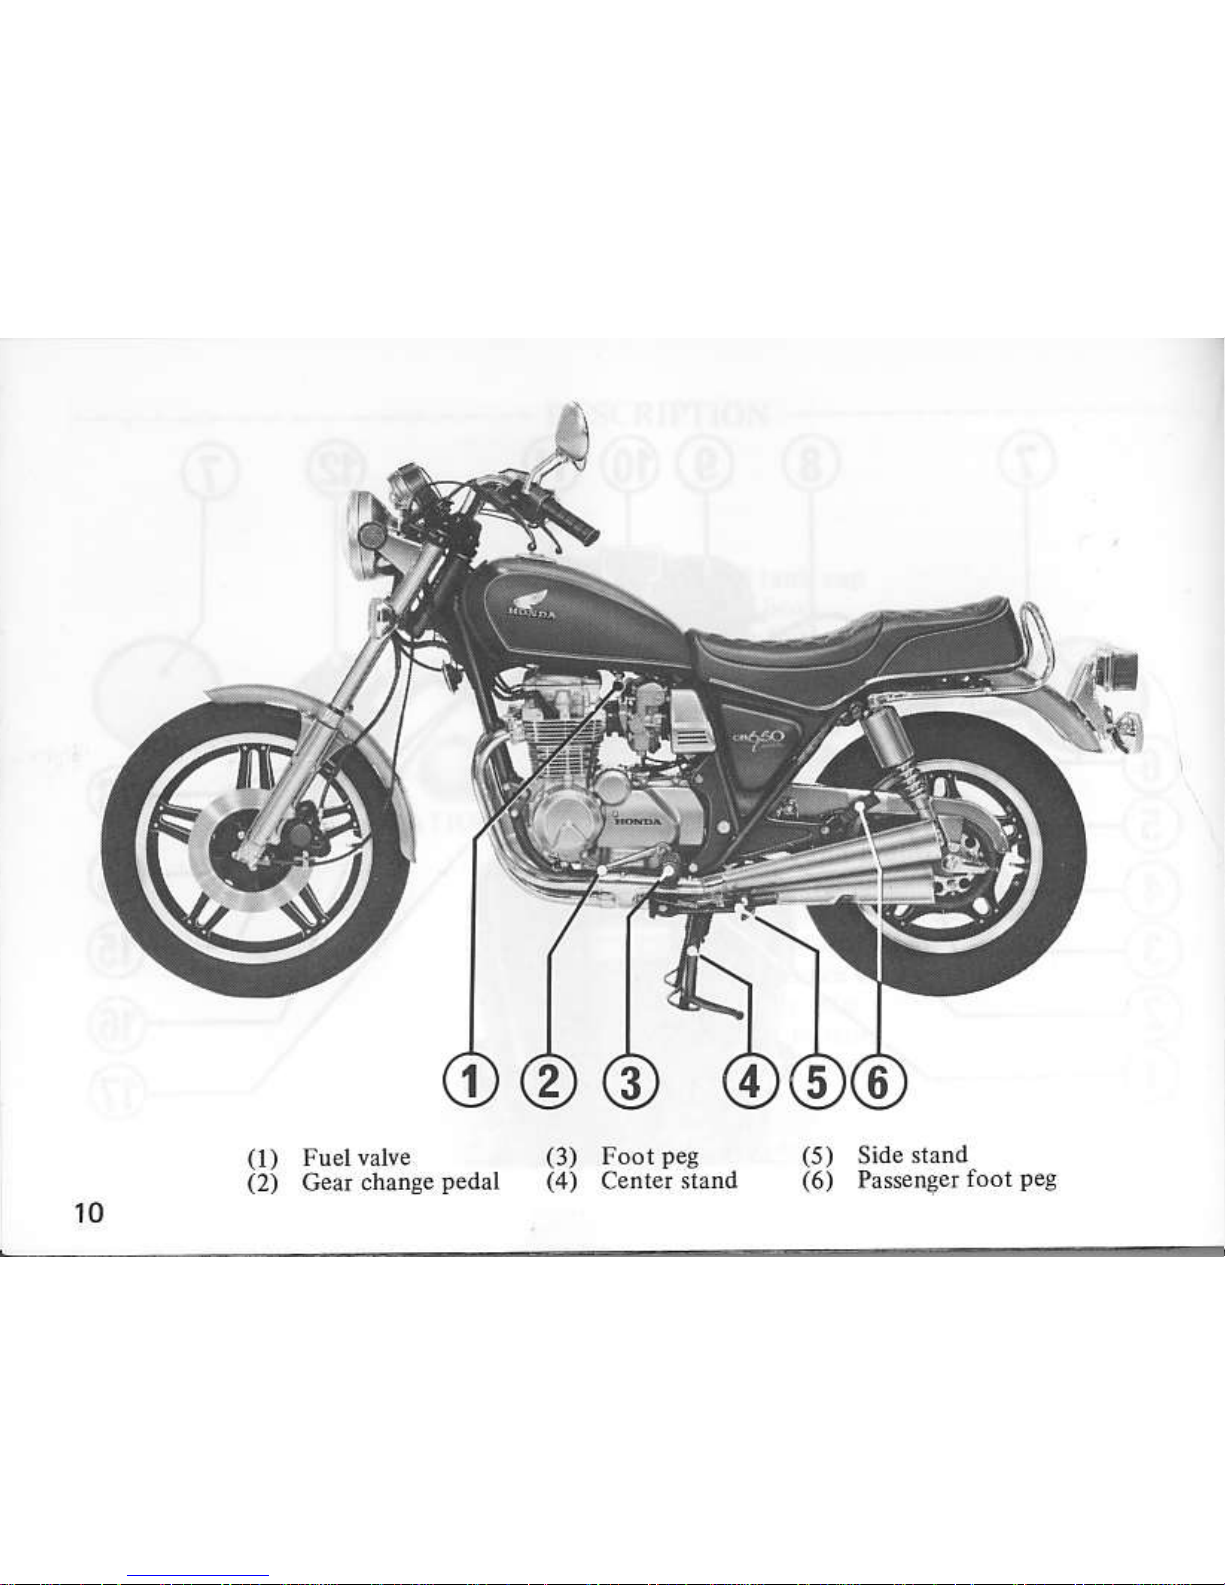
(1)
Fuelvalve
(3)
Foot
peg (s)
Sid€
srand
(2)
Cear chanae
pedal (4)
Center
sland
(6)
Pssnger
lbor
pec
10
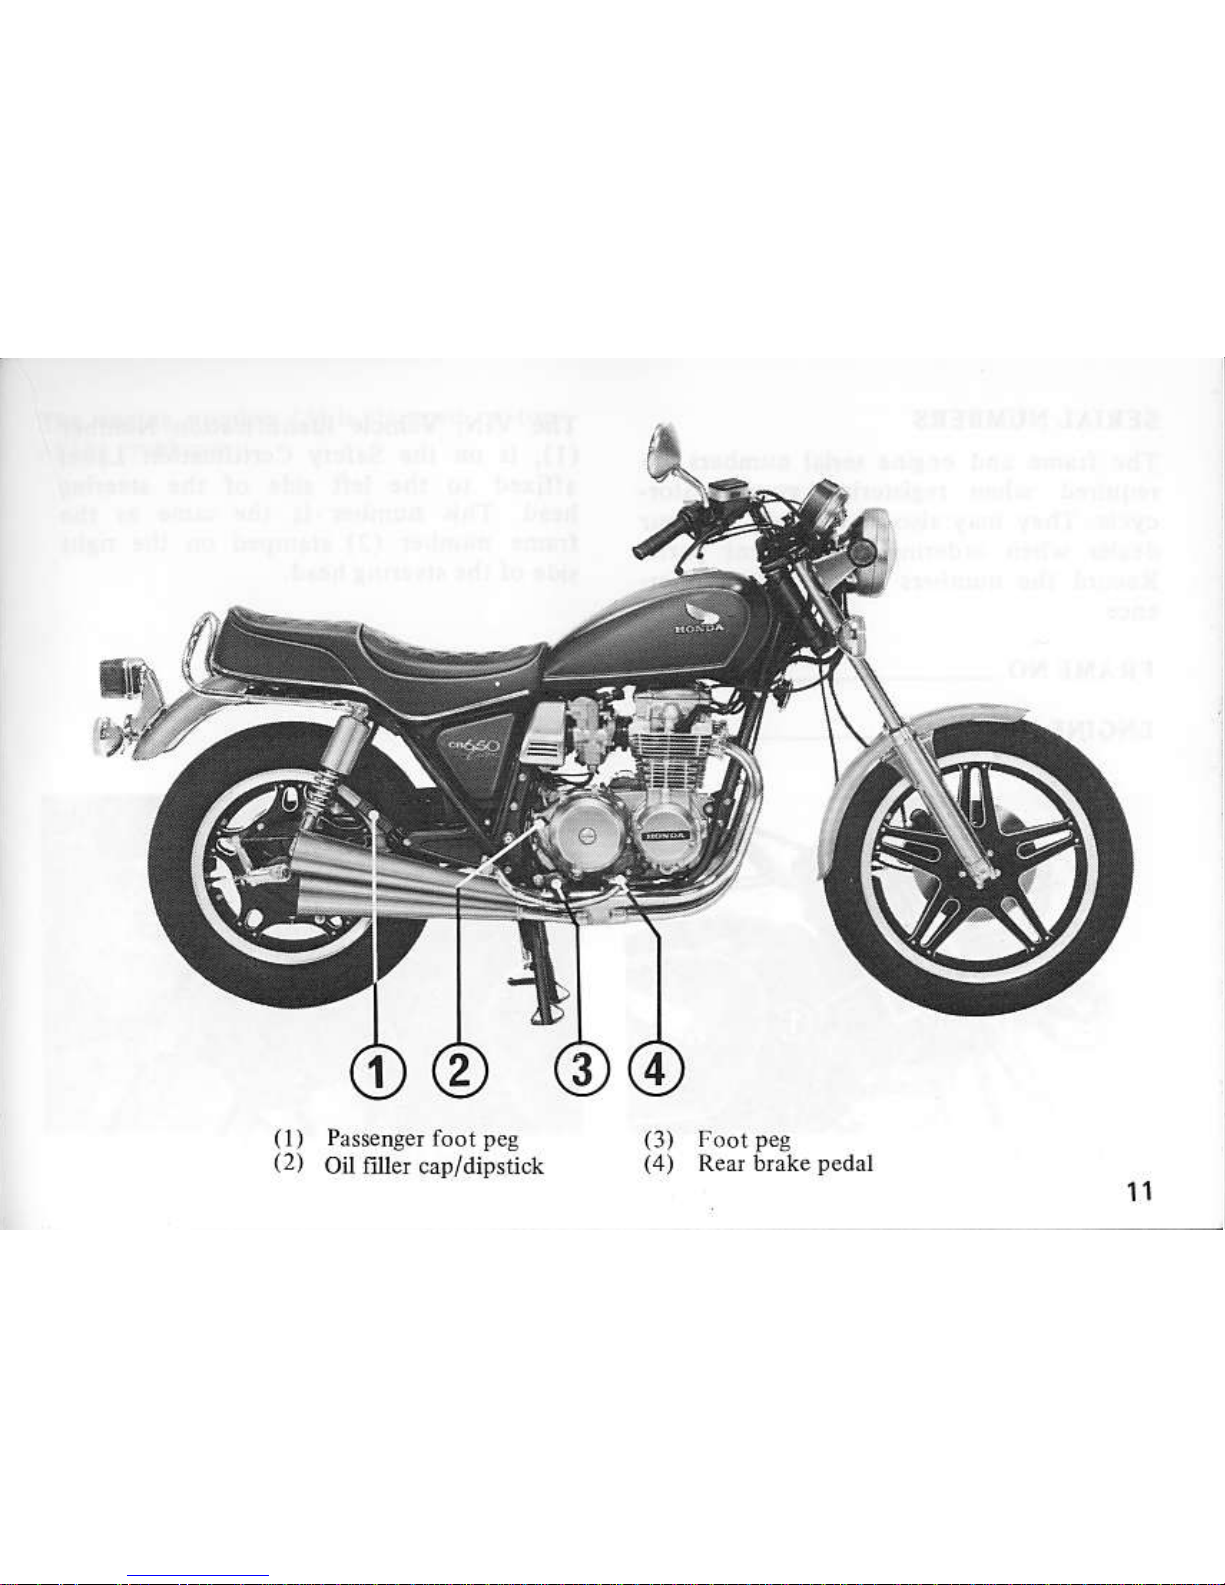
(1)
(2J
(3)
(4)
t1
SERTAL
NUMBERS
The
fiane
and
engine serial
numbers
are
lequired
when
registering
voLlr
motor
cycle.
They
may
also
be
iequired
bv
vour
deal€r when
ordering
!eplacement
parts
Recod
fte
numbers
here
for
vour
refeF
The VIN,
Vehicle
Idenhfication
"t.r"r-l
(l),
is
on the Safetv
Certification
Lab.l
rfiixed io the
left side
ol
the steering
head. This
number
is the
sane
as the
frame number
(2)
stamped
on
the.isht
side of the
steerine
head.
FRAME
NO.
ENGINE
NO.

The
eneine nunber
(3)
is
stamped
on top
-rt
PARTS
FUNCTION
Instruments.nd
lndicato6
Th€
indicaton
and
warnine
lighis
are
grouped
between
the
instruments.
above
the
hecdlsht.
Their
functions
dre descrrDeo
in
the tables
on the
following
pages
USA
nodel:
Odometer
and
tripneter
read
jn
miles'
Canadian
model:
Odometer
and tlipmete!
read
rn
kiloneters
Left turn
sieMl
indicator
Righi
turn
sigrul
indicator
Oil
pressure warnins
lisht
Hish
bean
indicator
Tachometer
red
zone
Tripmeter
resei
knob
l)
2)
3)
5)
6)
7)
8)
e)
IOJ
tll
(
(
(
(
(
(
(
(
(
(
'14
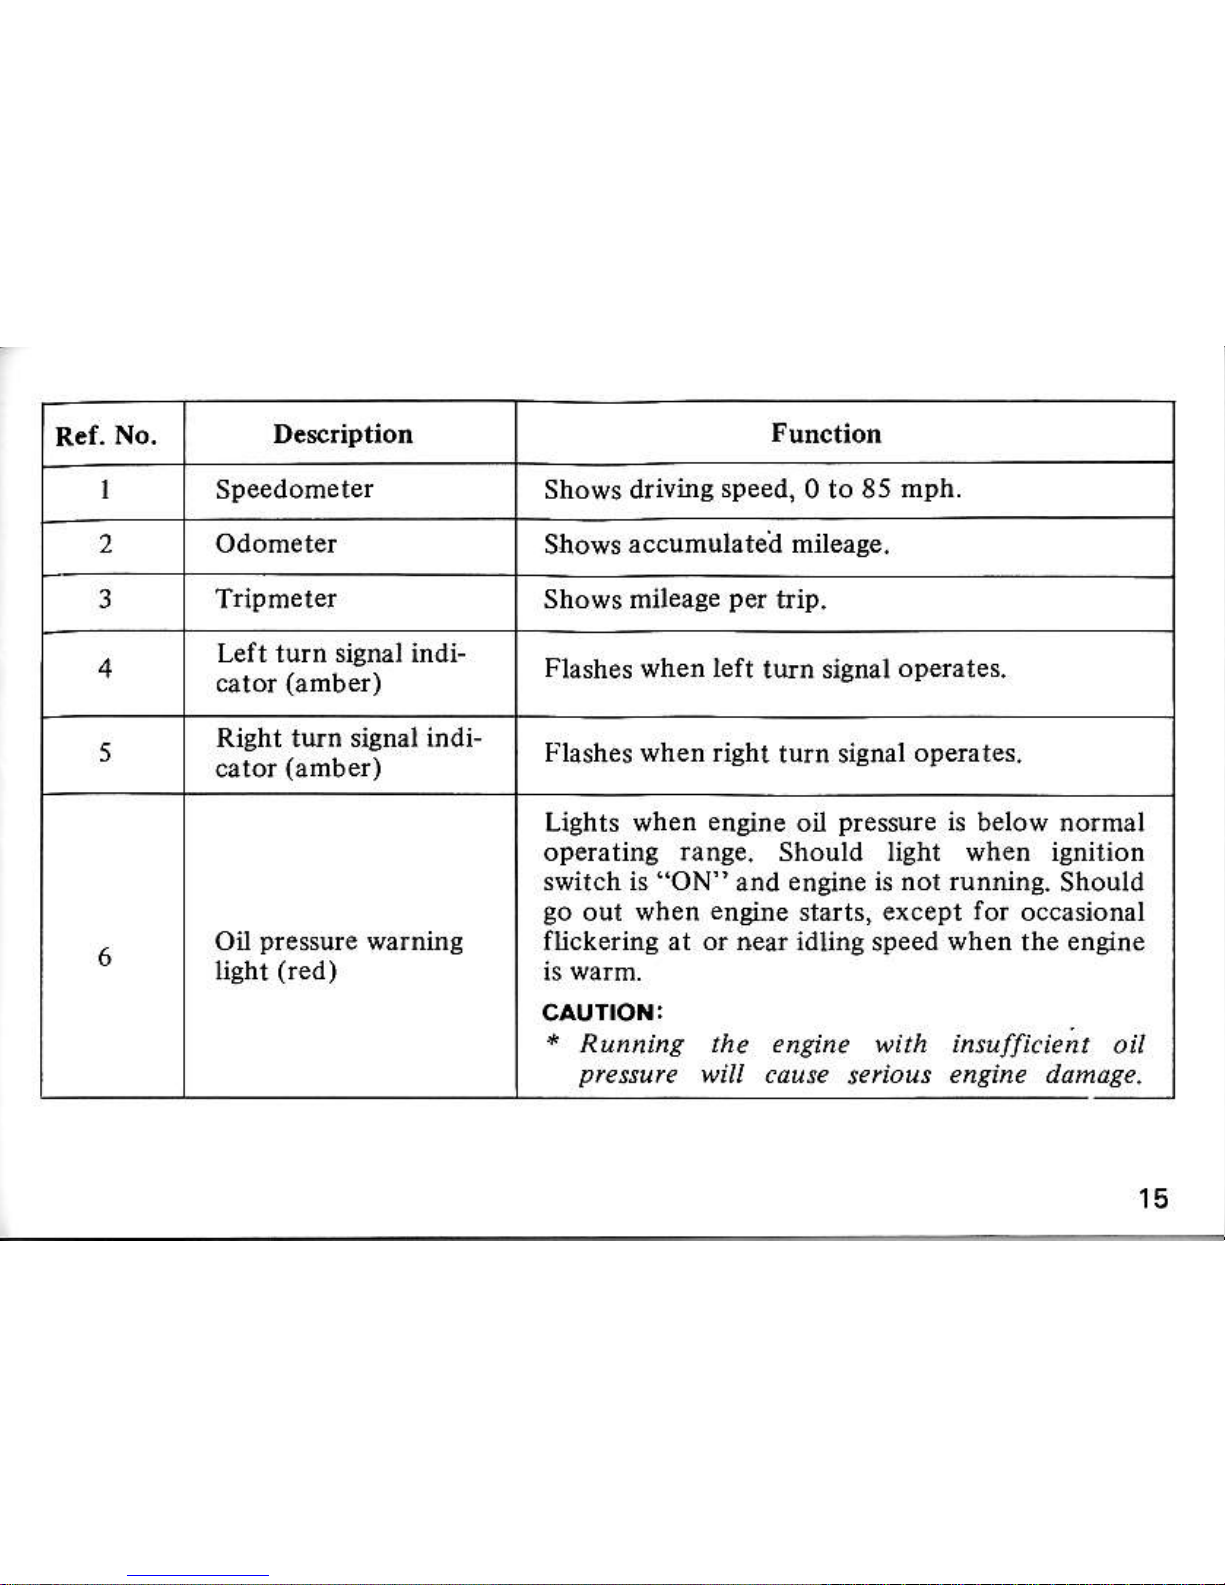
R.f.
No.
Shows driving
speed,0
to 85
mph.
2
Slows
accumutatea mjleae€.
3 Shows mileage
per
tdp.
Left turn sign2l indi-
Flashes
when
l€ft
tum signal
operates.
5
Right turn signal indi-
F'lashes wher rishr
turn signal
opqates.
Oil
piessure
warning
risht
(red)
Lighrs when
ensine
oil
pressure
is
below no'mal
operating lange. Should light when ienilion
swirch is
"ON
'a
nd engine k nor running.
Should
go
our
when engire
sldr\, eleept
for
oc!asional
nickerins ar or near idling
speed
when rhe engn.
CAUTION:
+
Rukains the cneihe @nh intullicient
oil
pressuft
will cdute
senous
ensine ddmase.
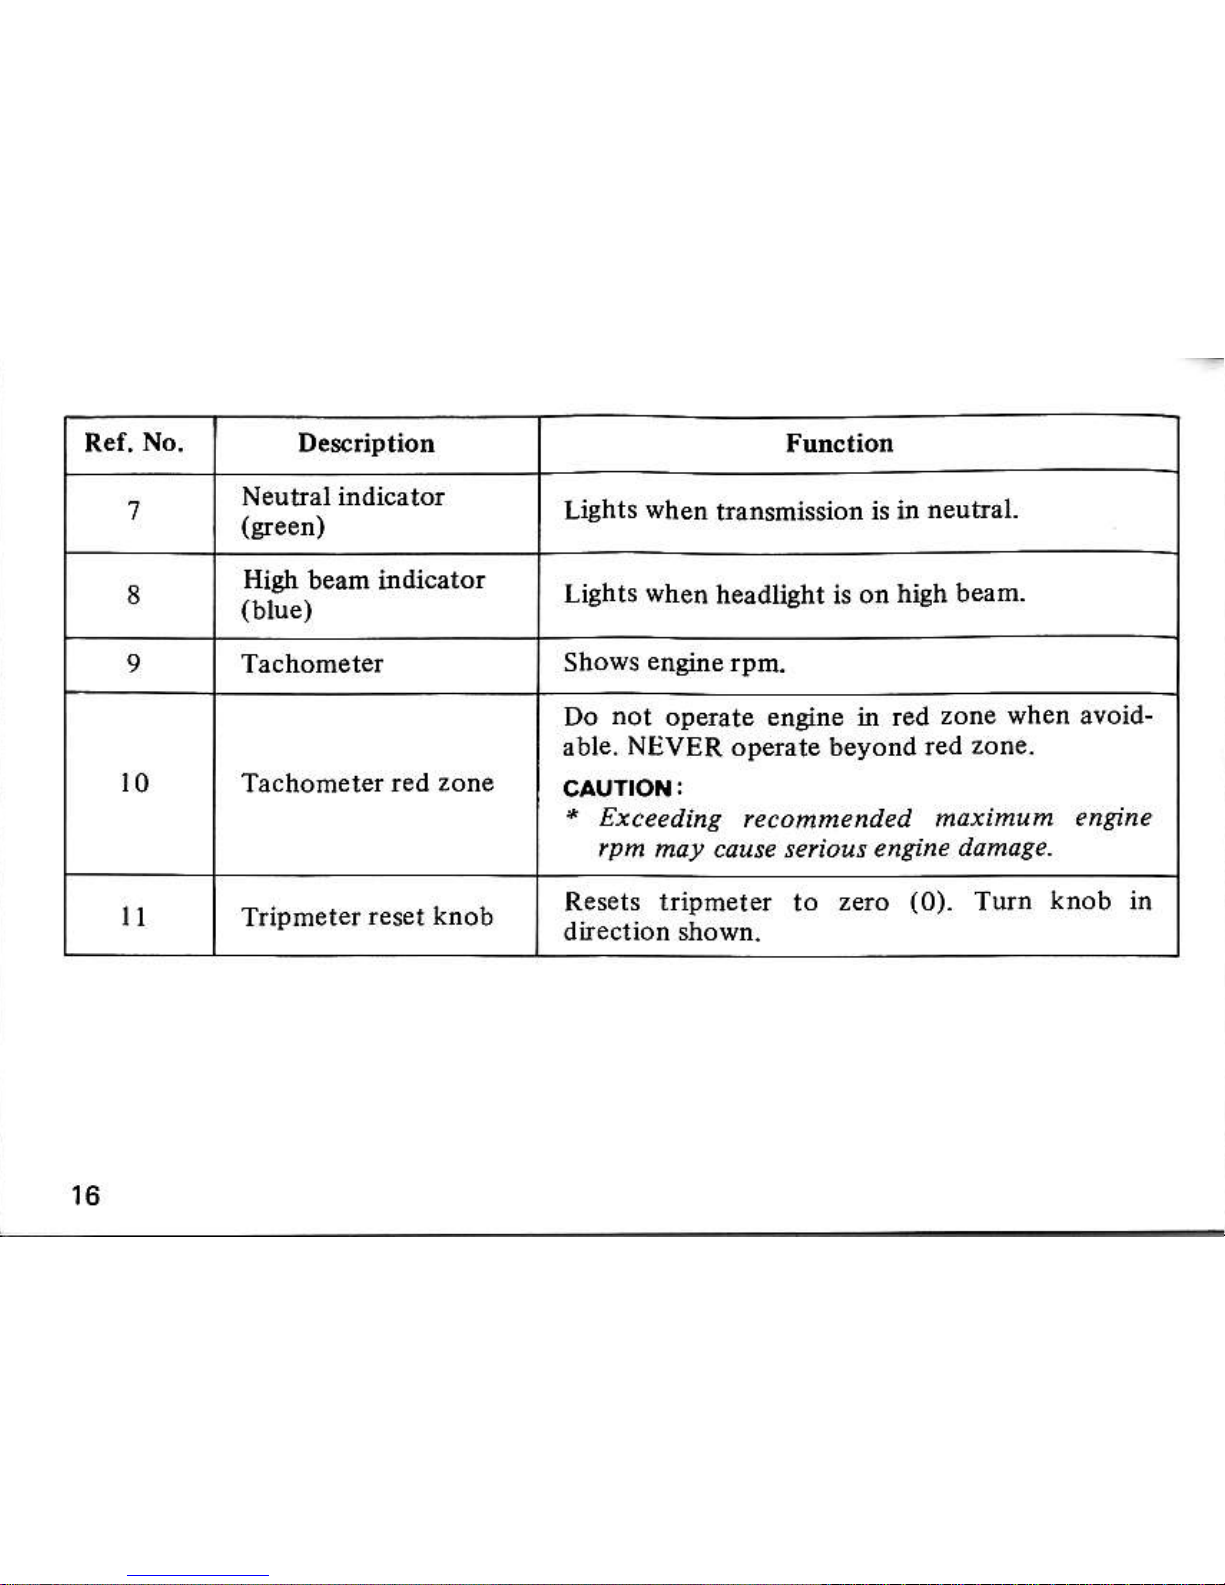
Ref.
No.
7 Lights
when
t.ansmission
is in
neutral.
8
Hi8h
beam indicator
(blue)
LiShts when
h€adlight is on
high b@m.
9
l0
Tachorneter
red zon€
Do
not
ope.ate engin€ in red
zone when avoid-
able. NtsVER opqate beyond red
zone-
*
E
ceedine rccomnekded maxinum
engine
rpm may cause senous engike
damaSe.
u Tripmeter
reset knob
Resers lripnerer ro zero
l0).
lurn
knob in
knition
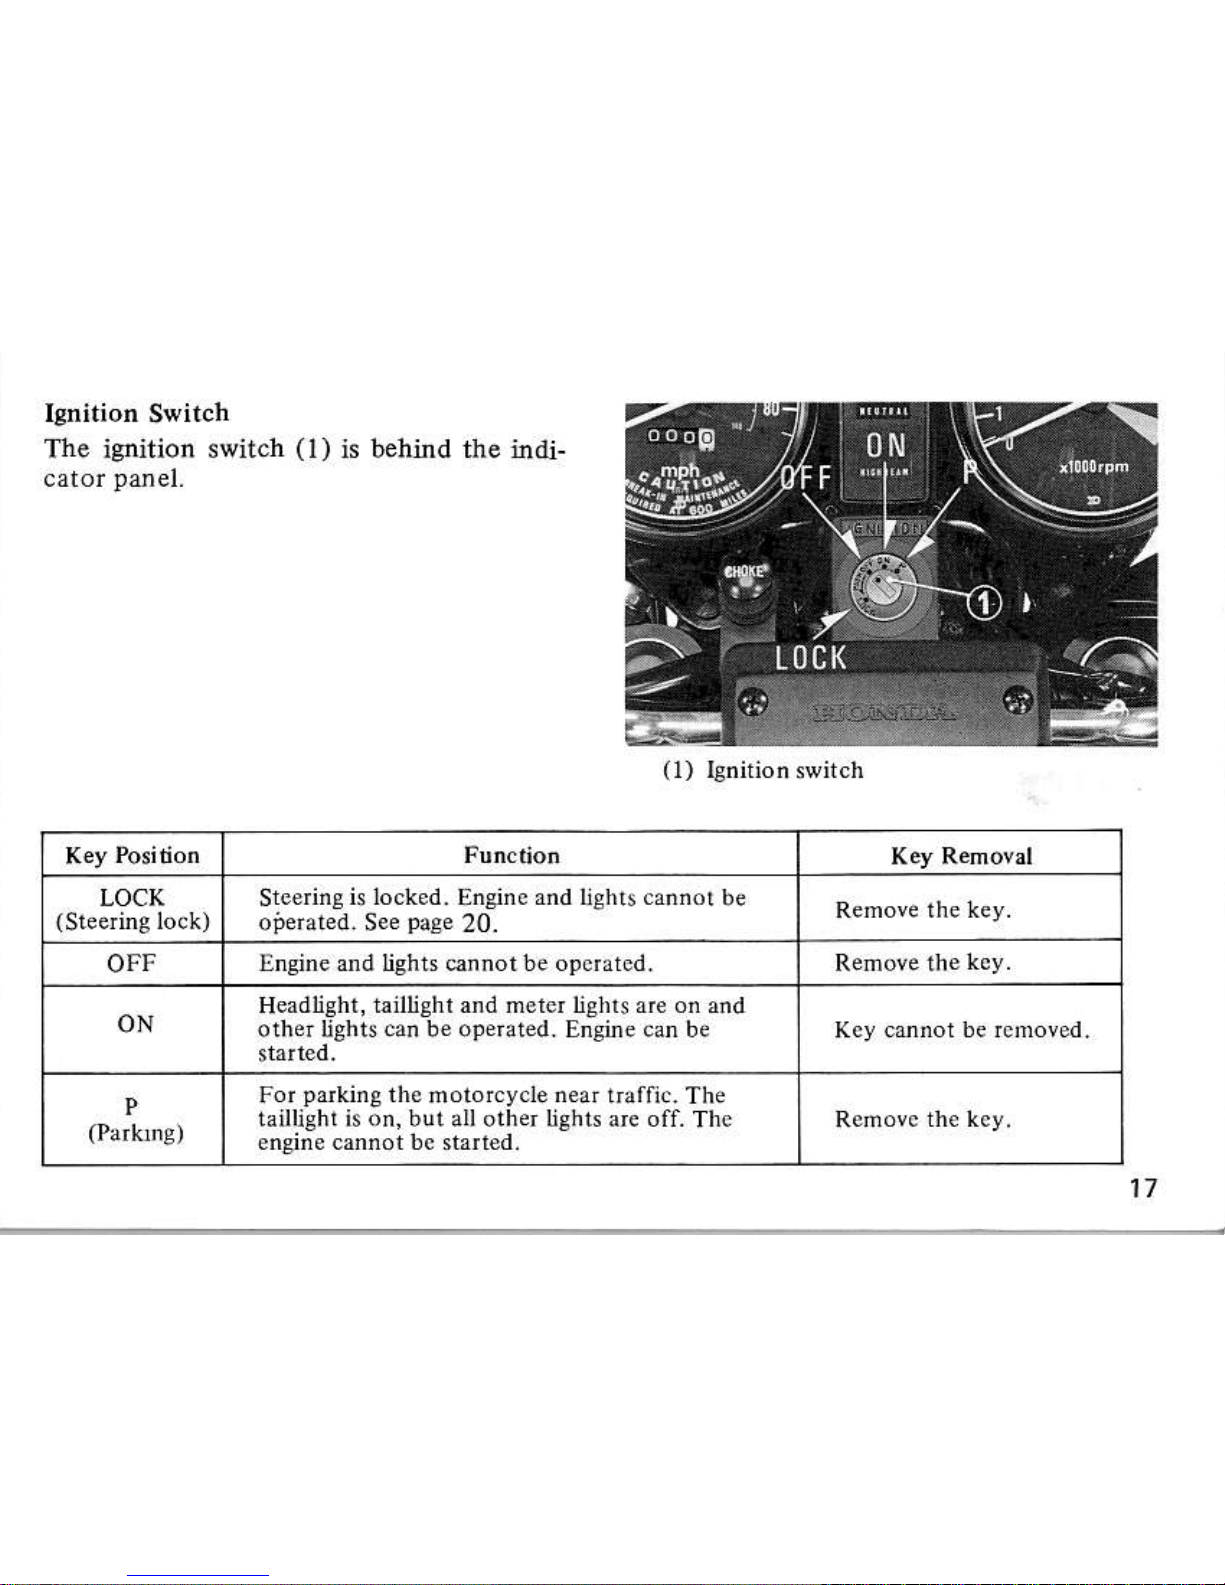
Switch
The isnition swiich
(l)
is behind the indi-
LOCI( SreerinE
is locked. Ensine and liehrs cannor
be
OFF
E.gine and lishls mnnotbe operared.
ON
Headtshl,
raillishl and m€ler lighls are on a.d
oiherUghtscan b€ operaied. Engine can be Key cdnol be rcmoved,
For
parkinBthe
nDlorcyclenqr farnc. The
tailughi is on, but all other lghls are ofi
Tne
eqine cannot bo starred.
17
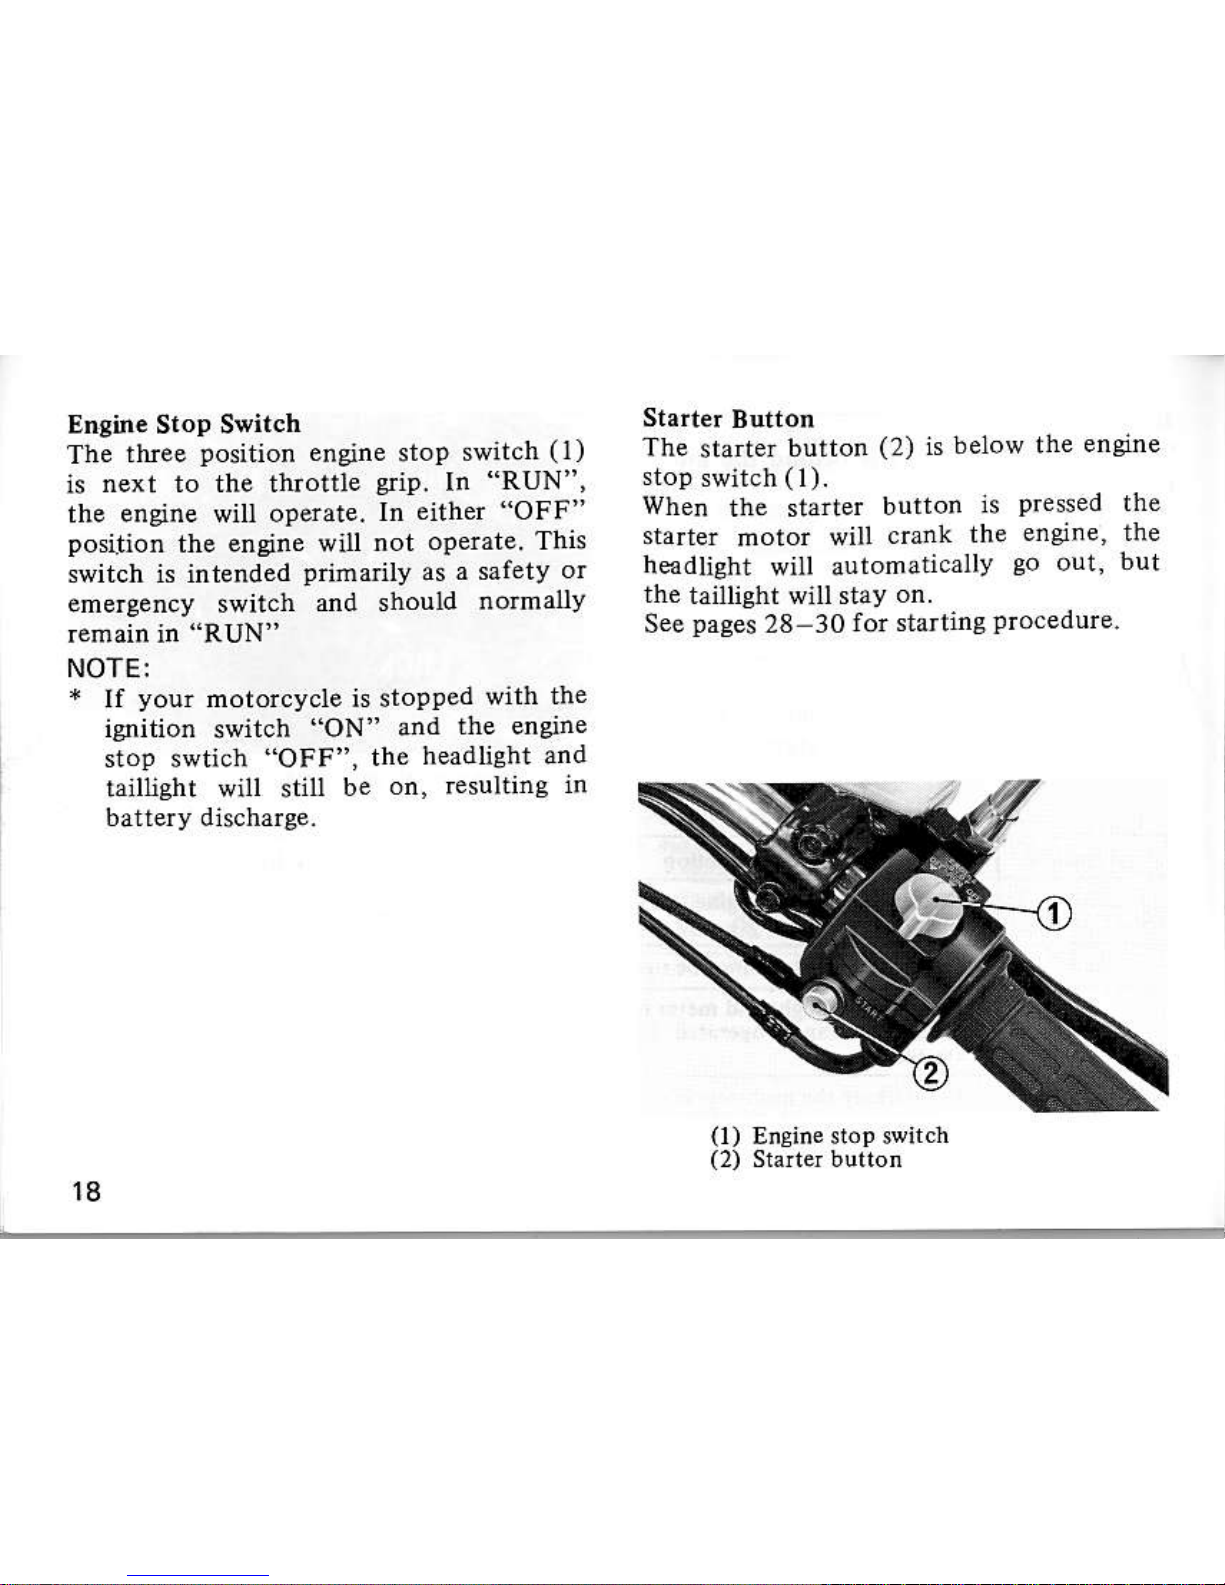
Engine StoD Switch
The
tbree
position
engine
stop
swiich
(t)
is
next to the throttle
edp.
In "RUN",
the engine wiU operate.
In
either
"OFF"
position
the engine witl
not
operate. This
switch is intended
primarily
as
a safety
or
emergency swiich
dd should
normauv
remain in
{RUN"
NOTE:
*
If
your
motorcycle is stopled
with
the
ignition
switch
"ON"
and
the encine
stop swtich
"OFF",
the
headlight and
tajllisht will still
be
on, resulting
in
battery discharge.
The
starter
button
(2)
is
below the
engine
When
the starter
button
is
pressed
the
starter
motor
will
crank
ihe
engine, the
h@dlieht
will automatically eo
oul,
but
the
taillieht will stay
on.
See
pages
28-30
for starting
procedure.
18

The three
controls next to the left
handle-
H€rdlisht
Dinner
Switch
(1)
Select "HI"
for high beam,
"LO
for low
Tum sisnat switch
(2)
Move
to
"L" to
sienal a left tum, "R" to
signal
a right tum. Retum to the
center
Eom Button
(3)
Pres
ihe button to sound ihe
horn.
(i)
HadIBnt dinmer
swftch
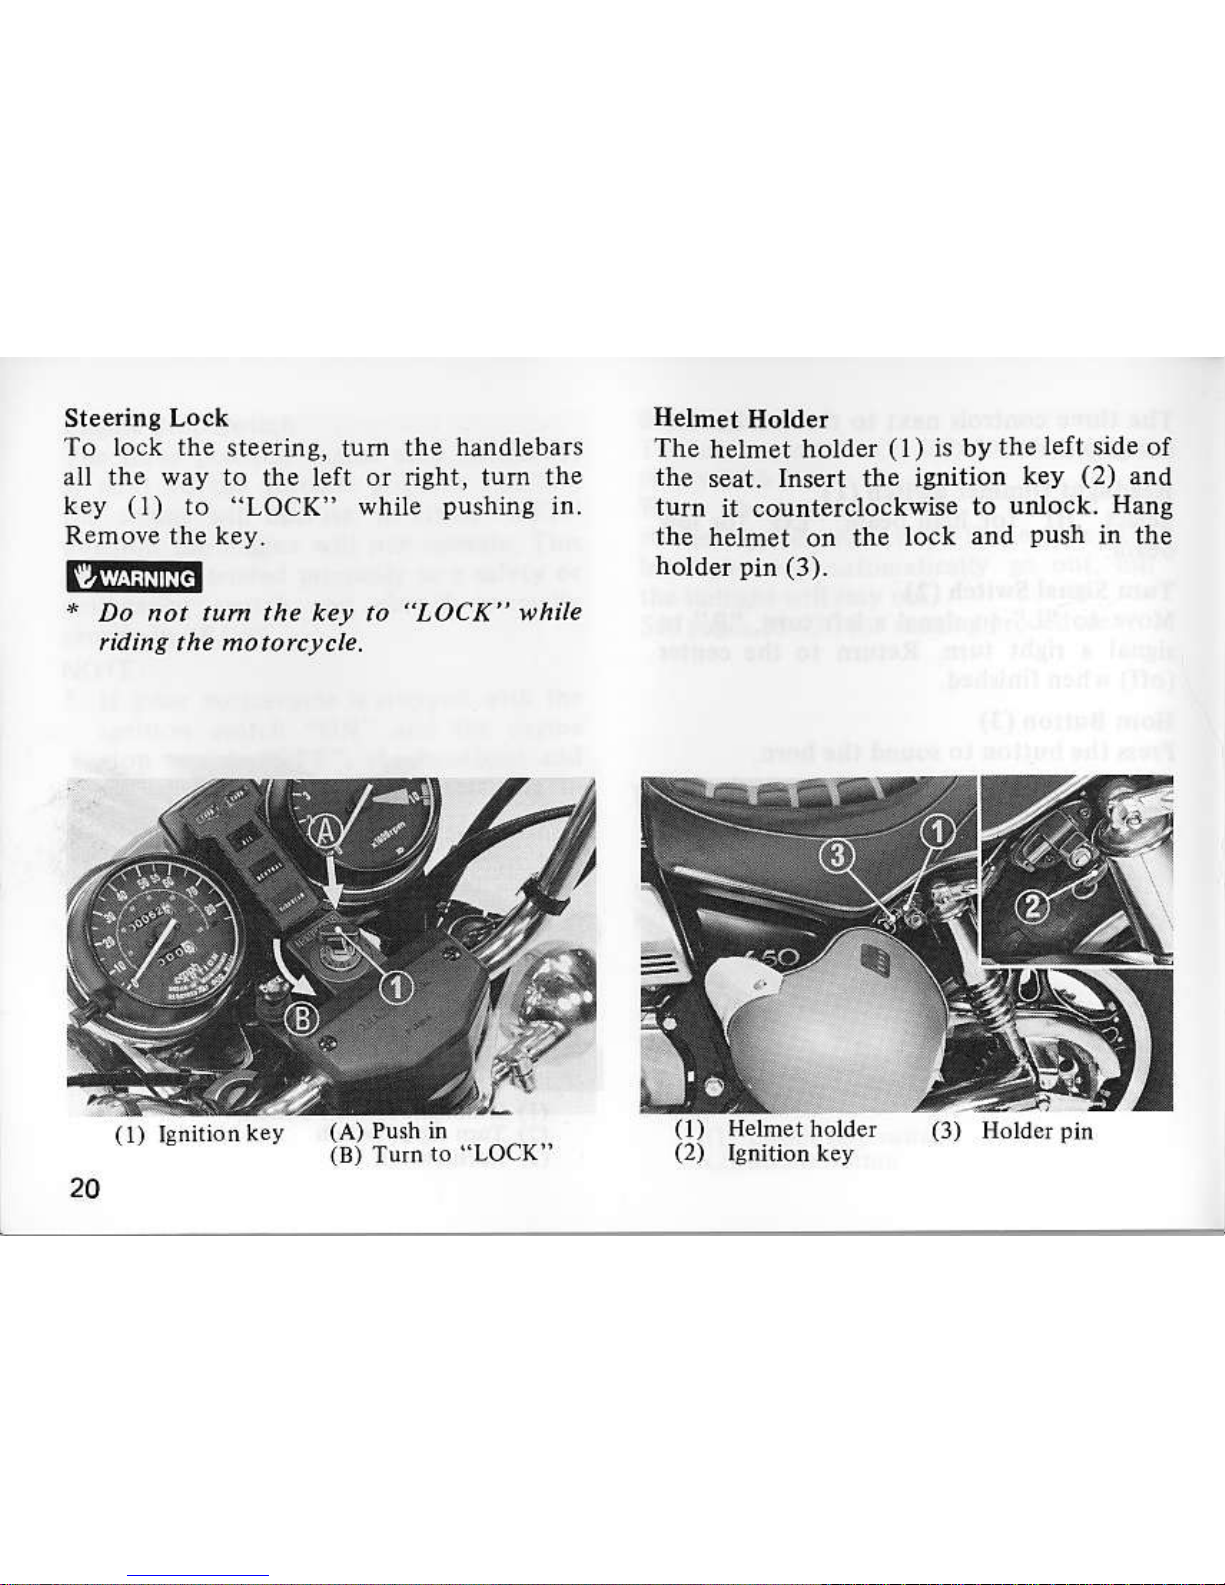
To lock the
steeiing. nrm the
handlebars
ail the way to
the
left oi dght, tum the
key
(l)
to
"LOCK"
while
pushine
in.
NEEG
*
Do not tum the ker to
'LocK"
while
ri.liflg t h.
mo torctcle,
Helnet
Holder
The
helmet holder
(l
)
is by
the left slde of
the
seat. Inseit the ignition
key
(2)
and
tum
it counterclockwis€
to
urlock. Hug
the helmet
on the
lock
and
Pwh
in the
holdq
lin
(3).
o)
(2)
{r) lsnrnnkey
(A)
Push in
(B)
T!rn
to
"IOCK
 Loading...