

Page 1
Access AWS-1B
Wrapping System
Operator Manual
ML-44216 AWS-1B (L-R)
ML-44217 AWS-1B (R-L)
701 S. RIDGE AVENUE
TROY, OHIO 45374
www.hobartcorp.com
F-35538 (April 2010)
Page 2

Page 3

Access AWS-1B Wrapping System Operator Manual
TABLE OF CONTENTS
Chapter 1: Introduction. . . . . . . . . . . . . . . . . . . . . . . . . . . . . . . . . . . . . . . . . . . . . . . . . . . . . . . . . . . . . . .1-1
Welcome. . . . . . . . . . . . . . . . . . . . . . . . . . . . . . . . . . . . . . . . . . . . . . . . . . . . . . . . . . . . . .1-1
FCC Note . . . . . . . . . . . . . . . . . . . . . . . . . . . . . . . . . . . . . . . . . . . . . . . . . . . . . . . . . . . . .1-1
Verify Correctness of
Weight and Price . . . . . . . . . . . . . . . . . . . . . . . . . . . . . . . . . . . . . . . . . . . . . . . . . . . . . . .1-2
Operator Manual Terminology. . . . . . . . . . . . . . . . . . . . . . . . . . . . . . . . . . . . . . . . . . . . .1-2
Important Information . . . . . . . . . . . . . . . . . . . . . . . . . . . . . . . . . . . . . . . . . . . . . . . . . . .1-3
Chapter 2: Understanding the System . . . . . . . . . . . . . . . . . . . . . . . . . . . . . . . . . . . . . . . . . . . . . . . . . . .2-1
Electrical Connections . . . . . . . . . . . . . . . . . . . . . . . . . . . . . . . . . . . . . . . . . . . . . . . . . . .2-2
Console Communication
Connections . . . . . . . . . . . . . . . . . . . . . . . . . . . . . . . . . . . . . . . . . . . . . . . . . . . . . . . . . . .2-2
Operator Start Screen . . . . . . . . . . . . . . . . . . . . . . . . . . . . . . . . . . . . . . . . . . . . . . . . . . . .2-3
Understanding the Wrapper . . . . . . . . . . . . . . . . . . . . . . . . . . . . . . . . . . . . . . . . . . . . . . .2-4
Loading Film . . . . . . . . . . . . . . . . . . . . . . . . . . . . . . . . . . . . . . . . . . . . . . . . . . . . . . . . . .2-5
Chapter 3: Using the Access Wrapping System. . . . . . . . . . . . . . . . . . . . . . . . . . . . . . . . . . . . . . . . . . . .3-1
Power Up the System . . . . . . . . . . . . . . . . . . . . . . . . . . . . . . . . . . . . . . . . . . . . . . . . . . . .3-1
Logging onto the System . . . . . . . . . . . . . . . . . . . . . . . . . . . . . . . . . . . . . . . . . . . . . . . . .3-1
Shutting Down the System . . . . . . . . . . . . . . . . . . . . . . . . . . . . . . . . . . . . . . . . . . . . . . . .3-2
Operator Start Screen
Menu Buttons and Flashkeys . . . . . . . . . . . . . . . . . . . . . . . . . . . . . . . . . . . . . . . . . . . . . .3-3
Run Screen . . . . . . . . . . . . . . . . . . . . . . . . . . . . . . . . . . . . . . . . . . . . . . . . . . . . . . . . . . . .3-4
Modifying the Run Screen . . . . . . . . . . . . . . . . . . . . . . . . . . . . . . . . . . . . . . . . . . . . . . . .3-5
Automatic Settings . . . . . . . . . . . . . . . . . . . . . . . . . . . . . . . . . . . . . . . . . . . . . . . . . . . . . .3-6
Using Automatic Mode . . . . . . . . . . . . . . . . . . . . . . . . . . . . . . . . . . . . . . . . . . . . . . . . . .3-6
Manual Mode . . . . . . . . . . . . . . . . . . . . . . . . . . . . . . . . . . . . . . . . . . . . . . . . . . . . . . . . .3-10
Running a Product . . . . . . . . . . . . . . . . . . . . . . . . . . . . . . . . . . . . . . . . . . . . . . . . . . . . .3-11
Using the Operator Run Screen Drop-Down Menus . . . . . . . . . . . . . . . . . . . . . . . . . . .3-12
Product Drop-Down Menu. . . . . . . . . . . . . . . . . . . . . . . . . . . . . . . . . . . . . . . . . . . . . . .3-13
Settings Drop-Down Menu. . . . . . . . . . . . . . . . . . . . . . . . . . . . . . . . . . . . . . . . . . . . . . .3-19
Help Drop-Down Menu . . . . . . . . . . . . . . . . . . . . . . . . . . . . . . . . . . . . . . . . . . . . . . . . .3-24
Chapter 4: Maintenance & Cleaning . . . . . . . . . . . . . . . . . . . . . . . . . . . . . . . . . . . . . . . . . . . . . . . . . . . .4-1
About Proper Care . . . . . . . . . . . . . . . . . . . . . . . . . . . . . . . . . . . . . . . . . . . . . . . . . . . . . .4-1
Guidelines. . . . . . . . . . . . . . . . . . . . . . . . . . . . . . . . . . . . . . . . . . . . . . . . . . . . . . . . . . . . .4-2
Cleaning Instructions . . . . . . . . . . . . . . . . . . . . . . . . . . . . . . . . . . . . . . . . . . . . . . . . . . . .4-4
Cleaning Each Component. . . . . . . . . . . . . . . . . . . . . . . . . . . . . . . . . . . . . . . . . . . . . . . .4-4
Removing Labels . . . . . . . . . . . . . . . . . . . . . . . . . . . . . . . . . . . . . . . . . . . . . . . . . . . . . . .4-7
Loading Labels. . . . . . . . . . . . . . . . . . . . . . . . . . . . . . . . . . . . . . . . . . . . . . . . . . . . . . . . .4-9
Setting the Label Size Plate . . . . . . . . . . . . . . . . . . . . . . . . . . . . . . . . . . . . . . . . . . . . . .4-12
Cleaning the Printhead . . . . . . . . . . . . . . . . . . . . . . . . . . . . . . . . . . . . . . . . . . . . . . . . . .4-13
F-35538 (April 2010) i Table of Contents
Page 4

Access AWS-1B Wrapping System Operator Manual
Chapter 5: Troubleshooting . . . . . . . . . . . . . . . . . . . . . . . . . . . . . . . . . . . . . . . . . . . . . . . . . . . . . . . . . . .5-1
Reviewing System Errors. . . . . . . . . . . . . . . . . . . . . . . . . . . . . . . . . . . . . . . . . . . . . . . . .5-2
Possible System Problems . . . . . . . . . . . . . . . . . . . . . . . . . . . . . . . . . . . . . . . . . . . . . . . .5-6
Index. . . . . . . . . . . . . . . . . . . . . . . . . . . . . . . . . . . . . . . . . . . . . . . . . . . . . . . . . . . . . . . . . . . . . . . . . . . . . I-1
Table of Contents ii F-35538 (April 2010)
Page 5

Access AWS-1B Wrapping System Operator Manual
Chapter 1: Introduction
Introduction
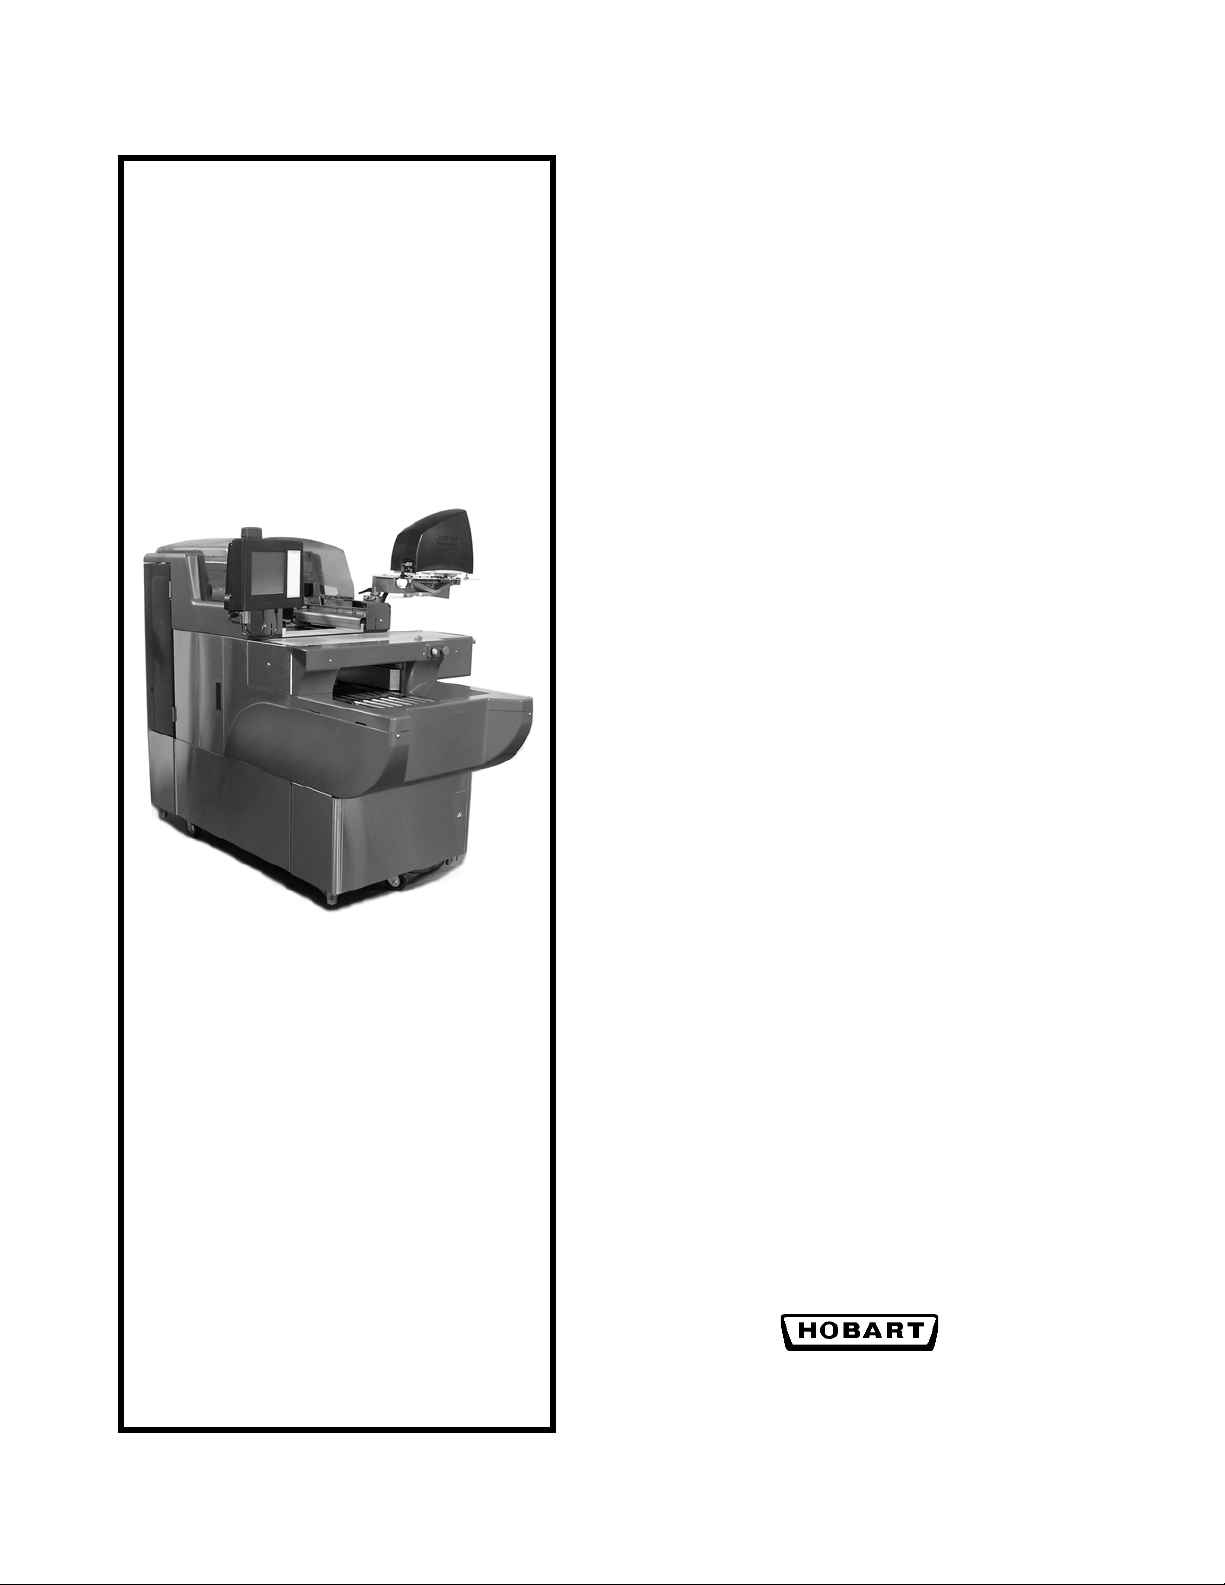
Welcome The Access Wrapping System was designed as a meat room or
produce back room wrapper. It gives you merchandising capabilities with multiple fonts, graphics, and label types.
Access Wrapping System
All necessary operator data appears on the touch screen.
FCC Note
F-35538 (April 2010) 1-1 Introduction
This scale has been tested and found to comply with the limits for
a Class A digital device, pursuant to Part 15 of the FCC rules.
These limits are designed to provide reasonable protection
against harmful interference when the scale is operated in a commercial environment. This scale generates, uses and can radiate
radio frequency energy and, if not installed and used in accordance with the instruction manual, may cause harmful interference to radio communications. Operation of this scale in a
residential area is likely to cause harmful interference; in which
case, the user will be required to correct the interference at their
own expense.
Page 6

Access AWS-1B Wrapping System Operator Manual
Verify Correctness of
Weight and Price
Routinely verify label information. Check the multiplication of
price per pound times weight, and check the scale weight against
printed label weight. Weigh the same package several times to
verify outcome consistency. Packages that weigh near the middle
of the 0.01 lb. increment will normally vary up or down by
0.01 lb. Greater variation than 0.01 lb indicates the system needs
adjustment. In such a case, or whenever necessary, contact your
local Hobart Representative.
Operator Manual Terminology
This manual uses the following terminology for keystrokes and
data manipulation procedures:
• The word TYPE means to touch a series of keys on the
Operator Screen Numeric Keypad or the Operator Screen
Alpha Keyboard.
• The word TOUCH means to activate an entry shown on the
Operator Screen.
• The word SELECT means to choose an item from a list
brought up on the Operator Screen.
• The word PRESS means to press a button on the Wrapper.
The following special instructions are used in the manual:
Note
A Note is information that you need to know , but is not an actual
step in the process.
Tip
A Tip is additional information that may be useful when you are
using the system.
Look At This
Look At This is information to alert you that you may be doing
something that will permanently alter your system.
Introduction 1-2 F-35538 (April 2010)
Page 7
Important Information
Access AWS-1B Wrapping System Operator Manual
The following warnings and notices are provided for your
protection:
Fluorescent lamp in display panel contains a small amount
of mercury. Please dispose of according to local, state, or
federal laws.
The Model AWS wrapper must be connected to a grounded,
metal, permanent wiring system; or an equipment-grounding
conductor must be run with the circuit conductors and connected
to the equipment-grounding lead on the product.
Online Viewing
If you are viewing this manual online or from a CD, you have the
advantage of using the cross-referencing feature that is built into
the document. Links are shown in italicized text and are crossreferenced.
For example, the text may say:
Shutting Down the System
When you move your mouse directly over the text, the cursor
changes to a pointing hand. This indicates a cross-reference. If
you click on this text, you will be taken to that section of the
document.
Use the back arrow on the top of your screen to return to your
starting point.
F-35538 (April 2010) 1-3 Introduction
Page 8

Access AWS-1B Wrapping System Operator Manual
Introduction 1-4 F-35538 (April 2010)
Page 9
Chapter 2: Understanding the System
Understanding the System
Access AWS-1B Wrapping System Operator Manual
The Access Wrapping System is the solution you need to address
your back room packaging needs. This state-of-the-art weighing/
wrapping system can handle a broad variety of products.
The Access Wrapping System can store information on thousands
of products. Retail store information required for product handling and processing, such as PLU number, UPC number, Pricing, Tare, and Shelf Life is included. Consumer information
describing products, such as NutriFacts, Safe Handling,
Expanded Text, Health Tips, Meal Planners, Recipes, Cooking
Instructions, and Merchandising Graphics is also included.
The scale should be installed and moved only by qualified
Hobart Service Technicians. The system can operate in a temperature range from 32°F to 82°F (0°C to 28°C).
The following topics are discussed in this chapter:
Electrical Connections
Console Communication Connections
Loading Film
Operator Start Screen
F-35538 (April 2010) 2-1 Understanding the System
Page 10
Access AWS-1B Wrapping System Operator Manual
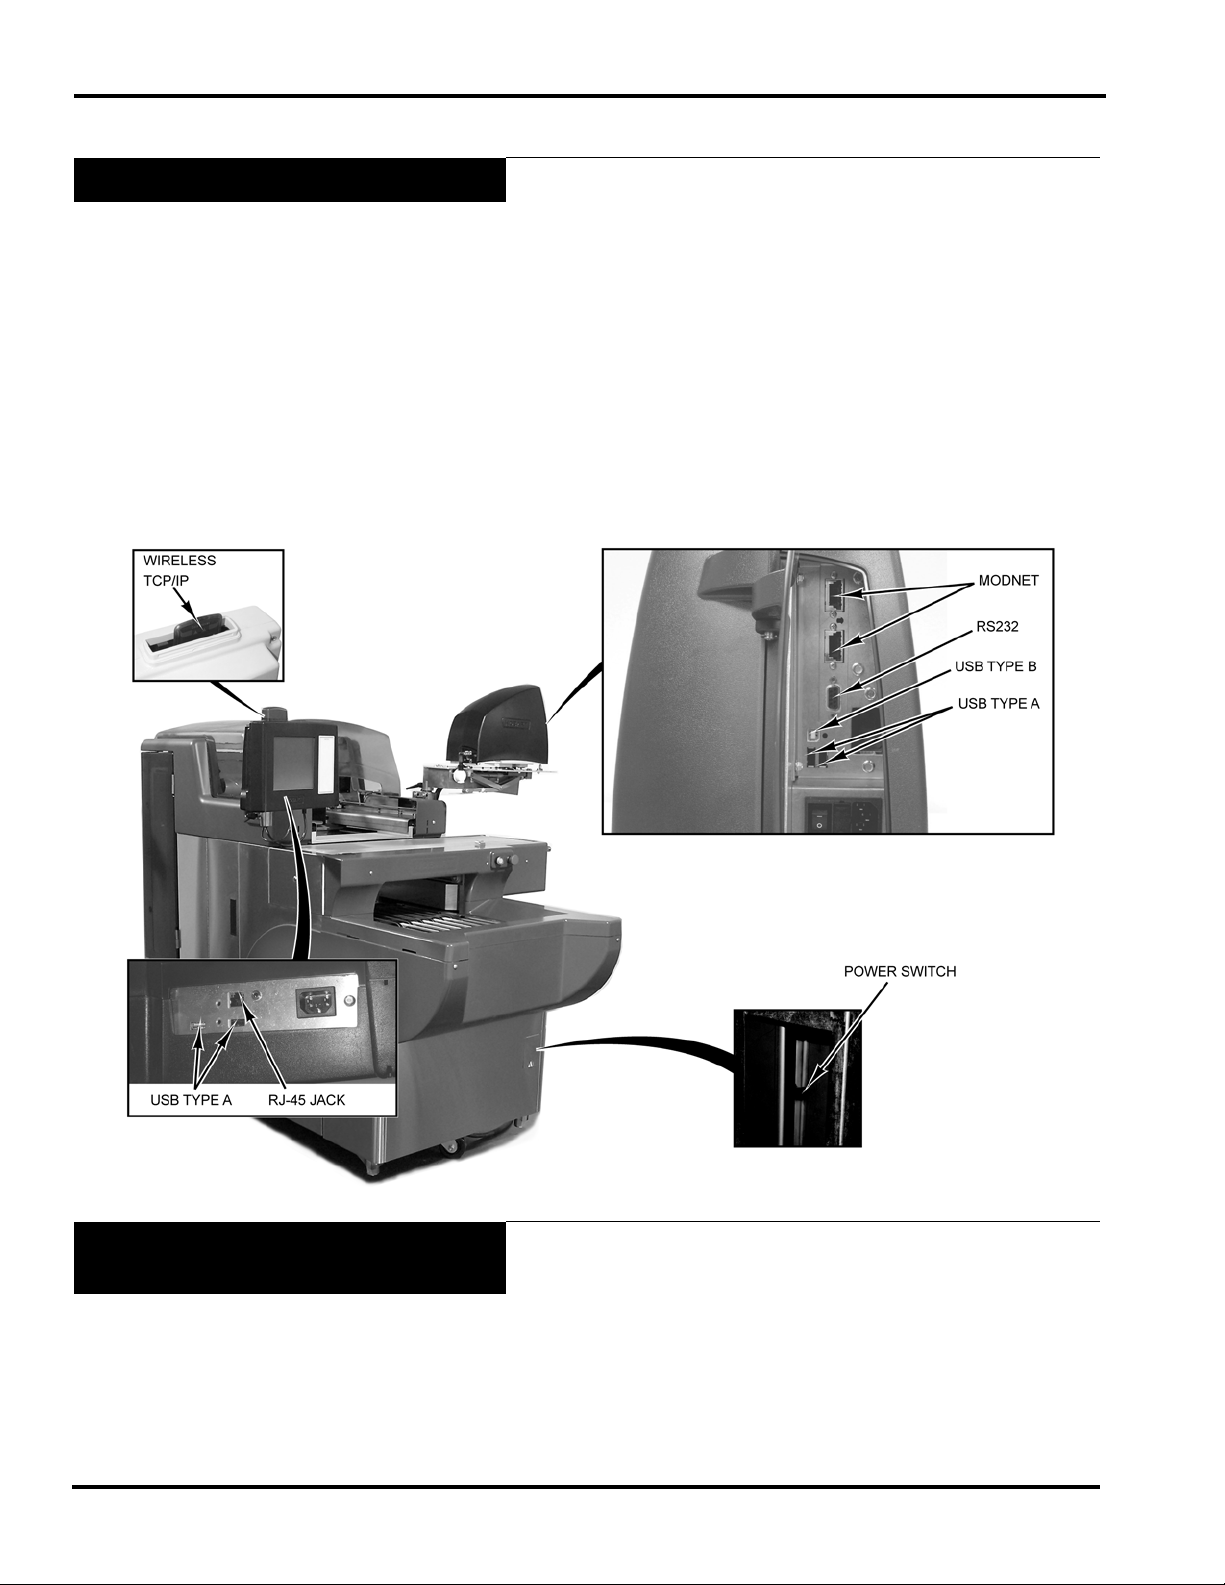
Electrical Connections
The Console has power, if plugged in, as soon as the power connections are made at the wrapper. The Printer must be switched
on, using the power switch located on the back of the printer. The
wrapper and label applier do not have power until the power
switch is in the On position. The power switch is located just
inside the small access door on the right-hand side of the
lower front panel of the wrapper.
Power runs to the Console through 110 VAC cable, which is connected in the back of the printer to the bottom of the console.
A dedicated circuit, rated 208-240 volts, 60 Hz, Phase 1 (3-wire
plus ground) is required. Twenty (20) amp circuit protection is
also required.
Console Communication
Connections
On the Access Wrapping System, in addition to the electrical connections, there are several ports that can be configured:
• RJ-45 Jack for an Ethernet Connector (TCP/IP)
–OR–
• Wireless TCP/IP (located on the top of the console).
• 2 Type A USB Ports
Understanding the System 2-2 F-35538 (April 2010)
Page 11
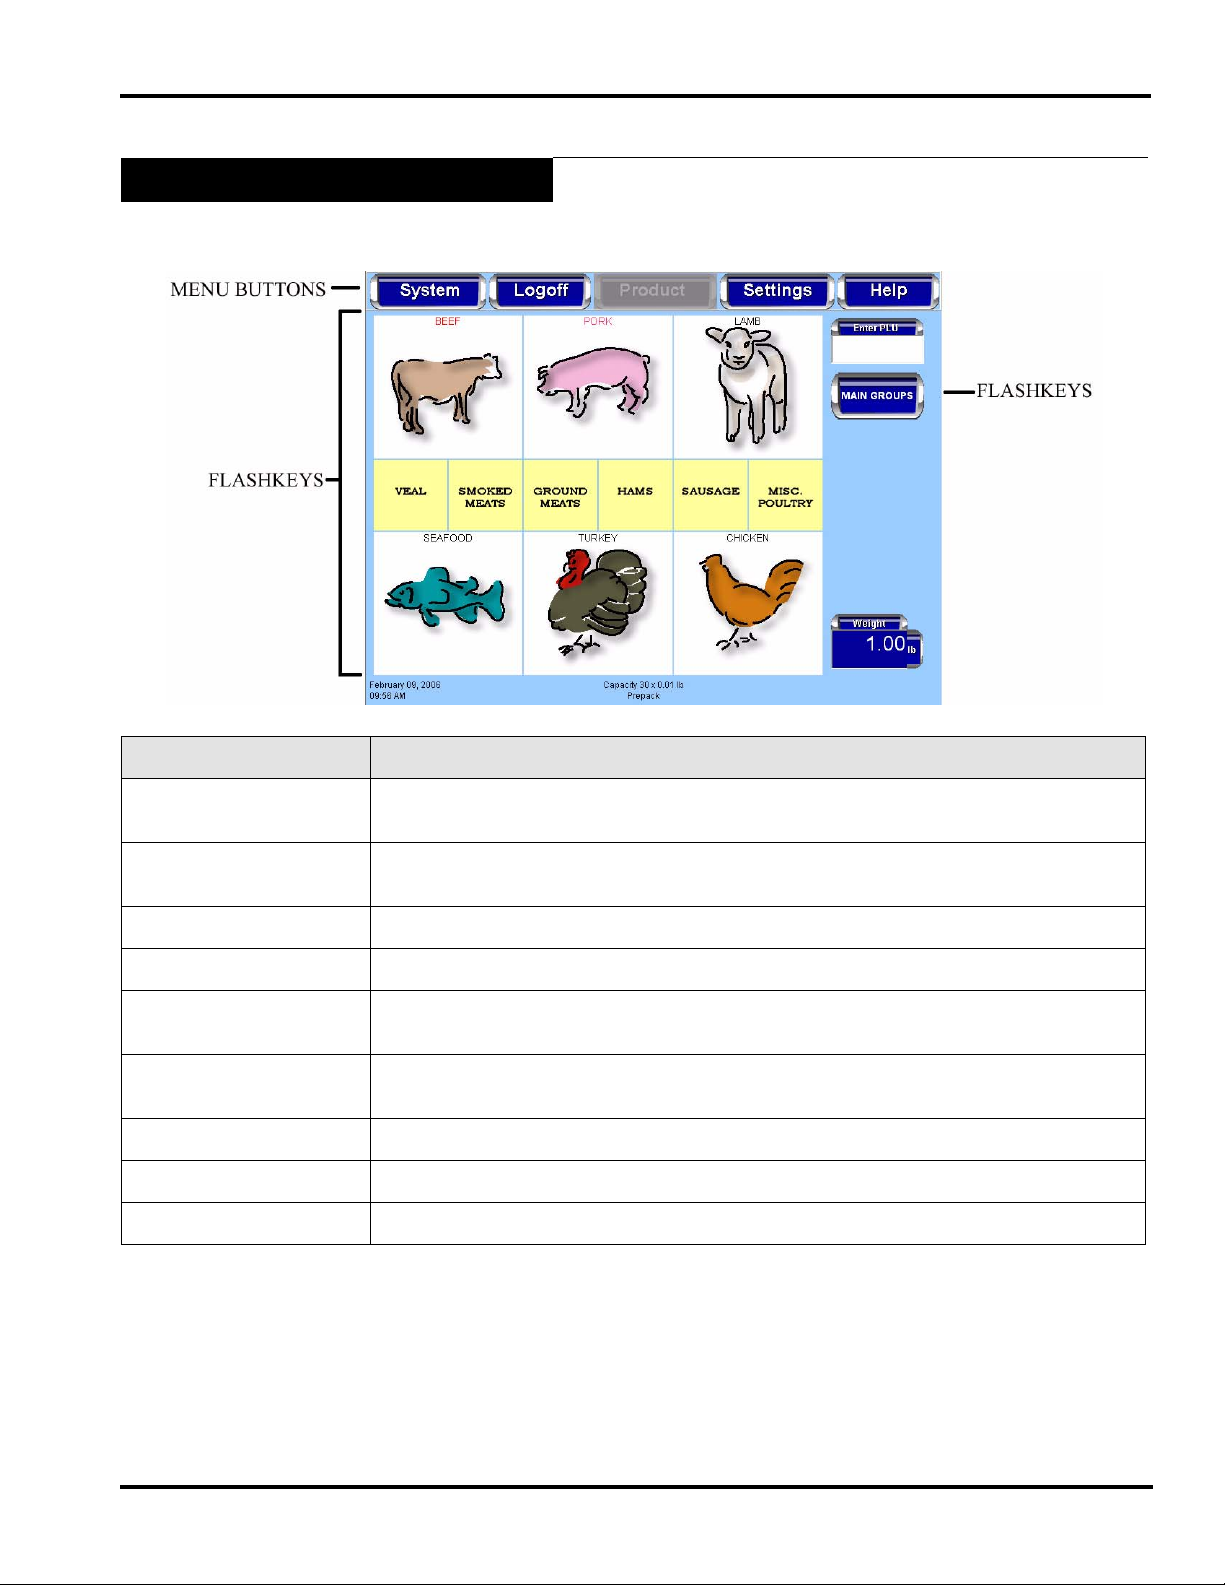
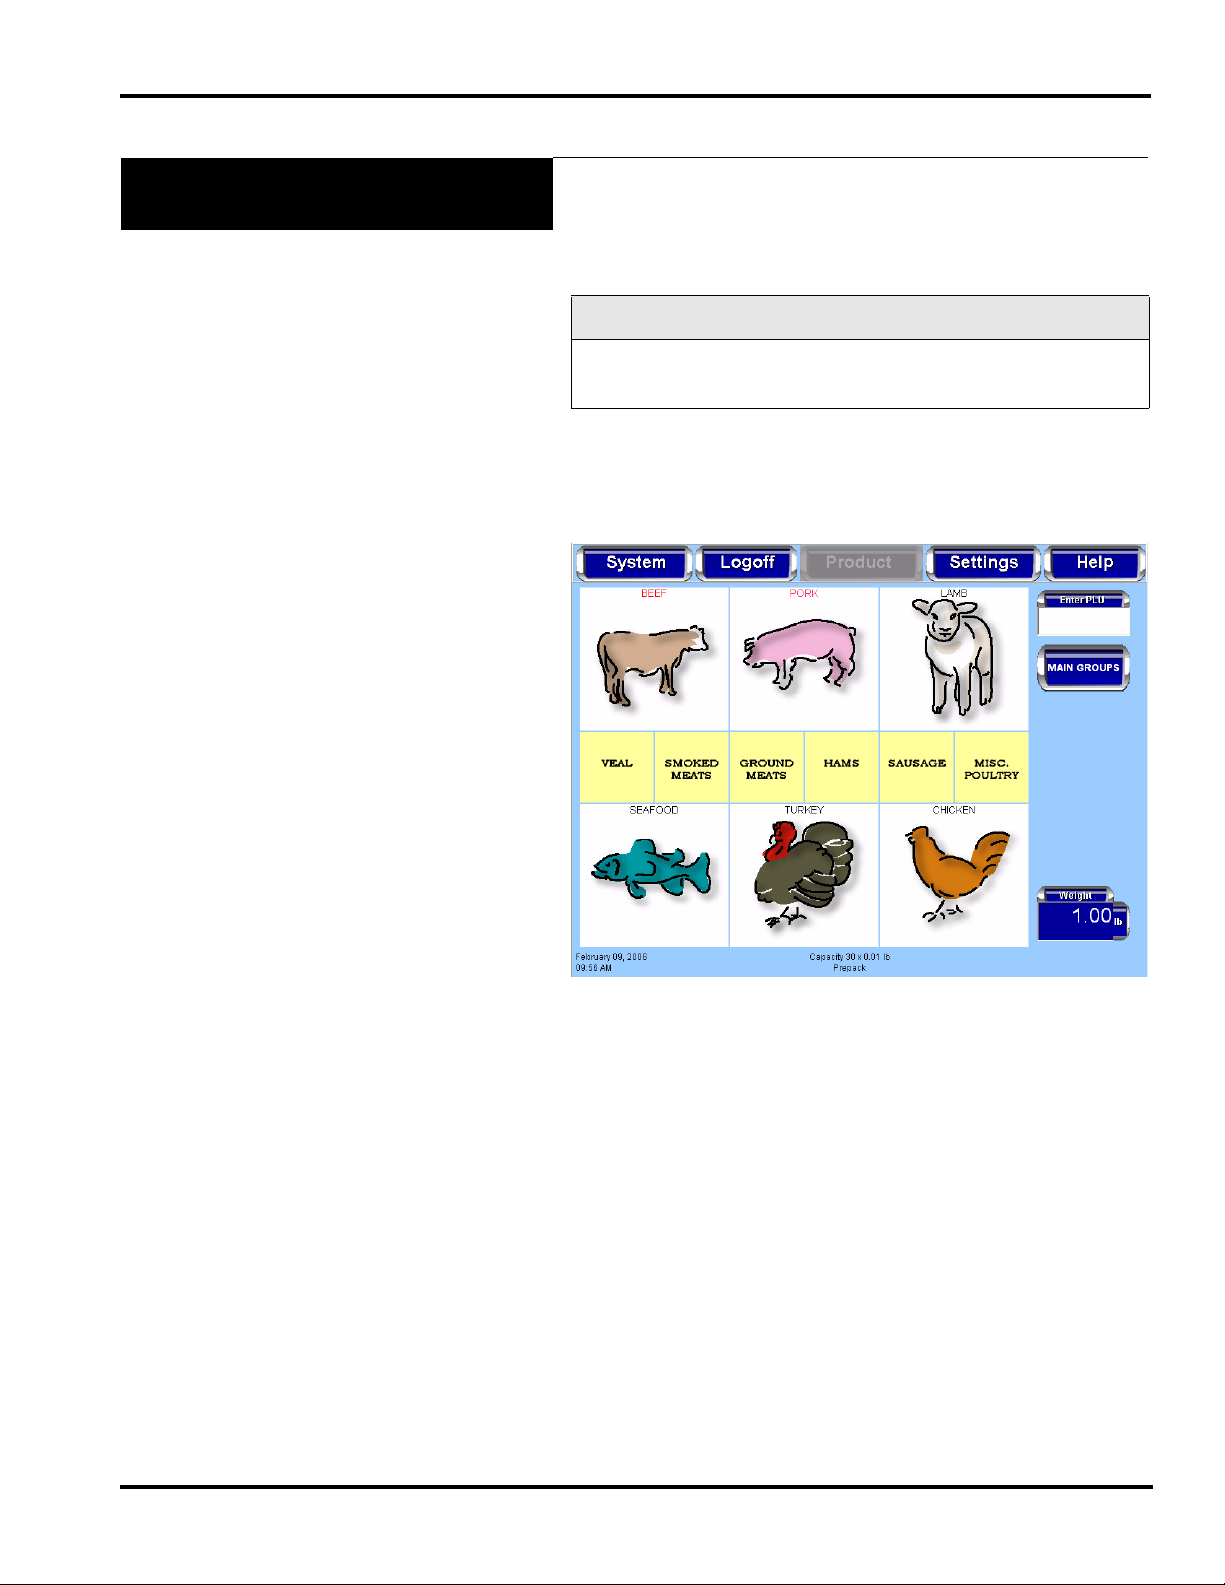
Operator Start Screen
Access AWS-1B Wrapping System Operator Manual
The Operator Start Screen is a touch screen that enables you to
enter information and move through the display screens.
Attributes Functions
Menu Buttons The menu buttons on the Operator Start Screen are used to access the drop-down
menus, which show the subcategories of data available for selection.
Check Box A check box enables or disables optional functions. A check mark or circle appears in
the box when a function is enabled.
Text Box A text box is a field into which you enter data.
Grayed Field A grayed field indicates the field is not available for the current screen or transaction.
Flashing Cursor The flashing cursor in a text box indicates that the field is currently activated and is
available for data entry.
Light Blue Highlighted
Drop-Down Menu
A drop-down menu, shown in light blue, indicates the menu h as been activ ated and a
subcategory may be selected.
Flashkeys The Flashkeys provide quick access to frequently used products and functions.
Numeric Keypad The numeric keypad appears on the screen when numeric data is to be entered.
Alpha Keyboard The alpha keyboard appears on the screen when alpha data is to be entered.
F-35538 (April 2010) 2-3 Understanding the System
Page 12

Access AWS-1B Wrapping System Operator Manual
Understanding the Wrapper
The wrapper is an automatic stretch wrapper designed to utilize
rolled stretch film. The package size is automatically sensed by
the wrapper, which then selects the length required to properly
wrap each package.
Selecting Film
Storing Film
Using Trays
The wrapping material required is rolled machine stretch film.
This wrapper is capable of using 13
of film required is determined by the size of the package being
wrapped. The film must be on 3
diameter is 9.5
Access Wrapping System is 60.
Film widths should allow a 1
age between flaps. Excessive film width should be avoided
because it can cause poor sealing, due to too many folded layers
of film under the package.
Film should be stored at temperatures between 50°F and 70°F
(10°C and 21°C) with a relative humidity of 50% to 85%. Storage
temperatures outside this range can adversely affect film performance and life expectancy.
All products must be contained within a tray in order to be
wrapped. The tray design and material must be strong enough
and rigid enough to be used for machine wrapping. Damp or soft
trays will not work properly and can cause package jams and loss
of product.
For best results, the bottom of the tray should be flat. T rays which
are distorted or have irregular bottoms cause problems with package movement and film sealing. Trays must have an angled edge
of not less than 15
package while wrapping the film under the tray.
. The minimum recommended gauge for the
to allow the rear underfolder to roll under the
to 20 film (width). The size
cores, and the maximum roll
overlap on the bottom of the pack-
The maximum tray width is 15
The minimum tray width is 5
Trays less than 1/2
paper stripping are not acceptable containers.
Understand Package Weight, Size,
Shape and Range Guidelines
Understanding the System 2-4 F-35538 (April 2010)
The performance of your wrapping system is partially dependent
on the package size and shape. Bulky or odd shaped packages
tend to roll and do not wrap properly.
Package length is defined as the length of the package based on
which direction it travels through the machine. Package width
must always exceed package height. If the package is high, but
short, it may roll over as it travels through the wrapper.
Uneven distribution of product weight in a package may result in
improper sealing or packages turning over. If the package is
heavy on one side, it should be placed in the machine with the
heavy side away from the operator.
Product must be completely within the tray. Overhanging or projecting parts could cause package jams resulting in damage to the
system and loss of time and product.
high are not recommended. Flat boards or
and the maximum length is 10.
and the minimum length is 4.
Page 13

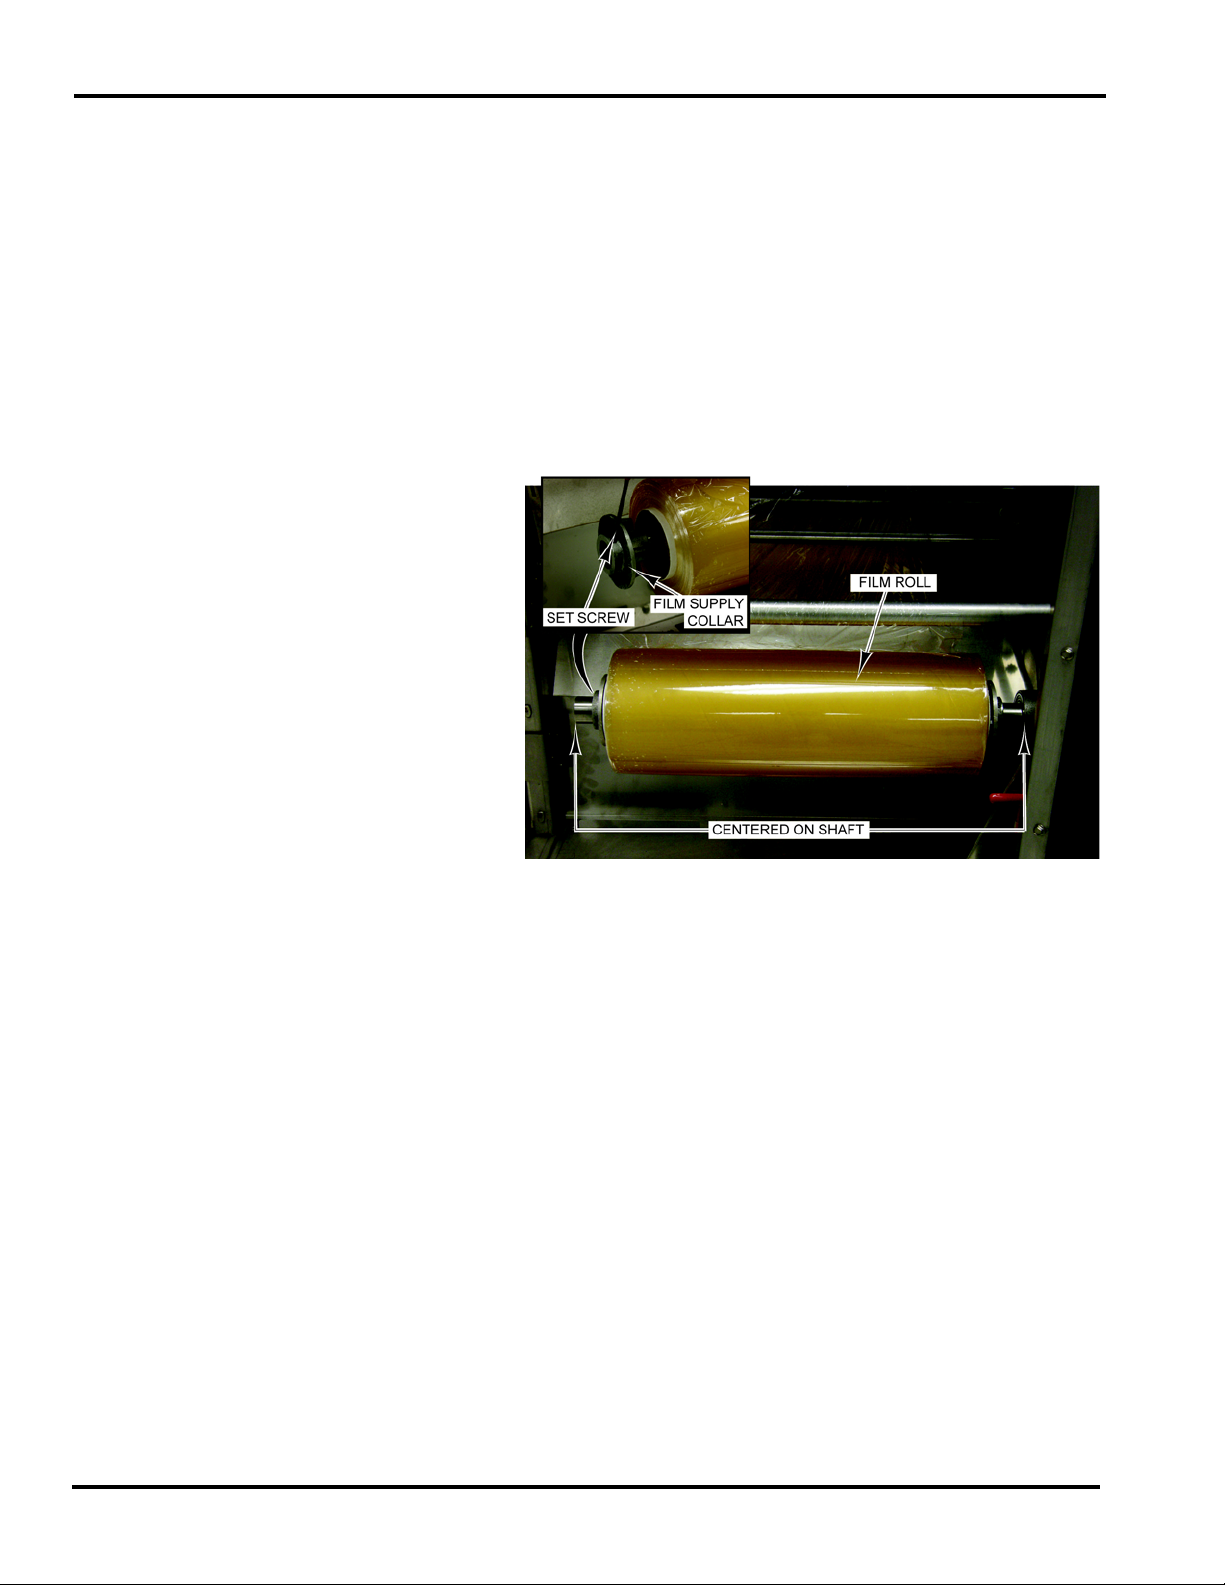
Loading Film
Access AWS-1B Wrapping System Operator Manual
Keep the film as straight as possible through the threading
process. The following diagram shows the different ways to load
film.
To thread film:
1. PRESS the STOP (red) button and allow the machine to stop.
2. Open the rear doors.
3. Release feed rollers by pulling the film lever down.
F-35538 (April 2010) 2-5 Understanding the System
Page 14
Access AWS-1B Wrapping System Operator Manual
4. Loosen 2 set screws on the film supply collar. (A T-Handled
Allen wrench is located on the inside of the machine for this
purpose.
5. If applicable, remove the empty film core.
6. Install the film roll on the shaft.
7. Install the film supply collar. Be sure both collars are flush
with the film roll. You may need to tap the film collar into
place with the old film core.
8. Verify that the film is centered on the shaft. (You may have
to loosen the other set screw to center.) Once centered,
tighten the set screws on both collars.
Understanding the System 2-6 F-35538 (April 2010)
Page 15
Access AWS-1B Wrapping System Operator Manual
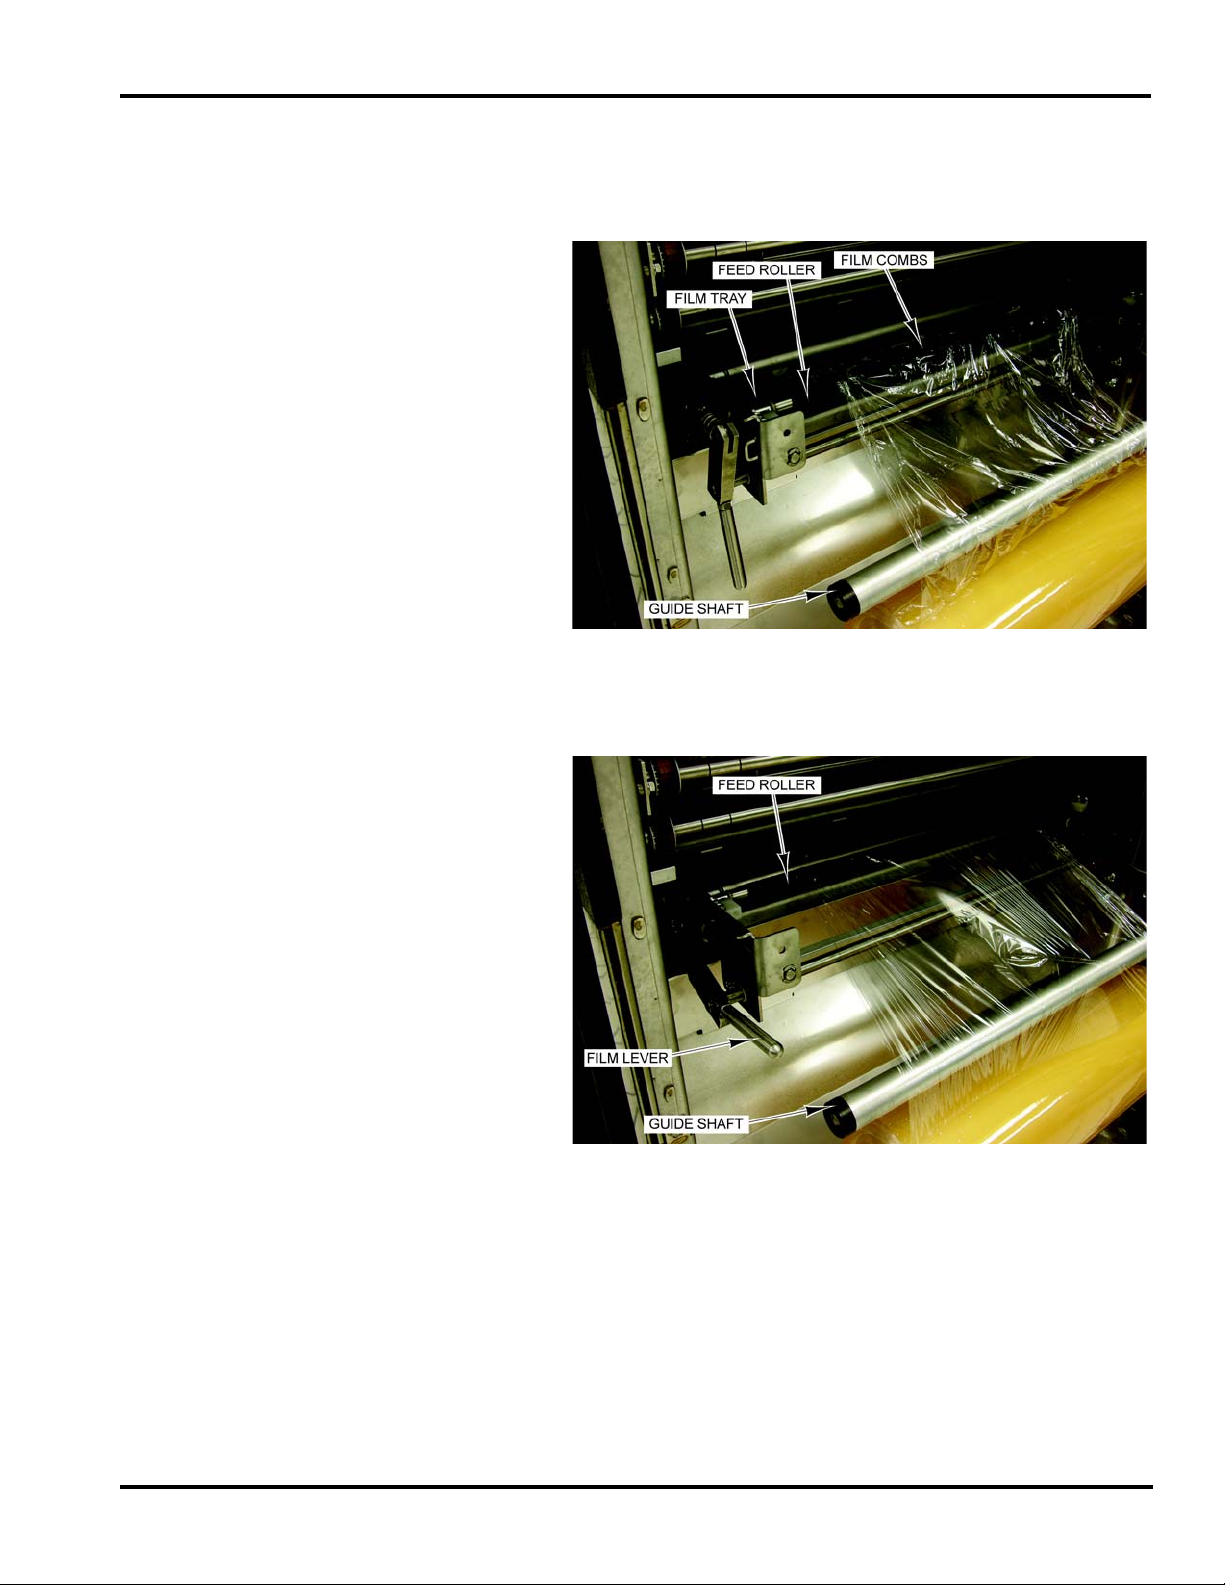
9. Slide the film tray out, exposing the film combs.
10. Pull the film end upward to the front of the guide shaft
continuing around the shaft toward the extended film tray.
11. Put the film over the rubber feed roller and make sure the
film gets to the ends of the film combs, securing the film end
down over the combs.
12. Push the feed tray in and lift the film lever up.
F-35538 (April 2010) 2-7 Understanding the System
Page 16
Access AWS-1B Wrapping System Operator Manual
13. Close the rear doors.
14. PRESS the ON (green) button. Wait for a steady light, no
blink mode.
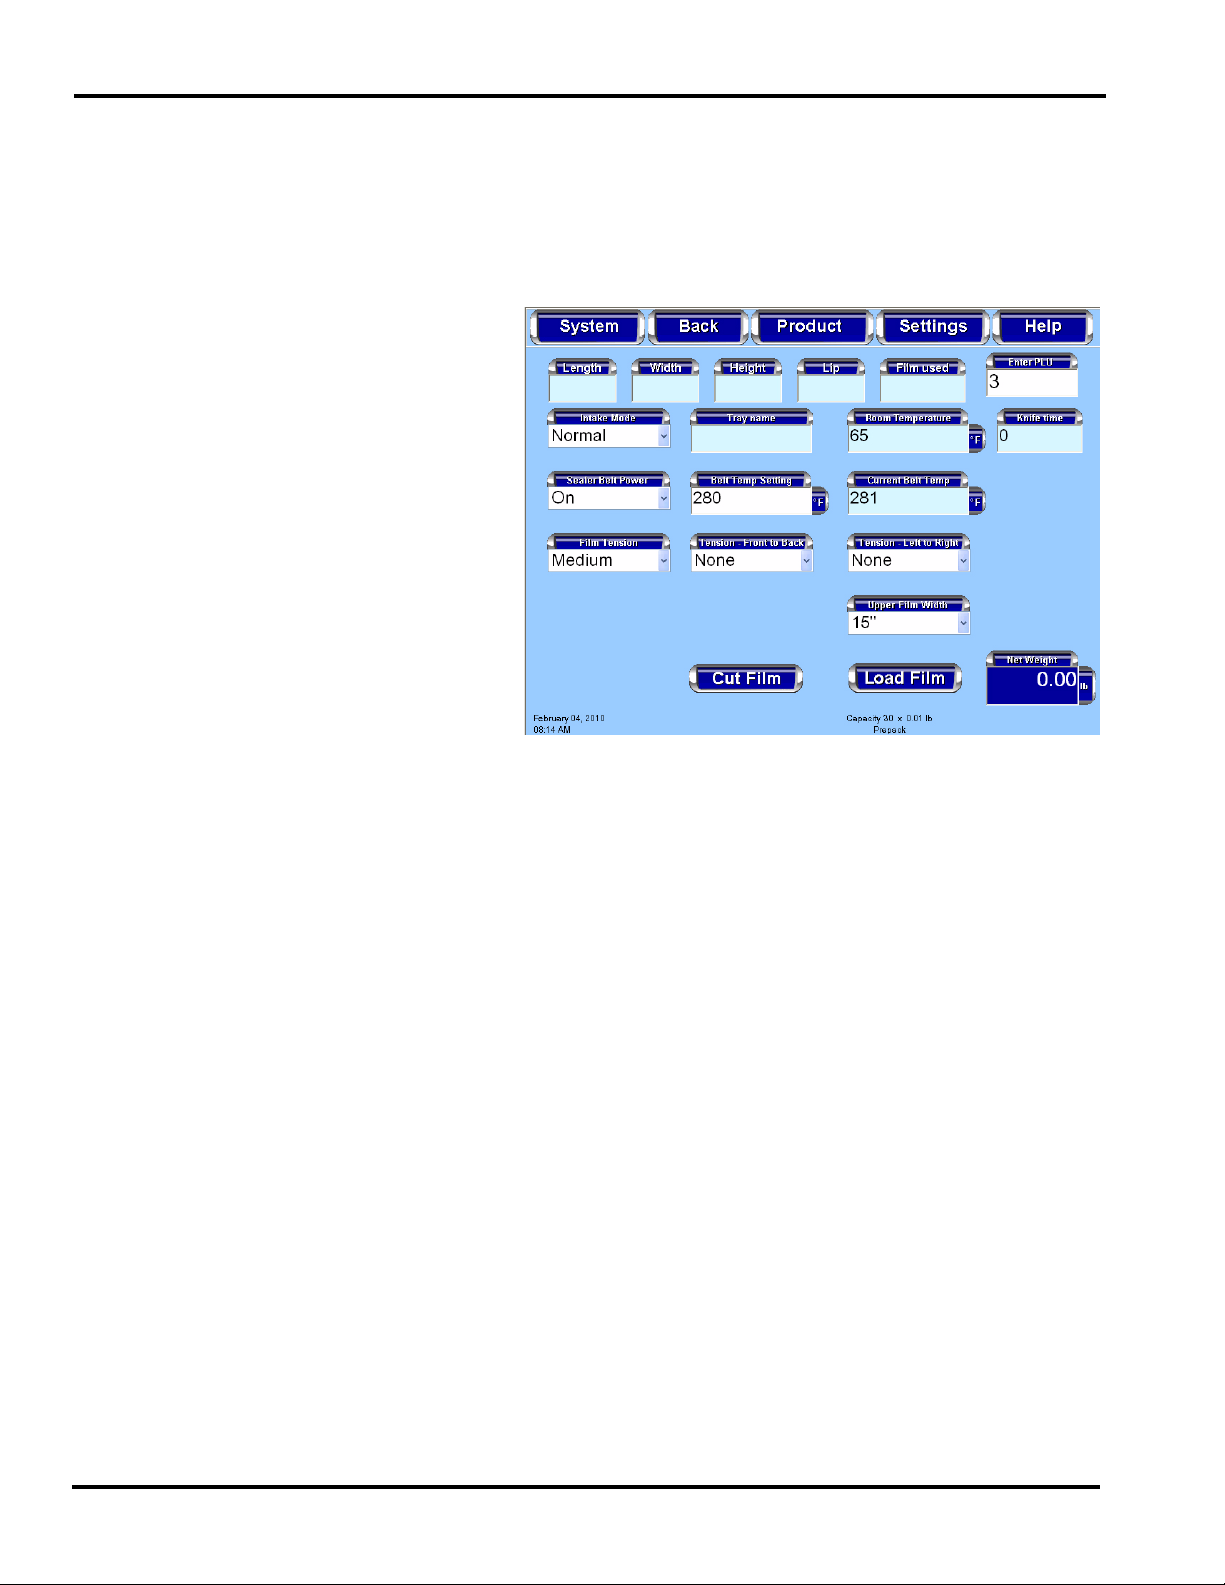
15. From the Operator Start Screen, TOUCH Settings. TOUCH
Wrapper. You should now be on the Wr apper Screen.
16. If the film width installed is different than the displayed
width, TOUCH Upper Film Width field to set film width.
17. TOUCH Load Film and the wrapper will position film, cut
any excess film and set itself (home) for operation.
18. TOUCH Back to exit this screen.
19. PRESS the STOP (red) button and allow the machine to stop.
20. Lift the canopy and remove excess film.
21. Close canopy.
22. PRESS the ON (green) button. It will be a steady light, no
blink mode. Ready for operation.
Understanding the System 2-8 F-35538 (April 2010)
Page 17

Chapter 3: Using the Access Wrapping System
Using the Access Wrapping System
Access AWS-1B Wrapping System Operator Manual
Power Up the System
Logging onto the System
To power up the system, use the ON/OFF switch located at the
back of the printer.
1. Verify that the breaker is on, located behind small access
door on the right-hand side of the lower panel.
2. PRESS the ON (green) button.
3. Remove any objects from the scale platter/weigher.
4. Turn printer on.
The Access Wrapping System may require each operator to login
before use. Not all systems are setup to have operator’s login.
The instructions for using this system are detailed in this chapter.
To login to the system you should be at the Operator Login
Screen shown below.
To Login to the System
TYPE your Operator ID. You should now be on the Operator
Start Screen.
: TOUCH the Operator ID field and
To Logoff the Operator Start Screen
Operator Start Screen. No further action is required. The Operator
Login Screen will be displayed.
F-35538 (April 2010) 3-1 Using the Access Wrapping System
: TOUCH Logoff on the
Page 18

Access AWS-1B Wrapping System Operator Manual
Shutting Down the System
The Shutdown feature is designed to stop all internal functions.
Shutdown is required before power can be disconnected from the
system.
To Shutdown the System:
1. From the Operator Start Screen, TOUCH System.
2. From the System Menu, TOUCH Shutdown. A screen will
appear and ask, “Are you sure you want to shutdown?”
3. TOUCH OK. A screen will appear and say, “The scale is
shutting down. Please wait....”
Shutdown may take a few minutes to complete depending on the
size of the database in the scale. DO NOT disconnect power to
the system during shutdown.
4. When the shutdown is complete, a screen will appear and
say, “The scale has been shutdown. You may remove power
from the scale.
–OR–
Press REBOOT to reboot now.”
5. Remove power by using the on/off switch on th e back of the
printer.
Do not remove power from the system by unplugging it. Always
use the on/off switch on the back of the printer to power down
the system. Failure to comply with will result in a service call.
Note
The Access Wrapping System is equipped with an automatic
sleep/start feature. When all packages clear the machine it will
only continue to run for a specified period of time. The machine
shuts off, but the green light remains on. When you place a
package on the intake, the machine automatically re-starts. The
PLU remains the same.
6. Lift small access door on the right-hand side of the lower
front panel of the wrapper and switch the power switch off.
Using the Access Wrapping System 3-2 F-35538 (April 2010)
Page 19
Access AWS-1B Wrapping System Operator Manual
Operator Start Screen
Menu Buttons and Flashkeys
The Operator Start Screen Menu Buttons provide access to dropdown menus showing available functions. The use of these keys,
the screens accessed, and the functions performed through these
keys are described in next section of this manual.
Note
The Product Menu Buttons will only be available when a PLU is
entered.
Flashkeys are the keys located below the Operator Start Screen
menu buttons. These keys are configured individually for each
system to provide quick access to products and functions
frequently used.
F-35538 (April 2010) 3-3 Using the Access Wrapping System
Page 20
Access AWS-1B Wrapping System Operator Manual
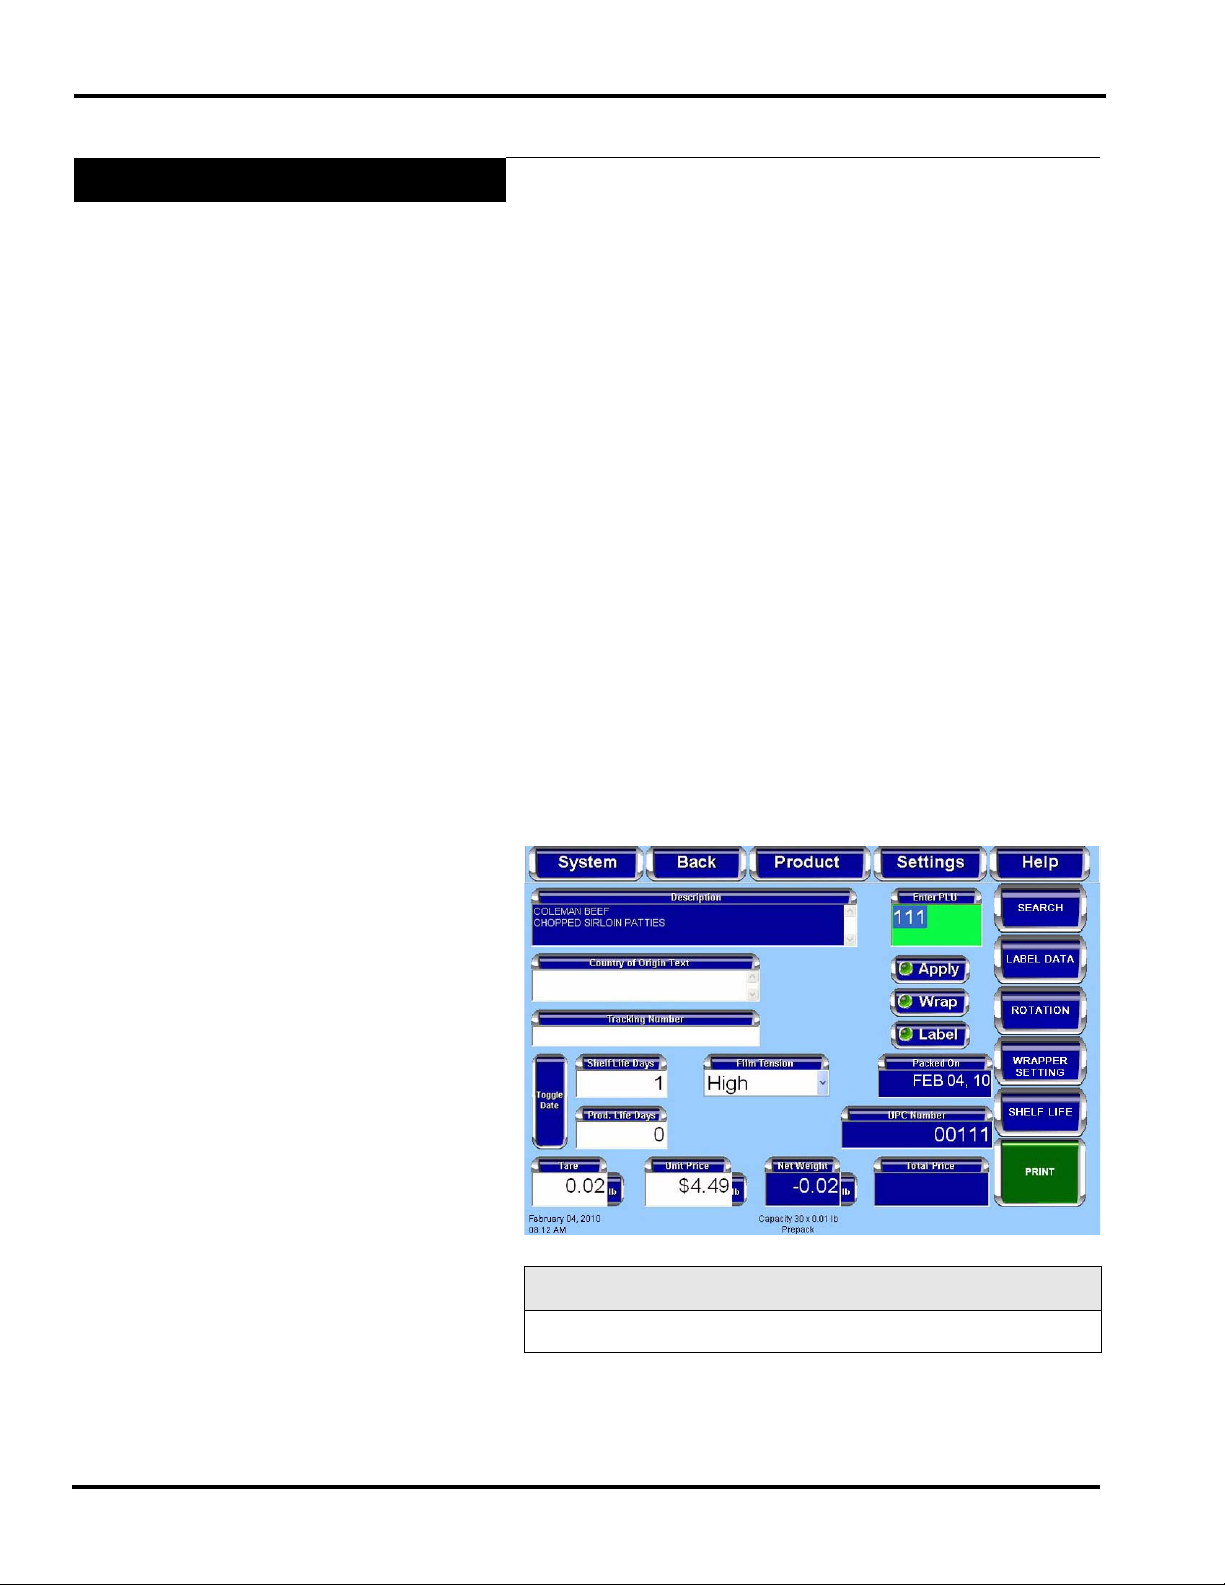
Run Screen
The Run Screen displays product information for the PLU that is
entered. The type of data displayed depends upon the product
weigh type of the PLU.
The Run Screen displays the following product information, if
applicable:
• Enter PLU Number
• Product Description
• Shelf Life Days (toggles to Sell By Date)
• Product Life Days (toggles to Best Before Date)
• Country of Origin Text (COOL)
•Tracking Number
• Product Image (optional)
•UPC Number
•Net Weight
•Total Price
•Print
• Film Tension
• Automatic Label Apply (toggles on/off)
• Automatic Wrap (toggles on/off)
• Automatic Label Print (toggles on/off)
• Tare (if applicable)
• Unit Price (if applicable)
• By Count (if applicable)
• Exception Price (if applicable)
• Volume (if applicable)
Note
System configuation may show different options.
Using the Access Wrapping System 3-4 F-35538 (April 2010)
Page 21

Modifying the Run Screen
Access AWS-1B Wrapping System Operator Manual
The operator can modify certain settings that display on the Run
Screen. Only text fields with a white background can be
modified. Text fields with a blue background cannot be edited
and provide information only.
Note
Changes made at the Run Screen, other than certain COOL and
Film Selection information will be in effect for the current
product only . The scale will revert to the system default settings
when a different PLU is entered.
T o change Text Field values: TOUCH the text field and SELECT
the setting from the list –OR– TYPE the change on the pop-up
Numeric Keypad or Alpha Keyboard. TOUCH Enter. The value
change will be displayed in the text field.
To change the Film Tension setting
: TOUCH the Film Tension
field. The settings of High, Medium, and Low will be displayed.
SELECT the desired setting. The setting selected will be
displayed in the Film Tension field.
T o change COOL
: TOUCH the Country of Origin T ext field. You
should now be on the COOL Screen. See Product Drop-Down
Menu - COOL Screen for information about modifying COOL.
The setting changes made will be displayed on the Run Screen.
To change Automatic functions
: TOUCH the automatic buttons
on the screen to turn them on or off. If the indicator is green the
function is enabled. If the indicator is red, then the function is
disabled. See Automatic Settings for more information about the
automatic functions available on the Access Wrapping System.
F-35538 (April 2010) 3-5 Using the Access Wrapping System
Page 22
Access AWS-1B Wrapping System Operator Manual
Automatic Settings
The Run Screen has settings for automatic or manual modes. In
Automatic Mode the operation will be performed without the
operator touching PRINT, as is required in Manual Mode. Automatic Mode is changed with the Apply , Wrap, and Label buttons.
The function is enabled when the indicator is green (Automatic
Mode) and is disabled when the indicator is red (Manual Mode).
Using Automatic Mode
Automatically Wrap, Print and
Apply Label
There are different automatic modes available for use with the
Access Wrapping System.
The automatic functions are:
Automatically Wrap, Print and Apply Label
Automatically Print Label Only
Automatically Print and Apply Label, No Wrap (Prepackaged
Products)
Automatically Wrap Only
To wrap the product and print and apply a label automatically:
TOUCH the Apply, Wrap, and Label buttons until the indicators
are green. The Enter PLU text background color is green.
TOUCH a Flashkey or TOUCH the Enter PLU field and TYPE
the product number on the numeric keypad.
A product is placed on the wrapper scale. The product will run
through the wrapper and will be wrapped. A label will be printed
when a stable weight has been sensed by the scale. The label will
be applied to the product as the product emerges from the
wrapper.
Note
Some pre-wrapped items, such as turkey or chicken, have a
cardboard band around the package. Do not run these through
the wrapper.
Using the Access Wrapping System 3-6 F-35538 (April 2010)
Page 23

Automatically Print Label Only
Access AWS-1B Wrapping System Operator Manual
To print a label without applying the label in Automatic Mode:
TOUCH the Label button until the indicator is green. TOUCH the
Apply and Wrap buttons until the indicators are red. The Enter
PLU text background color is white.
TOUCH a Flashkey or TOUCH the Enter PLU field and TYPE
the product number on the numeric keypad.
Place the product on the wrapper scale. A label will print
automatically when a stable weight has been sensed by the scale.
The label will not be applied to the product. Manually remove the
label from the printer and apply to the product.
F-35538 (April 2010) 3-7 Using the Access Wrapping System
Page 24

Access AWS-1B Wrapping System Operator Manual
Automatically Print and Apply
Label, No Wrap (Prepackaged
Products)
To print and apply a label to the product in Automatic Mode:
TOUCH the Apply and Label buttons until the indicators are
green. TOUCH the Wrap button until the indicator is red. The
Enter PLU text background is yellow.
TOUCH a Flashkey or TOUCH the Enter PLU field and TYPE
the product number on the numeric keypad.
Place the product on the wrapper scale. A label will print
automatically when a stable weight has been sensed by the scale.
The product will travel through the wrapper and the label will be
applied. The product will not be wrapped.
Note
Some pre-wrapped items, such as turkey or chicken, have a
cardboard band around the package. Do not run these through
the wrapper.
Using the Access Wrapping System 3-8 F-35538 (April 2010)
Page 25

Automatically Wrap Only
Access AWS-1B Wrapping System Operator Manual
To wrap a product without printing or applying a label in
Automatic Mode: TOUCH the Wrap button until the indicator is
green. TOUCH the Apply and Label buttons until the indicators
are red. The Enter PLU text background color is white.
A product is placed on the wrapper scale. The product will run
through the wrapper and will be wrapped.
F-35538 (April 2010) 3-9 Using the Access Wrapping System
Page 26

Access AWS-1B Wrapping System Operator Manual
Manual Mode
To use Manual Mode: TOUCH the Apply, Wrap, and Label
buttons until the indicators are red. The enter PLU text
background color is white.
A product is placed on the wrapper scale. TOUCH Print to print a
label.
Using the Access Wrapping System 3-10 F-35538 (April 2010)
Page 27

Running a Product
Access AWS-1B Wrapping System Operator Manual
Running a product is the basic function of the operator. This
function allows the operator to select the PLU, weigh, wrap,
print, and apply the label.
From the Operator Start Screen, TOUCH a Flashkey –OR–
TOUCH the Enter PLU field and TYPE the product number on
the Numeric Keypad. TOUCH Enter. You should now be on the
Run Screen.
Select the automatic setting for this run. See Using Automatic
Mode.
Note
Make sure the product settings are correct before starting a run.
To modify product settings, see Modifying the Run Screen.
To run in Automatic Mode
label will print automatically when a stable weight has been
sensed by the scale.
T o run in Manual Mode
Print to print a label. The label will print when a stable weight has
been sensed by the scale.
: Place the product on the scale. The
: Place the product on the scale. TOUCH
F-35538 (April 2010) 3-11 Using the Access Wrapping System
Page 28

Access AWS-1B Wrapping System Operator Manual
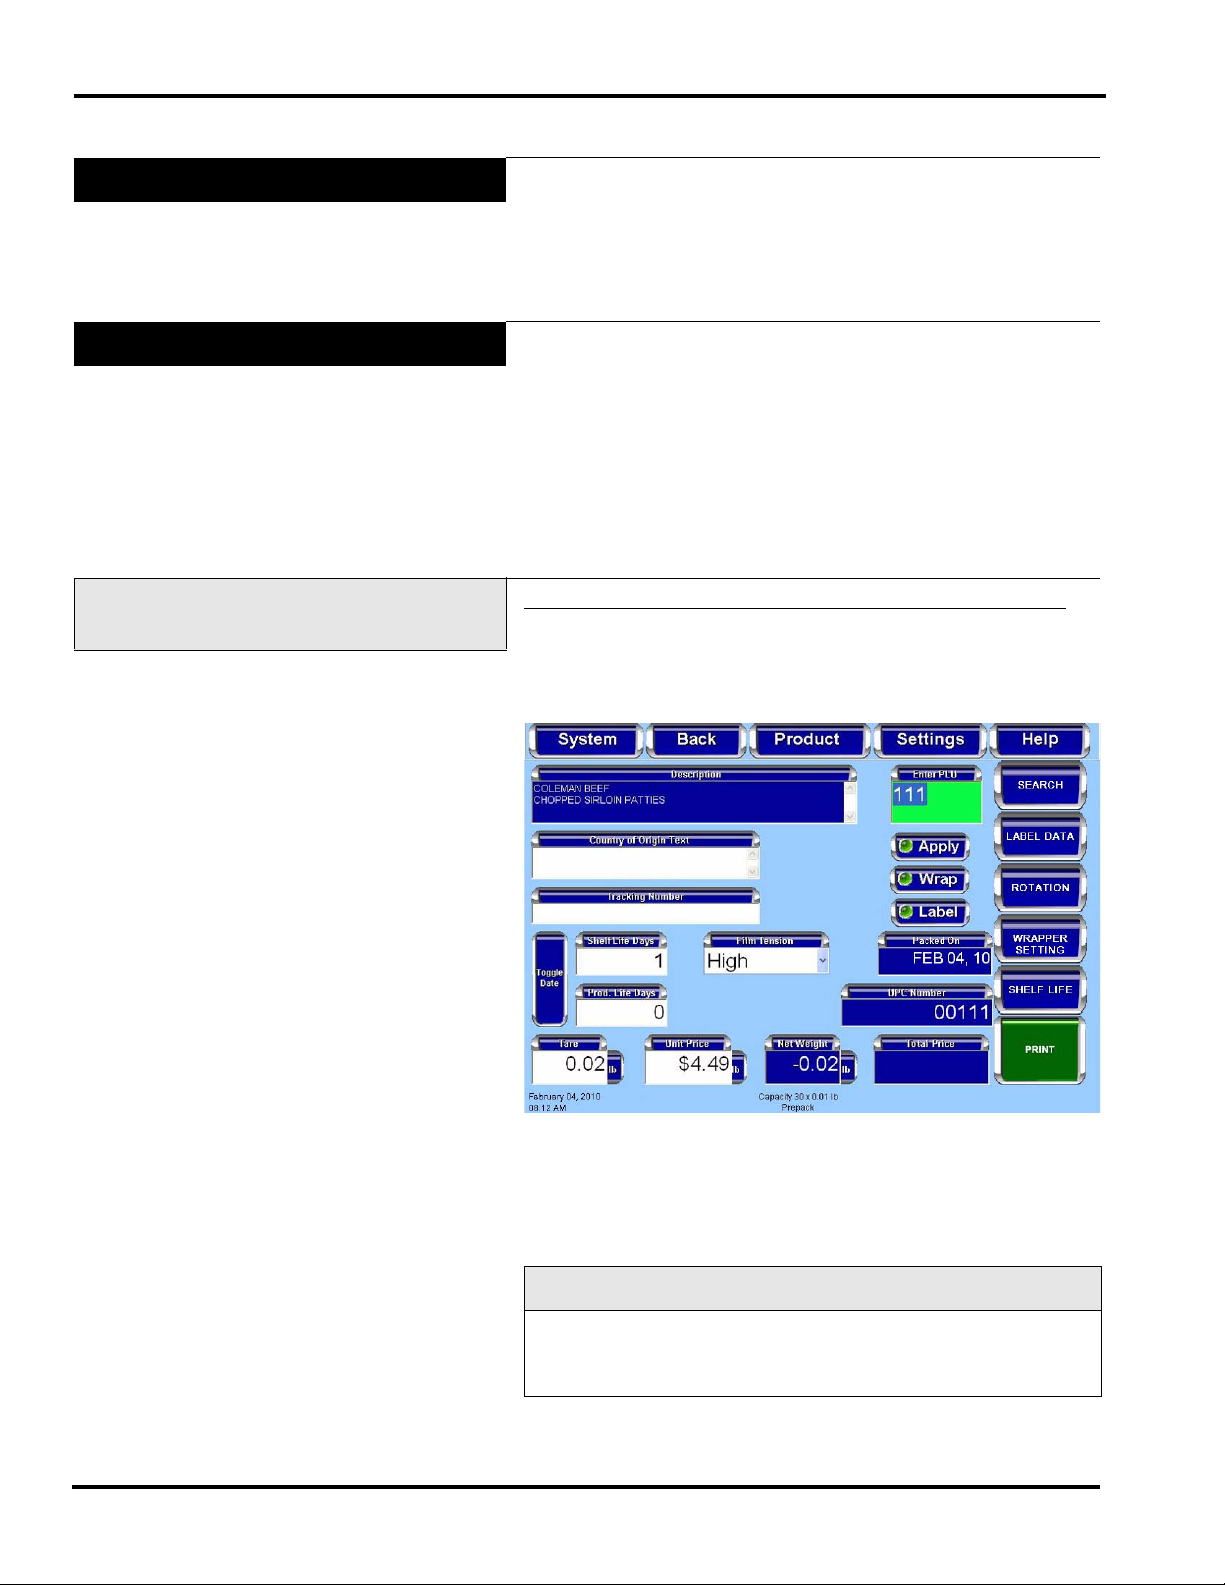
Using the Operator Run Screen
Drop-Down Menus
Additional information is available through a menu button;
Product, Settings, and Help are located on the Operator Screen
menu bar as shown on the Operator Run Screen.
The Operator Run Screen drop-down menus include:
Note
The Product Menu button will only be available when a PLU is
entered.
For Product
•Label Data
• Label Placement
• Product Note
• Product & Shelf Life
• COOL
• Void Transaction
For Settings
• Wrapper Settings
• Printer Settings
• Date and Time
• Total Types
• Rezero Weigher
For Help
•Search
• Describe this Page
• Questions
• Operator Note
• Weights & Measures
• About Access
Using the Access Wrapping System 3-12 F-35538 (April 2010)
Page 29

Product Drop-Down Menu
Access AWS-1B Wrapping System Operator Manual
The Product Drop-Down Menu has the following selections:
Label Data Screen
Label Placement Screen
Product Note Screen
Product & Shelf Life Screen
COOL Screen
Void Transaction
Product Drop-Down Menu Label Data Screen
From the Operator Run Screen, TOUCH Product. TOUCH
Label Data. You should now be on the Label Data Screen.
T o change the Lab el Type
Numeric Keypad will be displayed. TYPE the label number or
TOUCH clear to delete the label number and enter another one,
then TOUCH enter to complete the label number entry. The width
and length of the label will automatically be displayed below the
Label Type text box.
: TOUCH the Label T ype text box. The
Note
If in manual mode, TOUCH Print.
To change the Graphic
from the list.
To exit this screen
F-35538 (April 2010) 3-13 Using the Access Wrapping System
: TOUCH the graphic field and SELECT
: TOUCH Back.
Page 30

Access AWS-1B Wrapping System Operator Manual
Product Drop-Down Menu Label Placement Screen
From the Operator Run Screen, TOUCH Product. TOUCH
Label Placement. You should now be on the Label Placement
Screen.
To change the Printer Selected
: TOUCH the Printer field. The
printer drop-down selections of Primary and Secondary will be
displayed. SELECT the printer. The default settings for the
selected printer will be displayed.
Note
If only a Primary printer is available the Primary printer text box
will be disabled.
To change the Label Rotation
until the label shown on the screen is in the desired orientation.
Then, set the rotation lever to the position indicated in green.
: TOUCH the Label Rotation field
To change Label Position
: TOUCH the Label Position field. The
label position drop down selections of right and left will be
displayed. SELECT a label position.
To exit this screen
Using the Access Wrapping System 3-14 F-35538 (April 2010)
: TOUCH Back.
Page 31

Product Drop-Down Menu Product Note Screen
Access AWS-1B Wrapping System Operator Manual
From the Operator Run Screen, TOUCH Product. TOUCH
Product Note. You should now be on the Product Note Screen.
Note
Not all PLU’s have an associated Product Note.
To exit this screen
: TOUCH Back.
F-35538 (April 2010) 3-15 Using the Access Wrapping System
Page 32

Access AWS-1B Wrapping System Operator Manual
Product Drop-Down Menu Product & Shelf Life Screen
From the Operator Run Screen, TOUCH Product. TOUCH
Product & Shelf Life. You should now be on the Product & Shelf
Life Screen.
To change the Shelf Life Days:
TOUCH the Shelf Life Days box
to activate it. The numeric keypad will be displayed. TYPE in the
number of days. TOUCH enter on the keypad. The number of
days will appear in the Shelf Life Days box. The Sell By Date
will be calculated automatically and the date will be highlighted
in the calendar.
To change the Sell By Date
: TOUCH the Sell By Date box to
activate it. The numeric keypad will be displayed. TYPE in the
date using two digits each for the day, month, and year. TOUCH
enter on the keypad. The new date will appear in the Sell By Date
box as well as be highlighted in the calendar.
T o ch ange the Produ ct Life Days:
TOUCH the Product Life Days
box to activate it. The numeric keypad will be displayed. TYPE
in the number of days. TOUCH enter on the keypad. The number
of days will appear in the Product Life Days box. The Best
Before Date will be calculated automatically and the date will be
highlighted in the calendar.
Using the Access Wrapping System 3-16 F-35538 (April 2010)
Page 33

Access AWS-1B Wrapping System Operator Manual
To change the Best Be fore Date: TOUCH the Best Before Date
box to activate it. The numeric keypad will be displayed. TYPE
in the date using two digits each for the day, mont h, and year.
TOUCH enter on the keypad. The new date will appear in the
Best Before Date box as well as be highlighted in the calendar.
To change the Shelf/Product Life Hours:
TOUCH the S helf or
Product Life Hours box to activate it. The numeric keypad will be
displayed. TYPE in the number of days. TOUCH enter on the
keypad. The number of hours will appear in the Shelf or Product
Life Hours box. The Sell By and/or Best Before Date will be
calculated automatically and the date will be highlighted in the
calendar.
T o change the Don't print check boxes:
TOUCH the check box to
turn the function on.
Note
You can also use the calendar to change the best before or sell
by date. TOUCH the sell by or best before date field. TOUCH
cancel, then SELECT the date on the calendar.
To change the Month
: TOUCH the arrow keys to the right and
left at the top of the calendar.
To exit this screen
: TOUCH Back.
Note
The Best Before Date changes reflect a change in the Sell By
Date.
F-35538 (April 2010) 3-17 Using the Access Wrapping System
Page 34

Access AWS-1B Wrapping System Operator Manual
Product Drop-Down Menu COOL Screen
From the Operator Run Screen, TOUCH Product. TOUCH
COOL. You should now be on the COOL Screen.
To exclude COOL Data
To create COOL text
: TOUCH the Cool Not Required button.
: TOUCH the Create COOL Text button.
You should now be on the Create COOL Text Screen.
SELECT the appropriate production step from those listed in the
Production Steps box. Repeat this procedure to SELECT the
country from the list in the Country box in which the production
step was performed. The production step and country selected
will be displayed in the COOL Text box. If needed, TOUCH the
Start Over button to delete the COOL text. The created COOL
text should now appear in the COOL Short List.
To use text from the COOL Short List:
TOUCH the text in the
COOL Short List field. The text selected should now appear in
the Current COOL Text field. This is the COOL text that will be
used for this run only.
T o create COOL Tracking Number:
TOUCH the COOL Tracking
Number field to activate it. The alpha keyboard will be displayed.
TYPE in the tracking number.
To exit this screen
: TOUCH Back.
Using the Access Wrapping System 3-18 F-35538 (April 2010)
Page 35

Product Drop-Down Menu Void Transaction
Access AWS-1B Wrapping System Operator Manual
From the Operator Run Screen, TOUCH Product. TOUCH Void
Transation.
The current transaction will be voided. There will be no further
indication on the screen that the transaction has been completed.
Settings Drop-Down Menu
Settings Drop-Down Wrapper Screen
The Setting Drop-Down Menu has the following selections:
Wrapper Screen
Printer Settings Screen
Date and Time Screen
Total Type Screen
Rezero Weigher Screen
From the Operator Run Screen, TOUCH Settings. TOUCH
Wrapper. You should now be on the Wrapper Screen.
To change the Intake Mode
bring up the Intake Mode drop-down selections either Normal,
Default, or Gentle.
To turn on/off the Sealer Belt
field and SELECT either On or Off.
The sealer belt is hot. Do not touch.
: TOUCH the Intake Mode field and
: TOUCH the Sealer Belt power
Tip
Allow the sealer belt to warm up for 10-15 minutes; it must be
hot enough to seal properly. You will need to do this anytime
you change the temperature or if the circuit breaker is turned on
after being off.
F-35538 (April 2010) 3-19 Using the Access Wrapping System
Page 36

Access AWS-1B Wrapping System Operator Manual
To change the Belt Temperature: TOUCH the Belt Temperature
Setting field. The Numeric Keypad will be displayed. TYPE the
Belt T emperature Setting on the Numeric Keypad. TOUCH Enter.
To change Film Tension
: TOUCH the Film Tension field and
SELECT either High, Medium, or Low.
To change Film Tension - Front to Back
: TOUCH the Tension Front to Back field and SELECT from a range of -5 to +5;
negative allowing less tension; positive allowing more tension.
None is the default value.
To change Film Tension - Left to Right
: TOUCH the Tension Left to Right field and SELECT from a range of -5 to +5;
negative allowing less tension; positive allowing more tension.
None is the default value.
To load Film
To Cut Film
To change Film Width
: TOUCH the Load Film button.
: TOUCH the Cut Film button.
: TOUCH the Upper Film Width button.
SELECT the appropriate width.
To exit this screen
: TOUCH Back.
Using the Access Wrapping System 3-20 F-35538 (April 2010)
Page 37

Settings Drop-Down Menu Printer Settings Screen
Access AWS-1B Wrapping System Operator Manual
From the Operator Run Screen, TOUCH Settings. TOUCH
Printer Settings. You should now be on the Printer Settings
Screen.
To change the Printer Type
: TOUCH the Printer Type field and
SELECT Primary, Second, Third, or None.
To change the Printer Contras t
: TOUCH the Printer Contrast
field and SELECT a number from 0-7. TOUCH the Apply
Changes & Print Label button to save changes and print a sample
label.
Note
Use the lowest contrast level that allows for acceptable print.
To change Label Width
SELECT the desired width. TOUCH the Apply Changes & Print
Label button to save changes and print a sample label.
To change the Horizontal Print Position
Right buttons on either side of the Horizontal Print Position field
to move the print to the left or the right on the label. TOUCH the
Apply Changes & Print Label button to save changes and print a
sample label.
To change the Vertical Print Position
buttons on either side of the Vertical Print Position field to move
the print up or down on the label. TOUCH the Apply Changes &
Print Label button to save changes and print a sample label.
: TOUCH the Label Width field and
: TOUCH the Left or
: TOUCH the Up or Down
To exit this screen
F-35538 (April 2010) 3-21 Using the Access Wrapping System
: TOUCH Back.
Page 38

Access AWS-1B Wrapping System Operator Manual
Settings Drop-Down Menu Date and Time Screen
The current date and time set for the Access Wrapping System is
shown on the Operator Run Screen in the lower left-hand corner.
From the Operator Run Screen, TOUCH Settings. TOUCH Date
and Time. You should now be on the Date and Time Screen.
T o change the Month
month.
To change the Year
: TOUCH the year field and SELECT the
year.
To change the Day
T o change the Hour
: TOUCH the day on the calendar.
: TOUCH the HH field and TOUCH the up or
down arrow.
To change the Minute
up or down arrow.
To change AM/PM
: TOUCH the AM/PM field to toggle between
AM and PM.
To exit this screen
: TOUCH Back.
: TOUCH the month field and SELECT the
: TOUCH the MM field and TOUCH the
Using the Access Wrapping System 3-22 F-35538 (April 2010)
Page 39

Settings Drop-Down Menu Total Type Screen
Access AWS-1B Wrapping System Operator Manual
From the Operator Run Screen, TOUCH Settings. TOUCH T otal
Type. You should now be on the Total Type Screen.
Settings Drop-Down Menu Rezero Weigher Screen
To select a Total Type
: TOUCH the Total Type field and
SELECT a Total Type.
To exit this screen
: TOUCH Back.
Ensure that nothing is on the scale. From the Operator Main
Menu Screen, TOUCH Settings. TOUCH Rezero Weigher. A
process box will appear briefly; no other action is required.
F-35538 (April 2010) 3-23 Using the Access Wrapping System
Page 40

Access AWS-1B Wrapping System Operator Manual
Help Drop-Down Menu
The Help Drop-Down Menu has the following selections:
Search Screen
Describe this Page Screen
Questions Screen
Operator Note Screen
About Access Screen
Weights & Measures Screen
Help Drop-Down Menu Search Screen
From any screen, TOUCH Help. TOUCH Search. You should
now be on the Search Screen.
A search can be performed by a product number or by a product
description. TOUCH either the check box Search by character to
perform a search by product description or Search by PLU to
perform a search by product number.
T o perform a Search by character
by Character. TOUCH the text field to the left of the check boxes
to activate it for data entry. The Alpha Keyboard will be
displayed on the screen. TYPE the letters on the keyboard
describing the product. A maximum of 4 characters may be
entered. If the search does not begin automatically, TOUCH
Done.
Using the Access Wrapping System 3-24 F-35538 (April 2010)
: TOUCH the check box Search
Page 41

Access AWS-1B Wrapping System Operator Manual
As shown on the screen below, a list of products is displayed.
TOUCH the scroll bar arrows to the right of the box containing
the product list to scroll up or down and view all of the products
listed. TOUCH the scroll bar arrows below the box to view list
entries that are wider than the box.
SELECT the desired product on the list. The Run Screen for the
selected product will be displayed.
To perform a Search by PLU Range
: TOUCH the check box
Search by PLU. TOUCH the text field to the left of the check
boxes to activate it for data entry. The Numeric Keypad will be
displayed on the screen. TYPE the product number. If the search
does not begin automatically, TOUCH Enter.
F-35538 (April 2010) 3-25 Using the Access Wrapping System
Page 42

Access AWS-1B Wrapping System Operator Manual
As shown on the screen below, a list of products is displayed.
Help Drop-Down Menu Describe this Page Screen
TOUCH the scroll bar arrows to the right of the box containing
the product list to scroll up or down and view all of the products
listed. TOUCH the scroll bar arrows below the box to view list
entries that are wider than the box.
SELECT the desired product on the list. The Run Screen for the
selected product will be displayed.
The Describe this Page Screen will give you tips about the current
screen.
From any screen, TOUCH Help. TOUCH Describe this Page.
You should now be on the Describe this Page Screen.
To exit this screen
Using the Access Wrapping System 3-26 F-35538 (April 2010)
: TOUCH Back.
Page 43

Help Drop-Down Menu Questions Screen
Access AWS-1B Wrapping System Operator Manual
The Questions Screen will show a list of frequently asked
questions regarding the Access Wrapping System operation and
maintenance.
From any screen, TOUCH Help. TOUCH Questions. You should
now be on the Questions Screen.
Help Drop-Down Menu Operator Note Screen
T o view Questions
: TOUCH the scroll bar on the right of the list
of questions to scroll up and the down the list of questions.
To exit this screen
: TOUCH Back.
From any screen, TOUCH Help. TOUCH Operator Note. You
should now be on the Operator Note Screen. This is only
available if there is a note.
To exit this screen
F-35538 (April 2010) 3-27 Using the Access Wrapping System
: TOUCH Back.
Page 44

Access AWS-1B Wrapping System Operator Manual
Help Drop-Down Menu About Access Screen
From any screen, TOUCH Help. TOUCH About Access. You
should now be on the About Access Screen.
Help Drop-Down Menu Weights & Measures Screen
To exit this screen
: TOUCH Back.
From any screen, TOUCH Help. TOUCH Weights & Measures.
You should now be on the Weights & Measures Screen.
Note
The information on this screen will vary depending on the
peripherals attached.
To exit this screen: TOUCH Back.
Using the Access Wrapping System 3-28 F-35538 (April 2010)
Page 45

Chapter 4: Maintenance & Cleaning
Cleaning and Maintaining your System
Access AWS-1B Wrapping System Operator Manual
This durable Access Wrapping System has been designed and
manufactured to resist corrosion, scratches, stains, alkaline, protein and food acid when cared for properly. Improper care can
permanently damage the wrapper, electronics and printer.
Proper cleaning prolongs the life and productivity of the machine.
This machine should be thoroughly cleaned on a daily basis
(more often, if necessary). If the system is not cleaned on a
regular basis it may not run consistently and will cause service
problems. Failure to follow use, care and maintenance as noted
may void your Hobart warranty.
About Proper Care
Enemies of Stainless Steel
The following information was derived from the brochure STAINLESS STEEL EQUIPMENT CARE AND CLEANING
(F-24845) distributed by NAFEM.
Corrosion of metals is everywhere. We recognize it on iron and
steel as rust. These are called active metals because they actively
corrode in the natural environment. Stainless steels are passive
metals because they contain other metals, like chromium and
nickel.
There are three basic components which can break down your
stainless steel’s passivity layer (micro-thin film) and allow
corrosion:
Component Explanation
Mechanical
Abrasions
Deposits and Water Water comes out of the tap in varying
Items that will scratch the steel’s surface.
Steel pads, wire brushes, and scrapers are
prime examples.
degrees of hardness. Depending on what
part of the country you live in, you may
have hard or soft water. Hard water may
leave spots. Also, when heated, hard
water leaves deposits behind that, if left
to sit, will break down the passive layer
and rust your stainless steel.
Other deposits from food preparation
and service must be properly removed.
Chlorides Chlorides are found nearly everywhere.
They are in water, food, and table salt.
One of the worst perpetrators of
chlorides can come from household and
industrial cleaners.
F-35538 (April 2010) 4-1 Maintenance & Cleaning
Page 46

Access AWS-1B Wrapping System Operator Manual
Steps to help prevent stainless steel from rusting or pitting:
1. Use the proper tools. Soft cloths and plastic scouring pads
will not harm the stainless steel’s passive layer.
2. Clean with the polish lines.
3. Use alkaline, alkaline chlorinated or non-chloride contain-
ing cleaners. Also, avoid cleaners containing quaternary
salts as they can attack stainless steel and cause pitting and
rusting.
4. Treat your water. If you are not sure of the proper water
treatment, call a treatment specialist.
5. Keep your food equipment clean. Clean frequently to avoid
buildup of hard stubborn stains.
6. Rinse, Rinse, Rinse. If chlorinated cleaners are used you
must rinse and wipe dry immediately. The sooner you wipe
off standing water, especially when it contains cleaning
agents, the better. After wiping the equip ment down, allow it
to air dry for the oxygen helps maintain the stainless steels’
passivity film.
7. Never use hydrochloric acid on stainless steel.
Guidelines
All food-contact surfaces must be washed, rinsed, and sanitized:
• after each use
• when you begin working with another type of food
• anytime you are interrupted during a task
• at four hour intervals, if the items are in constant use
Other components should be cleaned and sanitized at least once
each day and whenever they become soiled.
Before using cleaning solvent, all food products and
packaging materials must be removed from the area or
carefully protected. All odor of the cleaner must dissipate
before food products or packaging materials are exposed.
Refer to manufacturers instructions.
• FDA Code of Regulations Vol. 21 require solutions
containing chlorine to be of no greater concentration than
200 ppm. Solutions containing concentrations greater than
200 ppm chlorine will accelerate corrosion of metals.
• Proper cleaning solvent is available from your local Hobart
service office for all rubber surfaces. Observe the instructions on the bottle.
Maintenance & Cleaning 4-2 F-35538 (April 2010)
Page 47

Access AWS-1B Wrapping System Operator Manual
Cleaning/Rinsing Guidelines
Do Don’t
Refer to the following Cleaning and Rinsing guidelines.
use products formulated to be safe on stainless steel
DO
(mild soap and water are recommended)..
DON’T dampen labels, electronic parts, or
connections.
DON’T
clean the system.
DON’T
ment with relative humidity levels consistently in
excess of 70%.
DON’T
• Chloride-Based cleaners
• Formula 409
• Glass Cleaners (i.e. Scotty’s Glass Cleaner)
• Citrus-Based Cleaners (i.e. Citro-Sol or Bio-T)
• Caustic Cleaners with high pH (i.e. Butchers
Block, concentrated Lysol or Pinesol)
DON’T
concentrations for detergent.
Sanitizing Guidelines
Do Don’t
use steam or a high pressure water spray to
operate and/or store the system in an environ-
use:
exceed chemical manufacturer’s recommended
use 5% Chlorine Bleach (5.25% Sodium
DO
Hypochlorite).
Ratio
Bleach Water Concentration
1 : 250 1 tsp. 1 gal. 200 ppm
1 : 500 1/2 tsp. 1 gal. 100 ppm
1 : 1000 1/4 tsp. 1 gal. 50 ppm
1 : 2000 1/8 tsp. 1 gal. 25 ppm
DON’T exceed chemical manufacturer’s recommended
concentrations for sanitizer.
DON’T
use solutions of greater than 200 ppm
concentration of chlorine cleaners.
F-35538 (April 2010) 4-3 Maintenance & Cleaning
Page 48

Access AWS-1B Wrapping System Operator Manual
Cleaning Instructions
Prior to cleaning, power down the touch screen, printer and wrapper. See Shutting Down the System. Unthread the film from the
film selector.
Disconnect power source to wrapper before cleaning.
Use of high pressure washing system will cause damage to the
wrapper.
Cleaning Each Component
Component Cleaning Table
T o appropriately clean each component of the system, refer to the
following component cleaning table.
Component Explanation
Rear Film Chamber Clean as needed with a soft cloth moistened with a mild detergent and water.
Rinse and allow to air dry.
Maintenance & Cleaning 4-4 F-35538 (April 2010)
Page 49

Access AWS-1B Wrapping System Operator Manual
Component Explanation
Canopy and Film Chamber
Doors
Clean as needed with a soft cloth moistened with a mild detergent and water.
Rinse and allow to air dry.
Covers (External - Plastic) Clean as needed by using a soft cloth moistened with a mild detergent and
water. Rinse and allow to air dry.
Sealer Belt
Hot surface. Do not touch.
Clean as needed by using a soft cloth moistened with a mild detergent and
water. Rinse and allow to air dry.
Intake Conveyor Area and
Weigher Rods
Clean as needed by using a long-handled brush or a moist cloth. Weigher rods
can be removed and cleaned in a sink with mild detergent and water. Use the
long-handled brush for additional cleaning of the belts. Replace weigher rods
after cleaning. Rinse and allow to air dry.
Side Panels (Stainless Steel) Clean as needed by using a soft cloth moistened with a mild detergent and
water. Rinse and allow to air dry.
F-35538 (April 2010) 4-5 Maintenance & Cleaning
Page 50

Access AWS-1B Wrapping System Operator Manual
Component Explanation
Package Hold Down Lift upward and clean as needed with a soft cloth moistened with a mild deter-
gent and water. Rinse and allow to air dry.
Rubber Pads, Side Clamp
Clean as needed with Hobart cleaning solvent or isopropyl alcohol.
Gripper
Rubber Roller (in film selector) Clean as needed with Hobart cleaning solvent or isopropyl alcohol.
Front, Rear and Side
Underfolders
Clean as needed by using a soft cloth moistened with a mild detergent and
water. Rinse and allow to air dry.
Elevator Area Clean as needed by using a soft cloth. Open the canopy and the side doors to
get access to the elevator area. Rinse and allow to air dry. A soft brush may be
required to reach confined areas.
Once cleaning is complete and any steam in the room has
dissipated, restore power to the printer and wrapper. See Power
Up the System.
Before restoring power, insure there is no water remaining on
the weigher. This could result in the system coming up out of
zero range.
Maintenance & Cleaning 4-6 F-35538 (April 2010)
Page 51

Removing Labels
Access AWS-1B Wrapping System Operator Manual
To remove labels from the printer:
1. Open the printer label access door.
2. Pull the printhead positioning lever toward the printhead to
lower the printhead.
3. Push and hold in the label door release located on the interior
back wall behind the roller and lower the label door.
F-35538 (April 2010) 4-7 Maintenance & Cleaning
Page 52

Access AWS-1B Wrapping System Operator Manual
4. Remove the take-up spool key.
5. Remove the label backing paper from the take-up spool and
the label roll from the hub.
Maintenance & Cleaning 4-8 F-35538 (April 2010)
Page 53

Loading Labels
Access AWS-1B Wrapping System Operator Manual
Note
Before loading labels:
•See Cleaning the Printhead.
•See Setting the Label Size Plate.
To load labels in the printer
:
1. Remove labels from the first 12 inches of the new label roll.
This will create a leader to attach to the take-up spool.
2. Pull the printhead positioning lever toward the printhead to
lower the printhead.
F-35538 (April 2010) 4-9 Maintenance & Cleaning
Page 54

Access AWS-1B Wrapping System Operator Manual
3. Push and hold in the label door release located on the interior
back wall behind the roller and lower the label door.
4. Place the label roll on the hub. The leader feeds from the
bottom of the roll in a clockwise direction.
5. Remove the take-up spool key.
6. Wrap the leader under the black label guide, around the roller
and the take-up spool and insert the take-up spool key. Insert
the short side of the key first and catch the leader under the
long side of the key.
7. Take up the leader slack and align the leader on the spool.
Maintenance & Cleaning 4-10 F-35538 (April 2010)
Page 55

Access AWS-1B Wrapping System Operator Manual
8. Close the label door on the front of the printer.
9. Pull the printhead positioning lever away from the printhead
to raise the printhead into position. The printer will
automatically advance the labels through the printhead
setting the labels in the ready position.
10. Close the printer label access door.
F-35538 (April 2010) 4-11 Maintenance & Cleaning
Page 56

Access AWS-1B Wrapping System Operator Manual
Setting the Label Size Plate
To set the label size plate:
1. Lift the label plate and set it in the slots for the size labels
being used.
2. Move the lever on the hub to the slot for the size labels being
used.
Note
If you change the label size, make sure to adjust the printer settings (see Printer Settings Screen).
Maintenance & Cleaning 4-12 F-35538 (April 2010)
Page 57

Cleaning the Printhead
Access AWS-1B Wrapping System Operator Manual
The printhead of your Access Wrapping System Printer should be
cleaned approximately once each week, or whenever labels are
obstructed due to a residue buildup on the printhead and/or roller.
It is a good idea to clean the printhead roller whenever a new
roll of labels is installed. To obtain a Printhead Cleaning Kit,
contact your local Hobart Representative; request
Part Number 00-184326.
Do not use a metal tool on the printhead. This could scratch or
break the printhead. In addition, monitor the printer to look for
labels stuck on the printer parts. If found, remove these labels at
once following the instructions given below.
To clean the printhead
:
1. With the label door lowered, the labels removed and the
printhead in the lowered position, check to see if the
printhead is clean and free of label stock and label adhesive.
2. Use the plastic scraper from the Printhead Cleaning Kit to
remove stuck-on label stock.
3. To remove burnt-on adhesive, gently rub the printhead
surface with the eraser from the Printhead Cleaning Kit.
4. Using the cleaner and a swab from the Printhead Cleaning
Kit, scrub the printhead until all of the residue is removed.
5. Clean the roller with the cleaner and swabs.
6. Allow the printhead and roller to dry before loading the
labels.
F-35538 (April 2010) 4-13 Maintenance & Cleaning
Page 58

Access AWS-1B Wrapping System Operator Manual
Maintenance & Cleaning 4-14 F-35538 (April 2010)
Page 59

Troubleshooting
Access AWS-1B Wrapping System Operator Manual
Chapter 5: Troubleshooting
In the event that your Access Wrapping System does not operate
as expected, please read through the following troubleshooting
steps before calling for service.
Tip
Properly loaded trays produce the most attractively wrapped
packages and can enhance wrapper operation by reducing rewraps, product spillage and loss, repeated shutdowns, machine
damage, etc.
To insure proper loading:
Keep all product in the tray.
Avoid top-heavy packages to prevent product from
rolling out.
Avoid stacking product whenever possible.
Use appropriate sized tray.
Keep loose product flat in the tray.
An improperly loaded tray has the following attributes:
Product exceeds height requirement and is unstable. You
should hand wrap oversized items to avoid possible
machine damage.
Product is unstable or overhanging tray. Use larger and
deeper tray or hand wrap.
These guidelines can improve product appearance, case life, and
overall productivity.
If the machine has shutdown because of an error, correct the
problem, cycle the stop switch, and push the START button. The
error message displays again if the error is not corrected.
F-35538 (April 2010) 5-1 Troubleshooting
Page 60

Access AWS-1B Wrapping System Operator Manual
Reviewing System Errors
Message What should I do?
Primary conveyor not at home. 1. Press the START button to home the machine.
Press the START button to home the machine. 1. Press the STOP button.
Primary intake jammed. 1. Press the STOP button.
Primary conveyor did not find home. 1. Press the STOP button.
Intake blocked. 1. Press the STOP button.
The following system error messages display at the console, if
problems occur.
2. Remove any packages, labels, debris in the machine.
3. Press the START button.
2. Remove any packages, labels, debris in the machine.
3. Press the START button.
2. Remove any packages, labels, debris in the machine.
3. Press the START button.
2. Remove any packages, labels, debris in the machine.
3. Press the START button.
Package is too long or too short. 1. Press the STOP button.
2. Remove any packages, labels, debris in the machine.
3. Press the START button.
Package did not trip the elevator sensor. 1. Press the STOP button.
2. Remove any packages, labels, debris in the machine.
3. Press the START button.
Secondary intake jammed. 1. Press the STOP button.
2. Remove any packages, labels, debris in the machine.
3. Press the START button.
Centering conveyor not at home. 1. Press the START button to home the machine.
Centering conveyor jammed. 1. Press the STOP button.
2. Remove any packages, labels, debris in the machine.
3. Press the START button.
Package is too far left. 1. Press the STOP button.
2. Remove any packages, labels, debris in the machine.
3. Press the START button.
Package is too far right. 1. Press the STOP button.
2. Remove any packages, labels, debris in the machine.
3. Press the START button.
Troubleshooting 5-2 F-35538 (April 2010)
Page 61

Access AWS-1B Wrapping System Operator Manual
Message What should I do?
Centering conveyor did not find home. 1. Press the STOP button.
2. Remove any packages, labels, debris in the machine.
3. Press the START button.
Secondary shift lost control. 1. Press the STOP button.
2. Remove any packages, labels, debris in the machine.
3. Press the START button.
Elevator not at home. 1. Press the START button to home the machine.
Elevator stalled. 1. Press the STOP button.
2. Check that the package is 15 lbs. or less.
3. Remove any packages, labels, debris in the machine.
4. Press the START button.
Elevator position error. 1. Press the STOP button.
2. Remove any packages, labels, debris in the machine.
3. Press the START button.
Elevator did not find home. 1. Press the STOP button.
2. Remove any packages, labels, debris in the machine.
3. Press the START button.
Elevator did not find top. 1. Press the STOP button.
2. Remove any packages, labels, debris in the machine.
3. Press the START button.
Elevator sensor is not working. 1. Press the STOP button.
2. Remove any packages, labels, debris in the machine.
3. Press the START button.
Package will not wrap with selected film. 1. Press the STOP button.
2. Select a larger size film.
3. Remove any packages, labels, debris in the machine.
4. Press the START button.
Film not pulled. 1. Press the STOP button.
2. Check to make sure film is properly loaded and the gripper
and film selector are clear of debris.
3. Press the START button.
Gripper not at home. 1. Press the START button to home the machine.
Gripper position error. 1. Press the STOP button.
2. Remove any packages, labels, debris in the machine.
3. Press the START button.
F-35538 (April 2010) 5-3 Troubleshooting
Page 62

Access AWS-1B Wrapping System Operator Manual
Message What should I do?
Gripper jammed. 1. Press the STOP button.
2. Remove any packages, labels, debris in the machine.
3. Press the START button.
Gripper did not find home. 1. Press the STOP button.
2. Remove any packages, labels, debris in the machine.
3. Press the START button.
Side clamps not at home. 1. Press the START button to home the machine.
Side clamps jammed. 1. Press the STOP button.
2. Remove any packages, labels, debris in the machine.
3. Press the START button.
Side clamps did not find home. 1. Press the STOP button.
2. Remove any packages, labels, debris in the machine.
3. Press the START button.
Side folders did not find home. 1. Press the STOP button.
2. Remove any packages, labels, debris in the machine.
3. Press the START button.
Side folders not at home. 1. Press the START button to home the machine.
Side folders jammed. 1. Press the STOP button.
2. Remove any packages, labels, debris in the machine.
3. Press the START button.
Rear folder did not find home. 1. Press the STOP button.
2. Remove any packages, labels, debris in the machine.
3. Press the START button.
Rear folder not at home. 1. Press the START button to home the machine.
Rear folder jammed. 1. Press the STOP button.
2. Remove any packages, labels, debris in the machine.
3. Press the START button.
Front folder did not find home. 1. Press the STOP button.
2. Remove any packages, labels, debris in the machine.
3. Press the START button.
Front folder not at home. 1. Press the START button to home the machine.
Front folder jammed. 1. Press the STOP button.
2. Remove any packages, labels, debris in the machine.
3. Press the START button.
Pusher did not find home. 1. Press the STOP button.
2. Remove any packages, labels, debris in the machine.
3. Press the START button.
Troubleshooting 5-4 F-35538 (April 2010)
Page 63

Access AWS-1B Wrapping System Operator Manual
Message What should I do?
Pusher not at home. 1. Press the START button to home the machine.
Pusher jammed. 1. Press the STOP button.
2. Remove any packages, labels, debris in the machine.
3. Press the START button.
Sealer belt jammed. 1. Press the STOP button.
2. Remove any packages, labels, debris in the machine.
3. Press the START button.
Label applier did not find home. 1. Press the STOP button.
2. Remove any packages, labels, debris in the machine.
3. Press the START button.
Label applier not at home. 1. Press the START button to home the machine.
Label applier did not find home. 1. Press the STOP button.
2. Remove any packages, labels, debris in the machine.
3. Press the START button.
Wrapper lost CAN communications. 1. Cycle the circuit breaker. Press the START button.
Canopy open. 1. Please close the canopy.
2. Remove any packages, labels, debris in the machine.
3. Press the START button.
Right-side access door open. 1. Please close the door.
2. Remove any packages, labels, debris in the machine.
3. Press the START button.
Left-side access door open. 1. Please close the door.
2. Remove any packages, labels, debris in the machine.
3. Press the START button.
Rear film door open. 1. Please be sure both film doors are closed.
2. Remove any packages, labels, debris in the machine.
3. Press the START button.
Package stopped on intake. 1. Press the STOP button.
2. Remove any packages, labels, debris in the machine.
3. Press the START button.
Wrapper did not respond. 1. Cycle the circuit breaker.
2. Remove any packages, labels, debris in the machine.
3. Press the START button.
An invalid Sealer belt temperature was
1. The previous value will be restored.
entered.
F-35538 (April 2010) 5-5 Troubleshooting
Page 64

Access AWS-1B Wrapping System Operator Manual
Possible System Problems
Problem Possible Cause Action/Solution
If you are experiencing problems with the wrapper, label applier
or printer, review the following scenarios.
There is no display on the
display unit.
The Operator ID was not
accepted.
Product number was not
found.
System prompts you to take
a label. No label is present.
Y ou may not have power running to the
system.
Verify the following connections:
• Power cord is plugged into a working electrical outlet.
• Power cord is plugged into the
rear of the printer.
• Display unit power cord is plugged
into the printer.
• Display unit power cord is plugged
into the display unit.
• USB cable is plugged into the
printer.
• USB cable is plugged into the
display unit.
You may have entered the wrong ID. Verify that you are entering the proper
ID. If correct, have your supervisor
check the ID number.
You may have entered an invalid prod-
Verify the product number.
uct number.
A portion of the label may be ‘hidden’
Make sure that the label exit is clear.
in the label exit.
Partial non-printed label is
exposed.
System prints blank labels or
partially printed labels.
The package has an open side
(incomplete wrap).
The labels may be improperly
threaded.
The labels may be improperly threaded
or the printhead or roller may be dirty.
Verify that labels are properly
threaded.
Check to see that labels are threaded
properly. If the problem persists,
clean the printhead using the Hobart
Printhead Cleaning Kit.
The film is not threaded correctly or
centered correctly.
The side clamp pads are dirty causing
film to slip out when being stretched.
Refer to Loading Film for correct
threading procedures.
Clean as required. Refer to Cleaning
and Maintaining for detailed
procedures.
The product is outside the tray. Rearrange product.
Film roll turning on film arbor. Tighten film collars.
Troubleshooting 5-6 F-35538 (April 2010)
Page 65

Access AWS-1B Wrapping System Operator Manual
Problem Possible Cause Action/Solution
The package has an open side
or end (incomplete wrap).
There are holes in the film on
the bottom of the package
(tear or burn).
The film selector rubber rollers are
dirty.
The tray or film is too slick or wet
Refer to Cleaning and Maintaining for
detailed procedures.
Change the film or tray.
preventing the film from sticking.
Improper film size or the type of film is
Change the film.
not suitable for machine wrapping.
The sealer belt temperature is too high. Verify sealer belt temperature.
Normally , the sealer belt does not need
to be hotter than 325° F (163° C).
The elevator or side under folders are
dirty.
The film gripper pads and/or side
clamp pads are dirty. --OR-- Foreign
Refer to Cleaning and Maintaining for
detailed procedures.
Refer to Cleaning and Maintaining for
detailed procedures.
material is stuck inside the plates, causing film to slip out when being
stretched.
Damaged or defective film. This may
be caused by improper storage,
improper handling or excessive age.
Verify the film storage conditions. The
film should be stored at a temperature
between 50° F (10° C) and 70° F
(21° C) and at a relative humidity of
50% to 85%.
Package is not sealed or
closed on the bottom.
Improper film size or the type of film is
Change the film.
not suitable for machine wrapping.
The sealer belt temperature is set too
low or off.
Adjust the temperature. Refer to
Wrapper Screen for detailed proce-
dures.
Foreign material in gripper or the grip-
per is dirty.
Too many layers of film on the bottom
Refer to Cleaning and Maintenance for
detailed procedures.
Verify the film selection.
of the package. A small tray may have
been wrapped with wide film.
The film selector rubber rollers are
dirty.
Improper film size or type of film is
Refer to Cleaning and Maintenance for
detailed procedures.
Change the film.
not suitable for machine wrapping.
Film roll is loose on film arbor. Tighten film collars..
F-35538 (April 2010) 5-7 Troubleshooting
Page 66

Access AWS-1B Wrapping System Operator Manual
Problem Possible Cause Action/Solution
Package has tails. The film gripper pads are dirty. Refer to Cleaning and Maintenance for
detailed procedures.
The elevator is dirty causing trays to
slide too far onto the elevator.
Improper film size or type of film is
Refer to Cleaning and Maintenance for
detailed procedures.
Change the film.
not suitable for machine wrapping.
Package rolls on the intake. The package was loaded incorrectly. Verify the package height versus the
package length.
The package was placed too far off
center.
The product was hanging over the
Center the package on the intake
sensor.
Re-adjust the product on the tray.
edges of the tray.
The intake shelf is dirty. Refer to Cleaning and Maintenance for
detailed procedures.
Package jams. The product was loaded on the tray
Re-adjust the product on the tray.
incorrectly.
The film is not threaded correctly. Refer to Loading Film for detailed
procedures.
The package was placed too far off
center.
Center the package on the intake
sensor.
The package fed into the machine in
the wrong direction.
Verify the package height versus the
package length.
Intake pusher will not cycle. The package is over 15 lbs. Hand wrap or re-pack the package.
The system is at the Run Screen. Select a PLU to begin.
The scale is not zero. Remove any weight from the platter
and try again.
Wrapper in label only mode. Verify wrap and apply buttons are
enabled.
Troubleshooting 5-8 F-35538 (April 2010)
Page 67

Access AWS-1B Wrapping System Operator Manual
Problem Possible Cause Action/Solution
The wrapper will not run, and
the start (green) button is
not lit.
The wrapper will not run, but
the start (green) button is lit.
The Scale Warm-Up message
won’t go away.
The power cords are not plugged in. Verify that the power connections are
secure.
The main electrical switch is in the
Turn the power ON.
OFF position.
The circuit breaker at the building
Verify that the circuit breaker is ON.
electric panel is off.
The store circuit protector is open. Verify that the circuit protector is
closed.
There is an unresolved error in the
system.
Check the console for the error and
follow up procedures.
--OR--
The stop (red) switch was not cycled
after the error was resolved.
Wrapper in label only mode. Verify wrap and apply buttons are
enabled.
Weight may be on the platter. Make sure the platter/weigher is clear.
Power the printer down and up using
the switch on the back.
The system won’t accept the
date & time.
Over gross weight displays on
screen.
Out of Labels message
You may have entered information in
an incorrect format.
There is too much weight on the
Verify that you are entering a valid date
& time.
Rezero weigher.
platter/weigher.
No labels are loaded. Load new labels.
displays.
Package not wrapped at all. Machine is in Apply/Label Mode. Reset system to Wrap Mode.
Label jammed. Out of labels. Load label stock.
F-35538 (April 2010) 5-9 Troubleshooting
Page 68

Access AWS-1B Wrapping System Operator Manual
Troubleshooting 5-10 F-35538 (April 2010)
Page 69

Access AWS-1B Wrapping System Operator Manual
Index
A
About Access Screen, 3-28
About Proper Care, 4-1
Access Wrapping System, 1-1
Alpha Keyboard, 2-3
Automatic Settings, 3-6
Automatically Print and Apply Label, No Wrap
(Prepackaged Products), 3-8
Automatically Print Label Only, 3-7
Automatically Wrap Only, 3-9
Automatically Wrap, Print and Apply Label, 3-6
C
Cleaning and Maintaining your System, 4-1
Cleaning Each Component, 4-5
Cleaning Instructions, 4-4
Cleaning the Printhead, 4-14
Cleaning/Rinsing Guidelines, 4-3
Component Cleaning Table, 4-5
Console Communication Connections, 2-2
COOL Screen, 3-18
D
Date and Time Screen, 3-22
Date, Best Before, 3-17
Date, Sell By, 3-16
Days, Product Life, 3-16
Days, Shelf Life, 3-16
Describe This Page Screen, 3-26
Don't print check boxes, 3-17
L
Label Data Screen, 3-13
Label Placement Screen, 3-14
Label Type, 3-13
Loading Film, 2-5
Loading Labels, 4-10
Logging onto the System, 3-1
M
Manual Mode, 3-10
Modifying the Run Screen, 3-5
N
Numeric Keypad, 2-3
O
Operator Manual Terminology, 1-2
Operator Note Screen, 3-27
Operator Start Screen, 2-3
Operator Start Screen Menu Buttons and Flashkeys, 3-3
P
Power up the system, 3-1
Printer Settings Screen, 3-21
Printhead Cleaning Kit, 4-14
Printhead cleaning kit part number, 4-14
Product & Shelf Life Screen, 3-16
Product Drop-Down Menu, 3-13
Product Note Screen, 3-15
E
Electrical Connections, 2-2
Enemies of Stainless Steel, 4-1
F
FCC Note, 1-1
Flashkeys, 2-3
G
Grayed Field, 2-3
Guidelines, 4-2
H
Help Drop-Down Menu, 3-24
I
Important Information, 1-3
F-35538 (April 2010) I-1 Index
Questions Screen, 3-27
Removing Labels, 4-8
Reviewing System Errors, 5-2
Rezero Weigher Screen, 3-23
Run Screen, 3-4
Running a Product, 3-11
Sanitizing Guidelines, 4-3
Search by character, 3-24
Search by PLU Range, 3-25
Search Screen, 3-24
Select a Total Type, 3-23
Setting the Label Size Plate, 4-13
Settings Drop-Down Menu, 3-19
Shelf/Product Life Hours, 3-17
Shutting Down the System, 3-2
Storing Film, 2-4
Q
R
S
Page 70

Access AWS-1B Wrapping System Operator Manual
T
Text Box, 2-3
To Login to the System, 3-1
Total Type Screen, 3-23
Troubleshooting, 5-1
U
Understand Package Weight, Size, Shape and Range Guidelines , 2-4
Understanding the System, 2-1
Understanding the Wrapper, 2-4
Using Automatic Mode, 3-6
Using the Access Wrapping System, 3-1
Using the Operator Run Screen Drop-Down Menus, 3-12
Using Trays, 2-4
V
Verify Correctness of Weight and Price, 1-2
Void Transaction, 3-19
W
Weights & Measures Screen, 3-28
Welcome, 1-1
Wrapper Screen, 3-19
Index I-2 F-35538 (April 2010)
Page 71

Access AWS-1B Wrapping System Operator Manual
F-35538 (April 2010) I-3 Index
Page 72

Access AWS-1B Wrapping System Operator Manual
Index I-4 F-35538 (April 2010)
 Loading...