

Page 1

Manuals and Instructions
Brought to your courtesy of
wechillit.com Ltd
Sales Team : 01743 284918
Page 2
CLF 26
Installation & Operation
Page 3

-
Contents
GENERAL INFORMATION ______________________________________________________ 2
1.
Documentation supplied with the machine
____________________________________________ 2
2.
General notes
___________________________________________________________________ 2
3.
Important safety notes
____________________________________________________________ 3
GETTING TO KNOW YOUR MACHINE____________________________________________ 4
1.
Control panel
___________________________________________________________________ 4
2.
Installation data
_________________________________________________________________ 4
INSTALLATION________________________________________________________________ 5
1.
Glossary
________________________________________________________________________ 5
2.
Unpacking the appliance
__________________________________________________________ 6
3.
Positioning
_____________________________________________________________________ 6
4.
Connections
_____________________________________________________________________ 6
5.
Dispenser settings
________________________________________________________________ 8
6.
Operator training
_______________________________________________________________ 10
USE AND MAINTENANCE _____________________________________________________ 11
1.
Safety notes
____________________________________________________________________ 11
2.
Preparation of the machine
_______________________________________________________ 12
3.
First cycle
_____________________________________________________________________ 13
4.
Subsequent cycles
_______________________________________________________________ 14
5.
Emptying the machine
___________________________________________________________ 15
6.
Before the daily shutdown
________________________________________________________ 15
7.
Maintenance
___________________________________________________________________ 16
8. Solutions to the most common problems _____________________________________________ 17
Page 4
GENERAL INFORMATION
Page 2
GENERAL INFORMATION
F
AILURE TO COMPLY WITH THE INSTRUCTIONS PROVIDED MAY COMPROMISE THE
SAFETY OF THE APPLIANCE AND WILL INVALIDATE THE WARRANTY WITH
IMMEDIATE EFFECT
.
1. Documentation supplied with the machine
This manual contains important information regarding safety during the installation,
use and maintenance of the appliance.
To ensure that you obtain the maximum safety, hygiene
and performance, keep all the documents supplied in a safe place near the appliance and ensure that
they are available for consultation by all the personnel assigned to the installation, operation and
maintenance of the machine.
I Manual
This manual is divided into various sections and contains instructions covering the entire service
life of the appliance:
• installation reserved for qualified technicians
• use and maintenance addressed to the user
•
•
II Technical documentation
In addition to this manual, the following documents are supplied with the appliance:
• electrical circuit diagram
• layout diagram
2. General notes
The quality of this machine is ensured by the use of high-quality materials, construction
according to EC safety directives and by fully testing each appliance.
• Adherence to the recommendations contained in this manual
is essential for the safety
of the
installation and the user.
• The manufacturer, the dealer and the authorized service centers are available for any further
clarification regarding the use and installation of the appliance.
• The manufacturer reserves the right to make any modifications to the appliance deemed
necessary without prior notice.
Page 5
GENERAL INFORMATION
Page 3
3. Important safety notes
The appliance is designed for professional use and notwithstanding the manufacturer’s efforts to
simplify its operation, installation and maintenance, the appliance is
designed for operation by
trained personnel
in compliance with the manufacturer’s instructions. Do not allow children to
operate or play with the machine.
Failure to comply with the manufacturer’s instructions contained in the documentation
supplied with the machine may compromise the safety of the appliance and will render the
warranty void with immediate effect.
T
HE MANUFACTURER ACCEPTS NO LIABILITY FOR ANY DAMAGE TO OBJECTS OR
PERSONAL INJURY ARISING FROM FAILURE TO COMPLY WITH THE INSTRUCTIONS
PROVIDED
.
T
HE FOLLOWING OPERATIONS ARE EXPRESSLY PROHIBITED
:
• The installation or deinstallation, maintenance, adjustment, repair of the appliance or any other
type of operation which requires the removal of the protective panels, unless
carried out by
qualified and authorized personnel
in compliance with the manufacturer’s instructions; such
persons must always disconnect the machine from the electrical power supply and the water
supply before undertaking any such operation and take the necessary precautions if they exclude
the safety devices installed by the manufacturer.
•
Installations of an inferior standard or temporary nature
or any installation in which
adequate protection is not provided for the electrical power supply (e.g. fuses, main switch,
EARTH CONNECTION
) or the water supply (e.g. stop cock, waste trap).
•
Modifications or the installation of additional devices
which alter the operation of the
machine.
•
Use of non-original replacement parts
.
• Installation or repositioning in environmental conditions which do not comply with the
manufacturer’s prescriptions.
• Use of the appliance to wash items of a type or size other than that prescribed by the
manufacturer.
• Use of corrosive, impure or dry products in the dispensers.
The servicing and repair of the machine must be carried out by qualified and
authorized technicians only.
Page 6

GETTING TO KNOW YOUR MACHINE
Page 4
GETTING TO KNOW YOUR MACHINE
1. Control panel
[1] = Power on/off switch and pilot light»
[2] = Start button
[3] = “Wash cycle” pilot light
[4] = “Heating” pilot light
[5] = Cold rinse (optional)
[6] = Drain pump (optional)
[7] = Cycle selection (optional)
2. Installation data
For correct installation, follow all the instructions in the section “Installation”.
All the data necessary for correct installation of the appliance can be found on the data plate affixed
to the machine. A copy of this data plate is printed on the cover of this manual for quick reference.
The appliance must be installed correctl y in order to function properly. Installation of
the appliance should be carried out by qualified and authorized technicians only.
Page 7
INSTALLATION
Page 5
INSTALLATION
T
HE MANUFACTURER ACCEPTS NO LIABILITY FOR ANY DAMAGE TO OBJECTS OR
PERSONAL INJURY ARISING FROM INSTALLATIONS WHICH FAIL TO COMPLY WITH
THE INSTRUCTIONS PROVIDED
.
1. Glossary
In this document, the terms
Main switch, water supply stop cock
and
Drain line
are defined
as follows:
M
AIN SWITCH
:
Must be of the type which
disconnects all conductors of the supply circuit including the
neutral
, with a distance between the open contacts of at least 3 mm, incorporating a thermal
magnetic circuit breaker or fuses, to be sized or calibrated in accordance with the power rating
indicated on the appliance data plate.
The main switch must be located near to the installation and
must serve only one machine.
WATER SUPPLY STOP COCK:
This must be a slide, ball or gate stop valve
capable of rapid and complete shut-off of the water
supply
, of sufficient dimensions to ensure the flow rate and pressure indicated on the machine data
plate.
If the water supply pressure exceeds the prescribed maximum, a pressure regulator must be installed
upstream of the machine. If the supply pressure is below the prescribed minimum, a pressure
booster pump must be installed upstream of the machine.
If the temperature of the incoming water is below the recommended minimum, additional steps
must be taken to obtain good washing results (see chapter “USE AND MAINTENANCE”)
The stop cock must be installed on the water supply pipe near to and
immediately upstream of the
appliance
.
D
RAIN LINE
Must comprise an
open trap
of sufficient dimensions to discharge at least double the required
supply flow.
It must be installed within reach of the discharge pipe supplied with the machine without this being
subject to
tension, kinking or joints
.
Page 8
INSTALLATION
Page 6
2.
Unpacking the appliance
Before removing the packaging, check for any signs of damage, noting any defects found on the
carrier’s delivery note
After removing the packaging
inspect the appliance for signs of damage;
if damaged, notify your
dealer by fax or registered post immediately and, if the damage is such as to compromise the safety
of the machine,
do not
proceed with the installation until the appliance has been checked by a
qualified technician.
Packing materials (plastic bags, expanded pol ystyrene, nails, etc.) must not b e left within
reach of children and pets as they potentially very dangerous.
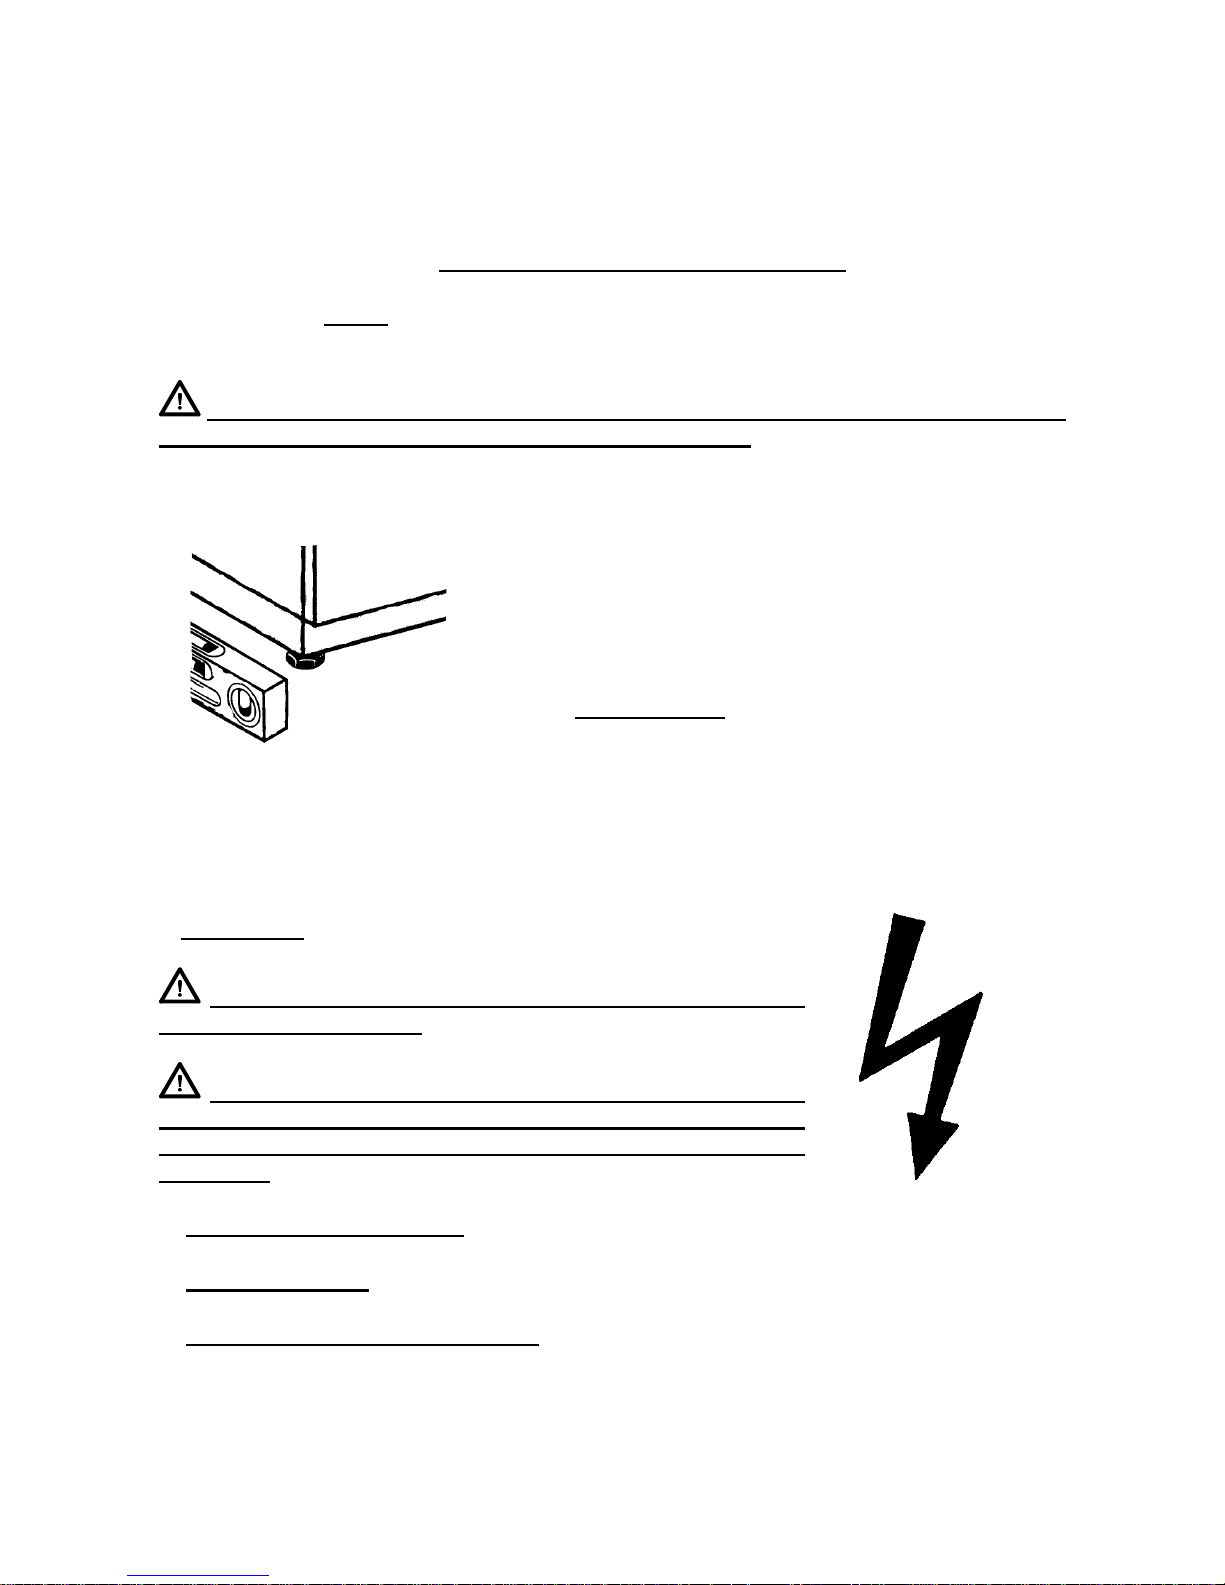
3. Positioning
Ensure that there are no objects or materials near the
installation site which could be damaged by water vapor or
splashes of detergent solution which might be produced by the
machine during operation.
The appliance must be leveled using the four adjustable feet so
that it is
perfectly stable
; any other type of installation must
be agreed and approved by the manufacturer.
4. Connections
I Electrical supply
A
Main Switch
must be provided for connection (see “Glossary”).
There must be an efficient EARTH CIRCUIT to which the
machine is to be connected
.
Do not use adapters, multiple sockets, cables of insufficient
cross-sectional area or with extension connections which do not
comply with specifications prescribed by EN 60335-1 and EN
60335-2-58.
•
The electrical power supply
must be compatible with the indications on the data plate. For
details on electrical operation consult the electrical circuit diagram.
•
The supply cable
must not be pulled or crushed during normal operation or routine
maintenance.
•
The equipotential bonding terminal
fixed to the body of the machine must be connected in
accordance with the requirements of standards EN 60335-1 and EN 60335-2-58 (using a cable
with a cross-sectional area of between 2.5 and 6 mm2)
Page 9

INSTALLATION
Page 7
II Water supply
A water supply pipe with a
“Stop cock”
(see “Glossary”) must be provided for each machine.
The water supply line must conform to the specifications indicated
in the section “Installation data”, even when other appliances are
connected to the supply line.
If the water supply system
is new or has not been used for a
prolonged period, run the water before connecting the
appliance
so as to eliminate any impurities or air pockets which
could soil or damage the machine.
Connect the filling solenoid valve to the stop cock with a flexible
pipe.
III Drain line
A suitable
“Drain line”
must be provided (see “Glossary”).
To ensure unrestricted discharge the pipe must reach the trap
without being put under tension,
kinked, crushed, pressed or forced.
(Model CLF 26 - supplied with Drain Pump as standard)
If the discharge pipe is connected to a trap in the floor, the
highest point of the pipe must be at least 300 mm above floor
level to prevent the machine from emptying.
The highest point of the discharge pipe should be less than 1
meter above floor level.
Page 10

INSTALLATION
Page 8
5. Dispenser settings
I Rinse-aid dispenser
Before starting the washing cycle, the dispenser and the delivery
pipe must be full.
Check that there is sufficient rinse-aid in t he container and top up
if necessary.
The rinse-aid container must never be allowed to empty
completely and must not be topped up with corrosive or impure
products.
The warranty does not extend to any damage arising from incorrect use of the dispenser.
The dispenser is
not
factory-set; the dispenser must be calibrated by a qualified technician.
The dispenser is calibrated by adjusting a screw which is
accessed by removing the front panel under the wash chamber
door.
With the panel removed, without pulling the connection pipe, fill
the delivery pipe with rinse-aid, and then fully close the adjuster
screw, without forcing.
To determine the dosage for the preliminary setting,
refer to the
information provided by the product manufacturer.
Once you have determined the required dosage, open the adjuster screw until this quantity is obtained.
Electric dispenser (DB-2)
One full turn of the adjuster screw is approximately equivalent to 0.06 grams of product per
dispenser pulse, given that when fully open (16 turns of the screw), the dispenser delivers 1
gram/pulse. If the machine has 3 pulses per cycle, it can thus dispense from a maximum 3x1=3
grams/cycle (16 turns of the screw) down to a minimum of 0.06x3=0,18 grams/cycle (1 turn of
the screw).
After this preliminary calibration, any subsequent adjustment is to be made on the basis of the
rinsing results obtained after at least 3 cycles.
Turn the screw counter-clockwise to increase and clockwise to reduce the dosage.
Bluish streaks on dishes and the formation of foam in the washing solution indicate too much rinse-
aid.
Drops of water on items and slow drying indicate too little rinse-aid.
In the event of imperfect washing, (at incorrect temperature or with too little detergent), an
invisible, non-toxic patina of grease or starch may form on the tableware. This patina will prevent
the rinse-aid from doing its job properly and in this case, increasing the dosage of the rinse-aid will
Page 11

INSTALLATION
Page 9
not lead to any significant improvement. To remove this patina, the tableware is to be left to soak in
a water and soap solution (10:1) for about 30 minutes and then washed again.
II Detergent dispenser (optional)
Never allow the detergent container to empty completely and
never top up with corrosive or impure products.
The warranty does not extend to damage arising from
incorrect use of the dispenser.
The detergent dispenser is factory-set; any subsequent adjustment
to the dispenser setting should carried out by a qualified
technician.
Refer to the dosage indicated by the detergent manufacturer
, taking into account:
• characteristics of the water in your area;
• the type of items to be washed: glass, plastic, ceramic, decorated or plain porcelain, metal,
cutlery or cooking utensils;
• type and quantity of food residue;
• intensity of use (number of wash cycles per hour ).
Electronic dispenser EV-400
Carefully clean the machine
.
Adjust the detergent potentiometer on the electronic control card (consult layout diagram), turning it
fully counter-clockwise to obtain zero detergent dosage.
Start a wash cycle, with no dishes in the machine, and allow the chamber to fill with water.
Page 12

INSTALLATION
Page 10
On completion of the filling cycle and before the wash cycle has
started, open the door and pour the previously determined quantity of
detergent into the chamber in the region of the wash pump suction
filter.
About 10 seconds after the start of the wash cycle, start turning the
potentiometer in a clockwise direction until you hear a buzzing which
indicates that the dispenser is delivering detergent to the chamber. At
this point the dispenser is calibrated to the previously determined
dosage.
Any subsequent adjustment to the dosage should be made on the basis of the results obtained after a
number of real wash cycles
(turn the potentiometer clockwise to increase the dosage and
counter-clockwise to decrease it.).
6. Operator training
The installer is required to
provide the users with suitabl e instruction on the operation of
the appliance and on th e safety precautions
. He/she must also give practical demonstrations of
the use of the appliance and ensure that he/she is in possession of all the documentation supplied
with the appliance.
Note that to obtain the best performance and longest service life from the appliance, it must be used
in accordance with the operating instructions
, which must be kept in a safe place,
with
particular attention to maintenance
(routine, periodic and major) and to periodic sanitation using
non-corrosive commercial products.
Page 13

USE AND MAINTENANCE
Page 11
USE AND MAINTENANCE
1. Safety notes
T
HE MANUFACTURER ACCEPTS NO LIABILITY FOR ANY DAMAGE TO OBJECTS OR
PERSONAL INJURY ARISING FROM FAILURE TO COMPLY WITH THE INSTRUCTIONS
PROVIDED
.
I Precautions
The correct operation and the service life of the appliance depend on external factors including
preventive maintenance
, the characteristics of the water supply and the products used for washing,
rinsing and cleaning.
Maintenance should be carried out at the recommended intervals and in the manner
prescribed.
The characteristics of the water supply (in particular the hardness and pressure) are the main factors
to be taken into consideration when deciding whether or not to install an additional rinse pump,
water softener, filters or purifiers to improve washing results or reduce detergent consumption.
Consult your installation technician
for advice.
II Safety
In case of malfunction, seek assistance from qualified and authorized technicians only.
Prior to all maintenance, adjustment, repair and cleaning operations and in the case of
malfunction,
always disconnect the appliance from the electrical power supply
at the external
main switch, and
shut off the water supply
at the supply tap.
Do not
clean the appliance using:
• pressurized water jets, as water could get into the electrical system and damage it;
• scouring pads, wire brushes or corrosive or abrasive cleaning products which could damage
surfaces and rubber parts.
A soft damp cloth with a small quantity of detergent is all that is required to get the appliance
perfectly clean.
III Warnings regarding use of the appliance
•
NEVER
open the door before the cycle has terminated and the machine has stopped to prevent
the possibility of splashes of alkaline washing solution being thrown out of the machine and to
allow the moving parts to come to a complete stop.
•
NEVER
climb or stand on any part of the appliance or use it as a support for objects or animals.
•
NEVER
overload the open door of a front-loading appliance; the door is only designed to
support the weight of the rack loaded with tableware.
•
NEVER
use the machine to wash items of a type, shape, size or material not compatible with
the manufacturer’s recommendations..
We recommend that you do not wash items which are not guaranteed suitable for dishwashers or
which are cracked or fragile through use.
Page 14

USE AND MAINTENANCE
Page 12
IV Hygiene
To ensure the hygiene of the machine, it is important to carry out the periodic
maintenance operations
indicated in the relative section of this manual. The appliance must also
be regularly
sanitized
using suitable non-corrosive commercial products.
The internal components of the appliance should be periodically cleaned and checked by a qualified
technician.
To ensure the
hygiene of the tableware
, apply the following basic rules:
•
remove dry or solid food particles
from items before washing;
•
change the washing solution
, in accordance with the number of cycles performed, but always
at
least three time a day
;
• to avoid contamination of clean tableware
do not use: rotary brushes, dish cloths or tea towels
which are not sterile
, or place washed items on sponge or other materials which may be
contaminated with bacteria.
Use disposable materials or draining racks
;
•
frequently clean all surfaces
where dishes may be placed, using commercial disinfectant
products.
2. Preparation of the machine
I Detergents
The type and quantity of detergen t used d etermine the w ash in g resu lts obtain ed from the
appliance and the length of its service life.
Detergents are not supplied with the appliance; we suggest that you contact a reputable detergent
manufacturer who can advise you on the type of detergent suitable for your particular requirements.
Use the dosage recommend by the detergent manufacturer; incorrect dosages may give
unsatisfactory results or cause unnecessary pollution.
To avoid damage to the appliance and to protect the environment, do not use corrosive or pollutant
products.
The appliance uses
two types of detergent
:
− Washing detergent
− Rinse-aid
Both powder and liquid products are available; only choose
low foaming industrial products.
Some detergents are age and temperature sensitive; these must not be stored for too long or in
very hot or cold ambient temperatures.
Detergents and rinse-aids are potentially hazardous chemical products.
NEVER immerse
you bare hands in the washing solution
; use protective gloves when necessary. In case of contact
with eyes, rinse with copious amounts of running water and seek medical assistance, indicating the
type of detergent..
II Checking the machine
Page 15

USE AND MAINTENANCE
Page 13
Before starting the machine, check that it has been installed correctly by a qualified
technician in compliance with all the indications contained in the documentation supplied
with the appliance.
Dispensers
for rinse-aid and detergent (optional)
Before starting the wash cycle, the dispensers and the
dispensing pipes must be full.
Check the levels of rinse-aid and detergent and top up if
necessary.
Never allow the rinse-aid and detergent containers to empty
completely. Do not top up with corrosive or impure products.
The warranty does not cover any damage or injury arising from the incorrect use of
dispensers.
3. First cycle
1. Turn on the external water stop cock.
2. Connect the power supply to the appliance by operating the external main switch.
3. Set the machine to “wash” mode by pressing switch [1]. The wash chamber will automatically
start to fill.
For appliances without detergent dispensers only.
Add detergent in the region of the pump suction filter every 5 cycles in
the amount recommended by the manufacturer. An average dosage
might be 1-2g/litre for powder detergents or double this amount for
liquid products. On first filling, and then at each subsequent changing
of the washing solution (at least three times per day), the dosage must
be sufficient for the amount of water in the chamber plus that used in
the next five rinses, as indicated in the section “installation data”. For
subsequent dosages only add the detergent required for the rinses.
4. Load the items to be washed into the racks: use racks suitable for the
type of item (long-stemmed glasses, tumbler, cups, ordinary plates,
large plates, cutlery, etc.) without overloading.
5. Remove large food particles; do not load dishes with dried-on or solid residue.
Page 16

USE AND MAINTENANCE
Page 14
6. Only load items which are guaranteed suitable for dishwashers and which are free from cracks.
7. Load the rack into the appliance and close the door.
8. Select the desired cycle with button [7]. Press button [2] to start the wash cycle.
9. Light [3] will illuminate to indicate that washing cycle is in progress.
If the door is accidentally opened during the washing cycle, the machine will stop
immediately. To resume the cycle from the point at which it was interrupted, simply re-
close the door.
Even though the cycle will stop immediately if the door is opened accidentally, some splashes
of alkaline washing solution may be thrown out of the appliance.
10. L Pilot light [3] switches off to indicate that the washing and rinsing phases have been
completed.
For appliances with the “cold rinse” option only.
If washed items are to be used immediately and require a cold rinse (beer glasses, ice
cream dishes), press button [5] for 10 - 20 seconds to perform a further rinse cycle
using fresh water drawn directly from the mains supply without heating.
11. Remove the rack immediately from the appliance to allow the items to dry properly.
12. When removing the tray, tilt it slightly to allow excess water to drain from the dishes.
13. Leave the dishes in the rack for a few seconds to allow the last drops of water to
evaporate.
14. Remove the items from the rack. Ensure that your hands and the surfaces where the items
are placed are perfectly clean to prevent contamination of the washed items.
4. Subsequent cycles
Check the washing solution
; if it is too dirty or the filters are clogged with residue from previous
washes:
• empty the wash chamber as described in the section “Emptying the machine”;
• clean the machine as described in the section “Maintenance”;
• renew the washing solution.
The washing solution must in any event be renewed at least
three times per day.
Page 17

USE AND MAINTENANCE
Page 15
For appliances without detergent dispensers only.
If five cycles have already been performed, add detergent in the
region of the washing pump suction filter in the amount indicated
by the detergent manufacturer and the installation manual.
Follow the instructions given for the first wash cycle from point 6 “Load the items to be washed
into the racks” onwards.
5. Emptying the machine
I Appliances without drain pumps
Switch off the machine at the power on/off switch [1].
Remove the overflow plug from the machine and wait until the chamber is completely
empty before proceeding to clean as described in the section “Maintenance”.
II Appliances with drain pumps
To drain the machine:
I. Clean the filters.
II. Remove the overflow plug.
III.Press the “drain pump” button [6] to drain, releasing it when the chamber is empty.
6. Before the daily shutdown
• Remove the overflow plug and empty the machine as described in the section “Emptying the
machine”.
• Clean the machine as described in the section “Maintenance”.
• Switch the machine off at the power on/off switch [1]
•
Disconnect the power supply to the machine
at the external main switch.
•
Turn off the external water stop cock
.
• Leave the door slightly ajar to prevent unpleasant odors forming in the chamber.
7. Maintenance
I Daily maintenance
The following operations are to be carried out
two or three times a day
when residue
accumulates around the chamber filter.
•
Drain
the water off completely as described in the section “Emptying the machine”.
•
Disconnect the power supply at the external main switch
.
•
Turn off the external water stop cock
.
• Remove the racks, filters and overflow plug from the chamber.
Page 18

USE AND MAINTENANCE
Page 16
• Clean the machine using a damp rag with a little detergent.
•
Do not use
scouring pads, wire brushes or abrasive cleaning products to clean the steel
surfaces.
If the machine is not to be used for a period, leave the door slightly ajar to prevent unpleasant odors
from forming.
II Periodic maintenance
The following operations are to be carried out
every two or three days
, after routine maintenance.
Remove and clean the wash and rinse arms
as shown below:
• Unscrew the ring nut and pull off the wash and rinse arms.
Thoroughly clean the chamber and the machine
, using a non-abrasive disinfectant product.
Refit the nozzles and arms, taking care to insert the arms properly in their respective mountings.
Refit all the filters.
III Major maintenance
Once a year
, or whenever limescale deposits are noted in the machine, call a
specialist technician
to:
• Remove limescale deposits from the chamber and heating elements.
• Dismantle and thoroughly clean the wash and rinse arms/nozzles.
• Check the condition of the seals and other components subject to wear such as pumps.
dispensers, level switches and programmers and replace parts when necessary.
• Adjust the settings of the rinse-aid dispenser and detergent dispenser (optional).
When the appliance is to remain
idle for a long period
, apply Vaseline oil to the steel surfaces
and call a
specialist technician to prepare the water circuits and the dispensers for storage.
.
If you suspect that
ice
may have formed in the appliance,
DO NOT USE IT
until
a qualified technician has inspected the boiler and the pipes.
Page 19

USE AND MAINTENANCE
Page 17
8. Solutions to the most common problems
I Dishes not clean
P
ROBLEM
R
EMEDY
Wash arms stuck. The arms should rotate easily by hand. Pull arms off and clean
carefully. Check and clean the arms supply pipe in the
machine.
Nozzles of spray arms obstructed Remove the spray arms and clean carefully to remove
obstructions.
Nozzles of rinse arms clogged with limescale Pull off the rinse arms and descale in a separate c ontainer.
Check that the water softener is operating correc tly (if fitted).
Too much or too little detergent. Check detergent dosage, referring to relative section in this
manual.
Filter clogged Remove, empty and clean filte r
Wash cycle too short. Select a longer cycle if possible, or repeat the cycle.
II Dishes not perfectly dry
P
ROBLEM
R
EMEDY
Too little rinse-aid Increase dosage (see instructions).
Grease or starch not completely removed Too little detergent. Incre ase dosage as per instructions in
relative section of this manual.
Wrong type of detergent Choose a more effective product.
Washing solution too dirty. Drain the wash chamber, clean filters and chamber. Remove
more residue prior to washing.
Rack unsuitable for type of tableware. Use a suitable rack and allow water to drain from tableware.
Tableware left in machine after c y cle has finished. Remove from machine immediately after the cycle finishes to
allow to dry.
Glassware surface rough and porous, or opaque
through corrosion.
Renew glasses and use suitable racks. Glasses should be
prevented from coming into contact with each other during the
wash cycle.
Streaks and spots on tableware. Too much rinse-aid. Reduce the dosage (see instructions).
Water too hard or containing too high a
concentration of dissolved minerals.
Ask local water board for information about water quality and
compare with values indicated on the machine’s data plate
Page 20

USE AND MAINTENANCE
Page 18
III Water softener(Optional)
P
ROBLEM
R
EMEDY
Excess salt in rinse water.
Salt left in container af ter regeneration.
Only fill container
immediately before starting the regeneration cycle with the
quantity of salt indicated in the ope rating instructions.
Wrong size salt grains.
Use salt with a grain size of 1 - 2 mm
Excessive salinity after resin regeneration.
External water softener.
Rinse the resin at the end of the
regeneration cycle, draining the water container in the water
softener.
Built-in water softener.
Salt container cap not fully tig htened.
Open container, remove salt usi ng hot water, replace cap and
screw on tightly..
Limescale deposits in machine
Regeneration not performed correctly at right time.
perform two or three consecutive regeneration cycles, adding
salt each time.
Descale the machine.
Water supply filter clogged.
Clean or, if necessary, replace
with a higher capacity filter.
IV Miscellaneous problems
P
ROBLEM
R
EMEDY
Tableware broken by impact during wash cycle. Use suitable racks for the type of tableware and do not
overload.
Machine stops in middle of cycle. Machine interconnected with other appliances. Provide
separate power supply for the machine with a switch or fuses
suitably rated for the current indicated on the data plate.
If the problem recurs, have the system checked by a qualified
electrician.
Machine fails to start after a period of inactivity. Have a qualified technician turn the pump motor over using
the splines on the opposite end of the shaft to the pump
impeller.
The cycle does not stop when the door is opened. Have a qualified technician repair the door safety switch and
check the magnetic contact and its circuit.
Page 21

D
M6
109
139
Y7
E
B11
C2
M4
109
FG
A
B
B
B
F
Y5
109
N01
123
M3
S3
151
102
109
151
N03
N02
C
N03
E1 E3
B3
PE
N
L3
L2
BRBK
201
204
203
205
202
B1
H4
N01
122
116
114
115
110
137
101
BL
L1
C1
ML
K11
B10
B5
S1
MV
K4
A1
1
K4 A1 A1M1Y2 H3
116
A1
2
3
A1
4
A1K4 S16
F1
109
K4
120
122
N01
111
116
116
122
K11
BK
Z1
K11
206
103
N02
Z1
116
109
Y4H1
S14
S14
YE-GR
F10
150
121
108
109
102
102
P
P P
ML
20'
MV
60"
1234
Fragnan L.
Ersetzt
Supds. dwg.
Remplace
Sostit. il
File
File
File
File
Datum
Date
Date
Data
Gezeichn
Dwn.by
Dessine
Disegn.
Mod.
Mod.
Mod.
Mod.
Zeichnungh n.
Drawing n.
Dessin n.
Disegno n.
784MANON.CAD 13-06-2001
CLF 26
.
784/Sc
BR
BL
NL3L2L1PE
D
With detergent pump
Mit dosiergeraet reiniger
Avec doseur produit de lavage
Con dosatore detergente
E
With break tank
Mit break tank
Avec break tank
Con break tank
G
With DB2
Mit DB2
Avec DB2
Con DB2
With drain pump
Mit umwaelzpumpe
Avec pompe de vidange
Con pompa scarico
F
C
B
A
Without drain pump
Ohne umwaelzpumpe
Sans pompe de vidange
Senza pompa scarico
Without break tank
Ohne break tank
Sans break tank
Senza break tank
With regeneration
Mit regenerieren
Avec regeneration
Con rigenerazione
MARRONEBRAUNBROWN MARRONBR
BLUBLAU BLEUBLUEBL
I
NERO
GIALLO-VERDE
D
SCHWARZ
JAUNE-VERSYELLOW-GREEN
NOIRBLACK
GB F
BK
BK
BL
BR
BK201
N01
101
BK
BRBLBK
2"
60"/180"
2"2"
17"
2
3
4
1
POWER
SUPPLY
INSIDE
MACHINE
OUTSIDE
MACHINE
230V ~230V 3~
N
N
PE
L1
L2
L3
L3L2L1PE
YE-GRYE-GR
GELB-GRUENYE-GR
BK
BL
BR
BK201
N01
101
BK
BRBLBK
400V 3N~
NL3L2L1PE
YE-GRYE-GR
BK
BL
BR
BK201
N01
101
BK
BRBLBK
NL3L2L1PE
YE-GRYE-GR
230V ~
201
N01
101
Page 22

GB D F I E P
A1 Cycle timer Programmschaltwerk Programmateur de cycle Timer ciclo Programador de ciclo Programador ciclo
B1 Boiler thermostat
Temperaturbegrenzer
Durchlauferhitzer
Thermostat surchauffeur Termostato boiler Termostato del calderin Regolador de temperatura caldeira
B3 Tank thermostat Tanktemperaturbegrenzer Thermostat cuve Termostato vasca Termostato del deposito Regolador de temperatura tanque
B5 Door switch Reed- Türsicherheitkontaktschalter Micro contact de porte Micro porta Interruptor de puerta Micro-interruptor porta
B10 Tank level control Tankniveauschalter Pressostat de cuve Controllo livello vasca Interruptor del nivel en la cuba Interruptor de nivel tanque
B11 Air gap level control "Air Gap" Niveauschalter Pressostat niveau "Air Gap" Controllo livello "Air Gap" Comprobación de nivel "Air Gap" Interruptor de nivel "Air Gap"
C1 Wash pump noise filter Fünkenstörfilter Umwälzpumpe Condensateur pompe de lavage Condensatore pompa lavaggio Condensador bomba de lavado Condensator bomba lavagem
C2 Rinse booster pump noise filt.
Fünkenstörfilter
Drucksteigerungspumpe
Condensateur pompe auxiliaire Condensatore pompa ausiliaria
Condensador bomba de aumento
presion
Condensator bomba do aumento de
pressão
E1 Boiler heating element Heizkörper Durchlauferhitzer Resistance du surchauffeur Resistenza boiler Resistencia del calderin Resisténcias caldera
E3 Tank heating element Tankheizung Resistance de cuve Resistenza vasca Resistencia de la cuba Resisténcia cuba
F1 Boiler safety thermostat
Durchlauferhitzer
Temperaturbegrenzer
Thermostat securite surchauffeur Termostato sicurezza boiler Limitador de temperatura del calderin Rgolador de temperatura caldera
F10 Tank level safety switch Überlaufschutz Tankniveauschalter Pressostat de contrôle niveau Cuve Sicurezza livello vasca Interruptor de nivel agua en la cuba Segurança de nivel tanque
H1 Power lamp Netz Kontrolleuchte Voyant reseau Spia di linea Lámpara de piloto alimentación Làmpada indicadora tenção
H3 Cycle lamp Spülprogramm Kontrolleuchte Voyant de cycle Spia ciclo Lámpara de piloto ciclo Làmpada indicadora ciclo
H4 Heating lamp Heizkörper Kontrolleuchte Voyant de chauffage Spia riscaldamento Lámpara de piloto calefacción Làmpada indicadora aquecimento
K4 Door security relay Türsicherheit Relais Relais securite de porte Relè sicurezza porta Relé de de segurancia puerta Relé de segurança porta
K11 Heating control relay
ReIais Versorgung Heizkörper (evt.
Schütz)
Relais contrôle chauffement Relè controllo riscaldamento Relé limitador de temperatura Relé limitador de temperatura
M1 Wash pump motor Motor UmwäIzpumpe Moteur pompe lavage Motore pompa lavaggio Motor bomba lavado Motor bomba de lavagem
M3 Drain pump motor Motor Laugenpumpe Moteur pompe vidange Motore pompa scarico Motor bomba de desagüe Motor bomba de esgoto
M4 Rinse booster pump motor Motor Drucksteigerungspumpe Moteur pompe auxiliaire Motore pompa ausiliaria
Motor bomba para aumentar la
presión
Motor bomba de enxágue
M6 Detergent pump motor Dosiergerät Reiniger Moteur pompe produit lavage Dosatore detergente Dosificador por el detergente Doseador de detergente
S1 Start cycle push button START- Taste SpüIprogramm Poussoir mise en cycle Pulsante avvio ciclo Pulsador de principio ciclo Botões arranque ciclo
S3 Drain push button Taste Laugenpumpe (EntIeeren) Poussoir pompe vidange Pulsante pompa scarico Pulsador bomba de desagüa Botões bomba de esgoto
S14 Machine main switch
UmschaIter Betriebs / RuhesteIIung Regenerieren
Sélecteur lavage / arrêt - regeneration
Deviatore servizio / riposorigenerazione
Conmutadore conex. / desconex regeneración
Comutador arranque / interrupçáo-
regeneração
S16 Wash time selector WahIschaIter Spülprogrammdauer Sélecteur durée cycle Selettore tempi Selector de tiempo de lavado
Manipulo para selecionar o tempo do
ciclo
Y2 Rinse agent dispenser Dosiergerät KIarspüImittei DB2 Doseur produit rinçage Dosatore brillantante Dosificador líquido tensioactivo Doseador do produto de enxágue
Y4 Fill / hot rinse solenoid valve
EIektromagnetventiI Füllen /
Klarspülung warm
Electrovanne remplissage Elettrovalvola carico / risciacquo caldo
Válvula magnetica de entrada /
enjuague caliente
Válvula magnetica de entrada /
enxague quente
Y5 Regeneration solenoid valve EIektromagnetventiI Regenerieren Electrovanne regeneration Elettrovalvola rigenerazione Válvula magnetica de regeneración Válvula magnetica de regeneração
Y7 Break tank solenoid valve
NiveaueIektromagnetventiI für "Air
Gap"
Electrovanne niveau "Air Gap" Elettrovalvola livello "Air Gap" Válvula magnetica de "Air Gap" Válvula magnetica de "Air Gap"
Z1 Interference suppression filter Funkenstörfilter Filtre antiparasite Filtro antidisturbo Filtro antiparasitario Filtro de ruídos
CLF 26
Page 23

DISHWASHER TECHNICAL SPECIFICATIONS
CHG25 CHF40 CHH50 CLG25 CLF26
Drain size 20MM 22MM 50MM 18MM 22MM
Drain hose length 2,5M 1,5M 1,80M 1,5M 1,5M
Water connection 3/4" 3/4" 3/4" 3/4" 3/4"
Water hose length 1,5M 1,5M 2M 1,5M 1,5mt
Water pressure 1-4BAR 1-4BAR 1-4BAR 1-4BAR 1-4BAR
Water temp 50-55C 15-55C 15-55C 50-55C 50-55C
Total KW loading 3P N/A N/A 6.8KW N/A N/A
Total KW loading 1P 2,85KW 2,7KW/6,7KW 4.8KW 2,85KW 2,7KW/6,7KW
Mains cable length 3,0M 3,0M 1,60M 3,0M 3,0M
Mains cable size 3x1,5mm 3x4mm 5x2,5mm 3x1,5mm 3x4mm
Det pipe length N/A 1,50M 1,50M 1,50M
R/aid pipe length 1,50M 1,50M 1,50M 1,50M 1,50M
Programme times. secs 150 60-120-180 60-120-180 150 60-180
Wat/consumption,cycle 2,6L 3,3L 3L 2,6L 3.3L
W/tank capacity 11L 33L 20L 11L 33L
R/tank capacity 2.6L 6L 12L 2.6L 6L
Drain pump YES YES NO NO YES
W/pump rating 0.15kw 0.8KW 0.8KW 0.15KW 0.8KW
W/pump flow rate 105L/min 330L/min 380lt/min 105L/min 330L/min
R/pump rating 0,45KW 0,45KW 0,15kw 0,45KW 0,45KW
R/pump flow rate 11L/min 11L/min 36L/min 11L/min 11L/min
Voltage 3P N/A N/A 400/50/3/N N/A N/A
Voltage 1P 230/50/1 230/50/1 230/50/1 230/50/1 230/50/1
Noise level(dB) 63db 67db 66dB 63db 67db
Rinse time 15 sec 17 sec 15 sec 17 sec 17 sec
Page 24

As continued product improvement is a policy of HOBART, specifications are subject to change without notice.
Ce catalogue n’est pas contractuel. HOBART se réser ve le droit, et sans préavis, d’apporter toutes modifications
ou améliorations à ses matériels.
HOBART behält sich das Recht vor, an allen Produkten technische Änderungen und Verbesserungen ohne
Ankündigung vorzunehmen.10.03.2003-Issue-1
 Loading...