

Page 1

DigitalTVRecorder
Model
HDR081
Instructionmanual
Toobtainthebestperformanceandensureyearsof
trouble-freeuse.pleasereadthisinstructionmanual
completely.
Page 2

INDEX
IMPORTANT SAFEGUARDS ............................................................................................................................................................2
SOME DOS AND DON'TS ON THE SAFE USE OF EQUIPMENT ..................................................................................................6
POWER CORD (MAINS LEAD) ........................................................................................................................................................7
SAFETY PRECAUTIONS..................................................................................................................................................................7
GENERAL PROPERTIES..................................................................................................................................................................8
CONTENTS OF PACKAGING...........................................................................................................................................................8
REMOTE CONTROL .........................................................................................................................................................................9
GETTING STARTED .........................................................................................................................................................................9
FRONT AND BACK PANEL ............................................................................................................................................................10
CONNECTION DIAGRAMS.............................................................................................................................................................11
REMOTE CONTROL LAYOUT .......................................................................................................................................................12
REMOTE CONTROL FUNCTIONS .................................................................................................................................................13
MENU INTERFACE .........................................................................................................................................................................14
FIRST TIME INSTALLATION ..........................................................................................................................................................14
MAIN MENU.....................................................................................................................................................................................14
1. CHANNEL LIST ...........................................................................................................................................................................14
1.1. NAVIGATING CHANNEL LIST .................................................................................................................................................15
1.2. DELETING CHANNEL..............................................................................................................................................................15
1.3. EDIT CHANNELS .....................................................................................................................................................................15
1.4. ADDING LOCKS TO CHANNELS ............................................................................................................................................15
1.5. SETTING FAVOURITE LIST ....................................................................................................................................................15
2. PROGRAMME GUIDE (7 DAYS EPG)........................................................................................................................................16
3. TIMERS........................................................................................................................................................................................16
4. RECORDINGS LIBRARY ............................................................................................................................................................17
4.1. PLAY OPTIONS........................................................................................................................................................................18
4.1.1. PLAY FROM START .............................................................................................................................................................18
4.1.2. RESUME................................................................................................................................................................................18
4.1.3. PLAY FROM OFFSET...........................................................................................................................................................18
4.1.4. MANAGE CHAPTERS...........................................................................................................................................................18
4.1.5. CREATE ARCHIVE (ARCHIVE MANAGEMENT).................................................................................................................18
EDIT RECORDINGS .......................................................................................................................................................................18
MAIN TITLE .....................................................................................................................................................................................19
RECORDING TITLE ........................................................................................................................................................................19
4.2. CHAPTER OPTIONS................................................................................................................................................................20
4.2.1. CREATE NEW CHAPTER MARK .........................................................................................................................................20
4.2.2. FORWARDS TO NEXT CHAPTER .......................................................................................................................................20
4.2.3. BACK TO START OF CHAPTER ..........................................................................................................................................20
4.2.4. BACK TO PREVIOUS CHAPTER .........................................................................................................................................20
5. SETUP .........................................................................................................................................................................................21
5.1. RECORDINGS..........................................................................................................................................................................21
5.1.1. MAX TIMESHIFT ...................................................................................................................................................................21
5.1.2. AUTO DISCARD....................................................................................................................................................................21
5.1.3. FORMAT DISK ...............................................................................................................
5.1.4. HARD DISK INFO..................................................................................................................................................................22
Recording Format ............................................................................................................................................................................23
Unrecordable Material......................................................................................................................................................................23
Hard Disk Operation (Recording / Playback / Time Shift Recording)..............................................................................................23
5.2. CONFIGURATION....................................................................................................................................................................24
5.2.1. TV TYPE ................................................................................................................................................................................24
5.2.2. TV OUT ..................................................................................................................................................................................24
5.2.3. VCR OUT ...............................................................................................................................................................................24
5.2.4. FAVOURITE MODE...............................................................................................................................................................24
5.2.5. CHANNEL LIST .....................................................................................................................................................................24
5.2.6. SCAN ENCRYPTED CHANNELS .........................................................................................................................................24
5.2.7. RECEIVER UPGRADE - OAD...............................................................................................................................................25
5.2.8. PARENTAL CONTROL .........................................................................................................................................................25
5.2.8.i. MENU LOCK ........................................................................................................................................................................25
5.2.8.ii. SET PIN ..............................................................................................................................................................................25
5.3. LANGUAGE ..............................................................................................................................................................................26
5.4. INSTALLATION ........................................................................................................................................................................26
5.4.1. AUTOMATIC CHANNEL SCAN ............................................................................................................................................26
5.4.2. MANUAL CHANNEL SCAN...................................................................................................................................................26
5.4.3. FIRST TIME INSTALLATION ................................................................................................................................................27
6. MESSAGES.................................................................................................................................................................................27
7. SPECIFIC FUNCTIONS OF REMOTE CONTROL .....................................................................................................................27
TIME SHIFTING (PAUSE LIVE RECORDING) ...............................................................................................................................29
8. TROUBLE SHOOTING GUIDE ...................................................................................................................................................30
9. TECHNICAL SPECIFICATIONS .................................................................................................................................................31
10. UK GUARANTEE.......................................................................................................................................................................33
11. IMPORTANT NOTICE: ..............................................................................................................................................................34
DIGITAL SWITCHOVER AND YOUR TV EQUIPMENT .................................................................................................................34
.......................................................22
1
Page 3

IMPORTANT SAFEGUARDS
CAUTION: Please read all of these instructions before you operate this product and save these
instructions for later use.
Electrical energy can perform many useful functions. This product has been engineered and
manufactured to assure your personal safety. BUT IMPROPER USE CAN RESULT IN POTENTIAL
ELECTRICAL SHOCK OR FIRE HAZARDS. In order not to defeat the safeguards incorporated in this
product, observe the following basic rules for its installation, use and servicing.
1. Power Supply
The receiver should be plugged into a 220 - 240V AC 50Hz supply only.
2. Leads
Ensure the power supply lead, and all other leads are positioned so they are not likely to be walked on
or pinched by objects placed on or against them. Pay particular attention to the power lead, where it
enters the mains plug and where is comes out of the receiver. Do not connect or adjust leads when
the receiver is plugged in.
3. Battery Disposal
Please ensure that exhausted batteries from the remote control handset are disposed of safely in
accordance with local government rules.
4. Read Instructions
All the safety and operating instructions should
be read before the product is operated.
5. Retain Instructions
The safety and operating instructions should be retained for future reference.
6. Heed Warnings
All warnings on the product and in the operating instructions should be adhered to.
7. Follow Instructions
All operating and use instructions should be
followed.
8. Cleaning
Unplug this product from the wall outlet before cleaning. Do not use liquid cleaners or aerosol
cleaners. Use a damp cloth for cleaning.
9. Attachments
Do not use attachments not recommended by the product manufacturer as they may cause hazards.
10. Water, Moisture and Temperature
Do not use this product near water, for example: near a bath tub, wash bowl, kitchen sink, or laundry
tub, in a wet basement, or near a swimming and the like.
Do not leave or use the receiver in a hot, cold or humid area. Do not allow the receiver to get wet from drips or splashes - as this may be dangerous. Do not place water filled objects such as flower
vases on the top of the receiver.
11. Accessories
Do not place this product on an unstable cart, stand, tripod, bracket, or table. The product may fall,
causing serious injury to a child or adult, and serious damage to the product. Use only with a cart,
stand, tripod, bracket, or table recommended by the manufacturer, or sold with the product. Any
mounting of the product should follow the manufacturer’s instructions, and should use a mounting
accessory recommended by the manufacturer.
12. Transportation
A product and cart combination should be moved with care. Quick stops, excessive force,
and uneven surfaces may cause the product and cart combination to overturn.
2
Page 4

13. Ventilation
Slots and openings in the cabinet are provided for ventilation to ensure reliable operation of the
product and to protect it from overheating, and these openings must not be blocked or covered. The
openings should never be blocked by placing the product on a bed, sofa, rug, or other similar surface.
This product should not be placed in a built-in installation such as a bookcase or rack unless proper
ventilation is provided or the manufacturer’s instructions have been adhered to.
14. Power Sources
This product should be operated only from the type of power source indicated on the marking label. If
you are not sure of the type of power supply to your home, consult your product dealer or local power
company. For products intended to operate from battery power, or other sources, refer to the operating
instructions.
15. Grounding or Polarization
This product is provided with one of the following types of plugs. If the plug should fail to fit into the
power outlet, please contact your electrician. Do not defeat the safety purpose of the plug.
a. Two-wire type (mains) plug.
b. Three-wire grounding type (mains) plug with a grounding terminal. This plug will only fit into a
grounding type power outlet.
16. Power-Cord Protection
Power-supply cords should be routed so that they are not likely to be walked on or pinched by items
placed upon or against them, paying particular attention to cords at plugs, convenience receptacles,
and the point where they exit from the product.
17. Lightning
For added protection for this product during a lightning storm, or when it is left unattended and unused
for long periods of time, unplug it from the wall outlet and disconnect the cable system. This will
prevent damage to the product due to lightning and power-line surges.
18. Overloading
Do not overload wall outlets, extension cords, or integral convenience receptacles as this can
result in a risk of fire or electric shock.
19. Object and Liquid Entry
Never push objects of any kind into this product through openings as they may touch dangerous
voltage points or short-out parts that could result in a fire or electric shock. Never spill liquid of any
kind on the product.
20. Servicing
Ensure the person who services your receiver is qualified to do so. Do not remove the cover yourself
as you could get an electric shock. We are proud to offer a high-quality product. To keep this level of
quality, your receiver should be serviced at an authorised service centre.
21. Damage Requiring Service
Unplug this product from the wall outlet and refer servicing to qualified service personnel under the
following conditions:
a. When the power-supply cord or plug is damaged.
b. If liquid has been spilled, or objects have fallen into the product.
c. If the product has been exposed to rain or water.
d. If the product does not operate normally by following the operating instructions. Adjust only
those controls that are covered by the operating instructions, as an improper adjustment of other
controls may result in damage and will often require extensive work by a qualified technician to restore
the product to normal operation.
e. If the product has been dropped or damaged
in any way.
f. When the product exhibits a distinct change in performance, this indicates a need for service.
• Microsoft® and Windows® are registered
and/or other countries.
trademarks of Microsoft Corporation in the United States
3
Page 5

• PC/AT is a registered trademark of International Business Machines Corporation in the United
States.
• Macintosh® is a registered trademark of Apple Computer, Inc. in the United States and/or other
countries.
• All other company or product names are trademarks or registered trademarks of their respective
companies.
• Some IC chips in this product include confidential and/or trade secret property belonging to Texas
Instruments. Therefore you may not copy, modify, adapt, translate, distribute, reverse engineer,
reverse assemble or discompile the contents thereof.
22. Replacement Parts
When replacement parts are required, be sure the service technician has used replacement parts
specified by the manufacturer or have the
same characteristics as the original part. Unauthorized substitutions may result in fire, electric shock,
or other hazards.
23. Safety Check
Upon completion of any service or repairs to this product, ask the service technician to perform safety
checks to determine that the product is in proper operating condition.
24. Wall or Ceiling Mounting
This product should be mounted to a wall or ceiling only as recommended by the manufacturer.
25. Heat and Flames
The receiver should not be placed near to naked flames or sources of intense heat, such as an electric
fire. Ensure that no naked flames sources, such as lighted candles are placed on top of the receiver.
4
Page 6

WARNING
This symbol on the product or in the instructions means that your
electrical and electronic equipment should be disposed at the end of
life separately from your household waste. There are separate
collection systems for recycling in the EU.
For more information, please contact the local authority or your
retailer where you purchased the product.
5
Page 7

SOME DOS AND DON'TS ON THE SAFE USE OF EQUIPMENT
This equipment has been designed and manufactured to meet international safety standards but, like
any electrical equipment, care must be taken if you are to obtain the best results and safety is to be
assured.
**************
DO read the operating instructions before you attempt to use the equipment.
DO ensure that all electrical connections (including the mains plug, extension leads and inter-
connections between the pieces of equipment) are properly made and in accordance with the
manufacturer's instructions. Switch off and withdraw the mains plug before making or changing
connections.
DO consult your dealer if you are ever in doubt about the installation, operation or safety of your
equipment.
DO be careful with glass panels or doors on equipment.
DO route the mains lead so that it is not likely to be walked on, crushed, chafed, or subjected to
excessive wear and tear or heat.
**************
DON'T remove any fixed cover as this may expose dangerous voltages.
DON'T obstruct the ventilation openings of the equipment with items such as newspapers, tablecloths,
curtains, etc. Overheating will cause damage and shorten the life of the equipment.
DON'T allow electrical equipment to be exposed to dripping or splashing, or objects filled with liquids,
such as vases, to be placed on the equipment.
DON'T place hot objects or naked flame sources such as lighted candles or nightlights on, or close to
equipment. High temperatures can melt plastic and lead to fires.
DON'T use makeshift stands and NEVER fix legs with wood screws - to ensure
complete safety always fit the manufacturer's approved stand or legs with the fixings
provided according to the instructions.
DON'T use equipment such as personal stereos or radios so that you are distracted from
the requirements of traffic safety. It is illegal to watch television whilst driving.
DON'T listen to headphones at high volume, as such use can permanently damage your
hearing.
DON'T leave equipment switched on when it is unattended unless it is specifically stated
that it is designed for unattended operation or has a stand-by mode. Switch off using the
switch on the equipment and make sure that your family know how to do this. Special
arrangements may need to be made for infirm or handicapped people.
DON'T continue to operate the equipment if you are in any doubt about it working
normally, or if it is damaged in any way - switch off, withdraw the mains plug and consult
your dealer.
ABOVE ALL
--- NEVER let anyone especially children push anything into holes, slots or any other opening
in the case - this could result in a fatal electrical shock;
--- NEVER guess or take chances with electrical equipment of any kind
--- it is better to be safe than sorry!
6
Page 8

POWER CORD (MAINS LEAD)
Do not place the product where a piece of furniture or other heavy object could trap the power cord
(mains lead). Handle the power cord by the plug. Do not pull out the plug by tugging the cord and
never touch the power cord when your hands are wet as this could cause a short circuit or electric
shock. Never make a knot in the cord or tie it with other cords. The power cords should be routed in
such a way that they are not likely to be stepped on. A damaged power cord can cause fire or give you
an electrical shock. Check the power cord periodically to see if it is damaged. If it is damaged, please
ask an approved service agent to replace it.
For your own safety read following instructions carefully before attempting to connect this device to the
mains.
This unit is designed to operate on a 220V-240V AC - 50Hz supply only. Connecting it to other power
sources may damage it. Ensure that the supply corresponds to the information on the rating label on
the bottom of the unit.
This digital terrestrial receiver is supplied with a moulded mains plug. This plug must not be cut off as
it may contain a special radio interference filter, the removal of which could lead to impaired performance. If you wish to extend the lead, obtain an appropriate safety approved extension lead or
consult your dealer.
Observe the manufacturers instructions when connecting extension leads to the set. Check the fuse
rating on the new plug, this should be fitted with a 5 Amp fuse which conforms to either ASTA or BSI
(BS1362) approvals, these are easily identifiable by either the
symbols. If you are in any doubt about the installation of an extension lead, please consult a
competent electrician.
This symbol means that this unit is double insulated. An earth connection is not required.
CAUTION
To prevent electric shock, do not remove the cover. No user servicable parts inside. Refer servicing to
qualified service personnel. Disconnect from the mains supply before cleaning.
or
SAFETY PRECAUTIONS
Power Source.
This unit should only be connected to a 220-240V AC 50-60 Hz power supply. Do not connect to any
other supply.
Power Lead.
Do not place the lead where it may be stepped on or tripped over. Do not place heavy objects on the
lead. If the lead becomes cut or damaged, please disconnect the unit from the mains supply.
The mains plug or the appliance coupler is used as the disconnect device, the disconnect device shall
remain readily operable.
Location.
Place on a solid base such as a shelf or in a TV cabinet or similar. Do not place near heat sources
such as radiators, fires or similar.
Do not block ventilation holes or place in a location that does not allow a free airflow.
Do not place the unit near water or in high humidity areas. Avoid splashing. If the unit does get wet
please call an approved service agent.
Apparatus shall not be exposed to dripping or splashing and no objects filled with liquids, such as vases,
shall be placed on the apparatus.
7
Page 9

GENERAL PROPERTIES
1. Menu Language : English
2. Channel lock, Menu lock
3. Channel list sorted by D-book logical channel numbers.
4. Channel list name editing option.
5. BBC UK Compliant Over Air Download.
6. PIP (Picture in picture)
7. Time shift – pause live TV.
8. One button record (Instant recording of channels).
9. Dual recordings at the same time.
10. Once, daily, weekly programmed event recordings.
11. Ability to record one channel while watching another channel.
12. X1/4, X1/2, X1, X2, X4, X8, X16, X32 forward and backward play options.
13. Play list shows available recordings (Event name, Start time, Duration, delete/playback
permission)
14. Timers list shows scheduled recordings (Event name, Start time, Duration, once/daily/weekly
repeat, change/delete/playback permission)
15. Record timer via 7 day EPG
16. Records DVB subtitles (If any are broadcasted by the broadcaster).
17. Automatic/Manual channel search.
18. Guided first time installation.
19. 200 channels.
20. Favourite channel lists.
21. Automatic day light saving time updating.
22. MHEG-5 Engine
CONTENTS OF PACKAGING
Inside your receiver package you should have;
1 x This user guide
1 x Quick Start Guide
1 x Digital terrestrial TV receiver & recorder
1 x Remote control
2 x 1,5 V R-03/AAA batteries
1 x Scart lead
1 x RF lead
8
Page 10
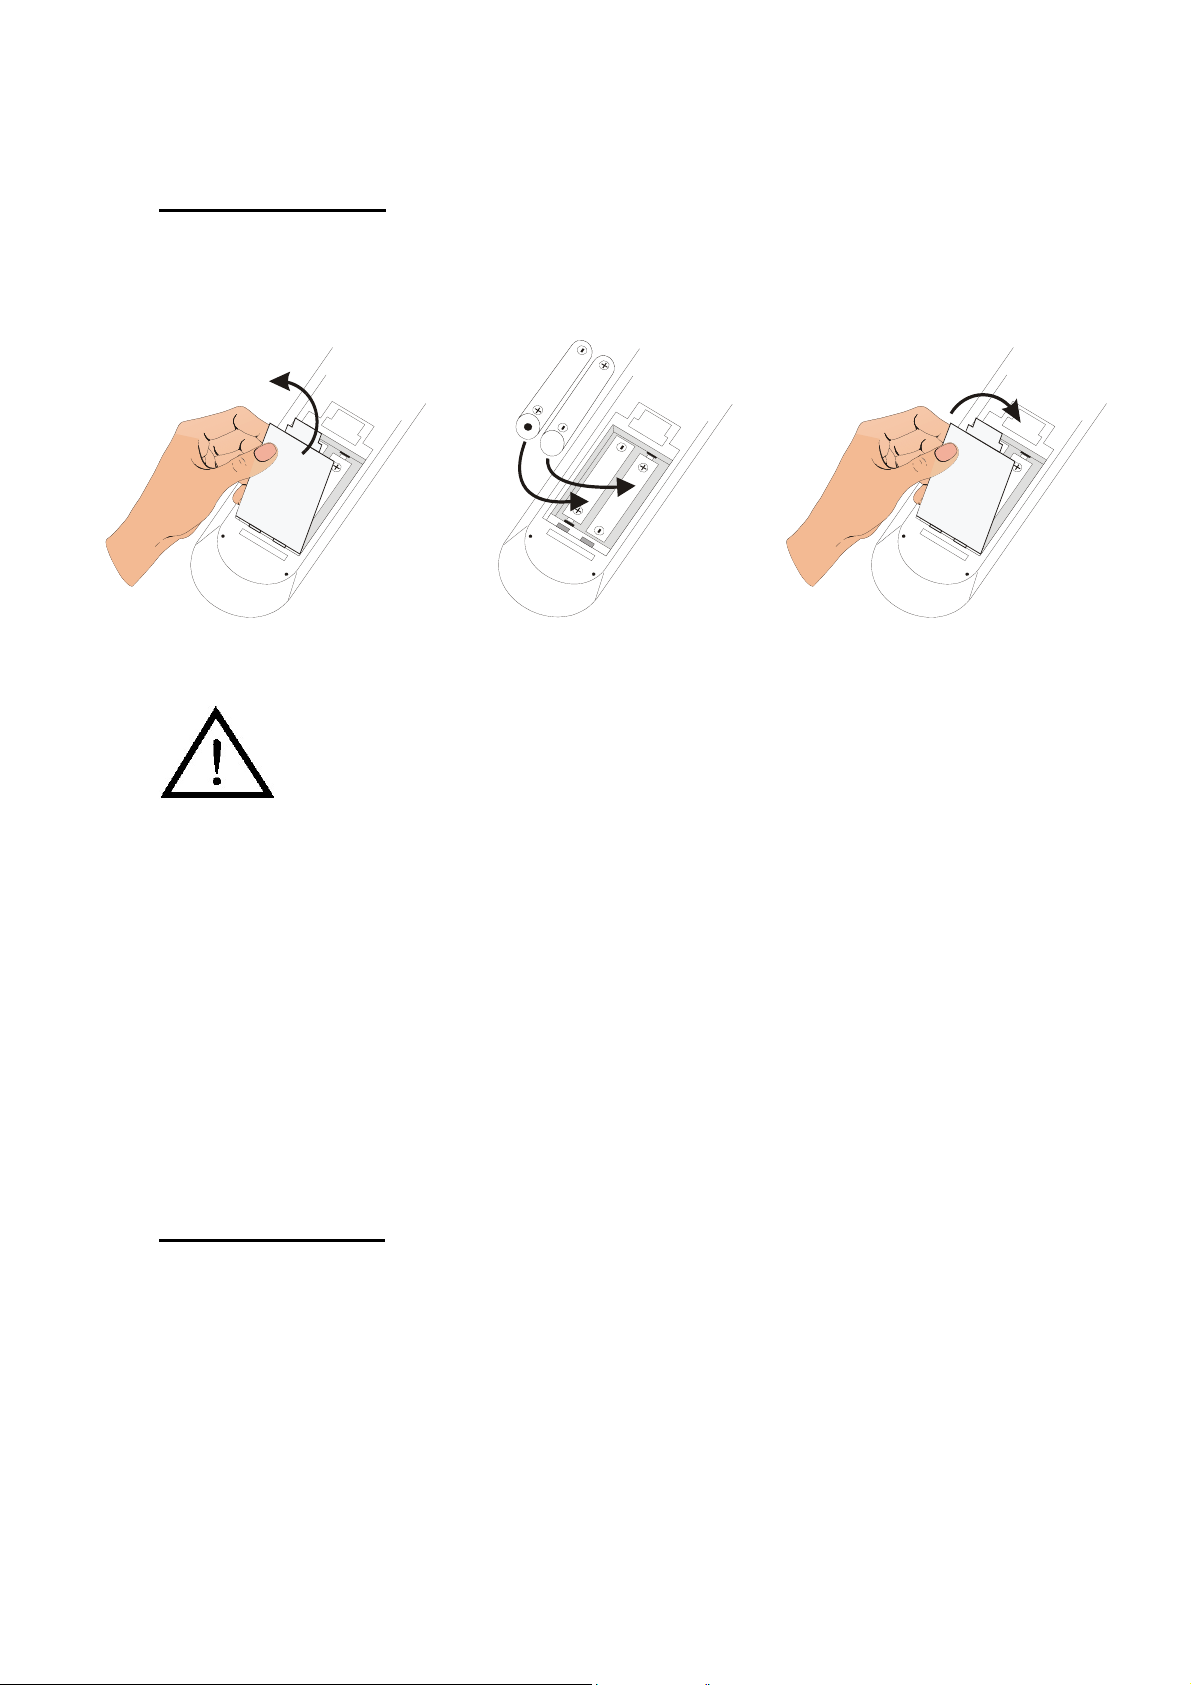
REMOTE CONTROL
1. Press the mark on the cover and slide it in the direction of the arrow.
2. Insert the batteries making sure the polarities correctly match the + and - marks inside the battery
compartment.
3. Attach the cover and slide it until it clicks into place.
Incorrect use of the batteries may cause them to leak or explode. Please follow the precautions below.
•Danger of explosion if battery is incorrectly replaced.
Replace only with the same or equivalent type.
• Insert the batteries making sure the polarities correctly match the + and - marks inside the battery
compartment.
• Batteries of different types have different properties, therefore do not mix batteries of different types.
• Do not mix new and old batteries.
This may shorten the life of new batteries or may cause old batteries to leak.
• Remove the batteries from the remote control once they have run out, as leaving them in can cause
them to leak.
Battery fluid from leaked batteries is harmful to skin, therefore ensure that you wipe them first and then
remove them using a cloth.
• Remove the batteries from the remote control if you will not be using the remote control for a long
time.
• Comply with the rules accordance of each local government when disposing of worn-out batteries.
Replacement batteries for this unit are 1.5 Volt (R03/AAA).
GETTING STARTED
Before connecting, ensure that the power cord of the unit is unplugged from the AC outlet and turn off
the devices to be connected. After making all connections (Diagrams on page 11), turn on the unit first
and then the other devices.
After plugging in the mains cord, wait until a blue light is viewable on the front panel (Standby Mode).
"NOTE" - When the unit is first powered up, please wait a short while before activating the receiver as
the unit's software needs to be initialised and the hard disk checked.
You can turn on your unit by pressing the Standby button on the remote control. Notice that the blue
light on the front panel will turn blue.
The unit is equipped with output terminals that support RGB, S-video and CVBS video signals.The
image quality is highest in the order of the RGB signal, the S-video signal and the CVBS video signal.
9
Page 11
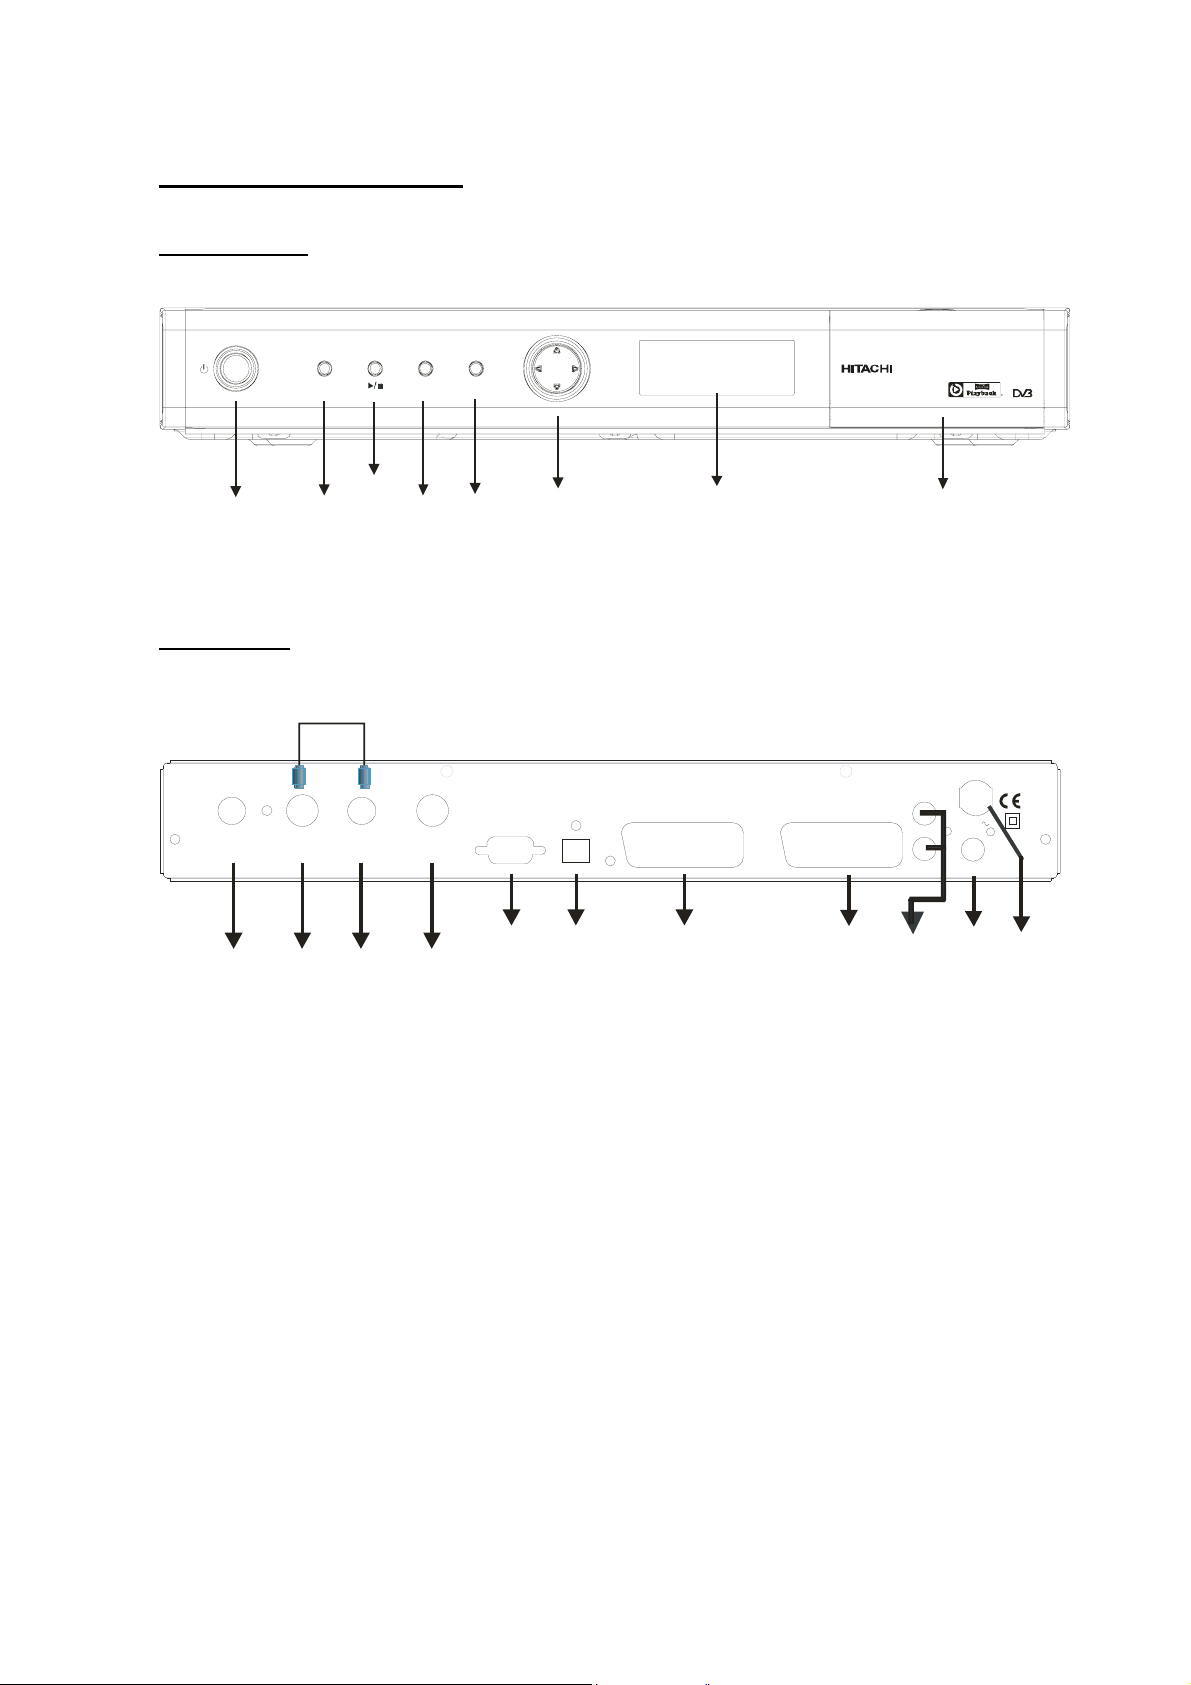
FRONT AND BACK PANEL
3
FRONT PANEL:
ON/OFF
BACK PANEL
ANTENNA 2
OUT
1
REC MENU OK
PLAY/ PAUSE
RECORD
DO NOT REMOVE
ANTENNA 1
ANTENNA 2
OUT
IN
MENU
ANTENNA 1
42
DIGITALTV RECORDER HDR081
RS 232
5
MENU
UP/DOWN
LEF T/RIGH T
OPTICAL OUT
67
OK
IN
VFD
DISPLAY
CAM
INTERFACE
(not available)
TV SCARTVCR SCART
8
LEFT
AC IN
CVBS
RIGHT
10
9
35015207_R003
11
1. AERIAL 2 OUT : To watch analogue channels on the TV
2. AERIAL 2 IN : Loop through
3. AERIAL 1 OUT : Loop through
4. AERIAL 1 IN : Aerial input
5. RS232 : Software Upgrade (Service purposes only)
6. OPTICAL SPDIF : Optical Digital Audio Output
7. VCR SCART : Output for other equipment such as DVD, VCR...etc.
8. TV SCART : TV Scart connection
9. ANALOGUE AUDIO LEFT/RIGHT : Analogue Audio output
10. CVBS : Video Output
11. POWER SUPPLY : 220-240V AC, 50 Hz
10
Page 12
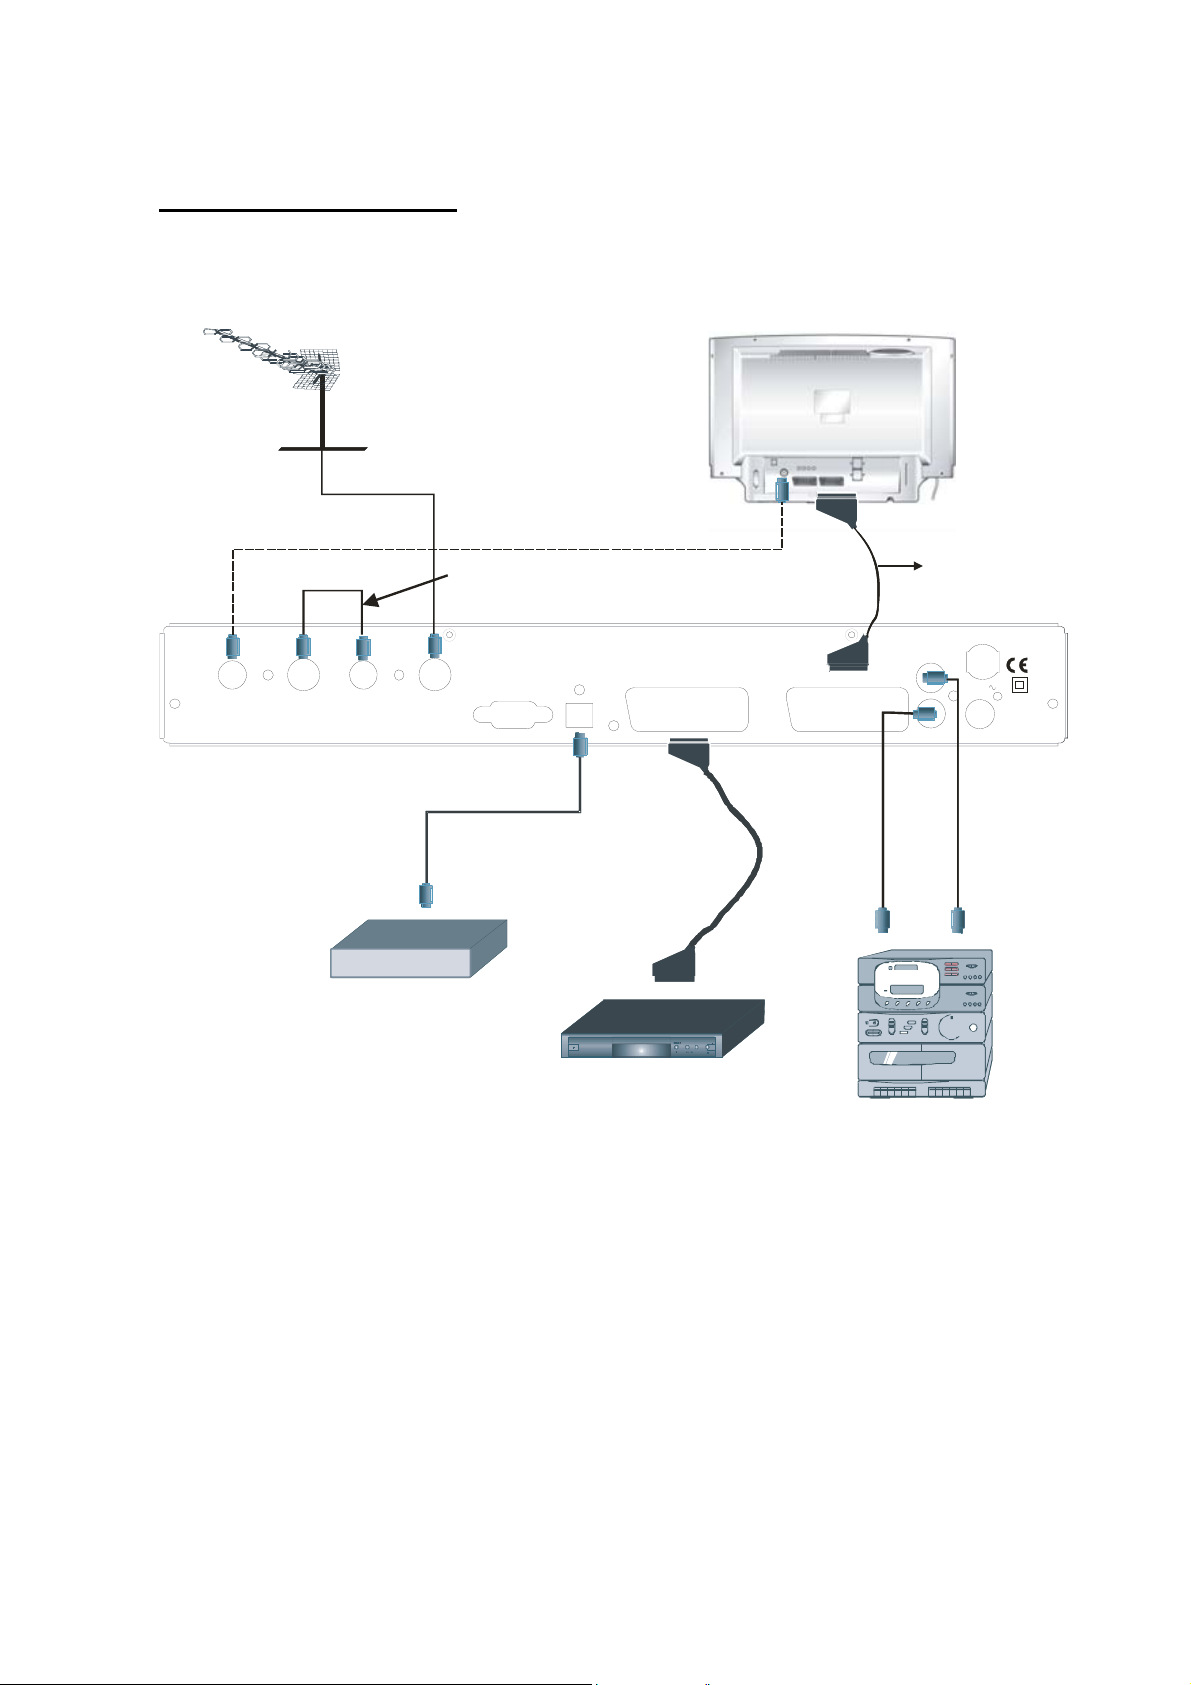
CONNECTION DIAGRAMS
TV Aerial
TV Aerial
LOOP THROUGH
ANTENNA 2
OUT
ANTENNA 2
IN
ANTENNA 1
ANTENNA 1
OUT
IN
"Optional RF lead if you
still wish to watch analogue
channels on the TV”
DO NOT REMOVE
OPTICALOUT
RS 232
VCR SCART
VCR SCART
ONLY
THIS SCART LEAD
IS SUPPLIED
LEFT
TV SCARTVCR SCART
RIGHT
AC IN
CVBS
35020157
Aux
Aux
AC3 DOLBY DIGITAL
AMPLIFIER
HI-FI
VCR
VCR
HI-FI
NOTE: This set top box supports Free To View only. There is no provision for a CAM or Pay To View
card.
11
Page 13

REMOTE CONTROL LAYOUT
USING THE CONTROLS ON THE FRONT PANEL
You can enter the main menu buy pressing the menu button on the front of the unit. Then navigate
through the menu with the four arrow buttons on the front of the unit and make a selection with the OK
button.
12
Page 14

REMOTE CONTROL FUNCTIONS
BUTTON
1. STAND BY Standby ON/OFF
2. Fast Forward
3. LIB. Library of records
4. TIMERS Schedule recording
5. Record key
6. INFO Displays Info window
7. Arrow buttons/OK Menu Navigation
8. BACK Exit from menu (Without saving)
9. PR+/- Next/Previous channel
10. YELLOW Teletext Function key
11. BLUE Teletext Function key
12. 0,1,2,3.....9 Numeric keys
13. PP Previous channel
14. WIDE TV Mode
15. SUBT. Enables Subtitles
16. SWAP
17. PIP + Next channel in PIP window
FUNCTION
Normal screen and PIP window change
their places
18. MUTE Mute
19. Play the records
20. Fast backward
21. Stop the records
22. Pause
23. GUIDE Electronic Program Guide
24. TEXT Teletext key
25. V+/ V - Volume UP/DOWN
26. GREEN Teletext Function key
27. RED Teletext Function key
28. AUX VCR Switch
29. MENU Enter menu/ Exit menu (With saving)
30. FAV Favourite list
31. PIP Opens PIP window
32. PIP- Previous Channel in PIP window
13
Page 15

MENU INTERFACE
FIRST TIME INSTALLATION
When the box is switched on from stand-by mode and if there is no channel stored in the database,
First Time Installation Menu window is displayed on the screen. In this window, set the TV type with
“/” keys and press OK button on remote control to continue.
Automatic channel scan window appears and the unit commences to search for channels.
MAIN MENU
Main menu is accessed by pressing the MENU key on the remote control.
Navigate with “/” keys among the menus and press OK to activate
menus. In some sub-menus, press the BACK button to return to the previous
menu, otherwise, use it to exit from the menu. In all menus there is an Info
banner at the bottom of the screen. These are functions that can be used in
the current menu.
1. CHANNEL LIST
Channel list is the place where the
channels are managed. The following
operations can be performed in this menu:
1. Navigating channel list
2. Deleting channels
3. Renaming channels
4. Adding locks to channels
5. Setting favourite list
14
Page 16

1.1. NAVIGATING CHANNEL LIST
In the channel table “/” moves the selection to the previous or next .To exit menu and watch a
specific channel highlight it using, “/” then press OK key while the "SELECT" option at the bottom
of the screen is highlighted. If the selected channel is password protected then a pop up menu is
displayed. If the correct code is entered, the selected channel can be watched. You can now select
another channel in the list. The scroll Bar in middle of the screen shows relative position of the
currently visible channels with respect to the whole list.
1.2. DELETING CHANNEL
To delete a channel highlight it using “/”, then highlight the “Delete” button using “/”and press
OK. A message is displayed to confirm your decision, if you still want to delete select “YES”, with the
< > buttons or the operation will be cancelled if you select “NO”.
1.3. EDIT CHANNELS
To rename a specific channel, highlight "Edit Name" button after the channel is selected and press
OK. A box appears on the screen. “/” moves to the previous/next character. “/” toggles the
current character, i.e., ‘b’ character becomes ‘a’ on “” and ‘c’ on “”. Pressing the numeric buttons
‘0...9’ replaces the highlighted character with the characters printed above the button one by one as
the button is pressed. Pressing BACK cancels the editing and OK saves the new name.
1.4. ADDING LOCKS TO CHANNELS
Channel Locking provides a password-protected access to channels selected by parents. In order to
lock a channel you should know the parental Lock password (set to 0000 in the factory and can only
be changed from the Configuration Menu), from the channel list menu highlight the channel to be
locked and select the “Lock” button with the < > keys, when OK is pressed a password box is
displayed. Enter the parental Lock code, press OK and the Lock icon will be displayed in front of the
selected channel. Repeat the same operation to cancel the Lock.
1.5. SETTING FAVOURITE LIST
Favourite lists provide an easy way to group
programs in a customizable way. Five
favourite lists are available on this product
named as List1, List2, List3, List4 and List5.
From the channel list use the “/”
buttons to highlight “Favourites” and
press OK to enter the “Favourite
Lists” menu.
Press the “/”buttons to select
your preferred favourite list
(List1/List2/List3/List4 or List5).
Press OK to add the highlighted programme to your list and continue to add the programmes
you want to include in your favourites by highlighting the channel and pressing OK.
Repeat the above steps to remove the channels from the list. Once complete press MENU to
save your settings.
You can step through your favourite lists with the FAV button on the remote. Each press will
advance to the next list. The PR+ and PR- buttons will cycle through the channels you put in
the currently selected favourites list.
15
Page 17

2. PROGRAMME GUIDE (7 DAYS EPG)
Electronic Program Guide appears on the
screen. It is able to get Information of the
channel - programs weekly by means of 7DAY–EPG. All programs of channels are
displayed. The current program is
highlighted and there is brief information
about the programs of the channel, such as:
name, short/extended event description,
start & end time. By pressing “/”keys
continuously the time scale can be
changed.If there is any event information
data available only program names and
dates are displayed. Across the bottom of
the screen there is an info bar showing all
the available commands which are listed
below.
RED BUTTON (SHRINK) : make the info boxes smaller
GREEN BUTTON (EXPAND) : make the info boxes larger
YELLOW BUTTON(PREV DAY) : displays the programs of previous day
BLUE BUTTON (NEXT DAY) : displays the programs of next day.
INFO (DETAILS) : displays the short extended programs in detail.
(RECORD) : the unit will record the selected progamme.
NUMERIC BUTTONS (JUMP) : go to preferred channel directly via numeric buttons.
OK (VIEW / REMINDER) : shows the highlighted channel / sets the reminder for future
programs
TEXT (SEARCH) : activates “Search” window.
(PAGE LEFT) : moves the page to left.
(PAGE RIGHT) : moves the page to right.
(NOW) : shows the current programme
3. TIMERS
To display Timer window press either
TIMERS key or activate it from main
menu.To add a Timer press YELLOW button
on the remote and the, “Add Timer “
windows appears.
Channel:
through the TV or Radio list .
Date:
keys start date is entered.
Start:
keys start time is entered.
End
Duration:
This is automatically worked out after the start and end times have been entered.
“3/4” keys will navigate the user
By using either “3/4” or “0,1,2…,9”
By using either “3/4” or “0,1,2…,9”
: By using either “3/4” or “0,1,2…,9” keys end time is entered.
Displays the duration of the recording.
Repeat:
Playback:
By using “3”/ “4” keys, repeat mode is set to “Once”, “Daily” or “ Weekly” .
permit or block playback for other users."use parental settings" is default.
16
Page 18

Change /Delete: permit or prohibit any modifications for other users.
When a timer Start time is reached, the receiver starts to record the desired program, then when the
end time is reached, the record stops. Save the adjustments by means of GREEN key or cancel with
RED button. Edit the list via GREEN key and delete with the RED button.
4. RECORDINGS LIBRARY
All the recordings are kept in list. To show the list of recordings press either LIB button on the remote
or access it from the main menu.
RED BUTTON (DELETE) : Erase the recordings
GREEN BUTTON (EDIT ) : make changes to the recordings
YELLOW BUTTON (TAG) : marks the recordings for archiving
BLUE BUTTON (SORT) : change the order of the recordings
INFO (DETAILS) : displays the short extended programs in detail
OK BUTTON : opens the play options menu
(RESUME) : recommence the recordings
Red bar:
Yellow bar:
Green bar:
indicates the used space of the recordings on the hard disk.
displays the approximate capacity required for the timers currently set.
shows the free space on the hard disk.
17
Page 19

4.1. PLAY OPTIONS
4.1.1. PLAY FROM START
Plays the recording from the beginning.
4.1.2. RESUME
Begins with playing from the last stopped position.
4.1.3. PLAY FROM OFFSET
Begins with playing, from the time which is entered.
4.1.4. MANAGE CHAPTERS
It will display any marked chapters (To set chapter marks, press the Menu button during playback and
enter the “Chapter Options” menu) and begin with playback from the selected chapter.
4.1.5. CREATE ARCHIVE (ARCHIVE MANAGEMENT)
Using this option, you will be able to archive your recordings to an external device like a DVD player.
Press the LIB. Button and come to the “Recordings Library”. In this library, the saved recordings are
listed. To select a recording which should be archieved, highlight one of them using the “/”
buttons and select the TAG option, by pressing the yellow button. After then, press the OK button to
open the “Play Options” menu. In this menu, using the “/” buttons, select the “Create Archive”
option and enter it bye pressing the OK button. You will see the menu below:
EDIT RECORDINGS
While the “Edit recordings” option is highlighted, using the 3/4” buttons come to the list of recordings
on the right of this menu. Select one of them, which should be archived and press the OK button. You
will come to the following menu:
18
Page 20

Here, only the “Start recording at” and “ Stop recording at” options are active. If you have alrady
separated recording, you could select any chapter to begin with the archiving and stop it. If it is not
separated in chapters, the beginning and ending time of the recording will be automatically the
beginning and ending time of the archiving.
MAIN TITLE
If you want to display a main title, select “Include” (To do this, use the “3/4” buttons). If not, select
“Skip”. By selecting “Skip”, the options below will be disabled.
TEXT: After you select the “Include” option in the “Main Title” menu, you could edit the main title.
DURATION: Set the duration of the appeareance of the main title on the screen.
RECORDING TITLE
If you want to display a recording title, select “Include” (To do this, use the “3/4” buttons). If not,
select “Skip”. By selecting “Skip”, the options below will be disabled. While archiving, you could decide
to show the names of the saved recordings on the scren.
DISPLAY: In this option, you could decide, which of the following items should be displayed in the
recording title: “Name”, “Start date/time” and “Length”.
DURATION: Set the duration of the appeareance of the “Edit recording title” menu main title on the
screen. If you press the Menu button during playback, you will enter the “Chapter options and in this
menu, you could set any point as a chapter. So, the user is be able to skip frames which should not be
archived. The user could also start and stop the playback from any chapter he wants.
To stop archiving, press the STOP button. During archiving, no other button will be function.
19
Page 21

4.2. CHAPTER OPTIONS
During playback of a recording, if you press the MENU button, you will get to the “Chapter Options”
menu. The chapter options menu includes following options:
This menu includes the options below:
4.2.1. CREATE NEW CHAPTER MARK
Using the “/” buttons select this option and press the OK button, to create a chapter mark. You
could set a chapter mark anywhere you want.
4.2.2. FORWARDS TO NEXT CHAPTER
Using the “/” buttons select this option and press the OK button, to go to the next chapter. If there
is more than one chapter.
4.2.3. BACK TO START OF CHAPTER
Using the “/” buttons select this option and press the OK button, to go to the beginning of the
current chapter. This is the last played chapter.
4.2.4. BACK TO PREVIOUS CHAPTER
Using the “/” buttons select this option and press the OK button, to go to back to the previous
chapter. If there is more than one chapter.
20
Page 22

5. SETUP
RECORD
Allows you to full make adjustments to the following: Recordings, Configuration, Language and
Installation.
5.1. RECORDINGS
The internal hard drive can store up to 40 hours of digital TV broadcast (depending on the data rate of
the recorded programme, which is set automatically by the broadcaster).
Because the PVR has a Twin Tuner it is possible to record two events and watch two programmes at
the same time. It is also possible to playback a recording previously made during an active recording.
The PVR record and playback functions are very similar to those of a VCR. The buttons used for
playback and recording are shown below.
PLAY
REWIND
STOP
PAUSE
To configure the playback/recording
options select the "Recordings..." option
from the configuration menu. The following
option are available for adjustment:
FAST FORWARD
5.1.1. MAX TIMESHIFT
Select the maximum time allowed for
timeshifting. See below for more
information on timeshifting
5.1.2. AUTO DISCARD
Discard: When the HDD is full and a timer
is set to record, the unit will automatically discard previous recordings based on this setting. The
options are as follows:
21
Page 23

None: The unit will not discard any recordings and the timer will not record the requested programme.
Oldest:
Longest:
Shortest:
Unplayed:
option is set to "INCLUDED", unplayed recordings WILL be deleted.
Starting with the oldest, recordings will be deleted to make space for the requested timer.
Starting with the longest, recordings will be deleted to make space for the requested timer.
Starting with the shortest, recordings will be deleted to make space for the requested timer.
If this option is set to "EXCLUDED" any unplayed recordings will NOT be deleted. If this
5.1.3. FORMAT DISK
On rare occasions the Hard Disk may malfunction, in most cases formatting the Hard Disk will restore
normal operation however ALL the data stored on the Hard Disk will be lost. Press OK with the
“Format Disk” option is highlighted. A menu appears, in which you will be asked for a pin number. If
you have not changed the pin number, the factory default is 0000. After you enter it, a pop-up menu
appears on the screen to ensure that the hard disk should be formated, select "YES" and press OK to
format the Hard Disk. Select "NO" and press OK to cancel. Ensure you dub important recordings onto
Video or DVD before you format the HDD.
5.1.4. HARD DISK INFO
To view the details about the Hard disc,
highlight "Hard Disk Info..." using "(up)/(down)"
keys and press OK. The following information
will be shown:
Total Space:
Reserved for timeshift:
reserved for use by the timeshift function and
is dependant on the setting in "Max timeshift"
(see page 21 for details)
Space used by recordings:
the recordings that are on the Hard Drive
Free Space:
recordings
Estimated space for times set:
timers that are currently set
Estimated Recording Time after:
settings of the recordings are configured in this menu, press OK to display the menu.
This Recorder has a built in hard disk (abbreviated as HDD ) for recording and playback. Beware of
the following points when setting up and using the Recorder. Failure to observe precautions may
cause damage to the HDD itself or its content, failure of the disk to operate, or recording of noise.
• Do not subject the Recorder to any vibration or impact.
• Do not place the Recorder in a cramped location which might block the ventilation port on the
• Do not place the Recorder in a location with severe temperature variation.
• Do not place the Recorder in a location with high humidity.
• Place the Recorder horizontally, never at an incline.
• Do not place a magnetic device (magnet etc.) close to the recorder.
• When the power is on, do not unplug the power cord from the AC outlet, turn off the breaker
The total size of the Hard Drive
This is the space that is
The space used by
Available space for future
The estimated space on the hard drive that will be used for the any
This is the estimated remaining time left available for recordingsThe
back of the Recorder.
If the Recorder is set up in a location with severe temperature variation, dew may form
on and inside the Recorder. If the Recorder is used with internal dew formation
present, this may cause HDD damage or malfunction. We recommend keeping
variation in room temperature within 10˚C per hour.
for the area where the Recorder is set up, or move the Recorder.
When moving the Recorder, first turn off the power and then unplug the power cord from the AC outlet.
22
Page 24

Recording Format
HDD recording is done using the variable bit rate format (VBR) for more efficient
recording. The following phenomena may occur.
With the variable bit rate format, the remaining amount which can be recorded may increase
or decrease relative to the display of the remaining amount of HDD space.
• When the display indicates that the remaining amount of HDD space is low, first delete
unnecessary programmes, and then record with an extra margin in the amount of remaining
space. There is an option in the configuration menu to discard the recordings. You can choose
between three options:
Deleting,
1 – Oldest recordings
2 – Largest recordings
3 – Smallest recordings
When the HDD is out of space, it will operate regarding one of these options and delete the
recordings.
• Even if you delete a programme, the remaining amount may not increase by the amount of
deleted time. When recording new video, record with an extra margin in the amount of
remaining space.
Unrecordable Material
In the unlikely event that there is some problem like loss of recorded video or audio content due to an
HDD malfunction, please be aware beforehand that we will bear no responsibility to compensate for
the content which could not be recorded or edited, for the loss of recorded or edited video, or for other
related direct or indirect damages.
If a power failure occurs
• The content being recorded or timer recorded may be damaged if power failure occurs.
• The content being played back may be damaged.
For important recording
• If the HDD malfunctions, the content recorded on the HDD may be lost. If you wish to save
content permanently, we recommend copying or moving the content to Video or DVD.
NOTE
• If a message indicating an HDD error is displayed (such as “ERROR IN HDD. CANNOT
OPERATE.”) and the HDD has malfunctioned, you cannot replace the HDD by yourself. If you
disassemble the Recorder, the warranty will become void. Also, recovery of data is
impossible. If playback is possible, re-record the recorded content onto a Video or DVD, and
contact the approved service centre with the details provided at the front and back of this
operation manual.
Hard Disk Operation (Recording / Playback / Time Shift Recording)
If the Recorder is used in a cold location (a location at low temperature), the drive will only allow live
viewing after power is turned on until the HDD is ready. During this time, the Recorder will not allow
Time Shift Viewing, recording, display of recording lists or playback of recorded programmes. Please
wait until the HDD is ready.
23
Page 25

5.2. CONFIGURATION
You can configure the settings of your set
top box. Select Configuration from Setup
menu and press OK to enter this menu.
Press the BACK button on the remote to
exit
5.2.1. TV TYPE
Digital terrestrial television channels can
broadcast programmes in a widescreen
format which must be output differently to
normal and widescreen TV sets. This
function tells the receiver the screen
format of the TV connected so that
broadcasts are displayed correctly.
Highlight the TV Type line in the
Configuration menu and use the “3/4”
keys to select 4:3 if you have a standard
TV set connected or 16:9 if it is a widescreen TV. This function duplicates the selection made at the
time of first installation and can be used if you change TV sets.
5.2.2. TV OUT
The receiver can output RGB , CVBS and S-Video signal from the TV SCART on the rear panel.
Although the RGB format results in a better quality picture, not all equipment can cope with an RGB
signal.
5.2.3. VCR OUT
This allows you to select CVBS or S-Video output from the VCR SCART socket.The receiver can
output SVideo and CVBS signal from the VCR SCART on the rear panel.
5.2.4. FAVOURITE MODE
This function enables or disables the 5 favourite channel list mode by pressing “/” buttons and
press OK . IF a favourites list exists it will switch to the list number selected. If there is no favourite
listing, a warning message is displayed.
5.2.5. CHANNEL LIST
Use “/” buttons to go to Channel List option. Use “/”buttons to toggle Channel List Mode. If
you select “TV Only”, with the PR+/PR- buttons, you navigate through only TV channels. If you select
”Radio Only”, with the PR+/PR- buttons, you navigate through only radio channels. If you choose
“Show All” all, channels can be navigated with the PR+/PR- buttons. To save the recent changes and
exit; press the MENU button.
5.2.6. SCAN ENCRYPTED CHANNELS
Use “▲ / ▼” buttons to go to the Scan Encrypted Channels option. Use “◄ / ►” buttons to toggle
YES or NO the searching for encrypted channels.
24
Page 26

5.2.7. RECEIVER UPGRADE - OAD
Over Air Download (OAD): To ensure that
your STB always has the most up-to-date
information. Please ensure that after use it
is set to its standby mode. The STB
automatically powers up at 3.00 A.M. each
day and searches for any new information
which may be broadcast and will download
this to your receiver automatically. This
operation will normally take approximately
30 minutes. If you have an important
recording to make at 3.00 A.M. which must
not have a 30 minutes interrupt then you
can disable the auto OAD search by
performing the following:
Press Menu button and using the
“/” buttons to choose Setup
and press the OK button.
Highlight Configuration menu with “/” keys and pres OK.
Use “/” buttons to choose "RECEIVER UPGRADE" and press OK button.
Using the left / right button change “Automatic scanning” from Enabled to Disabled.
Highlight “Scan for upgrade” menu with “/” keys and pres OK to commence upgrade.
Do not forget to re enable the automatic OAD function after you have made your recording by
repeating the above instructions but this time selecting ENABLE.
5.2.8. PARENTAL CONTROL
Use “/” buttons to go to Parental Control option.
Press OK button to enter the menu. A box asking for
the lock key is displayed. The key is set to “0000”
initially. Enter lock key. If it is incorrect, "Wrong Pin"
is displayed. If it is correct, the Parental Control
Menu is displayed.
5.2.8.i. MENU LOCK
In menu lock you can set locking for All Menus, or the Installation Menu to restrict access to these
menu's. If the menu lock is disabled, there will be free access to the menu system. Use “/” buttons
to go to Menu Lock option. Use “/” buttons to choose Menu Lock Mode.
DISABLED : All menus are unlocked.
ALL MENUS : All Menus are accessible only with the correct lock key.So the user can’t add, delete,
rename, channels, can’t set timers.
INSTALLATION MENU : Installation menu is locked.So the user can’t add channels. Changes will be
updated after exiting ‘Configuration Menu’.
5.2.8.ii. SET PIN
The PIN code of the unit changed. Use “/”
buttons to go to “Set PIN” option. Press OK to
display the “Set PIN” window. Use NUMERIC
buttons to enter new pin number you will need to
input your new pin a second time for verification
purposes. If Both pin numbers are four digits long
and the same, the pin will be changed.
25
Page 27

5.3. LANGUAGE
In this menu the user can adjust the preferred language. Language is changed by pressing OK key.
System:
Preferred
These settings will be used if available. Otherwise the current settings will be used.
Audio:
Subtitle:
Current
Audio: if audio language is supported change the audio language by pressing “/” keys
Subtitle:
NB.: This menu is intended for dual language transmissions.This product is not designed to resolve
“English (Visually Impaired)”.
shows the language of the system
by pressing “/” keys change the audio language.
alter the subtitle language with“/” keys. The chosen language will be seen in
subtitles.
if subtitle is backed up alter the subtitle language with“/” keys. The chosen language
will be seen in subtitles.
5.4. INSTALLATION
5.4.1. AUTOMATIC CHANNEL SCAN
Automatic channel scan is
activated by selecting OK when
the line is highlighted. A pop-up
menu appears on the screen,
select “YES” the automatic scan
begins. All the multiplexes are
searched and a channel table is
created automatically. All
channels found are stored in a
sorted form with respect to their channel numbers. Selecting "NO" will cancel the operation.
5.4.2. MANUAL CHANNEL SCAN
In manual search the number of the multiplex is entered manually and only that multiplex is searched
for the channels. In manual and auto search, any existing channel in the database is not re-stored to
avoid redundant duplicates of that channel. To start the scan enter the channel number manually and
press OK.
26
Page 28

5.4.3. FIRST TIME INSTALLATION
Use this option to load default settings, which had been set at the factory. To install factory settings,
highlight ‘First Time Installation’ menu and press OK key, then you will be asked to confirm deleting all
channels and settings. Selecting YES and pressing OK will delete the channel table. Selecting "NO"
and pressing OK will cancel the operation.
6. MESSAGES
When the box receives no signal (e.g. the antenna cable is
disconnected), “NO SIGNAL” message is seen on the screen.
When there are no channels stored in the box; the
Channel List menu is not accessible. Channel navigation is
not allowed. Therefore, trying to enter these menus or
navigate the channels will display an error message on the
screen.
7. SPECIFIC FUNCTIONS OF REMOTE CONTROL
When there is no menu active on the screen, each of the keys have specific functions.
OK KEY:
RECORD KEY
The programs are recorded at once.
Record time is obtained from EPG automatically. If the program has EPG information, you could
set the timer. If there is no EPG info, press the Record button to set the timer in 30 minutes
periods.
In EPG by pressing the record key, programs are recorded instantly.
LIB KEY:
your saved recordings. By pressing it again, you will exit the Recordings Library.
SUBTITLE :
ON/OFF message is displayed.
INFO KEY
When INFO key pressed, and when changing channels the information window is displayed on the
lower part of the screen. The small bar indicates the program duration. On the channel info window
there are
when OK key is pressed Channel list appears on the screen.
by pressing this key, you will get to the Recordings Library, which shows you the details of
subtitle key shows/hides subtitles of channel. When the subtitle key is pressed,subtitle
Current event name next event name, and their start and end times.
Program duration bar
Program mode (TV or Radio)
Channel number
Name of the channel
27
Page 29

The second press of the info button brings up a box containing a brief description of the currently
viewed programme.
You can now use the > button to change the programme description to that of the next programme on
the current channel.
PR+ / PR – (CHANNEL NAVIGATION )
There are two ways to navigate through the channels:
Pressing PR +/ PR - keys will take you to go to the next or the previous channel in the list.
Pressing a number key will activate a small digit entry window on the left upper corner of the
screen. After a digit is entered, the box will stay for 2 seconds while you enter another digit. If no
digit is entered during these 2 seconds, then the box will switch to the entered number channel.If a
number that is greater than the maximum number of channels is entered, the box will switch
automatically to the last channel.
Press OK button to display the channel list.
VOLUME CONTROL
The volume level of the sound from the receiver can
be altered with the VOL+ and VOL- keys on the
remote control handset. Pressing either key displays
a bar graph of the sound volume on the TV screen.The volume level selected will remain set, even
when the receiver is turned off and on again, until it is altered with VOL + and VOL - keys.The audio
volume adjustment for the receiver is independent of the volume control on your TV set. Be careful
that both volume controls are kept within reasonable levels so that when switching from analogue to
digital television viewing, or when first turning on your TV set, the sound level is not too high.
You can silence the sound from the receiver by pressing the MUTE key. The sound
remains muted until the MUTE key is pressed again, the VOL + or VOL- keys are
pressed. While the sound is muted in this way, the mute symbol is displayed in the top
left of the TV screen. The symbol is removed after 3 seconds, but the sound will remain
muted until the MUTE key is pressed for the second time and the mute symbol will display for 3
seconds.
PIP (PICTURE-IN-PICTURE)
Enables / disables PIP window.
PIP +: next channel in PIP
window.
PIP - : previous channel in PIP
window.
NOTE:
THROUGH is connected. (Please see
page connection diagrams)
SWAP
Main window and PIP window change
their places.
PIP is only available when LOOP
28
Page 30

TIME SHIFTING (PAUSE LIVE RECORDING)
Pause Live Recording is a feature that
enables you to pause a live broadcast if,
say the phone rings you can go back to
the same spot that you were at when you
left. The live broadcasting can be stopped
any time. Press PAUSE
suspend the broadcasting. In the INFO
banner the timeshift will comence. The
duration of Timeshift can be adjusted from
Recordings in the Configuration menu
(See 5.1.RECORDINGS). In order to stop
the timeshift press PLAY, PAUSE or OK
button. The paused recording can be
watched in different speeds by means of
keys. To terminate the
Pause Live Recording press
NOTE:
You can also use the PAUSE button on the front of the unit if you wish.
TEXT
Many digital terrestrial television channels not only broadcast pictures and sound for programmes but
also pages of information on the programmes, the weather, news and many other topics. This digital
teletext can be displayed by the receiver.Some channels are entirely given over to digital teletext and
carry no normal TV programme at all.
These dedicated digital teletext channels will not give a quarter-screen image in the EPG or the
Channel List screen. When such a channel is selected, after a brief pause, they will usually display
the opening page of information automatically. Other channels have digital teletext pages broadcast
alongside the television programme and often include a reduced-size broadcast picture within digital
teletext pages.
button to
button.
These usually require the TEXT button to be pressed to activate the digital teletext pages.In both
cases, moving through the different pages of information is accomplished in a variety of ways,
dependent on the individual broadcasters, but including use of the “///”and[OK]keysto
select items from on-screen menus, and the coloured keys to jump directly to particular pages.
You can exit teletext mode by pressing the TEXT button on the remote or by changing channel. Also if
you call for the INFO bar or bring up a menu you will temporarily enter TV mode returning to TEXT
mode when you cancel the menu or INFO bar.
You can exit any digital teletext channel by changing channel in any of the normal ways. You can
leave the digital teletext function of a combined digital teletext/programme channel, to return to normal
television viewing of that channel, by pressing the TEXT key.Calling for the information banner or any
menu on-screen stops the receiver from displaying the digital teletext pages and they are temporarily
replaced by a blank picture while the banner or menu is displayed.Digital teletext cannot be accessed
when the Subtitles are enabled
WIDE
TV sets are available with screens of the standard (4:3) format and widescreen (16:9) format. When
you first installed your receiver you specified the format of the connected TV (this can now be altered if
necessary; see Configuration)Digital terrestrial television broadcasts are also made in both standard
and widescreen formats. In particular, films and dramas tend to be broadcast in widescreen format to
closer emulate the cinema experience, but some programmes such as news bulletins are 4:3. To help
get the most from both TV set and programme when a widescreen film is watched on a standard TV,
or a standard broadcast is viewed on a widescreen set, the receiver includes the WIDE key.So long as
29
Page 31

the receiver has been correctly set up for the TV set connected, a widescreen programme will always
be displayed correctly on a widescreen set, and a standard format programme will correctly fill the
screen of a standard format TV.
With a widescreen TV set displaying a standard format programme the WIDE key switches between
displaying the picture with black bars down the sides, and enlarging the picture so that it fills the whole
width of the screen but the top and bottom are cropped off.With a standard format TV displaying a
widescreen programme, the WIDE key switches between displaying the picture with black bars at the
top and bottom of the screen, and filling the whole height of the screen but cropping the sides off
according to instructions broadcast with the programme (called 'pan and scan').The effect of the WIDE
key on the picture display is cancelled by pressing WIDE again.
NOTE:
Sometimes the TV will automatically try and compensate for an incorrect screen format, in this
instance set the tv to the correct format whilst viewing the programme.
8. TROUBLE SHOOTING GUIDE
Problem Possible Reason What to do
The Led indicator
does not glow
No picture or sound No signal or weak signal.
The settings you have made
in the menus have not been
changed.
The remote control is not
working.
Password forgotten.
Record does not start.
No PIP video.
Mains cable is
not connected
The digital set-top box was
unplugged without first
going to standby.
The digital set-top box is in
Stand by.
Remote control is
incorrectly aimed.
Battery exhausted.
No or weak Aerial 2 input
Signal.
No or weak Aerial 2 input
Signal.
PIP Channel is radio or
teletext based.
Check if the main cable is not
plugged into the power socket.
Check the Aerial and scart
connections
Before unplugging your digital settop box, make sure it is in standby
Press the standby key.
Check if anything is obstructing the
front panel .
Change the batteries
Take contact with the nearest
service center.
Check Aerial 2 input connection.
Check Aerial 2 input connection.
Use PIP+ / PIP- to choose a valid
TV channel.
30
Page 32

9. TECHNICAL SPECIFICATIONS
GENERAL CHARACTERISTICS
Supply Voltage 220 - 240 V AC ~ 50Hz
Input Frequency 470 Mhz-862 Mhz
Maximum Power consumption 21 W
Standby Power Consumption 11.7 W
Operating temperature 5ºC to +45ºC
Storage temperature -15ºC to +55ºC
Humidity 25 to 75 % rel
Physical dimensions 360x280x48 mm
Weight 2.80 kg
HARDWARE CONFIGURATION
Main Processor STM5100
Flash Memory 4 MB
DDRRAM 64 MB
DIGITAL CAPABILITIES
Transmission Standards DVB, MPEG2
DEMODULATION
COFDM with 2K/8K FFT mode.
FEC for all DVB Modes.(Automatically found)
VIDEO
ALL MPEG-2 MP@ML Video Decoder
Aspect Ratio 4:3, 16:9 with pan vector
RGB analogue outputs. BW ≥ 5MHz at 0.5 to 5 MHz sweep signal
CVBS analogue output.
AUDIO
MPEG1 Layer 1 and 2
Sampling frequencies supported 32 kHz, 44.1 kHz or 48 kHz.
Output can be programmed as STEREO, LEFT
only or RIGHT only (on both outputs). This is
useful for dual mono channels in order to select
the correct sound track, which is stored for every
channel.
Wide dynamic range 16-bit resolution
31
Page 33

REMOTE CONTROL
Operating Distance 10m Max.
Batteries 2x1.5V Micro (R-03/AAA)
TUNERS
2 xRF In
2 x RF Out (loop through) IEC-type, male (75Ohm)
HARD DISK
Hard Disk capacity 80 GB
FRONT PANEL
Display VFD
IEC-type, female (75Ohm)
Front Panel Control Keys
AUDIO R / L
Connector 2 x RCA (R + L)
Output 2 Vrms, 0 dBfs / Z = 10 kohm
DIGITAL AUDIO
Output Optical SPDIF
A / V & DATA IN / OUT
Scart TV scart, VCR scart
RGB Video Output TV scart
RGB Video Intput VCR scart
CVBS Video Output TV scart, VCR scart
CVBS Video Input VCR scart
Analog Audio Output TV scart, RCA jack , VCR scart
Standby ON/OFF, Record, Play/Pause, Menu,
OK, Menu Up/Down/Left/Right.
Analog Audio Input VCR scart
Digital Audio Output Optical output
Data Interface RS232 (max 115200 bps), 9Pin
* Any changes in the Instruction Manual format is reserved.
32
Page 34

10. UK GUARANTEE
Your Guarantee of Excellence
Thank you for purchasing this Hitachi product
In the unlikely event that this product should develop a fault, we undertake to replace or repair any
part of the product which fails due to a manufacturing defect within 12 months of the date of purchase
provided that:
I) The product has been installed and used only in accordance with the instructions supplied with the
product.
II) The product has not been repaired, maintained, or modified by any person other than a Hitachi
authorised engineer.
III) The product serial number has not been removed or altered.
This guarantee does not apply to product acquired second hand or for commercial or communal use.
This guarantee does not cover the replacement of exhausted batteries, the adjustment of user
controls, or head cleaning and general consumer maintenance tasks.
Any parts replaced under this guarantee shall become the property of Hitachi Europe Ltd. Any claims
made under guarantee must be directed to the dealer from whom the equipment was originally
purchased.
Please note that evidence of the date of purchase will be required before any service under this
guarantee is carried out.
THIS GUARANTEE DOES NOT AFFECT YOUR STATUTORY RIGHTS.
IN ALL CASES OF DIFFICULTY PLEASE CONSULT YOUR HITACHI DEALER
33
Page 35

11. IMPORTANT NOTICE:
DIGITAL SWITCHOVER AND YOUR TV EQUIPMENT
WHAT YOU NEED TO DO TO ENJOY WATCHING TV DURING AND FOLLOWING DIGITAL
SWITCHOVER
Starting in 2008* and ending in 2012, television services in the UK will go completely digital, TV region
by TV region.
To continue using this digital TV equipment during and following digital switchover, you will need to
“reset” your digital TV channels.
Users of this digital TV product must reset their channels on at least 2 different occasions, normally 1
month apart when switchover happens. Digital UK, the body leading digital TV switchover, and
broadcasters will advise you when to reset your channels on each occasion.
If you do not reset your channels, you risk losing some or all of your TV services during and following
switchover.
Please refer to the instruction manual supplied with your digital TV equipment for help with resetting
channels. Some manufacturers refer to resetting channels as “rescanning” channels or “retuning”.
Please note that in order to receive the maximum number of available TV services on your equipment
you must “reset” channels, not “add” channels.
For more information about this, please contact your equipment supplier or visit www.digitaluk.co.uk
* With the exception of Whitehaven in Cumbria and the surrounding area which will switch over in October 2007.
The FREEVIEW service is subject to coverage. An aerial upgrade may be required. Freeview
Playback™ and Logo™ © DTV Services Ltd 2002. Freeview is marketed by DTV Services Limited
trading as DTVSL, registered number 4435179
.
34
Page 36

A
s
g
e
DIGITAL VIDEO RECORDER
HDR 081
1
BEFORE YOU START
This Digital TV Recorder (DTR) can only receive and record
Digital Terrestrial TV (Freeview) signals. Please check that
you are in a Digital TV reception area. The FREEVIEW
service is subject to coverage. An aerial grade may be
up
required. FREEVIEW TM and logo © DTV services Ltd 2002.
To check FREEVIEW coverage in your area now text your
postcode to 83331 for a r eply in seconds (standard network
charges apply), telephone 08708 80 99 80 or visit
www.freeview.co.uk
Please check that all the following
accessories are included and then insert the batteries in the
remote control, ensuring that they are the correct way round.
Accessories
- RemoteControl&2xAAAbatteries
1
- Operation Manual
1
- Scart Cable (21 pin cable
1)
:
- 1 RF Cable
2
3
CONNECTION
ANTENNA2 OUT
TV Aerial
LOOP THROUGH
ANTENNA2 IN
"Optional RF lead if you
still wish to watch analogue
channels on the TV”
DO NOT REMOVE
ANTENNA1 OUT
ANTENNA1 IN
AC3 DIGITAL
AMPLIFIER
REMOTE CONTROL
ONLY
THIS SCART LEAD
IS SUPPLIED
LEFT
ACIN
CVBS
RIGHT
RS232
OPTICSPDIF
/
VCR
TV SCARTVCRSCART
HI-FI
Aux
some time. Then, you can turn on your digital set-top box
by pressing the button on the remote control.STANDBY
5
FIRST TIME INSTALLATION
/Set the TV type with “ ” keys and press OK .
select Normal 4:3 or Widescreen 16:9 if you ha e a
You can
v
widescreen TV.
Automatic channel scan wi ndow appears and the unit
starts to search for channels.
6
MAIN MENU
Main menu is accessed by pressing the key on
MENU
the remote control.
Navigate with keys among the menus and press
OK
to activate menus.
The Channel List, Electronic Programme Guide,
“”//
Timers, Recordings Library and Setup menu are
achieved from main menu.
changes. Press button to save the changes and
BACK
Press to abandon the menu without saving the
MENU
exit. In all menus, there is an Infobanner at the bottom of
the screen. These are functions that can be applied in the
menu.
STANDBY
PLAY
PAUSE
TIMESHIFT
OK KEY
VOLUME
UP/DOWN
MENU
PIP WINDOW
PICTURE IN
PICTURE
4
GETTING STARTED
ON OFF
LIBRARY
TIMERS
RECORD
ARROW KEYS
PROGRAM
UP/DOWN
NUMERIC
KEYS
Connect all cables before plugging in to mains. When the settop-box is first powered up please wait for a while before
the receiver since bootingof software will tak
activatin
7
CHANNEL LIST
Channel list is the place where the channels are
managed.The following operations can be performed in
this menu:
Navigating channel list Deleting channels
Renaming channels Setting favourite list
dding locks to channel
Page 37

8
p
.
SETUP
The entire settings and configuration of the unit is
adjusted in SETUP window.To activate setup window in
main menu press , when it is highlighted.OK Setup
window appears on the screen. Navigate in the window
by means of
9
“”// keys.
RECORDINGS
Model
HDR081
RECORD WITH SINGLE KEY
NOTE: The has two tuners so you can make a
recording of one digital channel and watch a different
digital channel on the TV.
To record a programme simply press the key
The recording time of the programme will be
automatically obtained from the Electroni Programme
Guide EPG .
It is also possible to record a programme in the EPG by
selecting it and pressing the button
ADD RECORDS VIA TIMERS
Programmes can also be recorded by means of “Timers”
menu.
Press button to add a new recording.
Select what you want to record.
Press GREEN button to store it.
When the programme starts it will be automatically
recorded.
HDR081
RECORD
c
()
RECORD
Select "Timers" from Main Menu and press OK.
YELLOW
DIGITAL/TERRESTRIAL TV
RECEIVER RECORDER
REC MENU OK
RECORDINGS LIBRARY
All the recordings are kept in “Recordings library”. To show
the list of recordings press either LIB. button or access it
from main menu.
Red bar:
Yellow bar:
for timer recordings.
Green bar:
PAUSE LIVE RECORDING
This feature allows you to freeze a programme if you need to
leave the TV for a while and resume watching the
programme from the same point when you return. Simply
Press the (pause) button and the immediately start
to record the programme being watched. When you return
simply press the (pause) key again and it will start replaying
whilst continuing to record. At the end of the programme
ress the stopbutton
Indicates the space used on the Hard Disk.
Yellow bar shows how much space has been set
Shows the free space on the hard disk.
HDR081
QUICK START GUIDE
Instruction manual
To obtain the best performance and ensure years of
trouble-free use. please read this instruction manual
completely.
Page 38

HitachiLtd.
ConsumerBusinessGroup
Shin-OtemachiBldg5f,2-1,Otemachi2-Chome,
Chiyoda-Ku,Tokyo100-0004Japan
HITACHIEUROPELTD.HITACHIEUROPES.A.
ConsumerAffairsDepartment364,KifissiasAve.&1,DelfonStr.
POBox300715233Chalandri
MaidenheadAthens
BerkshireSL68ZE
UNITEDKINGDOM
Tel:08704054405Fax:2106835694
Email: consumer.mail@hitachi-eu.com Email: dmgservice.gr@hitachi-eu.com
HITACHIEUROPEGmbHHITACHIEUROPES.A.
MunichOfficeGranViaCarlesIII,86Planta5ª
DornacherStrasse3EdificiosTrade-TorreEste
D-85622FeldkirchenbeiMünchen08028Barcelona
GERMANY
Tel:089-99180-0Tel:934092550
Fax:089-99180-224Fax:934913513
Hotline:0180-5512551(12ct/min.)Email: atencion.cliente@hitachi-eu.com
Email: dmg-mun.service@hitachi-eu.com
HITACHIEUROPES.r.l.
ViaT.Gulli,39
20147MILANO
ITALY
ServizioClienti
Tel.0238073415
Email: customerservice.italy@hitachi-eu.com
GREECE
Tel:2106837200
SPAIN
HITACHIEUROPEAB
Box77
S-16494KISTA
SWEDEN
Tel:0856271100
Fax:0856271111
Email: csgswe@hitachi-eu.com
HITACHIEUROPES.A.S
DigitalMediaGroup(NorwayBranchNuf)
CitéInternationaleStrandveien18
94QuaiCharlesdeGaulle,
69463LYONcedex06
FRANCE
Tel:0472142970Fax:67519032
Fax:0472142999Email: csgnor@hitachi-eu.com
Email: france.consommateur@hitachi-eu.com
HITACHIEUROPELTD.
BeneluxBrancheOffice2850Nærum
Bergensesteenweg421
1600Sint-Pieters-LeeuwTel:43436050
BELGIUM
Tel:0032/23639901Email:csgden@hitachi-eu.com
Fax:0032/23639900
Email
: info@hitachi.be
HITACHIEUROPELTD.HITACHIEUROPEAB
Kodanska46LarsSonckinkaari16
10100Praha10FIN-02600ESPOO
CZECHREPUBLICFINLAND
Tel:234064514Tel:010-8503085
Fax:234064513Fax:010-8503086
Email: dmg.eeu@hitachi-eu.com E-mail: info.finland@hitachi-eu.com
HITACHIEUROPEAB
1366Lysaker
NORWAY
Tel:67519030
HITACHIEUROPEAB
Egebækvej98
DENMARK
Fax:43436051
www.hitachidigitalmedia.com
 Loading...