

Page 1

Hitachi GD-5000 8X DVD-ROM User’s Guide
(English)
Information in this document is subject to change without notice.
©1999 Hitachi America, Ltd. All rights reserved.
Dell initial release: 16 June 1999
Last revised: 16 June 1999
Trademarks used in this text: Hitachi America Ltd are registered trademarks of Hitachi America Ltd; Dell and the DELL
logo are trademarks of Dell Computer Corporation.
Other trademarks and trade names may be used in this document to refer to either the entities claiming the marks and
names or their products. Hitachi America, Ltd. disclaims any proprietary interest in trademarks and trade names other
than its own.
Page 2

Introduction: Hitachi GD-5000 8X DVD-ROM User’s Guide
Manufacturer Hitachi
Model Number GD-5000 DVD-ROM
Drive speed
DVD-RAM 1x (ZCLV)
DVD-ROM
Single Layer 8x max. (3.3x – 8x Full CAV)
Dual Layer 6x max (2.5x – 6x Full CAV)
DVD-R 2.5x max. (1x – 2.5x CAV)
CD 40x max. (17x – 40x Full CAV)
CD-R 40x max. (17x – 40x Full CAV)
CD-RW 23x max. (10 – 23x Full CAV)
CD-I/VIDEO/CD-DA 10x max. (4.3 – 10x CAV)
Bus interface (E-IDE ATAPI)
Types of disc formats supported (read only)
DVD:
• DVD-ROM
• DVD-R
• DVD-RAM (2.6 GB format)
CD:
• CD-ROM
• CD-ROM-XA
• CD-I
• CD Audio (CD-DA)
• Photo-CD Multi-session
• CD-Extra
• CD-RW
• CD-R
• CD-TEXT
Disc-loading mechanism (Tray type auto loading)
3-way disc ejection (eject button, software, emergency eject hole)
Key DVD-RAM features
2
Page 3
250 ms average access time
2.6 Gbytes/side DVD-RAM disc read compatible
Key DVD-ROM features
120 ms average access time
Multiread capability
Regionalization RPC2 compliance
Key CD-ROM features
90 ms average access time
DAE (Digital audio extraction) audio capability
MPC3 compatibility
Headphone output volume control
DVD Configuration
This DVD-ROM drive should be used only in its current hardware and software configuration.
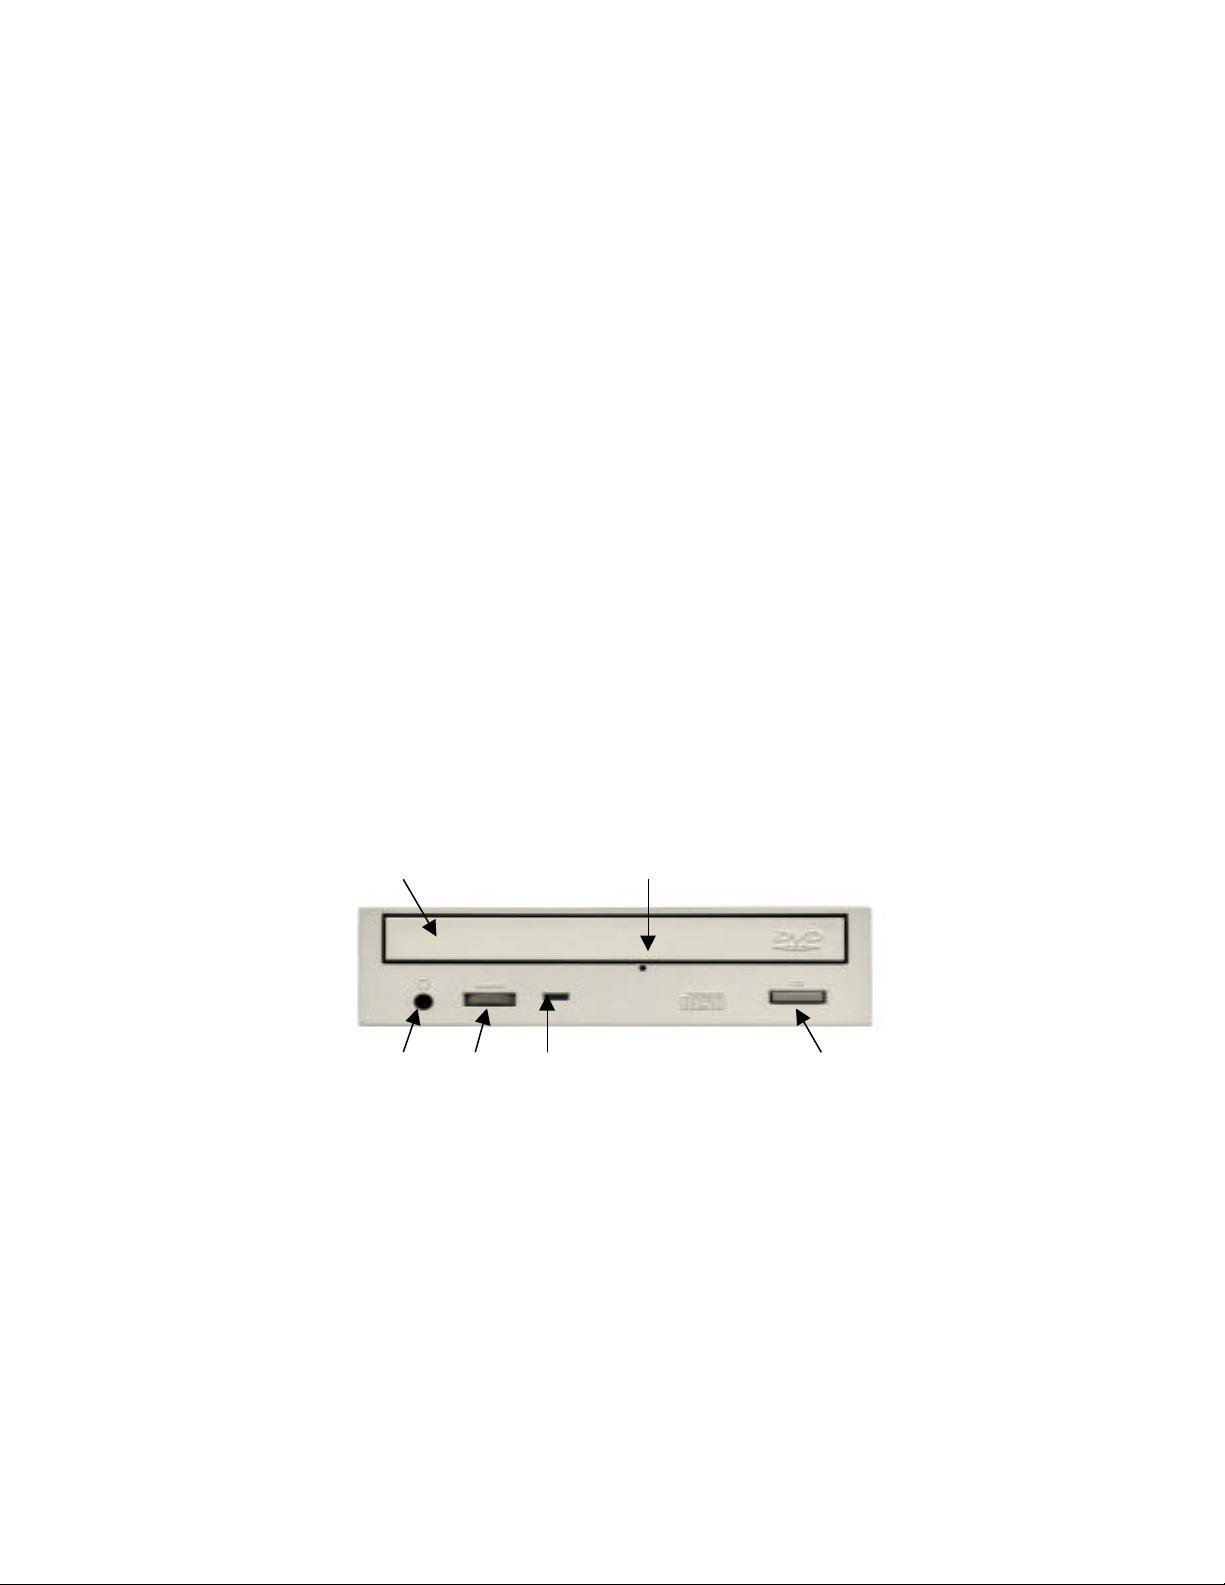
1 2
4 5 6 3
1. Disc Tray – The disc tray holds the media. The power must be turned on before
opening/closing the disc tray. Insert the disc into the disc tray.
2. Manual Emergency Eject Hole – This should only be used in the case of an emergency (if the
tray will not open when the eject button is pressed).
3. OPEN/CLOSE button – Press this button to open/close the disc tray.
4. Headphone Jack – The headphone jack is an optional feature in the GD-5000 model DVDROM. If this applies to your drive, this is for connecting headphones to the DVD-ROM drive.
5. Headphone Volume Control – Use this to adjust the volume of your headphone.
6. Power/Loading/Unloading/Busy Indicator – Indicator blinks green when the disc tray is being
opened or closed, or when the drive is accessing data.
3
Page 4

• During disc unloading, indicator will blink green for a few seconds.
• During spin down, indicator will be solid green for a few seconds.
• During disc loading, indicator will be blink green for a few seconds.
• During spin up, indicator will be solid green for a few seconds.
Setup: Hitachi GD-5000 8X DVD-ROM User’s Guide
Dell performs the installation and setup of a DVD-ROM configuration before shipping your
system. A native ATAPI device driver that works with this drive is included in the Windows
operating system that Dell installed on your system. The drive is ready for use when you receive
your system. No further installation or configuration is necessary
Using the DVD-ROM Drive: Hitachi GD-5000 8X DVDROM User’s Guide
Operating the Drive
Drive operation
1. Turn on your system, including the DVD-ROM drive.
2. To open the DVD-ROM disc tray, press the OPEN / CLOSE button.
3. Place the disc in the center of the disc tray with the label side facing up.
4. To close the disc tray, press the OPEN / CLOSE button on the DVD-ROM drive or push
lightly on the center of the disc tray. The disc tray will automatically close.
Usage guidelines
• Keep the disc tray closed when not using the DVD-ROM drive.
• Do not press down on the disc tray when opening or closing it.
• Do not place objects on the disc tray.
• Never use a damaged, broken, or deformed disc.
• Do not press the Open/Close button while the drive is playing a DVD movie. To stop a
DVD movie, click the Stop button in the DVD player application program.
• This drive is designed to respond to the region code that is recorded on a DVD disc.
If the region number described on the DVD disc does not match the drive region,
playback will not be possible. Refer to your system manual for help. If you are using the
drive as a data only device, you will not be able to play DVD Video (movies).
Copy Protection and Regional Coding
The Motion Picture Industry requires that DVD Drives conform to the Contents Scramble
System (CSS) to prevent copying DVD movies from DVD discs. To obtain a CSS license,
the drive must conform to two copy protection elements known as Copy Protection and
Regional Coding.
4
Page 5

Copy Protection and Content Scramble System
The DVD drive contains the Content Scramble System (CSS) which controls the Copy
Protection. The DVD drive’s CSS system undergoes an authentication process using the
DVD disc. DVD Disc producers (normally movie DVD Discs) incorporate specialized
software on the DVD disc from which the DVD drive can authenticate. Once the
authentication process concludes, the drive can play the movie disc, but will not allow the
drive to provide digital data for the purpose of replicating the DVD disc content.
Regional Playback Control
The motion picture industry divides the world into six regional "zones". These regions or
"zones" correlate to the regional markets into which the motion picture industry releases
movies. Each regional zone is numbered "One" through "Six", called the Region.
Region One North America
Region Two Western Europe, Japan & Middle East
Region Three Southeast Asia
Region Four Mexico, Central & South America, Australia
Region Five Africa, Russia, Eastern Europe
Region Six China
DVD movie discs are released for each region and are controlled by each region. The
RPC code prevents the new release of movies into other motion picture market regions
prior to their true release dates within those markets. All DVD movie discs are coded for
one or more regions. RPC Codes are placed on Movie Discs that correlate to the region
they are intended for sale. A DVD Drive must likewise be set to a region. For example, a
PC user located in Canada, would have their DVD Drive set to Region One, or a PC user
located in France would have their drive set to Region Two. A DVD disc can only play on
a DVD drive coded for its region. The Canadian PC user could only play Region One
coded Movie DVD discs and a French PC user could only play Region Two coded movie
discs. The Regional Playback Control system does not allow users to play DVD discs that
are not set for their drive. If a user attempts to play a DVD movie disc for a region the
DVD drive is not set, the user will receive an error message explaining the DVD title is of
another region and cannot be played. DO NOT RESET THE REGION.
Setting and Changing the Region Setting of the DVD Drive
To play a DVD movie, the drive must first be set to a Region. Several methods are
available to set the region, which are transparent to the user.
• The Manufacturer may set the region at the factory
• If no region is set at the factory, most software will set the drive to the region coded
on the first movie DVD disc that is played.
• If the first disc is a multi-region coded disc, the drive will be set to the region
determined by such factors as time zone, or language etc. set into the operating
system.
5
Page 6

Once a drive is set to a region, the region can be reset, but for unusual circumstances
only, such as when a user relocates to another region. A REGION CAN ONLY BE
RESET FOUR times. To reset a Region, use a DVD movie disc set to the new region. A
notification box will respond, explaining the disc belongs to another region and cannot be
played. The notification explains the region setting can be reset. Follow the instructions to
reset the Drive.
NOTE: High-speed drives spin the disc at a high rotational speed. If a CD has printing on only
half of the disc, or if there is a slight imbalance in the CD, the imbalance is greatly magnified
by the high speed, causing the drive to vibrate or produce a fan-like noise. These effects are
inherent in the high-speed technology and do not indicate a problem with the drive.
Emergency Ejection (use only in the case of an emergency)
If the disc tray does not open when the OPEN / CLOSE button is pressed:
1. Make sure that the power of the DVD-ROM is turned on.
2. Make sure the lock function has not been activated.
3. Try shutting down your system and turning off all power.
4. Turn power on again and try pressing the OPEN/CLOSE button again.
5. If the disc tray still will not open, the DVD-ROM drive’s manual emergency mechanism
may be activated.
6. Turn off the DVD-ROM drive and wait at least 15 seconds until the disc stops rotating.
7. Insert a straightened paper clip into the manual emergency eject hole (about 25mm (1
inch) to eject the tray.
8. Pull the disc tray open gently.
NOTE: If it is necessary to use the emergency eject procedure to open the drive, the tray should
be closed by turning on the power and pressing the OPEN / CLOSE button. Transporting the
drive before it has been properly closed may cause damage to the mechanism.
Handling media
DVD media is more sensitive to dust and fingerprints than CD media. Carefully handle media by
its edges only. If a DVD movie skips or hangs during playback, clean the media. Most DVD
video playback issues are media-related and can be solved by proper handling and care of
media.
Cleaning Media
A commercially available “Laser Lens Cleaning” may be used to clean the pick-up lens of the
DVD-ROM drive. Use the Compact Disc Laser Lens Cleaner LLC-1 (by AUDIO SOURCE in
U.S.A., by Akustik Sisteme Vertriebs GMBH in Germany and by SAEC COMMERCE CO., LTD.
in Japan.
1. Turn on the DVD-ROM drive.
2. Press the OPEN/CLOSE button to open the tray.
3. Using the small brush supplied with the cleaning disc case, straighten up the disc
cleaning brushes on the back of the cleaning disc.
4. Place the cleaning disc in the disc tray with its arrow marked on the discs at front.
5. Press the OPEN/CLOSE button or push the center of the disc tray lightly and close the
disc tray.
6. After about 20 seconds, the pick-up lens is cleaned by the cleaning disc.
6
Page 7

7. Press the OPEN/CLOSE button and remove the cleaning disc.
8. Set the cleaning disc in its case with the disc cleaning brushes in the pad hole.
9. Restart the system.
Troubleshooting: Hitachi GD-5000 8X DVD-ROM User’s
Guide
Problem Possible Causes Corrective Action
Cannot play a DVD or CD in
the drive or certain types of
discs cannot be read in the
drive.
Disc Tray cannot be opened 1) Power is not turned on.
Drive is not recognized by
system.
1) The disc is placed upside
down in the disc tray.
2) The disc is dirty.
3) The pick-up lens is dirty.
4) The disc is scratched or
warped.
5) The disc has a region
code that cannot be
played on the drive.
2) The lock function has
been activated.
3) The tray is stuck.
1) The cables are not properly
connected.
1) Place the disc right side
up.
2) Clean the disc surface.
3) Clean the pick-up lens.
4) Change the disc.
5) Refer to your system
manual for help.
1) Turn the power on and try
again.
2) De-activate the lock
function.
3) Turn off the DVD-ROM
drive. Insert a
straightened paperclip into
the manual emergency
eject hole. Pull the disc
tray open.
1) Turn off your system and
re-install the device driver.
Consult the Dell documentation for your system for additional information on troubleshooting
DVD-ROM drive problems.
Specifications: Hitachi GD-5000 8X DVD-ROM User’s
Guide
NOTE: These specifications are provided by the manufacturer for information purposes only and
do not constitute an extension of Dell’s warranty to you. Dell’s warranty is contained in the
documentation for your system.
General
Hitachi
GD-5000
7
Page 8

Enhanced IDE ATAPI interface
Compatible CD-ROM standards (read only)
• CD-ROM
• CD-ROM-XA
• CD-I
• CD Audio (CD-DA)
• Photo-CD Multi-session
• CD-Extra
• CD-RW
• CD-R
• CD-TEXT
Compatible DVD-ROM standards (read only)
• DVD-ROM
• DVD-R
• DVD-RAM (2.6 GB format)
Storage capacities: (1 Mbytes = 106 bytes, 1 Gbytes = 109 bytes)
DVD-ROM:
DVD-5: 4.7 GB (single-sided, single layer)
DVD-9: 8.5 GB (single-sided, dual layer)
DVD-10: 9.4 GB (double-sided, single layer)
DVD-18: 17 GB (double-sided, double layer)
DVD-R:
3.95 GB (single-sided)
7.9 GB (double-sided)
DVD-RAM:
2.6 GB (single-sided)
CD-ROM:
650 MB (Mode 1)
742 MB (Mode 2)
Performance
Rotational speed
Approx. 4,650 rpm (DVD-ROM single layer)
8
Page 9

Approx. 3,850 rpm (DVD-ROM dual layer)
Approx. 1,400 rpm (DVD-R)
Approx. 2,400 rpm (DVD-RAM inside), Approx. 1,000 rpm (DVD-RAM outside)
Approx. 8,750 rpm (CD-ROM 17x to 40x speed)
Approx. 5,000 rpm (CD-RW)
Approx. 2,150 rpm (CD-I/VIDEO CD/CD-DA)
Data transfer rate
Sustained rates
Burst rate
11.08 Mbytes/s DVD-ROM
3.463 Mbytes/s max. DVD-R
1.385 Mbytes/s max. DVD-RAM
6 Mbytes/s max. CD-ROM
DAE Speed
10x max (4.3x – 10x CAV)
Access time
120 ms (typical) DVD-ROM
90 ms (typical) CD-ROM
Average latency
6.5 ms DVD-ROM (8x Full CAV speed)
3.4 ms CD-ROM (40x Full CAV speed)
Data error rate
Less than 10
PIO Mode 4 - 16.6 Mbytes/s max.
Multi Word DMA Mode 2 - 16.6 Mbytes/s max.
Single Word DMA Mode 2 - 8.3 Mbytes/s max.
-12
DVD-ROM
Less than 10
Less than 10
-12
CD-ROM
-9
CD-ROM (Mode 2)
9
Page 10

Spin-up time
Memory buffer size
Reliability
MTBF
From power on
9 s : Max 12 s to drive ready mode DVD-ROM
9 s : Max.12 s to drive ready mode CD-ROM
From sleep on (stand by)
3 s : Max. 6 s to drive ready mode DVD-ROM
3 s : Max. 5 s to drive ready mode CD-ROM
512 kbytes DVD-ROM
512 kbytes CD-ROM
125,000 (POH)
Audio
3,000 POH per year
480 On/off cycles per year
20% of Power on time (seek: 5% of operating time) Operating duty cycle
MTTR
0.5 h Mean time to repair
2 channels
20 to 20,000 Hz+/-3 dB frequency response
0.1% (LPF 20 khZ, 1 khZ) max. Distortion
Output levels
Headphones: 0.65 Vrms typical (Volume maximum, 32 ohms Load)
Line Out: 0.7 Vrms (47 kohms Load, Att=0dB) typical
Output Terminals
Headphones: ϕ3.5mm Jack
Line Out: 4-pin Terminal
10
Page 11

Environmental
Ambient Temperature
Approved Temperature Rise
Temperature Gradient
Relative humidity
Dew-point restrictions
5oC to 45oC Operating
-30oC to 60oC Storage/Transportation
62o max. at the center of bottom cover
o
10
C/h (max.) Temperature gradient
15% to 85% Operating
10% to 90% Storage/Transportation
29° C
Power
Vibration
Less than 1.96 m/s2 (0.2G) Operating
Less than 9.8 m/s2 (1.0G) Storage
Shock (storage)
Less than 490 m/s2 (50G), 10 ms square wave shock
DC voltage and current requirements
+5 VDC + 5%
Standby (sleep) 120mA (typ.) 150mA (max.)
Idle 720mA (typ.) 1,100mA (max.)
Seek 720mA (typ.) 1,100mA (max.)
+12 VDC + 10%
Standby (sleep) 0mA (typ.) 5mA (max.)
Idle 360mA (typ.) 550mA (max.)
Seek 500mA (typ.) 750mA (max.)
11
Page 12

Physical
Height 41.3mm (1-5/8 inch)
Width 146mm (5-3/4 inch)
Depth 180mm (7-1/11 inch)
Weight 950gr (2-2/10 pounds)
Connectors
IDE Interface connector (with DC input connector)
Audio-output connector
Lasers
CD Laser
Red laser
780 nm wave length
DVD laser
Red laser
650 nm wave length
Drive Connectors: Hitachi GD-5000 8X DVD-ROM User’s
Guide
Audio Device IDE Interface Power
Connector Configuration Jumper Connector
12
Page 13

Jumpers: Hitachi GD-5000 8X DVD-ROM User’s Guide
Jumper settings
PINS SETTING DESCRIPTION
1-2 Master (Factory setting) The drive is set to Master
when the jumpers are
positioned on the two pins
closest to the IDE cable.
3-4 Slave The drive is set to slave when
the jumpers are positioned on
the middle two pins. This
allows the drive to be on the
same cable as the hard drive.
This may cause a negative
effect on the speed of your
hard drive.
5-6 Cable Select Please contact the
manufacturer of your computer
for information on this setting.
This is the standard
configuration for putting the
drive alone on a secondary
IDE cable.
None Slave The drive is set to slave when
the jumpers are positioned on
the middle two pins. This
allows the drive to be on the
same cable as the hard drive.
This may cause a negative
effect on the speed of your
hard drive.
Jumper locations
13
Page 14

Regulatory: Hitachi GD-5000 8X DVD-ROM User’s Guide
UL1950
C-UL (CSA C22.2 No. 950-95)
TUV (EN60950/EN60825)
CB (IEC950/IEC825)
Class 1 laser product comply with DHHS rules 21CFR Subchapter J
FCC Rule Part 15 Class B
CE Marking (89/336/EEC,92/31/EEC,93/68/EEC)
C-Tick Mark
RRL – (Korean)
This equipment has been tested and found to comply with the limits for a Class B digital device,
pursuant to Part 15 of the FCC rules. These limits are designed to provide reasonable protection
against harmful interference in a residential installation. This equipment generates, uses and can
radiate radio frequency energy, and, if not installed and used in accordance with the instructions,
may cause harmful interference to radio communications. However, there is no guarantee that
interference will not occur in a particular installation. If this equipment does cause harmful
interference to radio or television reception, which can be determined by turning the equipment
off and on, the user is encouraged to try to correct the interference by one or more of the
following measures:
1. Re-orientate or relocate the receiving antenna.
2. Increase the separation between the equipment and receiver.
3. Connect the equipment into an outlet on a circuit different from that to which the receiver is
connected.
4. Consult the dealer or an experienced radio/TV technician for help.
Changes or modifications not expressly approved by the party responsible for compliance
could void the user’s authority to operate the equipment.
14
 Loading...