

Page 1
Model
Modèle
Modelo
CH 22EAP (50ST)/CH 22EBP (62ST)
CH 22ECP (62ST)/CH 22ECP (78ST)
CH22EBP(62ST)
Hedge Trimmer
Taille-Haies
Cortasetos
SAFETY INSTRUCTIONS AND INSTRUCTION MANUAL
WARNING
IMPROPER OR UNSAFE use of this power tool can result in death or serious bodily injury!
This manual contains important information about product safety. Please read and understand this manual
BEFORE operating the power tool. Please keep this manual available for other users and owners before
they use the power tool. This manual should be stored in safe place.
INSTRUCTIONS DE SECURITE ET MODE D’EMPLOI
AVERTISSEMENT
Une utilisation INCORRECTE OU DANGEREUSE de cet outil motorisé peut entraîner la mort ou de
sérieuses blessures corporelles !
Ce mode d’emploi contient d’importantes informations à propos de la sécurité de ce produit. Prière de
lire et de comprendre ce mode d’emploi AVANT d’utiliser l’outil motorisé. Garder ce mode d’emploi à la
disponibilité des autres utilisateurs et propriétaires avant qu’ils utilisent l’outil motorisé. Ce mode d’emploi
doit être conservé dans un endroit sûr.
INSTRUCCIONES DE SEGURIDAD Y MANUAL DE INSTRUCCIONES
ADVERTENCIA
¡La utilización INAPROPIADA O PELIGROSA de esta herramienta eléctrica puede provocar lesiones
graves o la muerte!
Este manual contiene información importante sobre la seguridad del producto. Lea y comprenda este
manual ANTES de utilizar la herramienta eléctrica. Guarde este manual para que puedan leerlo otras
personas antes de utilizar la herramienta eléctrica. Este manual debe ser guardado en un lugar seguro.
Page 2
English
MEANINGS OF SYMBOLS
NOTE: Some units do not carry them.
Symbols
WARNING
The following show symbols used for the machine. Be sure that you understand their
meaning before use.
It is important that you read, fully
understand and observe the following
safety precautions and warnings. Careless
or improper use of the unit may cause
serious or fatal injury.
Read, understand and follow all warnings
and instructions in this manual and on the
unit.
Contents
WHAT IS WHAT? ................................................... 2
WARNINGS AND SAFETY INSTRUCTIONS ......... 3
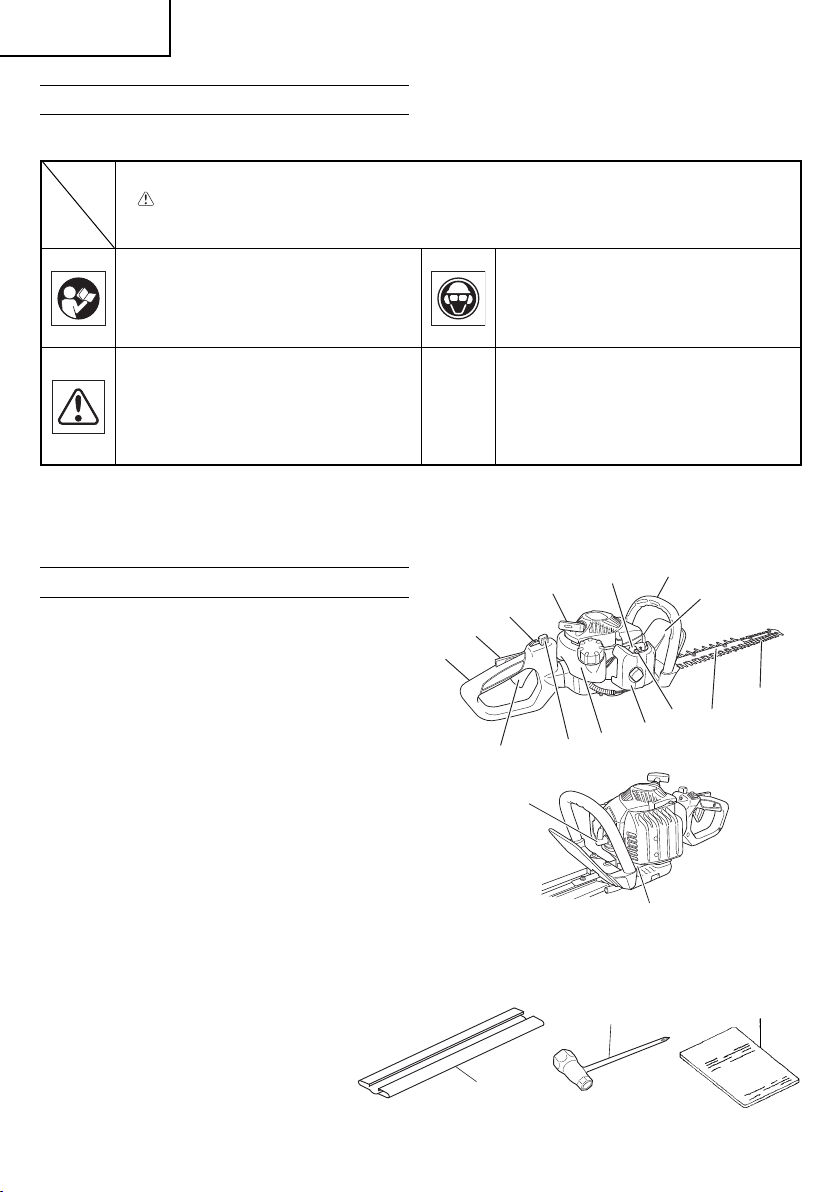
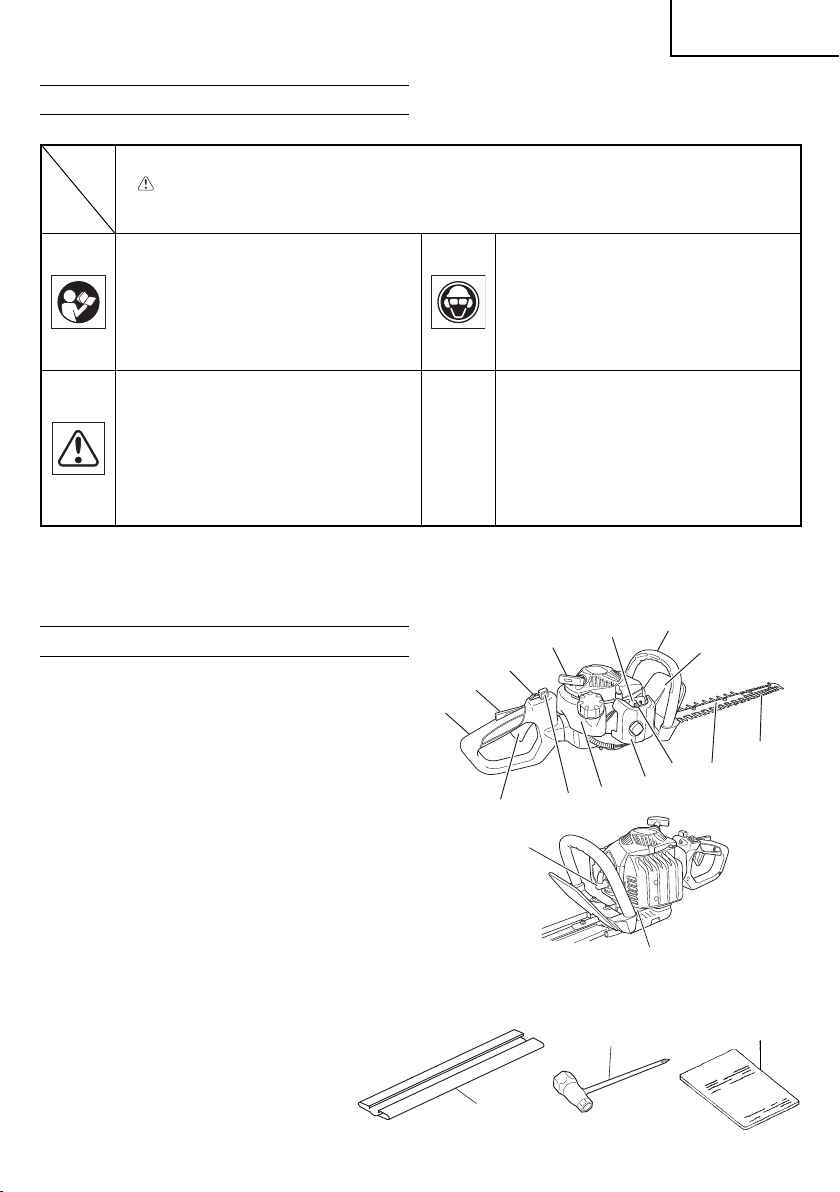
WHAT IS WHAT?
Since this manual covers several models, there may
be some diff erence between these illustrations and
your unit. Use the instructions that apply to your unit.
1. Recoil starter
2. Fuel tank
3. Throttle lever lockout
4. Throttle lever
5. Front handle
6. Rear handle
7. Spark plug
8. Hand guard
9. Cutting blade
10. Air cleaner
11. Stop switch
12. Blade guard
13. Gear case
14. Choke lever
15. Lock lever
16. Priming pump
17. Blade case
18. Combi box spanner
19. Handling instructions
Always wear eye, head and ear protectors
when using this unit.
Before using your machine
• Read the manual carefully.
• Check that the cutting equipment is
correctly assembled and adjusted.
• Start the unit and check the carburetor
adjustment. See “MAINTENANCE”.
SPECIFICATIONS .................................................. 5
OPERATING PROCEDURES ................................. 5
MAINTENANCE ..................................................... 7
10
13
5
14
8
9
12
19
16
1
11
3
6
2
4
CH22EAP (50ST), CH22EBP (62ST)
CH22ECP (62ST), CH22ECP (78ST)
15
7
18
17
2
Page 3

English
WARNINGS AND SAFETY
INSTRUCTIONS
Keep for future reference.
THIS HEDGE TRIMMER CAN CAUSE SERIOUS
INJURIES. Read the instructions carefully for the
correct handling, preparation, maintenance, starting
and stopping of the hedge trimmer. Become familiar
with all controls and the proper use of the hedge
trimmer.
Operator safety
○ Always wear a safety face shield or goggles.
○ Always wear heavy, long pants, boots and
gloves. Do not wear loose clothing, jewelry, short
pants, sandals or go barefoot. Secure hair so it is
above shoulder length.
○ Do not operate this tool when you are tired,
ill or under the infl uence of alcohol, drugs or
medication.
○ Never let a child or inexperienced person operate
the machine.
○ Beware of overhead power lines.
○ Wear hearing protection.
○ Never start or run the engine inside a closed
room or building. Breathing exhaust fumes can
kill.
○ Keep handles free of oil and fuel.
○ Keep hands away from cutting equipment.
○ Do not grab or hold the unit by the cutting
equipment.
○ When the unit is turned off , make sure the cutting
attachment has stopped before the unit is set
down.
○ When operation is prolonged, take a break from
time to time so that you may avoid possible
Hand-Arm Vibration Syndrome (HAVS) which is
caused by vibration.
○ If the cutting mechanism strikes any foreign object
or the hedge trimmer starts making any unusual
noise or vibration, shut off the power source and
allow the hedge trimmer to stop. Disconnect the
spark plug wire from the spark plug and take the
following steps:
• Inspect for damage;
• Check for, and tighten, any loose parts;
• Have any damaged parts replaced or repaired
with parts having equivalent specifi cations.
WARNING
● Antivibration systems do not guarantee that
you will not sustain Hand-Arm Vibration
Syndrome or carpal tunnel syndrome.
Therefore, continual and regular users
should monitor closely the condition of
their hands and fi ngers. If any symptoms
of the above appear, seek medical advice
immediately.
● If you are using any
electronic devices such as a pacemaker,
consult your physician as well as the device
manufacturer prior to operating any power
equipment.
● When a foreign object is caught in the blade,
turn off the engine, and remove the foreign
object carefully using a plier etc., after the
hedge
trimmer has been cooled down. Be
careful when removing the foreign object,
since the blade may move because of the
backlash.
Unit/machine safety
○ Inspect the entire unit/machine before each use.
Replace damaged parts. Check for fuel leaks and
make sure all fasteners are in place and securely
tightened.
○ Replace parts that are cracked, chipped or
damaged in any way before using the unit/
machine.
○ Keep others away when making carburetor
adjustments.
○ Use only accessories as recommended for this
unit/machine by the manufacturer.
WARNING
Never modify the unit/machine in any way.
Do not use your unit/machine for any job
except that for which it is intended.
Fuel safety
○ Mix and pour fuel outdoors and where there are
no sparks or fl ames.
○ Use a container approved for fuel.
○ Never remove the fuel cap or add fuel with the
power source running. Allow engine and exhaust
components to cool down before refuelling.
○ Do not smoke or allow smoking near fuel or the
unit/machine or while using the unit/machine.
○ Never refuel indoors.
○ Wipe up all fuel spills before starting engine.
○ Move at least 3 m away from fueling site before
starting engine.
○ Stop engine before removing fuel cap.
○ Empty the fuel tank before storing the unit/
machine. It is recommended that the fuel be
emptied after each use. If fuel is left in the tank,
store so fuel will not leak.
medical electric/
3
Page 4

English
○ Store unit/machine and fuel in area where fuel
vapors cannot reach sparks or open fl ames
from water heaters, electric motors or switches,
furnaces, etc.
WARNING
Fuel is easy to ignite or get explosion or
inhale fumes, so that pay special attention
when handling or fi lling fuel.
Cutting safety
○ Do not cut any material other than plant hedge.
○ Inspect the area to be cut before each use.
Remove objects which can be thrown or become
entangled.
○ For respiratory protection, wear an aerosol
protection mask when cutting the grass after
insecticide is scattered.
○ Keep others including children, animals,
bystanders and helpers outside the 15 m hazard
zone. Stop the engine immediately if you are
approached.
○ Hold the unit/machine fi rmly with both hands.
○ Keep fi rm footing and balance. Do not over-
reach.
○ Keep all parts of your body away from the muffl er
and cutting attachment when the engine is
running.
○ Keep cutting tool below shoulder level. NEVER
operate unit from a ladder, while in a tree or from
any unstable support.
○ When relocating to a new work area, be sure to
shut off the machine and ensure that all cutting
attachments are stopped.
○ Never place the machine on the ground when
running.
○ Always carry a fi rst-aid kit when operating any
power equipment.
○ Never start or run the engine inside a closed
room or building and/or near the infl ammable
liquid. Breathing exhaust fumes can kill.
Maintenance safety
○ Maintain the unit/machine according to
recommended procedures.
○ Disconnect the spark plug before performing
maintenance except for carburetor adjustments.
○ Keep others away when making carburetor
adjustments.
○ Use only genuine Hitachi replacement parts as
recommended by the manufacturer.
○ When the hedge trimmer is stopped for servicing,
inspection or storage, shut off the power source,
disconnect the spark plug wire from the spark
plug and make sure all moving parts have come
to a stop.
Allow the hedge trimmer to cool before making
any inspection, adjustment, etc.
Transport and storage
○ Carry the unit/machine by hand with the engine
stopped and the muffl er away from your body.
○ Allow the engine to cool, empty the fuel tank,
and secure the unit/machine before storing or
transporting in a vehicle.
○ Empty the fuel tank before storing the unit/
machine. It is recommended that the fuel be
emptied after each use. If fuel is left in the tank,
store so fuel will not leak.
○ Store unit/machine out of the reach of children.
○ Clean and maintenance the unit carefully and
store it in a dry place.
○ Make sure engine switch is off when transporting
or storing.
○ When transporting in a vehicle or storage, cover
blade with blade cover.
If situations occur which are not covered in this
manual, take care and use common sense. Contact
your Hitachi dealer if you need assistance. Pay
special attention to statements preceded by the
following words:
WARNING
Indicates a strong possibility of severe
personal injury or loss of life, if instructions
are not followed.
CAUTION
Indicates a possibility of personal injury or
equipment damage, if instructions are not
followed.
NOTE
Helpful information for correct function and use.
CAUTION
Do not disassemble the recoil starter. You
may get a possibility of personal injury with
recoil spring.
4
Page 5
SPECIFICATIONS
English
MODEL
Engine Size (cu. in.) 1.34 (21.1 ml)
Spark Plug Champion CJ 6
Fuel Tank Capacity (fl . oz) 10.1 (0.30 l)
Dry Weight (lbs) 9.9 (4.5 kg) 10.6 (4.8 kg) 11.7 (5.3 kg) 12.1 (5.5 kg)
Overall blade length (in.) 19.7 (500 mm) 24.4 (620 mm) 24.4 (620 mm) 30.7 (780 mm)
Blade type
Sound pressure level
LpA (dB(A)) (ISO 10517) 89 89 89 89
Sound power level
Lw measured (dB (A))
(2000/14/EC)
LwA (dB (A)) 112
Vibration level (m/s
(ISO 10517)
Front handle
Rear handl
NOTE
Equivalent noise level/vibration level are calculated as the time-weighted energy total for noise/vibration
levels under various working conditions with the following time distribution: ISO 10517.....1/5 idle, 4/5
racing. 2000/14/EC.....only racing.
* All data is subject to change without notice.
2
OPERATING PROCEDURES
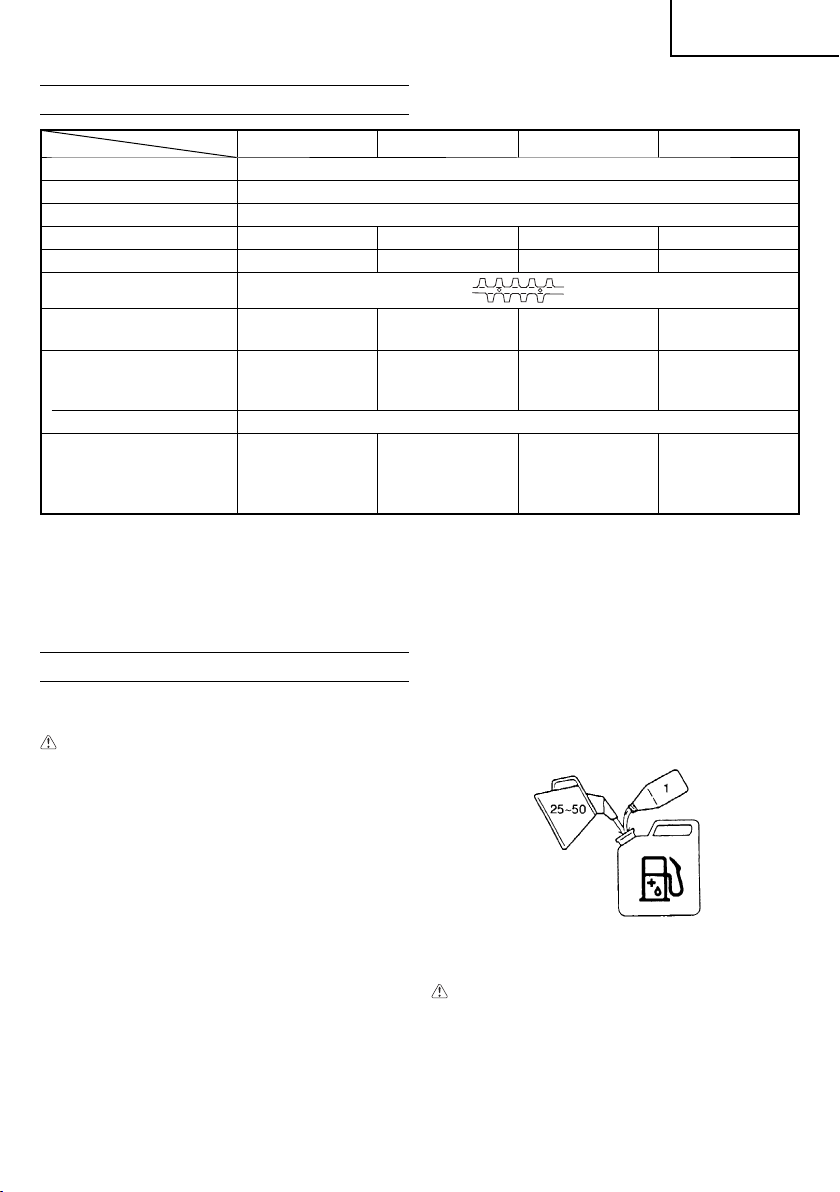
Fuel (Fig. 1)
WARNING
The hedge trimmer is equipped with a two-
stroke engine. Always run the engine on fuel,
mixed with oil.
Provide good ventilation, when fueling or
handling fuel.
Fuel
○ Always use branded 89 octane unleaded
gasoline.
○ Use genuine two-cycle oil or use a mix between
25:1 to 50:1, please consult the oil bottle for the
ratio or Hitachi dealer.
○ Only for the state of California at 50:1.
○ If genuine oil is not available, use an anti-oxidant
added quality oil expressly labeled for air-cooled
2-cycle engine use (JASO FC GRADE OIL or ISO
EGC GRADE). Do not use BIA or TCW (2-stroke
water-cooling type) mixed oil.
○ Never use multi-grade oil (10W/30) or waste oil.
○ Always mix fuel and oil in a separate clean
container.
CH22EAP (50ST) CH22EBP (62ST) CH22ECP (62ST) CH22ECP (78ST)
108 108 108 108
)
7.3
5.9
14.8
7.4
Always start by fi lling half the amount of fuel, which
is to be used. Then add the whole amount of oil. Mix
(shake) the fuel mixture. Add the remaining amount
of fuel.
Mix (shake) the fuel-mix thoroughly before fi lling the
fuel tank.
Fueling
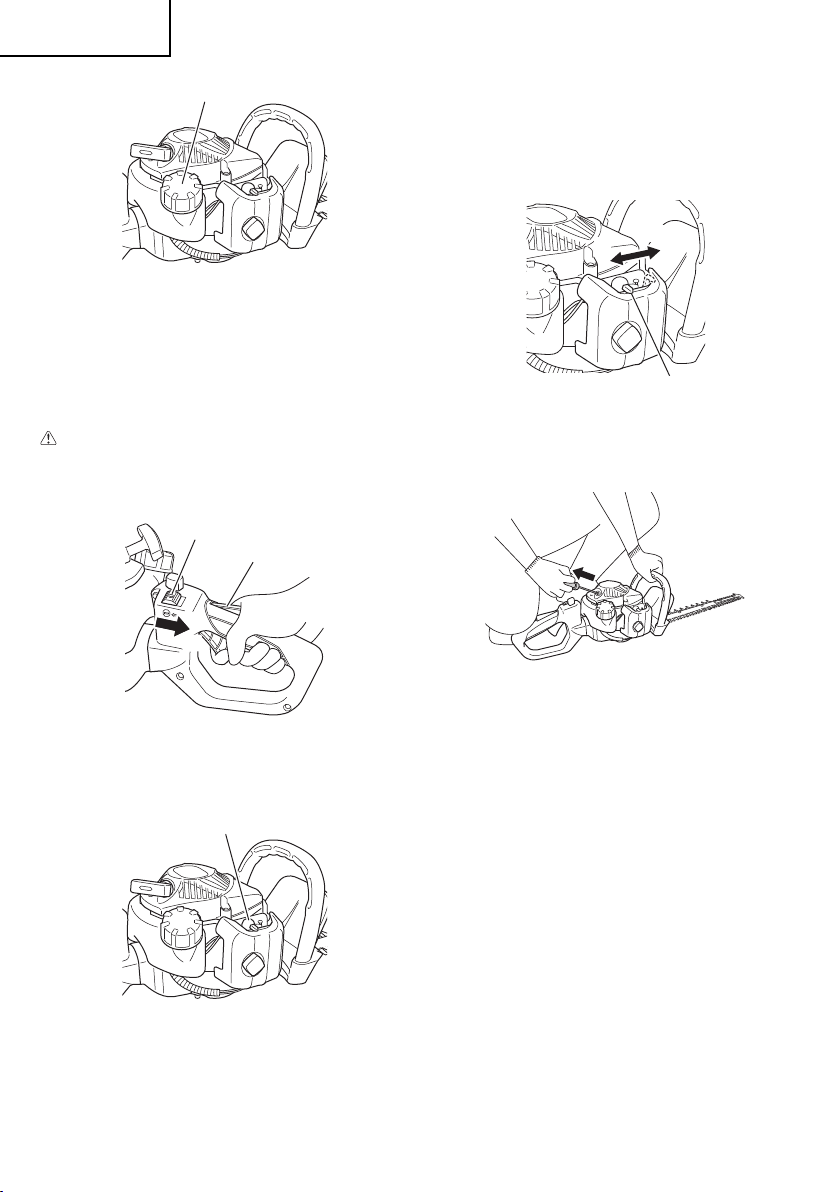
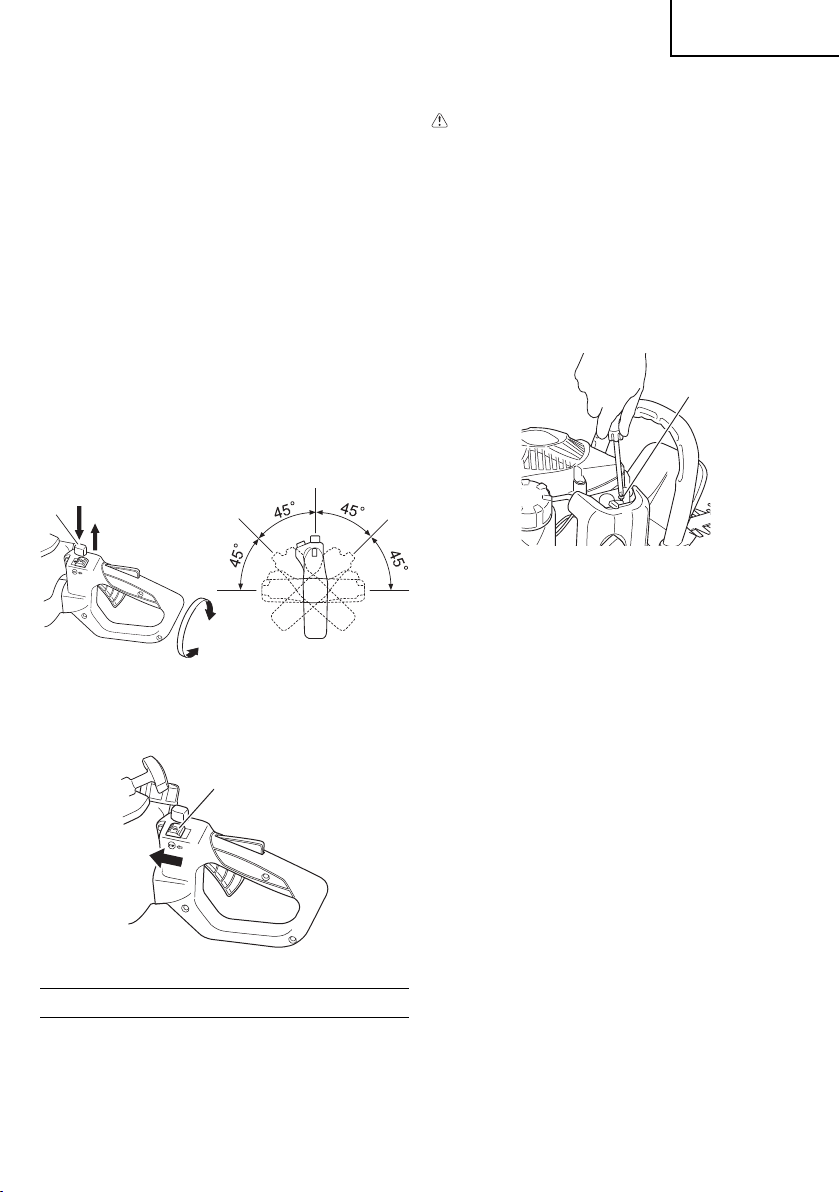
WARNING (Fig. 2)
● Always shut off the engine before refueling.
● Slowly open the fuel tank (1), when fi lling
up with fuel, so that possible over-pressure
disappears.
● Tighten the fuel cap carefully, after fueling.
● Always move the unit at least 10 ft (3 m) from
the fueling area before starting.
2.6
2.8
A
Fig. 1
2.6
2.8
B
5
Page 6
English
1
Fig. 2
Before fueling, clean the tank cap area carefully, to
ensure that no dirt falls into the tank. Make sure that
the fuel is well mixed by shaking the container, before
fueling.
Starting
CAUTION
Before starting, make sure the cutting
attachment does not touch anything.
1. Set stop switch (2) to ON position (A). (Fig. 3)
2
3
A
2. With the throttle lever lockout (3) pressed, pull
throttle lever, then slowly release the throttle lever
fi rst, then the throttle lever lockout. This will lock
the throttle in starting position. (Fig. 3)
3. Set choke lever (5) to CLOSED position (B). (Fig.
5)
B
C
5
Fig. 5
4. Pull recoil starter briskly, taking care to keep the
handle in your grasp and not allowing it to snap
back. (Fig. 6)
Fig. 3
* Push priming pump (4) several times so that
fuel fl ows through the pump or return pipe. (If so
equipped) (Fig. 4)
4
Fig. 4
6
Fig. 6
5. When you hear the engine attempts to start,
return choke lever to RUN position (open) (C).
Then pull recoil starter briskly again.
NOTE
If engine does not start, repeat procedures from 2
to 4.
6. After starting engine, allow the engine about 2-3
minutes to warm up before subjecting it to any
load.
Cutting
When cutting, operate engine at full throttle as this
maintains proper blade speed. When trimming top of
hedge, hold trimmer so blades are between 15 and 30
degrees from a horizontal position and swing trimmer
in an arc toward edge of hedge to sweep cuttings off .
When trimming sides of hedge, hold blade vertically
and swing unit in an arc.
Page 7
English
NOTE
○ Multi-position twist handle (Fig. 7)
The rear control handle turns 90 degrees to
provide comfortable use while accommodating a
variety of cutting angles. The handle allows for
fi ve diff erent locking positions. Before attempting
to adjust rear handle, make sure the machine is
at idle or engine is shut off .
○ The machine will automatically shut off if the
throttle lever is pressed while the handle is NOT
secured in one of the fi ve preset positions. Never
attempt to operate the machine unless the rear
handle is properly locked in place.
To rotate the handle; push the lock lever (6)
allowing the handle to turn. Press the lock lever
(6) to release the lock and allow the handle to
turn. Rotate the handle to the desired 0°, 45° or
90° locking position and release the lock lever (6)
to lock the handle in place.
D: LOCK
E: UNLOCK
E
6
D
Fig. 7
Stopping (Fig. 8)
Decrease engine speed, and push stop switch to stop
position (F).
2
F
Fig. 8
Carburetor adjustment (Fig. 9)
WARNING
● The cutting attachment may be spinning
during carburetor adjustments.
● Never start the engine without the complete
cleaner cover. Otherwise the clutch can
come loose and cause personal injuries.
In the carburetor, fuel is mixed with air. When the
engine is test run at the factory, the carburetor is
adjusted. A further adjustment may be required,
according to climate and altitude. The carburetor has
one adjustment possibility:
T = Idle speed adjustment screw.
T
Fig. 9
Idle speed adjustment (T)
Check that the air fi lter is clean. When the idle speed
is correct, the cutting attachment will not rotate. If
adjustment is required, close (clockwise) the T-screw,
with the engine running, until the cutting attachment
starts to rotate. Open (counter-clockwise) the screw
until the cutting attachment stops. You have reached
the correct idle speed when the engine runs smoothly
in all positions well below the rpm when the cutting
attachment starts to rotate.
If the cutting attachment still rotates after idle speed
adjustment, contact Hitachi dealer.
Air fi lter (Fig. 10)
The air fi lter must be cleaned from dust and dirt in
order to avoid:
○ Carburetor malfunctions.
○ Starting problems.
○ Engine power reduction.
○ Unnecessary wear on the engine parts.
○ Abnormal fuel consumption.
MAINTENANCE
MAINTENANCE, REPLACEMENT OR REPAIR OF
THE EMISSION CONTROL DEVICES AND SYSTEM
MAY BE PERFORMED BY ANY NONROAD ENGINE
REPAIR ESTABLISHMENT OR INDIVIDUAL.
7
Page 8

English
Clean the air fi lter daily or more often if working in
exceptionally dusty areas.
Fig. 10
Cleaning the air fi lter
Remove the cleaner cover and the fi lter. Rinse it in
warm soap suds. Check that the fi lter is dry before
reassembly. An air fi lter that has been used for some
time cannot be cleaned completely. Therefore, it
must regularly be replaced by a new one. A damaged
fi lter must always be replaced.
NOTE
Saturate the element in 2-cycle oil or the
equivalent. Squeeze the element to distribute the
oil completely and to remove any excess oil.
Spark plug (Fig. 11)
The spark plug condition is infl uenced by:
○ An incorrect carburetor setting.
○ Wrong fuel mixture (too much oil in the gasoline).
○ A dirty air fi lter.
○ Hard running conditions (such as cold weather).
These factors cause deposits on the spark plug
electrodes, which may result in malfunction and
starting diffi culties. If the engine is low on power,
diffi cult to start or runs poorly at idling speed, always
check the spark plug fi rst. If the spark plug is dirty,
clean it and check the electrode gap. Readjust if
necessary. The correct gap is 0.024״ (0.6 mm).
The spark plug should be replaced after about 100
operation hours or earlier if the electrodes are badly
eroded.
0.024״ (0.6 mm)
Fig. 11
NOTE
In some areas, local law requires using a resistor
spark plug to suppress ignition signals. If this
machine was originally equipped with resistor
spark plug, use the same type of spark plug for
replacement.
Cutting blade (Fig. 12, 13)
The blades are installed to the blade guide with the
four, fi ve or six bolts. Those bolts are tightened with
a clearance so that the blades can move smoothly.
Fig. 12
Fig. 13
When clearance is too small
The blades do not move properly and the sliding
surfaces may seize.
When clearance is too large
The blades are poor in sharpness.
To adjust the blade clearance
1. Loosen the blade fi xing nuts.
2. Fully tighten the blade fi xing bolts and then
loosen them approx. 3/8 turn.
3. With the bolts set at that position, tighten the
blade fi xing nuts.
Be sure to replace blade guide fi xing bolts when they
are loosened, worn or damaged. Also be sure to
replace damaged cutter blade.
NOTE
Properly lubricate the blade sliding surfaces with
machine oil.
8
Page 9
Gear case (Fig. 14)
Apply a good quality lithium based grease through the
grease fi tting until a small amount comes out between
the cutting blades and the gear case. Lubricate the
grease from the grease nipple (indicated by an arrow)
next to the gear case using a commercially available
cartridge grease gun.
Fig. 14
NOTE
Lubrication should be applied 3g at 20 hour
intervals and more frequently with heavy use.
Fuel fi lter (Fig. 15)
Remove the fuel fi lter from the fuel tank and thoroughly
wash it in solvent. After that, push the fi lter into the
tank completely.
Fig. 15
NOTE
If the fi lter is hard due to dust and dirt, replace it.
Cleaning the cylinder fi ns (Fig. 16)
When leaves get caught between cylinder fi ns (7),
the engine may overheat, resulting in lower output.
To avoid this, always keep cylinder fi ns and cylinder
cover clean.
Every 100 operating hours, or once a year (more
often if conditions require), clean fi ns and external
surfaces of engine of dust, dirt and oil deposits which
can contribute to improper cooling.
English
7
Fig. 16
Cleaning the muffl er (Fig. 17)
Remove the muffl er and spark arrestor (if so
equipped), and clean out any excess carbon from
the exhaust port or muffl er inlet every 100 hours of
operation.
Fig. 17
For long-term storage
Drain all fuel from the fuel tank. Start and let engine
run until it stops. Repair any damage which has
resulted from use. Clean the unit with a clean rag,
or high pressure air hose. Put a few drops of twocycle engine oil into the cylinder through the spark
plug hole, and spin the engine over several times to
distribute oil. Cover the unit and store it in a dry area.
Maintenance schedule
Below you will fi nd some general maintenance
instructions. For further information please contact
your Hitachi dealer.
Daily maintenance
○ Clean the exterior of the hedge trimmer.
○ Check the blade guide for damage or cracks.
Change the guard in case of impacts or cracks.
○ Check that the blade is sharp, and without cracks.
○ Check that the blade nut is suffi ciently tightened.
○ Make sure that the blade blunt guard is
undamaged and that it can be securely fi tted.
○ Check that nuts and screws are suffi ciently
tightened.
9
Page 10

English
Weekly maintenance
○ Check the starter, especially cord and return
spring.
○ Clean the exterior of the spark plug.
○ Remove it and check the electrode gap. Adjust it
to 0.024״ (0.6 mm), or change the spark plug.
○ Clean the cooling fi ns on the cylinder and check
that the air intake at the starter is not clogged.
○ Check gear case is fi lled with grease.
○ Clean the air fi lter.
Monthly maintenance
○ Rinse the fuel tank with gasoline.
○ Clean the exterior of the carburetor and the space
around it.
○ Clean the fan and the space around it.
10
Page 11
SIGNIFICATION DES SYMBOLES
REMARQUE: Certains ensembles n’en sont pas pourvus.
Symboles
ATTENTION
Les symboles suivants sont utilisés pour l’outil. Bien se familiariser avec leur
signifi cation avant d’utiliser l’outil.
II est essentiel de lire et de comprendre
parfaitement les consignes de sécurité
et autres avertissements suivants. Vous
devez les observer strictement. L’utilisation
inattentive ou inadéquate de cette machine
risque de provoquer des blessures graves
ou fatales.
Lisez attentivement et respectez toutes
les instructions et tous les avertissements
donnés dans ce manuel et sur le produit.
Sommaire
DESCRIPTION ..................................................... 11
PRÉCAUTIONS ET CONSIGNES
DE SÉCURITÉ ............................................... 12
DESCRIPTION
Ce manuel étant commun à plusieurs modèles, vous
constaterez peut-être certaines diff érences entre
les images et votre appareil. Suivez les instructions
concernant votre modèle.
1. Lanceur
2. Réservoir de carburant
3. Levier accélérateur bloqué
4. Commande des gaz
5. Poignée avant
6. Poignée arrière
7. Bougie d’allumage
8. Protection manuelle
9. Lame de coupe
10. Filtre à air
11. Interrupteur d’arrêt (Stop)
12. Protège-lame
13. Boîtier d’engrenages
14. Tirette de starter
15. Levier de verrouillage
16. Pompe d’amorçage
17. Étui de lame
18. Clé à douille multiple
19. Mode d’emploi
Français
Utilisez toujours des lunettes de protection
ainsi qu’une protection pour la tête et les
oreilles lorsque vous utilisez ce produit.
Avant l’utilisation de votre nouvelle
machine
• Lisez attentivement le manuel d’utilisation.
• Vérifi ez que l’équipement de coupe est
monté et réglé correctement.
• Démarrez la machine et vérifi ez le
réglage du carburateur. Voir la section
“ENTRETIEN”.
CARACTÉRISTIQUES ......................................... 14
PROCÉDÉS DE FONCTIONNEMENT ................. 15
ENTRETIEN ......................................................... 17
10
13
5
14
8
9
12
19
16
1
11
3
6
2
4
CH22EAP (50ST), CH22EBP (62ST)
CH22ECP (62ST), CH22ECP (78ST)
17
15
7
18
11
Page 12

Français
PRÉCAUTIONS ET CONSIGNES
DE SÉCURITÉ
À conserver pour référence future.
CE TAILLE-HAIES EST SUSCEPTIBLE DE CAUSER
DES ACCIDENTS CORPORELS GRAVES. Lisez
attentivement les instructions pour permettre une
manipulation, une préparation, une maintenance,
un démarrage et un arrêt corrects du taille-haies.
Familiarisez-vous avec les contrôles et avec
l’utilisation correcte du taille-haies.
Sécurité de l’utilisateur
○ Portez toujours une visière et des lunettes de
protection.
○ Portez toujours un pantalon, des chaussures
et des gants de sécurité. Evitez les vêtements
amples, les shorts, les sandales et les pieds nus.
Veillez à ce que vos cheveux ne descendent pas
au-dessous des épaules.
○ Utilisez cette machine uniquement si vous êtes
en pleine possession de vos moyens physiques.
Evitez strictement la consommation d’alcool, de
drogue ou de médicaments.
○ Ne laissez jamais un enfant ou une personne
inexpérimentée se servir de ces machines.
○ Faites attention aux câbles électriques en
surplomb.
○ Portez un dispositif de protection auditif contre le
bruit.
○ Ne mettez jamais le moteur en marche dans un
local clos, les gaz d’échappement étant toxiques.
○ Nettoyez les poignées de toute trace d’huile ou
de carburant.
○ N’approchez jamais les mains du guide-chaîne et
de la chaîne.
○ N’attrapez jamais et ne tenez jamais la machine
par l’extrémité du guide-chaîne.
○ Après l’arrêt de la tronçonneuse, attendez l’arrêt
complet de la chaîne de coupe avant de poser la
machine.
○ Lors d’une utilisation prolongée, veillez à
oratiquer des pauses régulières afi n d’éviter des
troubles éventuels provoqués par les vibrations.
○ Si le mécanisme de coupe heurte un objet
étranger ou si le taille-haies commence à émettre
des bruits ou des vibrations anormaux, coupez
l’alimentation et laissez le taille-haies s’arrêter.
Débranchez le fi l de la bougie de la bougie et
procédez de la façon suivante:
• Inspectez l’appareil pour détecter les
dommages éventuels;
• Vérifi ez qu’il n’y a pas d’éléments desserrés
et, le cas échéant, serrez-les;
• Faites réparer les éléments endommagés
ou faites-les remplacer par des éléments
possédant des caractéristiques équivalentes.
ATTENTION
● Les systèmes anti-vibrations ne préviennent
pas de la maladie des doigts blancs,
ni du syndrome du canal carpien. Par
conséquent, en cas d’utilisation régulière et
continue de votre tronçonneuse, surveillez
soigneusement l’état de vos mains et de
vos doigts. Si l’un des symptômes ci-dessus
venait à apparaître, il serait
de vous faire examiner immédiatement par
votre médecin.
● Si vous êtes équipé d’un appareillage
médical électrique/électronique (par ex. un
pacemaker), consultez votre médecin et le
fabricant de cet appareillage avant d’utiliser
tout appareil électrique/thermique.
● Quand un objet étranger est pris dans la lame,
arrêtez le moteur et enlevez soigneusement
l’objet étranger à l’aide de pinces ou autre,
après que l’appareil a refroidi. Faites attention
lorsque vous enlevez l’objet étranger, car la
lame risque de bouger en raison d’un recul
brusque.
Règles de sécurité concernant l’utilisation de la
machine
○ Contrôlez entièrement votre machine avant
chaque utilisation. Remplacez les pièces
endommagées. Vérifi ez l’absence de fuites de
carburant et assurez-vous que tous les dispositifs
de fi xation sont en place et solidement fi xés.
○ Remplacez les éléments de la machine qui
présentent des fi ssures, des ébréchures ou toute
autre avarie.
○ Ne laissez personne s’approcher lorsque vous
réglez le carburateur.
○ Utilisez uniquement les accessoires
recommandés par le constructeur pour cette
machine.
ATTENTION
Ne modifi ez en aucun cas la machine.
N’utilisez jamais la tronçonneuse pour un
autre usage que celui pour lequel elle est
prévue.
Sécurité au niveau du carburant
○ Faites le mélange et le plein à l’air libre, à distance
de toute étincelle ou fl amme.
○ Utilisez pour l’essence un récipient agréé.
indispensable
12
Page 13

Français
○ N’enlevez jamais le bouchon du réservoir à
carburant, n’ajoutez jamais de carburant lorsque
la source d’alimentation est connectée. Laissez
les composants du moteur et de l’échappement
refroidir avant de remettre de l’essence.
○ Ne fumez pas et ne laissez personne fumer
à proximité du carburant ou de la machine ni
lorsque vous utilisez la machine.
○ Ne remettez jamais de l’essence lorsque vous
êtes à l’intérieur.
○ Essuyez soigneusement toutes les traces de
carburant avant de mettre le moteur en marche.
○ Pour démarrer la tronçonneuse, écartez-vous
d’au moins 3 mètres de l’endroit où vous avez
fait le plein.
○ Arrêtez le moteur avant de dévisser les bouchons
des réservoirs de carburant ou d’huile.
○ Vidangez le réservoir de carburant avant de ranger
la machine. Cette opération est recommandée
après chaque utilisation. Si le réservoir n’est pas
vide, rangez alors la machine dans une position
empêchant toute fuite de carburant.
○ Rangez la machine et le carburant dans un
endroit où les vapeurs d’essence ne risquent
pas d’entrer en contact avec des étincelles ou
une fl amme en provenance d’un chauff e-eau,
d’un moteur électrique, d’un commutateur, d’une
chaudière, etc.
ATTENTION
Le carburant peut s’enfl ammer facilement
ou exploser et l’inhalation de ses vapeurs
est dangereuse. Faites particulièrement
attention lorsque vous manipulez le
carburant ou faites l’appoint du réservoir.
Sécurité au niveau de la coupe
○ Ne coupez rien d’autre que les haies.
○ Examinez la zone de coupe avant chaque
utilisation. Enlevez tout objet pouvant être projeté
ou s’emmêler dans la machine.
○ Pour la protection des voies respiratoires, portez
un masque de protection contre les aérosols lors
de la coupe d’une végétation traitée avec des
insecticides.
○ Veillez à ce que personne (enfants, animaux,
spectateurs ou aides) ne se tienne à l’intérieur
d’un périmètre de sécurité de 15 m. Arrêtez
immédiatement le moteur si quelqu’un s’approche
de vous.
○ Maintenez fermement la machine des deux
mains.
○ Tenez-vous bien en équilibre sur les deux
jambes. Ne travaillez jamais en porte-à-faux.
○ Restez toujours éloigné du silencieux
d’échappement et de l’ensemble de coupe
lorsque le moteur est en fonctionnement.
○ Maintenez toujours le taille-haie sous le niveau
de l’épaule. N’utilisez JAMAIS la machine sur une
échelle, un arbre ou tout autre support instable.
○ Quand vous déplacez l’appareil d’un lieu à un
autre, vérifi ez que l’appareil est complètement
arrêté et que tous les accessoires de coupe sont
à l’arrêt.
○ Ne placez jamais l’appareil sur le sol en cours de
fonctionnement.
○ Lors de l’utilisation de tout appareil électrique/
thermique, emportez toujours avec vous une
trousse de premiers soins.
○ Ne démarrez jamais le moteur de l’appareil/
N’utilisez jamais I’appareil dans un local clos ou
à l’intérieur d’un bâtiment et/ou à proximité d’un
produit infl ammable. Linhalation des fumées
d’échappement peut être mortelle.
Sécurité au niveau de l’entretien
○ Entretenez votre machine selon les
recommandations du constructeur.
○ Débranchez la bougie avant toute intervention
d’entretien, à l’exception des opérations de
réglages du carburateur.
○ Ne laissez personne s’approcher de la machine
lorsque vous procédez au réglage du carburateur.
○ Utilisez uniquement des pièces de rechange
d’origine Hitachi.
○ Lorsque le taille-haies est arrêté en vue d’une
réparation, d’un contrôle ou pour être rangé,
coupez la source d’alimentation, débranchez le
fi l de bougie de la bougie et assurez-vous que
tous les éléments mobiles se sont bien arrêtés.
Laissez le taille-haies refroidir avant toute
inspection, réglage, ou autre.
Transport et rangement
○ Portez la machine avec moteur arrêté et
silencieux orienté vers l’extérieur.
○ Laissez le moteur refroidir, videz le réservoir de
carburant et veillez à la stabilité de la machine
lors du rangement ou du chargement à bord d’un
véhicule.
○ Vidangez le réservoir de carburant avant
de ranger la machine. Cette opération est
recommandée après chaque utilisation. Si le
réservoir n’est pas vide, rangez alors votre
tronçonneuse dans une position empêchant
toute fuite de carburant.
○ Remisez la machine hors de portée des enfants.
○ Nettoyez soigneusement la tronçonneuse avant
de l’entreposer dans un endroit sec et aéré.
13
Page 14

Français
○ Assurez-vous que le commutateur d’arrêt du
moteur est bien sur la position « stop » lors du
transport ou du remisage de la machine.
○ Lors des transports en véhicule ou des remisages,
recouvrez la lame avec le couvre-lame.
Dans l’éventualité de situations qui ne seraient pas
prises en compte par le présent manuel, redoublez
d’attention et usez de bon sens. Prenez contact avec
un concessionnaire Hitachi pour toute assistance.
Faites particulièrement attention aux stipulations
introduites par les mots ci-dessous:
ATTENTION
Information de première importance pour
éviter des dommages corporels graves ou
mortels.
IMPORTANT
Information importante afi n d’éviter les
dommages corporels ou matériels.
REMARQUE
Information utile pour une utilisation et un
fonctionnement corrects de la machine.
IMPORTANT
Ne pas démonter le lanceur du moteur. On
pourrait se blesser à cause du ressort de
rappel.
CARACTÉRISTIQUES
MODÈLE
Taille du moteur (cu. in.) 1.34 (21.1 ml)
Bougie d’allumage Champion CJ 6
Contenance du réservoir de
carburant (fl . oz)
Poids à sec (livre) 9.9 (4.5 kg) 10.6 (4.8 kg) 11.7 (5.3 kg) 12.1 (5.5 kg)
Longueur hors tout du
couteau (in.)
Type de lame
Niveau de pression sonore
LpA (dB(A)) (ISO 10517) 89 89 89 89
Niveau de puissance sonore
Lw mesuré (dB (A))
(2000/14/EC)
LwA (dB (A)) 112
Niveau de vibrations (m/s
(ISO 10517)
Poignée avant
Poignée arrière
REMARQUE
Les niveaux de bruit/vibrations équivalents sont calculés comme total d’énergie pondérée en fonction du
temps pour les niveaux de bruit/vibrations dans diverses conditions de travail avec la répartition temporelle
suivante: ISO 10517.....1/5 ralenti, 4/5 vitesse de course. 2000/14/EC.....vitesse de course uniquement.
* Toutes les données sont susceptibles d’être modifi ées sans préavis.
CH22EAP (50ST) CH22EBP (62ST) CH22ECP (62ST) CH22ECP (78ST)
10.1 (0.30 l)
19.7 (500 mm) 24.4 (620 mm) 24.4 (620 mm) 30.7 (780 mm)
108 108 108 108
2
)
7.3
5.9
14.8
7.4
2.6
2.8
2.6
2.8
14
Page 15

Français
PROCÉDÉS DE
FONCTIONNEMENT
Carburant (Fig. 1)
ATTENTION
La machine est équipée d’un moteur à deux
temps et doit toujours être alimentée en
mélange essence/huile.
Veillez à une bonne aération pendant
l’opération de remplissage du réservoir.
Essence
○ Utilisez toujours de l’essence sans plomb avec
un indice d’octane de 89.
○ Utilisez une huile pour moteur à deux temps
ou un mélange variant de 25:1 à 50:1 ; veuillez
consulter le contenant d’huile pour la proportion
du mélange ou prendre contact avec un
concessionnaire Hitachi.
○ Et une proportion 50:1 pour l’Etat de la Californie
uniquement.
○ Si vous n’avez pas d’huile d’origine, utilisez une
huile de qualité contenant un antioxydant pour
une utilisation recommandée avec un moteur à
deux temps refroidi à l’air (JASO FC GRADE OIL
ou ISO EGC GRADE). N’utilisez jamais d’huiles
mélangées BIA ou TCW (pour les moteurs à
essence 2 temps à refroidissement par eau).
○ N’utilisez jamais d’huile Multigrade (10W/30), ni
d’huile usagée.
○ Eff ectuez toujours le mélange dans un récipient
propre.
Commencez toujours par verser la moitié de
l’essence à mélanger. Versez ensuite la totalité de
l’huile. Mélangez en agitant le récipient.
Enfi n, versez le reste de l’essence, puis agitez
le récipient afi n de mélanger soigneusement le
carburant avant de faire le plein.
B
A
● Desserrez lentement le bouchon du
réservoir de carburant (1) pour eff ectuer le
remplissage afi n de laisser échapper une
surpression éventuelle.
● Serrez le bouchon soigneusement après
avoir rempli le réservoir de carburant.
● Avant de
vous toujours d’au moins 10 pieds (3 m)
de l’endroit où vous avez fait le plein de
carburant.
Pendant le remplissage, respectez les règles de
propreté. Essuyez autour du bouchon du réservoir afi n
d’éviter que des corps étrangers ne pénètrent dans le
réservoir en occasionnent des dysfonctionnements.
Veillez à ce que le mélange soit bien homogène en
agitant le récipient avant le remplissage.
Démarrage
IMPORTANT
Avant le démarrage, vérifi ez que la lame ne
touche rien.
1. Réglez le contacteur d’allumage (2) sur la
position « ON » (A). (Fig. 3)
redémarrer le moteur, éloignez-
1
Fig. 2
2
3
A
Fig. 1
Faire le plein
ATTENTION (Fig. 2)
● Éteignez toujours le moteur avant de faire le
plein.
Fig. 3
* Pressez la poire de la pompe d’amorçage (4) à
plusieurs reprises pour que le carburant puisse
s’écouler par la poire ou par le tuyau de retour.
(Si la machine en est munie) (Fig. 4)
15
Page 16

Français
4
2. Tout en appuyant sur le levier accélérateur
bloqué (3), tirez sur la commande des gaz puis
relâchez-la lentement avant de relâcher le levier
accélérateur bloqué. Ceci bloquera l’accélérateur
sur la position démarrage. (Fig. 3)
3. Réglez le starter (5) en position fermée
« CLOSED » (B). (Fig. 5)
4. Tirez vivement sur la corde du lanceur, en faisant
attention de bien tenir la poignée sans la laisser
s’échapper brusquement. (Fig. 6)
5. Dès que vous entendez le moteur essayer de
démarrer, ramenez le starter en position (ouverte)
« RUN » (C). Puis tirez à nouveau vivement sur le
lanceur.
REMARQUE
Si le moteur ne se met pas en marche, répétez la
procédure à partir des points 2 à 4.
Fig. 4
C
Fig. 5
Fig. 6
B
5
6. Après avoir mis en marche le moteur, laissezle chauff er pendant 2 à 3 minutes avant de le
soumettre à une charge quelconque.
Coupe
Pour la coupe, faites tourner le moteur à plein régime
pour maintenir la vitesse adéquate. Pour ajuster la
partie supérieure d’une haie, tenez le taille-haie de
façon à ce que les lames soient orientées dans un
angle de 15 à 30 degrés par rapport à l’horizontale
et déplacez-le en arc de cercle vers le bord de la
haie pour éliminer les parties coupées. Pour couper
les parties latérales de la haie, maintenez la lame
verticalement et déplacez le taille-haie en arc de
cercle.
REMARQUE
○ Poignée pivotante multi-position (Fig. 7)
La poignée de commande arrière peut tourner
de 90 degrés pour permettre une utilisation plus
confortable et une grande diversité d’angles de
coupe. Cette poignée peut être réglée selon
cinq positions de verrouillage diff érentes. Avant
d’ajuster la position de la poignée arrière,
assurez-vous que la machine n’est pas alimentée
ou que le moteur est arrêté.
○ Si vous appuyez sur l’accélérateur alors que la
poignée N’EST PAS verrouillée sur l’une des
cinq positions pré-défi nies, la machine s’arrête
automatiquement. Ne faites pas fonctionner
la machine si vous n’avez pas auparavant
correctement verrouillé la poignée arrière.
Pour permettre la rotation de la poignée, poussez
sur le levier de blocage (6). Appuyez sur le levier
de verrouillage (6) pour libérer le dispositif de
verrouillage et permettre à la poignée de tourner.
Faites tourner la poignée jusqu’à ce qu’elle
s’enclenche dans la position de verrouillage
désirée à 0°, 45° ou 90°, puis désenclenchez
le levier de verrouillage (6) pour verrouiller la
poignée.
D: VERROUILLAGE
E: DÉVERROUILLAGE
E
6
D
Fig. 7
16
Page 17

Français
Arrêt (Fig. 8)
Réduisez la vitesse et placez le commutateur d’arrêt
(2) sur la position “Stop” (F).
2
F
Fig. 8
ENTRETIEN
L’ENTRETIEN, LE REMPLACEMENT OU LA
RÉPARATION DES DISPOSITIFS ET SYSTÈMES
DE CONTRÔLE DE L’ÉCHAPPEMENT PEUVENT
ÊTRE EFFECTUÉS PAR N’IMPORTE QUEL
ATELIER DE RÉPARATION OU MÉCANICIEN DE
MOTEUR NON AUTOMOBILE.
Réglage du carburateur (Fig. 9)
ATTENTION
● II se peut que la lame entre en mouvement
pendant le réglage du carburateur.
● N’essayez jamais de démarrer le moteur
tant que le carter de protection du côté
embrayage n’est pas parfaitement en place.
Dans le cas contraire l’embrayage risquerait
de se détacher, entraînant un risque de
blessures corporelles.
Dans le carburateur, l’air est mélangé avec de
l’essence. Le carburateur est réglé pendant les
essais en usine. Ce réglage peut nécessiter des
modifi cations selon les conditions climatiques et
l’altitude. Le carburateur présente une possibilité de
réglage:
T = Vis de réglage du ralenti.
T
Réglage du ralenti (T)
Commencez par vérifi er la propreté du fi ltre à air.
Lorsque le ralenti est correct, la chaîne ne doit pas
tourner. Si un réglage s’avère nécessaire, vissez
(dans le sens des aiguilles d’une montre) la vis T, le
moteur en marche, jusqu’à ce que la lame commence
à tourner. Dévissez alors en sens contraire (sens
inverse des aiguilles d’une montre) jusqu’à ce que
la chaîne s’immobilise à nouveau. Un ralenti correct
permet au moteur de tourner sans variation de régime
dans toutes les positions, ce qui assure une marge de
sécurité avant la mise en rotation de la chaîne.
Si le dispositif de coupe tourne encore après le réglage
du régime de ralenti, contactez un concessionnaire
Hitachi.
Filtre à air (Fig. 10)
Nettoyer le fi ltre à air régulièrement pour éviter:
○ Les troubles de fonctionnement du carburateur.
○ Les problèmes de démarrage.
○ Les pertes de puissance.
○ L’usure prématurée des organes du moteur.
○ Une consommation anormalement élevée.
Nettoyer le fi ltre à air tous les jours, plus fréquemment
en milieu poussiéreux.
Fig. 10
Nettoyage du fi ltre
Démontez le carter du fi ltre à air et sortez le fi ltre.
Lavez-le dans de l’eau savonneuse chaude. Veillez
ensuite à ce qu’il soit bien sec avant de le remonter.
Un fi ltre à air ayant servi longtemps ne peut être
complètement nettoyé. Pour cette raison, le fi ltre
doit être régulièrement remplacé par un fi ltre neuf.
Remplacez toujours un fi ltre endommagé.
REMARQUE
Imprégnez l’élément d’huile pour moteur deux
temps ou équivalente. Pressez l’élément pour
répartir complètement l’huile et en éliminer
l’excès.
Fig. 9
17
Page 18

Français
Bougie (Fig. 11)
L’état de la bougie est infl uencé par:
○ Un mauvais réglage du carburateur.
○ Un mélange incorrect (trop riche en huile).
○ Un fi ltre à air sale.
○ Des conditions d’utilisation diffi ciles (par temps
froid par exemple).
Ces facteurs contribuent à la formation de dépôts
sur les électrodes de la bougie et peuvent entraîner
des troubles de fonctionnement et des diffi cultés de
démarrage. Si le taille-haie manque de puissance,
s’il démarre mal ou si son ralenti est irrégulier,
commencez toujours par vérifi er l’état de la bougie.
Si la bougie est encrassée, nettoyez-la et vérifi ez
l’écartement des électrodes 0.024״ (0.6 mm). La
bougie devra être remplacée après une centaine
d’heures d’utilisation, ou plus tôt si les électrodes
sont endommagées.
0.024״ (0.6 mm)
Fig. 11
REMARQUE
Dans certaines régions, la réglementation
locale exige l’utilisation d’une bougie équipée
d’une résistance d’antiparasitage afi n d’éliminer
les signaux d’allumage. Si cette machine était
équipée à l’origine d’une bougie avec résistance
d’antiparasitage, utilisez le même type de bougie
lors du remplacement.
Lame de coupe (Fig. 12, 13)
Les lames sont installées sur le support de lame au
moyen de quatre, cinq ou six boulons. Ces boulons
sont serrés avec un jeu permettant le déplacement
des lames.
Fig. 13
Lorsque ce jeu est trop étroit
Les lames ne se déplacent pas aisément et les
surfaces de coulissement peuvent se gripper.
Lorsque ce jeu est excessif
Les lames sont mal aiguisées.
Comment régler le jeu des lames
1. Desserrez les écrous de fi xation des lames.
2. Serrez complètement les boulons de fi xation des
lames, puis desserrez-les d’environ 3/8 tour.
3. Avec les boulons réglés sur cette position, serrez
les écrous de fi xation des lames.
Veillez à bien remettre en place les boulons de fi xation
du support de lame au cas où ils seraient desserrés,
usés ou endommagés. Remplacez également les
lames endommagées.
REMARQUE
Lubrifi ez correctement les surfaces de
coulissement des lames avec une huile pour
machine.
Boîte d’engrenages (Fig. 14)
Utilisez de la graisse à base de lithium de bonne
qualité pour lubrifi er le graisseur jusqu’à ce qu’une
petite quantité apparaisse entre les lames et la boîte
d’engrenages. À l’aide du graisseur (indiqué par une
fl èche), lubrifi ez la zone à côté du boîtier de vitesse
en utilisant une cartouche lubrifi ante disponible dans
le commerce.
Fig. 14
Fig. 12
18
Page 19

Français
REMARQUE
Appliquez 3 g de graisse toutes les 20 heures de
service ou plus fréquemment en cas d’utilisation
intensive.
Nettoyage du fi ltre à carburant (Fig. 15)
Retirez le fi ltre à carburant du réservoir et lavez-
le soigneusement dans un solvant. Remettez-le
ensuite en place en le poussant complètement dans
le réservoir.
Fig. 15
REMARQUE
Le fi ltre doit être remplacé s’il a durci sous l’eff et
des impuretés contenues dans le carburant.
Nettoyage des ailettes du cylindre (Fig. 16)
Des feuilles peuvent se coincer entre les brosses des
cylindres (7) et entraîner une surchauff e du moteur,
réduisant ainsi les performances de l’appareil. Pour
éviter cela, nettoyez très régulièrement les brosses
des cylindres et le carter du ventilateur.
Après 100 heures de service, ou une fois par an
(plus fréquemment si les conditions d’utilisation
le requièrent), nettoyez les ailettes et la surface
extérieure du moteur afi n de retirer la poussière,
les saletés et les dépôts d’huile qui risqueraient
d’empêcher un bon refroidissement du moteur.
7
Fig. 16
Nettoyage du silencieux (Fig. 17)
Démontez le silencieux et le pare-étincelles (si la
machine est équipée d’un tel dispositif) et nettoyez
les résidus de carbone déposés au niveau de l’orifi ce
d’échappement et de l’entrée du silencieux toutes les
100 heures de service.
Fig. 17
Lors d’un stockage prolongé
Videz le réservoir de carburant. Mettez en marche le
moteur et laissezle tourner jusqu’à ce qu’il s’arrête
de lui-même. Eff ectuez toutes les réparations
nécessaires sur les pièces endommagées pendant
l’utilisation. Nettoyez la machine en utilisant un chiff on
propre ou à l’aide d’un jet d’air comprimé. Introduisez
quelques gouttes d’huile pour moteur deux temps
par le trou de la bougie d’allumage et faites tourner
plusieurs fois le moteur pour bien répartir l’huile.
Recouvrez la machine et remisez-la dans un endroit
à l’abri de l’humidité.
Entretien
Vous trouverez ci-dessous quelques conseils
d’entretien d’ordre général. Pour plus d’informations,
veuillez prendre contact avec un concessionnaire
Hitachi.
Entretien quotidien
○ Nettoyez extérieurement le taille-haie.
○ Vérifi ez que le protège-lame n’est pas fi ssuré. S’il
l’est ou s’il a subi des chocs, remplacez-le.
○ Assurez-vous que la lame est bien aff ûtée et
qu’elle est exempte de fi ssures.
○ Assurez-vous que les écrous de lame sont
suffi samment serrés.
○ Assurez-vous que le protecteur de lame pour le
transport est en bon état et que sa fi xation ne
pose aucun problème.
○ Vérifi ez le serrage de tous les écrous et vis.
Entretien hebdomadaire
○ Contrôlez le lanceur, sa corde et son ressort de
rappel.
○ Nettoyez la bougie extérieurement, démontez-la
et contrôlez l’écartement de ses électrodes, qui
doit être de 0.024״ (0.6 mm).
○ Remplacez-la le cas échéant.
19
Page 20

Français
○ Nettoyez les ailettes de refroidissement du
cylindre et vérifi ez que la prise d’air située au
niveau du lanceur n’est pas obstruée.
○ Vérifi ez que le carter d’engrenage est rempli de
graisse.
○ Nettoyez le fi ltre à air.
Entretien mensuel
○ Rincez le réservoir de carburant avec de
l’essence.
○ Nettoyez l’extérieur du carburateur ainsi que son
logement.
○ Nettoyez le ventilateur et son logement.
20
Page 21

LOS SIGNIFICADOS DE LOS
SÍMBOLOS
NOTA: Algunos aparatos no están provistos de ellos.
Símbolos
ATENCIÓN
A continuación se muestran los símbolos usados para la máquina. Asegúrese de
comprender su signifi cado antes del uso.
Es importante que usted lea, entienda
totalmente y observe las siguientes
precauciones y advertencias de seguridad.
El uso descuidado o incorrecto de la unidad
podrá causarle lesiones serias o fatales.
Lea, comprenda y siga todas las
advertencias y demás instrucciones de
este manual y las que hay en la máquina.
Contenido
¿QUÉ ES QUÉ? .................................................... 21
ADVERTENCIAS E INSTRUCCIONES
DE SEGURIDAD ............................................ 22
¿QUÉ ES QUÉ?
Ya que este manual es aplicable a varios modelos, es
posible que haya diferencias entre las imagenes y su
aparato. Utilice las instrucciones que sean relevantes
para su unidad.
1. Arrancador retráctil
2. Tanque de combustible
3. Tope del mango del acelerador
4. Mango del acelerador
5. Manija frontal
6. Mango posterior
7. Bujía de encendido
8. Protector de mano
9. Cuchilla de corte
10. Filtro de aire
11. Llave de ignición
12. Protector de la cuchilla
13. Caja de engranajes
14. Mando del estrangulador
15. Palanca de bloqueo
16. Bomba de cebado
17. Carcasa de la hoja
18. Llave combinada de cubo
19. Instrucciones de manejo
Español
Utilice siempre las protecciones para los
ojos, cabeza y oídos cuando trabaje con
la máquina.
Antes de usar la unidad
• Leer cuidadosamente el manual del
operador.
• Verifi car que el equipo de corte esté
correctamente montado y ajustado.
• Arrancar la unidad y comprobar el
ajuste del carburador. Ver la sección de
“MANTENIMIENTO”.
ESPECIFICACIONES ........................................... 24
MODO DE USO .................................................... 24
MANTENIMIENTO ............................................... 26
10
13
5
14
8
9
12
19
16
1
11
3
6
2
4
CH22EAP (50ST), CH22EBP (62ST)
CH22ECP (62ST), CH22ECP (78ST)
17
15
7
18
21
Page 22

Español
ADVERTENCIAS E
INSTRUCCIONES DE SEGURIDAD
Conserve estas instrucciones para poder
consultarlas en el futuro.
ESTE CORTASETOS PUEDE OCASIONAR
LESIONES GRAVES. Lea detenidamente estas
instrucciones; contienen información que le permitirá
manipular, preparar, mantener, arrancar y detener
correctamente el cortasetos. Familiarícese con todos
los controles y el uso correcto del cortasetos.
Seguridad del usuario
○ Lleve siempre las protecciones tales como la
pantalla o gafas de seguridad.
○ Use siempre pantalones largos gruesos, botas
y guantes. No utilice prendas sueltas, adornos,
pantalón corto, sandalias ni ande descalzo.
Sujete el cabello para que quede por encima de
los hombros.
○ No opere esta máquina cuando esté cansado,
enfermo o bajo la infl uencia del alcohol, drogas
o medicamentos.
○ No deje que los niños o personas inexpertas
operen esta máquina.
○ Extreme la precaución en presencia de líneas de
transmisión eléctrica.
○ Lleve las protecciones de oídos.
○ Nunca ponga en marcha esta máquina dentro de
un local cerrado o edifi cio. La respiración de los
gases de escape puede causar la muerte.
○ Mantenga la manilla limpia de aceite y
combustible.
○ Mantenga las manos alejadas de la cuchilla de
corte.
○ No agarre esta unidad por el equipo de corte.
○ Cuando pare la unidad, asegúsere de que el
aditamento de corte se haya detenido antes de
apoyarla sobre el suelo.
○ Durante una operación prolongada, se
recomienda interrumpir de vez en cuando el
trabajo para evitar una excesiva exposición a las
vibraciones que podría ocasionar los llamados
“dedos blancos”.
○ Si el mecanismo de corte entra en contacto con
algún objeto extraño o el cortasetos desarrolla
un ruido o vibración anormales, desactive la
fuente de alimentación y detenga el cortasetos.
Desconecte el cable conectado a la bujía y lleve
a cabo los pasos descritos a continuación:
• Inspeccione el equipo en busca de daños;
• Compruebe si existen piezas sueltas y
apriételas en tal caso;
• Solicite la sustitución o reparación de
cualquier pieza dañada por otra de calidad
equivalente.
22
ATENCIÓN
● Los sistemas antivibratorios no garantizan
que no sufra el síndrome de dedos blancos
o síndrome de túnel carpiano. Por lo tanto,
los usuarios continuos o regulares deberán
controlar frecuentemente el estado de
sus manos y dedos. Si aparece alguno de
los síntomas citados, deberá solicitarse
inmediatamente asistencia médica.
Si Ud. usa algún dispositivo médico eléctrico
●
o electrónico tales como marcapasos,
consulte a su médico así como al fabricante
del dispositivo antes de operar cualquier
equipo de potencia.
● Si la cuchilla se atasca como resultado del
contacto con un objeto extraño, detenga
el motor y extraiga el objeto extraño
cuidado empleando unos alicates u otra
herramienta similar una vez que el cortasetos
se haya enfriado. Preste atención al extraer
el objeto extraño; la cuchilla podría efectuar
un movimiento repentino al hacerlo.
Seguridad de la unidad de máquina
○ Inspeccione siempre la unidad de máquina
antes de usarla. Sustituya las piezas dañadas.
Compruebe que no haya fugas de combustible
y asegúrese de que todas las piezas estén bien
apretadas en su sitio.
○ Sustituya las piezas agrietadas, rotas o
deterioradas antes de poner en marcha la unidad
de máquina.
○ Al ajustar el carburador, no permita que se
acerquen otras personas.
○ Utilice únicamente los accesorios para esta
máquina que hayan sido recomendados por el
fabricante.
ATENCIÓN
No deberá modifi carse de ninguna manera
la maquina. No usar su máquina de corte
para otra tarea más que para la cual se ha
destinado.
Seguridad sobre el combustible
○ Mezcle y cargue el combustible al aire libre,
en lugares donde no se produzcan chispas ni
fuegos.
○ Utilice para el combustible un recipiente
adecuado.
○ No retire el tapón del depósito de combustible ni
agregue combustible al equipo con la fuente de
alimentación en funcionamiento. Permita que el
motor y los componentes del sistema de escape
se enfríen antes de repostar combustible.
con
Page 23

Español
○ No fume ni deje fumar a otras personas en las
cercanías del combustible o de la maquina
mientras esta está en marcha.
○ No reposte combustible en entornos interiores.
○ Limpie los residuos de combustible antes de
poner en marcha el motor.
○ Antes de poner en marcha el motor, apártese
como mínimo 3 metros del lugar en el que se ha
repostado.
○ Pare el motor antes de quitar el tapón del
depósito de combustible.
○ Antes de guardar la máquina, vacíe el depósito
de combustible. Es conveniente vaciar el
depósito cada vez que se ha usado la máquina.
Si se deja combustible en el depósito, asegúrese
de que no puedan producirse fugas.
○ Guarde la máquina y el combustible en un
lugar donde los vapores del combustible no
puedan entrar en contacto con chispas o llamas
de calentadores de agua, motores eléctricos,
interruptores, hornos, etc.
ATENCIÓN
El combustible puede encenderse o explotar
fácilmente o ser inhalados los humos, por
lo tanto preste especial atención cuando
maneje o cargue combustible.
Seguridad en el corte
○ No cortar ningún otro material más que plantas.
○ Inspeccione siempre el área que hay que cortar
antes de iniciar el trabajo. Quite los objetos
que puedan salir despedidos o enredarse en el
cabezal de corte.
○ Para proteger las vías respiratorias durante el
corte de plantas que hayan sido fumigadas,
deberá usarse la máscara de protección contra
aerosoles.
○ Mantenga a otras personas, niños, animales,
ayudantes y personas de alrededor fuera de
la zona de peligro de 15 metros. Pare el motor
inmediatamente si se acerca alguien.
○ Sujete fi rmemente la máquina con ambas manos.
○ Mantenga estable el cuerpo, con los pies bien
apoyados sobre el suelo. No estire demasiado el
cuerpo.
○ Manténga su cuerpo apartado del silenciador de
escape y el aditamento de corte mientras está en
marcha el motor.
○ Mantenga la herramienta de corte por debajo del
hombro. NUNCA trabaje con la unidad desde una
escalera, subido a un árbol o subido a cualquier
soporte inestable.
○ Cuando se reubique en una nueva área de
trabajo, asegúrese de parar la máquina y
asegure que todos los accesorios de corte se
hayan detenido.
○ Jamás coloque la máquina sobre el suelo cuando
esté en marcha.
○ Lleve siempre un botiquín de primeros auxilios
consigo cuando opere cualquier equipo de
potencia.
○ Jamás arranque o haga funcionar el motor dentro
de un recinto o edifìcio cerrado y/o cerca del
líquido infl amable. La inhalación de los humos
de escape puede ser letal.
Seguridad en el mantenimiento
○ Mantenga la unidad de máquina según las
recomendaciones.
○ Antes de iniciar el mantenimiento desconecte la
bujía, excepto si hay que ajustar el carburador.
○ No permita que se acerquen otras personas
mientras está ajustando el carburador.
○ Utilice únicamente repuestos y accesorios
originales de Hitachi recomendados por el
fabricante.
○ Al detener el cortasetos para llevar a cabo
operaciones de mantenimiento, inspección
o almacenamiento, desactive la fuente de
alimentación, desconecte el cable conectado a
la bujía y asegúrese de que se hayan detenido
todas las piezas móviles.
Permita que el cortasetos se enfríe antes de
llevar a cabo una inspección, un ajuste, etc.
Transporte y almacenamiento
○ Transporte la unidad de máquina con el motor y
el silenciador apartados del cuerpo.
○ Antes de almacenar o transportar la unidad
de máquina en un vehículo, espere a que se
haya enfriado el motor, vacíe el depósito de
combustible y asegúrela bien.
○ Vacíe el depósito antes de guardar la unidad de
la máquina. Es recomendable vaciar el depósito
cada vez que se ha usado la máquina. Si deja
combustible en el depósito, asegúrese de que no
puedan producirse fugas.
○ Almacene la unidad de máquina fuera del
alcance de los niños.
○ Limpie y mantenga la unidad en perfecto estado,
y guárdela en un lugar seco.
○ Asegúrese de que está desconectado el
conmutador del motor al transportarlo o al
almacenarlo.
○ Si se transporta en un vehículo o se almacena,
cubra la cuchilla con una cubierta de cuchilla.
Si ocurren situaciones que no se han previsto en
este manual, utilice el sentido común. Contacte con
su distribuidor Hitachi si necesita ayuda. Dedique
especial atención a los apartados precedidos por las
palabras siguientes:
23
Page 24

Español
ATENCIÓN
Indica gran peligro de daños personales
graves e incluso la muerte, si no se siguen
las instrucciones.
IMPORTANTE
Indica posibilidad de daños personales o
materiales, si no se siguen las instrucciones.
NOTA
Indica información útil para un correcto uso y
funcionamiento de la máquina.
IMPORTANTE
No se desmonte el dispositivo de arranque
de retroceso sobre el aparato. Uno podría
herirse a causa del resorte de retroceso.
ESPECIFICACIONES
MODELO
Tamaño del motor (cu. in.) 1.34 (21.1 ml)
Bujía Champion CJ 6
Capacidad del tanque de
combustible (fl . oz)
Peso en vacío (libras) 9.9 (4.5 kg) 10.6 (4.8 kg) 11.7 (5.3 kg) 12.1 (5.5 kg)
Largo total de la cortadora
(in.)
Tipo de hoja
Nivel de presión de sonido
LpA (dB(A)) (ISO 10517) 89 89 89 89
Nivel de potencia acústica
Lw medido (dB (A))
(2000/14/CE)
LwA (dB (A)) 112
Nivel de vibración (m/s
(ISO 10517)
Manija frontal
Manija posterior
NOTA
Los niveles de ruido/vibración equivalentes se calculan como la energía ponderada en tiempo en varias
condiciones de trabajo con la distribución de tiempo siguiente: ISO 10517.....1/5 ralentí, 4/5 a potencia.
2000/14/CE.....sólo a potencia.
* Todos los datos están sujetos a cambio sin previo aviso.
CH22EAP (50ST) CH22EBP (62ST) CH22ECP (62ST) CH22ECP (78ST)
10.1 (0.30 l)
19.7 (500 mm) 24.4 (620 mm) 24.4 (620 mm) 30.7 (780 mm)
108 108 108 108
2
)
7.3
5.9
14.8
7.4
2.6
2.8
2.6
2.8
MODO DE USO
Combustible (Fig. 1)
ATENCIÓN
El motor es de dos tiempos y ha de funcionar
siempre con una mezcla de gasolina y aceite.
Asegurarse siempre de que hay buena
ventilación en los lugares donde se maneja
el combustible.
Gasolina
○ Utilice siempre gasolina sin plomo de marca de
89 de octanos.
24
○ Use aceite de dos tiempos original o use una
mezcla de 25:1 a 50:1, sírvase ver la relación en
la botella o consulte con un distribuidor Hitachi.
○ Únicamente para el Estado de California a 50:1.
○ Si no dispone de aceite original, use un aceite
con antioxidante de calidad que esté etiquetado
expresamente para motores de dos tiempos
enfriados por aire (JASO FC GRADE OIL o ISO
EGC GRADE). No utilice aceite mezclado BIA o
TCW (tipo de 2 tiempos refrigerado por agua).
○ No utilice nunca aceites multigrado (10W/30) ni
residuales.
○ Mezcle siempre la gasolina y el aceite en un
recipiente especial para ello que esté limpio.
Page 25

Español
Empiece llenando el recipiente hasta la mitad con
gasolina y añada luego todo el aceite. Sacuda la
mezcla y añada el resto de la gasolina.
Antes de llenar el depósito agite la mezcla
cuidadosamente.
B
A
Fig. 1
Repostar
ATENCIÓN (Fig. 2)
● Parar siempre el motor antes de repostar.
● Para llenar el combustible del tanque,
deberá abrirse lentamente la tapa del tanque
de combustible (1) para que escape la
sobrepresión que pueda contener.
● Después de haber repostado, apretar bien la
tapa.
● Antes de arrancar la unidad, deberá alejarse
por lo menos 10 pies (3 m) del área de carga
de combustible.
1
2
3
A
Fig. 3
* Presione varias veces el cebador (4), de manera
que el combustible fl uya a través del cebador o
de la tubería de retorno (Si lo tiene equipado)
(Fig. 4)
4
Fig. 4
2. Con el tope del mango del acelerador (3)
pulsado tire del mango del acelerador, suelte
lentamente el mango del acelerador primero y, a
continuación, el tope del mango del acelerador.
Esto bloqueará el acelerador en la posición de
arranque. (Fig. 3)
3. Coloque la palanca del estárter (5) en la posición
CLOSED (cerrado) (B). (Fig. 5)
Fig. 2
Antes de repostar, limpiar cuidadosamente el área
del tapón del tanque, para garantizar que no entra
suciedad en el depósito. Asegurarse de que el
combustible está bien mezclado agitando bien el
recipiente antes de verter su contenido en el depósito.
Arranque
IMPORTANTE
Antes del arranque, asegúrense de que
el aditamento de corte no esté rozado con
nada.
1. Coloque el interruptor de encendido (2) en la
posición ON (conectado) (A). (Fig. 3)
B
C
5
Fig. 5
4. Tirar enérgicamente del arrancador de retroceso
y teniendo cuidado de no soltar el mango. (Fig. 6)
25
Page 26

Español
Fig. 6
5. Cuando escuche que el motor intenta arrancar,
vuelva la palanca del estárter a la posición RUN
(abierto) (C). Entones tire de nuevo el arrancador
de retroceso com fuerza.
NOTA
Si el motor no se pone en marcha, repita los
puntos 2 al 4.
6. Después de arrancar el motor, pemita que el
motor se caliente unos 2-3 minutos antes de
someter a cualquier carga.
Corte
Al efectuar el corte, operar el motor con el acelerador
a fondo para mantener la velocidad apropiada de
corte. Cuando se recorte la parte superior de un seto,
mantener la recortadora de manera que las cuchillas
formen un ángulo de 15 y 30 grados con la horizontal
y oscilar la recortadora en forma de arco contra el
borde del seto para eliminar los recortes. Cuando
se recorten los costados de un seto, mantener
verticalmente la cuchilla y mover la unidad en forma
de arco.
NOTA
○ Empuñadura orientable de posiciones
múltiples (Fig. 7)
La empuñadura con control trasero gira 90
grados para ser usada confortablemente
mientras son acomodados diferentes ángulos de
corte. La empuñadura permite cinco diferentes
posiciones de bloqueo. Antes de intentar ajustar
la empuñadura trasera, asegúrese de que la
máquina esté parada o el motor desconectado.
○ La máquina se desconectará inmediatamente si
la palanca del acelerador está apretada mientras
la empuñadura NO esté asegurada en una de las
cinco posiciones de ajuste previo. Jamás intente
operar la máquina salvo que la empuñadura
trasera esté correctamente bloqueada en su
lugar.
Para rotar la empuñadura empuje la palanca
de bloqueo (6) permitiendo que la empuñadura
gire. Pulse la palanca de bloqueo (6) para soltar
26
el bloqueo y permitir que el asidero gire. Gire el
asidero a la posición de bloqueo deseada 0°,
45° o 90° y suelte la palanca de bloqueo (6) para
bloquear asidero.
D: BLOQUEADO
E: DESBLOQUEADO
E
6
D
Fig. 7
Parada (Fig. 8)
Reduzca la velocidad del motor y coloque la llave de
ignición en la posición de parada (F).
2
F
Fig. 8
MANTENIMIENTO
EL MANTENIMIENTO, REEMPLAZO O
REPARACIÓN DE LOS DISPOSITIVOS Y
SISTEMAS DE CONTROL DE GAS PUEDEN
HACERSE EN CUALQUIER TALLER DE
REPARACIÓN DE MOTOR NO PARA CARRERAS
O PERSONALMENTE.
Ajuste del carburador (Fig. 9)
ATENCIÓN
● Es posible que el accesorio de corte dé
vueltas durante los ajustes del carburador.
● Jamás deberá arrancarse el motor sin la
cubierta completa del embrague, ya que
podría afl ojarse el embrague y causar
lesiones personales.
En el carburador se mezcla el combustible con el
aire. Durante la prueba del motor en la fábrica, el
carburador está ajustado. Sin embargo, puede ser
necesario reajustarlo según el clima y la altitud. El
carburador tiene una posibilidad de ajuste:
Page 27

Español
T = Tornillo para el ajuste de las revoluciones
de ralentí.
T
Fig. 9
Ajuste de precisión de ralentí (T)
Comprueben que el fi ltro de aire esté limpio. Cuando
la velocidad de ralentí es correcta, el aditamento de
corte no ha de girar. Si necesita ajustarlo, cierre (hacia
la derecha) el tornillo T con el motor en marcha hasta
que el aditamento de corte empiece a girar. Abra
(hacia la izquierda) el tornillo T hasta que la cuchilla
se detenga. Se habrá alcanzado el ralentí correcto
cuando el motor funcione con regularidad en cualquier
posición por debajo de las revoluciones por minuto en
las que empieza a girar el aditamento de corte.
Si la cuchilla todavía gira después del ajuste de la
velocidad al ralentí, comuníquese con un distribuidor
Hitachi.
Filtro de aire (Fig. 10)
Este fi ltro debe limpiarse con regularidad quitando
polvo y suciedad a fi n de evitar:
○ Perturbaciones en el funcionamiento del
carburador.
○ Problemas de arranque.
○ Pérdidas de potencia.
○ Desgaste innecesario de las piezas del motor.
○ Consumo de combustible excesivo.
Limpie el fi ltro de aire diariamente; si las condiciones
de trabajo son desfavorables.
Limpieza del fi ltro de aire
Desmontar la cubierta del fi ltro y sacarlo. Limpiar el
fi ltro con agua jabonosa caliente. Antes de volver a
montarlo, comprobar que está seco. Un fi ltro de aire
que ha prestado largo servicio nunca podrá quedar
completamente limpio, por lo que los fi ltros deberán
sustituirse por otros nuevos a intervalos regulares.
Cambie siempre los fi ltros que estén dañados.
NOTA
Bañe el elemento en aceite de 2 ciclos o
equivalente. Comprima el elemento para
distribuir el aceite completamente y para retirar
cualquier exceso de aceite.
Bujía (Fig. 11)
El estado de la bujía depende de lo siguiente:
○ Carburador mal ajustado.
○ Mezcla incorrecta de combustible y aceite
(exceso de aceite).
○ Filtro de aire sucio.
○ Condiciones de funcionamiento difíciles (como
clima frío).
Todos estos factores dan lugar a la formación de
sedimentos en los electrodos pudiendo causar
perturbaciones en el funcionamiento y difi cultades de
arranque. Si en la cortadora se nota falta de potencia,
si los arranques son difíciles y si el ralentí es inestable,
controlar siempre primero la bujía antes de adoptar
otras medidas. Si la bujía está muy sucia, limpiarla
y controlar la separación entre electrodos, que ha
de ser de 0.024״ (0.6 mm). La bujía debe cambiarse
después de unas 100 horas de funcionamiento o
antes si los electrodos están muy gastados.
Fig. 10
0.024״ (0.6 mm)
Fig. 11
NOTA
En algunas áreas, los reglamentos locales
requieren el uso de una bujía de encendido de
resistencia para eliminar señales de ignición.
En el caso de que esta máquina esté equipada
originalmente de la bujía de encendido de
resistencia, debe usar algún tipo de bujía de
encendido de resistencia como repuesto.
27
Page 28

Español
Hoja de la cortadora (Fig. 12, 13)
Las cuchillas van instaladas en la guía de la barra
mediante cuatro, cinco o seis tornillos apretados con
una holgura que permite el libre movimiento de las
mismas.
Fig. 12
Fig. 13
Cuando la holgura es muy pequeña
Las cuchillas no pueden moverse correctamente, y
podrían agarrotarse las superfi cies deslizantes.
Cuando la holgura es excesiva
Las cuchillas no cortan efi cazmente.
Para ajustar la holgura de las cuchillas
1. Afl oje las tuercas que las sujetan a la guía.
2. Apriete por completo los tornillos de sujeción de
las cuchillas, y luego afl ójelos aproximadamente
3/8 vuelta.
3. Con los tornillos en esta posición, apriete las
tuercas de sujeción de las cuchillas.
Asegúrese de cambiar los tornillos de sujeción de
la guía del cortasetos cuando compruebe que están
fl ojos, gastados o dañados. También asegúrese de
cambiar la cuchilla del cortasetos dañada.
NOTA
Lubrique correctamente las superfi cies
deslizantes del cortasetos con aceite.
Caja de engranajes (Fig. 14)
Aplíquese grasa a base de litio de buena calidad
a través de la grasera hasta que una cantidad
pequeña aparezca entre las hojas cortantes y la
caja de engranajes. Lubrique con la grasa desde el
engrasador (indicado por una fl echa) situado junto a
la carcasa del motor utilizando una pistola de grasa
que puede adquirir en tiendas especializadas.
28
Fig. 14
NOTA
Hay que efectuar una lubricación de 3 gr a
intervalos de 20 horas o con más frecuencia en
caso de trabajo intenso.
Filtro de combustible (Fig. 15)
Quitar el fi ltro de combustible del tanque de
combustible y lavar totalmente con disolvente.
Posteriormente, vuelva a insertar totalmente el fi ltro
en el tanque.
Fig. 15
NOTA
Si el fi ltro estuviera obstruido debido al polvo y la
suciedad, deberá reemplazarse.
Limpieza de las aletas del cilindro (Fig. 16)
El aprisionamiento de las hojas entre las aletas de
cilindro (7) puede ocasionar el sobrecalentamiento
del motor, con la consiguiente pérdida de potencia.
Para evitar esto, mantenga siempre separadas las
aletas y el ventilador.
Cada 100 horas de operación, o una vez al año (o
con más frecuencia cuando sea necesario), limpiar
las aletas y la superfi cie exterior del motor, para
eliminar los sedimentos de polvo, suciedad y aceite
que causen el enfriamiento inadecuado.
Page 29

7
Fig. 16
Limpieza del silenciador (Fig. 17)
Desmontar el silenciador y parachispas (si lo tiene
equipado), y limpiar cualquier exceso de carbón de
la boca de escape o entrada del silenciador cada 100
horas de operación.
Fig. 17
Para el almacenamiento durante largos periodos
Drenar totalmente el contenido del tanque de
combustible. Arrancar el motor y dejarlo en
funcionamiento hasta que se pare. Reparar cualquier
daño que haya sufrido por el uso. Limpiar la unidad
con trapo limpio o soplar con la manguera de aire
de alta presión. Aplicar algunas gotas de aceite de
motor para motocicletas dentro del cilindro a través
del orifi cio de la bujía de encendido y girar el motor
varias veces para que se distribuya el aceite. Cubrir
la unidad y almacenar en un lugar seco.
Esquema de mantenimiento
A continuación se muestran algunas instrucciones
generales de mantenimiento. Para obtener
información adicional, contacte con su distribuidor
Hitachi.
Cuidados diarios
○ Limpie la máquina por fuera.
○ Compruebe la protección de la hoja que no
esté deteriorada ni tenga grietas. Cambie la
protección si ha estado expuesta a golpes o tiene
grietas.
○ Compruebe que la hoja esté afi lada y no tenga
grietas.
Español
○ Compruebe que esté bien apretada la tuerca de
la hoja.
○ Compruebe que esté entera la protección de
transporte de la hoja y que pueda sujetarse bien.
○ Compruebe que las tuercas y tornillos estén
apretados.
Cuidados semanales
○ Compruebe el aparato de arranque, la cuerda y
el muelle de recuperación.
○ Limpie la bujía por fuera.
○ Desmóntela y compruebe que la distancia entre
los electrodos sea de 0.024״ (0.6 mm), o cambie
la bujía.
○ Limpie las aletas de refrigeración del cilindro y
controle que no se ha obstruido la admisión de
aire.
○ Compruebe que la caja de cambios esté bien
engrasada.
○ Limpie el fi ltro de aire.
Cuidados mensuales
○ Limpie el depósito de combustible con gasolina.
○ Limpie el carburador por fuera y los alrededores
del mismo.
○ Limpie el ventilador y sus alrededores.
29
Page 30

CH22EAP
30
Page 31

CH22EAP
Item
No.
1 COVER FIXING BOLT COMP 1
2 CLEANER COVER 1
3 CLEANER SPONGE 1
4 CHOKE VALVE 1
5
6 CLEANER BODY 1
7 CHOKE HANDLE 1
8
9 TSCREW (TAS) 1
10 SCREW (B) 3
11 SCREW (D) 4
12 SYRINGE 1
13 PRIMER BASE ASS'Y 1
14 PUMP GASKET 1
15 PUMP DIAPHRAGM 1
16 STRAINER 1
17 GUIDE PIN ROLLER 1
18 SYRINGE RETAINER 1
19 SCREW (E) 1
20 BALL PLUG RETAINER 1
21 SCREW (MAIN MIXTURE) 1
22 METERING LEVER SPRING 1
23 PIN 1
24
25 METERING COVER 1
26
27 POST 1
28 ROTOR COVER ASS'Y 1
29 SCREW (C) 1
30
31 O-RING 1
32 INLET NEEDLE VALVE 1
33 SCREW (A) 1
34 METERING LEVER 1
35 METERING GASKET 1
36 CARBURETOR ASS'Y 1
37 CARBURETOR INSULATOR 1
38 INTAKE PACKING 1
39 GLASS WASHER 4
40 CARBURETOR PACKING 1
41
42
43 CORD 1
44 CAUTION LABEL 1
45
46 CYLINDER COVER 1
47 METAL FITTING OF PLUG CAP 1
48 PLAG CAP 1
49 CORD INSULATION TUBE 1
50 BAND 1
51 IGNITION COIL 1
52 SPARK PLUG 1
53 CYLINDER 1
54 COVER PACKING 2
55 INTAKE COVER (A) 1
56 SEAL LOCK SCREW M4×10 4
57 HEAT PROTECTION PANEL 1
Part Name Q’TY
MACHINE SCREW
(W/WASHERS) M5×60
TAPPING SCREW
(W/FLANGE) D4×12
METERING DIAPHRAGM
ASS'Y
SCREW
(METERING COVER)
RETAINING RING (E-TYPE)
D2.3
SEAL LOCK HEX. SOCKET
BOLT (W/WASHERS) M5
HEX. SOCKET HD. BOLT
(W/WASHERS) M4×18
SEAL LOCK HEX. SOCKET HD.
BOLT M4×12
Item
No.
58 MUFFLER ASS'Y 1
59 BOLT WASHER M6 2
60
61 INTAKE COVER (B) 1
2
62 PISTON PIN 1
63 PISTON 1
64
1
65 CYLINDER PACKING 1
66 PISTON RING 1
67 PISTON PIN CIR CLIP 2
68 FLYWHEEL NUT 1
69 BOLT WASHER D7 1
70 STARTER PAWL 2
71 STARTER PAWL SPRING 2
72 MAGNETO ROTOR 1
73 RETAINING RING D4 2
74 CRANK CASE (B) ASS'Y 1
75 OIL SEAL TB 12227 2
76 BALL BEARING 6001C3 2
77 SHIM T0.2 1
78 SHIM T0.3 1
79 CRANK SHAFT 1
80 CRANK CASE (A) ASS'Y 1
81 CRANK CASE PACKING 1
1
82 KNOCK PIN 4×12 2
83 CLUTCH (B) 1
84 CLUTCH DRUM 1
2
85 BALL BEARING 6002ZC3 2
86
87 GREASE NIPPLE COMP. 1
1
88
89 MUFFLER PROTECTOR 1
90
91 HEX. HOLE BOLT 6×18/S 3
92
93 FIXATION PLATE (A) 1
94 FIXATION PLATE (B) 1
95 TAIL PIPE(A) 1
96 EXHAUST COVER 1
97 HITACHI LABEL 1
2
98 TAPPING SCREW D4.5×16 1
99 PLATE 1
2
100 STARTER KNOB 1
101 STARTER ROPE 1
102
1
103 RECOIL SPRING 1
104 STARTER ROPE REEL 1
105 DAMPER SPRING 1
106 CAM PLATE 1
107 SET SCREW 1
108 RECOIL STARTER 1
109 AIR DEFLECTOR 1
110 FUEL TANK CAP ASS'Y 1
111 TANK CAP CHAIN 1
112 FUEL GROMMET 1
113 FUEL PIPE 1
114 FUEL PIPE (PINK) 1
115 RETURN GROMMET 1
Part Name Q’TY
HEX. SOCKET HD. BOLT
M6×55
HEX. SOCKET HD. BOLT
(W/SP.WASHER) M5×18
RETAINING RING FOR D15
SHAFT
TAPPING SCREW
(W/FLANGE) D5×20
MACHINE SCREW
(W/WASHERS) M5×16
HEX. SOCKET HD. BOLT
(W/BUTTON) M5×20
HEX. SOCKET HD. BOLT
(W/BUTTON) M5×20
Item
No.
116 CLIP 1
117 PUMP FILTER 1
118 CUSHION RUBBER 4
2
119 TANK 1
120 HEAT PROTECTION PANEL (A) 2
141 NAME PLATE 1
142 HANDLE 1
8
143
144 SPRING LOCK WASHER D5 2
145 BRAKE AXIS WASHER 2
146 HANDLE (A) 1
147 START LABEL (B) 1
148 CAUTION LABEL 1
149 SPRING (A) 1
150 LOCK LEVER 1
151 THROTTLE LEVER 1
152 THROTTLE WIRE 1
153 PROTECTION TUBE 1
154 EARTH TERMINAL 1
155 TAPPING SCREW D3 3
156 TRIGGER LOCKOUT 1
157 THROTTLE LEVER SPRING 1
158 TAB TERMINAL 2
159 STOP SWITCH (A) 1
160 SCREW M3×10 1
161 STOP BUTTON(RED) 1
162 STOP BUTTON MARK 1
163 HANDLE B 1
164
1
165 NYLON NUT M5 2
166 SMALL WASHER 5 2
167 FIXATION PLATE (B) 1
1
168
169 NYLON NUT M6 1
1
170 BOLT WASHER D6 1
171 SUPPORT PLATE 1
3
172 U- NUT M6 3
173 WASHER D7 4
174 BOLT (B) 3
175 BLADE ASS'Y (A) 1
176 BLADE CASE (A) 1
177 BOLT (A) 1
178 GEAR CASE B 1
179 GEAR CASE (A) ASS'Y 1
180 CLIP 1
181 GEAR SHAFT 1
182 GUIDE PLATE 1
3
183 GEAR 2 1
184 HOLDING PLATE 1
185 GREASE STOP A 2
186 GEAR CASE GASKET 1
187 GEAR CASE COVER 1
188 GEAR CASE B 1
189
501 BOX WRENCH 10/19MM 1
Part Name Q’TY
SEAL LOCK HEX. SOCKET HD.
BOLT M5×40
TAPPING SCREW
(W/FLANGE) D4×16
HEX. SOCKET HD. BOLT
(W/FLANGE) M6×22
HEX. SOCKET HD. BOLT
(W/WASHERS) M4×18
2
4
1
6
31
Page 32

CH22EBP
32
Page 33

CH22EBP
Item
No.
1 COVER FIXING BOLT COMP 1
2 CLEANER COVER 1
3 CLEANER SPONGE 1
4 CHOKE VALVE 1
5
6 CLEANER BODY 1
7 CHOKE HANDLE 1
8
9 SCREW (TAS) 1
10 SCREW (B) 3
11 SCREW (D) 4
12 SYRINGE 1
13 PRIMER BASE 1
14 PUMP GASKET 1
15 PUMP DIAPHRAGM 1
16 STRAINER 1
17 GUIDE PIN ROLLER 1
18 SYRINGE RETAINER 1
19 SCREW (E) 1
20 BALL PLUG RETAINER 1
21 SCREW (MAIN MIXTURE) 1
22 METERING LEVER SPRING 1
23 PIN 1
24 METERING DIAPHRAGM 1
25 METERING COVER 1
26 SCREW (C) 2
27 POST 1
28 ROTOR COVER 1
29 SCREW (C) 1
30
31 O-RING 1
32 INLET NEEDLE VALVE 1
33 SCREW (A) 1
34 METERING LEVER 1
35 METERING GASKET 1
36 CARBURETOR ASS'Y 1
37 CARBURETOR INSULATOR 1
38 INTAKE PACKING 1
39 GLASS WASHER 4
40 CARBURETOR PACKING 1
41
42
43 CORD 1
44 CAUTION LABEL 1
45
46 CYLINDER COVER 1
47
48 PLAG CAP 1
49 CORD INSULATION TUBE 1
50 BAND 1
51 IGNITION COIL ASS'Y 1
52 SPARK PLUG 1
53 CYLINDER 1
54 COVER PACKING 2
55 INTAKE COVER (A) 1
56 SEAL LOCK SCREW M4×10 4
57 HEAT PROTECTION PANEL 1
58 MUFFLER ASS'Y 1
Part Name Q’TY
MACHINE SCREW
(W/SP. WASHERS) M5×60
TAPPING SCREW
(W/FLANGE) D4×12
RETAINING RING (E-TYPE)
D2.3
SEAL LOCK HEX. SOCKET
BOLT (W/WASHERS) M5×25
HEX. SOCKET HD. BOLT
(W/WASHERS) M4×18
SEAL LOCK HEX. SOCKET
BOLT (W/WASHERS) M4×12
METAL FITTING OF PLAG
CAP (60)
Item
No.
59 BOLT WASHER M6 2
60
61 INTAKE COVER (B) 1
62 PISTON PIN 1
2
63 PISTON 1
64
65 CYLINDER PACKING 1
1
66 PISTON RING (R1-1978-3) 1
67 CIR CLIP 2
68 FLYWHEEL NUT M7 1
69 BOLT WASHER D7 1
70 STARTER PAWL 2
71 STARTER PAWL SPRING 2
72 MAGNETO ROTOR 1
73 RETAINING RING D4 2
74 CRANK CASE (B) COMP. 1
75 OIL SEAL 2
76 BALL BEARING 6001C3 2
77 SHIM T0.2 1
78 SHIM T0.3 1
79 CRANK SHAFT 1
80 CRANK CASE (A) ASS'Y 1
81 CRANK CASE PACKING 1
82 KNOCK PIN 4×12 2
83 CLUTCH (B) 1
84 CLUTCH DRUM 1
85 BALL BEARING 6002ZC3 2
86
87 GREASE NIPPLE COMP. 1
1
88
89 MUFFLER PROTECTOR 1
90
91
92
93 FIXATION PLATE (A) 1
94 FIXATION PLATE (B) 1
95 TAIL PIPE (A) 1
2
96 EXHAUST COVER 1
97 HITACHI LABEL 1
2
98
99 ROPE STOPPER 1
100 STARTER KNOB 1
1
101 STARTER ROPE 1
102
1
103 RECOIL SPRING 1
104 REEL 1
105 DAMPER SPRING 1
106 CAM PLATE 1
107 SET SCREW 1
108 STARTER ASS'Y 1
109 AIR DEFLECTOR 1
110 FUEL TANK CAP ASS'Y 1
111 TANK CAP CHAIN 1
112 FUEL GROMMET 1
113 FUEL PIPE 1
114 FUEL PIPE (PINK) 1
Part Name Q’TY
HEX. SOCKET HD. BOLT
M6×55
HEX. SOCKET HD. BOLT
(W/SP.WASHER) M5×18
RETAINING RING FOR D15
SHAFT
TAPPING SCREW (W/FLANGE)
D5×20
MACHINE SCREW
(W/SP. WASHERS) M5×16
HEX. SOCKET BOLT
(W/SP. WASHER) M6×18
SEAL LOCK HEX. SOCKET
BUTTON BOLT (W/WASHERS)
M5×20
TAPPING SCREW (W/FLANGE)
D4.5×18
SEAL LOCK SOCKET BUTTON
BOLT (W/WASHERS) M5×20
Item
No.
115 RETURN GROMMET 1
116 CLIP 1
2
117 PUMP FILTER 1
118 ANTI VIB. RUBBER 4
119 TANK (A) 1
120 HEAT PROTECTION PANEL (A) 2
141 NAME PLATE 1
8
142 HANDLE 1
143
144 SPRING LOCK WASHER D5 2
145 BRAKE AXIS WASHER 2
146 HANDLE(A) 1
147 START LABEL (B) 1
148 CAUTION LABEL 1
149 SPRING (A) 1
150 LOCK LEVER 1
151 THROTTLE LEVER 1
152 THROTTLE WIRE 1
153 PROTECTION TUBE 1
154 EARTH TERMINAL 1
155 TAPPING SCREW D3 3
156 TRIGGER LOCKOUT 1
157 THROTTLE LEVER SPRING 1
158 TAB TERMINAL 2
159 STOP SWITCH ASS'Y 1
160 SCREW M3×10 1
161 STOP BUTTON (RED) 1
162 STOP BUTTON MARK 1
163 HANDLE (B) 1
1
164
165 WASHER 6 3
1
166 NYLON NUT M6 3
167 SUPPORT PLATE 1
1
168 FIXATION PLATE (B) 1
169
3
170 BLADE ASS'Y 1
3
171 U-NUT M6 4
172 GUARD PLATE 1
173 WASHER D7 5
174 BOLT (A) 5
175
176 BLADE CASE 1
177 FLEXIBLE GROMMET 1
1
178 GEAR CASE (A) ASS'Y 1
179 CLIP 1
180 GEAR AXIS 1
181
3
182 GUIDE PLATE 1
183 CAM ROD 2
184 GEAR 2 1
185 GREASE STOP A 2
186 GEAR CASE GASKET 2
187 GEAR CASE COVER 1
188
189 GEAR CASE B 1
190
501
Part Name Q’TY
SEASL LOCK HEX. HOLE
BOLT 5×40
TAPPING SCREW (W/FLANGE)
D4×16
HEX. SOCKET HD. BOLT
(W/FLANGE) M6×22
HEX. SOCKET FLAT HD.
SCREW M6×25
HEX. SOCKET FLAT HD.
SCREW M6×25
HEX. SOCKET HD. BOLT
M4×10
HEX. SOCKET HD. BOLT
(W/WASHERS) M4×18
COMBI. BOX SPANNER 10×19,
PLUS
2
4
1
1
1
2
6
1
33
Page 34

CH22ECP
34
Page 35

CH22ECP
Item
No.
1 COVER FIXING BOLT COMP 1
2 CLEANER COVER 1
3 CLEANER SPONGE 1
4 CHOKE VALVE 1
5
6 CLEANER BODY 1
7 CHOKE HANDLE 1
8
9 SCREW (TAS) 1
10 SCREW (B) 3
11 SCREW (D) 4
12 SYRINGE 1
13 PRIMER BASE ASS'Y 1
14 PUMP GASKET 1
15 PUMP DIAPHRAGM 1
16 STRAINER 1
17 GUIDE PIN ROLLER 1
18 SYRINGE RETAINER 1
19 SCREW (E) 1
20 BALL PLUG RETAINER 1
21 SCREW (MAIN MIXTURE) 1
22 METERING LEVER SPRING 1
23 PIN 1
24
25 METERING COVER 1
26 SCREW (C) 2
27 POST 1
28 ROTOR COVER ASS'Y 1
29 SCREW (C) 1
30
31 O-RING 1
32 INLET NEEDLE VALVE 1
33 SCREW (A) 1
34 METERING LEVER 1
35 METERING GASKET 1
36 CARBURETOR ASS'Y 1
37 CARBURETOR INSULATOR 1
38 INTAKE PACKING 1
39 GLASS WASHER 4
40 CARBURETOR PACKING 1
41
42
43 CORD 1
44 CAUTION LABEL 1
45
46 CYLINDER COVER 1
47
48 PLAG CAP 1
49 CORD INSULATION TUBE 1
50 BAND 1
51 IGNITION COIL 1
52 SPARK PLUG 1
53 CYLINDER 1
54 COVER PACKING 2
55 INTAKE COVER (A) 1
56 SEAL LOCK SCREW M4×10 4
57 HEAT PROTECTION PANEL 1
58 MUFFLER ASS'Y 1
59 BOLT WASHER M6 2
60
Part Name Q’TY
MACHINE SCREW
(W/WASHERS) M5×60
TAPPING SCREW
(W/FLANGE) D4×12
METERING DIAPHRAGM
ASS'Y
RETAINING RING (E-TYPE)
D2.3
SEAL LOCK HEX. SOCKET
BOLT (W/WASHERS) M5
HEX. SOCKET HD. BOLT
(W/WASHERS) M4×18
SEAL LOCK HEX. SOCKET
HD. BOLT M4×12
METAL FITTING OF PLUG
CAP
PISTON
Item
No.
61 INTAKE COVER (B) 1
62 PISTON PIN 1
63 PISTON 1
64
2
65 CYLINDER PACKING 1
66 PISTON RING 1
67 PISTON PIN CIR CLIP 2
68 FLYWHEEL NUT 1
1
69 BOLT WASHER D7 1
70 STARTER PAWL 2
71 STARTER PAWL SPRING 2
72 MAGNETO ROTOR 1
73 RETAINING RING D4 2
74 CRANK CASE (B) ASS'Y 1
75 OIL SEAL TB 12227 2
76 BALL BEARING 6001C3 2
77 SHIM T0.2 1
78 SHIM T0.3 1
79 CRANK SHAFT 1
80 CRANK CASE (A) ASS'Y 1
81 CRANK CASE PACKING 1
82 KNOCK PIN 4×12 2
83 CLUTCH (B) 1
84 CLUTCH DRUM COMP. 1
85 BALL BEARING 6002ZC3 2
1
86
87 GREASE NIPPLE COMP. 1
88
89 MUFFLER PROTECTOR 1
1
90
91 TAIL PIPE 1
92 FIXATION PLATE (A) 1
93
94 FIXATION PLATE (B) 1
95
96 HEX. HOLE BOLT 6×18/S 3
97 HITACHI LABEL 1
98 TAPPING SCREW D4.5×16 1
99 PLATE 1
2
100 STARTER KNOB 1
101 STARTER ROPE 1
2
102
103 RECOIL SPRING 1
104 STARTER ROPE REEL 1
1
105 DAMPER SPRING 1
106 CAM PLATE 1
107 SET SCREW 1
1
108 RECOIL STARTER 1
109 AIR DEFLECTOR 1
110 FUEL TANK CAP ASS'Y 1
111 TANK CAP CHAIN 1
112 FUEL GROMMET 1
113 FUEL PIPE 1
114 FUEL PIPE (PINK) 1
115 RETURN GROMMET 1
116 CLIP 1
117 PUMP FILTER 1
118 CUSHION RUBBER 4
119 TANK 1
120
1
Part Name Q’TY
HEX. SOCKET HD. BOLT
(W/SP.WASHER) M5×18
RETAINING RING FOR D15
SHAFT
TAPPING SCREW
(W/FLANGE) D5×20
SCREW (W/WASHERS)
M5×16
MACHINE SCREW
(W/WASHERS) M4×10
HEX. SOCKET HD. BOLT
(W/FLANGE) M6×22
HEX. SOCKET HD. BOLT
(W/BUTTON) M5×20
HEAT PROTECTION PANEL
(A)
Item
No.
141
142 FRONT HANDLE 1
143 CAUTION LABEL 1
8
144 FRAME 1
145 NAME PLATE 1
146 START LABEL (B) 1
147 DAMPER 1
148
149 HANDLE (A) 1
150 SPRING (A) 1
151 LOCK LEVER 1
152 THROTTLE LEVER 1
153 THROTTLE WIRE 1
154 PROTECTION TUBE 1
155 PROTECTION TUBE 1
156 BAND 1
157 EARTH TERMINAL 1
158 TAPPING SCREW D3 3
159 TRIGGER LOCKOUT 1
160 THROTTLE LEVER SPRING 1
161 TAB TERMINAL 2
162 STOP SWITCH (A) 1
163 SCREW M3×10 1
164 STOP BUTTON (RED) 1
165 STOP BUTTON MARK 1
1
166 HANDLE B 1
167
2
168
169 CLIP 1
1
170 NYLON NUT M6 3
171 WASHER 6 3
172 SUPPORT PLATE 1
173 SPRING HOLDER 4
1
174
175 ANTIVIBRATION SPRING 4
1
176 BLADE ASS'Y 1
177 U-NUT M6 4 (5)
178 GUARD PLATE 1
179 WASHER M7 5 (6)
180 BOLT (A) 5 (6)
181
182 WIRE 1
3
183
184 GEAR CASE ASS'Y 1
185 NEEDLE BEARING HK0810B 1
186
187 GUIDE PLATE 1
188 CAM ROD 2
189 GEAR 2 COMP. 1
190 GREASE STOP A 2
191 GEAR CASE GASKET 2
192 GEAR CASE COVER 1
193 BALL BEARING 608ZZC3 1
194 GEAR CASE B COMP. 1
195
196
197 BLADE CASE 1
501 BOX WRENCH 10/19MM 1
2
Part Name Q’TY
HEX. SOCKET HD. BOLT
(W/FLANGE) M6×32
TAPPING SCREW
(W/FLANGE) D5×20
TAPPING SCREW
(W/FLANGE) D4×16
HEX. SOCKET HD. BOLT
(W/FLANGE) M6×20
HEX. SOCKET HD. BOLT
(W/FLANGE) M5×10
HEX. SOCKET FLAT HD.
SCREW M6×25
MACHINE SCREW
(W/WASHERS) M5×10
HEX. SOCKET FLAT HD.
SCREW M6×25
HEX. SOCKET HD. BOLT
(W/WASHERS) M4×18
HEX. SOCKET HD. BOLT
M4×10
2
1
4
2
4
1
1
1
6
2
35
Page 36

WARNING:
Some dust created by power sanding, sawing, grinding, drilling, and other construction activities contains
chemicals known to the State of California to cause cancer, birth defects or other reproductive harm.
Some examples of these chemicals are:
• Lead from lead-based paints,
• Crystalline silica from bricks and cement and other masonry products, and
• Arsenic and chromium from chemically-treated lumber.
Your risk from these exposures varies, depending on how often you do this type of work. To reduce your
exposure to these chemicals: work in a well ventilated area, and work with approved safety equipment,
such as those dust masks that are specially designed to fi lter out microscopic particles.
AVERTISSEMENT:
La poussière résultant d’un ponçage, d’un sciage, d’un meulage, d’un perçage ou de toute autre activité
de construction renferme des produits chimiques qui sont connus par I’Etat de Californie pour causer
des cancers, des malformations congénitales et autres anomalies de reproduction. Nous énumérons
ci-dessus certains de ces produits chimiques :
• Plomb des peintures à base de plomb,
• Silice cristalline des briques et du ciment et autres matériaux de maçonnerie, et
• Arsenic et chrome du bois d’œuvre traite chimiquement.
Le risque d’exposition à ces substances varie en fonction de la fréquence d’exécution de ce genre de
travail. Pour réduire I’exposition à ces produits chimiques, travailler dans un lieu bien ventilé, et porter un
équipement de protection agréé, par exemple un masque anti-poussière spécialement conçu pour fi ltrer
les particules microscopiques.
ADVERTENCIA:
Algunos polvos creados por el lijado mecánico, el aserrado, el esmerilado, el taladrado y otras
actividades de construcción contienen sustancias quimicas consideradas por el Estado de California
como cancerígenas, causantes de defectos en el feto y otros daños reproductivos. Algunos ejemplos de
estas sustancias químicas son:
• El plomo de las pinturas a base de plomo,
• El sílice cristalino de los ladrillos y cemento y otros productos de mamposteria, y
• El arsénico y el cromo de la madera tratada químicamente.
El riesgo resultante de la exposición varía según la frecuencia con que se realiza este tipo de trabajo.
Para reducir la exposicíon a estas sustancias químicas: trabaje en un lugar bien ventilado y realice
el trabajo utilizando el equipamiento apropiado, tal como las máscaras para el polvo especialmente
diseñadas para eliminar las particulas minuscúlas.
Issued by
Shinagawa Intercity Tower A, 15-1, Konan 2-chome,
Minato-ku, Tokyo 108-6020, Japan
Distributed by
3950 Steve Reynolds Blvd.
Norcross, GA 30093
450 Export Blvd. Unit B,
Mississauga ON L5T 2A4
201
Code No. E99245162 NA
Printed in China
 Loading...