

Page 1

2.1 Bluetooth Soundbar
with Wireless Subwoofer
AXS460BTU
847/5833
For any help concerning set up and use of your sound bar
Please call the Customer Helpline: 0345 604 0105
7
Page 2
Contents
Safety Warnings ...................................................................................................................3
Support ................................................................................................................................. 5
Unpacking .............................................................................................................................6
Product Overview ................................................................................................................7
Main Unit .........................................................................................................................................................7
Rear View of Subwoofer ............................................................................................................................8
Remote Control ............................................................................................................................................9
Preparation .........................................................................................................................10
Battery Replacement for the Remote Control ............................................................................... 10
Remote Control Operation Range ...................................................................................................... 10
Installing the Foot Pads ...........................................................................................................................11
Wall Mounting .............................................................................................................................................11
Speakers Placement ..................................................................................................................................13
Connections ........................................................................................................................14
Method 1: Optical / Coaxial Connection ...........................................................................................14
Method 2: HDMI Hub Connection .......................................................................................................15
Method 3: AUX Connection ...................................................................................................................17
Connecting an MP3 Player .....................................................................................................................17
Connecting to the Mains Supply ........................................................................................................ 18
Pai
ring the Wireless Subwoofer with the Soundbar ....................................................................19
General Operation ............................................................................................................ 20
Standby / ON .............................................................................................................................................. 20
......... 20
Selecting Modes ........................................................................................................................................ 20
Adjusting the Speaker Level
AUX / Coaxial / Optical / HDMI Operation .......................................................................21
Bluetooth® Operation ....................................................................................................... 22
NFC (Near Field Communication) Operation ................................................................. 22
Maintenance ...................................................................................................................... 23
Hints and Tips .................................................................................................................... 23
Product Fiche and Speci cations .................................................................................... 24
Guarantee....................................... .................................................................................... 26
Other Informantion and Licenses..................................................................................... 27
2
Page 3

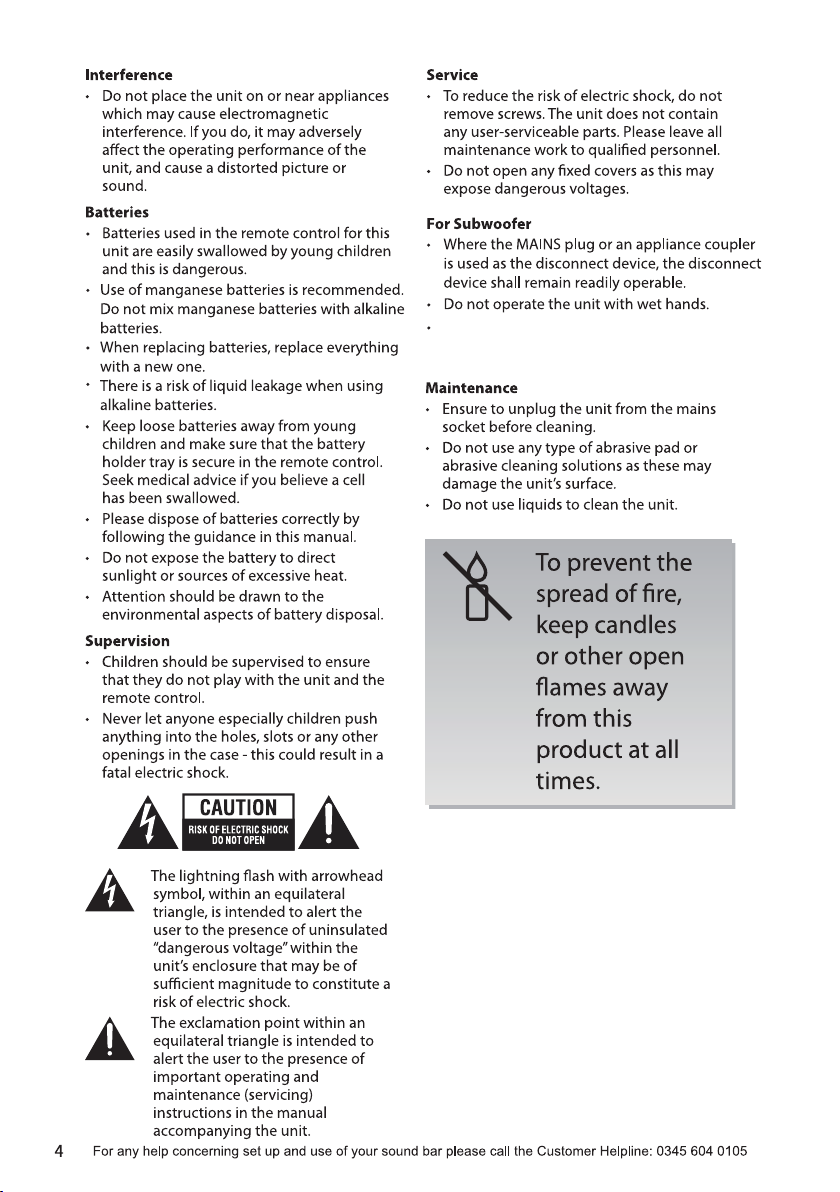
Safety Warnings
Read all the instructions carefully before
using the unit and keep them for future
reference.
Retain the manual. If you pass the unit
onto a third party make sure to include this
manual.
Check that the voltage marked on the
rating label matches your mains voltage.
Damage
Please inspect the unit for damage after
unpacking.
Do not continue to operate the unit if you
are in any doubt about it working normally,
withdraw the mains plug and consult your
dealer.
Location of Unit
surface and should not be subjected to
vibrations.
Do not place the unit on sloped or unstable
The mains socket must be located near the
unit and should be easily accessible.
This unit is designed for indoor, domestic
use only.
Temperature
Avoid extreme degrees of temperature,
either hot or cold. Place the unit well away
from heat sources such as radiators or gas /
Avoid exposure to direct sunlight and other
sources of heat.
Attention should be drawn to the use of
apparatus in moderate climates.
Naked Flames
Never place any type of candle or naked
Moisture
product damage, do not expose this unit
to rain, moisture, dripping or splashing.
vases, should be placed on the unit. Do
not operate the unit with wet hands, near
water or other liquid.
If you spill any liquid into the unit, it can
mains immediately. Withdraw the mains
plug and consult your dealer.
Ventilation
the ventilation should not be impeded by
covering the ventilation openings with
items,such as newspapers,table-cloths,
curtains,etc.
A minimum distance of 5 cm around the
unit should be maintained to allow for
Do not install or place this unit in a
bookcase, built-in cabinet or in another
ventilated.
Safety
Always disconnect the unit from the mains
supply before connecting / disconnecting
other devices or moving the unit.
Unplug the unit from the mains socket
during a lightning storm.
In the interests of safety and to avoid
unnecessary energy consumption,
never leave the unit switched on while
unattended for long periods of time, e.g.
overnight, while on holiday or while out of
mains plug from the mains socket.
Mains Cable
Make sure the unit or unit stand is not
resting on top of the mains cable, as the
weight of the unit may damage the mains
cable and create a safety hazard.
If the mains cable is damaged it must be
replaced by the manufacturer, its service
order to avoid a hazard.
Mains Adapter Cable
Make sure the unit or unit stand is not
resting on top of the mains adapter cable,
as the weight of the unit may damage the
cable and create a safety hazard.
Mains Adapter
The mains adapter will continue to
draw electricity from the mains supply
when plugged in the mains socket.
In the interests of safety and to avoid
unnecessary energy consumption, never
leave the adapter plugged in the mains
socket while unattended for long periods
of time. Disconnect the adapter from the
power supply.
Use only power supplies listed in the
user instructions.
3
Page 4
The product shall be connected to a MAINS socket
outlet with a protective earthing connection.
Page 5

Support
Technical experts are available 7 days a week
Simple help and advice on setting up your digital
equipment (image).
Guidance on connecting other devices to your
television such as a DVD player, Sky, home
cinema
system or a games console.
Order spare parts, including that lost remote
control.
Any other technical issues you may need
assistance with.
Call us today: 0345 604 0105
Local call rates applies*
Lines open 8am-7pm Monday to Saturday and 10am-4pm Sunday.
*Calls to Argos enquiry lines may attract a charge and set up fee from residential
lines depending on your call plan/tariff. Mobile and other providers costs may vary,
see www.bt.com/pricing for details.
For Security and training purposes, telephone calls to and from customer service
centres maybe recorded and monitored. Calls from Republic of Ireland will attract
international call charges.
HITACHI Europe Ltd., declares that the radio equipment type soundbar is in
compliance with Directive 2014/53/EU. The full text of the EU declaration of
conformity is available at the following internet address: https://estadoc.hitachi.
eu/estadoc/index.htm
5
Page 6
Thank you for purchasing your new product.
We recommend that you spend some time reading this instruction manual
Read all the safety instructions carefully before use and keep this
instruction manual for future reference.
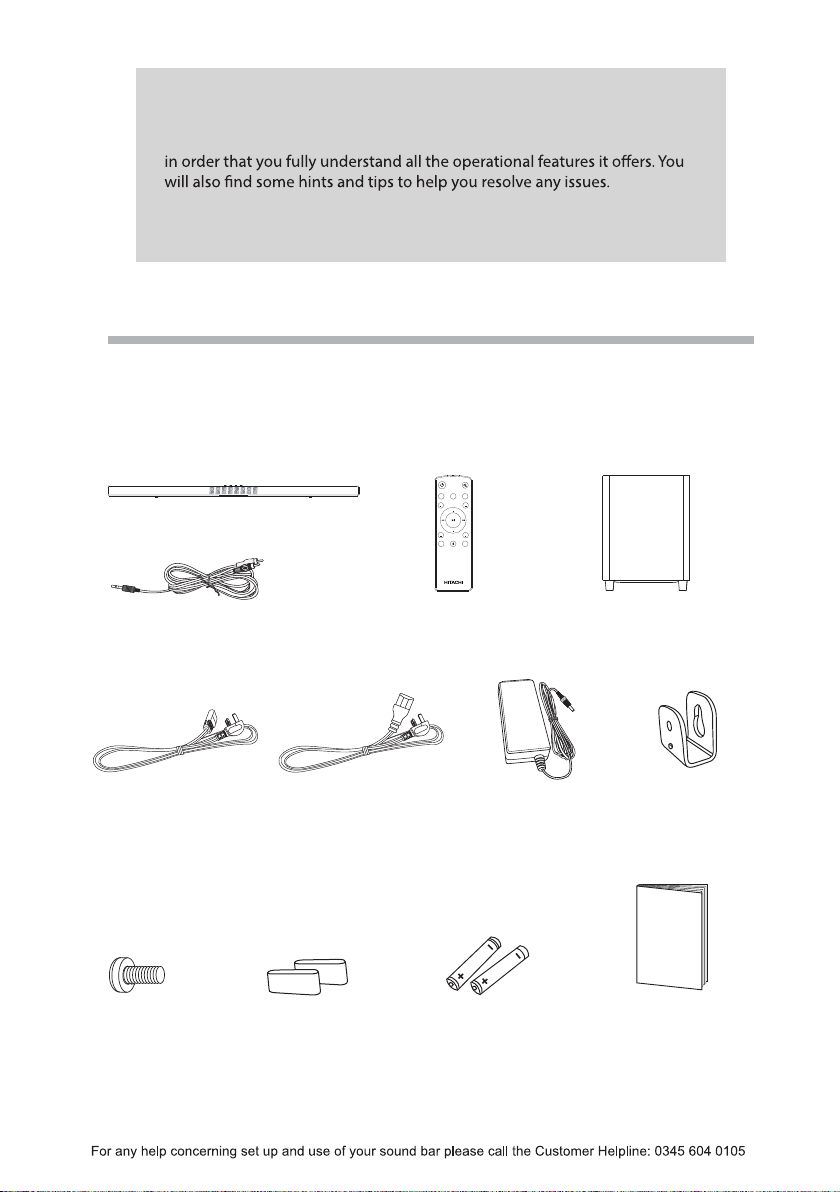
Unpacking
Remove all items from the packaging. Retain the packaging. If you dispose of it please do so
according to local regulations.
The following items are included:
AUX
HDMI
DIGITAL
BERTBERT
tinU niaM
VOL
VOL
BUSBUS
PAIR
DTS
DTS
TSHD
TVOL
Mains Cable x 1
6
RCA Extension Cable
Screw x 2
PM5*8
Mains Cable x 1
lortnoC etomeR
Mains Adapter for
Main Unit
Subwoofer
Instruction
Wall Bracket x 2
Manual
launaM noitcurtsnI2 x daP tooF AAA Battery x 2
Page 7

Product Overview
SOURCE VOL– VOL+
Main Unit
Front View
321
1. LED Display
Show the current status.
2. Remote Control Sensor
Receive signal from the remote control.
Top View
1. Button
Switch the unit between On and
Standby mode.
2. SOURCE Button
Select the input source.
3. VOL – / + Button
Adjust the volume.
3. NFC (Near Field Communication)
Sensor
SOURCE VOL– VOL+
1 2 3
7
Page 8
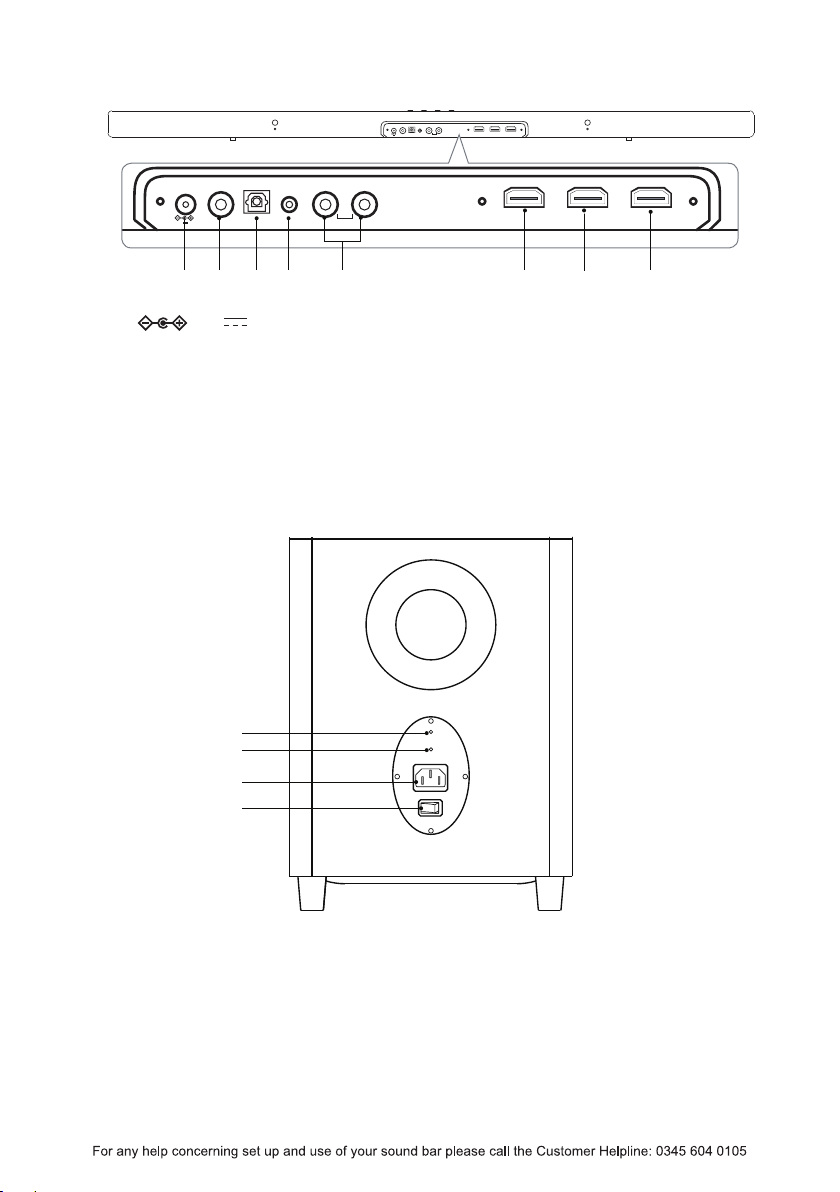
Rear View
COAXIAL OPTICAL AUX 2 AUX 1R L
25V 2.6A
ARC
HDMI2 HDMI1
COAXIAL OPTICAL AUX 2 AUX 1R L
25V 2.6A
1. 25V 2.6A Socket
2. COAXIAL Socket
3. OPTICAL Socket
4. AUX 2 Socket
Rear View of Subwoofer
1
2
3
4
5. AUX 1 (L/R) Sockets
6. ARC Sockets
7. HDMI 2 Socket
8. HDMI 1 Socket
Power
PAIR
AC 100-240V~
ON OFF
HDMI2 HDMI1ARC
7 84321 65
1. POWER Indicator
2. PAIR Button
8
Light up orange when the pairing
succeed.
Pair with the main unit.
3. AC 100~240V Power Socket
4. ON/OFF Switch
Switch the subwoofer ON or OFF.
Page 9

Remote Control
1. Button
Switch the unit between On and
Standby mode.
2.
Button
Mute the unit or resume the sound.
3. AUX Button
Switch between AUX 1 / AUX 2
mode.
4. DIGITAL Button
Switch between OPTICAL / COAXIAL
mode.
5. HDMI Button
Switch between HDMI 1 / HDMI 2 /
ARC mode.
6. TREB – / + Buttons
Adjust the treble sound level.
7. VOL + / – Buttons
Adjust the volume.
Button
Skip to the previous track in
Bluetooth® mode.
Button
Play / pause / resume playback in
Bluetooth® mode.
Button
Skip forwards to the next track in
Bluetooth® mode.
8. SUB – / + Buttons
Adjust the subwoofer sound level.
9. DTS TSHD Button
Activate: DTS ON / DTS OFF
10. DTS TVOL Button
Activate DTS TruVolume: TVOL ON/
TVOL OFF.
11.
PAIR Button
Direct switch to Bluetooth® mode.
Press and hold to enable Bluetooth®
pairing in Bluetooth® mode.
If there is an existing connection,
press and hold to disconnect the
paired Bluetooth® device. The unit
will then enter paring mode.
1
DIGITAL
3
7
9
AUX
DTS
TSHD
HDMI
VOL
VOL
PAIR
DTS
TVOL
2
4
5
6
BERTBERT
BUSBUS
8
10
11
9
Page 10

Preparation
Battery Replacement for the Remote Control
1. Press and slide the back cover to open the
battery compartment of the remote control.
2. Insert two AAA size batteries. Make sure the
(+) and ( – ) ends of the batteries match the
(+) and ( – ) ends indicated in the battery
compartment.
3. Close the battery compartment cover.
Handling the Battery
personal injury or damage to property.
Only use the battery type indicated in this manual.
erent types of batteries.
Do not dispose of used batteries as domestic waste. Dispose of them in accordance with local
regulations.
Handling the Remote Control
Do not drop the remote control.
Do not allow anything to impact the remote control.
Do not spill water or any liquid on the remote control.
Do not place the remote control on a wet object.
Do not place the remote control under direct sunlight or near sources of excessive heat.
Remove the battery from the remote control when not in use for a long period of time, as corrosion or
When the battery is exhausted, the remote control will not function.
Remote Control Operation Range
The remote control sensor on the front
unit is sensitive to the remote control’s
commands up to a maximum of 5 metres
away and within a maximum of a 60° arc.
Please note that the operating distance
may vary depending on the brightness of
the room.
30° 30°
Max. 5 m
AUX
HDMI
DIGITAL
VOL
VOL
PAIR
DTS
DTS
TSHD
TVOL
re,
re.
BERTBERT
BUSBUS
10
Page 11

Installing the Foot Pads
Ensure all cables to the main unit are disconnected before installing or removing the foot pads.
Wall Mounting
personal injury and property damage (if you intend to install this product yourself, you must check
for installations such as electrical wiring and plumbing that may be buried inside the wall). It is the
installer’s responsibility to verify that the wall will safely support the total load of the Soundbar.
Additional tools (not included) are required for the installation.
Do not overtighten screws.
Keep this instruction manual for future reference.
nder to check the wall type before drilling and mounting.
ed personnel only. Incorrect assembly can result in severe
1. Attach the wall brackets (included) to the main unit with the supplied screws.
2. Drill 2 parallel holes (Ø 3-8 mm each according to wall type) in the wall. The distance
between the holes should be 475 mm.
475 mm
Wall (Front view)
11
Page 12

Dowel
Solid wall (i.e., Solid brick,
Solid concrete, Solid wood,
Solid wooden battens)
Drywall, Plaster wall,
Lath wall, etc.
4. Insert 1 screw ( included) into each dowel. Be sure to leave a 3 mm gap between the
wall and the screw’s head. Lift the unit over the heads of the screws and slot into place.
3 mm
12
25-30 mm
Page 13

Speakers Placement
SOUNDBAR
SUBWOOFER
The subwoofer should
be within 5 metres of
the soundbar in an
open area (the closer
the better).
Do not put anything
on the top of the
subwoofer.
Soundbar
ects.
If your TV is placed on a table, you can place the soundbar on the table directly in front
of the TV stand, centered with the TV screen.
If your TV is attached to a wall, you can mount the soundbar on the wall directly below
the TV screen.
Subwoofer
ects (explosions, the rumble of
spaceships, etc.).
The performance of a subwoofer is directly related to its placement in the listening
nal location for your subwoofer.
Find the location where the bass performance is best.
13
Page 14

Connections
This section involves various methods of connecting the product to other external components. Ensure
all audio connections of the unit are connected before connecting to the mains power socket.
Method 1: Optical / Coaxial Connection
Use an optical cable (not included) / coaxial cable (not included) to connect the soundbar’s
OPTICAL / COAXIAL socket to the OPTICAL OUT / COAXIAL OUT socket of the external
device. The simplest option is to connect your soundbar directly to your TV. If you connect
the soundbar to another external device (e.g. Blu-Ray player), you will hear the sound from
that device through the soundbar.
1. After connection, press
2. Press SOURCE on the unit or DIGITAL on the remote control repeatedly to select
OPTICAL or COAXIAL to play audio from your input device.
button on the unit or remote control to switch the unit on.
Rear View of the Soundbar
COAXIAL OPTICAL AUX 2 AUX 1R L
25V 2.6A
ARC
HDMI2 HDMI1
Optical cable (not included) or
Coaxial cable (not included)
TV
Set-top Box
Blu-ray Player / DVD Player
/ Recorder
The unit may not be able to decode all digital audio formats from the input source. In this case, the unit
will mute. This is NOT a defect. Ensure that the audio setting of the input source (e.g. TV, game console,
DVD player, etc.) is set to PCM or Dolby AC-3 (Refer to the user manual of the input source device for its
audio setting details) with optical / coaxial input.
Satellite
Receiver
Game
Console
Video
Camera
14
Page 15

Method 2: HDMI Hub Connection
Using your Soundbar as a hub
Use this method to connect all your devices into your soundbar. If your TV is not ARC
compatible, then you will need to follow “Method 1: Optical / Coaxial Connection” to
listen to normal TV through your TV.
1. Connect an HDMI cable (not included) from your soundbar’s HDMI OUT (ARC) socket
to the HDMI IN socket on your TV.
2. After connection, press
3. Press SOURCE on the unit or HDMI on the remote control repeatedly to select HDMI 1
/ HDMI 2 to play audio from your input device.
button on the unit or remote control to switch the unit on.
HDMI Cable (not included)
Rear View of the Soundbar
TV
COAXIAL OPTICAL AUX 2 AUX 1R L
25V 2.6A
HDMI2 HDMI1ARC
HDMI Cable
Set-top Box
Satellite
Receiver
Blu-ray Player / DVD
Player / Recorder
Game
Console
Video
Camera
(not included)
The unit may not be able to decode all digital audio formats from the input source. In this case, the unit
will mute. This is NOT a defect. Ensure the audio setting of the input source (e.g. TV, game console, DVD
player, etc.) is set to PCM or Dolby AC-3 (Refer to the user manual of the input source device for its audio
setting details) with HDMI input.
For a single remote use when connected to a Hitachi TV please carry out the following:
(Please check your user manual for other manufacturers TV as this may not be the same.)
Connect HDMI cable to ARC supported HDMI port of
Set Speaker as Amplifier (Menu >> Settings>>More…>> Other Settings>> Speaker >> Amplifier)
Then whether you use TV remote control or sound bar remote control,TV speakers will be MUTE and you will
hear sound from sound bar without any problem.
After stand by on off or power off on, TV keeps last settings.
TV set,
15
Page 16

Using Your TV as a hub
Ensure to use an HDMI cables that can support the ARC function.
manual for details on setting up HDMI-CEC and ARC.
While using an HDMI cable for ARC function, CEC (Consumer Electronics Control) provides
interoperability between the unit and various devices (e.g. TV). However, this unit is not guaranteed to
fully operate with all HDMI-CEC enabled devices. This is NOT a defect.
erent manufacturers – please refer to your owner’s
The ARC (Audio Return Channel) function allows sound to travel to and from your ARCcompliant TV to your soundbar through a single HDMI connection. To enjoy the ARC
function, please ensure that your TV is both HDMI-CEC and ARC compliant and set up
accordingly. When correctly set up, the CEC feature allows you to adjust the volume output
(VOL +/– and MUTE) of the soundbar with the TV remote control. When you switch your
. Be patient
.
Use this method to connect all your devices into your TV.
1. Connect an HDMI cable (not included) from your soundbar’s HDMI OUT (ARC) socket
to the HDMI (ARC) socket on your ARC-compliant TV.
2. After connection, press
button on the unit or remote control to switch the unit on.
3. Press SOURCE on the unit or HDMI on the remote control repeatedly to select ARC to
play audio from your input device.
HDMI Cable (not included)
HDMI2 HDMI1
COAXIAL OPTICAL AUX 2 AUX 1R L
25V 2.6A
Rear View of the Soundbar
ARC
TV
Blu-ray Player / DVD
Player / Recorder
Receiver
Using the HDMI converter
Connect the HDMI cable with the HDMI converter (not included)
in
16
cient space for HDMI cable connection.
etilletaSxoB pot-teS
Game
Console
Video
Camera
Page 17

Method 3: AUX Connection
1. Use an RCA to RCA stereo audio cable (not included) or 3.5 mm to RCA stereo audio
cable (included) to connect the soundbar’s AUX 1 (L/R) socket to the AUDIO OUT
sockets of the external device.
2. After connection, press
3. Press SOURCE on the unit or AUX on the remote control repeatedly to select AUX 1 to
play audio from your input device.
button on the unit or remote control to switch the unit on.
Rear View of the Soundbar
COAXIAL OPTICAL AUX 2 AUX 1R L
25V 2.6A
RCA to RCA Stereo Audio
Cable (not included)
TV
Set-top Box
Blu-ray Player / DVD
Player / Recorder
OR
Satellite
Receiver
HDMI2 HDMI1ARC
3.5mm to RCA Stereo Audio
Cable (included)
Game
Console
Video
Camera
If the input to the soundbar is fed from the TV’s headphone socket, then to prevent
speaker from going into standby it is recommended to have the TV volume set to at
least 50% of its range and to use the soundbar remote to control volume.
r t cEnsu e to match the colours on the cable plugs o the olours on the input and output sockets.
Please check with the manufactures instructions for compatibility.
Connecting an MP3 Player
1. Use a 3.5mm to 3.5mm stereo audio cable (not included) to connect the soundbar’s
AUX 2 to the headphone socket of the external device.
2. After connection, press
3. Press SOURCE on the unit or AUX on the remote control repeatedly to select AUX 2 to
play audio from your input device.
button on the unit or remote control to switch the unit on.
Rear View of the Soundbar
HEADPHONE
COAXIAL OPTICAL AUX 2 AUX 1R L
25V 2.6A
3.5mm to 3.5mm Stereo
Audio Cable (not included)
HDMI2 HDMI1ARC
17
Page 18

Connecting to the Mains Supply
The soundbar and subwoofer are designed to operate with the supplied mains adapter and
mains cables.
Connecting the unit to any other power source may damage the unit.
Ensure all audio connections of the unit are connected before connecting to the mains power socket.
The mains adapter and mains cable are designed for this soundbar only. DO NOT use the mains
adapter and mains cable for other purposes.
Soundbar
Unwind the mains adapter cable to its full length. Connect mains cable to the mains
adapter and then connect to the
mains socket at the other end. Make sure the mains adapter is fully inserted into the mains
socket.
rmly inserted into the mains socket.
completely, remove the mains plug from the mains socket.
completely to save energy when not in use.
2.6A socket on the rear of the unit and a
25V
Rear View of the Unit
COAXIAL OPTICAL AUX 2 AUX 1R L
25V 2.6A
HDMI2 HDMI1ARC
To the
mains socket
Subwoofer
Connect the other end of the mains cable to the AC 100-240V socket at the rear of the
subwoofer then connect the mains plug to the mains socket.
Rear View of the Subwoofer
To the
Power
PAIR
AC 100-240V~
ON OFF
mains socket
18
Page 19

Pairing the Wireless Subwoofer with the Soundbar
Automatic Pairing
Plug the soundbar and the subwoofer into the mains sockets and switch on the subwoofer.
Press on the unit or on the remote control to switch the unit to On mode. The display will
show “WELCOME”. Then the subwoofer and soundbar will automatically paired within 30
seconds.
Do not press PAIR on the rear of the subwoofer, except for manual pairing.
Manual Pairing
It is very abnormal that the connection would fail. You should not attempt manual pairing in normal
usage.
If the automatic pairing fails or the subwoofer is switched OFF ash “CHK
SUB” for 20 seconds. Ensure that all the cables are well connected, the main unit and the
subwoofer is switched to On mode. If it still doesn’t work, pair the subwoofer with the
soundbar manually.
1. Unplug both units from the mains sockets, then plug them in again after 3 minutes.
2. Press
3. Press and hold the PAIR button on the rear of the subwoofer, and then press and hold
4. While the unit is pairing with the subwoofer, “CNCT SUB
5. After the subwoofer is paired with the unit, “CNCT SUB“ will disappear, and the display
on the unit or on remote control to switch the unit on.
SOURCE and VOL+ on the unit for a few seconds to start pairing. The pair indicator on
the subwoofer will rapidly blink when pairing and will become solid when successful.
ash on the display.
will show the current channel.
After connecting the power, you must press PAIR ective.
The subwoofer should be within 5 m of the soundbar in an open area.
ict or strong interference (for example,
icts or strong
interferences and repeat the above procedures.
19
Page 20

This instruction manual explains the basic instructions for operating this unit. Unless otherwise stated, all
operations described are based on remote control use.
General Operation
Standby / ON
rst connect the unit to the mains socket, the unit will be in Standby mode.
During Standby mode, the POWER . Press
on the unit or on the remote control to switch the unit on. The display will show
“WELCOME
every time the unit is switched on.
After the unit is idle for about 10 seconds, the display will show “--“.Press any button
(except
Press
mode. The display will show “GOODBYE .
and MUTE) to exit the idle mode.
on the unit or on the remote control again to switch the unit back to Standby
Function
The unit automatically turns to Standby mode after about 10 minutes if the TV or the
or the volume is too close to mute.
completely, remove the mains plug from the mains socket.
completely to save energy when not in use.
Selecting Modes
Press SOURCE on the unit repeatedly to select between AUX 1, AUX 2, BT (Bluetooth®),
OPTICAL, COAXIAL, HDMI 1, HDMI 2, and ARC mode.
x on level 15 after
20
Alternatively,
press AUX on the remote control repeatedly to select between AUX 1 and AUX 2 mode.
press DIGITAL on the remote control repeatedly to select between OPTICAL and COAXIAL mode.
press HDMI on the remote control repeatedly to select between HDMI 1, HDMI 2 and ARC mode.
Press
PAIR on the remote control to select BT (Bluetooth®) mode directly.
Page 21

ects
Adjusting the Volume
Press VOL + / – to adjust the volume.
, press
“MUTE”. Press
again, or press VOL + / – on the unit or on the remote control to
resume normal listening.
Adjusting the Subwoofer Volume Level
Press SUB + / – repeatedly to adjust the bass volume level from SUB MIN (–10) to SUB MAX
(10).
Adjusting the Treble Volume Level
Press TREB + / – repeatedly to adjust the treble volume level from TREB MIN (–10) to TREB
MAX (10), each press will increase or decrease 2 level.
DTS Studiosound
Press DTS TSHD to activate DTS ON or DTS OFF.
DTS TruVolume
Press DTS TVOL to switch between TVOL ON or TVOL OFF.
This feature is designed to level out the volume to provide a consistent loudness experience across
sources. When watching a TV program and the adverts come on the volume level of the adverts is often
louder than the program you are watching. This feature will level out the volume levels between the
TV program and adverts. After TVOL (TruVolume) is switched ON, it can adjust the volume levels while
watching TV or movies, which might cause the volume level dropping from time to time. If you notice this
on the remote control. The display will show
.
AUX / Coaxial / Optical / HDMI Operation
There are COAXIAL / OPTICAL / AUX 1(L/R) / AUX 2 and HDMI sockets located at the rear
of the unit. Analogue audio sound signals from other sources can be connected to the unit
through these sockets.
1. Before connecting to the mains socket, ensure all the connections are completed.
2. While in the On mode, press SOURCE on the unit repeatedly to select between AUX 1,
AUX 2, BT (Bluetooth®), OPTICAL, COAXIAL, HDMI 1, HDMI 2, and ARC mode.
Alternatively,
press AUX on the remote control repeatedly to select between AUX1 and AUX2 mode.
press DIGITAL on the remote control repeatedly to select between OPTICAL and COAXIAL mode.
press HDMI on the remote control repeatedly to select between HDMI1, HDMI2 and ARC mode.
Press
PAIR on the remote control to select BT (Bluetooth®) mode directly.
3. Operate your audio device directly for playback features.
21
Page 22

Bluetooth® Operation
Pairing the unit with a Bluetooth® device to listen to music:
First time pairing
1. During On mode, press SOURCE on the unit repeatedly or press
control to select Bluetooth® mode. The display will show BT. Then PAIRING ash in
the display.
2. Activate your Bluetooth® device and select the search mode. “
on your Bluetooth® device list.
3. Select “AXS460BTU” and enter “0000” for the password if necessary. After pairing, the
display will show PAIRED.
rst time pairing
1. In Bluetooth® mode, press and hold SOURCE on the unit or
control to clear all pairing setting. The unit will enter pairing mode, and PAIRING will
ash in the display.
2. Follow step 2-3 to pair your Bluetooth® device.
Bluetooth® device already in the connection memory
1. After entering the Bluetooth® mode, the display will show BT.
2. The unit will automatically reconnect with the Bluetooth® device. After pairing, the
display will show PAIRED.
To disconnect the Bluetooth® function, switch to another function on the unit or disable the
function from your Bluetooth® device. You may also press and hold SOURCE on the unit or
PAIR on the remote control to clear all pairing setting. PAIRING ash in the display
and the unit is now ready for pairing. Follow step 2-3 in “First time pairing“ above to pair
your Bluetooth® device.
PAIR on the remote
AXS460BTU
PAIR on the remote
” will appear
The operational range between the unit and the device is approximately 6 metres.
Before connecting a Bluetooth® device to the unit, ensure you know the device’s capabilities.
Compatibility with all Bluetooth® devices is not guaranteed.
Any obstacle between the device and the unit can reduce operational range.
Keep this player away from other electronic devices that may cause interference.
The player will also be disconnected when your device is moved beyond the operational range.
NFC (Near Field Communication) Operation
Pair your NFC-enabled mobile device directly with this unit by just a single tap.
1. Activate NFC on your mobile device.
2. Tap the mobile device on the
mode automatically. The display will show BT. The unit will enter pairing mode, and
PAIRING
3. Operate your mobile device for playback features.
4. To disconnect, tap the mobile device on the
Bluetooth® from your mobile device.
The NFC function only works with mobile devices that support NFC technology.
You may need to remove your mobile devices case to connect using NFC.
22
ash in the display.
icon of the unit. Your unit will switch to Bluetooth®
icon of the unit to disconnect or disable
Page 23

Maintenance
Ensure the unit is fully unplugged from the mains socket before cleaning.
To clean the units, wipe the case with a slightly moist, lint-free cloth.
uids containing alcohol, ammonia or abrasives.
Do not spray aerosol at or near the unit.
Hints and Tips
If a problem does occur, it may often be due to something very minor. The following table
contains various tips.
Problem Solution
No power.
The remote control does
not function.
Loud hum or noise is
heard.
No sound from
the soundbar and
subwoofer.
Ensure the mains plug is connected.
Make sure that you select the On mode.
Use the remote control near the unit.
Point the remote control at the remote sensor on the unit.
Replace the battery in the remote control with a new one.
Remove any obstacles between the remote control and
the unit.
The plugs and sockets are dirty. Wipe them with a cloth
slightly moistened with alcohol.
Please try either one of the solutions below:
Make sure that the unit is not muted. Press
button to resume normal listening.
Press on the unit or on the remote control to switch the
soundbar to standby mode. Then press the button again to
switch the soundbar on.
Unplug both the soundbar and the subwoofer from
the mains socket, then plug them again. Switch on the
soundbar.
Ensure the audio setting of the input source (e.g. TV, game
console, DVD player, etc.) is set to PCM or Dolby AC-3
mode while using digital (e.g. HDMI, OPTICAL, COAXIAL)
connection.
The subwoofer is out of range, please move the subwoofer
closer to the soundbar. Make sure the subwoofer is within
5 m of the soundbar (the closer the better).
The soundbar may have lost connection with the
subwoofer. Re-pair the units by following the steps on
the section “Pairing the Wireless Subwoofer with the
Soundbar”.
The unit may not be able to decode all digital audio
formats from the input source. In this case, the unit will
mute. This is NOT a defect.
or VOL +/–
23
Page 24

Problem Solution
The unit does not
respond when pressing
any buttons.
Cannot use the TV
remote control to switch
or adjust the
volume of the soundbar.
Intermittent sound
output from subwoofer.
nd
“AXS460BTU ” on my
Bluetooth® device.
Some NFC-enabled
mobile devices cannot
pair directly with the
unit.
If any anomaly is encountered, unplug the mains adapter from the mains socket and reconnect it again.
then on again at the mains socket to reset the unit.
Make sure that your TV is HDMI-CEC and ARC compatible.
Use the correct HDMI cable to make the connection
between the unit and TV. For details, please refer to
“Method 2: HDMI Hub Connection” section.
You are at the operating limit of the subwoofer. Move the
subwoofer closer to the Soundbar (the closer the better)
or remove obstacles from between the soundbar and
Subwoofer.
Ensure the Bluetooth® function is activated on your
Bluetooth® device.
Ensure you have paired your unit with the Bluetooth®
device.
Download and install NFC reader apps into your NFCenabled mobile device. Please refer to your mobile device’s
guidebook for more details.
Pair the NFC-enabled mobile device via Bluetooth®, and
then tap the
Pair your mobile device with the unit via Bluetooth®.
icon.
and
Product F ations
Model
Soundbar
Power Adapter (Use only power adapter listed below)
Power Adapter Manufacturer
Power Adapter Model
Input
Output
Main Unit
Main Unit Input
Bluetooth® Bluetooth® Version Bluetooth® 4.0
Maximum
transmitted power
Frequency bands 2402 MHz ~ 2480 MHz
24
AXS460BTU
Dongguan Dongsong Electronic Co., Ltd.
DYS602-250260W
100-240V AC 50/60Hz
DC 25 V 2.6 A
DC 25 V 2.6 A
10 dBm
Page 25

Ecodesign Information (Soundbar)
Information on
Power Consumption
Time interval for power management
function switches the unit automatically into
standby
Power consumption in network standby if all
wireless network ports are activated
How to activate wireless network port:
Connect the unit with power
How to deactivate wireless network port:
Press the
Standby button
Power Consumption
of Standby Mode
Network Standby
Power Consumption
Net Weight
Dimension
Subwoofer
Power Supply
Power Consumption
Ecodesign Information (Subwoofer)
Information on
Power Consumption
Time interval for power management
function switches the unit automatically into
standby
Power consumption in network standby if all
wireless network ports are activated
How to activate wireless network port:
Connect the unit with power
Power Consumption
of Standby Mode
Network Standby
Power Consumption
< 0.5 W
< 2.0 W
Switch to standby mode within 10
minutes after intended use
N/A
2.1 kg
985 mm (W) x 54 mm (H) x 74 mm (D)
AC100-240 V ~ 50 Hz
65 W
N/A
< 2.0 W
N/A
N/A
How to deactivate wireless network port:
Press the
2.4 GHz Wireless
Connection
Standby button
Maximum
transmitted power
Frequency bands
Net Weight
Dimension
8 dBm
2400 MHz ~ 2483 MHz
6 kg
250 mm (W) x 327 mm (H) x 265 mm
(D)
25
Page 26

26
Page 27

Amplifier(RMS Output)specifications
Soundbar
Subwoofer
Total
Total Peak Power
50 RMS
65 RMS
115 RMS
460 W
Page 28

 Loading...