

Page 1

TE 2/
TE 2-S/
TE 2-M
Operating instructions en
Mode d’emploi fr
Manual de instrucciones es
Manual de instruções pt
Printed: 07.07.2013 | Doc-Nr: PUB / 5070802 / 000 / 00
Page 2

1
1 4
2
1
2
76
8
TE2-M
3
5
9
TE 2 TE 2-S
Printed: 07.07.2013 | Doc-Nr: PUB / 5070802 / 000 / 00
TE 2-S
TE2-M
1
2
This Product is Certified
Ce produit est homologué
Producto homologado por
Este produto está registrado
CUS
Page 3

2
TE2-M
3
4
TE2-M
5a
1
TE2-M
2
5b
Printed: 07.07.2013 | Doc-Nr: PUB / 5070802 / 000 / 00
Page 4

6
TE2
TE2-S
1
TE2-M
2
Printed: 07.07.2013 | Doc-Nr: PUB / 5070802 / 000 / 00
Page 5

TE2
7
7a 7b
TE2-S
7
7a 7b
TE2-M
7
7a 7b 7d
1
2
1
2
9
1
TE2-M
2
7c
1
2
108
1
2
Printed: 07.07.2013 | Doc-Nr: PUB / 5070802 / 000 / 00
Page 6

ORIGINAL OPERATING INSTRUCTIONS
TE 2/TE 2-S/TE 2-M Rotary Hammer
General information
It is essential that the operating
instructions are read before the
tool is operated for the first time.
Always keep these operating
instructions together with the tool.
In these operating instructions, this symbol indicates
points of particular importance to safety. The instruc-
tions at these points must always be observedin order
to avoid the risk of serious injury.
en
Ensure that the operating
instructions are with the tool when
it is given to other persons.
Operating controls
햲 Chuck release ring (TE2-M)
햳 Function selector switch
햴 Control switch
햵 Forwards / reverse switch
햶 Lockbutton
Component parts
햷 Dust shield
햸 Chuck
햹 Side handle
햺 Type plate
Contents Page
General information 1
Technicaldata 2
Safety rules 2
Specific safety rules and symbols 3
Functional description 4
Assembly 5
Operation 6
Forwards/reverse rotation 7
Care and maintenance 7
Accessories 7
Manufacturer's warranty – tools 7
Disposal 8
Troubleshooting 8
Caution: Electrical
In this operating instruction, this symbol warns of haz-
ards as a result of electrical current. The instructions at
these points must always be followed in order to reduce
the risk of serious injury or damages to property.
The numbers refer to the illustrations. The illustra-
tions can be found on the fold-out cover pages. Keep
these pages open while you read the operating instruc-
tions.
In these operating instructions, the power tool to which
these operating instructions apply is referred to as “the
tool”.
Printed: 07.07.2013 | Doc-Nr: PUB / 5070802 / 000 / 00
1
Page 7

Technical data
Rated power 700 W
Rated voltage 120 V
Rated current input 6.5A
en
Mains frequency 50–60 Hz
Weight of tool without side handle 2.4 kg / 5.3 lbs (TE2 / TE2-S)
Dimensions (l×h×w) 352×203×89 mm / 14.3×8×3.5in(TE2/TE2-S)
Minimum distance between wall and hole drilled 34 mm (1.3 in)
No load speed 0– 930 r.p.m. (hammer drilling)
Hammering speed:
Precision hammering action 0–2600 blows/min. (TE 2-S)
Full hammering action 0–4600 blows/min (TE 2 / TE2-S / TE 2-M)
Single impact energy Nm (J):
Precision hammering action 0.6 Nm / 0.4 ft lbs (TE 2-S)
Full hammering action 1.8 Nm / 1.3 ft lbs (TE2 / TE 2-S / TE 2-M)
Typical drilling performance in medium-hard B35 8 mm dia.: 550 mm/min (
concrete 10 mm dia.: 500 mm/min (
Right of technical changes reserved
2.7 kg / 6.0 lbs (TE2-M)
360×203×89 mm / 14.2×8×3.5 in (TE2-M)
0–1200 r.p.m. (in 1st gearTE2/TE2-S / TE2-M)
0–2500 r.p.m. (in 2nd gear TE2-M)
5
/16″ dia.: 21.7 in/min)
3
/8″ dia.: 19.7 in/min)
12 mm dia.: 400 mm/min (1/2″ dia.: 15.7 in/min)
Safety rules
1. General safety rules
-WARNING- Read all instructions! Failure to follow all
instructions listed below may result in electric shock,
fire and/or serious injury. The term "power tool" in all of
the warnings listed below refers to your mains operated (corded) power tool or battery operated (cordless)
power tool.
SAVE THESE INSTRUCTIONS
1.1 Work area safety
a) Keep work area clean and well lit. Cluttered and
dark areas invite accidents.
b) Do not operate power tools in explosive atmos-
pheres, such as in the presence of flammable liquids, gases or dust. Power tools create sparks which
may ignite the dust or fumes.
c)Keep children and bystanders away while operat-
ing a power tool. Distractions can cause you to lose
control.
1.2 Electrical safety
a) Power tool plugs must match the outlet. Never mod-
ify the plug in any way. Do not use any adapter plugs
with earthed (grounded) power tools. Unmodified
plugs and matching outlets will reduce risk of electric shock.
2
Printed: 07.07.2013 | Doc-Nr: PUB / 5070802 / 000 / 00
b) Avoid body contact with earthed or grounded sur-
faces such as pipes, radiators, ranges and refrigerators. There is an increased risk of electric shock
if your body is earthed or grounded.
c) Do not expose power tools to rain or wet conditions.
Water entering a power tool will increase the risk of
electric shock.
d) Do not abuse the cord. Never use the cord for car-
rying, pulling or unplugging the power tool. Keep
cord away from heat, oil, sharp edges or moving
parts. Damaged or entangled cords increase the risk
of electric shock.
e) When operating a power tool outdoors, use an exten-
sion cord suitable for outdoor use. Use of a cord
suitable for outdoor use reduces the risk of electric
shock.
1.3 Personal safety
a) Stay alert, watch what you are doing and use com-
mon sense when operating a power tool. Do not use
a power tool while you are tired or under the influence of drugs, alcohol or medication. A moment of
inattention while operating power tools may result in
serious personal injury.
b) Use safety equipment. Always wear eye protec-
tion. Safety equipment such as dust mask, non-skid
safety shoes, hard hat, or hearing protection used
for appropriate conditions will reduce personal
injuries.
Page 8

c) Avoid accidental starting. Ensure the switch is in
the off position before plugging in. Carrying power
tools with your finger on the switch or plugging in
power tools that have the switch on invites accidents.
d) Remove any adjusting key or wrench before turn-
ing the power tool on. A wrench or a key left attached
to a rotating part of the power tool may result in personal injury.
e) Do not overreach. Keep proper footing and balance
at all times. This enables better control of the pow-
er tool in unexpected situations.
f) Dress properly. Do not wear loose clothing or jew-
ellery. Keep your hair, clothing and gloves away
from moving parts. Loose clothes, jewellery or long
hair can be caught in moving parts.
g) If devices are provided for the connection of dust
extraction and collection facilities, ensure these
are connected and properly used. Use of these devices
can reduce dust related hazards.
1.4 Power tool use and care
a) Do not force the power tool. Use the correct power
tool for your application. The correct power tool will
do the job better and safer at the rate for which it was
designed.
b) Do not use the power tool if the switch does not
turn it on and off. Any power tool that cannot be con-
trolled with the switch is dangerous and must be
repaired.
c) Disconnect the plug from the power source before
making any adjustments, changing accessories, or
storing power tools. Such preventive safety mea-
sures reduce the risk of starting the power tool accidentally.
d) Store idle power tools out of the reach of children
and do not allow persons unfamiliar with the power tool or these instructions to operate the power
tool. Power tools are dangerous in the hands of
untrained users.
e) Maintain power tools. Check for misalignment or
binding of moving parts, breakage of parts and any
other condition that may affect the power tool's operation. If damaged, have the power tool repaired
before use. Many accidents are caused by poorly
maintained power tools.
f) Keep cutting tools sharp and clean. Properly main-
tained cutting tools with sharp cutting edges are less
likely to bind and are easier to control.
g) Use the power tool, accessories and tool bits etc.,
in accordance with these instructions and in the
manner intended for the particular type of power
tool, taking into account the working conditions and
the work to be performed. Use of the power tool for
operations different from those intended could result
in a hazardous situation.
1.5 Service
a) Have your power tool serviced by a qualified repair
person using only identical replacement parts. This
will ensure that the safety of the power tool is maintained.
2. Specific safety rules and symbols
2.1 Personal safety
a) Wear ear protectors. Exposure to noise can cause
hearing loss.
b) Use auxiliary handles supplied with the tool. Loss
of control can cause personal injury.
c) Hold power tools by insulated gripping surfaces
when performing an operation where the cutting
tool may contact hidden wiring or its own cord. Con-
tact with a "live" wire will make exposed metal parts
of the tool "live" and shock the operator.
d) Keep the grips dry, clean and free from oil and grease.
e) Exercise your fingers during pauses between work
to improve the blood circulation in your fingers.
f) Avoid contact with rotating parts. Switch the tool
on only once it has been brought into the working
position close to the workpiece.
g) Breathing protection must be worn when the tool is
used without a dust removal system for work that
creates dust.
h) To avoid tripping and falling when working, always
lead the sypply cord, extension cord and dust extraction hose away to the rear.
i) Whendrilling or chiseling through-holes, check that
no person is present in the danger area immediately behind the work surface.
j) Children must be instructed not to play with the
tool.
k) The tool is not intended for use by children,by
debilitated persons or those who have received
no instruction or training.
l) WARNING: Some dust created by grinding, sand-
ing, cutting and drilling contains chemicals known
to cause cancer, birth defects, infertility or other
reproductive harm; or serious and permanent respiratory or other injury. Some examples of these
chemicals are: lead from leadbased paints, crystalline
silica from bricks, concrete and other masonry products and natural stone, arsenic and chromium from
chemicallytreated lumber. Your risk from these exposures varies, depending on how often you do this type
of work. To reduce exposure to these chemicals,
the operator and bystanders should work in a wellventilated area, work with approved safety equipment, such as respiratory protection appropriate
for the type of dust generated, and designed to filter out microscopic particles and direct dust away
from the face and body. Avoid prolonged contact
with dust. Wear protective clothing and wash exposed
areas with soap and water. Allowing dust to get into
your mouth, eyes, or to remain on your skin may promote absorption of harmful chemicals.
2.2 Power tool use and care
a) Secure the workpiece. Use clamps or a vice to hold
the workpiece in place. The workpiece is thus held
en
Printed: 07.07.2013 | Doc-Nr: PUB / 5070802 / 000 / 00
3
Page 9

more securely than by hand and both hands remain
free to operate the tool.
b) Ensure that the insert tools used are equipped with
the appropriate connection end system and that
they are properly fitted and secured in the chuck.
c) In the event of a power faillure, switch the tool off
en
and unplug the supply cord. This prevents inadvertent starting when the power returns.
d) In the event of an interruption in the electric supply
and before laying the tool down each time, check
that the lockbutton for sustained operation has been
released. Release the lockbutton if necessary. Fail-
ure to observe this point could cause the tool to start
unexpectedly when the power returns.
e) Do not apply an excessive quantity of grease to the
drill bit connection end. Excess grease may other-
wise be forced out of the chuck during operation.
2.3 Electrical safety
a) Before beginning work, check the working area (e.g.
with a metal detector) to ensure that no concealed
electric cables or gas and water pipes are present.
External metal parts of the tool may become live if,
for example, an electric cable is damaged inadvertenly.
This presents a serious risk of electric shock.
b) Check the condition of the supply cord and its plug
connections and have it replaced by a qualified electrician if damage is found. Check the condition of
the extension cord and replace it if damage is found.
Do not touch the supply in the event of it suffering
damage while working. Disconnect the supply cord
plug from the socket. Damaged supply cords and
extension cords present a risk of electric shock.
c) Dirty or dusty electric tools should thus be checked
at a Hilti service center at regular intervals, especially if used frequently for working on conductive
materials. Dust (especially dust from conductive
materials) or dampness adhering to the surface of
the tool may, under unfavorable conditions, present
a risk of electric shock.
2.4 Work area
a) Ensure that the workplace is well lit.
b) Ensure that the workplace is well ventilated.
Poorly ventilated workplaces may be injurious to the
health due to exposeure to dust.
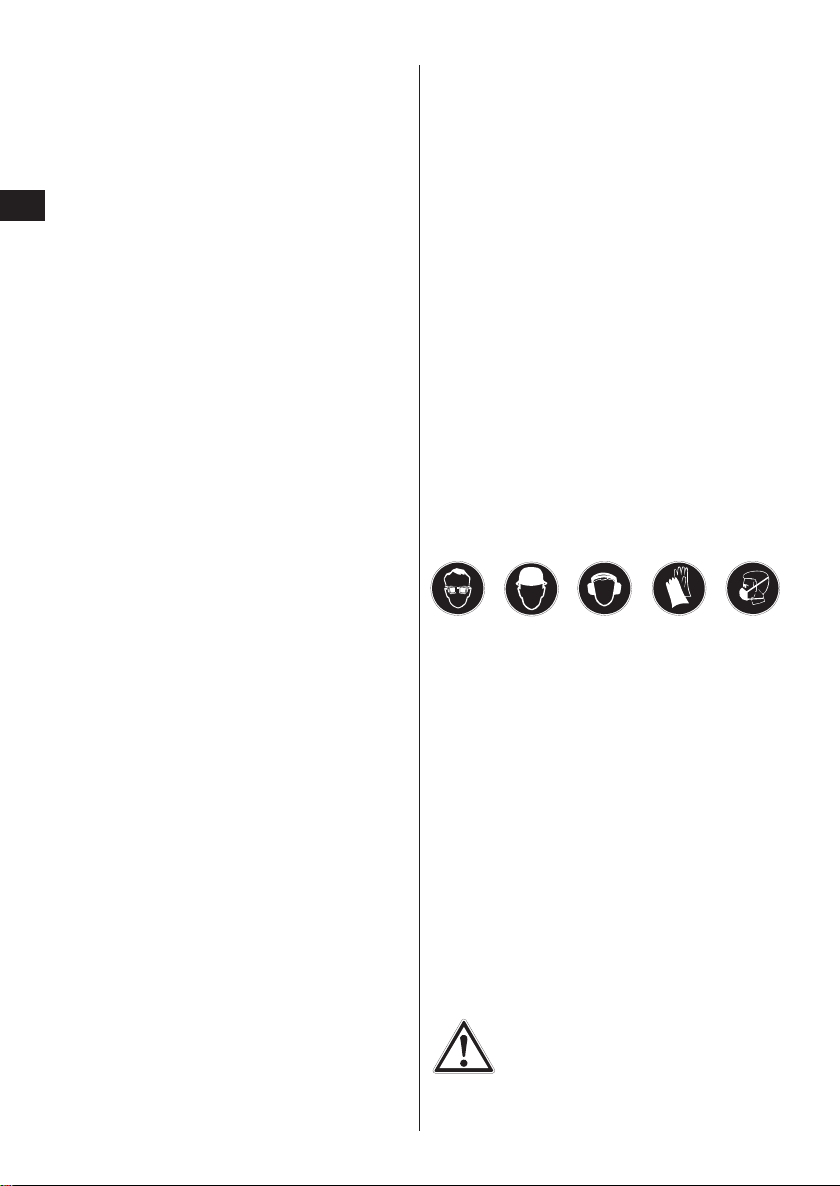
2.5 Personal protective equipment
The user and any other persons in the vicinity must
wear suitable eye protection, a hard hat, ear protection
and protective gloves when the tool is in use. Breathing protection must be worn if no dust removal system is used.
Symbols used on the tool:
V ............................ volts
~ ............................ alternating current
Hz ............................ hertz
W ............................ watts
A ............................ amperes
n
............................ no load speed
0
n ............................ speed under normal load
/min ............................ revolutions per minute
∅ ............................ diameter
Z ............................ double insulated
Functional description
The TE 2 / TE2-S / TE2-M is an electrically powered rotary
hammer with pneumatic hammering mechanism designed
for professional use.
The following items are supplied: power tool, (quick-
release chuck TE2-M), operating instructions, grease
(except TE 2-E), toolbox, side handle, cleaning cloth,
Depth gauge.
The following conditions must always be observed
when the tool is in use:
– The tool must be connected to an alternating current
electric supply in compliance with the information
given on the type plate.
– The tool is for hand-held use only.
– The tool must not be used in places where the sur-
rounding conditions may present a risk of explo-
sion.
– Changes or modifications to the tool are not per-
missible.
– T oavoid the risk of injury, use only the genuine Hilti
accessories and additional equipment specified for
use with this tool.
– Obser ve the information printed in the operating
instructions concerning operation, care and main-
tenance. The tool and its ancillary equipment may
present hazards when used incorrectly by untrained
personnel or when used not as directed.
– The tool is intended for professional use.The tool
may be operated, serviced and repaired only by
authorized, trained personnel. This personnel must
be informed of any special hazards that may be
encountered.
Wear eye
protection
4
Wear a
hard hat
Printed: 07.07.2013 | Doc-Nr: PUB / 5070802 / 000 / 00
Wear ear
protection
Wear
protective
gloves
Wear
breathing
protection
Main features of the tool
Class II electrical protection (double insulated) Z
Mechanical torque-limiting clutch
Grip and side handle with vibration absorption
TE-C chuck
TE-C insert tool system
Page 10

Variable speed switch
Rotary-only drilling mode
Gearing and hammering mechanism with permanent
grease lubrication
Interface for quick-release chuck (TE 2-M)
Precision hammering action (TE 2-S)
High spindle speed without hammering action (TE2-M)
Lockbutton for sustained operation
Pivotable side handle (360°)
Mechanical depth gauge
Right of technical changes reserved
The tool is designed for the following uses:
Use Required insert tools Diameter range
TE2 / TE 2-S / TE 2-M:
Hammer drilling in concrete, Drill bits with TE-C connection end Drilling in concrete:
masonry and natural stone – Short hammer drillbits Anchor holes of 4–22 mm (
3
/16″–7/8″) dia.
– Long hamer drill bits Through holes of 4–22 mm (3/16″–7/8″) dia.
TE2-S:
Drilling with precision Drill bits with TE-C connection end Drilling in brittle materials:
hammering action in perforated – TE-C hammer drill bits Anchor holes of 4–22 mm (
3
/16″–7/8″)dia.
brick, tiles and marble – Thin-barrel core bits Cutting sockels of 25–68 mm (1″–25/8″) dia.
TE2 / TE 2-S:
Drilling in wood, drywall panels Quick-release chuck
and metal with TE-C adaptor
for insert tools
with cylindrical shank or hexagonal shank
for rotary-only drilling
Wood drill bits 4–20 mm (
Metal drill bits 3–13 mm (
3
/16″–3/4″)dia.
3
/16″–1/2″) dia.
Hole saws 25–68 mm (1″–25/8″) dia.
TE2-M:
Drilling in wood, drywall panels, Interchangeable quick-release chuck
tiles and metal for insert tools
with cylindrical shank or hexagonal
shank for rotary-only drilling:
Wood drill bits 4–10 mm (
10–20 mm (
Metal/stepped drill bits 3– 8 mm (
8–13 mm (
3
/16″–3/8″) dia. in 2nd gear
3
/8″–3/4″) dia. in 1st gear
3
/16″–5/16″) dia. in 2nd gear
5
/16″–1/2″) dia. in 1st gear
Hole saws 25–68 mm (1″–25/8″) dia. in 1st gear
en
Assembly
It is essential that the safety precautions printed in these
operating instructions are read and observed.
Fitting the side handle
1.Unplug the tool from the mains socket.
2.Release the side handle clamping band by turning
the handle in a counter-clockwise direction.
3.Fit the side handle clamping band over the chuck
and onto the cylindrical section at the front end of
the tool.
4. Pivot the side handle into the desired position.
5.Tighten the side handle securely to prevent inad-
vertent movement.
Printed: 07.07.2013 | Doc-Nr: PUB / 5070802 / 000 / 00
Check that the side handle is seated securely.
The supply voltage must correspond to the information
on the type plate.
If extension cords are used: Only extension cords of a
type approved for the intended use and of adequate cross
section may be used. Failure to observe this point may
5
Page 11

result in reduced performance of the tool and overheating
of the cord. Damaged extension cords must be replaced.
2. Open the chuck by pulling back the locking sleeve.
3. Pull the insert tool out of the chuck.
Conductor cross-section
AWG
Voltage 16 14 12
en
110–120 V 50 ft 75 ft 125 ft
Use only insert tools with TE-C connection end.
Don’t exert excessive pressure on the tool. This will not
increase its hammering power.
At low temperatures: The tool requires to reach a minimum operating temperature before the hammering
mechanism begins to operate. Switch on the tool and
position the tip of the drill bit on the work surface.While
the tool is running, apply light pressure briefly and repeatedly until the hammering mechanism begins to operate.
Operation
CAUTION: In the event of the drill bit sticking, the tool
will pivot about its own axis.
Always use the tool with the side handle fitted and hold
it securely with both hands applying an opposing torque
so that the clutch releases in the event of the drill bit
sticking.
Use a vice or clamp to secure loose workpieces.
Fitting the insert tool
1. Unplug the supply cord from the mains socket.
2.Check that the connection end of the insert tool is
clean and lightly greased. Clean it and grease it if necessary.
3. Check that the sealing lip of the dust shield is clean
and in good condition. Clean the dust shield if nec-
essary or replace it if the sealing lip is damaged.
4. Push the connection end of the insert tool into the
chuck and, while applying slight pressure, rotate the
insert tool until it engages in the guide grooves.
5. Push the insert tool further into the chuck until it is
heard to engage.
6. Check that the insert tool has engaged correctly (pull
by hand).
Removing the insert tool
-CAUTION-
– The insert tool may become hot during use. There is
a risk of burning the hands. Wear protective gloves
when changing insert tools.
1. Unplug the supply cord from the mains socket.
5a
5b
Drilling
Hammer drilling (TE 2 / TE2-S / TE 2-M) / precision
hammering action (TE 2-S)
1. Insert the drill bit into the chuck.
2. Turn the function selection switch to the hammer
drilling position ( ) until the gearing is engaged
7a
. Rotate the chuck spindle slightly if necessary.
Check that forwards rotation is selected (I.).
3. Use of the precision hammering action ( ) is advantageous when drilling in brittle materials (e.g. tiles,
marble, perforated brick). This will improve the quality of the holes drilled .
7c
4. Connect the supply cord to the power supply.
5. Pivot the side handle, with or without the depth gauge,
to the desired angle and tighten the handle to lock it
in this position. Check that the side handle is seated
and attached securely .
6. Bring the tip of the drill bit into contact with the work
surface at the position where the hole is to be drilled
and press the control switch slowly. Drill at low speed
until the drill bit centres itself in the hole.
7. Press the control switch fully and continue drilling at
full power.
Rotary-only drilling
(without hammering action) (TE2 / TE 2-S)
Turn the function selection switch to the drilling posi-
7b
tion ( ) . When the switch is in this position, only the
rotary movement is transmitted to the TE-C insert tool
or chuck adaptor for insert tools with cylindrical shanks.
Rotary-only drilling
(without hammering action) (TE2-M)
Turn the function selection switch to the 1
gear drilling position . When the switch is in these
7b 7d
st
gear or 2
positions, only the rotary movement is transmitted to
the TE-C insert tool or quick-release chuck.
Use of a high spindle speed can be advantageous when
drilling in metal or wood. For higher drilling speed, the
function selection switch must be engaged in the 2nd
gear position ( 2) .
7d
Changing the chuck (TE2-M)
Pull the chuck release ring towards the front and remove
the chuck completely. When fitting the chuck, pull the
release ring towards the front and hold it in this position. Push the chuck onto the guide tube as far as it will
go and release the ring. Rotage the chuck until it engages
and the ring snaps back into its original position .The
TE-C interchangeable chuck or quick-release interchangeable chuck may be tited to the TE 2-M with chuck
interface .
Drilling using the depth gauge
We recommend the use of the depth gauge for drilling
holes accurately to the desired depth. The depth gauge
nd
6
Printed: 07.07.2013 | Doc-Nr: PUB / 5070802 / 000 / 00
Page 12

is integrated in the side handle, which can be pivoted
and locked in position. Release the side handle (turn
counter-clockwise), set the depth gauge to the desired
drilling depth and tighten the side handle (turn clockwise) .
Forwards / reverse rotation
For screwdriving, the desired direction of rotation can
be selected simply by moving the switch .
For forwards rotation, select position ( ) and for reverse rotation, select position ( ).
When the tool is operated in reverse rotation, the function selection switch should be engaged in the position for drilling without hammering action ( / 1st gear).
For drilling, always ensure that for wards rotation
( ) is selected.
Care and maintenance
Unplug the supply cord.
Care of insert tools
Remove any dirt adhering to the surface of the insert
tools and protect them from corrosion by rubbing them
with an oily cloth from time to time.
Care of the tool
CAUTION
Keep the power tool, especially its grip surfaces, clean
and free from oil and grease. Do not use cleaning agents
which contain silicone.
The outer casing of the power tool is made from impactresistant plastic. Sections of the grip are made from a
synthetic rubber material.
Never operate the power tool when the ventilation slots
are blocked. Clean the ventilation slots carefully using a
dry brush. Do not permit foreign objects to enter the interior of the power tool. Clean the outside of the power tool
at regular intervals with a slightly damp cloth. Do not use
a spray, steam pressure cleaning equipment or running
water for cleaning. This may negatively affect the electrical safety of the power tool.
Maintenance
Check all external parts of the tool for damage at regular
intervals and check that all controls operate faultlessly.
Do not operate the tool when parts are damaged or when
the controls do not operate faultlessly. If necessary, have
the tool repaired at a Hilti service centre.
Electrical parts of the tool may be repaired only by trained
electrical specialists.
Checking the tool after care and maintenance
After all care and maintenance work, the tool must be
checked to ensure that all safety equipment is fitted and
that it operates faultlessly.
Information for possible Serviceadresses can be
obtained at our Headquarter for North America.
Hilti Inc.
5400 South 122
US - Tulsa, OK 74146
U. S. A.
Tel.+1-800-879-8000
nd
East Ave.
Accessories
Use only insert tools with TE-C connection end or straight
shank bits with quick release chuck or adaptor .
Hilti power tools have been designed to work optimally as a system together with Hilti insert tools.
Accordingly, highest performance and longest life
expectancy can be achieved when you use this power tool with Hilti insert tools. A comprehensive pro-
gram of insert tools and accessories is available for the
TE-C system . Details of the entire programme can
be found in the current Hilti product catalogue.
Should you require insert tools not included in the standard programme, please contact the Hilti customer service department or your Hilti sales representative. Hilti
offers a comprehensive range of special insert tools in
professional quality.
Check your insert tools at regular intervals and replace
them in good time. A damaged or badly worn connection end may result in damage to the power tool. Drill
bits with chipped or broken carbide tips may no longer
drill holes of the specified diameter, thus influencing
their suitability for anchor fastenings.
Please observe the instructions on care and maintenance of your insert tools given in the following section.
Dust removal (TE DRS-S)
A DRS extraction head can be attached to the side handle / depth gauge. An industrial vacuum cleaner is used
to remove drilling dust and fragments.
Manufacturer's warranty – tools
Hilti warrants that the tool supplied is free of defects in
material and workmanship. This warranty is valid so
long as the tool is operated and handled correctly, cleaned
and serviced properly and in accordance with the Hilti
Operating Instructions, and the technical system is maintained. This means that only original Hilti consumables,
components and spare parts may be used in the tool.
en
Printed: 07.07.2013 | Doc-Nr: PUB / 5070802 / 000 / 00
7
Page 13

This warranty provides the free-of-charge repair or
replacement of defective parts only over the entire lifespan of the tool. Parts requiring repair or replacement as
a result of normal wear and tear are not covered by this
warranty.
en
Additional claims are excluded, unless stringent national rules prohibit such exclusion. In particular,Hilti is
not obligated for direct, indirect, incidental or consequential damages, losses or expenses in connection
with, or by reason of, the use of, or inability to use the
tool for any purpose. Implied warranties of merchantability or fitness for a particular purpose are
specifically excluded.
For repair or replacement, send tool or related parts
immediately upon discovery of the defect to the address
of the local Hilti marketing organization provided.
This constitutes Hilti's entire obligation with regard to
warranty and supersedes all prior or contemporaneous
comments and oral or written agreements concerning
warranties.
Disposal
Most of the materials from which Hilti power tools are manufactured can be recycled. The materials must be correctly separated before they can be recycled. In many countries, Hilti has already made arrangements for taking
back your old electric tools for recycling. Please ask your Hilti customer service department or Hilti sales representative for further information.
Troubleshooting
Symptom Possible cause Possible solution
The tool doesn’t start Fault in the electric power supply Plug in another electric tool and check
Defective supply cord or plug Have it checked by an electrical
Switch defective Have it checked by an electrical
No hammering action The tool is too cold Allow tool to reach the minimum
Function selection switch Set function selection switch
set to rotary drilling to hammer drilling
Tooldoesn’t produce full Cross-section of the Usean extensioncordofadequatecrosspower extension cord is inadequate se ctional area. See section “Before use”
Control switch is not pressed fully Press the control switch as far as it will go
Function selection switch set Set function selection switch
to precision hammering action tohammer drilling
Forwards / reverse switch set Set forwards / reverse switch
to reserve when drilling to forwards
Drill bit cannot be released Chuck not opened fully Pull the chuck locking sleeve back as
whether it starts
specialist and replace if necessary
specialist and replace if necessary
operating temperature
See section “Before use”
far as it will go and remove the insert
tool
8
Printed: 07.07.2013 | Doc-Nr: PUB / 5070802 / 000 / 00
Page 14

NOTICE ORIGINALE
TE 2/TE 2-S/TE 2-M Perforateur
Consignes générales
Avant de mettre en marche
l’appareil, lire absolument le
mode d’emploi.
Le présent mode d’emploi doit
toujours accompagner l’appareil.
Les symboles utilisés dans le présent mode d’emploi
caractérisent des consignes particulièrement impor-
tantes pour la sécurité. Toujours bien suivre ces consignes
pour éviter tous risques de blessures graves.
fr
Ne prêter ou céder l’appareil à
quelqu’un d’autre qu’en lui fournissant aussi le mode d’emploi.
Eléments de commande
햲 Verrouillage du mandrin (TE 2-M)
햳 Sélecteur de fonction
햴 Interrupteur de commande
햵 Inverseur du sens de rotation gauche/droite
햶 Bouton d'arrêt
Autres éléments de l’appareil
햷 Capuchon pare-poussière
햸 Mandrin
햹 Poignée latérale
햺 Plaquette signalétique
Contents Page
Consignes générales 9
Caractéristiques techniques 10
Règles générales de sécurité 10
Règles de sécurité particulières et symboles 11
Description du fonctionnement de l’appareil 12
Mise en marche 14
Utilisation 14
Nettoyage et entretien 15
Accessoires 16
Garantie constructeur des appareils 16
Recyclage 16
Guide de dépannage 17
MISE EN GARDE (danger électrique)
Ce symbole met en garde contre tous risques dus au
courant électrique lors de l’utilisation de l’appareil. Il
signale une situation dangereuse. Il est toujours abso-
lument nécessaire de bien suivre le comportement illus-
tré après ce symbole pour éviter toutes blessures graves
ou tous dommages matériels.
Les chiffres renvoient à des illustrations. Les illus-
trations correspondant au texte se trouvent sur les pages
rabattables précédentes. Pour lire le mode d’emploi,
rabattre ces pages de manière à voir les illustrations.
Dans le texte du présent mode d’emploi, le terme «appa-
reil» désigne toujours le perforateur TE 2/TE2-S/TE2-M.
Printed: 07.07.2013 | Doc-Nr: PUB / 5070802 / 000 / 00
9
Page 15

Caractéristiques techniques
Puissance absorbée nominale: 700 W
Tensionnominale: 120 V
Intensité absorbée nominale: 6,5 A
Fréquence du secteur: 50–60 Hz
Poids de l’appareil sans poignée latérale: 2.4 kg / 5.3 lbs (TE2 / TE2-S)
fr
Encombrement (L×h×l): 352×203×89 mm / 14.3×8×3.5 in (TE2 / TE2-S)
Ecartement minimal du mur pour percer: 34 mm (1.3 in)
Rotation 0– 930 r.p.m. (
Cadence de percussion (percussion fine): 0–2600 coups/mn (TE2-S)
Cadence de percussion (percussion 100 %): 0–4600 coups/mn (TE 2 / TE 2-S / TE 2-M)
Energie libérée par coup (percussion fine): 0,6 Nm (J) / 0,4 ft lbs (TE 2-S)
Energie libérée par coup (percussion 100 %): 1,8 Nm (J) / 1,3 ft lbs (TE 2 / TE2-S / TE 2-M)
Rendement en perçage caractéristique dans du béton ∅ 8 mm: 550 mm/mn ∅
de dureté moyenne B 35: ∅ 10 mm: 500 mm/mn ∅
Sous réserve de toutes modifications techniques!
2.7 kg / 6.0 lbs (TE2-M)
360×203×89 mm / 14.2×8×3.5 in (TE2-M)
0–1200 r.p.m. (1ère vitess TE2/TE2-S / TE2-M)
Perçage avec percussion)
0–2500 r.p.m. (2ème vitesse TE 2-M)
5
/16″: 21,7 in/mn
3
/8″: 19,7 in/mn
∅ 12 mm: 400 mm/mn ∅1/2″: 15,7 in/mn
Consignes de sécurité
1. Indications générales de sécurité
ATTENTION! Lire toutes les indications. Le non-
respect des instructions indiquées ci-après peut entraîner un choc électrique, un incendie et / ou de graves
blessures sur les personnes. La notion d'«outil électroportatif» mentionnée par la suite se rapporte à des outils
électriques raccordés au secteur (avec câble de raccordement) et à des outils électriques à batterie (sans câble
de raccordement).
GARDER PRECIEUSEMENT CES INSTRUCTIONS DE
SECURITE.
1.1 Place de travail sécurité
a) Maintenez l'endroit de travail propre et bien éclai-
ré. Un lieu de travail en désordre ou mal éclairé aug-
mente le risque d'accidents.
b) N'utilisez pas l'appareil dans un environnement pré-
sentant des risques d'explosion et où se trouvent
des liquides, des gaz ou poussières inflammables.
Les outils électroportatifs génèrent des étincelles risquant d'enflammer les poussières ou les vapeurs.
c)T enez les enfants et autres personnes éloignés durant
l'utilisation de l'outil électroportatif. En cas d'inat-
tention vous risquez de perdre le contrôle sur l'appareil.
1.2 Sécurité relative au système électrique
a) La fiche de secteur de l'outil électroportatif doit être
appropriée à la prise de courant. Ne modifiez en
aucun cas la fiche. N'utilisez pas de fiches d'adaptateur avec des appareils avec mise à la terre. Les
fiches non modifiées et les prises de courant appropriées réduisent le risque de choc électrique.
b) Evitez le contact physique avec des surfaces mises
à la terre tels que tuyaux, radiateurs, fours et réfrigérateurs. Il y a un risque élevé de choc électrique
au cas où votre corps serait relié à la terre.
c) N'exposez pas l'outil électroportatif à la pluie ou à
l'humidité. La pénétration d'eau dans un outil élec-
troportatif augmente le risque d'un choc électrique.
d) N'utilisez pas le câble à d'autres fins que celles pré-
vues, n'utilisez pas le câble pour porter l'appareil
ou pour l'accrocher ou encore pour le débrancher de
la prise de courant. Maintenez le câble éloigné des
sources de chaleur, des parties grasses, des bords
tranchants ou des parties de l'appareil en rotation.
Un câble endommagé ou torsadé augmente le risque
d'un choc électrique.
e) Au cas où vous utiliseriez l'outil électroportatif à l'ex-
térieur,utilisez une rallonge homologuée pour les
applications extérieures. L'utilisation d'une rallonge
électrique homologuée pour les applications extérieures
réduit le risque d'un choc électrique.
1.3 Sécurité des personnes
a) Restez vigilant, surveillezce que vous faites. Faites
preuve de bon sens en utilisant l'outil électroportatif. N'utilisez pas l'appareil lorsque vous êtes fatigué ou après avoir consommé de l'alcool, des drogues
ou avoir pris des médicaments. Un moment d'inat-
tention lors de l'utilisation de l'appareil peut entraîner
de graves blessures sur les personnes.
b) Portez des équipements de protection. Portez tou-
jours des lunettes de protection. Le fait de porter des
10
Printed: 07.07.2013 | Doc-Nr: PUB / 5070802 / 000 / 00
Page 16

équipements de protection personnels tels que masque
anti-poussières, chaussures de sécurité antidérapantes,
casque de protection ou protection acoustique suivant
le travail à effectuer, réduit le risque de blessures.
c) Evitez une mise en service par mégarde. Assurez-
vous que l'interrupteur est effectivement en position
d'arrêt avant de mettre la fiche de la prise de courant. Le fait de porter l'appareil avec le doigt sur l'in-
terrupteur ou de brancher l'appareil sur la source de
courant lorsque l'interrupteur est en position de fonctionnement, peut entraîner des accidents.
d) Enlevez tout outil de réglage ou toute clé avant de
mettre l'appareil en fonctionnement. Une clé ou un
outil se trouvant sur une partie en rotation peut causer des blessures.
e) Ne surestimez pas vos capacités. Veillez à garder
toujours une position stable et équilibrée. Ceci vous
permet de mieux contrôler l'appareil dans des situations inattendues.
f) Portez des vêtements appropriés. Ne portez pas de
vêtements amples ni de bijoux. Maintenez cheveux,
vêtements et gants éloignés des parties de l'appareil en rotation. Des vêtements amples, des bijoux ou
des cheveux longs peuvent être happés par des pièces
en mouvement.
g) Si des dispositifs servant à aspirer ou à recueillir
les poussières doivent être utilisés, vérifiez que
ceux-ci sont effectivement raccordés et qu'ils sont
correctement utilisés. L'utilisation de tels dispositifs
réduit les dangers dus aux poussières.
1.4 Utilisation et emploi soigneux de l'outil électroportatif
a) Ne surchargez pas l'appareil. Utilisez l'outil électro-
portatif approprié au travail à effectuer. Avec l'outil
électroportatif approprié, vous travaillerez mieux et avec
plus de sécurité à la vitesse pour laquelle il est prévu.
b) N'utilisez pas un outil électroportatif dont l'inter-
rupteur est défectueux. Un outil électroportatif qui ne
peut plus être mis en ou hors fonctionnement est dangereux et doit être réparé.
c) Retirez la fiche de la prise de courant avant d'effectuer
des réglages sur l'appareil, de changer les accessoires,
ou de ranger l'appareil. Cette mesure de précaution
empêche une mise en fonctionnement par mégarde.
d) Gardez les outils électroportatifs non utilisés hors
de portée des enfants. Ne permettez pas l'utilisation de l'appareil à des personnes qui ne se sont pas
familiarisées avec celui-ci ou qui n'ont pas lu ces
instructions. Les outils électroportatifs sont dangereux
lorsqu'ils sont utilisés par des personnes non initiées.
e) Prenez soin des outils électroportatifs. Vérifiez que
les parties en mouvement fonctionnent correctement et qu'elles ne sont pas coincées, et contrôlez
si des parties sont cassées ou endommagées de telle sorte que le bon fonctionnement de l'appareil s'en
trouve entravé. Faites réparer les parties endommagées avant d'utiliser l'appareil. De nombreux
accidents sont dus à des outils électroportatifs mal
entretenus.
Printed: 07.07.2013 | Doc-Nr: PUB / 5070802 / 000 / 00
f) Maintenez les outils de coupe aiguisés et propres.
Des outils soigneusement entretenus avec des bords
tranchants bien aiguisés se coincent moins souvent
et peuvent être guidés plus facilement.
g) Utilisez les outils électroportatifs, les accessoires,
les outils à monter etc. conformément à ces instructions et aux prescriptions en vigueur pour ce type
d'appareil. Tenez compte également des conditions
de travail et du travail à effectuer. L'utilisation des
outils électroportatifs à d'autres fins que celles prévues peut entraîner des situations dangereuses.
1.5 Service
a) Ne faites réparer votre outil électroportatif que par
un personnel qualifié et seulement avec des pièces
de rechange d'origine. Ceci permet d'assurer la sécu-
rité de l'appareil.
2. Règles de sécurité particulières et symboles
2.1 Sécurité des personnes
a) Porter un casque antibruit. Le bruit peut entraîner
des pertes auditives.
b) Utiliser la poignée supplémentaire livrée avec l'ap-
pareil. La perte de contrôle peut entraîner des bles-
sures.
c) Essuyer les poignées afin d'éliminer toute trace
d'humidité et enlever toute trace de graisse ou
d'huile.
d) Tenez l’outil par ses surfaces de prise isolées pendant
toute opération où l’outil de coupe pourrait venir
en contact avec un câblage dissimulé ou avec son
propre cordon. En cas de contact avec un conduc-
teur sous tension, les pièces métalliques à découvert
de l’outil transmettraient un choc électrique à l’utilisateur.
e) Faire régulièrement des pauses et des exercices
de relaxation et de massage des doigts pour favoriser l'irrigation sanguine dans les doigts.
f) Eviter de toucher des pièces en rotation.Brancher
l'appareil uniquement dans l'espace de travail.
g) Si l'appareil fonctionne sans dispositif d'aspiration
de la poussière et si le travail effectué dégage de
la poussière, porter un masque respiratoire léger.
h) Pour éviter tout risque de chute, toujours tenir le
cordon d'alimentation, le câble de rallonge et le
tuyau flexible d'aspiration vers l'arrière de l'appareil.
i) Vérifier qu'en cas de travaux de perçage, person-
ne ne se trouve dans la zone de danger derrière
la pièce travaillée.
j) Avertir les enfants et veiller à ce qu'ils ne jouent
pas avec l'appareil.
k) L'appareil n'est pas destiné à être utilisé par des
enfants ou des personnes affaiblies sans encadrement.
l) AVERTISSEMENT : Certains types de poussières
générées par ébarbage, meulage, tronçonnage et
perçage contiennent des substances chimiques,
connues pour être cancérogènes, qui risquent d'entraîner des malformations congénitales, une infer-
11
fr
Page 17
tilité, des lésions permanentes des voies respiratoires ou d'autres natures. Quelques-unes de ces
substances chimiques sont le plomb contenu dans
les peintures au plomb, le quartz cristallin provenant
des briques, du béton, de la maçonnerie ou de pierres
naturelles, ou encore l'arsenic ou le chrome provenant de bois de construction traités chimiquement.
Les risques pour l'utilisateur varient en fonction de
fr
la fréquence de ces travaux. Afin de réduire la charge de ces substances chimiques, l'utilisateur et les
tierces personnes doivent travailler dans une pièce bien ventilée et utiliser les équipements de sécurité homologués. Porter un masque respiratoire
adapté au type de poussière déterminé, qui filtre
les particules microscopiques et permet d'éviter
tout contact de la poussière avec le visage ou le
corps. Éviter tout contact prolongé avec la poussière. Porter des vêtements de protection et laver
à l'eau et au savon la portion de peau qui a été en
contact avec la poussière. L'absorption de pous-
sières par la bouche ou les yeux, ou le contact prolongé des poussières avec la peau, risque de favoriser l'absorption de substances chimiques nocives
pour la santé.
2.2 Utilisation et emploi soigneux de l'outil électroportatif
a)Bloquer la pièce travaillée. Pour ce faire, utiliser
un dispositif de serrage ou un étau, pour maintenir
la pièce travaillée en place. Elle sera ainsi mieux
tenue qu'à la main, et les deux mains restent alors
libres pour commander la machine.
b)Vérifier que les outils sont bien munis du système
d'emmanchement adapté à l'appareil et qu'ils sont
toujours correctement verrouillés dans le mandrin.
c)Lors d'une coupure de courant : mettre l'appareil
sur arrêt, débrancher la fiche.Ceci évite toute mise
en marche intempestive de l’appareil en cas de remise sous tension.
d) Lors d'une coupure de courant et à chaque fois que
l'appareil électrique est posé, vérifier si le bouton
d'arrêt est déverrouillé et, le cas échéant, le déverrouiller.
Sinon l'appareil pourrait se mettre en marche
inopinément lors de l'alimentation en courant.
e) Eviter de graisser excessivement l'emmanche-
ment de la mèche.
Sinon la graisse pourrait gicler
du mandrin lors du fonctionnement.
2.3 Sécurité relative au système électrique
a) Avant de commencer, vérifier que l’espace de tra-
vail ne comporte pas de câbles ou gaines électriques,
conduites de gaz ou d'eau cachés, par exemple à
l'aide d'un détecteur de métaux. Toute pièce métal-
lique extérieure à l'appareil peut devenir conductrice,
par exemple si un câble électrique est endommagé
par inadvertance. Ceci représente un danger sérieux
d’électrocution.
b)Contrôler régulièrement les câbles de raccordement
de l'appareil et les faire remplacer par un spécialiste s'ils sont endommagés. Contrôler régulièrement les câbles de rallonge et les remplacer s'ils
sont endommagés.Si le cordon d'alimentation ou
le câble de rallonge est endommagé pendant le travail, ne pas le toucher. Débrancher la prise. Les
câbles de raccordement et les câbles de rallonge
endommagés représentent un risque d’électrocution.
c)Si vous travaillez souvent sur des matériaux conduc-
teurs, faites contrôler les appareils encrassés à
intervalles réguliers par le S.A.V. Hilti. Ne jamais
faire fonctionner l'appareil s'il est encrassé ou mouillé.
Dans de mauvaises conditions d'utilisation, la poussière collée à la surface de l'appareil, surtout la poussière de matériaux conducteurs, ou l'humidité, peut
entraîner une électrocution.
2.4 Place de travail
a) Veiller à ce que l'espace de travail soit correcte-
ment éclairé.
b) Veiller à ce que l'espace de travail soit bien ventilé.
Un espace de travail mal ventilé peut être nocif pour
la santé en raison des nuisances dues à la poussière.
2.5 Equipement de protection individuel
L'utilisateur et les personnes se trouvant à proximité
pendant l'utilisation de l'appareil doivent porter des
lunettes de protection adaptées, un casque de protection, un casque antibruit, des gants de protection et,
lorsqu'ils n'utilisent pas de dispositif d'aspiration de la
poussière, un masque respiratoire léger.
Porter des
lunettes de
protection
Porter un
casque de
protection
Porter un
casque
antibruit
Porter des
gants de
protection
Porter un
masque respi-
ratoire léger
Symboles utilisés sur l’appareil:
V Volts n
~ courant alternatif n vitesse en charge
vitesse à vide
0
Hz Hertz /min tours par minute
W Watts ∅ diamètre
A Ampères Z double isolation
Description du fonctionnement
de l’appareil
Le TE 2 / TE 2-S / TE 2-M est un perforateurélectroportatif muni d’un mécanisme de percussion pneumatique,
destiné aux professionnels, Poignée latérale, chamoisette, Butée de profondeur.
L’appareil est livré en coffret Hilti avec son mode d’emploi, (un mandrin autoserrant TE2-M), graisse.
Lors de l’utilisation de l’appareil, toujours bien respecter les conditions suivantes:
– Faire fonctionner l’appareil sur le secteur à courant
12
Printed: 07.07.2013 | Doc-Nr: PUB / 5070802 / 000 / 00
Page 18

alternatif, conformément aux valeurs indiquées sur
la plaquette signalétique.
– L’utiliser uniquement en le tenant des deux mains.
– Ne pas l’utiliser dans une ambiance déflagrante.
– T outemanipulation ou modification de l'appareil est
interdite.
– Pour éviter tout risque de blessure, utiliser unique-
ment les accessoires et adaptateurs Hilti d'origine
définis pour l'appareil.
– Bien respecter les consignes concernant l'utilisation,
le nettoyage et l'entretien de l'appareil qui figurent
dans le présent mode d'emploi. L'appareil et ses acces-
soires peuvent s'avérer dangereux s'ils sont utilisés
de manière incorrecte par du personnel non qualifié
ou de manière non conforme à l'usage prévu.
– L'appareil est destiné à des utilisateurs profession-
nels. L'appareil ne doit être utilisé, entretenu et répa-
ré que par un personnel agréé et formé à cet effet.
rents à l'utilisation de l'appareil.
Principales caractéristiques de l’appareil
– Classe de protection électrique II (double isolation) Z
– Limiteur de couple mécanique
– Poignée principale et poignée latérale antivibratiles
– Mandrin TE-C
– Système d’outils TE-C
– Variateur électronique de vitesse
– Mode de fonctionnement: forage
– Graissage permanent de l’engrenage et du mécanis-
me de percussion
– Poignée latérale orientable sur 360°
– Jauge de profondeur mécanique
– Système d’échange rapide du mandrin (TE2-M)
– Fonction Percussion fine (TE2-S)
– Vitesse d’arbre élevée sans la fonction Percussion
(TE2-M)
– Bouton d'arrêt pour fonctionnement en continu
Ce personnel doit être au courant des dangers inhé-
Applications:
Mode de fonctionnement Outils nécessaires Plage de travail
TE2 / TE 2-S / TE 2-M:
Perçages en percussion Mèches à emmanchement TE-C Plage de perçage dans le béton:
dans le béton, la maçonnerie – mèches béton courtes ∅ 4–22 mm (
3
/16″–7/8″) / chevillages
et la pierre naturelle – mèches béton longues ∅ 4–22 mm (3/16″–7/8″) / transpercements
TE2-S:
Perçages avec la percussion Mèches à emmanchement TE-C Plage de perçage dans les matériaux
fine dans la brique creuse, – mèches béton TE-CX fragiles:
le carrelage et le marbre – mèche-couronne pour ∅ 4–22 mm (
murs et parois minces ∅ 25–68 mm (1″–2
3
/16″–7/8″) / chevillages
5
/8″) / encastrement de
commutateurs
TE2 / TE 2-S:
Perçages dans le bois, Mandrin autoserrant avec
le placoplâtre et les métaux adaptateur TE-C
de mèches à queue
cylindrique ou hexagonale pour
perçages«en rotation seule»:
Mèches à bois ∅ 4–20 mm (
Forets métaux ∅ 3–13 mm (
3
/16″–3/4″)
3
/16″–1/2″)
Scies-cloche ∅ 25–68 mm (1″–25/8″)
TE2-M:
Perçages dans le bois, le Mandrin autoserrant avec système
placoplâtre et les métaux d’échange rapide de mèches
à queue cylindrique ou hexagonale
pour perçages «en rotation seule»:
Mèches à bois ∅ 4–10 mm (
∅ 10–20 mm (
Forets métaux/forets étagés ∅ 3– 8 mm (
∅ 8–13 mm (
Mèche-couronne pour murs ∅ 25–68 mm (1″–2
3
/16″–3/8″) / 2ème vitesse
3
/8″–3/4″) / 1ère vitesse
3
/16″–5/16″) / 2ème vitesse
5
/16″–1/2″) / 1ère vitesse
5
/8″) / 1ère vitesse
et parois minces
Scies-cloche
fr
Printed: 07.07.2013 | Doc-Nr: PUB / 5070802 / 000 / 00
13
Page 19

Mise en marche
Avant de mettre en marche l’appareil, lire absolument
et bien suivre les consignes de sécurité qui figurent dans
le présent mode d’emploi.
fr
Montage de la poignée latérale
1. Débrancher la prise.
2. Ouvrir le dispositif de serrage de la poignée latérale
en tournant la poignée.
3. Faire glisser la poignée latérale (collier de fixation) audessus du porte-outil dans le mandrin.
4. Tourner la poignée latérale dans la position souhaitée.
5. Fixer la poignée latérale anti-torsion en la tournant par
la poignée.
Vérifier que la poignée latérale est correctement fixée.
La tension du secteur doit correspondre à celle indiquée
sur la plaquette signalétique
Utilisation
ATTENTION: Lorsque la mèche se bloque, l'appareil pivo-
te sur son axe.
Toujoursutiliser l'appareil avec la poignée latérale et maintenir fermement l'appareil avec les deux mains afin de
créer un couple résistant et d'enclencher l'accouplement
à glissement en cas d'un blocage.
Pour bloquer les pièces, utiliser un dispositif de serrage
ou un étau.
Mise en place de l'outil
1. Débrancher la prise.
2. Vérifier si l’emmanchement de l’outil est bien propre
et légèrement graissé. Le nettoyer et le graisser si
nécessaire.
3.Vérifier que la lèvre d'étanchéité de la protection
anti-poussière est bien propre et en bon état. Si nécessaire, nettoyer la protection anti-poussière ou
remplacer la lèvre d'étanchéité si celle-ci est endommagée.
4. Introduire l'outil dans le mandrin et le tourner en le
serrant légèrement, jusqu'à ce qu'il se clipse dans les
rainures de guidage.
5. Pousser l'outil dans le mandrin jusqu'à ce qu'on entende un clic.
6. Vérifier que l'outil est bien serré dans le dispositif de
verrouillage en tirant dessus.
Retrait de l'outil
5b
5a
Si vous avez besoin de rallonges, n’utiliser que des câbles
de section suffisante, agréés pour l’utilisation prévue,
afin d’ éviter toute perte de puissance dans l’appareil et
toute surchauffe du câble.
Sections min. recommandées et longueurs max. de
câbles:
Sections de conducteur
AWG
Voltage 16 14 12
110–120 V 50 ft 75 ft 125 ft
N’utiliser que des outils à emmanchement TE-C.
Ne pas appuyer exagérément l’appareil contre le sup-
port; ceci n’augmente pas sa puissance de percussion.
Si la température extérieure est basse, l’appareil doit
atteindre une température de fonctionnement minimale avant que le mécanisme de percussion ne commence à s’enclencher. Mettre en marche l’appareil, l’appuyer
brièvement contre le support et le laisser tourner à vide.
Le réappuyer ensuite contre le support jusqu’à ce que
le mécanisme de percussion s’enclenche.
14
Printed: 07.07.2013 | Doc-Nr: PUB / 5070802 / 000 / 00
-ATTENTION-
L'appareil peut être très chaud après utilisation. Vous
risquez de vous brûler les mains. Utilisez les gants de
protection pour changer d'outil.
1.Débrancher la prise.
2. Ouvrir le mandrin en tirant vers l'arrière le dispositif
de verrouillage de l'outil.
3. Tirer l'outil hors du mandrin.
Perçages
Perçages en percussion (TE 2 / TE2-S / TE 2-M) /
percussion fine (TE 2-S)
1. Emmancher la mèche dans le mandrin.
2. Tourner le sélecteur de fonction en position Roto-
percussion ( ) jusqu'à ce que le cliquet et l'engrenage s'engrènent bien . Si besoin est, tourner légè-
7a
rement l'arbre. Verrouiller la mèche en rotation à
droite (I.).
3. Pour travailler dans des matériaux supports fragiles
(p. ex. carrelage, marbre, brique creuse), il est avantageux de travailler avec la fonction Percussion fine
( ). Les trous sont ainsi mieux calibrés .
7c
4. Brancher l’appareil.
5. Tourner la poignée latérale avec ou sans la jauge de
profondeur jusque dans la position désirée, puis la
bloquer.Vérifier que la poignée latérale est correctement fixée .
Page 20

6. Placer l’appareil contre le support en positionnant la
mèche à l’endroit désiré, puis actionner lentement l’interrupteur de commande. Percer à vitesse lente jusqu’à ce que la mèche se centre toute seule dans le trou.
7. Appuyer à fond sur l’interrupteur de commande pour
continuer de travailler à plein régime.
Perçages en rotation seule (TE2 / TE2-S)
Tourner le sélecteur de fonction en position Perçages
7b
( ) . Dans cette position, l’arbre transmet seulement
le mouvement de rotation aux outils TE-C et aux adaptateurs de mandrin autoserrant pour l’adaptation d’outils à queue cylindrique.
Perçages en rotation seule (TE2-M)
Tourner le sélecteur de fonction en position Perçages
1ère/2ème vitesses . Dans cette position, l’arbre
7b 7d
transmet seulement le mouvement de rotation aux outils
TE-C et au mandrin autoserrant.
Pour percer dans les métaux et le bois, il est préférable
que l'arbre tourne à grande vitesse. Pour cela, le sélecteur de fonction doit être verrouillé en position ( 2) .
7d
Remplacement du mandrin (TE2-M)
Tirer la douille vers l'avant et enlever complètement le
mandrin. Pour le remettre, tirer la douille vers l'avant et
la tenir. Faire coulisser le mandrin sur le tube de guidage à fond et relâcher la douille. Tourner le mandrin jusqu'à ce que les billes s'engrènent bien et que la douille
se clipse vers l'arrière . Ce système d'échange rapide permet d'adapter aussi bien un mandrin TE-C qu'un
mandrin autoserrant .
Perçages avec la jauge de profondeur
Pour percer des trous à une profondeur exacte, nous
conseillons d’utiliser la jauge de profondeur. La jauge
de profondeur est intégrée dans la poignée latérale,
réglable et blocable dans n’importe quelle position sur
360°. Desserrer la poignée latérale (tourner à gauche),
choisir la profondeur de perçage en réglant la jauge de
profondeur,puis reverrouiller la poignée latérale (tourner à droite) .
Inverseur du sens de rotation droite/gauche
L’inverseur du sens de rotation permet de choisir le
sens de rotation pour les travaux de vissage. Rotation
à droite = position ( ); rotation à gauche = position ( ).
En rotation à gauche, le sélecteur de fonction doit
être verrouillé en position Perçages sans la percussion
(/1ère vitesse). Pour percer en percussion en rotation
à droite, vérifier que le sélecteur de fonction est bien en
position ( ).
Nettoyage et entretien
Débrancher l’appareil.
Nettoyage des outils
Enlever toutes traces de saletés ou tous résidus et bien
protéger la surface de vos outils de la corrosion en les
frottant à l’occasion avec un chiffon imbibé d’huile.
Nettoyage de l’appareil
ATTENTION
Tenir l'appareil, en particulier les surfaces de préhension, sec, propre et exempt d'huile et de graisse.
Ne pas utiliser de nettoyants à base de silicone.
La coque extérieure du boîtier de l'appareil est fabriquée
en plastique résilient. La partie préhensible est en élastomère.
Ne jamais faire fonctionner l'appareil si ses ouïes d'aération sont bouchées ! Les nettoyer avec précaution au
moyen d'une brosse sèche. Éviter toute pénétration de
corps étrangers à l'intérieur de l'appareil. Nettoyer régulièrement l'extérieur de l'appareil avec un chiffon légèrement humide. N'utiliser ni pulvérisateur, ni appareil à
jet de vapeur, ni eau courante pour nettoyer l'appareil,
afin de garantir sa sûreté électrique.
Entretien
Vérifier régulièrement toutes les pièces extérieures de
l’appareil pour voir si elles ne sont pas abîmées et tous
les éléments de commande pour établir s’ils fonctionnent
bien. Ne pas utiliser l’appareil si des pièces sont abîmées
ou si des éléments de commande ne fonctionnent pas
parfaitement. Faire réparer l’appareil par le S.A.V. Hilti.
Toutesréparations de la partie électrique de l’appareil ne
doivent être effectuées que par un électricien qualifié.
Contrôle après tous travaux de nettoyage et d’entretien
Aprèstoustravauxdenettoyageetd’entretien,ilest
nécessaire de vérifier si tous les équipements de protection sont bien en place et fonctionnent parfaitement.
Les adresses des "Services" peuvent être obtenues à
notre siège social aux USA.
Hilti Inc.
5400 South 122
US - Tulsa, OK 74146
U. S. A.
Tel.+1-800-879-8000
nd
East Ave.
fr
Printed: 07.07.2013 | Doc-Nr: PUB / 5070802 / 000 / 00
15
Page 21
Accessoires
Garantie constructeur des appareils
Utiliser uniquement des outils avec emmanchements
TE-C ou queues cylindriques avec mandrin à serrage
rapide ou adaptateur .
Appareils et outils Hilti sont parfaitement adaptés entre
eux et constituent un système complet et homogène.
fr
Un appareil Hilti ne peut donc fournir un rendement
maximal et durer le plus longtemps possible que si
vous utilisez des outils Hilti. Hilti propose toute une gam-
me d’outils et d’accessoires pour son système
TE-C . Les outils les plus importants pour le perçage
en percussion ou non, sont illustrés à l’intérieur du coffret de transport. Pour plus de détails sur l’ensemble de
la gamme, vous référer au catalogue de vente Hilti.
Si vous avez besoin d’outils autres que ceux standard,
n’hésitez pas à contacter le Service-Clients Hilti ou votre
conseiller de vente Hilti. Hilti peut en effet proposer tout
un programme d’outils spéciaux haut de gamme aux
professionnels.
Vérifier régulièrement vos outils et les échanger en temps
voulu. S’ils sont abîmés ou si leur emmanchement est
déjà bien usé, ils risquent d’abîmer votre appareil.Si les
segments en métal dur des mèches ou forets sont cassés ou ébréchés, les trous risquent de ne pas être bien
calibrés, ce qui influe sur la capacité de charge des fixations par chevilles!
Lire et bien respecter les instructions de nettoyage et
d’entretien de vos outils au paragraphe suivant.
Aspiration de la poussière (TE DRS-S)
Sur la poignée latérale/la jauge de profondeur,il est possible d'adapter une tête d'aspiration DRS. Pour aspirer
la poussière fine, utiliser un aspirateur!
Hilti garantit l'appareil contre tout vice de matières et
de fabrication. Cette garantie s'applique à condition
que l'appareil soit utilisé et manipulé, nettoyé et entretenu correctement, en conformité avec le mode d'emploi Hilti, et que l'intégrité technique soit préser vée,
c'est-à-dire sous réserve de l'utilisation exclusive de
consommables, accessoires et pièces de rechange
d'origine Hilti.
Cette garantie se limite strictement à la réparation gratuite ou au remplacement gracieux des pièces défectueuses pendant toute la durée de vie de l'appareil. Elle
ne couvre pas les pièces soumises à une usure normale.
Toutesautres revendications sont exclues pour autant
que des dispositions légales nationales impératives
ne s'y opposent pas. En particulier, Hilti ne saurait
être tenu pour responsable de toutes détériorations,
pertes ou dépenses directes, indirectes, accidentelles ou consécutives, en rapport avec l'utilisation
ou dues à une incapacité à utiliser l'appareil dans
quelque but que ce soit. Hilti exclut en particulier
les garanties implicites concernant l'utilisation et
l'aptitude dans un but bien précis.
Pour toute réparation ou tout échange, renvoyer l'appareil ou les pièces concernées au réseau de vente Hilti compétent, sans délai, dès constatation du défaut.
La présente garantie couvre toutes les obligations d'Hilti et annule et remplace toutes les déclarations antérieures ou actuelles, de même que tous accords oraux
ou écrits concernant des garanties.
Recyclage
Les appareils Hilti sont, pour la plus grande partie, fabriqués en matériaux recyclables qui doivent être, bien sûr,
triés au préalable. Dans de nombreux pays, Hilti est déjà équipé pour reprendre votre ancien appareil afin de le faire recycler. Consultez notre Service-Clients Hilti ou votre conseiller de vente.
16
Printed: 07.07.2013 | Doc-Nr: PUB / 5070802 / 000 / 00
Page 22

Guide de dépannage
Défauts Causes possibles Comment y remédier
L’appareil ne fonctionne plus. Alimentation électrique Brancher un autre appareil électrique,
interrompue. vérifier s’il fonctionne.
Fiche ou cordon défectueux. Les faire vérifier et, éventuellement,
remplacer par un électricien qualifié.
Interrupteur défectueux. Le faire vérifier et, éventuellement,
remplacer par un électricien qualifié.
Absence de percussion. L’appareil est trop froid. Réchauffer l’appareil jusqu’à une
température minimale de fonctionnement. Voir paragraphe «Consignes de
mise en marche».
Sélecteur de fonction sur Perçages Commuter le sélecteur de fonction
en rotation seules sur Perçages en percussion
L’appareil ne fonctionne pas La section du câble de rallonge Utiliser un câble de rallonge de section
à plein régime. est trop faible. suffisante. Voir «Consignes de mise en
marche».
L’interrupteur de commande n’est Enfoncer l’interrupteur de commande
pas enfoncé à fond. à fond.
Le sélecteur de fonction est sur Placer le sélecteur de fonction sur
percussion fine. Perçages en percussion.
Inverseur du sens de rotation Placer l’inverseur du sens de
droite/gauche lors de perçages rotation droite/gauche sur
sur Rotation à gauche. Rotation à droite.
La mèche ne peut pas être Le mandrin n’est pas Retirer le dispositif de verrouillage de
déverrouillée. complètement ouvert. l'outil jusqu'à la butée et sortir l'outil.
fr
Printed: 07.07.2013 | Doc-Nr: PUB / 5070802 / 000 / 00
17
Page 23

fr
18
Printed: 07.07.2013 | Doc-Nr: PUB / 5070802 / 000 / 00
Page 24

MANUAL ORIGINAL
TE 2 /TE 2-S/TE 2-M Martillo perforador ligero
Indicaciones generales
Es imprescindible leer las
instrucciones de uso antes de la
puesta en marcha.
Guarde siempre estas instrucciones junto con la herramienta.
Este símbolo identifica en este manual las instruccio-
nes especialmente importantes para la seguridad. Se
deben respetar siempre, ya que de no hacerse así podrí-
an producirse graves lesiones.
es
Si entrega la herramienta a otras
personas, hágalo siempre junto
con las instrucciones.
Elementos de operación
햲 Bloqueo del mandril (TE2-M)
햳 Selector de función
햴 Interruptor electrónico
햵 Giro derecha / izquierda
햶 Botón de bloqueo
Componentes del aparato
햷 Caperuza protección polvo
햸 Mandril
햹 Empuñadura lateral
햺 Placa de características
Indice Página
Indicaciones generales 19
Datos técnicos 20
Reglas de seguridad 20
Reglas y símbolos especifícos de seguridad 21
Descripción 22
Preparación para el uso 24
Utilización 24
Cuidado y mantenimiento 25
Accesorios 26
Garantía del fabricante de las herramientas 26
Reciclado y eliminación 26
Detección de averías 27
Aviso de tensión eléctrica peligrosa
Enestasinstruccionesdeuso,estesímboloadviertedel
peligro provocado por la corriente eléctrica. Dichas ins-
trucciones deberán seguirse siempre para reducir el
riesgo de que se produzcan heridas en las personas o
daños en la propiedad.
Los números remiten a las figuras. Las figuras cita-
das en el texto se encuentran en la parte desplegable de
las tapas. Manténgalas desplegadas durante la lectura
de las instrucciones.
En este texto, el término «la herramienta» se refiere
siempre a la herramienta eléctrica objeto de estas ins-
trucciones de uso.
Printed: 07.07.2013 | Doc-Nr: PUB / 5070802 / 000 / 00
19
Page 25

Datos Técnicos
Potencia absorbida nominal 700 W
Voltaje 120 V
Intensidad nominal 6.5 A
Frecuencia de la red 50–60 Hz
Peso del aparato sin empuñadura lateral 2,4 kg / 5,3 lbs (TE 2 / TE 2-S)
Dimensiones (L×Al×An) 352×203×89 mm / 14.3×8×3.5 in (TE 2 / TE 2-S)
es
Distancia mínima broca-pared 34 mm (1.3 in)
Velocidad 0– 930 1/min (Taladrar con percusión)
Golpes por minuto (30% percusión) 0–2600 1/min (TE 2-S)
Golpes por minuto (100% percusión) 0–4600 1/min(TE2 / TE 2-S / TE 2-M)
Energia de impacto (30% percusión) Nm (J) 0,6 Nm / 0,4 ft lbs (TE2-S)
Energia de impacto (100% percusión) Nm (J) 1,8 Nm / 1,3 ft lbs (TE 2 / TE2-S / TE 2-M)
Típico rendimiento de cincelado en hormigón de ∅ 8 mm: 550 mm/min ∅
dureza media B35 ∅ 10 mm: 500 mm/min ∅
Derecho reservado de modificaciones técnicas
2,7 kg / 6,0 lbs (TE2-M)
360×203×89 mm / 14.2×8×3.5 in (TE2-M)
0–1200 1/min (1a velocidad TE 2 / TE2-S / TE 2-M)
0–2500 1/min (2a velocidad TE 2-M)
5
/16″: 21,7 in/min
3
/8″: 19,7 in/min
∅ 12 mm: 400 mm/min ∅1/2″: 15,7 in/min
Indicaciones de seguridad
1. Instrucciones generales de seguridad
¡ATENCIÓN! Lea íntegramente estas instrucciones. En
caso de no atenerse a las instrucciones de seguridad
siguientes, ello puede dar lugar a una descarga eléctrica, incendio o lesión seria. El término "herramienta eléctrica" empleado en las siguientes instrucciones se refiere a su aparato eléctrico portátil, ya sea con cable de red
o, sin cable, en caso de ser accionado por acumulador.
GUARDAR ESTAS INSTRUCCIONES EN UN LUGAR
SEGURO.
1.1 Puesto de trabajo seguridad
a) Mantenga limpio y bien iluminado su puesto de tra-
bajo. El desorden y una iluminación deficiente en las
áreas de trabajo pueden provocar accidentes.
b) No utilice la herramienta eléctrica en un entorno con
peligro de explosión, en el que se encuentren combustibles líquidos, gases o material en polvo. Las
herramientas eléctricas producen chispas que pueden
llegar a inflamar los materiales en polvo o vapores.
c)Mantenga alejados a los niños y otras personas de
su puesto de trabajo al emplear la herramienta eléctrica. Una distracción le puede hacer perder el con-
trol sobre el aparato.
1.2 Seguridad eléctrica
a) El enchufe del aparato debe corresponder a la toma
de corriente utilizada. No es admisible modificar
el enchufe en forma alguna. No emplee adaptadores en aparatos dotados con una toma de tierra.
Los enchufes sin modificar adecuados a las respectivas tomas de corriente reducen el riesgo de una descarga eléctrica.
b) Evite que su cuerpo toque partes conectadas a tie-
rra como tuberías, radiadores, cocinas y refrigera-
dores. El riesgo a quedar expuesto a una sacudida eléc-
trica es mayor si su cuerpo tiene contacto con tierra.
c) No exponga las herramientas eléctricas a la lluvia
y evite que penetren líquidos en su interior. Existe
el peligro de recibir una descarga eléctrica si penetran ciertos líquidos en la herramienta eléctrica.
d) No utilice el cable de red para transportar o colgar
el aparato, ni tire de él para sacar el enchufe de la
toma de corriente. Mantenga el cable de red alejado del calor, aceite, esquinas cortantes o piezas
móviles. Los cables de red dañados o enredados
pueden provocar una descarga eléctrica.
e) Al trabajar con la herramienta eléctrica en la intem-
perie utilice solamente cables de prolongación
homologados para su uso en exteriores. La utiliza-
ción de un cable de prolongación adecuado para su
uso en exteriores reduce el riesgo de una descarga
eléctrica.
1.3 Seguridad de personas
a) Esté atento a lo que hace y emplee la herramienta
eléctrica con prudencia. No utilice la herramienta
eléctrica si estuviese cansado, ni tampoco después
de haber consumido alcohol, drogas o medicamentos. El no estar atento durante el uso de una herra-
mienta eléctrica puede provocarle serias lesiones.
b) Utilice un equipo de protección y en todo caso unas
gafas de protección. El riesgo a lesionarse se redu-
ce considerablemente si, dependiendo del tipo y la
aplicación de la herramienta eléctrica empleada, se
utiliza un equipo de protección adecuado como una
mascarilla antipolvo, zapatos de seguridad con suela antideslizante, casco, o protectores auditivos.
c) Evite una puesta en marcha fortuita del aparato.
Cerciórese de que el aparato esté desconectado
20
Printed: 07.07.2013 | Doc-Nr: PUB / 5070802 / 000 / 00
Page 26

antes conectarlo a la toma de corriente. Si transporta el aparato sujetándolo por el interruptor de conexión/desconexión, o si introduce el enchufe en la toma
de corriente con el aparato conectado, ello puede dar
lugar a un accidente.
d) Retire las herramientas de ajuste o llaves fijas antes
de conectar la herramienta eléctrica. Una herra-
mienta o llave colocada en una pieza rotante puede
producir lesiones al ponerse a funcionar.
e) Sea precavido. Trabajesobre una base firme y man-
tenga el equilibrio en todo momento. Ello le permi-
tirá controlar mejor la herramienta eléctrica en caso
de presentarse una situación inesperada.
f) Lleve puesta una vestimenta de trabajo adecuada.
No utilice vestimenta amplia ni joyas. Mantenga
su pelo, vestimenta y guantes alejados de las piezas móviles. La vestimenta suelta, las joyas y el pelo
largo se pueden enganchar con las piezas en movimiento.
g) Siempre que sea posible utilizar unos equipos de
aspiración o captación de polvo, asegúrese que
estos estén montados y que sean utilizados correctamente. El empleo de estos equipos reduce los ries-
gos derivados del polvo.
1.4 Trato y uso cuidadoso de herramientas eléctricas
a) No sobrecargue el aparato. Use la herramienta pre-
vista para el trabajo a realizar. Con la herramienta
adecuada podrá trabajar mejor y más seguro dentro
del margen de potencia indicado.
b) No utilice herramientas con un interruptor defec-
tuoso. Las herramientas que no se puedan conectar
o desconectar son peligrosas y deben hacerse reparar.
c) Saque el enchufe de la red antes de realizar un ajus-
te en el aparato, cambiar de accesorio o al guardar el aparato. Esta medida preventiva reduce el ries-
go de conectar accidentalmente el aparato.
d) Guarde las herramientas fuera del alcance de los
niños y de las personas que no estén familiarizadas con su uso. Las herramientas utilizadas por per-
sonas inexpertas son peligrosas.
e) Cuide sus aparatos con esmero. Controle si fun-
cionan correctamente, sin atascarse, las partes
móviles del aparato, y si existen partes rotas o deterioradas que pudieran afectar al funcionamiento de
la herramienta. Si la herramienta eléctrica estuviese defectuosa haga repararla antes de volver a
utilizarla. Muchos de los accidentes se deben a apa-
ratos con un mantenimiento deficiente.
f) Mantenga los útiles limpios y afilados. Los útiles
mantenidos correctamente se dejan guiar y controlar mejor.
g) Utilice herramientas eléctricas, accesorios, útiles,
etc. de acuerdo a estas instrucciones y en la manera indicada específicamente para este aparato.
Considere en ello las condiciones de trabajo y la
tarea a realizar. El uso de herramientas eléctricas
para trabajos diferentes de aquellos para los que han
sido concebidas puede resultar peligroso.
1.5 Servicio
a) Únicamente haga reparar su herramienta eléctri-
ca por un profesional, empleando exclusivamente
piezas de repuesto originales. Solamente así se
mantiene la seguridad de la herramienta eléctrica.
2. Reglas y símbolos específicos de seguridad
2.1 Seguridad de personas
a) Utilice protección para los oídos. El ruido excesivo
puede causar pérdida de oído.
b) Utilice las empuñaduras auxiliares suministradas
conlaherramienta.La pérdida del control de la herra-
mienta puede conllevar lesiones.
c) Mantenga las empuñaduras secas, limpias y sin
residuos de aceite o grasa.
d) Sostener la herramienta por las empuñaduras ais-
ladas cuando durante la operación puedan cortarse
conductores eléctricos o el propio cable de la herramienta. El contacto con un conductor bajo tensión
hará que las piezas expuestas reciban corriente eléctrica,
pudiendo el operario recibir una descarga eléctrica.
e) Efectúe pausas durante el trabajo, así como ejer-
cicios de relajación y estiramiento de los dedos
para mejorar la circulación.
f) Evite el contacto con las piezas giratorias. Conec-
te primero la herramienta en la zona de trabajo.
g) Si la herramienta se emplea sin un sistema de aspi-
ración de polvo, debe utilizar una mascarilla ligera cuando realice trabajos que produzcan polvo.
h) Coloque el cable de red, el alargador y el tubo de
aspiración por detrás de la herramienta a fin de evitar tropezar con ellos.
i) Asegúrese de que durante el proceso de taladrado
no se encuentren personas en la zona peligrosa
situada detrás de la pieza en la que se está trabajando.
j) Es conveniente advertir a los niños de que no deben
jugar con la herramienta.
k) La herramienta no es apta para el uso por parte de
niños o de personas físicamente no preparadas que
no tengan la debida instrucción.
l) ADVERTENCIA: Ciertos tipos de polvo que se pro-
ducen al realizar trabajos de desbarbado, lijado,
tronzado y taladrado, contienen sustancias químicas, conocidas por provocar cáncer, que ocasionan malformaciones en el feto, esterilidad, problemas en las vías respiratorias y otras lesiones.
Entre estas sustancias químicas se encuentran el plomo de la pintura de plomo, el cuarzo cristalino derivado de ladrillos secos, hormigón, mampostería o
piedras naturales, o el arsénico y el cromo derivados
de la madera de construcción tratada con productos
químicos. El nivel de riesgo varía dependiendo de la
frecuencia con la que se realizan estos trabajos. Para
reducir los efectos de estas sustancias químicas,
tanto el usuario como terceras personas deben trabajar en espacios con buena ventilación y usar
siempre equipos de seguridad autorizados. Utilice una mascarilla adecuada para determinados
es
Printed: 07.07.2013 | Doc-Nr: PUB / 5070802 / 000 / 00
21
Page 27

tipos de polvo que pueda filtrar además partículas
microscópicas y mantenga alejado el polvo de la
cara y el cuerpo. Evite un contacto prolongado con
el polvo. Utilice prendas protectoras y lave con
agua y jabón las partes de su cuerpo que hayan
estado en contacto con el polvo. La inhalación de
partículas de polvo a través de la boca y el contacto
prolongado del polvo con la piel y los ojos puede favorecer la ingestión de sustancias químicas perjudiciales para la salud.
es
2.2 Trato y uso cuidadoso de herramientas eléctricas
a)Sujete con firmeza la pieza de trabajo. Utilice dispo-
sitivos de sujeción o un tornillo de banco para sujetar
la pieza de trabajo. De esta forma estará sujeta de modo
más segura que con la mano y por otro lado se podrán
mantener libres ambas manos para el manejo de la herramienta.
b)Asegúrese de que los útiles presentan el sistema de
inserción adecuado para la herramienta y estén enclavados en el portaútiles conforme a las prescripciones.
c)En caso de corte de corriente: Desconecte la herra-
mienta y extraiga el enchufe. De esta manera se impe-
dirá que la herramienta se ponga accidentalmente en
funcionamiento en el momento en que vuelva a disponerse de tensión.
d)En caso de producirse un corte de la corriente eléc-
trica y tener que retirar la herramienta eléctrica,
comprobar si el botón de bloqueo está desbloqueado y, en caso necesario, desbloquearlo.
lo contrario, en caso de que se restableciera el suministro de corriente, la herramienta podría ponerse
en marcha involuntariamente.
e)No engrase en exceso el extremo de inserción del
martillo.
La grasa podría saltar del portaútiles duran-
te el funcionamiento.
2.3 Seguridad eléctrica
a)Antes de comenzar a trabajar compruebe si en la
zona de trabajo existen cables eléctricos o tuberías de agua y gas, por ejemplo, con la ayuda de un
detector de metales. Las partes metálicas exteriores
de la herramienta pueden llegar a conducir electricidad, por ejemplo, en caso de que se haya dañado un
cable eléctrico por error. En tal caso existirá un serio
peligro de que se produzca una descarga eléctrica.
b)
Compruebe con regularidad el cable de conexión de la
herramienta y encargue a un profesional en la materia que lo sustituya en caso de que presentara daños.
Inspeccione regularmente los alargadores y sustitúyalos en caso de que estuvieran dañados. Si se daña
el cable de red o el alargador durante el trabajo, evite tocar el cable. Extraiga el enchufe de red de la toma
de corriente. Los cables de conexión dañados y los
cables de prolongación representan un peligro ya que
podrían provocar una descarga eléctrica.
c)Por lo tanto, lleve a revisar periódicamente al servi-
cio técnico de Hilti la herramienta sucia, sobre todo si
se ha usado con frecuencia para cortar materiales conductivos. El polvo adherido en la superficie de la herra-
mienta, sobre todo el de los materiales conductivos, o la
humedad pueden provocar descargas eléctricas bajo condiciones desfavorables.
2.4 Puesto de trabajo
a)
Procure una buena iluminación de la zona de trabajo.
b)Procure que el lugar de trabajo se encuentre adecua-
damente ventilado. Aquellos lugares de trabajo que
estén insuficientemente ventilados podrían provocar
daños para la salud debido a la presencia de polvo.
2.
5 Equipo de seguridad personal
El usuario y las personas que se encuentren en las inme-
diaciones de la zona de uso de la herramienta deberán lle-
var gafas protectoras adecuadas, casco de seguridad, pro-
tección para los oídos, guantes de protección y, si no usa
aspiración de polvo, una mascarilla ligera.
Utilizar
protección
para los
ojos
Utilizar cas-
co de pro-
tección
Utilizar
protección
para los
oídos
Utilizar
guantes de
protección
Símbolos utilizados en la herramienta:
V voltios n velocidad con carga
~ corriente alterna normal
Hz hertz /min revoluciones
W vatios por minuto
De
A amperios ∅ diámetro
n
velocidad sin carga Z doble aislamiento
0
Descripción
El TE2/TE2-S/TE 2-M es un martillo para perforación
que funciona eléctricamente, con mecanismo de percusión neumático, para uso del profesional.
Se suministra: la herramienta, (Mandril intercambiable
de cierre rápido TE2-M), las instrucciones de uso,
grasa, caja de transporte, Empuñadura lateral, Paños
de limpieza, Tope de profundidad.
Al utilizar la herramienta deben cumplirse siempre
las siguientes condiciones:
– La herramienta debe ser conectada a la red de alter-
na conforme a los datos de la placa de características.
– Utilizarla exclusivamente de forma manual.
– No utilizarla en ambientes con peligro de explosión.
– No está permitido efectuar manipulaciones o modi-
ficaciones en la herramienta.
– Para evitar lesiones, utilizar exclusivamente acce-
sorios y complementos originales Hilti apropiados
para su aparato.
– Observar las indicaciones sobre el funcionamiento,
cuidado y mantenimiento contenidas en el manual
Utilizar una
mascarilla
ligera
22
Printed: 07.07.2013 | Doc-Nr: PUB / 5070802 / 000 / 00
Page 28

de instrucciones. La herramienta y sus dispositivos
auxiliares pueden conllevar riesgos si son manejados de forma inadecuada por parte de personal no
cualificado o si se utilizan para usos diferentes a los
que están destinados.
– Tope de profundidad
– Conexión para mandril de cierre rápido (TE 2-M)
– Regulación de la intensidad de percusión (TE2-S)
– Alta velocidad de rotación (sin percusión) (TE 2-M)
– Botón de bloqueo para marcha continua
– Esta herramienta ha sido diseñada para el usuario
profesional. Por este motivo, las operaciones de manejo, mantenimiento y reparación correrán a cargo
exclusivamente de personal autorizado y debidamente
cualificado. Este personal debe estar especialmente
instruido en lo referente a los riesgos de uso.
Características más importantes de la herramienta
– Clase de protección eléctrica II (con doble aisla-
miento de protección) Z
– Acoplamiento con encaje mecánico
– Empuñadura trasera y lateral con amortiguación de
vibraciones
– Mandril TE-C
– Sistema inserción útiles TE-C
– Velocidad con regulación continua
– Modalidad de taladro
– Mecanismo de percusión y engranajes con
lubricación
– Empuñadura lateral ajustable (360°)
La herramienta esté diseñado para las siguientes aplicaciones:
Aplicaciones Útiles Diám. de broca
TE2 / TE 2-S / TE 2-M:
Perforación con percusion , Brocas con conexión TE-C Perforación en hormigón:
en hormigón, mampostería – Brocas cortas Diam. 4–22mm (
3
/16″–7/8″) colocación
y piedra natural de anclajes
– Brocas largas Taladros de 4–22 mm (3/16″–7/8″) de diam.
TE2-S:
Perforación con precisión Brocas con conexión TE-C Perforaciones en ladrillo:
en la percusión pare ladrillo, – Brocas TE-C Diam. 4–22 mm (
3
/16″–7/8″) para colocación
mármol y azulejo. de anclajes
– Brocas corona Diam. de corte de 25–68 mm (1″–25/8″)
TE2 / TE 2-S:
Taladrosen madera, Mandril intercambiable de cierre
tabique seco y metal rápido con adaptador TE-C
con vástago cilíndrico o hexagonal,
para taladros sólo a rotación:
Brocas para madera ∅ 4–20 mm (
Brocas para metal ∅ 3–13 mm (
3
/16″–3/4″)
3
/16″–1/2″)
Brocas corona ∅ 25–68 mm (1″–25/8″)
TE2-M:
Taladrosen madera, Mandril intercambiable de cierre
tabique seco y metal rápido para consumibles con
vástago cilíndrico o hexagonal,
para taladros sólo rotación:
Brocas para madera ∅ 4–10 mm (
∅ 10–20 mm (
Brocas para metal ∅ 3– 8 mm (
∅ 8–13 mm (
3
/16″–3/8″) 2. velocidad
3
/8″–3/4″) 1. velocidad
3
/16″–5/16″) 2. velocidad
3
/16″–1/2″) 1. velocidad
Brocas corona ∅ 25–68 mm (1″–25/8″) 1. velocidad
es
Printed: 07.07.2013 | Doc-Nr: PUB / 5070802 / 000 / 00
23
Page 29
Preparación para el uso
Utilización
ATENCIÓN: al atascarse la broca, la herramienta se mueve
lateralmente.
Es imprescindible leer y seguir las indicaciones de seguridad de estas instrucciones de uso.
Montaje de la empuñadura lateral
1. Extraiga el enchufe de red de la toma de corriente.
es
2. Abra el soporte de la empuñadura lateral girando la empu-
ñadura.
3. Desplace la empuñadura lateral (banda de sujeción) a
través del portaútiles hacia el vástago.
4. Gire la empuñadura lateral hasta la posición deseada.
5. Fije la empuñadura lateral asegurándola al girar la empu-
ñadura.
Compruebe que la empuñadura lateral está bien sujeta.
La tensión de la red debe coincidir con los datos de la
placa de características.
Si se utilizan cables de prolongación: utilizar sólo los
autorizados para la aplicación en cuestión, debiendo ser
de sección suficiente. De lo contrario puede reducirse
el rendimiento de la herramienta o producirse sobrecalentamiento del cable. Si el cable alargador está deteriorado, sustituirlo. Las secciones y longitudes máximas recomendadas para los prolongadores son las
siguientes:
Sección del cable
Tensión AWG
de la red 16 14 12
110–120 V 50 ft 75 ft 125 ft
Utilizar únicamente herramientas con extremo de inserción TE-C.
No aplicar una presión excesiva sobre la herramienta,
ya que no aumentará la potencia de percusión.
En el caso de temperaturas exteriores bajas: la herramienta necesita una temperatura de funcionamiento
mínima para que funcione el mecanismo de percusión.
Encender la herramienta y apoyar la punta de la broca
del cincel sobre la superficiede trabajo. Cuando la herramienta esté girando, aplicar brevemente una ligera presión de forma repetida hasta que el mecanismo percutor empiece a funcionar.
Utilice siempre la herramienta con la empuñadura lateral y
sujete la herramienta con ambas manos para que se produzca un par de retroceso y el acoplamiento de fricción se
active en caso de atasco. Fije las piezas de trabajo sueltas
con un dispositivo de sujeción o un tornillo de banco.
5a
Inserción del útil
1. Extraiga el enchufe de red de la toma de corriente.
2. Compruebe si el mandriles de inserción del útil está limpio y ligeramente engrasado. Límpielo y engráselo en
caso necesario.
3. Compruebe que la falda de obturación de la tapa de protección contra polvo esté limpia y en perfecto estado. En
caso necesario, limpie la tapa de protección contra polvo o reemplace la falda de obturación si está dañada.
4. Inserte el cincel en el portaútiles y gírelo ejerciendo una
leve presión hasta que se enclave en las ranuras de la
inserción.
5. Inserte el cincel en el portaútiles hasta que encaje de forma audible.
6. Tire del útil para comprobar que está encajado.
Extracción del útil
-PRECAUCIÓN-
– La herramienta puede calentarse durante su empleo. Pue-
de quemarse las manos. Utilice guantes de protección
para el cambio de útil.
1. Extraiga el enchufe de red de la toma de corriente.
2. Abra el portaútiles retirando el bloqueo de la herramienta.
3. Extraiga el útil del portaútiles.
5b
Operación de taladrado
Taladrarcon percusión (TE 2 / TE2-S / TE 2-M) /
Percusión con precisión (TE 2-S)
1. Colocar la broca en el portabrocas.
2. Girar el conmutador de función a la posición de taladrar
( ) hasta que el mecanismo haja engranado .
7a
Comprobar que el movimiento de giro es el correcto
(I.).
3. Si se trabaja sobre una base frágil (por ejemplo, azu-
lejos, Mármol, ladrillo) puede ser ventajoso trabajar
con reducción de percusión ( ).
Con ello se puede mejorar la calidad del agujero .
7c
4. Enchufar la herramienta a la red.
5. Girar la empuñadura lateral, con o sin tope de pro-
fundidad, hasta conseguir el ángulo deseado y girar
le empuñadura lateral para bloquearla un esa posición. Comprobar que esté bien sujeta y bloqueada
6. Aplicar la herramienta con la broca en el punto que
se desee taladrar, accionar lentamente el interruptor
24
Printed: 07.07.2013 | Doc-Nr: PUB / 5070802 / 000 / 00
Page 30

de mando. Trabajar con velocidades bajas hasta que
la broca se haya autocentrado en el orificio de taladro.
7. Accionar a fondo el interruptor de mando para seguir
trabajando con potencia total.
Perforación sólo rotación (TE2 / TE 2-S)
Girar el commutador de función haste la posición de
taladro ( ) . Cuando esté en este posición, sólo el
7b
movimiento de giro se transmite al útil TE-C o al adaptador del mandril pare brocas cilindricos.
Perforación sólo rotación (TE2-M)
Girar el selector de función a la 1a/2avelocidad .
7d7b
Cuando el selector esté en esta posición, no se transmite percusión, sólo rotación.
Usar la velocidad alta es ventajoso sólo cuando taladremos en madera o metal. Para seleccionar alta
velocidad, girar el selector de función hasta la ( 2a)
velocidad .
7d
Cambio de mandril (TE2-M)
Presionar el anillo del extremo del mandril y tirar haciafuera. Cuando queramos fijar el mandril presionar el
anillo del extremo del mandril y acoparlo en el martillo
. Girar el mandril hasta que coincida con el tubo guía
y liberar el anillo; así quedará fijado y bloqueado .
Taladracon tope de profundidad
Para el taladro de agujeros con una profundidad precisa recomendamos la utilización del tope de profundidad.
El tope de profundidad esté integrado en le empuñadura lateral, la cual se puede girar y ajustar en la posición
deseada. Aflojándola (girando en el sentido de las agujes del reloj), libera el tope de profundidad y lo podemos
colocar a la distancia que desaemos .
Giro derecha / izquierda
Para atornillar/desatornillar, la dirección del giro se puede seleccionar simplemente moviendo la palanca .
Giro hacia derecha ( ) y giro izda, seleccione ( ).
Cuando la máquina trabaje hacia la izquierda, el conmutador de función debe estar en la posición de taladro sin percusión ( / 1
a
velocidad).
Para trabajar taladrando, asegúrese de que el giro es
hacia la derecha ( ).
Cuidado y mantenimento
Inserte el enchufe de la herramienta en la toma de
corriente.
Cuidado de las herramientas
Retire toda la suciedad que esté adherida a la herramienta
y proteja la superficie de sus útiles contra la corrosión
frotándolas con un paño ligeramente humedecido con
aceite.
Cuidado de la herramienta
PRECAUCIÓN
Mantenga la herramienta seca, limpia y libre de aceite y grasa, en especial las superficies de la empuñadura. No utilice productos de limpieza que contengan
silicona.
La carcasa exterior de la herramienta está fabricada en
plástico resistente a los golpes. La empuñadura es de un
material elastómero.
No utilice nunca la herramienta si esta tiene obstruidas
las ranuras de ventilación. Límpielas cuidadosamente
con un cepillo seco. Evite la penetración de cuerpos extraños en el interior de la herramienta. Limpie regularmente el exterior de la herramienta con un paño ligeramente humedecido. No utilice pulverizadores, aparatos de
chorro de vapor o agua corriente para la limpieza, ya que
podría afectar a la seguridad eléctrica de la herramienta.
Mantenimiento
Compruebe regularmente que las partes externas de la
herramienta no estén dañadas y que todos los elementos de manejo estén en perfecto estado de funcionamiento. No utilice la herramienta si hay partes dañadas
o si algún elemento de manejo no funciona correctamente. Para reparar la herramienta llévela al servicio Hilti.
Las reparaciones de la parte eléctrica sólo las llevará a
cabo un profesional de la electricidad.
Control tras las tareas de cuidado y mantenimiento
Una vez realizado el cuidado y mantenimiento hay que
comprobar si se han colocado y funcionan perfectamente
todas las piezas de la herramienta.
Información acerca de posibles Centros de Atención
y Servicio se puede obtener en nuestra oficina central de Norte America.
Hilti Inc.
5400 South 122
US - Tulsa, OK 74146
U. S. A.
Tel.+1-800-879-8000
nd
East Ave.
es
Printed: 07.07.2013 | Doc-Nr: PUB / 5070802 / 000 / 00
25
Page 31

Accesorios
Utilice únicamente herramientas con extremos de inserción TE-C o un vástago cilíndrico con mandril intercambiable de cierre rápido o adaptador .
Los útiles Hilti optimizan como sistema los aparatos
Hilti. En consecuencia, el uso de útiles Hilti con el
aparato permite conseguir máximo rendimiento y prolongar la vida útil del mismo. Existe un amplio pro-
es
grama de útiles y accesorios para el sistema TE-C.
En el catálogo actual de Hilti se puede ver el programa
en su totalidad.
Si usted necesita útiles no incluidos en el programa
estándar,pónganse en contacto con el Servicio al Cliente o con su vendedor Hilti. Hilti posee un amplio programa especial de herramientas de calidad para el profesional.
Garantía del fabricante de las
herramientas
Hilti garantiza la herramienta suministrada contra todo
fallo de material y de fabricación. Esta garantía se otorga a condición de que la herramienta sea utilizada, manejada, limpiada y revisada en conformidad con el manual
de instrucciones de Hilti, y de que el sistema técnico sea
salvaguardado, es decir, que se utilicen en la herramienta
exclusivamente consumibles, accesorios y piezas de
recambio originales de Hilti.
Esta garantía abarca la reparación gratuita o la substitución sin cargo de las piezas defectuosas durante toda
la vida útil de la herramienta. La garantía no cubre las
piezas sometidas a un desgaste normal. Hilti será quien
defina cuál es el periodo de vida útil de la herramienta,
fijando este plazo siempre por encima de lo que marque la ley vigente.
Comprobar los útiles regularmente y sustituirlos a su
debido tiempo. El deterioro o el gran desgaste del extremo de inserción pueden producir daños consecutivos
en su aparato. Las pastillas rotas en las brocas pueden
modificar el orificio del taladro, influyendo con ello en
la idoneidad de las fijaciones con tacos.
Observe cuidadosamente las instrucciones del epígrafe siguiente para el cuidado de las herramientas.
Extracción de polvo (TE DRS-S)
La cabaza del extractor de polvo se puede incorpar a la
empuñadura lateral, y el tope de profundidad. Un aspirador industrial se usa para eliminar el polvo.
Quedan excluidas otras condiciones que no sean las
expuestas, siempre que esta condición no sea contraria a las prescripciones nacionales vigentes. Hilti
no acepta la responsabilidad especialmente en relación con deterioros, pérdidas o gastos directos, indirectos, accidentales o consecutivos, en relación con
la utilización o a causa de la imposibilidad de utilización de la herramienta para cualquiera de sus finalidades. Quedan excluidas en particular todas las
garantías tácitas relacionadas con la utilización y la
idoneidad para una finalidad precisa.
Para toda reparación o recambio, les rogamos que envíen la herramienta o las piezas en cuestión a la dirección
de su organización de venta Hilti más cercana inmediatamente después de la constatación del defecto.
Estas son las únicas obligaciones de Hilti en materia de
garantía, las cuales anulan toda declaración anterior o
contemporánea, del mismo modo que todos los acuerdos orales o escritos en relación con las garantías.
Reciclado y eliminación
Las herramientas Hilti están fabricados en gran parte con material reutilizable. Para la reutilización es necesario
separar correctamente los materiales. Hay muchos países en los que Hilti ya está preparado para recoger su viejo herramienta para la reutilización. Consultar al Servicio al Cliente Hilti o al agente de ventas.
26
Printed: 07.07.2013 | Doc-Nr: PUB / 5070802 / 000 / 00
Page 32

Detección de averías
Avería Posible causa Eliminación
La herramienta no arranca Interrumpida la alimentación Enchufar otro herramienta eléctrico
Cable de red o enchufe defectuoso Hacer revisar por técnico electricista
Enchufe defectuoso Hacer revisar por técnico electricista
No funciona la percusión La herramienta está frío Llevar la herramienta hasta la tempe
La herramienta no alcanza Cable alargador con sección Utilizar cable alargador con sección
su potencia total demasiado pequeña Véase Puesta en servicio
El conmutado no esté Ajustar el conmutador en
correctamente posicionado el modo deseado
Giro dcha./izda Ajustar correctamente
no ajusta adecuadamente el inversor de giro
La broca no se puede soltar del El mandril no se abre
mandril completamente. extraer el útil
Comprobar función
y, si es necesario, sustituirlo
y, si es necesario, sustituirlo
ratura mínima de funcionamiento
ver preparación para el uso
Retraer el bloqueo del útil hasta el tope y
es
Printed: 07.07.2013 | Doc-Nr: PUB / 5070802 / 000 / 00
27
Page 33

es
28
Printed: 07.07.2013 | Doc-Nr: PUB / 5070802 / 000 / 00
Page 34

MANUAL ORIGINAL
TE 2/TE 2-S/TE 2-M Martelo Perfurador
É imprescindível ler o manual de
instruções antes de ligar o
aparelho.
Guarde este manual de instruções
junto com o aparelho.
Entregue o aparelho a outras
pessoas juntamente com o manual
de instruções.
Assegure-se que ao entregar o
aparelho entrega também o
manual de instruções.
Dispositivos de manuseamento
햲 Mandril de aperto rápido (TE 2-M)
햳 Comutador de funções
햴 Interruptor de comando
햵 Rotação direita/esquerda
햶 Botão de bloqueio
Componentes da máquina
햷 Capa protectora contra pó
햸 Mandril
햹 Punho lateral
햺 Características
Instruções gerais
Neste manual de instruções, este símbolo representa
instruções importantes para a segurança. Siga-as sempre, de modo a evitar lesões graves.
Cuidado: Voltagem Elétrica Perigosa
Este símbolo, nestas instruções de funcionamento, previne-o sobre os riscos da corrente elétrica. Estas instruções devem ser seguidas a fim de reduzir o risco de
lesões pessoais graves ou de danos importantes no aparelho.
Estes números referem-se a figuras. Estas encontram-se nas contracapas desdobráveis. Ao ler as instruções, mantenha as contracapas abertas.
No texto destas instruções, «a máquina» refere-se sempre a esta máquina eléctrica, objecto deste manual de
instruções.
pt
Índice Página
Instruções gerais 29
Características técnicas 30
Normas gerais de segurança 30
Normas e símbolos especificos de segurança 31
Descrição 32
Utilização 33
Manuseamento 34
Conservação e manutenção 35
Ferramentas e acessórios 35
Garantia do fabricante sobre ferramentas 36
Reciclagem 36
Avarias possíveis 36
Printed: 07.07.2013 | Doc-Nr: PUB / 5070802 / 000 / 00
29
Page 35

Características técnicas
Potência nominal 700 W
Voltagem nominal 120 V
Corrente nominal 6,5 A
Frequência rede 50–60 Hz
Peso do aparelho sem punho lateral 2,4 kg / 5,3 lbs (TE2 / TE 2-S)
Dimensões (c×a×l)) 352×203×89 mm / 14.3×8×3.5 in (TE 2 / TE2-S)
Distância mínima entre perfuração e parede 34mm (1.3 in)
pt
Velocidade 0– 930 1/min (Perfurar com percussão)
Velocidade do Martelo (Acção de precisão) 0–2600 1/min (TE 2-S)
Velocidade do Martelo (Acção de potência máxima) 0–4600 1/min (TE2 / TE 2-S / TE2-M)
Energia de impacto (Acção de precisão) Nm (J) 0,6 Nm / 0,4 ft lbs (TE 2-S)
Energia de impacto (Acção de potência máxima) Nm (J) 1,8 Nm / 1,3 ft lbs (TE2 / TE 2-S / TE2-M)
Capacidade típica de perfuração em betão B 35 ∅ 8 mm: 550 mm/min ∅
de dureza média ∅ 10 mm: 500 mm/min ∅
Sujeito a modificações técnicas
2,7 kg / 6,0 lbs (TE2-M)
360×203×89 mm / 14.2×8×3.5 in (TE2-M)
0–1200 1/min (na 1
a
Veloc. TE 2 / TE 2-S / TE 2-M)
0–2500 1/min (na 2aVeloc. TE 2-M)
5
/16″: 21,7 in/min
3
/8″: 19,7 in/min
∅ 12 mm: 400 mm/min ∅1/2″: 15,7 in/min
Normas de segurança
1. Regras gerais de segurança
ATENÇÃO! Leia todas as instruções. O desrespeito das
instruções a seguir podem causar choque eléctrico, incêndio e/ou graves lesões. O termo "ferramenta eléctrica" utilizado a seguir refere-se a ferramentas eléctricas ligação à
rede eléctrica (por cabo) e a ferramentas operadas por acumulador (sem cabo).
GUARDE BEM ESTAS INSTRUÇÕES
1.1 Lugar de trabalho segurança
a) Mantenha a sua área de trabalho limpa e arrumada.
Desordem e áreas de trabalho com fraca iluminação
podem ser causa de acidentes.
b) Não trabalhar com a ferramenta eléctrica em áreas
com risco de explosão, nas quais se encontrem líquidos, gases ou pós inflamáveis. Ferramentas eléctricas
produzem faíscas que podem provocar a ignição de pó
e vapores.
c) Mantenha crianças e outras pessoas afastadas da ferra-
menta eléctrica durante o trabalho com a ferramenta.
Distrações podem causar a falta de controle sobre o aparelho.
1.2 Segurança eléctrica
a) A ficha da ferramenta eléctrica deve servir na toma-
da. A ficha não deve ser modificada de modo algum.
Não utilize quaisquer fichas de adaptação juntamente com ferramentas eléctricas ligadas à terra. Fichas
não modificadas e tomadas adequadas reduzem o risco
de choques eléctricos.
b) Evite o contacto do corpo com superfícies ligadas à
terra, como por exemplo canos, radiadores, fogões e
geladeiras. Existe um risco elevado de choque eléctri-
co se o corpo estiver em contacto com a terra.
c) A ferramenta eléctrica não deve ser exposta à chuva
nem humidade. A infiltração de água na ferramenta eléc-
trica aumenta o risco de choques eléctricos.
d) O cabo do aparelho não deve ser utilizado para o trans-
porte, para pendurar o aparelho, nem para puxar a
ficha da tomada. Mantenha o cabo afastado de calor,
óleo, arestas vivas ou partes em movimento do aparelho. Cabos danificados ou torcidos aumentam o risco
de choques eléctricos.
e) Ao trabalhar com a ferramenta eléctrica ao ar livre,
use um cabo de extensão autorizado para espaços exteriores. O uso de um cabo apropriado para espaços exte-
riores reduz o risco de choques eléctricos.
1.3 Segurança de pessoas
a) Esteja alerta, observeo que está a fazer,e tenha pru-
dencia ao trabalhar com a a ferramenta eléctrica. Não
use a ferramenta eléctrica se estiver fatigado ou sob
a influência de drogas, álcool ou medicamentos. Um
momento de falta de atenção durante a utilização da ferramenta eléctrica pode causar graves lesões.
b) Usar um equipamento pessoal de protecção e sempre
óculos de protecção. Equipamento de segurança, como
por exemplo, máscara de protecção contra poeiras, sapatos de segurança anti-derrapantes, capacete de segurança ou protecção auricular, de acordo com o tipo e aplicação da ferramenta eléctrica, reduzem o risco de lesões.
c) Evite um accionamento involuntário. Assegure-se de
que o interruptor esteja na posição "desligado", antes
de introduzir a ficha na tomada. Manter o dedo sobre
o interruptor ao transportar a ferramenta eléctrica ou
conectar o aparelho à rede com ele no estado de "ligado", pode levar a graves acidentes.
30
Printed: 07.07.2013 | Doc-Nr: PUB / 5070802 / 000 / 00
Page 36

d) Remova chaves de ajuste ou chaves de fenda, antes
de ligar a ferramenta eléctrica. Uma ferramenta ou cha-
ve que se encontre numa parte giratória do aparelho,
pode levar a lesões.
e) Não se sobrestime. Mantenha uma posição firme e
mantenha sempre o equilíbrio. Desta forma é será mais
fácil controlar o aparelho em situações inesperadas.
f) Use roupa apropriada. Não use roupa larga ou jóias.
Mantenha o cabelo, roupa e luvas afastadas de partes em movimento. Roupas largas, jóias ou cabelos lon-
gos podem ser agarradas por partes em movimento.
g) Se for prevista a montagem de dispositivos de aspi-
ração de pó e de dispositivos colectores, assegure-se
de que estejam conectados e utilizados de forma apropriada. A utilização destes dispositivos reduz os riscos
provocados por poeiras.
1.4 Uso e tratamento de ferramentas eléctricas
a) Não sobrecarregue a ferramenta eléctrica. Use para o
seu trabalho a ferramenta eléctrica correcta. A ferra-
menta correcta realizará o trabalho de forma melhor e
mais segura dentro da faixa de potência indicada.
b) Não utilize a ferramenta eléctrica se o interruptor esti-
ver defeituoso. Qualquer ferramenta eléctrica que não
possa ser controlada através do interruptor de ligar-desligar, é perigosa e deve ser reparada.
c) Retire a ficha da tomada antes de efectuar ajustes no
aparelho, substituir acessórios ou guardar a ferramenta eléctrica. Esta medida de segurança evita que a
ferramenta eléctrica arranque acidentalmente.
d) Guarde ferramentas eléctricas que não estejam a ser
utilizadas fora do alcance de crianças. Não permita
que o aparelho seja utilizado por pessoas não familiarizadas com o mesmo ou que não tenham lido estas
instruções. Ferramentas eléctricas são perigosas nas
mãos de pessoas inexperientes.
e) Trate a sua ferramenta eléctrica com cuidado. Verifi-
que se as partes móveis do aparelho funcionam perfeitamente e não emperram, se há peças quebradas
ou danificadas, que possam influenciar o funcionamento do aparelho. Peças danificadas devem ser reparadas antes da utilização do aparelho. Muitos aciden-
tes tem como origem uma manutenção insuficiente das
ferramentas eléctricas.
f) Mantenha as ferramentas de corte sempre afiadas e
limpas. Ferramentas de corte devidamente preservadas,
com gumes afiados emperram com menos frequência
e podem ser conduzidas com maior facilidade.
g) Use a ferramenta eléctrica, os acessórios os bits de
aplicação etc., de acordo com estas instruções e do
modo especificado para este tipo especial de ferramenta eléctrica. Tome também em consideração as
condições de trabalho e o trabalho a ser efectuado. A
utilização da ferramenta eléctrica para outros fins que os
previstos, pode resultar em situações perigosas.
1.5 Serviço
a) A sua ferramenta eléctrica só deve ser reparada por
pessoal qualificado e só devem ser utilizadas peças
sobressalentes originais. Desta forma assegura-se a
segurança da ferramenta eléctrica.
2. Normas e símbolos específicos de segurança
2.1 Segurança de pessoas
Utilize auricular. Ruído em excesso pode levar à per-
a)
da de audição.
b) Utilize o punho adicional fornecido com a ferra-
menta. A perda de controlo da ferramenta pode causar ferimentos.
c) Mantenha os punhos secos, limpos e isentos de
óleo e gordura.
d) Segure a ferramenta pelas superfícies isoladas de
segurança ao executar uma operação em que a ferramenta de corte pode entrar em contato com a fiação
oculta ou com o seu próprio fio. O contato com o fio
«eletrizado», fará com que as peças de metal expostas da ferramenta sejam «eletrizadas» e causará choque no operador.
e) Faça pausas durante o trabalho. Aproveite para
relaxar os músculos e melhorar a circulação sanguínea nas mãos.
f) Evite o contacto com peças rotativas.Ligue a ferra-
menta somente quando esta estiver na posição de
trabalho, junto ao material a ser trabalhado.
g) Se a ferramenta for utilizada sem o sistema de
remoção de pó, o operador deve usar máscara antipoeiras.
h) Para evitar tropeçar e cair durante os trabalhos,
mantenha o cabo de alimentação, a extensão e a
mangueira de aspiração pela retaguarda da ferramenta.
i) Ao realizar trabalhos de perfuração, certifique-se
que atrás da peça a trabalhar não existe ninguém
na zona de perigo.
j) Deve ensinar-se às crianças que não podem brin-
car com a ferramenta.
k) A ferramenta não está concebida para a utilização
por crianças ou pessoas debilitadas sem formação.
l) AVISO: Alguns tipos de pó que são produzidos ao
desbastar, rebarbar, cortar e furar, contêm agentes químicos conhecidos pelos seus efeitos cancerígenos e teratogénicos, que podem provocar
esterilidade e danos permanentes das vias respiratórias ou outros. Alguns desses agentes químicos
são chumbo contido em tinta de chumbo, quartzo
cristalino proveniente de tijolos, betão, alvenaria ou
pedras naturais, ou, também, arsénico e crómio provenientes de madeira de construção tratada quimicamente. A perigosidade para si varia, consoante a
frequência com que efectua estes trabalhos. Para
minimizar a exposição a estes agentes químicos,
os utilizadores e terceiros devem trabalhar num
espaço bem ventilado, bem como usar equipamentos de segurança apropriados. Use uma máscara antipoeiras adequada para determinados pós,
que possa filtrar partículas microscópicas e manter o pó afastado da face e do corpo. Evite o contacto permanente com pó. Use roupa de protecção
elaveaáreadapeleafectadacomáguaesabão.
A absorção de pó através da boca, dos olhos ou o
contacto permanente dos pós com a pele pode promover a absorção de agentes químicos com risco de
efeitos graves para a saúde.
pt
Printed: 07.07.2013 | Doc-Nr: PUB / 5070802 / 000 / 00
31
Page 37

2.2 Uso e tratamento de ferramentas eléctricas
a) Para maior segurança e porque assim fica com
ambas as mãos livres para segurar a ferramenta,
use o grampo ou um torno para segurar peças soltas.
b)Verifique se os acessórios utilizados são compatí-
veis com o sistema de encaixe e se estão correctamente fixos (encaixados).
c)Quando houver um corte de energia: Desligue a
ferramenta e retire a ficha da tomada. Isto impede
que a ferramenta seja ligada involuntariamente quando a energia for restabelecida.
d)Em caso de corte de energia e cada vez que pou-
pt
sar a ferramenta eléctrica, verifique se o botão de
bloqueio está destrancado; se necessário, destranque-o.
Caso contrário, ao ser restabelecida a
energia, a ferramenta poderia arrancar de forma inesperada.
e)Evite uma lubrificação excessiva do topo de encai-
xe da broca.
Em funcionamento, o excesso de mas-
sa lubrificante pode ser forçado para fora do porta-
-ferramentas.
2.3 Segurança eléctrica
a) Antes de iniciar os trabalhos, verifique se no local
de trabalho não existem condutores eléctricos,
tubos de gás e de água encobertos; para o efeito
utilize, p.ex., um aparelho detector de metais. As
partes metálicas exteriores da ferramenta podem ficar
sob tensão caso, p.ex., se tenha danificado inadvertidamente um condutor eléctrico. Isto representa um
sério perigo de choque eléctrico.
b)Verifique regularmente o estado do cabo de ali-
mentação e das extensões de cabo. Se danificados,
estes deverão ser reparados/substituídos por pessoal devidamente especializado. Se danificar o cabo
de rede, ou de extensão, enquanto trabalha, desligue o cabo de alimentação da corrente eléctrica.
Cabos de ligação e de extensão danificados representam perigo de choque eléctrico.
c)Deste modo, as ferramentas utilizadas frequente-
mente para trabalhar materiais condutores e consequentemente muito sujas, devem ser verificadas
num centro de Assistência Técnica Hilti a intervalos regulares. Humidade ou sujidade na superfície
da ferramenta dificultam o seu manuseio e, sob condições desfavoráveis, podem causar choques eléctricos.
2.4 Lugar de trabalho
a)Assegure-se de que o local está bem iluminado.
b)Providencie uma boa ventilação do local de trabal-
ho. Locais de trabalho com ventilação deficiente podem
provocar problemas de saúde devido ao pó.
2.5 Equipamento de protecção pessoal
O operador, bem como outras pessoas na proximidade
da ferramenta, devem usar óculos de protecção, capacete, protecção auricular e luvas de protecção enquanto duram os trabalhos. Igualmente devem ser usadas
máscaras anti-poeiras leves quando o sistema de aspiração de poeira não for utilizado.
32
Printed: 07.07.2013 | Doc-Nr: PUB / 5070802 / 000 / 00
Use óculos
de protecção
Use
capacete de
segurança
Use
protecção
auricular
Use luvas
de protecção
Use
máscara
anti-poeiras
Símbolos usados na ferramenta:
V ............................ volts
~ ............................ corrente alternada
Hz ............................ hertz
W ............................ watts
A ............................ ampère
n
............................ sem velocidade de carga
0
n ............................ velocidade sob carga
normal
/min ............................ rotações por minuto
∅ ............................ diâmetro
Z ............................ aterramento de proteção
Descrição
OTE2/TE2-S/TE2-Méummarteloperfuradoraccionado electricamente, com mecanismo pneumático de
percussão, para uso profissional.
O fornecimento inclui: máquina eléctrica manual de instruções, (mandril de rápida remoção TE2-M), massa,
mala para transporte, Punho lateral, Pano de limpeza,
Limitador de profundidade.
Ao utilizar o aparelho devem sempre ser observadas
as seguintes condições:
– conectá-lo à rede de corrente eléctrica alternada de
acordo com as indicações das características
– utilizá-lo exclusivamente em serviços manuais
– não o utilizar em ambientes sujeitos a explosões
– Não é permitida a modificação ou manipulação da
ferramenta.
– Para evitar ferimentos/danos, utilize apenas aces-
sórios e equipamento auxiliar original Hilti que se
destinam à ferramenta.
– Leia as instruções contidas neste manual sobre a uti-
lização, conservaçãoe manutenção. A ferramenta e
seu equipamento auxiliar podem representar perigo
se usados incorrectamente por pessoas não qualifi-
cadas ou se usados para fins diferentes daqueles
para os quais foram concebidos.
– A ferramenta foi concebida para utilização profissio-
nal. A ferramenta deve ser utilizada, feita a sua manu-
tenção e reparada apenas por pessoal autorizado e
devidamente especializado. Estas pessoas deverão
ser informadas sobre os potenciais perigos que a
ferramenta representa.
Page 38

Características importantes do aparelho
– Classe de protecção eléctrica II
(isolamento duplo) Z
– Embraiagem mecânica de protecção das per-
cussões em vazio
– Punhos principal e lateral com amortecimento de
vibrações
– Mandril TE-C
– Sistema de ferramentas com encaixe TE-C
– Rotação com ajuste electrónico contínuo
– Modos de perfuração
– Mecanismo de martelo com permanente lubrifi-
cação
– Punho lateral giratório (360°)
– Aferidor de profundidade
– Interface para rápida remoção do mandril (TE 2-M)
– Precisão da accão de percussão (TE 2-S)
– Rosca de alta velocidade sem acção de percussão
(TE2-M)
– Botão de bloqueio para operação continuada
A ferramenta foi designada para as seguintes aplicações:
Uso Ferramentas necessárias Amplitude do Diâmetro
TE2 / TE 2-S / TE 2-M:
Perfuração com martelo Brocas de perfuração com
no betão, alvenaria e a conexão própria para TEC Perfuração no Betão:
na rocha – Brocas de perfuração pequenas Furos para ancoragem 4–22 mm (
3
/16″–7/8″) dia.
– Brocas de perfuração grandes Furos para atravessamentos 4–22 mm (3/16″–7/8″) dia.
TE2-S:
Perfuração de precisão Brocas com conexão TE-C Perfuração em materiais quebradiços:
com acção de martelo – Brocas de perfuração TE-C Furos para ancoragem de 4–22 (
em tijolos frágeis, telhas – Brocas de perfuração para Cortes variados 25–68 mm (1″–2
3
/16″–7/8″) mm dia.
5
/8″)dia.
e mármore madeira fina
TE2 / TE 2-S:
Perfuração na madeira, Mandril de troca rápida com
drywall e metal o adaptador da TE-C para
aplicar brocas utilizando
a conexção cilíndrica ou hexagonal
para a perfuração apenas com rotação
Brocas de perfuração na Madeira 4–20 mm (
Brocas de perfuração no Metal 3–13 mm (
3
/16″–3/4″) dia.
3
/16″–1/2″) dia.
Broca coroa 25–68 mm (1″–25/8″) dia.
TE2-M:
Perfuração na madeira, Mandril de troca rápida com
drywall e metal o adaptador da TE-C para
aplicar brocas utilizando
a conexão cilíndrica ou hexagonal
para a perfuração apenas com rotação:
Brocas de perfuração na Madeira 4–10mm (
10–20 mm (
Brocas de perfuração no Metal 3– 8 mm (
8–13 mm (
Broca coroa para madeira 25–68 mm (1″–2
3
/16″–3/8″) dia. na 2aVeloc.
3
/8″–3/4″ dia. na 1aVeloc.
3
/16″–5/16″)dia.na2aVeloc.
3
/16″–1/2″) dia. na 1aVeloc.
5
/8″) dia. na 1aVeloc.
Broca coroa
pt
Utilização
Leia e observe as instruções de segurança contidas neste manual de instruções.
Colocar o punho lateral
1. Desligue o cabo de alimentação da corrente eléctrica.
Printed: 07.07.2013 | Doc-Nr: PUB / 5070802 / 000 / 00
2.Abra a abraçadeira de aperto no do punho lateral
rodando o punho.
3. Alargue a peça de aperto no madril, na direcção da
parte frontal da ferramenta.
4. Regulare a posição do punho.
5. Aperto o punho.
Verifique se o punho auxiliar está bem fixo.
33
Page 39

A voltagem deve ser compatível com a indicada nas
características.
No caso de utilização de cabos eléctricos de extensão:
somente utilizar cabos aprovados para o tipo de serviço
pt
considerado e com secção transversal suficiente. Caso
contrário, pode ocorrer perda de potência do aparelho
e sobreaquecimento do cabo. Troque cabos eléctricos
de extensão danificados.
Seção transversal do condutor
AWG
Voltagem 16 14 12
110–120 V 50 ft 75 ft 125 ft
Utilizar somente ferramentas com encaixe TE-C.
Não excercer pressão excessiva; isto não aumentará a
capacidade de percussão.
No caso de temperaturas externas baixas: o aparelho
necessita de uma temperatura mínima de funcionamento
para que o mecanismo de percussão funcione. Ligar o
aparelho, apoiá-lo sobre o material a ser trabalhado e
deixá-lo trabalhar em vazio. Enquanto pue a ferramenta está a trabalhar,aplicar brevemente alguma pressão,
repetindo esta operação até que o mecanismo de percussão comece a funcionar.
Manuseamento
ATENÇÃO: Caso a broca encrave a ferramenta rodará
sobre o seu próprio eixo.
Utilize sempre a ferramenta com o punho lateral e segure-a com as duas mãos, aplicando alguma força no sentido oposto à rotação da broca para que, caso esta encrave, a embraiagem dispare.
Colocar a broca
1. Desligue o cabo de alimentação da corrente eléctrica.
2. Verifique se o encabadouro da broca está limpo e ligeiramente lubrificado. Caso necessário, limpe e lubrifique o encabadouro.
3. Verifique se o vedante do protector de pó está limpo
e em boas condições. Caso necessário, limpe o protector de pó ou se o vedante estiver danificado, substitua-o.
4. Empurre o encabadouro da broca para dentro do mandril aplicando alguma pressão e rode-a de forma a
que esta encaixe nas ranhuras guia. Rode a patilha
do mandril.
5. Empurre a broca dentro do mandril até que esta encaixe de forma audível.
6. Tente puxar a broca para fora do mandril, verificando assim se esta está bem fixo.
5a
Retirar a broca
5b
-CUIDADO-
– Após utilização prolongada, o acessório pode ficar
quente. Pode queimar as mãos. Use luvas de protecção
quando trocar os acessórios.
1. Desligue o cabo de alimentação da corrente eléctrica.
2. Abra o mandril puxando para fora o casquilho de bloqueio.
3. Retire a broca do mandril.
Perfuração
Perfuração (TE 2 / TE 2-S / TE 2-M) com
percussão (TE 2-S)
1. Inserir a broca no mandril.
2. Girar o comutador de funções para a posição de per-
furação com percussão até que o mecansimo esteja
encaixado( ) . Rode o mandril ligeiramente se
7a
necessário. Verifique que a rotação correcta está seleccionada (I.).
3. Para trabalhos sobre base quebradiça (por exemplo,
tijolos furados) pode ser conveniente trabalhar com
percussão ( ) a qualidade dos furos pode ser, assim,
melhorada .
7c
4. Introduzir a ficha na tomada.
5. Rode o punho lateral, com ou sem o aferidor de pro-
fundidade, para o ângulo desejado e de seguida aperte o punho para o fixar. Verifique se o punho está efectivamente seguro .
6. Apoiar a ponta da broca na posição desejada, accio-
nar lentamente o interruptor de comando. Trabalhar
com rotação baixa até que a broca se guie por ela
mesma no furo.
7. Puxar o interruptor de comando totalmente para con-
tinuar a trabalhar com toda a potência ajustada.
Perfuração apenas com rotação (sem o mecanismo
de percussão) (TE 2 / TE2-S)
Girar o comutador de funções para a posição de rotação
7b
( ) . Quando estiver na posição correcta, apenas o
movimento de rotação é transmitido para a ferramenta
inserida na TE-C ou no mandril adaptador no caso de
se inserir ferramentas com conexão cilíndrica.
Perfuração apenas com rotação (TE 2-M)
Rodeoselectordefunçõesparaa1
de perfuração . Quando o selector está numa des-
7b 7d
a
ou 2avelocidade
tas posições, apenas o movimento de rotação é transmitido à broca TE-C ou ao mandril de aperto rápido.
Pode ser vantajoso trabalhar com uma rotação elevada
no caso de furar metal ou madeira. Para aumentar a
velocidade de perfuração, o selector deve estar «engrenado» na ( 2
a
) posição .
7d
Trocaro mandril (TE 2-M)
Puxe o anel de segurança do mandril de aperto rápido
para a frente e remova o mandril completamente. Ao
34
Printed: 07.07.2013 | Doc-Nr: PUB / 5070802 / 000 / 00
Page 40

encaixar o mandril, puxe novamente o anel para a frente e segure-o nesta posição. Empurre o mandril na
direcção da guia o mais que puder e largue o anel de
segurança. Rode o mandril até estar preso e o anel
voltará à sua posição original . Quer o mandril TE-C
quer o mandril de aperto rápido podem ser usado no
TE 2-M .
Perfurar utilizando o aferidor de profundidade
Para fazer furos com profundidade exacta, recomendamos a utilização do aferidor de profundidade.
O aferidor de profundidade está integrado no punho lateral e pode ser ajustado e preso na posição desejada. Para
realizar esta operação, desaperte o punho lateral
(movimento contrário aos ponteiros do relógio),coloque
o aferidor na profundidade desejada e de seguida aperte
o punho lateral(movimento dos ponteiros do relógio) .
Rotação direita/esquerda
Para aparafusamentos, a direcção de rotação desejada
pode ser seleccionada simplesmente ajustando o comutador . Para uma rotação para a direita, seleccione a
posição ()e para a rotação para a esquerda, seleccione a posição ().
Quando a ferramenta estiver a funcionar na rotação para
a esquerda , o comutador de funções deve estar seleccionado na posição de perfuração sem percussão ( /
a
1
Veloc.). Para per furar assegure-se sempre que a
rotação para a direita está seleccionada ( ).
Conservação e manutenção
Desligue o cabo de alimentação.
Manutenção dos acessórios
Remova quaisquer resíduos aderentes ao encabadouro
do acessório (broca ou cinzel).
Conserve os acessórios limpos, sem pó nem sujidade.
Mantenha sempre o encabadouro limpo e lubrificado.
Manutenção da ferramenta
CUIDADO
Mantenha a ferramenta, particularmente as superfícies do punho, seca, limpa e isenta de óleos e massas. Não utilize produtos de limpeza que contenham
silicone.
A carcaça exterior da ferramenta é fabricada em plástico resistente a impactos. O punho é feito de uma borracha sintética.
As saídas de ar devem estar sempre limpas e desobstruídas! Limpe as saídas de ar cuidadosamente com uma
Printed: 07.07.2013 | Doc-Nr: PUB / 5070802 / 000 / 00
escova seca. Evite a penetração de corpos estranhos no
interior da ferramenta. Limpe regularmente o exterior da
ferramenta com um pano ligeiramente húmido. Não utilize qualquer spray, sistema de vapor ou água, pois poderá
afectar negativamente a parte eléctrica da ferramenta.
Manutenção
Examine periodicamente todos os componentes e partes externas da ferramenta prevenindo assim o seu perfeito funcionamento. Não ligue a ferramenta se houver
partes danificadas, incompletas ou se os elementos de
comando não estiverem a funcionar correctamente. Nesse caso, mande reparar a ferramenta num centro de
assistência técnica Hilti.
Verificação da ferramenta após manutenção
Após efectuar os trabalhos de manutenção, deverá verificar se o equipamento de segurança está completo e
correctamente encaixado, e se a ferramenta funciona em
perfeitas condições.
Para mais informações sobre centros de serviço ao
cliente por favor contactar a Sede nos EUA.
Hilti Inc.
5400 South 122
nd
East Ave.
US - Tulsa, OK 74146
U. S. A.
Tel.+1-800-879-8000
Ferramentas e acessórios
Utilize apenas ferramentas com topo de encaixe TE-C
ou encabadouro cilíndrico com mandril de aperto rápido ou adaptador .
As máquinas Hilti formam um sistema optimizado com
a utilização de ferramentas Hilti. Portanto, o rendimento máximo e a vida útil máxima são obtidos se,
com esta máquina, forem usadas ferramentas Hilti. Há
à disposição um vasto programa de ferramentas e acessórios para o sistema TE-C . O programa completo
pode ser visto no catálogo de vendas actualizado da Hilti.
Se forem necessárias ferramentas que não se encontram no programa padrão, contacte a assistência técnica Hilti ou o seu conselheiro de vendas Hilti. A Hilti
mantém um programa especial e abrangente de ferramentas com qualidade profissional.
Examine as suas ferramentas regularmente e troque-as
a tempo. Uma conexão danificada ou desgastada pode
provocar danos à sua ferramenta. Segmentos de metal
duro arrancados em ferramentas de perfuração podem
provocar alterações no diâmetro do furo e prejudicar a
fixação de buchas!
Observe as instruções de conservação de suas ferra-
35
pt
Page 41

mentas na secção seguinte.
Remoção do pó (TE DRS-S)
O acessório extractor do pó DRS pode ser encaixado no
punho lateral. Um aspirador industrial é utilizado para
remover o pó e os fragmentos da perfuração.
Garantia do fabricante sobre ferramentas
A Hilti garante que a ferramenta fornecida está isenta de
quaisquer defeitos de material e de fabrico. Esta garan-
pt
tia é válida desde que a ferramenta seja utilizada e manuseada, limpa e revista de forma adequada e de acordo
com o manual de instruções Hilti e desde que o sistema técnico seja mantido, isto é, sob reservada utilização
exclusiva na ferramenta de consumíveis, componentes
e peças originais Hilti.
A garantia limita-se rigorosamente à reparação gratuita ou substituição das peças com defeito de fabrico
durante todo o tempo de vida útil da ferramenta. A garantia não cobre peças sujeitas a um desgaste normal de
uso.
Estão excluídas desta garantia quaisquer outras
situações susceptíveis de reclamação, salvo legislação nacional aplicável em contrário. Em caso algum
será a Hilti responsável por danos indirectos, directos, acidentais ou pelas consequências daí resultantes, perdas ou despesas em relação ou devidas à utilização ou incapacidade de utilização da ferramenta,
seja qual for a finalidade. A Hilti exclui em particular
as garantias implícitas respeitantes à utilização ou
aptidão para uma finalidade particular.
Para toda a reparação ou substituição, enviar a ferramenta ou as peças para o seu centro de vendas Hilti,
imediatamente após detecção do defeito.
Reciclagem
Os aparelhos Hilti são, em grande parte, fabricados com materiais reutilizáveis. Condição prévia para a reutilização
é uma separação apropriada dos materiais. Em muitos países a Hilti está em condições de receber de volta o seu
aparelho usado para fins de reutilização. Consulte sua assistência técnica Hilti ou seu conselheiro de vendas.
Avarias possíveis
Defeito Possível causa Soluçãopossível
Aparelho não liga. Falta de corrente na rede. Conectar outro aparelho eléctrico,
Defeito no cabo eléctrico ou Mandar verificar por um electricista
na ficha. especialista e trocar, se necessário.
Defeito no interruptor. Mandar verificar por um electricista
Falta de percussão. Aparelho frio demais. Aquecer aparelho até à temperatura
Aparelho não tem a potência Cabo eléctrico de extensão Usar cabo com secção suficiente;
máxima. com secção insuficiente. Ver secção utilização.
Interruptor de comando Pressionar o interruptor de comando
não está pressionado totalmente. o mais possível.
Selecção da rotação para a Seleccione a rotação
esquerda quando está a perfurar. para a direita.
Broca não sai do mandril. Mandril não aberto Puxe o casquilho do mandril na sua
36
Printed: 07.07.2013 | Doc-Nr: PUB / 5070802 / 000 / 00
completamente. amplitude máxima e remova o
verificar funcionamento.
e trocar, se necessário.
mínima de funcionamento;
Ver secção utilização.
acessório.
Page 42

Hilti Corporation
FL-9494 Schaan
Tel.:+423 / 234 21 11
Fax: +423/2342965
www.hilti.com
Hilti = registered trademark of Hilti Corp.,Schaan W 2740 0809 10-Pos. 3 1 Printed in China © 2009
Right of technical and programme changes reserved S. E. & O.
Printed: 07.07.2013 | Doc-Nr: PUB / 5070802 / 000 / 00
228074 / H
*228074*
228074
 Loading...