

Page 1

SB12, SBC12 H, SBP12
Bedienungsanleitung
Operating instructions
Page 2

Safety precautions (Please read and keep these instructions)
Caution: The following fundamental safe-
ty precautions must always be observed
when using electric tools/machines as protection against and electric shock, the risk
of injury and fire hazards. Please read and
take note of these precautions before you
use the tool/machine. Keep these safety precautions in a safe place!
1
■
Keep your place of work clean and tidy.
Disorder where you are working creates a potential risk of accidents.
2
■
Make allowance for influence from the surroundings. Don’t expose your electric tools/machines to rain. Don’t use electric tools/machines in damp or wet surroundings. Make
sure the work area is well lit. Don’t use electric tools/ machines near inflammable liquids
or gases.
3
■
Always protect yourself against electric
shock. Never touch grounding (earthing) parts
e.g. pipes, radiators, cookers, ovens, refrigerators.
4
■
Keep children away. Don’t let other persons touch the electric tool/machine or supply cord. Keep them away from your work
area.
5
■
Keep your electric tool/machine in a safe
place. Electric tools/machines not in use should
be kept in a dry locked-up place out of the
reach of children.
6
■
Don’t overload your electric tools/machines.
You will do your work better and safer in the
specified performance/rating range.
7
■
Always use the right electric tool/machine
for the job. Don’t use underpowered tools/machines or attachments for heavier duty jobs.
Don’t use electric tools/ machines for work
and purposes for which they are not intend-
ed, e.g. don’t use a hand-held circular saw to
cut down trees or cut up branches.
8
■
Wear suitable clothing. Don’t wear loose
clothing or jewellery – they could be caught
up in moving parts. When working outside,
the use of rubber gloves and non-slip shoes
is recommended. Wear a helmet or cap if you
have long hair.
9
■
Always wear protective goggles. If work
causes dust, wear a mask as well.
10
■
Don’t use the supply cord for any other
purpose. Don’t carry the electric tool/ machine
by the supply cord and don’t pull the plug out
of the socket/receptacle by pulling the supply cord. Protect the cable from heat, oil and
sharp edges.
11
■
Secure the workpiece. Use a clamping device or vice to hold the workpiece. It is secured more reliably in this way than in your
hand and you can then hold and operate your
electric tool/machine with both hands.
12
■
Don’t bend over too far when working.
Avoid an unusual stance. Make sure that you
are standing firmly and keep your balance at
all times.
13
■
Take good care of your electric tools/machines. Keep the drill bits, insert tools etc.
sharp and clean so that you can do your work
better, safer and more reliably. Observe the
cleaning and maintenance regulations and
the instructions for changing drill bits, insert
tools etc. Check the supply cord regularly and
have it renewed by a recognized specialist if
it is damaged. Check the extension supply
cord regularly and, if it is damaged, replace
it. Keep grips and side handles dry and free
from oil or grease.
14
■
Always pull out the plug from the mains if
the electric tool/machine is not in use, prior
to cleaning and maintenance work and when
changing a drill bit, saw blade or insert tools
of any kind.
15
■
Never leave a key in place. Always check
before switching on that the key or adjusting
tools have been removed.
16
■
Avoid any unintentional start-up. Never
carry a plugged-in electric tool/machine with
your finger on the switch. Always make sure
that the switch is off when plugging the electric tool/machine into the main electric supply.
17
■
If an extension supply cord is used outside, only use one which has been approved
for the purpose and is correspondingly marked.
18
■
Be attentive at all times. Keep your eye on
your work. Remain in a sensible frame of mind
and don’t use the electric tool/machine if you
cannot concentrate completely.
19
■
Check your electric tool/machine for damage. You must check the safety devices or
damaged parts carefully for perfect functioning in keeping with the intended purpose before using the electric tool/machine further.
Check whether the moving parts function
properly, whether they aren’t sticking, whether
any parts are broken, whether all other parts
work properly and are fitted correctly, and
make sure that all other conditions which can
influence operation and running of the electric tool/machine are as they should be. Damaged guards and protective devices and parts
must be repaired properly by an authorized
service workshop or replaced provided that
nothing else is stated in the operating instructions. Damaged switches must also be
replaced in the recognized service workshop.
Never use electric tools/machines which cannot be switched on and off by the switch.
20
■
Caution ! For your own safety’s sake, on-
ly use accessories and attachments which are
specified in the operating instructions or in
the respective catalogue. The use of accessories or insert tools or attachments other
than those specified in the operating instructions can result in personal injury to you.
21
■
Only have repairs carried out by recognized
electrical specialists. This electric tool/machine complies with respective safety regulations. Repairs may only be carried out by
an electrical specialist otherwise an accident
hazard for the operator can exist.
22
■
Connect dust extraction equipment. If devices are provided for the connection of dust
extraction and collection facilities ensure these
are connected and properly used.
23
■
Locking the chuck: Check that insert tools
(chisels, drill bits) are properly secured in the
chuck.
24
■
When working on electrically conductive
materials, conductive dust may collect inside
an electric tool, causing leakage of electric
voltage and a possible risk of electric shock.
Work of this kind, for example, includes grinding cast iron, chiselling or other operations
using impact tools on solid metal, overhead
drilling in metal and, under certain conditions,
drilling through steel reinforcement in concrete ceilings. Electric tools or machines used
for applications of this kind must be inspected at regular, short intervals by a recognised
specialist or at a Hilti service workshop in order to ensure that no hazardous deposits of
conductive dust are present inside the tool
and to confirm the integrity of the tool’s electrical insulation.
Please keep these safety precautions in a
safe place.
9
Page 3
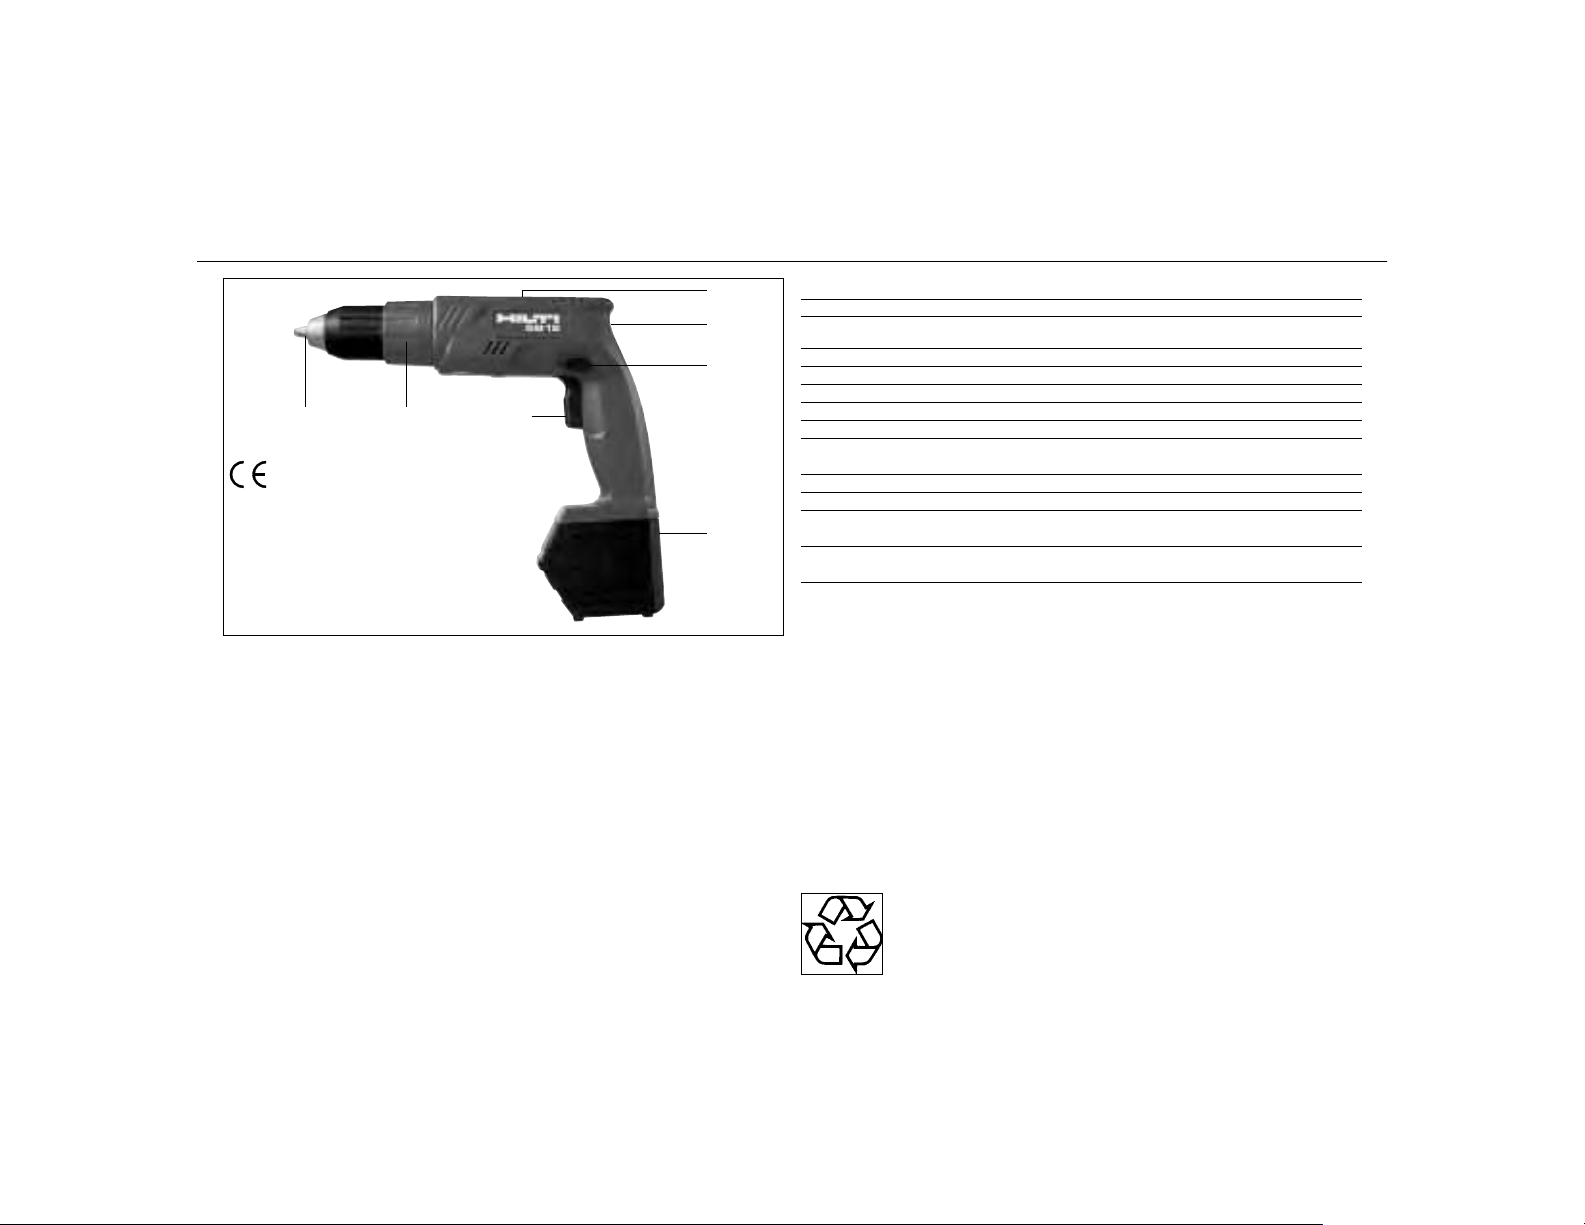
SB12 battery screwgun (12 volt)
➂
➄
➁
➆➃
➀ Switch with electronic speed control
➁ Reversing switch
➂ 2-speed switch
➃ Torque clutch adjustment ring
➄ Motor brake
➅ Battery release buttons (2)
➆ Quick-release chuck, 1.5–13 mm
➀
➅
Safety
● The list of safety precautions must be observed!
● Do not use this product in any way other than as described in the operating
instructions.
● Make sure the SBP 12 battery is securely attached to the screwgun before beginning work.
● Do not continue operating the screwgun until the SBP 12 battery is fully discharged.
This may reduce the life of the battery cells.
● High temperatures increase the rate of battery self-discharge. Direct exposure to
the sun or other sources of heat should be avoided.
● The chuck begins to rotate when the electronic on/off switch ➀ is pressed. To prevent battery discharge, ensure that the switch is not pressed during transport and/or
storage. The on/off switch ➀ can be deactivated by setting the reversing switch ➁
to the central position.
● Use only Hilti original parts and accessories ( SBC12H, SBC 12M and SBC12C
chargers, SBP12 battery). This ensures optimum safety as these units have been
designed to operate as a system of coordinated components.
● High drilling and screwdriving performance, high battery capacity and long life can
be achieved only when the screwgun is serviced correctly and insert tools are kept
clean and in good condition.
Technical data
Battery capacity: 1.7 Ah×12 Volt = 20.4 Wh
Speed (no load): 1st speed: 0– 320 r.p.m.
Max. torque: 20 Nm (setting: drill bit symbol)
Torque adjustment: 1–10 Nm in 20 increments
Chuck clamping range: Quick release chuck 1.5–13 mm
Weight: 1.9 kg (incl. battery and chuck)
Speed adjustment: Electronic control switch
Reversing switch: Electronic switch - locking device prevents
Spindle lock: When the screwgun is switched off
Motor brake: Activated by the control switch
Noise level: The typical A-rated noise level of the
Vibration: Typical hand-arm vibration exposure is
One-hour charger: see SBC12 H operating instructions
Battery: see SBP12 operating instructions
Right of technical changes reserved!
2nd speed: 0–1150 r.p.m.
operation while the motor is running
screwgun is less than 70 dB (A)
less than 2.5 m/s
2
Initial operation
● Charge the SBP12 battery before beginning work. For best results, a new battery
should be left in the charger for approx. 24 hours for the initial charge. This allows
the battery cells to become balanced.
● For optimum performance, it is recommended that the screwgun and battery are
at room temperature before work begins. Keep the screwgun and battery warm
when working at low temperatures.
Environmental protection / recycling
The SBP 12 battery contains 10 nickel-cadmium cells. You share reponsibility for protecting the environment by ensuring that used batteries are returned for recycling.
Important: Exhausted SBP12 nickel-cadmium batteries should not
be disposed of with household waste and should not be thrown
into a fire or into water.
Return the exhausted batteries to your local Hilti centre so that they can
be disposed of correctly.
10
Page 4

Operating functions
➀ Switch with electronic speed control
Screwdriving speed can be adjusted
smoothly up to maximum r.p.m. by slowly pressing the control switch.
➁ Reversing switch
The reversing switch is used to reverse the
direction of rotation of the chuck. A locking device prevents operation of the switch
while the motor is running. The control
switch ➀ is deactivated when the revers-
ing switch is in the central position.
➂ 2-speed switch
The speed range can be selected by adjusting the 2-speed switch.(1st speed:
0–320 r.p.m. or 2nd speed: 0–1150 r.p.m.)
This switch should be operated only when
rotation has stopped.
➃ Torque clutch adjustment ring
The release torque (1 Nm to 10 Nm) is adjusted by rotating the adjustment ring to
the desired torque setting (positions 1-
10). The torque clutch is deactivated when
the ring is set to the drill bit symbol. With
the ring set to this position, the screwgun
provides a max. torque of approx. 20 Nm
(blocking torque).
➄ Motor brake
The motor brake reduces the time taken
for the chuck to stop rotating. This permits, for example, screws to be driven to
an even depth for optimum appearance.
➅ Battery release button (2-finger
operation)
To remove ther battery, press the battery
release buttons and pull the SB 12 battery out of the screwgun.
➆ Quick-release chuck (1.5–13 mm)
The insert tool can be inserted or removed
without the use of a chuck key. A locking
device prevents rotation of the motor spindle when the control switch is in the OFF
position. This feature is of assistance when
tightening or opening the chuck.
Care and maintenance
The gearing section has been filled with
sufficient grease during assembly. The
screwgun thus requires no maintenance.
If used heavily over a long period of time,
it is recommended that the screwgun is
returned to Hilti for inspection.This can extend the life of the screwgun and avoid unnecessary repair costs. The air intake/exit slots should be kept clean. If an excessive amount of dust collects, clean the
screwgun by blowing out dust with a jet
of compessed air.
Electric tools must comply with the applicable safety regulations. Servicing may
only be carried out by a recognised electrical specialist. Optimum safety can be
ensured by using only original Hilti spare
parts.
Warranty
Hilti warrants that the tool supplied is free
of defects in material and workmanship.
This warranty is valid as long as the tool
is operated and handled correctly,
cleaned and serviced properly and in
accordance with the Hilti Operating
Instructions, all warranty claims are
made within 12 months from the date of
the sale (invoice date), and the technical
system is maintained. This means that
only original Hilti consumables, components and spare parts may be used in
the tool.
This warranty provides the free-of-charge
repair or replacement of defective parts
only. Parts requiring repair or replacement as a result of normal wear and tear
are not covered by this warranty.
Additional claims are excluded, unless
stringent national rules prohibit such
exclusion. In particular, Hilti is not obligated for direct, indirect, incidental or
consequential damages, losses or
expenses in connection with, or by
reason of, the use of, or inability to use
the tool for any purpose. Implied war-
ranties of merchantability or fitness
for a particular purpose are specifically excluded.
For repair or replacement, send the tool
and/or related parts immediately upon
discovery of the defect to the address of
the local Hilti marketing organization provided.
This constitutes Hilti’s entire obligation
with regard to warranty and supersedes
all prior or contemporaneous comments
and oral or written agreements concerning warranties.
Applications
Type of screw / application Size Speed
Wood screw / chipboard screw in pine / up to 4 mm dia. 2nd seed
chipboard 4–8 mm dia. 1st speed
Machine screw up to M8 dia. 1st/2nd speed
Screw in plastic anchor
Screw 8 mm dia. 1st speed
Plastic anchor 10 mm dia.
Drill bit type / application Size Speed
Twist drill in softwood / chipboard 12 mm dia. 2nd speed
Twist drill in hardwood 8–12 mm dia. 2nd speed
Auger bit in softwood / chipboard 20 mm dia. 2nd speed
Auger bit in hardwood 15 mm dia. 2nd speed
Paddle bit in softwood / chipboard 25 mm dia. 2nd speed
Paddle bit in hardwood 12 mm dia. 2nd speed
Hole saw in softwood / chipboard 68 mm dia. 1st speed
Twist drill (HSS drill bit) in steel up to 6 mm dia. 2nd speed
pre-drill using 6 mm dia. drill bit 6 - 12 mm dia. 1st speed
Masonry drill bit up to 6 mm dia. 1st speed
Special insert tools / applications Size Speed
Thread cutting in metal up to M8 1st speed
Deburring holes in metal using countersink bit 1st speed
Wire brush, grinding point, sanding /
grinding paper 1st speed
11
Page 5

SBC12 H one-hour charger
➀➁
➂
➀ Charging indicator
➁ Battery compartment
➂ Wall mount
➃ Supply cord
Safety
Important
● The enclosed list of safety precautions must be observed!
● Do not use this product in any way
other than as directed by these operating instructions.
● The mains supply voltage must correspond to the information printed on the rating plate. 230-volt units can also be connected to 220 and 240-volt mains supplies.
●
This charger should be used only for charging the Hilti SBP12 or SBP 10
The SBC12 H charger and the
batteries.
SBP12 or
SBP10
batteries have been designed for
each other for optimum performance.
● The charger must be able to give off heat
during the charging procedure. The ventilation slots must, therefore, always be kept
free.
Do not operate the charger in a closed container!
● Do not short-circuit the contacts on the
battery charger or battery - this could present a risk of fire or explosion!
● The battery charger should be stored
and operated in a clean, cool and dry place
where it is protected from frost.
➃
Technical data
Mains voltage: 100 / 110 / 115 / 220
Mains frequency: 50 Hz / 60 Hz
Output current: Charging current: 1.7 A
Charging time: Approx. 60 minutes for 1.7 Ah
Weight: 1.7 kg
Supply cord: 2 m
Power input: Approx. 15 W
Electronic control of charging function: By microcontroller
Battery cell temperature monitoring: By diode
Provision for wall mounting
Indicator: Connected to mains supply -
Screwgun - See SB 12 operating instructions.
Battery - See SBP 12 operating instructions.
Operation
●
Connect the charger to the mains sup-
ply. The red LED must blink (long intervals).
● Insert the SBP12 battery into the
battery compartment. The battery must engage securely in the charger.
➀ Red LED charging indicator blinks
(long intervals)
The charging indicator LED blinks at long
intervals when the charger is connected to
the mains supply.
Red LED charging indicator lights continously
The charging indicator LED lights con-
230 / 240 V AC
Trickle charge current: 150 mA
cells
red LED blinks (long intervals)
Charging indicator - red LED
lit continuously.
Battery charged - red LED
blinks (short intervals)
tinuously when the SBP12 battery is being charged.
Red LED charging indicator blinks (short
intervals)
The LED charging indicator blinks at short
intervals when the battery has been
charged. A trickle charging current flows
to the battery during this phase of the
charging cycle. The battery may be left
in the charger for long periods (max. 1
week) without risk.
➁ Battery compartment
The SBP12 battery clicks into position in
the battery compartment ensuring that correct contact is made.
12
Page 6

➂ Wall mount
Provision has been made for mounting the
charger on a wall. The base of the charger
housing is equipped with slots for this
purpose.
Note
If the charging cycle does not begin when
a discharged SBP 12 battery is inserted into the charger, then battery will be either
too cold or too warm. The battery can be
left in the charger and the chargig cycle will
begin automatically when the battery reaches a temperature between 0° C –65° C.
The charger is equipped with an electronic temperature monitoring circuit. The SBP 12
battery will be charged after approx. 50
minutes, under normal conditions. A trickle charge then flows in order to counteract
the tendency to self-discharger.
The SBP12 battery can be left in the
charger for long periods without risk
(max. 1 week)!
Care and maintenance:
● Always disconnect the charger from the
mains supply before beginning cleaning
or maintenance.
● The contacts in the battery compartment
must be kept free of oil and grease. Clean
the contacts, if necessary, using a clean
cloth.
● The ventilation slots should be kept clean.
If an excessive amount of dust collects,
clean the charger by blowing out dust with
a jet of compressed air.
● A damage supply cord should be replaced only by a Hilti service centre.
● Electric tools must comply with the applicable safety regulations. Servicing may
only be carried out by a recognised elec-
trical specialist. Optimum safety can be ensured by using only original Hilti spare parts.
Warranty
Hilti warrants that the tool supplied is free of defects in material and workmanship.
This warranty is valid so long as the tool is operated and handled correctly, cleaned
and serviced properly and in accordance with the Hilti Operating Instructions, all warranty claims are made within 12 months from the date of the sale (invoice
date), and the technical system is maintained. This means that only original Hilti consumables, components and spare parts may be used in the tool.
This warranty provides free-of-charge repair or replacement of defective parts
only. Parts requiring repair or replacement as a result of normal wear and tear are not
covered by this warranty.
Additional claims are exccluded, unless stringent national rules prophibit such
exclusion. In particular, Hilti is not obligated for direct, indirect, incidental or
consequential damages, losses or expenses in connection with, or by reason
of, the use of, or inability to use the tool for any purpose. Implied warranties of
merchantability or fitness for a particular purpose are specifically excluded.
For repair or replacement, send the tool and/or related parts immediately upon discovery
of the defect to the address of the local Hilti marketing organization provided.
This constitutes Hilti’s entire obligation with regard to warranty and supersedes all
prior or contemporaneous comments and oral or written agreements concerning
warranties.
Right of technical modifications reserved!
13
Page 7

SBP12 battery (12 volt)
➁
➀
➀ Release buttons (2)
➁ Contacts
Technical data
Type of cell:
No. of cells: 10
Capacity: 1.7 Ah x 12 volts =
Nominal voltage: 12 V DC
Weight: 0.65 kg
Charging
characteristics:
One-hour charger: See SBC 12 H operating instructions.
Battery screwgun: See SB12 operating instructions.
Nickel-cadmium cells
Sub C design
20.4 Wh
May be charged
using one-hour
charger, rapid
charger or car charger
(cells suitable
for rapid charging)
Safety
Important
● The enclosed list of safety precautions must be observed!
● Do not use this product in any way
other than as directed by these operating instructions.
● Make sure the SBP12 battery is securely attached to the screwgun before beginning work.
● Do not operate the screwgun until the
SBP12 battery is fully discharged. This
may reduce the life of the battery cells.
● High temperatures increase the rate of
battery self-discharge. Direct exposure to
the sun or other sources of heat should be
avoided.
● The SBP12 battery should be used only with the units recommended by Hilti
(SBC 12H, SB 12 M and SB12C chargers, SB 12 screwgun). These units are designed to operate together as a system of
co-ordinated components.
● If necessary, clean the battery contacts
using a clean cloth before inserting the
battery into the charger or screwgun.
● Do not short-circuit the battery or battery charger contacts – this could present
a risk of fire and explosion!
● New batteries, or batteries which
have not been used for some time, only
reach their full capacity after 3–4 charging / discharging cycles.
Initial operation
● Charge the SBP12 battery before beginning work. For best results, a new battery should be left in the charger for approx. 24 hours for the initial charge. This
allows the battery cells to become balanced.
● For optimum performance, it is
recommended that the screwgun and battery are at room temperature before work
begins. Keep the screwgun and battery
warm when working in low temperatures.
● Charging can only begin within the temperature range 0°C – 65°C. If the battery
is too warm, it can be left in the charger
and allowed to cool. The charging cycle
will begin automatically when the battery
has cooled sufficiently. It is not necessary
to remove the battery from the charger.
Environmental protection / recycling
● The SBP 12 battery contains 10 nickel-
Cd
Important: Exhausted nickel-cadmium
batteries should not be disposed of with household waste and
should not be thrown into a fire or water.
Return the exhausted batteries to your local Hilti centre so that they can be disposed
of correctly.
cadmium cells. You share responsibility for protecting the environment
by ensuring that used
batteries are returned for
recycling.
Operating functions
➀ Battery release button
(2-finger operation)
To remove the battery, press the battery
release buttons and pull the SBP 12 battery
out of the screwgun.
a
b
➁ Contacts
Power contacts (a)
Power is supplied to or drawn from the battery through the power contacts.
Caution: These two contacts must not be
short-circuited!
Temperature contact (b)
The temperature contact relays the actual battery cell temperature to the charger
and therefore protects the battery from
overheating.
b
a
Note
● The SBP12 battery can be recharged more than 1000 times!
● The SBP 10 battery will not suffer damage even when left in the charger for long
periods.
Care and maintenance
● The contacts must be kept free of dust,
14
Page 8

oil and grease. If necessary, use a clean cloth
to clean the contacts.
● If battery capacity drops below an acceptable level after it has been used for a
long period, we recommend that the battery be returned to Hilti for testing.
● Electric tools must comply with the applicable safety regulations. Servicing may
only be carried out by a recognised electrical specialist. Optimum safety can be
ensured by using only original Hilti spare
parts.
Warranty
Hilti warrants that the tool supplied is free of defects in material and workmanship.
This warranty is valid so long as the tool is operated and handled correctly, cleaned
and serviced properly and in accordance with the Hilti Operating Instructions, all warranty claims are made within 12 months from the date of the sale (invoice
date), and the technical system is maintained. This means that only original Hilti consumables, components and spare parts may be used in the tool.
This warranty provides free-of-charge repair or replacement of defective parts
only. Parts requiring repair or replacement as a result of normal wear and tear are not
covered by this warranty.
Additional claims are exccluded, unless stringent national rules prophibit such
exclusion. In particular, Hilti is not obligated for direct, indirect, incidental or
consequential damages, losses or expenses in connection with, or by reason
of, the use of, or inability to use the tool for any purpose. Implied warranties of
merchantability or fitness for a particular purpose are specifically excluded.
For repair or replacement, send the tool and/or related parts immediately upon discovery
of the defect to the address of the local Hilti marketing organization provided.
This constitutes Hilti’s entire obligation with regard to warranty and supersedes all
prior or contemporaneous comments and oral or written agreements concerning
warranties.
Right of technical modifications reserved!
15
Page 9

DEUTSCHLAND:
Hilti Deutschland GmbH
Hiltistraße 22, 86916 Kaufering
Ihr direkter Draht zu Hilti:
Bau/ Holz/Metall: 0130/ 18 20 10
SHK/Elektro: 0130/ 18 2020
Industrie/ Behörden: 0130/ 18 20 30
ÖSTERREICH:
Hilti Austria Gesellschaft m. b.H.
Zentrale
1231 Wien
Altmannsdorfer Straße 165
Telefon: 0222/66101
Telefax: 02 22/ 66101 (DW 340)
Telex: 1-32562
BTX* 6123 #
SCHWEIZ:
Hauptverwaltung/Administration:
Hilti (Schweiz) AG
Soodstrasse 61
8134 Adliswil /Zürich
Telefon 01/7121314
Telex: 826708
Telefax 01/ 7121313
GREAT BRITAIN:
Hilti (Gt. Britain) Limited
Hilti House
1 Trafford Wharf Road, Trafford Park
Manchester M171BY
Telephone 0161-8861000
Fax 0161-8488876
Credit Service Line: 0161-8861300
IRELAND:
Hilti (Fastening Systems) Limited
Dublin Office:
Dublin Industrial Estate
Finglas Road, Glasnevin
Dublin 11
Telephone (01) 303422
Telefax (01) 30 3569
FRANCE:
Hilti-France
Siège social:
1, Rue Jean Mermoz
Rond point Mérantais
78778 Magny-les-Hameaux cedex.
Tél.: 30.12.50.00
Télécopie: 30.12.50.12
BELGIE:
Hilti Belgium N.V.
Bettegem 12
B-1731 Asse /Zellik
Tel. 02/4677911
Telefax 02/4665802
ITALIA:
Hilti Italia s.p.a.
Via Console Flaminio 17
20134 Milano MI
Tel. (02) 2640441
Telefax:
Divisione tecnica (02) 26 4132 69
Amministrazione (02) 26 4134 06
Divisione vendite (02) 21 52767
NEDERLAND:
Hilti Nederland B.V.
Postbus 92 – Industrieweg 5
2650 AB Berkel en Rodenrijs
Tel. (010) 5191100 (General)
Tel. (010) 5191111 (Customer service)
Fax (010) 5191198 (General)
Fax (010) 5191199 (Customer service)
PORTUGAL:
Hilti (Portugal) –
Produtos e Serviços, Lda.
Rua dos Fogueteiros, 341
Padrão-da-Légua
Custóias
4450 Matosinhos
ESPAÑA:
Hilti Española, S.A.
Isla de Java, 35
28034 Madrid
Teléfono 358.15.00, Fax 358.04.46
DANMARK:
Hilti Danmark A/S
Lucernemarken 15
3520 Farum
Telefon 42958990
Telefax 42 95 84 90
SUOMI – FINLAND:
Hilti (Suomi) Oy
Kankiraudantie 1, PL 45
00701 Helsinki
Puhelin (09) 478700
Telefax (09) 478 701 00
NORGE:
Motek A.S.
Hovedkontor
Østre Aker vei 61
Postboks 81, Økern
0508 Oslo
Telefon 22644590
Telefax 22 64 00 63
SVERIGE:
Hilti Svenska AB
Box 123
Testvägen 1
23222 Arlöv
Telefon 040/539300
Telefax 040 / 43 51 96
GREECE:
Hilti Hellas AS
th
Klm National Road
16
Athens-Lamia
GR-14564 Nea Kifisia/Athens
Hilti = registered trademark of Hilti Corp., Schaan W 2087 1296 10-Pos. 1 1 Printed in Liechtenstein © 1996
Right of technical and programme changes reserved S. E. & O.
307802/A
 Loading...