

Page 1

HDE 500-A18
Operating instructions en
Mode d’emploi fr
Manual de instrucciones es
Printed: 10.06.2015 | Doc-Nr: PUB / 5142533 / 000 / 02
Page 2
+,7&%
+,7&5+,7&5
POIOR]
POIOR]
POIOR]
POIOR]
POIOR]
POIOR]
ꙭ
ꙮ
ߜ
ߙ
ߓ ߕ
ߖ
ߘ
ߛ
ߗ
ߔ
ߚ
1
Printed: 10.06.2015 | Doc-Nr: PUB / 5142533 / 000 / 02
Page 3
2
3
4
Page 4

5
6
Page 5
7
8
9
Page 6

ORIGINAL OPERATING INSTRUCTIONS
HDE 500-A18 dispenser
It is essential that the operating instructions
are read before the tool is operated for the
first time.
Always keep these operating instructions together with the tool.
Ensure that the operating instructions are
with the tool when it is given to other persons.
Contents Page
1 General information 1
2 Safety instructions 2
3Description 4
4 Technical data 5
5Beforeuse 5
6 Operation 5
7 Care and maintenance 7
8 Troubleshooting 7
9Disposal 8
10 Manufacturer’s warranty 8
1 These numbers refer to the illustrations. You can
find the illustrations at the beginning of the operating
instructions.
In these operating instructions, the designation “the tool”
always refers to the HDE 500-A18 cordless dispenser.
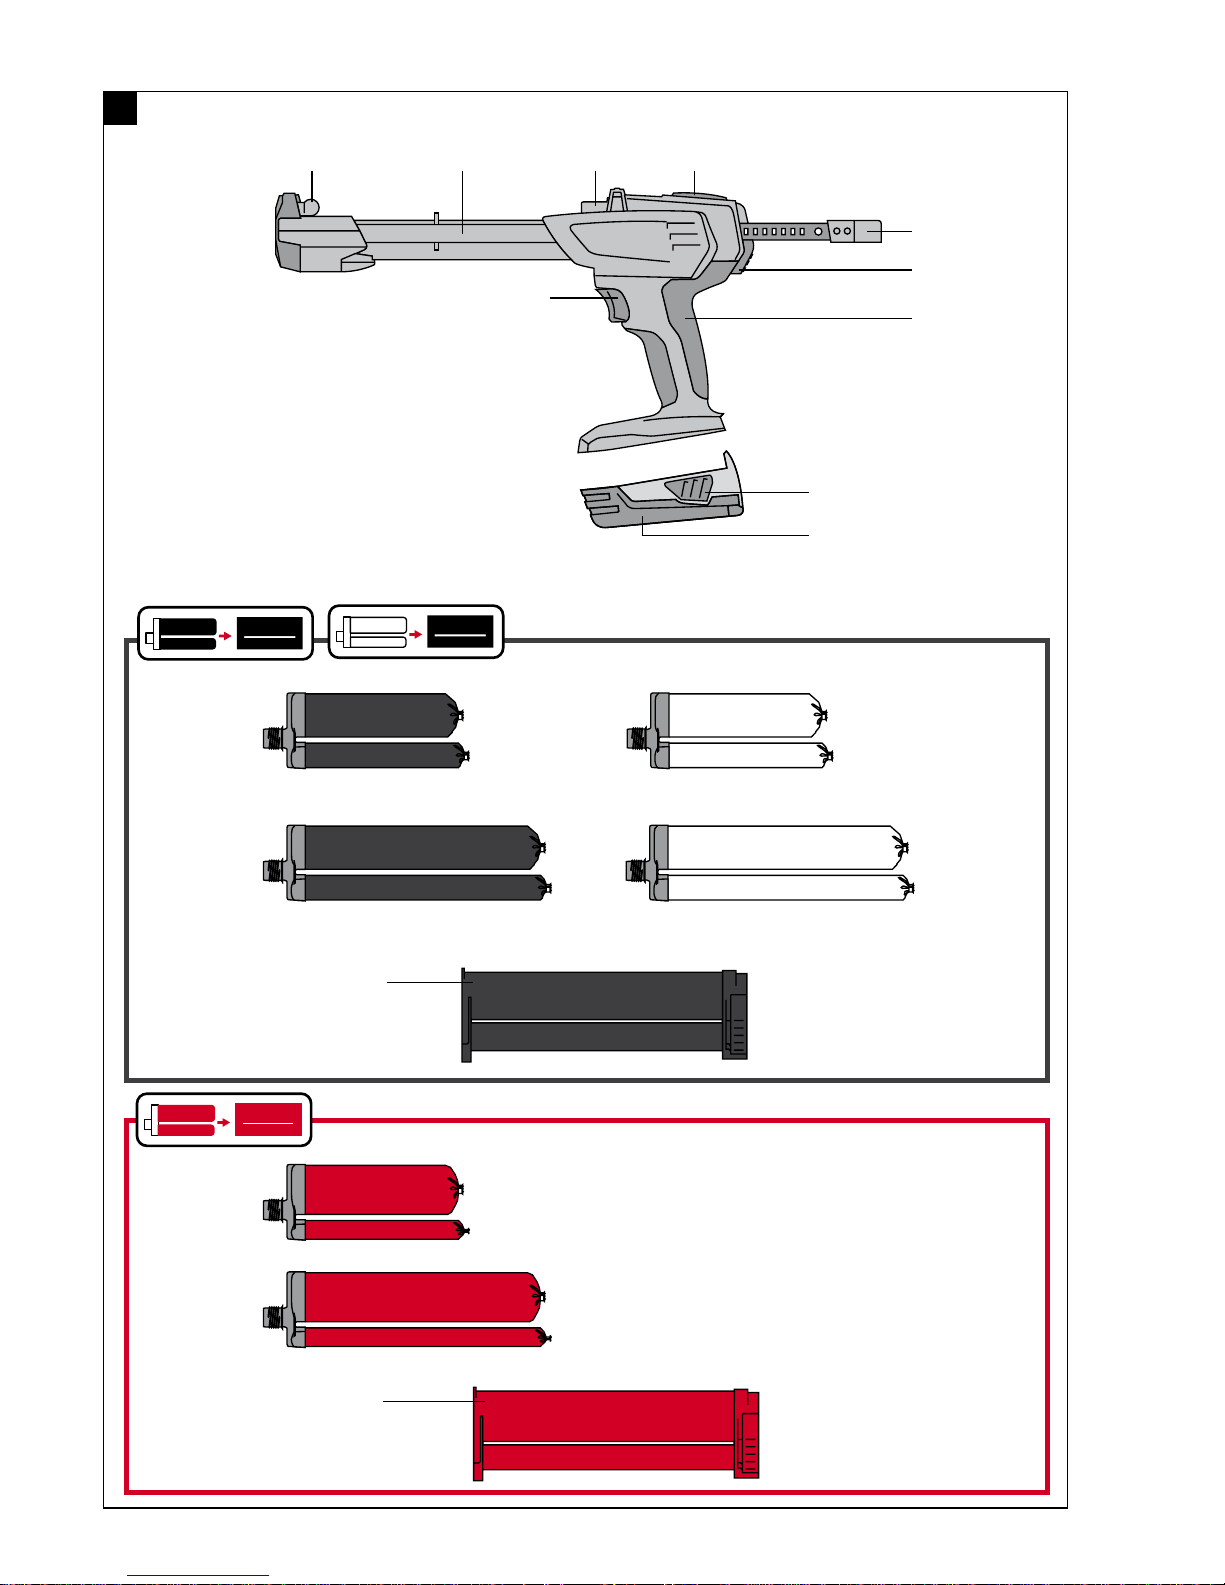
Product overview 1
Cradle for foil pack holder
@
Front locating lug for fitting the foil pack holder
;
Rear locating lug for fitting the foil pack holder
=
Parallel piston rods with grip
%
Release button
&
Grip
(
Trigger
)
Dispensing mode selector switch
+
Battery
§
Battery release buttons (also used to activate the
/
charge status display)
Accessories 1
Black foil pack holder
:
Red foil pack holder
·
en
1 General information
1.1 Safety notices and their meaning
DANGER
Draws attention to imminent danger that will lead to
seriousbodilyinjuryorfatality.
WARNING
Draws attention to a potentially dangerous situation that
could lead to serious personal injury or fatality.
CAUTION
Draws attention to a potentially dangerous situation that
could lead to slight personal injury or damage to the
equipment or other property.
NOTE
Draws attention to an instruction or other useful information.
1.2 Explanation of the pictograms and other
information
Warning signs
General
warning
Obligation signs
Wear eye
protection.
Wear
protective
gloves
Wear
protective
clothing
Read the
operating
instructions
before use.
1
Page 7

en
Symbols
National
waste
material
recycling
system
Measured
dispensing
“Off” position Continuous
2 Safety instructions
Location of identification data on the tool
The type designation and serial number can be found
on the type identification plate on the appliance. Make
a note of this data in your operating instructions and
always refer to it when making an enquiry to your Hilti
representative or service department.
dispensing
Type:
Generation: 01
Serial no.:
The safety rules in section 2.1 contain all general safety
rules for power tools which, in accordance with the
applicable standards, require to be listed in the operating
instructions. Accordingly, some of the rules listed may
not be relevant to this tool.
2.1 General power tool safety warnings
a)
WARNING
Read all safety warnings and instructions. Failure
to follow the warnings and instructions may result
in electric shock, fire and/or serious injury. Save all
warnings and instructions for future reference.
The term “power tool” in the warnings refers to
your mains-operated (corded) power tool or batteryoperated (cordless) power tool.
2.1.1Workareasafety
a) Keep work area clean and well lit. Cluttered or dark
areas invite accidents.
b) Do not operate power tools in explosive atmo-
spheres, such as in the presence of flammable
liquids, gases or dust. Power tools create sparks
which may ignite the dust or fumes.
c) Keep children and bystanders away while operat-
ing a power tool. Distractions can cause you to lose
control.
2.1.2 Electrical safety
a) Power tool plugs must match the outlet. Never
modify the plug in any way. Do not use any adapter
plugs with earthed (grounded) power tools. Un-
modified plugs and matching outlets will reduce risk
of electric shock.
b) Avoid body contact with earthed or grounded
surfaces such as pipes, radiators, ranges and
refrigerators. There is an increased risk of electric
shock if your body is earthed or grounded.
c) Do not expose power tools to rain or wet condi-
tions. Water entering a power tool will increase the
risk of electric shock.
d) Do not abuse the cord. Never use the cord for
carrying, pulling or unplugging the power tool.
Keep cord away from heat, oil, sharp edges or
moving parts. Damaged or entangled cords increase
the risk of electric shock.
e) When operating a power tool outdoors, use an
extension cord suitable for outdoor use. Use of
a cord suitable for outdoor use reduces the risk of
electric shock.
f) If operating a power tool in a damp location is
unavoidable, use a residual current device (RCD)
protected supply. Use of an RCD reduces the risk
of electric shock.
2.1.3 Personal safety
a) Stay alert, watch what you are doing and use
common sense when operating a power tool. Do
not use a power tool while you are tired or under
the influence of drugs, alcohol or medication. A
moment of inattention while operating power tools
may result in serious personal injury.
b) Use personal protective equipment. Always wear
eye protection. Protective equipment such as dust
mask, non-skid safety shoes, hard hat, or hearing
protection used for appropriate conditions will reduce
personal injuries.
c) Prevent unintentional starting. Ensure the switch
is in the off‐position before connecting to power
source and/or battery pack, picking up or carrying
the tool. Carrying power tools with your finger on the
switch or energising power tools that have the switch
on invites accidents.
d) Remove any adjusting key or wrench before turn-
ing the power tool on. A wrench or a key left at-
2
Page 8

tached to a rotating part of the power tool may result
in personal injury.
e) Do not overreach. Keep proper footing and bal-
ance at all times. This enables better control of the
power tool in unexpected situations.
f) Dress properly. Do not wear loose clothing or
jewellery. Keep your hair, clothing and gloves
away from moving parts. Loose clothes, jewellery
or long hair can be caught in moving parts.
g) If devices are provided for the connection of dust
extraction and collection facilities, ensure these
are connected and properly used. Use of dust
collection can reduce dust-related hazards.
another. Shorting the battery terminals together may
cause burns or a fire.
d) Under abusive conditions, liquid may be ejected
from the battery, avoid contact. If contact accidentally occurs, flush with water. If liquid contacts
eyes, additionally seek medicalhelp. Liquid ejected
from the battery may cause irritation or burns.
2.1.6 Service
a) Have your power toolserviced by a qualified repair
person using only identical replacement parts.
This will ensure that the safety of the power tool is
maintained.
en
2.1.4 Power tool use and care
a) Do not force the power tool. Use the correct
power tool for your application. The correct power
tool will do the job better and safer at the rate for
which it was designed.
b) Do not use the power tool if the switch does not
turn it on and off. Any power tool that cannot be
controlled with the switch is dangerous and must be
repaired.
c) Disconnect the plug from the power source
and/or the battery pack from the power tool
before making any adjustments, changing
accessories, or storing power tools. Such
preventive safety measures reduce the risk of
starting the power tool accidentally.
d) Store idle power tools out of the reach of chil-
dren and do not allow persons unfamiliar with the
power tool or these instructions to operate the
power tool. Power tools are dangerous in the hands
of untrained users.
e) Maintain power tools. Check for misalignment or
binding of moving parts, breakage of parts and
any other condition that may affect the power
tool’s operation. If damaged, have the power tool
repaired before use. Many accidents are caused by
poorly maintained power tools.
f) Keep cutting tools sharp and clean. Properly main-
tained cutting tools with sharp cutting edges are less
likely to bind and are easier to control.
g) Use the power tool, accessories and tool bits etc.
in accordance with these instructions, taking into
account the working conditions and the work to
be performed. Use of the power tool for opera-
tions different from those intended could result in a
hazardous situation.
2.1.5 Battery tool use and care
a) Recharge only with the charger specified by the
manufacturer. A charger that is suitable for one type
of battery pack may create a risk of fire when used
with another battery pack.
b) Use power tools only with specifically designated
battery packs. Use of any other battery packs may
create a risk of injury and fire.
c) When battery pack is not in use, keep it away
from other metal objects, like paper clips, coins,
keys, nails, screws or other small metal objects,
that can make a connection from one terminal to
2.2 Additional safety rules
2.2.1 Power tool use and care
a) Modification of the machine or tampering with its
parts is not permissible.
b) Never point the tool toward yourself or other per-
sons.
c) The tool may be operated only when in faultless
condition.
d) Use only foil pack holders of a type approved for
use with the tool.
e) Do not use damaged foil pack holders or damaged
foil packs.
f) The tool, the cradle for the foil pack holders,
the piston rods with pressure pieces and the foil
pack holders must be clean and free from foreign
matter.
2.2.2 Battery tool use and care
a) Ensure the switch is in the off position before
inserting battery pack. Inserting the battery pack
into power tools that have the switch on invites
accidents.
b) Do not expose batteries to high temperatures and
keep them away from fire. This presents a risk of
explosion.
c) Do not disassemble, squash or incinerate batter-
ies and do not subject them to temperatures over
80°C (176°F). This presents a risk of fire, explosion
or injury through contact with caustic substances.
d) Observe the special guidelines applicable to the
transport, storage and use of Li-ion batteries.
e) Do not charge or continue to use damaged bat-
teries (e.g. batteries with cracks, broken parts,
bent or pushed-in and/or pulled-out contacts).
f) If the battery is too hot to touch it may be defective.
Place the tool in a location where it can be kept
under observation, well away from flammable materials, and allow it to cool down. Contact Hilti
Service after the battery has cooled down.
2.2.3 Work area safety
a) Ensure that the workplace is well ventilated.
b) The appliance is not intended for use by debili-
tated persons who have received no special training. Keep the appliance out of reach of children.
3
Page 9

c) This appliance is not intended for use by per-
sons (including children) with reduced physical,
sensory or mental capabilities, or lack of experience and knowledge, unless they have been given
supervision or instruction concerning use of the
appliance by a person responsible for their safety.
en
2.2.4 Personal protective equipment
a) Wear personal protective equipment while the
tool is in use: closely fitting protective glasses
or face shield, protective gloves and protective
clothing. Wearing personal protective equipment re-
duces the risk of injury.
b) Persons in the immediate vicinity must also wear
personal protective equipment while the tool is in
use.
3 Description
3.1 Use of the product as directed
Proper use can be ensured only when the instructions for use of the foil pack are also read and observed.
The tool is designed to dispense the contents of Hilti foil packs in a controlled operation. The HDE 500‑A18 cordless
dispenser is designed to be used exclusively to dispense the contents of Hilti 330 ml (11.1 fl.oz.) or 500 ml (16.9 fl.oz.)
foil packs . Use of third-party products with the tool is not permissible.
Depending on the type of foil pack, the tool can be used with either a black or a red foil pack holder (see fig. 1).
Black foil pack holder: Used to dispense Hilti mortars supplied in black or white foil packs.
Red foil pack holder: Used to dispense Hilti mortars supplied in red foil packs.
The appliance is designed for professionaluseandmaybeoperated,serviced and maintained only by trained,
authorized personnel. This personnel must be informed of any special hazards that may be encountered. The
appliance and its ancillary equipment may present hazards when used incorrectly by untrained personnel or when
used not as directed.
Do not use the battery as a power source for other unspecified appliances.
To avoid the risk of injury, use only genuine Hilti tools and accessories.
Observe the national health and safety requirements.
3.2 Items supplied
1 The appliance
1 Operating instructions
1 Foil pack holder, black (optional)
1 Foil pack holder, red (optional)
3.3 Additional items required for operating the tool
A suitable battery of the specified type (see table in the Technical Data section) and a suitable battery charger from
the C 4⁄36 series.
3.4 Charge state and overheating indicator display on the Li-ion battery
The Li-ion battery features a charge status display. The charge status is indicated by the LEDs on the battery during
charging (please refer to the operating instructions for the charger). When the battery is not in use, pressing one of the
battery release buttons or inserting the battery into the power tool causes the battery charge status to be displayed
by the four LEDs for three seconds.
LEDs light constantly LEDs blink
LED1,2,3,4
LED1,2,3
LED 1, 2
LED 1
-
-
-
-
-
-
LED 1
LED 1 The battery has overheated
Charge status C
C≧75%
50 % ≦ C < 75 %
25 % ≦ C < 50 %
10 % ≦ C < 25 %
C<10%
4
Page 10

NOTE
During and immediately after work (approx. 3 seconds), it is not possible tocheckthechargestatus.Ifthebattery
charge status LEDs blink, please refer to the information given in the Troubleshooting section.
4 Technical data
Right of technical changes reserved.
Power tool
Weight in accordance with EPTA procedure 01/2003 2.62 kg (5.78 lb)
Rated voltage (DC voltage) 21.6 V
Dispensing mode selector switch Modes available: off, continuous dispensing, measured
volume dispensing with settings 1 to 15
Battery B 18/1.6 Li‑Ion B 18/2.6 Li‑Ion (02) B 18/3.3 Li‑Ion B 18/5.2 Li‑Ion (01)
Rated voltage 21.6 V 21.6 V 21.6 V 21.6 V
Capacity 1.6 Ah 2.6 Ah 3.3 Ah 5.2 Ah
Weight 0.48 kg (1.06 lb) 0.48 kg (1.06 lb) 0.78 kg (1.72 lb) 0.78 kg (1.72 lb)
5Beforeuse
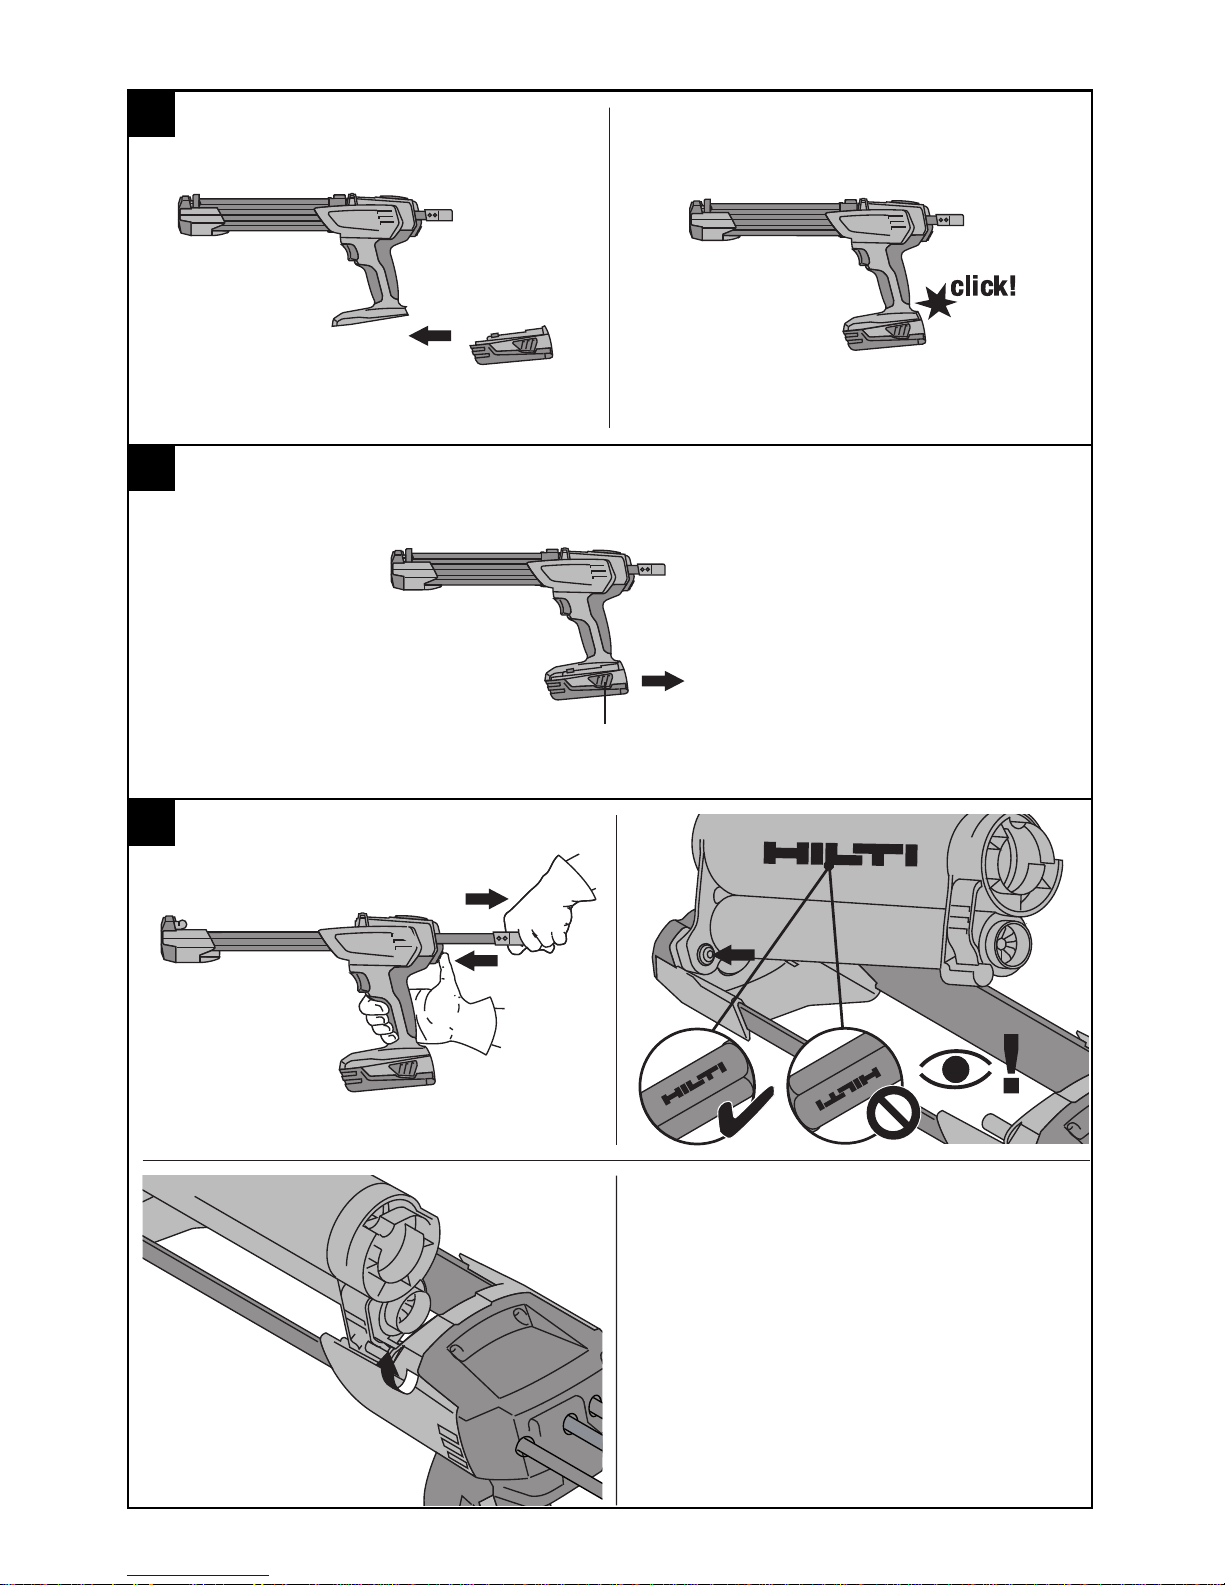
5.1 Inserting the battery 2
CAUTION
Before inserting the battery, check that the dispenser
output regulator switch is in the “off” position.
1. CAUTION A falling battery may present a risk of
injury to yourself and others.
Check that the battery is securely seated in the tool.
5.2 Removing the battery 3
5.3 Transport and storage of batteries
CAUTION
Fire hazard. Never transport batteries in loose, bulk form.
There is a risk of short circuiting.
Pull the battery out of the locked position (working position) and move it into the first latching position (transport
position).
Observe national and international transport regulations
when shipping batteries (transportation by road, rail, sea
or air).
en
6Operation
6.1 Further instructions for use
CAUTION
Risk of pinching your fingers! Keep your hands clear
of the cradle area when pivoting the foil pack holder
into position.
WARNING
Observe the information on the safety data sheets, on
the packaging and in the instructions for use before
using the product.
WARNING
Always set the dispensing mode selector switch to
the “0” (off) position before transporting or storing
the tool. This will prevent inadvertent battery discharge
or mortar ejection.
The tool begins to operate if the trigger is pressed while
the dispensing mode selector switch is in the “dispensing” position. To prevent inadvertent operation causing
battery drain or mortar being dispensed, the dispensing
mode selector switch must be left in the “off” position
during transport or storage.
Use of genuine Hilti parts ensures maximum safety. The
dispenser, the foil pack holder and the foil packs are
perfectly matched to each other.
The tool will achieve high performance, high battery
capacity and long life if handled carefully and maintained
correctly.
IMPORTANT! The motor cut-out will be activated if the
tool is overloaded. The tool relieves pressure automatically and is subsequently ready for further operation.
5
Page 11

6.2 Dispensing mode selector switch positions
NOTE
Thevolumetobedispensedcannotbeadjustedwhile
the trigger is pressed.
en
6.2.1 “0” (off) position
The tool is switched off.
No mortar can be dispensed.
6.5 Discarding the initial quantity of mortar
dispensed
CAUTION
The initial quantity of mortar dispensed is not suitable
for use. The quantity to be discarded is product specific and is indicated in the applicable instructions for
use. The initial quantity must also be discarded after
changing a mixing nozzle.
6.2.2 Volume settings 1 to 15
NOTE
The volume settings required may vary according to foil
pack type and temperature. The values given here are to
be used as a guide.
1. Select the required volume.
1 = 1 stroke (approx. 5 ml (0.17 fl.oz.))
15 = 15 strokes (approx. 75°ml (2.55 fl.oz.))
2. Press the trigger and maintain pressure on it until
the tool stops automatically after ejection of the
selected volume.
6.2.3 Switch position for sustained operation
1. Press the trigger to begin dispensing and control
the flow rate.
Increase pressure on the trigger to increase the flow
rate and reduce pressure to reduce the flow rate.
2. Release the trigger when you wish to interrupt or
stop the dispensing operation.
Pressure on the foil pack is released automatically
so no further mortar escapes from the mixing nozzle.
6.3 Selecting and inserting the foil pack
holder 14
CAUTION
Check the foil pack holder for damage and/or soiling.
Both pistons must move smoothly and easily in both
directions over the full length of their travel in the foil
pack holder. Damaged and/or badly soiled foil pack
holders must be replaced.
Select the correct foil pack holder according to the color
of the foil pack.
Black foil pack holder: BLACK or WHITE foil pack
Red foil pack holder: RED foil pack
WARNING
Begin dispensing mortar only after the mixing nozzle
has been screwed on.
1. Set the mode selector switch to “continuous operation”.
2. Press the trigger until the mixing nozzle is completely
full.
3. Set the dispensing selector switch to the mortar
volume to be discarded (number of strokes) in accordance with the instructions for use of the mortar.
4. Discard this initial quantity of mortar dispensed.
5. The tool is then ready to dispense ready-to-use
mortar.
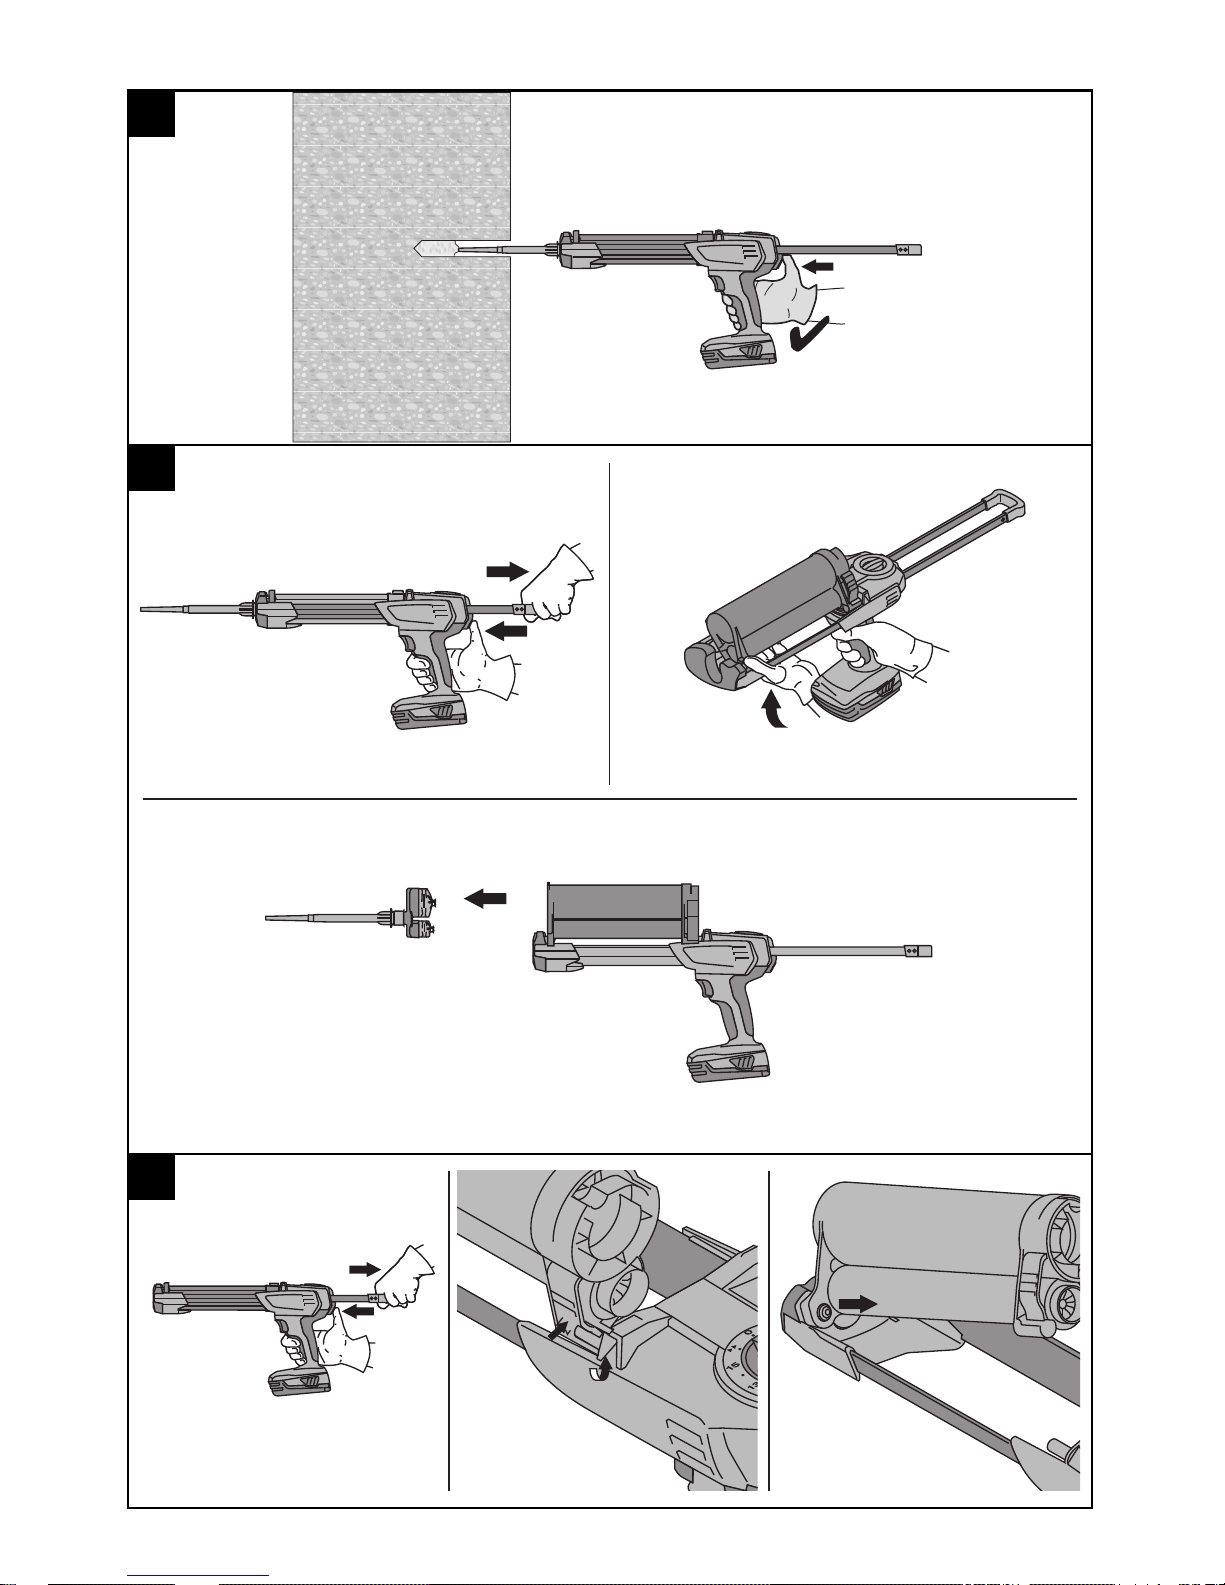
6.6 Injecting mortar 67
WARNING
Begin dispensing mortar only after the mixing nozzle
has been screwed on.
CAUTION
The tool / foil pack must not be under pressure when
the mixing nozzle is changed.
NOTE
Please refer to the instructions for use of the foil pack for
further information about use of the mortar.
1. Pull the trigger fully toward the grip several times.
2. Press the release button after finishing dispensing
or if the operation is interrupted.
3. Pressing the release button prevents further ejection
or leakage of mortar.
6.7 Removing the foil pack 8
NOTE
All 4 LEDs on the battery blink briefly to indicate when a
foil pack is completely empty.
6.4 Inserting the foil pack in the foil pack holder 5
NOTE
Follow the instructions for use of the foil pack.
6
6.8 Removing the foil pack holder from the tool 9
6.9 Transport and storage
1. Set the dispensing mode selector switch to the “off”
position before transporting or storing the tool.
2. Remove the battery before transporting or storing
the tool.
Page 12

7 Care and maintenance
WARNING
Repairs to the electrical section of the appliance may
be carried out only by trained electrical specialists.
7.1 Care of the tool
CAUTION
Keep the appliance, especially its grip surfaces, clean
and free from oil and grease. Do not use cleaning
agents which contain silicone.
Do not permit foreign objects to enter the interior of the
tool. Clean the outside of the tool at regular intervals with
a slightly damp cloth. Do not use a spray, steam pressure
cleaning equipment or running water for cleaning. This
may negatively affect the electrical safety of the tool.
Use a cloth to remove any mortar adhering to the tool and
foil pack holder as soon as possible, before it hardens.
Hardened mortar can be removed only by mechanical
means. Take care to ensure that the tool is not damaged
by cleaning. Never dip or soak the tool or its parts in
solvents.
Lubricate the piston rods with oil when necessary. Check
that the pistons move freely in the foil pack holder.
7.2 Care of the Li‑ion battery
NOTE
Battery performance drops at low temperatures.
NOTE
Store the battery in a cool and dry place.
In order to achieve maximum battery life, stop using the
battery as soon as a significant drop in battery performance is noticed.
NOTE
- If use continues, further battery discharge will be
stopped automatically before the battery cells suffer
damage.
- Charge the batteries using the specified and approved
Hilti battery chargers for Li‑ion batteries.
8 Troubleshooting
If a fault is not listed or if the recommended measures fail to remedy the fault, please contact Hilti Service.
en
Fault Possible cause Remedy
The tool doesn’t work.
The tool doesn’t work and all 4
LEDs blink.
The power tool doesn’t work
and 1 LED blinks.
The battery runs down more
quickly than usual.
The battery doesn’t engage with
an audible click.
Thetoolorthebatterygetsvery
hot.
The battery is discharged or is not
pushed all the way in.
The dispensing mode selector switch
is set to “0”.
The overload cut-out is activated; The
mortar in the mixing nozzle has hardened.
The overload cut-out is activated; The
dispensing pressure required is too
high for the tool.
The foil pack is empty. Change the empty foil pack.
The battery is discharged. Change the battery and charge the
The battery is too hot or too cold. Bring the battery to room tempera-
Battery condition is not optimal. Have battery condition diagnosed by
The retaining lugs on the battery are
dirty.
Electrical fault. Switch the tool off immediately, re-
The battery must be heard to engage
with a click or, respectively, needs to
be charged.
Select the desired dispensing mode.
Change the mixing nozzle.
Raise the temperature of the foil pack
(observe the instructions for use of
the foil pack). Select and use a suitable tool for the application.
empty battery.
ture.
Hilti Service or replace with a new
battery.
Clean the retaining lugs and push the
battery in until it engages. Contact
Hilti Service if the problem persists.
move the battery and contact Hilti
Service.
7
Page 13

Fault Possible cause Remedy
en
Thetoolorthebatterygetsvery
hot.
The foil pack cannot be tilted
and pushed down into the tool.
The foil pack holder doesn’t engage with an audible click.
No mortar flows out of the mixing nozzle.
The power tool has been overloaded
(application limits exceeded).
The foil pack is not pushed fully into
the holder.
The piston rods are not pulled back
fully.
The retaining catches are dirty /
clogged.
The retaining lugs are defective. Fit another foil pack holder.
The mortar in the mixing nozzle has
hardened.
Use the right power tool for the job
(don’t use a low-powered tool for
heavy work).
Push the foil pack into the holder as
far as it will go.
Press the release button and pull the
piston rods back as far as they will
go.
Clean the retaining catches and engage the foil pack holder fully.
Contact Hilti Service if the problem
persists.
Unscrew the hardened mixing nozzle.
Screw on a new mixing nozzle.
9 Disposal
CAUTION
Improper disposal of the equipment may have serious consequences: The burning of plastic components generates
toxic fumes which may present a health hazard. Batteries may explode if damaged or exposed to very high
temperatures, causing poisoning, burns, acid burns or environmental pollution. Careless disposal may permit
unauthorized and improper use of the equipment. This may result in serious personal injury, injury to third parties and
pollution of the environment.
CAUTION
Dispose of defective batteries right away. Keep them out of reach of children. Do not disassemble or incinerate the
batteries.
CAUTION
Batteries that have reached the end of their life must be disposed of in accordance with national regulations or returned
to Hilti.
Most of the materials from which Hilti tools or appliances are manufactured can be recycled. The materials must
be correctly separated before they can be recycled. In many countries, Hilti has already made arrangements for
taking back old tools and appliances for recycling. Ask Hilti customer service or your Hilti representative for further
information.
10 Manufacturer’s warranty
Please contact your local Hilti representative if you have
questions about the warranty conditions.
8
Page 14

*2017693*
2017693
Hilti Corporation
LI-9494 Schaan
Tel.: +423/234 21 11
Fax: +423/234 29 65
www.hilti.com
Hilti = registered trademark of Hilti Corp., Schaan
Pos. 3 | 20150515
Printed: 10.06.2015 | Doc-Nr: PUB / 5142533 / 000 / 02
 Loading...