

Page 1

GX 90-WF
Bedienungsanleitung de
Operating instructions en
Mode d’emploi fr
Istruzioni d’uso it
Manual de instrucciones es
Manual de instruções pt
Gebruiksaanwijzing nl
Brugsanvisning da
Bruksanvisning sv
Bruksanvisning no
Käyttöohje
Οδηγιεςχρησεως el
KulllanmaTalimatı tr
Lietošanas pamācība lv
Instrukcija lt
Kasutusjuhend et
Printed: 07.05.2015 | Doc-Nr: PUB / 5069885 / 000 / 04
Page 2
1
꼊꼉 꼅 꼃꼂꼂
꼂
껻
껽
꼆
꼀
꼄
껾
Printed: 07.05.2015 | Doc-Nr: PUB / 5069885 / 000 / 04
꼇
껿
껼
꼈
꼁
Page 3
23
[
4
5
6
7
Page 4
8
9
10
Page 5
11
Page 6
12
Page 7

ORIGINAL OPERATING INSTRUCTIONS
GX 90-WF gas-driven fastening tool
It is essential that the operating instructions
are read before the tool is operated for the
en
first time.
Always keep these operating instructions together with the tool.
Ensure that the operating instructions are
with the tool when it is given to other persons.
Contents Page
1 General information 12
2 Safety instructions 13
3Description 14
4 Technical data 15
5Beforeuse 16
6 Guidelines 17
7 Operation 17
8 Unloading the tool 18
9 Care and maintenance 18
10 Troubleshooting 19
11 Disposal 21
12 Manufacturer’s warranty - tools 21
13 EC declaration of conformity (original) 21
1 General information
1.1 Safety notices and their meaning
DANGER
Draws attention to imminent danger that will lead to
seriousbodilyinjuryorfatality.
WARNING
Draws attention to a potentially dangerous situation that
could lead to serious personal injury or fatality.
CAUTION
Draws attention to a potentially dangerous situation that
could lead to slight personal injury or damage to the
equipment or other property.
NOTE
Draws attention to an instruction or other useful information.
1 These numbers refer to the illustrations. You can
find the illustrations at the beginning of the operating
instructions.
In these operating instructions, "the tool" always refers
to the GX 90-WF gas-driven fastening tool.
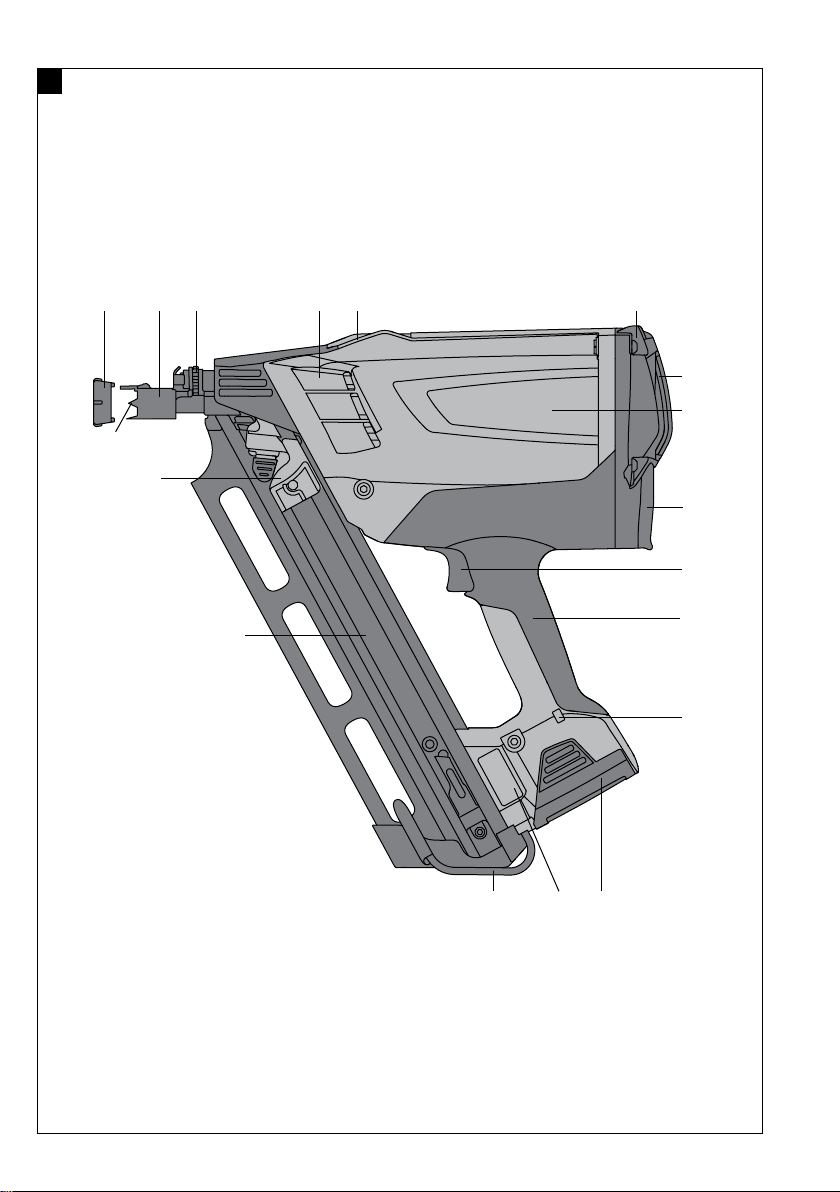
Tool parts, operating controls and indicators 1
Tool body
@
Grip
;
Nosepiece
=
Magazine
%
Type identification plate
&
Gas can compartment
(
Battery
)
Ventilation slots
+
Casing cover
§
Trigger
/
Adjusting wheel
:
Nail pusher
·
Belt hook
$
LED
£
Adapter for surface protection
|
Sliding sleeve
¡
1.2 Explanation of the pictograms and other
information
Warning signs
General
warning
Obligation signs
Read the
operating
instructions
before use.
12
Page 8

Location of identification data on the tool
The type designation and serial number can be found on
the type identification plate on the tool. Make a note of
this data in your operating instructions and always refer
to it when making an enquiry to your Hilti representative
or service department.
2 Safety instructions
2.1 Basic information concerning safety
In addition to the information relevant to safety given
in each of the sections of these operating instructions,
the following points must be strictly observed at all
times.
2.1.1 Requirements to be met by users
a) The tool is intended for professional use.
b) The appliance may be operated, serviced and re-
paired only by authorized, trained personnel. This
personnel must be informed of any special hazards
that may be encountered.
2.1.2 Personal safety
a) Stay alert, watch what you are doing and use
common sense when operating a direct fastening
tool. Don’t use the tool when you are tired or under
the influence of drugs, alcohol or medication. Stop
using the tool if you experience pain or do not feel
well. A moment of inattention while operating the
tool may result in serious personal injury.
b) Avoid unfavorable body positions. Make sure you
work from a safe stance and stay in balance at all
times.
c) Wear non-skid shoes.
d) Never point the tool toward yourself or other per-
sons.
e) Never press the nosepiece of the tool against your
hand or against any other part of your body (or
other person’s hand or part of their body).
f) Do not place your free hand directly behind the
material being fastened.
g) Keep other persons, especially children, away
from the area in which the work is being carried
out.
h) Keep the arms slightly bent while operating the
tool (do not straighten the arms).
i) Both the user and any other persons in the vicin-
ity must wear suitable personal protective equipment including adequate eye protection, ear protectors and a hard hat.
2.1.3 Fastening tool use and care
a) Use the right tool for the job. Do not use the tool
for purposes for which it was not intended. Use it
only as directed and when in faultless condition.
b) Never leave a loaded tool unattended.
c) Remove the gas can from the tool before trans-
porting the tool.
Type:
Generation: 01
Serial no.:
en
d) Always unload the tool (remove the battery, gas
can and nails) before cleaning, servicing, and
repair work, before a break in your work, and for
storing the tool.
e) Store unused gas cans and tools that are not
currently being used in a dry place where they are
not exposed to moisture and high temperatures.
f) Check the tool or machine and its accessories for
damage and ensure that they function faultlessly
and as intended. Check that moving parts function correctly without sticking and that no parts
are damaged. All parts must be fitted correctly
and fulfill all conditions necessary for correct operation of the tool. Damaged guards and parts
that are not integral elements of the service pack
that is available as an accessory (see "Care of
the tool") must be professionally repaired or replaced by the Hilti Service Team unless otherwise
specified in the operating instructions.
g) Always hold the tool firmly when making a fasten-
ing. This will reduce the possibility of the fastener
being deflected by the material into which it is
driven.
h) Never attempt to re-drive a fastener. Never drive
a fastener on top of another previously-driven
fastener. This may lead to fastener breakage and
jamming.
i) Always observe the application guidelines. For
more information, consult the Hilti Fastening
Technology Manual.
j) Donotpullthenosepiecebackwithyourhand
or with another object. This can prime the tool in
certain circumstances. When the tool is ready to fire,
fasteners could be driven inadvertently into parts of
the body.
2.1.4 Work area safety
a) Ensure that the workplace is well lit.
b) Operate the tool only in well-ventilated working
areas.
c) Drive fasteners only into wood and other suitable
wood materials (see “Use of the product as directed”): Driving a fastener into other materials may
cause the fastener to break, shatter or to be driven
right through.
d) Before driving fasteners, check that no one is
present immediately behind or below the working
surface.
e) Keep the workplace tidy. Objects which could
cause injury should be removed from the work-
13
Page 9

ing area. Untidiness at the workplace can lead to
accidents.
f) Keep the grips dry, clean and free from oil and
grease.
g) Take the influences of the surrounding area into
account. Do not expose the tool to rain or snow
and do not use it in damp or wet conditions. Do
notusethetoolwherethereisariskoffireor
en
explosion.
h) Concealed electric cables or gas and water pipes
present a serious hazard if damaged while you
are working. Accordingly, check the area in which
you are working beforehand (e.g. using a metal
detector). External metal parts of the tool or machine
may become live, for example, when an electric cable
is damaged accidentally.
i) Only hold the tool by its insulated gripping sur-
faces if carrying out work where the insert tool
may come into contact with concealed wiring.
Cutting accessory contacting a “live” wire may make
exposed metal parts of the power tool “live” and
shock the operator.
2.1.5 Thermal hazards
a) If the tool overheats, remove the gas can and
allow the tool to cool down. Do not exceed the
recommended fastener driving rate.
b) Always wear gloves if the tool has to be dis-
mantled for cleaning or maintenance before it
has been allowed to cool down.
2.1.6 Careful handling and use of gas cans
Read the safety data sheet for the gas can for information about use, care and maintenance and first-aid
measures.
2.1.7 Careful handling and use of batteries
a) Use only batteries of the type approved by the
manufacturer for use with the applicable tool. Use
of other batteries or use of the batteries for purposes
for which they are not intended presents a risk of fire
and explosion.
b) Recharge only with the charger specified by the
manufacturer. A charger that is suitable for a certain
type of battery may present a risk of fire when used
with other types of battery.
c) Under abusive conditions, liquid may be ejected
from the battery, Avoid contact. If contact accidentally occurs, flush with water. If liquid contacts
eyes, additionally seek medical help. Liquid ejec-
ted from the battery may cause irritation or burns.
d) Observe the special guidelines applicable to the
transport, storage and use of Li-ion batteries.
e) Do not disassemble, squash or incinerate batter-
ies and do not subject them to temperatures over
80°C. This presents a risk of fire, explosion or injury
through contact with caustic substances.
f) Keep the battery and the charger away from paper
clips, coins, keys, nails, screws or other small
metal objects that could cause a short circuit at
the battery terminals or the charging contacts.
A short circuit at the battery terminals or charging
contacts could result in personal injury (burns) or fire.
g) Do not charge or continue to use damaged bat-
teries (e.g. batteries with cracks, broken parts,
bent or pushed-in and/or pulled-out contacts).
h) If the battery is too hot to touch it may be defective.
Place the tool in a location where it can be kept
under observation, well away from flammable materials, and allow it to cool down. Contact Hilti
Service after the battery has cooled down.
3 Description
3.1 Use of the product as directed
The tool is for fastening wood to wood using specially
manufactured fasteners. The tool is suitable for use with
solid wood, laminated timber, plywood, chipboard materials (e.g. coarse oriented-strand board), fiberboard
materials (e.g. medium density fiberboard), and veneer
materials (e.g. Multiplex).
The tool is intended for use by professionals in the timber construction industry. For usage recommendations,
please consult the Hilti Fastening Technology Manual.
Thetool,gascanandfastenersformasingletechnical
unit. This means that the tool can ensure optimum fastening performance only when used in conjunction with the
Hilti nails and gas cans that are specially manufactured
for it. The fastening and application recommendations
14
given by Hilti apply only when these conditions are observed.
The tool is for hand-held use only.
Modification of the tool is not permissible.
3.2 Items included in the delivery
1 Tool in plastic case
2Batteries
1Charger
1 Cleaning cloth
1 Operating instructions
3.3 System components for operating the tool
The following items are required to use the tool: Tool,
chargedB7/1.5Li-Ionbattery,GC31orGC32gascan
and GX-WF nails for wood joints.
Page 10

4 Technical data
Right of technical changes reserved.
Tool
Weight (including battery) 3.7 kg (8.16 lbs)
Dimensions(LxWxH) 384mmx134mmx381mm
Gas can
Gas can type
Operating temperature / ambient temperature with
GC 31 gas can
Operating temperature / ambient temperature with
GC 32 gas can
1
Contains: 1-butene, propene
Battery B 7/1.5 Li‑Ion
Rated voltage 7.2 V
Capacity 1.5 Ah
Energy capacity 10.8 Wh
Weight 0.19 kg
Maximum fastener driving rate
Work with interruptions: up to 3 fastenings per second
Continuous operation: 1,200 fastenings per hour
Suitable fasteners
Nail length 50…90 mm
Nail diameter 2.8…3.1 mm
Magazine capacity 75 (max.)
Magazine angle 34°
1
GC 31, GC 32
-5…+45°C(23°Fto113°F)
-10…+45°C (14°F to 113°F)
en
Noise measurement conditions
Operation and set-up conditions: Set-up and operation of the fastening tool in accordance with E DIN EN 15895-
1 in the semi-anechoic test room of Müller-BBM GmbH. The ambient conditions in the test room conform to
DIN EN ISO 3745. Test method: Enveloping surface method in anechoic room on reflective surface area in
accordance with E DIN EN 15895, DIN EN ISO 3745 and DIN EN ISO 11201.
Caliber Gas can 40 g
Power regulation None
Application Fastening to squared timber 500 x 100 x 100 mm using
nail with smooth shank 75 x 2.8 mm
Declared measured values of noise characteristics according to 2006/42/EC Machinery Directive in conjunction
with DIN EN 15895
Sound power level, L
Emission sound pressure level at the workplace,
2
L
pA, 1s
Peak sound pressure emission level, L
1
±2dB(A)
2
±2dB(A)
3
±2dB(C)
WA, 1S
1
pC, peak
3
108 dB (A)
106 dB (A)
138 dB (C)
15
Page 11

NOTE
The sound pressure and vibration values given in these instructions have been measured in accordance with a
standardized test and may be used to compare one fastening tool with another. They may be used for a preliminary
assessment of exposure. The data given represents the main applications of the fastening tool. However, if the
fastening tool is used for different applications, with different accessoriesorispoorlymaintained,thedatamay
vary.Thismaysignificantlyincreasethelevelofexposureoverthetotalworking period. An estimation of the level of
exposure should also take into account the periods of time when the tool is not actually in use. This may significantly
reduce the level of exposure over the total working period. Prescribe additional safety measures to protect the operator
from the effects of noise and/or vibration, such as: maintaining the fastening tool and its additional equipment or
en
accessories, keeping the hands warm, reorganization of work patterns.
Recoil
Energy-equivalent acceleration, a
hw, RMS(3)
Results for nail size 90 x 3.1 mm on solid wood (spruce)
<2.5 m/s²
5Beforeuse
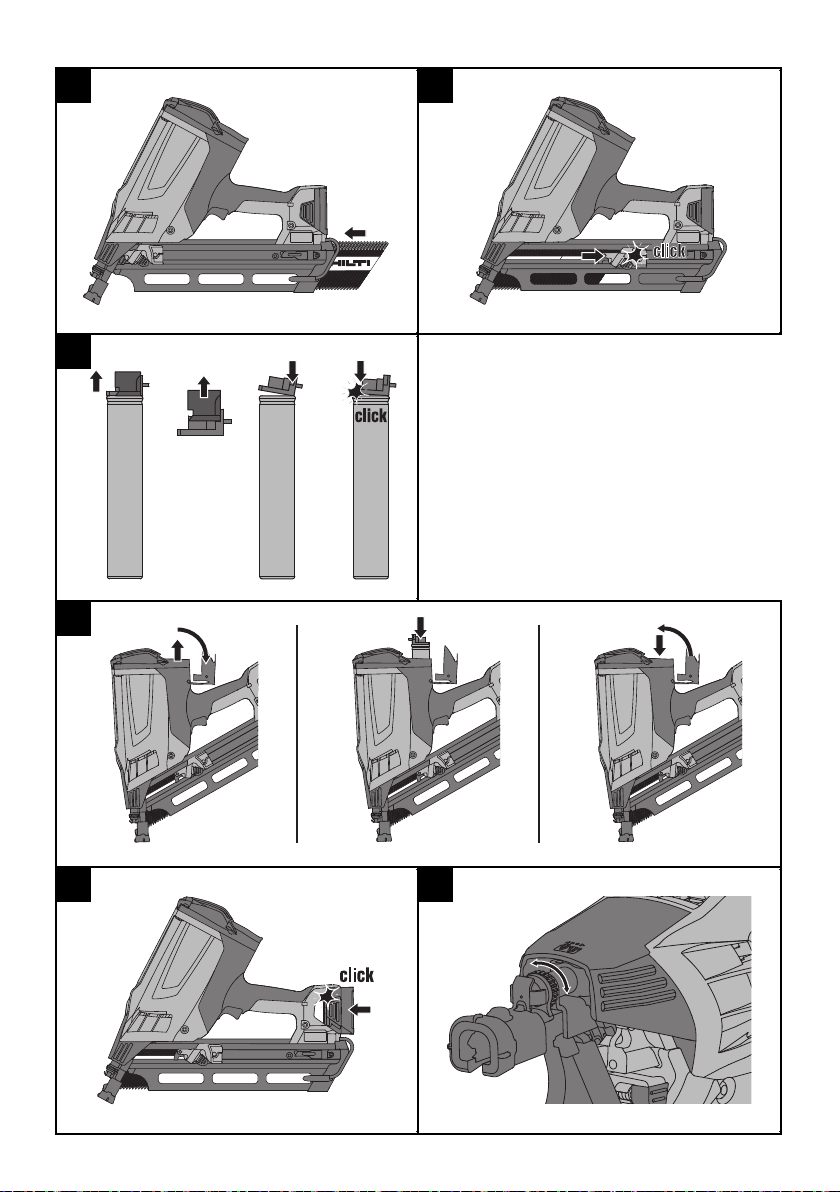
5.2.1 Removing the transport lock 4
5.1 Inserting nails 23
WARNING
In this tool use only fasteners of a suitable type with
the correct collation angle. Use of unsuitable fasteners
may cause tool malfunctions or present a risk of injury.
1. Insert the fasteners into the magazine from below,
pointing in the right direction.
NOTE There is a retention spring in the bottom of
the magazine. If the maximum number of nails in the
magazine is exceeded, the last strip of nails to be
inserted cannot be held back by this spring. Remove
the strip of nails that was last inserted.
2. Push the nails as far as they will go in the direction
of the nosepiece.
3. CAUTION Move the nail pusher with care. There
is a risk of your fingers being trapped.
Pull the nail pusher back over the nails, keeping a
firm hold of it, until it snaps into place at the bottom
end of the nail strip.
NOTE The nail pusher must engage in this position.
NOTE The nail strip could suffer damage if the nail
pusher is allowed to strike it with force. Do not allow
the nail pusher to strike the nail strip with force.
5.2 Preparing the gas can
WARNING
Escaping gas can damage the lungs, skin, and eyes.
Keep the metering valve away from your face and
eyes.
WARNING
Never attempt to remove the metering valve of an
already prepared gas can or a gas can that is currently
in use. Relatively large quantities of pressurized liquefied
gas can escape, endangering you and other persons.
NOTE
The gas can is fitted with a transport lock. Remove the
lock before inserting the gas can into the tool.
1. Lift the safety cap and metering valve off the gas
can.
2. Disconnect the safety cap from the metering valve.
3. Insert the metering valve with the front hooking
groove into the gas can notch.
NOTE Themeteringvalvehasafrontandarear
hooking groove.
4. Press the rear hooking groove firmly over the lip of
the gas can until the metering valve snaps into place
on the can.
5.2.2 Inserting the gas can 5
1. Open the cover of the gas can compartment by
pressing it upwards and to the rear.
2. Push the gas can and metering valve into the red
adapter.
3. Close the cover by pressing it downwards with your
thumb and allow the clasp to snap into place.
5.3 Inserting the battery 6
WARNING
Read the operating instructions for the C 7 charger
regarding charging the battery and for further instructions on use and care of the battery.
WARNING
A falling battery may present a risk of injury to yourself and/or others. Check that the battery is securely
seated in the tool.
WARNING
Take care when inserting the battery. There is a risk of
pinching the skin.
NOTE
Charge the battery fully before using the tool for the first
time.
16
Page 12

1. Before inserting the battery, make sure that the
battery contacts and the contacts in the tool are
free of foreign bodies.
5.4 Battery charge state
NOTE
Battery performance drops at low temperatures.
Green LED Lights The battery is ready for use.
Flashing Failing battery voltage. Change the bat-
Red LED Lights The battery voltage is no longer suffi-
Flashing The battery is too cold (< -15°C/< 5°F)
No signal No LED lit up or flashing The battery voltage is below the
2. From below, push the battery into the opening at
the end of the grip until it snaps into place.
The LED briefly lights up in green to signal that the
tool is ready for use.
tery soon.
cient to operate the device. Change the
battery.
NOTE You must switch to the second
battery, at the latest, when the LED
lights up in red on the tool. Recharge
the battery immediately so that it is
ready for reuse.
or too hot (> 60°C/> 140°F) and the fan
doesn’t start. Remove the battery and
allow it to warm up or cool down to the
required temperature.
threshold value. Charge the battery.
en
5.5 Deep discharge protection and battery reset
function
NOTE
ThetoolhasadeepsleepmodetoprotecttheLi-ion
battery from deep discharge.
6Guidelines
6.1 Fastening guidelines
NOTE
Always observe the usage guidelines and instructions
on the nail packaging. Observe any applicable national
technical regulations.
7Operation
NOTE
When holding the tool steady with the second hand, the
hand must be positioned in such a way that no ventilation
slots or openings are covered.
WARNING
Parts of the tool outside the grip area may get hot when
fasteners are driven at a rapid rate over a long period of
time. Wear protective gloves.
7.1 Settings at the nosepiece 7
The depth of penetration of the nails can be controlled
via the position of the nosepiece.
The tool switches itself off completely, automatically, if
unused for 120 minutes.
Make the tool ready for operation again by removing the
battery for a moment and then refitting it (battery reset).
NOTE
For detailed information, request the Hilti Fastening Technology Manual from your regional Hilti office.
Use the adjusting wheel to change the depth of penetration.
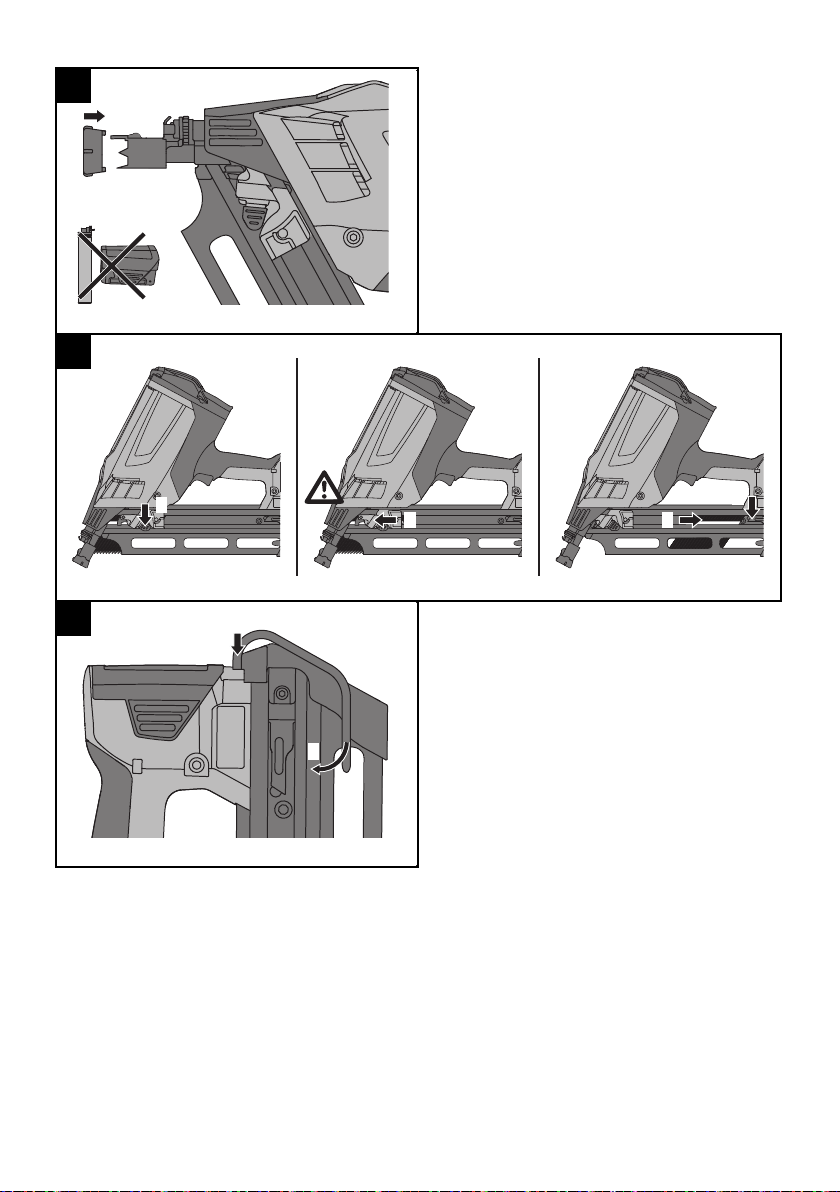
7.2 Protecting sensitive surfaces 8
WARNING
Remove the battery and gas can before fitting or
removing the surface protector.
If working on visible sensitive surfaces such as facades,
use the surface protection adapter.
The surface protection adapter reduces the possibility of
the nosepiece leaving marks on the surface of the wood.
17
Page 13

7.3 Unintentional firing safety device
WARNING
Do not use the tool if the sliding sleeve has been
removed.
The tool is equipped with a safety device to prevent it from
being triggered accidentally. The sliding sleeve prevents
the nosepiece from being pushed back deliberately or
en
unknowingly. This prevents accidental releases.
7.4 Driving nails
NOTE
You can drive nails only if there are more than 5 nails in
the magazine.
8 Unloading the tool
8.1 Removing the battery
NOTE
Store the battery in a cool and dry place. Never store the
battery where it is exposed to direct sunlight or sources of
heat, e.g. on heaters / radiators or behind glass. Batteries
that have reached the end of their life must be disposed
of safely and correctly to avoid environmental pollution.
Press both battery release buttons.
Pull the battery downwards out of the power tool.
8.2 Removing the gas can
1. Open the cover of the gas can compartment.
2. Remove the gas can.
3. Close the cover of the gas can compartment.
8.3 Unloading nail strips 9
1. Release the catch on the nail pusher by pressing the
black button.
NOTE
Hold the tool securely. Avoid resilient materials.
NOTE
Pull the trigger only after the tool has been fully pressed
against the working surface.
NOTE
Do not release the trigger until the nail is driven fully.
1. Position the nosepiece on the working surface and
press the tool against the surface until the nosepiece
is fully compressed.
2. Drive the fastener by pulling the trigger.
3. Once the nail has been driven, release the trigger
and lift the tool completely away from the working
surface.
2. CAUTION Move the nail pusher with care. There
is a risk of your fingers being trapped.
Allow the pusher to slowly slide back towards the
nosepiece until it stops.
3. Allow the nails in the magazine to slide downwards.
4. Press the internal pawl on the bottom end of the
magazine.
You can now completely remove the nails from the
magazine.
8.4 Tool hook
WARNING
A falling tool can endanger you and/or other persons.
Make sure that the tool is firmly secured when hung
up.
You can use the tool hook to attach the tool to your belt,
a ladder, or a roof batten.
Press the belt hook towards the tool in the direction of
the longitudinal axis of the magazine.
This releases the belt hook from its locked position and
it can then be pivoted in or out.
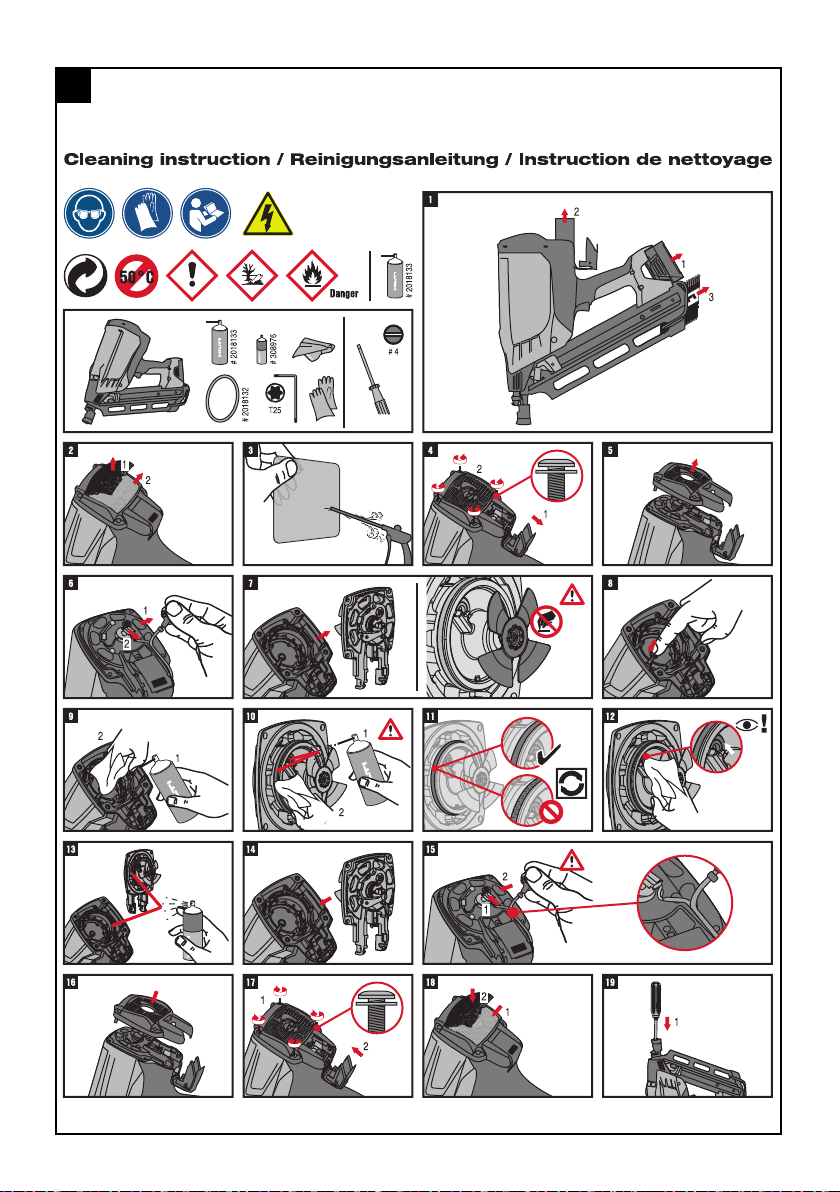
9 Care and maintenance
WARNING
The tool must be unloaded (gas can and fasteners
removed from the tool) before carrying out cleaning
or maintenance. Completely remove the battery, gas
can and nail strip from the tool.
9.1 Care of the tool
1. Clean the outside of the tool at regular intervals with
a slightly damp cloth.
2. Never operate the tool when the ventilation slots are
blocked. Clean the ventilation slots carefully using a
dry brush.
18
3. Do not allow moisture or foreign bodies to enter
inside the tool or battery.
4. Remove the tool from its toolbox and allow it to
dry out if moisture has entered the tool. To do this,
remove the battery and keep the gas can compartment cover at the rear in the open position.
5. Always keep the grip surfaces of the tool free from
oil and grease.
6. Do not use a spray, steam pressure cleaning equipment or running water for cleaning.
7. Do not use cleaning agents which contain silicone.
Page 14

8. Make sure that there is no oil or grease on the
battery contacts.
9.2 Tool repair
WARNING
If your tool is damaged, only have it repaired by the
Hilti Service Team.
Check all external parts of the tool for damage at regular
intervals and check that all controls operate faultlessly.
Do not operate the tool if parts are damaged or when the
controls do not function faultlessly.
9.3 Cleaning the tool
NOTE
The tool must be cleaned and serviced regularly. We recommend that the tool is cleaned, at the latest, after making 40,000 fastenings. The tool should also be cleaned
if malfunctions occur frequently, e.g. misfiring or firing
without a nail being driven.
You can arrangefor Hilti to carry outthe required servicing
work for you. To do so, contact your local Hilti Center or
sales and service office.
Alternatively, you can do the cleaning service yourself.
The required materials, tools, and documentation are
available from Hilti as accessories. Use only Hilti products
or products of equivalent quality to clean the tool.
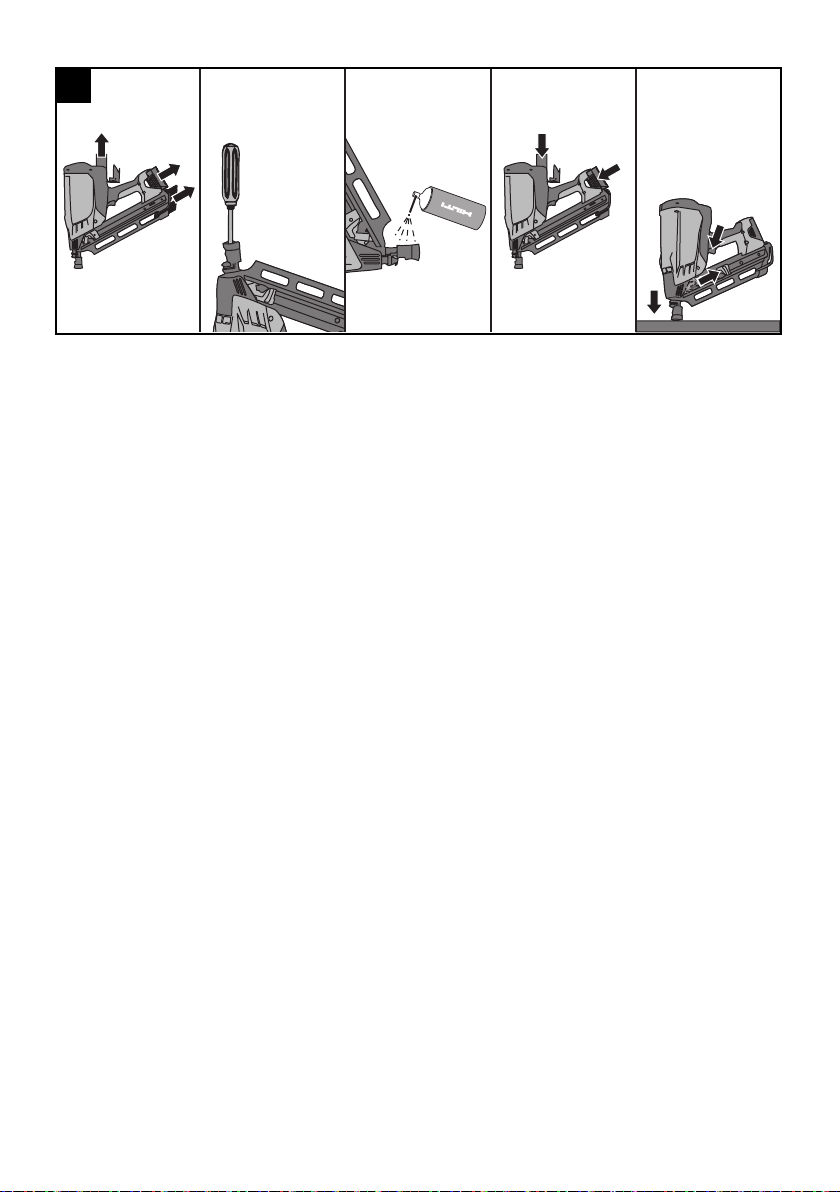
9.3.1 Cleaning the piston
Dirt and remains of the nail collation strip may hinder
piston movement. Malfunctions occur increasingly, i.e.
the tool is triggered but no fastener is driven. In this case,
the piston should be cleaned as follows:
1. Remove the battery, gas can and fasteners from the
tool (see section “Unloading the tool”).
2. Use a screwdriver to push the piston back as far as
it will go.
3. Spray cleaning fluid generously into the tool
nosepiece.
4. First replace the battery and then the gas can.
5. Pull the nail pusher back by hand and then trigger
the tool five times, without driving fasteners, with the
tool nosepiece pressed against a suitable surface
(see “Use of the product as directed”).
6. Reload the fasteners and continue working with the
tool in the usual way.
NOTE If necessary, repeat steps 1-6.
10 Troubleshooting
Fault Possible cause Remedy
The tool is fired frequently
without a fastener loaded.
Irregular nail stand-off. The tool requires a cleaning service. Carry out a cleaning service.
Working speed is too high. Observe the maximum nail-driving
The tool is not pressed fully against
the working surface and/or the trigger
is not pulled fully.
The tool requires a cleaning service. Carry out a cleaning service.
Jammed piston (paper, nail or wood
debris in the tool)
Hard and/or knotty wood. Change the nails or, if possible, use a
Empty gas can Insert a new gas can.
Inadequate support / material is resilient.
Working speed is too high. Observe the maximum nail-driving
frequency (see Technical Data section).
Press the tool fully against the working surface and don’t release it until
the nail has been fully driven.
See section: 7.4 Driving nails
See section: 9.3 Cleaning the tool
Carry out a piston cleaning service.
See section: 9.3.1 Cleaning the pis-
ton
See section: 9.3 Cleaning the tool
different supporting material.
See section: 5.2 Preparing the gas
can
See section: 5.2.2 Inserting the gas
can 5
Increase the pressure applied to the
tool and/or the working surface: adopt the optimum working position;
avoid resilient materials.
See section: 7.4 Driving nails
frequency (see Technical Data section).
en
19
Page 15

Fault Possible cause Remedy
The piston is incorrectly positioned.
Jammed piston (paper, nail or wood
debris in the tool)
Carry out a piston cleaning service.
See section: 9.3.1 Cleaning the piston
The tool doesn’t fire: The tool
indicates that it’s ready for use
The tool is not pressed fully against
the working surface.
but doesn’t fire when the trigger
is pulled.
en
Nail jam. A nail is jammed in the tool
nosepiece.
Press the tool fully against the working surface and then pull the trigger.
See section: 7.4 Driving nails
Remove the battery and the gas can.
Removed the jammed nail.
Use a screwdriver to push the piston
back all the way.
Gas can capacity sufficient for <
1000 nails
The gas can compartment will
not close (when the gas can has
been inserted).
Gas loss due to frequent pressing of
the tool against the surface without
firing.
Transport lock on gas can not re-
moved.
Press the tool against the surface
only when you intend to drive a
fastener.
Remove the safety cap on the gas
can.
See section: 5.2.1 Removing the
transport lock 4
Nail driven in too far Nosepiece too far back Move the nosepiece forward using
the adjusting wheel.
See section: 7.1 Settings at the
nosepiece 7
Protruding nail Nosepiece too far forward Move the nosepiece backwards by
moving the adjusting wheel.
See section: 7.1 Settings at the
nosepiece 7
Very flat application angle Press the tool against the base ma-
terial at an angle that is as near as
possible to a right angle.
The tool slips out of position on
the surface.
The adapter on the surface protector
is fitted to the tool nosepiece.
Remove the adapter and expose the
teeth on the tool nosepiece.
See section: 7.2 Protecting sensitive
surfaces 8
The fan doesn’t start, the LED
blinks red.
The battery is too cold (<-15°C) or too
hot (>60°C).
Remove the battery and allow it to
warm up / cool down.
Fit another battery.
The fan doesn’t start, no LED
lights.
The tool is in deep sleep mode. Carry out a battery reset.
See section: 5.5 Deep discharge protection and battery reset function
If the problem remains: No battery
power.
Fit another battery.
Charge the battery.
Water or moisture in the tool. Allow the tool to dry out.
See section: 9.1 Care of the tool
The fan does not start, the LED
lights up in red
The fan doesn’t start, the LED
lights green.
The battery voltage is not sufficient to
operate the tool.
The plug connector to the fan is dis-
connected.
The fan connector is fitted correctly
but the fan still doesn’t start.
Fit another battery.
Charge the battery.
Remove the battery and the gas can.
Plug in the fan connector.
Have the power tool repaired by Hilti
Service.
The fan is running, the tool does
not fire
20
Empty gas can Insert a new gas can.
See section: 5.2 Preparing the gas
can
See section: 5.2.2 Inserting the gas
can 5
Page 16

Fault Possible cause Remedy
The fan is running, the tool does
not fire
Thetoolcannotbepressed
against the work surface
The tool requires a cleaning service. Carry out a cleaning service.
See section: 9.3 Cleaning the tool
Less than 5 nails in the magazine Add more nail strips.
See section: 5.1 Inserting nails 23
Nails jammed. Remove the battery and the gas can.
WARNING
N.B.:Donotcarryoutanymaintenance work without fully unloading the
tool.
Remove the jammed nails.
Frequent transport malfunctions
with nails in plastic strips.
Damaged magazine strip. Hold the nail pusher securely when it
is operated.
11 Disposal
Most of the materials from which Hilti tools or appliances are manufactured can be recycled. The materials must
be correctly separated before they can be recycled. In many countries, Hilti has already made arrangements for
taking back old tools and appliances for recycling. Ask Hilti customer service or your Hilti representative for further
information. If you wish to bring the tool to a materials separation facility yourself: Regional and international directives
and regulations must be observed.
12 Manufacturer’s warranty - tools
Please contact your local Hilti representative if you have
questions about the warranty conditions.
NOTE
Observe the gas can expiry date printed on the edge of
the can.
en
13 EC declaration of conformity (original)
Designation: Gas-driven fastening tool
Type: GX 90-WF
Generation: 01
Year of design: 2011
We declare, on our sole responsibility, that this product
complies with the following directives and standards:
2006/42/EC, until 19th April 2016: 2004/108/EC, as of
20th April 2016: 2014/30/EU, 2011/65/EU, 2006/66/EC,
EN ISO 12100, EN 792‑13.
Hilti Corporation, Feldkircherstrasse 100,
FL‑9494 Schaan
Norbert Wohlwend Lars Taenzer
Head of Quality & Processes Management
BU Direct Fastening BU Direct Fastening
02/2015 02/2015
Head of BU Direct Fastening
21
Page 17

Hilti Corporation
LI-9494 Schaan
Tel.: + 423/234 2111
Fax: +423/234 29 65
www.hilti.com
Hilti = registered trademark of Hilti Corp., Schaan
Pos. 1 | 20150413
Printed: 07.05.2015 | Doc-Nr: PUB / 5069885 / 000 / 04
*440645*
440645
 Loading...