

Page 1
Gasoline
Powered
Rotary Hammer Drill
Type:
Speed:
hole to
Data
(5000
Air Cooled
Combustion
(1
22.6 cc
0.8 hp-7000RPM
Recoil
Starter
(0.132
liter
0.5
T.C.l. Electronic
Mixture 25:1
2-stroke oil)
liter/hour
0.5
RPM
0-440
lmpacUMin
3150
(159+"
LxHxW
11|q"
lbs.
157+
1lz
7
inlmin with
1" in concrete
Technical
Engine Type:
Piston
Displacement:
Maximum
Horsepower:
Starter
Fuel Tank Capacity:
lgnition Type:
Fuel:
Fuel
Consumption
Rate:
Full Load
Percussion:
Dimensions:
Closest
colner:
Weight:
Drilling rate
psi
concrete):
Max.
bit diameter:
Features
.
Equals or exceeds the HILTITE-2z
Hammer
o
Two
and rotary
.
Permanent lubrication
.
Two finger
Drill in
only
throttle
oerformance
lever
drilling modes; hammer drilling
Instruction
2-Stroke
Engine
.38 cu. in.)
Gal.)
U.S.
(Gasoline
(0.132 gal./houQ
and
x81lz")
xlosle"
lslsz"
diameter
.
Side handle is locked in
tightening hand
.
gauge
Depth
positively
locks
.
Easy
to operate recoil starter
llzliter
c
(0j32
full load
refueling
bit
grip
is readily
gal.)
operation for t hour without
Manual
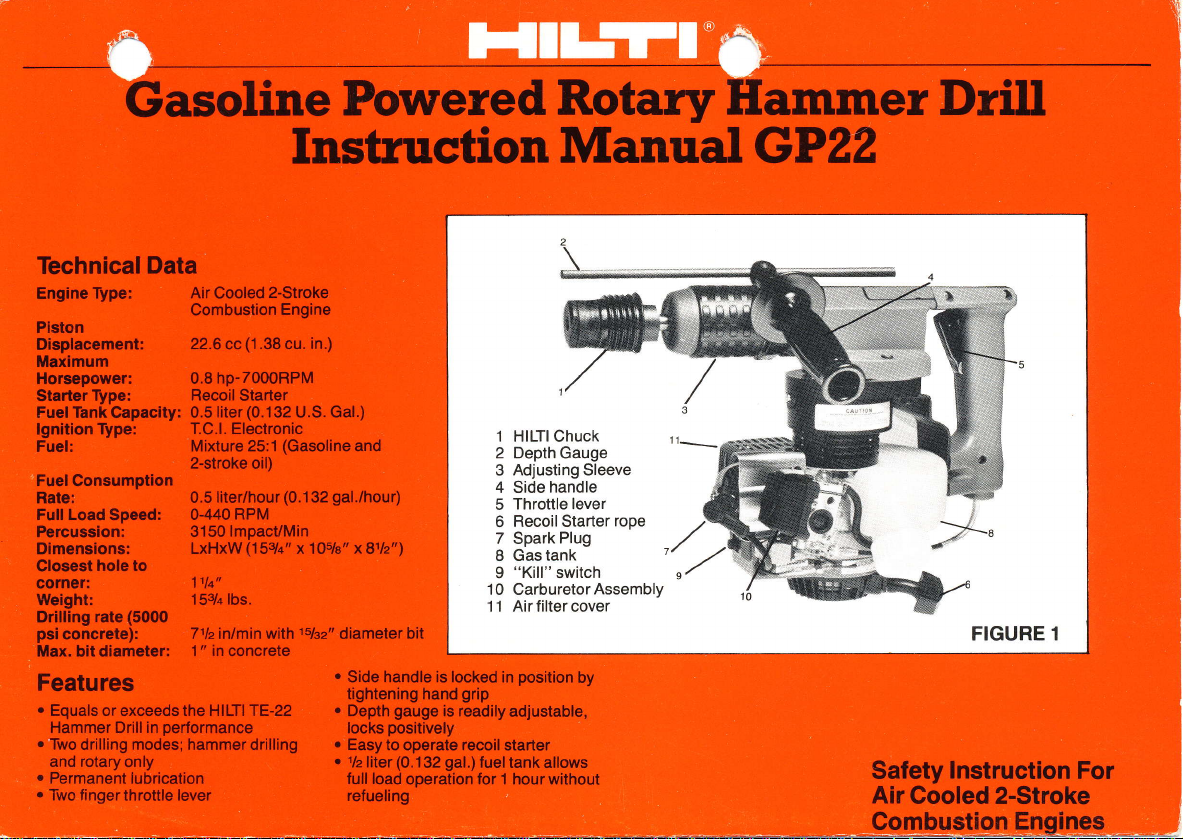
1 HILTI Chuck
2 Depth
3 Adjusting Sleeve
4 Side
5
6
7
8 Gas
9
10
11 Air filter cover
fuel tank allows
Gauge
handle
Throttle
Recoil
Starter
Plug
Spark
tank
"Kill"
switch
Carburetor
position
adjustable,
lever
by
rope
Assembly
,r/
GP22
FIGURE 1
Safety
Air
Instruction
Gooled 2-Stroke
Com[uslion
For
Eng_ines
Page 2
Operation
SAVE
1. Side
THESE
Handle and
INSTRUCTIONS
Depth Gauge
Adiustment:
Loosen the side
counter-clockwise.
gauge
the handle to the
position.
Note: When
surc
insure correct
proper
to the
Retighten the
setting depth
that the drill bit
setting.
handle by
most comfortable
turning
Adiust the
length and
side handle.
gauge
pushed
is
2. Lubrication of theChuck:
Always
end of the bit shank before
in the
with Hilti
and lubricate the chuck
clean
To lubricate, spray
drill.
spray
lubricant.
inserting
depth
rotate
be
back to
lightly
Bit
3.
Chucking
Pull the locking sleeve back
insert the bit
locking sleeve and
the
bit until the
back into its original
I;:i;l:,i:ii
For hammer drilling:
4.
With the drill stopped,
adjusting sleeve
twisting a
by
clockwise.
work surface, apply
switch the drill on.
Note: lf the machine
before being
hammering
in the chuck.
locking
sleeve
position.
pull
all the
quarter
placed
turn counter
light
is switched on
in
Place the drill
will occur.
turn the drill
way and lock
against the
pressure,
position,
and
Release
snaps
the
back
no
For rotary drilling:
5.
With the drill stopped, unlock the
adjusting sleeve with a
clockwise. A spring
ward
allthe way.
sleeve a
wise to lock in the
position.
work surface and switch on
FUELING/REFUELING
1. Read the
for air cooled
tions
ouarter
Place
first six safety
combustion
2. Fill tank
with a
gasoline (regular)
2-stroke oil.
equivalent
gasoline
gal.
gal.)
available
two
quickly;
container
this manual.
to
or 5 tluid oz.
gasoline.
of
gasoline/oil
from HILTI
tanks of
instructions
appear
quarter
push
will
Turn
turn
"drilling
the drill against the
engines.
25
to
A 25 to
1/s
pint
A
mixing container
properly
it
the adjusting
counter clock-
only"
instruc-
two stroke
1 ratio of
and high
is
1 ratio
1
oil to
of oil to
liter
one
provide
will
mixed
for using this
near the end
turn
for-
quality
gal.
1
(.264
fuel
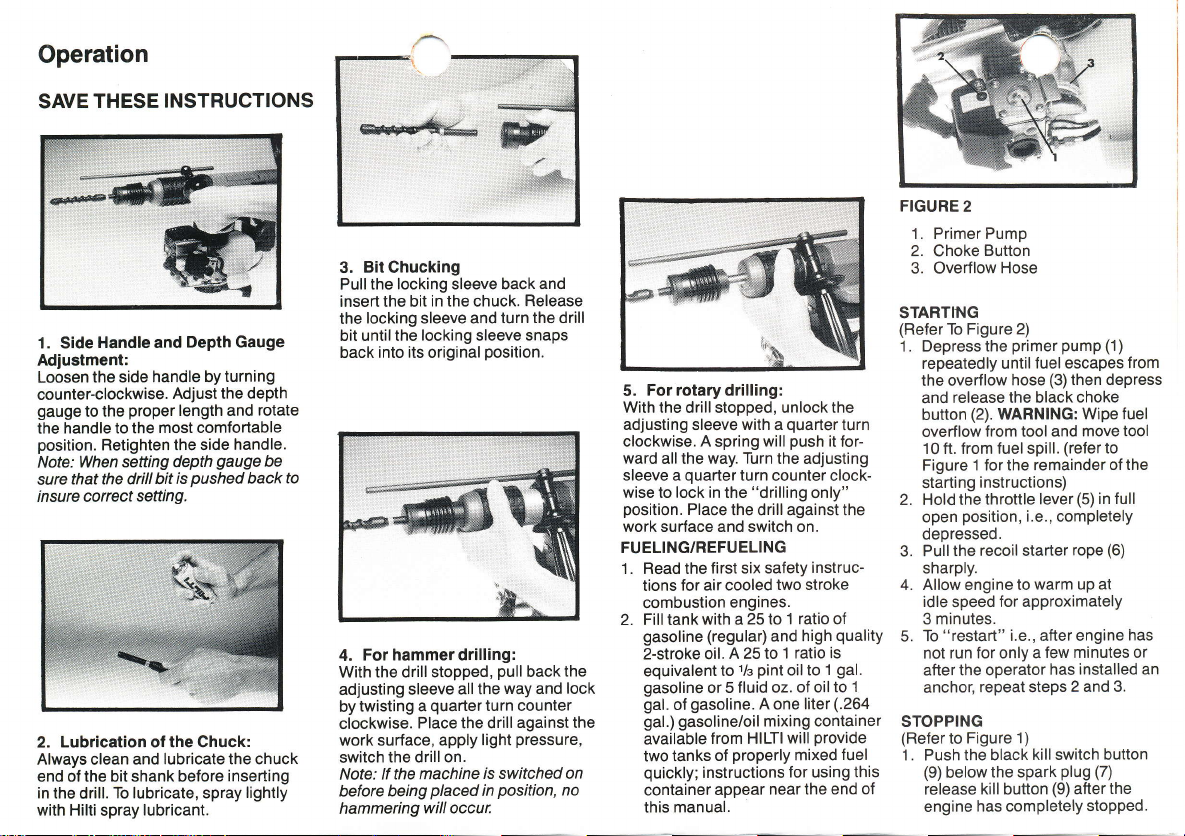
FIGURE
'1
. Primer Pumo
2.
Choke
3. Overflow Hose
START]NG
(Refer
1 . Depress the
repeatedly until
the overflow
and release the black
button
overflow
10 ft. f rom fuel spill.
Figure 1 for the remainder
starting
2. Hold the
open
deoressed.
3. Pullthe
sharply.
4. Allow engine to
idle speed for approximately
3 minutes.
5. To
not run tor only a
after the oDerator
anchor,
STOPPING
(Refer
1. Push the black
of
(9)
release
engine
2
Button
To Figure
2)
primer pump
fuel escapes
hose
(2).
WARNING:
from tool and move tool
instructions)
throttle lever
position,
"restart"
to
below
i.e.,
recoil starter
warm up at
i.e., after engine
few minutes or
repeat steps
Figure 1)
kill switch button
the spark
kill
button
has completely
(3)
then depress
choke
Wipe fuel
(refer
(5)
in full
completely
rope
installed an
has
2 and 3.
plug
(7)
(9)
after
stopped.
(1)
from
to
of the
(6)
has
the
Page 3

Maintenance
Accessories
Servicing
AIR FILTER
(Referto
Replace
every 10
often in dusty
drilling
overhead): Remove
in
black
cover
and air
Remove
in fuel
mix, wring
the spring. Re-install
spring assembly.
(11)
make
the locating
CAUTION:
the
air filter installed.
SPARK PLUG
Check
spark
(D24-.027
To
clean
sandpaper
after
cleaning.
FUEL
FILTER
No
maintenance
(1)
Figure
or thoroughly
hours
of operation
conditions
filter
cover
tilter spring
spring from
out filter
Replace
sure the
points
Never run
plug gap
in).
plug
spark
or wire brush.
required.
GEAROIL
GP22 is
permanently
reouired.
The
No
maintenance
clean air filter
and when
(1
1)
and
assembly.
filter, wash
and replace
the air filter
filter
spring fits
in the
cover
engine
0.6-0.7 mm
electrode
Reset
lubricated.
(more
2
screws
remove
cover
over
(1
without
use
gap
filter
1
).
Fuel Mixing Container
Provides
20, 25.
set of marks for a 25:1 ratio.
TE-C-BF
For use
speed
diameter
in
accurate fuel/oil ratios
and 30 to 1.
Keyless
with
smooth
steel twist
and
hammer
wood bits.
mode.
the
Use
Chuck Assembly
shank,
bits up
to
Do not
center
high
112,
All repairs
HILTI GP22 should be
the designated HILTI
(HlLTl
Tulsa.
and adjustments
National Parts Warehouse) in
OK.
Warranty
This new fastening tool is
product
of
through
fastening methods and applications
of
ciated trades. Every reasonable
orecaution
manufacture
compliance with
high
operation and maintenance
tool
Salesman.
90 Day Limited
days trom
original
use
Hilti.
of
study and
the
building
has
quality.
Consultation
is
available from
the date of shipment,
purchaser
lt has been developed
industry
been taken in
of
this tool to assure its
Warranty: For
conducted by
Repair Center
a
research into
and asso-
Hilti's
standards of
on the
our Territory
the
of
tool will not
to the
quality
the
of the
90
the
the
be charged for the
required
rials
tool is returned
and
has not been removed
only Hilti
parts
and no
been
not
the cost
This
to correct defects in mate-
and workmanship
inspection,
compatible bits
have been
unauthorized servicing has
performed.
cover normal
of shipping
is
the only warranty
antee made
in lieu
of all other
including
merchantability
particular
circumstances
gated
for
damages, losses
expenses in
reason
of
use the tool for
,
parts
to Hilti for
the serial number
used
The wananty
wear and
by Hilti
warranties.
implied
warranties
and of fitness
purpose.
will Hilti
connection
the use
of, or inability
any
labor
and
provided
servicing
or defaced,
Hilti
and
with
the tool,
does
tear and
and insurance.
and it is
or
guargiven
of
Under no
be obli.
or
with or
purpose.
the
for
a
by
to
HILTI
P.O. Box 21148
(91
c
252-6000
8)
Tulsa.
OK 74121
HILTI is
@Copyright
Hilti
registered
a
is an equal
1986
by HlLTl,
opportunity
tradem..
Inc.
company
rHlLTl
Corp.
Page 4

Safety
Instructions
READ ALL
INSTRUCTIONS
1. Keep Work Area
Cluttered areas and benches invite
injuries.
Clean
2. Keep Children Away
Do not let visitors
visitors
should be kept away from
worK area.
3. Store
When not in
stored in dry,
olace - out of
4. Don't Force Tool
It will do the
the
ldle Tools
use, tools should be
and
reach
job
rate for which it was intended.
better and safer at
contact
high
or
of children.
tool. All
locked-up
5. Use Right Tool
Don't force
to
do the
Don't use tool for
intended.
Dress Properly
6.
Do not wear
They
can be caught
gloves
Rubber
recommended
are
outdoors.
ering to contain long hair.
tool
small
job
of a heavy-duty tool.
loose
Wear
or attachment
purpose
clothing or
in movlng
and non-skid footwear
when working
orotective hair cov-
not
jewelry.
parts.
7. Use Salety Glasses
Also use face or dust mask if cuttinq
operation
is
dusty.
8. Secure Work
Use clamos or a
It's safer than using
frees both hands to operate tool.
Don't
9.
proper
Keep
all times.
10. Maintain Tools With
Keeo tools
and safer r
vise
to hold work.
your
hand
Overreach
footing and balance at
e
-
r
and clean
,rance.
Care
Follow
for
and
better
instructions tubricatingand
I
Do not
changing accessories.
periodically
cords
have repaired
facility.
free from
1 1. Remove
by authorized service
Keep handles
oil and
Adiusting Keys and
Inspect
and if
dry, clean, and
grease.
tool
damaged
Wrenches
Form
habit of checking to see that
keys and adjusting wrenches
removed from
it on.
12.
Stay Alert
Watch
common sense. Do not
when
13.
CheckDamaged
Before further use of the tool
that is
checked to deterrnine
operate
intended functions.
ment
of moving
any
other conditions that may atfect
its operation. Any
damaged should be
replaced
or
tool before turnino
you
what
you
damaged should be carefully
are doing.
are tired.
properly
and
Check for align-
parts,
part
by an authorized service
properly
Use
ooerate tool
Parts
it
that
will
perform
mounting,
is
that
are
part
any
its
and
repaired
center unless otherwise indicated
elsewhere in this instruction
14. Replacement
When
servicing use
replacement
15. Wear Ear Protectors
Wear
extended
16,
it
ments
Do not
flammable
Caution
The metal
made
Only the handles
be
or other concealed
protectors
ear
periods.
Avoid Flammable Environ-
use tool
parts
live if
contacted when drilling into a wall
Parts
parts.
in
the
liquids
or
of the drill can be
the tool drills into wiring.
of the GP-22 shculd
space.
manual.
identical
only
when using for
presence
gasses.
of
L
9.
10.
11.
12.
use any other
than a 25:1 mixture of regular
gasoline
Refuel in
away from
sources,
in
and
a safe
possible
such as
clothes dryers,
furnaces, etc. Always stop
engine before
Do not open tank with more than
1/+
because of oossible overflow.
Open
pressure
Move tool at least 10 ft. from
fueling area
prevent
Wipe away any excess fuel
spilled on tank or engine.
allow dust, dirt, fuel, or debris to
fuel remaining
tank of
gas
cap slowly to relieve
in tank.
alire
before
build up on engine. Before
starting make sure that engine
has dried completely and that no
fuel leaks
Do not
operating the GP22.
Do not
poorly
Do not run
muffler. Keep screens and batfles
clean.
Do not let
come in contact with hot
muffler,
immediately
stopped.
Do not touch
while
attempt to change spark
until
Do
areas where flammable materiai
is oresent.
"Kill"
drill bits, setting anchors, etc.
exist.
smoke
use tool
ventilated areas.
equipment without a
your
etc. while operating or
operating and do not
has
engine
not set a hot
engine
fuel
other
2-stroke
oil.
place.
Keep tool
ignition
gas pilot
water heaters,
ref
ueling.
starting to
hazard.
Do
while fueling
indoors
or
hands or body
after engine
spark
engine down
before changing
plug
cooled.
engine,
has
wire
plug
lights
not
or
in
in
 Loading...