

Page 1
DX462
CM/HM
-
-
-
-
-N
:lTl
-l\
-ryr
Page 2
Page 3
Page 4
Page 5
-.w
@tf
Nsr
t-
Jr"
Wsi"
WI
-.@
e
$o
@
W
jt
=
Page 6
DX-462
CM
DX-462 HM
I
powder-
actuated
ll|s
essentialthal the operaling:::.
tool
instruclions are reqd before lhe,,:
loot is operated for the first time.
Always keep these operating
instructions
Ensui0
tionsare
given
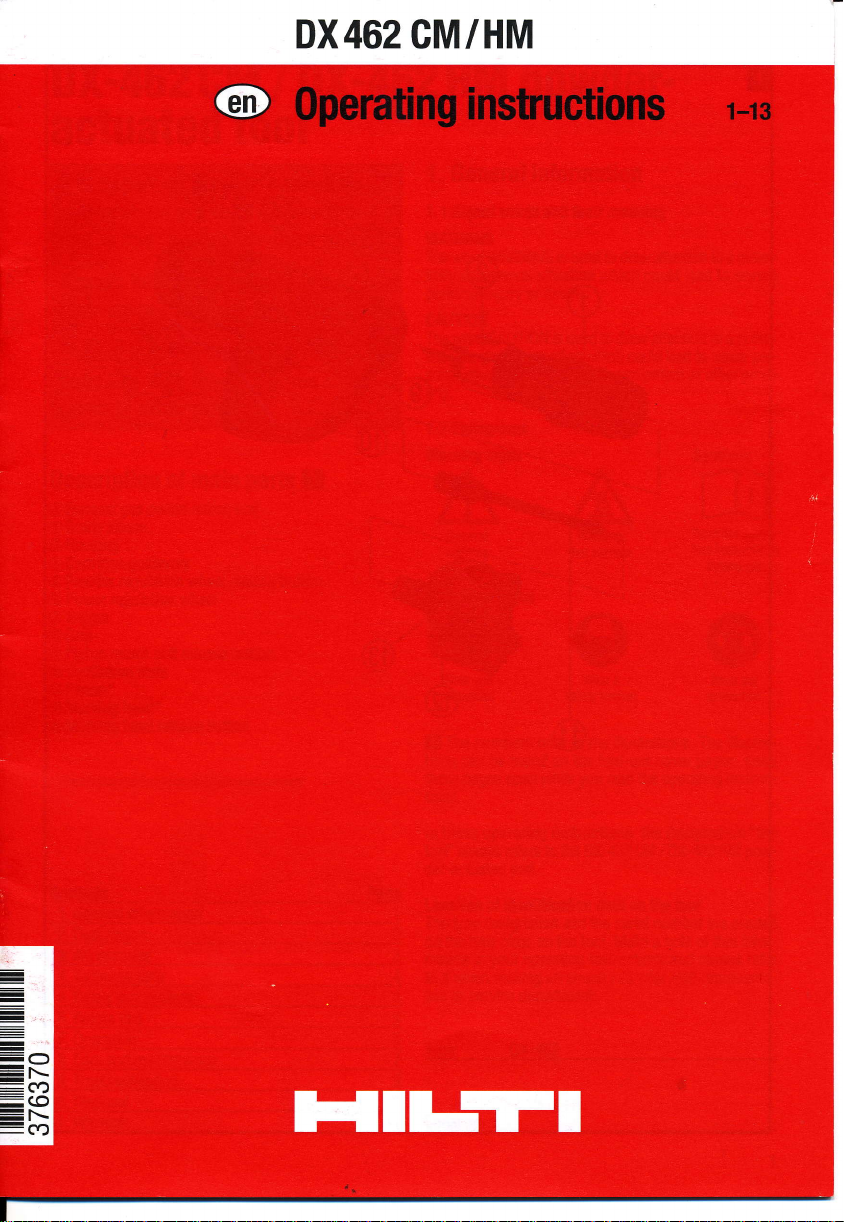
Description of
O Exhaust
@ Guide sleeve
@ Housing
@ Cartridge
Powder regulation wheel release button
@
Power regulation wheel
@
OTrigger
@Grip
Piston return
@
@Ventilation slots
@ Piston"
Marking head.
@
@ Marking head release button
-
parts
These
togelher
that lhd
with
to other
gas
piston
guideway
unit
may
replaced
be
lhe loolwhen,it
persons.
main
return
release
with
the tool.
operating iirstruG.
is,,,
parts
E
unit
button
by the user/operator.
1. General
:t:
1.1 Signal
::
WARNING
The word WARNING is used to draw attention to a ooten-
tially dangerous situation
personal
CAUTION
word
The
:ri
tially
dangerous situation
injury or damage
sonal
::,
ertv.
Pictograms
1.2
Warning signs
'A.
t\
information
words
and their
injury or death.
CAUTI0N is used to draw attention to a Doten-
meaning
which
which
to
the equipment or other
'A,
could
could
lead to
lead to minor
./t\
,r':\
General
warnrng
0bligation
signs
.-.
tl7/t
'&l.
weaieye
pr0tecti0n
The numbers refer to
E
tions
these
l0ns.
be found on the fold-out cover
can
pages
open while
Warning:
hot surface
,r-
,l
w7
Wear a
safety helmet
illustrations. The illustra-
the
you
read the
operating
severe
per-
prop-
Symbols
-^r-i
l--L-J
Read the opera-
tion instructions
use
before
^tL.
r-l
V
Wear ear
protection
pages.
Keep
instruc-
1. General information
Descriotion 2
2.
3. Accessories 3
4. Technical
5. Safetv orecautions
6. Before use 5
7. Ooeration
8. Care and maintenance
9. Troubleshootino
Disposal 10
10.
11. Wanantv 1 l
data
these
In
operating instructions,
tool"
der-actuated tool.
Localion of identification dala on the lool
The
the type
on
mation in
4
it
to
tive or
refers to the DX-462
always
type
designation and
plate
your
making
when
service
the
on the tool. Make a note of this infor-
operating instructions and always refer
an enquiry
deoartment.
serial
Tvoe: DX-462
Serial no
to
the
CM /
your
designation
DX-462 HM
number
are
Hilti representa-
"the
pow-
printed
Page 7

2. Description
The Hilti DX-462 HM
the
marking
a wide variety
of
and DX-462 CM
of base materials.
are suitable
(less
ity
than 100 m/sec.) in
process
driving
travel.
for
of its
This makes dangerous through-shots
tually impossible when the tool
ends
a controlled manner. The
when
piston
the
is used correctly.
reaches the
end
vir-
The tool works
and is therefore not
piston
principle provides
fastening
6.8/'11
The
cartridges
by
The
fortably,
of base
safety. The tool works with
caliber.
piston
are
gas pressure
system
quickly
materials with temperatures
for the DX-462
800'C with DX-462 HM.
5 seconds or roughly
are changed.
The X-462
marking heads accept
acters or 10 of the
heights
of 6, 10 or
As
with all
the
on
well-proven
related to high-velocity tools. The
an optimum of working and
is returned to the
fed to the
lrom
permits
and
starting
firing chamber automatically
the fired cartridge.
quality
a high
economically applied to a
CM and with temperatures
A mark can be made every
every 30 seconds if characters
polyurethane
CM
12
powder-actuated
and the X-462 HM
either 7 of
mm type
5,6
mm.
tools, the
the
and the DX-462 CM, the X-462 HM
marking
tridges form
blefree marking with this
if the
characters and
tured for the
are used. The
given
tions
is
observed.
the
heads,
"technical
a
marking
characters and
unit". This means that trou-
system can only
cartridges specially manufacproducts
tool, or
of equivalent
marking and application recommenda-
Hilti
by
are only applicable if this
piston principle
cartridges ol
position
and the
mark to be
up
to
com-
variety
50'C
up to
8 mm type char-
steel
characters, with
DX-462 HM
and X-462 CM
the
car-
assured
be
quality,
condition
The drop{iring
firing
the
prevents
onto a
occurs.
trigger
The
cannot be
tool can be fired
surface.
The contact
pressed
to
be
force.
cant
ly
against
In
addition, all Hilti
tentional firing
from firing if the trigger is
against the work
it is first
ly
and
safety device El is
mechanism with the
the Hilti DX toolfrom
hard
surface, no matteratwhich
safety device B
fired
simply by
only
pressure
safety device El requires the tool
against the work
The tool can
the
work surface in this way.
DX
safety device E. This
surface.
pressed
(1.)
the trigger
against the work surface
then
ln
the
cocking movement. This
firing
ensures
pulling
the trigger
pressed
when
surface
fired
be
only
tools are
pulled
pulled
The tool
(2.).
equipped
the
and
can be
result
of coupling
when
it is dropped
angle the impact
that
the cartridge
only.
against the work
with
a signifi-
pressed
when
with
an unin-
prevents
tool then
fired
the tool
pressed
only when
correct-
The
ful-
The tool features
operator
and bystanders.
piston principle
The
w
The energy from the
piston,
a
the
tener into the
the kinetic
is driven into the
2
accelerated
base
energy is absorbed
base material at much reduced veloc-
5-way
propellant
material.
for the
safety
-
charge is transferred to
mass
of
As approximately 95 %
the
by
which
piston,
safety of
drives
the fastener
the
the
t
fas-
of
Page 8

3. Cartridges, accessories and characters
Markino heads
orderino desionalion Annlicalion
x-462 CM Polvurethane head for markino uo to 50'C
X-462 HM Steel head for markino uo to 800"C
Pistons
ordedno desionation Annlicalion
X-462 PM Standard oiston for markino aDDlications
Accessories
orderino desionation
X-PT 460 Also known as the
pack
Spares
HM1
Centering devices
Characlers
0rderino deslonalion Anolicalion
X-MC-S characters Sharp characters cut into
X-MC-LS characters For use in more sensitive applications. With a rounded radius,
X-MC-MS
Please
characters
contactyour
local Hilti
AoDlication
pole
tool. An extension system
that
allow marking on very hot
materials at a safe distance. Used with DX-462 HM
To replace the screws and the
For marking on curve surfaces. 0nly with X-462 CM marking head.
alwavs reouired when centerino device
Thev
used where the influence of markino on the
can be
deform, rather than cut, the surface of
it is reduced
on
Mini-stress characters exert
low-stress. Like these, they have a rounded,
mini-stress characteristics
Center or Hilti
representative for
ring. Only with X-462 HM marking head
0
is
used)
the
surface of the base
the
less influence on the
even
material
base material. In this way, their inlluence
deforming
from
details of otherfasteners and
interrupted
the
pattern
dot
accessories.
to
base
base
radius, but
(onlv
(Axle
A40-CML
form
an impression.
material is non-critical
low-stress
material
surface
derive
characters
than
their
available on sDecial)
Gailrid0es
ordeilno desionation ColoIr code Pouer lewl
6.8x11 M oreen Green
6.8x11 M vellow Yellow Medium
90%
the
ot
all
piston,
marking can
head
impact
out
be canied
and marking characters to a minimum
using
the
green
Use the cartridge with the lowest
cartridge.
Safely accessoru and cleaning sel
goggles,
Safety
earplugs, Hilti
ramrod, flat brush, large round
spray,
cloth.
small round brush,
brush,
possible
power
in
keep wear
ordert0
scraper, cleaning
on
Page 9

4. Technical data
Weioht
Tool lenqth
Cartridoes
DX-462 CM DX-462 HM
3.92 Ko
435 mm
1 M
6.8/1
(8.64lb)
(17.13')
oreen and vellow
4.62 Ko
425mm
(10.19Ib)
(16.73)
5. Safety
5.1 Basic
In
addition to the safety
vidual
following
precaulions
instluctions
safety
sections of these operating instructions, the
points
precautions
must be strictly observed
listed
5.2 Use as intended
The tool is designed for
tool unless
safe use. For
representative.
5.3
O
missible.
O
atmosphere, unless the tool is approved for
O
acters, cartridges, accessories
of
you
assistance, contact
lmproper
Manipulation
Do
not operate the tool in
To
avoid the risk of iniury
equivalent
quality.
O 0bserve the information
instructions
nance.
Never
O
O Never
or other
Do not
O
plastic,
glazed
O Never use
parts.
concerning operation,
point
press
part
of
mark into materials such
bronze, brass, copper, natural rock, hollow
tile and
grease
Use only Hilti
professional
have received
use
or modification
proper
of
an explosive orflammable
use only original Hilti char-
and spare
printed
the tool at
the muzle
your
gas
yourself
of the tool against
body.
concrete.
for maintenance/lubrication
spray or such of equivalent
use. Never use this
instruction
your
local Hilti sales
the tool is not
parts
in the operating
care and
or any bystander.
glass,
as
in the indi-
times.
at all
on its
such use.
or those
mainte-
your
hand
marble,
brick,
of tool
quality.
5.4 Iechnology
O This tool is
nology.
O The tool and its
when
ards
not as directed.
A
/l\
/z-s
5.5 Make the workplace
O Avoid
O Objects which could
from the working
The
O
tool is for hand-held
Keep
O
working
O Keep the
per-
,A^
/f\
14-$\
5.6 General salety
O Operate
in faultless
lf a
O
cartridge
lows:
1 . Keep the
30 seconds.
2. lf the
the working surface, taking
towards
Manually
3.
up the remaining
Use
the
used cartridge strip and dispose of it in such
wav that
designed
used
with the
latest available tech-
ancillary equipment may
incorrectly
by untrained
sale
cause
children in
clean and
positions.
injury
use only.
particular,
free from
unfavourable body
area.
persons,
other
area.
grip
dry,
precaulions
the
tool only as directed and
condition.
mislires
or fails to ignite,
pressed
tool
cartridge still
your
advance the cartridge strip
it
can be neither reused nor misused.
against the working
body
fails to fire,
or
withdraw the tool from
that it is not
care
bystanders.
cartridges on the strip. Remove
present
haz-
personnel
should be removed
outside the
grease.
oil and
when
only
proceed
one cartridge.
as
surface
pointed
it is
fol-
for
or
a
Page 10

lf 2-3 cartridges
O
out clearly
with
1. Stop using
2.
3.
4. Clean
5.
O
strip
o
straighten
O
O
servicing
O Store
high
audible
significantly
tridges
Disassemble
Check
Do
sists after carrying
Have the
Hilti
Never attempt
Keep the arms
Never leave the
from the
piston
the
the tool for
not continue
tool checked
repair center
the tool.
or
the
the
the tool
arms).
Always unload
or changing
cartridges
place
locked
or
,A
r'N
/t,-$,,
5.2Irmpet.ture
not disassemble
O Do
Never exceed
O
driving
otherwise overheat.
O Should
using
(number
rate
plastic
the
the tool immediately
occur
misfires
the cartridge
noise of
less
power),
proceed
tool immediately.
tool.
(see
8.3)
(see
wear
to use
pry
to
flexed
loaded
the
and unused
out
recommended
the
8.4)
the tool
the
out
steps
repaired if necessary
and
a cartridge
when the
tool unattended.
tool before beginning
parts
and before storage.
tools unloaded,
reach of children.
of the
tool when it
per
marks
of
cartridge
strip begin
and allow
in
succession
firing and
follows
as
Remove
problem per-
if the
described
from the
tool is fired
is hot.
maximum
The tool
hour).
to
it to cool down.
(with-
marK
:
the car-
above.
at a
magazine
(do
not
cleaning,
in a dry,
fastener
may
melt, stop
Betore use
6.
Tool inspection
6.1
Ensure
O
is cartridge
there
the tool.
O Check
intervals
ular
Do not operate
erly.
the
when
the tool
have
O Check
nance").
Changing the
6.2
1. Ensure
Remove
the tool.
of
the release button
Press
2,
Unscrew
3.
4.
Check
maintenance").
and
the
Push
5.
the marking
Push
6.
unit.
7. Screw
that there
all external
controls
the
is no cartridge
in the
strip
parts
and check
the
not operate
do
repaired at a
piston
for wear
marking
that no cartridge
the cartridge
the marking
the marking
piston
marking head
the
head
into
head firmly
strip
tool, remove
the tool for damage
of
that
controls operate
all
tool when
pafts
properly.
Hilti service centre.
"8.
(see
head
strip is loaded
pulling
by
strip
the
on
side
heac.
piston
for
tool
as
the tool until
onto
far as
onto the
the
in the
it
hand
by
are.damaged
lf necessary
Care and
in
it upwards
of marking
(see
wear
it will
piston
it engages.
tool. lf
from
reg'
at
prop-
mainte-
the tool.
out
head.
"Care
go.
return
or
met by
Requiremenb
5.8
t00l is intended
The
O
The tool may be operated,
o
authorised,
by
informed of any
be
tered.
Proceed carefully
o
attention
O Stop
5.9
is not on
working
Personal
to be
trained
special
and
the
with the
proteclive
for
personnel.
do not use
iob.
tool i{
equipment
@@@
The operator and
o
must always
vicinity
protection.
ear
other
wear
users
professional
serviced and
This
that may
hazards
you
persons
protection,
eye
use.
repaired
personnel
be encoun'
the tool
feel unwell.
immediate
in the
hard
a
if
your
hat
only
must
full
and
Page 11

7. Operation
m
@
@
CAUTl0l'l
I The
base
orfnagments of
may fly off.
Flying
I
fragments may
the
of
body or
I Wear safety
(users
hat
material may splinter
the
cartridge strip
parts
inlure
the eyes.
goggles
and bystanders).
and a hard
Loading
Eil
The marking head can receive
10
or
characters
1. Insert the characters according to the
Locking lever
2. Always insert the marking characters
of the marking
acters should
of characters.
3. When using a
fie desired character string.
is achieved.
4. After inserting the
must be secured by turning
The tool
5.
oosition.
characters
the
5.6 mm width
in the
head.
be inserted on
'-",
head
and
7
characters 8 mm
unblocked
An equal number of space char-
insert it at
desired
are
position.
side of the string
each
one end
In
fiis way, an even impact
marking characters, they
the
locking
now in the ready to
mark
in
the middle
or the
lever.
width
desired.
other
operate
of
CAUTION
I
The marking is achieved by a car-
tridge
I
I
being fired.
Excessive
hearing.
Wear ear
bystanders).
noise may damage the
protection
(users
and
I The tool could be made readyto
pressed
lire if
the
body
I
When
a marking head could be driven
into
a
I Never
the tool against
I
Under certain circumstances,
tool
could
pulling
by
I
When
a marking head could be driven
into a
I Never
bv hand.
against a
(e.9.
hand)..
"ready
in the
part
of the body.
press
the marking head of
parts
be made ready to fire
back the
"ready
in the
part
of the body.
pull
backthe marking head
part
to fire"
state,
of the body.
marking head.
to fire"
state,
GAUTION:
O Use only original space characters as blank space.
emergency, a
useo.
Do not
O
results in
reduces the marking
E
Load
it into the
has been
tridge is in the chamber.
back of
to be fired.)
next
Enoiusting
Start
set at
of
1. Press the release button.
Turn the
2.
normal
marking
insert
life length of
shorter
Loading the tool
the
cartridge strip
of the tool
bottom
partly
used,
the
cartridge strip
with
the lowest
the driving
the lowest cartridge
power
power
character can
characters upside-down.
the
quality
(narrow
pull
(The
setting.
regulation wheel to 1.
impact extractor and
end
grip
until
it through
last
visible
indicates which
power
power
3. Drive a nail.
4. lfthe mark doesn't
the
the desired depth 0f
more
EMarking
1 . Press the tool
angle.
2. Fire
the
WARNING
O Never
hand.
Never exceed
O
7.5 Reloading the tool
Remove the
of
out
power
powerful
the
tool by
press
This is
the
tool. Load a new cartridge strip.
penetrate
level and repeat steps 1 to 3. Repeat until
cartridge
with the tool
firmly
pulling
the marking
accident hazard.
an
the
maximum
cartridge strip by
used
deeply enough, increase
penetration
if necessary.
the
against
the trigger
head with the
fastener
ground
be
first) by inserting
flush.
lf the strip
an
until
unused
number
cartridge
level and the tool
is reached.
sudace
work
palm
driving
pulling
it upwards
off and
This
car-
the
on
Use
right
at
your
of
rate.
In
is
a
Page 12

8. Gare
8.1 Care of
The
resistant
section.
The
clean at all
the interior of
the outside of
spray 0r steam-cleaning system
8.2 Maintenance
Check
lar intervals and
ly. Do not
when the controls
and maintenance
the lool
outer casing of
plastic.
ventilation
all external
the tool is manufactured from impact-
The
slots
times.
Do not
the
tool. Use a slightly damp cloth
the
tool at regular
parts
check
the tool when
operate
do
grip
comprises a synthetic
must
be unobstructed and
permit
the tool for
of
that all controls
not
operate
foreign
intervals.
for
cleaning.
parts
properly.
CAUTION
objects
Do
damage
operate
damaged or
are
lf necessary,
rubber
to
enter
to
clean
not
use a
at regu-
proper
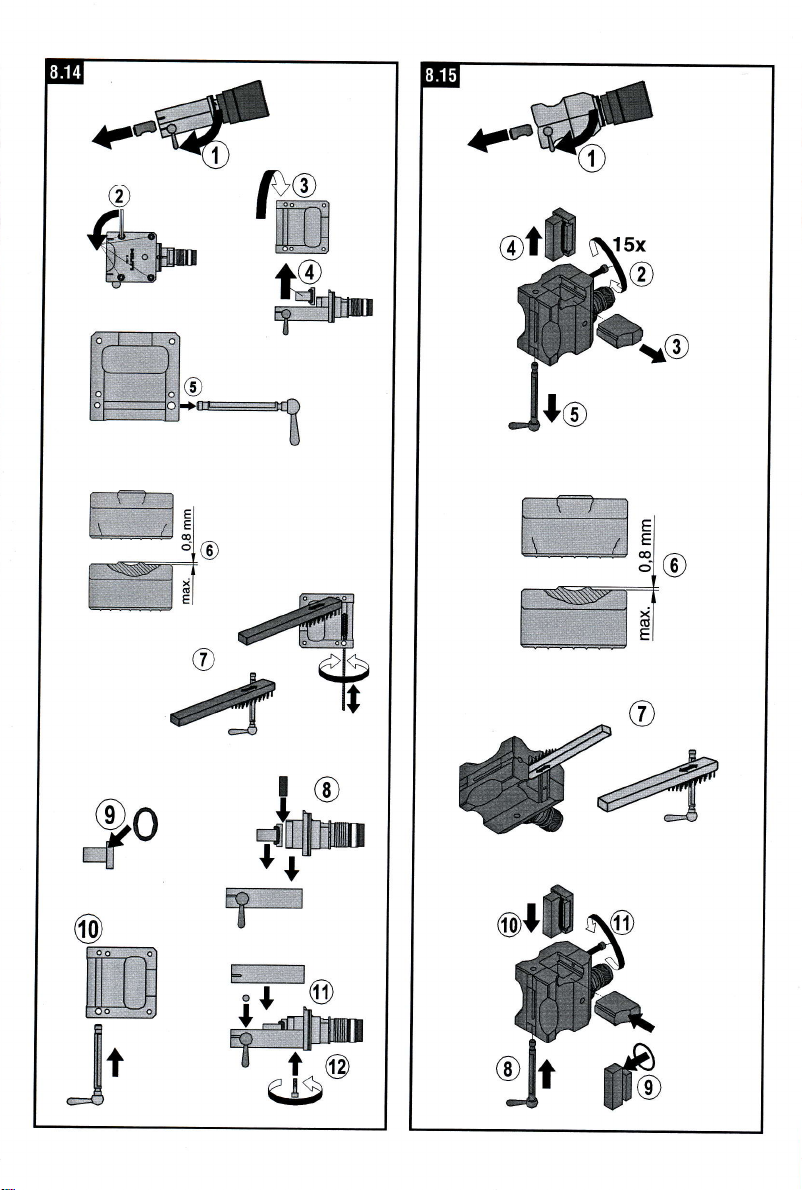
f,ECheckthe
Replace the
piston
piston
if:
O lt is broken
The tip is heavily worn
O
off)
Piston rings are
O
lt is
O
NOTE
Do
tons
not
bent
use
kept
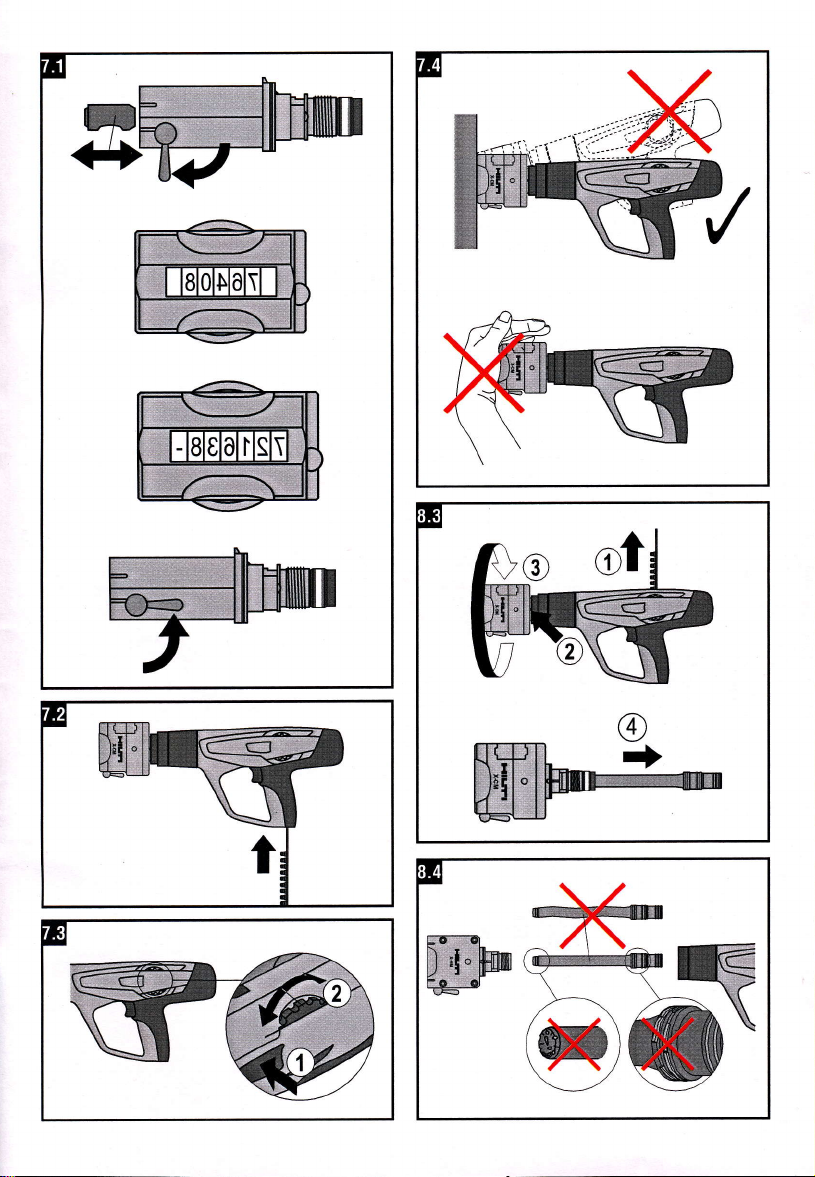
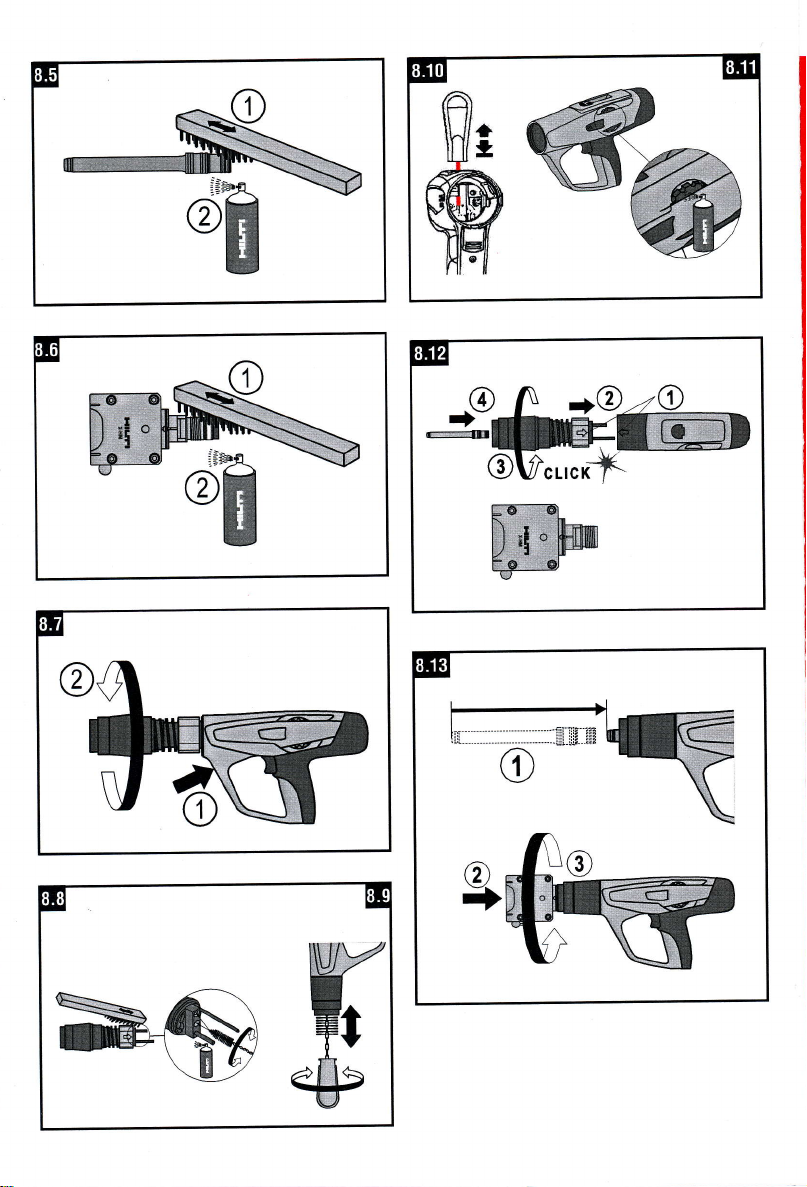
EECleaning
1.
the flat brush to clean the
Use
2. Spray the
Clean lne threaded section ol the marking head
m
1. Clean the thread with the flat brush.
2. Spray the thread lightly with Hilti spray.
(check
worn
the
piston
broken
rolling on a even
by
pistons.
piston
rings lightly
wear
for
(i.e.
a 90' segment is chipped
or missing
Do not modify
surface)
rings
piston
rings.
with
Hilti spray.
grind pis-
or
could
get
burn
your
hot while oper-
hands.
I The tool can
ating.
I You
I Do not disassemble the
it is hot. Let the tool
have the tool repaired at a Hilti service centre.
Servicing
The tool
1.
2. Fastener driving
3. lfyou
O contact
O trigger
O
O the cartridge strip is difficult
GAUTI0N
O
parts.
tool.
O Difi
endangering
-
-
-
EE
1. Ensure that no
2. Press the release
3. Unscrew
4. Remove
lhe lool
should be serviced
Caftridges
power
Never use
Do
Keep dust away from food.
Wash
misfire
power
notice that:
pressure
force increases,
regulation is ditficult
while
This may
Use only
from DX tool
not
breath
your
Disassemble the tool
increases,
cleaning
grease
for maintenance/lubrication of tool
strongly affect
Hilti
spray or such
contains substances
your
health.
in
the dust
hands after cleaning
cartridge
Remove the cartridge
the tool.
of
the marking head.
the
marking
strip
button at
head
if:
is inconsistent
to
to remove.
the tool:
the functionality of the
from
strip is loaded in the tool.
by
the marking head side.
and
adjust
of
equivalent
cleaning.
the
tool.
pulling
piston.
the
cool
(stitf),
that
it upwards out
tool while
down.
quality.
could be
piston
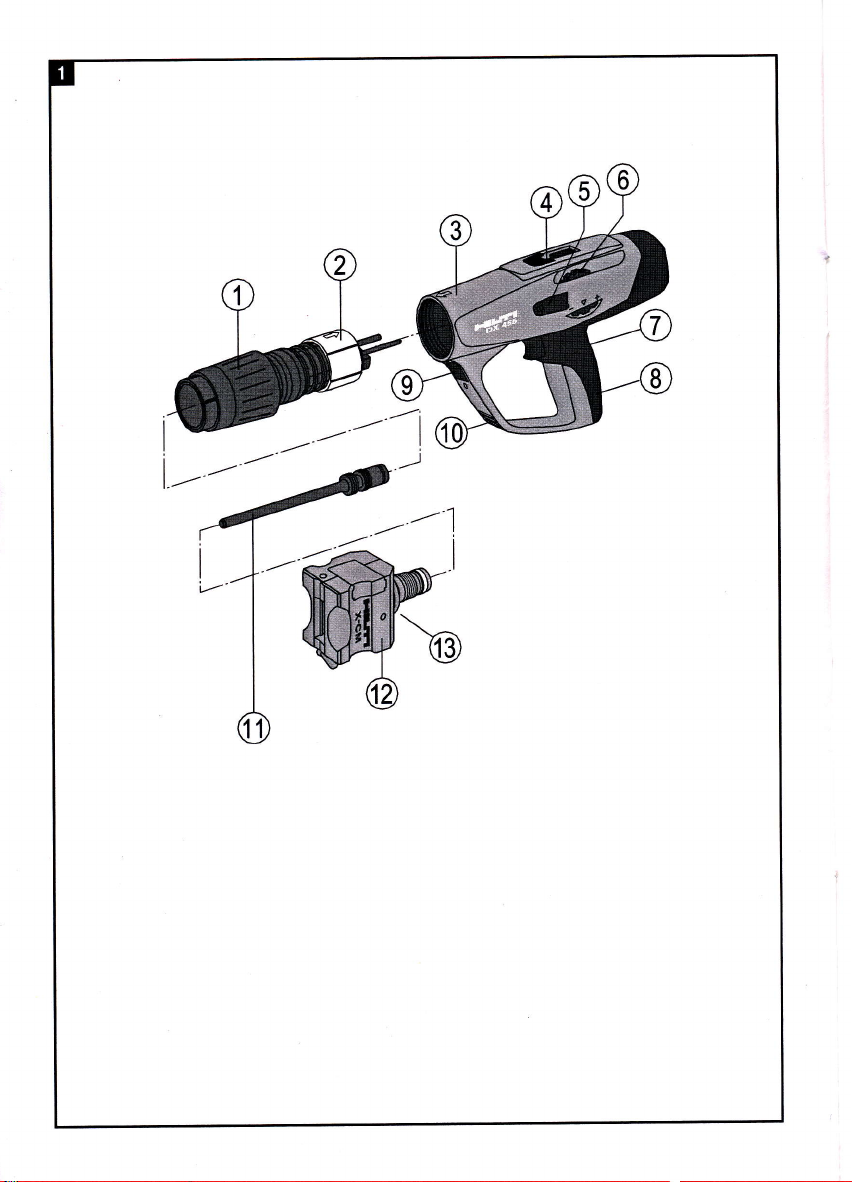
f,flDisassemble
1. Press the release
2. Unscrew
Clean the
f,E
1. Clean the spring with the
2. Clean the
3. Use the small round brush
4.
5. Spray
face.
the end
the large round brush to clean the large hole.
Use
the
EECtean
1.
the large round
Use
ing.
2. Spray
m
Use
tridge strip
slightly
ffi
Hilti
EfP
1. Bring the arrows
2. Push the
3. Screw
the inside
spray.
Clean the cartridge strip
the scraper
to lacilitate
Spray
spray.
Fit
the
gas piston
go.
will
it
the
engages.
the
button
piston
the
pislon
front
end with
piston
return unit lightly with Hilti spray.
inside
the
of
provided
guideways.
cleaning
power
me
pislon
retum
on
return
unit
piston
return
piston
return
return
gripping part.
at the
return
unit.
retum
unit
flat
brush,
the flat
brush.
to
clean the two
housing
to clean inside the hous-
brush
the housing lightly with Hilti
guideway
The rubber cover must be lifted
of the
guideway.
the
to clean
regulation wheel lightly with
unit
the housing and on the exhaust
into alignment.
into the housing as far as
unit
unit onto
unit
holes
right and left car-
the tool
until
at
it
Page 13

Assemble
ffi
1. Push the
2. Press the marking head firmly onto the
unit.
3.
the marking head
Screw
Cleaning and servicing the
ffi
the
piston
tool
into the tool as
the tool until it engages.
onto
far
as it will
X-462
marking head
The
large number of markings
occur
quality
1. Remove the marking
2. Remove the 4 locking
3. Sepante
4. Remove and individually check
5.
6. Pay special attention to fie wmr on the
7.
8. Install
9.
10. Insert the axle with
1
1 . Afier
1 2.
marking head
steel
impact extractor damaged
e.g.
disimproves
chancters by
the open
upper and
with
premature
position
0-dng,
wom
a
and
piece
0-ring
locking lever
lever to
ing
key
the
ing
mer
impact extractor
tor
Remove the locking lever with axle
tor.
force, for example by using a rubber ham-
some
assembly
Failure to replace
tor can cause
quality.
ing
the inside head
Clean
the
Mount a new rubber
extractor
Join
ing screws M6x30 using loctite and Allen key.
adaptor
inshlling fie impact
the upper and lower housing.
be
should
(20,000)
cleaned:
when
/
/
tuming the lock-
M6x30 with an Allen
screws
lower housing
for
wear and
he absorbers and adap
or cncked
breakage and
the axle
the housing
in
on the impact
in the bore
place
extnctor
Secure
go.
piston
return
HM steel
after a
problems
when marking
parb
by
apply-
tmr,
the
impact
extrac-
impact
extnc-
poor
mark-
the absorbers
the 4 lock-
extractor.
impact extractor can cause
and
7.
Clean
8. lnseft
firmly
9.Mount
Failure to replace a worn 0r cracked
premature
poor
the inside head and the axle
the
press
a new rubber
quality.
marking
with locking lever in the
axle
it until it
clicks
0-ring
place
into
on the impact extrac-
breakage
bore and
tor
placing
10.After
insert
11.lnsert the
secure
Ghecking the toolfollowing
ffi
nance
After
carrying
check that
that they function correctly.
and
NOTE
the
absorber on
the impact extractor,
them inlo the marking head
the
locking screw
M6x30 with
into the marking head and
breech
care and mainte-
out care and maintenance on the tool,
protective
all
and safety devices
Allen key
an
are fitted
o The use of lubricants other than Hilti spray could
parts.
dammage
rubber
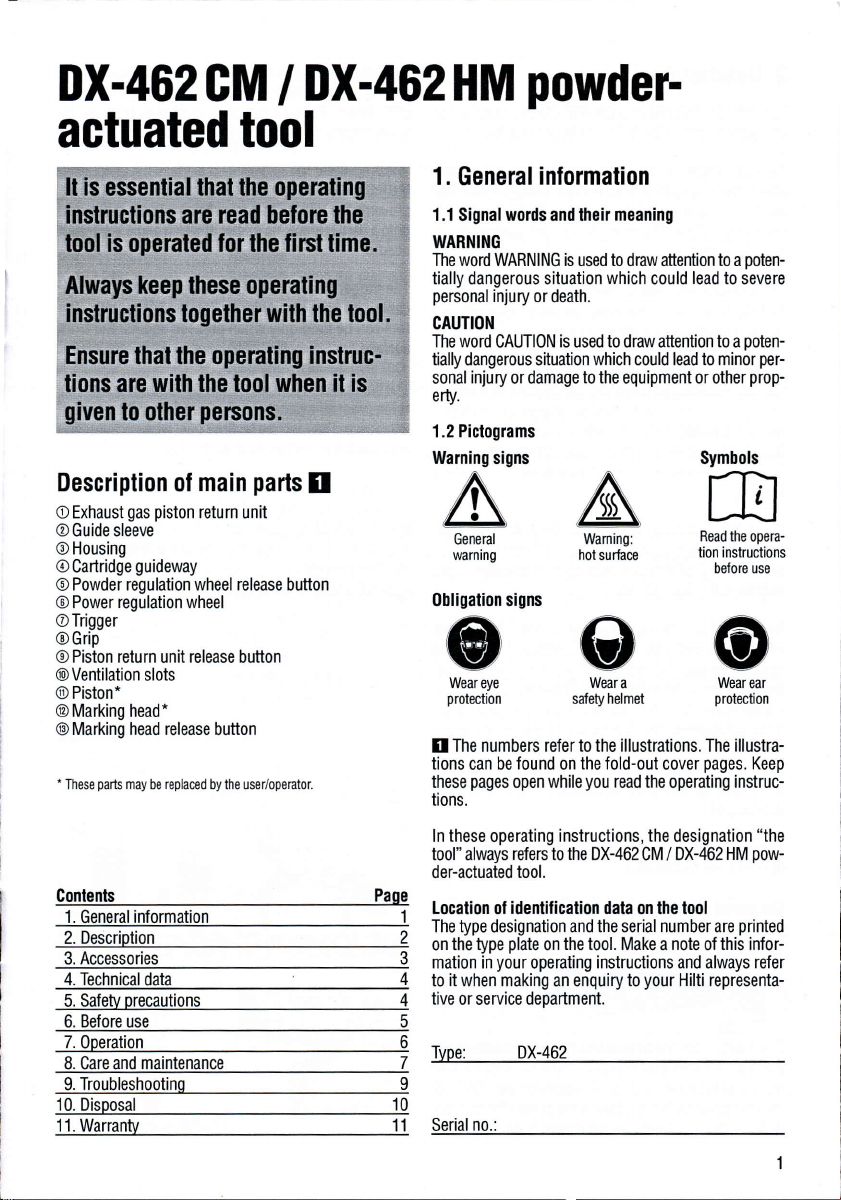
ffiGleaning
head
marking
polyurethane
The
scrvicing
and
marking head should be cleaned:
tre
X462 GM
after a large number of markings
problems
marking
when
occur e.g.
quality
impact
extractor damaged /
disimproves
polyurefiane
(20,000)
/
when
l.Remove the marking characters by turning the
lever
locking
2. Unscrew the locking screw
15 times with an Allen key
Remove the
3.
4. Remove and individually check for wear and tear,
the
impact
to the open
breech
extractor
and adaptor assembly.
punch
drift
5. Remove the locking
the unlocked
6. Pay special attention
8
through the
position
position
M6x30
approximately
from the marking head
with
0-ring,
the absorbers
lf it is necessary, insert a
bore.
lever with
and applying some
to the wear
axle by
on
turning it to
the impact
force.
Page 14

9. Troubleshooting
Gartridge
not lransporled
>f
7ffi
Carlridge
removed
Gartridge
strip cannot be
xw
I\--r-
\
-(-a-.-
-
\s
cannol be fired
/ \
xr
f
Gause
I
Damaged cartridge
:
I Carbon build up
I Tool damaged
I Tool overheated
rate
setting
I Tool damaged
WAR]IING
ItrdvdiiliJmpt to
from the
magazine strip or tool.
I Bad
cartridge
strip
because of hioh
pry
a cartridge
Cartridge strip melts
Garlridge lalls
carlridge slrip
out of the
.-:-
t Tool is compressed
while fastening.
I Fastening frequency is
r r.:
i
l
l
t l
a ::: l i i : l::: ii :
, i
i
I Fastening
frequency is too high
long
too
too high
. .
: ,: :
-,.',:li::,:::ll:].:,r]::
:t..1:::::::l:::l:::::i:il:l
,r:
.
I ::
i I
l
i
l:::
:
i:
l
.-l
Page 15

Fcause
The
opelator
increased
-
increased trigger
-
power
-
cailridge slrip is difficull lo
-
rem0ve
Piston is
unit and cannol be removed
Piston return
notices:
contacl
regulation
in
stuck
unil
pressure
force
stiff to
the
is
stuck
piston
adiusl
I Carbon,build-up
I Damaged
l,Carbon,build-up
I Carbon build-up
piston
Variation in marking
quality
LPiston damaged
I Damaged
I Worn characters
10. Disposal
power
Hilti
actuated
information.
power
actuated tool
without the need for
tools for recycling. Please ask
your
tools
old
lrom
powder
far
as
which
as oossible
Most of the materials
be conectly separated before they can be
taking
back
Hilti sales reoresentative for further
you
Should
Dismantle the
10
wish to return the
parts
pact
(im
extractor, 0-ring)
into the marking head
tools
actuated
recycled. In many
yourself
are
to
soecial
,:1,
,,,,
manufactured can be recycled.
countries,
a disposal
Hilti has already made arrangements for
your
Hilti customer service department or
facility for recycling,
tools.
The materials
proceed
as follows:
must
Page 16

Senarate the individual 0arts as
Pail /assemblv lllain maleilal
0uter casino
Screws. small oarts
cartridoe strio
Used
lollows:
Plastic
/
Steel Scrao
Plastic
/ steel
11. Warranty
Plastics recvclino
svnthetic rubber Plastics recvclino
metal
Accordinq to local reoulations
Hilti warrants that the
material and workmanship. This warrantv is valid so
the tool
long as
and serviced
operating
within 5
head from the
technical system is maintained. This
original
or other
the tool.
instructions,
years
Hilti
consumables, components and spare
products
This warranty
replacement
or replacement as a result of normal
not
Additional claims are ercluded, unless sfringenl
al rules
not otligated
quential
wilh, or by
tool
of defective
covered by
prohibit
damages, losses or expenses in connection
reason
lor any
tool
is operated and
properly
and in
for the tool
the
date of
ol equivalent
provides
parts
this warranty.
such erclusion.
for
direct,
of, the use 0f, ff
purpose.
all warranty claims are
the
indirecl, incidenhl or conse-
lmplied warranties ol
is free
supplied
handled con6cfly,
accordance
'l
year
and
(invoice
sale
quality,
free-of-charge
Parts requiring repair
only.
wear
parlicular,
In
inability
of defects
cleaned
with the Hilti
for the marking
made
and the
date),
means
that only
parts,
may be used in
repair or
tear are
and
nati0n-
Hilti is
use the
t0
mer-
in
chantability or
specifically
Send the
covery
tion for
This constitutes Hilti's entire obligation with regard to
warranty and
tool
of a
repair
excluded.
and/or
defect
lilness for
related
to the local Hilti marketing organiza-
or replacement.
supersedes
comments and oral or
warranties.
particular purpose
a
parts
immediately
prior
all
written
or contemporaneous
agreements concerning
Confirmation of GIP lesting
The Hilti DX 462 has been system and type tested.
result, the tool bears the PTB approval mark of square
shape showing approval number S 808.
guarantees
Unacceptable/inadm
determined during
the manager responsible
and to the Otfice of the
mission
compliance
(C.l.P.).
with the approved type.
issible
defects,
use
the tool must
of
the approval
at
Permanent International
In this way, Hilti
def iciencies, etc.
be
authority
are
upon dis-
As
reported to
(PIB)
Com-
a
Page 17

X-462
HM
marking
head:
ornnfifv 0rderino desionation
Piece
Piece detent
Piece
Piece
Piece
Piece
HM
Item no.
268017
4892
267979
Page 18

X-462GM
marking
head:
absorber
annular
detent
CM
extractor
HM
CM
Page 19

 Loading...