

Page 1

DX460
Operating instructions 1–17
*371665*
371665
en
Page 2
1
3
5
4
6
13
15
15
14
11
12
1
2
9
10
7
8
D
X
4
6
0
DX 460
16
20
M
X
7
2
MX 72
19
17
18
15
14
21
Page 3
XMX72
X-460-F8
X-460-F8N15
X-460-F8N10
X-460-F8S12
X-460-F8SS
X-460-F10
X-460-F810SS
X-460-FIE
X-460-FIE-L
X-DNI S/W S/W S/W S/W S
X-ZF S/W S/W S/W S/W
X-SL S/W S/W S/W S/W
X-EDNI S S S S
X-CR S S S
X-DAK S S S S
X-AL-H AL AL AL
X-FS S/W S/W
X-SW S/W S/W
X-M8/X-W8 ... P8 S S
X-M6/W6 ... P8 S S
X-M10/W10 ... P10 10 10
X-IE IE
X-IE / XI-FV IE-L
S = X-460-P8
W = X-460-P8W
AL = X-460-P8AL
10 = X-460-P10
IE = X-460-PIE
IE-L = X-460-PIE-L
6.2
Page 4
7.8
7.11
7.9
90
7.12
90
7.10
1
1
6.1
2
3
5
6
7
8
4
6.3
1
2
7.1
2
3
1
7.2
7.3
1
2
7.4
1
2
3
4
5
7.5
7.6
1
2
3
4
5
7.7
Page 5
1
2
8.3
3
4
5
4
2
2
3
11
8.4
8.6
1
2
8.7
1
2
1
2
8.8
1
2
8.9 8.10
8.11 8.12
2 1
3
CLICK
8.13
8.5
Page 6
2 2
4
3
4
3
1
8.14
1
2
9.1
Page 7

1
DX460 powder -actuated tool
Warning signs
General
warning
Warning:
hot surface
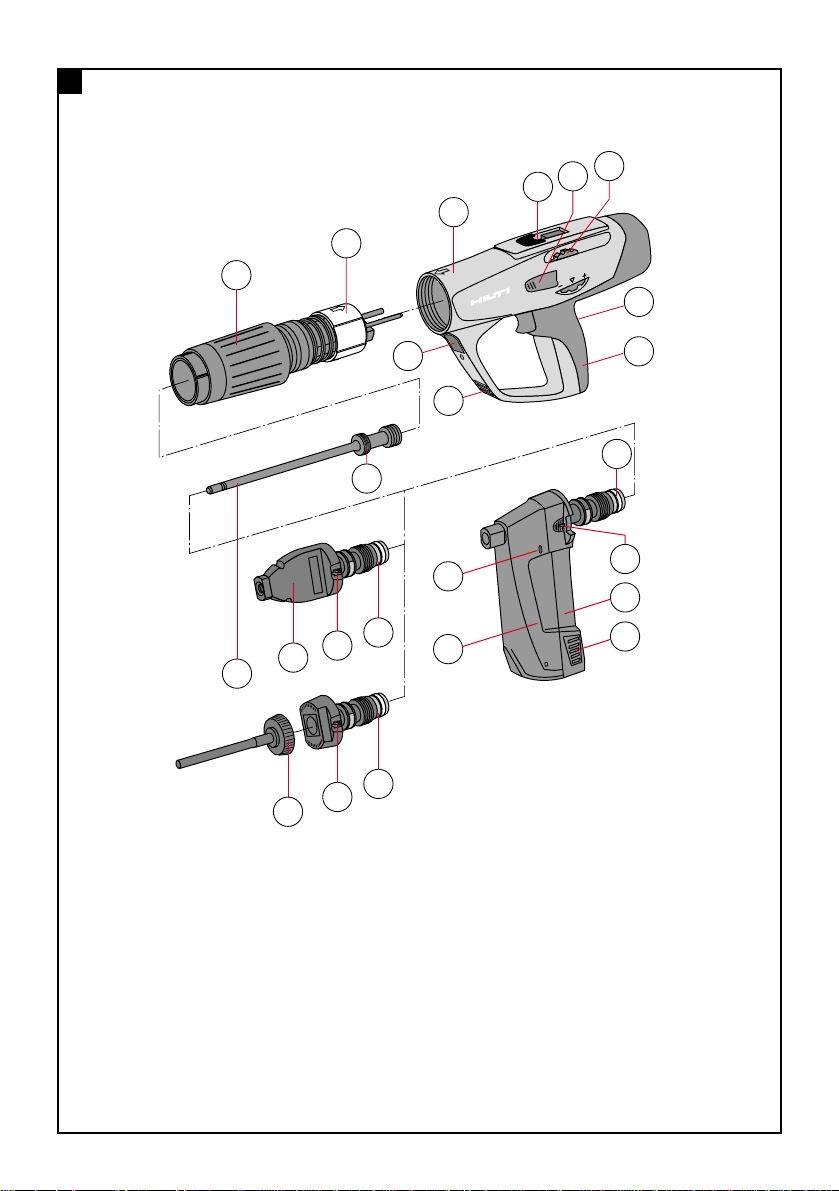
Description of main parts
@ Exhaust gas piston return unit
; Guide sleeve
= Housing
% Cartridge guideway
& Power regulation wheel release button
( Power regulation wheel
) Trigger
+ Grip
§ Piston return unit release button
/ Ventilation slots
: Piston rings
· Piston *
$ Fastener guide *
£ Fastener guide release button
| Buffer *
¡ Magazine *
Q Magazine cover
W Magazine cover release button
E Magazine release button
R Load status indicator
T Replaceable fastener guide nosepiece *
* These parts may be replaced by the user/operator .
Obligation signs
Wear eye
protection
Wear a
safety helmet
Wear ear
protection
Symbols
Read the opera-
tion instructions
before use
It is essential that the operating
instructions are read before the
tool is operated for the first time.
Always keep these operating
instructions together with the tool.
Ensure that the operating instructions are with the tool when it is
given to other persons.
Contents Page
1. General information 1
2. Description 2
3. Accessories 3
4. Technical data 5
5. Safety precautions 5
6. Before use 6
7. Operation 7
8. Care and maintenance 9
9. Troubleshooting 11
10. Disposal 16
11. Warranty 17
1. General information
1.1 Signal words and their meaning
WARNING
The word WARNING is used to draw attention to a potentially dangerous situation which could lead to severe
personal injury or death.
CAUTION
The word CAUTION is used to draw attention to a potentially dangerous situation which could lead to minor personal injury or damage to the equipment or other property.
1.2 Pictograms
The numbers refer to the illustrations. The illustrations can be found on the fold-out cover pages. Keep
these pages open while you read the operating instructions.
In these operating instructions, the designation “the
tool” always refers to the DX 460 powder-actuated tool.
Location of identification data on the tool
The type designation and the serial number are printed
on the type plate on the tool. Make a note of this information in your operating instructions and always refer
to it when making an enquiry to your Hilti representative or service department.
Type: DX460
Serial no.:
Page 8
2
2. Description
The tool is designed for professional use in fastening
applications where nails, threaded studs and composite
fasteners are driven into concrete, steel and sand-lime
block masonry.
The tool works on the well-proven piston principle and
is therefore not related to high-velocity tools. The piston principle provides an optimum of working and fastening safety. The tool works with cartridges of 6.8/11
caliber .
The piston is returned to the starting position and the
cartridges are fed to the firing chamber automatically
by gas pressure from the fired cartridge. This permits
fastenings to be made very quickly and economically
with nails and threaded studs. The use of a nail magazine greatly increases the speed and convenience of fastening with the tool, above all when making large numbers of identical fastenings of all kinds.
As with all powder-actuated tools, the tool, magazine,
fastener program and cartridge program form a “technical unit”. This means that optimal fastening with this
system can only be assured if the fasteners and cartridges are specially manufactured for it, or products of
equivalent quality, are used. The fastening and application recommendations given by Hilti are only applicable
if these conditions are observed.
The tool features 5-way safety – for the safety of the
operator and bystanders.
The piston principle
The energy from the propellant charge is transferred to
a piston, the accelerated mass of which drives the fastener into the base material. As approximately 95 % of
the kinetic energy is absorbed by the piston, the fastener
is driven into the base material at much reduced velocity (less than 100 m/sec.) in a controlled manner . The
driving process ends when the piston reaches the end
of its travel. This makes dangerous through-shots virtually impossible when the tool is used correctly .
The drop-firing safety device is the result of coupling
the firing mechanism with the cocking movement. This
prevents the Hilti DX tool from firing when it is dropped
onto a hard surface, no matter at which angle the impact
occurs.
The trigger safety device ensures that the cartridge
cannot be fired simply by pulling the trigger only. The
tool can be fired only when pressed against the work
surface.
3
2
The contact pressure safety device requires the tool
to be pressed against the work surface with a significant force. The tool can be fired only when pressed fully against the work surface in this way.
In addition, all Hilti DX tools are equipped with an unintentional firing safety device . This prevents the tool
from firing if the trigger is pulled and the tool then pressed
against the work surface. The tool can be fired only when
it is first pressed (1.) against the work surface correctly and the trigger then pulled (2.).
5
4
1
2
4
2
5
3
1
Page 9

3
3. Cartridges, accessories and fasteners
Fasteners
Ordering designation Application
X-DNI, X-ZF Nails with differing application profile for a wide variety of fastenings
X-SL Easily removable formwork nail for temporary fastenings
X-EDNI Magazined standard nails for efficient fastening to steel
X-CR Stainless-steel nails for fastenings in damp or corrosive surroundings
X-AL-H High-strength nails for fastening to steel and concrete of higher strength
X-FS The ideal fastener for positioning formwork
X-IE The ideal fastener for fastening insulation material to concrete, plastered solid
masonry and steel
X-SW Flexible washer fasteners for fastening insulating foils / sheeting to concrete and steel
23/36 mm Washers for Hilti nails: simple securing of joint seals, foils / sheeting and timber to
concrete and steel using the X-460 WH23/36 washer holder
X-(E)M/W/6/8 ... P8, Studs for bolted fastenings on concrete and steel
X-M/W10 ... P10
X-(D)FB Metal conduit clip for fastening conduits or cable ducts and insulated pipes (hot or
cold) for plumbing and heating
X-EFC Plastic conduit clip for fastening flexible electric cable ducts and water or heating
pipes (hot or cold)
X-EKB Cable clasp for fastening electric cables flat on ceilings and walls
X-ECH Bunched cable holder for fastening cables on ceilings and walls
X-JH For fastening electric cables in accordance with fire prevention regulations (LAR)
X-ET Fastener for plastic (PVC) electric cable trunking
X-CC Clip for securing suspended fastening systems using wires or chains
X-HS Suspension system with threaded connection
For further equipment contact your local Hilti organisation.
Magazine
MX 72 Magazine – For quick and convenient fastenings
Fastener guides
Ordering designation Application
X-460-F8 Standard
X-460-F8N15 15 mm width for improved accessibility
X-460-F8N10 10 mm width for improved accessibility
X-460-S12 Fastener guide for fasteners with a 12 mm steel washer – higher pull over values
X-460-F8SS Spall stop for 8 mm studs – reduces spalling
X-460-F10 For 10 mm studs and nails
X-460-F10SS Spall stop for 10 mm studs – reduces spalling
X-460-FIE For driving X-IE insulation fasteners
X-460-FIE-L For driving XI-FV and X-IE insulation fasteners
Page 10

4
Accessories
Ordering designation Application
X-SGF8 Splinter guard for the X-460-F8 standard fastener guide
X-460-SGMX Splinter guard for the X-460-MX72
X-460-STAB For the X-460-F10 fastener guide
X-460-TIE Replacement nosepiece for the X-460-FIE fastener guide
X-460-TIE-L Replacement nosepiece for the X-460-FIE-L fastener guide
X-EF adaptor X-EF adaptor for stabilizing the tool perpendicular to the work surface and for reduc-
ing concrete spalling when fastening the X-EKB and X-ECH (only with X-460-F8 fas-
tener guide)
X-460-B Rubber buffer – protects the fastener guide when the tool is used incorrectly
X-460-WH23/36 Washer holder – For fastening 23 and 36 mm steel washers with the magazine. The
washer holder can be mounted on the magazine.
X-PT 460 Pole tool extension – Extension system for various ceiling application
Pistons
Ordering designation Application
X-460-P8 Standard piston
X-460-P8AL AL piston – Only for AL nails. Gives the nail better guidance and increases the applica-
tion limit.
X-460-P8W Wood piston – With a tapered point. For applications when overdriving the nail into
wood is desired. Allows proper piston return.
X-460-P10 10 mm piston – For fastening M 10 / W10 studs
X-460-PIE Piston for driving X-IE insulation fasteners using the X-460-FIE fastener guide
X-460-PIE-L Piston for driving X-IE insulation fasteners using the X-460-FIE-L fastener guide
Cartridges
Ordering designation Colour code Power level
6.8/11 M green Green Low
6.8/11 M yellow Yellow Medium
6.8/11 M red Red Heavy
6.8/11 M black Black/purple Extra heavy
Safety accessory and cleaning set
Safety goggles, earplugs, Hilti spray, ramrod, flat brush, large round brush, small round brush, scraper, cleaning
cloth.
Page 11

5
4. T echnical data
DX 460 tool
Weight 3.25 kg (7.16 lb),
3.51 kg (7.78 lb) with magazine
Tool length 458 mm (18.03″),
475 mm (18.7″) with magazine
Nail length Max. 72 mm (27/8″)
Recommended maximum fastening rate 700 per hour
Cartridges 6.8/11 M (27 cal. short) green, yellow, red, black
Power regulation 4 cartridge power levels, regulation wheel with locking
function
MX 72 magazine
Weight 0.653 kg (1.44 lb)
Nail length Max. 72 mm (27/8″)
Magazine capacity Max. 13 nails
Right of technical changes reserved
5. Safety precautions
5.1 Basic safety instructions
In addition to the safety precautions listed in the individual sections of these operating instructions, the
following points must be strictly observed at all times.
5.2 Use as intended
The tool is designed for professional use in fastening
applications in construction where nails, threaded studs
and composite fasteners are driven into concrete, steel
and sand-lime block masonry.
5.3 Improper use
● Manipulation or modification of the tool is not permissible.
●Do not operate the tool in an explosive or flammable
atmosphere, unless the tool is approved for such use.
●To avoid the risk of injury, use only original Hilti fasteners, cartridges, accessories and spare parts or those
of equivalent quality.
● Observe the information printed in the operating
instructions concerning operation, care and maintenance.
●Never point the tool at yourself or any bystander .
●Never press the muzzle of the tool against your hand
or other part of your body.
●Do not drive nails into materials such as glass, marble,
plastic, bronze, brass, copper , natural rock, insulation
material, hollow brick, glazed tile, thin-gauge sheet metal
(< 4 mm), grey cast iron, spheroidal cast iron and gas
concrete.
5.4 Technology
● This tool is designed with the latest available tech-
nology.
●The tool and its ancillary equipment may present haz-
ards when used incorrectly by untrained personnel or
not as directed.
5.5 Making the workplace safe
●Avoid unfavourable body positions.
●Objects which could cause injury should be removed
from the working area.
●The tool is for hand-held use only .
●Keep other persons, children in particular, outside the
working area.
● Before using the tool, make sure that no one
is standing behind or below the point where fasteners
are to be driven.
●Keep the grip dry, clean and free from oil and grease.
5.6 General safety precautions
●Operate the tool only as directed and only when it is
in faultless condition.
●Use the stabiliser/splinter guard when the application
permits.
●If a cartridge misfires or fails to ignite, proceed as fol-
lows:
1. Keep the tool pressed against the working surface
for 30 seconds.
2. If the cartridge still fails to fire, withdraw the tool
from the working surface, taking care that it is not
pointed towards your body or bystanders.
Page 12

6
3. Manually advance the cartridge strip one cartridge.
Use up the remaining cartridges on the strip.
Remove the used cartridge strip and dispose of it in
such a way that it can be neither reused nor misused.
● If 2–3 cartridge misfires occur in succession (with-
out clearly audible noise of the cartridge firing and the
fastener being driven with significantly less power), proceed as follows:
1. Stop using the tool immediately.
2. Disassemble the tool (see 8.3).
3. Check that the correct combination of fastener
guide, piston and fastener are used (see 6.2).
4. Check the buffer, piston and fastener guide / magazine for wear and replace the parts if necessary
(See 6.3 and 8.4. X-IE see 8.5).
5. Clean the tool.
6. Do not continue to use the tool if the problem persists after carrying out the steps described above.
Have the tool checked and repaired if necessary at
a Hilti repair center .
● Never attempt to pry a cartridge from the magazine
strip or the tool.
● Keep the arms flexed when the tool is fired (do not
straighten the arms).
●Never leave the loaded tool unattended.
● Always unload the tool before beginning cleaning,
servicing or changing parts and before storage.
●Store cartridges and unused tools unloaded, in a dry,
high or locked place out of the reach of children.
5.7 Temperature
●Do not disassemble the tool while it is hot.
●Never exceed the recommended maximum fastener
driving rate (number of fastenings per hour). The tool
may otherwise overheat.
●Should the plastic cartridge strip begin to melt, stop
using the tool immediately and allow it to cool down.
5.8 Requirements to be met by users
●The tool is intended for professional use.
●The tool may be operated, serviced and repaired only
by authorised, trained personnel. This personnel must
be informed of any special hazards that may be encountered.
●Proceed carefully and do not use the tool if your full
attention is not on the job.
●Stop working with the tool if you feel unwell.
5.9 Personal protective equipment
●The operator and other persons in the immediate vicin-
ity must always wear eye protection, a hard hat and ear
protection.
6. Before use
6.1 Tool inspection
● Ensure that there is no cartridge strip in the tool. If
there is a cartridge strip in the tool, remove it by hand
from the tool.
●Check all external parts of the tool for damage at regular intervals and check that all controls operate properly. Do not operate the tool when parts are damaged or
when the controls do not operate properly. If necessary ,
have the tool repaired at a Hilti service centre.
● Check the buffer and piston for wear (see “8. Care
and maintenance”).
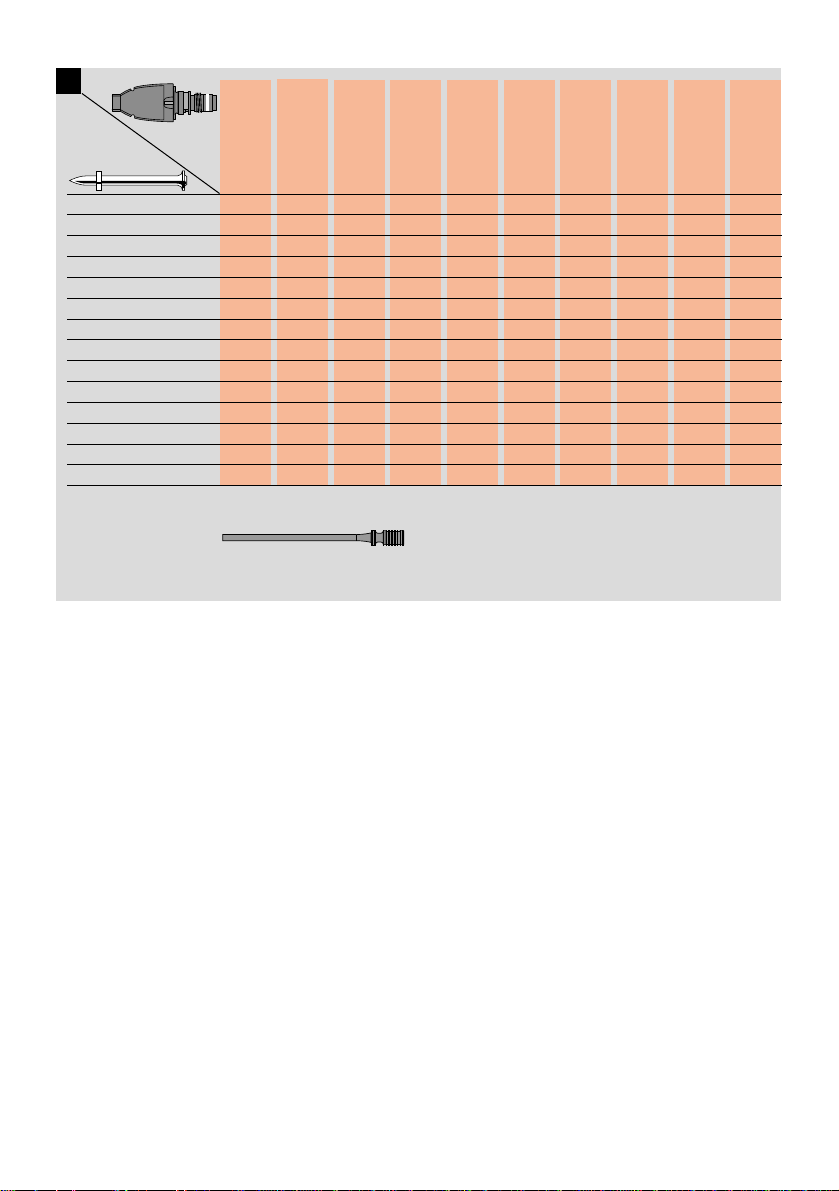
6.2 Choosing the right fastener guide / piston / fastener combination
Use of the wrong combination may result in damage to
the tool and / or affect fastening quality (see table on last
page of these instructions).
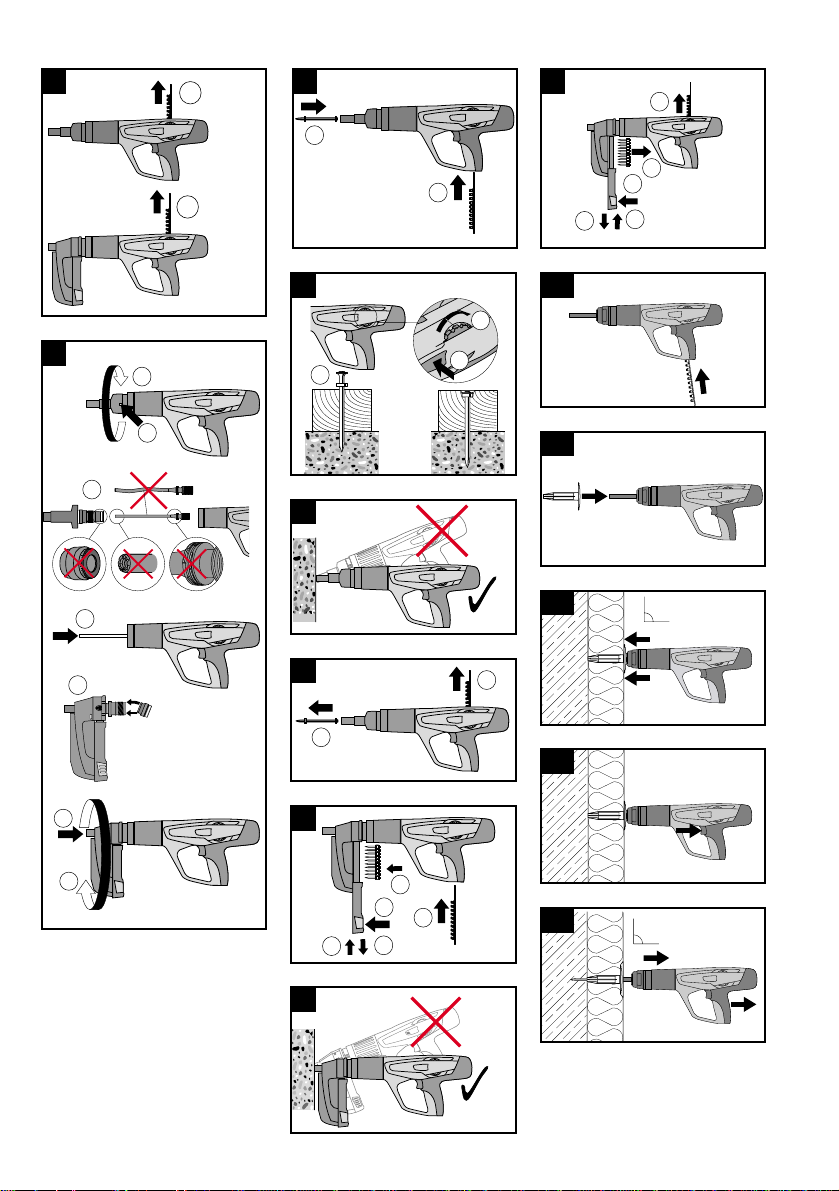
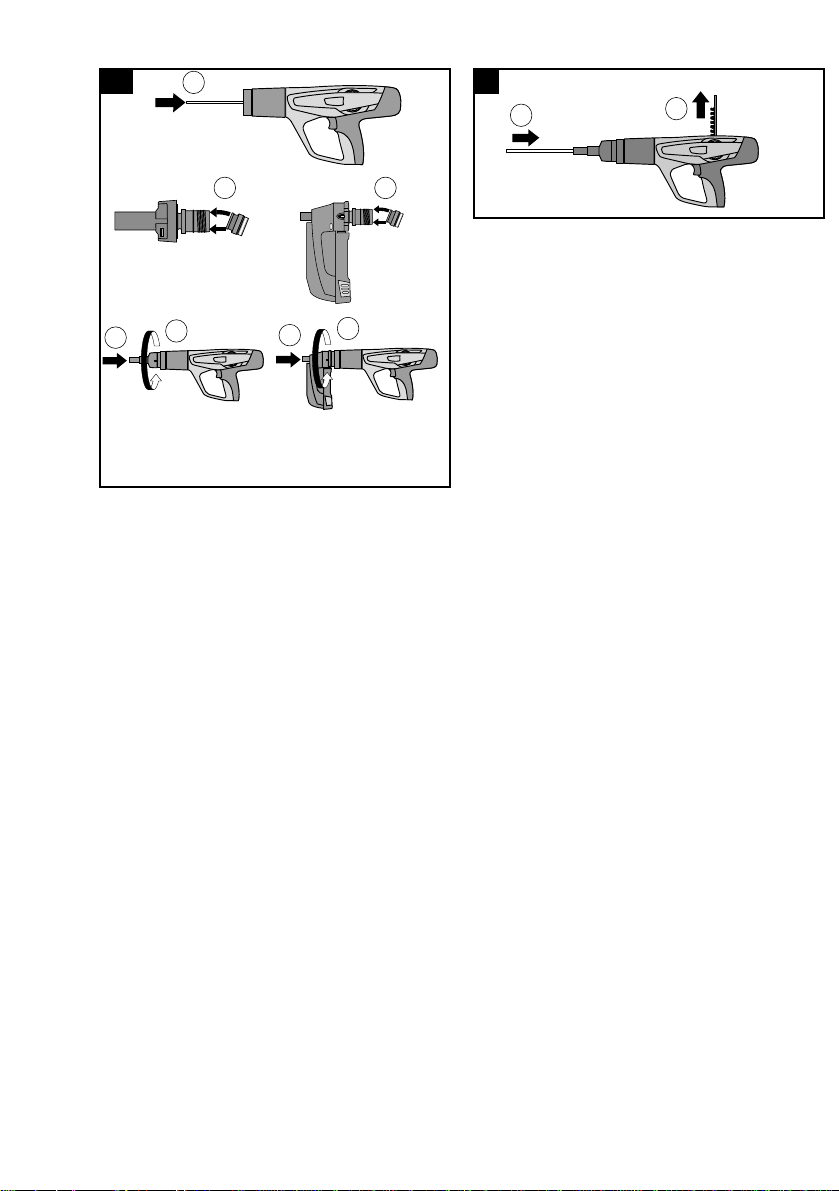
6.3 Conversion from single-fastener tool to maga-
zine tool (changing the fastener guide)
1. Ensure that no cartridge strip or fastener is loaded in
the tool. Remove the cartridge strip by pulling it
upwards out of the tool and remove the fastener from
the fastener guide / magazine.
2. Press the release button on the side of the fastener
guide.
3. Unscrew the fastener guide.
4. Check the buffer and piston for wear (see "Care and
maintenance").
5. Push the piston into the tool as far as it will go.
6. Press the buffer onto the magazine until it snaps into
place.
7. Push the magazine firmly onto the piston return unit.
8. Screw the magazine onto the tool until it engages.
Page 13

7
7. Operation
CAUTION
■ The nail or stud is driven by a cartridge being fired.
■ Excessive noise may damage the
hearing.
■ Wear ear protection (users and
bystanders).
WARNING
■ The tool could be made ready to
fire if pressed against a part of
the body (e.g. hand)..
■ This could cause a nail to be driven into a part of the body.
■ Never press the muzzle of the tool
against parts of the body.
WARNING
■ Under certain circumstances, the
tool could be made ready to fire
by pulling back the magazine, fastener guide or the fastener by
hand.
■ When in the “ready to fire” state,
a fastener could be driven into a
part of the body.
■ Never pull back the magazine,
fastener guide or fastener by hand.
CAUTION
■ The base material may splinter
when a fastener is driven or fragments of the cartridge strip may
fly off.
■ Flying fragments may injure parts
of the body or the eyes.
■ Wear safety goggles and a hard
hat (users and bystanders).
X-DNI nail (concrete/steel)
MD
ET
SL
SD
Length of nails for steel
Penetration depth (ET) 22± 5 mm
(nail point must protrude)
+material thickness (MD) = shank length
steel thickness (SD) = min. 4 mm,
max. 10 mm
Length of nail for concrete
Penetration depth (ET) 27±5 mm
+ material thickness (MD) = shank
length
Penetration depth (ET) 12± 2 mm
+material thickness (MD)
= shank length (SL) min.
steel thickness (SD) = min. 4 mm
X-EDNI nail (steel)
Penetration depth
concrete: 27±5 mm
steel: 12±2 mm
Threaded studs
for concrete or steel
Concrete
A = min. edge distance = 70 mm (2
3
/4")
B = min. spacing = 80 mm (3
1
/8")
C = min. base material thickness = 100 mm (4")
Steel
A = min. edge distance = 15 mm (
5
/8")
B = min. spacing = 20 mm (
3
/4")
C = min. base material thickness = 4 mm (
5
/32")
MD
ET
SL
Fastening guidelines
NOTE
These application recommendations must always be
observed. For more specific information, refer to the
Hilti Fastening T echnology Manual, which is available
from your local Hilti organisation.
BA
d
C
X-IE fastener (concrete, solid rendered masonry, steel)
On all base materials, fastener length corresponds to thickness of insulating
material.
SD
MD
ET
SL
BA
ET
C
Page 14

8
There are more than There are 3 or less nails in
3 nails in the magazine. the magazine. A strip of
10 nails may be loaded.
WARNING
●All nails in the magazine must be of the same length.
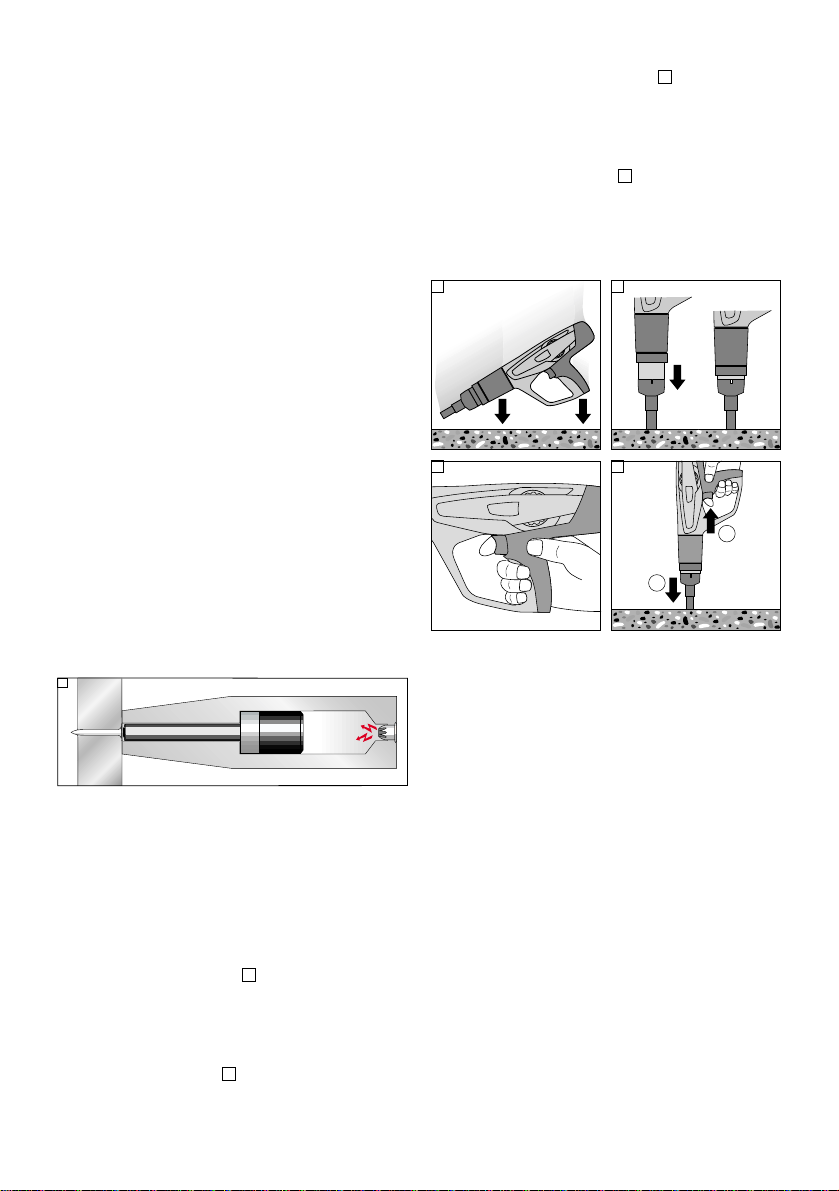
7.6 Fastening with the magazine tool
1. Press the tool firmly against the work surface at right
angles.
2. Fire the tool by pulling the trigger.
WARNING
●Never attempt to drive a fastener in an existing hole
except where recommended by Hilti, e.g. when using
the DX Kwik system.
●Never attempt to redrive the same fastener .
●Never exceed the maximum fastener driving rate.
7.7 Unloading the magazine tool
1. Ensure that there is no cartridge strip in the tool. If
there is a cartridge strip in the tool, remove it by pulling
it upwards out of the tool.
2. Release the magazine cover by pressing the release
button.
3. Pull the magazine cover down as far as it will go.
4. Ensure that there is no nail strip in the magazine.
5. Push the magazine cover up until it snaps closed.
7.8
Load the cartridge strip (narrow end first) by inserting
it into the bottom of the tool grip until flush. If the strip
has been partly used, pull it through until a live cartridge
is in the chamber . (The last visible number on the back
of the cartridge strip indicates which cartridge is next to
be fired.)
7.9
Push the X-IE fastener onto the nosepiece of the DX 460
IE as far as it will go.
7.10
Press the tool against the insulating material at right
angles so that the X-IE is pushed through the insulating
material and lies flush with its surface.
7.11
Drive the fastener by pulling the trigger .
7.12
Pull the tool out of the X-IE fastener at right angles.
7.1 Loading the single-fastener tool
1. Insert the fastener (head first) until the washer is held
in the tool.
2. Load the cartridge strip (narrow end first) by inserting it into the bottom of the tool grip until flush. If the
strip has been partly used, pull it through until a live
cartridge is in the chamber. (The last visible number
on the back of the cartridge strip indicates which cartridge is next to be fired.)
7.2 Adjusting the driving power
Start with the lowest cartridge power level and the tool
set at the lowest power setting.
1. Press the release button.
2. Turn the power regulation wheel to 1.
3. Drive a nail.
4. If the fastener doesn't penetrate deeply enough,
increase the power level and repeat steps 1 to 3.
Repeat until the desired depth of penetration is reached.
Use a more powerful cartridge if necessary.
7.3 Fastening with the single-fastener tool
1. Press the tool firmly against the work surface at right
angles.
2. Fire the tool by pulling the trigger.
WARNING
●Never attempt to drive a fastener in an existing hole
except where recommended by Hilti, e.g. when using
the DX Kwik system.
●Never attempt to redrive the same fastener .
●Never exceed the maximum fastener driving rate.
7.4 Reloading the single-fastener tool
Ensure that no cartridge strip or fastener is loaded in the
tool. Remove the cartridge strip by pulling it upwards
out of the tool and remove the fastener from the fastener
guide.
7.5 Loading the magazine tool
1. Release the magazine cover by pressing the release
button.
2. Pull the magazine cover down as far as it will go.
3. Load a new nail strip into the magazine.
4. Push the magazine cover up until it snaps closed.
5. Load the cartridge strip (narrow end first) by pushing it into the grip from below until flush. If the strip
has been partly used, pull it through until an unused
cartridge is in the chamber. (The last visible number
on the back of the cartridge strip indicates which cartridge is next to be fired.)
When the indicator shows red, or partly red, there are 3
or less nails in the magazine. A strip of 10 nails may then
be loaded.
Page 15

9
CAUTION
■ The tool can get hot while operating.
■ You could burn your hands.
■ Do not disassemble the tool while
it is hot. Let the tool cool down.
8. Care and maintenance
8.1 Care of the tool
The outer casing of the tool is manufactured from impactresistant plastic. The grip comprises a synthetic rubber
section.
The ventilation slots must be unobstructed and kept
clean at all times. Do not permit foreign objects to enter
the interior of the tool. Use a slightly damp cloth to clean
the outside of the tool at regular intervals. Do not use a
spray or steam-cleaning system for cleaning.
8.2 Maintenance
Check all external parts of the tool for damage at regular intervals and check that all controls operate properly. Do not operate the tool when parts are damaged or
when the controls do not operate properly. If necessary ,
have the tool repaired at a Hilti service centre.
Servicing the tool
The tool should be serviced if:
1. Cartridges misfire
2. Fastener driving power is inconsistent
3. If you notice that:
●contact pressure increases,
●trigger force increases,
●power regulation is difficult to adjust (stiff),
●the cartridge strip is difficult to remove.
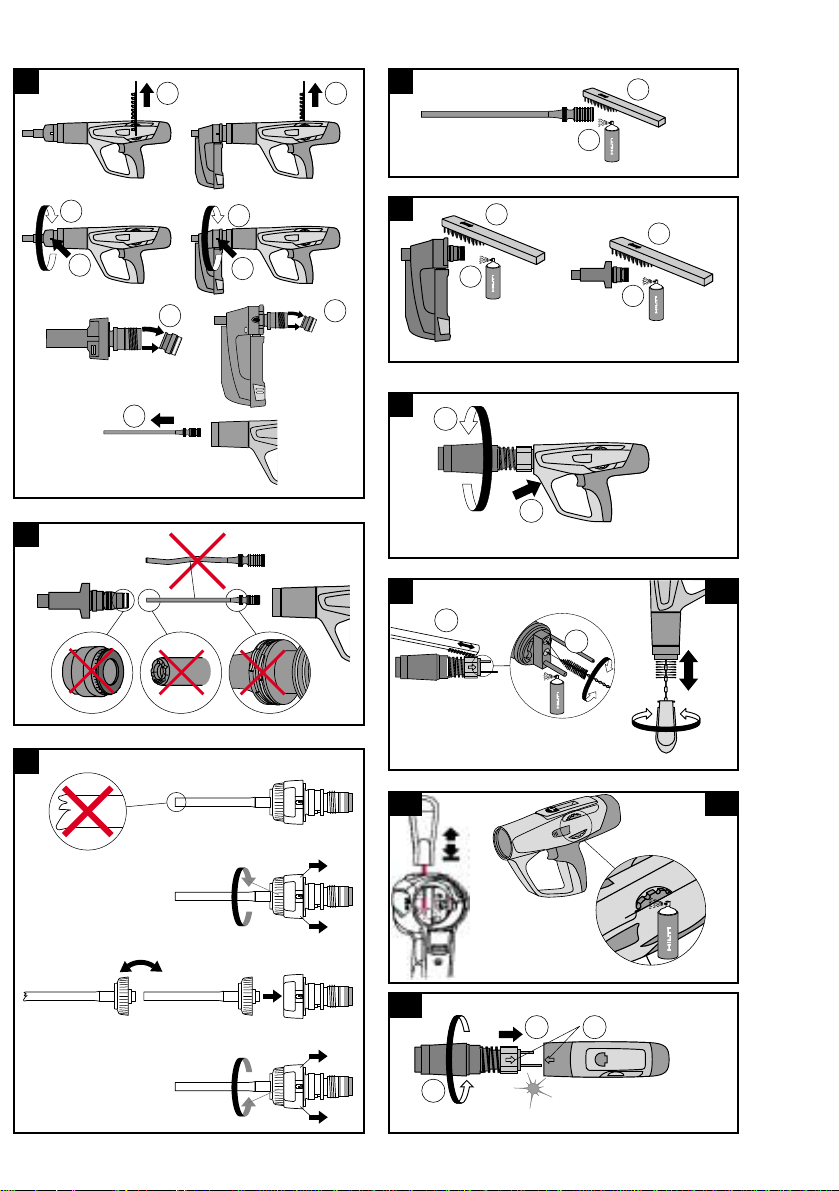
8.3 Disassemble the tool
1. Ensure that no cartridge strip or fastener is loaded in
the tool. Remove the cartridge strip by pulling it
upwards out of the tool and remove the fastener from
the fastener guide.
2. Press the release button at the side.
3. Unscrew the fastener guide / magazine.
4. Remove the buffer by bending it away from the fastener guide / magazine.
5. Remove the piston.
8.4 Check the buffer and piston for wear
Replace the buffer if:
●the metal ring is loose or broken,
●the buffer no longer holds on the fastener guide,
● excessive, uneven wear beneath the metal ring is
noticed.
Replace the piston if:
●it is broken,
●the tip is heavily worn (i.e. a 90°segment is chipped
off),
●piston rings are broken or missing,
●it is bent (check by rolling on an even surface).
NOTE
Do not use worn pistons. Do not modify or grind pistons.
8.5 Check the fastener guide for wear
The nosepiece of the X-460-FIE and X-460-FIE-L fastener guides should be replaced if the tubular section is
damaged (e.g. bent, widened or cracked). For instructions on replacing the nosepiece, please refer to sections 6.3 and 8.5.
1. Ensure that no cartridge strip or fastener is loaded
in the tool. Remove the cartridge strip by pulling it
upwards out of the tool and remove the fastener
from the fastener guide.
2. Press the release button on the side of the fastener
guide.
3. Unscrew the fastener guide.
4. Check the buffer and piston for wear (see care and
maintenance instructions).
5. Pull the moveable ring downwards and unscrew and
remove the clamping nut.
6. Replace the fastener guide nosepiece.
7. Pull the moveable ring downwards and screw on
the clamping nut.
8. Push the piston into the tool as far as it will go.
9. Press the buffer onto the fastener guide until it
engages.
10. Push the fastener guide firmly onto the exhaust gas
piston return unit.
11. Screw the fastener guide onto the tool until it engages.
8.6 Clean the threaded section of the fastener guide/
magazine
1. Clean the thread with the flat brush.
2. Spray the thread lightly with Hilti spray .
8.7 Disassemble the piston return unit
1. Press the release button at the gripping part.
2. Unscrew the piston return unit.
8.8 Clean the piston return unit
1. Clean the spring with the flat brush.
2. Clean the front end with the flat brush.
3. Use the small round brush to clean the two holes at
the end face.
4. Spray the piston return unit lightly with Hilti spray .
8.9 Clean inside the housing
1. Use the large round brush to clean inside the hous-
ing.
2. Spray the inside of the housing lightly with Hilti spray .
Page 16

10
8.10 Clean the cartridge strip guideway
Use the scraper provided to clean the right and left cartridge strip guideways. The rubber cover must be lifted
slightly to facilitate cleaning of the guideway .
8.11 Spray the power regulation wheel lightly with
Hilti spray
8.12 Fit the piston return unit
1. Bring the arrows on the housing and on the exhaust
gas piston return unit into alignment.
2. Push the piston return unit into the housing as far as
it will go.
3. Screw the piston return unit onto the tool until it
engages.
8.13 Assemble the tool
1. Push the piston into the tool as far as it will go.
2. Press the buffer onto the fastener guide / magazine
until it snaps into place.
3. Press the fastener guide / magazine firmly onto the
piston return unit.
4. Screw the fastener guide / magazine onto the tool
until it engages.
8.14 Checking the tool following care and mainte-
nance
After carrying out care and maintenance on the tool,
check that all protective and safety devices are fitted and
that they function correctly.
NOTE
●The use of lubricants other than Hilti spray could dam-
age rubber parts, especially the buffer .
Page 17

11
Cartridge strip cannot be
removed
9. T roubleshooting
Piston is stuck in the base
material
Cartridge not transported
Cause
■ Fastener too short
■ Fastener without washer
■ Driving power too high
■ Damaged cartridge strip
■ Carbon build up
■ Tool damaged
■ Tool overheated because of high
setting rate
■ Tool damaged
WARNING
Never attempt to pry a cartridge
from the magazine strip or tool.
■ Bad cartridge
■ Carbon build-up
WARNING
Never attempt to pry a cartridge
from the magazine strip or the tool.
Possible remedies
■ Remove cartridge strip and use
pushrod provided to push piston
fully back (See 9.1)
■ Use longer fastener
■ Use fastener with washer for
wood applications
■ Reduce power setting
• Power regulation
• Lower cartridge power level
■ Change cartridge strip
■ Clean the cartridge strip guide-
way (see 8.10)
If the problem persists:
■ Contact Hilti Repair Centre
■ Let the tool cool down and then
carefully try to remove the
cartridge strip
If not possible:
■ Contact Hilti Repair Centre
■ Manually advance the cartridge
strip one cartridge
If the problem occurs more
often: Clean the tool
If the problem persists:
■ Contact Hilti Repair Centre
■ Tool is compressed too long
while fastening.
■ Fastening frequency is too high
■ Compress the tool less long
while fastening.
■ Remove the cartridge strip
■ Disassemble the tool (see 8.7)
for fast cooling and to avoid
possible damage
If the tool cannot be disassembled:
■ Contact Hilti Repair Centre
Cartridge strip melts
Cartridge cannot be fired
Page 18

12
Piston is stuck in the piston return
unit and cannot be removed
Cartridge falls out of the
cartridge strip
The operator notices:
– increased contact pressure
– increased trigger force
– power regulation stiff to adjust
– cartridge strip is difficult to
remove
■ Fastening frequency is too high
WARNING:
Never attempt to pry a cartridge
from the magazine strip or tool.
■ Carbon build-up
■ Immediately discontinue using
the tool and let it cool down
■ Remove cartridge strip
■ Let the tool cool down.
■ Clean the tool and remove loose
cartridge.
If it is impossible to disassemble
the tool:
■ Contact Hilti Repair Centre
■ Clean the tool
(see 8.3–8.13)
■ Incorrect piston position
■ Carbon build-up
■ Remove cartridge strip and use
enclosed pushrod to push piston
fully back (see 9.1)
If problem persists:
■ Clean the tool
(see 8.3–8.13)
■ Check piston and buffer, replace
if necessary (see 8.4)
Varying depths of penetration
Misfire: the nail is only partly
driven into the base material
■ Incorrect piston position
■ Bad cartridge
■ Remove cartridge strip and use
enclosed pushrod to push piston
fully back (see 9.1)
If problem persists:
■ Change cartridge strip (possibly
use a new/dry package)
■ Clean the tool (see 8. –8.13)
■ Damaged piston
■ Buffer debris inside the piston
return unit
■ Damaged buffer
■ Carbon build-up
■ Remove cartridge strip
■ Unscrew piston return unit and
push out the piston through the
cartridge chamber using the
pushrod provided
■ Check buffer and piston, if
necessary, change (see 8.4)
■ Clean the tool
(see 8.3–8.13)
Cause Possible remedies
Page 19

13
Magazine fastener guide is stuck
Piston stuck in magazine fastener
guide
Trigger cannot be pulled
Piston return unit is stuck
■ Carbon build-up ■ Manually pull the front part of
the piston return unit out of the
tool
■ Clean the tool
(see 8.3–8.13)
If the problem persists:
■ Contact Hilti Repair Centre
■ Incorrect piston position
■ Tool not fully compressed
■ Safety mechanism activated
because:
– Magazine not loaded
– Plastic debris inside the
magazine
– Incorrect piston position
– Nail incorrectly positioned in
magazine
■ Piston and/or buffer damaged
■ Plastic debris inside the
magazine
■ Excess power when fastening on
steel
■ Tool fired with high power
without fastener in place
■ Fastener guide damaged
■ Remove cartridge strip and use
enclosed pushrod to push piston
fully back (see 9.1)
If problem persists:
■ Clean the tool (see 8.3–8.13)
■ Release the tool and fully com-
press it again
■ Load fastener strip
■ Open magazine, remove fastener
strip and plastic debris
■ Remove cartridge strip and use
pushrod provided to push piston
fully back (see 9.1)
If problem persists:
■ Clean the tool (see 8.3–8.13)
■ Unscrew the magazine
■ Check buffer and piston and
replace if necessary (see 8.4)
■ Open magazine, remove fastener
strip and plastic debris
■ Change magazine
The tool fires but no nail is driven
Cause Possible remedies
Page 20

14
Fastener does not penetrate
deeply enough
Fastener penetrates too deeply
■ Fastener too short
■ Driving power too high
■ Fastener too long
■ Driving power too low
■ Use longer fastener
■ Reduce power setting
■ Use lighter cartridge
■ Use shorter fastener
■ Increase power setting
■ Use heavier cartridge
Base material is spalling
Nail bends
■ Hard and/or large aggregate in
concrete
■ Rebar close to surface of
concrete
■ Hard surface (steel)
■ High strength concrete
■ Hard and/or large aggregate in
concrete
■ Old concrete
■ Use shorter nail
■ Use thicker nail DNI => AL
■ Use DX-Kwik (predrill)
■ Use co-acting principle/fastener
guide
■ Use stepped shank nail DAK
or X-ZFAH
■ Stud application
Use spall stop:
X-SS....
■ Nail application
Use shorter nail
Use DX-Kwik (predrill)
Use DAK16 or X-ZFAH16
(for high-strength precast
concrete)
Cause Possible remedies
■ Wrong type of fastener used
■ Fastener driving power set incor-
rectly
■ Concrete contains hard and/or
large aggregates
■ Rebar located just beneath the
surface
■ Hard surface
■ Use a fastener with a length suit-
able for the insulation material to
be fastened
■ Adjust the fastener driving power
■ Use a different cartridge power
level
Page 21

15
Nail head penetrates through
material fastened (metal sheet)
Nail breaks
Nail does not hold in base
material
Nail does not
penetrate surface
■ Driving power too low
■ Application limit exceeded
(very hard surface)
■ Unsuitable system
■ Thin steel base material
(3 to 5 mm steel)
■ Driving power too low
■ Application limit exceeded
(very hard surface)
■ Driving power too high
■ Try higher power setting or heavier
cartridge
■ Short nail application:
try DAK 16 P8 (TH) or
X-ZFAH 16 S8 TH
■ Long nail application:
try DAA or X-AL-H
■ Use co-acting principle/fastener
guide
■ Switch to more powerful system
like DX 750, DX 600 N
■ Try different power setting or
different cartridge
■ Try EDNK 20P8H or
ENKK 20-S12 for fastening sheet
metal
■ Try ESD MK...MA for fastening
wood
■ Try higher power setting or
heavier cartridge
■ Use shorter nail
■ Use stronger nail (X-...-H)
■ Use stepped shank nail:
DAK 16 P8 (TH) or
X-ZFAH 16 S8 TH
■ Reduce power setting
■ Use lighter cartridge
■ Use nail with top hat
■ Use nail with washer e.g.
EDNI ... S12
Fastening on steel
Cause Possible remedies
Damaged nail head
■ Driving power too high
■ Wrong piston used
■ Damaged piston
■ Reduce power setting
■ Use lighter cartridge
■ Check nail/piston combination
■ Change piston
Page 22

16
10. Disposal
Most of the materials from which Hilti power actuated tools are manufactured can be recycled. The materials
must be correctly separated before they can be recycled. In many countries, Hilti has already made arrangements for taking back your old powder actuated tools for recycling. Please ask your Hilti customer service
department or Hilti sales representative for further information.
Should you wish to return the power actuated tool yourself to a disposal facility for recycling, proceed as follows: Dismantle the tools as far as possible without the need for special tools.
Separate the individual parts as follows:
Part / assembly Main material Recycling
Toolbox Plastic Plastics recycling
Outer casing Plastic / synthetic rubber Plastics recycling
Screws, small parts Steel Scrap metal
Used cartridge strip Plastic / steel According to local regulations
Damaged nail head
■ Driving power too high
■ Wrong piston used
■ Worn-out piston
■ Reduce power setting
■ Use lighter cartridge
■ Check nail/piston combination
■ Change piston
Fastening on steel
Cause Possible remedies
Page 23

17
Noise information
as per German legislation (3, GSGV dated January 18, 1991):
The noise (power) level L
WA, 1S
as per § 1 (2) 1b) applicable to the tool and, due to different workplaces depend-
ing on the application for which the tool is used, also the noise (pressure) level L
pAImax
, at the measurement surface of 1 metre as per § 1 (2) 1e), are given in addition to the workplace related noise emission value in accordance
with the noise measurement standard. Operating conditions and circumstances of use: most powerful cartridge
power load in accordance with instructions for use with suitable nail or stud fired vertically downwards into a steel
plate and in accordance with the means of measurement DIN 45635, part 34 “Measurement of the noise emitted
by powder-actuated fastening tools”.
Noise information: With black cartridge and maximum power setting:
Application: Plywood to concrete – fastener X-DNI72MX
1b) Noise(power) level L
WA, 1S
= 108 dB (A)
workplace relevant emission value L
pAImax
= 103 dB (A)
(measured at operator ear level)
1e) Noise (pressure) level L ’
pA, 1s
= 95 dB (A)
Variations in operating conditions may cause deviations from these noise emission values.
11. Warranty
Hilti warrants that the tool supplied is free of defects in
material and workmanship. This warranty is valid so
long as the tool is operated and handled correctly, cleaned
and serviced properly and in accordance with the Hilti
Operating Instructions, all warranty claims are made
within 5 years for the tool and 1 year for the fastener
magazine and fastener guide from the date of the sale
(invoice date), and the technical system is maintained.
This means that only original Hilti consumables, components and spare parts, or other products of equivalent quality, may be used in the tool.
This warranty provides the free-of-charge repair or
replacement of defective parts only. Parts requiring repair
or replacement as a result of normal wear and tear are
not covered by this warranty.
Additional claims are excluded, unless stringent national rules prohibit such exclusion. In particular , Hilti is
not obligated for direct, indirect, incidental or consequential damages, losses or expenses in connection
with, or by reason of, the use of, or inability to use the
tool for any purpose. Implied warranties of merchantability or fitness for a particular purpose are
specifically excluded.
For repair or replacement, send tool and/or related parts
immediately upon discovery of the defect to the address
of the local Hilti marketing organisation provided.
This constitutes Hilti's entire obligation with regard to
warranty and supersedes all prior or contemporaneous
comments and oral or written agreements concerning
warranties.
Confirmation of CIP testing
The Hilti DX 460 has been system and type tested. As a
result, the tool bears the PTB approval mark of square
shape showing approval number S 812. In this way , Hilti
guarantees compliance with the approved type.
Unacceptable/inadmissible defects, deficiencies, etc.
that are determined during use of the tool must be reported to the manager responsible at the approval authority (PTB) and to the Office of the Permanent International
Commission (C.I.P.).
Page 24

Hilti = registered trademark of Hilti Corp., Schaan W 2678 0503 2-engl. 1 Printed in Liechtenstein © 2003
Right of technical and programme changes reserved S. E. & O.
371665/E
Hilti Corporation
FL-9494 Schaan
Tel.:+423/234 2111
Fax: +423 /2342965
www.hilti.com
 Loading...