

Page 1

DD 350
Printed: 02.11.2017 | Doc-Nr: PUB / 5145267 / 000 / 04
English
Page 2

Printed: 02.11.2017 | Doc-Nr: PUB / 5145267 / 000 / 04
Page 3
1 Information about the documentation
1.1 About this documentation
• Read this documentation before initial operation or use. This is a prerequisite for safe, trouble-free
handling and use of the product.
• Observe the safety instructions and warnings in this documentation and on the product.
• Always keep the operating instructions with the product and make sure that the operating instructions
are with the product when it is given to other persons.
1.2 Explanation of signs used
1.2.1 Warnings
Warnings alert persons to hazards that occur when handling or using the product. The following signal words
are used in combination with a symbol:
DANGER! Draws attention to imminent danger that will lead to serious personal injury or fatality.
WARNING! Draws attention to a potential hazard that could lead to serious personal injury or
fatality.
CAUTION! Draws attention to a potentially dangerous situation that could lead to minor personal
injury or damage to the equipment or other property.
1.2.2 Symbols in the documentation
The following symbols are used in this document:
Read the operating instructions before use
Instructions for use and other useful information
1.2.3 Symbols in the illustrations
The following symbols are used in illustrations:
These numbers refer to the corresponding illustrations found at the beginning of these operating
instructions.
The numbering reflects the sequence of operations shown in the illustrations and may deviate
from the steps described in the text.
Item reference numbers are used in the overview illustrations and refer to the numbers used in
the product overview section.
These characters are intended to specifically draw your attention to certain points when handling
the product.
1.3 Symbols on the product
1.3.1 Product-dependent symbols
The following "must do" symbols are used on the product:
Do not transport by crane
Return material for recycling
Alternating current
Service indicator
Rated speed under no load
Diameter
Printed: 02.11.2017 | Doc-Nr: PUB / 5145267 / 000 / 04
English 1
Page 4

Drilling performance indicator
1.4 Product-dependent symbols
3-way valve
Illustrations
Position for wet drilling
Position for dry drilling
Core bit draining position
At temperatures below 4 °C the cooling circuit must be drained as
described before breaks of an hour or longer.
Operate the system only with a fully functional PRCD.
Top: An additional means of securing the drill stand must be employed when the machine is used for horizontal drilling with the
vacuum securing method.
1.5 Product information
Hilti products are designed for professional use and may be operated, serviced and maintained only by
trained, authorized personnel. This personnel must be informed of any particular hazards that may be
encountered. The product and its ancillary equipment can present hazards if used incorrectly by untrained
personnel or if used not in accordance with the intended use.
The type designation and serial number are stated on the rating plate.
2 English
Printed: 02.11.2017 | Doc-Nr: PUB / 5145267 / 000 / 04
Page 5

▶ Write down the serial number in the table below. You will be required to state the product details when
contacting Hilti Service or your local Hilti organization to inquire about the product.
Product information
Diamond core drilling machine DD 350-CA
Generation 01
Serial no.
1.6 Declaration of conformity
We declare, on our sole responsibility, that the product described here complies with the applicable directives
and standards. A copy of the declaration of conformity can be found at the end of this documentation.
The technical documentation is filed and stored here:
Hilti Entwicklungsgesellschaft mbH | Tool Certification | Hiltistrasse 6 | 86916 Kaufering, Germany
2 Safety
2.1 General power tool safety warnings
WARNING Read all safety warnings, instructions, illustrations and specifications provided with this
power tool. Failure to follow the instructions below may result in electric shock, fire and/or serious injury.
Save all warnings and instructions for future reference.
The term "power tool" in the warnings refers to your mains-operated (corded) power tool or battery-operated
(cordless) power tool.
Work area safety
▶ Keep your work area clean and well lit. Cluttered or dark work areas invite accidents.
▶ Do not operate the power tool in explosive atmospheres, such as in the presence of flammable
liquids, gases or dust. Power tools create sparks which may ignite the dust or fumes.
▶ Keep children and bystanders away while operating a power tool. Distractions can cause you to lose
control.
Electrical safety
▶ Power tool plugs must match the outlet. Never modify the plug in any way. Do not use any adapter
plugs with earthed (grounded) power tools. Unmodified plugs and matching power outlets reduce the
risk of electric shock.
▶ Avoid body contact with earthed or grounded surfaces, such as pipes, radiators, ranges and
refrigerators. There is an increased risk of electric shock if your body is earthed or grounded.
▶ Do not expose power tools to rain or wet conditions. Water entering a power tool will increase the
risk of electric shock.
▶ Do not abuse the cord. Never use the cord for carrying, pulling or unplugging the power tool. Keep
cord away from heat, oil, sharp edges or moving parts. Damaged or entangled cords increase the
risk of electric shock.
▶ When operating a power tool outdoors, use an extension cord suitable for outdoor use. Use of a
cord suitable for outdoor use reduces the risk of electric shock.
▶ If operating a power tool in a damp location is unavoidable, use a residual current device (RCD)
protected supply. Use of an RCD reduces the risk of electric shock.
Personal safety
▶ Stay alert, watch what you are doing and use common sense when operating a power tool. Do
not use a power tool while you are tired or under the influence of drugs, alcohol or medication. A
moment of inattention while operating the power tool may result in serious personal injury.
▶ Use personal protective equipment. Always wear eye protection. Protective equipment such as a
dust mask, non-skid safety shoes, hard hat or hearing protection used for appropriate conditions will
reduce personal injuries.
▶ Prevent unintentional starting. Ensure the switch is in the off-position before connecting to power
source and/or battery pack, picking up or carrying the tool. Carrying power tools with your finger on
the switch or energising power tools that have the switch on invites accidents.
▶ Remove any adjusting key or wrench before turning the power tool on. A wrench or a key left
attached to a rotating part of the power tool may result in personal injury.
▶ Do not overreach. Keep proper footing and balance at all times. This enables better control of the
power tool in unexpected situations.
Printed: 02.11.2017 | Doc-Nr: PUB / 5145267 / 000 / 04
English 3
Page 6

▶ Dress properly. Do not wear loose clothing or jewellery. Keep your hair and clothing away from
moving parts. Loose clothes, jewellery or long hair can be caught in moving parts.
▶ If devices are provided for the connection of dust extraction and collection facilities, ensure these
are connected and properly used. Use of dust collection can reduce dust-related hazards.
▶ Do not let familiarity gained from frequent use of tools allow you to become complacent and ignore
tool safety principles. A careless action can cause severe injury within a fraction of a second.
Power tool use and care
▶ Do not force the power tool. Use the correct power tool for your application. The correct power tool
will do the job better and safer at the rate for which it was designed.
▶ Do not use the power tool if the switch does not turn it on and off. Any power tool that cannot be
controlled with the switch is dangerous and must be repaired.
▶ Disconnect the plug from the power source and/or remove the battery pack, if detachable, from
the power tool before making any adjustments, changing accessories, or storing power tools.
Such preventive safety measures reduce the risk of starting the power tool accidentally.
▶ Store idle power tools out of the reach of children and do not allow persons unfamiliar with the
power tool or these instructions to operate the power tool. Power tools are dangerous in the hands
of untrained users.
▶ Maintain power tools and accessories. Check for misalignment or binding of moving parts,
breakage of parts and any other condition that may affect the power tool’s operation. If damaged,
have the power tool repaired before use. Many accidents are caused by poorly maintained power
tools.
▶ Keep cutting tools sharp and clean. Properly maintained cutting tools with sharp cutting edges are
less likely to bind and are easier to control.
▶ Use the power tool, accessories and tool bits etc. in accordance with these instructions, taking
into account the working conditions and the work to be performed. Use of the power tool for
operations different from those intended could result in a hazardous situation.
▶ Keep handles and grasping surfaces dry, clean and free from oil and grease. Slippery handles and
grasping surfaces do not allow for safe handling and control of the tool in unexpected situations.
Service
▶ Have your power tool serviced by a qualified repair person using only identical replacement parts.
This will ensure that the safety of the power tool is maintained.
2.2 Diamond drill safety warnings
▶ When performing drilling that requires the use of water, route the water away from the operator’s
work area or use a liquid collection device. Such precautionary measures keep the operator’s work
area dry and reduce the risk of electrical shock.
▶ Operate power tool by insulated grasping surfaces, when performing an operation where the
cutting accessory may contact hidden wiring or its own cord. Cutting accessory contacting a “live”
wire may make exposed metal parts of the power tool “live” and could give the operator an electric
shock.
▶ Wear hearing protection when diamond drilling. Exposure to noise can cause hearing loss.
▶ When the bit is jammed, stop applying downward pressure and turn off the tool. Investigate and
take corrective actions to eliminate the cause of the bit jamming.
▶ When restarting a diamond drill in the workpiece check that the bit rotates freely before starting. If
the bit is jammed, it may not start, may overload the tool, or may cause the diamond drill to release from
the workpiece.
▶ When securing the drill stand with anchors and fasteners to the workpiece, ensure that the
anchoring used is capable of holding and restraining the machine during use. If the workpiece is
weak or porous, the anchor may pull out causing the drill stand to release from the workpiece.
▶ When drilling through walls or ceilings, ensure to protect persons and the work area on the other
side. The bit may extend through the hole or the core may fall out on the other side.
▶ Do not use this tool for overhead drilling with water supply. Water entering the power tool will
increase the risk of electric shock.
2.3 Additional safety precautions
Personal safety
▶ Do not tamper with or attempt to make alterations to the device.
▶ The power tool is not intendedfor use by debilitated persons who have received no special training.
▶ Keep the power tool out of reach of children.
4 English
Printed: 02.11.2017 | Doc-Nr: PUB / 5145267 / 000 / 04
Page 7

▶ Do not touch rotating parts. Switch the power tool on only after it is in position at the workpiece.
Touching rotating parts, especially rotating accessory tools, can result in injury.
▶ Avoid skin contact with drilling slurry.
▶ Dust from materials such as lead-based paint, certain types of wood and concrete/masonry/stone
containing quartz, minerals or metal can be harmful to health. Contact with or inhalation of the dust can
cause allergic reactions and/or respiratory or other diseases among operators or bystanders. Certain
kinds of dust such as oakwood and beechwood dust are classified as carcinogenic, especially in
conjunction with additives for wood conditioning (chromate, wood preservative). Only specialists are
permitted to handle material containing asbestos. Use as effective a dust removal system as possible.
To achieve a high level of dust collection, use a suitable vacuum extractor of the type recommended
by Hilti for wood dust and/or mineral dust and which is designed for use with this power tool. Ensure
that the workplace is well ventilated. It is advisable to wear a respirator appropriate for the type of dust
generated. Comply with national regulations applicable to the materials you will be working with.
▶ The diamond core drilling machine and the diamond core bit are heavy. There is a risk of crushing parts
of the body. The user and persons in the vicinity must wear suitable protective goggles, a hard hat,
ear defenders, protective gloves and protective footwear while the tool is in use.
Power tool use and care
▶ Make sure that the device is correctly secured to the drill stand.
▶ Always make sure that an end stop is installed on the drill stand as otherwise the safety-relevant
end-stop function is not implemented.
▶ Check that accessory tools are compatible with the power tool’s chuck/drive system and that they
are installed and secured correctly.
Electrical safety
▶ Do not use extension cords with multiple power outlets powering two or more devices in operation
at the same time.
▶ Operate the device only when it is connected to an adequately rated power supply with a ground
conductor.
▶ Before beginning work, check the working area (e.g. using a metal detector) to ensure that no
concealed electric cables or gas and water pipes are present. External metal parts on the power tool
can become live, for example if you inadvertently damage electric wiring. This presents a serious risk of
electric shock.
▶ Make sure that the supply cord cannot be damaged as the carriage advances.
▶ Never operate the machine without the accompanying PRCD (machines without PRCD: Never
operate the machine without an isolating transformer). Test the PRCD each time before use.
▶ Check the machine’s supply cord at regular intervals and have it replaced by a qualified specialist if
found to be damaged. If the machine’s supply cord is damaged it must be replaced with a specially
prepared and approved supply cord available from Hilti Customer Service. Check extension cords
at regular intervals and replace them if found to be damaged. Do not touch the supply cord or
extension cord if it is damaged while you are working. Disconnect the supply cord plug from the
power outlet. Damaged supply cords and extension cords present a risk of electric shock.
▶ Never operate the machine when it is dirty or wet. Dust, especially dust from conductive materials, or
dampness on the surface of the power tool can, under unfavorable conditions, lead to electric shock.
Have dirtied or dusty machines checked at regular intervals by Hilti Service, especially if they are used
frequently for working on conductive materials.
Workplace
▶ Approval must be obtained from the site engineer or site management before beginning work.
Drilling work on buildings and other structures can influence the statics, especially when steel reinforcing
bars and load-bearing components are cut through.
▶ If the drill stand has not been secured correctly, always move the machine on the drill stand all the
way down to keep the stand from toppling.
▶ Keep the supply cord, extension cord, water hose and vacuum hose away from rotating parts.
▶ Use of the water collection system in combination with a wet-type industrial vacuum extractor is
mandatory for upward wet drilling.
▶ Use of the vacuum fastening method for upward drilling without additional means of securing the
equipment is prohibited.
▶ An additional means of securing the drill stand must be employed when the machine is used for
horizontal drilling with the vacuum securing method (accessory).
Printed: 02.11.2017 | Doc-Nr: PUB / 5145267 / 000 / 04
English 5
Page 8
3 Description
3.1 Product overview
6 English
Printed: 02.11.2017 | Doc-Nr: PUB / 5145267 / 000 / 04
Page 9
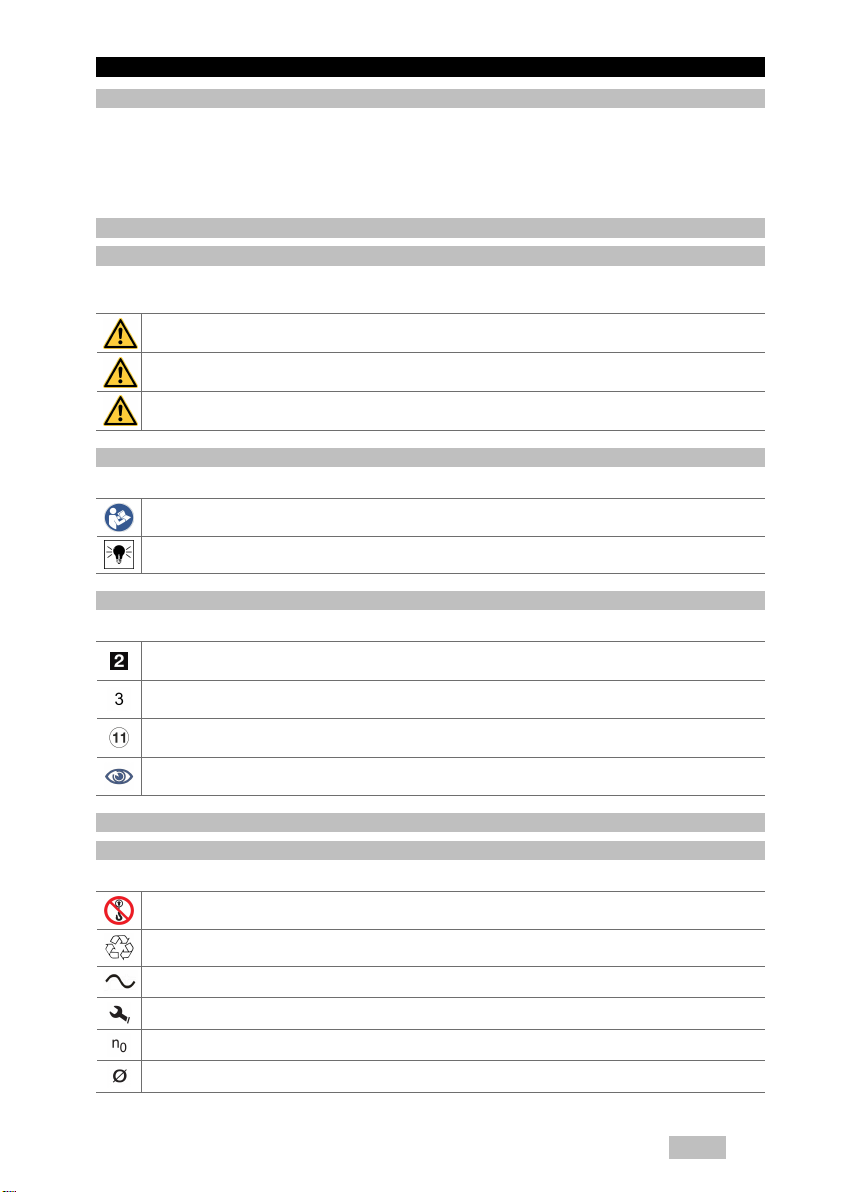
Controls and indicators panel
@
Carrying bar
;
Rating plate
=
Grip
%
Water drainage plug
&
3-way valve
(
3.2 Controls and indicators panel
Chuck
)
Connector
+
Supply cord guide
§
Water connection
/
Water flow regulator
:
Supply cord with PRCD
∙
Gear switch
@
Drilling performance indicator
;
Temperature monitoring/ground fault
=
ON switch
%
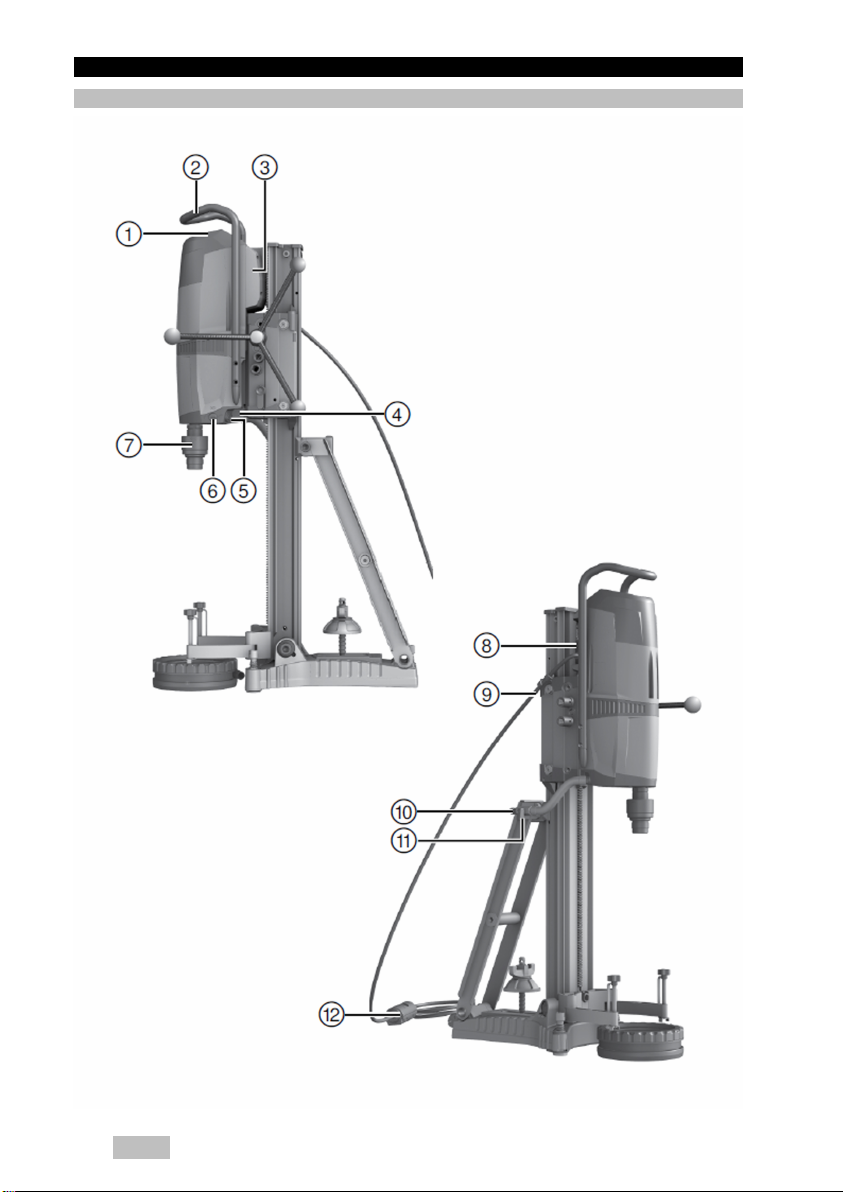
3.3 Vacuum plate (accessory)
Vacuum release valve
@
Vacuum hose connector
;
Vacuum seal
=
OFF switch
&
Rebar button (iron boost)
(
Service indicator
)
Pressure gauge
%
Wheel assembly mount
&
Leveling screws (4x)
(
Printed: 02.11.2017 | Doc-Nr: PUB / 5145267 / 000 / 04
English 7
Page 10

3.4 Overview, accessories
8 English
Printed: 02.11.2017 | Doc-Nr: PUB / 5145267 / 000 / 04
Page 11

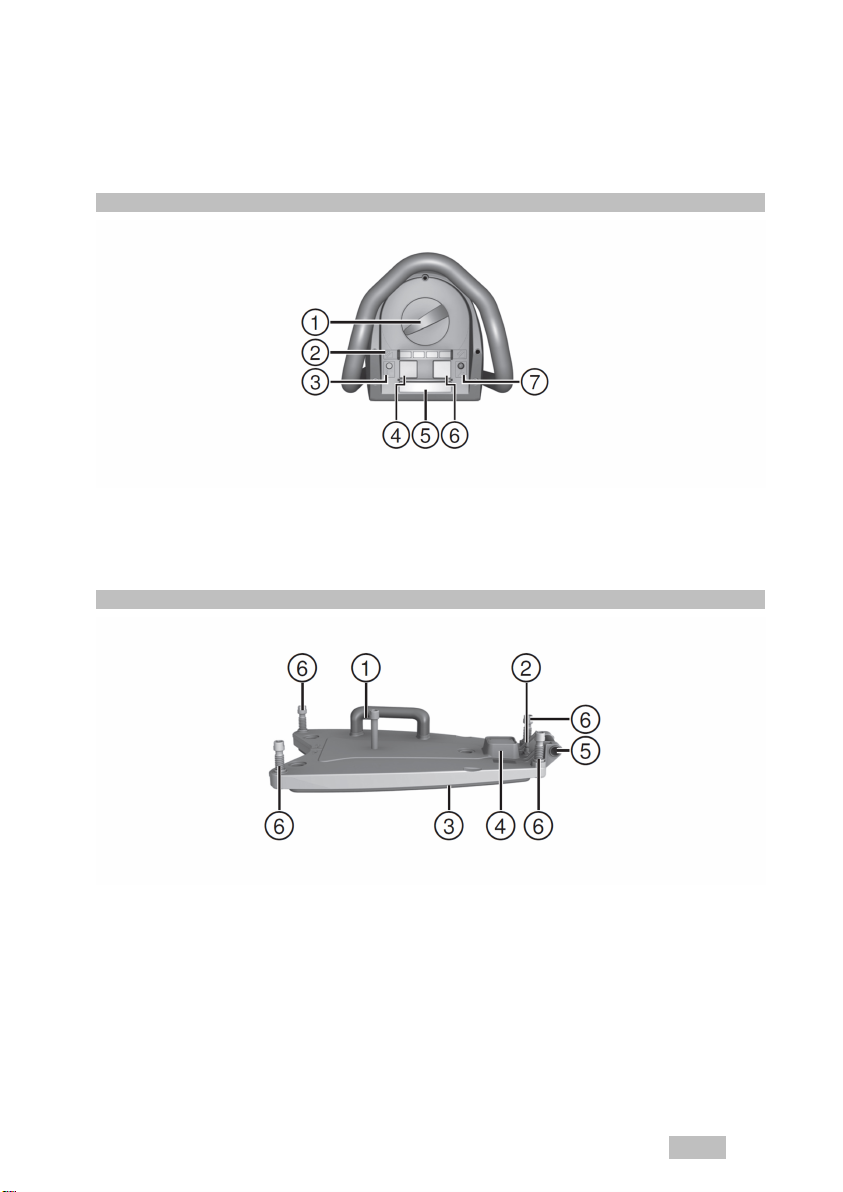
DD-HD 30 drill stand (accessory)
Limit stop with rail cap
@
Leveling indicators (2x)
;
Carriage
=
Carrying handle (2x)
%
Brace
&
Leveling screws (3x)
(
Wheel assembly mount
)
Base plate
+
Rail
§
Set of fasteners for drill stand (accessory)
Clamping nut
W
Water collection system (accessory)
Seal
R
Water collector
T
3.5 Intended use
The product described is an electrically-powered diamond core drilling machine. It is designed for the drillstand-mounted wet drilling of through-holes and blind holes in (reinforced) mineral materials using diamond
core bits.
The diamond core drilling machine must be mounted on the drill stand and the drill stand must be firmly
secured to the base material by means of an anchor or a vacuum plate.
▶ Operate the tool only when it is connected to a power source providing a voltage and frequency in
compliance with the information stated on the rating plate.
▶ The product described is not suitable for hand-guided operation.
3.6 Use of the machine with various items of equipment
When the drilling rail is extended to a length of 2 m or more, an additional support must be used.
Equipment Core bit diameter ⌀ Drilling direction Standard
With water collection system 52 mm...250 mm All directions 500 mm
System without water 52 mm...500 mm All directions 500 mm
Carriage lock
/
Eccentric pin (for securing the equipment)
:
Hand wheel
∙
Anchor position
$
Reduction gearing (1:3)
£
Direct drive (1:1)
|
Rating plate
¡
Hole center indicator
Q
Clamping spindle
E
Water collector holder
Z
working length
3.7 Indicators
Status Meaning
Service indicator shows • Have the product repaired by Hilti Service.
Service indicator flashes briefly • Fault affecting the product.
Service indicator flashes steadily • Have the product repaired by Hilti Service.
Indicators for cooling and electrical fault show • Check the water flow rate.
Indicators for cooling and electrical fault flash • Check the electricity supply.
Drilling performance indicator shows green • Optimum contact pressure (after the hole has
Drilling performance indicator shows orange • Low contact pressure, e.g. when starting a hole.
Drilling performance indicator shows red • Contact pressure too high.
3.8 Items supplied
Diamond core drilling machine, operating instructions.
Other system products approved for use with this product can be found at your local Hilti Store or online at:
www.hilti.group | USA: www.hilti.com.
Printed: 02.11.2017 | Doc-Nr: PUB / 5145267 / 000 / 04
been started).
English 9
Page 12

4 Technical data
4.1 Diamond core drilling machine
Note
For rated voltage, rated current, frequency and/or input power, refer to the country-specific type
identification plate.
If the tool is powered by a generator or transformer, the generator or transformer’s power output must be
at least twice the rated input power shown on the rating plate of the tool. The operating voltage of the
transformer or generator must always be within +5% and -15% of the rated voltage of the tool.
DD 350
Chuck
Max. permissible water pressure
Minimum flow rate (max. +30 °C)
Weight (basic machine) in accordance with EPTA procedure 01
Weight (drill stand) in accordance with EPTA procedure 01
Rated power input
Max. drilling depth without extension
Protection class
Portable residual current device
Protected against dust and water
BL
6 bar
0.5 ℓ/min
14.4 kg
20.5 kg
3,600 W
500 mm
I
PRCD
IP 55
4.2 Gear selector for core bit diameter
Core bit diameter ⌀ Core bit diameter ⌀ No-load speed (240 V) No-load speed (110 V)
52 mm …62 mm 2 in …2 3/8 in 667 /min 667 /min
1
72 mm …92 mm 2 3/4 in …3 1/2 in 667 /min 667 /min
2
102 mm …112 mm 4 in …4 1/2 in 667 /min 619 /min
3
122 mm 4 3/4 in 619 /min 571 /min
4
127 mm …142 mm 5 in …5 1/2 in 571 /min 524 /min
5
152 mm …162 mm 6 in …6 3/4 in 524 /min 464 /min
6
172 mm …182 mm 6 3/4 in …7 in 405 /min 369 /min
7
202 mm 8 in 357 /min 321 /min
8
225 mm …250 mm 9 in …10 in 310 /min 286 /min
9
300 mm …500 mm 12 in …20 in 286 /min 238 /min
10
4.3 Noise information and vibration values in accordance with EN 62841
The sound pressure and vibration values given in these instructions were measured in accordance with a
standardized test and can be used to compare one power tool with another. They can also be used for a
preliminary assessment of exposure.
The data given represent the main applications of the power tool. However, if the power tool is used for
different applications, with different accessory tools, or is poorly maintained, the data can vary. This can
significantly increase exposure over the total working period.
An accurate estimation of exposure should also take into account the times when the tool is switched off, or
when it is running but not actually being used for a job. This can significantly reduce exposure over the total
working period.
Identify additional safety measures to protect the operator from the effects of noise and/or vibration, for
example: maintaining the power tool and accessory tools, keeping the hands warm, organization of work
patterns.
10 English
Printed: 02.11.2017 | Doc-Nr: PUB / 5145267 / 000 / 04
Page 13

Noise emission values
DD 350
Sound power level (LWA)
Uncertainty for the sound pressure level (KpA)
Sound pressure level (LpA)
Uncertainty for the sound power level (KWA)
108 dB(A)
3 dB(A)
95 dB(A)
3 dB(A)
Vibration information
DD 350
Drilling in concrete (wet) (a
Uncertainty (K)
h, DD
)
2.5 m/s²
1.5 m/s²
5 Operation
5.1 Preparations at the workplace
WARNING
Risk of injury. When a drill stand is used, it can spin or topple if it is not adequately secured.
▶ Before using the diamond core drilling machine, secure the drill stand to the work surface with
anchors or with a vacuum base plate.
▶ Use only anchors suitable for the base material and comply with the anchor manufacturer's
instructions.
▶ Use a vacuum base plate only when the work surface is suitable for securing the drill stand by the
vacuum method.
5.1.1 Setting up the drill stand
1. Slacken the screw at the top at the brace and the screw at the bottom at the pivot joint of the rail.
2. Bring the rail into the vertical position.
3. Tighten the screw at the top at the brace and the screw at the bottom at the pivot joint of the rail.
4. Install the cover with the integral end stop at the top end of the rail.
5.1.2 Installing the hand wheel
Note
You can install the hand wheel on the right or left side of the carriage on two different shafts.
If you install the hand wheel on the top shaft, the shaft acts directly on the drive of the carriage.
If you install the hand wheel on the bottom shaft, the shaft acts through reduction gearing on the drive
of the carriage.
1. Install the hand wheel on the shaft of your choice on the appropriate side.
2. Secure the hand wheel with the screw.
English 11
Printed: 02.11.2017 | Doc-Nr: PUB / 5145267 / 000 / 04
Page 14

5.1.3 Securing the drill stand with an anchor
WARNING
Risk of injury The tool may become detached and cause damage if the wrong anchor is used.
▶ Use an anchor suitable for the base material on which you are working and observe the anchor
manufacturer’s instructions. Please contact Hilti Technical Service if you have any questions about
secure fastening.
1. Set the anchor for the base plate 330 mm (13 inch) from the hole center.
Note
If you work with a spacer, increase the distance accordingly.
2. Screw the clamping spindle into the anchor.
3. Slip the drill stand over the spindle and align it.
4. Screw the clamping nut on to the spindle but do not tighten it.
5. Use the leveling screws to level the base plate.
6. Use a suitable open-end wrench to tighten the clamping nut on the clamping spindle.
7. Check that the drill stand is secure.
5.1.4 Securing the drill stand by vacuum
DANGER
Risk of injury Hazard presented by a falling diamond core drilling machine.
▶ Fastening the drill stand to the ceiling only by means of the vacuum securing method is not
permissible. A heavy structural support or a threaded spindle, for example, can serve as an
additional means of fastening.
WARNING
Risk of injury Pressure check
▶ Before beginning drilling and during operation, it must be ensured that the pressure gage indicator
remains within the green area.
Note
In order to use the drill stand with anchor base plate, establish a secure, flat-on-flat connection between
vacuum base plate and anchor base plate. Screw the anchor base plate securely to the vacuum base
plate. Make sure that the core bit selected for use will not damage the vacuum base plate.
If you are going to drill horizontally, use additional means of securing the diamond core drilling machine
(e. g. chain secured to anchor).
Read the operating instructions for the vacuum pump.
12 English
Printed: 02.11.2017 | Doc-Nr: PUB / 5145267 / 000 / 04
Page 15

Note
Before positioning the drill stand, check that you have sufficient space for assembly and operation.
1. Turn all the leveling screws until they project approx. 5 mm underneath the vacuum base plate.
2. Connect the vacuum connector on the vacuum base plate to the vacuum pump.
3. Set the drill stand on the vacuum base plate.
4. Use the screw supplied, complete with its washer, to secure the drill stand to the vacuum base plate.
5. Locate the center point of the hole to be drilled.
6. Draw a line approximately 800 mm in the direction in which the core drilling system is to stand.
7. At a distance of 165 mm (6 1/2 inches) from the center point of the hole to be drilled, make a mark on the
800 mm long line.
8. Switch on the vacuum pump and press and hold down the vacuum release valve.
9. Position the drill stand on the work surface.
10. Release the vacuum release valve.
11. Use the leveling screws to level the vacuum base plate.
◁ The needle of the pressure gauge is in the green area.
Note
Do not level the anchor base plate on the vacuum plate.
12. Secure the drill stand for drilling horizontally.
13. Check that the drill stand is secure.
5.1.5 Adjusting the drilling angle when using the drill stand with combination base plate
WARNING
Risk of injury Risk of crushing the fingers in the articulation.
▶ Wear protective gloves.
English 13
Printed: 02.11.2017 | Doc-Nr: PUB / 5145267 / 000 / 04
Page 16

1. Slacken the screw at the top at the brace and the screw at the bottom at the pivot joint of the rail.
2. Adjust the rail to the desired position.
3. Tighten the screw at the top at the brace and the screw at the bottom at the pivot joint of the rail.
5.1.6 Extending the rail
Note
When starting a hole, use only a core bit or extended core bit with a maximum total length of 650 mm
(25 1/2 in).
A depth gage on the rail can be used as an additional end stop.
After removing the extension rail, reinstall the cover (with integrated end stop) on the drill stand.
Otherwise the safety-relevant end-stop function is not implemented.
1. Remove the cover (with built-in end stop) from the top end of the rail.
2. Install the cover on the extension rail.
3. Insert the cylindrical connector of the extension rail into the end of the rail of the drill stand.
4. Secure the extension rail by turning the eccentric pin.
5.1.7 Installing the spacer
WARNING
Risk of injury. The fastening may become overloaded.
▶ When one or more spacers are used, the contact pressure must be reduced in order to avoid
overloading the fastening.
14 English
Printed: 02.11.2017 | Doc-Nr: PUB / 5145267 / 000 / 04
Page 17

Note
When core bits of diameter > 300 mm (11 1/2 in) are used, the distance between drill stand and
drilling axis has to be increased by installing one or two spacers. The hole center indicator is no longer
functional when spacers are used.
Insert the spacer or spacers without the diamond core drilling machine mounted on the drill stand.
1. Lock the carriage on the rail with the carriage lock.
2. Pull out the eccentric pin for locking the diamond core drilling machine on the carriage.
3. Insert the spacer into the carriage.
4. Push the eccentric pin into the carriage until it is seated.
5. Tighten the eccentric pin.
6. Make sure that the spacer is secure.
5.1.8 Securing the diamond core drilling machine to the drill stand
CAUTION
Risk of injury Hazard presented by inadvertent starting of the diamond core drilling machine.
▶ The diamond core drilling machine should not be connected to the power supply during set-up.
1. Lock the carriage on the rail with the carriage lock.
2. Pull out the eccentric pin for locking the diamond core drilling machine on the carriage.
3. Set the diamond core drilling machine on the carriage or the spacer.
4. Push the eccentric pin into the carriage or the spacer until it is seated.
5. Tighten the eccentric pin.
6. Secure the supply cord in the cord guide on the carriage cover.
7. Make sure that the diamond core drilling machine is secure on the drill stand.
Printed: 02.11.2017 | Doc-Nr: PUB / 5145267 / 000 / 04
English 15
Page 18

5.1.9 Installing the water supply connection
CAUTION
Risk of personal injury and material damage The hose may become damaged if it is used incorrectly.
▶ Regularly check the hoses for damage and make sure that the maximum permissible water supply
pressure of 6 bar is not exceeded.
▶ Make sure that the hose does not come into contact with rotating parts.
▶ Make sure that the hose is not damaged as the carriage advances.
▶ Maximum water temperature: 40 °C.
▶ Check the water supply system to ensure there are no leaks.
Note
To avoid damage to the components, use only fresh water containing no dirt particles.
A flow meter can be inserted as an accessory between the device and the water supply.
1. Connect the water flow regulator to the diamond core drilling machine.
2. Connect the water supply (hose connection).
5.1.10 installing the water collection system (accessory)
WARNING
Risk of personal injury and material damage If the diamond core drilling machine is damaged the
risk of electric shock is increased.
▶ Do not permit water to run over the motor and cover.
▶ Use of a wet-type industrial vacuum cleaner is mandatory requirement for drilling upward.
Note
The diamond core drilling machine must be at a 90° angle to the slab. The water collection system
sealing disc must match the diamond core bit diameter.
Note
Use of the water collection system allows water to be led away under control, thus preventing the
surrounding area from being heavily soiled. The best results are achieved with a wet-type industrial
vacuum extractor.
Note
When using the drill stand: Before installing the water collector holder, screw the spacer for the water
collector holder to the drill stand.
1. At the front of the drill stand, slacken the bottom screw at the rail.
16 English
Printed: 02.11.2017 | Doc-Nr: PUB / 5145267 / 000 / 04
Page 19

2. Slip the water collector holder behind the screw from below.
3. Securely tighten the screw.
4. Position the water collector, with seal and water collector sealing disc installed, between the two movable
arms of the holder.
5. Secure the water collector to the holder with the two screws.
6. Connect a wet-type industrial vacuum extractor to the water collector or establish a hose connection
through which the water can drain away.
5.1.11 Inserting a diamond core bit
DANGER
Risk of injury Fragments of the workpiece or of broken insert tools may be ejected and cause injury
beyond the immediate area of operation.
▶ Do not use damaged insert tools. Check the insert tools for chipping, cracks, or heavy wear each
time before use.
CAUTION
Risk of injury The tool becomes hot as a result of use. It may have sharp edges.
▶ Wear protective gloves when changing the tool.
Note
Replace diamond core bits as soon as their cutting performance and/or rate of drilling progress drops
significantly. This generally is the case when the diamond segments wear to a height of less than 2
mm (1/16 in).
1. Lock the carriage on the rail with the carriage lock. Check to ensure that it is securely fastened.
2.
Open the chuck by turning it in the direction indicated by the open brackets symbol.
3. From below, push the connection end of the diamond core bit into the splines of the chuck on the
diamond core drilling machine.
4.
Close the chuck by turning it in the direction indicated by the closed brackets symbol.
5. Check that the diamond core bit is seated securely in the chuck.
5.1.12 Setting the depth gage (accessory)
1. Turn the hand wheel until the core bit is in contact with the base material.
2. Set the desired drilling depth by adjusting the distance between the depth gage and the carriage.
3. Lock the depth gage in position.
English 17
Printed: 02.11.2017 | Doc-Nr: PUB / 5145267 / 000 / 04
Page 20

5.2 Types of work
5.2.1 Keep the danger zone clear
The shaded area in the illustration defines the danger zone round the diamond core drilling machine.
• When operating the machine, always keep at least 15 cm clear of the core bit.
• Position yourself behind the drill stand while drilling is in progress.
5.2.2 Selecting the speed
Note
Press the switch only when the tool is stationary.
1. Set the selector switch to suit the diameter of the core bit used.
2. Turn the switch to the recommended setting while turning the core bit by hand at the same time.
5.2.3 Portable residual current device (PRCD)
1. Plug the diamond core drilling machine’s supply cord into a grounded socket outlet.
2.
Press the ON button on the PRCD.
◁ The indicator lights up.
3.
Press the TEST button on the PRCD.
◁ The indicator goes out.
WARNING
Risk of injury Risk of electric shock.
▶ If the indicator continues to light up, further operation of the diamond core drilling machine
is not permissible. Have your diamond core drilling machine repaired by Hilti Service.
4.
Press the ON button on the PRCD.
◁ The indicator lights up.
5.2.4 Using the hole-starting function
1. Advance the core bit as close as possible to the work surface without brining it into contact with the work
surface.
2. Press the ON switch on the diamond core drilling machine.
3. Press the ON switch on the diamond core drilling machine again.
◁ The core bit rotates slowly (21 rpm)
4. Press the core bit against the base material.
5. After approx. 5 seconds, press the ON switch again.
◁ The core bit rotates at normal speed.
6. Continue the drilling operation.
18 English
Printed: 02.11.2017 | Doc-Nr: PUB / 5145267 / 000 / 04
Page 21

5.2.5 Operating the diamond core drilling machine
WARNING
Risk of personal injury and material damage The diamond core drilling machine may become
damaged and the risk of electric shock is increased.
▶ Use of the water collection system in conjunction with a wet-type industrial vacuum cleaner is a
mandatory requirement for wet drilling overhead.
DANGER
Risk of personal injury and material damage The wet-type industrial vacuum cleaner switches on
and off with a delay. This allows water to run over the diamond core drilling machine. The diamond
core drilling machine may become damaged and the risk of electric shock is increased.
▶ When drilling in an upward direction, the wet-type industrial vacuum cleaner must be switched on
manually before opening the water supply valve and switched off again manually after closing the
water supply valve.
DANGER
Risk of personal injury and material damage The diamond core drilling machine may become
damaged and the risk of electric shock is increased.
▶ When drilling in an upward direction, stop working if the suction removal system stops working
(e.g. the wet-type industrial vacuum cleaner is full).
WARNING
Risk of personal injury and material damage The water collector cannot function correctly during
drilling in an upward direction at an angle. The diamond core drilling machine may become damaged
and the risk of electric shock is increased.
▶ Do not drill in an upward direction at an angle.
1. Slowly open the water flow regulator until the water flows at the desired rate.
2. Press the ON switch on the diamond core drilling machine.
3. Release the carriage lock.
4. Turn the hand wheel until the core bit is in contact with the base material.
5. When you start drilling apply only light pressure until the core bit has centered itself. Then apply more
pressure.
6. Watch the drilling performance indicator and adjust contact force accordingly.
English 19
Printed: 02.11.2017 | Doc-Nr: PUB / 5145267 / 000 / 04
Page 22

5.2.6 Operating the diamond core drilling machine dry
DANGER
Risk of personal injury and material damage The diamond core drilling machine may become
damaged and the risk of electric shock is increased.
▶ When drilling in an upward direction, stop working if the suction removal system stops working
(e.g. the wet-type industrial vacuum cleaner is full).
WARNING
Risk of personal injury and material damage The water collector cannot function correctly during
drilling in an upward direction at an angle. The diamond core drilling machine may become damaged
and the risk of electric shock is increased.
▶ Do not drill in an upward direction at an angle.
Note
Wear a dust mask
1. Switch on a dust extractor and compressed air.
2.
Set the 3-way valve on the core drilling machine to dry drilling.
3. Press the ON switch on the diamond core drilling machine.
4. Release the carriage lock.
5. Turn the hand wheel until the core bit is in contact with the base material.
6. When you start drilling apply only light pressure until the core bit has centered itself. Then apply more
pressure.
7. Watch the drilling performance indicator and adjust contact force accordingly.
5.2.7 Switching off the diamond core drilling machine
WARNING
Risk of personal injury and material damage The diamond core bit fills with water during overhead
drilling. The diamond core drilling machine may become damaged and the risk of electric shock is
increased.
▶ As a first step, carefully allow the water to drain away after completing overhead drilling. This is
done by disconnecting the water supply from the water flow regulator and draining the water by
opening the water flow regulator. Do not allow the water to run over the motor and cover.
20 English
Printed: 02.11.2017 | Doc-Nr: PUB / 5145267 / 000 / 04
Page 23

1. If the following conditions are met, also take this action:
Conditions: Drilling upward
▶ Set the 3-way valve to the middle position to drain the water from the core bit.
2. Remove the diamond core bit from the hole.
3. Switch off the diamond core drilling machine.
4. Lock the carriage on the rail with the carriage lock.
5. Switch off the wet-type industrial vacuum cleaner, if used.
5.2.8 Procedure for dealing with a jammed core bit
If the bit jams the safety clutch disengages. Then the motor switches off.
The step-by-step procedure for releasing the core bit is as follows:
5.2.8.1 Releasing the core bit
1. Unplug the supply cord from the power outlet.
2. If the following conditions are met, also take this action:
Conditions: Releasing with open-ended wrench
▶ Release the core bit by engaging an open-ended wrench close to the connection end.
▶ Release the core bit by turning it.
3. If the following conditions are met, also take this action:
Conditions: Releasing with hand wheel
▶ Release the core bit from the base material by turning the hand wheel.
▶ Check that the carriage is locked by lightly turning the hand wheel.
▶ Plug the supply cord of the diamond core drilling machine into the power outlet.
4. Plug the supply cord of the diamond core drilling machine into the power outlet.
5. Continue the drilling operation.
5.2.9 Removing the diamond core bit
1. Unplug the supply cord from the power outlet.
2. Lock the carriage on the rail.
3. Check that the carriage is locked by lightly turning the hand wheel.
4.
Open the chuck by turning it in the direction indicated by the open brackets symbol.
5. Remove the core bit.
Printed: 02.11.2017 | Doc-Nr: PUB / 5145267 / 000 / 04
English 21
Page 24

5.2.10 Removing the diamond core drilling machine
1. Lock the carriage on the rail with the carriage lock. Check to ensure that it is securely fastened.
2. Hold the diamond core drilling machine securely with one hand on the carrying grip.
3. Release the eccentric pin in the lock of the diamond core drilling machine.
4. Pull out the eccentric pin.
5. Remove the diamond core drilling machine from the carriage.
6. Push the eccentric pin into the carriage as far as it will go.
6 Care and maintenance
WARNING
Danger of electric shock! Carrying out care and maintenance while the supply cord is connected to
the power outlet presents a risk of serious injuries including burns.
▶ Always unplug the supply cord before carrying out all care and maintenance tasks.
Care
• Carefully remove stubborn dirt from the tool.
• Clean the air vents carefully with a dry brush.
• Use only a slightly damp cloth to clean the casing. Do not use cleaning agents containing silicone as
they can attack the plastic parts.
Maintenance
WARNING
Danger of electric shock! Improper repairs to electrical components may lead to serious injuries
including burns.
▶ Repairs to the electrical section of the tool or appliance may be carried out only by trained electrical
specialists.
• At regular intervals, check all visible parts and the controls for signs of damage and make sure that they
all function correctly.
• Do not operate the power tool if signs of damage are found or if parts malfunction. Have damage repaired
immediately by Hilti Service.
• After cleaning and maintenance, refit all guards or protective devices and check that they function
correctly.
6.1 Adjusting the play between the rail and carriage
Note
You can adjust the play between the rail and carriage using the four adjusting screws on the carriage.
The four adjustable rollers are adjusted as described below.
1. Loosen the adjusting screws using a 5 mm hexagon socket wrench (do not remove the screws).
22 English
Printed: 02.11.2017 | Doc-Nr: PUB / 5145267 / 000 / 04
Page 25

2. Use a 19 mm open-end wrench to turn the adjusting screws so that the rollers are pressed slightly
against the rail.
3. Tighten the adjusting screws firmly. The carriage is correctly adjusted when it remains in position without
a diamond core drilling machine fitted and moves down when the drilling machine is fitted.
7 Transport and storage
• Do not transport electric tools with accessory tools fitted.
• Always unplug the supply cord before storing an electric tool or appliance.
• Store tools and appliances in a dry place where they cannot be accessed by children or unauthorized
persons.
• Check electric tools or appliances for damage after long periods of transport or storage.
7.1 Storage of the equipment and breaks at freezing temperatures
Note
At temperatures below 4 °C (39 °F), the water in the cooling circuit has to be blown out with compressed
air when drilling is interrupted for more than one hour and before the equipment is stowed away.
1. Interrupt the water supply.
2. Disconnect the water supply from the diamond core drilling machine.
3. Open the water flow regulator.
4.
Set the 3-way valve to Wet drilling.
5. Use compressed air (max. 3 bar) to blow the water out of the water circuit.
8 Troubleshooting
If the trouble you are experiencing is not listed in this table or you are unable to remedy the problem by
yourself, please contact Hilti Service.
8.1 The diamond core drilling machine is in working order
Malfunction Possible cause Action to be taken
Service interval reached. ▶ Bring the diamond core drilling
machine to Hilti at your earliest
convenience.
The service indicator lights.
Service interval exceeded. ▶ Bring the diamond core drilling
machine to Hilti.
The service indicator blinks.
The drilling speed is decreasing.
Printed: 02.11.2017 | Doc-Nr: PUB / 5145267 / 000 / 04
Maximum drilling depth has been
reached.
The core is stuck in the diamond
▶ Remove the core and use a core
bit extension.
▶ Remove the core.
core bit.
Wrong core bit specification for the
base material.
High steel content (indicated by
clear water containing metal cut-
▶ Select a more suitable diamond
core bit specification.
▶ Select a more suitable diamond
core bit specification.
tings).
The diamond core bit is defective. ▶ Check the diamond core bit
for damage and replace it if
necessary.
Wrong gear selected. ▶ Select the right gear.
Contact pressure is too low. ▶ Increase the contact pressure.
The machine has too little power. ▶ Select the next lower gear.
English 23
Page 26

Malfunction Possible cause Action to be taken
The drilling speed is decreasing.
The diamond core bit is polished. ▶ Sharpen the diamond core bit
by drilling into a sharpening
plate.
The volume of water is too high. ▶ Reduce the volume of water us-
ing the water volume regulator
(ensure that the volume of water
is at least 0.5 l/min as required).
The water flow rate is too low. ▶ Check the water supply to
the diamond core bit or,
respectively, increase the water
flow by adjusting the water flow
regulator.
The carriage lock is engaged. ▶ Release the carriage locking
mechanism.
The diamond core bit doesn’t
rotate.
The diamond core bit has become
jammed in the base material.
▶ Use an open-end wrench to
release the diamond core bit:
Disconnect the supply cord plug
from the power outlet. Grip the
diamond core bit with a suitable
open-end wrench close to the
connection end and release the
diamond core bit by rotating it.
Stand-guided drilling
▶ Turn the handwheel and try to
release the diamond core bit
by moving the carriage up and
down.
The handwheel can be turned
The shear pin is broken. ▶ Replace the shear pin.
without resistance.
The diamond core bit can’t be
fitted into the chuck.
The core bit connection end or
chuck is dirty or damaged.
▶ Clean and grease the connec-
tion end and/or the chuck or
replace these parts.
Water escapes at the water
The water pressure is too high. ▶ Reduce the water pressure.
swivel or gear housing.
Water escapes from the
chuck during operation.
The diamond core bit isn’t securely
tightened in the chuck.
▶ Tighten the diamond core bit
securely.
▶ Remove the core bit. Rotate the
diamond core bit approx. 90°
about its own axis. Refit the
diamond core bit.
The drilling system has too
much play.
The core bit connection end /
chuck is dirty.
The chuck seal or connection end
is defective.
The diamond core bit isn’t securely
tightened in the chuck.
▶ Clean and grease the connec-
tion end and/or the chuck.
▶ Check the seal and replace it if
necessary.
▶ Tighten the diamond core bit
securely.
▶ Remove the core bit. Rotate the
diamond core bit approx. 90°
about its own axis. Refit the
diamond core bit.
The core bit connection end /
chuck is defective.
▶ Check the connection end and
chuck and replace them if
necessary.
The connection between the diamond core drilling machine and the
carriage or spacers is loose.
▶ Check the connection and,
if necessary, refasten the
diamond core drilling machine.
24 English
Printed: 02.11.2017 | Doc-Nr: PUB / 5145267 / 000 / 04
Page 27

Malfunction Possible cause Action to be taken
The drilling system has too
much play.
The carriage has too much play. ▶ Adjust the play between the rail
and carriage. → page 22
Screws / bolts on the drill stand are
loose.
▶ Check the security of screws
/ bolts on the drill stand and
tighten them if necessary.
The drill stand is inadequately fastened.
▶ Fasten the drill stand more
securely.
8.2 The diamond core drilling machine is not in working order
Malfunction Possible cause Action to be taken
The PRCD isn’t switched on. ▶ Check that the PRCD is
functioning and switch it on.
Interruption in the electric supply. ▶ Plug in another electric tool or
The service indicator shows
nothing.
appliance and check whether it
works.
▶ Check the plug connections,
supply cord, power supply line
and main supply fuse.
The motor has overheated. ▶ Switch the diamond core drilling
machine off (press off-switch in
the middle) and back on again.
Check the water supply. After
cooling down, the diamond core
drilling machine is ready for use
Temperature, overvoltage or
again.
undervoltage indicator is lit.
Fault in the power supply. ▶ Switch the diamond core drilling
machine off (press off-switch
in the middle) and back on
again. Check the power supply
(especially during operation by
generator or transformer).
Temperature, overvoltage
or undervoltage indicator is
flashing.
The automatic drill feed DD-AF CA
emergency stop button has been
pressed.
The diamond core drilling machine
is defective or the safety function
has been activated.
▶ Release the automatic drill feed
DD-AF CA emergency stop
button.
▶ Switch the diamond core drilling
machine off (press off-switch in
the middle) and back on again.
The service indicator blinks.
The motor cuts out. Core bit jammed for too long. ▶ Free the jam and switch the
motor off and back on again.
9 Disposal
Most of the materials from which Hilti products are manufactured can be recycled. The materials must be
correctly separated before they can be recycled. In many countries, your old tools, machines or appliances
can be returned to Hilti for recycling. Ask Hilti Service or your Hilti sales representative for further information.
In accordance with the European Directive on waste electrical and electronic equipment and its implementation in conformance with national law, electric tools, machines or appliances that have reached the end of
their life must be collected separately and returned to an environmentally compatible recycling facility.
▶ Disposal of electric tools or appliances together with household waste is not permissible.
English 25
Printed: 02.11.2017 | Doc-Nr: PUB / 5145267 / 000 / 04
Page 28

Drilling and sawing slurry
Disposing of drilling and sawing slurry directly into rivers, lakes or the sewerage system without suitable
pretreatment is problematic from an environmental point of view.
▶ Ask the local public authorities for information about current regulations.
We recommend the following pretreatment:
▶ Collect the drilling or sawing slurry (for example, using a wet-type vacuum cleaner).
▶ Allow the drilling or sawing slurry to stand for some time or add a flocculation agent to help the fine
particles in the slurry settle and separate from the water.
▶ Dispose of this solid portion of the drilling or sawing slurry at a construction waste disposal location.
▶ Neutralize the remaining water from the drilling or sawing slurry (alkaline, pH-value > 7) by adding an
acidic neutralizing agent or dilute it by adding a large quantity of water before allowing it to enter the
sewerage system.
10 RoHS (Restriction of Hazardous Substances)
Click on the link to go to the table of hazardous substances: qr.hilti.com/r3411829.
There is a link to the RoHS table, in the form of a QR code, at the end of this document.
11 Manufacturer’s warranty
▶ Please contact your local Hilti representative if you have questions about the warranty conditions.
26 English
Printed: 02.11.2017 | Doc-Nr: PUB / 5145267 / 000 / 04
Page 29

Printed: 02.11.2017 | Doc-Nr: PUB / 5145267 / 000 / 04
Page 30

Hilti = registered trademark of Hilti Corp., Schaan
**
Printed: 02.11.2017 | Doc-Nr: PUB / 5145267 / 000 / 04
20171009
 Loading...