

Page 1

14 englisch
Safety precautions
■
1
Keep your place of work clean and tidy.
Disorder where you are working creates a potential risk of accidents.
■
2
Make allowance for influence from the surroundings. Don’t expose your electric tools/machines to rain. Don’t use electric tools/machines in damp or wet surroundings. Make
sure the work area is well lit. Don’t use electric tools/ machines near inflammable liquids
or gases.
■
3
Always protect yourself against electric
shock. Never touch grounding (earthing) parts
e.g. pipes, radiators, cookers, ovens, refrigerators.
■
4
Keep children away. Don’t let other persons touch the electric tool/machine or supply cord. Keep them away from your work
area.
■
5
Keep your electric tool/machine in a safe
place. Electric tools/machines not in use should
be kept in a dry locked-up place out of the
reach of children.
■
6
Don’t overload your electric tools/machines.
You will do your work better and safer in the
specified performance/rating range.
■
7
Always use the right electric tool/machine
for the job. Don’t use underpowered tools/machines or attachments for heavier duty jobs.
Don’t use electric tools/ machines for work
and purposes for which they are not intended, e.g. don’t use a hand-held circular saw to
cut down trees or cut up branches.
■
8
Wear suitable clothing. Don’t wear loose
clothing or jewellery – they could be caught
up in moving parts. When working outside,
the use of rubber gloves and non-slip shoes
is recommended. Wear a helmet or cap if you
have long hair.
■
9
Always wear protective goggles. If work
causes dust, wear a mask as well.
■
10
Don’t use the supply cord for any other
purpose. Don’t carry the electric tool/ machine
by the supply cord and don’t pull the plug out
of the socket/receptacle by pulling the supply cord. Protect the cable from heat, oil and
sharp edges.
■
11
Secure the workpiece. Use a clamping device or vice to hold the workpiece. It is secured more reliably in this way than in your
hand and you can then hold and operate your
electric tool/machine with both hands.
■
12
Don’t bend over too far when working.
Avoid an unusual stance. Make sure that you
are standing firmly and keep your balance at
all times.
■
13
Take good care of your electric tools/machines. Keep the drill bits, insert tools etc.
sharp and clean so that you can do your work
better, safer and more reliably. Observe the
cleaning and maintenance regulations and
the instructions for changing drill bits, insert
tools etc. Check the supply cord regularly and
have it renewed by a recognized specialist if
it is damaged. Check the extension supply
cord regularly and, if it is damaged, replace
it. Keep grips and side handles dry and free
from oil or grease.
■
14
Always pull out the plug from the mains if
the electric tool/machine is not in use, prior
to cleaning and maintenance work and when
changing a drill bit, saw blade or insert tools
of any kind.
■
15
Never leave a key in place. Always check
before switching on that the key or adjusting
tools have been removed.
■
16
Avoid any unintentional start-up. Never
carry a plugged-in electric tool/machine with
your finger on the switch. Always make sure
that the switch is off when plugging the electric tool/machine into the main electric supply.
■
17
If an extension supply cord is used outside, only use one which has been approved
for the purpose and is correspondingly marked.
■
18
Be attentive at all times. Keep your eye on
your work. Remain in a sensible frame of mind
and don’t use the electric tool/machine if you
cannot concentrate completely.
■
19
Check your electric tool/machine for damage. You must check the safety devices or
damaged parts carefully for perfect functioning in keeping with the intended purpose before using the electric tool/machine further.
Check whether the moving parts function
properly, whether they aren’t sticking, whether
any parts are broken, whether all other parts
work properly and are fitted correctly, and
make sure that all other conditions which can
influence operation and running of the electric tool/machine are as they should be. Damaged guards and protective devices and parts
must be repaired properly by an authorized
service workshop or replaced provided that
nothing else is stated in the operating instructions. Damaged switches must also be
replaced in the recognized service workshop.
Never use electric tools/machines which cannot be switched on and off by the switch.
■
20
Caution ! For your own safety’s sake, only use accessories and attachments which are
specified in the operating instructions or in
the respective catalogue. The use of accessories or insert tools or attachments other
than those specified in the operating instructions can result in personal injury to you.
■
21
Only have repairs carried out by recognized
electrical specialists. This electric tool/machine complies with respective safety regulations. Repairs may only be carried out by
an electrical specialist otherwise an accident
hazard for the operator can exist.
■
22
Connect dust extraction equipment. If devices are provided for the connection of dust
extraction and collection facilities ensure these
are connected and properly used.
Caution: The following fundamental safety
precautions must always be observed when
using electric tools/machines as protection
against electric shock, the risk of injury and
fire hazards.
Please read and take note of these precautions before you use the tool/machine.
Please keep these safety precautions in a
safe place.
Page 2
15
DD100 basic unitContents
DD100 basic unit 15
Versions with additional equipment 16
Assembly instructions/conversion 17
Drilling speeds 18
Water collector 18+19
Safety regulations 20
DD100 motor/technical data 21
Overload indicator 22
Aids for starting drilling 23
Accessories 23
Ground fault interruptor PRCD 24
Maintenance 24
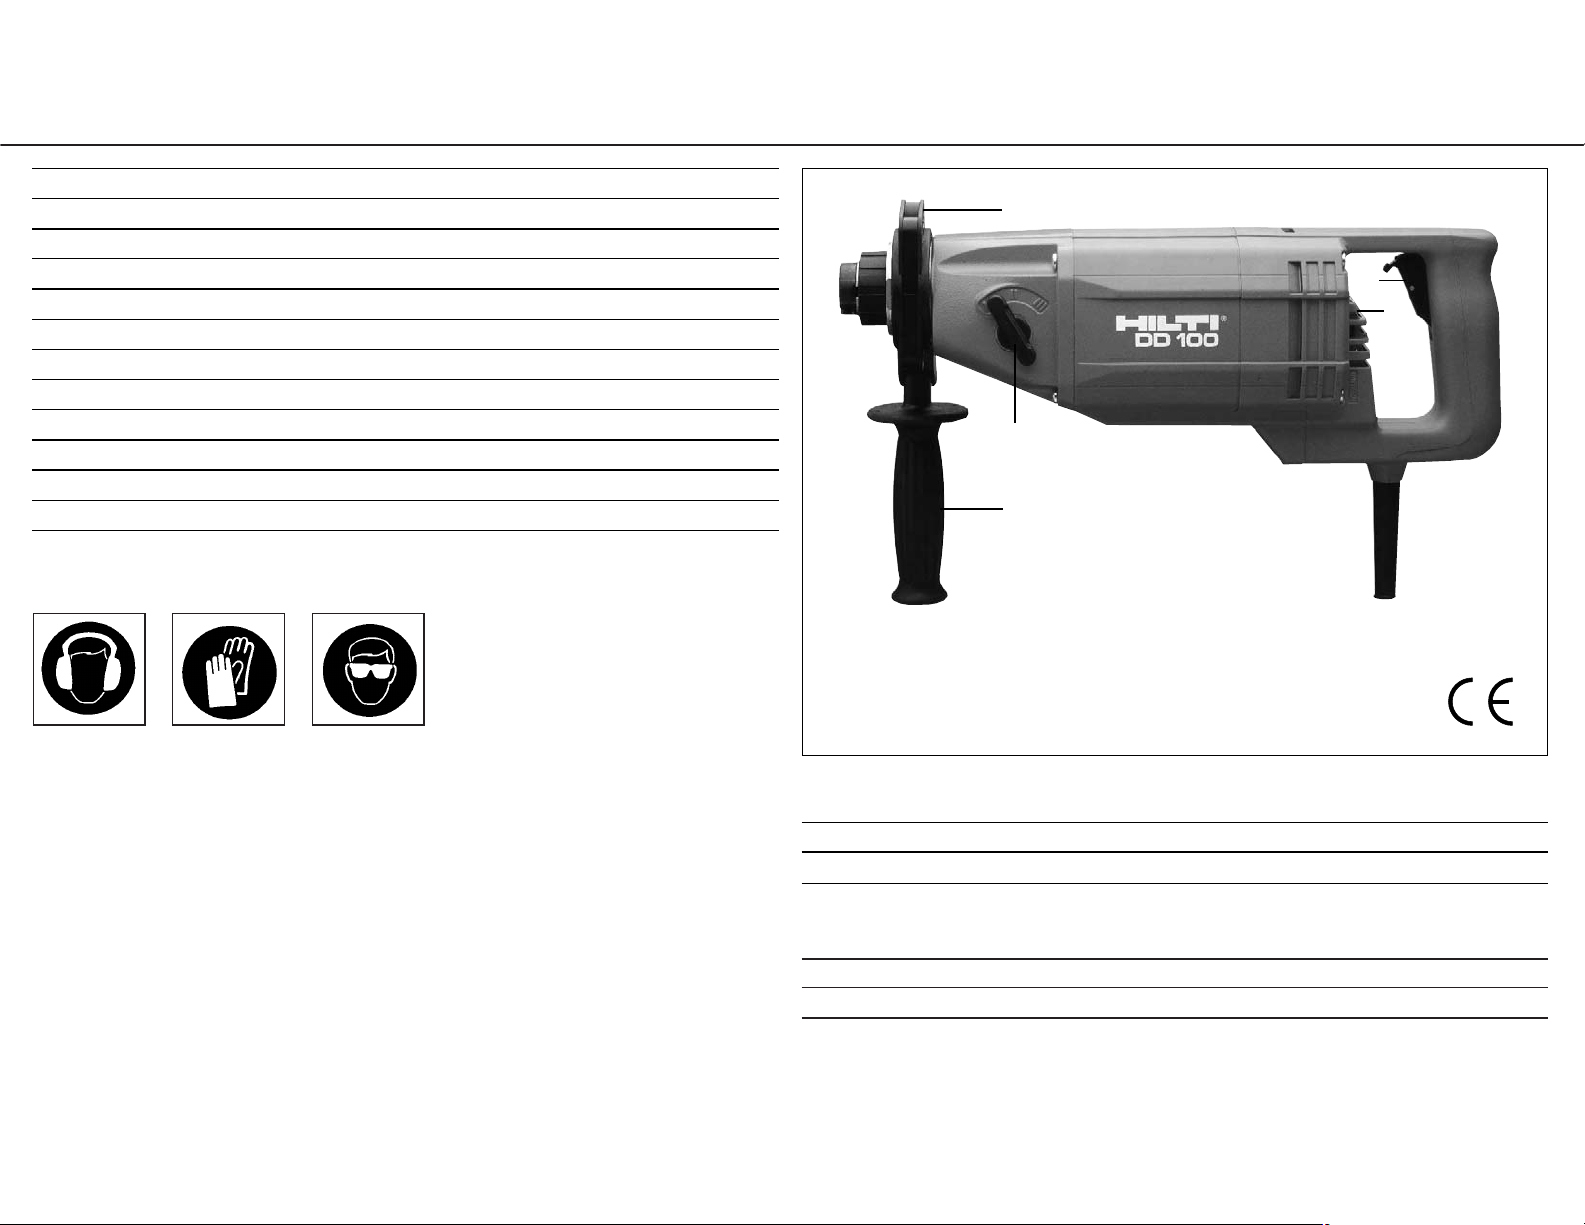
➂
➄
➁
➀ Electronic switch (easy hole-starting)
➁ Side handle
➂ Depth gauge ( not fitted)
➃ Overload indicator
➄ Speed-change switch
➀
➃
Technical data
Weight (basic unit): Approx. 6,2 kg
Dimensions: Approx. 440=115 =155 mm
Drill bit size range: dry 16–152 mm dia.
wet 8– 42 mm dia. (hand held)
8– 82 mm dia. (drilling rig)
Chuck for core bits: Hilti quick-change DD-BI
Chuck for dry-cutting core bits: Key-type chuck
Before beginning work:
Please observe the enclosed safety precautions!
Noise and vibration
Typically the A-weighted noise levels of the tool are:
– sound pressure level: 89 dB (A)
– sound power level: 102 dB (A)
Wear ear protection.
The typical hand-arm-vibration is below is 2,5 m/s
2
.
Do not use this product in any way other than as directed by these operating instructions.
When working with the machine, it must be held with two hands.Always make sure that you
have a safe stance/ foothold.
Always wear ear
protectors.
Always wear protective gloves.
Always wear safety
glasses.
Page 3
16
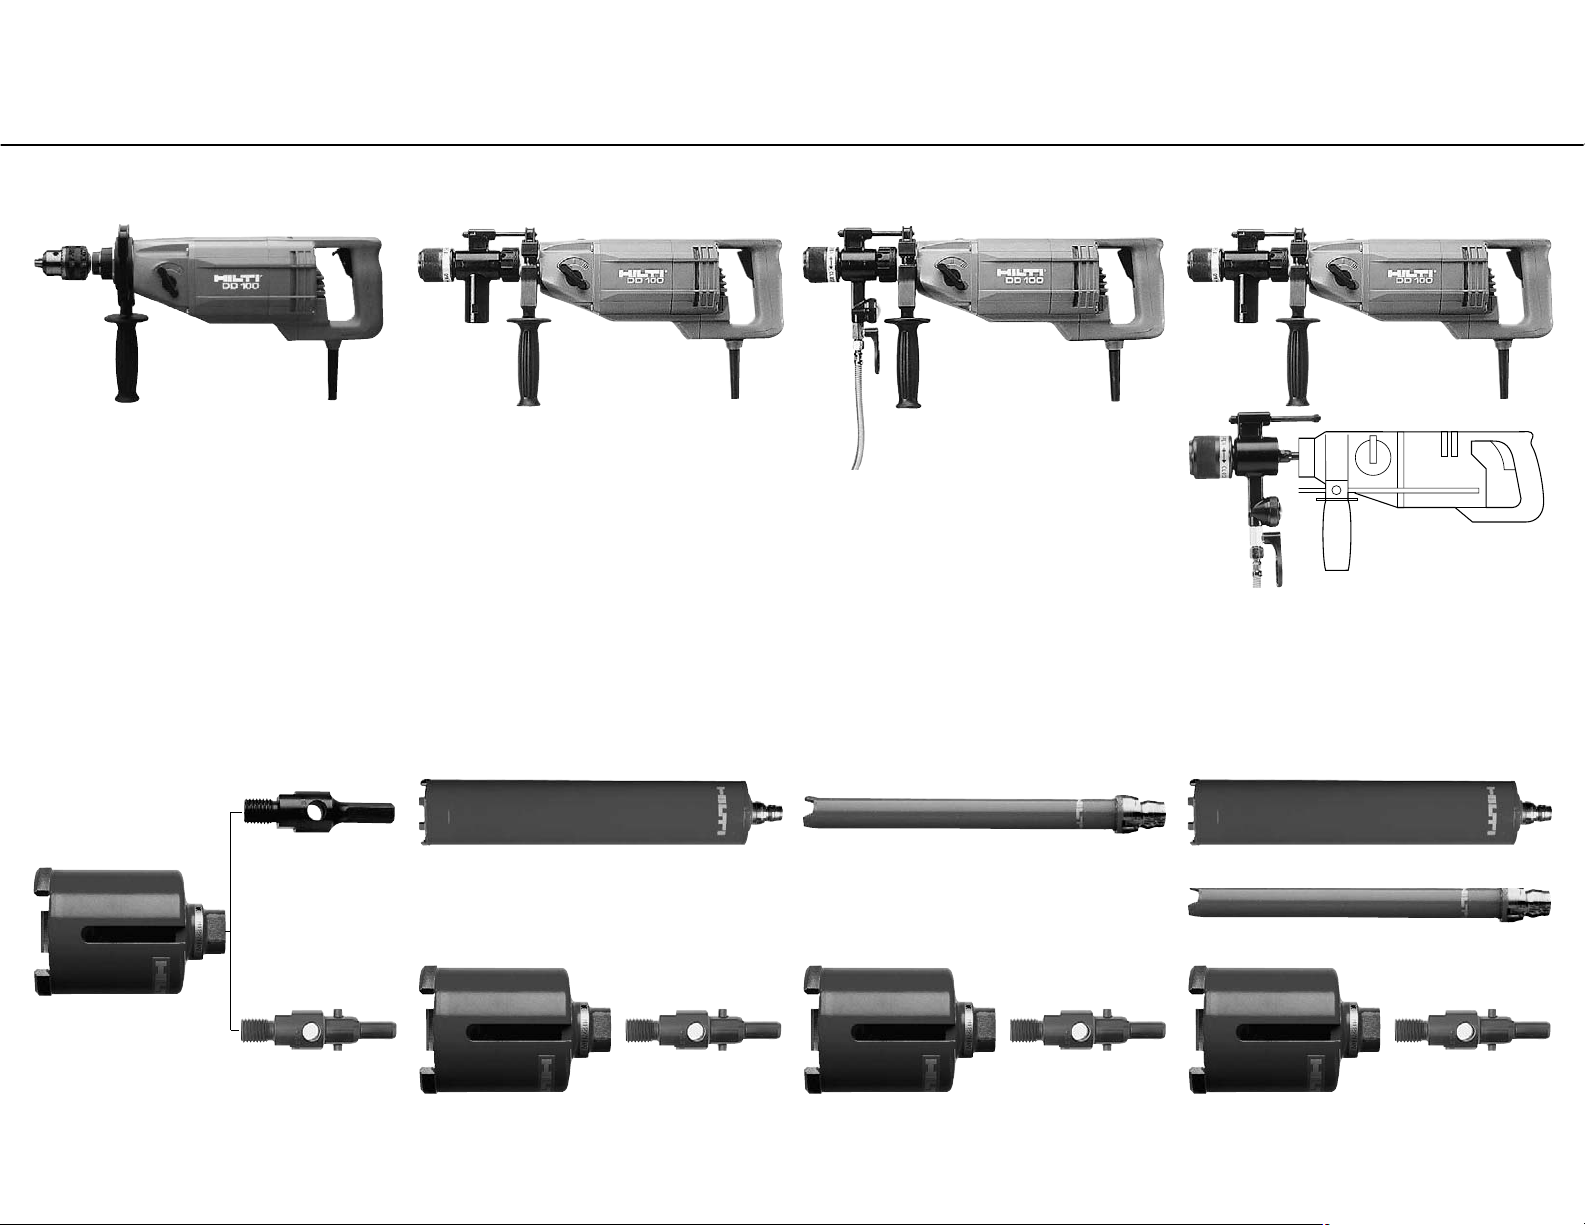
DD100 versions with additional equipment
DD100-B
Basic-version
DD100-D
Dry-drilling version
DD100-W
Wet-drilling version
DD100-M
Multi-purpose (wet/dry) version
Core bit for dry drilling Core bit for wet drilling
Core bit for wet drilling
Core bit for dry drilling
Socket cutters
DD100 adaptorDD100 adaptor
Universal
adaptor
DD100 adaptor DD100 adaptor
Equipment supplied
Insert tool programme
● Machine
● Key-type chuck
● Cardboard box
● Machine
● Extraction head with chuck
● Plastic case
● Machine with build-in ground fault interruptor
● Water swivel witch chuck
● Water collector
● Plastic case
● Machine with built-in ground fault interruptor
● Extraction head with chuck
● Water swivel with chuck
● Water collector
● Plastic case
Socket cutters Socket cutters Socket cutters
Page 4

17
DD100: Assembly and conversion
Re-equipping Key-type chuck Extraction head Water swivel
The water swivel is connected by way of a Gar-
dena coupling.
The water supply valve (➀) can be regulated
using the index finger (➁).The flow of water is
displayed by the flow indicator.
Note: If wet-drilling core bits are allowed to run
dry,they will become overheated, which could
lead to destruction of the diamond segments.
Connection to vacuum cleaner: If a Hilti vacuum cleaner is used, no additional adaptor is
necessary.Press the vacuum cleaner hose firmly into the extration head connection (➀). (See
page 23 for adaptor for other vacuum cleaners.)
Note: Drilling without dust removal could permanently damage or destroy the diamond core
bit.
Open the chuck as far as is necessary,and insert an insert tool with cylindrical, 3-flat or
hexagonal shank(13 mm or
1
/2w). After pushing in the insert tool as far as it will go, tighten the chuck using the key provided.
To remove the chuck, first turn the locking ring
(➀) until it clicks into place. When fitting the
chuck, the drive pin must be inserted into the
groove.
The chuck is secured by turning the locking
ring as far as it will go.
Important: Due to the keyed fit, the water
swivel cannot be fitted to the DD100-D.
Conversion of a DD100-D or DD100-B for
the first time, for wet drilling (DD100-W,
DD100-M) must be carried out by a Hilti service centre.
➀
➁
➀
Push the chuck rotation-prevention pin into the
opening provided.
➞
Insert the core bit into the chuck, possibly turning it slightly until the longitudinal groove can
be felt to lock in place. to remove the core bit,
first slide back the locking sleeve and then pull
out the core bit.
➀
Page 5

18
Speed-change switch
Recommended speeds for maximum drilling performance
Speed (r.p.m.) Wet (dia. in mm) Dry (dia. in mm)
3 (3900) 8–25 16– 42
2 (2400) 20–32 35– 67
1 (1200) 30–82 56–152
Important:
Wet and dry-drilling core bits are designed for
a drilling contact pressure of 250 N (25 kg). Insufficient pressure can lead to polishing of the
segments and a reduction of drilling performance. Polished/blunt core bits can be resharpened e.g. using the Hilti sharpening plate
(item no. 51343/3).
Water collector
Insert the centering ring (➀) for the appropriate
core bit diameter into the ring holder (➁).
Insert the water collector (➂) and press it down
firmly into the holder. Connect the water extraction hose.
Insert the guide pin (➀) on the water collector holder into the boss (➁) in the side handle
collar.Press the frame of the water collector
holder into its guide on the side handle collar
(➂).
If the sealing ring supplied with the diamond core bit begins to leak, it must be replaced. Reordering information: The diameter range is printed on the sealing disc.
Dry drilling Wet drilling
Extraction and Vacuum cleaner connection Water connection and
water supply water extraction
Power supply Electric supply as per Electric supply as per rating
rating plate plate
Safety device according to
national
approval for the use of this
hand-held electric tool
Speed selection Select correct speed Select correct speed
Hole-starting aid Use centering disc Use centering ring
Core bit Use DD100-D diamond core Use DD100-W core bits
bits
Caution:
DD-BI-HCW core bits (hand held) must be used for drilling anchor holes!
Page 6

19
O
P
E
N
C
L
O
S
E
1
3
2
O
P
E
N
C
L
O
S
E
5
Press the core bit through the water collector
(sealing disc, centering ring) onto the surface
to be drilled. Switch on the DD 100 by pressing the main switch.
Fitting a core bit
1. Chuck
2. Connection end
3. Core bit
4. Locking sleeve
5. Motor unit
The water supply valve can be regulated using the index finger.
Removing a core bit
1. Chuck
2. Core bit
3. Locking sleeve
Hold the core bit before disengaging the locking sleeve.
When the core bit is released, ensure that the
core does not accidentally fall out of the bit.
When drilling overhead, close the water supply valve and drain the core bit via the water
supply hose before releasing it from the chuck.
Important: First-time conversion of a dry-drilling machine (DD100-D, DD100-B) to a wet-drilling (DD100-W, DD100-M) can only be carried out by a Hilti service centre.
1
4
2
3
Page 7

20
Safety precautions on the jobsite
Preparations before beginning work Electrical safety
Before beginning work with the drilling system, read the operating instructions carefully and ensure that the saftety precautions listed below are observed.
Please also note that permission to begin drilling work must be
obtained from the site engineer or other authorised person.
● Ensure that no electric cables, gas or water pipes etc. are
situated where holes are to be drilled.
● Cables, pipes or other supply lines situated in close prox-
imity to where holes are to be drilled must be switched off.
● The drilling work must not have a negative effect on the
structural design of the building (drilling through steel reinforcement!).
● Cordon off areas where drilling work is taking place, partic-
ularly behind/below walls or ceilings which are being drilled
through.
● Wear a helmet, safety shoes,gloves and ear protectors.
● Tidiness and good organisation on the jobsite help to pre-
vent accidents.
● Use only original Hilti parts.
● Protect the motor unit from water spray and rain.
● For overhead drilling,the water collector and water removal
system must be in good order and function correctly.
● The wet drilling system must only be operated with the built-
in PRCD fault interruptor ( GB-with isolating transformer).
● In order to ensure safe, trouble-free operation, the drilling
system must be kept clean.(Do not clean using a jet of water.)
●Drilling work should only be carried out by trained person-
nel.
● If leakage occurs in the water supply system, the equipment
must be serviced.
In addition to the safety precautions, the following preparations
at the jobsite must be made.
– Make sure that a water connection or pressurized container with continuous water flow is available.
– Make preparations for the flow of water. If necessary, install
water extraction equipment.When drilling into hollow building
components, find out where the drilling water is likely to flow,
in order to avoid damage.
– A power supply with earth/ground connection must be available for use.
– Measure out and mark holes to be drilled.
– Safe electrical operation of the DD 100 can only be guaranteed as long as moisture is prevented from entering the motor. All electrical safety precautions can only reduce the consequences of allowing water to enter a DD 100 motor, but not
eliminate them. A DD 100 motor which has become wet must
be serviced by the electrical specialists at a Hilti centre.
Caution: When drilling overhead you have to use a proper water collector, replace a leaky water extraction device/sealing disc immediately (see page 19), if not your life
could be in danger.
Additional safety precautions:
– When drilling, make sure you have a secure position to work
from.
– Hold the DD 100 firmly with both hands.
– Pay attention and concentrate on the job when working.
The PRCD (DD 100 wet drilling machine) fault interruptor protects the operator in case of faults in the insulation of the motor unit or supply cord (between the PRCD and the motor unit).
This device also prevents the machine from restarting of its own
accord when power returns after an interruption in the power
supply.The earth/ground connection protects the operator from
dangerously high voltages in case of drilling into live cables.The
protective function of the ground fault interruptor must be checked
at regular intervals in accordance with regulations issued by
national authorities.
Page 8

21
DD100 motor Technical data
➄
➂
➁
➀ Quick-change coupling for rapid re-equipping with different chucks
➁ Adjustable side handle
➂ 3 speeds
➃ Overload indicator
➄ Switch with infinite speed adjustment (for hole-starting mode)
Caution:
Switch should be fully depressed when DD 100 is in continuous operation!
➀
➃
Voltages: 100/115V 230/240 V
Power input: 100V = 1400 W 1700 W
110 V = 1600 W
115 V = 1600 W
Current input: 15 A 8 A
Frequency: 50/60 Hz 50/60 Hz
No-load speed: 1
st
speed: 1200 r.p.m.
2
nd
speed: 2400 r.p.m.
3rdspeed : 3900 r.p.m.
(Operate speed-change switch only
when motor has stopped.)
Drill bit size range
Wet drilling, hand-held: 8– 42 mm dia.
Wet drilling with drilling rig: 8– 82 mm dia.
Dry drilling: 16–152 mm dia.
Drilling depth
Wet: Approx. 280 mm
Dry: Up to 400 mm (above 25 mm dia.)
Drilling rig stroke: Up to approx. 330 mm
Weight (basic unit without cord): 6,2 kg
Dimensions (unit without head): 440=115 =155 mm
Chuck for core bits : Hilti quick-change DD-BI
(Key-type chuck)
Depth gauge: Same as TE machines
Electronic speed regulator for constant no-load speed (nominal speed)
Overload current regulator and integrated starting current regulator
Thermal/mechanical motor protection/safety clutch
Electrical protection class1 (electric supply with earth/ground connection necessary)
Radio and television interference suppression in accordance with EN 55014 (CISPR. PUBL.
14)
See EN 60555, parts 2 and 3 for implications for electric supply (mains)
Ground fault interruptor (PRCD) 6 mA 10 mA
Zero-voltage trip
Please refer to the respective regulations of your trade association and the enclosed safety precautions.
Before beginning work: Please observe the enclosed safety precautions!
Please keep these operating instructions in a safe place.
Right of technical modifications reserved!
Page 9

22
Overload protection Dry/wet vacuum removal
The DD100 is equipped with
mechanical,electronic and thermal overload
protection devices.
Mechanical
This protects the operator, motor and core bit
if the core bit suddenly sticks (safety clutch)
Electronic
If the machine is overloaded due to excessive pressure being applied, the current is
reduced so that the core bit only rotates slowly.After releasing pressure on the core bit,
full current is again supplied to the motor and
the drilling speed returns to normal.
Thermal
The motor is protected additionally against continuous overloading by a temperature sensor
which automatically reduces current input.The
DD 100 can be made to operate at normal speed
by pressing the switch after the temperature
of the motor windings has dropped sufficiently.
Cooling of the motor windings can be assisted by allowing the machine to run without load.
The motor speed necessary for effective cooling can be reached more quickly by depressing the switch several times.
Overload indicator TDA-VC 60
If the overload indicator (➀) lights up, it is an
indication that you are approaching the limit
of thermal overload. It is recommended that
the DD100 is operated in such a way that the
overload indicator lamp does not light up(if the
indicator remains on, the thermal motor protection will be activated).After the machine has
been allowed to cool, work can continue normally (cooling at no-load speed approx. 20 seconds).
Caution: In order to avoid overheating and
damage to the core bit, drilling dust must be
removed continuously,allowing ventilation of
the cutting edge.
If suction is poor (low drilling progress), clean
the contaminated filter (operate shaker after
drilling each hole). Clean the extraction head
and core bit. It may be necessary to use a vacuum cleaner with greater suction capacity.
Empty the dust container regularly.
Note:
The TDA-VC60 must be used when a large
number of consecutive holes are being
drilled! The TDA-VC40 is suitable only for
occasional use.
When drilling overhead, wet vacuum removal
is absolutely essential. A dust removal system
must be used for dry drilling.
Wet vacuum removal: See page 23 for adaptor.
➀
Page 10

23
Hole starting aids Accessories
Wet (centering ring) Adhesive plate Drilling rig Adaptor
Hole-starting aid for wet drilling: A centering
ring is available for each core bit diameter (8–32
mm).It can be used with the water dam holder and adhesive plate (see accessories)
Dry (centering disc)
Hole-starting aid for dry drilling:Use the appropriate
disc for each core bit diameter.Apply the selfadhesive disc where the hole is to be drilled
after removing the protective foil. Nails can be
used if the adhesive is not effective. The selfadhesive centering disc can be used only once.
An adhesive plate for drilling individual holes.
– Apply double-sided adhesive foil to the adhesive plate.
– Position adhesive plate in the desired position, or use nails if the adhesive is not effective.
– Insert the appropriate centering ring.
– Insert the the water collector incl. appropriate
sealing disc into the adhesive plate, ensuring
it is held firmly in place.
– Connect the water supply hose.
– The adhesive plate can be re-used after
replacing the adhesive foil.
A drilling rig for semi-stationary use with core
bit diameters up to 82 mm.
– For use only with M12 anchors.
– Drilling overhead is only allowed when using the water collector.
Wet adaptor for connecting the water extraction hose to a water extractor (hose diameter
12 and 20 mm, item no.213149/8).
Dry adaptor for connecting other types of vacuum cleaner to the DD 100 extraction head
(35-50 mm connections, item no.213148/0).
Page 11

24
DD100 ground fault interruptor (PRCD) Maintenance Warranty
1
6
2
4
6
3
5
7
1. Plug - type depends on country
2. PRCD ground fault interruptor
3. ON-switch for PRCD (ON)
4. Test button (TEST)
5. Indicator
6. Supply cord (three wire grounded)
7. Monitor unit ON/OFF switch
The PRCD interruptor must be tested for correct operation each time before beginning work.
1. Check that the motor is switched off.
2. Connect the plug to the mains supply.
3. Press the ON button. The lamp must light!
4. Press the TEST button. The lamp must extinguish!
5. Press the ON button again before beginning
operation.
In the case of a malfunction (test failed),
the unit must be checked by an electrical
specialist before work with the equipment
continues!
To avoid damage to the system and to ensure trouble-free operation, the following parts
must be cleaned and oiled or greased after finishing work:
– Rods on water collector holder
– Chuck
– Extraction head/water swivel
– Thread on side handle
Keep the ventilation slots on the motor housing and side handle clean.
Ensure that the extraction head and water swivel interfaces are kept clean.Lubricate with Hilti
spray.
Keep the chuck clean – use Hilti spray.
In case of technical problems, please contact
the Hilti customer service.
Repairs to the electrical parts of the DD100
must be carried out by an electrical specialist.
Hilti warrants that the tool supplied is free of
defects in material and workmanship. This warranty is valid as long as the tool is operated and
handled correctly,cleaned and serviced properly and in accordance with the Hilti Operating
Instructions, all warranty claims are made within 12 months from the date of the sale (invoice
date), and the technical system is maintained.
This means that only original Hilti consumables,
components and spare parts may be used in
the tool.
This warranty provides the free-of-charge
repair or replacement of defective parts only.
Parts requiring repair or replacement as a result
of normal wear and tear are not covered by this
warranty.
Additional claims are excluded, unless
stringent national rules prohibit such exclusion. In particular, Hilti is not obligated for
direct, indirect, incidental or consequential
damages, losses or expenses in connection
with, or by reason of, the use of, or inability
to use the tool for any purpose. Implied warranties of merchantability or fitness for a
particular purpose are specifically excluded.
For repair or replacement, send tool and/or
related parts immediately upon discovery of the
defect to the address of the local Hilti marketing organization provided.
This constitutes Hilti’s entire obligation with
regard to warranty and supersedes all prior or
contemporaneous comments and oral or written agreements concerning warranties.
Warning : This appliance must be earthed
As the colours of the wires in the mains lead of this tool may not correspond with the coloured
maekings identifying the terminals in your plug, proceed as follows:
–The wire that is coloured green and yellow must be conected to the terminal in the plug that
is marked with the letter E or by the earth symbol or coloured green or green and yellow.
–The wire that is coloured blue must be connected to the terminal that is marked with the
letter N or coloured black.
–The wire that is coloured brown must be connected to the teminal that is marked with the letter L or coloured red.
 Loading...