

Hilti DAG 451S Operating Instructions Manual

DAG 451S
Operating instructions
Mode d’emploi
Manual de instrucciones
Printed: 07.07.2013 | Doc-Nr: PUB / 5069465 / 000 / 00
4
1
2
3
5
6
7
8
9
10
11
12
Printed: 07.07.2013 | Doc-Nr: PUB / 5069465 / 000 / 00
4
5
6
13
14
15
16
This Product is Listed by Underwriters Laboratories Inc.
and Bears the Mark:
R
Printed: 07.07.2013 | Doc-Nr: PUB / 5069465 / 000 / 00

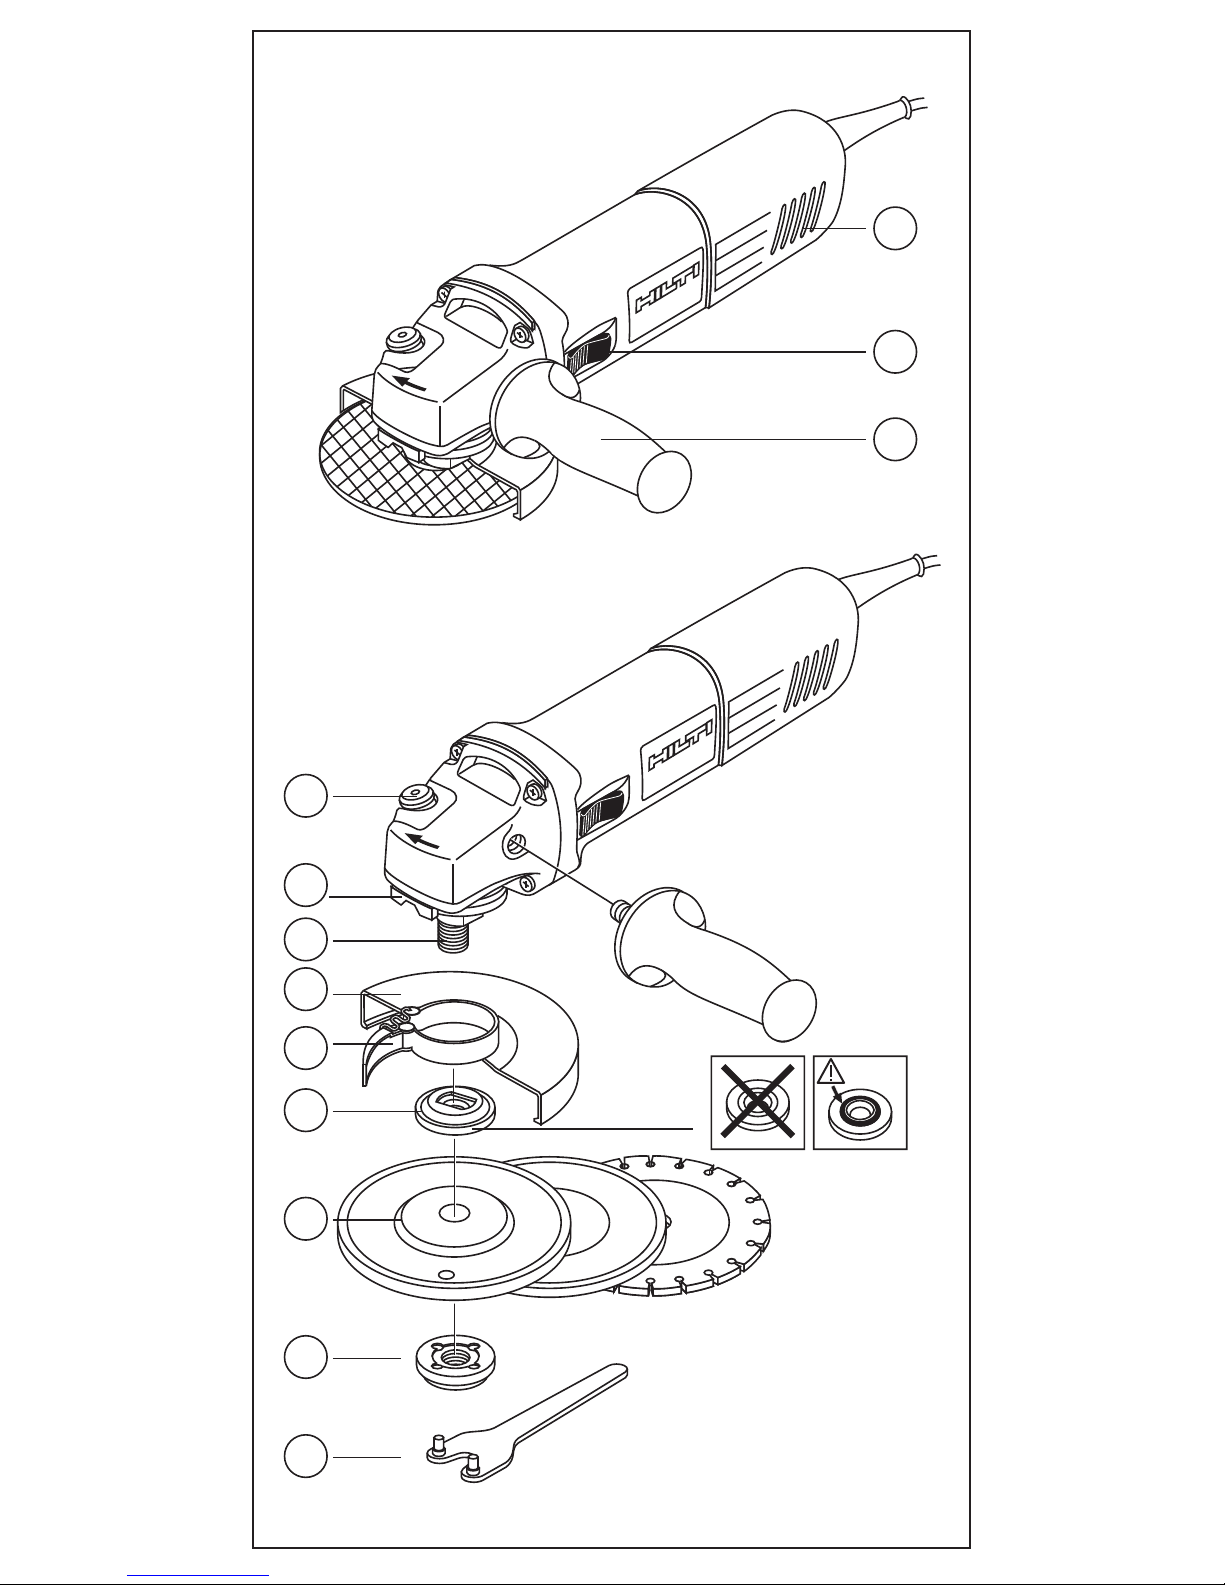
1 Ventilation slots
2 On/off switch
3 Side handle
4 Spindle lockbutton
5 Spindle neck
6 Spindle
7 Disc guard
8 Guard release / lock latch
9 Mounting flange
10 Grinding / disc *
11 Clamping nut
12 Wrench
* Accessories
The accessories illustrated or described in these instructions are not supplied with the angle grinder.
13 Rubber backing pad *
14 Flexible grinding disc *
15 Round nut *
16 Screw
DAG 451S angle grinder
Power Tool Safety Rules
WARNING
Read and understand all instructions. Failure to follow all instructions
listed below, may result in electric shock, fire and/or serious personal injury.
SAVE THESE INSTRUCTIONS
Work Area
Keep your work area clean and well lit. Cluttered benches and dark areas
invite accidents.
Do not operate power tools in explosive atmospheres, such as in the
presence of flammable liquids, gases, or dust. Power tools create sparks
which may ignite the dust or fumes.
Keep by-standers, children, and visitors away while operating a power
tool. Distractions can cause you to lose control.
Electrical Safety
Double Insulated tools are equipped with a polarized plug (one blade is
wider than the other.) This plug will fit in a polarized outlet only one way.
If the plug does not fit fully in the outlet, reverse the plug. If it still does
not fit, contact a qualified electrician to install a polarized outlet. Do not
change the plug in any way. Double Insulation eliminates the need for the
three wire grounded power cord and grounded power supply system. Before
plugging in the tool, be certain the outlet voltage supplied is within the voltage
marked on the nameplate. Do not use “AC only” rated tools with a DC power
supply.
Avoid body contact with grounded surfaces such as pipes, radiators,
ranges and refrigerators. There is an increased risk of electric shock if your
body is grounded. If operating the power tool in damp locations is unavoidable, a Ground Fault Circuit Interrupter must be used to supply the power to
your tool. Electrician's rubber gloves and footwear will further enhance your
personal safety.
Don't expose power tools to rain or wet conditions. Water entering a
power tool will increase the risk of electric shock.
Do not abuse the cord. Never use the cord to carry the tools or pull the
plug from an outlet. Keep cord away from heat, oil, sharp edges or moving parts. Replace damaged cords immediately. Damaged cords increase
the risk of electric shock.
Technical data:
Rated voltage: 120 V AC
Rated current: 7.0 A
Mains frequency: 60 Hz
Rated speed: 11000 /min
Drive spindle thread:
5
/8"–11
Grinding disc diameter: 41/2" (115 mm) maximum
Weight approx. (without accessories): 3.5 lbs (1.6 kg)
Insulation class: Z II (double insulated)
Listings/Approvals: UL (Underwriters laboratory)
CSA (Canadian Std. Assoc.)
Printed: 07.07.2013 | Doc-Nr: PUB / 5069465 / 000 / 00

When operating a power tool outside, use an outdoor extension cord
marked “W-A” or “W.” These cords are rated for outdoor use and reduce the
risk of electric shock. Refer to “Recommended sizes of Extension Cords” in
the Accessory section of this manual.
Personal Safety
Stay alert, watch what you are doing and use common sense when
operating a power tool. Do not use tool while tired or under the influence
of drugs, alcohol, or medication. A moment of inattention while operating
power tools may result in serious personal injury.
Dress properly. Do not wear loose clothing or jewelry. Contain long hair.
Keep your hair, clothing, and gloves away from moving parts. Loose
clothes, jewelry, or long hair can be caught in moving parts. Keep handles
dry, clean and free from oil and grease.
Avoid accidental starting. Be sure switch is “OFF” before plugging in.
Carrying tools with your finger on the switch or plugging in tools that have the
switch “ON” invites accidents.
Remove adjusting keys or wrenches before turning the tool “ON”. A
wrench or a key that is left attached to a rotating part of the tool may result in
personal injury.
Do not overreach. Keep proper footing and balance at all times. Proper
footing and balance enables better control of the tool in unexpected situations.
Use safety equipment. Operators and bystanders must always wear eye
protection meeting the requirements of ANSI Z87.1. Appropriate respira-
tory protection, non-skid safety shoes, hard hat, or hearing protection must
be used as conditions warrant.
Tool Use and Care
Use clamps or other practical way to secure and support the workpiece
to a stable platform. Holding the work by hand or against your body is unsta-
ble and may lead to loss of control.
Do not force tool. Use the correct tool for your application. The correct
tool will do the job better and safer at the rate for which it is designed.
Do not use tool if switch does not turn it “ON” or “OFF”. Any tool that
cannot be controlled with the switch is dangerous and must be repaired.
Disconnect the plug from the power source before making any adjustments, changing accessories, or storing the tool. Such preventive safety
measures reduce the risk of starting the tool accidentally.
Store idle tools out of reach of children and other untrained persons.
Tools are dangerous in the hands of untrained users.
Maintain tools with care. Keep cutting tools sharp and clean. Properly
maintained tools, with sharp cutting edges are less likely to bind and are easier to control. Any alteration or modification is a misuse and may result in a
dangerous condition.
Check for misalignment or binding of moving parts, breakage of parts,
and any other condition that may affect the tools operation. If damaged,
have the tool serviced before using. Many accidents are caused by poorly
maintained tools. Develop a periodic maintenance schedule for your tool.
Use only accessories that are recommended by the manufacturer for
your model. Accessories that may be suitable for one tool, may become haz-
ardous when used on another tool.
Service
Tool service must be performed only by qualified repair personnel. Ser-
vice or maintenance performed by unqualified personnel could result in a risk
of injury. For example: internal wires may be misplaced or pinched, safety
guard return springs may be improperly mounted.
When servicing a tool, use only identical replacement parts. Follow
instructions in the Maintenance section of this manual. Use of unautho-
rized parts or failure to follow Maintenance Instructions may create a risk of
electric shock or injury. Certain cleaning agents such as gasoline, carbon
tetrachloride, ammonia, etc. may damage plastic parts.
Angle Grinder Safety Rules
Always use proper guard with grinding wheel. A guard helps protects oper-
ator from broken wheel fragments. When using grinding wheel attachments,
the guard must always be securely attached to the tool and positioned for
maximum safety, so the least amount of wheel is exposed toward the operator.
Accessories must be rated for at least the speed listed on the tool warning label. Wheels and other accessories running over rated speed can fly
apart and cause injury. Grinding wheels or any other accessory must have a
Printed: 07.07.2013 | Doc-Nr: PUB / 5069465 / 000 / 00

maximum safe operating speed greater than the “rated speed” marked on the
tool's nameplate.
Hold tool by insulated gripping surfaces when performing an operation
where the grinding tools may contact hidden wiring or its own cord. Con-
tact with a “live” wire will make exposed metal parts of the tool “live” and
shock the operator.
Before using a grinder or installing a new wheel, inspect the grinding
wheel for chips and cracks. Remove bad wheels immediately. Run the
tool at no load for one minute, holding the tool in the direction away from
people. Wheels with flaws will normally break apart during this time.
Carefully handle both the tool and individual grinding wheels to avoid
chipping or cracking. Install a new wheel if tool is dropped while grinding. Do not use a wheel that may be damaged. Fragments from a wheel
that bursts during operation will fly away at great velocity possibly striking you
or bystanders.
Do not use grinding wheel that is larger than the maximum recommended size for your tool, or worn down damaged wheels from larger
grinders. Wheels intended for large angle sander/grinders are not suitable for
the high speed of a small angle sander/grinder, these wheels may easily burst
and the fragments strike you or bystanders.
Depressed hub wheels are not intended for cutting and may shatter.
Depressed hub wheels or type 1 (cutting) wheels are not intended for side
loading and may shatter under overload.
Do not use hubbed spin-on type 27 grinding wheels.
Do not use this tool with “Woodcarving” blade. Such blades create fre-
quent kick-back and loss of control.
Wear proper apparel while using a sander/grinder. Face shield or at least
safety goggles, dust mask, leather gloves and shop apron capable of stopping small wheel or workpiece fragments.
Position the cord clear of the spinning grinding wheel or any other sanding accessory. Do not wrap the cord around your arm or wrist. If you lose
control and have the cord wrapped around your arm or wrist it may entrap you
and cause injury.
Avoid bouncing and snagging the wheel, especially when working corners, sharp edges etc. This can cause loss of control and kick-back.
Regularily clean the tool's air vents by compressed air. Excessive accumu-
lation of powdered metal inside the motor housing may cause electrical failures.
Do not grind or sand near flammable materials. Sparks from the wheel
could ignite these materials.
This tool can be converted to a sander. When grinding is resumed the
proper guard and wheel flanges MUST be reinstalled before proceeding
with grinding. The guard must always be attached to the tool and
positioned for maximum safety, so the least amount of wheel is exposed
from the side the tool is being operated. The grinding wheel guard cannot
be used for most sanding operations or for wire brushing.
When sanding, do not use oversized sanding disc. Larger sanding disc will
extend beyond the sanding pad causing snagging, tearing of the disc or kickback. Extra paper extending beyond the sanding pad can also cause serious
lacerations.
When grinding or sanding any material that may create harmful dust, use
special precautions. A suitable breathing respirator must be worn by all per-
sonal entering the work area. Work area should be sealed by plastic sheeting and
persons not protected should be kept out until work area is thoroughly cleaned.
WARNING: This product contains or produces an exposure to chemicals
known to the state of California to cause cancer and births defects ( or other
preproductive harm).
Symbols used on the tool:
V = Volts n = Rated speed
~ = Alternating current /min = Revolutions per minute
Hz = Hertz ∅ = Diameter
W = Watts Z = Class II construction
A = Amperes
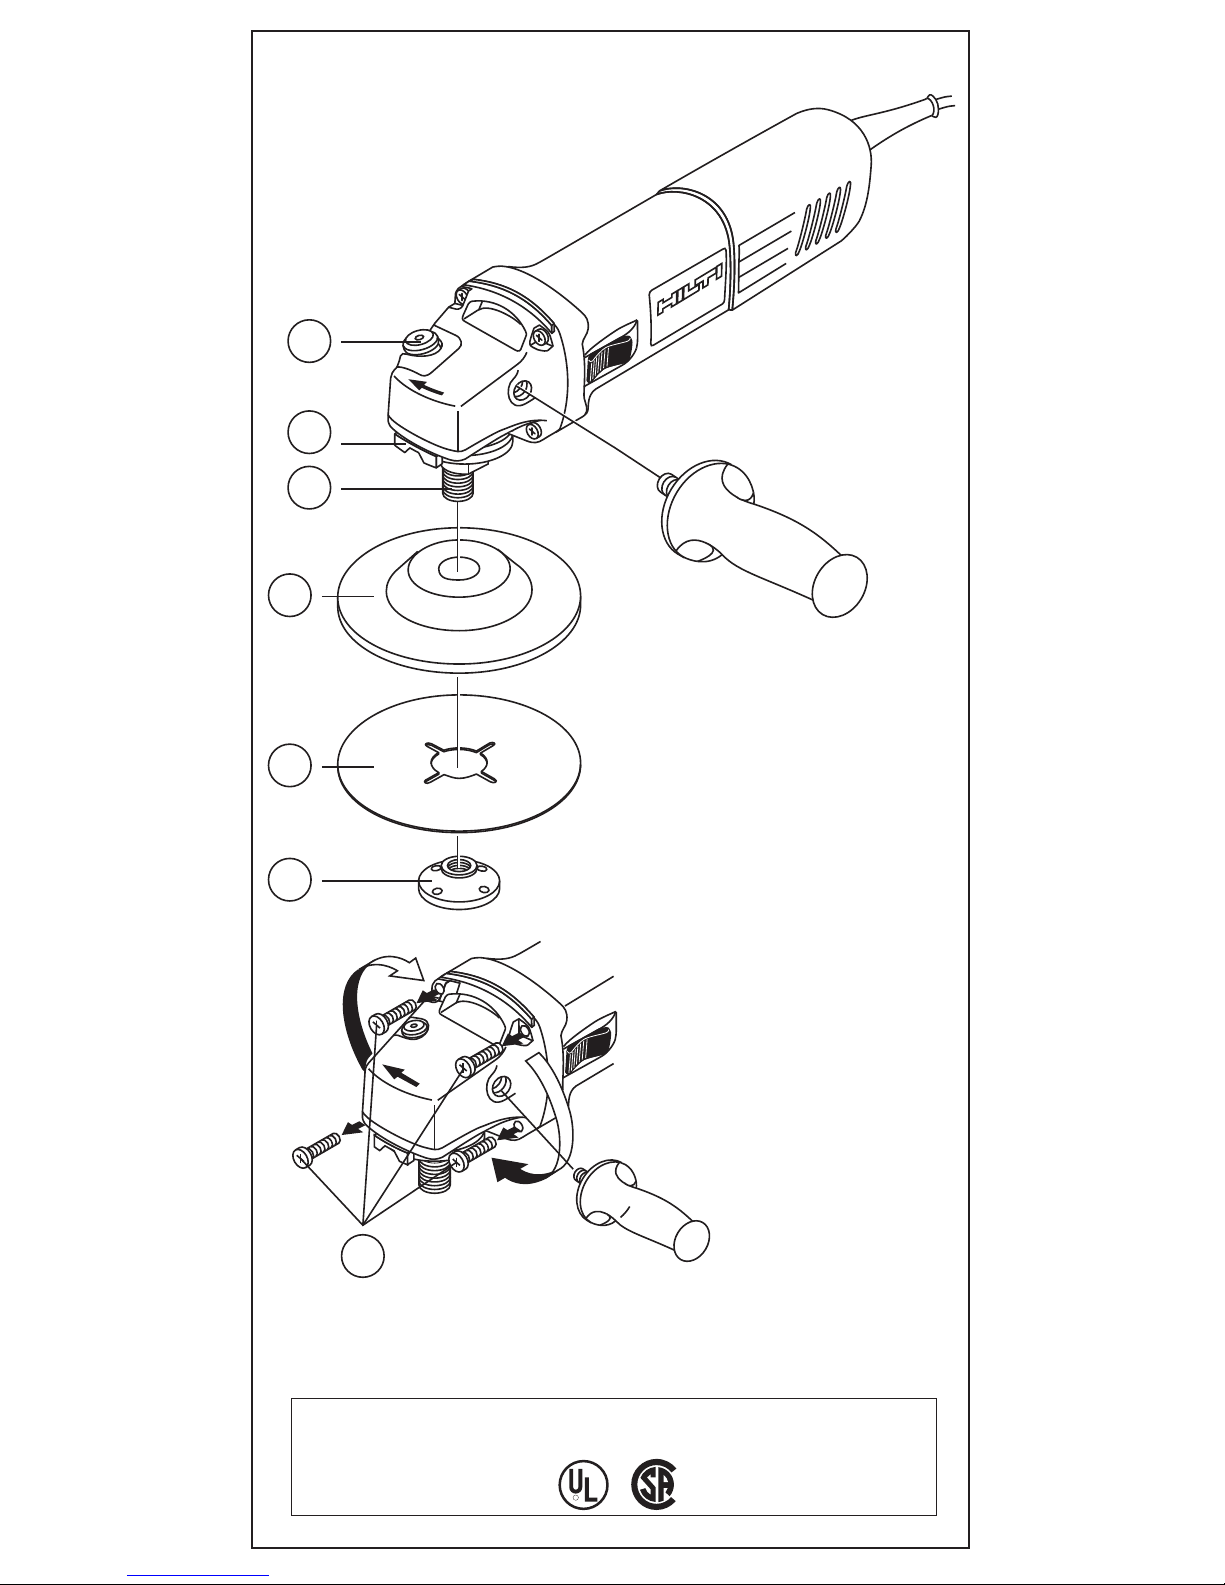
Fitting the disc guard
Always disconnect the plug from the mains socket before carrying out any
work on the machine!
Disc guard
The guard must always be fitted when working with rigid grinding discs.
Printed: 07.07.2013 | Doc-Nr: PUB / 5069465 / 000 / 00
Open guard release/lock latch 8 and position guard on spindle neck so that the
two bumps on guard, line up with the two notches on the spindle neck.
Rotate guard either direction to desired position, and close latch to secure
guard in place.
TO REMOVE GUARD: Open guard release/lock latch 8 rotate guard until the
two bumps on guard line up with the two notches on the spindle neck, and lift
guard off the spindle neck.
The closed side of the disc guard 7 must always be positioned towards on
the operator.
Side handle
The side handle must be fitted whenever the machine is in use.
Screw on the side handle 3 on the right or left side of the gear housing, depending on how the machine is to be used.
Fitting grinding discs, brushes, etc.
(accessories)
Always disconnect the plug from the mains socket before carrying out any
work on the machine!
Use only grindings discs approved for use at the max. permitted no-load
speed of the machine.
Lock the spindle 6 by pressing the spindle lockbutton 4.
Wait until spindle rotation has stopped before pressing the lockbutton!
Discs and rigid grinding discs
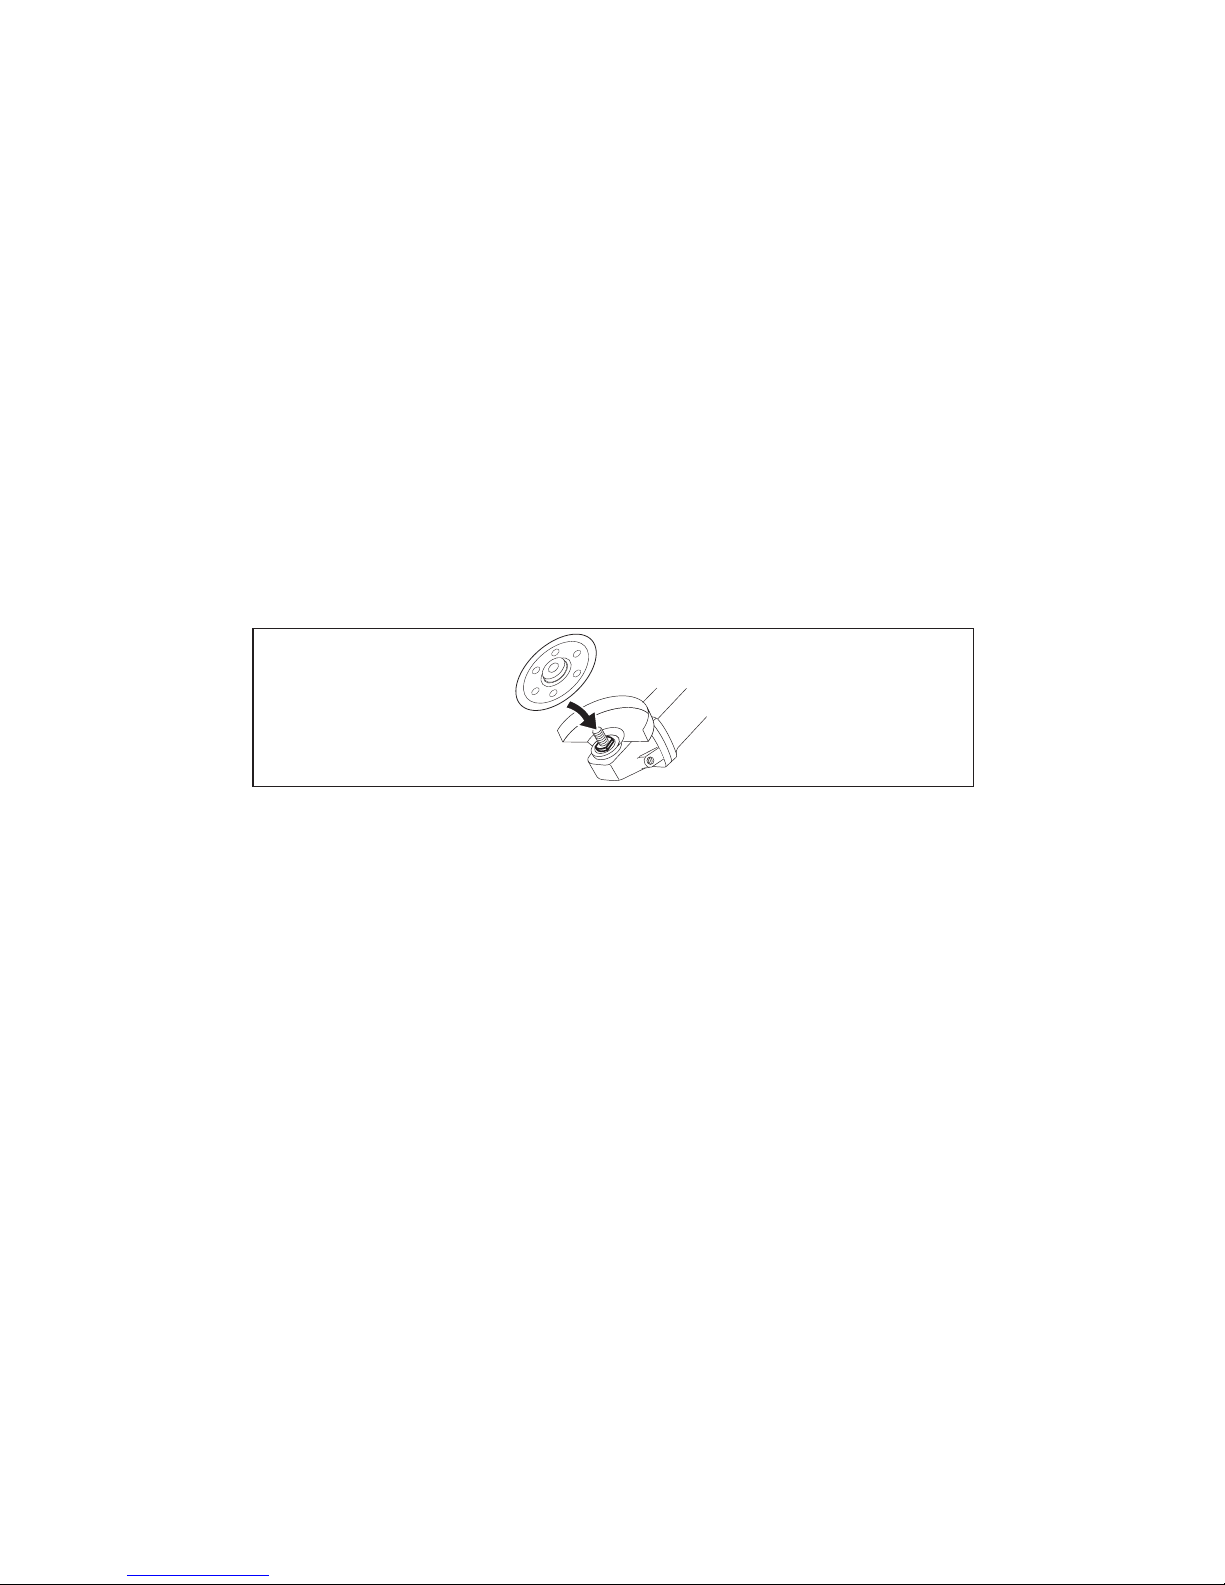
Fit the mounting flange 9 onto the spindle 6 so that the recess engages with the
spindle flange (the mounting flange is driven by the spindle).
Screw on the clamping nut 11 and tighten it with the wrench.
Check that the disc is free to rotate before switching on the machine.
Fan-type grinding discs
Remove the disc guard 7. Fit the mounting flange 9 and fan-type grinding disc
onto the spindle 6. Screw on and tighten the clamping nut 11.
Rubber backing pad
Remove the disc guard 7. Fit the rubber backing pad 13 and flexible grinding
disc onto the spindle 6. Screw on the round nut 15* (accessory) and tighten it
with the wrench.
Cup or disc-type brushes
Remove the disc guard 7. Screw the cup or disc-type brush onto the spindle 6
and tighten it with the open-end wrench. The brush attachment must be
screwed on the full length of the spindle thread, i.e. it must fit tightly against the
spindle collar at the end of the thread.
Initial operation
Important: The voltage of the power source must conform to the specifications
printed on the rating plate on the machine.
Switching on: Slide the ON/OFF switch 2 forwards.
Switching off: Release the ON/OFF switch 2.
Locking switch: Slide the ON/OFF switch 2 further forwards
and press it down to lock it in the ON position.
Printed: 07.07.2013 | Doc-Nr: PUB / 5069465 / 000 / 00
 Loading...