

Hill-Rom The Vest P205 User Manual
PROPRIETARY AND CONFIDENTIAL DRAFT 19-DEC-11
USER MANUAL
The Vest
®
Airway
Clearance System,
Model 205
From Hill-Rom
Product No. P205
140643 REV 7

PROPRIETARY AND CONFIDENTIAL DRAFT 19-DEC-11

The Vest® Airway Clearance System, Model 205 i
User Manual (140643 REV 7)
PROPRIETARY AND CONFIDENTIAL DRAFT 19-DEC-11
© 2011 by Hill-Rom Services, Inc. ALL RIGHTS RESERVED.
Authorized European Union Representative:
HILL-ROM SAS
B.P. 14 - Z.I. DU TALHOUET
56330 PLUVIGNER
FRANCE
TEL: +33 (0)2 97 50 92 12
No part of this text shall be reproduced or transmitted in any form or by
any means, electronic or mechanical, including photocopying,
recording, or by any information or retrieval system without written
permission from Hill-Rom Services, Inc. (Hill-Rom).
The information in this manual is confidential and may not be disclosed
to third parties without the prior written consent of Hill-Rom.
Seventh Edition
First Printing 2006
Printed in the USA
3M® is a registered trademark of Minnesota Mining and Manufacturing
Company.
Citris II® is a registered trademark of Beaumont Products, Inc.
Cough Pause® is a registered trademark of Hill-Rom Services, Inc.
Dispatch® is a registered trademark of the Clorox Company.
Hill-Rom® is a registered trademark of Hill-Rom Services, Inc.
Matar® is a registered trademark of EcoLab, Inc.
The UL logo is a registered trademark of Underwriters Laboratories,
Inc.
The Vest
®
is a registered trademark of Hill-Rom Services PTE Ltd.
Underwriters Laboratories Inc.® is a registered trademark of
Underwriters Laboratories Inc.
Units with a 51-XXXXX serial number are manufactured by:
HILL-ROM, INC.
4349 CORPORATE ROAD
CHARLESTON, SC 29405
Units with a 52-XXXXX serial number are manufactured by:
HILL-ROM SERVICES PRIVATE LIMITED
1 YISHUN AVENUE 7
SINGAPORE 768923

ii The Vest® Airway Clearance System, Model 205
User Manual (140643 REV 7)
PROPRIETARY AND CONFIDENTIAL DRAFT 19-DEC-11
Velcro® is a registered trademark of Velcro Industries, BV (a Dutch
corporation).
Viraguard® is a registered trademark of Veridien Corp.
Virex® is a registered trademark of Diversity, Inc.
Wex-Cide™ is a trademark of Wexford Labs, Inc.
The information contained in this manual is subject to change without
notice. Hill-Rom makes no commitment to update or keep current, the
information contained in this manual.
Hill-Rom reserves the right to make changes without notice in design,
specifications, and models. The only warranty Hill-Rom makes is the
express written warranty extended on the sale or rental of its products.
To order additional copies of this manual (140643), refer to the back
cover for contact information. For countries not listed on the back cover,
contact your distributor.
NOTE:
The back cover is a comprehensive list of Technical Support contact
information for Hill-Rom. The product discussed in this manual may
not be available in all of the countries listed.
Revision Pages Affected Date
Original Issue July 2006
2 All September 2007
3 All January 2008
4 All April 2008
5 All September 2008
6 All February 2010
7 All November 2011

The Vest® Airway Clearance System, Model 205 iii
User Manual (140643 REV 7)
PROPRIETARY AND CONFIDENTIAL DRAFT 19-DEC-11
Table of Contents
Document Symbols . . . . . . . . . . . . . . . . . . . . . . . . . . . . . . . . . . . . 1
Precautions . . . . . . . . . . . . . . . . . . . . . . . . . . . . . . . . . . . . . . . . . . . 2
Intended Use . . . . . . . . . . . . . . . . . . . . . . . . . . . . . . . . . . . . . . . . . 4
Introduction . . . . . . . . . . . . . . . . . . . . . . . . . . . . . . . . . . . . . . . . . . 4
Contraindications . . . . . . . . . . . . . . . . . . . . . . . . . . . . . . . . . . . . . . 4
Relative Contraindications . . . . . . . . . . . . . . . . . . . . . . . . . . . 5
Features . . . . . . . . . . . . . . . . . . . . . . . . . . . . . . . . . . . . . . . . . . . . . 6
Air Pulse Generator . . . . . . . . . . . . . . . . . . . . . . . . . . . . . . . . 6
Push Bar . . . . . . . . . . . . . . . . . . . . . . . . . . . . . . . . . . . . . . . . . 6
Remote Control . . . . . . . . . . . . . . . . . . . . . . . . . . . . . . . . . . . 7
Height Adjustment Release Lever . . . . . . . . . . . . . . . . . . . . . 7
Locking Casters . . . . . . . . . . . . . . . . . . . . . . . . . . . . . . . . . . . 7
Stand . . . . . . . . . . . . . . . . . . . . . . . . . . . . . . . . . . . . . . . . . . . . 7
Storage Basket . . . . . . . . . . . . . . . . . . . . . . . . . . . . . . . . . . . . 7
Air Hose Connector Ports . . . . . . . . . . . . . . . . . . . . . . . . . . . . 7
Air Hoses . . . . . . . . . . . . . . . . . . . . . . . . . . . . . . . . . . . . . . . . 7
Control Panel . . . . . . . . . . . . . . . . . . . . . . . . . . . . . . . . . . . . . 7
Assembly . . . . . . . . . . . . . . . . . . . . . . . . . . . . . . . . . . . . . . . . . . . . 8
Instructions for Use . . . . . . . . . . . . . . . . . . . . . . . . . . . . . . . . . . . . 9
Put on the Disposable, Single-Patient Use (SPU) Vests . . . . 9
Wrap SPU Vest . . . . . . . . . . . . . . . . . . . . . . . . . . . . . . . . 9
Full SPU Vest . . . . . . . . . . . . . . . . . . . . . . . . . . . . . . . . 10
Connect the Air Hoses . . . . . . . . . . . . . . . . . . . . . . . . . . . . . 10
Set Up the Air Pulse Generator . . . . . . . . . . . . . . . . . . . . . . 12
Software Version . . . . . . . . . . . . . . . . . . . . . . . . . . . . . . . . . . . . . 12
Use The Vest® Airway Clearance System, version 1.20 . . . . . . 13
Setting and Using a New Program Mode . . . . . . . . . . . 15
Using the Program Mode . . . . . . . . . . . . . . . . . . . . . . . 18
Setting and Using a New Ramp Mode . . . . . . . . . . . . . 19
Using the Ramp Mode . . . . . . . . . . . . . . . . . . . . . . . . . 23
Change the Language . . . . . . . . . . . . . . . . . . . . . . . . . . 24

iv The Vest® Airway Clearance System, Model 205
User Manual (140643 REV 7)
PROPRIETARY AND CONFIDENTIAL DRAFT 19-DEC-11
Disable the Program Modes (Program and Ramp) . . . . 25
Set Facility Custom Default Settings . . . . . . . . . . . . . . 26
Use The Vest® Airway Clearance System, version 1.22 . . . . . . 30
Normal Mode . . . . . . . . . . . . . . . . . . . . . . . . . . . . . . . . . . . . 30
Set and Use the New Program Mode . . . . . . . . . . . . . . . . . . 32
Use the Program Mode . . . . . . . . . . . . . . . . . . . . . . . . . . . . 37
Set and Use the New Ramp Mode . . . . . . . . . . . . . . . . . . . . 40
Use the Ramp Mode . . . . . . . . . . . . . . . . . . . . . . . . . . . . . . . 44
Change the Language . . . . . . . . . . . . . . . . . . . . . . . . . . . . . . 46
Disable the Program Modes (Program and Ramp modes) . . 47
Set Custom Default Settings . . . . . . . . . . . . . . . . . . . . . . . . . 48
Move the Air Pulse Generator . . . . . . . . . . . . . . . . . . . . . . . 52
Raise or Lower the Air Pulse Generator . . . . . . . . . . . . . . . . 53
Cleaning . . . . . . . . . . . . . . . . . . . . . . . . . . . . . . . . . . . . . . . . . . . . 54
General Cleaning . . . . . . . . . . . . . . . . . . . . . . . . . . . . . . . . . 55
Steam Cleaning . . . . . . . . . . . . . . . . . . . . . . . . . . . . . . . . . . . 55
Cleaning Hard to Clean Spots . . . . . . . . . . . . . . . . . . . . . . . . 55
Disinfecting . . . . . . . . . . . . . . . . . . . . . . . . . . . . . . . . . . . . . . 55
Maintenance . . . . . . . . . . . . . . . . . . . . . . . . . . . . . . . . . . . . . . . . . 56
Disposable Garments and Replacement Parts . . . . . . . . . . . . . . . 57
Size the Disposable Garments . . . . . . . . . . . . . . . . . . . . . . . 58
Service Calls . . . . . . . . . . . . . . . . . . . . . . . . . . . . . . . . . . . . . . . . 58
Troubleshooting . . . . . . . . . . . . . . . . . . . . . . . . . . . . . . . . . . . . . . 58
Air Pulse Generator Does Not Power On . . . . . . . . . . . . . . . 59
No Air Pulses into the Disposable Garments . . . . . . . . . . . . 59
Screen Shows “Please Call for Service” Message . . . . . . . . 59
An Air Hose Comes out of the Air Pulse Generator or
Disposable Garments during Operation . . . . . . . . . . . . . . . . 59
Screen Shows “RESTARTING” . . . . . . . . . . . . . . . . . . . . . 60
Product Symbols . . . . . . . . . . . . . . . . . . . . . . . . . . . . . . . . . . . . . 61
Specifications . . . . . . . . . . . . . . . . . . . . . . . . . . . . . . . . . . . . . . . . 64
Classification and Standards . . . . . . . . . . . . . . . . . . . . . . . . . 65
Frequently Asked Questions . . . . . . . . . . . . . . . . . . . . . . . . . . . . 70

The Vest® Airway Clearance System, Model 205 1
User Manual (140643 REV 7)
PROPRIETARY AND CONFIDENTIAL DRAFT 19-DEC-11
Document Symbols
This manual contains different typefaces and symbols to make the
content easier to read and understand:
• Standard text—used for regular data.
• Boldface text—emphasizes a word or phrase.
• NOTE:—sets apart special data or important instruction
clarification.
• WARNING or CAUTION
– A WARNING identifies situations or actions that may have an
effect on patient or user safety. To ignore a warning could
cause patient or user injury.
– A CAUTION identifies special procedures or precautions that
persons must obey to help prevent equipment damage.
• CAUGHT HAZARD WARNING
• CHEMICAL HAZARD WARNING
• ELECTRICAL SHOCK HAZARD WARNING
NOTE:
These document symbols may or may not be used in this manual.

2 The Vest® Airway Clearance System, Model 205
User Manual (140643 REV 7)
PROPRIETARY AND CONFIDENTIAL DRAFT 19-DEC-11
Precautions
• Federal USA law restricts this device to sale by or on the order of a
physician.
• Unplug this system immediately after you use it.
• Do not use the system near flammable chemicals or products,
including flammable anaesthetics. To do so could cause personal
injury or equipment damage.
• Use close supervision when this system is used by or near children or
patients with physical limitations.
• Use this system only for its intended use. Use only those attachments
that are specified by the manufacturer.
• Patients that may have difficulty clearing secretions from the upper
airway (such as those with DMD or other advanced neuromuscular or
neurological disorders) may require specialized therapy regiments
involving manually or mechanically assisted coughing or other
techniques in conjunction with The Vest
®
Airway Clearance System,
Model 205
therapy. Please consult your physician to determine if
additional therapy is appropriate.
• To help prevent cross-contamination, replace the single-patient use,
disposable garment between patients.
• Only authorized persons should service the unit.
• If service is necessary, call Hill-Rom Technical Support. For contact
information, refer to the back cover. For countries not listed on the
back cover, contact your distributor.
•Do not operate the Air Pulse Generator without the disposable
garment and Air Hoses attached. Equipment damage could occur.
• If it is difficult to connect the Air Hoses to the Air Pulse Generator or
disposable garment, do not use lubricant. Equipment damage could
occur.
• If it is difficult to connect the Remote Control to the Air Pulse
Generator, do not use lubricant. Equipment damage could occur.
• Do not use harsh cleansers, solvents, or detergents.
• Frequent exposure to Matar® germicidal detergent may discolor the
Air Pulse Generator.

The Vest® Airway Clearance System, Model 205 3
User Manual (140643 REV 7)
PROPRIETARY AND CONFIDENTIAL DRAFT 19-DEC-11
• When you use Dispatch® disinfectant or CSI disinfectant spray,
make sure you wipe the unit dry. Failure to do so could result in the
build-up of residue or equipment damage.
• Do not eat or drink during a therapy session. To do so could cause a
choking hazard.
• Do not leave the garment on a patient for extended periods of time
without a cloth barrier between the patient and the garment.
KEEP THESE INSTRUCTIONS

4 The Vest® Airway Clearance System, Model 205
User Manual (140643 REV 7)
PROPRIETARY AND CONFIDENTIAL DRAFT 19-DEC-11
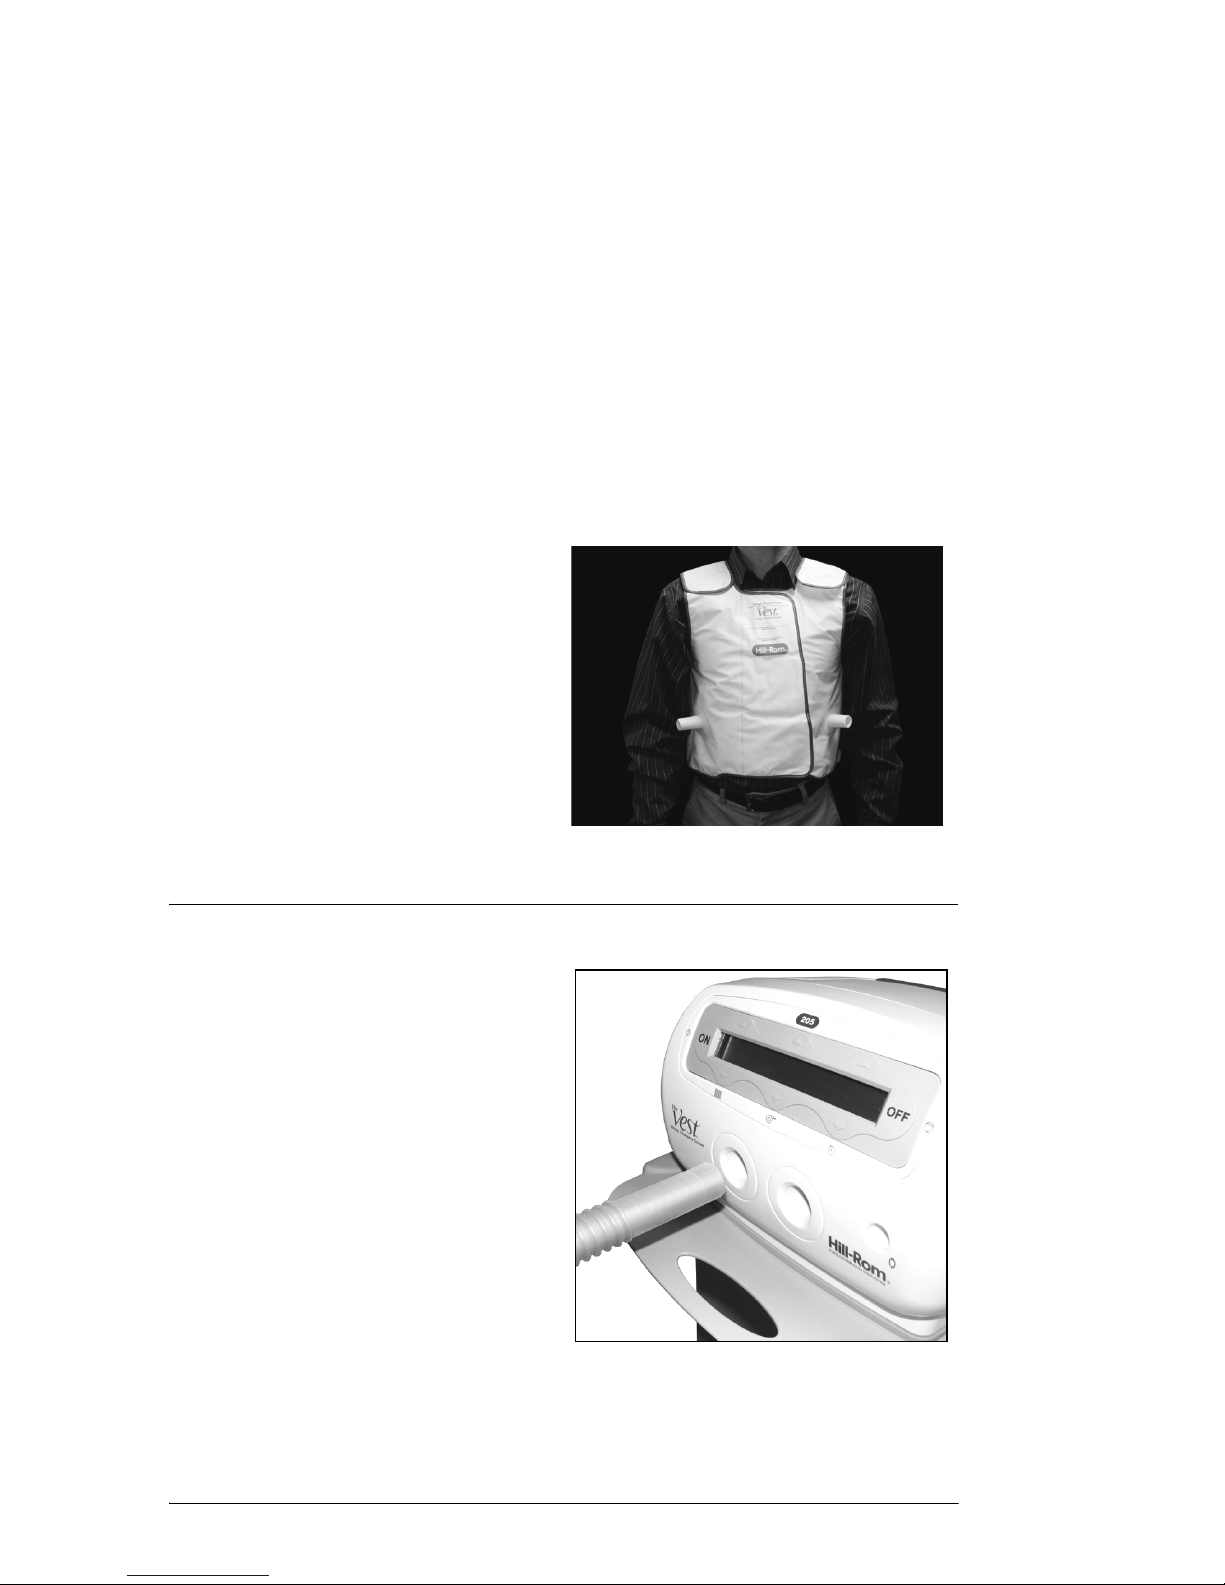
Intended Use
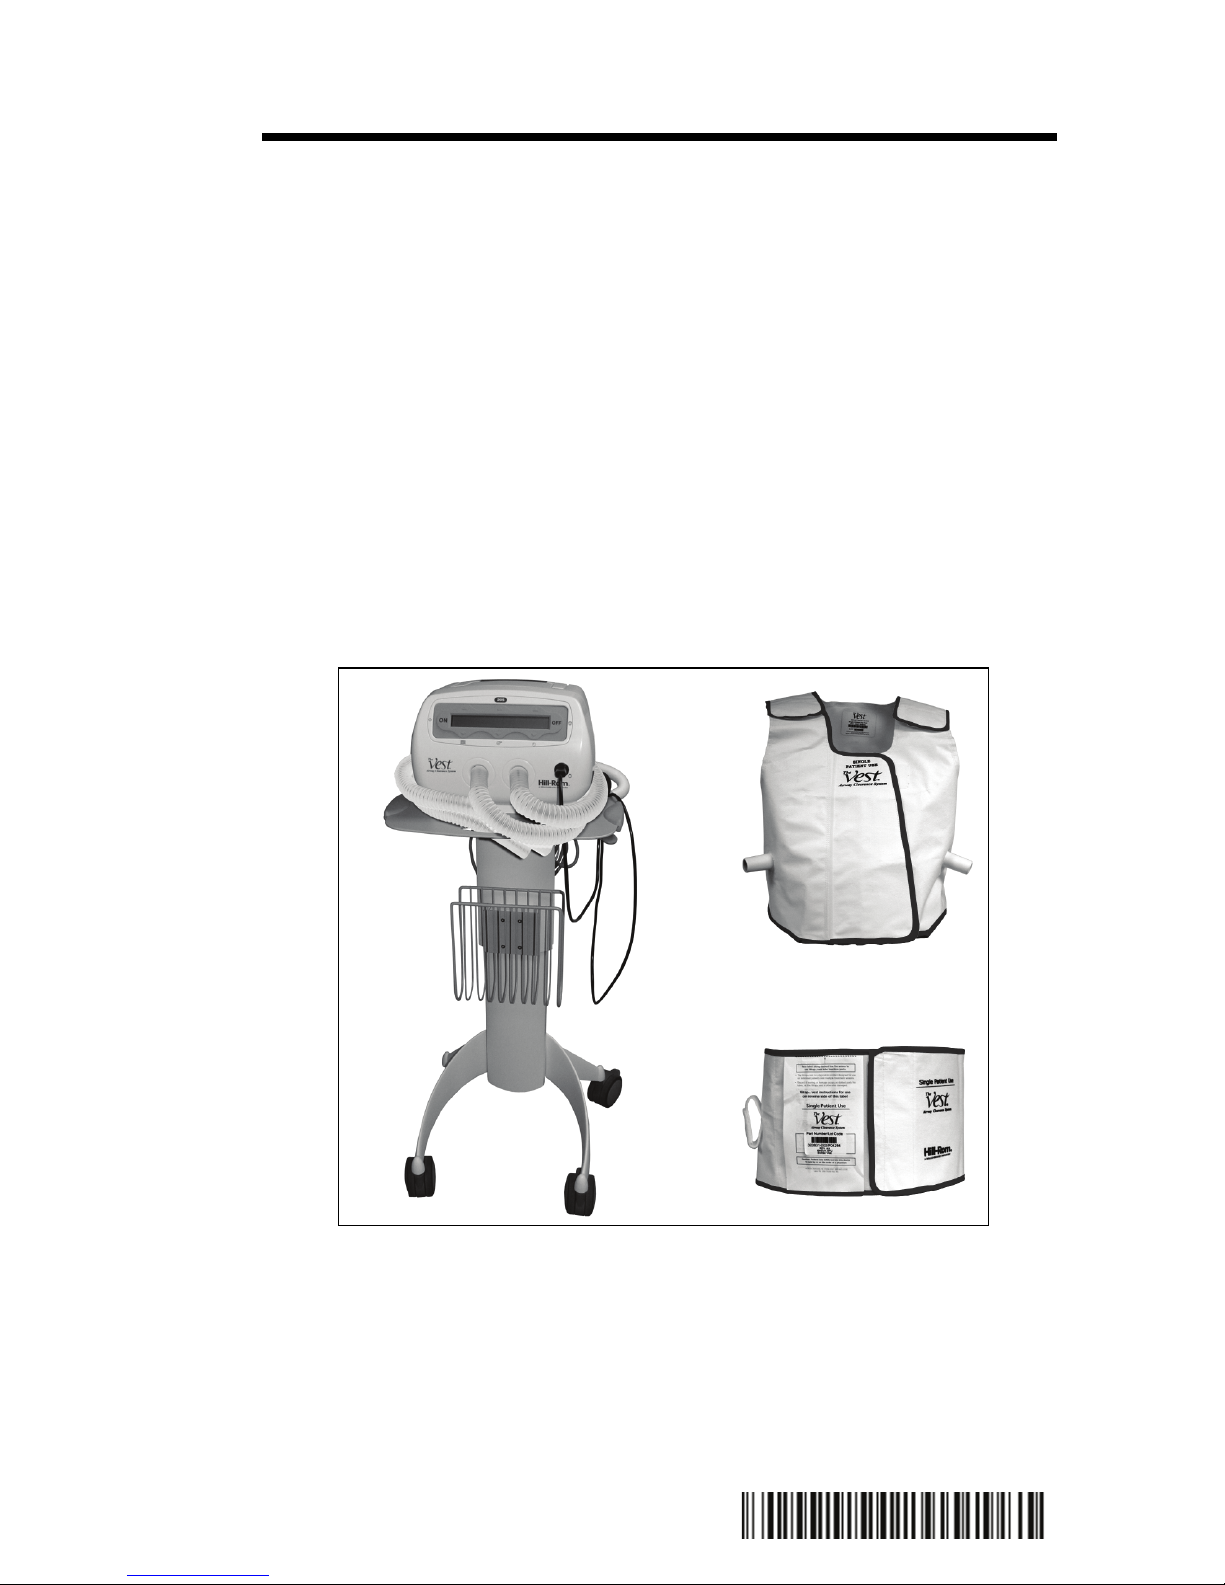
The Vest® Airway Clearance System, Model 205 was developed to
provide effective Airway Clearance Therapy. The system consists of a
disposable garment attached to an Air Pulse Generator that rapidly
inflates and deflates the disposable garment. This causes the chest wall
to be gently compressed and released, which creates airflow within the
lungs. This process moves mucus toward the large airways where it can
be cleared by coughing or suctioning. This type of Airway Clearance
Therapy is referred to as High Frequency Chest Wall Oscillation
(HFCWO).
Introduction
This manual includes instructions for setup, use, and maintenance of
The Vest
®
Airway Clearance System, Model 205. It is to be used as a
reference guide. Please review all sections carefully before you use the
system.
The Vest
®
Airway Clearance System, Model 205 is intended for use as
prescribed by a physician.
Contraindications
WARNING:
If patient conditions exist that cause the use of The Vest® Airway
Clearance System, Model 205 to present a risk to the patient, do
not use the unit except as directed by a physician. Death or
serious injury could occur.
The Vest
®
Airway Clearance System, Model 205 is contraindicated if
these conditions are present:
• Head and/or neck injury that has not yet been stabilized
• Active hemorrhage with hemodynamic instability

The Vest® Airway Clearance System, Model 205 5
User Manual (140643 REV 7)
PROPRIETARY AND CONFIDENTIAL DRAFT 19-DEC-11
Relative Contraindications
If the patient has one or more of the conditions below, carefully consider
and assess the patient’s case before you decide to use The Vest
®
Airway
Clearance System, Model 205.
• Intracranial pressure (ICP) >20 mm Hg, or patients in whom
increased intracranial pressure is to be avoided
• Uncontrolled hypertension
• Hemodynamic instability
• Pulmonary edema associated with congestive heart failure
• Bronchopleural fistula
• Subcutaneous emphysema
• Large pleural effusions or empyema
• Recent esophageal surgery
• Active or recent gross hemoptysis
• Pulmonary embolism
• Uncontrolled airway at risk for aspiration such as tube feeding or
recent meal
• Distended abdomen
• Bronchospasm
• Suspected pulmonary tuberculosis
• Recently placed transvenous pacemaker or subcutaneous pacemaker
• Recent epidural spinal infusion or spinal anesthesia
• Recent spinal surgery or acute spinal injury
• Rib fractures, with or without flail chest
• Surgical wound, healing tissue, recent skin grafts, or flaps on thorax
• Burns, open wounds, and skin infections on the thorax
• Lung contusion
• Osteomyelitis of the ribs
•Osteoporosis
• Coagulopathy
• Complaint of chest wall pain
6 The Vest® Airway Clearance System, Model 205
User Manual (140643 REV 7)
PROPRIETARY AND CONFIDENTIAL DRAFT 19-DEC-11
Features
Air Pulse Generator
When correctly connected, the Air Pulse Generator controls the
disposable garment and supplies pulsations to the chest wall.
Push Bar
Permits the unit to be moved around a room or from room to room.
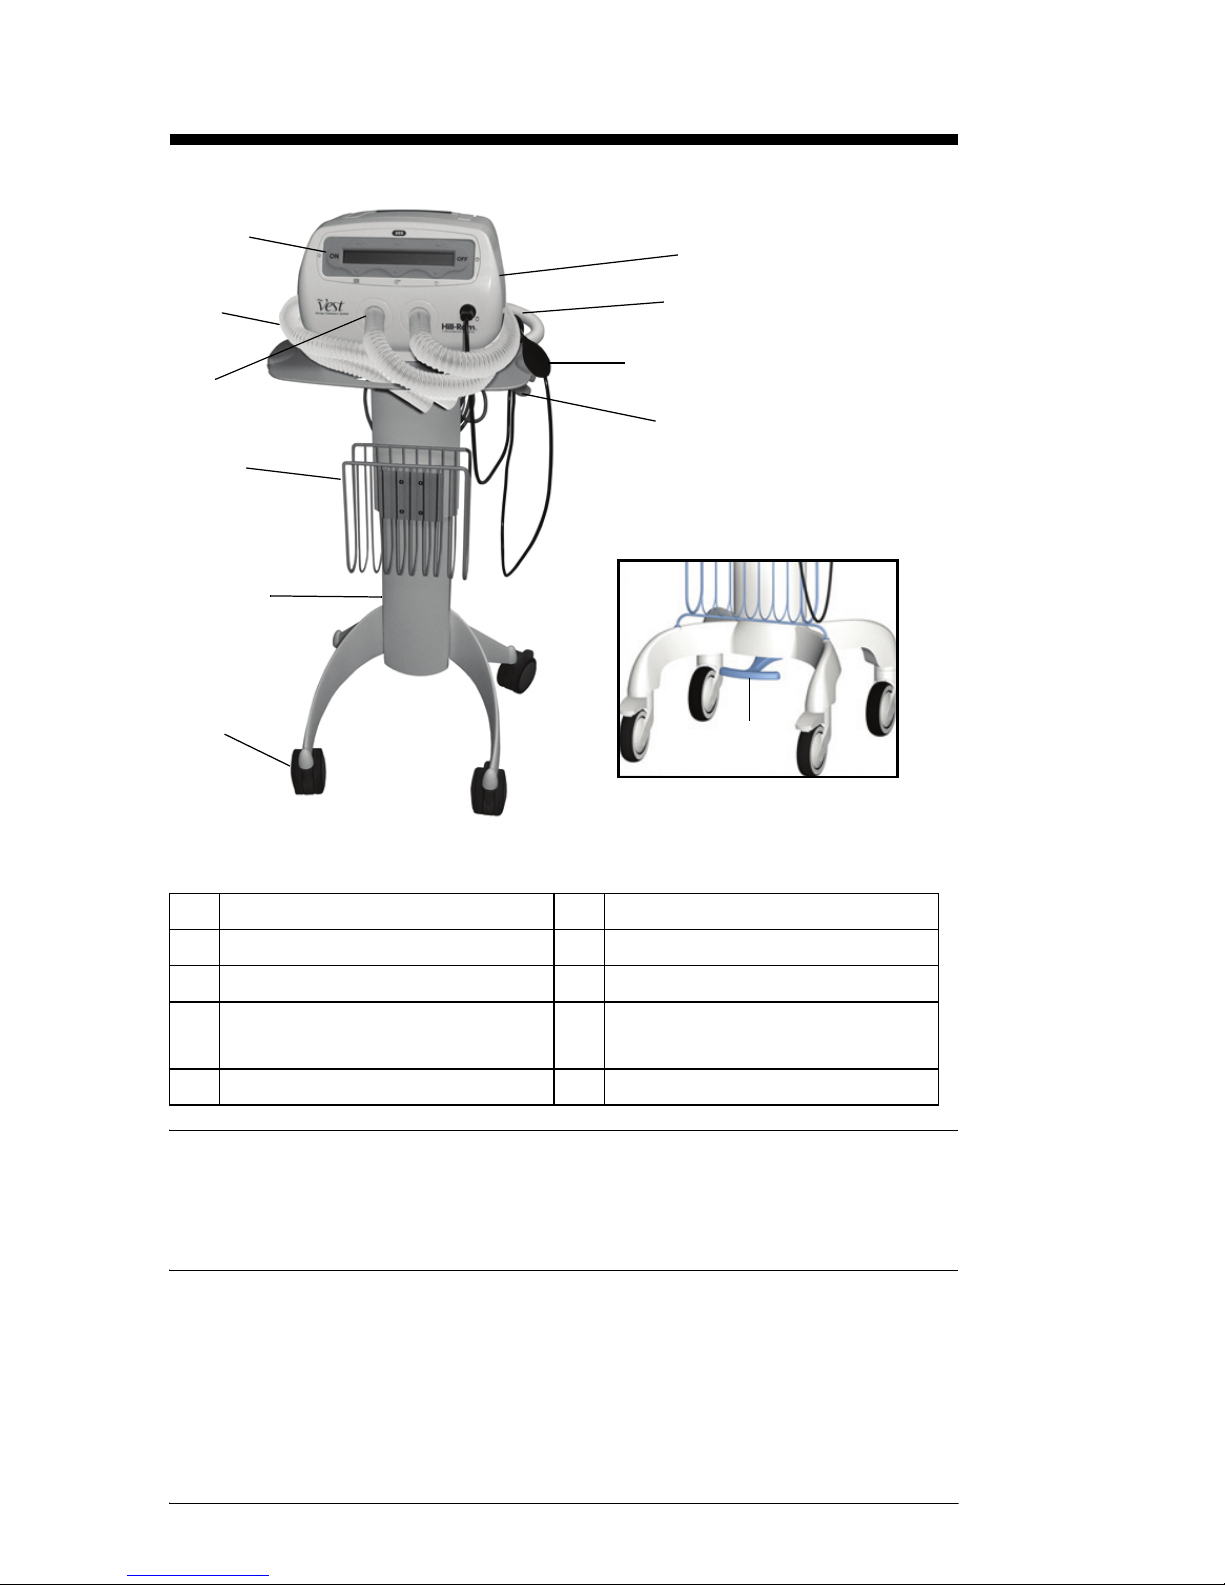
A Air Pulse Generator F Stand
B Push Bar G Storage Basket
C Remote Control H Air Hose Connector Ports
D Height Adjustment Release
Lever
IAir Hoses
E Four Locking Casters J Control Panel
A
B
C
D
E
F
G
H
I
J
Alternate Stand
D

The Vest® Airway Clearance System, Model 205 7
User Manual (140643 REV 7)
PROPRIETARY AND CONFIDENTIAL DRAFT 19-DEC-11
Remote Control
Can be used instead of the ON/OFF button to pause or resume the Air
Pulse Generator.
Height Adjustment Release Lever
Used to raise or lower the Air Pulse Generator to a comfortable working
height.
Locking Casters
Keeps the stand and Air Pulse Generator from unintentionally moving.
Stand
Holds the Air Pulse Generator.
Storage Basket
Can be used to store disposable garments.
Air Hose Connector Ports
Air Hoses connect to the Air Hose Connector Ports on the front of the
Air Pulse Generator.
Air Hoses
Connect the disposable garment to the Air Pulse Generator.
Control Panel
Shows the modes, system settings, and system messages.
8 The Vest® Airway Clearance System, Model 205
User Manual (140643 REV 7)
PROPRIETARY AND CONFIDENTIAL DRAFT 19-DEC-11
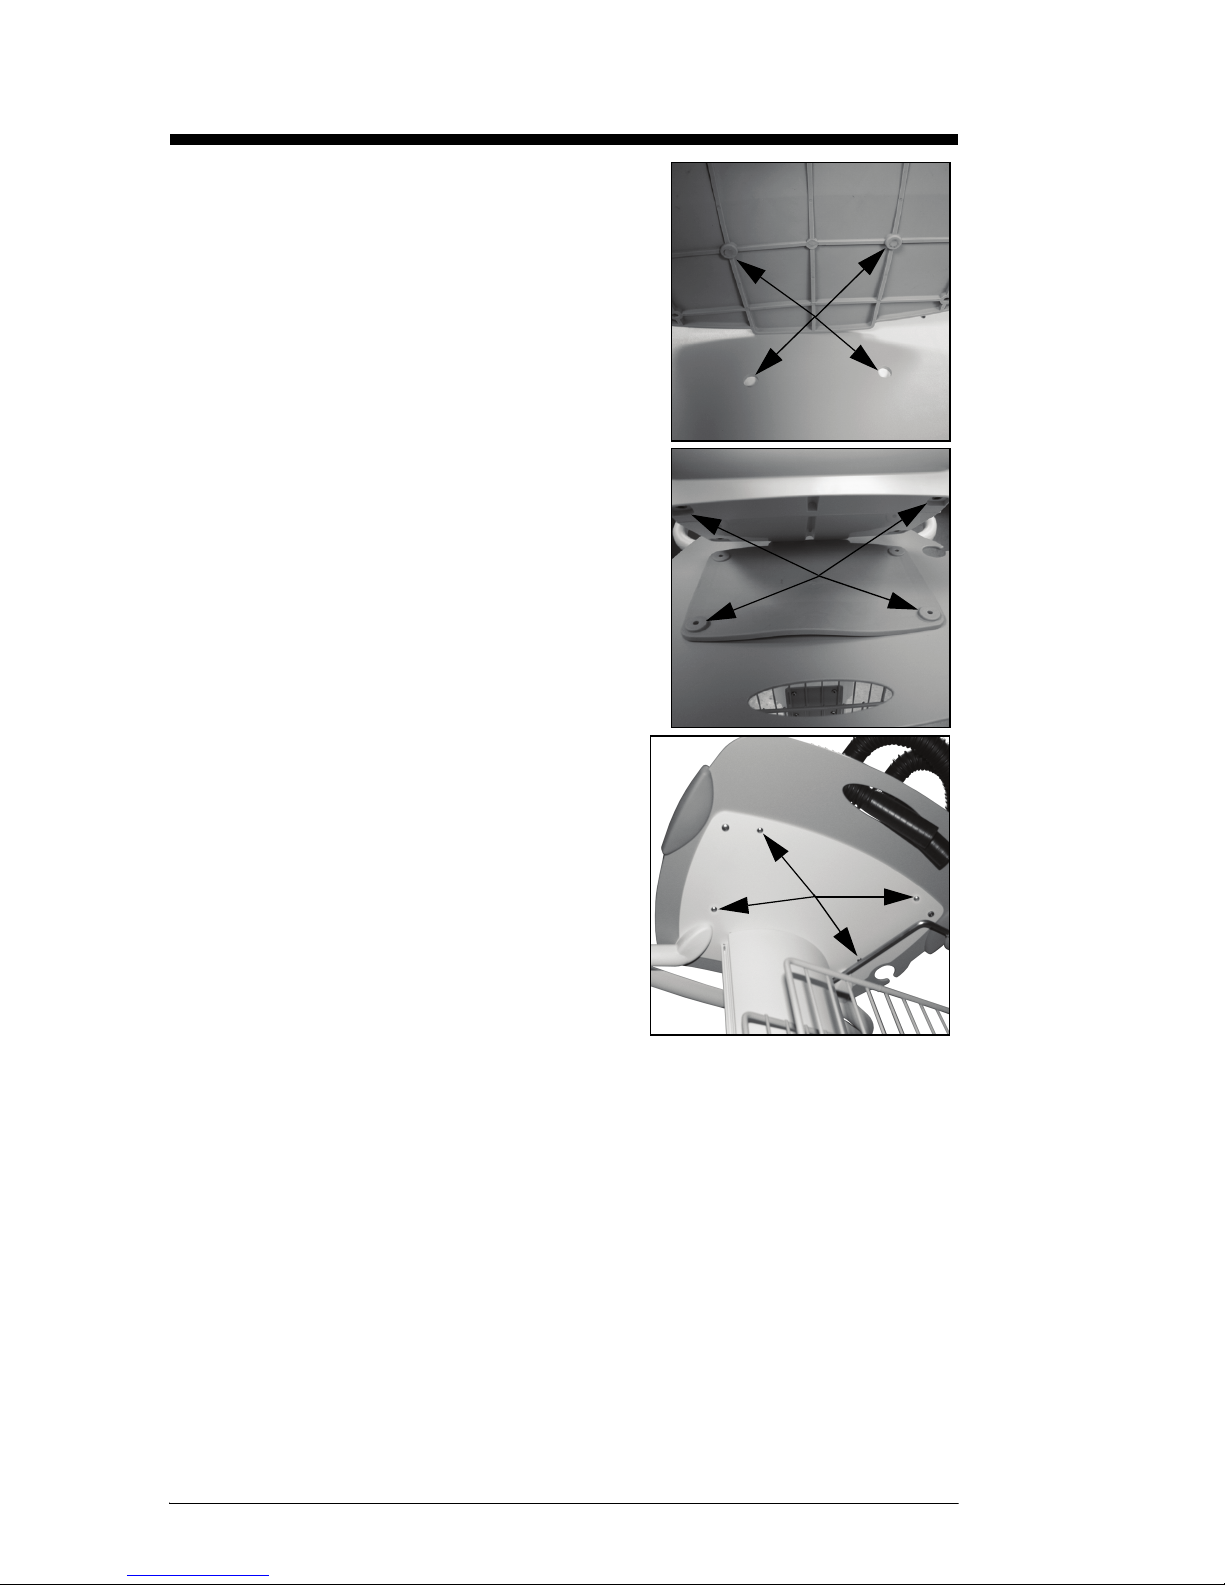
Assembly
1. Align the two posts on the rubber
mat with the holes in the top of
the stand.
2. Align the holes on the bottom of
the Air Pulse Generator with the
posts on the rubber mat.
NOTE:
The screen on the Air Pulse Generator
faces the side of the stand that the
basket is on.
3. Install the four screws to attach
the Air Pulse Generator to the
stand.
4. Tighten, but not overtighten, the
four screws with the supplied
wrench.
The Vest® Airway Clearance System, Model 205 9
User Manual (140643 REV 7)
PROPRIETARY AND CONFIDENTIAL DRAFT 19-DEC-11
Instructions for Use
Put on the Disposable, Single-Patient Use (SPU) Vests
NOTE:
It is recommended that a single layer of cotton clothing be worn beneath
the disposable garment.
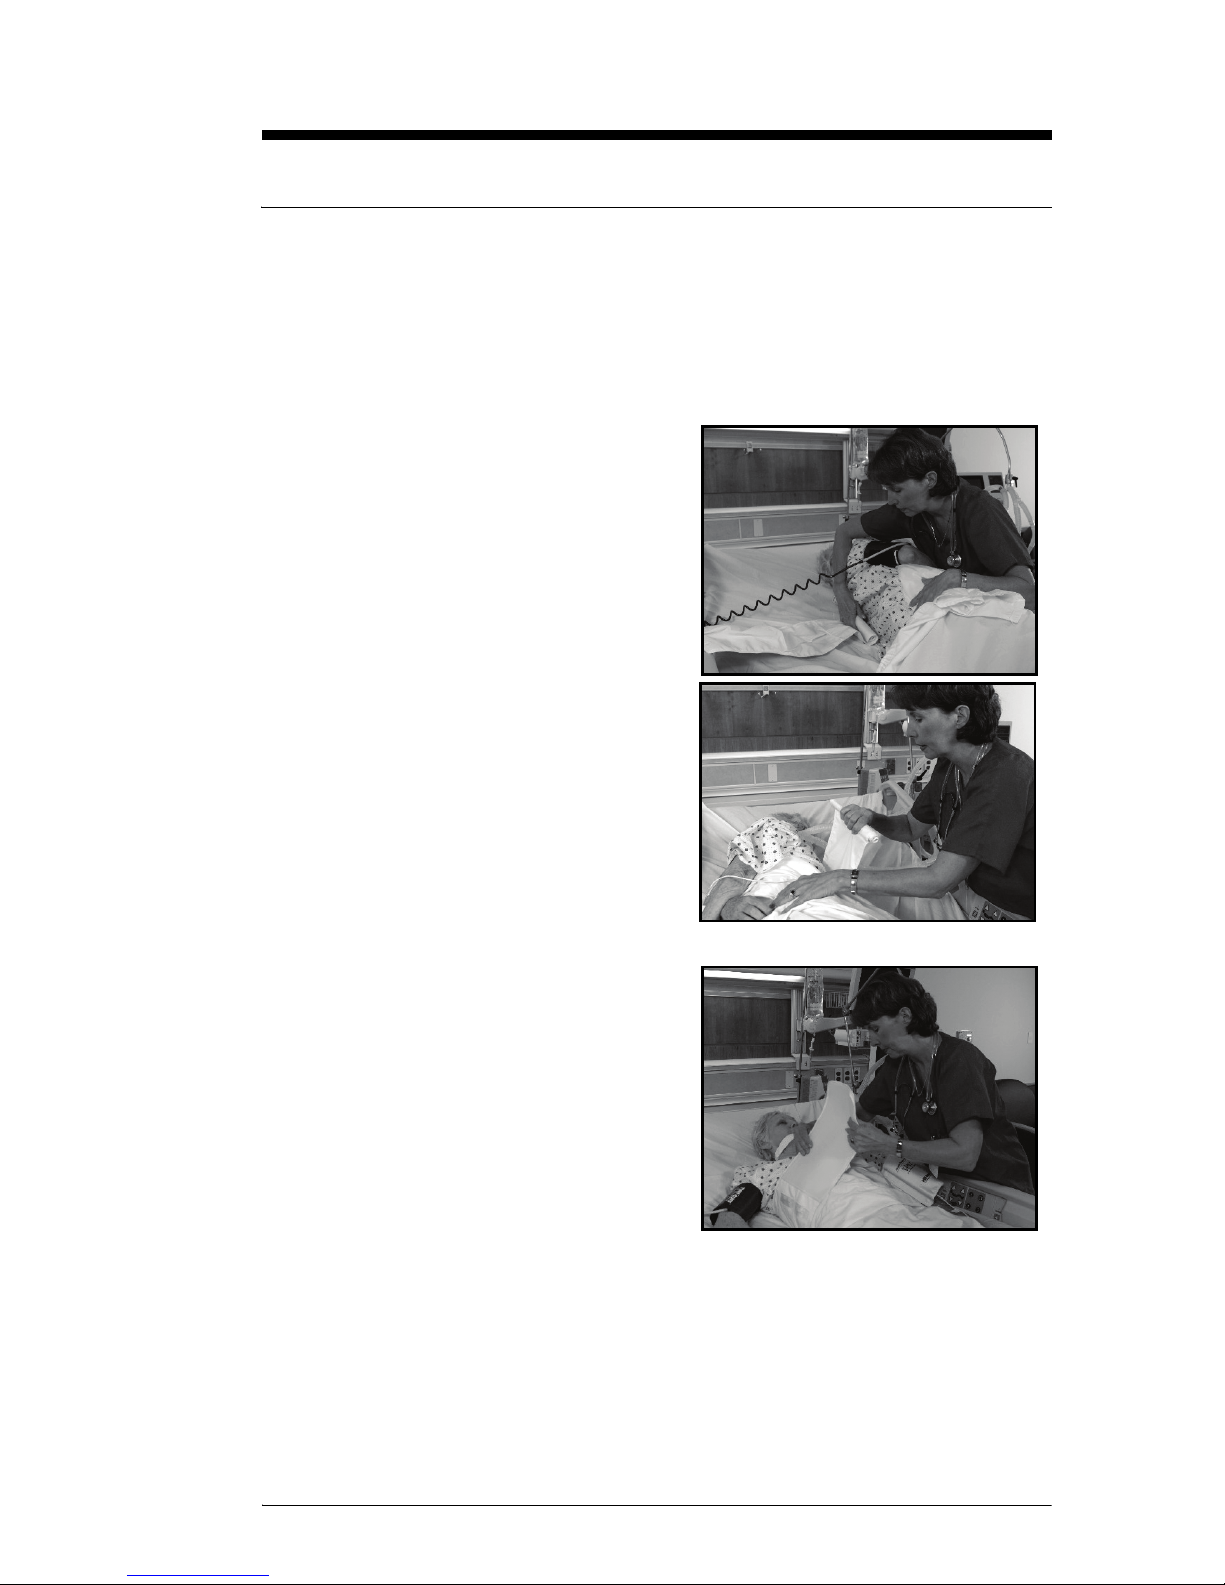
Wrap SPU Vest
1. Turn the patient towards you.
2. With the Wrap SPU Vest
deflated, begin to lay it flat on
the bed so it is perpendicular
with the patient’s torso.
3. Roll the patient away from
you and on the open portion of
the Wrap SPU Vest.
4. Put the Wrap SPU Vest in
position just beneath the
patient’s underarms, and
continue to pull the Wrap SPU
Vest around the patient’s torso.
5. Roll the patient to a supine
position.
6. Pull both ends of the Wrap
SPU Vest around the patient’s
chest, and use the Velcro®
fasteners to temporarily attach
both ends to each other.
Have the patient inhale deeply, and
then attach the ends of the Wrap
SPU Vest so it fits close to the
body, but is not uncomfortable.
10 The Vest® Airway Clearance System, Model 205
User Manual (140643 REV 7)
PROPRIETARY AND CONFIDENTIAL DRAFT 19-DEC-11
Full SPU Vest
NOTE:
It is recommended that a single layer of cotton clothing be worn beneath
the disposable garment.
1. Separate the front flaps of the Full SPU Vest at the Velcro®
fasteners.
2. Turn the Full SPU Vest so the front flaps will meet in front of the
patient. Then put the patient’s arms through the arm openings in the
Full SPU Vest.
3. With the Full SPU Vest deflated, use the Velcro® fasteners to attach
the front flaps of the Full SPU Vest to each other.
4. Make sure there is
approximately 3" to 4"
(8 cm to 10 cm) between
the bottom edge of the
front of the Full SPU Vest
and the patient.
Adjust the Velcro® fasteners at
the shoulder straps so the
bottom edge of the Full SPU
Vest is level with the top of the
patient’s hip bone.
Connect the Air Hoses
1. Slide one end of each Air
Hose into each Air Hose
Connector Port on the
front of the Air Pulse
Generator. Use a slight
twist motion as you push
the Air Hose to help keep
it in position.
The Vest® Airway Clearance System, Model 205 11
User Manual (140643 REV 7)
PROPRIETARY AND CONFIDENTIAL DRAFT 19-DEC-11
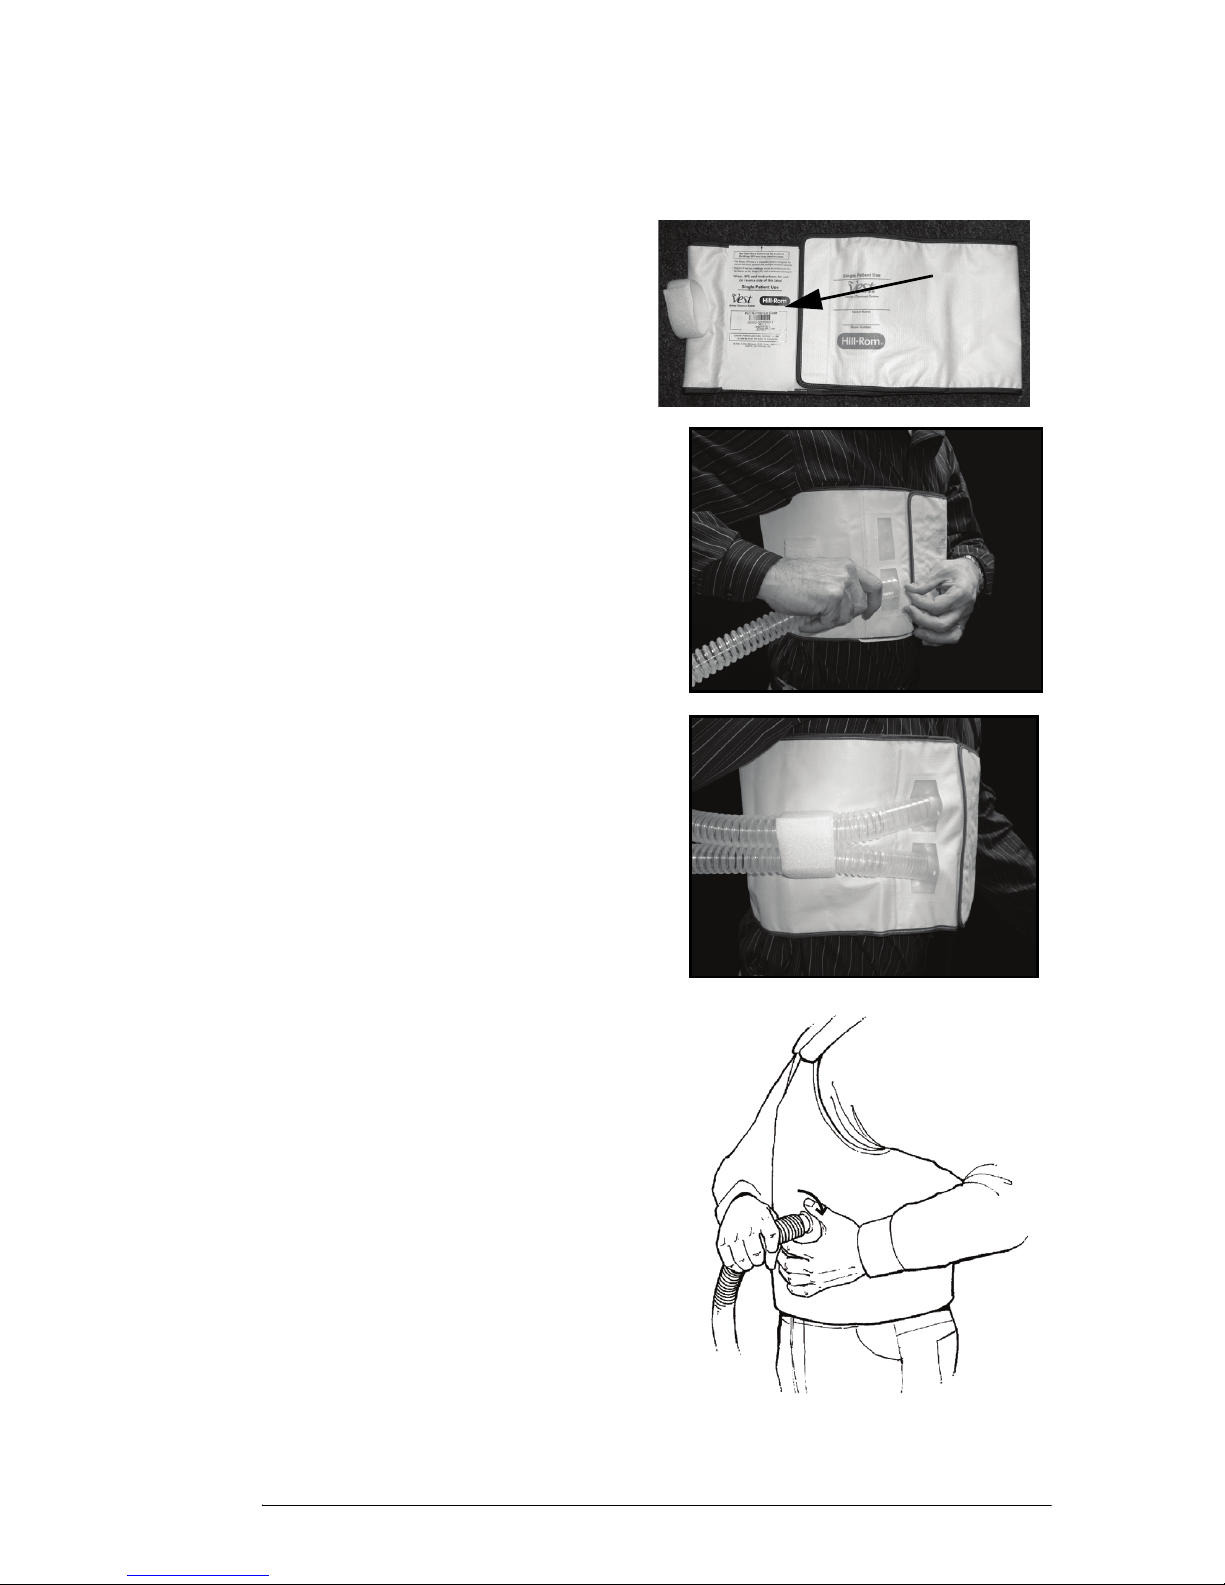
2. Connect the Air Hoses to the disposable garment:
For a Wrap SPU Vest, do as follows:
a. Remove the tear
label from the
disposable garment.
b. Slide the other end of
each Air Hose into the
disposable garment Air
Hose slits at least 2"
(5 cm).
c. Use the Velcro® loops on
the side of the disposable
garment to hold the Air
Hoses in position.
For a Full SPU Vest, slide the
other end of each Air Hose over
the disposable garment Air Hose
Ports. To help keep the Air Hoses
in position, slightly twist the Air
Hoses as you push them over the
Full SPU Vest Air Hose Ports.
12 The Vest® Airway Clearance System, Model 205
User Manual (140643 REV 7)
PROPRIETARY AND CONFIDENTIAL DRAFT 19-DEC-11
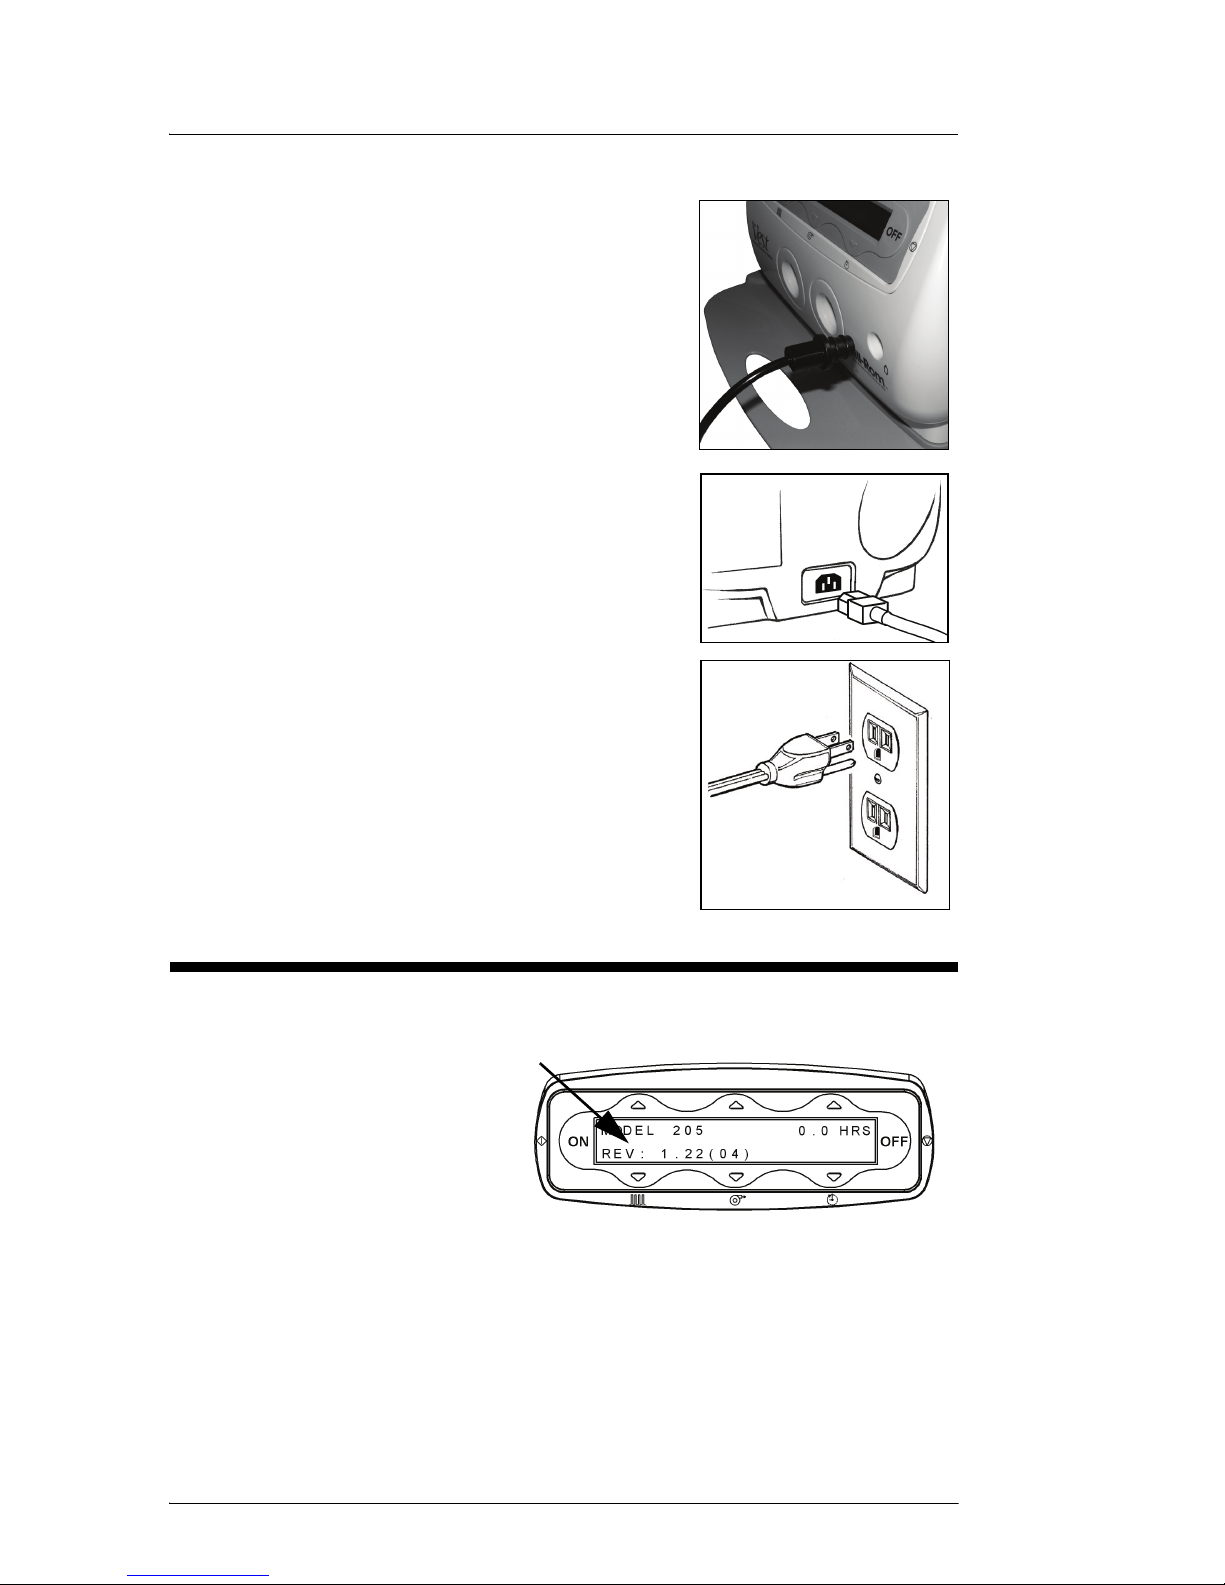
Set Up the Air Pulse Generator
1. Install the Remote Control into the Air
Pulse Generator.
NOTE:
Use of the Remote Control is optional.
2. Plug the Power Cord into the power
inlet on the back of the Air Pulse
Generator.
3. Plug the Power Cord into a grounded,
three-pronged outlet.
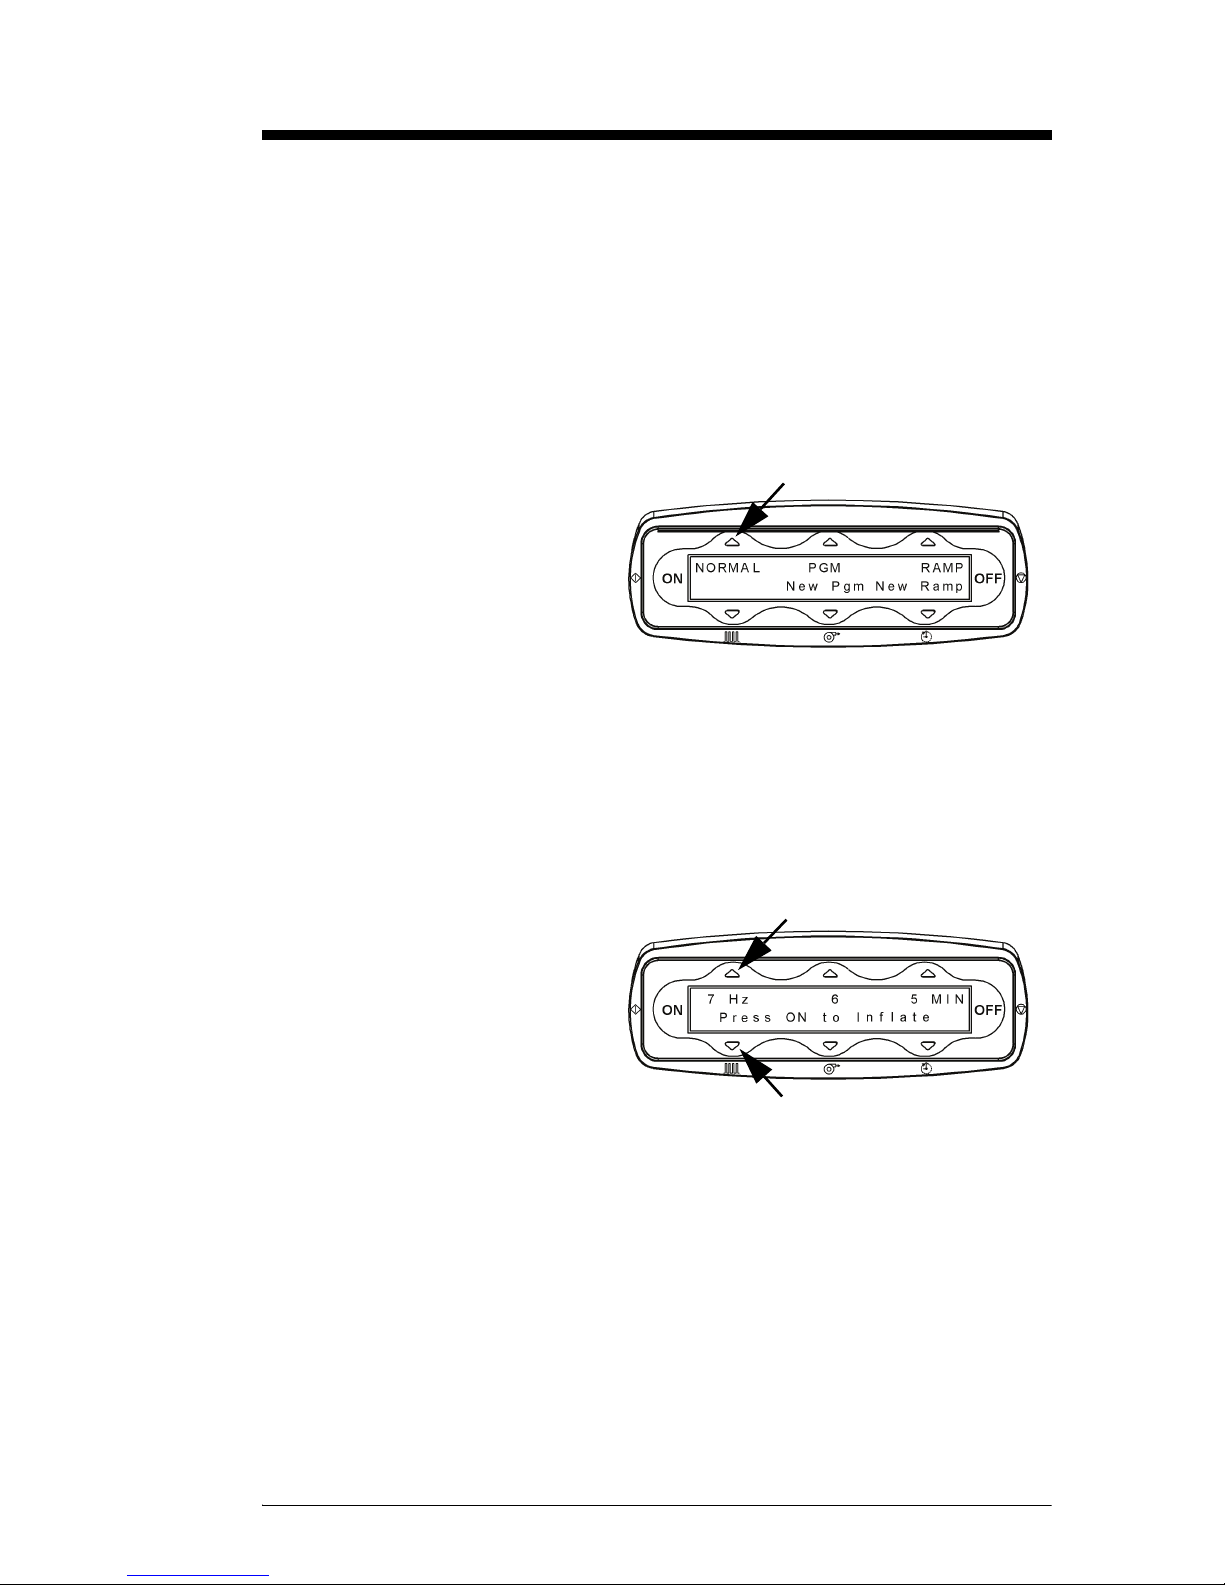
Software Version
The software version
is displayed on the
opening screen when
the unit is connected
to AC power.
To use the 1.20
software, go to “Use The Vest® Airway Clearance System,
software version 1.20” on page 13.
To use the 1.22 software, go to “Use The Vest® Airway
Clearance System, software version 1.22” on page 30.
The Vest® Airway Clearance System, Model 205 13
User Manual (140643 REV 7)
PROPRIETARY AND CONFIDENTIAL DRAFT 19-DEC-11
Use The Vest® Airway Clearance System, software
version 1.20
Make sure the unit is set up correctly. Once power is connected, the unit
will show a blank screen for up to 15 seconds. Then it will show the
model number and the total therapy hours for the unit. This screen will
show for 10 seconds or until you press the ON button.
NOTE:
To show the total therapy hours, press the OFF button when the unit is
on the main menu.
1. Press the Up arrow
above NORMAL for
the standard mode.
The screen will show
the previously
programmed
Frequency, Pressure,
and treatment Time
settings (or the default settings, depending on how it was
programmed).
2. Confirm the settings on the screen. If the settings match the
prescribed treatment, continue to step 3. Otherwise, adjust the
settings to match the prescription.
a. To adjust the
Frequency
setting, press the
left Up or Down
arrow buttons
until the
prescribed
treatment shows
on the screen. The Frequency or Hertz (Hz) may be set
between 5 and 20 cycles per second.
b. To adjust the Pressure setting, press the middle Up or Down
arrow buttons until the prescribed treatment Pressure shows on
the screen. The Pressure may be set between 1 and 10.
c. To adjust the treatment Time, press the right Up or Down
arrow buttons until the prescribed treatment Time shows on the
screen. The treatment Time may be set between 1 and 60
minutes.
14 The Vest® Airway Clearance System, Model 205
User Manual (140643 REV 7)
PROPRIETARY AND CONFIDENTIAL DRAFT 19-DEC-11
NOTE:
It is not necessary to stop the treatment to adjust the settings.
NOTE:
If the backlight turns itself OFF, press any button to turn it back ON.
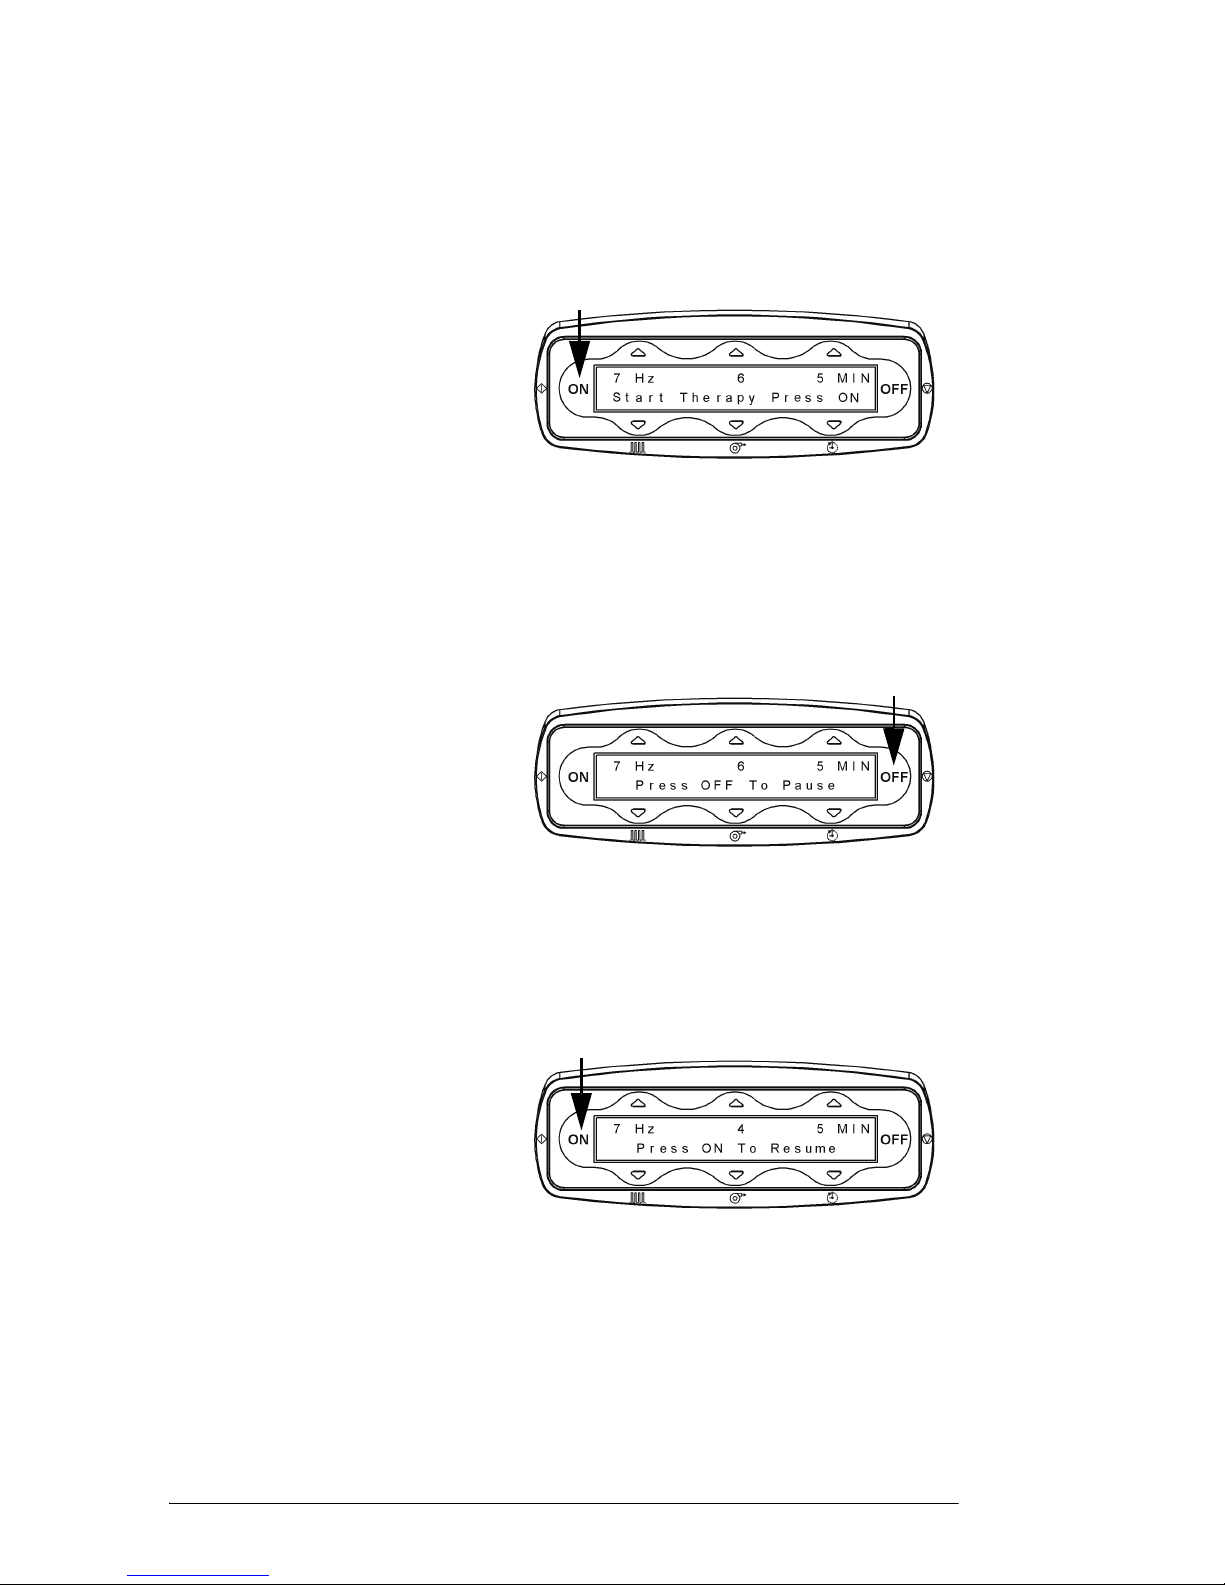
3. Press the ON button.
The disposable
garment will inflate.
NOTE:
If the unit is left in this
mode for 10 minutes, it
will turn off.
4. Press the ON button again to begin the treatment. The set treatment
Time shows as it counts down to zero.
5. If it is necessary to pause the treatment during a session, do as
follows:
a. Press the OFF
button or Remote
Control once.
The unit will stop
the pulsations,
but the settings
will continue to
show on the
screen.
NOTE:
When the unit is paused, the disposable garment will deflate.
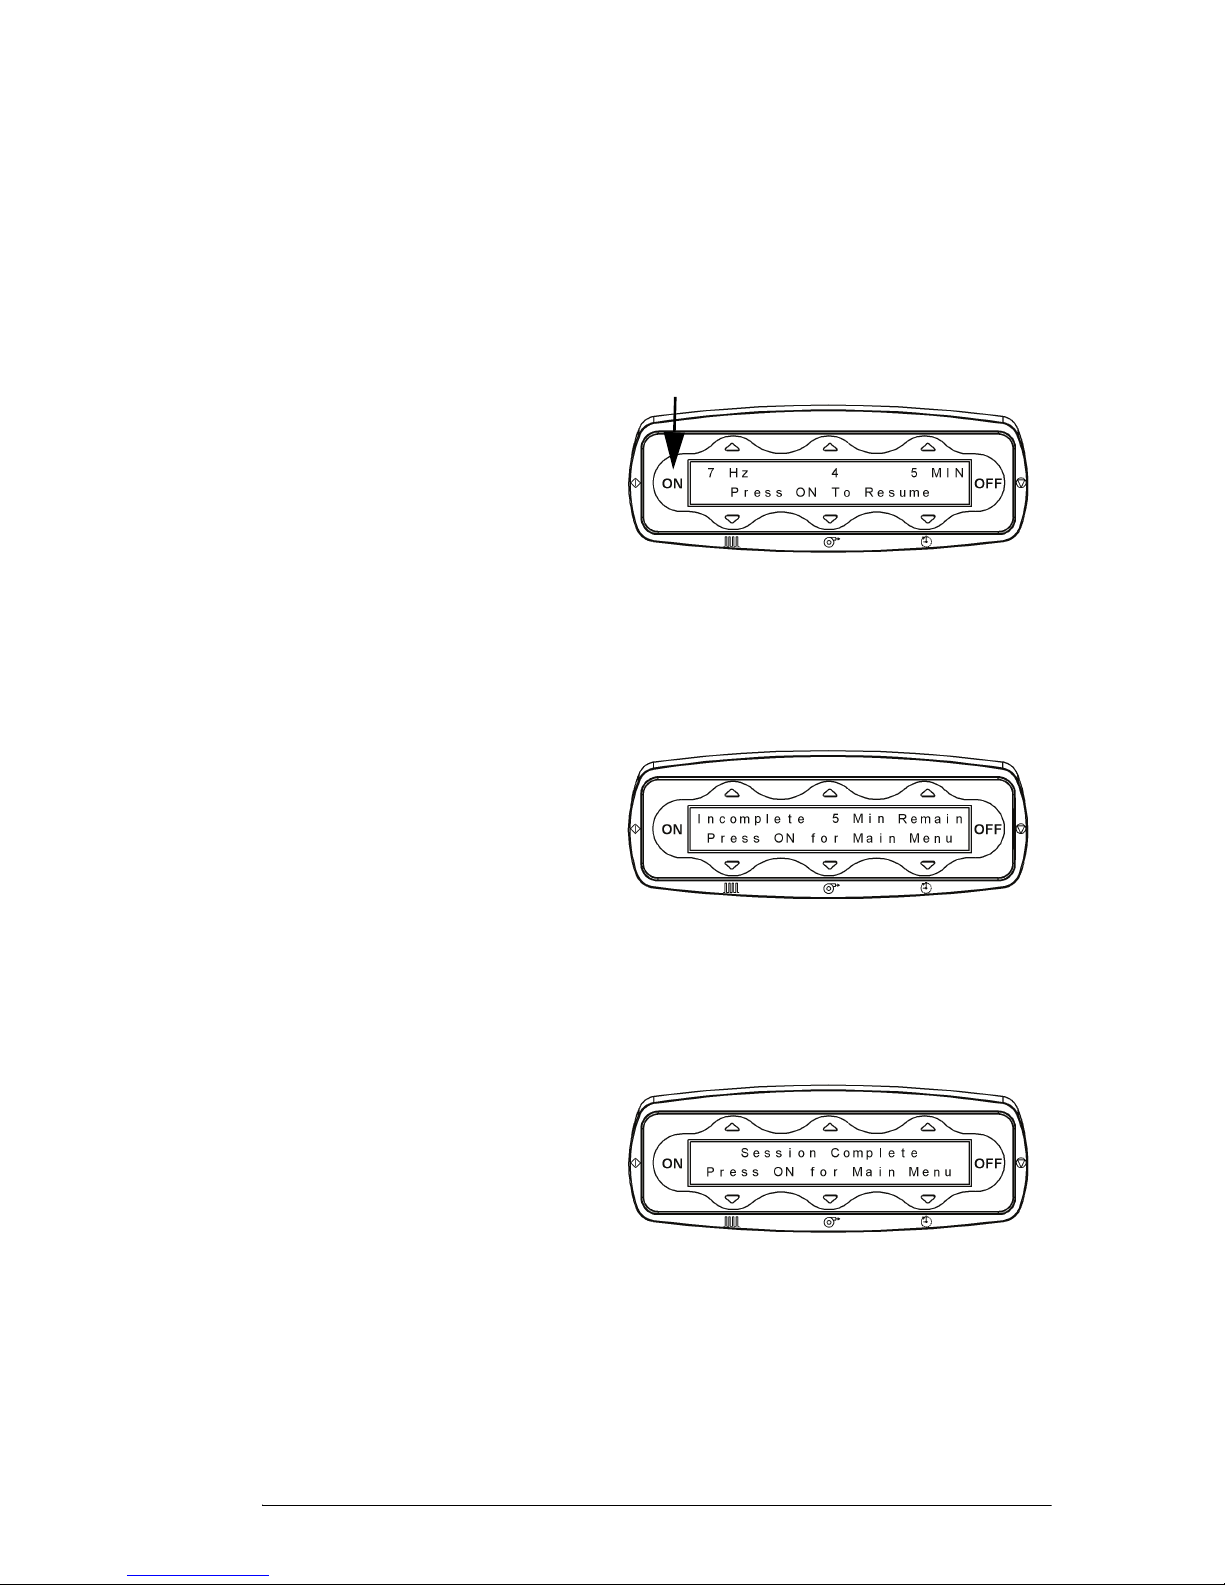
b. To resume
treatment, press
the ON button or
the Remote
Control again.
6. If it is necessary to
end the treatment
session before it is complete, press the OFF button.
NOTE:
Pressing the OFF button does not turn off the screen.
The Vest® Airway Clearance System, Model 205 15
User Manual (140643 REV 7)
PROPRIETARY AND CONFIDENTIAL DRAFT 19-DEC-11
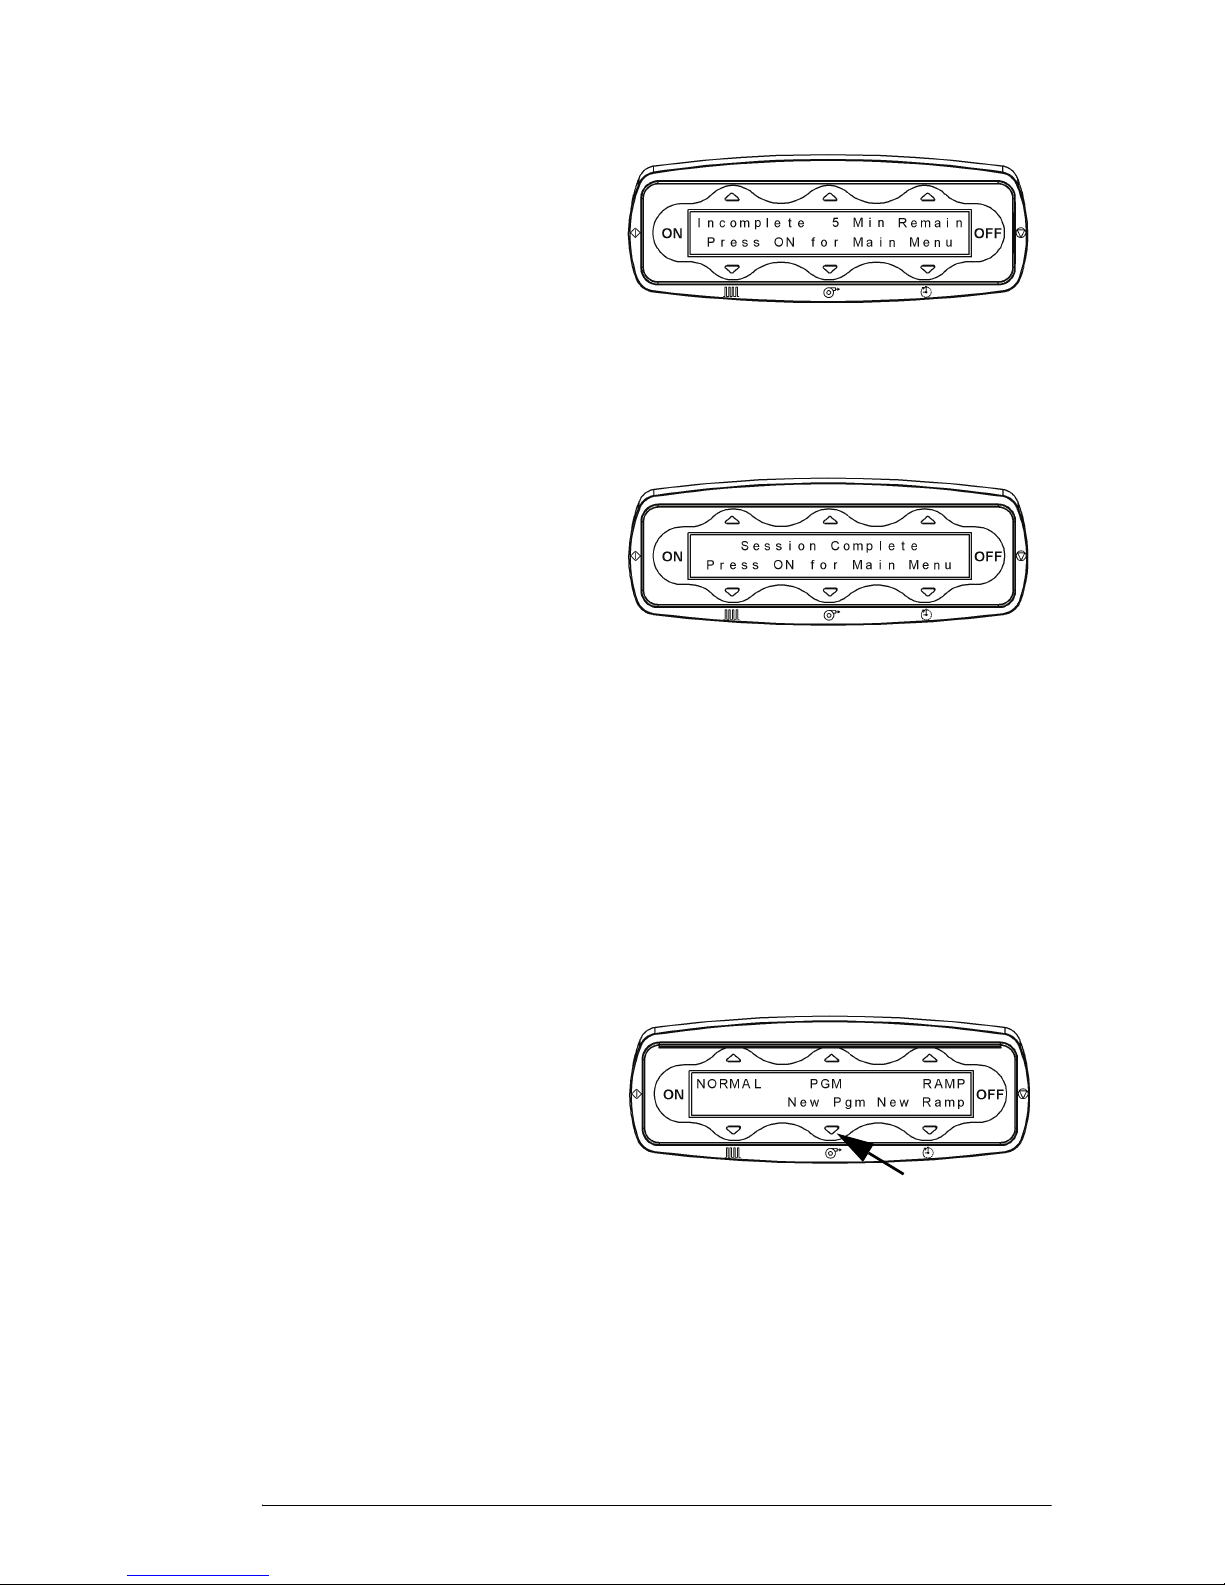
7. When the OFF button
is pressed, the
disposable garment
deflates and the
“Incomplete X Min
Remain” message
shows on the screen.
You must press ON to
continue to the main screen.
8. When the treatment session is complete:
a. The “Session
Complete”
message shows.
b. The pulsations
stop.
c. The disposable
garment deflates.
d. Immediately unplug the system from its power source.
e. Remove the Air Hoses from the Air Hose Ports on the
disposable garment.
f. Remove the disposable garment from the patient.
Setting and Using a New Program Mode
New Program Mode allows the caregiver to program up to eight (8)
points with various settings within a single therapy session.
1. Press the Down arrow
below New Pgm to
create a new program.
The screen will show
the Frequency,
Pressure, and
treatment Time
settings for the first Programming Point.
NOTE:
All the settings can be adjusted.
NOTE:
You can program up to 8 different Programming Points, each with its
own combination of Frequency, Pressure and treatment Time.

16 The Vest® Airway Clearance System, Model 205
User Manual (140643 REV 7)
PROPRIETARY AND CONFIDENTIAL DRAFT 19-DEC-11
2. For Programming
Point 1, if the settings
match the prescribed
treatment, continue to
step 3. Otherwise,
adjust the settings to
match the prescription
by pressing the Up and Down arrows associated with Frequency,
Pressure and treatment Time.
3. Once you have
Programming Point 1,
proceed to
Programming Point 2
by pressing the ON
button (to move to a
previous
Programming Point,
press the OFF button). Adjust the settings to match the prescription
and repeat for all 8 Programming Points.
4. If the prescription does not call for all 8 Programming Points, after
Programming Point 2, set the Time to 0 MIN for the following
segments, press the ON button to advance through the remaining
Programming Points.
NOTE:
Once you change the Programming Point Time to 0 MIN and press the
ON button, it will take you to the start of the program to begin therapy.
5. Press the ON button.
The disposable
garment will inflate.
6. Press the ON button
again to begin the
treatment program.
The set treatment
Time shows as it counts down to zero for each Programming Point.
7. Therapy will
automatically end
after it has gone
through each
Programming Point.
The Vest® Airway Clearance System, Model 205 17
User Manual (140643 REV 7)
PROPRIETARY AND CONFIDENTIAL DRAFT 19-DEC-11
8. If it is necessary to pause the treatment during a session, do as
follows:
a. Press the OFF button or Remote Control once. The unit will
stop the pulsations, but the settings will continue to show on
the screen.
NOTE:
When the unit is paused, the disposable garment will deflate.
b. To resume
treatment, press
the ON button or
the Remote
Control again.
9. If it is necessary to
end the treatment
session before it is complete, press the OFF button.
NOTE:
Pressing the OFF button does not turn off the screen.
10. When the OFF
button is pressed, the
disposable garment
deflates and the
“Incomplete X Min
Remain” message
shows on the screen.
You must press ON to
continue to the main screen.
11. When the treatment session is complete:
a. The “Session
Complete”
message shows.
b. The pulsations
stop.
c. The disposable
garment deflates.
d. Immediately unplug the system from its power source.
e. Remove the Air Hoses from the Air Hose Ports on the
disposable garment.
f. Remove the disposable garment from the patient.
18 The Vest® Airway Clearance System, Model 205
User Manual (140643 REV 7)
PROPRIETARY AND CONFIDENTIAL DRAFT 19-DEC-11
Using the Program Mode
Allows the caregiver the capability to use a previously created New
Program Mode, see “Setting and Using a New Program Mode” on page
15.
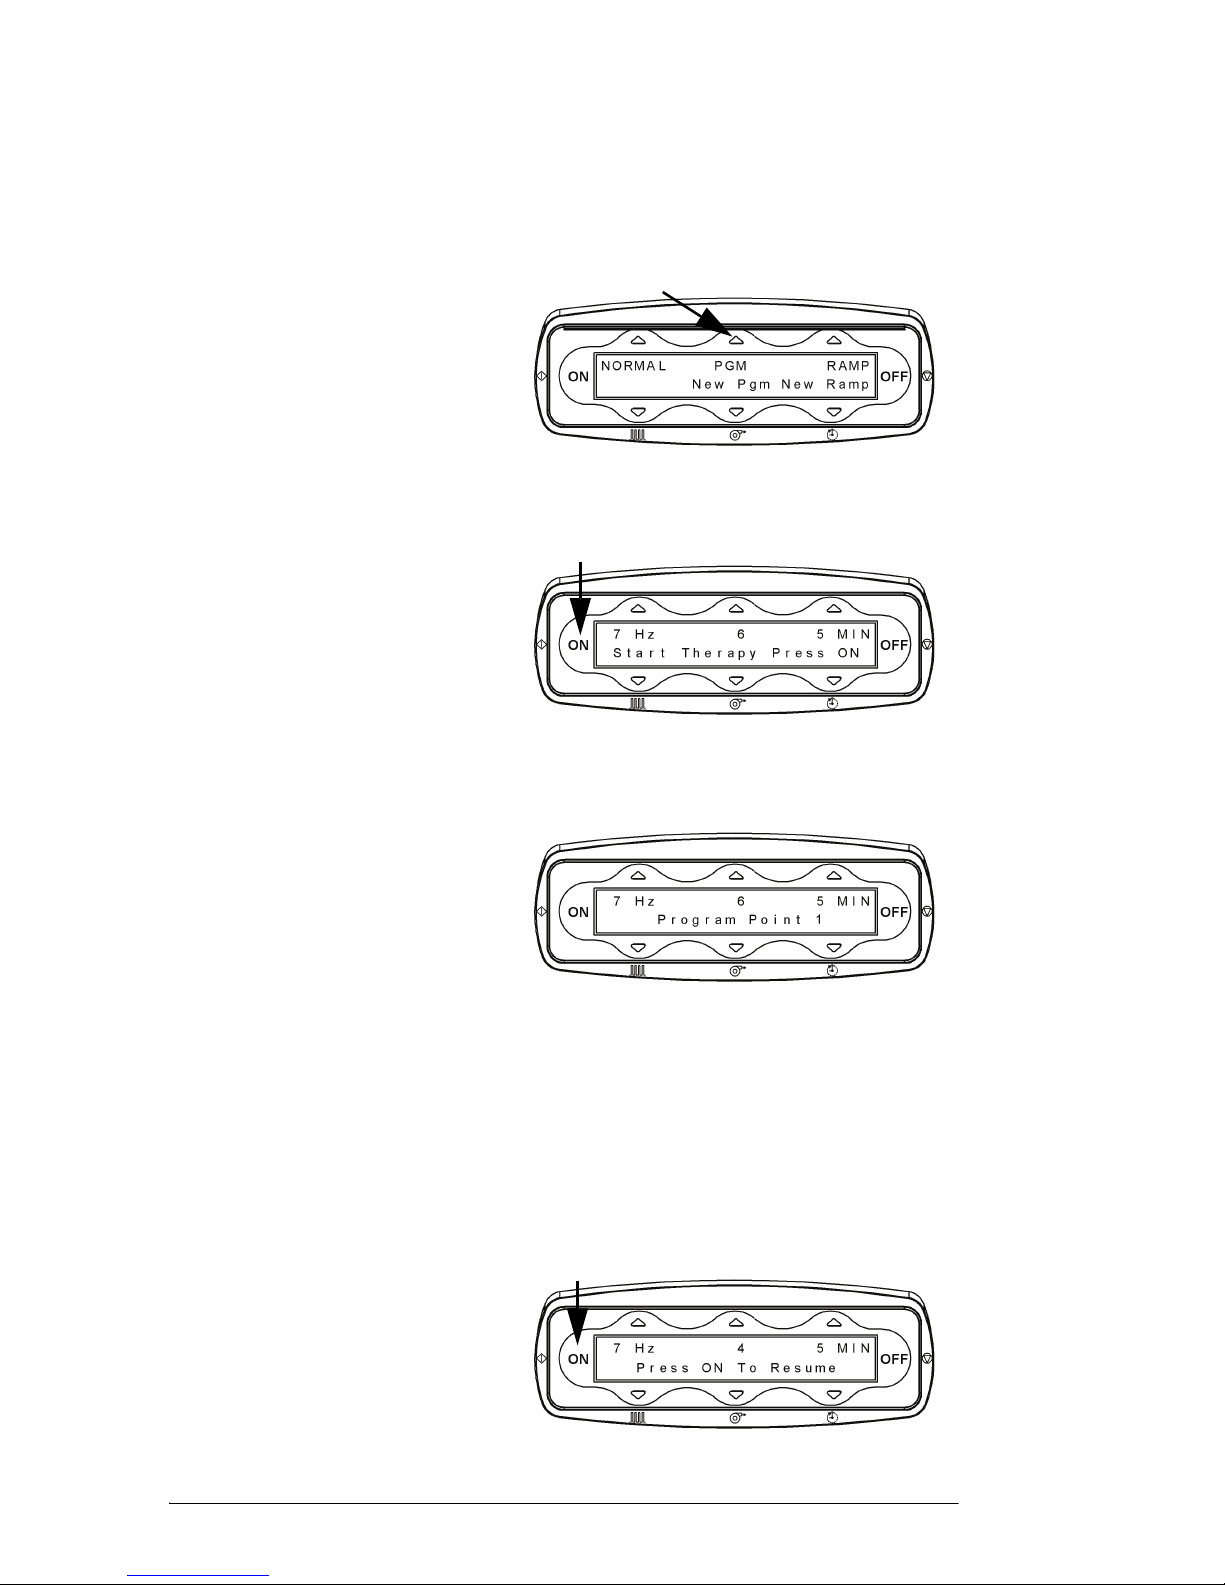
1. Press the Up arrow
above PGM to run the
previously created
program, or selected
default program.
2. Press the ON button.
The disposable
garment will inflate.
3. Press the ON button
again to begin the
treatment program.
The set treatment
Time shows as it
counts down to zero
for each Programming
Point.
4. The therapy will
automatically end
after it has gone
through each of the
Programming Points.
5. If it is necessary to
pause the treatment
during a session, do as follows:
a. Press the OFF button or Remote Control once. The unit will
stop the pulsations, but the settings will continue to show on
the screen.
NOTE:
When the unit is paused, the disposable garment will deflate.
b. To resume
treatment, press
the ON button or
the Remote
Control again.
 Loading...