

Page 1

LCD Monitor
User Manual
Page 2

LCD Monitor User Manual
1
User Manual
COPYRIGHT © 2017 Hangzhou Hikvision Digital Technology Co., Ltd.
ALL RIGHTS RESERVED.
Any and all information, including, among others, wordings, pictures, graphs are the
properties of Hangzhou Hikvision Digital Technology Co., Ltd. or its subsidiaries
(hereinafter referred to be “Hikvision”). This user manual (hereinafter referred to be
“the Manual”) cannot be reproduced, changed, translated, or distributed, partially or
wholly, by any means, without the prior written permission of Hikvision. Unless
otherwise stipulated, Hikvision does not make any warranties, guarantees or
representations, express or implied, regarding to the Manual.
About this Manual
This Manual is applicable to the Monitor.
The Manual includes instructions for using and managing the product. Pictures, charts,
images and all other information hereinafter are for description and explanation only.
The information contained in the Manual is subject to change, without notice, due to
firmware updates or other reasons. Please find the latest version in the company
website (http://overseas.hikvision.com/en/).
Please use this user manual under the guidance of professionals.
Trademarks Acknowledgement
and other Hikvision’s trademarks and logos are the properties of Hikvision
in various jurisdictions. Other trademarks and logos mentioned below are the properties
of their respective owners.
Legal Disclaimer
TO THE MAXIMUM EXTENT PERMITTED BY APPLICABLE LAW, THE PRODUCT DESCRIBED,
WITH ITS HARDWARE, SOFTWARE AND FIRMWARE, IS PROVIDED “AS IS”, WITH ALL
FAULTS AND ERRORS, AND HIKVISION MAKES NO WARRANTIES, EXPRESS OR IMPLIED,
INCLUDING WITHOUT LIMITATION, MERCHANTABILITY, SATISFACTORY QUALITY, FITNESS
FOR A PARTICULAR PURPOSE, AND NON-INFRINGEMENT OF THIRD PARTY. IN NO EVENT
WILL HIKVISION, ITS DIRECTORS, OFFICERS, EMPLOYEES, OR AGENTS BE LIABLE TO YOU
FOR ANY SPECIAL, CONSEQUENTIAL, INCIDENTAL, OR INDIRECT DAMAGES, INCLUDING,
AMONG OTHERS, DAMAGES FOR LOSS OF BUSINESS PROFITS, BUSINESS INTERRUPTION,
OR LOSS OF DATA OR DOCUMENTATION, IN CONNECTION WITH THE USE OF THIS
PRODUCT, EVEN IF HIKVISION HAS BEEN ADVISED OF THE POSSIBILITY OF SUCH
DAMAGES.
REGARDING TO THE PRODUCT WITH INTERNET ACCESS, THE USE OF PRODUCT SHALL BE
WHOLLY AT YOUR OWN RISKS. HIKVISION SHALL NOT TAKE ANY RESPONSIBILITES FOR
ABNORMAL OPERATION, PRIVACY LEAKAGE OR OTHER DAMAGES RESULTING FROM
CYBER ATTACK, HACKER ATTACK, VIRUS INSPECTION, OR OTHER INTERNET SECURITY
RISKS; HOWEVER, HIKVISION WILL PROVIDE TIMELY TECHNICAL SUPPORT IF REQUIRED.
SURVEILLANCE LAWS VARY BY JURISDICTION. PLEASE CHECK ALL RELEVANT LAWS IN
YOUR JURISDICTION BEFORE USING THIS PRODUCT IN ORDER TO ENSURE THAT YOUR
USE CONFORMS THE APPLICABLE LAW. HIKVISION SHALL NOT BE LIABLE IN THE EVENT
THAT THIS PRODUCT IS USED WITH ILLEGITIMATE PURPOSES.
IN THE EVENT OF ANY CONFLICTS BETWEEN THIS MANUAL AND THE APPLICABLE LAW,
THE LATER PREVAILS.
Page 3
LCD Monitor User Manual
2
Regulatory Information
FCC Information
Please take attention that changes or modification not expressly approved by the party
responsible for compliance could void the user’s authority to operate the equipment.
FCC compliance: This equipment has been tested and found to comply with the limits for
a Class A digital device, pursuant to part 15 of the FCC Rules. These limits are designed
to provide reasonable protection against harmful interference when the equipment is
operated in a commercial environment. This equipment generates, uses, and can radiate
radio frequency energy and, if not installed and used in accordance with the instruction
manual, may cause harmful interference to radio communications. Operation of this
equipment in a residential area is likely to cause harmful interference in which case the
user will be required to correct the interference at his own expense.
FCC Conditions
This device complies with part 15 of the FCC Rules. Operation is subject to the following
two conditions:
1. This device may not cause harmful interference.
2. This device must accept any interference received, including interference that may
cause undesired operation.
EU Conformity Statement
This product and - if applicable - the supplied accessories too are marked with
"CE" and comply therefore with the applicable harmonized European
standards listed under the EMC Directive 2014/30/EU, the LVD Directive 2014/35/EU,
the RoHS Directive 2011/65/EU.
2012/19/EU (WEEE directive): Products marked with this symbol cannot be
disposed of as unsorted municipal waste in the European Union. For proper
recycling, return this product to your local supplier upon the purchase of
equivalent new equipment, or dispose of it at designated collection points. For more
information see: www.recyclethis.info
2006/66/EC (battery directive): This product contains a battery that cannot be
disposed of as unsorted municipal waste in the European Union. See the
product documentation for specific battery information. The battery is marked
with this symbol, which may include lettering to indicate cadmium (Cd), lead (Pb), or
mercury (Hg). For proper recycling, return the battery to your supplier or to a designated
collection point. For more information see: www.recyclethis.info
Industry Canada ICES-003 Compliance
This device meets the CAN ICES-3 (A)/NMB-3(A) standards requirements.
Page 4
LCD Monitor User Manual
3
Applicable Models
This manual is applicable to the model: LCD Monitor.
Symbol Conventions
The symbols that may be found in this document are defined as follows.
Symbol
Description
Provides additional information to emphasize or supplement important points
of the main text.
Indicates a potentially hazardous situation, which if not avoided, could result
in equipment damage, data loss, performance degradation, or unexpected
results.
Indicates a hazard with a high level of risk, which if not avoided, will result in
death or serious injury.
Page 5

LCD Monitor User Manual
4
TABLE OF CONTENTS
Chapter 1 Overview ................................................................................................................... 5
Overview .................................................................................................................................. 5 1.1
Key Features ............................................................................................................................. 5 1.2
Dimensions (unit: mm) ............................................................................................................ 6 1.3
Chapter 2 Panels and Connections.............................................................................................. 7
Interfaces ................................................................................................................................. 7 2.1
Panel Buttons ........................................................................................................................... 7 2.2
Remote Controller .................................................................................................................... 7 2.3
Power Supply Connections ...................................................................................................... 7 2.4
Chapter 3 System Configuration ................................................................................................. 8
Input Source Selection ............................................................................................................. 8 3.1
Image Parameters .................................................................................................................... 8 3.2
Configuring Image Mode ..................................................................................... 8 3.2.1
Configuring Lighting Mode .................................................................................. 9 3.2.2
Configuring Audio Settings ................................................................................ 10 3.2.3
Configuring VGA Parameters ............................................................................. 10 3.2.4
Overscan Settings ................................................................................................................... 11 3.3
Aspect Settings ....................................................................................................................... 12 3.4
System Information and Maintenance ................................................................................... 13 3.5
Upgrading the Device ........................................................................................ 13 3.5.1
Restoring the Defaults ....................................................................................... 13 3.5.2
Enabling/Disabling Lock Keypad ........................................................................ 13 3.5.3
Enabing/Disabling Auto Input Source ............................................................... 14 3.5.4
Checking System Information ............................................................................ 14 3.5.5
Configuring Fan Monitoring .............................................................................. 14 3.5.6
General Settings ..................................................................................................................... 15 3.6
Configuring OSD Settings................................................................................... 15 3.6.1
Selecting Screen Saver Mode ............................................................................ 16 3.6.2
Configuring Backlight Settings ........................................................................... 16 3.6.3
Configuring Image Freezing ............................................................................... 17 3.6.4
Playing External Files .............................................................................................................. 18 3.7
Appendix A: Specifications ....................................................................................................... 19
Page 6

LCD Monitor User Manual
5
Chapter 1 Overview
Overview 1.1
The LCD monitor is a reliable surveillance display with LED backlit technology, excellent color
reduction and image processing, and true display of video details. Multiple interfaces are able to
meet various surveillance environments, and build-in speaker is convenient to audio play. The
monitor is an ideal choice for security and surveillance application.
Key Features 1.2
LED backlit technology with full HD 1920 × 1080
Wide view angle: 178 º (H) / 178 º (V)
Image processing: 3D comb filter, 3D De-interlace, 3D noise reduction
Multiply inputs: HDMI, VGA, BNC input, USB, audio in
Outputs: BNC output, audio out
Support HD TVI and CVBS signal input
Build-in speaker
Image freeze
Auto input signal source switch
IR remote control
Standby during no signal input
Eco power saving mode
Dual power supply: 24 VDC or 100 to 240 VAC
High reliable components for 7 × 24 working hours
VESA stand bracket
Page 7
LCD Monitor User Manual
6
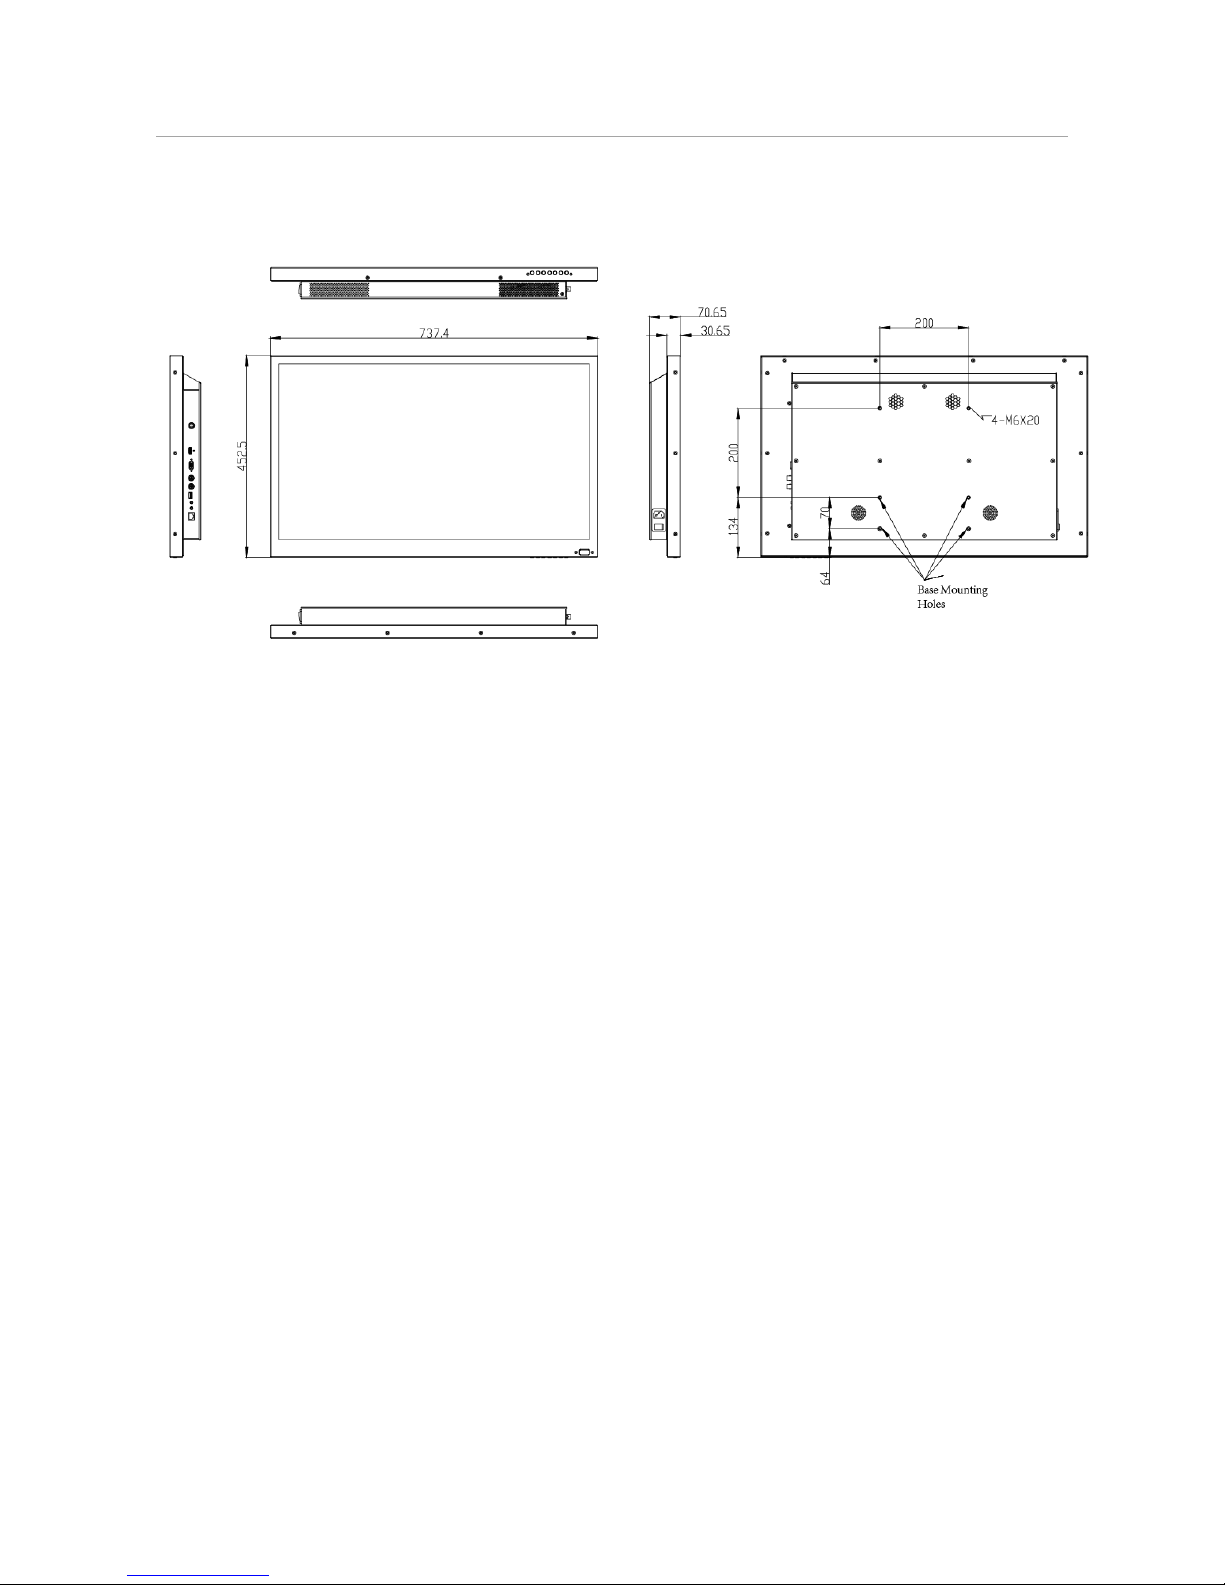
Dimensions (unit: mm) 1.3
Refer to the following figure for the dimensions of the monitor:
Dimensions Figure 1-1
Page 8

LCD Monitor User Manual
7
Chapter 2 Panels and Connections
Interfaces 2.1
Rear Panel of Device Figure 2-1
Description of Rear Panel Table 2-1
Interface
Description
DC 24V
24 VDC power input
HDMI IN
HDMI digital signal input
VGA IN
Analog VGA input
BNC IN
BNC input
BNC OUT
BNC output
USB
USB interface
AUDIO IN
Audio input
AUDIO OUT
Audio output
RS232 IN
RS-232 communication interface
Panel Buttons 2.2
Refer to the following figure and table for the description of the touch buttons on the lower right
corner of the monitor.
Buttons on the Display Unit Figure 2-2
Description of Buttons Table 2-2
Button
Description
SOURCE
Enter source menu
MENU
Enter main menu
UP/DOWN
Move the cursor up/down
LEFT/RIGHT
Move the cursor left/right
POWER
Confirm/start up; hold down to shut down
Page 9

LCD Monitor User Manual
7
Remote Controller 2.3
Refer to the following figure and table for the remote controller descriptions.
Remote Control
Figure 2-3
Button Description
Table 2-3
Key
Function
On/Off switch, turn on/off the
monitor
Mute key, for turning off the sound of
the monitor
MENU
Enter main menu
FREEZE
Freeze the image
SOURCE
Input source selection menu
Direction
Keys
Up/down/left/right direction keys
OK
Confirm
Play/Pause
Stop
Previous
Next
Repeat
Return
Power Supply Connections 2.4
Insert the 3-pin power plug (100 to 240 VAC, 2A) into well-grounded power socket.
Power Supply Figure 2-4
Disconnect the power of the monitor if it will not be used for a long time.
Page 10

LCD Monitor User Manual
8
Chapter 3 System Configuration
Input Source Selection 3.1
Turn on the display unit when the power supply is on and input source is confirmed.
Press SOURCE on the remote controller to enter the menu as shown below. 22 inch LCD Step 1
display unit includes 4 input sources as AV, HDMI, DVI, VGA and USB signal.
Press direction keys to select the input source. Step 2
Press OK to accomplish the input source selection. Step 3
Input Source Figure 3-1
Image Parameters 3.2
Configuring Image Mode 3.2.1
You can adjust the image parameters by switching image modes and adjust the values of contrast,
brightness, color, sharpness and hue.
On the main menu, press the ▲ and ▼ buttons on the remote control to select the Image Step 1
Mode.
Press OK to enter the image mode settings interface. Step 2
Page 11

LCD Monitor User Manual
9
Image Mode Figure 3-2
Press ◄ or ► to switch it to Standard/Gentle/Dynamic/User mode. Different parameters of Step 3
contrast, brightness, color, hue and sharpness are provided for different image modes.
(Optional) When you select the User mode, press ◄ or ► to set the brightness and contrast Step 4
values from 0 to 100.
Press MENU again to complete the settings and back to the main menu interface. Step 5
Configuring Lighting Mode 3.2.2
You can set the lighting parameters to adopt different surrounding lighting conditions.
On the main menu, press the ▲ and ▼ buttons on the remote control to select the Lighting. Step 1
Press OK to enter the lighting mode settings interface. Step 2
Press ◄ or ► to Normal, Daylight 1 to 3 and Night 1 to 3. You can switch to different modes Step 3
according to the surrounding lighting conditions.
Normal: for normal light conditions.
Daylight1/Daylight2/Daylight3: for daylight conditions. Night1/Night2/Night3: for night
light conditions.
The level 3 is more suitable for a surrounding lighting condition with higher backlight
compensation requirement.
Image Mode User
Brightness 51
Contrast 53
Color 50
Sharpness 50
Hue 50
Page 12

LCD Monitor User Manual
10
Lighting Mode Figure 3-3
Press MENU again to complete the settings and back to the main menu interface. Step 4
Configuring Audio Settings 3.2.3
You can switch the mute on/off and adjust the volume.
On the main menu, press the ▲ and ▼ buttons on the remote control to select the Audio Step 1
Mode.
Press OK to enter the audio settings interface. Step 2
Press ◄ or ► to set the mute to On/Off. Step 3
When the mute is set to Off, you can press ◄ or ► to set the volume from 0 to 100. Step 4
Select Balance and press ◄ or ► to adjust the sound balance. Step 5
Press MENU again to complete the settings and back to the main menu interface. Step 6
Audio Settings Figure 3-4
Configuring VGA Parameters 3.2.4
For VGA input source, you can adjust the VGA parameters, including adjusting VGA H position, V
Position, clock and phase.
Lighting Normal Mode
Mute Off
Volume 30
Balance 0
Page 13

LCD Monitor User Manual
11
The VGA parameter settings are valid only for the VGA input source.
Auto Adjust
On the main menu, press the ▲ and ▼ buttons on the remote control to select the VGA Step 1
Parameter.
Press OK to enter the VGA parameters settings interface. Step 2
Select the Adjust Lock to Off, and the device can automatically adjust the parameters Step 3
according to signal source.
Manual Adjust
On the main menu, press the ▲ and ▼ buttons on the remote control to select the VGA Step 1
Parameter.
Press OK to enter the VGA parameters settings interface. Step 2
Press ◄ or ► to adjust the values of the Row, Column, Clock and Phase from 0 to 100. Step 3
When the device is restarted or the signal input is changed, the VGA parameters cannot be
automatically adjusted.
VGA Parameters Figure 3-5
Press MENU again to complete the settings and back to the main menu interface. Step 4
Overscan Settings 3.3
Overscan is the situation in which not all of an image is present on a viewing screen. You can shield
the borders for better image quality adjust the overscan value of up/down/left/right.
On the main menu, press the ▲ and ▼ buttons on the remote control to select Overscan. Step 1
Press OK to enter the overscan settings interface. Step 2
Adjust Select
Column 50
Clock 50
Phase 7
Row 50
Adjust Lock On
Page 14

LCD Monitor User Manual
12
Press ◄ or ► to switch the overscan to On/Off. Step 3
When the overscan is selected to On, you can set values of the left edge, right edge, top Step 4
edge and bottom edge from 0 to 100. The value of overscan is the pixel value of certain
edge.
Overscan Settings Figure 3-6
Press MENU again to complete the settings and back to the main menu interface. Step 5
Aspect Settings 3.4
The aspect ratio refers to the proportions of the height and width of an image.
On the main menu, press the ▲ and ▼ buttons on the remote control to select the Aspect. Step 1
Press OK to enter the Aspect settings interface. Step 2
Press ◄ or ► to set the aspect ratio to 16:9, 4:3, P-to-P. Step 3
Aspect Settings Figure 3-7
Press MENU again to complete the settings and back to the main menu interface. Step 4
Overscan On
Right Edge 0
Top Edge 0
Bottom Edge 0
Left Edge 0
Aspect 16:9
Page 15

LCD Monitor User Manual
13
System Information and Maintenance 3.5
Upgrading the Device 3.5.1
Before you start
Insert the USB flash drive with the update file to the device before you upgrade the device.
On the main menu, press the ► on the remote control to enter the Maintenance interface. Step 1
Press OK to enter the maintenance settings interface. Step 2
Press Maintenance key to enter the Maintenance interface. Step 3
System Maintenance Figure 3-8
Select Upgrade (USB) and press ►to enter the pop-up dialog box. Step 4
Press the ◄ to continue the upgrading or ► to cancel the operation and back to the menu. Step 5
Restoring the Defaults 3.5.2
All parameters of the device can be restored to the user defaults settings.
On the Maintenance interface, select Restore Defaults and press ►to enter the pop-up Step 1
dialog box.
Press the ◄ to continue to restore the defaults or ► to cancel the operation and back to the Step 2
menu.
Enabling/Disabling Lock Keypad 3.5.3
You can enable the lock for the control panel buttons of the monitor to avoid misoperation.
On the Maintenance interface, select Lock Keypad. Step 1
Press ◄ or ► to set the Lock Keypad to On or Off. When the Lock Keypad is turned on, the Step 2
control panel buttons operation is invalid.
Upgrade (USB) On
Lock Keypad Off
Restore Defaults On
Auto Input Source On
Page 16

LCD Monitor User Manual
14
Enabing/Disabling Auto Input Source 3.5.4
The input signal source can be automatically detected by the device and switched to the
connected signal source on the screen.
On the Maintenance interface, select Auto Input Source. Step 1
Press ◄ or ► to set the Auto Input Source to On or Off. When it is turned on, the device can Step 2
automatically detect and switch to the currently connected input signal source.
Checking System Information 3.5.5
Press System Info to enter the system information interface. Step 1
Check the current software version information, working hours, current temperature, device Step 2
ID and fan status.
System Information Figure 3-9
Configuring Fan Monitoring 3.5.6
You can enable the fan temperature control and the overheat alarm prompt on the screen and
once the board temperature is too high.
Select Fan Setting and press OK. Step 1
Press ◄or ► to set the fan mode to On or Auto. Step 2
On: always turns on the fan.
Auto: automatically turns on the fan when the device reaches the defined temperature
(refer to step 3).
In the auto fan mode, set the temperature for automatically starting the fan. Step 3
Press ◄or ► to switch the overheat alarm to On/Off. Step 4
When the overheat alarm is turned on, set the alarm temperature. Step 5
Press MENU again to complete the settings and back to the main menu interface. Step 6
Software Version V0.0.0_000000
Device ID 0101
Working Hours 5
Current Temperature 30
Fan Work Status On
Page 17

LCD Monitor User Manual
15
Temperature Monitor Figure 3-10
General Settings 3.6
Configuring OSD Settings 3.6.1
You can set the language and OSD duration on the menu.
On the main menu, press the ► on the remote control to enter the general settings Step 1
interface.
Press the ▲ and ▼ buttons to select the OSD Settings. Step 2
Press OK to enter the OSD settings interface. Step 3
Configure the language, OSD duration and OSD blending parameters. Step 4
Language: press ◄ or ► to switch the language between Chinese and English.
OSD Blending: refers to the OSD transparency. Press ◄ or ► to adjust the blending value to:
High/Middle/Low/Off.
OSD Duration: sets the OSD duration on the screen. Press ◄ or ► to adjust the OSD
duration to: Always On/5Sec/15Sec/30Sec.
OSD Settings Figure 3-11
F a n M o d e O n
O v e r h e a t A l a r m O n
F a n T e m p ( °C ) 4 0
A l a r m T e m p ( °C ) 6 0
L a n g u a g e E n g l i s h
O S D B l e n d i n g M i d d l e
O S D D u r a t i o n A l w a y s O n
Page 18

LCD Monitor User Manual
16
Press MENU again to complete the settings and back to the main menu interface. Step 5
Selecting Screen Saver Mode 3.6.2
The screen saver allows you to set the screen mode and the auto sleep mode when the monitor
has no signal input.
On the main menu, press the ► on the remote control to enter the general settings Step 1
interface.
Press the ▲ and ▼ buttons to select the Screen Saver. Step 2
Press OK to enter the image screen saver settings interface. Step 3
Select No Signal and press ◄ or ► to set the Blue Screen or Black Screen when there is no Step 4
signal input.
Select Auto Sleep and press ◄ or ► to set it to On or Off when the monitor has no signal Step 5
input.
Screensaver Mode Figure 3-12
Press Menu again to complete the settings and back to the main menu interface. Step 6
Configuring Backlight Settings 3.6.3
You can set backlight, low energy, and energy diagram.
Press◄ or ► to set the backlight, and adjust the value ranging from 0 to 100. Step 1
Press◄ or ►to turn on/off the low energy. Step 2
No Signal Blue
Auto Sleep Off
Page 19

LCD Monitor User Manual
17
Backlight Settings Figure 3-13
Press MENU again to complete the settings and back to the main menu interface. Step 3
Configuring Image Freezing 3.6.4
Image freeze feature refers to freezing the current image on the monitor.
On the main menu, press the ► on the remote control to enter the general settings Step 1
interface.
Press the ▲ and ▼ buttons to select the Image Freeze. Step 2
Press OK to enter the image freeze settings interface. Step 3
Press ◄ or ► to set Image Freeze to Yes or No to enable or disable the image freeze Step 4
feature.
Image Freeze Settings Figure 3-14
Press MENU key to return to the main menu after accomplishing the settings. Step 5
After having switched the input source, the image freeze is automatically disabled by default.
Backlight 45
Low Energy Off
Image Freeze Yes
Page 20

LCD Monitor User Manual
18
Playing External Files 3.7
You can play the external files on the monitor, including the photo, movies, music or txt files, etc.
Before you start
Insert the USB flash driver with the external files to the device before operating the following
steps.
Press the SOURCE of the remote controller. Step 1
Select USB of Input Source menu to enter the interface. Step 2
Press◄ or ► to play the photo, movies, music or txt files. Step 3
Enter the menu to select identified USB flash drive and press OK to accomplish it. Step 4
Photo Music Movie Text
USB Menu Figure 3-15
You can use the toolbar at the bottom of the playing window to realize different functions. Step 5
Refer to the following table.
Toolbar Buttons Table 3-1
Icons
Description
Icons
Description
Pause
/
Speed/Reverse
/
Previous/Next
Stop
Repeat All
Playlist
Information
/
Slow/Frame by
frame
Resume
/
Zoom In/Out
Aspect
Move
Stereo
Page 21

LCD Monitor User Manual
19
Appendix A: Specifications
Model
DS-D5032FL-B
LCD Screen
Backlight
LED Backlight
Dimension
32 inch
Dot pitch
0.3637 mm × 0.3637 mm
Max. resolution
1920 × 1080p
Optimal working resolution
1920 × 1080@60Hz
Brightness
400 cd/m²
Contrast
3000: 01: 00
Response time
10 ms
Color
16.7M
Active Area
698.4 × 392.85 mm
Viewing Angle
Horizantal 178°, vertical 178º
Interfaces
VGA Input
1
BNC Input
1
BNC Output
1
USB 2.0 Interface
1
HDMI input
1
RS-232 interface
1
IR Receiver
1 (for remot control)
Audio input
1
Audio output
1
General
Casing Material
Metal
Color of Casing
Black
Wall-mounting Hole
200 × 200 mm
Wall-mounting Screw
M4
Power Supply
24 VDC; 100 to 240 VAC, 50/60Hz
Power Consumption
≤ 60 W
Standby Power
Consumption
≤ 0.5 W
Working Temperature
0 to 40 º C (0 to 104 º F)
Working Humidity
10 to 90 %
Storage Temperature
-20 to 55 º C (-68 to 140 º F)
Storage Humidity
5 to 95%
Dimensions (without base)
737.4 × 452.5 × 70.7 mm
(29.0" × 17.8" × 2.8")
Packing Dimensions
881 × 205 × 630 mm
(34.7" × 8.1" × 24.8")
Gross Weight
19 kg (41.9 lb)
Net Weight
12 kg (26.5 lb)
Page 22

LCD Monitor User Manual
20
UD06628B
 Loading...