

HIKVISION DS-2CZ2152PN, DS-2CZ2152P-IRA, DS-2CZ2182PN, DS-2CZ2192PN, DS-2CZ2132P User Manual
...Page 1

Color Zoom Camera
User Manual
V1.0.0
Hikvision Digital Technology Co., Ltd.
http://www.hikvision.com
Page 2

Color Zoom Camera User Manual
© Hikvision Digital Technology Co., Ltd. All Rights Reserved.
1
Thank you for purchasing our product. If there are any questions, or requests, please do not
hesitate to contact the dealer.
This manual applies to DS-2CZ2132P(N), DS-2CZ2152P(N), DS-2CZ2152P(N)-IRA, DS-2CZ2182P(N),
DS-2CZ2192P(N) series color zoom cameras.
This manual may contain several technical incorrect places or printing errors, and the content is
subject to change without notice. The updates will be added to the new version of this manual. We
will readily improve or update the products or procedures described in the manual.
DISCLAIMER STATEMENT
“Underwriters Laboratories Inc. (“UL”) has not tested the performance or reliability of the security
or signaling aspects of this product. UL has only tested for fire, shock or casualty hazards as
outlined in UL’s Standard(s) for Safety, UL60950-1. UL Certification does not cover the performance
or reliability of the security or signaling aspects of this product. UL MAKES NO REPRESENTATIONS,
WARRANTIES OR CERTIFICATIONS WHATSOEVER REGARDING THE PERFORMANCE OR RELIABILITY
OF ANY SECURITY OR SIGNALING RELATED FUNCTIONS OF THIS PRODUCT.”
Page 3
Color Zoom Camera User Manual
© Hikvision Digital Technology Co., Ltd. All Rights Reserved.
2
Regulatory Information
FCC Information
FCC compliance: This equipment has been tested and found to comply with the limits for a digital
device, pursuant to part 15 of the FCC Rules. These limits are designed to provide reasonable
protection against harmful interference when the equipment is operated in a commercial
environment. This equipment generates, uses, and can radiate radio frequency energy and, if not
installed and used in accordance with the instruction manual, may cause harmful interference to
radio communications. Operation of this equipment in a residential area is likely to cause harmful
interference in which case the user will be required to correct the interference at his own expense.
FCC Conditions
This device complies with part 15 of the FCC Rules. Operation is subject to the following two
conditions:
1. This device may not cause harmful interference.
2. This device must accept any interference received, including interference that may cause
undesired operation.
EU Conformity Statement
This product and - if applicable - the supplied accessories too are marked with "CE"
and comply therefore with the applicable harmonized European standards listed
under the Low Voltage Directive 2006/95/EC, the EMC Directive 2004/108/EC.
2002/96/EC (WEEE directive): Products marked with this symbol cannot be disposed
of as unsorted municipal waste in the European Union. For proper recycling, return
this product to your local supplier upon the purchase of equivalent new equipment,
or dispose of it at designated collection points. For more information see:
www.recyclethis.info.
2006/66/EC (battery directive): This product contains a battery that cannot be
disposed of as unsorted municipal waste in the European Union. See the product
documentation for specific battery information. The battery is marked with this
symbol, which may include lettering to indicate cadmium (Cd), lead (Pb), or mercury
(Hg). For proper recycling, return the battery to your supplier or to a designated collection point.
For more information see: www.recyclethis.info.
Page 4
Color Zoom Camera User Manual
© Hikvision Digital Technology Co., Ltd. All Rights Reserved.
3
Safety Warnings and Cautions
Please pay attention to the following warnings and cautions:
Hazardous Voltage may be present: Special measures and precautions must be
taken when using this device. Some potentials (voltages) on the device may
present a hazard to the user. This device should only be used by HIKVISION
Employees with knowledge and training in working with these types of devices
that contain live circuits.
Power Supply Hazardous Voltage: AC mains voltages are present within the power supply assembly.
This device must be connected to a UL approved, completely enclosed power supply, of the proper
rated voltage and current. No user serviceable parts inside the power supply.
System Grounding (Earthing): To avoid shock, ensure that all AC wiring is not exposed and that the
earth grounding is maintained. Ensure that any equipment to which this device will be attached is
also connected to properly wired grounded receptacles and are approved medical devices.
Power Connect and Disconnect: The AC power supply cord is the main disconnect
device to mains (AC power).The socket outlet shall be installed near the equipment
and shall be readily accessible.
Installation and Maintenance: Do not connect/disconnect any cables to or
perform installation/maintenance on this device during an electrical storm.
Page 5
Color Zoom Camera User Manual
© Hikvision Digital Technology Co., Ltd. All Rights Reserved.
4
Power Cord Requirements: The connector that plugs into the wall outlet must be a grounding-type
male plug designed for use in your region. It must have certification marks showing certification by
an agency in your region. The connector that plugs into the AC receptacle on the power supply must
be an IEC 320, sheet C13, female connector. See the following website for more information
http://kropla.com/electric2.htm.
Lithium Battery: This device contains a Lithium Battery. There is a risk of
explosion if the battery is replaced by an incorrect type. Dispose of used
batteries according to the vendor’s instructions and in accordance with local
environmental regulations.
Perchlorate Material: Special handling may apply. See
www.dtsc.ca.gov/hazardouswaste/perchlorate. This notice is required by California Code of
Regulations, Title 22, Division 4.5, Chapter 33: Best Management Practices for Perchlorate Materials.
This device includes a battery which contains perchlorate material.
Taiwan battery recycling:
Please recycle batteries.
Thermal and Mechanical Injury: Some components such as heat sinks, power
regulators, and processors may be hot; care should be taken to avoid contact
with these components.
Electro Magnetic Interference: This equipment has not been tested for
compliance with emissions limits of FCC and similar international regulations. This device is not, and
may not be, offered for sale or lease, or sold, or leased until authorization from the United States
FCC or its equivalent in other countries has been obtained. Use of this equipment in a residential
location is prohibited. This equipment generates, uses and can radiate radio frequency energy
which may result in harmful interference to radio communications. If this equipment does cause
harmful interference to radio or television reception, which can be determined by turning the
equipment on and off, the user is required to take measures to eliminate the interference or
discontinue the use of this equipment.
Page 6
Color Zoom Camera User Manual
© Hikvision Digital Technology Co., Ltd. All Rights Reserved.
5
Lead Content:
Please recycle this device in a responsible manner. Refer to local
environmental regulations for proper recycling; do not dispose of device in
unsorted municipal waste.
Safety Instruction
These instructions are intended to ensure that user can use the product correctly to avoid danger or
property loss.
The precaution measure is divided into “Warnings” and “Cautions”
Warnings: Serious injury or death may cause if any of the warnings is neglected.
Cautions: Injury or equipment damage may cause if any of the cautions is neglected.
Warnings Follow these safeguards to
prevent serious injury or death.
Cautions Follow these precautions
to prevent potential injury or
material damage.
Warnings:
1. In the use of the product, you must be strict compliance with the electrical safety regulations of
the nation and region.
2. Input voltage should meet both the SELV(Safety Extra Low Voltage) and the Limited Power
Source with DC 12V according to the IEC60950 - 1 standard. Please refer to technical
specifications for detail information.
3. Do not connect several devices to one power adapter as adapter overload may cause over-heat
or fire hazard.
4. Please make sure that the plug is firmly connected on the power socket.
5. When the product is mounted on wall or ceiling, the device shall be firmly fixed.
6. If smoke, odor or noise rise from the device, turn off the power at once and unplug the power
cable, and then please contact the service center.
7. If the product does not work properly, please contact your dealer or the nearest service center.
Page 7

Color Zoom Camera User Manual
© Hikvision Digital Technology Co., Ltd. All Rights Reserved.
6
Never attempt to disassemble the camera yourself. (We shall not assume any responsibility for
problems caused by unauthorized repair or maintenance.)
Page 8

Color Zoom Camera User Manual
© Hikvision Digital Technology Co., Ltd. All Rights Reserved.
7
Cautions:
1. Make sure the power supply voltage is correct before using the camera.
2. Do not drop the camera or subject it to physical shock.
3. Do not touch CCD (Charge Coupled Device) modules with fingers. If cleaning is necessary, use
clean cloth with a bit of ethanol and wipe it gently. If the camera will not be used for an
extended period, please turn on the lens cap to protect the CCD from dirt.
4. Do not aim the camera at the sun or extra bright places. A blooming or smear may occur
otherwise (which is not a malfunction however), and affecting the endurance of CCD at the
same time.
5. The CCD may be burned out by a laser beam, so when any laser equipment is on using, make
sure that the surface of CCD will not be exposed to the laser beam.
6. Do not place the camera in extremely hot, cold(the operating temperature shall be-10°C~+
60°C ), dusty or damp locations, and do not expose it to high electromagnetism radiation.
7. To avoid heat accumulation, good ventilation is required for operating environment.
8. Keep the camera away from liquid while on using.
9. While on a delivery, the camera shall be packed in its original packing, or packing of the same
texture.
10. Regular part replacement: a few parts (e.g. electrolytic capacitor) of the equipment shall be
replaced regularly according to their average enduring time. The average time varies because of
differences between operating environment and using history, so regular checking is
recommended for all the users. Please contact with your dealer for more details.
Page 9

Color Zoom Camera User Manual
© Hikvision Digital Technology Co., Ltd. All Rights Reserved.
8
Table of Contents
Chapter 1 Introduction ........................................................................................................................... 9
1.1 Features ..................................................................................................................................... 9
1.2 Functions ................................................................................................................................... 9
1.3 Application .............................................................................................................................. 11
Chapter 2 Hardware Overview ............................................................................................................. 12
2.1 Lens ......................................................................................................................................... 12
2.2 Side Plate ................................................................................................................................. 12
2.3 Rear Plate ................................................................................................................................ 14
2.4 Connections ............................................................................................................................ 14
2.4.1 Rear Plate Definition ..................................................................................................... 14
2.4.2 I/O Interfaces Description ............................................................................................. 15
2.4.3 Power supply ................................................................................................................. 17
Chapter 3 Menu Functions .................................................................................................................. 18
3.1 Menu Buttons Operation ........................................................................................................ 18
3.2 OSD Menu Configuration ........................................................................................................ 18
3.2.1 Main Menu Overview ................................................................................................... 19
3.2.2 CAM ID Setting (Camera ID) .......................................................................................... 20
3.2.3 IRIS Setting .................................................................................................................... 20
3.2.4 BLC/WDR Setting (Back Light Compensation/ Wide Dynamic Range) ......................... 21
3.2.5 SHUTTER Setting ........................................................................................................... 23
3.2.6 AGC Setting (Auto Gain Control) ................................................................................... 23
3.2.7 WB Setting (White Balance) .......................................................................................... 24
3.2.8 FOCUS Setting ............................................................................................................... 25
3.2.9 D/N Setting (Day/Night) ................................................................................................ 25
3.2.10 VIDEO Parameters Setting ........................................................................................... 26
3.2.11 SPECIAL Functions Setting ........................................................................................... 28
3.2.12 EXIT ............................................................................................................................. 32
Appendix Specification ......................................................................................................................... 33
1 DS-2CZ2132P(N) ......................................................................................................................... 33
2 DS-2CZ2152P(N) ......................................................................................................................... 35
3 DS-2CZ2152P(N)-IRA .................................................................................................................. 37
Page 10

Color Zoom Camera User Manual
© Hikvision Digital Technology Co., Ltd. All Rights Reserved.
9
Chapter 1 Introduction
1.1 Features
DS-2CZ2132P(N),DS-2CZ2152P(N), DS-2CZ2152P(N)-IRA, DS-2CZ2182P(N),DS-2CZ2192P(N) series
are high performance cameras which adopt 1/4" SONY Interline Transfer Super HAD-II CCD,
advanced print circuit board design technology, possess of high resolution, lower distortion, and
lower noise features. They are extremely suitable for surveillance system and image process
system.
Features:
High performance SONY CCD.
High resolution. This camera series provide high resolution up to Color 540TVL and B/W 600TVL
for ensuring clear image.
Low illumination. The 2132 camera model supports Day Night Auto Switch. The
2152/2182/2192 camera models support IR cut filter with auto switch.
The IR distance of the DS-2CZ2152P(N)-IR is up to 100M.
Support RS-485 control and ZCF wiring control.
BLC (Back light Compensation).
Auto-focus algorithm with self-owned intellectual property.
Support OSD menu and parameters configuration.
High S/N ratio.
Auto iris and auto electronic shutter.
3D-Digital Noise Reduction (3D-DNR).
Electronic image stabilization (EIS).
2182/2192 camera models support Wide Dynamic Range.
1.2 Functions
Motion Detection: In the user-defined motion detection surveillance area, the moving object can
be detected and trigger alarm. The sensitive level can be customized according to the environment.
DAY/NIGHT Auto Switch: The cameras deliver color images during the day. And as light diminishes
at night, the cameras switch to night mode and deliver black and white images with high quality.
AGC: AGC is a control circuit that automatically changes the gain of a receiver or other piece of
equipment, so that the desired output signal remains essentially. When under low illumination, AGC
Page 11
Color Zoom Camera User Manual
© Hikvision Digital Technology Co., Ltd. All Rights Reserved.
10
will regulate the gain and amplification of the video signal.
S/N ratio: It is the ratio of Signal voltage and noise voltage. The ratio is larger, the effect of noise is
less, and the image is clearer.
OSD (On Screen Display): The on-screen display (abbreviated OSD) is an image superimposed on a
screen picture, used for displaying information and menu.
White Balance: White balance can remove the unrealistic color casts. White balance is the white
rendition function of the camera to adjust the color temperature according to the environment
automatically.
ICR Auto Switch: The infrared cut filter can block infrared light during the daytime. For ensuring a
high sensitivity and clear image, the infrared cut filter will be replaced by normal filter at night to let
the infrared light in.
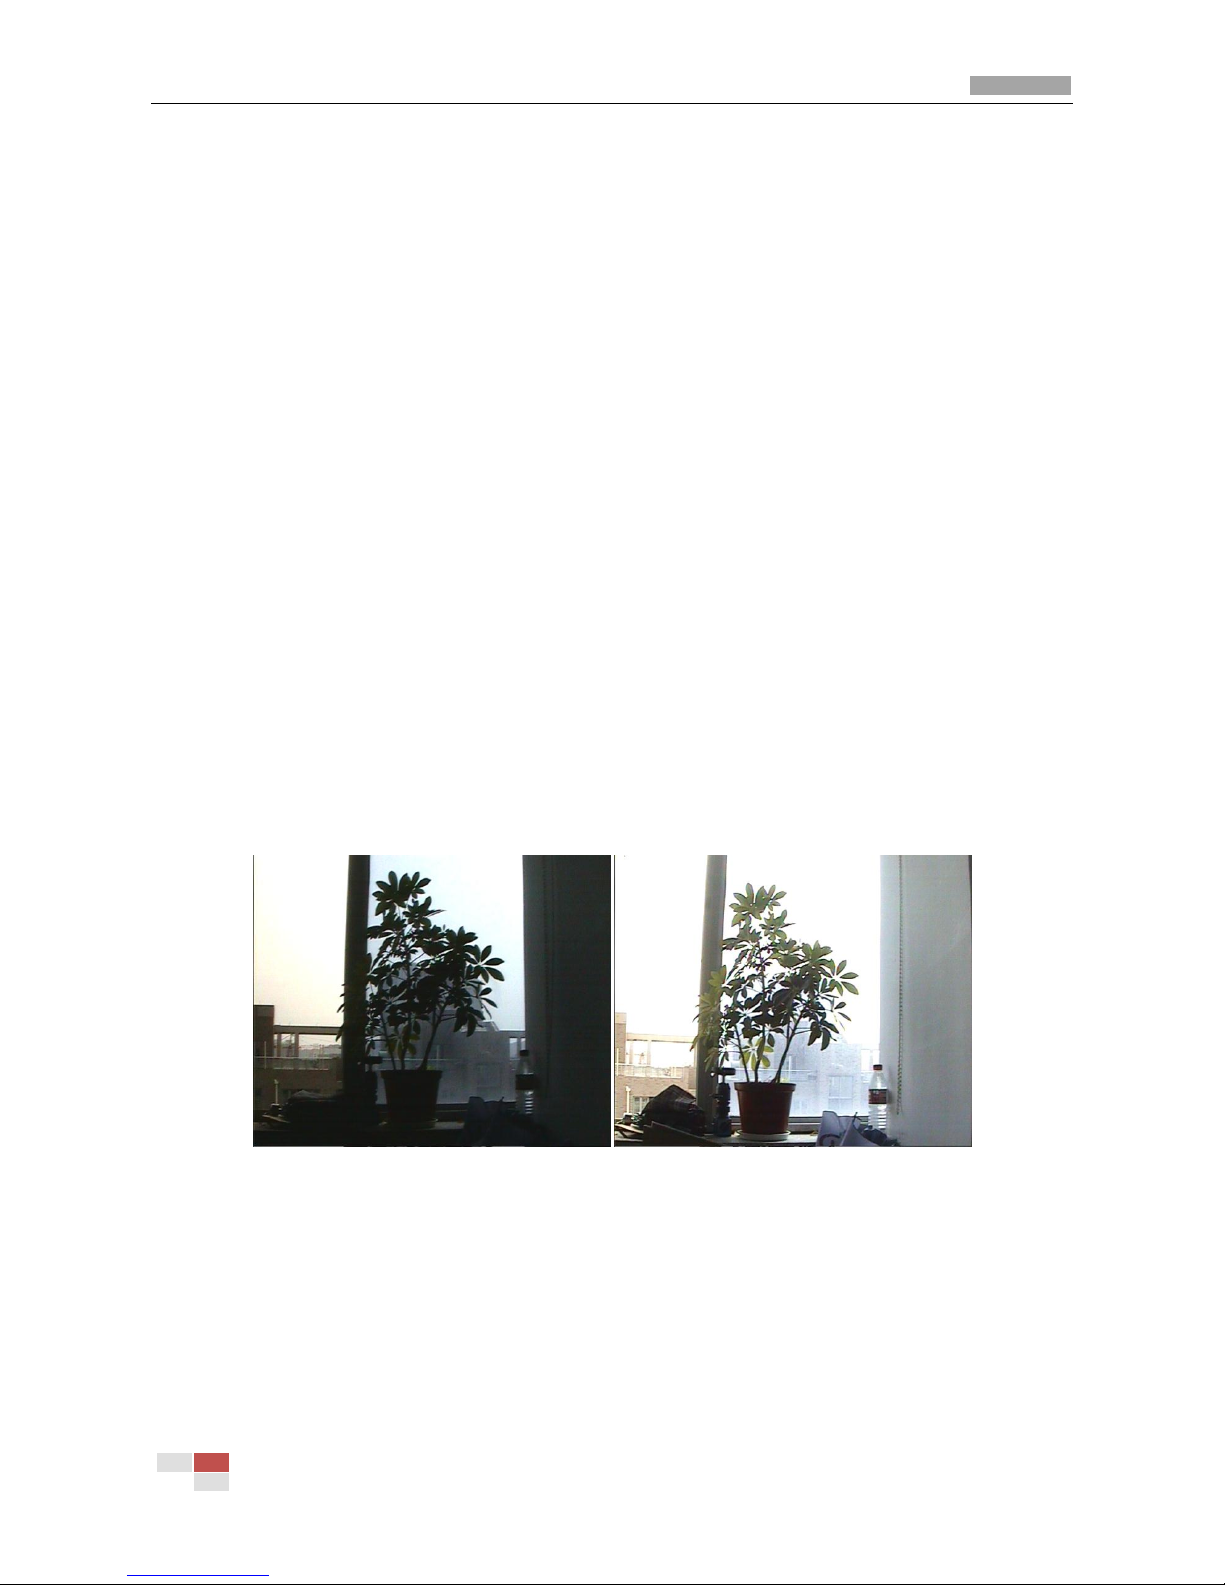
BLC: If you focus on an object against strong backlight, the object will be too dark to be seen clearly.
The BLC (Backlight Compensation) function can compensate light to the object in the front to make
it clear, but this causes the over-exposure of the background where the light is strong.
BLC OFF BLC ON
EIS (Electronic Image Stabilization): Electronic image stabilization function can reduce certain
ranges of vibration which is caused by the external environment.
3D Digital Noise Reduction: Comparing with the general 2D digital noise reduction, the 3D digital
noise reduction function processes the noise initiated by CCD besides processing the noise in the
separated Y video signal and C video signal.
Page 12

Color Zoom Camera User Manual
© Hikvision Digital Technology Co., Ltd. All Rights Reserved.
11
1.3 Application
The product is applicable to the large-sized monitoring scenes, such as large warehouse,
surrounding area of residential district, dock, plaza, school, station, park, etc.
Page 13

Color Zoom Camera User Manual
© Hikvision Digital Technology Co., Ltd. All Rights Reserved.
12
Chapter 2 Hardware Overview
2.1 Lens
The lens is integrated in the camera. The focal length of the 2132 camera is 3.9-85.8mm, the 2152
camera is 3.84-88.4mm, the 2182 camera is 3.4-102mm and the 2192 camera is 3.3-119mm.
2.2 Side Plate
Figure 2.2.1 DS-2CZ2132P(N) side plate
Figure 2.2.2 DS-2CZ2152P(N) side plate
Page 14

Color Zoom Camera User Manual
© Hikvision Digital Technology Co., Ltd. All Rights Reserved.
13
Figure 2.2.3 DS-2CZ2182P(N) side plate
Figure 2.2.4 DS-2CZ2192P(N) side plate
Figure 2.2.5 DS-2CZ2152P(N)-IRA side plate
Page 15

Color Zoom Camera User Manual
© Hikvision Digital Technology Co., Ltd. All Rights Reserved.
14
2.3 Rear Plate
Figure 2.3.1 Rear plate of DS-2CZ2132P(N),DS-2CZ2152P(N),DS-2CZ2182P(N)and DS-2CZ2192P(N)
2.4 Connections
2.4.1 Rear Plate Definition
Page 16

Color Zoom Camera User Manual
© Hikvision Digital Technology Co., Ltd. All Rights Reserved.
15
Figure 2.4.1 DS-2CZ2132P(N), DS-2CZ2152P(N), DS-2CZ2182P(N), DS-2CZ2912P(N) Rear plate definition
Figure 2.4.2 DS-2CZ2152P(N)-IRA wiring definition
No.
Name
Description
1
GND
GND Interface
2
Power
12V DC Power Supply
3
ZCF
Zoom and Focus control interfaces
4
Video Output
Video Output Interfaces
5
RS-485
D+,D- Control Signal Input
Table 2.4.1 DS-2CZ2152P(N)-IRA interfaces description
2.4.2 I/O Interfaces Description
The interfaces description of DS-2CZ21X2P(N) are as follows:
Pin No.
Name
Description
ZOOM
(Wire Control Interface)
Lens Zoom Adjustment
COM
(Wire Control Interface)
Common Interface for the Pins No. 1 and
No. 3
FOCUS
(Wire Control Interface)
Focus Adjustment
Page 17

Color Zoom Camera User Manual
© Hikvision Digital Technology Co., Ltd. All Rights Reserved.
16
IN/GND
Trigger Interface of the Day/Night
switching/GND Interface
OUT/COM
Alarm Output/Common Interface
RS-485 D+/RS-485 D-
External Control Signal Input
GND
GND Interface
Table 2.4.2 DS-2CZ21X2P(N) interfaces description
Note: The working voltage of Z interface is +3V ~ +12V or -3V ~ -12V. The working voltage of F
interface is +3V to +12V or - 3V to -12V.
The maximum drive voltage and current of the alarm output interface (with the Open Collector
inside) is 24VDC and 45mA.
Zoom/Focus Remote Control
Purpose:
You can route the cable from the RS-485 signal output connector of your control device to the
RS-485 signal input connector of the camera. Then use the control device to adjust the lens
remotely.
The RS-485 connector supports PELCO-D protocol.
The default setting requirements are:
The baud rate is 2400bit/s.
The protocol is PELCO-D.
The data bit is 8bit.
The stop bit is 1bit.
The parity bit is none.
Day/Night in, GND, Alarm output, Alarm output Com
You can use the 4-IN interface to trigger the switching between the Day mode and Night mode.
Connect an alarm output device to the 6-OUT interface . The motion detection can
trigger alarm output.
Page 18

Color Zoom Camera User Manual
© Hikvision Digital Technology Co., Ltd. All Rights Reserved.
17
2.4.3 Power supply
Connect the supplied power adapter to the power supply connector . Make sure that the
power indicator is in solid red.
Note: Please make sure that the power adapter can match with the camera. The standard power
supply of the camera is usually 12V DC (Please refer to technical specifications for more details).
Page 19

Color Zoom Camera User Manual
© Hikvision Digital Technology Co., Ltd. All Rights Reserved.
18
Chapter 3 Menu Functions
The menu functions of the DS-2CZ21X2P/N are introduced in this chapter. The first part is the
instruction of the menu buttons, the second part is the instruction of the menu configuration of all
the items.
Note: To configure the menu function of the DS-2CZ2152P(N)-IRA model, you have to use the
control device to send RS-485 signals to call the 95 preset.
3.1 Menu Buttons Operation
Figure 3.1.1 the buttons of Camera
There are two working modes for the setting buttons: common and Menu modes.
Common mode:
T/W buttons: You can press them to zoom out and in.
N/F buttons: You can press them to focus near and far.
Menu button: Pressing the MENU button for 2 seconds, you can enter the menu mode. The main
menu displays on the screen.
Menu mode:
T/W button: You can use these buttons to move the cursor up/down.
N/F button: You can use these buttons to switch options.
Menu button: You can use this button to enter or exit the submenu.
3.2 OSD Menu Configuration
Press the menu button for 2 seconds to enter the main menu. Refer to the Figure 3.2.1.
The menu items are on the left. The options are on the right.
“…” means there is a submenu you can enter.
“---” means this menu is not available.
Page 20

Color Zoom Camera User Manual
© Hikvision Digital Technology Co., Ltd. All Rights Reserved.
19
Figure 3.2.1 Main Menu
3.2.1 Main Menu Overview
The Main Menu
Menus
Options
1. CAM ID
OFF/001~254
2.IRIS
ALC/ELC/MANUAL…
3.BLC/WDR
BLC…
4.SHUTTER
The SHUTTER value can be set to AUTO, AUTOx2, AUTOx4, AUTOx6, AUTOx8, AUTOx12,
AUTOx16, AUTOx24, AUTOx32, AUTOx48, AUTOx64, AUTOx96, AUTOx128, AUTOx256,
1/50, 1/120, 1/250, 1/500, 1/1K, 1/2K, 1/4K, 1/10K or the value is not adjustable.
5. AGC
The AGC value can be set to LOW, HIGH, OFF or the value is not adjustable.
The MOVE value can be set to NORM, FAST, FASTER, SLOWER, SLOW when the SHUTTER
value is the slow shutter value.
6.WB
ATW1/ATW2/ MANUAL…/ATC
7. FOCUS
AF. . ./ MANUAL/ONE AF
8.D/N
AUTO. . ./ NIGHT/ DAY/TRIG
9.VIDEO
SET
Press Menu button to enter VIDEO SET submenu.
DNR/MIRROR/EXPOSURE/DEFINITION/DONTRAST/CHROMA/POSNEG/EIS/SUPPRESS/RET
10.
SPECIAL
Press Menu button to enter SPECIAL submenu. The submenu items are shown in Table
3.2.2.
11. EXIT
QUIT/SAVE/DEFAULT
Table 3.2.1 Main menu set
The SPECIAL Submenu
Menus
Options
1.GAMMA
0.45/1
MAIN MENU
CAM ID OFF
IRIS ALC
BLC/WDR BLC…
SHUTTER AUTO
AGC -- WB ATW2
FOCUS AF. . .
D/N AUTO…
VIDEO SET . . .
SPECIAL . . .
EXIT QUIT
Page 21

Color Zoom Camera User Manual
© Hikvision Digital Technology Co., Ltd. All Rights Reserved.
20
2.MASK
ON. . ./OFF
3.MD
Motion Detection: ON. . ./OFF
4.ZOOMRATE
1/2/3/4/5
5.EZOOM
OFF/x2/x4/x6/x8/x10/x12/x14/x16
6.ZOOMDISP
ON/OFF
7.ZCFMOD
MODE1/MODE2
8.RS-485
PROTOCOL/BAUDRATE/ADDRESS
9.PRESET
PRESETND/ZOOM SET
10.RET
Return
Table 3.2.2 SPECIAL Submenu
3.2.2 CAM ID Setting (Camera ID)
Steps:
1. Move the cursor to CAM ID, press the left/right buttons to select one number or disable this
function.
2. Move the cursor to EXIT, press the left/right buttons to select SAVE, press the menu button to
save the setting and exit.
3. If you set a CAM ID, you can find the ID number is displayed on the top right corner of the
screen.
3.2.3 IRIS Setting
The iris mode can be set to Manual. . . , ALC (auto) and ELC (Electronic).
Manual. . . mode:
Purpose:
You can adjust the Iris manually to adjust the brightness level of the camera.
Steps:
1. Select Manual. . . mode, press the menu button to enter the submenu as shown in Figure
3.2.2.
2. In the submenu ,you can increase the LEVEL value to brighten the scene. Decrease the
LEVEL to darken the scene. The range is from 0 to 63.
3. Move the cursor to RET to return to the previous menu.
4. If you want to save the settings, move the cursor to EXIT, press the left/right buttons to
Page 22

Color Zoom Camera User Manual
© Hikvision Digital Technology Co., Ltd. All Rights Reserved.
21
choose SAVE, press the menu button to save the settings.
ALC mode:
If you choose ALC mode, the camera adjust the Iris automatically in response to changing light
conditions.
ELC mode:
The Iris is turned to wide open in the ELC mode.
Figure 3.2.2 Manual Iris
3.2.4 BLC/WDR Setting (Back Light Compensation/ Wide Dynamic Range)
BLC (Back Light Compensation)
Purpose:
When there is a bright backlight and the subjects before the backlight is too dark, you can enable
the BLC (Back Light Compensation) function.
In the BLC. . . submenu, select one area where the dark object is in this area. The camera will
properly expose the object in the area. But the backlight out of this area will be over exposed.
Steps:
1. Press the up/down buttons to position the cursor on BLC/WDR, press the menu button to enter
the BLC. . . submenu.
2. Move the cursor to TYPE, the BLC type can be set to OFF, RIGHT, LEFT, DOWN, UP, CENTER.
3. Press the up/down buttons to position the cursor on RET to return to the previous menu.
4. If you want to save the settings, move the cursor to EXIT, press the left/right buttons to choose
SAVE, press the menu button to save the settings.
MANUAL IRIS
LEVEL - - -| - - - - 29
RET
Page 23

Color Zoom Camera User Manual
© Hikvision Digital Technology Co., Ltd. All Rights Reserved.
22
Figure 3.2.3 BLC
WDR (Wide Dynamic Range)
Note: Only the models with "-WD" support Wide Dynamic Range function.
The Wide Dynamic Range function combines a long time exposed image and a short time exposed
image to get an image for both bright and dark areas to be visible. The image also provides details in
both areas.
Steps:
1. Press the up/down buttons to position the cursor on BLC/WDR, press the menu button to enter
the WDR. . . submenu.
2. Move the cursor to LEVEL1, press the left/right buttons to adjust the level value. This value is
for the long time exposed image. The value is larger, the exposing time is longer.
3. Move the cursor to LEVEL2, press the left/right buttons to adjust the level value. This value is
for the short time exposed image. The value is larger, the exposing time is longer.
4. Press the up/down buttons to position the cursor on RET to return to the previous menu.
5. If you want to save the settings, move the cursor to EXIT, press the left/right buttons to choose
SAVE, press the menu button to save the settings.
Figure 3.2.4 Wide Dynamic Range
WDR
LEVEL1 - - -| - - - - 00
LEVEL2 - - -| - - - - 07
RET
BLC
TYPE OFF/RIGHT/LEFT/DOWN/UP/CENTER
RET
Page 24

Color Zoom Camera User Manual
© Hikvision Digital Technology Co., Ltd. All Rights Reserved.
23
3.2.5 SHUTTER Setting
The shutter value is the speed of the electronic shutter. The duration for exposure is determined by
shutter value. The SHUTTER value can affect the brightness of the image.
When the IRIS value is ALC or MANUAL…, the SHUTTER value can be set to AUTO, AUTOx2,
AUTOx4, AUTOx6, AUTOx8, AUTOx12, AUTOx16, AUTOx24, AUTOx32, AUTOx48, AUTOx64,
AUTOx96, AUTOx128, AUTOx256, 1/50, 1/120, 1/250, 1/500, 1/1K, 1/2K, 1/4K, 1/10K.
AUTO, AUTOx2, AUTOx4, AUTOx6, AUTOx8, AUTOx12, AUTOx16, AUTOx24, AUTOx32, AUTOx48,
AUTOx64, AUTOx96, AUTOx128, AUTOx256 values are called slow shutter values.
When the IRIS value is ELC, the SHUTTER value is not adjustable.
Steps:
1. Press the up/down buttons to move the cursor to SHUTTER, press the left/right buttons to
select one shutter value you need.
2. Move the cursor to EXIT, press left/right buttons to choose SAVE, press the menu button to
save the settings.
3.2.6 AGC Setting (Auto Gain Control)
In low-light conditions, the camera balances the AGC value and the SHUTTER value to enhance the
brightness of the image.
When the IRIS value is ALC or MANUAL… and the SHUTTER value is slow shutter value, the AGC
menu will switch to MOVE menu. The MOVE menu can be set to NORM, FAST, FASTER,
SLOWER, SLOW.
When the SHUTTER value is slow shutter value, you can set the MOVE values according to the
speed of the moving objects in the scene. This can reduce the streaking of the fast moving
objects.
If the speed of the moving objects is low, you can choose SLOWER and SLOW.
If the speed of the moving objects is normal, you can choose NORM.
If the speed of the moving objects is high, you can choose FAST and FASTER.
When the IRIS value is ALC and the SHUTTER value is 1/50, 1/120, 1/250, 1/500, 1/1K, 1/2K,
1/4K, 1/10K, the AGC value is not adjustable.
When the IRIS value is MANUAL… and the SHUTTER value is 1/50, 1/120, 1/250, 1/500, 1/1K,
1/2K, 1/4K, 1/10K, the AGC value can be set to LOW, HIGH, OFF.
When the IRIS value is ELC, the AGC value can be set to LOW, HIGH, OFF.
Page 25

Color Zoom Camera User Manual
© Hikvision Digital Technology Co., Ltd. All Rights Reserved.
24
3.2.7 WB Setting (White Balance)
This feature processes the viewed image to retain color balance over a color tempreture range and
remove the unrealistic color casts. The WB mode can be set to ATW1, ATW2, ATC, and Manual. . . .
ATW1: The Auto Tracking White Balance. In the AT W mode, white balance is continuously being
adjusted in real-time according to the color temperature of the scene illumination. The color
temperature range of the ATW1 mode is from 2500K to 9300K.
ATW2: The Auto Tracking White Balance. In the AT W mode, white balance is continuously being
adjusted in real-time according to the color temperature of the scene illumination. The color
temperature range of the ATW2 mode is from 2200K to 10000K.
ATC: Select ATC mode, the camera retains color balance automatically according to the current
color temperature. If the lighting environment is changed, you have to readjust the settings
accordingly.
Manual. . . : You can adjust the color temperature manually to meet your own demand.
Steps:
1. Select Manual. . . and press the menu button to enter the submenu.
2. Move the cursor to SET, press the left/right buttons to select a SET value. SET can be set to
3200K, 6300K and USER.
3200K is an estimated value for indoor application. And the RED and BLUE values
are not adjustable.
6300K is an estimated value for outdoor application. And the RED and BLUE values
are not adjustable.
When you select USER, you can adjust the RED and BLUE values to meet your
demand.
Figure 3.2.5 Manual White Balance
MWB
SET USER
RED 032
BLUE 016
Page 26

Color Zoom Camera User Manual
© Hikvision Digital Technology Co., Ltd. All Rights Reserved.
25
3.2.8 FOCUS Setting
The FOCUS mode can be set to AF. . . , MANUAL and ONE AF.
AF. . .: This is the auto focus setting. If you choose the AF… mode, the lens keeps in focus during
the zoom-in and zoom-out functions.
Steps:
1. Move the cursor to FOCUS, press the left/right buttons to choose AF… .
2. Select the MODE, SENSE and NEAR LIM values of the auto focus. The available values
are shown in the Figure 3.2.6.
MODE: The auto focus mode can be set to NORM and INTERVAL. The lens focuses
continuously when you select the NORM mode. The lens focuses at intervals when
you select the NORM mode.
SENSE: The sensitivity of autofocus function can be set to MID, LOW, HIGH.
NEAR LIM: You can set the nearest focus distance to 1M, 1.5M, 3M, 6M, 10CM,
30CM and INF(infinite).
Figure 3.2.6 Focus Mode Settings
ONE AF: If you choose ONE AF mode, the lens will be focused automatically once. You have to
manually adjust the focus, when the scene changes.
MANUAL: If you choose MANUAL mode, to focus, you can press the FOCUS NEAR and FOCUS
FAR buttons on the rear plate of the camera.
3.2.9 D/N Setting (Day/Night)
The DAY/NIGHT mode can be set to TRIG, AUTO…, DAY and NIGHT.
TRIG mode, the day and night mode is switched by triggering the 4-IN interface on the rear
plate of the camera.
AF
MODE NORM/INTERVAL
SENSE MID/LOW/HIGH
NEAR LIM 1M, 1.5M, 3M, 6M,10CM,30CM,INF
RET
Page 27

Color Zoom Camera User Manual
© Hikvision Digital Technology Co., Ltd. All Rights Reserved.
26
DAY mode is used for normal lighting conditions. The camera delivers color image.
NIGHT mode can increase the sensitivity in low light conditions. The camera delivers black and
white image.
AUTO mode, the day mode and the night mode can switch automatically.
Steps:
1. After moving the cursor to D/N, choose the AUTO… mode.
2. Press the menu button to enter the submenu.
LEVEL: The value ranges from 0 to 7. This value is the delay time before the day/night
mode switches.
DAYNIGHT: The value can be set to 2s, 3s, 5s, 10s, 15s, 20s, 25s and 30s. The day
mode switches to the night mode when the light condition reaches to the value you
select.
NIGHTDAY: The value can be set to 2s, 3s, 5s, 10s, 15s, 20s, 25s and 30s. The night
mode switches to the day mode when the light condition reaches to the value you
select.
Figure 3.2.7 Auto D/N
3.2.10 VIDEO Parameters Setting
Steps:
1. Move the cursor to the VIDEO SET… .
2. Press menu button to enter the submenu as shown in Figure 3.2.8.
In the submenu, the adjustable features are DNR, MIRROR, EXPOSURE, DEFINITION,
CONTRAST, CHROMA, POS/NEG, EIS and SUPPRESS.
AUTO D/N
LEVEL - - -| - - - - - 07
D->N 5S
N->D 10S
RET
Page 28

Color Zoom Camera User Manual
© Hikvision Digital Technology Co., Ltd. All Rights Reserved.
27
Figure 3.2.8 VIDEO SET Parameters
DNR
DNR (Digital Noise Reduction) function can reduce the noise in the image. The reduce value can be
set to 1, 2, 3, 4, 5 and OFF.
MIRROR
If you turn the MIRROR function on, the image will be flipped. It is like the image in the mirror. The
flip direction can be set to HORIZONTAL, CENTRAL and VERTICAL.
EXPOSURE
This function can enhance the brightness of the image. The value ranges from 0 to 15.
DEFINITION
DEFINITION describes the clarity of detail in the image. The value ranges from 0 to 15.
CONTRAST
This feature enhances the difference in color and light between parts of an image. The value ranges
from 0 to 7.
CHROMA
Adjust this feature to change the depth of the color. The value ranges from 0 to 7.
POS/NEG
The default setting of the POS/NEG is +. It means the image is positive. If you select -, you can see
the image turn to positive.
EIS
Turning the EIS (Electronic Image Stabilization) function on may reduce the image vibration caused
by external environment.
VIDEO SET
DNR 1
MIRROR OFF
EXPOSURE - - -| - - - - - 07
DEFINITION - - -| - - - - - 07
CONTRAST - -| - - 02
CHROMA - -| - - 03
POS/NEG +
EIS OFF
SUPPRESS 2
RET
Page 29

Color Zoom Camera User Manual
© Hikvision Digital Technology Co., Ltd. All Rights Reserved.
28
SUPPRESS
You can take advantage of this function to reduce the color under the night mode. The value ranges
from 0 to 3.
3.2.11 SPECIAL Functions Setting
Steps:
1. Move the cursor to the SPECIAL.
2. Press menu button to enter the submenu as shown in Figure 3.2.9.
In the submenu, the adjustable features are GAMMA, MASK, MD, ZOOMRATE, EZOOM,
ZOOMDISP, ZCFMOD, RS-485 and PRESET.
Figure 3.2.9 SPECIAL Settings
GAMMA
This function is used for adjusting the image brightness according to the ratio of the original video
signal and the output signal.
When you select 1, the brightness will not be affected.
When you select 0.45, the brightness will be adjusted.
MASK (Privacy Mask)
Steps:
1. Move the cursor to MASK, press the left/right buttons to select ON… .
SPECIAL
GAMMA 0.45
VIDEO …
ZOOMRATE 1/ 2/ 3/ 4/5
EZOOM OFF,x2,x4,x6,x8,x10,x12,x14,x16
ZOOMDISP ON/OFF
ZCFMOD MODE1/MODE2
RS485 …
PRESET …
BLEMISH DETECT
RET
Page 30

Color Zoom Camera User Manual
© Hikvision Digital Technology Co., Ltd. All Rights Reserved.
29
2. Press the menu button to enter the submenu.
3. Move the cursor to MASK NO. to choose a mask number. There are up to 8 privacy masks you
can configure.
4. Move the cursor to ON/OFF and select ON to enable the privacy mask function.
5. Move the cursor to MASK SET.
1) Press the menu button to select LOC.
2) Press the up/down/left/right buttons to set the position of the privacy mask on the screen.
3) Press the menu button to select SIZE.
4) Press the up/down/left/right buttons to set the size of the privacy mask.
5) Press the menu button to select OK to finish setting the position and size of the privacy
mask.
6. Move the cursor to COLOR, press the left/right buttons to select the color you want. There are
8 colors available.
7. If you want mosaic privacy masks, move the cursor to MOSAIC and enable this function.
8. Move the cursor to RET, press the menu button to return to the previous menu.
9. In the main menu, move the cursor to EXIT, press the left/right buttons to select SAVE, DEL or
QUIT
10. Press the menu button to exit the menu.
Figure 3.2.10 Motion Detection
MD (Motion Detection)
Steps:
1. Move the cursor to MD, press the left/right buttons to select ON… .
MASK
MASK NO. - - -| - - - - - 03
ON/OFF OFF/ON
MASK SET OK/LOC/SIZE
COLOR - - -| - - - - - 03
MOSAIC ON/OFF
RET
Page 31

Color Zoom Camera User Manual
© Hikvision Digital Technology Co., Ltd. All Rights Reserved.
30
2. Press the menu button to enter the submenu.
3. Move the cursor to TYPE, select the type you want. There are 2 types. Type 1 is a frame with
the adjustable position and the size. Type 2 is the full screen panes.
Type1 settings:
1) Move the cursor to AREA.
2) Press the menu button to select LOC.
3) Press the up/down/left/right buttons to set the position of the motion detection area on
the screen.
4) Press the menu button to select SIZE.
5) Press the up/down/left/right buttons to set the size of the area.
6) Press the menu button to select OK to finish setting the position and size of the area.
7) Move the cursor to SENSE. You can select LOW, MID, HIGH to set the sensitivity level of the
motion detection.
Type2 settings:
1) Move the cursor to SENSE. You can select LOW, MID, HIGH to set the sensitivity level of the
motion detection.
4. Move the cursor to RET, press the menu button to return to the previous menu.
5. In the main menu, move the cursor to EXIT, press the left/right buttons to select SAVE, DEL or
QUIT
6. Press the menu button to exit the menu.
Figure 3.2.11 Motion Detection
ZOOMRATE
You can adjust this feature to change the speed of zoom. The value ranges from 1 to 5. The value is
larger, the speed is higher.
EZOOM
MOTION DET
TYPE 1/2
AREA OK/LOC/SIZE
SENSE HIGH/MID/LOW
RET
Page 32

Color Zoom Camera User Manual
© Hikvision Digital Technology Co., Ltd. All Rights Reserved.
31
The EZOOM can be set to OFF, x2, x4, x6, x8, x10, x12, x14 and x16. The maximum optical zoom is
23X. 2 times 23X is 46X. If you choose x2, the maximum digital zoom can reach to 46X. The camera
zooms electronically after reaching to the value 23x.
ZOOMDISP
There are two ZOOMDISP modes:
ON: The zoom value will be displayed on the top right of the screen when you press the T/W
buttons.
OFF: The zoom value will not be displayed on the top right of the screen when you press the T/W
buttons.
ZCFMOD
The ZCFMOD can be set to MODE1 and MODE2.
When you select the MODE1, the zoom in voltage is from +3V to +12V. The zoom out voltage is from
-3V to -12V.
When you select the MODE2, the zoom in voltage is from -3V to -12V. The zoom out voltage is from
+3V to +12V.
The voltage of the focus near and far is the same as the zoom in and out in these two modes.
RS-485
Before you use the RS-485 interface to send control signal to the camera, you have to configure the
RS-485 parameters first.
PROTOCOL: The control protocol is PELCO-D. It is not adjustable.
BAUDRATE: The baudrate can be set to 1200, 2400, 4800, 9600, 19200 and 38400.
ADDRESS: Choose a number as the address of the camera. It is for the control device to distinguish
the different cameras when there are multiple cameras to control.
Figure 3.2.12 RS-485 Settings
PRESET
There are up to 254 presets that can be configured.
RS485
PROTOCOL PELCO-D
BAUDRATE 2400
ADDRESS 001
RET
Page 33

Color Zoom Camera User Manual
© Hikvision Digital Technology Co., Ltd. All Rights Reserved.
32
Steps:
1. Move the cursor to PRESET and press the menu button to enter the submenu
2. Move the cursor to PRESET NO and select one preset number.
3. Move the cursor to ZOOM SET, press the menu button to turn the ◇ symbol to ◆.
4. Press the up/down buttons to zoom in and zoom out.
5. press the menu button to turn the ◆ symbol to ◇.
6. Move the cursor to EXIT, press the left/right buttons to select SAVE, DEL or QUIT.
7. Press the menu button to exit the menu.
Figure 3.2.13 Preset Programming
3.2.12 EXIT
Purpose:
EXIT option is used for returning default, saving or canceling the settings.
Steps:
1. Move the cursor to EXIT, press the left/right buttons to choose an option.
SAVE: When you select SAVE, all the modifications will be saved before exit the menu.
DEFAULT: When you select DEFAULT, all the settings will be initialized to factory settings
before exit the menu.
QUIT: When you select QUIT, all the modifications will be canceled before exit the menu.
2. Press the menu button to confirm your selection.
PRESET SET
PRESET NO 000
ZOOM SET ◆
EXIT QUIT
Page 34

Color Zoom Camera User Manual
© Hikvision Digital Technology Co., Ltd. All Rights Reserved.
33
Appendix Specification
1 DS-2CZ2132P(N)
Parameter Model
DS-2CZ2132P(N)
22X 1/4” CCD Day&Night Zoom Camera
Camera
Image Sensor
1/4" SONY Interline Transfer Super HAD-II CCD
Signal System
PAL/NTSC
Effective Pixels
PAL: 752(H)x582(V)
NTSC: 768(H)x494(V)
Min. Illumination
0.2Lux @ (F1.6,AGC ON), 0.0008Lux @ (F1.6,AGC ON,
sensitivity × 256)
Shutter Time
PAL: 1/50 to 1/100,000s
NTSC: 1/60 to 1/100,000s
Day & Night
Electronic
Horizontal Resolution
540TVL
Synchronization
Internal synchronization
Video Output
1Vp-p Composite Output (75Ω/BNC)
S/N Ratio
More than 50dB
Lens
Focal Length
3.9-85.8mm,22X
Zoom Speed
Approx 3s (Optical Wide-Tele)
Angle of View
49.6°-2.40°(Wide-Tele)
Min. Working Distance
10-1500mm(Wide-Tele)
Aperture Range
F1.6-F3.7
Menu
Camera ID
Off/On (0-254)
Iris Mode
ALC / Manual / ELC
Auto Gain
Low/High/Off
Auto White Balance
ATW1 / ATW2 / ATC / Manual
Focus Mode
AF/ONE AF/Manual
Day/Night
Auto/Day/Night/TRIG
Slow Shutter
Max. X256
Privacy Mask
On/Off, Maximum 8 Zones
Motion Detection
Off/Mode1/Mode2
Gamma Amendment
0.45/1
Video
Digital Zoom, 3D Digital Noise Reduction, POS/NEG ,Mirror,
Resolution, Electronic image stabilization, Back Light
Page 35

Color Zoom Camera User Manual
© Hikvision Digital Technology Co., Ltd. All Rights Reserved.
34
Compensation
Zoom speed
1-5
Optical Zoom
OFF, x2, x4, x6, x8, x10, x12, x14, x16
Zoom Display
ON/OFF
ZCF
Model1/Model2
RS-485
Address/Protocol/Baud Rate
Preset
Up to 254
General
Operating Conditions
-10°C - 60°C (14°F - 140°F), Humidity 90% or
less(non-condensing)
Power Supply
12VDC / 300mA ±10%
Power Consumption
Max. 4W
Dimension
64 x 69 x 120mm(2.53” x 2.42” x 4.46”)
Weight
450g (0.99lbs)
Page 36

Color Zoom Camera User Manual
© Hikvision Digital Technology Co., Ltd. All Rights Reserved.
35
2 DS-2CZ2152P(N)
Parameter Model
DS-2CZ2152P(N)
23X 1/4” CCD Day&Night Zoom Camera
Camera
Image Sensor
1/4" SONY Interline Transfer Super HAD-II CCD
Signal System
PAL/NTSC
Effective Pixels
PAL: 752(H)x582(V)
NTSC: 768(H)x494(V)
Min. Illumination
Color: 0.2Lux @ (F1.6,AGC ON), 0.0008Lux @ (F1.6,AGC ON,
sensitivity × 256)
B / W: 0.02Lux @ (F1.6,AGC ON), 0.00008Lux @ (F1.6,AGC ON,
sensitivity × 256)
Shutter Time
PAL: 1/50 to 1/100,000s
NTSC: 1/60 to 1/100,000s
Day & Night
IR cut filter with auto switch
Horizontal Resolution
Color: 540 TVL
B / W: 600TVL
Synchronization
Internal synchronization
Video Output
1Vp-p Composite Output (75Ω/BNC)
S/N Ratio
More than 50dB
Lens
Focal Length
3.84-88.4mm,23X
Zoom Speed
Approx 3s (Optical Wide-Tele)
Angle of View
50.2-2.36°(Wide-Tele)
Min. Working Distance
10-1500mm(Wide-Tele)
Aperture Range
F1.6-F4.5
Menu
Camera ID
Off/On (0-254)
Iris Mode
ALC / Manual / ELC
Auto Gain
Low/High/Off
Auto White Balance
ATW1 / ATW2 / ATC / Manual
Focus Mode
AF/ONE AF/Manual
Day/Night
Auto/Day/Night/TRIG
Slow Shutter
Max. X256
Privacy Mask
On/Off, Maximum 8 Zones
Motion Detection
Off/Mode1/Mode2
Gamma Amendment
0.45/1
Video
Digital Zoom, 3D Digital Noise Reduction, POS/NEG ,Mirror,
Resolution, Electronic image stabilization, Back Light
Compensation
Zoom speed
1-5
Page 37

Color Zoom Camera User Manual
© Hikvision Digital Technology Co., Ltd. All Rights Reserved.
36
Optical Zoom
OFF, x2, x4, x6, x8, x10, x12, x14, x16
Zoom Display
ON/OFF
ZCF
Model1/Model2
RS-485
Address/Protocol/Baud Rate
Preset
Up to 254
General
Operating Conditions
-10°C - 60°C (14°F - 140°F), Humidity 90% or
less(non-condensing)
Power Supply
12VDC / 300mA ±10%
Power Consumption
Max. 4.5 W
Dimension
66 x 76 x 128mm (2.6” x 3.0” x 5.0”)
Weight
550g (1.21lbs)
Page 38

Color Zoom Camera User Manual
© Hikvision Digital Technology Co., Ltd. All Rights Reserved.
37
3 DS-2CZ2152P(N)-IRA
Parameter Model
DS-2CZ2152P(N)-IRA
23X 1/4” CCD Day&Night Zoom Camera
Camera
Image Sensor
1/4" SONY Interline Transfer Super HAD-II CCD
Signal System
PAL/NTSC
Effective Pixels
PAL: 752(H)x582(V)
NTSC: 768(H)x494(V)
Min. Illumination
Color: 0.2Lux @ (F1.6,AGC ON), 0.0008Lux @ (F1.6,AGC ON,
sensitivity × 256)
B / W: 0.02Lux @ (F1.6,AGC ON), 0.00008Lux @ (F1.6,AGC ON,
sensitivity × 256)
Shutter Time
PAL: 1/50 to 1/100,000s
NTSC: 1/60 to 1/100,000s
Day & Night
IR cut filter with auto switch
Horizontal Resolution
Color: 540 TVL
B / W: 600TVL
Synchronization
Internal synchronization
Video Output
1Vp-p Composite Output (75Ω/BNC)
S/N Ratio
More than 50dB
Lens
Focal Length
3.84-88.4mm,23X
Zoom Speed
Approx 3s (Optical Wide-Tele)
Angle of View
50.2-2.36°(Wide-Tele)
Min. Working Distance
10-1500mm(Wide-Tele)
Aperture Range
F1.6-F4.5
Menu
Camera ID
Off/On (0-254)
Iris Mode
ALC / Manual / ELC
Auto Gain
Low/High/Off
Auto White Balance
ATW1 / ATW2 / ATC / Manual
Focus Mode
AF/ONE AF/Manual
Day/Night
Auto/Day/Night/TRIG
Slow Shutter
Max. X256
Privacy Mask
On/Off, Maximum 8 Zones
Motion Detection
Off/Mode1/Mode2
Gamma Amendment
0.45/1
Video
Digital Zoom, 3D Digital Noise Reduction, POS/NEG ,Mirror,
Resolution, Electronic image stabilization, Back Light
Compensation
Zoom speed
1-5
Page 39

Color Zoom Camera User Manual
© Hikvision Digital Technology Co., Ltd. All Rights Reserved.
38
Optical Zoom
OFF, x2, x4, x6, x8, x10, x12, x14, x16
Zoom Display
ON/OFF
ZCF
Model1/Model2
RS-485
Address/Protocol/Baud Rate
Preset
Up to 254
General
Operating Conditions
-10°C - 60°C (14°F - 140°F), Humidity 90% or
less(non-condensing)
Power Supply
12VDC / 300mA ±10%
Power Consumption
Max. 15 W
Weather Proof Rating
IP66
IR Range
Approx 100 meters
Dimension
117 x 97 x 255mm (4.6” x 3.8” x 10.0”)
Weight
2.5kg (5.51lbs)
Page 40

Color Zoom Camera User Manual
© Hikvision Digital Technology Co., Ltd. All Rights Reserved.
39
First Choice for Security Professionals
 Loading...