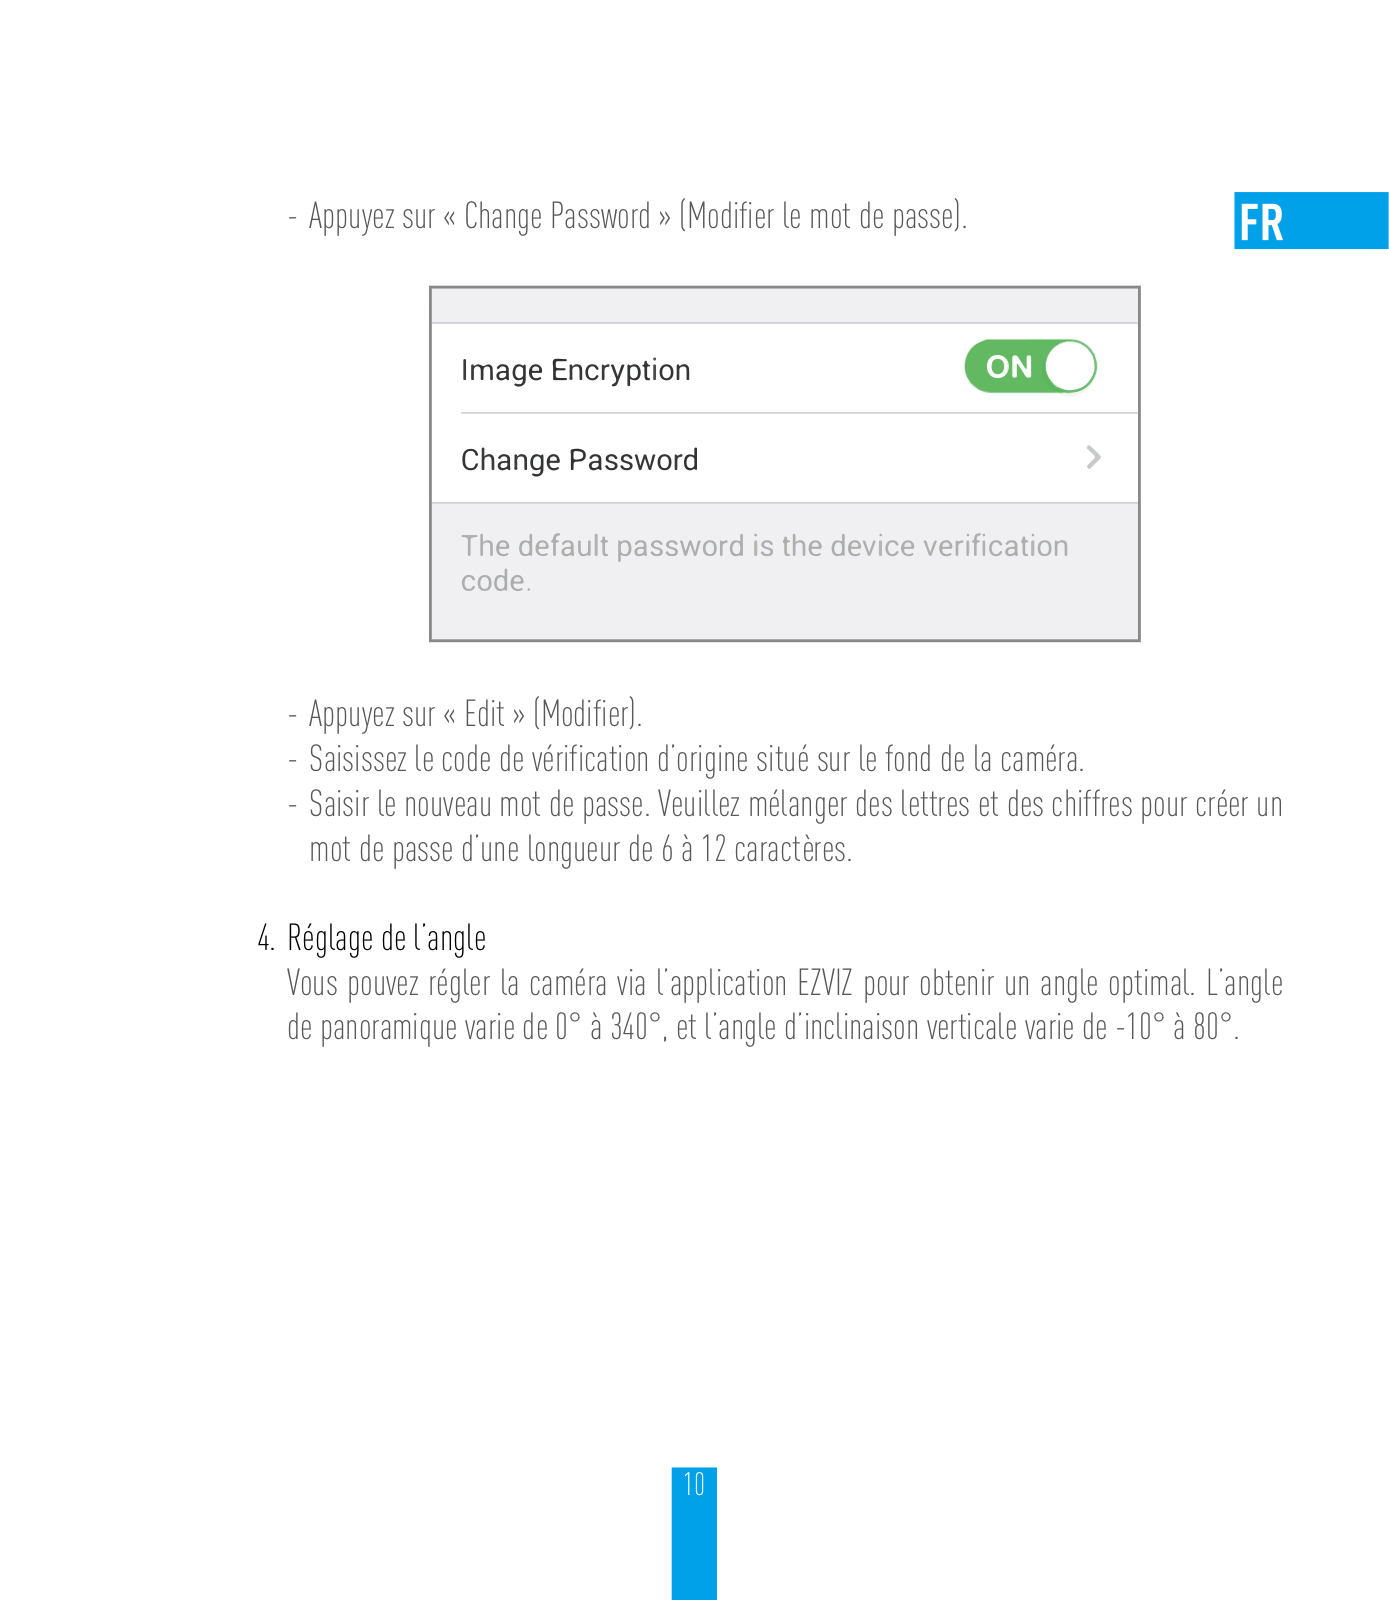
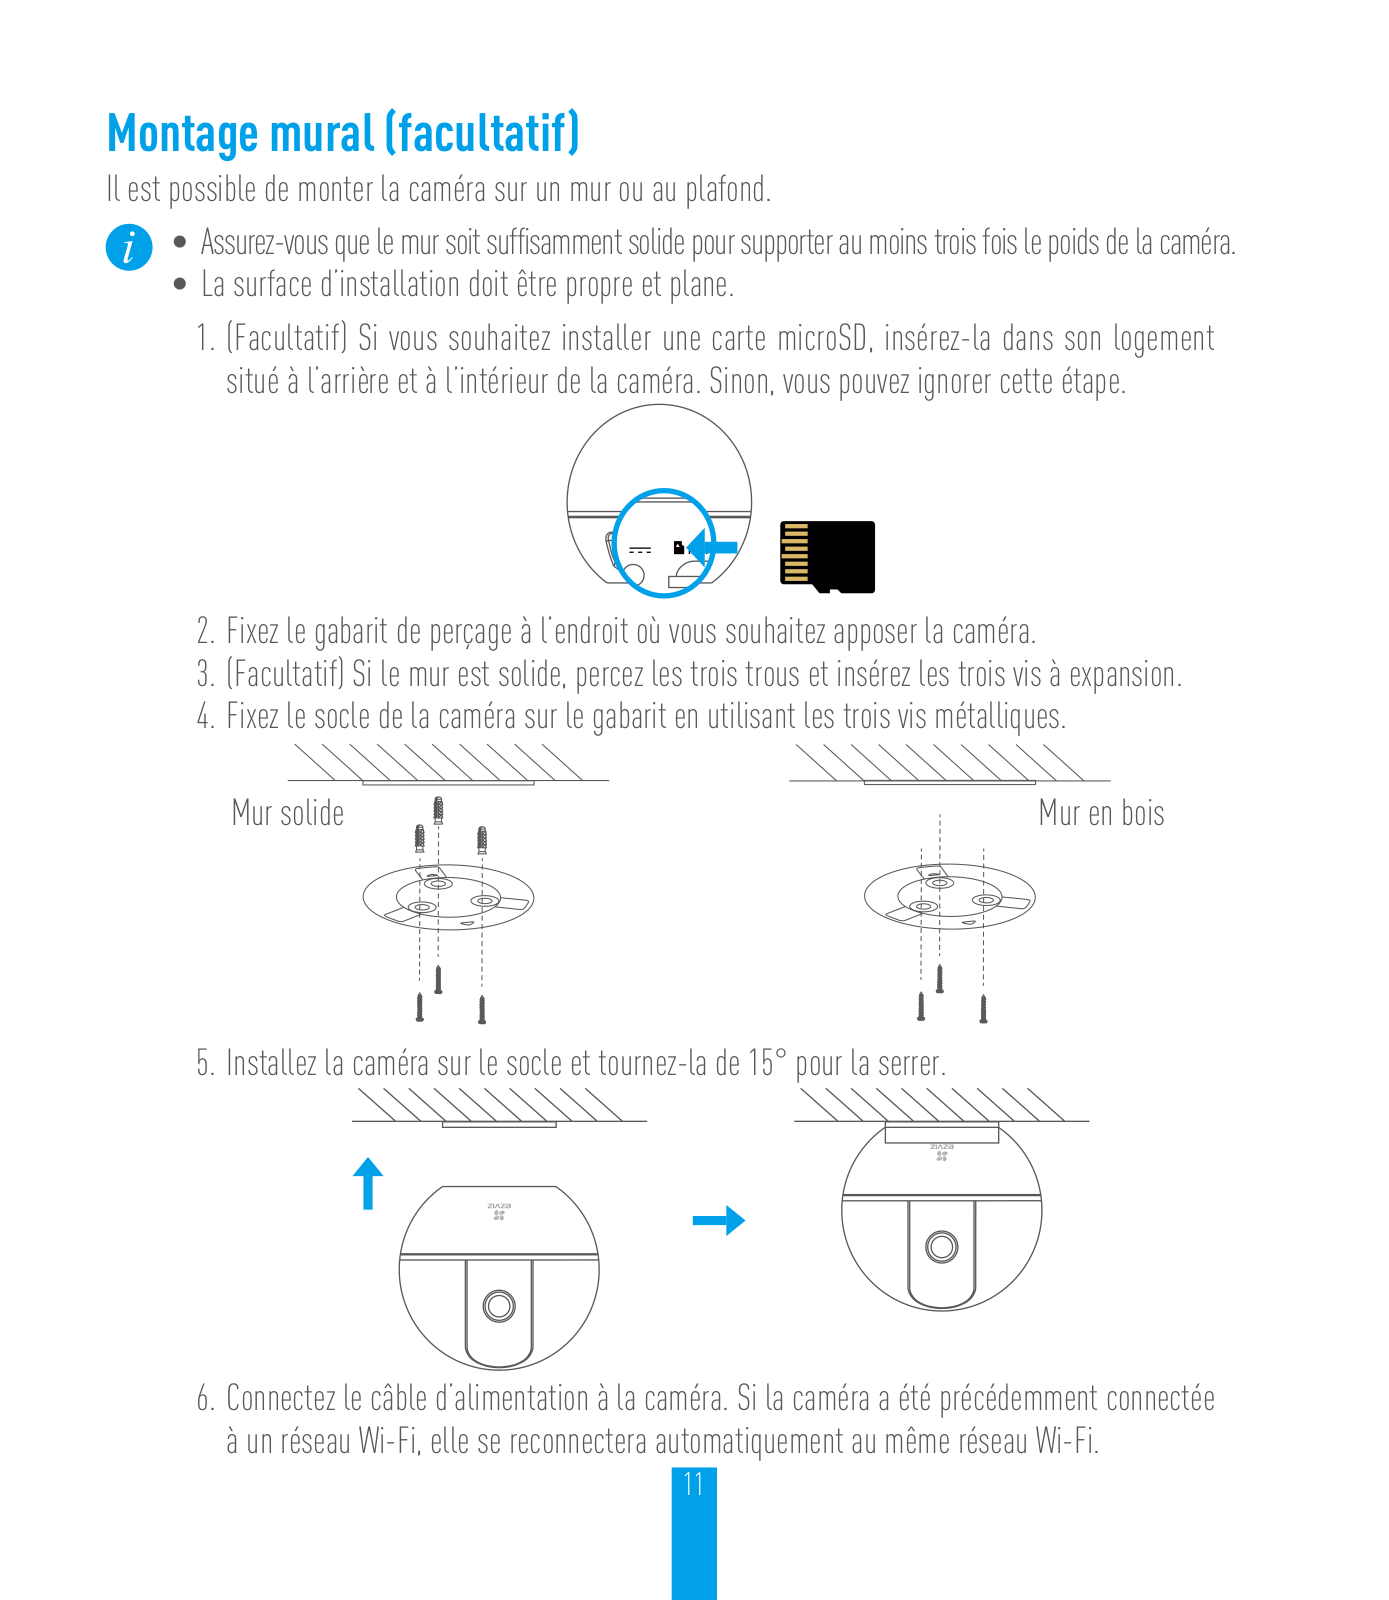
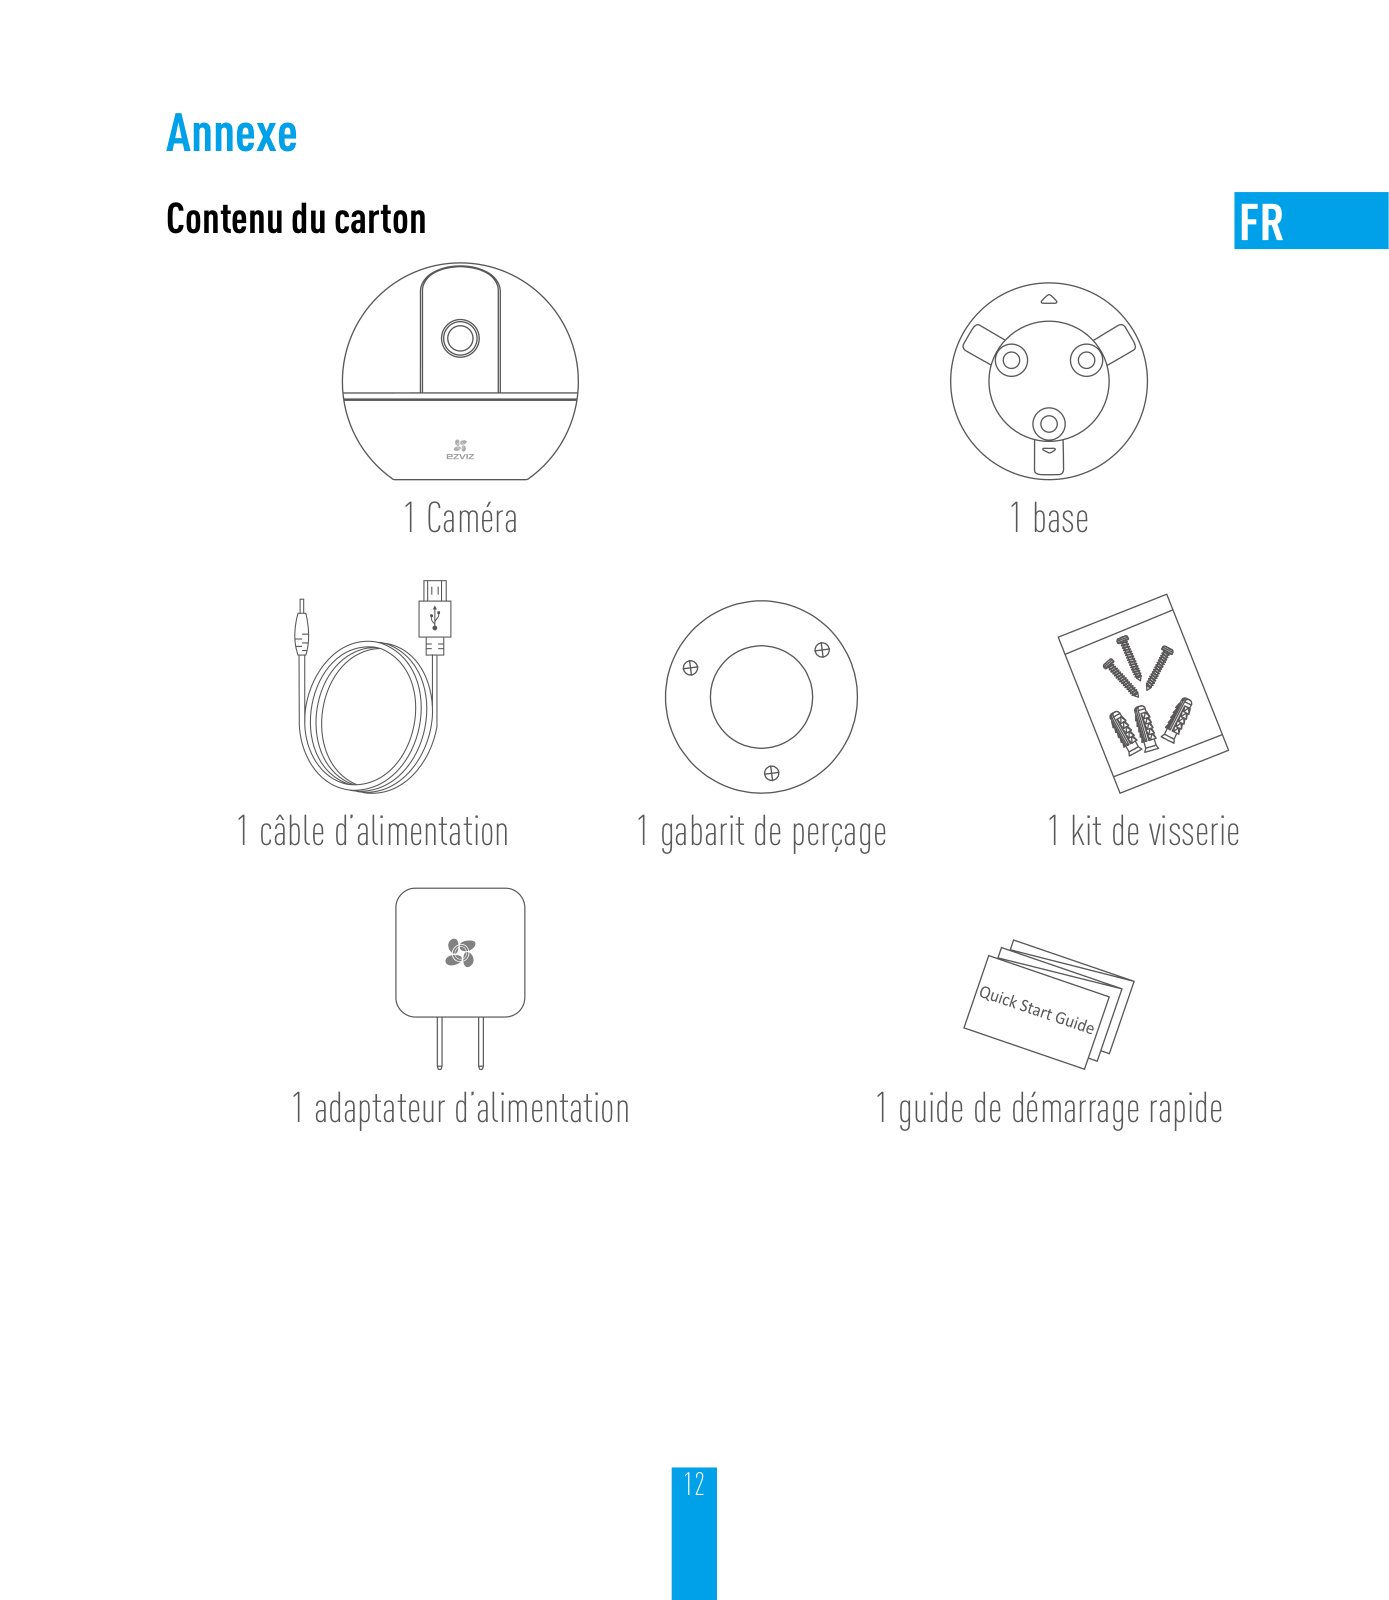
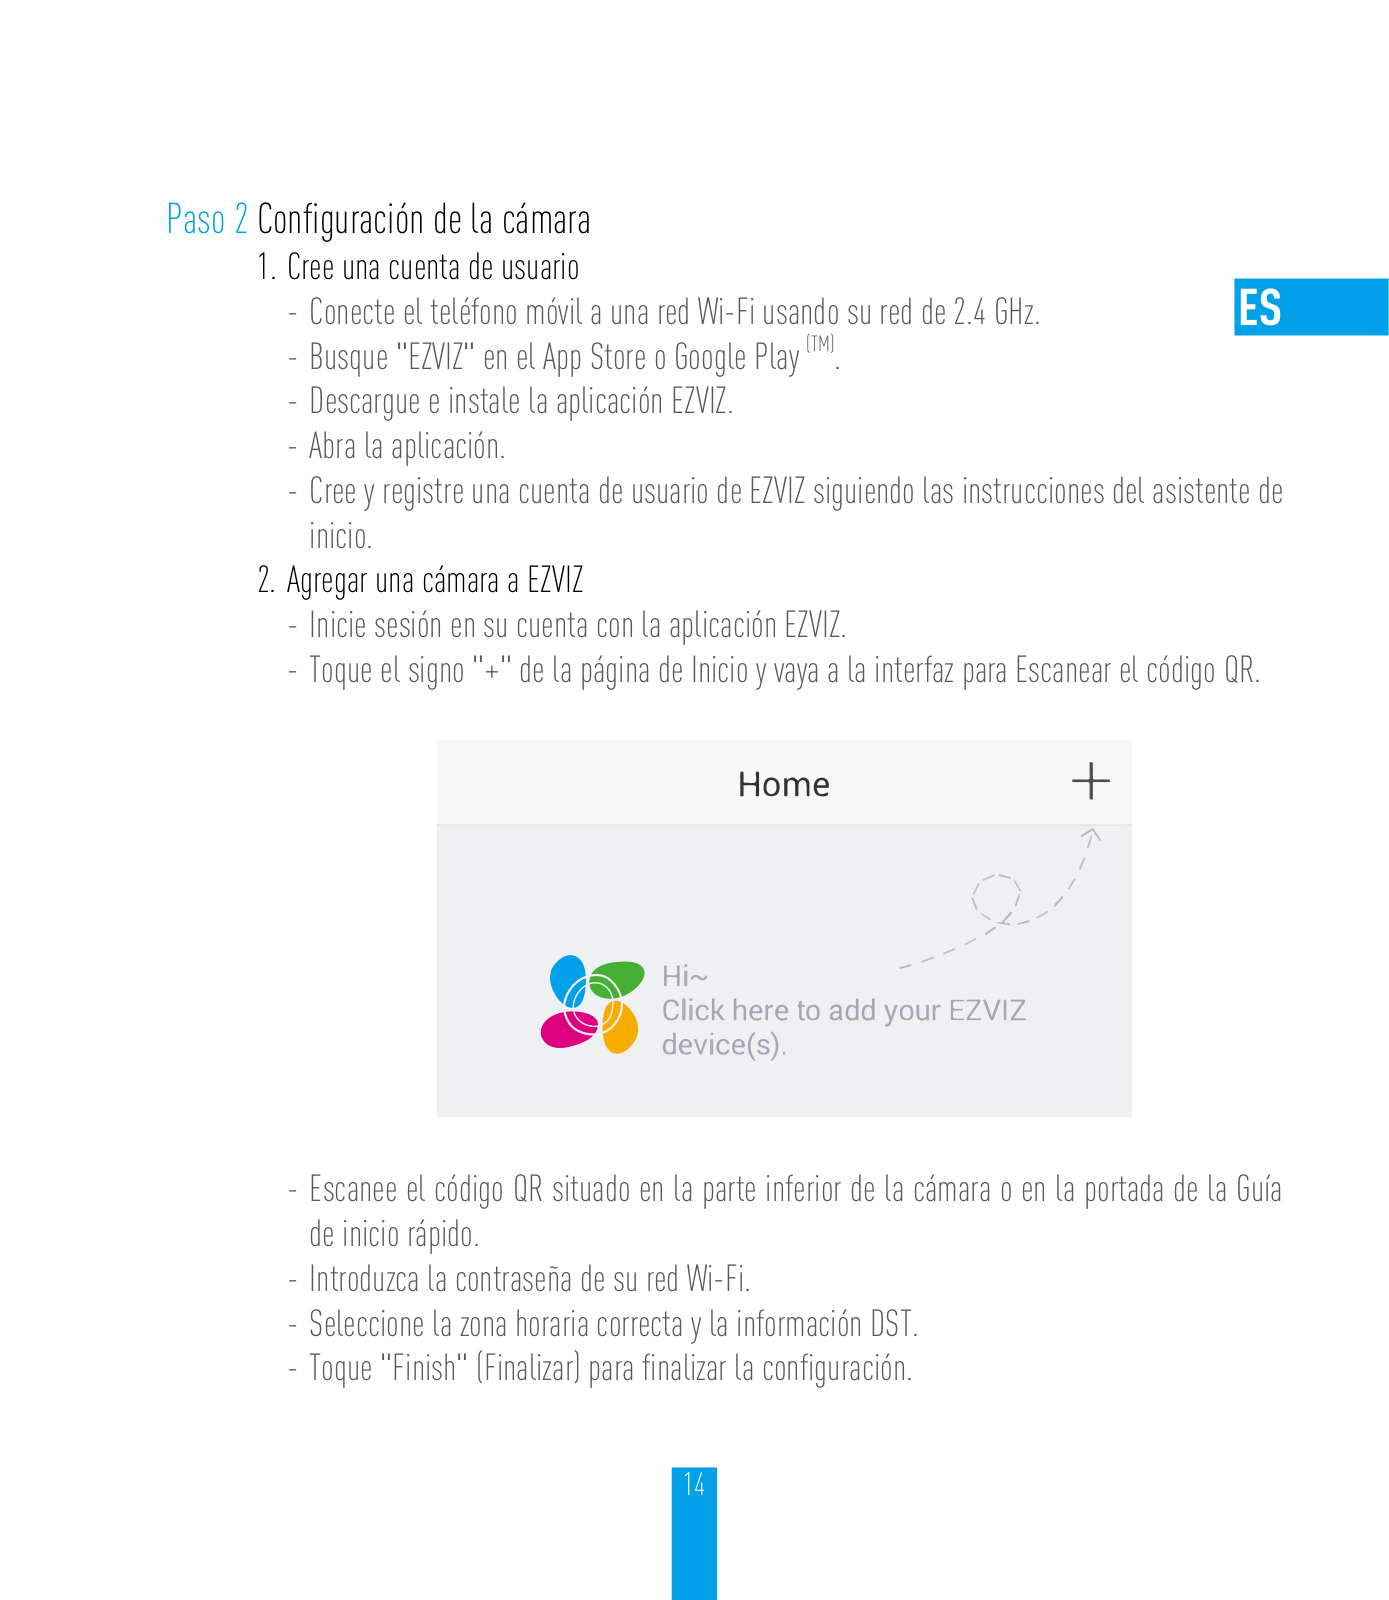
Hikvision CS-CV248-A0-32WFR User Manual

0 (0)

COPYRIGHT ©2017 Hangzhou Hikvision Digital Technology Co., Ltd. or its subsidiaries. ALL RIGHTS RESERVED. About this Manual

The Manual includes instructions for using and managing the product. Pictures, charts, images and all other information hereinafter are for description and explanation only. The information contained in the Manual is subject to change, without notice, due to firmware updates or other reasons. Please find the latest version in the ™ website (http://www.ezvizlife.com).

Any and all information, including, among others, wordings, pictures, graphs are the properties of Hangzhou Hikvision Digital Technology Co., Ltd. or its subsidiaries (hereinafter referred to be “Hikvision”). This user manual (hereinafter referred to be “the Manual”) cannot be reproduced, changed, translated, or distributed, partially or wholly, by any means, without the prior written permission of Hikvision. Unless otherwise stipulated, Hikvision does not make any warranties, guarantees or representations, express or implied, regarding to the Manual.

Trademarks Acknowledgement

™, ™, and other Hikvision’s trademarks and logos are the properties of Hikvision in various jurisdictions.

Other trademarks and logos mentioned below are the properties of their respective owners. Legal Disclaimer

TO THE MAXIMUM EXTENT PERMITTED BY APPLICABLE LAW, THE PRODUCT DESCRIBED, WITH ITS HARDWARE, SOFTWARE AND FIRMWARE, IS PROVIDED “AS IS”, WITH ALL FAULTS AND ERRORS, AND HIKVISION MAKES NO WARRANTIES, EXPRESS OR IMPLIED, INCLUDING WITHOUT LIMITATION, MERCHANTABILITY, SATISFACTORY QUALITY, FITNESS FOR A PARTICULAR PURPOSE, AND NON-INFRINGEMENT OF THIRD PARTY. IN NO EVENT WILL HIKVISION, ITS DIRECTORS, OFFICERS, EMPLOYEES, OR AGENTS BE LIABLE TO YOU FOR ANY SPECIAL, CONSEQUENTIAL, INCIDENTAL, OR INDIRECT DAMAGES, INCLUDING, AMONG OTHERS, DAMAGES FOR LOSS OF BUSINESS PROFITS, BUSINESS INTERRUPTION, OR LOSS OF DATA OR DOCUMENTATION, IN CONNECTION WITH THE USE OF THIS PRODUCT, EVEN IF HIKVISION HAS BEEN ADVISED OF THE POSSIBILITY OF SUCH DAMAGES.

TO THE MAXIMUM EXTENT PERMITTED BY APPLICABLE LAW, IN NO EVENT SHALL HIKVISION’S TOTAL LIABILITY FOR ALL DAMAGES EXCEED THE PURCHASE PRICE THE PRODUCT.

HIKVISION does not undertake any liability for personal injury or property damage, as the result of product interruption or service termination cause by: a) improper installation or usage other than as requested; b) the protection of national or public interests; c) Force Majeure; d) yourself or the third party, including not limitation, using any third party’s products, software, applications, and among others.

REGARDING TO THE PRODUCT WITH INTERNET ACCESS, THE USE OF PRODUCT SHALL BE WHOLLY AT YOUR OWN RISKS. HIKVISION SHALL NOT TAKE ANY RESPONSIBILITES FOR ABNORMAL OPERATION, PRIVACY LEAKAGE OR OTHER DAMAGES RESULTING FROM CYBER ATTACK, HACKER ATTACK, VIRUS INSPECTION, OR OTHER INTERNET SECURITY RISKS; HOWEVER, HIKVISION WILL PROVIDE TIMELY TECHNICAL SUPPORT IF REQUIRED.

The purpose of the Products is to provide an adequate warning in the event of illegal encroachment in certain area; however, the proper installation of the Products will not eliminate, but only reduce, that accidents will not occur or that

there will be no personal injury or property loss as a result. You are highly recommended to raise your vigilance and strengthen the safety awareness in the daily life.

SURVEILLANCE LAWS VARY BY JURISDICTION. PLEASE CHECK ALL RELEVANT LAWS IN YOUR JURISDICTION BEFORE USING THIS PRODUCT IN ORDER TO ENSURE THAT YOUR USE CONFORMS TO THE APPLICABLE LAW. YOU FUTHER AGREE THAT THIS PRODUCT IS ONLY FOR CIVIL USE, AND HIKVISION SHALL NOT BE LIABLE IN THE EVENT THAT THIS PRODUCT IS USED WITH ILLEGITIMATE PURPOSES, SUCH AS THIRD PARTY RIGHTS INFRINGEMENT, MEDICAL TREATMENT, SAFETY EQUIPMENT OR OTHER SITUATIONS WHERE THE PRODUCT FAILURE COULD LEAD TO DEATH OR PERSONAL INJURY, OR WEAPON OF MASS DESTRUCTION, CHEMINCAL AND BIOLOGICAL WEAPON, NUCLEAR EXPLOSION, AND ANY UNSAFE NUCLEAR ENERGY USES OR ANTI-HUMANITY USAGES. YOU SHOULD UNDERTAKE ALL RESPONSIBILITIES FOR LOSSES OR DAMAGES RESULTING FROM THE ABOVE USAGES WHATSOEVER.

IN THE EVENT OF ANY CONFLICTS BETWEEN THE ABOVE AND THE APPLICABLE LAW, THE LATER PREVAILS.

Regulatory Information

FCC Information

This device complies with Part 15 of the FCC Rules. Operation is subject to the following two conditions:

(1)This device may not cause harmful interference, and

(2)This device must accept any interference received, including interference that may cause undesired operation.

Note: This product has been tested and found to comply with the limits for a Class B digital device, pursuant to Part 15 of the FCC Rules. These limits are designed to provide reasonable protection against harmful interference in a residential installation. This product generates, uses, and can radiate radio frequency energy and, if not installed and used in accordance with the instructions, may cause harmful interference to radio communications. However, there is no guarantee that interference will not occur in a particular installation. If this product does cause harmful interference to radio or television reception, which can be determined by turning the equipment off and on, the user is encouraged to try to correct the interference by one or more of the following measures:

—Reorient or relocate the receiving antenna.

—Increase the separation between the equipment and receiver.

—Connect the equipment into an outlet on a circuit different from that to which the receiver is connected. —Consult the dealer or an experienced radio/TV technician for help.

Please take attention that changes or modification not expressly approved by the party responsible for compliance could void the user’s authority to operate the equipment.

This equipment should be installed and operated with a minimum distance 20cm between the radiator and your body. This device complies with Industry Canada licence-exempt RSS standard(s). Operation is subject to the following two conditions:

(1)this device may not cause interference, and

(2)this device must accept any interference, including interference that may cause undesired operation of the device. Under Industry Canada regulations, this radio transmitter may only operate using an antenna of a type and maximum (or lesser) gain approved for the transmitter by Industry Canada. To reduce potential radio interference to other users, the antenna type and its gain should be so chosen that the equivalent isotropically radiated power (e.i.r.p.) is not more than that necessary for successful communication.

EU Conformity Statement

This product and - if applicable - the supplied accessories too are marked with "CE" and comply therefore with the applicable harmonized European standards listed under the Radio Equipment Directive 2014/53/EU, the EMC Directive 2014/30/EU, the RoHS Directive 2011/65/EU.

2012/19/EU (WEEE directive): Products marked with this symbol cannot be disposed of as unsorted municipal waste in the European Union. For proper recycling, return this product to your local supplier upon the purchase of equivalent new equipment, or dispose of it at designated collection points. For more information see: www.recyclethis.info.

2006/66/EC (battery directive): This product contains a battery that cannot be disposed of as unsorted municipal waste in the European Union. See the product documentation for specific battery information. The battery is marked with this symbol, which may include lettering to indicate cadmium (Cd), lead (Pb), or mercury (Hg). For proper recycling, return the battery to your supplier or to a designated collection point. For more information see: www.recyclethis.info.

Гарантийный срок-1 год Срок службы-3 года

Производитель:Ханджоу Хиквижн Диджитал Технолоджи(Китай) Импортер-поставщик в России: ЗАО ''Хиквижн'' Импортер-поставщик в Республике Беларусь:ООО ''Торговый Дом ''АВАНТ-ТЕХНО''

Сайт:www.ezviz.ru

EC DECLARATION OF CONFORMITY

Hereby, Hangzhou Hikvision Digital Technology Co., Ltd. declares that the radio equipment type [CS-CV240 (B0-21WFR)] is in compliance with Directive 2014/53/EU.

The full text of the EC DECLARATION OF CONFORMITY is available at the following web link: http://www.ezvizlife.com/declaration-of-conformity.

Safety Instruction

CAUTION: THE PRODUCT IS BUILT IN A REPLACEABLE BATTERY. RISK OF EXPLOSION IF BATTERY IS

REPLACED BY AN INCORRECT TYPE. DISPOSE OF USED BATTERIES ACCORDING TO THE INSTRUCTIONS.

Due to the product shape and dimension, the name and address of the importer/ manufacturer are printed on the package.

SAVE THIS MANUAL FOR FUTURE REFERENCE

Setup

Step 1 Power-on

Plug the power cable into the camera, and then plug the power adapter into an outlet as shown in the figure below. The LED indicator will flash red and blue when the camera is ready for setup.

Power Interface

Power Outlet

Power Cable


LED Indicator Status


Blue Flicker: The netw ork is properly

LED Indicator

connected.


Solid Red: The device is activating.


Slow Red Flicker: Invalid network connection.


Fast Red Flicker: MicroSD card or other error


occurred.


Alternating Blue and Red Flicker: Camera is


ready for Wi-Fi setup.

Turn on the camera and let it power up. The camera will completely rotate side-to-side and tilt up-and-down once.

1

Step 2 Camera Setup

1.Create a user account

-Connect your mobile phone to Wi-Fi using your 2.4GHz network.

-Search for "EZVIZ" in the App Store or Google Play (TM).

-Download and install the EZVIZ app.

-Launch the app.

-Create, and register an EZVIZ user account by following the startup wizard.

2.Adding a camera to EZVIZ

-Log in to your account using the EZVIZ app.

-Tap "+" on the Home page to go to the Scan QR Code interface.

-Scan the QR Code on the bottom of the camera or the front cover of the Quick Start Guide.

-Enter the password for your Wi-Fi network.

-Select the correct time zone and DST information.

-Tap "Finish" to finish setup.

2

If the camera fails to connect to your Wi-Fi network, press and hold the RST button for 3s and repeat Step 2.2.

To select another Wi-Fi network, press and hold the RST button for 3s to reboot the device. When the LED indicator flickers red and blue, you can choose a new Wi-Fi network.

3.To Change the Default Password

The camera uses the verification code found on the bottom of the camera as the default password. After adding the camera to your network, you will be required to change the device password to ensure video security. The password is used for Image Encryption, too. If you turn on the Image Encryption, you will be required to input your password when you view live video or playback stored video from the camera.

-Go to the camera settings screen to change the default password.

-Tap on “Change Password”.

3

-Tap on “Edit”.

-Enter the original verification code located on the bottom of the camera.

-Enter the new password. Please use letters and numbers to make a password anywhere from 6 to 12 characters in length.

4.Angle Adjustment

You can adjust the camera via the EZVIZ app to get an optimum angle. The panning angle ranges from 0° to 340°, and the tilting angle ranges from -10° to 80°.

4

Wall Mounting (Optional)

The camera can be mounted on the wall or ceiling.

Make sure the wall is strong enough to withstand three times the camera's weight.

The installation surface should be clean and flat.

1.(Optional) If you want to install the microSD card, insert the microSD card into the microSD card slot on the rear side of the camera. Otherwise, you can skip this step.

2.Attach the supplied drill template to the place where you want to affix the camera.

3.(Optional) If the wall is solid, drill and insert three expansion screws.

4.Affix the camera base onto the template using the three metal screws.

Solid Wall

Wooden Wall

5.Install the camera on the base, and turn it 15° to secure it.

6.Connect the power cable to the camera. If the camera was previously connected to the Wi-Fi network, it will automatically connect to the same Wi-Fi network.

5

Appendix

Box Content

Camera (x1)

Base (x1)

Power Cable (x1)

Drill Template (x1)

Screw Kit (x1)

Power Adapter (x1)

Quick Start Guide (x1)

6

Mise en place

Étape 1 Mise sous tension

Branchez le câble d’alimentation à la caméra puis l’adaptateur d’alimentation à une prise électrique, comme illustré dans la figure ci-dessous. L’indicateur LED clignotera en rouge et bleu quand la caméra est prête à être configurée.

Interface d’alimentation

Prise électrique

Câble d’alimentation

État de l’indicateur LED

Clignotement en bleu : la connexion au réseau


est correcte.

Indicateur LED

Rouge fixe : l’appareil est en cours d’activation.


Clignotement lent en rouge : connexion au


réseau non valide.


Clignotement rapide en rouge : erreur carte


microSD ou autre.


Clignotement alterné bleu et rouge : la caméra


est prête pour la configuration Wi-Fi.

Mettez le caméra sous tension et laissez-le s’allumer. La caméra pivotera entièrement de chaque côté et de haut en bas une fois.

7

Étape 2 Configuration de la caméra

1.Créer un compte utilisateur

-- Connectez votre téléphone mobile à votre réseau Wi-Fi 2,4 GHz. -- Recherchez « EZVIZ » dans l’App Store ou Google Play(TM).

-- Téléchargez et installez l’application EZVIZ. -- Lancez l’application.

-- Créez et enregistrez un compte utilisateur EZVIZ en suivant l’assistant de démarrage.

2.Ajouter une caméra à EZVIZ

-- Connectez-vous à votre compte à l’aide de l’application EZVIZ.

-- Appuyez sur l’icône « + » de la page d’accueil pour accéder à l’interface de lecture du code QR.

-- Scannez le code QR au bas de la caméra ou sur la première de couverture du guide de démarrage rapide.

-- Saisissez le mot de passe de votre réseau Wi-Fi.

-- Sélectionnez le bon fuseau horaire et les informations d’heure légale.

8

-- Appuyez sur « Finish » (Terminer) pour compléter la configuration.

Scannez le code QR

Bouton de réinitialisation

Si la connexion de la caméra à votre réseau Wi-Fi échoue, maintenez enfoncé le bouton de réinitialisation (RST) pendant 3 s et répétez l’étape 2.2.

Pour sélectionner un autre réseau Wi-Fi, maintenez enfoncé le bouton de réinitialisation (RST) pendant 3 s pour redémarrer l’appareil. Une fois que l’indicateur LED clignote en bleu et rouge, il sera possible de choisir un nouveau réseau Wi-Fi.

3.Pour modifier le mot de passe par défaut

Le code de vérification situé sur le fond de la caméra est utilisé comme mot de passe par défaut. Après avoir ajouté la caméra à votre réseau, vous devrez modifier le mot de passe de l’appareil pour garantir la sécurité de votre vidéo. Le mot de passe est également utilisé pour le cryptage des images. Si le cryptage des images est activé, vous devrez saisir votre mot de passe au moment de l’affichage de la vue en direct ou pour lire les vidéos enregistrées par la caméra.

-- Accédez à l’écran des réglages de la caméra pour modifier le mot de passe par défaut.

9

-- Appuyez sur « Change Password » (Modifier le mot de passe).

-- Appuyez sur « Edit » (Modifier).

-- Saisissez le code de vérification d’origine situé sur le fond de la caméra.

-- Saisir le nouveau mot de passe. Veuillez mélanger des lettres et des chiffres pour créer un mot de passe d’une longueur de 6 à 12 caractères.

4.Réglage de l’angle

Vous pouvez régler la caméra via l’application EZVIZ pour obtenir un angle optimal. L’angle de panoramique varie de 0° à 340°, et l’angle d’inclinaison verticale varie de -10° à 80°.

10

Hikvision CS-CV248-A0-32WFR User Manual

Montage mural (facultatif)

Il est possible de monter la caméra sur un mur ou au plafond.

Assurez-vous que le mur soit suffisamment solide pour supporter au moins trois fois le poids de la caméra.

La surface d’installation doit être propre et plane.

1.(Facultatif) Si vous souhaitez installer une carte microSD, insérez-la dans son logement situé à l’arrière et à l’intérieur de la caméra. Sinon, vous pouvez ignorer cette étape.

2.Fixez le gabarit de perçage à l’endroit où vous souhaitez apposer la caméra.

3.(Facultatif) Si le mur est solide, percez les trois trous et insérez les trois vis à expansion.

4.Fixez le socle de la caméra sur le gabarit en utilisant les trois vis métalliques.

Mur solide

Mur en bois

5.Installez la caméra sur le socle et tournez-la de 15° pour la serrer.

6.Connectez le câble d’alimentation à la caméra. Si la caméra a été précédemment connectée

à un réseau Wi-Fi, elle se reconnectera automatiquement au même réseau Wi-Fi.

11

Annexe

Contenu du carton

1 Caméra

1 base

1 câble d’alimentation

1 gabarit de perçage

1 kit de visserie

1 adaptateur d’alimentation

1 guide de démarrage rapide

12

Loading...
+ 38 hidden pages