

Page 1
1/18
More information (forum, tutorials, videos...) available at
www.HERCULESDJMIXROOM .com
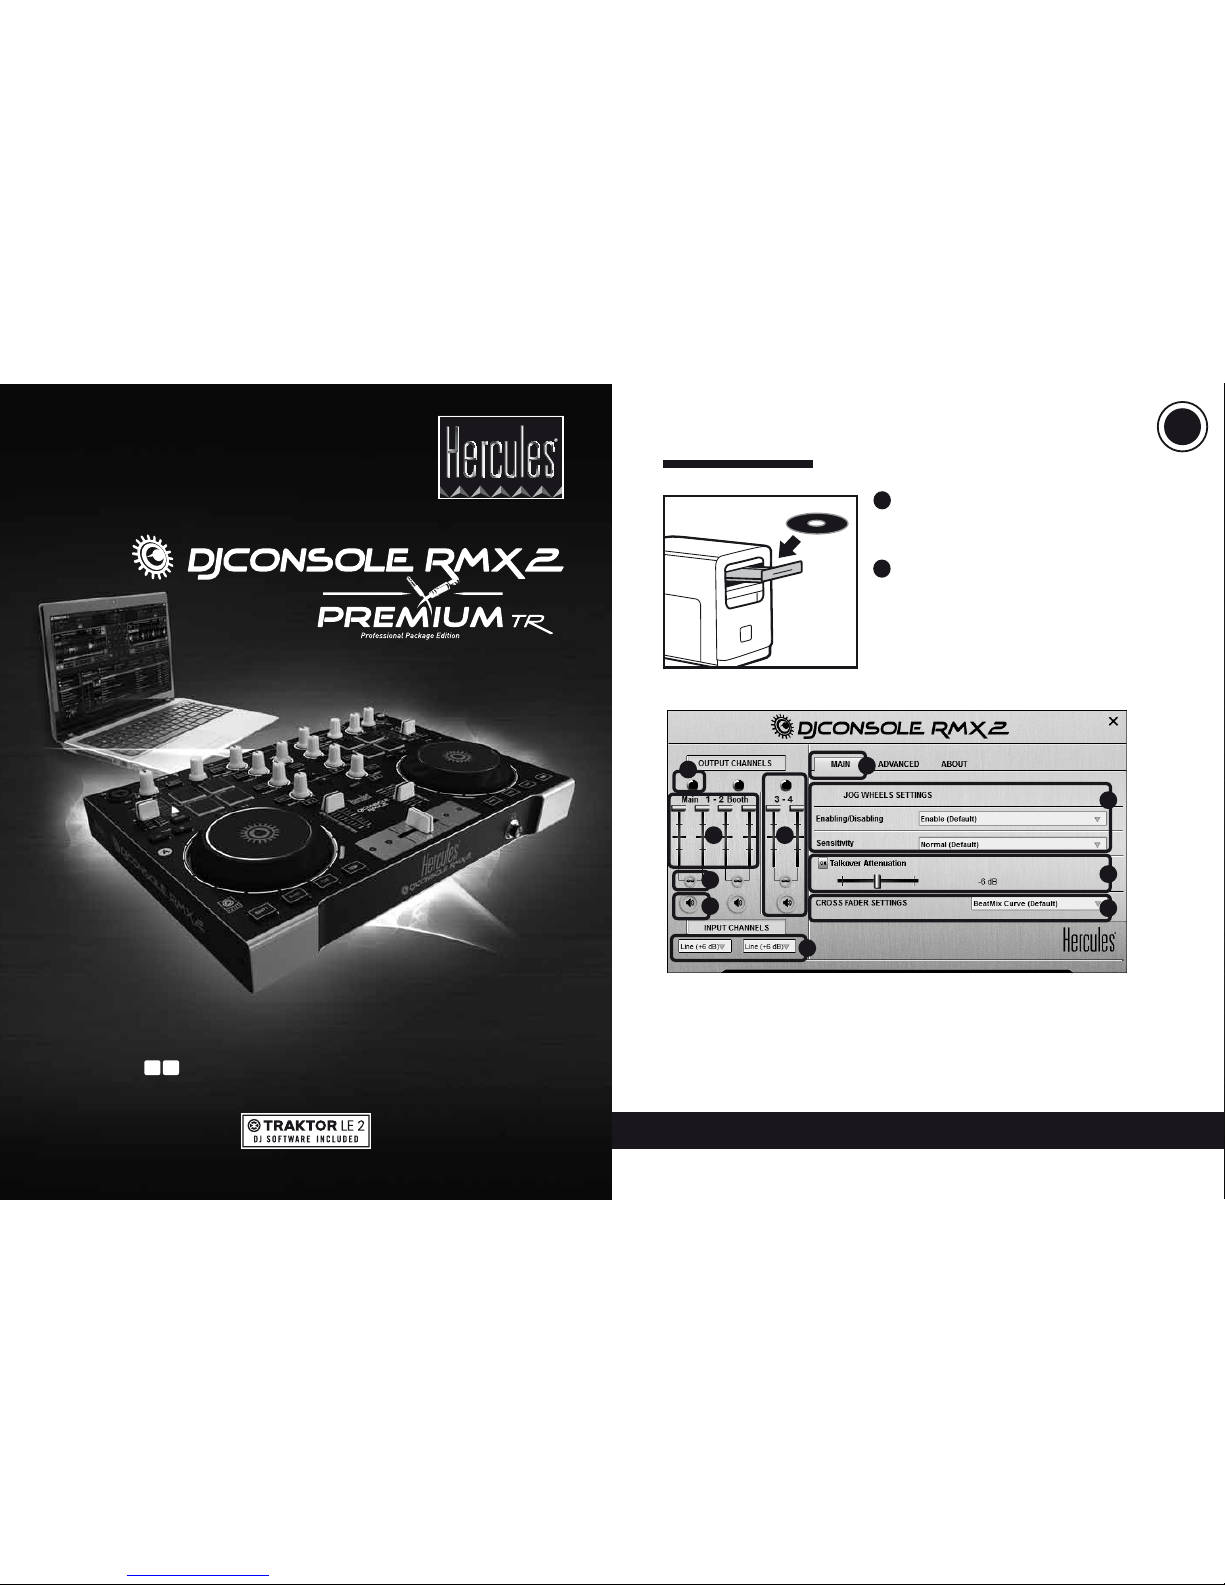
• Insert the DJ Console Rmx2 Prem ium
installation CD-ROM into your computer’s drive.
• Run the installer program.
• Follow the instructions.
1
• When prompte d to do so, remove
the DJConsole Rmx2 Premium installation
CD-ROM and insert the Traktor LE 2 installation
CD-ROM into your computer ’s drive.
• Run the Traktor LE 2 installer program.
• Follow the instructions.
Traktor LE 2 is installed on yo ur system.
2
INSTALLATION
1- Channels 1-2 (mix
output) balance
2- Volume on channels
1-2 (Main) and 1-2 (Booth)
3- Lock/unlock right
and left channel volume
4- Mute on/o
5- Channels 3-4
(headphones output)
control
6- Select input t ype
7- Main panel
8- Set jog wheels (enable/
disable and set
sensitivity)
9- Adjust talkover
attenuation
10- Congure crossfader
7
1
52
3
4
6
8
9
10
GETTING STARTED WITH DJCONSOLE RMX2 AND TRAkTOR LE 2
Professional Package Edition
UKUS
US
UK
Page 2
2/18 3/18
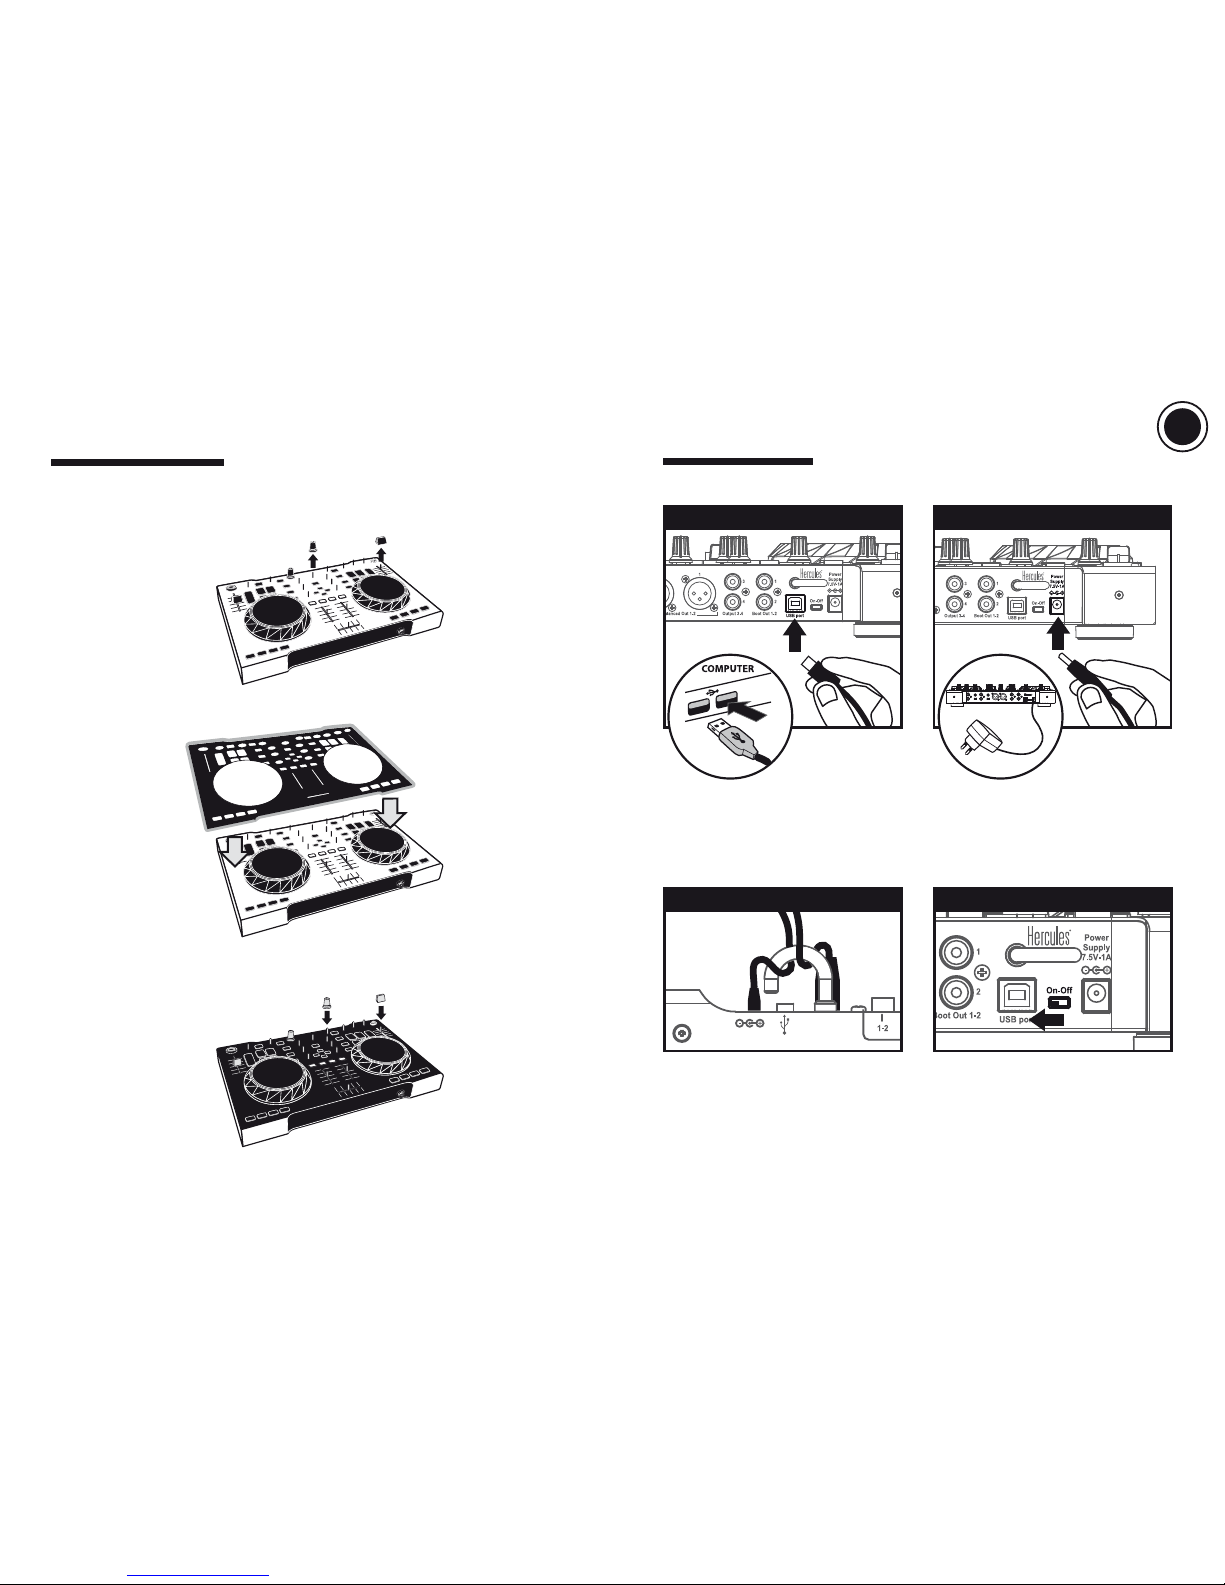
Connect the DJConsole Rmx2 to your
computer using the USB cable.
Thread both the USB cable and the
power adapter cable through the hook to
prevent accidental disconnection.
Connect the power adapter.
Finally, set the On/O switch to On.
1
43
2
CONNECTIONS
2) Replace the caps on the 14 rotar y buttons and the 5 faders.
- Substitute any black caps you wish with the included yellow caps, instead.
CUSTOMIZATION
To customize the look of your DJ Console Rmx2 Prem ium, you can:
1) Add a black overlay (inclu ded) on the controller ’s top face.
- Remove the caps f rom the 14 rotary buttons and the 5 faders.
- Place the black overlay on the controller’s top face.
US
UK
Page 3

4/18 5/18
CD players or v inyl turntables: set the switch to Phono if the vinyl turntable has
a ground wire. Adjust the input level in the control panel.
Microphone: you can connec t a balanced or unbalanced microphone.
The mixing of external sources (turntables, CD players or mobile players) requires
a not included professional DJ program (such as Traktor Pro...).
2
CONNECTING AUDIO SOURCES
When connecting headphones, make sure that the volume level is suitable for
listening with headphones: before putting the headphones on your ears,
start playing a music track, and turn down the volume if it seems that the sound
coming from the headphones is too loud.
FRONT/TOP PANEL: HEADPHONES
REAR PANEL: SPEAKERS
1
CONNECTING HEADPHONES
AND SPEAKERS
US
UK
Page 4

6/18 7/18
3.2 Traktor Setup Wizard
3
FIRST SESSION OF
TRAKTOR LE 2
Run Traktor LE 2
3.1 Activation
In the rst screen, click Activate
The Service Center program opens.
- If you already have a user account with
Native Instruments, enter your email
address and password (if you have
forgotten your password, click Forgot your
passwor d? and follow the instructions).
- Once you have entered your email address
and password, click Log in.
- If you do not already have a user account
with Native Instruments, click Create new
User Account, and follow the instructions.
- Once you have created your user account,
the Ser vice Center prompts you to log out,
in order to receive your password by email.
- Enter your email address and the password
you have received, then click Log i n.
Set up Traktor LE 2 as follows.
- Click Next to begin the setup process, and proceed as shown in the following screenshots.
- Click Finish at the end of the setup
process.
Once you have logged in, the Service
Center prompts you to activate your Traktor
version.
After activating the sof tware, the Service
Center displays a conrmation scre en.
The activation process is complete.
You can now set up Traktor LE 2.
- Select Hercules for the manufac turer.
- Select DJ R mx2 LE for the mode l, which is
the map for the DJConsole Rmx2 Premium
in Traktor LE 2.
- Select YES. - Click Finish at the end of the setup
process.
- Select NO.
- Enter the serial number found on your
Traktor LE 2 CD-ROM envelope.
US
UK
Page 5

8/18 9/18
Toggle between large
and small browser display
Step-by-step browsing
through folders
Expand/collapse a tree
structure
Fast browsing
+
+
+
3.3 BROWS ING IN TRAKTOR LE 2
Browsing through areas in Traktor LE 2
Browser controls on the DJConsole Rmx2
Browsing through folders
Press and hold down the left arrow button on the controller to browse through folders.
Control 1 Control 2 Command
A
When you run Traktor LE 2:
1) Fir st o, set all faders and rot ary buttons on the DJConsole Rmx2 Premium to their
central positions (the default position for all gradual controls in Traktor).
2) Set the mixer mode to Int. Mixe r Cover mode , unless yo u will be co nnec ting an ex tern al
mixer (you can control the mixer mode on the DJConsole Rmx2 Premium by pressing the
button labeled VINYL).
You can browse through the list
of folders on the left-hand side
You can browse through the list of
tracks on the right-hand side
US
UK
Page 6

10/18 11/18
Browsing through tracks
Press and hold down the right arrow button on the controller to browse quickly through
tracks.
Toggle between large
and small browser display
Step-by-step browsing
through track s
Fast browsing
Load track on left deck
Load track on right deck
+
Control 1 Control 2 Command
B
Previewin g lets you prepare the next tra ck to be played (following t he track that you
are currently playing for your audience). You will use previewing to beatmatch the
next tr ack to be played, or paus e the track at a preci se spot so that playba ck will start
from this e xact positi on. Or you can plac e a Cue point, whic h will let you star t playback
of the trac k from that point (plea se also see sectio n 9 – PLACING A CUE POINT).
4.1 You are playing a track on deck A, and want to preview the next track on deck B.
4.2 Set the Cue to Mix knob to Cue.
4.3 Press the button
on deck B (the deck on which the track that yo u want to preview
is loaded).
4
PREVIEWING A TRACK
US
UK
Page 7

12/18 13/18
4.4 Adjust the volume level on your headphones using the Vol - /+ knob.
4.5 Start playing the track to be previewed on de ck B. Prepare the track (beatmatch the
track, place a Cue point...).
Mixing tracks means to link up songs,
one after another, without any gaps or
silences between them.
5.5 Before the end of the track being
played, star t playing the track loaded
on deck B.
5.7 To make the transition, progressively
move the crossfader toward the deck
on which the new track is being played
(here, to the right).
5.6 To ensure a transition at the same
tempo, synchronize the BPM (number
of beats per minute) of the track that
you are getting ready to play. Adjust
the BPM to match the BPM of the track
on deck A using the pitch (tempo) fader
(1). Or press the
button on deck
B (2) to synchronize the track ’s BPM
with the BPM value of the track that is
ending (on deck A).
5.1 You have loaded a track on each deck
(A and B). Position the volume faders as
shown below.
5.4 Select previewing on deck B (please
see 4. Previewing a track).
5.3 Set the crossfader to the side of the
deck on which the track is playing
(here, to the lef t).
A B
A B
5.2 You start o by playing the track on
deck A.
1
2
5
MIXING TRACKS
US
UK
Page 8

14/18 15/18
6
EFFECTS:
REVERB, DELAY OR FLANGER
Eects are real-time alterations of the sound.
Reverb is a duplication of the sound, replayed once in the background with an ultra-small
time dierence compared to the original sound, making it sound richer.
Delay (or echo) is a sound replayed several times in the backg round, at a lower volume for
each repetition.
Flanger is a sound mixed with the original sound, using a delay and a frequency that are
changed at playback.
Eects are modulated in Traktor LE 2 using two variables:
- The amplitude of the eect: the time dierence for reverb and delay, and the
frequenc y change amplitude + time dierence for the anger.
- The dry/wet variable: how much of the sound is played without the eect (= dry) and
how much of the sound is played with the eect (= wet).
6.1 Eects areas in Traktor LE 2
Eect on left de ck Eect on right deck
6.2 Ef fect control s on the DJConsole R mx2 Premium
6.3 Controlling effects
+
Press the MODE button to
enter Eect mode: light up
the
- Eect or
- Cue
indicator.
Select your choice of eect:
- Flanger
- Reverb or
- Delay
Toggle the selec ted eect
on/o
Set the dry (-) / wet (+) mix for
the eect
Set the eec t’s amplitude
Pad 4 or Pad 2
Pad 1
Pad 1
+
Control 1 Control 2 Command
US
UK
Page 9

16/18 17/18
7
LOOPS
8
FILTERS
A loop is a section of the track played over
and over.
Loop in is the precise moment in the track
where you set the start of the loop section.
Loop out is the precis e mome nt in the track
where you set the end of the loop section.
A lter cuts out some frequencies from the audio playback.
In the central position, the lter is inactive.
- Turning the knob to the left applies a low-pass lter: the more you turn it to the left, the more
hi gh and m edium fre que ncie s are cu t out , keep ing onl y the lo w (bass) f req uenc ies aud ible .
Turning the lter all the way to the left keeps only the low frequencies, so that no higher
frequencies can be heard.
- Turning the knob to the right applies a high-pass lter: the more you turn it to the right, the
more low and medium frequencies are cut out, keeping only the high (treble) frequencies
audible. Turning the lter all the way to the right keeps only the high frequencies, so that
no lower frequencies can be heard.
Filter on lef t deck Filter on right deck
7.1 Loops are as in Tr aktor LE 2
7. 2 Loop controls on the DJConsole
Rmx2 Pre mium
7. 3 Controlling loops
In the waveform, the Loop sec tion is
displayed in a dierent color
Below the tempo (pitch) virtual
fader, the ACT IVE button is
highlighted in a dierent color
Below the wave over view, the
loop length is highlighted in a
dierent color
Press the MODE button
to enter Loop mode:
light up the
- Loop or
- Sample
indicator.
Loop on 2 beats
Loop on 4 beats
Loop on 8 beats
Pad 4 lit up = active loop
(whatever the loop
length)
Set the loop length
If a loop is active: exit the
loop. If no loop is active:
activate a loop with the
last selec ted length.
Pad 2
Pad 3
Pad 4
Pad 4
Pad 1
Control Command
8.1 Filters ar ea in Traktor LE 2
8.2 Fil ter controls on the DJCon sole
Rmx2 Premium
8.3 Controlling the filter
Modulate the lter
- Left: low-pass lter
- Right: high-pass lter
Enable/disable the lter
Control Command
Filter On/O
Filter On/O
+
US
UK
Page 10

18/18
9
PLACING A CUE POINT
A Cue point is a marker that you can place in a music track. It lets you start playback
of the track from that point.
Press the
button to place a Cue point in the track loaded on deck A, for example.
When you press the button, playback starts from the Cue point you have placed
in the track.
 Loading...