

Page 1

CONTENTS
1. INTRODUCTION ................................................................................................. 2
2. FEATURES ......................................................................................................... 3
3. CONNECTING YOUR PROPHETVIEW 720....................................................... 4
4. DRIVER INSTALLATION.................................................................................... 5
4.1. Driver installation for Windows 98................................................................. 5
4.2. Driver installation for Windows Millennium ................................................... 5
4.3. Driver installation for Windows 2000............................................................. 6
5. OSD MENU FUNCTIONS ................................................................................... 7
5.1. OSD buttons ................................................................................................. 7
5.2. Auto-adjust.................................................................................................... 7
5.3. Brightness setting ......................................................................................... 7
5.4. Main menu .................................................................................................... 8
6. RECOMMENDED USE ....................................................................................... 9
7. TECHNICAL SPECIFICATIONS....................................................................... 10
8. TROUBLESHOOTING ...................................................................................... 11
FRANÇAIS ESPAÑOLITALIANOHOTLINE PORTUGUÊSNEDERLAND ENGLISHDEUTSCH
9. TECHNICAL SUPPORT.................................................................................... 12
9.1. If you need to return a product.................................................................... 12
Page 2
1. INTRODUCTION
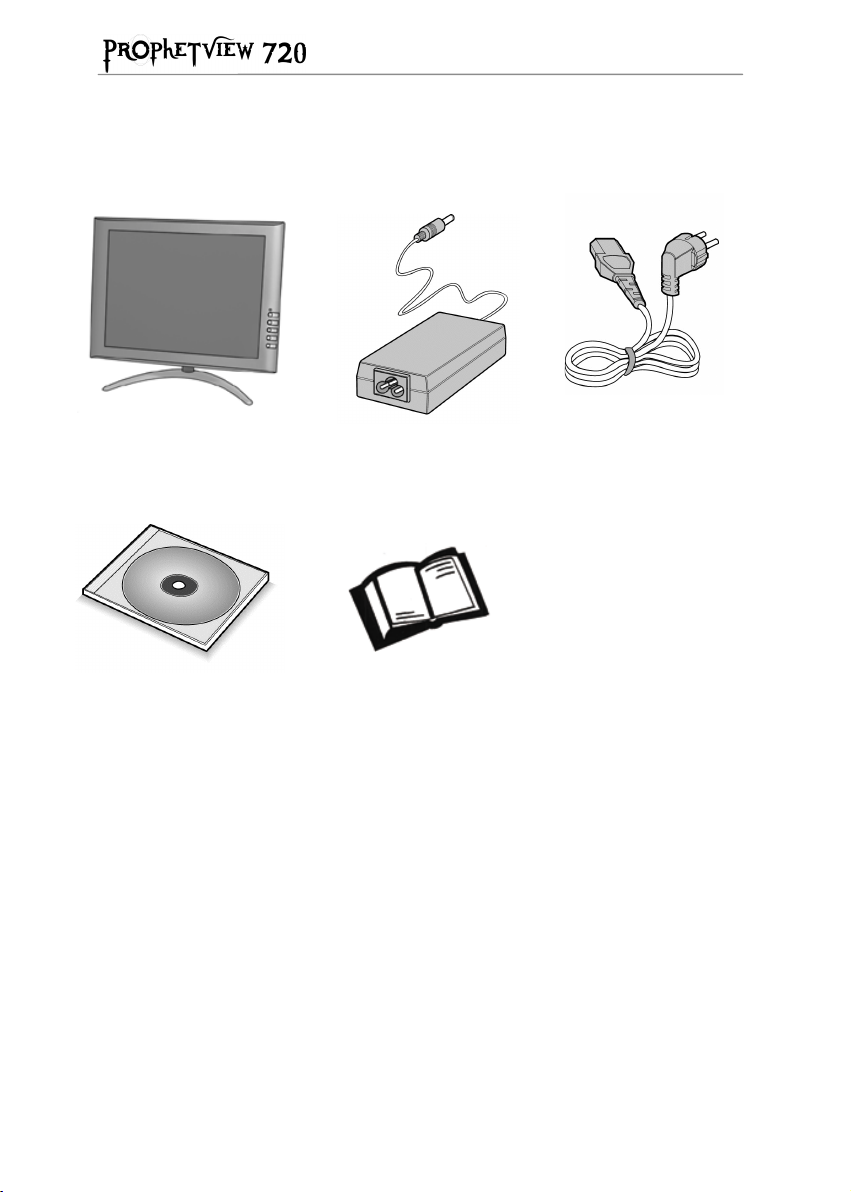
Your Prophetview 720 box contains the following:
TFT-LCD monitor
Installation CD-ROM User manual
AC power adapter
Power cord
2/14 - User Manual
Page 3
2. FEATURES
The HERCULES Prophetview 720 is a high quality, 15-inch TFT-LCD (Thin Film
Transistor - Liquid Crystal Display) monitor that works in conjunction with standard VGA
graphics boards.
Your Prophetview 720 offers a large display area and is suitable for use as a 17" class
monitor, at a recommended resolution of 1024x768 pixels.
Distortion-free and unsusceptible to electromagnetic interference, the Prophetview 720’s
sharp, lifelike picture, wide viewing angle and space-saving design make it the ultimate
monitor for home or business users!
! TFT-LCD monitor
The Prophetview 720’s sleek 15-inch LCD panel (equivalent to a 17-inch CRT monitor)
takes up very little space on your desktop, leaving more room available for other
peripheral devices.
Desk space can now be used more efficiently than ever, thanks to the panel’s
impressive depth of only 2cm (14cm with stand)!
! Plug and Play compatible
Your Prophetview 720 conforms to the VESA (Video Electronics Standards Association)
standard and DDC1/2B. The picture adjustment function allows the image quality to be
adjusted to match the input signal.
! Low power consumption
Your Prophetview 720 features very low power consumption (<30W in power on mode,
<4W in standby mode) and auto power switch (100~240V).
FRANÇAIS ESPAÑOLITALIANOHOTLINE PORTUGUÊSNEDERLAND ENGLISHDEUTSCH
! Easy-to-use On-Screen Display (OSD) menu
Your monitor’s display is easily configurable using the OSD menu and its 4-button
system. You may either use the auto-adjust function or manually adjust the advanced
settings.
! Environmentally friendly
Power consumption can be reduced by using your monitor in combination with a
computer that conforms to the VESA DPMS (Display Power Management Signalling)
standard.
State Power indicator Power consumption
Power on Green <30W
Standby Amber <4W
Deep Sleep No light <3W
User Manual - 3/14
Page 4
3. CONNECTING YOUR PROPHETVIEW 720
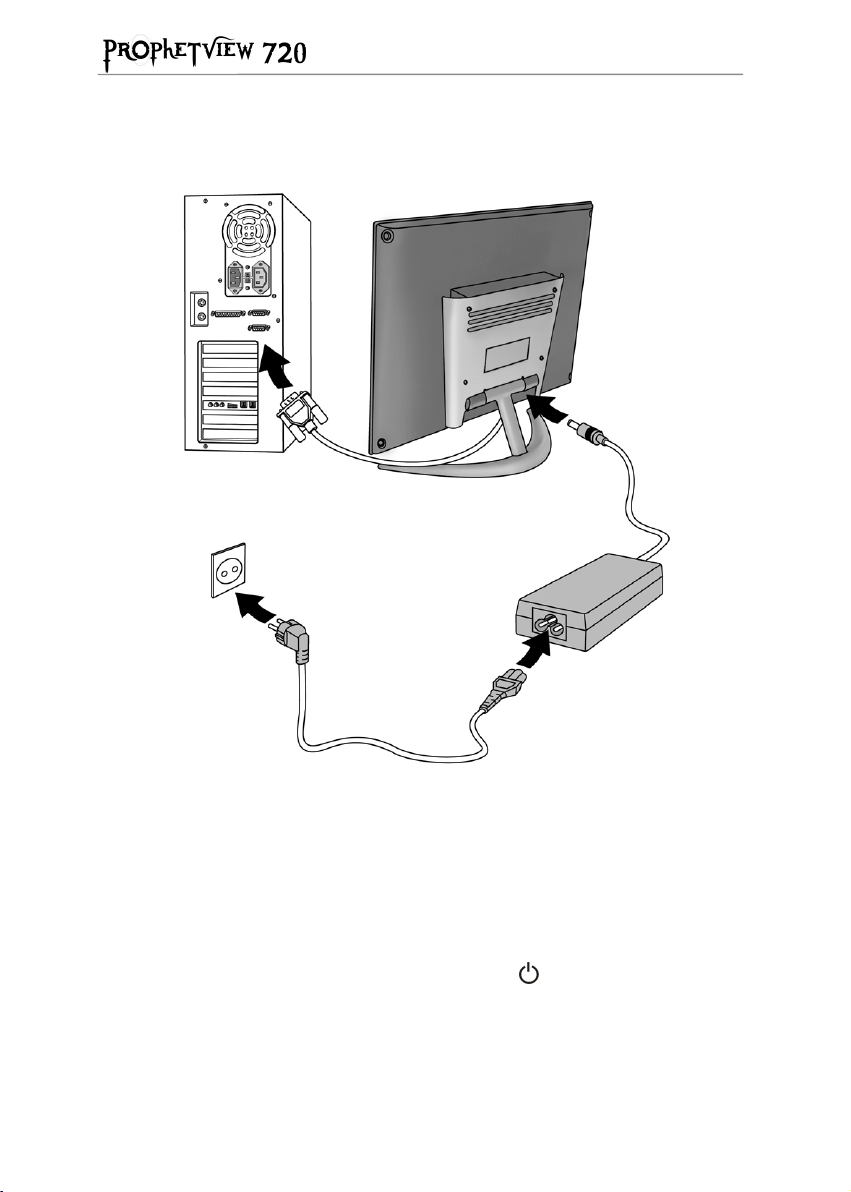
To connect your Prophetview 720 to your system, follow the instructions below:
- First of all, turn off your computer and unplug its power cord.
- You may also need to disconnect your previous monitor from your system.
- Connect the 15-pin D-sub signal cable to your computer's graphics board. Tighten all screws.
- Connect the AC adapter cable to the power terminal at the back of the monitor base.
- Connect the power cord to the AC adapter.
- Connect your computer and monitor’s power cords to available electrical outlets.
- Now turn on your computer and monitor (for the latter, by pressing the
Your Prophetview 720 is now ready for use.
button).
4/14 - User Manual
Page 5
4. DRIVER INSTALLATION
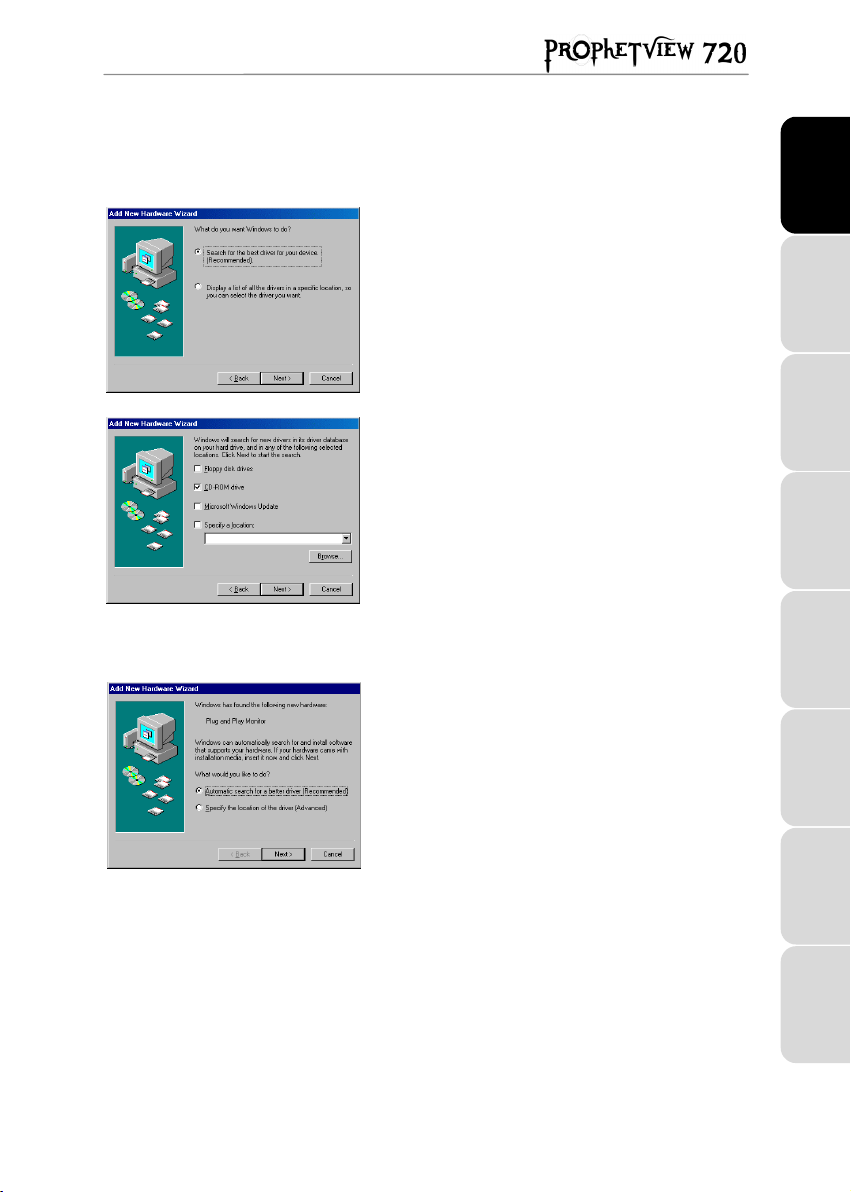
4.1. Driver installation for Windows 98
Windows will display a
informing you that the system has found a
.
Monitor
- Insert the installation CD-ROM into your CD-ROM drive.
Next
- Click on
The Add New Hardware Wizard will suggest a
best driver for your device. (Recommended)
- Click on
The wizard will ask you for the path of the driver.
- Tick the
- Click on
The wizard will then display the name of your monitor.
- Click on
- Click on
.
Next
.
CD-ROM drive
Next
.
Next
to start driver installation.
Finish
New Hardware Found
option.
.
4.2. Driver installation for Windows Millennium
Windows will display a
informing you that the system has found a
.
Monitor
- Insert the installation CD-ROM into your CD-ROM drive.
Next
- Click on
.
New Hardware Found
dialog box
Plug and Play
Search for the
.
dialog box
Plug and Play
FRANÇAIS ESPAÑOLITALIANOHOTLINE PORTUGUÊSNEDERLAND ENGLISHDEUTSCH
The Add New Hardware Wizard will suggest an
search for a better driver (Recommended)
Next
- Click on
Windows will then specify the path and the name of the folder
where the drivers are located.
- Click on
- Click on
.
Next
to start driver installation.
Finish
.
Automatic
.
User Manual - 5/14
Page 6

4.3. Driver installation for Windows 2000
Windows 2000 uses default drivers for your monitor. You
therefore need to replace the Windows default drivers by the
Hercules drivers.
- Right-click on
- Select the
- Click on the + sign to the left of
- Double-click on your monitor.
- Select the
- Insert the installation CD-ROM into your CD-ROM drive.
- Click on
My Computer
Hardware
Driver
Next
.
tab and click on
tab and click on
and click on
Device Manager...
Monitors
Update Driver...
Properties
.
.
.
.
The Add New Hardware Wizard will suggest a
suitable driver for my device (recommended)
Next
- Click on
The wizard will ask you for the path of the driver.
- Tick the
- Click on
Windows may inform you that other compatible drivers have
been detected.
- Click on
- Click on
.
CD-ROM drive
Next
Next
Finish
option.
.
to install your optimized Hercules drivers.
.
Search for a
.
6/14 - User Manual
Page 7

5. OSD MENU FUNCTIONS
5.1. OSD buttons
The OSD menu allows you to apply customized settings to your display. The OSD
buttons have the following functions:
Default function Auto-adjust.
OSD function Selects OSD icon above.
Default function Displays the OSD main menu.
OSD function Selects OSD icon below.
Default function Displays the
brightness value.
OSD function Increases value for highlighted item.
Default function Displays the
brightness value.
OSD function Decreases value for highlighted item.
BRIGHTNESS
BRIGHTNESS
setting and increases
setting and decreases
5.2. Auto-adjust
Press the button to automatically adjust the following display parameters: horizontal
and vertical position, phase and frequency.
5.3. Brightness setting
Press either the or button to display the
brightness by using the
and buttons.
BRIGHTNESS
setting. Now adjust the
FRANÇAIS ESPAÑOLITALIANOHOTLINE PORTUGUÊSNEDERLAND ENGLISHDEUTSCH
User Manual - 7/14
Page 8

5.4. Main menu
Press the button to display the OSD main menu. The OSD menu automatically
saves any changes and disappears when no button has been pressed for 10 seconds.
Adjusts screen contrast.
Adjusts the horizontal image position.
Adjusts the vertical image position.
Adjusts the focus of the display. Alter this setting if characters pile up on
each other.
Adjusts the screen's horizontal size by increasing or reducing the number of
pixels in steps.
Restores default settings.
Select a language among the five available using the button, then press
button. The OSD menu is now displayed in the language you have
the
selected.
Adjusts red color gain.
Adjusts green color gain.
Adjusts blue color gain.
High temperatures mean cool colors (blue, green, purple), whereas low
temperatures mean warm colors (red, yellow, orange). Four settings are
available:
USER
(auto-adjust function dedicated to RGB values).
Closes the OSD menu.
9300K
(screen image is bluish),
(selects the parameters set in the
6500K
(screen image is reddish),
,
and options),
AUTO
8/14 - User Manual
Page 9

6. RECOMMENDED USE
For optimum performance, please note the following when setting up and using your
Prophetview 720:
! Tilt the screen forwards or backwards at an angle, so that it does not reflect any
light into your eyes.
! Do not open up your monitor. Opening or removing the cover may expose you to
dangerous shock hazards or other risks. Warning: warranty is void if the monitor
has been opened.
! Unplug the monitor’s power cord and disconnect it from your computer before
cleaning. Do not use liquid or aerosol cleaners. Use a damp cloth for cleaning.
! Avoid using the Prophetview 720 in extreme heat or humidity, as this may cause
color loss or damage.
! Place the Prophetview 720 on a flat surface to prevent it from falling.
! Install the Prophetview 720 in a well-ventilated room, and do not cover the
ventilation openings.
! Do not expose the Prophetview 720 to fluids, such as chemicals, liquids or water.
! Turn off both the Prophetview 720 and your computer before connecting or
disconnecting the D-Sub signal cable.
! To protect the monitor during electrical storms or when it is left unattended and
unused for long periods of time, disconnect it from your computer and unplug its
power cord. This will prevent damage to the monitor from lightning and power
surges.
! Handle your Prophetview 720 with care during transportation. Make sure to save
the packaging materials, in case it needs to be transported in future.
User Manual - 9/14
FRANÇAIS ESPAÑOLITALIANOHOTLINE PORTUGUÊSNEDERLAND ENGLISHDEUTSCH
Page 10

7. TECHNICAL SPECIFICATIONS
LCD MODULE Size:
Display type:
Number of pixels:
Color depth:
Pixel pitch:
Brightness:
Contrast ratio:
Response time:
Backlight unit:
CABINET Color: Blue fashionable design
STAND CONTROL Backward tilt:
Forward tilt:
VIEWING ANGLE Wide v. a. technique:
Horizontal:
Vertical:
FREQUENCY Horizontal scan:
Vertical scan:
AUTO ADJUSTMENT
SCREEN IMAGE
COMMUNICATION Plug & Play DDC1/2B (Windows 95/98/NT/2000)
INPUT SIGNAL Signal level:
ENVIRONMENTAL
CONDITIONS
POWER Power input:
SAFETY &
REGULATIONS
DIMENSION WxHxD: 378x285x20mm
WEIGHT Set:
640x350
640x400
640x480
720x400
800x600
832x624
1024x768
Synchronization:
VGA compatibility:
Operating temp.:
Operating humidity:
Power adapter:
Power consumption:
Power management:
Safety:
EMC:
Box:
15” (38.1cm)
Color TFT LCD Active Matrix
1024x768 (2.36 million sub-pixels)
16.7 million colors
0.29x0.29mm
2
230Cd/m
300:1
<30ms
2 CCFL lamps
20 degrees
-5 degrees
Compensation film
Right/left +140 degrees
Up/down +110 degrees
30~75kHz
50~75Hz
70Hz
70Hz
60Hz, 72Hz, 75Hz
70Hz
60Hz, 72Hz, 75Hz
75Hz
60Hz, 70Hz, 75Hz, 75Hz (Mac)
RGB analog 0.7Vpp/75ohm
H/V Separate (TTL)
VESA VGA / SVGA / XGA, MACII, PC98
0~40°C
Less than 80%
AC 100-240V, 50/60Hz (auto-adjusting)
12V DC, 2.0A
24W
Standby mode: less than 4W
IEC950, UL1950, CB, CE-LVD, TUV-GS
FCC Class B, CE
3.5kg
4.5kg
10/14 - User Manual
Page 11

8. TROUBLESHOOTING
No image on screen
- The signal cable should be firmly connected to the graphics board.
- Your monitor’s power button and your computer’s power switch should both be in the
ON position.
- Check the signal cable connectors for bent or pushed-in pins.
LED on monitor is amber (and no image on screen)
- The signal cable should be firmly connected to the graphics board.
- Make sure your computer is not in standby mode (hit a key or move the mouse to exit
this mode).
LED on monitor is green (and no image on screen)
Adjust brightness and contrast settings in the OSD menu.
“SIGNAL OVER RANGE” displayed on screen
After having checked your graphics board specifications, select another vertical
frequency between 60 and 75Hz.
“RGB NO INPUT SIGNAL!” displayed on screen
Check the D-Sub signal cable, and make sure that it is connected firmly.
FRANÇAIS ESPAÑOLITALIANOHOTLINE PORTUGUÊSNEDERLAND ENGLISHDEUTSCH
Display is not clear
- Adjust the
- Select the recommended screen settings: 1024x768 @ 60Hz.
Display is not sized properly
- Use the OSD menu to increase or decrease
POSITION
- Make sure that a supported mode and signal timing have been selected on the
graphics board and the system being used. (Please refer to your graphics board or
system manuals to change the display mode or refresh rate.)
PHASE
.
FREQUENCY
and
settings in the OSD menu.
HORIZONTAL
VERTICAL
and
User Manual - 11/14
Page 12

9. TECHNICAL SUPPORT
Before you contact us (*), please have the following information/items ready:
! Product name,
! Date of purchase of your product,
! Your full system configuration details: processor type, memory, operating system,
! Pen and paper.
Please have your computer switched on and ready at the point where you have
encountered a problem.
9.1. If you need to return a product
Hercules offers a standard three year parts & service warranty.
To return a product for factory service, contact a Hercules technical support
representative at the phone number corresponding to the country you live in (*).
In Europe
product is defective, please follow the instructions we provide to have your product
replaced directly by our services.
In the USA and Canada
Hercules (30 days). All customers should register online at our web site. Just visit
http://us.hercules.com, click on
to the mailing list to receive upgrade information, information on new products and
special offers.
Note: only packages that have been assigned an RMA (Return Merchandise
Authorization) number by a technical support agent will be accepted.
When returning the product, be sure to include all materials, such as the manual(s),
connection cable(s) and the product packaging box.
: after receiving confirmation from our technical support service (*) that your
: refund policies apply to products purchased directly from
Support/Drivers
and
Registration
. You will be added
(*) Hotline details are listed at the end of this manual.
12/14 - User Manual
Page 13

Trademarks
Hercules®, Guillemot™ and Prophetview™ are trademarks and/or registered trademarks of Guillemot Corporation S.A. VESA®, DPMS™ and
DDC™ are trademarks and/or registered trademarks of Video Electronics Standards Association. Microsoft® Windows® 95, 98, Millennium, 2000,
Windows NT® and MS-DOS® are registered trademarks of Microsoft Corporation in the United States and/or other countries. All other nationally
and internationally recognized trademarks and trade names are hereby acknowledged. Photos not binding.
Declaration of conformity
USA COMPLIANCE NOTICE: this device complies with the limits for a Class B computing device according to Subpart J or Part 15 of the FCC
rules.
COMPLIANCE NOTICE FOR CANADA: this Class B peripheral apparatus meets all requirements of the Canadian Interference-Causing
Equipment Regulations.
EC COMPLIANCE NOTICE: the test report was made in accordance with the procedures set out in European Council Directive 89/336/EEC for a
Class B digital device. In a domestic environment this product may cause radio interference in which case the user may be required to take
adequate measures.
Copyright
Copyright
Guillemot Corporation and H ercules Technologies 2001. All rights reserved.
This publication may not be reproduced in whole or in part, summarized, transmitted, transcribed, stored in a retrieval system, or translated into any
language or computer language, in any form or by any means, electronic, mechanical, magnetic, photocopying, recording, manual or otherwise,
without the prior written permission of Guillemot Corporation and Hercules Technologies.
Disclaimer
Hercules Technologies reserves the right to make changes in specifications at any time and without notice. The information provided by this
document is believed to be accurate and reliable. However, no responsibility is assumed by Hercules Technologies or Guillemot Corporation either
for its use or for the infringement of patents or other rights of third parties resulting from its use. This product may exist in a light or special version
for PC integration or other purposes. Certain functions detailed in this manual may not be available in these versions. Wherever possible, a
README.TXT
present documentation.
End-user software license Agreement
IMPORTANT: please read the Agreement carefully prior to opening and installing the software. By opening the software package, you agree to be
bound by the terms of this Agreement. The Software enclosed in this package is licensed, not sold, and is only available under the terms of the
present license Agreement. If you do not agree with the terms hereafter, you must promptly return the Software within 15 days, together with the
entire contents of the box, to the place of purchase.
The Hercules Technologies/Guillemot Corporation software (hereafter named the “Software”) is copyrighted by Hercules Technologies and/or
Guillemot Corporation. All rights are reserved. The term “Software” refers to all documentation and related material, including drivers, executable
programs, libraries and data files. The purchaser is granted a license to use the Software only. The licensee also agrees to be bound by the terms
and conditions of the present Agreement concerning copyright and all other proprietary rights for any third party software, documentation and
related material included in the software package.
Hercules Technologies reserves the right to terminate this license in the event of failure to comply with any of the terms or conditions
laid out in the present Agreement. On termination, all copies of the Software shall immediately be returned to Hercules Technologies;
the purchaser remaining liable for any and all resulting damages.
License:
1. The license is granted to the original purchaser only. Hercules Technologies and/or Guillemot Corporation retain all title to and ownership
2. The licensee may only use the Software on a single computer at any time. The machine-readable portion of the Software may be
3. The licensee acknowledges the copyright protection belonging to Hercules Technologies and/or Guillemot Corporation. The copyright
4. The licensee is granted the right to make one back-up copy of the machine-readable portion of the Software on the condition that all
5. Except where the present Agreement expressly permits, the licensee is strictly prohibited from engaging in, nor may he permit third parties
Warranty
Prophetview 720 comes with a standard three year parts and service warranty from the date of purchase. Hercules Technologies’ entire liability
and your exclusive remedy is limited to the replacement of defective products. The warranty does not cover a decline in the luminosity of liquid
crystal displays, a normal occurrence due to the passage of time. Likewise, the warranty does not cover the non-display of pixels, up to a limit of 6
defective pixels. In no event shall Hercules Technologies be liable to you or any third party for direct or indirect consequential, incidental or special
damages which you may incur as a result of using the software, including, but not limited to, loss of data, or information of any kind, that you may
experience.
will be included on the installation CD-ROM detailing the differences between the supplied product and the product described in the
of the Software and reserve all rights not expressly granted. The licensee is not permitted to sub-license or lease any of the rights that are
hereby granted. Transfer of the license is permitted, provided that the transferor does not retain any part or copy of the Software and the
transferee accepts to be bound by the terms and conditions of the present Agreement.
transferred to another computer provided it is previously erased from the first machine and there is no possibility that the Software can be
used on more than one machine at any one time.
notice must not be removed from the Software, nor from any copy thereof, nor from any documentation, written or electronic,
accompanying the Software.
copyright and proprietary notices are also reproduced.
to engage in, the following: providing or disclosing the Software to third parties; providing use of the Software in a network, multiple PCs,
multi-user or time-sharing arrangement where the users are not individual licensees; making alterations or copies of any kind of the
Software; making any attempt to disassemble, de-compile or reverse engineer the Software in any way or form, or engaging in any activity
aimed at obtaining underlying information not visible to the user during normal use of the Software; making copies or translations of the
User Manual.
FRANÇAIS ESPAÑOLITALIANOHOTLINE PORTUGUÊSNEDERLAND ENGLISHDEUTSCH
User Manual - 13/14
Page 14

14/14 - User Manual
 Loading...