

Page 1

BCS-G6 Series
Body Composition Scales
User Instructions
PELSTAR, LLC
9500 West 55th St. McCook, IL 60525-7110 USA www.homscales.com
© Pelstar, LLC 2015
Rev 3.A
Page 2

2
Page 3

Table of Contents
Section I - Installation ..................................................................................................................... 5
Caution and Warnings................................................................................................................. 5
Scale Specifications ..................................................................................................................... 6
Receiving and Inspection ............................................................................................................ 6
Scale Parts ................................................................................................................................... 7
Detail ........................................................................................................................................... 8
Assembly ..................................................................................................................................... 9
Connecting Scale to Printer (USB Setup) .......................................................................... 12
Installing the Wireless Device (optional) .................................................................................. 13
Connecting Scale to Wireless Printer ........................................................................................ 14
Powering up .............................................................................................................................. 15
Section II - Operations .................................................................................................................. 17
How to Take a Measurement ................................................................................................... 17
How to Recall the Last Measurement....................................................................................... 18
Section III – Understanding Results and Norms ........................................................................... 19
Section IV - Printouts .................................................................................................................... 22
Plain Printouts ........................................................................................................................... 22
Programming Number of Copies .......................................................................................... 22
Graphic Printouts ...................................................................................................................... 22
Selecting Default Graphic Report Type ................................................................................. 22
Section V - Special Modes ............................................................................................................. 24
Weight Only Mode .................................................................................................................... 24
Athletic Mode ........................................................................................................................... 24
Bodybuilder Mode .................................................................................................................... 24
Section VI – Customizing ............................................................................................................... 25
Lock Option ............................................................................................................................... 25
Print Ohms Option .................................................................................................................... 25
Physician ID ............................................................................................................................... 26
3
Page 4

Patient ID Option ...................................................................................................................... 26
Disabling/Enabling the Calorie Option ...................................................................................... 26
Section VII – Maintenance ............................................................................................................ 27
Serial Number and other Technical Information ...................................................................... 27
Calibration ................................................................................................................................. 28
Zero Calibration ........................................................................................................................ 28
Cleaning ..................................................................................................................................... 28
Troubleshooting ........................................................................................................................ 29
Section VIII – Compatible Printers ................................................................................................ 30
Note: This scale has been factory calibrated, and does not
require calibration prior to use.
Please register your scale for warranty coverage at:
www.homscales.com
For User Instructions updates and revisions please go to:
www.homscales.com
4
Page 5

Section I - Installation
Caution and Warnings
• Individuals who have internally implanted medical devices, such as Pacemakers, should
not use this equipment due to the risk of malfunction to the device that may be caused
by the weak electrical current.
• To prevent injury and damage to your scale, please follow these instructions very
carefully.
• Assemble and operate the scale per the enclosed user instructions.
• For accurate weighing, this scale must be placed on a flat, stable surface.
• For accurate weighing, verify before each use the proper operation according to the
procedure described in this manual.
• Operating this scale at voltages and frequencies other than specified can damage the
equipment and will void the warranty.
• Do not transport the scale with any weight on the platform.
• Do not exceed recommended weight limit of 1000 lbs for this scale.
• Do not use in the presence of flammable or explosive materials.
• To prevent patient injury, the patient must be attended to throughout the entire
weighing event.
• Operate this scale exclusively with the power adapter provided by Health o meter®
Professional. Use of an unspecified adapter will void the warranty, and can pose a
serious safety hazard.
• Prior to using this scale, inspect the power adapter cord for cracking or fraying, or for
broken / bent plug prongs.
• Prior to using this scale, ensure that the power adapter is plugged into an outlet with
the rated voltage appropriate for operation.
• Ensure that the power adapter outlet is wired to a circuit breaker or other protected
power source.
• Ensure that the power adapter and scale do not come in contact with liquids, excessive
temperature, or excessive humidity.
• Unplug the power adapter, and carefully store both the power adapter and adapter
cord before moving the scale.
5
Page 6

Scale Specifications
Capacity and Resolution
Power Requirements
Environmental
1000 lb x 0.1 lb
110Vac/220Vac to 6VDC/2A
Operating temperatures: 0°C to 50°C
Storage temperatures: -15°C to 65°C)
Humidity: 70% or less up to 40°C non-condensing
Physical Dimensions
Platform
Length: 20”
Width: 18”
Height: 2.25”
Scale
Length: 23.5”
Width: 18”
Height: 41.5”
Weight: 27 lbs.
Receiving and Inspection
Each BCS-G6 scale is shipped disassembled in one carton. Carefully inspect the carton for
shipping damage before unpacking. If damage is found, contact your shipper or a Health o
meter® Professional representative immediately at 1-800-815-6615. Claims must be filed with
the shipper as soon as possible after receipt of the package. The following information details
what you will find inside the main carton as you unpack the parts for assembly.
Included in the box are:
Scale (Base and Stem/Head Assembly),
Feet (4),
Lock Washers (4),
Butterfly Nuts (4),
Power Supply,
Surge Protector,
USB Cable,
Manual,
Sample Printouts.
To prevent scratching any components, carefully remove each assembly from the carton and
unwrap the packing materials. Set the carton aside for storage. To avoid damaging the scale
parts when unpacking, do not use a box cutter, knife, scissors, or any sharp object to open the
protective inner packaging.
6
Page 7

Scale Parts
7
Page 8

Detail
ATTENTION - WARNING
Power Status LED is an indicator that shows the status of scale’s internal computer. To avoid
damage to the operating system, never disconnect the power supply from the scale while the
LED is ON or FLASHING. Switch the scale off with the ON/OFF switch and wait for the LED to
turn off before disconnecting the power supply from the scale.
8
Page 9

Assembly
Step 1. Remove the base from the box and install the four feet.
NOTE: The feet sub-assembly, come pre-assembled. There are 3 components to each foot
assembly:
• Foot
• Space
• Nut
DO NOT DISASSEMBLE FOOT
Removing the nut and/or spacer from the foot assembly will cause the scale to malfunction.
9
Page 10

Step 2. Connect the plug from the stem to the receptacle on the base.
To properly connect, the notches on the plug and receptacle must align.
Step 3. Align the 4 studs from the stem to the 4 holes on the base and insert.
10
Page 11

Step 4. While holding the stem and studs in place, carefully tip the scale at an angle to view the
bottom of the base. Insert the 4 lock washers and tighten the butterfly nuts to the 4 studs.
11
Page 12

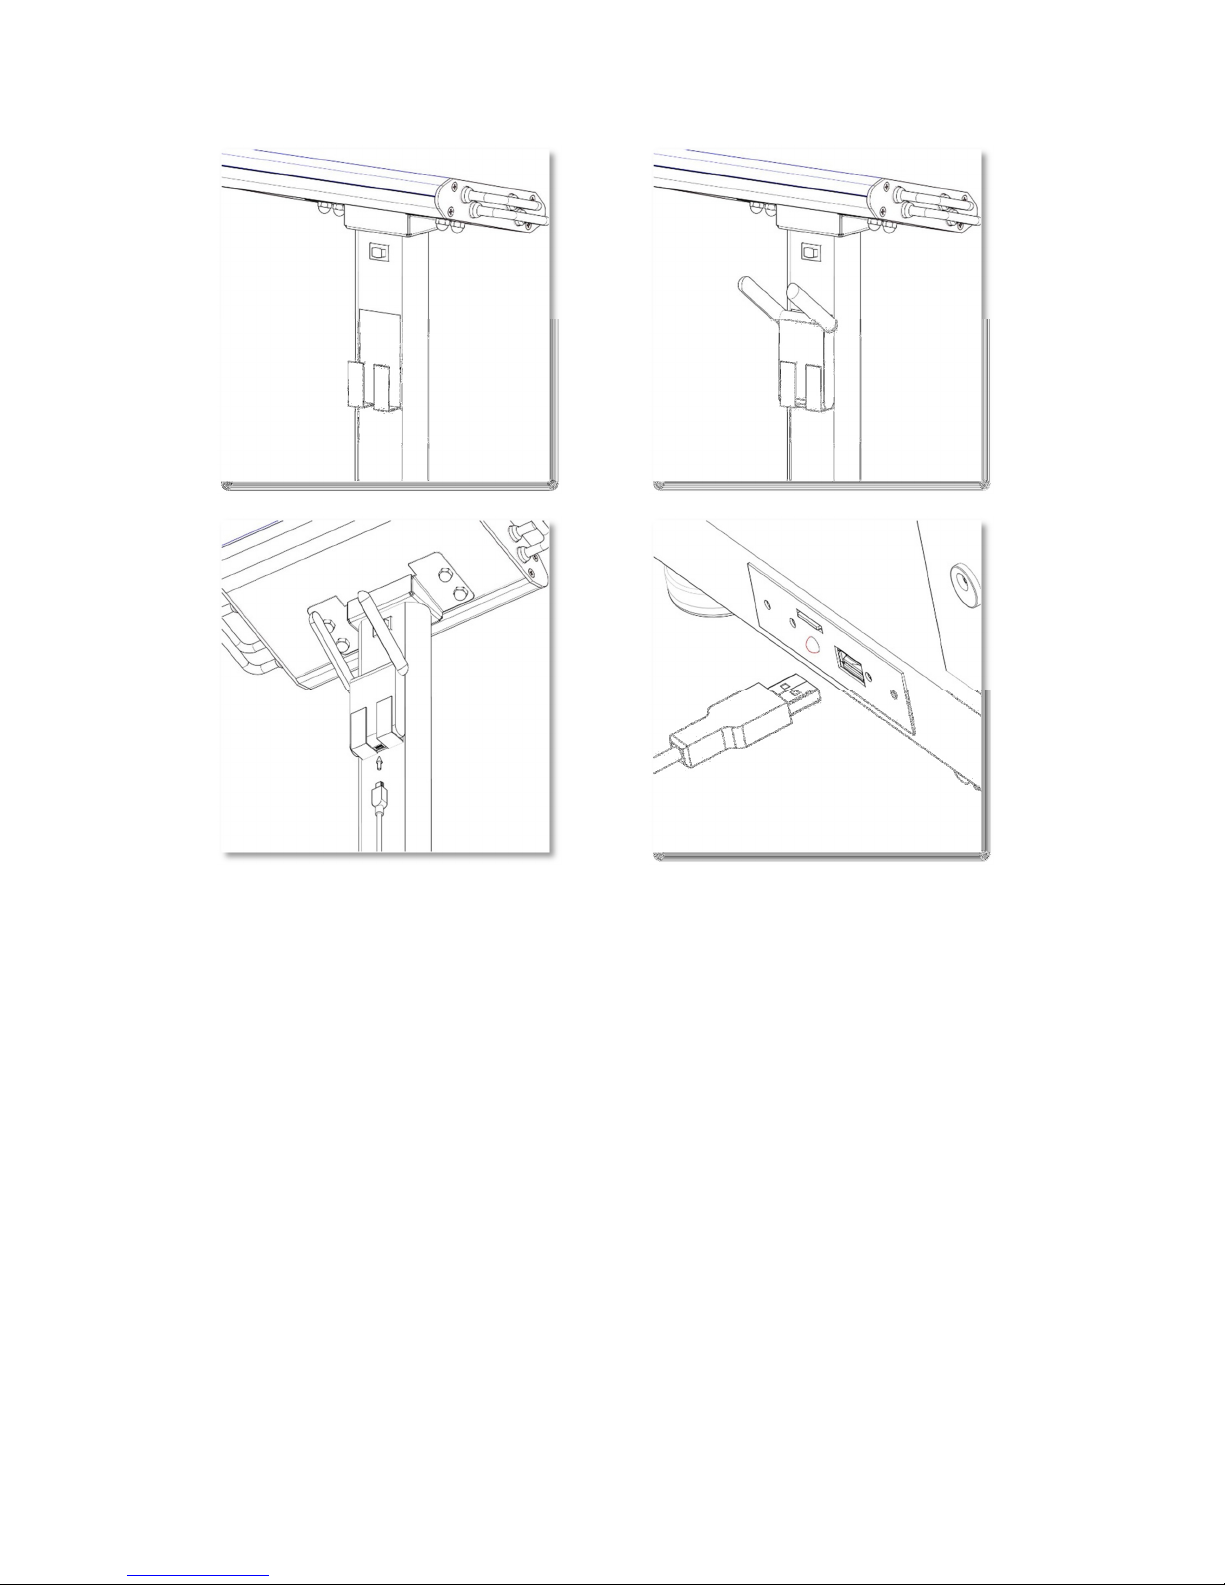
Connecting Scale to Printer (USB Setup)
The BCS-G6 is designed to work with several HP printers. Before purchasing a printer, please
check the list of compatible printers. (View the list online at www.homscales.com)
1. Before making connections, make sure that the scale is off.
2. Turn on the printer and follow any first time power up and alignment procedures.
3. Connect the BCS-G6 to the HP printer by inserting one end of a standard USB cable into
the scale’s USB port and the other end into the printer’s USB port.
4. Make sure the printer is on and connected to the scale, then turn the scale on.
The BCS-G6 will automatically sense the printer at power-up and select the appropriate drivers.
For optimal performance, make sure to disable the printer’s “auto-off” function.
12
Page 13

Installing the Wireless Device (optional)
If you have purchased the wireless option for your BCS-G6, in addition to your scale and
hardware, you will also receive the following:
a. TP Link Antenna Model TL-WN822N
b. Antenna Bracket
c. Mini USB Cable
d. SD Card with Wireless Drivers
Make sure that the scale is off, then use the following steps to install the antenna to your scale.
(See illustrations on the following page.)
1. Remove the film from the double-side type on the back side of the bracket.
2. Place the bracket about 2 inches below the ON/OFF switch on the stem.
3. Place the antenna into the bracket. Make sure the green indicator window is visible.
4. Connect the antenna to the USB port of the scale base using the provided Mini USB
cable.
5. Remove the preinstalled SD Card and replace it with the one included in the wireless
package.
Note: Retain the preinstalled SD card in case a wired connection is desired in the future.
ATTENTION – WARNING
Do not remove the SD Card from its slot while the Power Status LED is on or flashing. The SD
Card contains the printer drivers necessary for printing and can be damaged if removed while
the scale is on.
13
Page 14
Connecting Scale to Wireless Printer
If you have purchased a BCS-G6 system with the wireless option, make sure to have the
wireless device installed.
Before purchasing a wireless printer, please check the list of compatible “Wireless Direct”
printers online at www.homscales.com.
To set up the printer to receive data from the scale:
1. Turn on the printer and follow any first time power up and alignment procedures.
2. Turn on the “Wireless Direct” function on the printer. (see printer manual)
3. Select “On Without Security”.
4. Disable any “Auto Off” features of the printer.
5. Turn the scale on.
The BCS-G6 will automatically sense the wireless device at power-up and select the appropriate
drivers. For optimal performance, make sure to disable the printer’s “auto-off” function.
14
Page 15

Powering up
Before plugging the power supply into the wall, verify that the ON/OFF switch located on upper
part of the stem is in the OFF position. Connect the power supply to the wall socket and then to
the scale.
Once the connection is made, flip the switch to the ON position.
Attention:
To avoid failure, never disconnect the power supply from the scale while the Power Status LED
is ON or FLASHING.
Switch the scale off from the ON/OFF switch and wait for the LED to turn off before
disconnecting the power supply from the scale.
15
Page 16

When the BCS-G6 turns on, the screen will briefly display a start-up message which includes the
Serial Number and other technical information.
The startup will be followed by a synchronization countdown. Once the display goes blank, the
scale is ready to be used.
16
Page 17

Section II - Operations
How to Take a Measurement
1. Have the patient remove their shoes and socks and stand on the scale1.
2. Ensure the patient remains still while the scale measures their weight.
3. When prompted, enter the Age.
On BCS-G62 Duo scales only: For children (4 to 17y11m) the age must be entered in
Years and Months. From 4 to 9 you will need to press enter after the year is entered,
from 10 to 17 the scale will automatically skip to the month field. For Adults 18 to 99, no
months are required.
Press the flashing ENTER button to confirm.
4. The screen will prompt you to enter the Height.
The height may be entered in the following format. A height of 6 feet 2 inches can be entered
as:
6+2
The ½ button is used to add a half inch to the height.
For example 5 feet 7.5 inches is entered as:
5+7+½
If a wrong number is pressed, press CLR (clear) to start over.
Press the flashing ENTER button to confirm the height and move to the next step.
5. When prompted, select Male or Female and press the flashing ENTER button to confirm
selection.
6. When prompted, have the patient grip the handles so that the palm of each hand makes
contact with both handles on both sides of the display module. The thumb should rest
gently on top of upper handle. The scale will now measure their bio-impedance and
display their results.
1
ATTENTION: G61 does NOT require removal of shoes and socks
17
Page 18

7. To print the results, select graphic or plain and press ENTER. (See Section IV - Printouts
for details on the print types).
How to Recall the Last Measurement
The BCS-G6 allows the user to recall the last measurement and reprint it. To recall the last
results:
1. Press the RCL button on the display panel. The data will be displayed.
The display is be cleared by pressing the CLR button.
2. To print the results, select graphic or plain and press ENTER.
The last results will be erased if the scale is turned off.
18
Page 19

Section III – Understanding Results and Norms
In order to determine a discernable change in body composition a 3 % change in body weight is
recommended.2
Body Weight: Indicates the gross total body weight.
% Body Fat: Total Percent of Body Fat. Norms are based on age3
%Body Fat Norms
Male: Under Fat Optimal Overfat Obese
Ages 4-5 <12 12-19 19-23 23+
Age 6 <12 12-20 20-24 24+
Age 7 <13 13-20 20-25 25+
Age 8 <13 13-21 21-26 26+
Age 9 <13 13-22 22-27 27+
Ages 10-11 <13 13-23 23-28 28+
Age 12 <12 12-23 23-28 28+
Age 13 <12 12-22 22-27 27+
Age 14 <11 11-21 21-26 26+
Age 15 <10 10-21 21-25 25+
Ages 16-18 <10 10-20 20-24 24+
Ages 18-39 <10 10-21 21-26 26+
Ages 40-59 <11 11-22 22-27 27+
Ages 60+ <13 13-24 24-29 29+
Female: Under Fat Optimal Overfat Obese
Age 4 <14 14-22 22-26 26+
Age 5 <14 14-22 22-26 26+
Age 6 <14 14-23 23-27 27+
Age 7 <15 15-25 25-29 29+
Age 8 <15 15-26 26-30 30+
Age 9 <16 16-27 27-31 31+
Age 10 <16 16-28 28-32 32+
Ages 11-13 <16 16-29 29-33 33+
Ages 14-16 <16 16-30 30-34 34+
Age 17 <16 16-30 30-35 35+
Age 18 <17 17-31 31-35 35+
Ages 18-39 <20 20-34 34-39 39+
Ages 40-59 <21 21-35 35-40 40+
Ages 60+ <22 22-36 36-41 41+
2
Schoeller, Dale. Human Body Composition: Human Kinetics, 2005. Print
3
Based on National Institute of Health/World Health Organization Guidelines.
19
Page 20

Body Mass Index: BMI is a value derived from the mass (weight) and height of an individual.
The BMI is defined as the body mass divided by the square of the body
height.
% Body Water: Proper hydration norms are based on % body fat4.
Note: G6-Duo does not display %Body Water in Pediatric Mode.
Proper Hydration Ranges
Body Fat% Male %Water Female %Water
10-15 72-65 60-56
16-23 64-59 55-49
24-28 58-54 48-44
29-34 53-49 43-39
35-40 48-45 38-33
% BMI: Displayed only for children (4-17), the BMI percentile is the ranking of the
child’s BMI when compared to other children the same age and gender.
Note: %BMI is only available on G6-DUO scales.
REE: Resting Energy Expenditure is the number of calories required over 24
hours to maintain vital organs and body functions. REE is determined by
integrating the muscle mass value as a predictive variable for each
individual.
Health Status: The health status indicator window is based on recommended BMI
ranges5.
Health Status Ranges - Adult
Underweight Healthy At Risk High Risk
BMI < 18.5 18.5 – 24.9 25 – 29.9 > 30
On the BCS-G6 Duo models, for children under the age of 18, the Health
Status indicator is based on the BMI Percentile.
Health Status Ranges - Pediatrics
Underweight Healthy At Risk High Risk
% BMI < 5 5 – 85 86 – 94 > 95
4
Schoeller, Dale. Human Body Composition: Human Kinetics, 2005. Print
5
Based on CDC Guidelines
20
Page 21

Fat Free Mass: Fat Free Mass refers to the portion of the body composed of muscle,
bones, organs and fluids.
Caloric Burn Rates: Caloric Burn Rates are determined by adding the REE calories to various
levels of physical activity. For your own calculations, remember 3500
calories make one pound of fat.
Visceral Fat: Visceral fat is body fat that is stored within the abdominal cavity and is
therefore stored around a number of important internal organs such as
the liver, pancreas and intestines.
Visceral Fat Level Range6
Normal High Very High
1 – 9 10 – 14 15+
6
Simplified Estimation Method for Visceral Adipose Tissue. North American Association for the Study of Obesity.
21
Page 22

Section IV - Printouts
When the results are displayed, the BCS-G6 allows you to select the print type, Plain or Graphic.
Plain Printouts
The Plain printout is a single page containing all the results from the measurements and
calculations.
Programming Number of Copies
The user can pre-define the number of copies to print. The default value is 1.
To change the value:
1. Without stepping on the scale,
Press # 3 to access Settings Menu – Menu Password (PW): 7538
2. When prompted [MENU ?], press Plain.
3. Enter the number of copies you wish to print (1 thru 9).
4. The scale will display DONE and return to standby.
Graphic Printouts
The Graphic printout is a multi-page report designed for specific preprinted paper. The BCS-G6
is programmed to handle several different graphic layouts.
Note that the BCS-G6 Duo models automatically default to the 7 page Pediatric printout for
individuals under the age of 18.
To properly load the Illustrated Printouts in the printers, place the pre-collated pages face
down, header in.
Selecting Default Graphic Report Type
Your BCS-G6 scale enables you to select the 5 page Adult/Bariatric or the 3 page Fitness graphic
printout.
1. Without stepping on the scale, Press # 3 to access Settings Menu –
Menu Password (PW): 7538
2. When prompted [MENU ?], press Graphic.
3. Enter “0”for the five page Adult Bariatric printout.
4. Enter “4”for the three page Fitness printout.
5. The scale will display DONE and return to standby.
22
Page 23

23
Page 24

Section V - Special Modes
Weight Only Mode
The BCS-G6 allows you to take weight only measurements.
To enable this measurement mode: Press Weight Only before stepping onto the scale.
The scale will display WGT ON. Step on the scale and press Enter. The display will count down
from 5 to 1 and display your weight.
To clear the weight: Press CLR
Athletic Mode
To qualify as “athletic”, the individual must meet the following requirements:
Work out 40 minutes in duration (20 min aerobic/20 min anaerobic), 3 days a week, for at least
the last 6 months.
To enable the Athletic Mode predictive equation:
1. Before stepping on the scale, Press 7. The screen will display: [ATH MODE Y/N?]
2. Press the YES key to enable the Athletic Mode equations, NO to cancel.
These steps will enable the Athletic Mode for a single use. After the test is performed, the BCSG6 will automatically return to Standard Mode measurements.
Bodybuilder Mode
To qualify as a “bodybuilder” the individual must be at least 20% above their ideal weight (as
defined in the Metropolitan Life Height/Weight Tables), and that weight must be primarily
muscle mass.
To enable the Bodybuilder Mode predictive equation:
1. Before stepping on the scale, Press 8. The screen will display: [BB MODE Y/N?]
2. Press the YES key to enable the Body Builder Mode equations, NO to cancel.
These steps will enable the Bodybuilder Mode for a single use. After the test is performed, the
BCS-G6 will automatically return to Standard Mode measurements.
24
Page 25

Section VI – Customizing
Lock Option
The Lock option allows you to “lock” the BCS-G6 and prevent it from being used by
unauthorized people. When the BCS-G6 is locked, you will be required to enter an authorization
ID before each test.
To enable the Lock feature:
1. Press 3 to access Settings Menu – Menu Password (PW): 7538
2. When prompted [MENU ?], press # 9. The screen will display: [PIN? Y/N?]
3. Press the YES key to enable the Lock Pin Option, NO to cancel.
The default authorization ID number is 1234. The ID can be changed at any time.
To change the Authorization ID Number:
1. Press 9 to access Maintenance Menu – Menu Password (PW): 7538
2. When prompted [MENU ?], press # 1. - Enter (PW): 1973
The screen will display: [NEW PIN ----]
3. Enter the new 4 digit ID.
Note: The master PIN/Password is 1973 and this number can always be used to access the
menu should you forget the new PIN/Password.
Print Ohms Option
The Print Ohms option gives you the choice of whether or not to print the measured bioimpedance value on the printouts. When you first receive the scale, the Print Ohms function is
set to OFF.
To enable the printing of the Ohms measurement:
1. Press 3 to access Settings Menu – Menu Password (PW): 7538
2. When prompted [MENU ?], press # 5. The screen will display: [OHMS MODE Y/N?]
3. Press the YES key to enable the Print Ohms Option, NO to cancel.
25
Page 26

Physician ID
The BCS-G6 allows the user to set a physician’s ID. The ID can be a number up to 8 digits and if
set will be printed on the printouts under “Prepared By:”
To set the Physician ID:
1. Press 5 before stepping on the scale. The screen will display: [ID 0000 0000]
2. Enter the preferred ID, up to 8 digits and press ENTER.
The Physician ID can be changed or reset at any time.
Patient ID Option
The Patient ID option gives you the choice of using a Patient ID with every test. When you first
receive the scale, the Patient ID function is set to OFF.
To enable the Patient ID Option:
1. Press 2 to access Settings Menu – Menu Password (PW): 7538
2. When prompted [MENU ?], press # 4.
The screen will display: [ID MODE Y/N?]
3. Press the YES key to enable the Patient ID Option, NO to cancel.
Disabling/Enabling the Calorie Option
Disabling the calorie option will prevent the scale from displaying and printing REE and activity
level burn rates. When you receive the scale, the calories option is set to ON.
To disable the Calorie Option:
1. Press 3 to access Settings Menu – Menu Password (PW): 7538
2. When prompted [MENU ?], press # 8. The screen will display: [CALS Y/N?]
3. Press the NO key to disable the Calorie Option, Yes to Enable.
26
Page 27

Section VII – Maintenance
The following pages provide instructions for maintenance, cleaning, calibration, and
troubleshooting for the BCS-G6 scale.
Caution: Before first use, or after long periods of non-use, check the scale for proper operation
and function. If the scale does not operate correctly, refer to qualified service personnel.
1. Check overall appearance of the total scale for any obvious damage, wear, and tear.
2. Inspect the AC adapter for cord cracking or fraying, or for broken/bent prongs.
Serial Number and other Technical Information
To access technical information about the scale, press [4] on the keypad. The screen will display
Serial Number, Firmware Revision, and Model Number of the scale. Press [CLR] cancel.
27
Page 28

Calibration
For Calibration instructions, please contact Health o meter® Professional Scales Customer
Service at 1-800-815-6615.
Zero Calibration
Press 0 when scale is idle to reset any zero offset.
Cleaning
Proper care and cleaning is essential to ensure a long life of accurate and effective operation.
Caution: Disconnect the scale from the power supply prior to cleaning the unit.
ATTENTION - WARNING
Power Status LED is an indicator that shows the status of scale’s internal computer. To avoid
damage to the operating system, never disconnect the power supply from the scale while the
LED is ON or FLASHING. Switch the scale off with the ON/OFF switch and wait for the LED to
turn off before disconnecting the power supply from the scale.
1. Clean all external surfaces with a clean damp cloth or tissue. Mild antimicrobial or
antibacterial soap and water solution may be used. Dry with a clean soft cloth.
2. Do not immerse the scale into cleaning or other liquid solutions.
3. Do not use Isopropyl Alcohol or other solutions to clean the display surface.
4. Do not use abrasive cleaners.
28
Page 29

Troubleshooting
Issue Cause Solution
Unable to print7 Incompatible printer Verify that the printer being used is on the list
of compatible printers.
Low Ink, out of ink
Use of non-approved or
refurbished cartridges
No paper in tray Verify that there is paper in the correct paper
Loose USB Cable Verify that the USB cable is firmly connected to
Defective USB Cable Replace the USB Cable.
Scale does not communicate with
printer.
Unable to print.
“Wireless setup only”
Graphic forms not
printing properly
Scale does not turn on. Wrong power supply used Verify that the factory provided power supply
Scale not sensing
weight
Inconsistent weight
measurements
Scale does not process
body composition after
patient grips handles.
Antenna has no power. Antenna
Green LED on not on.
Wrong collation selected Set the scale collation to match printer. To
Damaged power supply Contact technical support at 1-800-815-6615.
No power to AC outlet Verify that the outlet used has power.
Power strip is off Reset or turn on the power strip.
Power supply not connected Verify that the power supply is properly
Power Switch in the OFF position Turn the power switch to the ON position.
Feet are not installed on the base Verify that all four feet have been properly
Standoff or nut removed from feet Verify that during assembly, spacer or nut was
10 Pin plug is disconnected Remove the stem/head assembly from the
Scale is not on a level surface Turn the scale off. Move the scale to a level
User did not remove shoes and
socks
Very dry or callused hands or feet Use lotion on hands and/or feet.
Check if ink cartridges are low and need to be
replaced.
Make sure that the ink cartridges are authentic
HP. Some printers do not work well with
refurbished or third party cartridges.
tray.
both the scale and printer.
Turn off scale. Wait for the Power Status LED to
turn off. Make sure that the printer is on and
connected to the scale. Turn Scale on. Wait for
scale to finish count down.
Contact technical support at 1-800-815-6615.
properly load the Illustrated Printouts in the
printers, place the pre-collated pages face
down, header in.
unit is being used.
connected to the power receptacle.
installed on to the base. Refer to the assembly
procedure in the manual.
not removed from the feet before installing
them to the base. See assembly step 1.
base and verify that the cylindrical 10 pin plug
is connected to the receptacle. Refer to the
assembly procedure in the manual.
surface or adjust the leveling feet.
Remove shoes and socks and try again
7
Cause and Solutions may depend on the model of printer.
29
Page 30

Section VIII – Compatible Printers
Please see enclosed list of compatible printers or check our web site at www.homscales.com to
find the most current list of printers that will work with your BodyComp Scale.
For additional information, call 1-800-815-6615
Visit our website at www.homscales.com
30
 Loading...