


PHYSICIAN ELECTRONIC SCALES
BALANCE ELECTRONIQUE
BALANZA ELECTRONICA
MODEL752KL |
MODEL 599KL |
MODEL 597KL |
MODELE 752KL |
MODELE 599KL |
MODELE 597KL |
MODELO 752KL |
MODELO 599KL |
MODELO 597KL |
|
|
|
REMOTE DISPLAY |
WAIST-HIGH |
EYE-LEVEL |
AFFICHAGE À DISTANCE |
JUSQU’À LA CEINTURE |
À HAUTEUR DES YEUX |
PANTALLA REMOTE |
HASTA LA CINTURA |
AL NIVEL DE LOS OJOS |
OPERATION MANUAL
MODE D’EMPLOI
MANUAL DE OPERACIÓN
MODELS 597KL, 599KL, 752KL
Thank you for your purchase of this product. Please read this manual carefully and keep it handy for ready reference.
Merci d’avoir acheté ce produit. Veuillez lire attentivement ce manuel et le garder à portée de main pour pouvoir le consulter à tout moment
Gracias por la adquisición de este producto. Lea por favor este manual cuidadosamente y manténgalo a su alcance
para una pronta referencia.
ENGLISH . . . . . . . . . . . . . . . . . . . . . . . . . . . . . . . . . . . . . . . 2
FRANCAIS . . . . . . . . . . . . . . . . . . . . . . . . . . . . . . . . . . . . . . 9
ESPANOL . . . . . . . . . . . . . . . . . . . . . . . . . . . . . . . . . . . . . 17
TABLE OF CONTENTS
CAUTION AND WARNING . . . . . . . . . . . . . . . . . . . . . . . . . . . . . . . . . . 2
SCALE SPECIFICATIONS. . . . . . . . . . . . . . . . . . . . . . . . . . . . . . . . . . . 2
SET UP . . . . . . . . . . . . . . . . . . . . . . . . . . . . . . . . . . . . . . . . . . . . . . . 3-4
OPERATION INSTRUCTIONS . . . . . . . . . . . . . . . . . . . . . . . . . . . . . . . 4
MAINTENANCE . . . . . . . . . . . . . . . . . . . . . . . . . . . . . . . . . . . . . . . . . . 5
TROUBLESHOOTING. . . . . . . . . . . . . . . . . . . . . . . . . . . . . . . . . . . . . . 5
CALIBRATION PROCEDURE . . . . . . . . . . . . . . . . . . . . . . . . . . . . . . 5-6
EXPLODED VIEW OF SCALE . . . . . . . . . . . . . . . . . . . . . . . . . . . . . . . . 6
PARTS LIST . . . . . . . . . . . . . . . . . . . . . . . . . . . . . . . . . . . . . . . . . . . . . 7
WARRANTY . . . . . . . . . . . . . . . . . . . . . . . . . . . . . . . . . . . . . . . . . . . . . 8
CAUTION AND WARNING
To prevent injury and damage to your scale, please follow these instructions very carefully
•Do not transport the scale while the platform is loaded.
•For accurate weighing the scale must be placed on a flat, stable surface.
•For accurate weighing, verify proper operation according to the procedure described in this manual before each use.
•Do not use in the presence of flammable materials.
•Operating at other voltages and frequencies than specified could damage the equipment.
•If the “LOW BAT” indicator activates, for accurate weighing replace the batteries or connect the scale to an AC power source as soon as possible.
SPECIFICATIONS
GENERAL
Health o meter’s Digital Physician Scales, models 597KL, 599KL, 752KL use sophisticated microprocessor technology. Each precision instrument is designed to provide accurate, reliable and repeatable weight measurements and features that make the weighing process simple, fast and convenient.
The scale is set up to determine the weight of a stationary patient. The weight can be displayed in pounds or in kilograms. The scale features a swivel display module which allows for viewing from either side of the scale. Also included with the 599KL and 597KL models are wheels for easy mobility.
The unit can be operated using its AC adapter or by 6-C cell batteries (not included)
SCALE SPECIFICATIONS
2
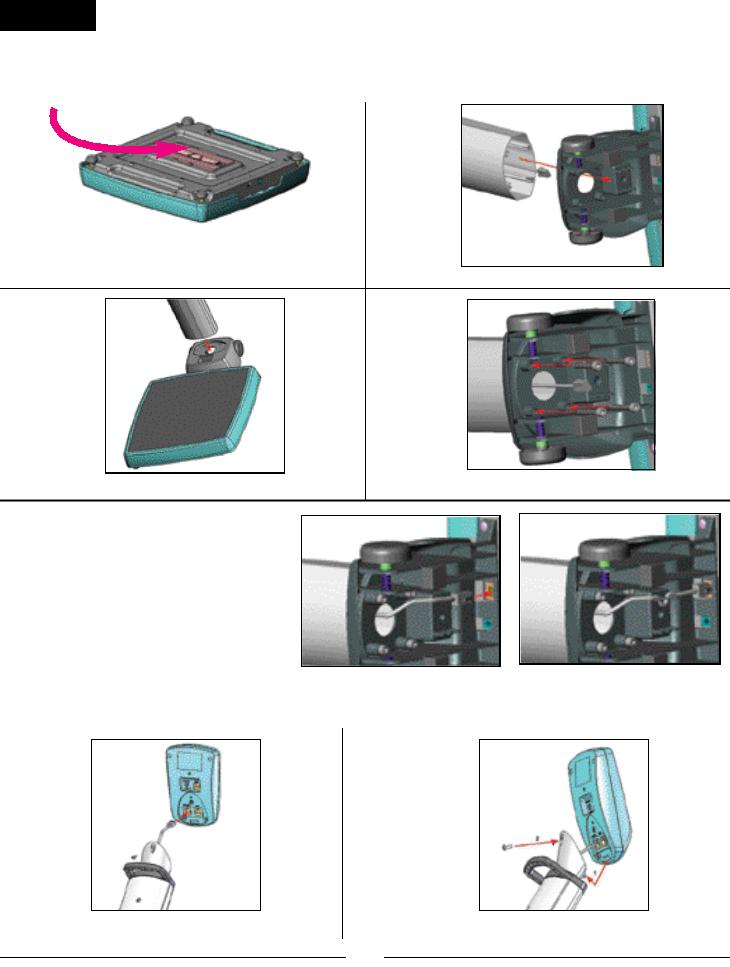
Set Up
Tools Needed – 5mm Hex Driver, Phillips Screwdriver, Flat-Head Screwdriver (for 597KL height rod mount only)
Materials Included – 4-Hex Head Machine Screws; 1-Phillips Screw (model 597and 599KL, 2 Phillips Screws (model 752KL);
1-Custom Height Rod Attachment Screw, for models 597 and 599; 1 AC adapter holder with 2 sheet-metal screws.
1. |
2. |
Place batteries in battery holder at base of scale (if using battery operation – we recommend the use of
EVEREADY Energizer® e2™ batteries).
Feed load cell wire through pillar base.
3. |
4. |
Screw in 4 hex screws with (5mm) hex driver.
Insert pillar into pillar base
5. Plug load cell wire into load cell plug in base of scale (see diagram 2a). The base of the scale has been designed to provide wire management for the load cell cable. See diagram 2b for wire management of load cell cable.
|
Diagram 2a |
Diagram 2b |
|
|
|
6. |
Set base upright |
|
|
|
|
7. |
8. |
|
Plug load cell wire into load cell plug in display module (correct plug is labeled load cell)
For models 597KL and models 599KL, place display module on top of the pillar and use Phillips screw to tighten module to pillar.
3

9. |
For model 752KL, insert display module into wall |
mount/table top adapter. For wall mount place |
display module in adapter (see diagram 5a). For table-top place display module in adapter (see diagram 5b). Use 2 Phillips screws to secure the adapter to the display module.
Diagram 5a |
Diagram 5a |
10. For model 597KL, insert height rod into pillar base slot (see diagram 6a). Feed screw into hole. Use Flat-Head Screwdriver to tighten height rod to scale from the back (see diagram 6b).
Diagram 6a |
Diagram 6b |
11.
For models 597KL and models 599KL, attach the AC adapter holder with 2 Phillips sheet metal screws.
12. For AC operation – plug adapter into base of scale and into power source, or use the DC IN plug on the back of the display module.
13. Remove protective plastic film from display
14. Turn scale on by pressing the ON/OFF button. The display will show “Health o meter ….. and then 000.0
NOTE: if the set up procedure failed, refer to the troubleshooting instructions. If the problem is not corrected, refer to Health o meter® Professional technical support at 1.800.638.3722
Operating Instructions
1.Press the ON/OFF button to turn the scale on.
2.Wait until ‘000.0’ and ‘Zero’ on the left side of the display appear
3.Ask the patient to step on the scale. The scale will display the patient’s weight. (Note: the weight will change until the patient is stable). Once the patient is standing still, the scale will beep three times and the word Lock will appear on the display.
4.To use the BMI feature, place the patient on the scale platform; press the BMI button. The scale will prompt you to enter the patient’s height. Use the arrow (scroll) keys to find the correct height (the default height is 5 ft. 6.0 in.). Press ENTER. Display will read the patient’s BMI.
Weight may remain displayed on the scale by pressing the HOLD/RELEASE button. To release, press the HOLD/RELEASE button again.
NOTE: The scale will always default to the settings and units last used.
* To change the scale default units to kilograms, or to deactivate the LB/KG button, please contact Technical Support at 1.800.638.3722.
NO. |
DESCRIPTION |
FUNCTION |
1. |
ON/OFF |
Turns scale ON and OFF. |
2. |
ZERO |
Zeros the scale prior to weighing. |
3. |
HOLD/RELEASE |
Holds the value of the weighed object on the display until the button |
|
|
is pressed again to clear the value. |
4. |
KG/LB button |
Toggles between kilograms or pounds. |
5. |
UP ARROW |
Scrolling method for entering height |
6. |
BMI |
Prompts entry of data to calculate the patient’s Body Mass Index (BMI). |
7. |
DOWN ARROW |
Scrolling method for entering height |
|
|
|
8. |
CLEAR |
Functions as menu escape in BMI mode |
9. |
ENTER |
Used to accept height in BMI mode |
|
|
|
4

GENERAL
This section provides instructions for maintenance, cleaning, troubleshooting and operator replaceable parts for the Physician Digital Scale. Maintenance operations other than those described in this section should be performed by qualified service personnel.
MAINTENANCE
B e f o re first use and after periods of non-use, check the scale for proper operation and function. If the scale does not operate corre c t l y, refer to qualified service personnel.
1.Check overall appearance of the total scale for any obvious damage, abuse, etc.
2.Inspect condition of AC adapter cord and prongs, replace if needed.
CLEANING
Proper care and cleaning is essential to ensure a long life of accurate and effective operation. Disconnect the scale from the AC power source
1.Clean all external surfaces with a clean damp cloth or tissue. Mild soap and water solution may be used. Dry with a clean soft cloth.
2.Do not immerse the scale into cleaning or other liquid solution.
3.Do not use Isopropyl Alcohol or other solutions to clean the display surface.
TROUBLESHOOTING
Refer to the following instructions to check and correct any failure before contacting service personnel.
SYMPTOM |
POSSIBLE CAUSE |
CORRECTIVE ACTION |
|
|
|
|
|
|
|
|
|
|
|
|
ERROR LIST
ERROR NO. DEFINITION |
CHECK/REPLACE |
|
|
|
|
|
|
|
|
|
|
|
|
|
|
|
|
|
|
|
|
|
|
CALIBRATION PROCEDURE
The calibration procedure may be performed using a known weight in either kilograms or pounds. Simply set the scale for the desired unit of measure using the KG/LB key and start the calibration procedure. The following instructions assume the scale is set to measure lbs.
The calibration is performed using kg or lb, according to the unit of measure used upon entering into the calibration path. Note: The calibration weight must be no less than 60 lb (28 kg) and no more than 300 lb (135 kg).
5

OPERATOR ACTION |
DISPLAY |
|
|
|
|
|
|
|
|
|
|
|
|
|
|
|
|
|
|
|
|
Exploded View of Scale
6

Parts List

LIMITED WARRANTY
What does the Warranty Cover?
Pelstar LLC scales are warranted from date of purchase against defects of materials or in workmanship for a period of one (1) year. If product fails to function properly, return the product, freight prepaid and properly packed to Pelstar. See “To Get Warranty Service” below for instructions. If manufacturer determines that a defect of material or in workmanship exists, customers' sole remedy will be repair or replacement of scale at no charge. Replacement will be made with a new or remanufactured product or component. If the product is no longer available, replacement may be made with a similar product of equal or greater value. All parts including repaired and replaced parts are covered only for the original warranty period.
Who is Covered?
The original purchaser of the product must have proof of purchase to receive warranty service. Pelstar dealers or retail stores selling Pelstar products do not have the right to alter, or modify or any way change the terms and conditions of this warranty.
What is Excluded?
Your warranty does not cover normal wear of parts or damage resulting from any of the
following: negligent use or misuse of the product, use on improper voltage or current, use contrary to the operating instruction, abuse including tampering, damage in transit, or unauthorized repair or alternations. Further, the warranty does not cover Acts of God, such as fire, flood, hurricanes and tornadoes. This warranty gives you specific legal rights, and you may also have other rights that vary from country to country, state to state, province to province or jurisdiction to jurisdiction.
To get Warranty Service Make sure you keep your sales receipt or document showing proof of purchase.
Call 1 (800) 638-3722 or 1 (708) 598-9100 to receive a return authorization number. Attach proof of purchase to your defective product along with your name, address, daytime telephone number and description of the problem. Carefully package the product and send with shipping and insurance prepaid to:
Pelstar LLC
Attention R/A#_____________
Repair Department
7400 W. 100th Place
Bridgeview, IL 60455
If your scale is not covered by warranty, or has been damaged, an estimate of repair costs or replacement costs will be provided to you for approval prior to servicing or replacing.
Pelstar LLC 7400 West 100th Place, Bridgeview IL 60455 • 1-800-638-3722 or 1-708-598-9100
www.healthometermedical.com
Health o meter Professional products are manufactured, designed and owned by Pelstar LLC.
Health o meter® is a registered trademark of Sunbeam Products Inc., Boca Raton, FL 33431.
Patents Pending
8
 Loading...