

Page 1

User’s Guide
Slide Feeder for
Flextight 949 Scanners
by Hasselblad
Page 2

2
© 2005 Hasselblad A/S. All rights reserved.
Slide Feeder for Flextight 949 Scanners, Part No 75020088 revision B.
e information in this manual is furnished for informational use only, is subject to change
without notice, and should not be construed as a commitment by Hasselblad A/S.
Hasselblad A/S assumes no responsibility or liability for any errors or inaccuracies that may appear
in this manual.
Hasselblad A/S assumes no responsibility or liability for loss or damage incurred during or as a
result of using Hasselblad soware or products.
Hasselblad, FlexColor, Flextight, FlexFrame and Ixpress are trademarks of Hasselblad A/S. Adobe
and Adobe Photoshop are trademarks of Adobe Systems, Inc. Macintosh, Mac OS, ColorSync, and
FireWire are registered trademarks of Apple Computer, Inc.
Printed in Denmark.
Page 3

3
Table of Contents
Introduction 4
Important Warnings and Restrictions 4
System Requirements 5
Feeder Diagram 6
Slide Original Holder Diagram 7
Mounting and Unmounting the Slide Feeder 8
Mounting the Feeder 8
Unmounting the Feeder 15
Loading Slides 18
Loading Directly into the Feeder 18
Using a Second Magazine 19
Scanning with the Slide Feeder 22
Batch Scanning with 3f 22
Scanning Individual Slides 25
Troubleshooting 28
Aligning the Feeder 30
Checking the Alignment 30
Correcting the Alignment 30
Preparing the Feeder for Transport 32
Preventive Maintenance 33
Disposal 33
Technical Information 34
Specications 34
CE Declaration 35
Page 4

4
Introduction
e Slide Feeder is an optional accessory for Flextight 949 Scanners. It
enables you to use your scanner to load individual slides and to batch
scan up to 50 slides at a time. It features a removable magazine, which
enables operators to scan one magazine while a second magazine is being
loaded.
While in use, the Slide Feeder loads slides one at a time from the
magazine and into the scanner, where light is shown through the slide
and the image is scanned to your computer. e mechanism itself
is similar to those typically used in slide projectors that have linear
magazines. is process is repeated until all selected slides have been
scanned.
is manual provides important information about using the Slide
Feeder for your Flextight 949 Scanner.
Important Warnings and Restrictions
Read all of the included documentation before attempting to install
and use the Slide Feeder.
Never mount or unmount the Slide Feeder when the scanner is
switched on.
Always use the standard, soware-guided procedure when mounting
or unmounting the Slide Feeder from your scanner. See “Mounting
and Unmounting the Slide Feeder” on page 8 for details.
Keep the original box in which the Slide Feeder was delivered to you.
is box is made of sturdy cardboard and includes a foam lining
custom cut to hold the Slide Feeder safely and securely. Always store
the Slide Feeder in this box when you are not using it. If you must
return the Feeder to Hasselblad for service, you must use this box for
shipping or the shipment will be refused. See “Preparing the Slide
Feeder for Storage and Transport” on page 32 for instructions.
•
•
•
•
Page 5

5
Install the scanner and Slide Feeder in a location where they are not
accessible by children. e units contain small openings and moving
parts that can cause injury.
Do not touch the Slide Feeder while the magazine is moving.
Do not touch the originals or the original holder during scanning.
When you switch on the scanner with the Slide Feeder attached, the
unit move the Feeder into its “home” position if it is not already there.
Do not touch the Slide Feeder while the magazine is moving.
When using the Slide Feeder, a huge amount of data is oen
generated. Be sure to allocate ample hard disk space for scanned
images.
Before servicing the scanner and/or Slide Feeder, remove the power
supply from the mains (unplug the scanner). It is not sucient simply
to press the on/o button on the scanner.
System Requirements
For Macintosh Users
Flextight 949 Scanner
A computer running Mac OS 10.2.1 or later
FlexColor 4.0.2 or later for Mac OS
For Windows Users
Flextight 949 Scanner
A computer running Windows 2000 or XP
FlexColor 4.0.2 or later for Windows
•
•
•
•
•
•
•
•
•
•
•
•
Page 6
6
Feeder Diagram
A
C
D
F
B
E
G
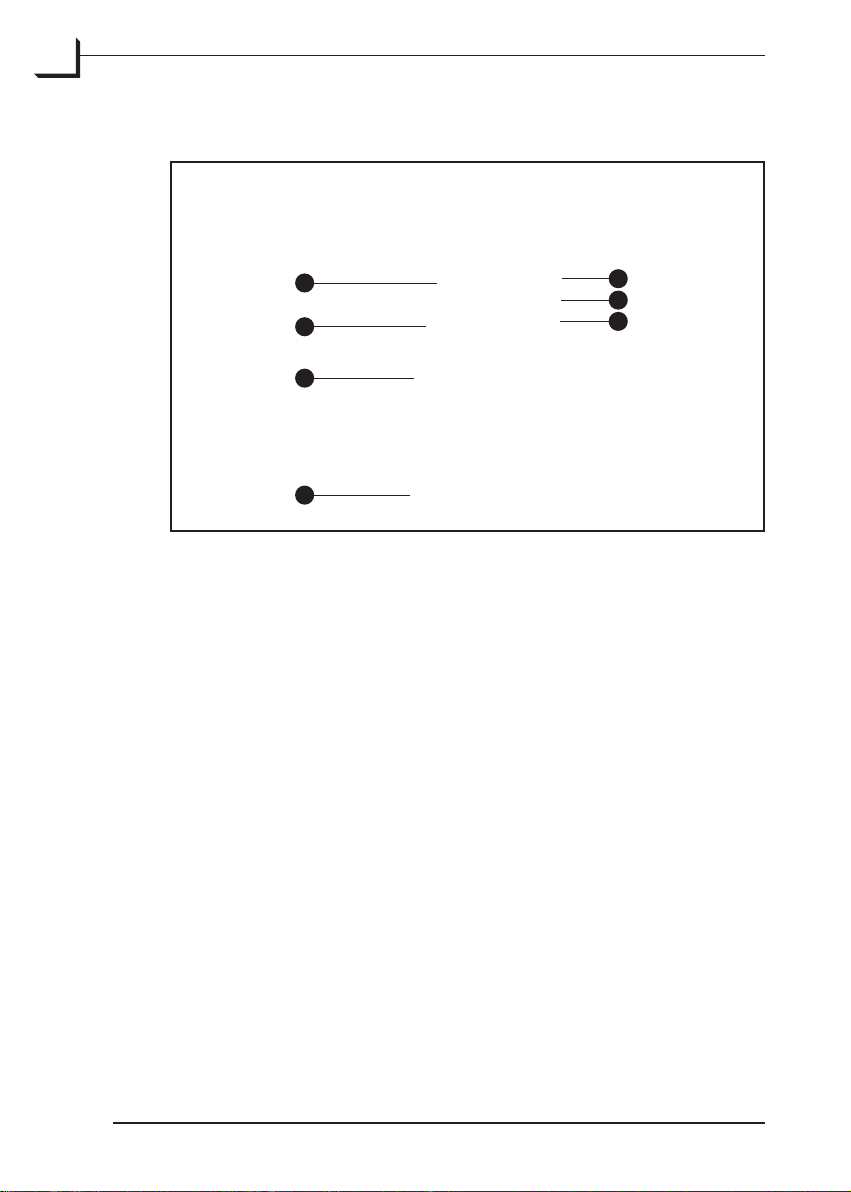
Figure 1: Features of the Slide Feeder
Magazine drawer clasp: holds the drawer closed; to open the drawer,
pull here and swing down.
Slide holder supports: support the slide holder and guide it into the
scanner.
Magazine drawer with magazine and slides mounted: this is where
your slides are held until they are scanned. e magazine holds up to
50 slides.
Magazine drawer hinge: when you open the magazine drawer, it
rotates around this hinge. e drawer can also be removed by pulling
it away from this hinge, thereby enabling you to change magazines.
Power Indicator (Green): Remains lit when ready to scan; ashes
when the scanner is switched on.
Motor Drive Indicator (Yellow): Lights when the scanner is
positioning the original holder, loading a new original or positioning
the optics.
Scan Indicator (Red): Lights when scanning. Do not touch the
scanner or Slide Feeder while this indicator is lit. If the light is
ashing when not scanning, then an error has occurred—please
contact your Flextight dealer for assistance.
A
B
C
D
E
F
G
Page 7
7
Slide Original Holder Diagram
A
C
D
E
F
B
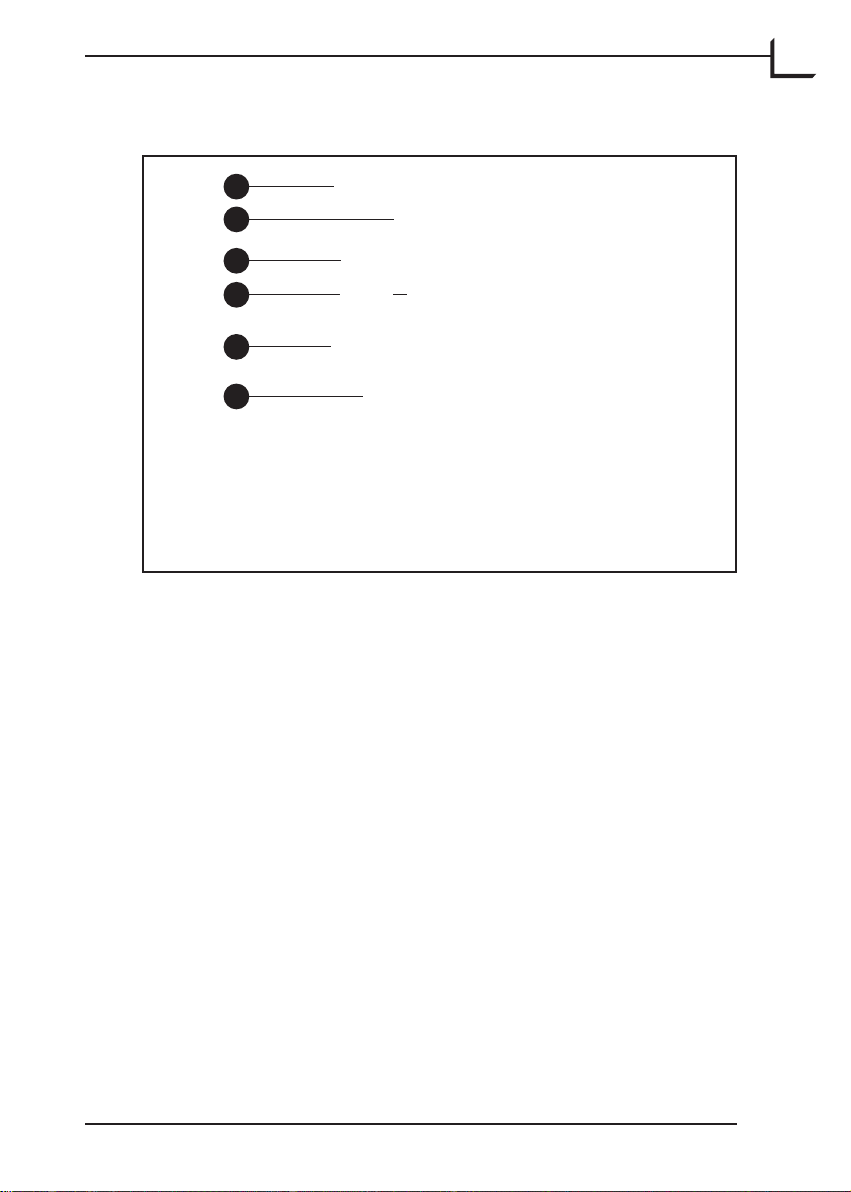
Figure 2: Slide original holder features
Loading tab: is tab must face into the scanner. A magnet inside the
scanner grabs the holder here.
White calibration slot: Before each scan, the scanner makes a white
calibration through this opening.
Tension springs: ensure that each slide is positioned correctly as it
loads into the holder.
Slide clasp: grabs each slide from the magazine.
Flexible back plate: this exible metal plate is wrapped onto the
internal virtual drum of the scanner.
Rigid top plate: this rigid plate holds and supports the slide.
A
B
C
D
E
F
Page 8

8
Mounting and Unmounting
the Slide Feeder
e procedures for both mounting and unmounting the Feeder to/
from your scanner require that you use the soware-guided procedure
described below, which ensures that the mechanical pars of the scanner
and Feeder are correctly aligned for each step. Always use this soware
feature when you need to mount or unmount the Feeder. Otherwise, you
may damage your Feeder and/or scanner. Also, the unmount procedure
makes sure that the Feeder is correctly positioned for storage in its
original box.
Important notice! Never mount or unmount the feeder with power switched
on. It can cause damage to both scanner and feeder!
Mounting the Slide Feeder
Always use the procedure below to mount the feeder:
If you have not already done so, set up your Flextight 949 Scanner,
connect it to your computer and install the FlexColor soware as
described in your scanner and soware user manuals. Conrm that
the scanner is working correctly by making a test scan using one of
the standard original holders.
If there is still an original holder mounted inside the scanner, then
remove it. Close the light table, if it is open, by liing its front edge.
See your scanner manual for instructions.
Position the Flextight 949 Scanner so that its front edge is aligned
with the edge of your table. e Slide Feeder will hang over the edge
of the table when it is mounted.
Make sure the scanner is turned on and launch the FlexColor
soware. If FlexColor is already running, then quit and restart the
program.
1.
2.
3.
4.
Page 9
9
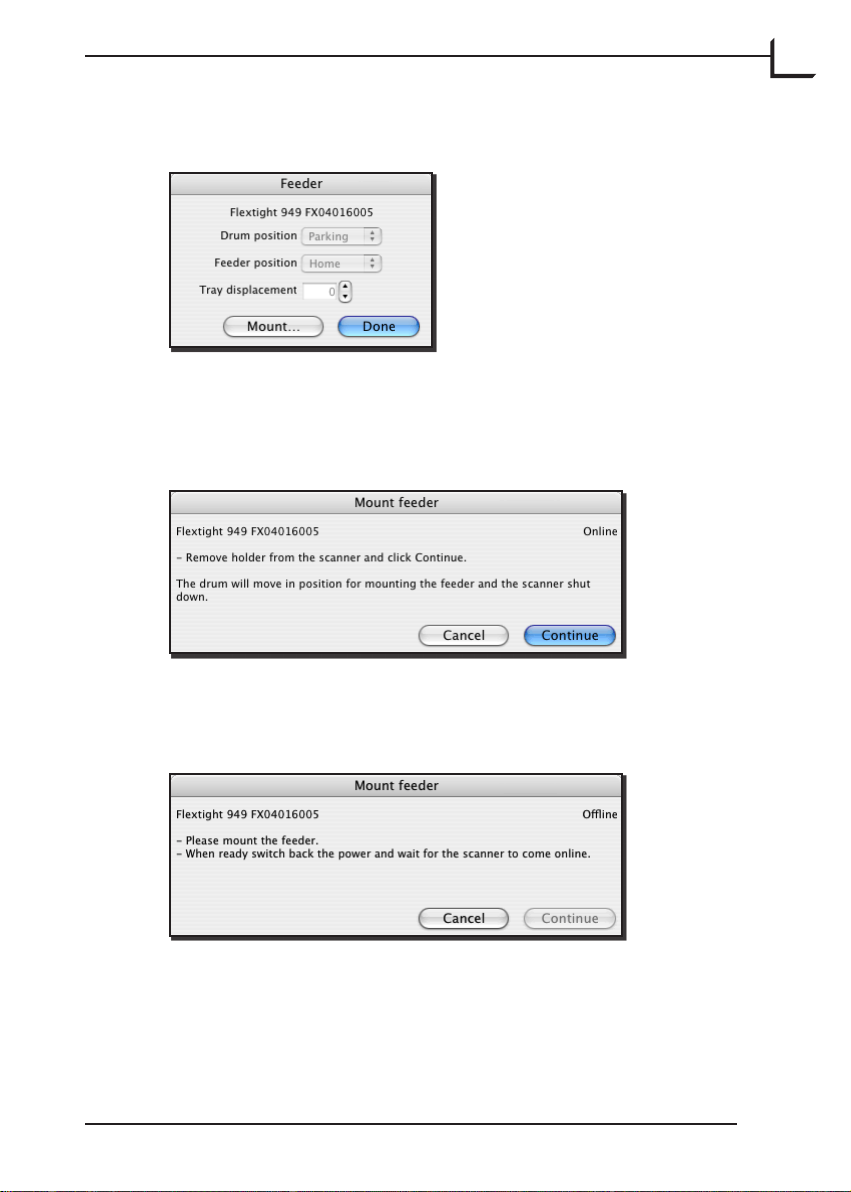
Select Maintenance > Feeder from the FlexColor menu bar. e
Feeder window opens.
Click on the Mount button.
e Mount feeder window opens, which guides you through each
step of preparing the scanner for the Feeder. e procedure here in
this manual also describes each step.
Click on the Continue button.
e scanner then positions itself to accept the Feeder and shuts itself
down. e Mount feeder window updates with new instructions.
Get the Slide Feeder and study its back panel. Locate the connector
(A) and two mounting pins (B) as shown in Figure 3 below.
5.
6.
7.
8.
Page 10

10
A
B
Figure 3: Back panel of the Slide Feeder, showing
the electrical connector (A) and mounting pins (B).
Li the batch-feeder panel on the front of the Flextight 949 Scanner
and locate the connector (A) and two mounting holes (B) inside
the scanner, as shown in Figure 4 below. ese match the pins and
connector of the Feeder.
Figure 4: Flextight 949 Scanner with the batch-feeder panel open,
showing the electrical connector (A) and mounting holes (B).
9.
Page 11
11
Grasp the Slide Feeder rmly with one hand while holding the batchscan door open on the scanner with your other hand. Align the pins
and connector on the back of the Feeder with the holes and connector
inside the scanner. Gently press the Feeder down and in place,
making sure that the Feeder sits rmly and has a good connection
with the connector.
Turn on the scanner by pressing its on/o switch.
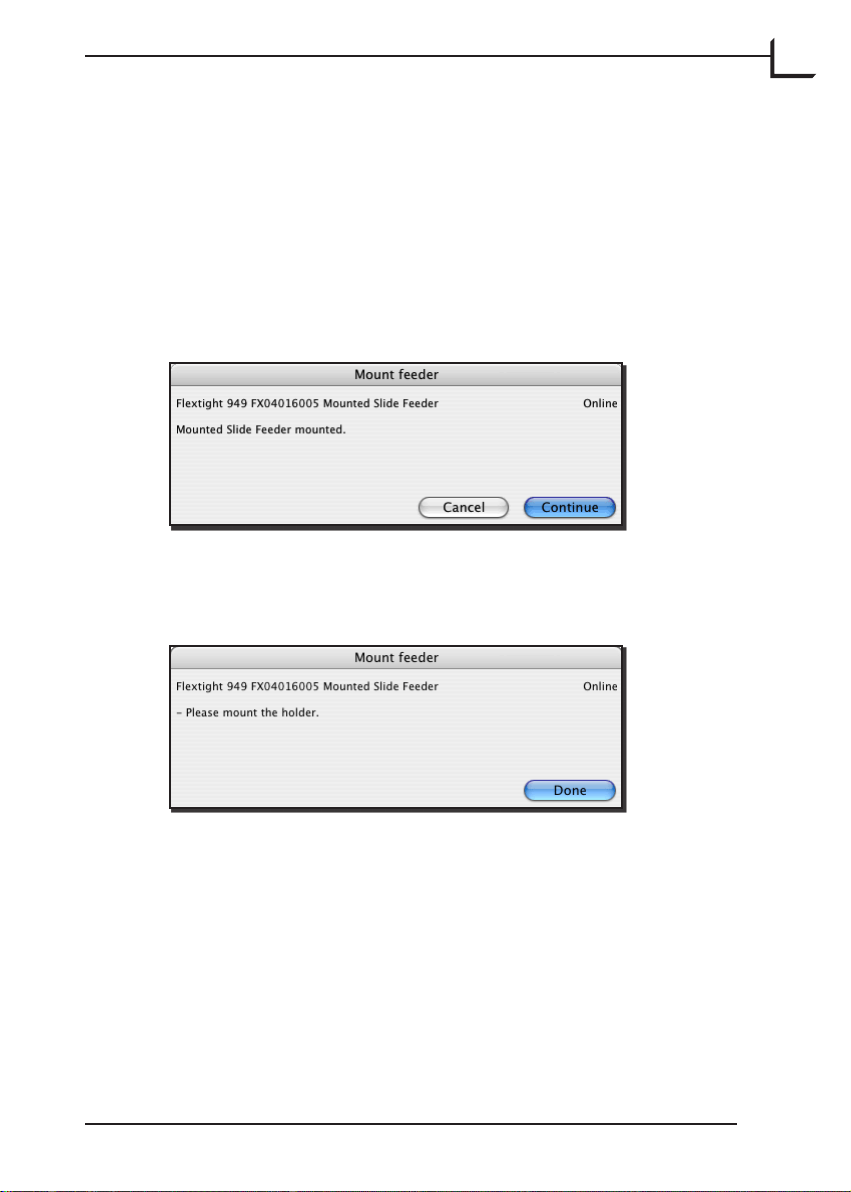
FlexColor detects that the scanner has been turned back on. e
Mount feeder window updates with new instructions.
Click on Continue in the Mount feeder window.
e scanner repositions its drum and then the Mount feeder window
updates again, asking you to mount the holder.
Open the magazine drawer by grasping it at the top and pulling it
down. It rotates forward on its hinge (B) and then stops, exposing the
magazine (C) with magazine drawer top (D) facing out (see Figure 5,
below). Note also the original-holder supports (A); this is where you
will insert the slide holder later in this procedure.
10.
11.
12.
13.
14.
Page 12

12
B
A
C
D
Figure 5: e Slide Feeder attached to a scanner and with its magazine
drawer open, showing the original-holder supports (A), drawer hinge
(B), magazine (C) and drawer top (D).
Take the slide holder and position it with the heavy metal plate facing
up and the tab facing into the scanner. Hold it with both hands,
grasping its lower right and lower le corners respectively as shown in
Figure 6.
15.
Page 13

13
Figure 6: Inserting the Slide original holder.
Position the Slide holder on the two supports extending from the
front of the Slide Feeder and slide the holder into the scanner. A
magnet inside the scanner will grab the holder. Gently press the
holder into the scanner to make sure it is fully inserted. Do not force
it.
Go back to your computer and click on Done in the Mount feeder
window. e scanner draws the holder inside and sets the drum in the
“parked” position. You then return to the Feeder window, in which
the Drum position and Feeder position menus are now active.
16.
17.
Page 14

14
Click on Done to close the Feeder window.
Close the magazine drawer by rotating it up and pressing it into place
so that the metal clasp clicks in it at the top.
e Slide Feeder is mounted and ready for use.
Figure 7: Flextight scanner with the Slide Feeder
attached and ready for use.
18.
19.
20.
Page 15

15
Unmounting the Slide Feeder
To unmount the feeder, you must always use the soware-guided
procedure below to ensure that the scanner drum and the magazine
drawer are positioned correctly before detaching.
Turn on the scanner and launch the FlexColor soware.
Select Maintenance > Feeder from the menu bar.
e Feeder window opens.
Press the Unmount button. e feeder will move the slide magazine
drawer into storage position
FlexColor displays the Mount feeder window.
As instructed in the window, open the magazine drawer by grasping
it at the top and pulling it down. en click Continue to go on to the
next step.
1.
2.
3.
4.
Page 16

16
e Mount feeder window updates with new instructions.
As instructed in the window, remove the holder from the scanner
with both hands, grasping the le and right extended corners, and
gently pull it out and away from the scanner as shown in Figure 8,
below. Put the holder away in a safe place.
Figure 8: Removing the slide original holder.
When you have removed the holder, click Continue in the Mount
feeder window. e scanner then shuts down.
5.
6.
Page 17

17
e Mount feeder window updates with new instructions.
Close the magazine drawer by rotating it up and pressing it into place
so that the metal clasp holds it at the top. Unmount the feeder and
place it in it’s original packaging.
Click on Done in the Mount feeder window.
Open the scanner light table and switch on the power.
7.
8.
9.
Page 18

18
Loading Slides
Depending on your work load and preferred working method, you
might decide to load slides directly into the Feeder, or to work using two
(or more) magazines, lling one magazine while the other one is being
scanned.
Loading Directly into the Feeder
Open the magazine drawer by grasping it at the top and pulling it
down. It rotates forward on its hinge (B) and then stops, exposing the
magazine (C) with magazine drawer top (D) facing out (see Figure 9,
below).
B
A
C
D
Figure 9: e Slide Feeder with its magazine drawer open, showing
the original-holder supports (A), drawer hinge (B), magazine (C) and
drawer top (D).
1.
Page 19

19
Remove any slides that you have already scanned. en, starting at
the front/top of the magazine, load new slides in the order in which
you would like to scan them. When standing in front of the scanner,
position each slide with the top pointing up and with any text
showing forward (not in mirror image).
Work your way towards the back of the magazine until you have
mounted all of the slides you want to scan or until there are no slots
le. Usually, you should not skip any slots; however, if you would like
to scan the magazine in two or more dierent batches, then leave two
empty slots between each batch. Single empty slots will be ignored.
Close the magazine drawer by rotating it up and pressing it into place
so that the metal clasp holds it at the top.
Using a Second Magazine
Load your extra magazine with slides. Start at the front of the
magazine (the side the slots lean towards) and load new slides in
the order in which you would like to scan them. Position each slide
with the top pointing up and with any text showing forward (not in
mirror image) as you look from the front of the magazine. Usually,
you should not skip any slots when loading slides into the magazine;
however, if you would like to scan the magazine in two or more
dierent batches, then leave two empty slots between each batch.
Single empty slots will be ignored.
Go to your scanner and open the magazine drawer by grasping it at
the top and pulling it down. It rotates forward on its hinge (B) and
then stops, exposing the magazine (C) with magazine drawer top (D)
facing out (see Figure 9, above).
e magazine drawer can be removed from its hinge. Do this now by
grabbing the bottom of the Slide Feeder near the hinge with one hand
and grasping the magazine drawer with the other hand. Hold the
drawer from below and about halfway up (see Figure 10, next page).
Use the hand that is holding the Feeder to keep the Feeder steady
while using your other hand to pull the drawer straight away from the
Feeder; rocking gently from le to right can help loosen it. e drawer
will come free from its hinge.
2.
3.
4.
1.
2.
3.
Page 20

20
Figure 10: Removing the magazine drawer from its hinge.
Place the drawer at on a table with its magazine facing up.
Using both hands, pinch the four corners of the magazine together (is
shown in Figure 11 below) until you are able to li the magazine away
from the drawer.
Figure 11: Pinch the magazine at its four corners (as indicated by the
arrows) to free it from the magazine drawer.
4.
5.
Page 21

21
Take the second magazine, which you just nished loading, and
position it the same way as the magazine you just removed. At one
end, the magazine has a broad metal plate (A) and ared rails with a
notch at each side (B); this must face the bottom of the drawer, with
the rst slide facing the top (see Figure 12, below). Align the slots on
the rails with the bottom tabs of the drawer and press the magazine
down into place until it clicks at both the top and bottom ends.
B
A
Figure 12: e bottom end of the magazine has a broad metal plate
(A) and ared, notched rails (B); this end must face the bottom of the
magazine drawer when you replace the magazine.
Take the drawer back to the scanner. As when you removed the
drawer, hold the drawer with one hand and stabilize the Feeder with
the other. Insert the two pins at the bottom of the drawer into the
holes at the top of the hinge. Press the drawer down so that it sits ush
against the hinge panel.
Close the magazine drawer by rotating it up and pressing it into place
so that the metal clasp holds it at the top.
6.
7.
8.
Page 22

22
Scanning with the Slide
Feeder
Batch Scanning with 3f
e Slide Feeder is intended as a tool for scanning large number of
slides in a production environment. For this application, we strongly
recommend the 3f workow for maximum eciency and exibility.
e 3f image-le format preserves your full-resolution, 16-bit raw scans
and keeps a record of settings applied to each exported image. is gives
you the exibility to use all of the image correction and sizing tools in
FlexColor while ensuring that no data is lost from your original scan.
Once you have made all of the required settings in FlexColor for each
image, you can export TIFF or JPEG les in which all of your FlexColor
settings are applied. Your settings are stored in the original 3f le, but
not applied to it. If you export using dierent settings, then these are
also stored with the original le, providing you with a history of all the
exports you have made from a given 3f image. A given image might,
for example, be optimized several times for use in a black & white
newspaper, color brochure, poster and web page.
e 3f workow is fully described in the FlexColor User’s Guide. An
example of how to use it in a production environment is briey outlined
below.
If you have a large number of slides to scan, then use two (or more)
magazines so that you can load one with new slides as another one is
being scanned. See also “Using a Second Magazine” on page 19.
Either ll the magazine in the Feeder or load a new, full magazine
into it.
1.
2.
Page 23

23
Instead of using the standard preview/scan workow in FlexColor,
click on the 3f button to open the Scan 3f window.
Make the various 3f settings as described in the FlexColor User’s
Guide. Note the following:
Use the Destination setting to select a parent folder in which to
save your 3f les. If you would like to create a new sub-folder for
each batch, mark the Add job folder check box; then, each time
you begin a new 3f batch scan, FlexColor will create a new subfolder below the Destination folder and save the new scans there.
Either way, the contents of the most recently used folder will be
displayed in the FlexColor Thumbnails window immediately aer
the batch is nished.
All images will have a name based on the value entered in the
Image Name eld, plus a unique number.
Usually, it is easiest use the Crop settings to automatically remove
the parts of the scan that are covered by the slide mounting.
If you have both negative and positive originals in your batch,
you should set the Film Type to “Auto Detection”. is will cause
3.
4.
•
•
•
•
Page 24

24
FlexColor to analyze each image to decide whether it is negative
or positive. It will then use either the Positive Setup or Negative
Setup that you have selected.
If all of your originals are either positive or negative, then you
can set the Film Type to match (though you could also use auto
detection). In this case, only one setup selection will be available
(Positive Setup or Negative Setup), depending on the lm type
you have selected.
If you would like to export TIFF images automatically using your
selected setup, then mark the Save nal TIFFs check box. You
will still get the 3f images, but TIFF versions will also be exported
using the positive or negative setup you have selected and saved in
a sub-folder below the 3f images.
To set highlight and shadow points automatically, mark the Auto
levels check box. is will result in automated ne-tuning of
your selected setup based on an analysis of each image. is is
especially useful when you are using the Save nal TIFFs feature.
Usually, you should use a Scan Resolution of 100%, which
ensures that your 3f les will contain the full scan data possible
with your scanner, allowing for maximum exibility in the future.
However, if you are short on disk space and are sure that you do
not need full resolution images, you may consider reducing this
value or setting a maximum size. Alternatively, if you are sure that
you will use your scans for just one specic purpose with known
dimensions and resolution, you might use the Adapt to format
settings.
Be sure to mark the Feeder check box and to use the From
Position and To Position elds to set the rst and last original
you wish to scan from the Slide Feeder.
Click on Scan in the Scan 3f window to scan all of your selected
slides to 3f les.
To use 3f les, you must use FlexColor to review, process and export
the images to standard TIFF or JPEG les, which are compatible with
most image-editing and DTP programs. FlexColor provides a virtual
light table of all 3f images from a selected folder and enables you to view
details, view export history and load each image into the main FlexColor
window to make export settings.
•
•
•
•
•
5.
Page 25

25
As you work with the 3f images in the light table, you can load each
image into FlexColor to make settings and then save the settings back in
the history for the 3f image. When you have nished making settings for
an entire batch, you can then batch-process all images to save them as
TIFF or JPEG les with your settings applied.
In a production environment, you might choose to store your 3f
images on a shared network drive, allowing any computer that has
FlexColor installed to open and export images for use even while the
scan workstation is busy scanning. Even at sites where there is only one
Flextight scanner in use, the FlexColor license agreement permits your
organization to install FlexColor on any number of computers at the site.
Scanning Individual Slides
As mentioned above, we usually recommend that you use the 3f workow
when working with the Slide Feeder to scan large numbers of slides
for general use. However, when you just need to scan a few slides for a
specic purpose, you might nd it more convenient to use the standard
preview/scan workow, which generates a standard TIFF le right away
without saving a 3f le. You might also use the standard FlexColor
batch-scan feature, which can make nal scans on several dierent slides
and/or with several dierent setups, again by saving directly to TIFF les
rather than 3f.
e standard preview/scan and batch-scan workows are fully described
in the FlexColor User’s Guide. An example of how to use these features
when you have the Slide Feeder attached is given below, which includes
some specic advice for using the Feeder.
Page 26

26
Click on the Batch Scan button to open the Batch Scan window.
If it is not already shown, expand the Feeder heading in the Batch
Scan window by clicking on the triangle next to the heading.
Set the Position eld to the slide number you wish to scan. You can
enter the number directly using your keyboard, or select it by clicking
on the up and down buttons next to the eld.
In the main FlexColor window, make sure that the auto-focus button
(labeled AF) is enabled. You must always enable auto-focus when
scanning slides because mountings can vary in thickness and each
slide may sit slightly dierently in its mounting.
Click on Preview in the main FlexColor window. e scanner then
advances the Feeder to your selected slide and makes a preview.
Make image settings, such as rotation, crop, corrections and output
size, using the various FlexColor tools as described in the FlexColor
User’s Guide.
Either make a nal scan now by clicking on Scan in the main
FlexColor window or add the image to the Manual list in the Batch
Scan window by clicking on the Add button there (this enables you
to set up several scans based on their previews and then scan them all
at once later).
1.
2.
3.
4.
5.
6.
7.
Page 27

27
If you are using the Manual list, then continue taking previews and
adding scans until you have dened all of the scans you wish to make
in this batch; then click on Scan in the Batch Scan window to scan
them all.
For complete details about how to work with the Batch Scan window,
please see the FlexColor User’s Guide.
Page 28

28
Troubleshooting
Below are a few common problems and how to solve them.
Problem: I am not able to mount the Feeder to my scanner.
Solution: First, make sure you are using the latest version of FlexColor.
en, use the soware-guided procedure for mounting the
Feeder as described in “Mounting the Feeder” on page 8.
Problem: e Feeder is not recognized by the scanner or FlexColor
soware.
Solution: e electronic connection between the scanner and Feeder
is probably not secure enough. Gently, but rmly, press the
Feeder down against the scanner. When the connection is
good and the scanner is turned on, the diodes on the front of
the Feeder will light. See also “Mounting the Feeder” on page
8.
Problem: I get an error message that says that the “Feeder cannot nd
the magazine position.”
Solution 1: Make sure that the magazine is pressed fully into the drawer
hinge. (See also “Loading Slides” on page 18.)
Solution 2: Move the magazine to its home position. To do this, run
FlexColor and select Maintenance > Feeder to open the
Feeder window. en set the Feeder position drop-down
list to “home”. Try scanning again.
Problem: I get an error message that says that the “Feeder cannot nd
the frame position.”
Solution 1: Check that the holder is mounted correctly. It should be
perfectly straight (not angled to either side) and be pressed
into the scanner so that it is held by the clasp on the virtual
drum (it can sometimes get caught on the front edge of the
clasp instead of sliding into it). See also “Mounting the
Feeder” on page 8.
Page 29

29
Solution 2: Move the drum to its home position. To do this, run
FlexColor and select Maintenance > Feeder to open the
Feeder window. en set the Drum position drop-down list
to “home”. Try scanning again.
Solution 3: Make sure that the magazine is pressed fully into the drawer
hinge. See also “Loading Slides” on page 18.
Solution 4: Check that light is not shining directly into the scanner. e
Feeder uses an optical system to monitor the position of the
original holder; this system can be confused if outside light is
shining directly into the scanner.
Solution 5: Check the alignment of the Feeder to make sure the slide
original holder is centered. See “Aligning the Feeder” on page
30.
Page 30

30
Aligning the Feeder
e Feeder is pre-adjusted to align perfectly with most individual
scanners. However, some scanners may have a drum that is aligned
slightly outside of the tolerance range of the Feeder. If the slide original
holder is not being drawn correctly into the scanner, then you may
need to adjust your Feeder alignment as described below. In most cases,
however, this is not necessary. Usually, you will need to do this just once
if at all.
Checking the Alignment
To check the alignment, mount the Feeder to your scanner and insert
the slide original holder as described in “Mounting the Feeder” on page
8. en inspect the slide original holder to see if it sits perfectly centered
within the Feeder. If it is too far to the le or right, then the Feeder will
have diculty loading the Feeder in or out of the scanner. It may also
have trouble monitoring the position of the holder, so you may get an
error claiming that the Feeder “can’t nd the frame position”.
If possible, measure the distance on each side of the slide original holder
and calculate the correction needed to center it.
Correcting the Alignment
If the slide original holder is not centered correctly in the Feeder, then
use the procedure below to realign the Feeder.
If the feeder is currently mounted, then use the soware-assisted
procedure to unmount the Feeder as described in “Unmounting the
Feeder” on page 15.
Inspect the back panel of the Feeder and locate the two nuts that hold
the feeder to its mounting plate, as illustrated below in Figure 13.
1.
2.
Page 31

31
Figure 13: Unlocking/locking the Feeder position. Two nuts hold the
Feeder in place—one is visible above; the other is located on the other
side of the mounting plate, close to the connector.
Use a wrench to loosen both of the nuts just slightly, but do not
remove them.
Adjust the position of the mounting plate in the direction and
distance indicated from your inspection of the original holder
position above.
Tighten the nuts again.
Use the soware-assisted procedure to mount the Feeder to the
scanner as described in “Mounting the Feeder” on page 8.
Inspect the slide original holder alignment once again. Repeat this
procedure as necessary until the holder is positioned in the exact
center of the slide feeder when it is mounted.
3.
4.
5.
6.
7.
Page 32

32
Preparing the Slide Feeder
for Storage or Transport
To prepare the Feeder for storage or transportation:
Detach the Feeder using the soware-guided procedure given
“Unmounting the Slide Feeder” on page 15. Note that the Feeder must
be in its “home” position in order to t into the box.
Retrieve the box in which your Feeder was originally delivered. is
box is made of sturdy cardboard and includes a foam lining custom
cut to hold the Feeder safely and securely.
Lay the box down on the oor or on a table.
Open the box, remove the top slab of foam and set it aside.
Align the Feeder so that it will t into the cut foam, with the back of
the Feeder facing downwards.
Lower the Feeder into the box.
Replace the top slab and close the box.
e Feeder is now prepared for storage or shipping. If you will be storing
the box in any position other than lying down, then use packaging tape
to secure the aps.
If you are planning to ship the feeder, be extra careful to ensure that the
aps are securely taped shut. We recommend that you furthermore wrap
the box in strong paper before shipping.
If you need to return the Feeder to Hasselblad for repair, it must be in its
original box. Hasselblad will not accept shipment if the Feeder is shipped
in anything other than its original box.
1.
2.
3.
4.
5.
6.
7.
Page 33

33
Preventive Maintenance
All Flextight scanners should be serviced every 25,000 scans or every 12
months, whichever comes rst. If a Feeder is mounted, the recommended
number of scans is 15,000 provided that the feeder is mounted for all
scans. Please note that previews are also counted as scans.
Newer Flextight scanners have a counter installed so that the number
of scans can be monitored from FlexColor. Please refer to the FlexColor
manual to learn more about monitoring the number of scans.
Failures or faults originating from lack of service and/or daily
maintenance are not covered by the factory warranty.
Disposal
If you need to dispose of the Feeder, it must be delivered to an authorized
waste plant for electronics equipment.
Page 34

34
Technical Information
Specications
Scanner supported Flextight 949
Scanner footprint with feeder 36 x 42 cm
Weight 3.1 kg
Maximum batch 50 slides
Original types 35 mm slides
Scan soware FlexColor 4.0.2 or later
Computer OS Mac OS X 10.2.1 (or later)
Windows 2000 (or later)
(See FlexColor data sheet or manual
for full computer requirements)
Maximum resolution up to 8000 ppi
Scanning speed 50 slides scanned to 50 MB 3f les
takes approximately 60 minutes.
Page 35

35
CE Declaration
Page 36

36
 Loading...