

Page 1
MAS 101/102/111
Music system
Owner’s Manual
Page 2

MAS SYSTEM
SAFETY INSTRUCTIONS 3
INTRODUCTION AND FEATURES 4
Harman Kardon® High-Performance
Audio system 4
FRONT-PANEL CONTROLS (Controller and Amplifier) 5
REAR-PANEL CONNECTIONS (Controller) 6
REAR-PANEL CONNECTIONS (Amplifier) 7
REMOTE CONTROL FUNCTIONS 8
INSTALLATION 10
OPERATION 11
Using the Remote Control 11
Turning On the MAS System 11
Setting the Clock 11
Table of Contents
Setting the Alarms 11
Volume Control 13
Speaker Setup (Tone Controls) 13
Source Selection 13
FM Radio 13
Program Station Presets 13
DAB Tuner (MAS 111 Systems Only) 14
CD 14
Playback Control 14
Data Discs 14
USB 15
Programmed Play 15
The Bridge IIIP Dock for iPod 15
Auxiliary Inputs 15
Recording 16
System Software Version 16
System Reset 16
System Memory 16
TROUBLESHOOTING 17
SPECIFICATIONS 18
2
Page 3
MAS SYSTEM
Important Safety Instructions
Read these instructions.1.
Keep these instructions.2.
Heed all warnings.3.
Follow all instructions.4.
Do not use this apparatus near water.5.
Clean only with a dry cloth.6.
Do not block any ventilation openings. Install in accordance with the manufacturer’s instructions.7.
Do not install near any heat sources such as radiators, heat registers, stoves or other apparatus (including amplifiers) that produce heat.8.
Do not defeat the safety purpose of the polarized or grounding-type plug. A polarized plug has two blades with one wider than the other. A grounding-type 9.
plug has two blades and a third grounding prong. The wide blade or the third prong is provided for your safety. If the provided plug does not fit into your outlet,
consult an electrician for replacement of the obsolete outlet.
Protect the power cord from being walked on or pinched, particularly at plugs, convenience receptacles and the point where they exit from the apparatus.10.
Only use attachments/accessories specified by the manufacturer.11.
Use only with the cart, stand, tripod, bracket or table specified by the manufacturer or sold with the apparatus. 12.
When a cart is used, use caution when moving the cart/apparatus combination to avoid injury from tip-over.
Unplug this apparatus during lightning storms or when unused for long periods of time.13.
Refer all servicing to qualified service personnel. Servicing is required when the apparatus has been damaged in any way, such as power supply cord or plug 14.
is damaged, liquid has been spilled or objects have fallen into the apparatus, or the apparatus has been exposed to rain or moisture, does not operate normally
or has been dropped.
Do not expose this apparatus to dripping or splashing and ensure that no objects filled with liquids, such as vases, are placed on the apparatus.15.
To completely disconnect this apparatus from the AC Mains, disconnect the power supply cord plug from the AC receptacle.16.
The mains plug of the power supply cord shall remain readily operable.17.
Do not expose batteries to excessive heat such as sunshine, fire or the like.18.
Safety Instructions
CAUTION
THE LIGHTNING FLASH WITH AN ARROWHEAD SYMBOL, WITHIN AN EQUILATERAL
TRIANGLE, IS INTENDED TO ALERT THE USER TO THE PRESENCE OF UNINSULATED
“DANGEROUS VOLTAGE” WITHIN THE PRODUCT’S ENCLOSURE THAT MAY BE OF
SUFFICIENT MAGNITUDE TO CONSTITUTE A RISK OF ELECTRIC SHOCK TO PERSONS.
Pb
WARNING: TO REDUCE THE RISK OF FIRE OR ELECTRIC SHOCK, DO NOT EXPOSE THIS
APPARATUS TO RAIN OR MOISTURE.
RISK OF ELECTRIC SHOCK
DO NOT OPEN
SEE MARKING ON BACK OF PRODUCT.
THE EXCLAMATION POINT WITHIN AN EQUILATERAL TRIANGLE IS INTENDED TO
ALERT THE USER TO THE PRESENCE OF IMPORTANT OPERATING AND MAINTENANCE
(SERVICING) INSTRUCTIONS IN THE LITERATURE ACCOMPANYING THE PRODUCT.
Instructions for users on removal and disposal of used batteries. Specification of included battery types.
These symbols shown on the product, on the packaging or in the manual or separate information sheet mean that the product itself, as well as the batteries included or built into
the product, should never be thrown away with general household waste. Take them to applicable collection points, where proper treatment, recycling and recovery takes place, in
accordance with national or local legislation, or European Directives 2002/96/EC and 2006/66/EC.
Correct handling of the product and batteries to be disposed of helps saving resources and prevents possible negative effects on the environment or human health.
The batteries included with your equipment may be alkaline, carbon zinc/manganese or lithium (button cells) type. All types should be disposed of according to the above
instructions.
To remove the batteries from your equipment or remote control, reverse the procedure described for inserting batteries in the Owner’s Manual.
For products with a built-in battery that lasts for the lifetime of the product, removal may not be possible for the user. In this case, recycling or recovery centers handle the dismantling
of the product and the removal of the battery. If, for any reason, it becomes necessary to replace such a battery, this procedure must be performed by authorized service centers.
3
Page 4
MAS SYSTEM
Introduction and Features
More than 50 years ago, Harman Kardon sold the very first audio receiver, a highperformance component that combined the functions of several products that previously
had only been available separately. Our mission was and is to deliver high-fidelity sound
in an easy-to-use package, and we are confident that you will enjoy the quality and
convenience of the MAS 101/MAS 102/MAS 111 music system for many years to come.
The MAS systems are complete high-performance audio systems with a CD player, an
FM tuner (MAS 111 models include a DAB tuner) and auxiliary inputs for other products,
as well as a pair of custom-designed bookshelf loudspeakers. MAS 101 and MAS 111
systems also include The Bridge IIIP dock for iPod/iPhone (optional for the MAS 102
system).
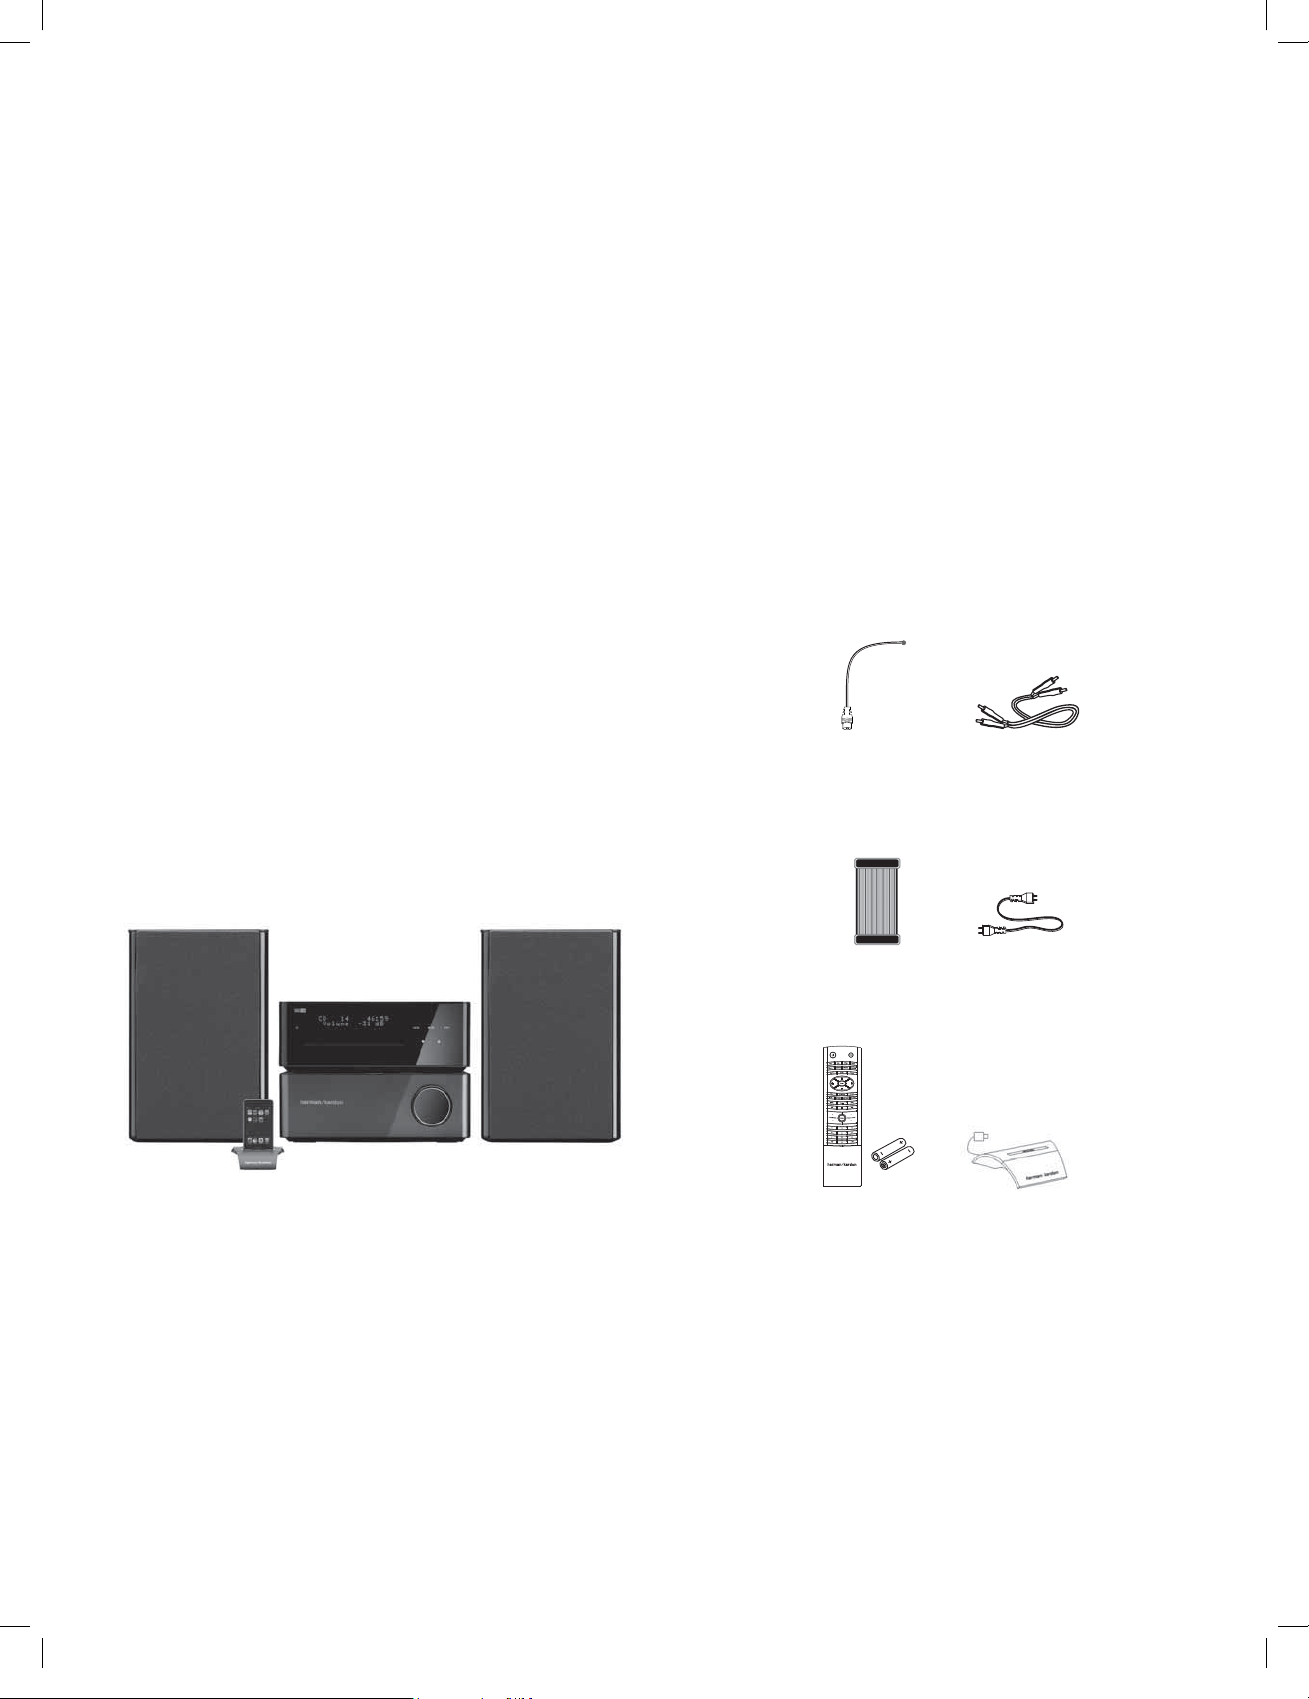
Harman Kardon® MAS High-Performance Audio System
The Bridge IIIP dock for iPod (included with MAS 101, MAS 111 only) charges iPod touch t
2nd generation, iPod nano 4th generation, iPod classic, iPod touch 1st generation, iPod
nano 3rd generation, iPod nano 2nd generation and iPod 5th generation. iPod not
included.
Slot-loaded CD player with CD, CD-R, CD-RW, MP3 and WMA playback, with CD Text t
capability and ID3 tag support
Front and rear USB ports with MP3 and WMA audio playback capability t
FM tuner with RDS text display and 30 presets t
DAB/DAB+/T-DMB-Audio tuner with DLS text display and 30 presets (MAS 111 t
systems only)
Eight auxiliary audio inputs: one front stereo mini-jack (3.5mm) on right side of t
controller, two rear-panel dual RCA jacks (line-level), one rear-panel phono MM input,
two optical digital audio inputs, two coaxial digital audio inputs
One line-level analog audio output t
One coaxial digital audio output t
Stereo headphone output (3.5mm) t
Clock with dual alarms t
To obtain the maximum enjoyment from your new system, we urge you to read this
manual and refer back to it to familiarize yourself with the features and operation of the
MAS system.
If you have any questions about this product, its installation or its operation, please
contact your retailer or custom installer, or visit www.harmankardon.com.
Two 2-way, 130mm bass-reflex speakers t
FM wire antenna
DAB wire antenna
(MAS 111only)
Stereo RCA-plug
male-to-male
cable (1m)
iPod not included
Controller-toamplifier ribbon
cable
System remote
control with
two AAA
batteries
Detachable AC
power cord
The Bridge IIIP dock
for iPod (included with
MAS 101, MAS 111
systems only; optional
for MAS 102).
4
Page 5
MAS SYSTEM
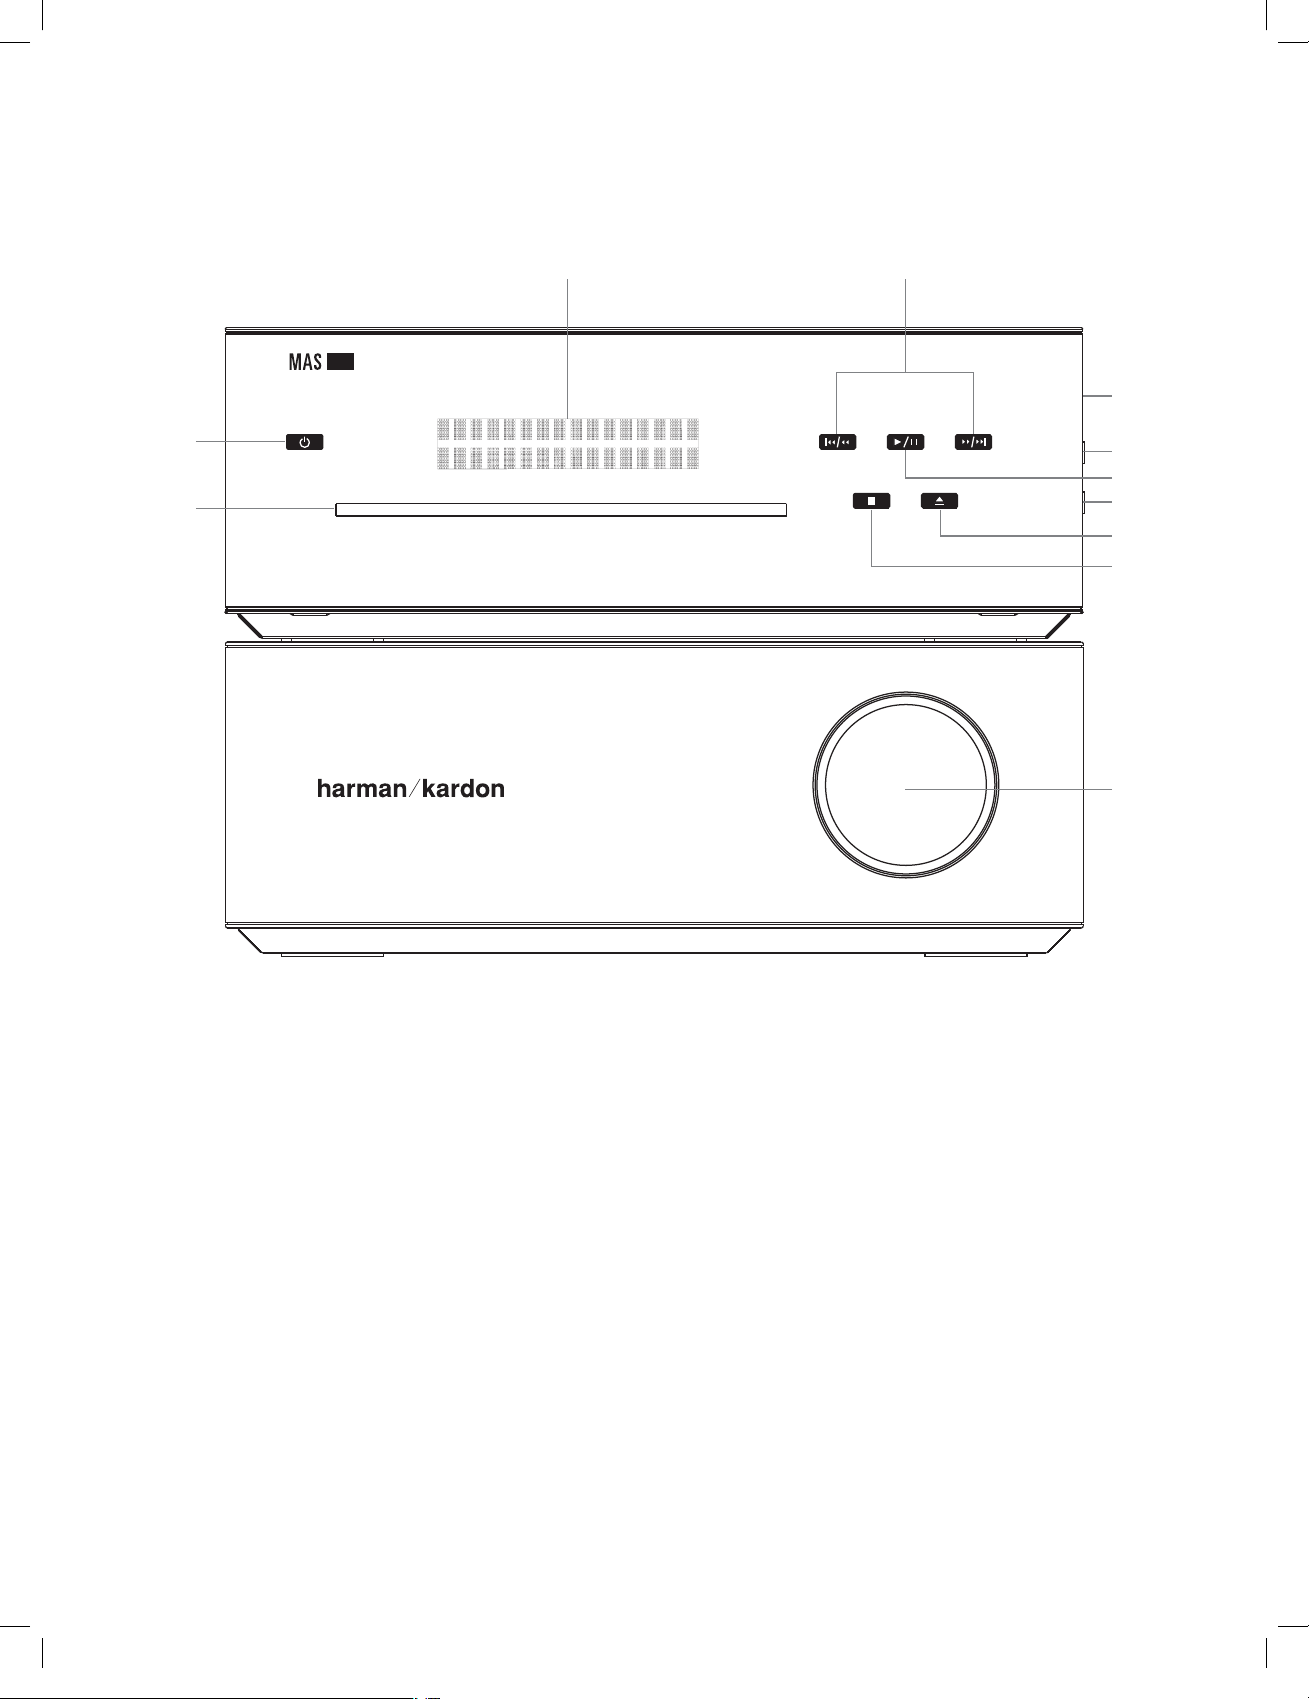
Note: Controls are the same for all models.
Front-Panel Controls
Controller and Amplifier
The MAS systems use touch-sensitive controls. To use a control, tap gently on its
lit icon.
NOTE:
Controls are the same for all models.
Power:
Turns the MAS system on or places it in Standby mode. To completely power
off the unit, unplug the power supply.
Message Display:
display.
CD Slot:
Load compatible discs here.
Skip/Scan Forward/Reverse:
the current source:
iPod, CD or USB: t Press and release to skip to the next track. Press the reverse button
twice to skip to the previous track. Press and hold to scan forward or reverse within
a track.
t Radio: Press and release to select the next programmed preset station. Press and
hold to scan quickly through the stations. When you release the button, the tuner
continues to scan until it finds a station of acceptably strong signal quality, and then it
stops. To stop the scan before a station is found, press the button again.
The time and messages are displayed in this two-line text
These buttons function differently, depending on
Play/Pause:
Stop:
Eject:
USB Port A:
or WMA files. Although most USB flash and hard-disk drives in the FAT32 file format,
as well as many MP3 players, are compatible with the MAS system, due to the wide
variety of manufacturers, playback cannot be guaranteed. Do not connect an iPod
or iPhone to this port. Do not connect a personal computer or any peripherals to
this port.
Line-In Jack (Line Input):
included) to the headphone or line-level output on a portable player or other device.
Headphone Jack:
headphones that are equipped with a stereo 3.5mm plug.
Volume Control:
Each tap toggles between the Play and Pause functions.
Fully stops playback.
When a CD is loaded, tap here to eject it.
Connect a compatible USB device here to enjoy playback of audio MP3
Connect a stereo 3.5mm male-to-male cable (not
Outputs a stereo signal for private listening through most
Increases or decreases the volume.
5
Page 6

MAS SYSTEM
Rear-Panel Connections
Controller
FM Antenna Terminal:
DAB Antenna Terminal (MAS 111 Only): Connect the included DAB antenna wire
lead here to enjoy programming from digital DAB, DAB+ or T-DMB-Audio radio
stations available in your area.
USB Port B: Connect a compatible USB device here to enjoy playback of audio MP3
or WMA files. Although most USB flash and hard-disk drives in the FAT32 file format,
as well as many MP3 players, are compatible with the MAS system, due to the wide
variety of manufacturers, playback cannot be guaranteed. Do not connect an iPod or
iPhone to this port. Do not connect a personal computer or any peripherals to this
port.
Optical 1/2 and Coaxial 1/2 Digital Audio Inputs: Connect a source device’s optical
or coaxial digital audio output to the corresponding input. Only the uncompressed
PCM format is supported.
TV and AUX Analog Audio Inputs: Connect the analog audio outputs of a television
or any source device to enjoy playback through the high-performance MAS system.
Phono Input: Connect the outputs of a moving-magnet (MM) type turntable to this
input. Do not connect any other type of turntable to this input, and do not connect the
outputs of an MM-type turntable to any other analog audio inputs on the MAS system
without using a phono preamp, available separately from many electronics stores.
The Bridge IIIP Input: To enjoy playback of audio materials stored on a compatible
iPod (see page 4), connect The Bridge IIIP. Make sure the insert for The Bridge IIIP is
installed, and install the appropriate dock adapter for your iPod within the insert, as
shown in Figure 1 on page 10.
6
Connect the included FM antenna wire here.
Analog Audio Outputs: Connect these outputs to the analog audio inputs of an audio
recorder. When a source connected to the MAS system is playing, the signal will be
available at these outputs for recording.
Coaxial Digital Audio Output: Connect this output to the coaxial digital audio input of
a digital audio recorder. When a source connected to the MAS system is playing, the
signal will be available at this output for recording.
NOTES:
• The MAS system can convert analog sources to the digital domain, or digital
sources to the analog domain for recording.
• It is the user’s responsibility to comply with all laws pertaining to the copying
of audio materials.
Output to Amplifier: Connect the included ribbon cable to this connector and to the
corresponding connector on the MAS amplifier. This cable passes audio signals from
the controller to the amplifier, and it transfers DC power from the amplifier to the
controller. If this cable is ever damaged, do not use it, and contact Harman Kardon
for a replacement.
RS-232 Serial Port: This port is used only for system upgrades. Do not connect it to
any devices unless instructed to do so at the time a system upgrade is released.
Update Switch: This switch is used only for system upgrades. Leave it in the “N”
position for normal operation unless instructed to switch it to the “U” position to install
a system update.
Page 7

MAS SYSTEM
Rear-Panel Connections
Amplifier
Right and Left Speaker Output Terminals: Use two-conductor speaker wire to
connect each set of terminals to the correct speaker. Remember to observe the
correct polarity (positive and negative connections).
Input From Controller: Connect the included ribbon cable to this connector and to
the corresponding connector on the MAS controller. This cable passes audio signals
from the controller to the amplifier, and it transfers DC power from the amplifier to
the controller. If this cable is ever damaged, do not use it, and contact Harman Kardon
for a replacement.
AC Power Input: After you have made all other connections, plug the AC power cord
into this receptacle and into an unswitched wall outlet.
NOTE:
MAS 101/111 systems require 23OV, 50/60Hz AC current. MAS 102 systems
require 120V, 60HZ AC current
7
Page 8

MAS SYSTEM
Remote Control Functions
Power
Source Selectors
Info
Back
1/57/3 Navigation
Clear
FM Mode
Transport Controls
Preset Folder +/–
–10 Numeric Keys +10 Numeric Keys
Eject
Numeric Keys
Sleep
Settings
Time
Enter
Check
Auto Store
Volume +/–
Mute
Display
Program/Memory
Random
Power: Turns the MAS system on or off. To completely power off the unit, unplug the
power supply.
Sleep: Each press increases the time until turn-off, from 10 to 90 minutes, in increments
of 10 minutes. The next press after the 90 minutes setting turns off the Sleep function.
Source Selectors: Selects a source input. Each press of the Line In or Digital In buttons
toggles among the available analog (Line Input on right-side panel; TV, AUX or Phono
Input on rear panel) or digital audio inputs (Coaxial 1 or 2, Optical 1 or 2), respectively.
Press the Bridge button to select an iPod docked in The Bridge IIIPP.
Display: Adjusts the brightness of the message display. Each press changes the
brightness: Full, Half or Off. When the display is fully dimmed while the system is turned
on, the LED inside the Volume knob and the LED behind the Power button will remain lit
to remind you that the system is still on.
Settings: Accesses menus for Speaker Setup (tone controls), Time Setup (clock),
Alarm Setup, System Version and System Reset. See the Operation section for more
information.
Back: Returns to previous menu level.
Info: Displays status of current source.
8
• Radio: When FM band is in use, each press toggles between the PS (Program Service)
and RT (Radio Text) RDS information, if available. When a DAB radio station is playing,
press this button to access the menu system for the DAB tuner. See pages 13 and 14
for more information.
• Audio CD: Displays CD text information, if available. Each press displays the following
items: Song, Artist, Album.
• USB or Data CD: Scrolls all ID3 tag information for current source, if available. Each
press displays the following individual items: Song, Artist, Album, File type, Folder, then
back to scrolling. If ID3 tags are not available, the file name will appear.
Time: Displays elapsed track time for the current Audio CD (no effect on data CDs or
other sources). Each additional press changes the display as follows: remaining track
time, elapsed disc time, remaining disc time then back to elapsed track time.
Å/Ç É/Ñ Navigation Buttons: Use the É and Ñ buttons to scroll forward and reverse
through the Settings menus or through lists of content, and press the Enter button to
make selections. Press the Back button to return to the previous menu or content level.
Enter: Selects a menu item, or saves setting changes and returns to the previous menu
level.
ÅÇ 1.
Page 9

MAS SYSTEM
Clear: Clears the current preset station or a playlist entry.
sRadio: To delete the current preset station, press the Clear button while it is playing.
• Playlist: While programming a playlist, press the clear button to delete the track just
entered. After the playlist has been saved by pressing the Stop button, press the Clear
button to delete the entire playlist. To delete a single track, stop play, press the Check
button repeatedly until the desired track appears and press the Clear button. Press the
Play button to exit Check mode.
Program/Memory: Used to program playlists and radio presets.
• Radio: If the current station has not been programmed into a preset, press Program/
Memory and press the Enter button to store the station at the current preset number, or
use the numeric keys to enter a different preset number. The new preset will overwrite
the existing one.
• USB or CD (Audio or Data): Press the Program button to begin Program mode. Add
tracks to the playlist by using the Skip/Scan Transport Controls or the numeric keys to
select the track, then press the Program button to enter the selection. Add up to 99
files. Press Play to play the playlist, or Stop to save the playlist without playing it. During
playback, the order of the track in the playlist will appear on the left, with the disc’s
track number to the right. See pages 14 and 15.
Check: After a playlist has been programmed and play has been stopped, each press of
the Check button displays the tracks in the playlist.
Eject: When a CD is loaded, press this button to eject it.
FM Mode: Used with FM radio, each press toggles between Stereo and Monaural
playback.
Auto Store: Scans through all frequencies, searching for stations with acceptably strong
signal quality, and stores them as presets.
Random: Each press turns Random playback mode (shuffle) on or off. This mode plays
the tracks of the current disc or drive in random order.
Remote Control Functions
Transport Controls
Track Skip/Tuning Up/Down: These buttons function differently, depending on which
source has been selected:
• iPod, CD or USB: Press and release to skip to the next track. Press the reverse button
twice to skip to the previous track.
• Radio: Press and release the Track Skip buttons to tune to the next higher or lower station
by one frequency increment. Press and hold to scan quickly through the stations.
Scan Forward/Reverse: Press and hold to scan forward or in reverse within a track
when the iPod, CD or USB sources are playing.
Play/Pause: Each tap toggles between the Play and Pause functions.
Stop: Fully stops playback.
Preset/Folder +/–: Selects a preset station or folder on a USB or data CD.
• Radio: Each press changes to the next or previous preset station, if any have been
programmed.
• USB or Data CD: Press once to open the current folder. Each additional press changes
to the next or previous folder. After 3 seconds, the first track in the new folder will
begin playing.
Mute: Press to temporarily silence the speakers. Press again to restore audio. Muting is
also canceled if the MAS system is turned off.
Volume +/–: Increases or decreases the volume. Press and hold to change the volume
more quickly.
Numeric Keys: Used to enter track numbers, radio stations or preset numbers, or while
adjusting the clock and alarm times.
–10 and +10 Numeric Key: Used with a USB device or CD to quickly advance through a
large number of tracks. Each press of these keys changes to the next or previous track
in increments of 10.
9
Page 10

MAS SYSTEM
Installation
Carefully unpack the controller, amplifier, speakers, FM antenna, DAB antenna (MAS 1.
111 systems only), analog audio cable, ribbon cable, detachable AC power cord, The
Bridge IIIP dock for iPod, remote control and batteries.
Open the battery compartment of the remote control by firmly grasping the portion 2.
of the remote that has the Harman Kardon logo and pulling it downward. Install the
batteries in the remote control, following the “+” and “–” symbols in the battery
compartment to maintain the correct polarity.
CAUTION: Danger of explosion if batteries are incorrectly replaced. Replace only with the
same or equivalent type.
With the controller stacked on top of the amplifier, carefully insert one end of the 3.
ribbon cable into the connector on the rear panel of the controller, and the other end
into the corresponding connector on the rear panel of the amplifier.
Connect the FM antenna to its terminal. The system requires a female connector on 4.
the antenna. For MAS 111 systems only, connect the DAB antenna to its terminal.
Install The Bridge IIIP (included with MAS 101/MAS 111 systems only) dock for iPod 5.
(iPod is not included).
a. Holding the cable with the wider part of the connector at the bottom, gently squeeze
the tabs on each side as you insert it into the connector on the rear panel of the
controller.
b. Place the black insert in The Bridge IIIP, making sure to push it all the way down.
See Figure 1.
NOTE: Do not place an iPod in The Bridge IIIP unless both the black insert and a
dock adapter are installed. Otherwise, the iPod will not connect properly, and both
The MAS system features eight audio inputs for other devices, such as portable 6.
players. This step is optional, and may be skipped if you have no external devices.
If your player has:
A stereo 3.5mm analog audio output or headphone jack: t Plug an analog audio
cable (not included) into the output or headphone jack and the front mini-jack,
which is located on the right side of the controller.
Pair of RCA-type analog audio outputs: t Plug one end of a two-conductor
interconnect cable (one cable is included; purchase additional cables for other
devices) into the player, and the other end into the TV or Auxiliary Input jacks on
the rear panel of the MAS system. Use the same-color connector for each channel
(usually red for right, and white or black for left).
If your device is a turntable with an MM-type cartridge, connect its outputs to t
the Phono (MM) Inputs on the rear panel of the controller. If it is another type of
turntable, do not connect it to the MAS system without using a separate phono
preamp, available from electronics outlets. Do not connect a turntable to another
set of inputs without using a phono preamp.
Optical or coaxial digital audio S/PDIF output: t Plug one end of the digital audio
cable (not included) into the player, and the other end into one of the Optical or
Coaxial Inputs on the rear panel of the MAS system.
Remember to select the correct analog or digital input as the source by pressing the
Line In or Digital In Source Selector on the remote.
To make analog or digital audio recordings, connect the Coaxial Digital Output or the 7.
Line Output on the rear panel of the controller to the corresponding input on an audio
recorder (not included). The MAS system can convert analog or digital signals to the
other domain.
Place the left and right loudspeakers as desired. It is recommended that the speakers 8.
be placed so as to form an equilateral triangle with the usual listening position. Thus,
each speaker will be the same distance from the other speaker as it is from the
listening position.
Place the speakers at about the same height as the listener's ears.
Connect one end of each included speaker cable to the terminals on the speaker, and
the other end to the terminals on the amplifier. To ensure proper performance and
bass response, make sure to preserve the correct polarity by connecting the positive
terminals (colored red) to each other and the negative terminals (colored black) to
each other.
Plug all power cords for the MAS system and any external sources into unswitched 9.
AC outlets.
Figure 1:
Docking an iPod
in The Bridge IIIP
it and The Bridge IIIP may sustain damage that is not covered by the warranty.
c. Locate the dock adapter that was included with your iPod, or select one of the
included dock adapters by referring to Table 1. If your iPod is an older model that
does not appear in Table 1 and that did not include an adapter, contact Apple, Inc.
to purchase one.
Place the adapter in The Bridge IIIP insert, as shown in Figure 1.
d. Remove the iPod from any case, and dock it in The Bridge IIIP, as shown in Figure 1.
10
Table 1 – Select the Correct The Bridge IIIP Insert
The Bridge IIIP Insert iPod Model
NANO iPod nano, 1st and 2nd generations
5G (VIDEO 60GB) iPod, 5th generation (60GB, 80GB) and
iPod classic (160GB)
5G (VIDEO 30GB) iPod, 5th generation (30GB) and iPod
classic (80GB)
13 iPod nano, 3rd generation and 4th
generation
12, 14 iPod touch – install large bumper
Page 11

MAS SYSTEM
Operation
Using the MAS system is simple and intuitive. The front-panel controls use advanced
touch-sensitive technology. To use the front panel, place a finger over any of the illuminated
icons. A gentle tap is all that is necessary. Wait a few seconds for the system to process
each command. To remove fingerprints, wipe the front panel with a dry microfiber cloth.
Using the Remote Control
Point the remote at the front of the MAS system. The remote IR sensor is located on
the right half of the front panel of the controller. Do not block the sensor. The remote
has a range of approximately 6m, up to 30 degrees off center. If the batteries require
replacement, see Step 2 of the Installation section. Use caution and dispose of batteries
according to environmental requirements. Never throw the batteries into fire, and remove
them from the remote if the remote will be unused for a long period of time.
Turning on the MAS System
To turn on the MAS system, press and hold the Power button on the remote or the controller
for 1 second. The system will also turn on when one of the Source Selectors, the Eject
button or the Play/Pause button on the remote is pressed.
Press the Power button to turn off the system. If the clock has been turned off, the
message display will go dark to conserve power. Otherwise, the time will be displayed
at half-brightness.
Setting the Clock
The clock may be set using the Settings menu. See Figure 2.
1. Press the Settings button on the remote.
2. Press the 7/3 buttons until “Time Setup” appears in the message display.
3. Press the Enter button to display “Clock.”
Turn the clock on or off: Press the Enter button and use the 7/3 buttons to select “On”
or “Off.” Turning the clock off conserves power when the system is powered down to
Standby mode.
4. Set the clock: Press the 7/3 buttons until “Set Clock” appears on the lower line. Press
the Enter button to display “Set Time.”
Set the time: Press the Enter button and use the numeric keys to enter the hour, t
then the minute. If the 12-hour time format is active, use the 7/3 buttons to select
“AM” or “PM.” Press the Enter button to advance from one field to the next without
changing it, and press the Enter or Back button to save the settings.
Set the format: Press the t 7/3 buttons until “Set 12/24 hour” appears. Press the
Enter button to change the format, and use the 7/3 buttons to select between
the 12- and 24-hour time displays. Press the Enter or Back button to save the
change.
5. Set the day of the week: Press the 7/3 buttons until “Set Day” appears. Press the Enter
button to display the day of the week, and use the 7/3 buttons to select the desired day.
Press the Enter or Back button to save the changes.
Setting the Alarms
For automatic turn-on at a programmed time, set one or both of the alarms. The alarms
may be set using the Settings menu. See Figure 3 on page 12.
1. Press the Settings button on the remote.
2. Press the 7/3 buttons until “Alarm Setup” appears in the message display.
Figure 2: Setting the Clock
Setti ngs
Speaker Setup
>
T i me Setup
Clock
Clock
Off
Ri ght
Left
>
Ri ght
Left
Setti ngs
T i me Setup
Enter
T i me Setup
Set Clock
Enter Back
Set Clock
Set Ti me
Enter Enter or Back
Set Ti me
12 : 43
><
Back
>
>
>
Ri ght
Left
Ri ght
Left
T i me Setup
<
Set Day
Enter Enter or BackEnter Enter or Back
Set Day
Monday
Set Clock
Set 12/24 hour
<
Enter Enter or Back
Set 12/24 hour
12 hour
>>
>
>
11
Page 12

MAS SYSTEM
Operation
3. Press the Enter button to display “Alarm 1.” Use the 7/3 buttons to display “Alarm
2.” When the desired alarm is displayed, press the Enter button to set it. The
“Weekday: On” message will appear. Use the 7/3 buttons to display the Weekday
Time, Weekend On/Off, Weekend Time or Source Settings, and press the Enter button
to make a change. You may adjust the Weekday, Weekend and Source settings for
either alarm.
Weekday On/Off: Select to adjust whether Alarm 1 or Alarm 2 will sound on week-
days. Use the 7/3 buttons to turn the setting On or Off. Press the Enter or Back button
to save the change.
Weekday Time: Select to set the Alarm 1 or Alarm 2 time for weekdays. The numeric
time display will appear, with the hour setting flashing. Use the numeric keys to enter
the two-digit hour setting, and the minute setting will flash. Use the numeric keys to
enter the two-digit minute setting. Press the Enter button to advance from one field to
the next without changing it, and press the Enter or Back button to save the change.
Weekend On/Off: Select to adjust whether Alarm 1 or Alarm 2 will sound on week-
ends. Use the 7/3 buttons to turn the setting On or Off. Press the Enter or Back button
to save the change.
Weekend Time: Select to set the Alarm 1 or Alarm 2 time for weekends. The numeric
time display will appear, with the hour setting flashing. Use the numeric keys to enter
the two-digit hour setting, and the minute setting will flash. Use the numeric keys to
enter the two-digit minute setting. Press the Enter button to advance from one field to
the next without changing it, and press the Enter or Back button to save the change.
Source: Select the source that will play when Alarm 1 or Alarm 2 sounds. The week-
day and weekend alarms for each of Alarm 1 and Alarm 2 must use the same source.
If you prefer different sources for weekdays and weekends, use Alarm 1 for weekdays
only and Alarm 2 for weekends only by adjusting the Weekday On/Off and Weekend
On/Off settings appropriately.
Use the t 7/3 buttons to select one of these sources: Disc, USB A (front) or B (rear),
Radio FM, Radio DAB (available only on MAS 111) or DMP (iPod docked in The
Bridge IIIP when available). If Disc, DMP or USB A or B is selected, make sure a
CD, iPod or USB is present and contains audio materials. If no device is present,
the system will switch to FM Radio. Press the Enter or Back button to save the
change.
4. You may adjust the duration of playback and the snooze control, as well as the volume
level. These settings are global to both Alarm 1 and Alarm 2, and for both the weekday
and weekend alarms.
Alarm Timeout: With “Alarm 1” in the message display, press the 7/3 buttons until
“Timeout” appears. This setting determines how long the system will play once the
alarm sounds.
To change the Timeout setting, press the Enter button. Use the t 7/3 buttons to change
the duration of play: 10, 20, 30, 40, 50 or 60 minutes. Press the Enter or Back button
to save the change.
Snooze: With “Alarm 1” in the message display, press the 7/3 buttons until “Snooze”
appears. When the Power button or the Sleep button is pressed while the alarm is
playing, the alarm will turn off for the amount of time specified by the Snooze setting,
and will then resume.
◆ To change the Snooze setting, press the Enter button. Use the 7/3 buttons to change
how long play will be paused: 5, 10, 15, 20, 25 or 30 minutes. Press the Enter or
Back button to save the change.
Volume Level: With “Alarm 1” in the message display, press the 7/3 buttons until
“Level” appears. This setting only affects playback using the alarms.
◆ To change the Level setting, press the Enter button. Use the 7/3 buttons to change
the volume level within the range of – 80dB to +10dB. It is strongly recommended
that you avoid using levels higher than 0dB to preserve your hearing and to avoid
damage to the equipment. Before setting the alarm volume level, play the alarm
source to determine a comfortable volume. Press the Enter or Back button to save
the change.
Figure 3: Setting the Alarms
Setti ngs
Speaker Setup
Right
>
Left
Setti ngs
T ime Setup
Right
><
Left
Setti ngs
Alarm 1
On
Alarm 2
On >
T imeout
T imeout
10 mi n
><
>
Right
>
>
>
>
Alarm 1 Setup
Weekday Time
Left
Enter Enter or Back Enter Enter or Back Enter Enter or Back Enter Enter or Back
Weekday Time
07 : 15
Right
Alarm 2 Setup
Weekday Time
Left
Enter Enter or Back Enter Enter or Back Enter Enter or Back Enter Enter or Back
Right
Weekday Time
Left
Right
Left
07 : 15
Alarm Setup
Snooze ><
Snooze
05 mi n
Right
Left
Right
Right
Right
Alarm 1 Setup
Weekend: Off
Weekend Alarm
Off
<
Alarm 2 Setup
Weekend: Off ><
Left
Weekend Alarm
Left
Left
Off<
Alarm Setup
Level<
Level
–55dB
><
><
><
><
>
Alarm Setup
Enter Back
Right
Alarm Setup
Enter Back
Alarm 1 Setup
Weekday: On
Enter Enter or Back
Weekday Alarm
Left
Alarm Setup
Right
<
Enter Enter or Back
Alarm 2 Setup
Weekday: On
Enter Enter or Back
Weekday Alarm
Left
Alarm Setup
<>
Enter Enter or Back Enter Enter or Back Enter Enter or Back
Right
Alarm 1 Setup
Left
Right
Weekend Time
Weekend Time
10 : 00
Alarm 2 Setup
Weekend Time
Left
Weekend Time
10 : 00
><
>
Right
Alarm 1 Setup
><
Left
Right
><
Left
Source
Alarm 1 Source
Alarm 2 Setup
<
Source
Alarm 2 Source
D isc
D isc
><
>
>
12
Page 13

MAS SYSTEM
Operation
At the set time, the MAS system will automatically turn on and begin playing the selected
source. The system will play at the volume selected at the Level setting of the Alarm
Setup menu, and will continue to play for the period specified by the Timeout setting.
Press the Power button or the Sleep button to place the unit in Snooze mode. It will
remain off for the period of time set by the Snooze setting, and then the alarm will
resume.
Press the Power button twice while the alarm is playing to turn it off and return to
normal play.
Volume Control
Use the front-panel or remote Volume Controls to raise or lower the volume. The default
setting at turn-on is –50dB, and the maximum setting is +10dB. Use caution with volume levels to avoid damage to your hearing or equipment. The volume level appears in
the message display when the Volume Controls are used.
To temporarily silence playback, press the Mute button on the remote. “Mute” will flash
in the message display. Press the Mute button or Volume Control to resume normal
volume. Source playback will continue during muting.
Speaker Setup (Tone Controls)
You may boost or cut the high or low frequencies, or adjust the stereo imaging, using
the Speaker Setup settings. See Figure 4.
s0RESSTHE3ETTINGSBUTTONANDh3PEAKER3ETUPvWILLAPPEARINTHEMESSAGEDISPLAY
s0RESS THE %NTER BUTTON SO THAT h"ASSv APPEARS 5SE THE 7/3 buttons to select the
Treble or Balance settings, and press the Enter button to change the setting.
Bass: To boost or cut the low frequencies, use the 7/3 buttons to adjust the setting
between –10dB and +10dB in 1dB steps. Press the Enter or Back button to save the
change.
Treble: To boost or cut the high frequencies, use the 7/3 buttons to adjust the setting
between –10dB and +10dB in 1dB steps. Press the Enter or Back button to save the
change.
Balance: This setting boosts all frequencies playing through either the left or right
speaker by up to 12dB when one of the L1 – L12 or R1 – R12 settings is selected. The
default setting is “Center,” which plays both channels at the same volume. Use the
7/3 buttons to adjust the setting. Press the Enter or Back button to save the change.
If the station is broadcasting RDS information, both the Program Service (PS) and
dynamic Radio Text (RT) will be displayed. Press the Info button to display the station
frequency on the upper line and toggle between the Program Service (PS) and dynamic
Radio Text (RT) displays on the lower line. When no RDS information is available, only
the frequency will be displayed.
Program Station Presets
To scan for all available local stations and store them as presets, press the Auto Store
button. The system will scan for stations with acceptable signal strength and automatically store them in order in one of the 30 presets.
To program a single preset for quick access to a favorite station, tune to the station’s
frequency and press the Program/Memory button. The preset number will appear. Press
the Enter button to store the station in that preset location, or use the numeric keys to
enter a different preset.
If a different station was previously programmed, it will be overwritten by the new
station. If all 30 presets have been programmed, you must overwrite or erase one to
program a new station preset.
To erase a preset, select the station for playback and press the Clear button. Press the
Enter button as prompted to confirm the deletion.
To select a preset station, use the preset +/– buttons, or use the numeric keys to enter
the preset directly.
Source Selection
The first time the MAS system is turned on, it will default to FM radio. Press a Source
Selector to switch to another source: Disc, USB, DMP (iPod docked in The Bridge IIIP),
Radio, Line In (additional presses select an analog audio input) or Digital In (additional
presses select a coaxial or optical digital audio input).
Subsequently, the MAS system will select the last source used before turn-off.
FM Radio
Press the Track Skip Up/Down buttons on the remote to tune a station. Press and hold
the buttons to scan for the next station, or tap the buttons to scan one frequency increment at a time.
When using the front-panel controls, the combined Skip/Scan buttons select programmed preset stations when tapped, and scan the frequency band for a station of
acceptable signal strength when pressed and held.
Monaural stations, or weak stereo stations, will be played in mono (one channel). Press
the FM Mode button to switch between Stereo and Monaural playback.
13
Page 14

MAS SYSTEM
Figure 4: Speaker Setup Settings (Tone Controls)
Setti ngs
Speaker Setup
>
Operation
Enter
Speaker Setup
Bass
Enter or Back
>
Ri ght
Speaker Setup
Treble
Left
Enter
Set Bass
00dB
Enter or Back
><
Enter
Set Treble
00dB
DAB Tuner (MAS 111 Systems Only)
The MAS 111 system is equipped with a DAB/DAB+/T-DMB-Audio tuner for use with
compatible digital radio stations, where available.
The included DAB antenna must be connected to receive these stations.
Press the Radio Source Selector repeatedly to toggle between the FM and DAB bands.
The first time the DAB tuner is selected, the system will automatically scan for stations
and store them in the Station List. Press the Auto Store button at any time to repeat the
scan. Any stations found may be selected from the lower line using the 7/3 buttons.
Then press the Enter button.
The DAB tuner uses a sophisticated menu. The menu may be accessed while a station is
playing by pressing the Info button. Use the 7/3 buttons to select menu options:
Station List: Press the Enter button to view the stations found and select one for
playback.
Local Scan: Begin a scan for local stations.
Full Scan: Begin a full-spectrum scan for available stations.
Manual Tune: Manually select a DAB band.
DRC: Adjust dynamic-range-control audio compression, which reduces the level of
louder passages while maintaining intelligibility of softer passages. Select “High” or
“Low” compression, or select “Off” for no compression.
Station Order: Select whether stations are displayed in Alphanumeric, Valid or
Ensemble order.
Ri ght
><
Speaker Setup
<
Balance
Left
Enter or Back
Enter
Enter or Back
Set Balance
><
The “Reading” message will appear for a few moments while the MAS system identifies
the disc type.
NOTE: If the “Error” message appears, the disc is not compatible with the MAS
system, or its data may be damaged. Press the Eject button to remove it.
The Play icon will appear, along with the current track numbers and the elapsed track
time. When the disc has finished playing, the Stop icon will appear, with the total number
of tracks and total disc time.
<>
Center
Playback Control
To momentarily pause playback for later resumption at the same point, press the Play/
Pause button. Press it again to resume play. The Pause icon will be displayed. Press the
Stop button to fully stop playback.
s4O SEARCH AT HIGH SPEED THROUGH THE CURRENT TRACK PRESS AND HOLD THE 3KIP3CAN
Forward or Skip/Scan Reverse button. When the track’s beginning or end is reached,
normal play will begin.
s4OSKIPTOTHENEXTTRACKTAPTHE3KIP3CAN&ORWARDBUTTON)FTHECURRENTTRACKISTHE
last one on the disc, the MAS system will skip to the first track.
s4ORETURNTOTHEBEGINNINGOFTHECURRENTTRACKTAPTHE3KIP3CAN2EVERSEBUTTON4AP
it twice quickly to skip backward to the previous track.
s&ORRANDOMSHUFFLEPLAYPRESSTHE2ANDOMBUTTON
CD
Press the Disc Source Selector to switch to the CD source. Then gently insert a CD,
CD-R, CD-RW, MP3 or WMA disc, label-side up, partway into the slot loader. The
mechanism will detect the disc and pull it the rest of the way in. Do not attempt to force
the disc. If the disc will not load, turn off the MAS system, unplug it and bring it to an
authorized Harman Kardon service center for inspection.
14
Data Discs
JPEG discs are not compatible with the MAS system, and the display will indicate that
they have no files and no folders.
When an MP3 or WMA disc is loaded, the number of folders and tracks in the current
folder will be displayed, up to a limit of 9999 tracks. Play will begin automatically.
If ID3 tag information is present, the song, artist, album, file type and folder will scroll in
the message display. To view each item individually, press the Info button repeatedly. If
no ID3 tags are present, the file name will appear.
The Skip and Scan functions and Repeat and Random play are the same as for audio
CDs.
Page 15

MAS SYSTEM
Operation
Use the numeric keys to directly access a track. If the disc is organized into folders,
press the Folder +/– buttons to open a folder. Additional presses skip to the next or previous folder. Within a folder you may search through the tracks more quickly by pressing
the +10 and –10 numeric keys.
USB
Your MAS system is equipped with two USB Ports, one on the rear panel of the controller,
and one on the right side panel, near the front of the controller. The front port is selected
as USB A, and the rear port is USB B. Each press of the USB Source Selector toggles
between the two ports.
The system is compatible with flash and hard-disk USB drives formatted in the FAT32 file
format. The system will recognize up to 9999 files in the MP3 or WMA formats, which
may be organized into folders.
NOTE: Although you can connect many different MP3 music players to the USB
port, you should not connect an iPod here. To enjoy audio content stored on an
iPod, use the included The Bridge IIIP docking station. Connect The Bridge IIIP
to its proprietary connector on the controller’s rear panel and dock the iPod in
The Bridge IIIP as shown on page 10. Do not connect a personal computer or any
peripherals to either of your MAS system’s USB ports.
When installing the system, make sure to leave sufficient room on the right side to safely
accommodate a USB device.
When the USB device is inserted, the total number of files will be displayed after a delay
to allow the device to be read.
Playback and navigation are the same as for an audio or data CD, as described above.
It is recommended that you stop playback before removing a USB device, although it is
not necessary to turn off the system.
Programmed Play
Playlists of selected tracks may be programmed for the current audio or data CD or USB
device. Playlists are not available for other sources. To program a playlist, play must
be stopped.
s0RESS THE 0ROGRAM BUTTON TO BEGIN 0ROGRAM MODE 4O EXIT WITHOUT PROGRAMMING A
playlist, press the Stop button.
s!DD TRACKS TO THE PLAYLIST BY USING THE 3KIP3CAN4RANSPORT#ONTROLSORTHENUMERIC
keys to select the track, then pressing the Program button to enter the selection. Add
up to 99 tracks.
s)F YOU MAKE A MISTAKE YOU MAY CLEAR THE TRACK JUST PROGRAMMED BY PRESSING THE
Clear button.
s0RESS0LAYTOPLAYTHEPLAYLISTOR3TOPTOSAVETHEPLAYLISTWITHOUTPLAYINGIT4HESYSTEM
will remain in Program mode.
To delete the playlist and exit Program mode:
s)FTHEPLAYLISTISPLAYINGSIMPLYPRESSTHE0ROGRAMBUTTONTODELETETHEENTIREPLAYLIST
the current track will continue playing.
s)FTHEPLAYLISTISSTOPPEDPRESSTHE#LEARBUTTON
Playlists may be edited:
s4OADDATRACKTOTHEPLAYLISTPRESSTHE3TOPBUTTONTHENTHE0ROGRAMBUTTON0ROCEED
as described above.
s4OVIEWTHETRACKSINAPLAYLISTWITHOUTMAKINGCHANGESSTOPPLAYANDPRESSTHE#HECK
button. Each press advances to the next track in the playlist. To exit Check mode,
press the Play button.
s4ODELETEASINGLETRACKFROMTHEPLAYLISTSTOPPLAYANDPRESSTHE#HECKBUTTONREPEAT-
edly until the desired track appears. Press the Clear button.
Playlists are lost when the system is turned off or the disc or USB device is removed.
The playlist will also be lost when the source is changed.
The Bridge IIIP Dock for iPod
Press the Bridge Source Selector to select The Bridge IIIP as the source. When a compatible iPod is docked (see page 4), a message will appear in the front-panel display that
The Bridge IIIP is connected.
The display will switch to the navigation menus, and the menu screen on the iPod
itself will be replaced by a “check mark” graphic and a message reading “OK to
Disconnect.”
When you see the “OK to Disconnect” message displayed, the iPod may be operated
using the MAS system’s front-panel or remote controls.
s4ONAVIGATETHEMENUSPRESSTHE7/3 buttons to scroll through a list. Press the Enter
button to select a menu item. Pressing the Enter button while an audio track is displayed will begin play. Press the Back button to return to the previous menu level.
The transport controls work as they do for CDs:
s4OPAUSEORRESTARTPLAYPRESSTHE0LAY0AUSEBUTTON
s4O SEARCHFORWARD ORREVERSE THROUGHATRACKPRESSANDHOLDTHE3KIP3CAN&ORWARD
or Reverse button.
s4OSKIPFORWARDOR REVERSETHROUGHTHETRACKSTAPTHE3KIP3CAN&ORWARDOR2EVERSE
button.
To play the tracks in the current playlist or category in random order (“Shuffle” mode),
press the Random button. Press it again to end random playback.
Any Repeat Play settings on the iPod will be indicated in the message display. To change
the settings, remove the iPod from The Bridge IIIP and use the controls on the iPod.
During normal play, select the Now Playing menu option to view the status. The upper
line of the message display will show the elapsed track time and remaining track time.
The song, artist and album information will scroll on the lower line, if available.
It is recommended that you stop playback before undocking the iPod, although it is not
necessary to turn off the system. However, the system should be turned off before connecting or disconnecting The Bridge IIIP.
Auxiliary Inputs
Your MAS system is equipped with three analog audio inputs, a phono input (MM type)
and four digital audio inputs. If you have connected a compatible device, such as a
portable audio player or a cassette deck, select the corresponding auxiliary input as the
source and use the device’s own controls.
To select one of the analog audio inputs or the phono input, press the Line In button
repeatedly to toggle through the inputs. To select one of the coaxial or optical digital
audio inputs, press the Digital In button repeatedly.
TV Input (Analog): Dual rear-panel RCA-type jacks
AUX Input (Analog): Dual rear-panel RCA-type jacks
Phono Input (Analog): Dual rear-panel RCA-type jacks
Line Input (Analog): Front 3.5mm jack
Coaxial 1 Input (Digital): Rear-panel RCA-type jack
Coaxial 2 Input (Digital): Rear-panel RCA-type jack
Optical 1 Input (Digital): Rear-panel TOSLINK™ connector
Optical 2 Input (Digital): Rear-panel TOSLINK connector
15
Page 16

MAS SYSTEM
NOTES:
• Only connect a turntable with an MM-type cartridge to the Phono Input. Do not
connect a turntable to any other input without using a phono preamp.
• When one of the digital audio inputs is selected, if no signal is present – e.g.,
if the device is turned off or paused – the “UNLOCK” message will appear. This
does not reflect a problem; it is simply an indication that no signal is present.
Recording
Two-channel analog and digital audio signals are normally available at the Coaxial
Output and Line Output on the rear panel of the controller. The MAS system can convert
one type of signal to the other. Thus, to make a recording, you need only make sure to
connect your audio recorder to the preferred output jacks, insert blank media and make
sure the recorder is turned on and recording while the source is playing.
NOTE: Please make certain that you are aware of any copyright restrictions on
any material you record. Unauthorized duplication of copyrighted materials is
prohibited by law in most jurisdictions.
System Software Version
To view the current system software version, press the Settings button and use the
7/3 buttons to display “System Version.” Press the Enter button to display it, and then
press the Enter or Back button to return to the Settings Menu.
Operation
System Reset
In the event that the system behaves erratically, a system reset may return it to normal
operation.
NOTE: All user settings, including radio presets and the languages selection, will
be returned to their factory defaults and must be reentered.
Press the Settings button and use the 7/3 buttons to display “System Reset.” Press the
Enter button, and a message will appear asking you to confirm that you wish to reset
the system. Press the Enter button again to perform the reset.
System Memory
The MAS system will retain user settings for up to four weeks after it has been completely turned off by unplugging the AC power cord.
16
Page 17

MAS SYSTEM
Troubleshooting
Troubleshooting
This unit is designed for trouble-free operation. Most problems users encounter are due to operating errors. So if you have a problem, first check this list for a possible solution. If the
problem persists, consult your authorized Harman Kardon service center.
If the problem is... Make sure that...
Unit does not function when Power On Switch is pressed. Make sure the AC power cord is securely plugged into an unswitched outlet. t
Display lights, but there’s no sound. Press the Mute button to make sure the system is not muted. t
There is sound on only one side, or the sound is distorted. Make sure both speakers are securely connected with the correct polarity, t
The MAS system does not respond to remote commands. The batteries in the remote control may require replacement. t
The tuner is buzzing intermittently. Adjust the placement of the antenna to improve reception. t
You can find ad ditional troubles hooting i nformation in the FAQ s link on the Suppor t page at www.harma nkardo n.com.
If the “PROTECT” message appears, press and hold the remote control Power
button for at least 1 second to turn off the MA S system, then unplug the
system. Do not use the system again without first bringing it to an authorized
Harman Kardon service center for inspection.
Turn up the volume. t
Check that the correct source was selected. If the source is an external t
device, make sure the device is plugged in, turned on and playing, and that it
is properly connected to one of the auxiliary inputs.
If the headphones are in use, unplug them. t
and that no wires are touching each other and creating a short circuit.
There may be a problem with one of the speakers. Bring the MAS system to t
an authorized Harman Kardon service center for inspection and service.
The IR sensor may be blocked. The sensor is located on the right half of the t
controller’s front panel.
Check that the antenna is securely connected to the rear-panel terminal. t
17
Page 18

MAS SYSTEM
Specifications
Specifications
System
Power output: 65 watts per channel, 20Hz – 20kHz, THD <0.07%, into 6 ohms, both channels driven
Bandwidth: 20Hz–35kHz, –3dB
System frequency response: 20Hz–20kHz, ±0.5dB
Signal-to-noise ratio, A-weighted: 90dB (Analog inputs), 96dB (Digital inputs)
Channel separation: ≥65dB
Crosstalk between sources: ≥70dB
Line-level input sensitivity at 1kHz: 250mV RMS, ±1dB
Phono MM input sensitivity at 1kHz: 7.5mV
Loudspeakers
Low-frequency transducers: Two 130mm honeycomb composite drivers, ported
High-frequency transducers: Two 25mm MMD® domes, shielded
Nominal impedance: 8 ohms
Sensitivity (2.83V/1m): 85dB
Frequency response: 60Hz–25kHz (–3dB)
Crossover frequency: 2200Hz
FM Tuner Section
Frequency range: 87–108.0MHz
Usable sensitivity: IHF 1.3μV/13.2dBf
Frequency response: 10Hz to 15.3kHz
Signal-to-noise ratio: mono/stereo 68/65dB
Distortion: mono/stereo 0.15/0.3%
Stereo separation: 35dB @ 1kHz, 100% deviation @ 65dBf
Selectivity: ±300kHz: 65dBF
Image rejection: 80dB
IF rejection: 90dB
Tuner output level: 1kHz, ±50kHz, Dev 500mV
Number of presets: 30
RDS capability: PS (program service), RT (dynamic radio text)
18
Page 19

MAS SYSTEM
Specifications
CD Section
Disc compatibility: CD, CD-R, CD-RW, MP3, WMA
THD+N (20Hz – 20kHz): <0.025%
Frequency response: 20Hz to 20kHz, 0dB ±0.5
Channel separation: ≥65dB
Signal-to-noise ratio: “A” WTG > 96dBr; 22kHz filter > 94dBr
General
Power requirement: AC 230V/50Hz (MAS 101/MAS 111); AC 120V/60Hz (MAS 102)
Power consumption: <1W full standby (clock not activated); <2W standby (clock activated);
Operating temperature: 0°C to 40°C
Dimensions (H x W x D): Controller: 90mm x 240mm x 240mm (3-9/16" x 9-7/16" x 9-7/16")
Weight: System: 13.9kg (30.5 lb)
150W maximum (both channels driven)
Amplifier: 90mm x 240mm x 240mm (3-9/16" x 9-7/16" x 9-7/16")
Loudspeakers (each, with grille): 272mm x 181mm x 196mm
(10-23/32" x 7-1/8" x 7-3/4")
Controller: 2.0kg (4.4 lb)
Amplifier: 2.8kg (6.3 lb)
Loudspeakers (each): 4.4kg (9.8 lb)
19
Page 20

Harman Consumer, Inc.
8500 Balboa Boulevard, Northridge, CA 91329 USA
516.255.4545 (USA only)
© 2010 Harman International Industries, Incorporated. All rights reserved.
Features, specifications and appearance are subject to change without notice.
Harman Kardon and MMD are trademarks of Harman International Industries, Incorporated, registered in the United States and/or other countries. The Bridge IIIP logo
is a trademark of Harman International Industries, Incorporated. Windows Media
Audio is a proprietary file format developed by Microsoft.
iPod, iPod classic, iPod nano and iPod touch are trademarks of Apple Inc., registered in the U.S. and other countries. iPhone is a trademark of Apple Inc. iPod not
included. “Made for iPod” and “Made for iPhone” mean that an electronic accessory has been designed to connect specifically to iPod and iPhone, respectively, and
have been certified by the developer to meet Apple performance standards. Apple
is not responsible for the operation of this device or its compliance with safety and
regulatory standards.
TOSLINK is a trademark of Toshiba Corporation.
Part No. 443369
www.harmankardon.com
 Loading...