

Page 1
BDS
Integrated home theater system
Quick-Start Guide
Page 2

BDS
1
2
BDS
Introduction, Speaker Placement and Connection
Thank you for choosing a Harman Kardon® product!
This quick-start guide contains all the information you need to connect and set up your
new BDS integrated home theater system.
To conserve our natural resources, your BDS system does not include a printed user
manual. A user manual containing complete information about operating all of your
new system’s features is available at our Web site. Go to www.harmankardon.com and
download the BDS Integrated Home Theater System User Manual.
USA: EU:
Blu-ray Disc™ region Blu-ray Disc™ region
DVD region DVD region
Place the Speakers
5.1-Channel Systems
Front Left
Speaker
Center
Speaker
TV
Front Right
Speaker
Subwoofer
2.1-Channel Systems
Left Speaker
TV
For more detailed speaker placement information – including wall-mounting
instructions – download the complete BDS Integrated Home Theater System User Manual
from www.harmankardon.com.
Right Speaker
Subwoofer
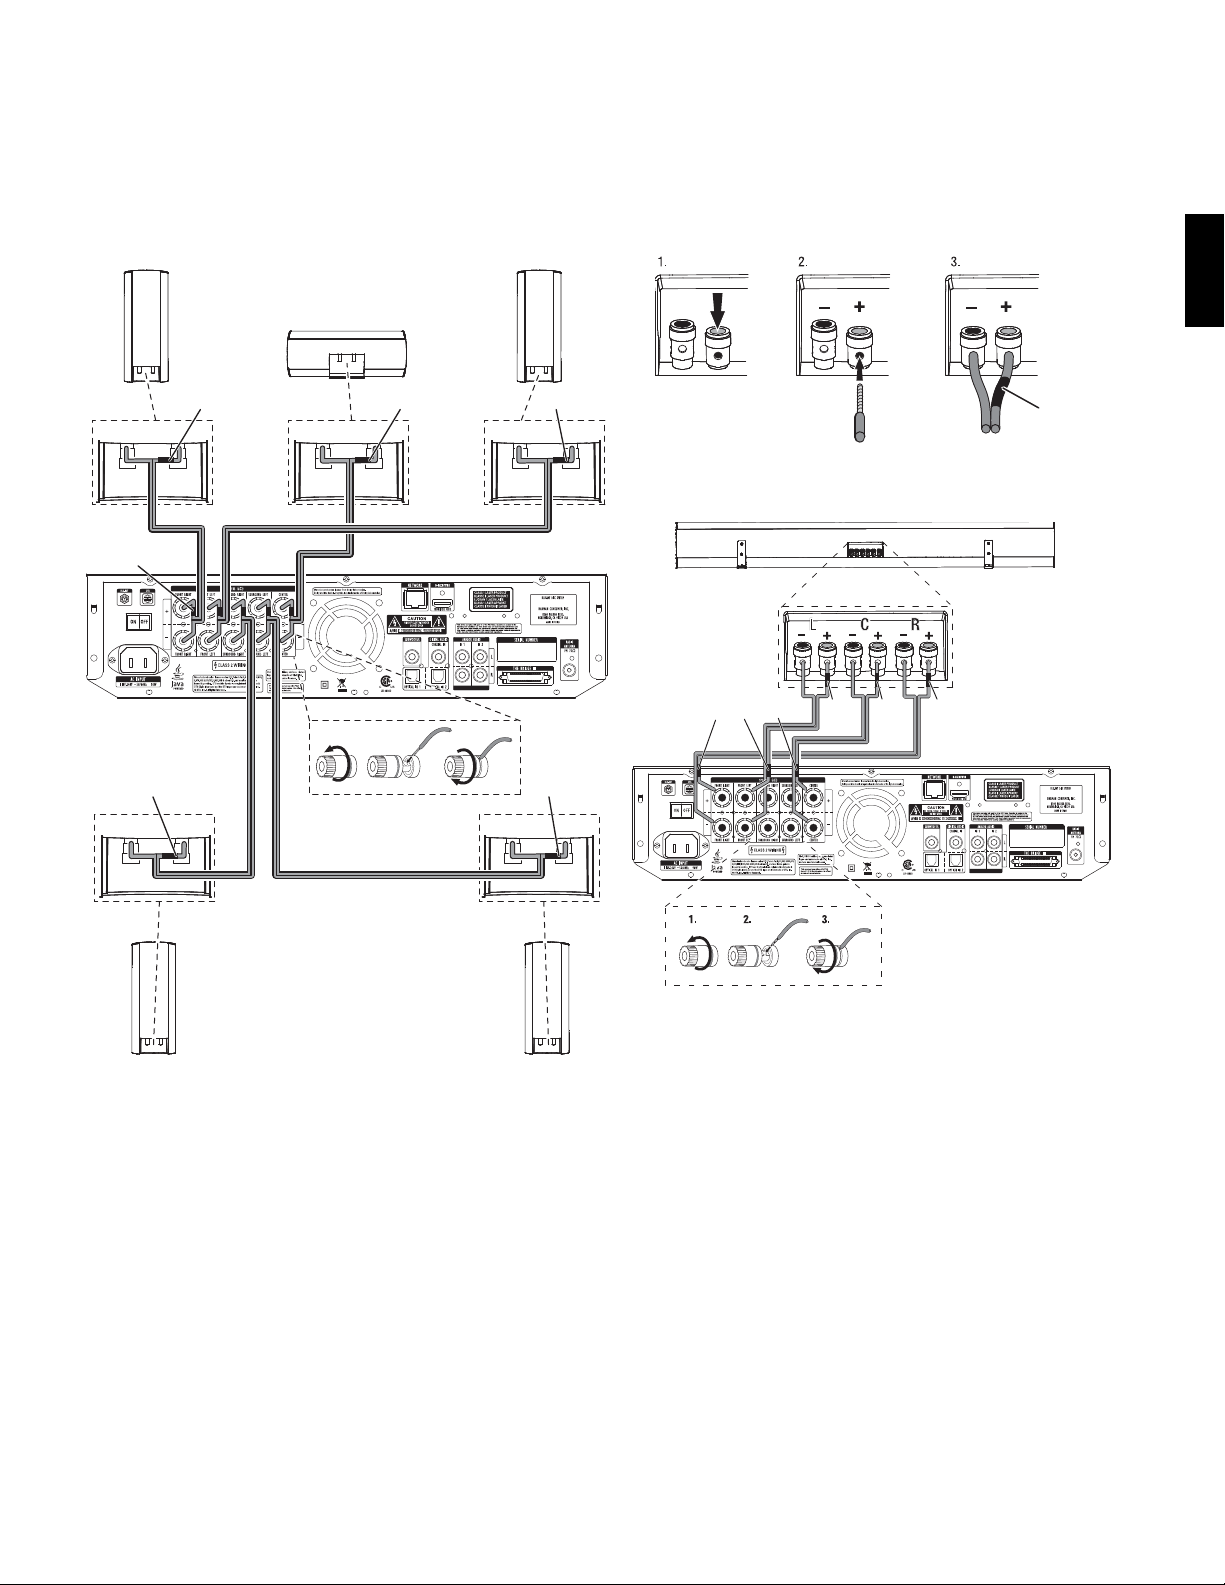
Connect the Speakers
CAUTION: Before making any connections to the BDS receiver, ensure that the
receiver’s AC cord is unplugged from the receiver and the AC outlet. Making
speaker connections with the receiver plugged in and turned on could damage
the speakers.
5.1 and 2.1 System Speakers Option 1
Surround Left
Speaker
Soundbar Systems
2
Soundbar Speaker
TV
Surround Right
Speaker
Colored
Band
Subwoofer
5.1 and 2.1 System Speakers Option 2
Colored
Band
Page 3
BDS
+– +–
+–+– +–
1. 2. 3.
BDS
Connections
Front Right
Satellite
Colored Bands
to "+" Terminals
Gray Band
Red Band
Center*
Green Band
BDS Receiver (BDS 5.1 shown)
Front Left
Satellite
Blue Band
White Band
3.1 Soundbar System
SB 10 Soundbar
White
Red
Band
Band
Green
Band
White
Band
Green
Band
ENGLISH
Colored
Band
Red
Band
BDS 5.1 Receiver
Surround Right
Satellite*
IMPORTANT: Make sure the (+) and (–) bare wires do not touch each other or the
other terminal. Touching wires can cause a short circuit that can damage the
receiver.
*Speakers included only in 5.1 system
Surround Left
Satellite*
IMPORTANT: Make sure the (+) and (–) bare wires do not touch each other or the
other terminal. Touching wires can cause a short circuit that can damage your
receiver or amplifier.
3
Page 4

BDS
BDS
Connections
Connect the Speakers (Continued)
Subwoofer Connection
IMPORTANT: Do not plug the subwoofer’s AC power cord into an AC outlet at this
time.
LFE Cable
Connect a TV or Video Display
HDMI
Cable
TV
Connect Other Devices
Connect the Radio Antenna
Connect to a Local Area Network (LAN)*
To
Internet
Network
Modem
CAT-5/5E
* Needed only for BD-Live™ functionality
FM Antenna
4
Page 5

BDS
PL0004-01001
BDS
Connections
Connect Audio Sources
Connect the AC Power
ENGLISH
Receiver
TV
To
Optical Out
-OR-
To
Audio Out
110V – 240V, 50Hz/60Hz
Tape Deck
Cable/Satellite Turner
To
Optical Out
Digital Audio Source
To
Play Out
To
Coaxial Out
Subwoofer
USA: 120V, 60Hz
EU: 220V – 230V,
50Hz/60Hz
5
Page 6

BDS
PL0004-01001
DISC
AUX
iPOD
RADIO
SETTINGS
DISPLAY
A - B
REPEAT
2
EJECT POWER TV
1
3
5
4
6
8
0
7
9
CLEAR
HOME
FIND
OPTIONS
SURROUND
OK
TOP MENU
POP-UP
EXIT
+ +
––
VOLUME
CHANNEL
MUTE
THUMBNAIL
ZOOM
BOOKMARK
PROGRAM
BDS
Receiver Setup
Set Up the Receiver
Install the Batteries in the Remote Control
To set up your BDS receiver you will use the remote to navigate through the on-screen
menus and to make selections from them.
Settings Button
Home Button
OK Button
Cursor Controls
Exit Button
Set Up the Receiver
Set the receiver’s and subwoofer’s Main Power switches in the “On” position.
Receiver
Main Power
Switch
Subwoofer
Main Power
Switch
Use the Cursor Up/Down buttons to navigate through the menu list. When an item is
•
highlighted, a blue border will appear around it.
To select a highlighted item, press the OK button. The screen will change depending
•
on your selection.
To return to the previous screen, press the Exit button.
•
6
Page 7

BDS
Select to adjust speaker configuration
Tone Controls
Audio Out
Speaker Settings
Configuration
Speaker Position
2.1
3.1
5.1
Audio Settings
BDS
Setup Wizard and Soundbar System Setup
Setup Wizard
When you turn your BDS receiver on for the first time, the on-screen menu will display
the Setup Wizard.
Before you can use your BDS system you need to set the language and make a few basic
settings so that the BDS receiver’s video output will work properly with your TV.
Press the OK button and the Wizard’s language screen will appear.
Soundbar System Setup
NOTE: These instructions apply only to BDS soundbar systems.
Before you can use your soundbar system, you must configure the receiver for
3.1-channel operation.
1. Press the remote’s Settings button. The General Settings screen will appear.
2. Press the right Cursor control to select Audio Settings. The Audio Settings screen will
appear.
ENGLISH
After setting the language you want the receiver’s on-screen menus to appear in, press
the OK button and the Wizard’s TV resolution screen will appear.
After selecting your TV’s highest resolution, press the OK button, and the Wizard’s aspect
ratio screen will appear. NOTE: If you are unsure of your display's highest resolution, select
"Auto" and BDS will select the optimal resolution for you.
After selecting the aspect ratio that best fits your TV, press the OK button to save your
setting, and then press it again to exit the Setup Wizard.
3. Press the down Cursor control to select Speaker Settings.
4. Press the right Cursor control to select Configuration, then press it again to highlight 2.1.
5. Press the down Cursor control to highlight 3.1.
6. Press the OK button to select the configuration, then press the Settings button to exit.
7
Page 8

BDS
1 / 5 Exit Option
Type:Disc
Size:23684.875M
FS:UDF
Home Menu
Blu-Ray Disc
USB
FM Radio
Playlist
Settings
HOME
OPTIONS
BDS
Using the Receiver
Press the remote’s Home button to display the Home Menu screen:
The available sources are listed on the left. If a disc has been inserted into the receiver’s
built-in disc slot, it will appear on the list as either “Blu-Ray Disc,” “DVD Video” or “CDDA”
(CD audio recording or CD data disc). If you have inserted a USB device into the receiver’s
USB port, it will appear on the list as “USB.”
NOTE: Audio sources connected to the receiver’s rear-panel digital and line inputs will not
appear on the list but can be selected using the remote’s “Aux” Source Selector button
(see below).
To select a source from the list, use the Cursor Up/Down buttons to highlight the desired
source, then press the OK button to select it.
You can also select a source directly by pressing its Source Selector button on the remote.
Using the Receiver
Source Selector
Buttons
For complete information about using all of your BDS system's features,
you can download the
www. harmankardon.com.
8
BDS Integrated Home Theater System User Manual
from
Page 9

BDS
ENGLISH
9
Page 10

Harman Consumer, Inc.
8500 Balboa Boulevard, Northridge, CA 91329 USA
516.255.4545 (USA only)
Made in P.R.C.
© 2010 Harman International Industries, Incorporated. All rights reserved.
Harman Kardon is a trademark of Harman International Industries, Incorporated, registered in the United States and/or other
countries. Blu-ray Disc and BD-Live are trademarks of the Blu-ray Disc Association. Manufactured under license from Dolby
Laboratories. Dolby, Pro Logic, and the double-D symbol are trademarks of Dolby Laboratories. Manufactured under license under
U.S. Patent #’s: 5,451,942; 5,956,674; 5,974,380; 5,978,762; 6,487,535 & other U.S. and worldwide patents issued & pending. DTS
and the Symbol are registered trademarks & DTS Digital Surround and the DTS logos are trademarks of DTS, Inc. Product includes
software. © DTS, Inc. All Rights Reserved. HDMI, the HDMI logo, and High-Definition Multimedia Interface are trademarks or
registered trademarks of HDMI Licensing LLC in the United States and other countries. Java and Java-based trademarks and
logos are trademarks or registered trademarks of Sun Microsystems, Inc., in the U.S. and other countries. This item incorporates
copy-protection technology that is protected by U.S. patents and other intellectual-property rights of Rovi Corporation. Reverse
engineering and disassembly are prohibited.
Features, specifications and appearance are subject to change without notice.
www.harmankardon.com
 Loading...