

Page 1

INFERNO 3000
Hardt Equipment Manufacturing
2025 52nd Avenue, Lachine,
(Montreal), Quebec
H8T 3C3
Canada
TECHNICAL SUPPORT
Tel: (800) 387-6847
(514) 631-7271
Fax: (514) 631-5443
SELF CLEANING ROTISSERIE
Installation and Operation Manual
Page 2

24-HOUR TECHNICAL SUPPORT 1-800-387-6847 Inferno 3000 Ref-Mnl (2010-02)
2
Page 3
24-HOUR TECHNICAL SUPPORT 1-800-387-6847 Inferno 3000 Ref-Mnl (2010-02)
INTRODUCTION - 4 -
ABOUT THIS MANUAL ................................................................................................................................... - 4 -
CUSTOMER SERVICE PROGRAM ................................................................................................................ - 5 -
WARRANTY CONDITIONS ............................................................................................................................. - 6 -
UL LISTING AND SAFETY WARNING ........................................................................................................... - 7 -
SPECIFICATIONS - 8 -
INFERNO 3000 SINGLE DECK ...................................................................................................................... - 8 -
INFERNO 3000 DOUBLE DECK ................................................................................................................... - 10 -
LOCATION OF COMPONENTS ................................................................................................................... - 14 -
DELIVERY INFORMATION - 16 -
SHIPPING WEIGHTS / DIMENSIONS: ......................................................................................................... - 16 -
TO CONNECT THE ROTISSERIE ONCE IT IS IN POSITION ..................................................................... - 16 -
INSTALLATION INFORMATION - 17 -
ORDER OF INSTALLATION ......................................................................................................................... - 17 -
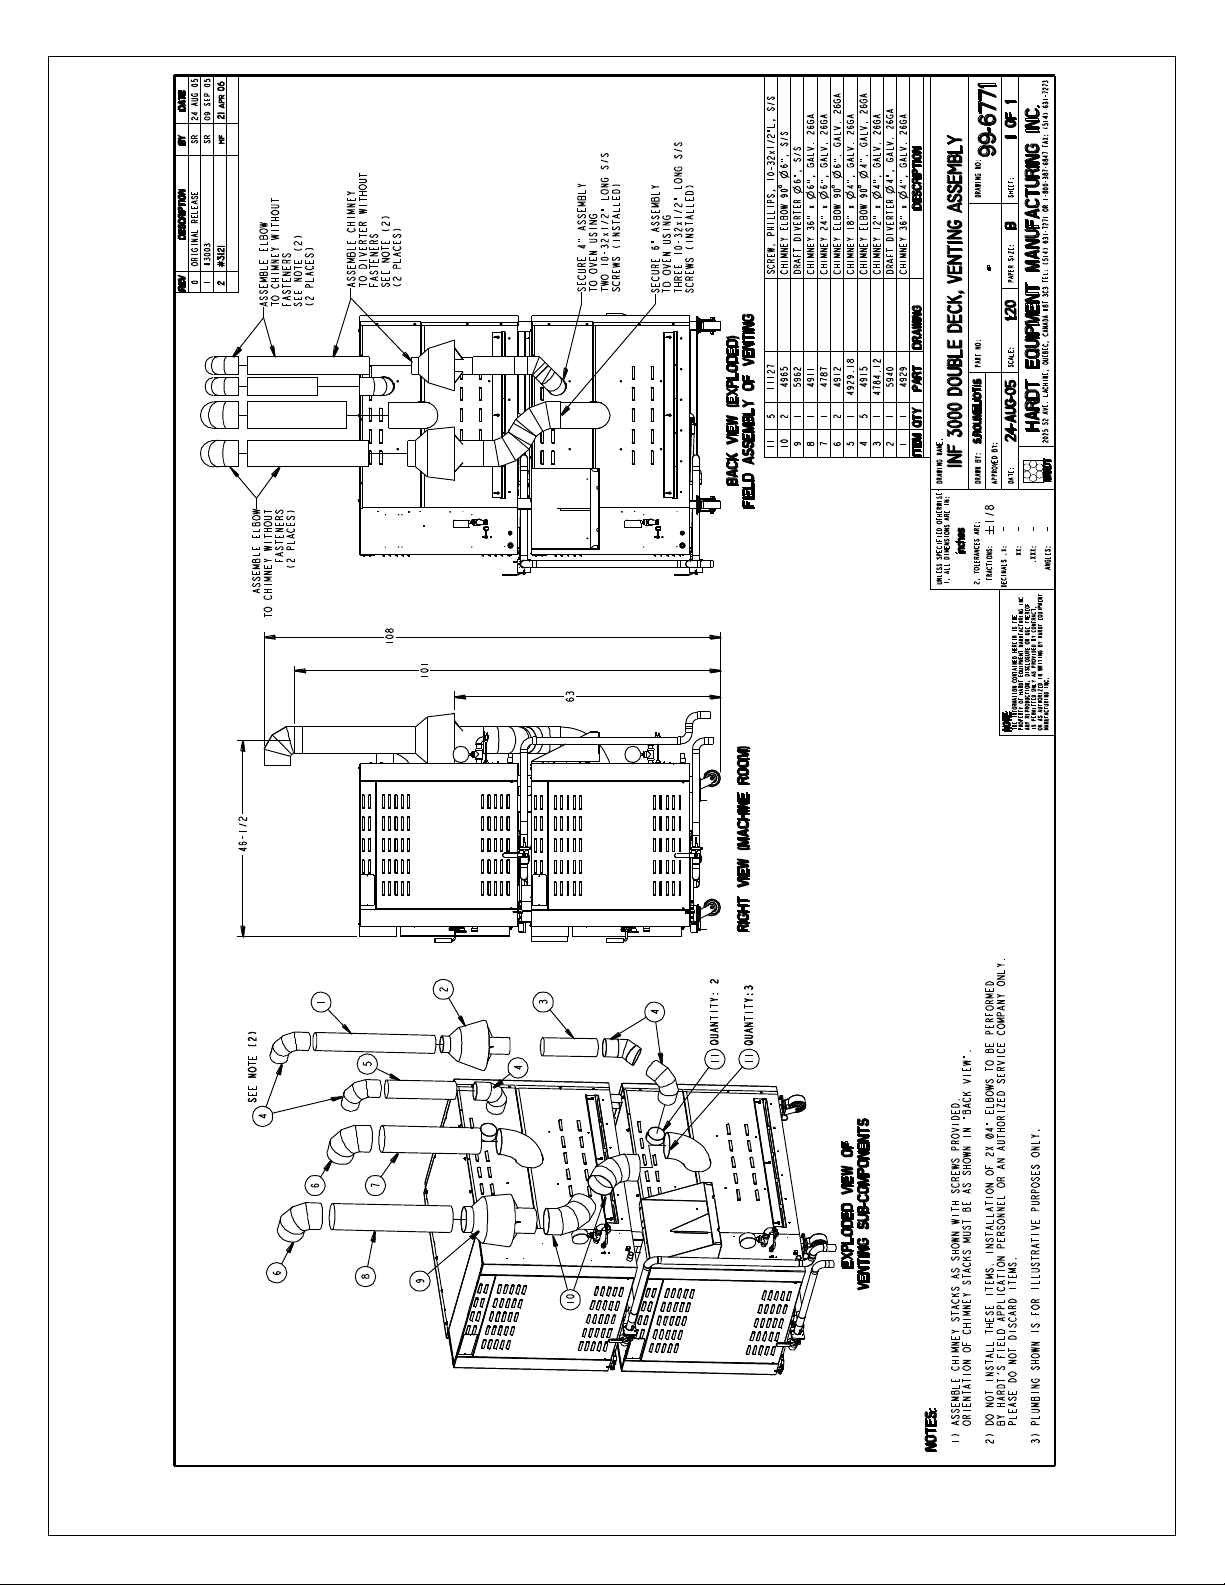
VENTING INFORMATION ............................................................................................................................. - 17 -
POSITIONING OF THE ROTISSERIE .......................................................................................................... - 18 -
GAS SUPPLY SPECIFICATIONS ................................................................................................................. - 18 -
INSTALLATION OF GAS SUPPLY ............................................................................................................... - 19 -
CONNECTION OF ELECTRICAL SUPPLY .................................................................................................. - 20 -
ELECTRICAL SCHEMATIC .......................................................................................................................... - 21 -
INSTALLATION OF WATER SUPPLY .......................................................................................................... - 22 -
INSTALLATION OF DRAIN ........................................................................................................................... - 23 -
OPERATION - 24 -
CONTROL PANEL .......................................................................................................................................... - 24 -
CONTROL PANEL BUTTON FUNCTIONS ................................................................................................. - 25 -
ELECTRONIC CONTROLLER PROGRAMMING.............................................................................................. - 26 -
MORNING START-UP PROCEDURES ........................................................................................................ - 27 -
COOKING PROCEDURES ........................................................................................................................... - 28 -
INSERTION / REMOVAL OF SKEWERS (BASKETS) ................................................................................. - 29 -
MAINTENANCE - 30 -
DAILY CLEANING ......................................................................................................................................... - 30 -
TROUBLESHOOTING - 33 -
3
Page 4
24-HOUR TECHNICAL SUPPORT 1-800-387-6847 Inferno 3000 Ref-Mnl (2010-02)
WARNING!
WARNING!
WARNING!
IN THE EVENT THE USER SMELLS GAS:
SHUT OFF THE MAIN GAS VALVE TO THE BUILDING.
DO NOT TOUCH ANY ELECTRICAL APPLIANCE.
DO NOT TOUCH ANY ELECTRICAL SWITCH.
DO NOT USE ANY TELEPHONE IN YOUR BUILDING.
EXTINGUISH ANY OPEN FLAME.
IMMEDIATELY CALL YOUR GAS SUPPLIER FROM A NEIGHBOR’S PHONE.
FOLLOW THE GAS SUPPLIER’S INSTRUCTIONS.
IF YOU CANNOT REACH YOUR GAS SUPPLIER CALL THE FIRE DEPARTMENT.
INTRODUCTION
ABOUT THIS MANUAL
This manual must be retained for future reference. This manual contains information
necessary for the installation and operation of the HARDT Inferno 3000 rotisserie. To
help the reader in the utilization of this manual certain information has been highlighted
using the following conventions.
SPECIFIES INFORMATION THAT REFERS TO ACTIONS WHICH MAY HAVE
CONSEQUENCES POTENTIALLY DANGEROUS TO THE OPERATOR AND/OR
THE ROTISSERIE.
Specifies information necessary for the proper installation and functioning of the
rotisserie.
Specifies additional important information
POST IN A PROMINENT LOCATION:
FOR YOUR SAFETY
DO NOT STORE OR USE GASOLINE OR OTHER FLAMMABLE VAPOURS AND
LIQUIDS IN THE VICINITY OF THIS OR ANY OTHER APPLIANCE. KEEP THE
AREA AROUND THE APPLIANCE FREE FROM ANY COMBUSTIBLE MATERIAL.
IMPROPER INSTALLATION, ADJUSTMENT ALTERATION, SERVICE OR
MAINTENANCE CAN CAUSE PROPERTY DAMAGE, INJURY OR DEATH. READ
THE INSTALLATION, OPERATION AND MAINTENANCE INSTRUCTIONS
THOROUGHLY BEFORE INSTALLING OR SERVICING THIS EQUIPMENT.
Never obstruct the flow of combustion or ventilation air.
4
Page 5

24-HOUR TECHNICAL SUPPORT 1-800-387-6847 Inferno 3000 Ref-Mnl (2010-02)
CUSTOMER SERVICE PROGRAM
We at HARDT Equipment have developed a Customer Service Program (CSP) to
ensure fast response time and efficient flow of information. Our authorized service
companies are required to attend training sessions to ensure they are up-to-date on the
latest information.
Here are some of the proactive steps in our CSP:
Our authorized service companies provide service in the 50 states and
Canada. All our service companies stock parts.
We are committed to a 4-hour service response time for units that are in a
"down" situation.
We are available 24 hours per day, 7 days per week, including holidays. We can
also be reached at 514-631-7271, Monday to Friday - 8:30 AM to 6:00 PM EST.
What to do if a service issue occurs:
The FIRST call should be to HARDT Customer Service at 800-387-6847 (24
hours per day, 7 days per week, including holidays).
Customer Service will work with you to diagnose the problem. Should a
technician be required, HARDT will dispatch one and give them the specific
information required to solve the problem. This will allow the call to be handled
in more effective manner.
Please remember that during the WARRANTY period, all service calls MUST be directed to
HARDT for approval before contacting the service company.
5
Page 6

24-HOUR TECHNICAL SUPPORT 1-800-387-6847 Inferno 3000 Ref-Mnl (2010-02)
WARRANTY CONDITIONS
HARDT EQUIPMENT MANUFACTURING WARRANTS ITS PRODUCTS TO BE FREE
FROM DEFECTS IN MATERIAL AND WORKMANSHIP UNDER NORMAL USE AND
SERVICE FOR A PERIOD OF TWO YEARS FROM DATE OF ORIGINAL
INSTALLATION OR 8 WEEKS AFTER THE ROTISSERIE IS SHIPPED, WHICHEVER
COMES FIRST. THIS WARRANTY IS APPLICABLE TO THE INITIAL END-USER AND
IS NOT TRANSFERABLE.
Warranty is conditional on proper installation as per the instructions in the 'INSTALLATION
INFORMATION' section of this guide. Should the rotisserie be improperly installed and
service be required as a result, all charges will be invoiced to the individual who requested
the service. HARDT reserves the right to void the warranty if unauthorized service is
performed or if the equipment has not been paid for in full.
Warranty is conditional on proper maintenance and cleaning as per the 'MAINTENANCE'
section of this manual. Improper or insufficient maintenance or cleaning will cause
premature deterioration of components and the replacement of these will not be covered
under warranty. Please read the 'MAINTENANCE' section carefully.
Work performed under warranty must be performed by service representatives authorized
by HARDT. Should other service companies be used, authorization must be obtained from
HARDT prior to the commencement of any service.
During the warranty period, specified parts changed by authorized service companies must
be returned to HARDT to determine if they are covered under warranty. A copy of the
service sheet explaining the problem and the corrective measure taken must be included
with the invoice along with the Return Authorization Number given by HARDT.
Warranty includes labour, material, travel expenses and material freight charges. Labour is
limited to straight-time. Overtime charges cover only time and one half in emergencies
when the rotisserie is completely non-operational. Travel expenses are limited to 100 miles
and 2 hours travel, per call.
WARRANTY DOES NOT INCLUDE:
Problems arising from improper use or installation, including high or low voltage,
high or low gas pressure, improper venting and/or poor maintenance.
The adjustment, drying and/or aligning of the igniters.
The replacement of the glass. (All rotisseries are fully heat tested prior to
shipment. Glass breakage is a result of sharp, abrupt contact. Please exercise
caution during operation.)
The replacement of light bulbs.
Lost revenue or expenses incurred due to equipment failure.
Calls made directly to our service companies (without an authorization number
from Hardt).
SPARE PARTS WARRANTY
HARDT grants an operation warranty of 3 months on original HARDT spare parts.
In cases of failure within this period, HARDT will supply a replacement part.
6
Page 7
24-HOUR TECHNICAL SUPPORT 1-800-387-6847 Inferno 3000 Ref-Mnl (2010-02)
WARNING!
WARNING!
WARNING!
WARNING!
WARNING!
UL LISTING AND SAFETY WARNING
The HARDT Inferno 3000 rotisserie is listed by UL, ULC and NSF. The UL or ULC label
is the only evidence provided by UL or ULC to identify products manufactured under the
respective listing and follow-up service programs. Consult the authority having
jurisdiction to determine what regulations are in force for appliances of this type.
POST IN A PROMINENT LOCATION THE INSTRUCTIONS TO BE FOLLOWED IN
THE EVENT THE USER SMELLS GAS. THIS INFORMATION SHOULD BE
AVAILABLE FROM YOUR LOCAL GAS SUPPLIER.
FOR YOUR SAFETY!
DO NOT STORE OR USE GASOLINE OR OTHER FLAMMABLE VAPOURS AND
LIQUIDS IN THE VICINITY OF THIS OR ANY OTHER APPLIANCE.
KEEP THE AREA AROUND THE APPLIANCE FREE FROM ANY COMBUSTIBLE
MATERIAL.
IMPROPER INSTALLATION, ADJUSTMENT, ALTERATION, OR MAINTENANCE
CAN CAUSE PROPERTY DAMAGE, INJURY OR DEATH. READ THE
INSTALLATION INSTRUCTIONS THOROUGHLY BEFORE INSTALLING OR
SERVICING THIS EQUIPMENT.
AN ADEQUATE AIR SUPPLY MUST BE SUPPLIED TO THE UNIT AT ALL TIMES
DURING THE OPERATION TO ENSURE A PROPER FLOW OF COMBUSTION AND
VENTILATION AIR.
IF YOU SMELL GAS CALL YOUR LOCAL GAS SUPPLIER.
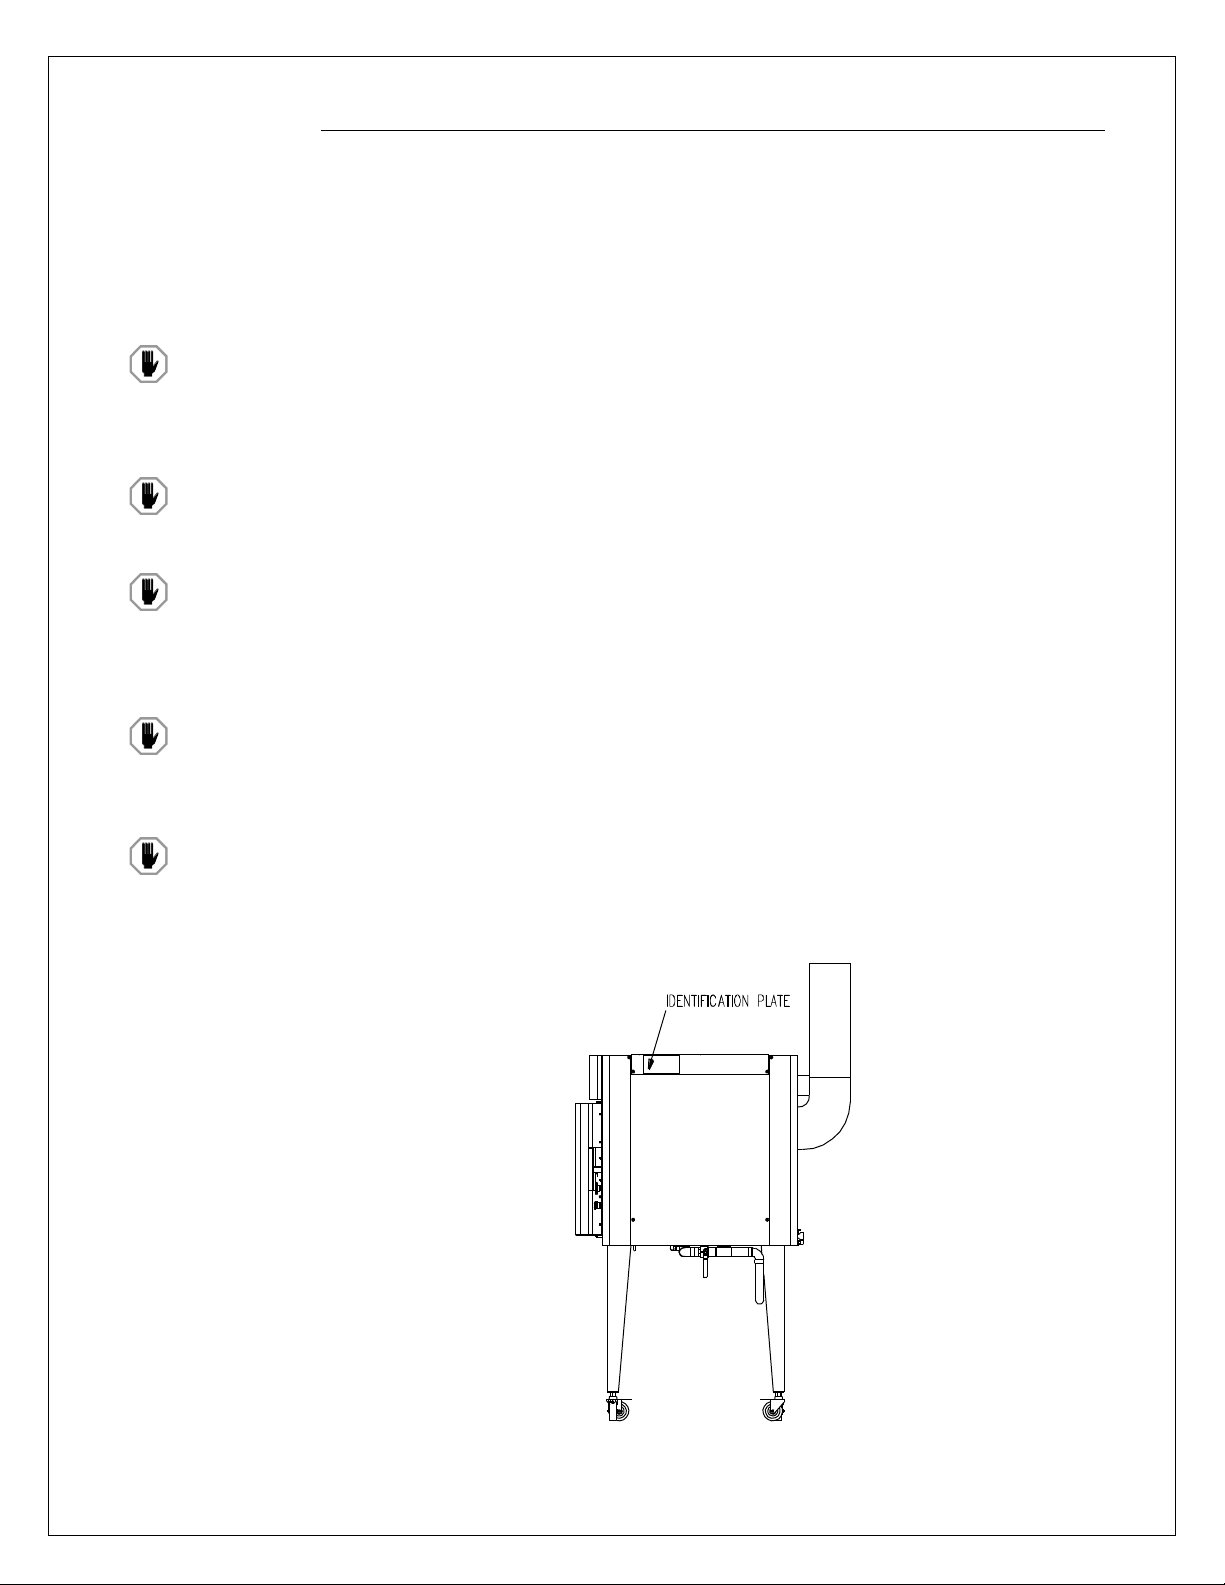
The rotisserie‟s serial number is located on the unit's identification plate which can be
found on the right side of the rotisserie.
7
Page 8
24-HOUR TECHNICAL SUPPORT 1-800-387-6847 Inferno 3000 Ref-Mnl (2010-02)
SPECIFICATIONS
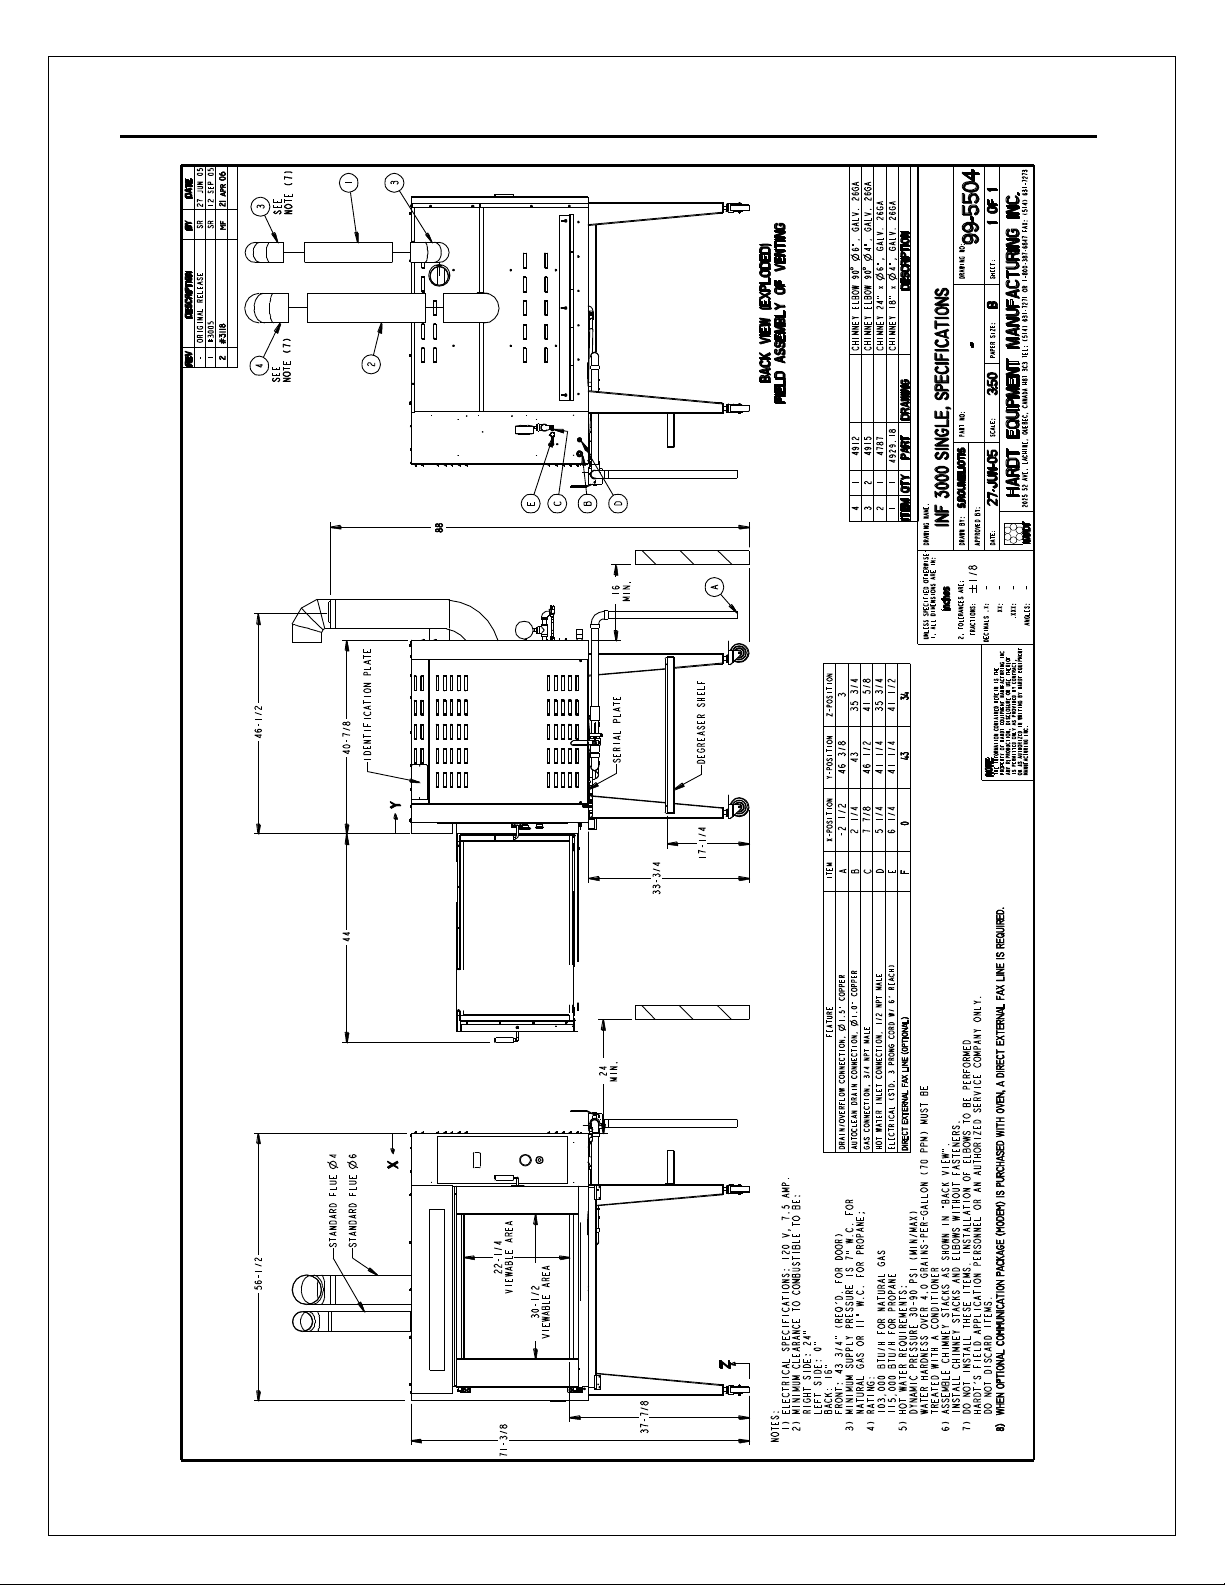
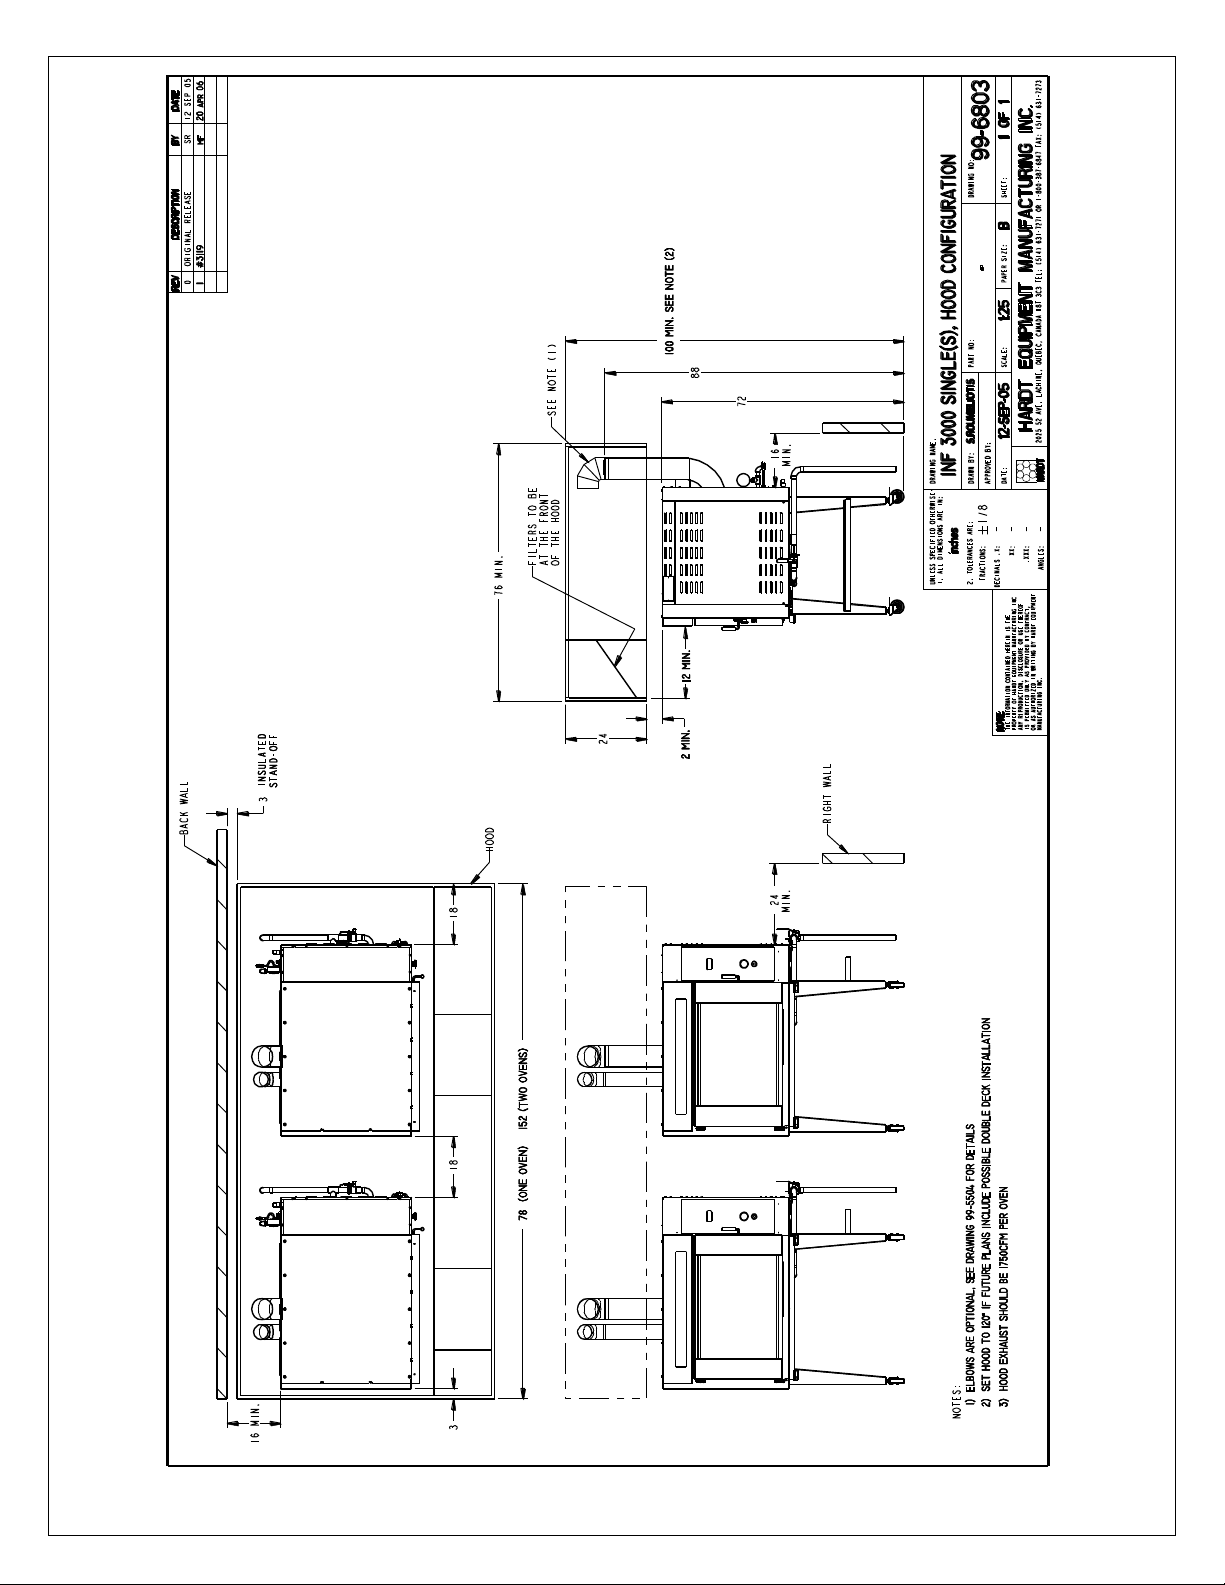
INFERNO 3000 SINGLE DECK
Hardt improves its products continuously and reserves the right to change specifications without notice.
8
Page 9
24-HOUR TECHNICAL SUPPORT 1-800-387-6847 Inferno 3000 Ref-Mnl (2010-02)
Hardt improves its products continuously and reserves the right to change specifications without notice.
.
9
Page 10
24-HOUR TECHNICAL SUPPORT 1-800-387-6847 Inferno 3000 Ref-Mnl (2010-02)
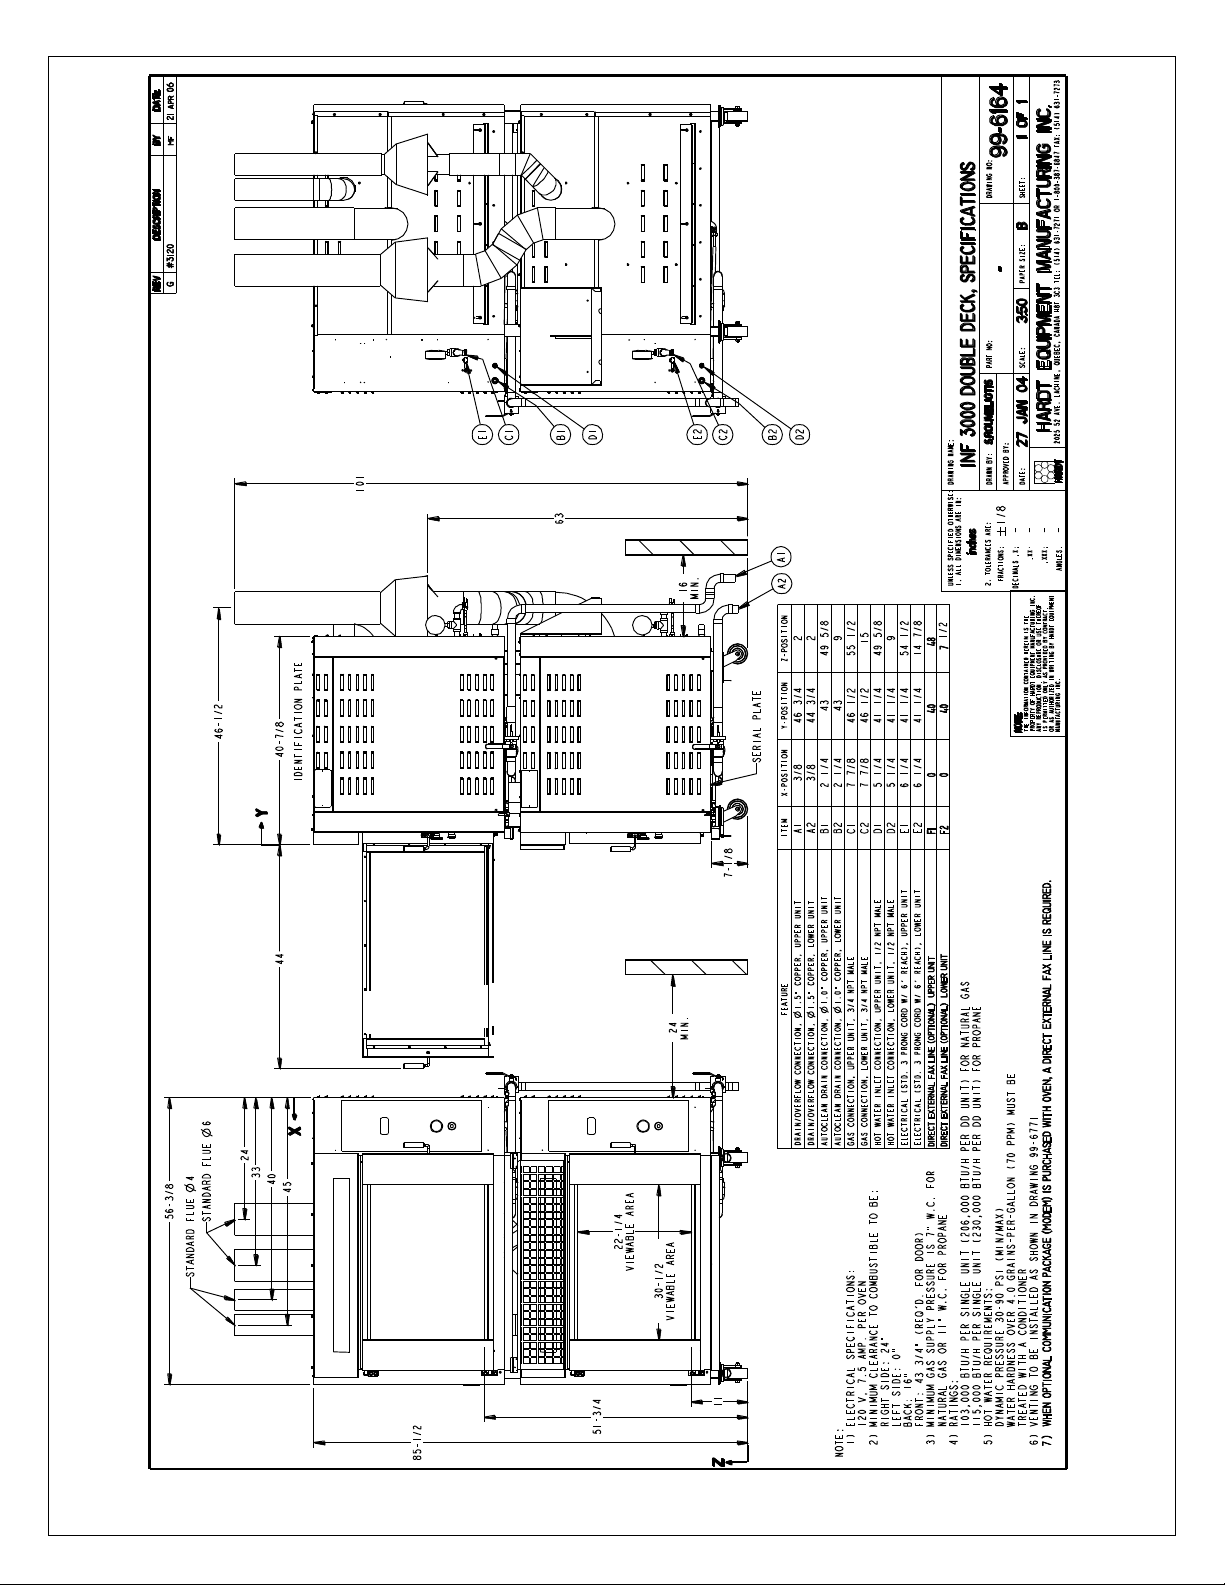
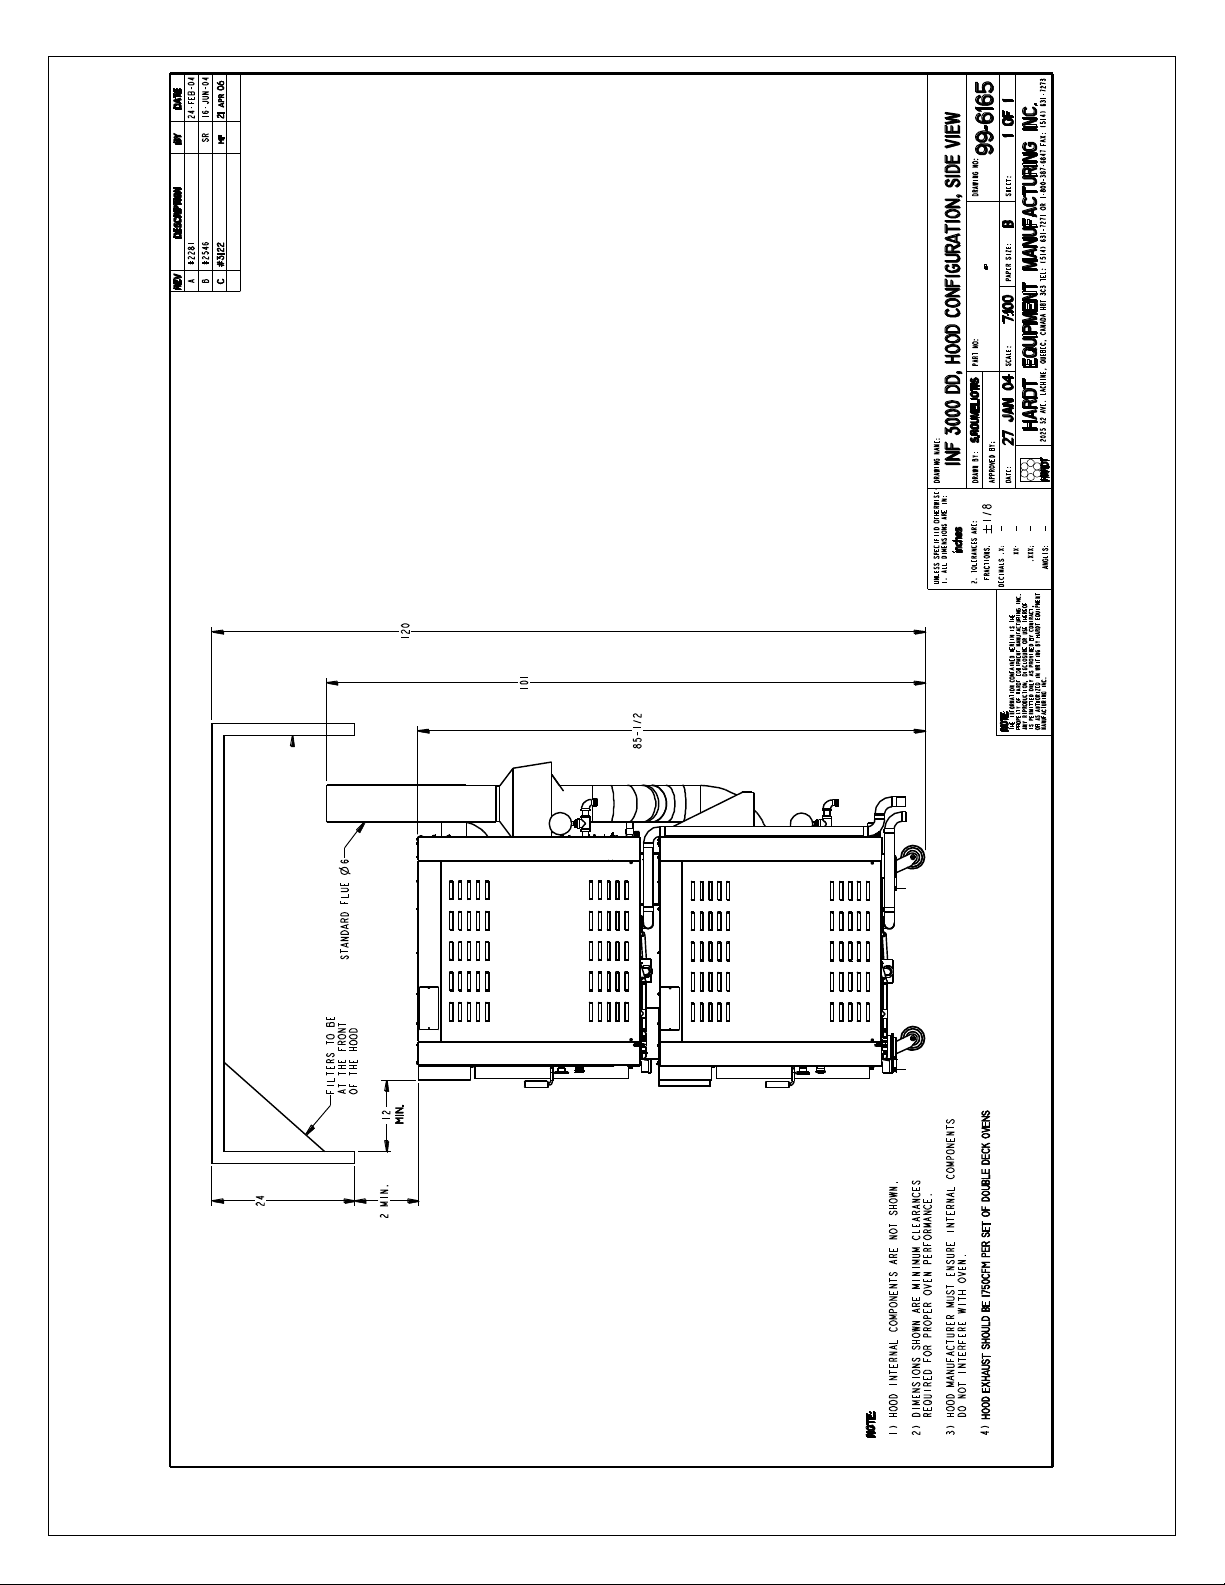
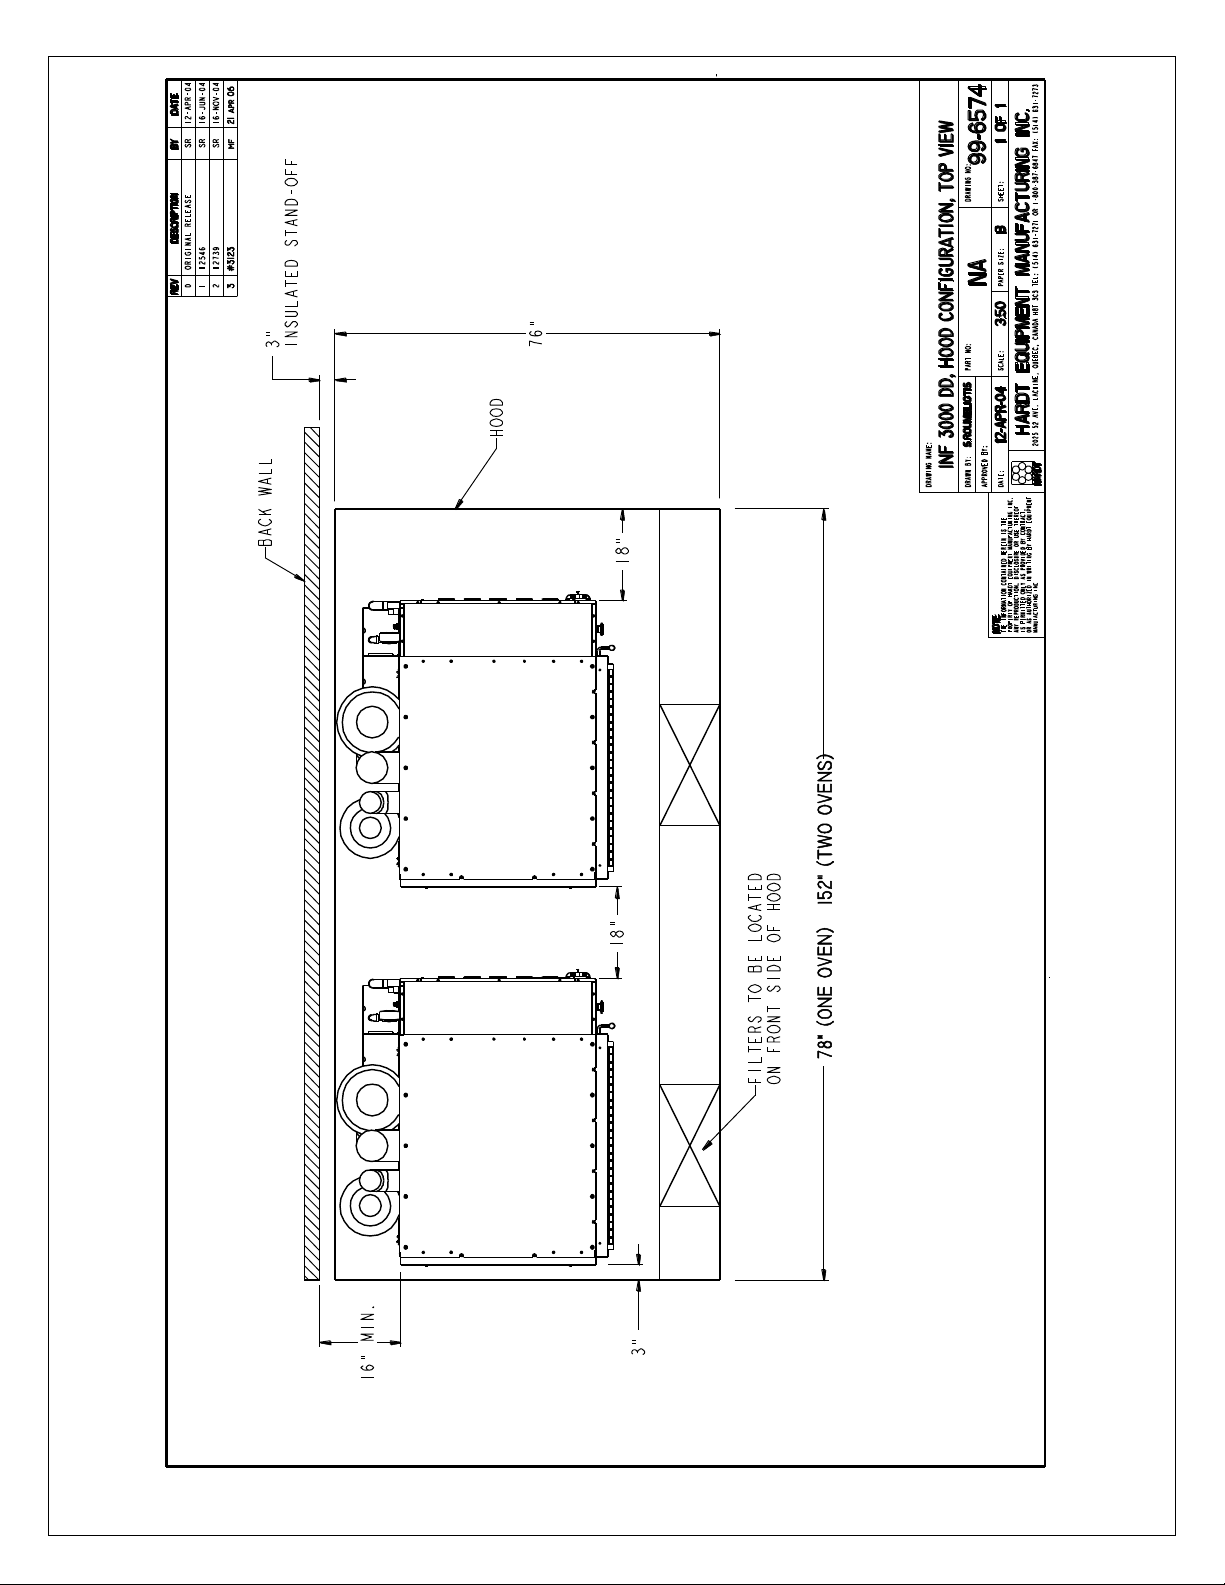
INFERNO 3000 DOUBLE DECK
Hardt improves its products continuously and reserves the right to change specifications without notice.
10
Page 11
24-HOUR TECHNICAL SUPPORT 1-800-387-6847 Inferno 3000 Ref-Mnl (2010-02)
Hardt improves its products continuously and reserves the right to change specifications without notice.
.
11
Page 12
24-HOUR TECHNICAL SUPPORT 1-800-387-6847 Inferno 3000 Ref-Mnl (2010-02)
Hardt improves its products continuously and reserves the right to change specifications without notice.
12
Page 13
24-HOUR TECHNICAL SUPPORT 1-800-387-6847 Inferno 3000 Ref-Mnl (2010-02)
Hardt improves its products continuously and reserves the right to change specifications without notice.
13
Page 14
24-HOUR TECHNICAL SUPPORT 1-800-387-6847 Inferno 3000 Ref-Mnl (2010-02)
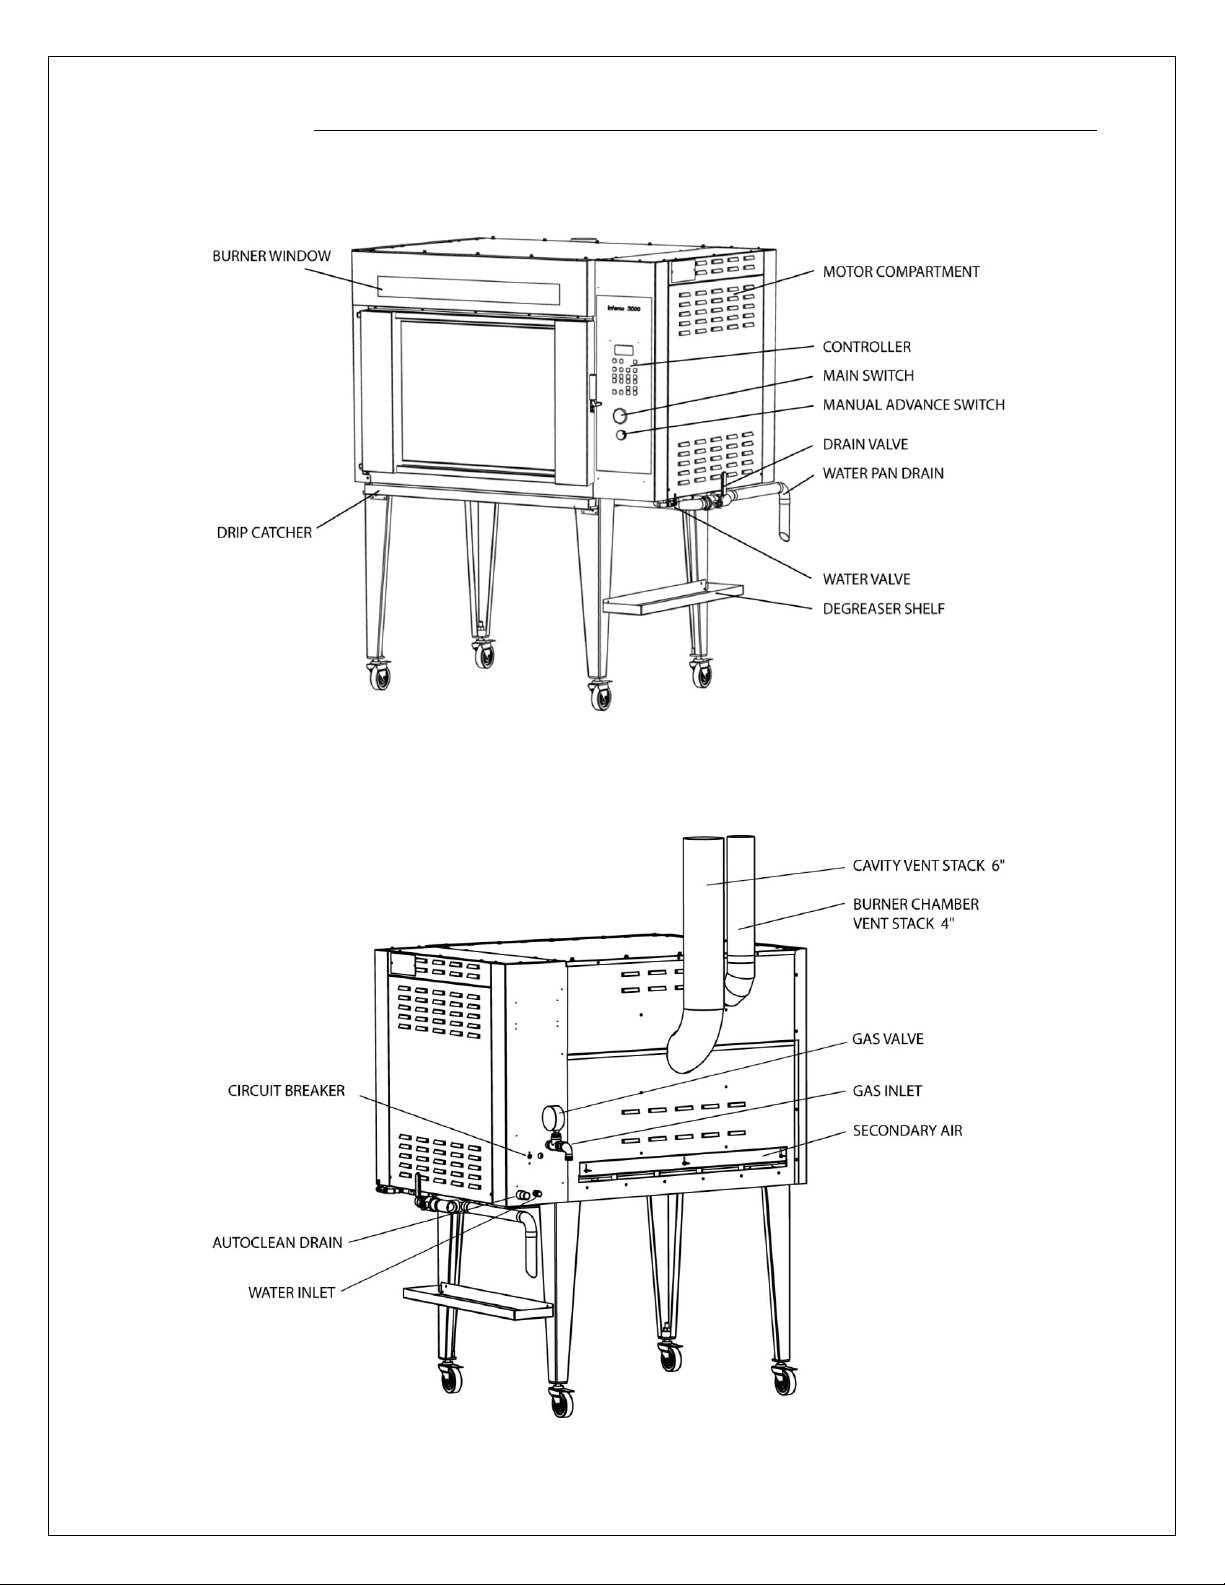
LOCATION OF COMPONENTS
SINGLE DECK
FRONT
REAR
14
Page 15
24-HOUR TECHNICAL SUPPORT 1-800-387-6847 Inferno 3000 Ref-Mnl (2010-02)
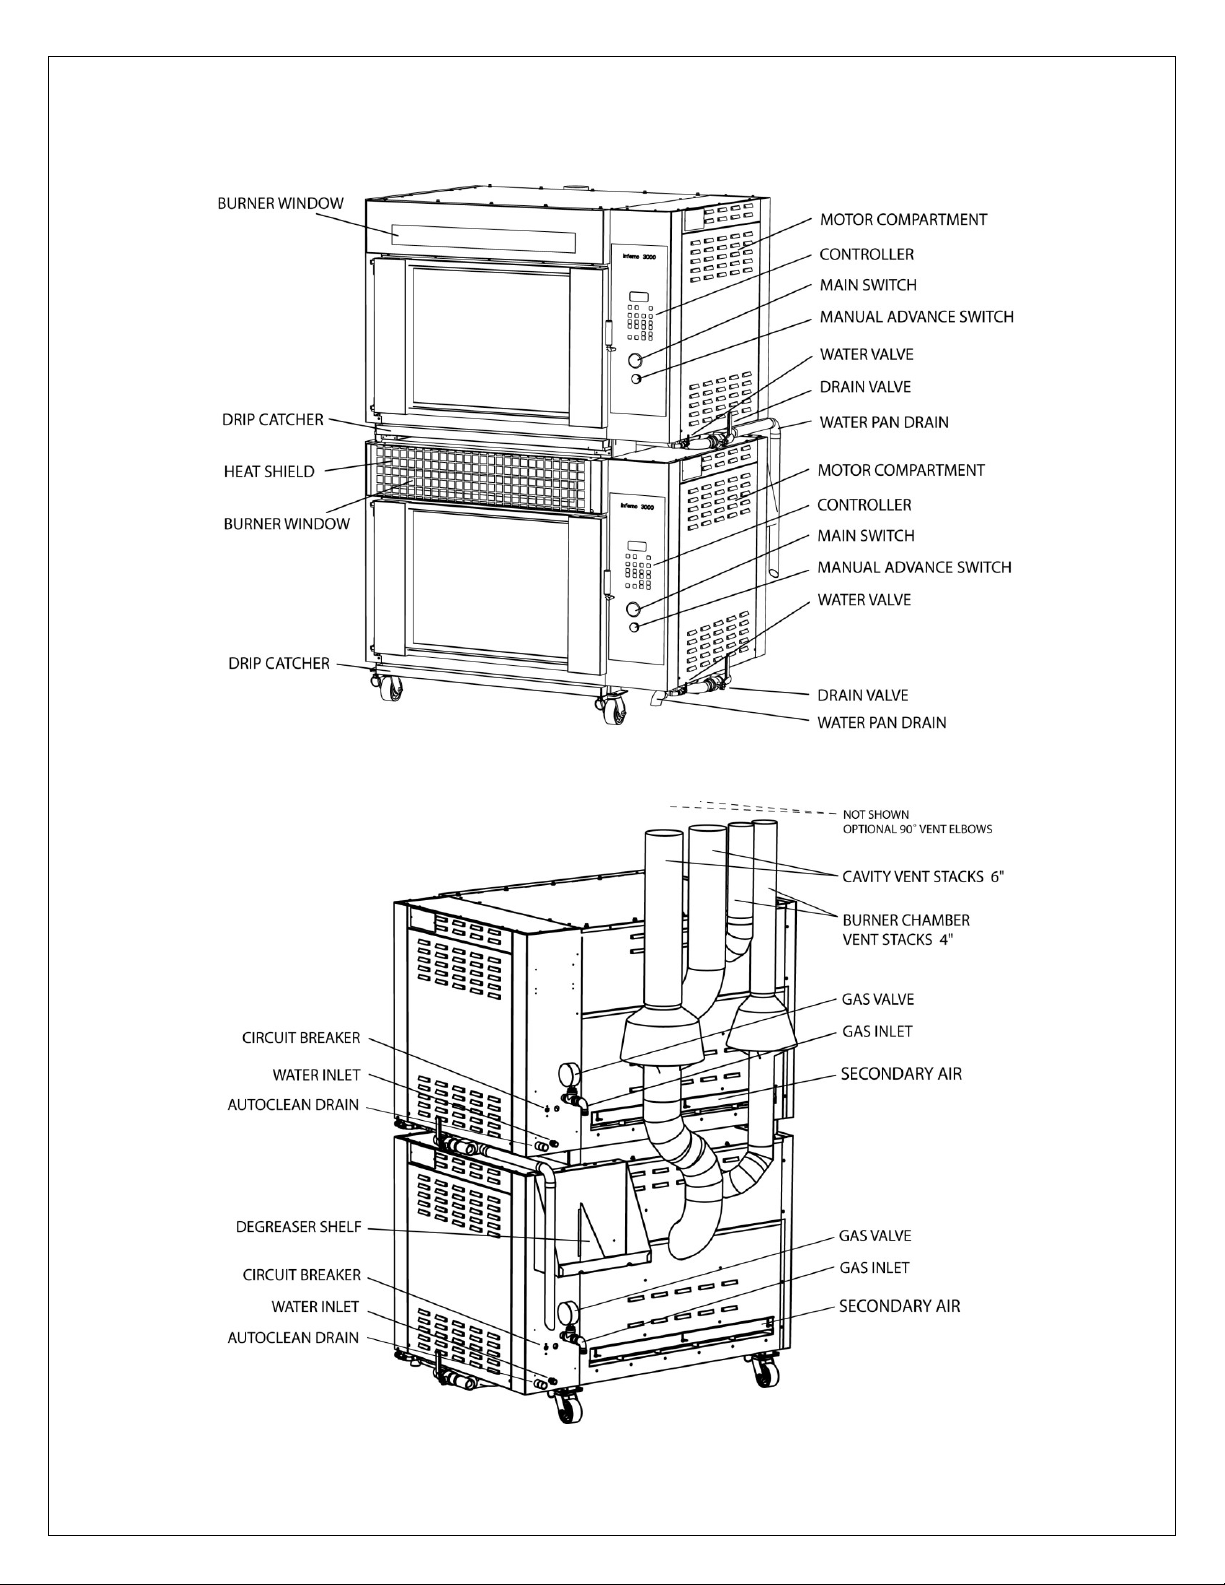
DOUBLE DECK
FRONT
REAR
15
Page 16
24-HOUR TECHNICAL SUPPORT 1-800-387-6847 Inferno 3000 Ref-Mnl (2010-02)
WARNING!
DELIVERY INFORMATION
The HARDT Inferno 3000 rotisserie is constructed in the form of a stainless steel main
structure. All parts of the rotisserie drive, the burner system and all associated electrical
and mechanical hardware are assembled into this structure.
TAKE CARE WHEN HANDLING THE CRATE AS IT IS TOP HEAVY.
The unit should be dragged as little as possible as this may cause vibrations that
may damage the electronic ignition system.
Please do not uncrate the rotisserie until ready to install in order to prevent the loss of
any parts or accessories shipped with the unit. Call HARDT if you have any questions.
SHIPPING WEIGHTS / DIMENSIONS:
Crated with Accessories: Single: Approx. 1400 pounds (80” H x 64” W x 52” D)
Double: Approx. 2800 pounds (shipped as 2 single crates)
FOB Montreal.
TO CONNECT THE ROTISSERIE ONCE IT IS IN POSITION
You will require:
1) The local gas company (to install gas connections from the main supply).
2) A plumber (If permanently connected to water inlet and/or drain).
3) A Hardt certified technician (to perform a post installation verification after the
installation is completed).
Please refer to the 'INSTALLATION INFORMATION' section for the order of connection to
the rotisserie once it is in place, as well as other important installation information.
If you require any information in addition to that described above please contact a
HARDT Customer Service Representative at the above Customer Service 1-800
number, available 24 hours per day, 7 days per week.
16
Page 17
24-HOUR TECHNICAL SUPPORT 1-800-387-6847 Inferno 3000 Ref-Mnl (2010-02)
INSTALLATION INFORMATION
ORDER OF INSTALLATION
Warranty is conditional on proper installation as per the instructions in this section. Should
the rotisserie be improperly installed and service be performed, all charges will be invoiced
to the individual who requested the service. Please call our Customer Service department if
you have any questions whatsoever.
1. Install the ventilation hood,
2. Place the HARDT Inferno 3000 rotisserie in position,
3. Connect the gas,
4. Connect the electricity,
5. Connect the water inlet,
6. Connect the water pan and AutoClean drains,
7. Connect the degreaser bottle.
VENTING INFORMATION
The Inferno 3000 rotisserie is designed to be used with a hood / canopy type vent. The
maximum cooking temperature is approx. 650 deg. F
The HARDT Inferno 3000 rotisserie must vent using the supplied flues as shown
on the diagrams in the 'SPECIFICATIONS‟ section. Do not install the hood and
make-up air in a way that air is being blown into or pulled out of the rotisserie.
Either of these events will greatly affect the rotisserie‟s operation. The hood
should remove the exhaust gases without disturbing the air within the rotisserie.
Hood Specification Recommendations
We recommend a Type 1 / Class A grease hood with filters. It is normally equipped with
a fire suppression system. Per local authorities and codes, NFPA 96 recommends that
all rotisseries that produce grease laden vapours should be vented to a Type 1 / Class
A hood. Other equipment that would fall into this category would be fryers and griddles.
The hood should have at least 12" of overhang canopy on sides and front (this may
vary as per local code).
Ensure that the fire suppression nozzles do not prevent it from moving.
The grease filters MUST be located at the front of the hood to avoid pulling too
much air from the flues.
Service calls related to the incorrect venting of the units are not covered under warranty.
17
Page 18
24-HOUR TECHNICAL SUPPORT 1-800-387-6847 Inferno 3000 Ref-Mnl (2010-02)
WARNING!
POSITIONING OF THE ROTISSERIE
FAILURE TO CONFORM TO MINIMUM CLEARANCES CAN CAUSE PROPERTY
DAMAGE, INJURY OR DEATH.
Failure to conform to minimum clearances may result in service not being able to
be performed!
The rotisserie should be installed in a draft-free area where temperatures are
above 45 degrees Fahrenheit (7 degrees Celsius).
Do not locate the rotisserie in an area where the control side is next to fryers,
broilers or any other appliance that emits grease, smoke, humidity, flour, etc.
As the venturi for the burner is behind the control panel, precautions should be taken to
prevent the above mentioned particles from entering the burner and causing it to
malfunction.
Once the hood installation has been completed the rotisserie can be placed in position.
The rotisserie should be positioned on a level surface.
To allow for sufficient cooling the required minimum clearances to combustible surfaces
are:
Right (Control side) 24” (for service)
Left 0”
Front: 44” (for service and operation)
Back: 16”
Flooring: Non-combustible
GAS SUPPLY SPECIFICATIONS
All gas installations must be performed by a licensed professional. Check local ordinances
for applicable regulations.
It is required that Inferno 3000 rotisseries be equipped „Quick Disconnect‟
gas/water installation hardware.
IN THE USA: Installation must conform to local codes, or in the absence of local
codes, with the NATIONAL FUEL GAS CODE, ANSI Z83.11.
IN CANADA: Natural gas installation must be in accordance with current code
CAN/CGA B149.1.
Propane gas installation must be in accordance with current code CAN/CGA B149.2
and/or local codes.
NATURAL GAS Minimum required inlet pressure 7" W.C.
Manifold pressure (front + rear): 5" W.C.
Maximum rating: 103,000 Btu/h
PROPANE GAS Minimum required inlet pressure 11" W.C.
Manifold pressure (front + rear): 10" W.C.
Maximum rating: 115,000 Btu/h
Connection: ¾" NPT male
18
Page 19
24-HOUR TECHNICAL SUPPORT 1-800-387-6847 Inferno 3000 Ref-Mnl (2010-02)
WARNING!
WARNING!
WARNING!
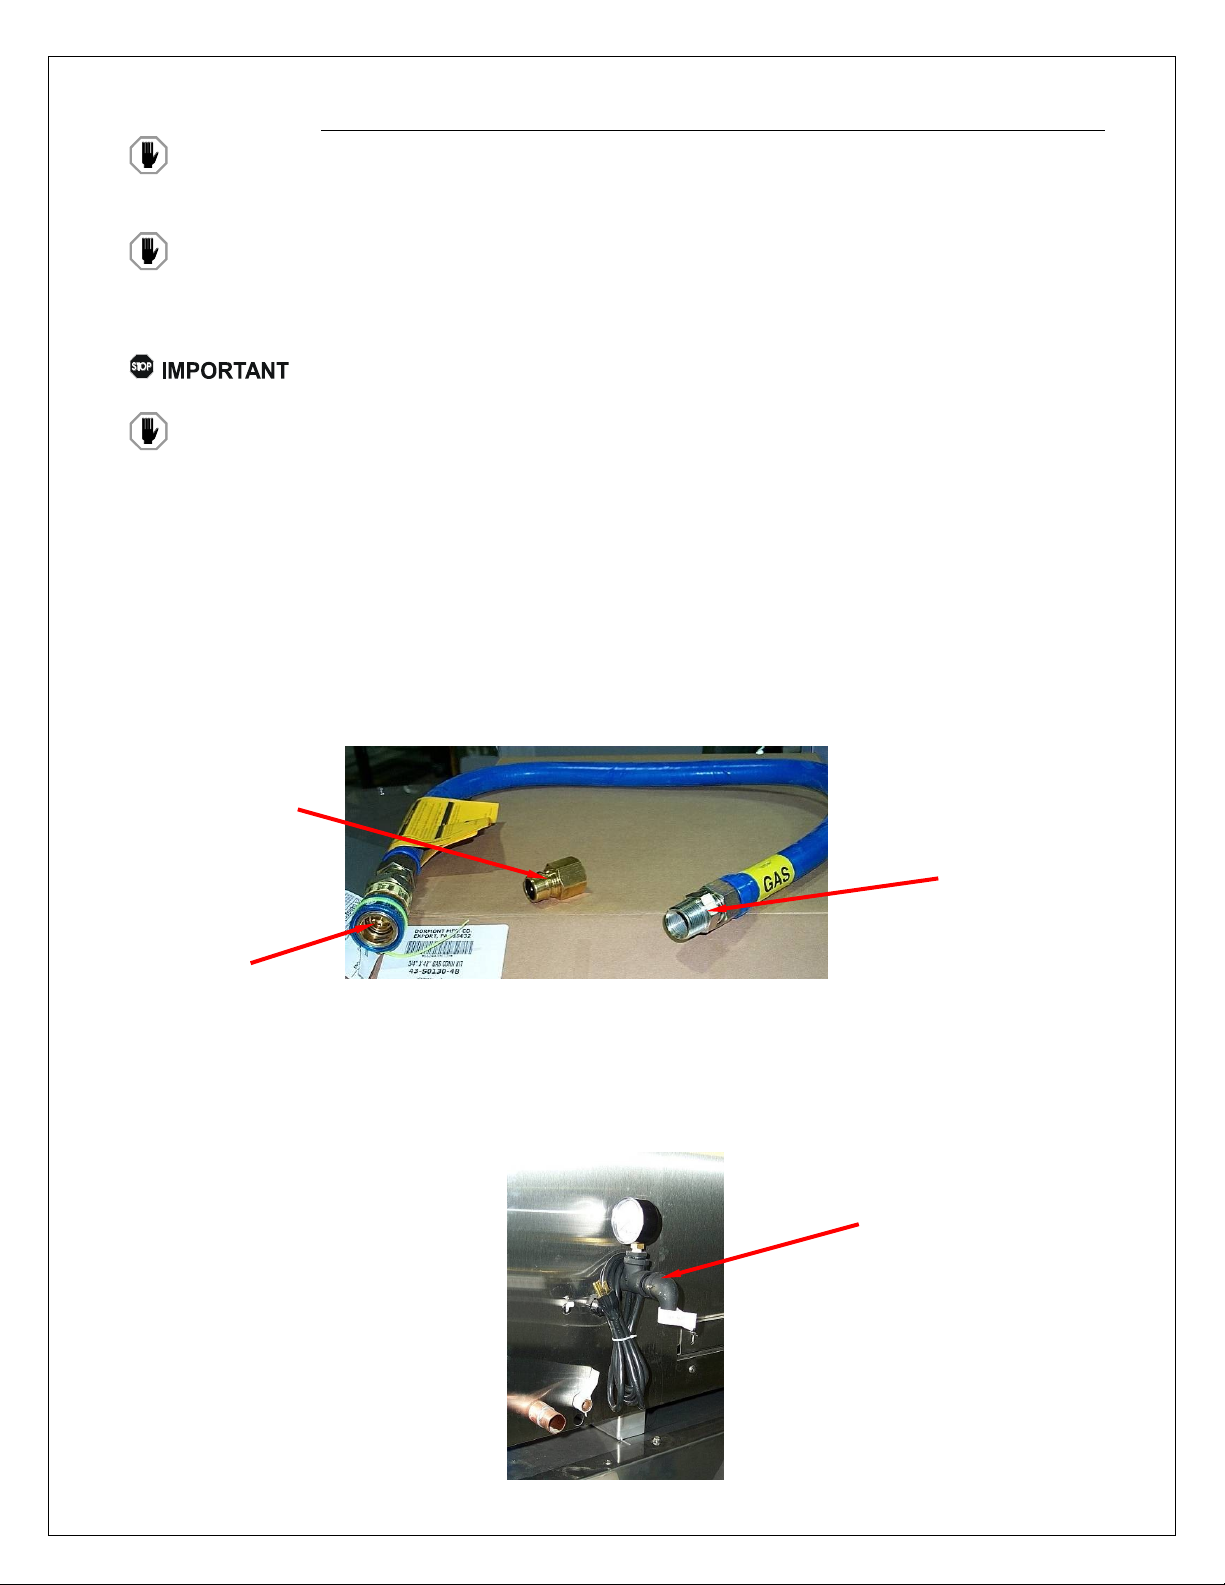
Flexible gas hose,
connect this side
to supply
Quick-disconnect
hose fitting
Quick-disconnect
fitting, pipe adapter
Gas Inlet Connection
INSTALLATION OF GAS SUPPLY
THE ROTISSERIE IS VERY HOT WHEN OPERATING. MAKE SURE THAT THE
MAIN GAS VALVE IS INSTALLED IN A LOCATION EASILY ACCESSIBLE TO THE
EMPLOYEES.
ENSURE THE FACILITY GAS SUPPLY IS TURNED OFF BEFORE OPENING ANY
CONNECTIONS PRIOR TO OR DURING THE GAS HOSE INSTALLATION AND
CONNECTION OF THE UNIT.
It is required that Inferno 3000 rotisseries be equipped „Quick Disconnect‟
gas/water installation hardware.
A RESTRAINING DEVICE MUST BE INSTALLED SUCH THAT THE ROTISSERIE
MOVEMENT IS LIMITED WITHOUT RELYING ON THE 'QUICK DISCONNECT'
HARDWARE OR ITS ASSOCIATED PIPING.
When using the „Quick Disconnect‟ hardware, the rotisserie must be equipped with a
connector that complies with the Standard for Connectors for Movable Gas Appliances,
ANSI Z21.69 or Connectors for Movable Gas Appliances, CAN/CGA-6.16
The „Quick Disconnect‟ hardware must comply with the Standard for Quick Disconnect
Devices for Use with Gas Fuel, CAN1-6.9 or the National Electrical Code ANSI/NFPA 70.
All hardware required for a „Quick Disconnect‟ gas/water installation may be purchased
from HARDT. The „Quick Disconnect‟ flexible hose and pipe adapter available from
Hardt are shown below.
1. Connect the restraining cable to the attachment point located at the rear of the
rotisserie beneath the motor compartment and to the wall using the wall-mount
bracket. The restraining cable and the wall mount bracket are supplied with the
„Quick Disconnect‟ kit.
2. The gas connection is located behind the right rear corner of the rotisserie (see
picture).
19
Page 20

24-HOUR TECHNICAL SUPPORT 1-800-387-6847 Inferno 3000 Ref-Mnl (2010-02)
3. Apply Teflon tape to the threaded pipe end on the gas pipe extending from the rear
of the rotisserie.
4. Screw the quick disconnect fitting (pipe adapter) onto the threaded connection.
5. Attach the flexible gas supply hose to the facility gas supply line and connect the
gas to the unit by sliding the quick disconnect hose fitting onto the pipe adapter.
6. Open the main gas valve from the facility gas supply line(s).
7. Verify all hoses, fittings and connections for leaks prior to operating the oven.
Failure to do so may result in serious injury.
CONNECTION OF ELECTRICAL SUPPLY
The rotisserie runs on 120v 60HZ 15A 1-phase and is supplied with a 6 foot long
electrical cord.
The appliance must be electrically grounded in accordance with local codes, or in the
absence of local codes, with the NATIONAL ELECTRICAL CODE, ANSI / NFPA 70.
The rotisserie power supply must be connected by a licensed electrician. Check local
ordinances for applicable regulations.
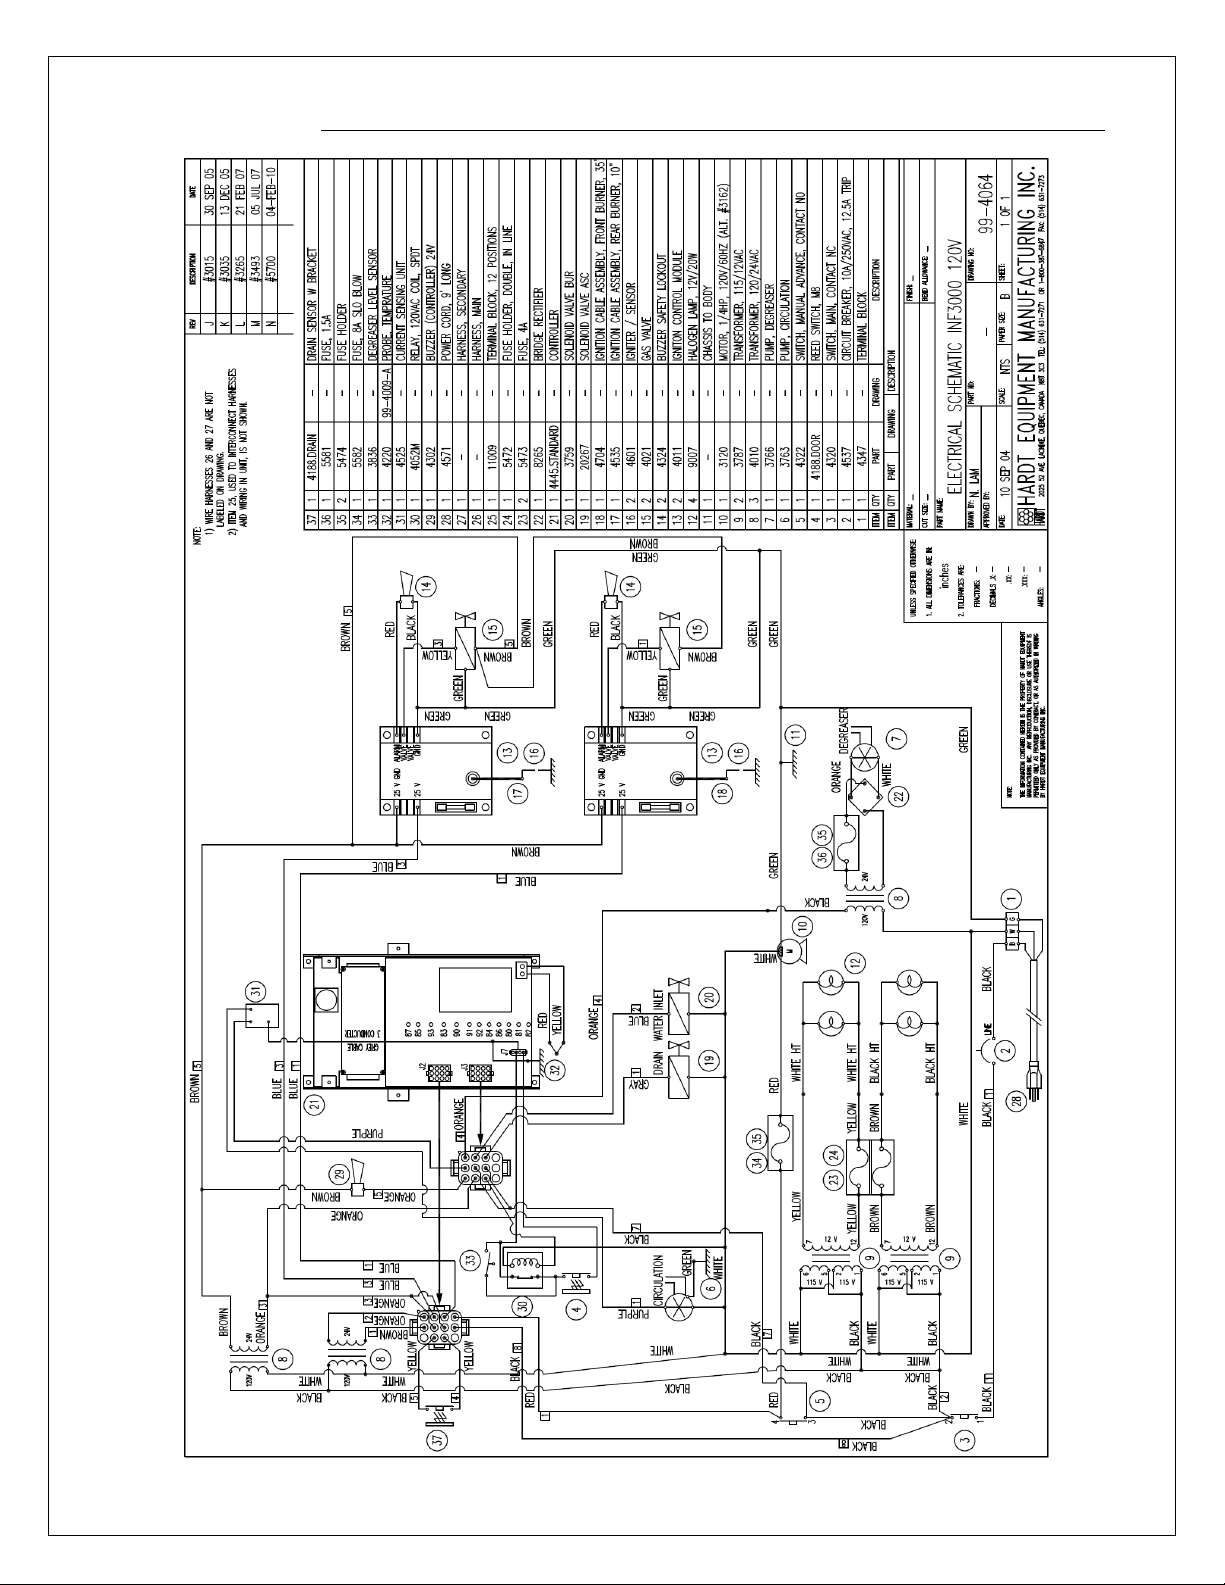
The Electrical Schematic is shown on the following page.
20
Page 21
24-HOUR TECHNICAL SUPPORT 1-800-387-6847 Inferno 3000 Ref-Mnl (2010-02)
ELECTRICAL SCHEMATIC
Hardt improves its products continuously and reserves the right to change specifications without notice.
21
Page 22
24-HOUR TECHNICAL SUPPORT 1-800-387-6847 Inferno 3000 Ref-Mnl (2010-02)
WARNING!
WARNING!
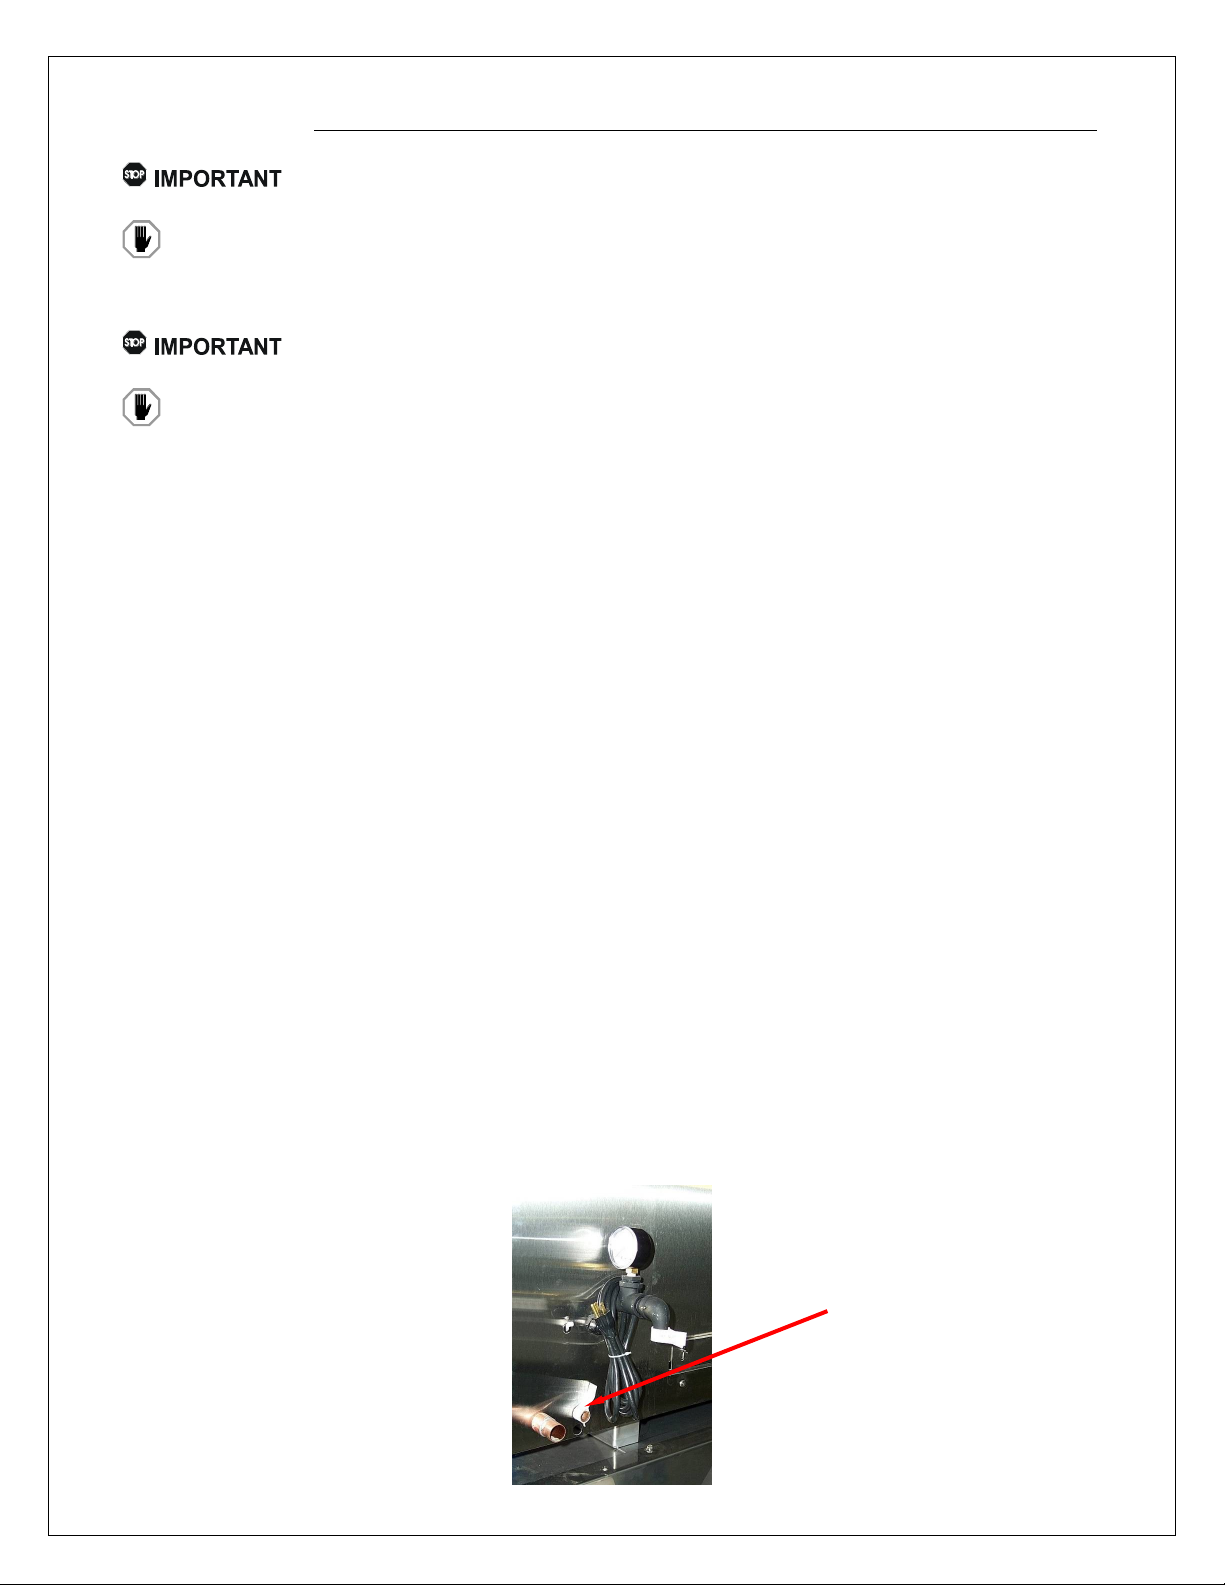
Water Inlet Connection
INSTALLATION OF WATER SUPPLY
It is required that Inferno 3000 rotisseries be equipped „Quick Disconnect‟
gas/water installation hardware. See GAS INSTALLATION for specifications.
A RESTRAINING DEVICE MUST BE INSTALLED SUCH THAT THE ROTISSERIE
MOVEMENT IS LIMITED WITHOUT RELYING ON THE 'QUICK DISCONNECT'
HARDWARE OR ITS ASSOCIATED PIPING.
Make sure that the water supply is plumbed in a manner which allows the
rotisserie to remain mobile for servicing.
THE ROTISSERIE IS VERY HOT WHEN OPERATING. MAKE SURE THAT THE
MAIN WATER VALVE IS INSTALLED IN A LOCATION EASILY ACCESSIBLE TO
THE EMPLOYEES.
A direct connection to a permanent HOT water supply is required to ensure good
cleaning results at the end of the day. The water source should be connected to the
copper water inlet pipe on the rotisserie.
Water pressures must be between 30 PSI (MIN) and 90 PSI (MAX).
In locations where the water hardness exceed 4 GPG (70 PPM) a water softener is
required. External softeners are not required in locations that have integrated water
softening systems in their potable water supply lines. For all other locations it is
recommended that you install an external softening filter. The filter should be installed on
the water supply line to the rotisserie and be connected to the water inlet (see picture)
located at the back of the rotisserie. Do NOT mount the water softener on the rotisserie.
Connecting the Oven to the Water Supply
1. Ensure the water supply is turned off.
2. Locate the water inlet connection at the lower rear right corner of the oven (see
picture).
3. Apply Teflon thread sealant to the ½" NPT fitting and screw on the threaded quick
disconnect connector supplied with the rotisserie oven.
4. Connect the flexible water supply hose purchased with the rotisserie to the
connection bib located in the rotisserie room.
5. Insert the „Quick Disconnect‟ connector at the end of the flexible supply hose into
the mating connector on the oven. Connect the other end into the wall mounted
water softener.
6. Ensure the manual water valve, located on the front right corner just below the
machine room access door is closed. Open the water supply valve and check lines
for leaks.
22
Page 23
24-HOUR TECHNICAL SUPPORT 1-800-387-6847 Inferno 3000 Ref-Mnl (2010-02)
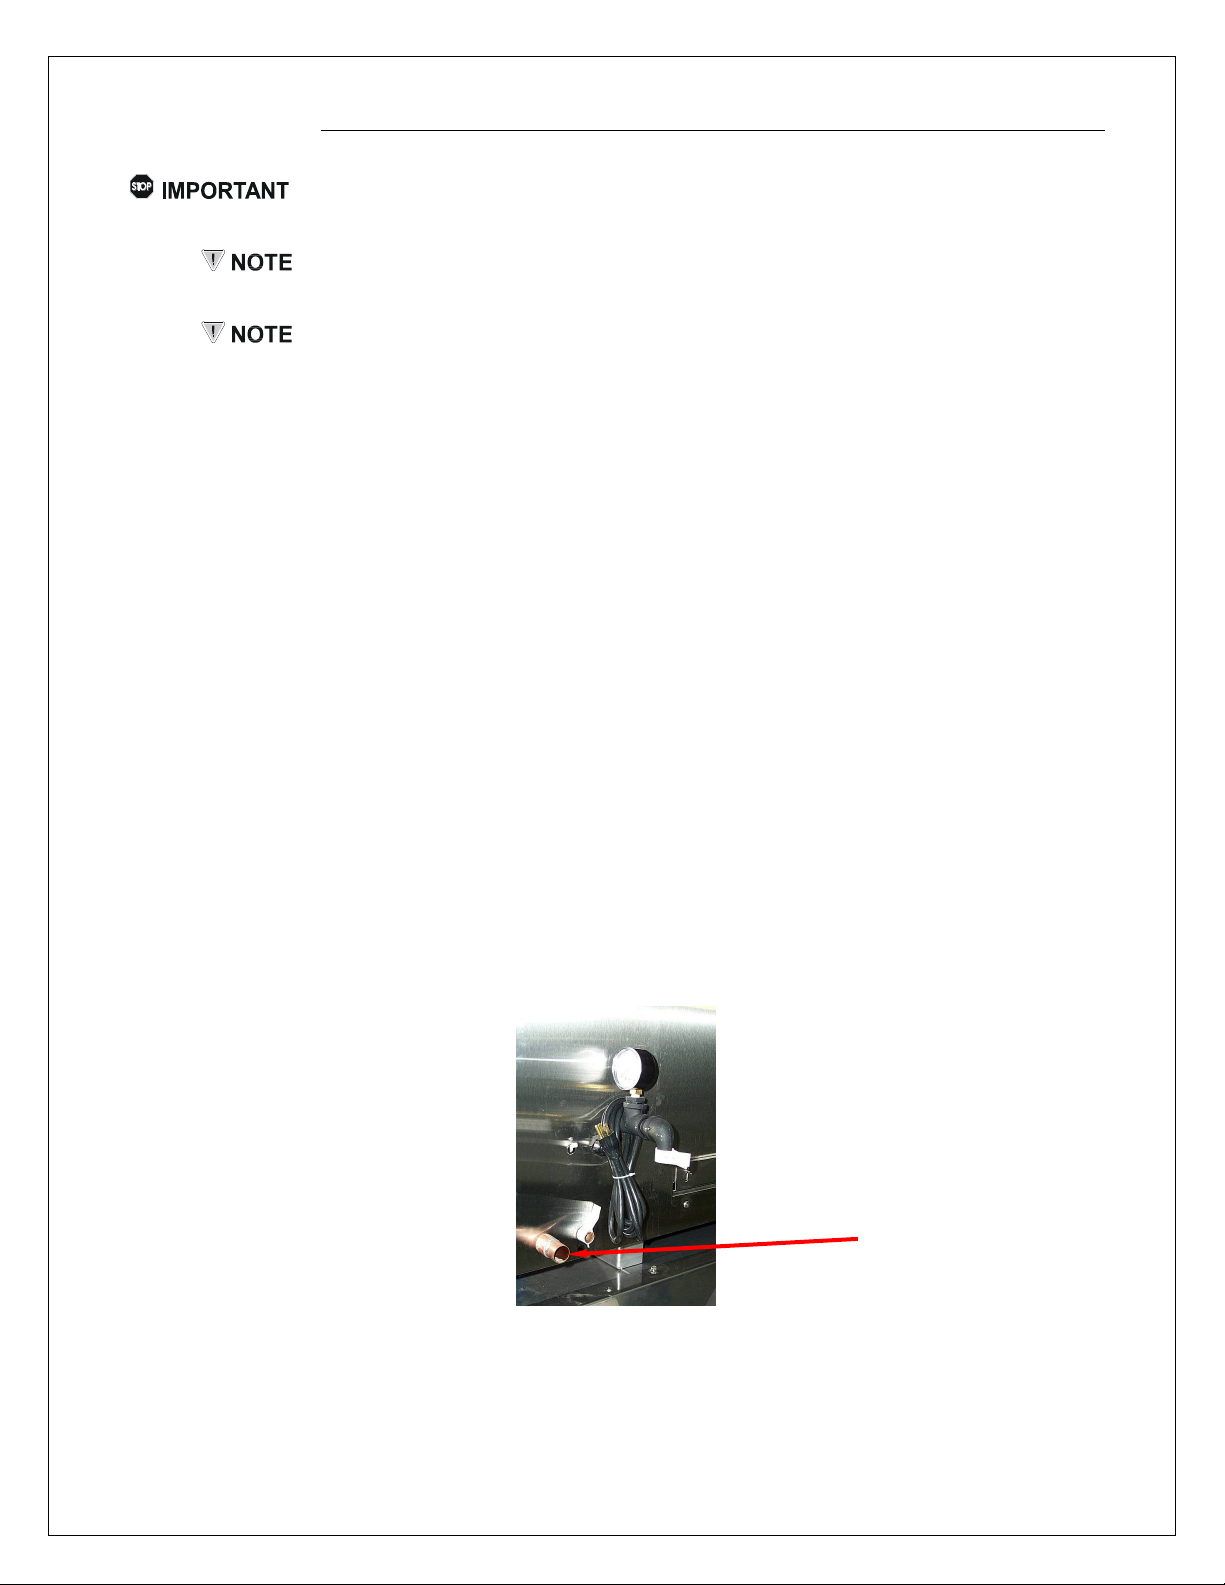
AutoClean Drain
Connection
INSTALLATION OF DRAIN
Make sure that the drain is plumbed in a manner which allows the rotisserie to
remain mobile for servicing.
Local ordinances may require a backflow prevention device. Consult the authority having
jurisdiction to determine what regulations are in force for appliances of this type.
Please consult the authority having jurisdiction to determine what regulations are in force
regarding the disposal of grease-laden water.
The Inferno 3000 is equipped with two drains. One drain is for the drainage of the
cooking effluent and the other is for the AutoClean drain line. The 1½" diameter drain
line is for the removal of grease and water during the cooking process. The effluent
from this drain must be passed through a grease separation unit prior to disposal into
the facility drainage system. The 1" drain line is for the AutoClean system and should
be plumbed directly to the facility drains.
Water Pan - Plumbing the 1½'' Drain Line
The 1½" drain line is the drain line coming from the water pan drain. The effluent from
this drain may contain high concentrations of FOG‟s (Fats, Oils and Grease) produced
during the cooking process and must be passed through a grease separation unit prior
to disposal into the waste water drainage. For locations equipped with a grease
separator/trap located on the drain line from the rotisserie room the units may be
plumbed directly into this drain. For locations not equipped with a grease separation
unit, the effluent must be collected in containers and transferred to a rendering barrel
for proper disposal. Please consult the local plumbing authorities for proper disposal
requirements.
AutoClean - Plumbing the 1" Drain Line
The 1" drain line is located at the exterior lower rear right corner of the oven (see
picture on previous page). This drain is for the AutoClean process and is used to drain
the water/detergents used during this process. It may be connected either by means of
a flexible connection or plumbed directly, as per the customers requirements, to the
waste water drainage system.
23
Page 24
24-HOUR TECHNICAL SUPPORT 1-800-387-6847 Inferno 3000 Ref-Mnl (2010-02)
OPERATION
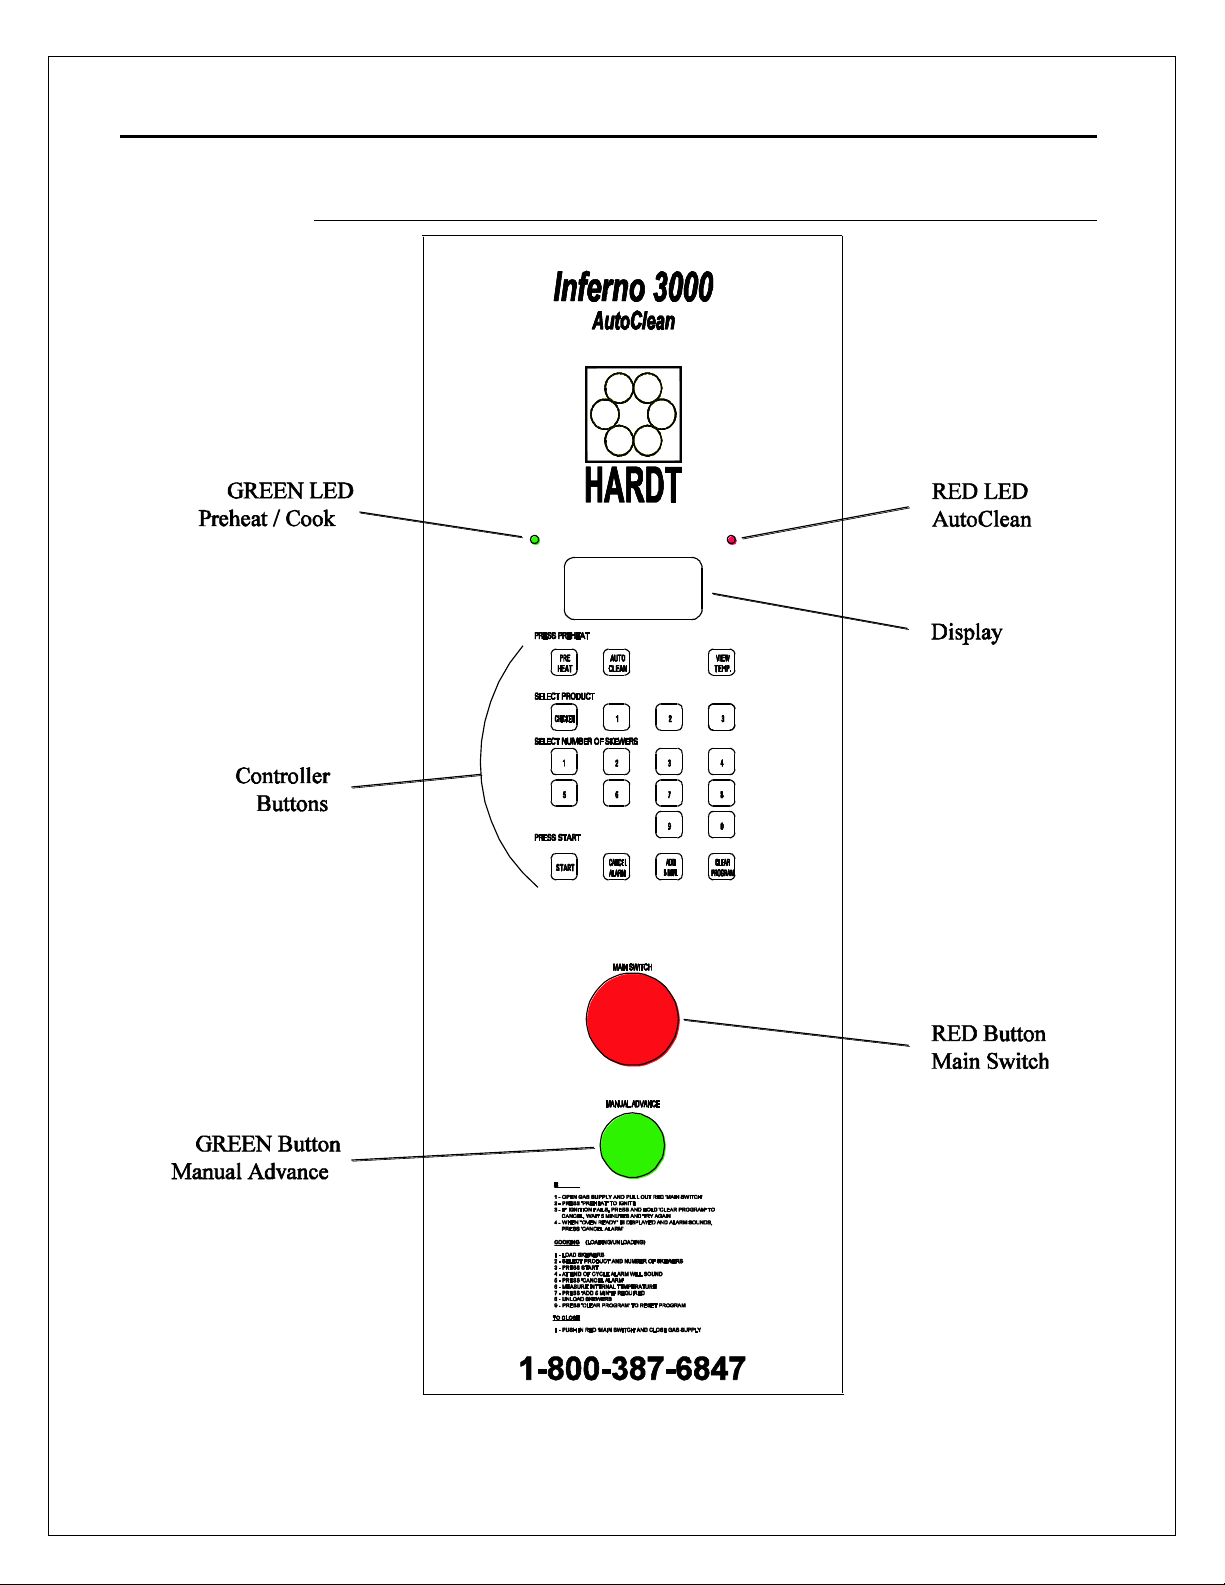
CONTROL PANEL
24
Page 25
24-HOUR TECHNICAL SUPPORT 1-800-387-6847 Inferno 3000 Ref-Mnl (2010-02)
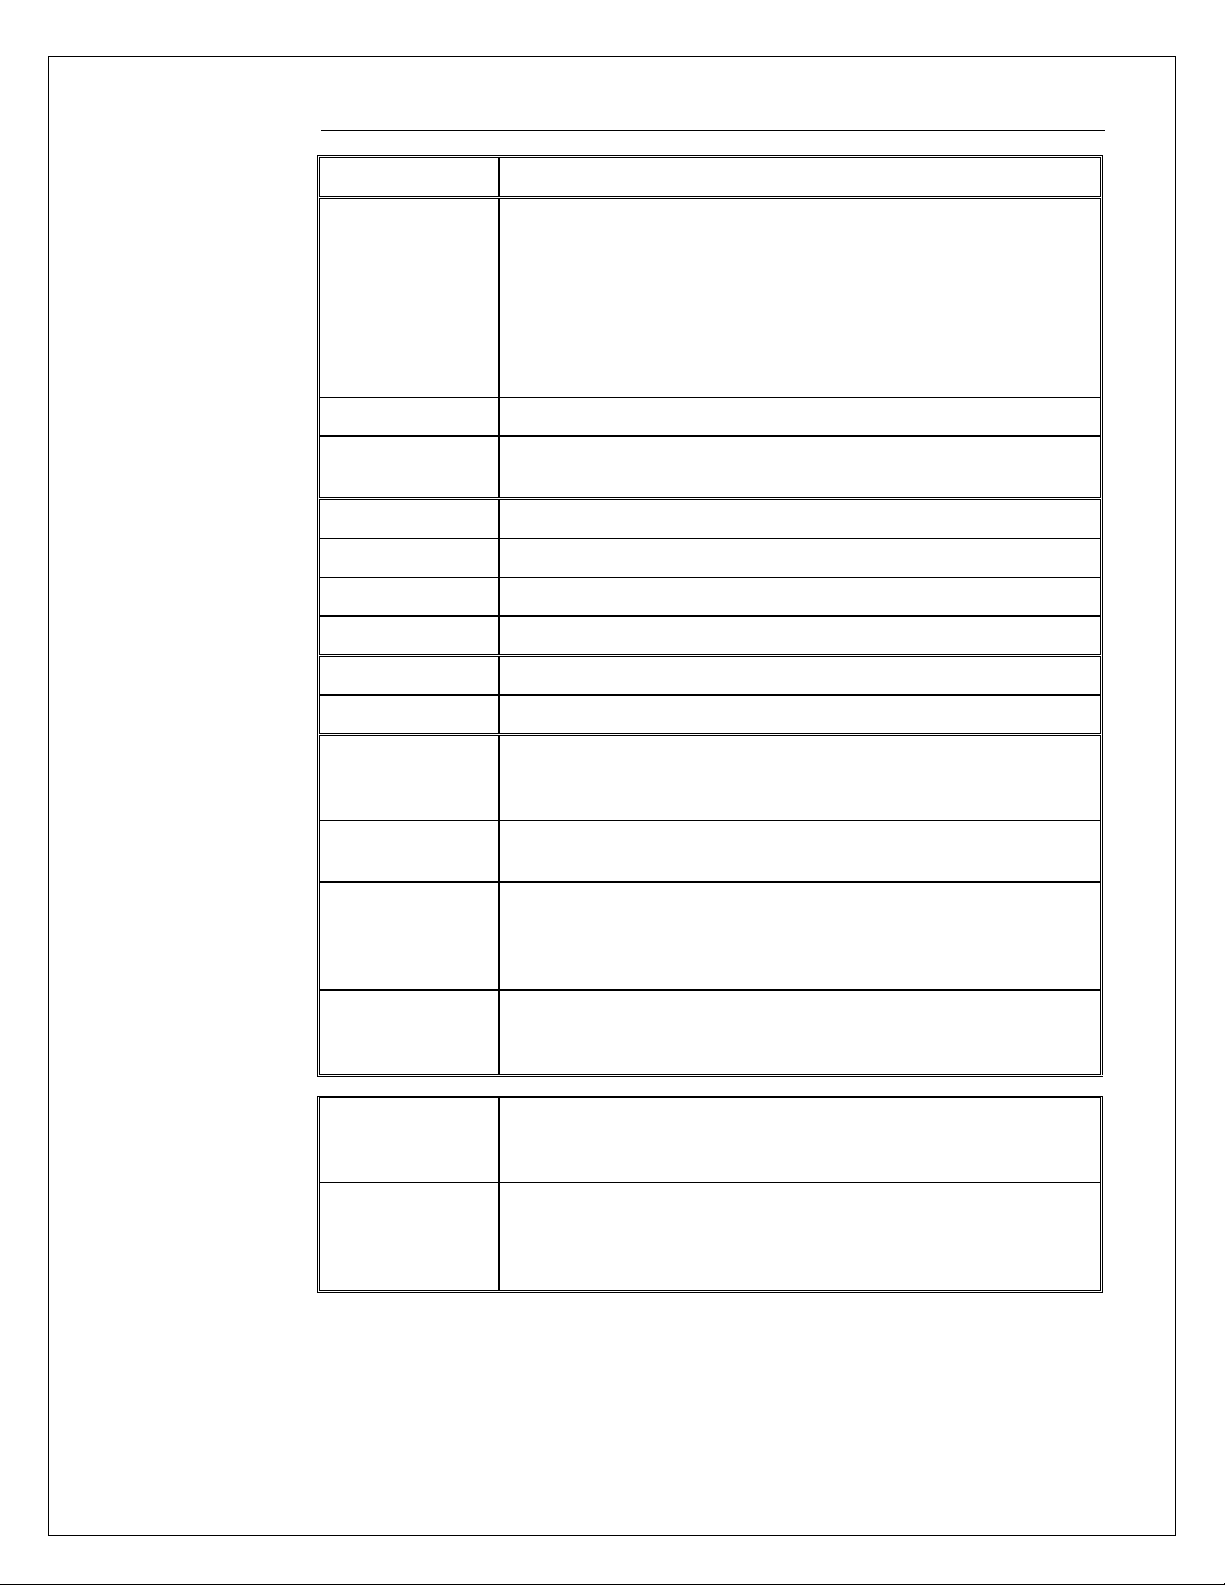
BUTTON
FUNCTION
PREHEAT
Preheats the oven to a predetermined temperature.
Press when display reads “OVEN COLD – PLEASE PREHEAT”. Display will
read “PREHEATING” and a countdown will begin, starting at 15 minutes. Once
the unit is preheated, the display will read “OVEN READY-PREHEATED-
SELECT PRODUCT” and an alarm will sound. It is critical that the oven is
preheated before each cooking cycle to ensure consistent product quality. The
controller won’t accept the selection of a cooking program until the oven is
preheated and “OVEN READY” appears on the display.
AUTO CLEAN
Selects the AutoClean program
VIEW TEMP.
Displays the cavity temperature for approximately 10 seconds when pressed.
Press at any time to display the oven’s internal temperature.
CHICKEN
Selects chicken as the product being cooked
1
Selects cooking #1 program (configurable to customer requirements)
2
Selects cooking #2 program (configurable to customer requirements)
3
Selects cooking #3 program (configurable to customer requirements)
1 to 8
Numeric data entry i.e. number of skewers or baskets
9 and 0
Numeric data entry for programming
START
Starts the selected cook cycle. Responds only after preheating has been
completed and the operator has selected the product and number of skewers
or baskets.
CANCEL ALARM
Cancels the audible alarm.
Press to silence the alarm
ADD 5 MIN.
Operator may select this feature at the end of the cook cycle only. It will cook
the product for an additional 5 minutes.
Press when the internal temperature of the product is less than the required
temperature at the end of a cooking cycle.
CLEAR PROGRAM
Cancels any program the controller is executing and returns it to ready state.
Press and hold for 2 seconds to cancel a program and to return to “OVEN
READY – SELECT PRODUCT”.
MAIN SWITCH (Red)
Pull out to turn power on. Push in to turn the power off.
In case of emergency, it should be pushed in to stop the gas flowing to the
burners.
MANUAL ADVANCE
(Green)
Push in to rotate drive while doors are open.
When the doors are opened, the burners and drive stop. The drive can be
advanced by pushing the green button for loading and unloading product and to
facilitate the cleaning of the unit.
CONTROL PANEL BUTTON FUNCTIONS
25
Page 26
24-HOUR TECHNICAL SUPPORT 1-800-387-6847 Inferno 3000 Ref-Mnl (2010-02)
ELECTRONIC CONTROLLER PROGRAMMING
1. Press and hold the “ALARM CANCEL” and “VIEW TEMP” buttons simultaneously
to enter the editing mode of the controller. The display will read:
CLOCK XX-XX-XX
CHECK XX:XX:XX.X (you are now in the program)
2. Press the controller buttons to select the program you wish to change;
“PREHEAT”, “AUTO CLEAN”, “CHICKEN”, “1”, “2”, “3” or “VIEW TEMP”.
3. Press the “CANCEL ALARM” button to move between each program characteristic
and make changes. “CANCEL ALARM” also serves as the “enter” button to save
changes before moving into another program
4. Once you have updated the program, you can press any of the other controller
buttons to continue making changes or press the “VIEW TEMP” button to return to
the main clock screen.
5. Press the “CLEAR PROGRAM” button to exit the programming mode.
The controller ensures precision cooking from load to load. Each of the programs
stored in the controller delivers a precise amount of heat and cook time so it is
important to use the correct program for the size of load and type of product.
Make sure your personnel know that they must follow the preset cooking
parameters to produce consistently high quality product.
26
Page 27
24-HOUR TECHNICAL SUPPORT 1-800-387-6847 Inferno 3000 Ref-Mnl (2010-02)
WARNING!
MORNING START-UP PROCEDURES
ALWAYS TURN ON THE VENTILATION SYSTEM BEFORE STARTING THE
ROTISSERIE. IT IS REQUIRED TO REMOVE COMBUSTION BY-PRODUCTS AND
GREASE-LADEN AIR.
1. Turn on the hood fan.
2. Check the level of degreaser (located on the right side shelf or back of the units).
3. Check the Secondary Air to verify it is free and not blocked.
4. Make sure the oven is On. If the oven is off turn it on by pulling out the Red Button.
The display must read "OVEN COLD – PLEASE PREHEAT". If this is not what is
displayed, call Hardt with the message shown on the screen.
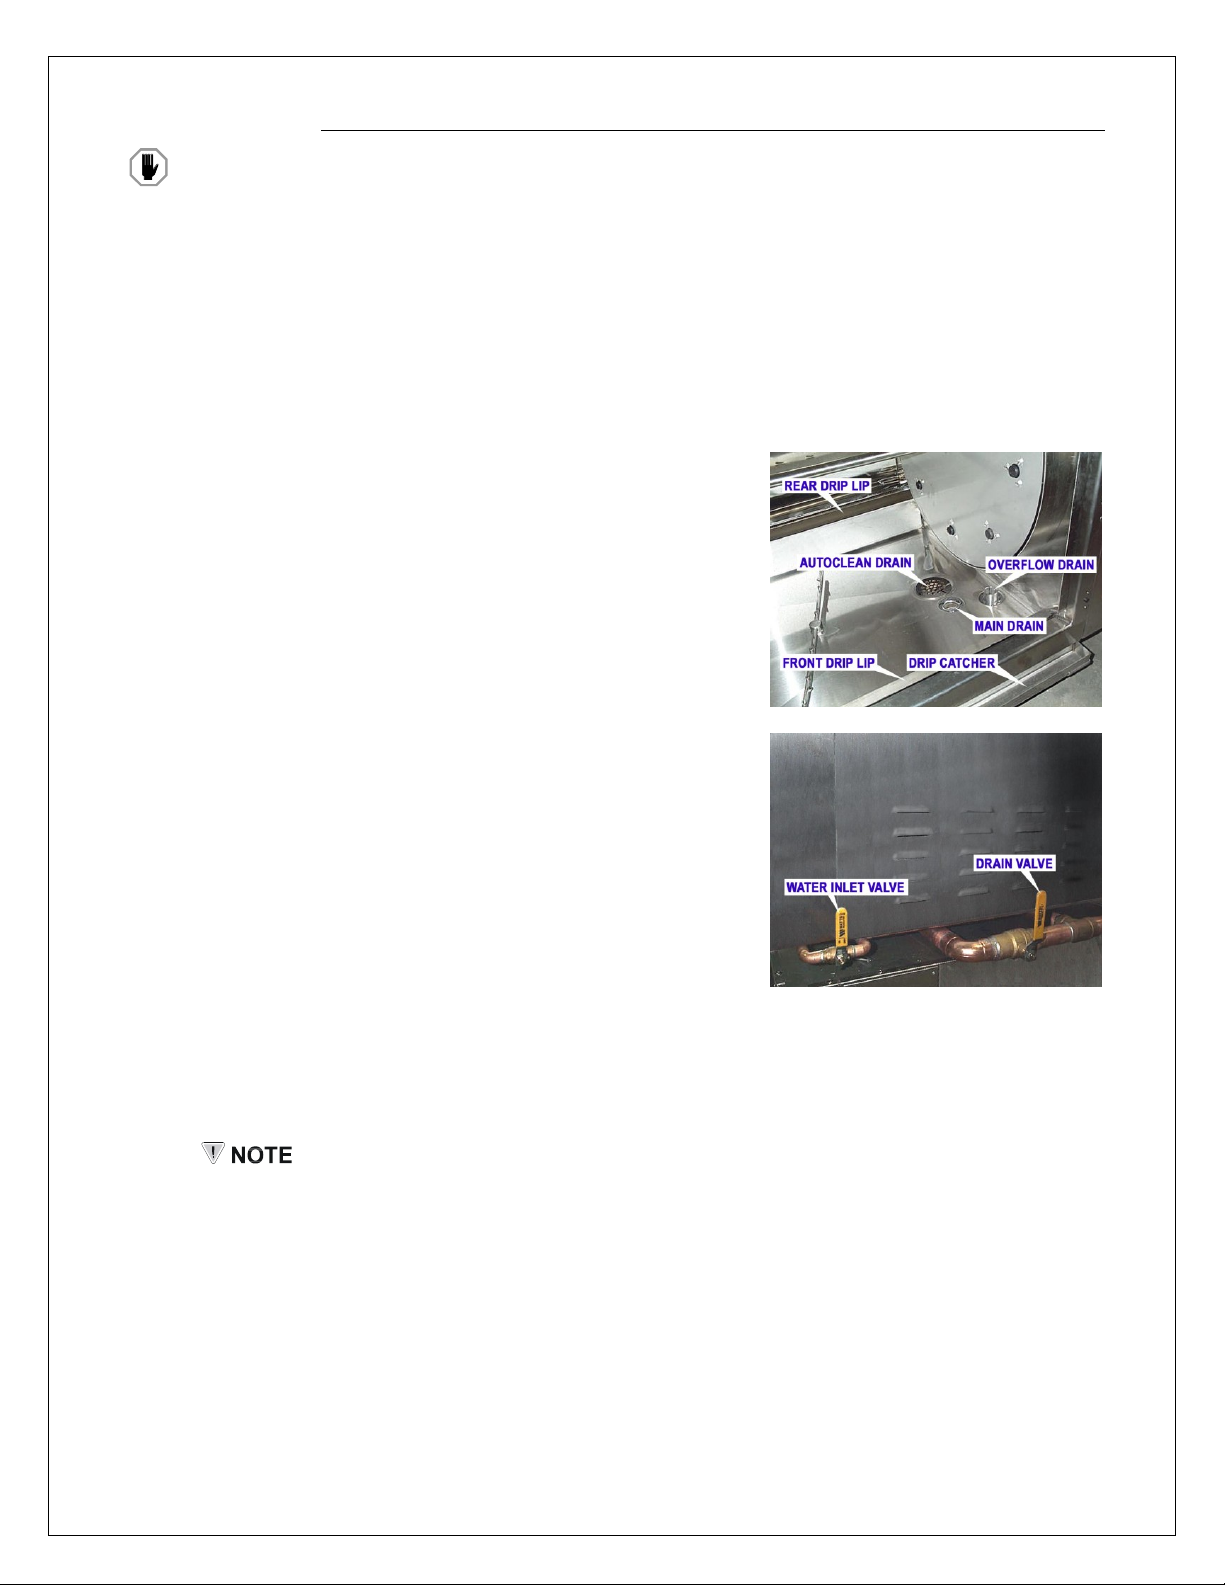
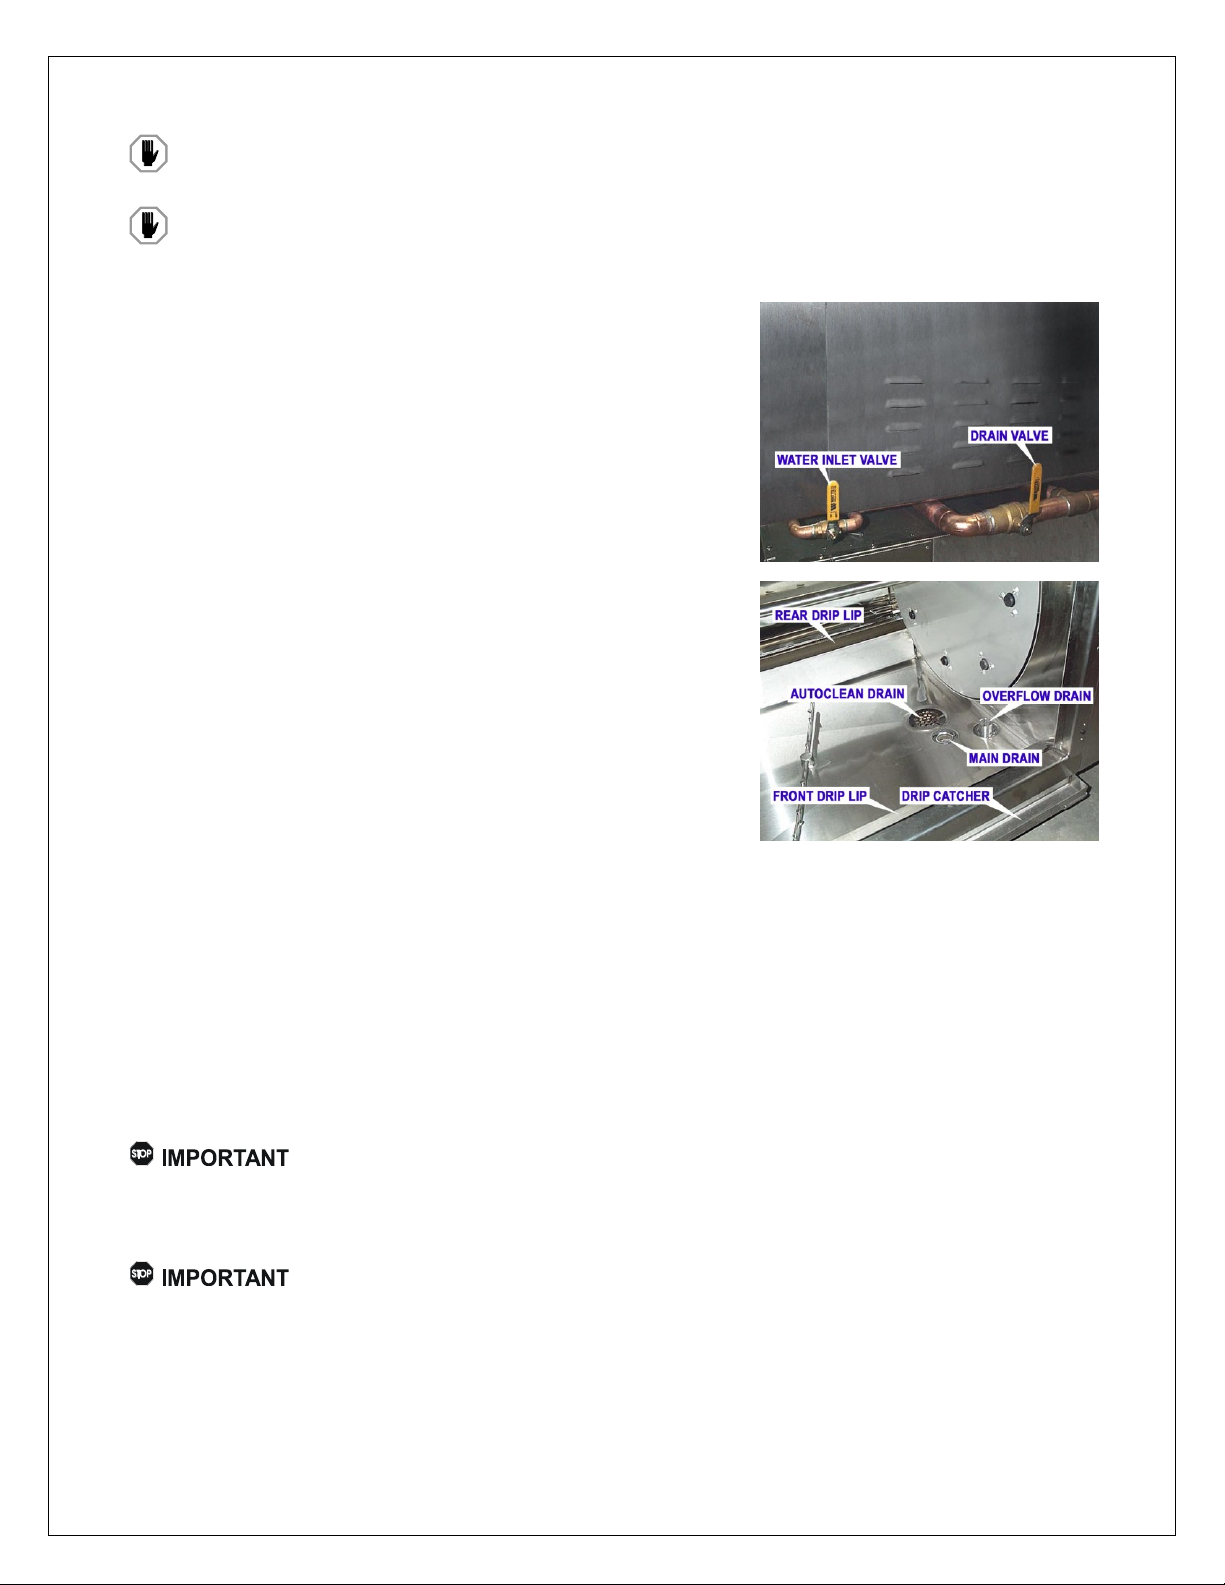
5. Remove the Front Drip Lip, at the front of
the waterpan, clean the area behind it and
put it back.
6. Reinstall the Rear Drip Lip, at the back of
the waterpan, in front of the back burner.
7. Scrape the Drive Plates to remove any
residual black carbon.
8. Wipe the waterpan clean with a towel
removing all particles. DO NOT PUSH
DEBRIS INTO THE DRAINS.
9. Make sure the Drip Catcher is empty, clean
and in position. If it is half full with water call
Hardt.
10. Make sure the Drain Valve is closed.
11. Open the Water Inlet Valve and fill the
waterpan to the top of the Overflow Drain.
12. Press the „PREHEAT‟ button to warm up
the oven. Once preheated, the display will
read "OVEN READY - SELECT
PRODUCT" and an alarm will sound. Press
the „CANCEL ALARM‟ button to silence the
alarm.
13. The oven must be fully preheated before loading product into it. Preheating takes
approximately 15 minutes when first starting in the morning and less time during
the day once the oven is already in use.
If either burner does not ignite, an alarm will sound and the oven enters into Safety Lockout.
To stop the alarm hold the door open for 5 minutes, close it and the burners will try to ignite
again. During this time, verify that the gas valves are open. If ever the alarm continues to go
off after multiple attempts to start the oven, call Hardt Service at 800-387-6847.
27
Page 28
24-HOUR TECHNICAL SUPPORT 1-800-387-6847 Inferno 3000 Ref-Mnl (2010-02)
WARNING!
WARNING!
WARNING!
WARNING!
COOKING PROCEDURES
SHOULD THE ROTISSERIE NOT LIGHT ON THE FIRST TRY, OPEN THE DOORS
AND ALLOW A FIVE MINUTE PERIOD BEFORE RELIGHTING.
THE OVEN IS HOT. ENSURE YOU ARE WEARING OVEN MITTS AT ALL TIMES
WHEN WORKING WITH THE HOT OVEN.
NEVER LOAD PRODUCT INTO AN OVEN WHICH IS NOT PREHEATED.
CROSS CONTAMINATION IS VERY DANGEROUS.
DO NOT LOAD FRESH PRODUCT INTO THE ROTISSERIE UNTIL THE COOKING
CYCLE IS COMPLETE AND ALL OF THE COOKED PRODUCT HAS BEEN
REMOVED FROM THE ROTISSERIE.
LOADING
1. Make sure the display reads, “OVEN READY - SELECT PRODUCT”. Open the
door and load the product.
2. Close the door.
3. Press the desired product button on the control panel.
The available product programs are: „CHICKEN‟, „1‟, „2‟ and „3‟.
4. Press the number of skewers/baskets loaded from 1 to 8.
5. Press the „START‟ button to begin cooking.
If an error is made at any time during this process, pressing and holding for 2 seconds the
‘CLEAR PROGRAM’ button on the control panel will begin the process again.
If the oven has lost too much heat during loading an alarm may sound and the display will
read "QUICK WARM-UP". The display will begin counting down once it has reached the
proper cooking temperature.
END OF THE COOK CYCLE
1. Press the „CANCEL ALARM‟ button to silence the alarm.
2. Take the internal temperature of the product and make sure it meets the required
minimum temperature .
3. If the product is below the desired temperature, close the door and press the „+ 5
MIN‟ button.
4. If the product is at or above the desired temperature, unload the skewers/baskets.
5. Press and hold the „CLEAR PROGRAM‟ button for 2 seconds until the display
reads, “PRESS PREHEAT”. Then press the „PREHEAT‟ button.
6. Open the Water Inlet Valve to raise the water level. Skim off the grease down the
Overflow Drain. Make sure the water is draining freely and not rising or overflowing
out of the oven door.
7. Close the Water Inlet Valve.
8. Wipe the inside of the glass door with a clean, damp cloth to remove any grease
build up before it bakes on.
NEVER use abrasive pads on the glass.
28
Page 29
24-HOUR TECHNICAL SUPPORT 1-800-387-6847 Inferno 3000 Ref-Mnl (2010-02)
WARNING!
WARNING!
INSERTION / REMOVAL OF SKEWERS (BASKETS)
CROSS CONTAMINATION IS VERY DANGEROUS.
DO NOT LOAD FRESH PRODUCT INTO THE ROTISSERIE UNTIL THE COOKING
CYCLE IS COMPLETE AND ALL OF THE COOKED PRODUCT HAS BEEN
REMOVED FROM THE ROTISSERIE.
When the rotisserie has reached its operating temperature the skewers (baskets) can
be loaded into the rotisserie.
Opening the doors will cause the burners to shut off and the drive to stop rotating. The
Manual Switch (Green button, located on the front of the control panel) actuates the
drive mechanism without igniting the burners. Press and hold this switch until the
desired socket on the drive drum is easily accessible at the front of the rotisserie.
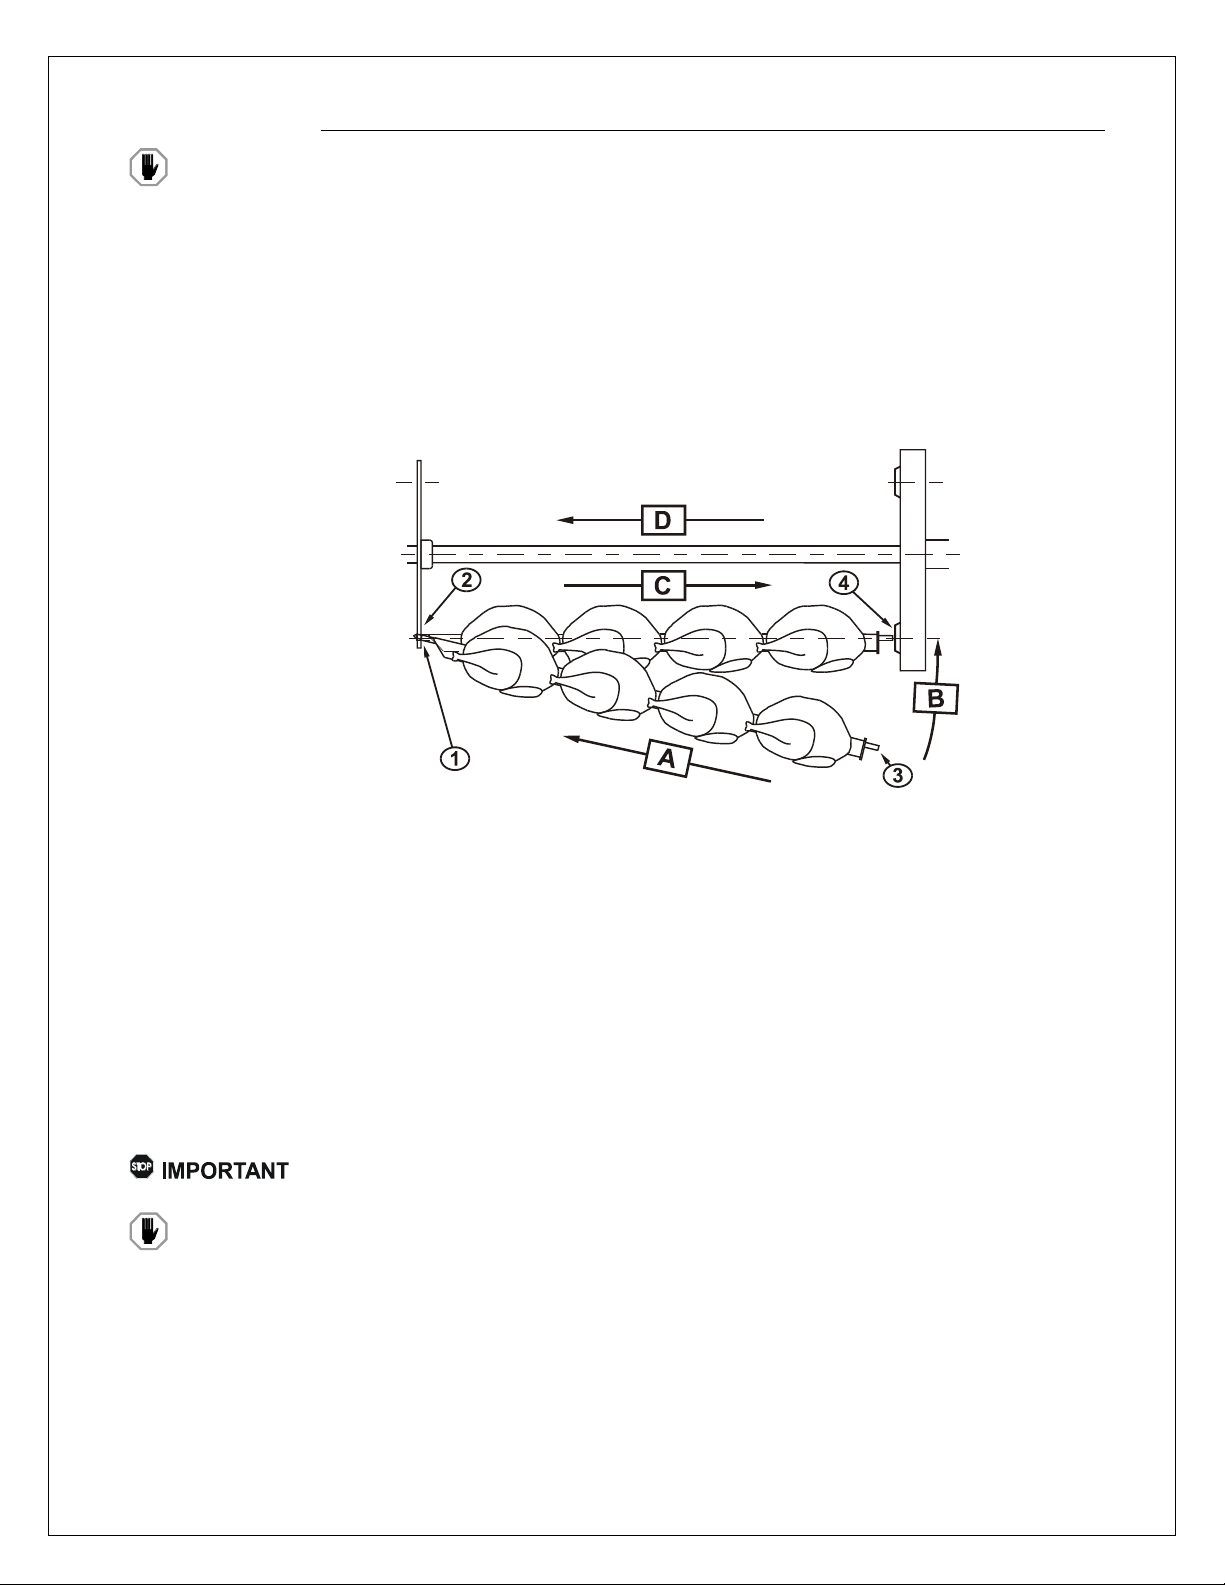
The above sketch illustrates the insertion of the loaded skewers into the drive sockets
as described in the steps below.
The above sketch illustrates the insertion of the loaded skewers (baskets) into the drive
sockets as described in the steps below.
A) The pointed end (1) of the skewer is inserted into the hole (2) in the support plate
at the left side of the rotisserie.
B) The hexagonal end (3) is then raised and inserted into the drive socket slot (4) in
the right hand drive drum.
C) The hexagonal end must be slid into the socket as far to the right as possible.
D) Once the hex end has been fully inserted into the socket, the skewer (basket) must
be slid to the left to make certain that the shoulder on the pointed end is inside the
face of the support plate. This prevents it from slipping out of the drive drum socket.
To prevent unnecessary loss of heat that will increase cooking time, the doors
should not be opened until the end of the cooking cycle.
NEVER PLACE THE SKEWERS (OR BASKETS) INTO THE ROTISSERIE WITH THE
GROOVE IN THE SKEWER‟S POINTED END RESTING ON THE SUPPORT PLATE.
THE GROOVE IS ONLY FOR HANGING THE SKEWER ON THE OPTIONAL WALL
MOUNTED SKEWER RACK.
To remove the skewers, open the door to stop the skewer rotation and shut off the
burners. Use the Green DRIVE ADVANCE button to activate the drive motor alone and
bring the desired skewer to the front where it is readily accessible. Reverse the
insertion process by raising the pointed end slightly so that the shoulder is level with the
hole in the support plate and push the skewer to the left until the hexagonal end is free
from the drive socket. Remove the skewer.
29
Page 30
24-HOUR TECHNICAL SUPPORT 1-800-387-6847 Inferno 3000 Ref-Mnl (2010-02)
WARNING!
WARNING!
MAINTENANCE
Your HARDT rotisserie was built using only the highest quality products. All bushings,
as well as the complete drive train, are permanently lubricated and do not require any
greasing or oiling. The most important maintenance is the daily cleaning as described in
the sections below.
DISCONNECT POWER SUPPLY TO THE ROTISSERIE BEFORE SERVICING.
If parts returned are found to have not been adequately maintained, they will NOT be
covered by our warranty plan. Warranty does not cover damage caused by misuse or
neglect.
Maintenance other than that described in this manual should be performed by your HARDT
authorized service representative. This should not be necessary if the cleaning procedures
are correctly followed.
ALWAYS MOVE OVEN(S) OUT FROM UNDER THE HOODS OR COVER THEM
WITH A TARP WHEN CLEANING THE HOODS.
DAILY CLEANING
CLEANING THROUGHOUT THE DAY:
To maximize the rotisserie's merchandising power it is highly recommended to clean
the rotisserie glass with a wet cloth at the end of each cooking cycle. This procedure
keeps the glass clean without scratching it. Depending on the volume of product
cooked, replenishing or changing the water during the day will be required.
If manually cleaning the unit, avoid using scouring pads or cleaners with grit on
the glass as it is easily scratched.
CLEANING AT THE END OF THE DAY: AUTOCLEAN
It is recommended to run the AutoClean cycle at the end of the business day, that is after all
cooking has been completed for that day.
Description of Operation
If the cavity temperature of the rotisserie is too high, the controller will allow a cool down
period until the optimum temperature range is reached.
Once the cavity temperature is in an operable range (175ºF), the AutoClean system will
begin by metering in a prescribed volume of degreasing agent into the cavity. The
degreaser will be delivered through nozzles on the rotary arm in the waterpan. The
degreaser is then re-circulated from the water pan and sprayed through the nozzles on
the rotary arm in the waterpan as the drive rotates. Next, a soak period will occur during
which the drive will not rotate.
The degreaser cycle is then repeated a fixed number of times.
The degreaser is then automatically removed from the water pan through the drain. A
volume of clean water is then introduced through the drain into the water pan. The
clean water is sprayed through the rotary arm, located on the water pan, for a certain
amount of time. The water is then automatically removed from the water pan through
the drain.
30
Page 31
24-HOUR TECHNICAL SUPPORT 1-800-387-6847 Inferno 3000 Ref-Mnl (2010-02)
WARNING!
WARNING!
AutoClean Operation
ENSURE YOU ARE WEARING OVEN MITTS AT ALL TIMES WHEN WORKING
WITH THE HOT OVEN.
NEVER SPRAY THE OVEN(S) WITH A HOSE OR PRESSURE-WASHER. NEVER
SPRAY THE OUTSIDE OF THE OVEN(S).
1. Check the level of Degreaser.
2. Open the door. Remove any large pieces
of chicken/bones.
3. Open the Water Inlet Valve to raise the
water level. Skim off the grease down the
Overflow Drain. Make sure the water is
draining freely and not rising or
overflowing out the oven door.
4. Close the Water Inlet Valve. Open the
Drain Valve and drain the waterpan
completely.
5. Scrape the Drive Plates to remove the
worst of the black carbon while still warm.
6. Remove all debris, chicken parts, wings,
bones, etc., from the waterpan, and put
into the garbage. DO NOT PUSH THE
DEBRIS INTO THE DRAINS.
7. Remove the Rear Drip Lip, in front of the
back burner, and clean it prior to the
morning start-up..
8. Remove the Front Drip Lip, at the front of
the waterpan.
9. Open the Water Inlet Valve to add a small
amount of water to the waterpan. Using a towel wipe the waterpan clean removing
all particles.
10. Close the Water Inlet Valve.
11. Close the Drain Valve. The Drain Valve must be closed for the AutoClean to operate.
12. Replace the Front Drip Lip, at the front of the waterpan.
13. Remove, clean and replace the Drip Catcher located on the front of the unit, below
the door.
14. Close the oven door, wait 10 minutes and press the „AUTOCLEAN‟ button and then
the „START‟ button. Read the display. If the AutoClean has begun it will read
either, “A‟CLEAN COOLDOWN” or “A‟CLEAN-DEGREASING”.
If the display reads, “A‟CLEAN COOLDOWN” the AutoClean will not start immediately
because the cooking cavity is too hot. DO NOT open the door to cool the oven down! It
must cool down on it‟s own with the door closed so the degreaser works properly. The
AutoClean cycle will start on its own when the unit has properly cooled.
For units equipped with the optional sensors – If the degreaser is low, an alarm will
sound and the display will show: “REFILL DEGREASER & PRESS A‟CLEAN
AGAIN”. Press the „CANCEL ALARM‟ button, replace the bottle and start again.
If the display shows: “CLOSE DRAIN VALVE & PRESS A‟CLEAN AGAIN”, the Drain
Valve is not fully closed. Press the „CANCEL ALARM‟ button, close it and start again.
15. Clean the outside of the oven.
31
Page 32
24-HOUR TECHNICAL SUPPORT 1-800-387-6847 Inferno 3000 Ref-Mnl (2010-02)
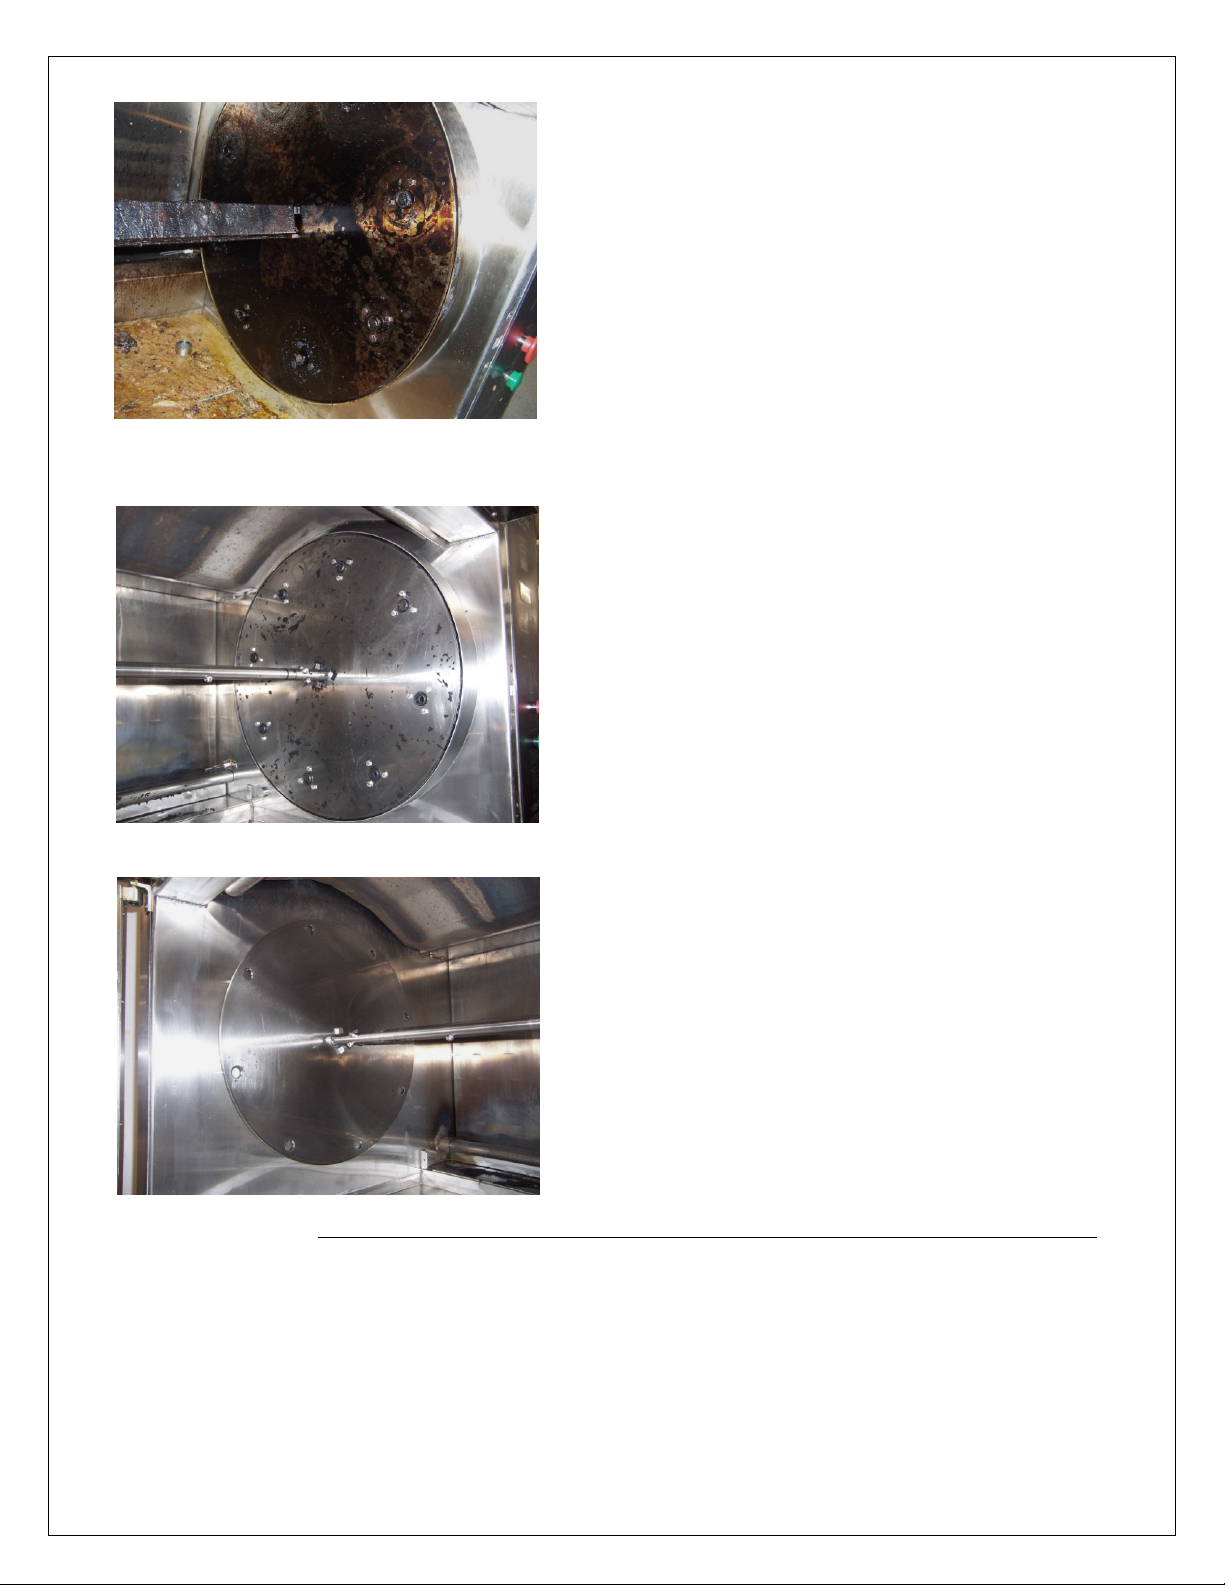
If your rotisserie looks like this, it is NOT being cleaned
properly. This may be because:
The Cleaning Procedures are not being followed on
a consistent basis.
The AutoClean system has not been functioning
properly for an extended period of time.
It will require cleaning by hand using normal oven
cleaner (in a spray bottle) and a scrub pad or scraper to
remove the buildup of carbon prior to running the
AutoClean cycle. The AutoClean function will only clean
1 day's worth of grease. It may take a few days of
AutoClean and hand scraping to get the unit back to the
point where following the correct procedures will produce
a clean oven in the morning.
If your rotisserie looks like the photo on the left you must
remove the residual flakes with a scrub pad PRIOR to
cooking. Please verify that all the Cleaning Procedures
have been followed. Residual flakes are often caused by
pieces of chicken fat that stick to the drive and are not
removed during the AutoClean cycle. At the end of the
day run the AutoClean again, making sure to follow the
correct procedures.
If your rotisserie looks like this, you have followed all of
the procedures and the AutoClean System is operating
properly. Please note that if the unit is in the condition
shown in the top picture you will not obtain this result
after a single cleaning.
The rear igniter should be inspected at this time also to ensure that it is free of carbon
and grease build-up. If dirty, use a dry paper towel to wipe it clean.
For any technical assistance, or if you require information additional to that described
above, please contact a HARDT Customer Service Representative at the above
Technical Support 1-800 number, available 24 hours per day, 7 days per week.
We can also be reached at 514-631-7271, Monday to Friday - 8:30 AM to 6:00 PM EST.
32
Page 33
24-HOUR TECHNICAL SUPPORT 1-800-387-6847 Inferno 3000 Ref-Mnl (2010-02)
WARNING!
WARNING!
TROUBLESHOOTING
THE ROTISSERIE IS HOT WHEN OPERATING. EXERCISE CAUTION WHEN
WORKING NEAR THE HOT ROTISSERIE.
WEAR APPROPRIATE PROTECTIVE CLOTHING.
ROTISSERIE DOES NOT OPERATE
Rotisserie does not operate when Main ON/OFF switch (Red button) is pulled. (i.e.
drive does not turn, no spark to igniters)
SOLUTION
A) Check that rotisserie has electrical power by checking if the interior lights are 'ON'. If
the rotisserie's interior lights do not turn on, check that the circuit breaker on the
back of the unit is in the 'ON' position. See page 9 for exact location.
B) If the circuit breaker is in the 'ON' position, check that there is power coming to the
rotisserie. If there is power to the rotisserie and it still does not operate, call our
customer service department at 1-800-387-6847.
SAFETY LOCKOUT
Main ON/OFF switch (Red button) is pulled, drive drum rotates but after 11 seconds the
alarm buzzer sounds. The rotisserie has gone into 'SAFETY LOCKOUT'.
The most common causes of this are that either the gas is shut off (likely if both burners
do not light), there is humidity on the igniters (see which burner does not light) or the
setting of the gap clearance on the igniters is incorrect (see which burner does not
light).
SOLUTION
A) Verify that the gas supply to the rotisserie is open. Check that the gas valve on the
rotisserie and the main gas supply valve are both open. To check the main gas
supply valve, try another gas powered appliance connected to the same line.
If the gas is open, try starting the unit again. Pull the Main ON/OFF Switch (Red
button).
B) If the rotisserie again goes into safety lockout it is possible that humidity may have
condensed on one or both of the igniters.
Turn the rotisserie "OFF" by pushing in the Main ON/OFF Switch.
If it is the rear igniter, open the door of the rotisserie for 1 minute to allow the excess
gas to escape. Get a paper towel and gently clean the rear igniter. This procedure
will clean and de-humidify the ignition. Turn the rotisserie "ON" by pulling the Main
ON/OFF Switch.
If it is the top burner that is not lighting, remove the top burner panel with the
window in it, lift the protective pane of glass on the right side and clean the igniter.
C) If the rotisserie again goes into safety lockout it is possible that the setting for the
gap clearance on one or both of the igniters is incorrect.
Turn the rotisserie "OFF" by pushing in the Main ON/OFF Switch.
If it is the rear igniter, open the door of the rotisserie for 1 minute to allow the excess
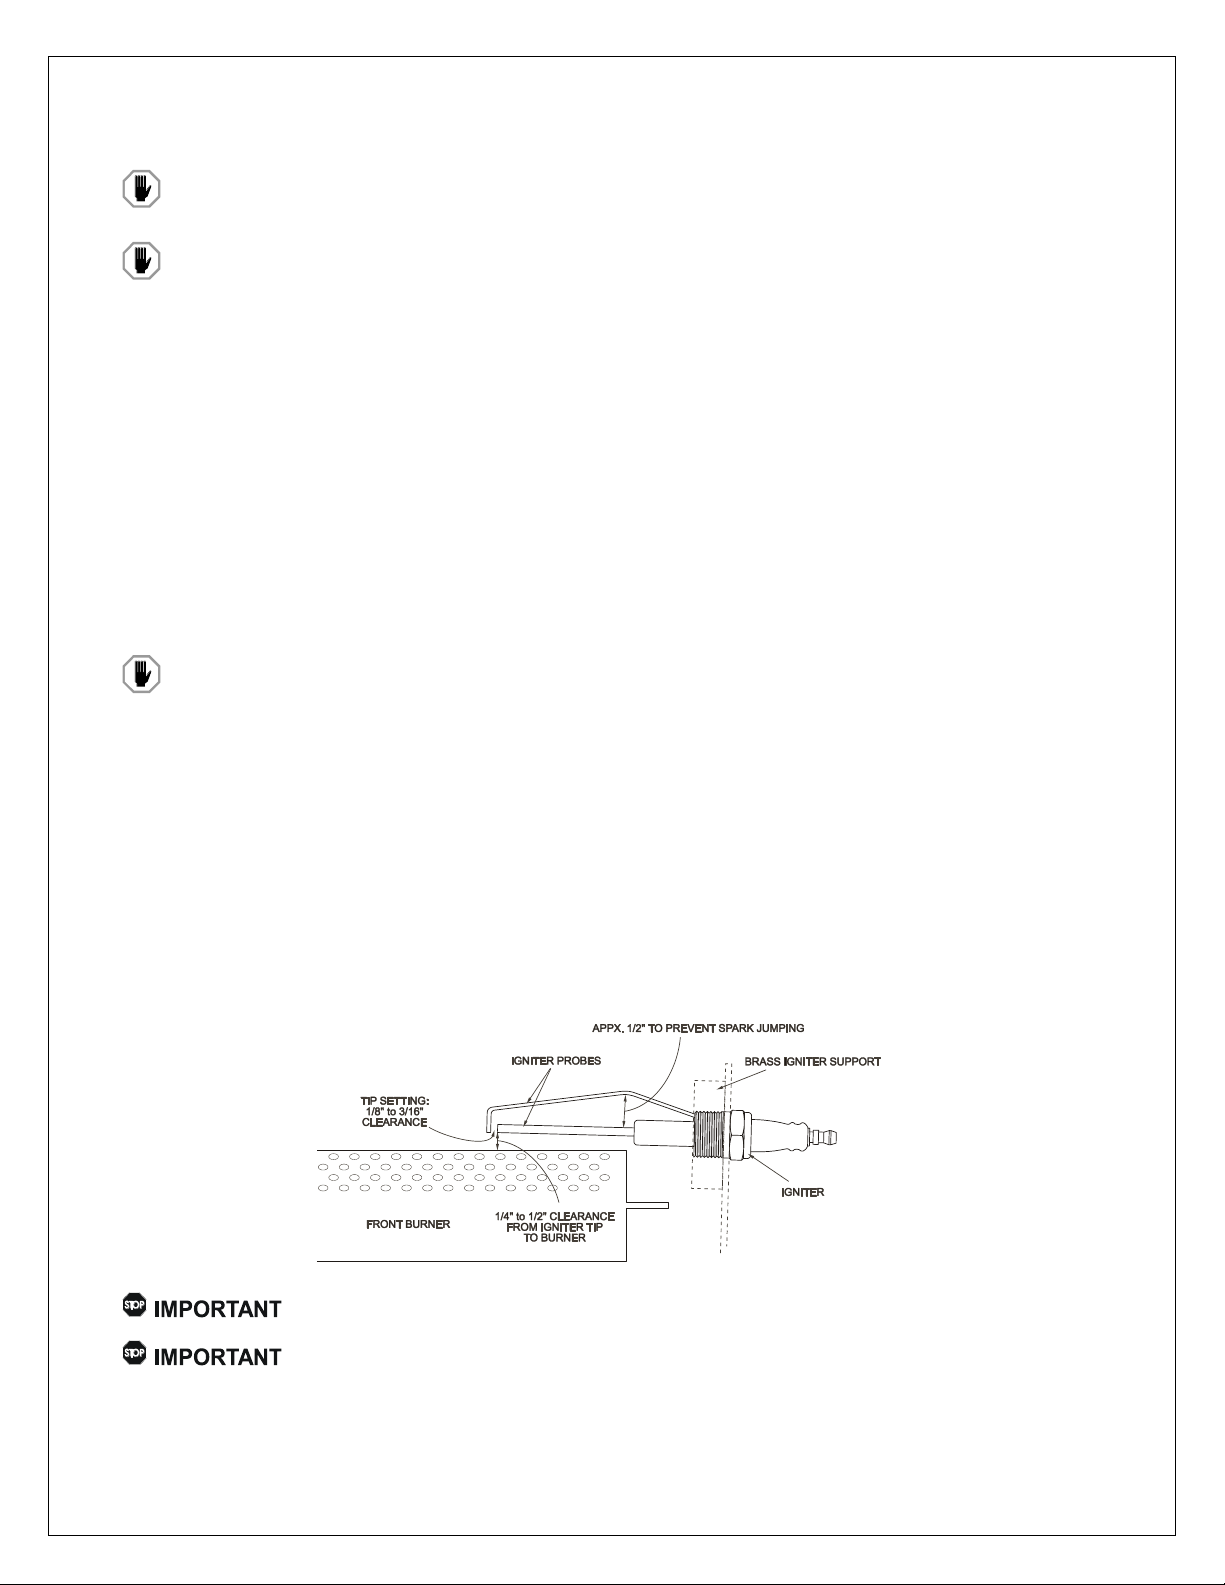
gas to escape. Check the gap at the tip of the rear igniter. The gap should be
between 1/8" and 3/16" in size as shown in the following diagram. Verify that the
igniter and the area of the burner that is near the igniter are clean.
If it is the top burner that is not lighting, remove the top burner panel with the
window in it, lift the protective pane of glass on the right side and gap the igniter.
33
Page 34
24-HOUR TECHNICAL SUPPORT 1-800-387-6847 Inferno 3000 Ref-Mnl (2010-02)
WARNING!
WARNING!
WARNING!
D) If ALL above steps are verified and you still have a problem, call our customer
service at 1-800-387-6847.
THE ROTISSERIE IS HOT WHEN OPERATING. EXERCISE CAUTION WHEN
WORKING NEAR THE HOT ROTISSERIE.
WEAR APPROPRIATE PROTECTIVE CLOTHING.
REPLACING A LIGHT BULB
1. Pull off the trim cover.
2. Unscrew the 2 wing nuts.
3. Turn the side panel and remove the protective glass.
4. Replace the light bulb (Do NOT touch the bulb with bare hands, wear vinyl gloves)
5. Replace the glass cover.
6. Flip the side panel closed.
7. Tighten with wing nuts.
8. Install the trim cover.
REPLACING A DEGREASER CONTAINER.
FOLLOW ALL SAFETY PRECAUTIONS LISTED ON THE DEGREASER CONTAINER.
When degreaser level is below the line on the container:
1. Unscrew the cap and remove the degreaser hose from the empty bottle.
2. Remove the empty container.
3. Place the new bottle in place.
4. Open the cap and save it. It will be used later.
5. Verify that the black valve on the end of the degreaser hose is in place
6. Install the degreaser line into the new bottle and screw the cap closed.
7. Close the empty bottle using the cap from the new bottle.
REAR IGNITER VERIFICATION
Ensure that the igniter probes are well cleaned with steel wool.
Verify that the burner holes near the igniter are free of any obstructions.
If problems other than those described above arise, DO NOT ATTEMPT TO FIX THEM
YOURSELF. For any technical assistance, please contact a HARDT Customer Service
Representative at 1-800-387-6847, available 24 hours per day, 7 days per week.
34
 Loading...