

Page 1
VUS30ASS50A
Anleitung/Version:
196640 DE 20191008
Bestell-Nr.: 8757 8500
Nachdruck, auch
aus zugs wei se, nicht
ge stat tet!
Gebrauchsanleitung
Bürstsauger
Page 2

InhaltsverzeichnisSeite DE-2
Inhaltsverzeichnis
Lieferung . . . . . . . . . . . . . . DE-3
Lieferumfang . . . . . . . . . . DE-3
Lieferung kontrollieren. . . DE-3
Sicherheit . . . . . . . . . . . . . . DE-4
Bestimmungsgemäßer
Gebrauch. . . . . . . . . . . . . DE-4
Begriffserklärung . . . . . . . DE-5
Symbolerklärung . . . . . . . DE-5
Sicherheitshinweise . . . . DE-5
Geräteteile . . . . . . . . . . . . DE-10
Düsen . . . . . . . . . . . . . . .DE-11
Inbetriebnahme . . . . . . . . DE-13
Gerät auspacken. . . . . . DE-13
Griff aufstecken . . . . . . . DE-13
Gerät einrichten. . . . . . . DE-13
Bedienung . . . . . . . . . . . . DE-14
Boden saugen. . . . . . . . DE-14
Saugen beenden. . . . . . DE-16
Turbobürste benutzen. . DE-16
3-in-1-Düse benutzen . . DE-17
Gerät transportieren . . . DE-19
Abstellen und
aufbewahren . . . . . . . . . . DE-20
Pflege und Wartung . . . . . DE-21
Staubbehälter entleeren DE-21
Motorschutzfilter
reinigen/wechseln . . . . . DE-22
Grobstaubfilter reinigen. DE-24
Hygienefilter und
Abluftfilter reinigen/
wechseln . . . . . . . . . . . . DE-25
Gerät reinigen . . . . . . . . DE-26
Bodendüse reinigen . . . DE-27
Turbobürste reinigen. . . DE-27
Antriebsriemen der
Bürste auswechseln . . . DE-28
Fehlersuchtabelle. . . . . . . DE-30
Service . . . . . . . . . . . . . . . DE-32
Beratung, Bestellung
und Reklamation . . . . . . DE-32
Ersatzteile . . . . . . . . . . . DE-32
Umweltschutz. . . . . . . . . . DE-33
Elektro-Altgeräte
umweltgerecht
entsorgen . . . . . . . . . . . DE-33
Verpackung . . . . . . . . . . DE-33
Technische Daten . . . . . . DE-34
Page 3
Lieferung
Lieferung
Seite DE-3
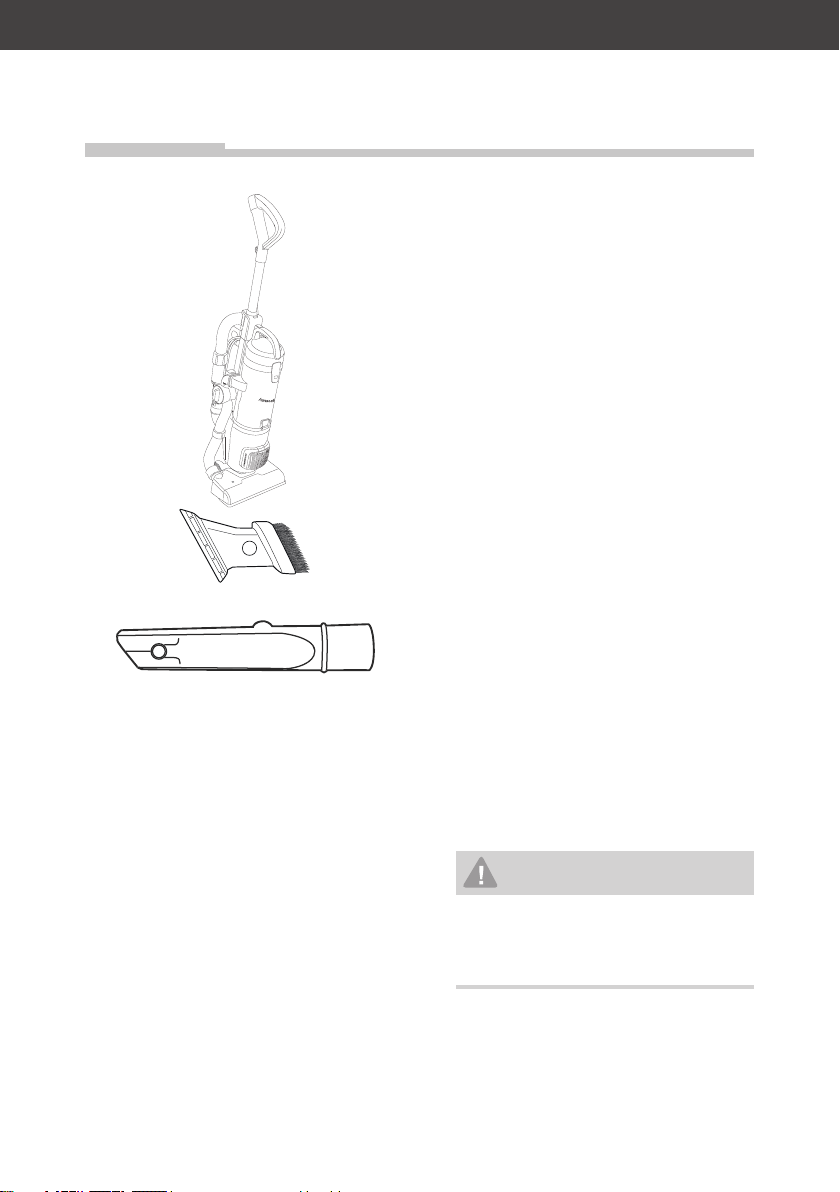
Lieferumfang
–Bürstsauger
– Saugschlauch mit Bodendüse,
Turbodüse, Staubbehälter und
Netzkabel
– Parkettdüse/Möbelpinsel
– Fugendüse
–Gebrauchsanleitung
Lieferung kontrollieren
1. Transportieren Sie das Gerät an
einen geeigneten Standort und
packen Sie es aus.
2. Prüfen Sie, ob die Lieferung
vollständig ist.
3. Kontrollieren Sie, ob das Gerät
Transpor tschäd e n auf we i st.
4. Sollte die Lieferung unvollstän-
dig sein oder das Gerät einen
Transpor tschad e n auf we i sen,
nehmen Sie bitte Kontakt mit
unserem Service auf (siehe
„Service“ auf Seite DE-32).
WARNUNG!
Gerät nicht in Betrieb neh-
men, wenn es einen sicht-
baren Schaden aufweist.
Page 4

SicherheitSeite DE-4
Sicherheit
Bevor Sie das Gerät benutzen, le sen Sie bit te
zu erst die Si cher heits hin wei se und die Ge brauchs an lei tung aufmerksam durch. Nur so
können Sie alle Funk tio nen si cher
und zu ver läs sig nut zen.
Beachten Sie unbedingt auch die
nationalen Vorschriften in Ihrem
Land, die zusätzlich zu den in
dieser Gebrauchsanleitung genannten Vorschriften gültig sind.
Bewahren Sie alle Sicherheitshinweise und Anweisungen für
die Zukunft auf. Geben Sie alle
Sicherheitshinweise und Anweisungen an den nachfolgenden
Verwender des Geräts weiter.
Bestimmungsgemäßer
Gebrauch
Das Gerät dient zum Aufsaugen
von losem, trockenem Schmutz
wie z. B. Staub, Fusseln, Krümeln
auf Bodenbelägen und Polstern
in Haushalt und Auto. Zur Aufnahme gefährlichen Staubes
oder Flüssigkeiten ist es nicht
geeignet.
Das Gerät ist nur zur Verwendung im privaten Haushalt
bestimmt und ist nicht für eine
gewerbliche Nutzung oder Mehrfachnutzung (z. B.: Verwendung
durch mehrere Parteien in einem
Mehrfamilienhaus) ausgelegt.
Verwenden Sie das Gerät ausschließlich wie in dieser
Gebrauchsanleitung beschrieben.
Jede andere Verwendung gilt als
nicht bestimmungsgemäß und
kann zu Sachschäden oder sogar
zu Personenschäden führen.
Der Hersteller übernimmt keine
Haftung für Schäden, die durch
nicht bestimmungsgemäßen
Gebrauch entstanden sind.
Page 5
Sicherheit
Seite DE-5
Begriffserklärung
Folgende Si gnal begriffe fi nden Sie in dieser Gebrauchsanleitung.
WARNUNG
Dieser Signalbegriff bezeichnet eine Gefährdung mit
einem mittleren Risikograd,
die, wenn sie nicht vermieden wird, den Tod oder eine
schwere Verletzung zur Folge
haben kann.
VORSICHT
Dieser Signalbegriff bezeichnet eine Gefährdung mit
einem niedrigen Risikograd,
die, wenn sie nicht vermieden
wird, eine geringfügige oder
mäßige Verletzung zur Folge
haben kann.
HINWEIS
Dieser Signalbegriff warnt
vor möglichen Sachschäden.
Dieses Symbol verweist
auf nützliche Zusatzinformationen.
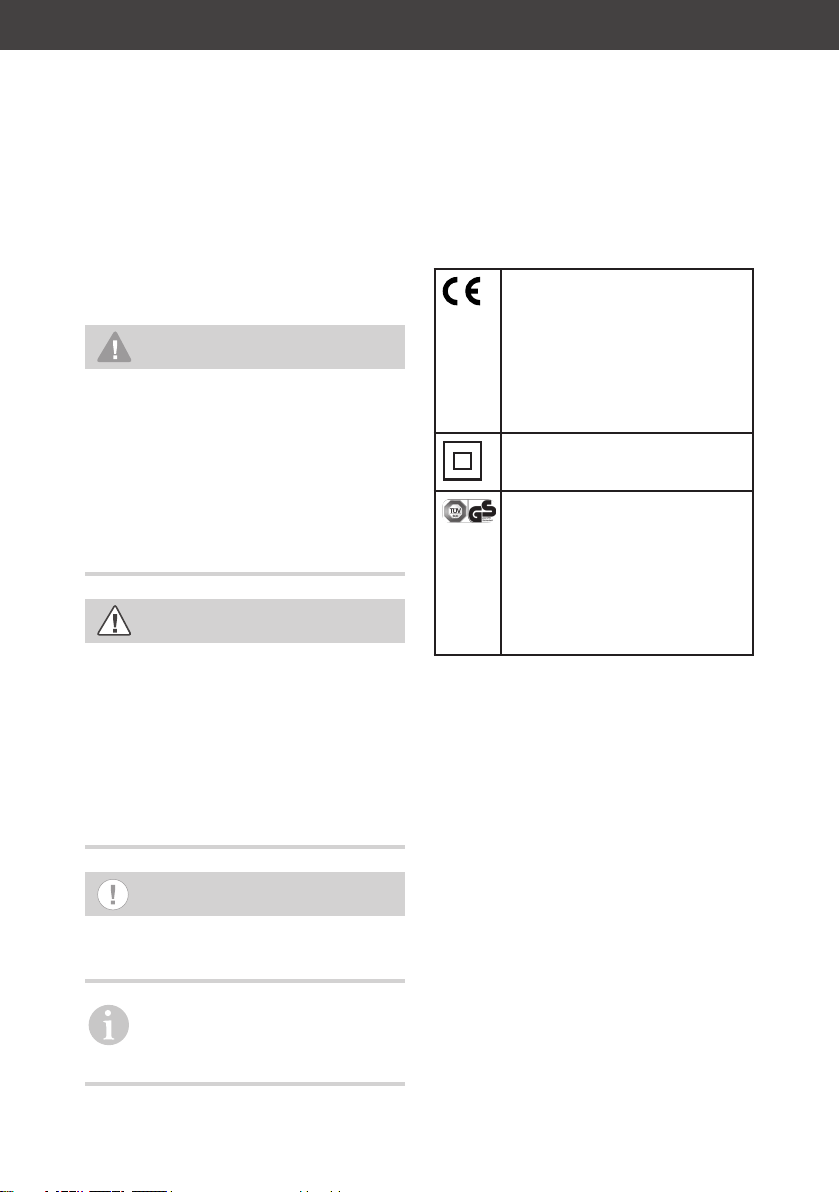
Symbolerklärung
Dieses Gerät erfüllt die
geltenden europäischen
und nationalen Richtlinien. Dies wird durch
die CE-Kennzeichnung
bestätigt.
Schutzklasse II
Doppelte Isolierung
Produkte mit dem
GS-Kennzeichen entsprechen den Anforderungen des deutschen
Produktsicherheitsgesetzes (ProdSG)
Sicherheitshinweise
In diesem Kapitel fi nden
Sie allgemeine Sicherheitshinweise, die Sie zu Ihrem
eigenen Schutz und zum
Schutz Dritter stets beachten
müssen. Beachten Sie zusätzlich die Warnhinweise in den
einzelnen Kapiteln zu Bedienung, Reinigung etc.
Page 6

SicherheitSeite DE-6
Risiken im Umgang
mit elektrischen
Haushaltsgeräten
WARNUNG
Stromschlaggefahr!
Das Berühren spannungsführender Teile kann zu schweren Verletzungen oder zum
Tod führen.
■ Gerät nur in Innenräu-
men verwenden. Nicht in
Feucht räumen oder im Regen betreiben.
■ Gerät niemals Witterungs-
einfl üssen (Regen etc.) aussetzen.
■ Gerät nicht in Betrieb neh-
men oder weiterbetreiben,
■ wenn es sichtbare Schä-
den aufweist, z.B. das
Netzkabel defekt ist.
■ wenn es Rauch entwickelt
oder verbrannt riecht.
■ ungewohnte Geräusche
von sich gibt.
In diesen Fällen Netzstecker aus der Steckdose
ziehen und Gerät reparieren lassen (siehe „Service“
auf Seite DE-32).
■ Gerät nur an eine gut zu-
gängliche Steckdose an-
schließen, damit Sie es im
Störfall schnell vom Stromnetz trennen können.
■ Gerät, Netzstecker und
Netzkabel von offenem
Feuer und heißen Flächen
fernhalten.
■ Netzkabel nicht knicken,
klemmen oder mit dem Gerät überfahren. Die Folge
kann ein Kabelbruch sein.
■ Wenn ein Ersatz der An-
schlussleitung erforderlich
ist, dann ist dies vom Hersteller oder seinem Vertreter auszuführen, um Sicherheitsgefährdungen zu
vermeiden.
■ Gerät nie unbeaufsichtigt
lassen, wenn sich der Netzstecker in der Steckdose
befi ndet.
■ Netzstecker nie am Netz-
kabel aus der Steckdose
ziehen, immer den Netzstecker selbst anfassen.
■ Im Fehlerfall sowie vor
Reinigung und Wartung
(z. B. Filter wechseln) den
Netzstecker immer aus der
Steckdose ziehen.
■ Netzstecker niemals mit
feuchten Händen anfassen.
Page 7

Sicherheit
Seite DE-7
■ Darauf achten, dass kein
Wasser in das Gerät eindringt. Gerät niemals in
Wasser tauchen.
■ Netzstecker erst in die
Steckdose stecken, wenn
alle Teile des Geräts vollkommen trocken sind.
■ Eingriffe und Repara-
turen am Gerät dürfen
ausschließlich autorisierte Fachkräfte vornehmen,
so wie unser Service (siehe
Seite DE-32). Eigenständige
Reparaturen an dem Gerät
können Sach- und Personenschäden verursachen,
und die Haftungs- und
Garantieansprüche verfallen. Niemals versuchen, das
defekte – oder vermeintlich
defekte – Gerät selbst zu
reparieren.
■ In diesem Gerät befi nden
sich elektrische und mechanische Teile, die zum Schutz
gegen Gefahrenquellen unerlässlich sind. Bei Reparaturen dürfen ausschließlich
Teile verwendet werden,
die den ursprünglichen Gerätedaten entsprechen.
Risiken für Kinder
Erstickungsgefahr!
■ Kinder nicht mit der Verpa-
ckungsfolie spielen lassen.
Kinder können sich darin
verfangen oder ersticken.
■ Kinder daran hindern,
Kleinteile vom Gerät abzuziehen und in den Mund zu
stecken.
VORSICHT
Risiken für bestimmte
Personengruppen
Gefahren für Kinder und
Personen mit eingeschränkten physischen, sensorischen
oder geistigen Fähigkeiten!
■ Dieses Gerät kann von Kin-
dern ab 8 Jahren sowie von
Personen mit reduzierten
physischen, sensorischen
oder mentalen Fähigkeiten
oder Mangel an Erfahrung
und/oder Wissen benutzt
werden, wenn sie beaufsichtigt oder bezüglich des
sicheren Gebrauchs unterwiesen wurden und die
daraus resultierenden Gefahren verstanden haben.
Page 8

SicherheitSeite DE-8
■ Kinder dürfen nicht mit
dem Gerät spielen und
keinen Zugriff auf das Gerät haben, wenn sie unbeaufsichtigt sind.
■ Gerät während des Be-
triebs nicht unbeaufsichtigt lassen.
■ Reinigung und Wartung
dürfen nicht von Kindern
durchgeführt werden, es
sei denn, sie werden beaufsichtigt.
Trotz der Filter kann noch
eine geringe Menge an
Schmutz partikeln in der
Ausblasluft des Geräts vorhanden sein. Diese können
bei kleinen Kindern durch
Einatmen zu allergischen
Reaktionen führen.
■ Möglichst nicht in der un-
mittelbaren Nähe von Kindern staubsaugen.
Risiken im Umgang mit
dem Staubsauger
Verletzungsgefahr!
Unsachgemäßer Umgang
mit dem Gerät kann zu Verletzungen führen.
■ Niemals in sich bewegende
Teile des Geräts und des Zubehörs, z.B. Turbo bürsten,
fassen. Es besteht die Gefahr des Einklemmens.
■ Die Turbobürste vor der
Reinigung immer vom
Teleskoprohr oder Saugschlauch abziehen.
■ Netzkabel so legen, dass es
nicht zur Stolperfalle wird.
Brandgefahr!
Das Einsaugen von glühender
Asche, brennenden Zigaretten
etc. setzt den Filter in Brand.
■ Weder glühende Asche,
brennende Zigaretten noch
Streichhölzer aufsaugen.
Gesundheitsgefahr!
Unsachgemäßer Umgang mit
dem Gerät kann zu Beeinträchtigungen der Gesundheit führen.
■ Das Gerät nicht benutzen,
wenn der Hygiene- oder
der Motorschutzfi lter fehlt
oder beschädigt ist.
Der aufgesaugte Staub
kann sonst in das Gerät eindringen und in die
Raumluft gelangen.
Page 9

Sicherheit
Seite DE-9
HINWEIS
Beschädigungsgefahr!
Unsachgemäßer Umgang
mit dem Gerät kann zu Sachschäden führen.
■ Beim Auspacken keine
spitzen Gegenstände verwenden.
■ Niemals sich auf das Gerät
setzen oder stellen.
■ Gerät nur mit eingesetztem
Motorschutzfi lter benutzen.
Der Motorschutzfi lter darf
nicht beschädigt sein.
■ Nur die original mitgelie-
ferten Zubehörteile und die
genannten Motorschutzfi lter und Hygienefi lter verwenden.
■ Niemals Toner, Gips, Ze-
ment, Steinstaub oder
Bohrstaub aufsaugen. Das
Aufsaugen dieser Materialien verstopft die Filter.
■ Niemals Wasser und andere
Flüssigkeiten aufsaugen.
■ Niemals spitze Gegenstän-
de, wie z.B. Glassplitter
aufsaugen.
■ Bei frisch schamponiertem
Teppich mit dem Absaugen
so lange warten, bis das
Reinigungsmittel vollständig trocken ist.
■ Den Staubsauger nie direkt
neben eine Heizung oder
einen Ofen stellen.
■ Den Hygienefi lter niemals
auf einer Heizung oder mit
einem Haar- oder Wäschetrockner etc. trocknen. Der
Hygienefi lter wird dadurch
porös und kann beschädigt
werden.
■ Zum Waschen der Filter
nicht die Waschmaschine
oder den Geschirrspüler benutzen.
■ Filter nur an der Raumluft
trocknen lassen.
■ Zum Reinigen des Geräts
und des Zubehörs keine
scharfen Reiniger (Scheuermittel, Verdünnung) verwenden. Diese können die
Oberfl äche des Geräts angreifen.
Page 10
GeräteteileSeite DE-10
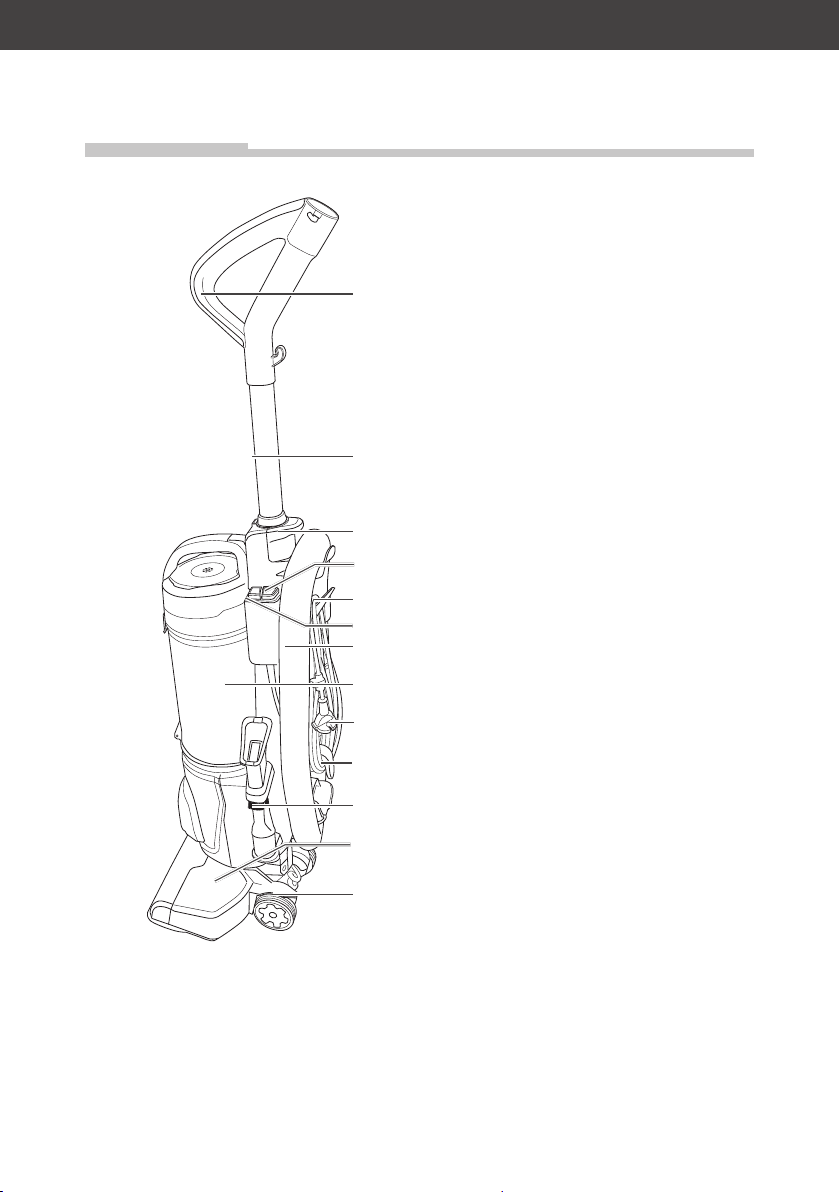
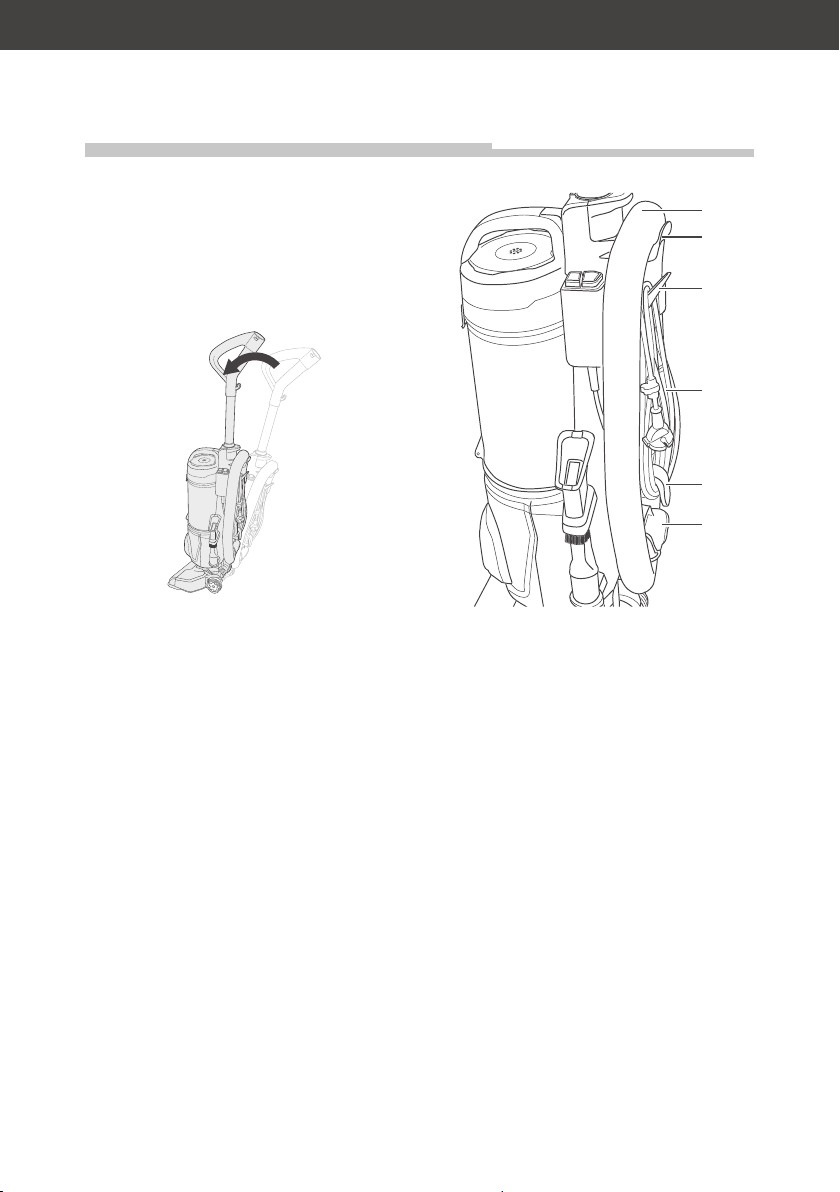
Geräteteile
(1)
(2)
(3)
(4)
(5)
(6)
(7)
(1)
Handgriff
(2)
Saugrohr
(3)
Saugrohr-Freigabetaste
(4)
Zuschalttaste für Turbobürste
(5)
obere Netzkabelhalterung
(6)
Ein-/Aus-Taste
(7)
Saugschlauch
(8)
Staubbehälter
(9)
Netzkabel mit Netzstecker
(10)
untere Netzkabelhalterung
(11)
3-in-1-Düse
(12)
Bodendüse mit Turbobürste
(13)
Laufrad
(8)
(9)
(10)
(11)
(12)
(13)
Page 11
Geräteteile
Seite DE-11
Düsen
Zusammen mit dem Staubsauger
erhalten Sie verschiedene Düsen,
die für unterschiedliche Zwecke
be stimmt sind. Jede Düse kann
bei Bedarf vor oder während des
Saugens auf den Teleskoprohrgriff des Saugschlauchs (7) oder
das Saugrohr (2) gesteckt werden.
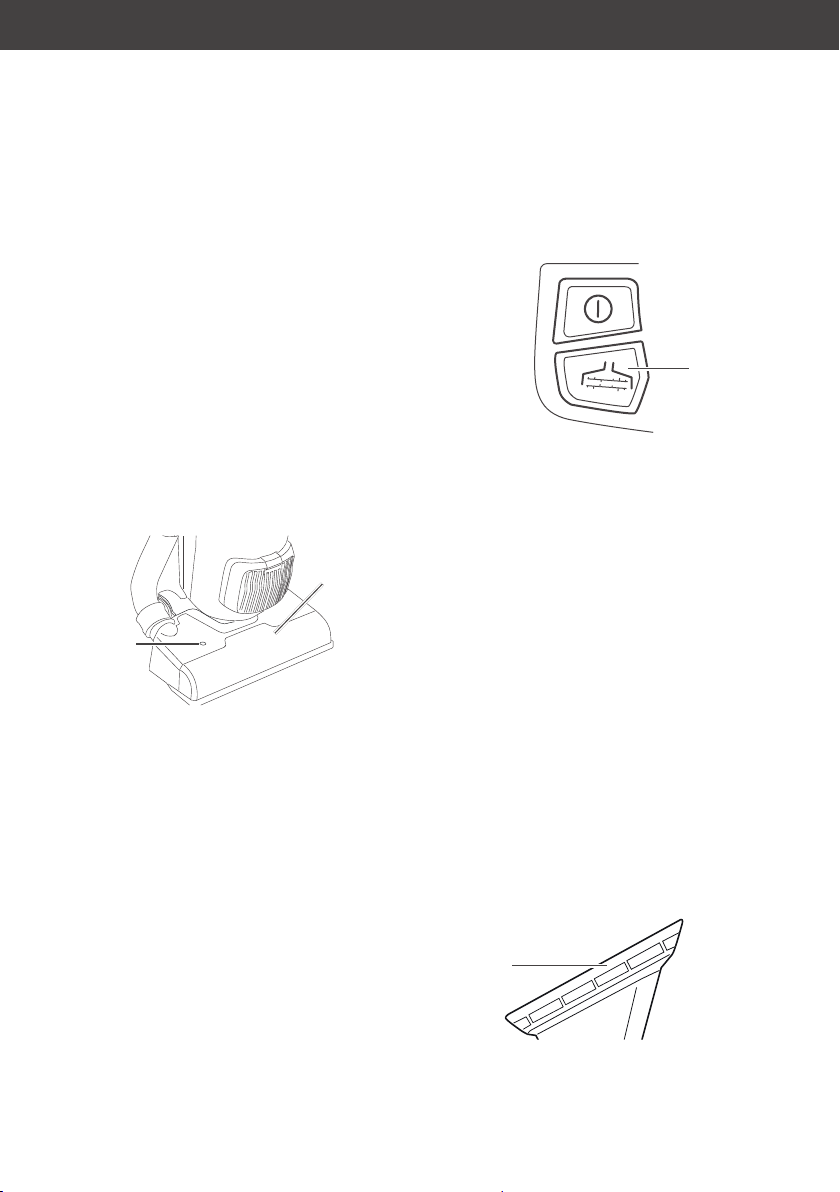
Bodendüse/Turbobürste
(12)
(14)
Die Bodendüse/Turbobürste ist
fest montiert. Mit der Bodendüse/
Turbobürste (12) werden Sie die
meiste Zeit arbeiten, da sie für
große ebene Flächen geeignet
ist.
der Zuschalttaste (4) an den Untergrund anpassen.
(4)
– Für kurzflorige oder glatte Bö-
den wie Nadelfilz, PVC, Parkett
oder Fliesen:
Turbobürste ausschalten: Zuschalttaste (4) betätigen, bis die
Leuchtanzeige (14) erlischt.
– Für hochflorige Teppiche:
Turbobürste einschalten: Zuschalttaste (4) betätigen, bis
die Leuchtanzeige (14) blau
aufleuchtet.
Die Zuschalttaste (4) lässt sich
auch während des Betriebs umstellen.
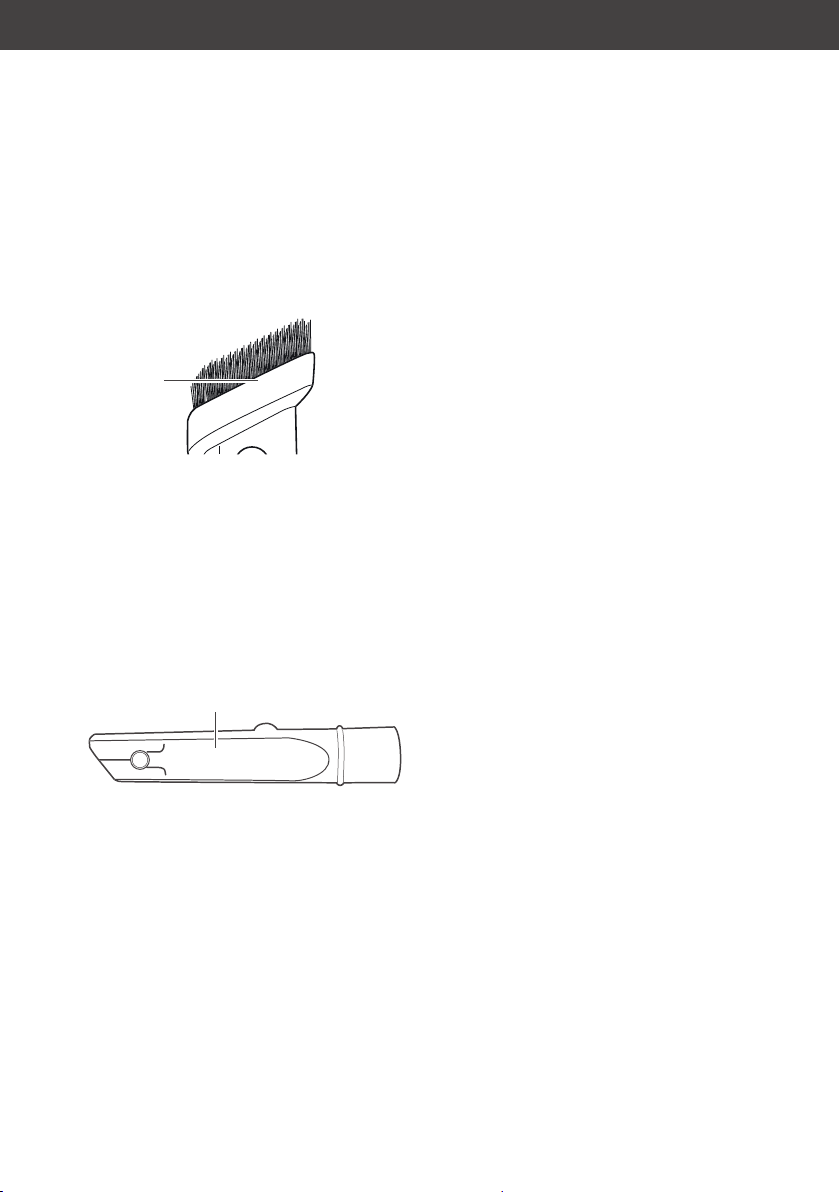
Parkettdüse
Die rotierende Turbobürste wird
durch den Saug-Luftstrom angetrieben. Sie eignet sich besonders für Verschmutzungen wie
z. B. Haare und Fäden auf Teppichen und Teppichböden.
Das beste Saugergebnis erhalten
Sie, wenn Sie das Gerät mit Hilfe
(15)
Das Parkettdüsenende (15) der
3-in-1-Düse (11) ist zur Pflege von
Page 12
GeräteteileSeite DE-12
Parkett-Fußböden und Laminat
geeignet.
Möbelpinsel
(16)
Mit dem Möbelpinsel-Ende (16)
der 3-in-1-Düse (11) können Sie
Bücher oder empfindliche Gegenstände wie Bilderrahmen etc.
entstauben.
Fugendüse
(18)
Die Fugendüse (18) der 3-in-1Düse eignet sich zum Aussaugen
von Stofffalten, Fugen, Ecken und
Nischen, die Sie mit der Bodendüse nicht erreichen können.
Page 13
Inbetriebnahme
Inbetriebnahme
Seite DE-13
Gerät auspacken
HINWEIS
Beschädigungsgefahr!
Unsachgemäßer Umgang
mit dem Gerät kann zu Beschädigungen führen.
■ Beim Auspacken keine
spitzen Gegenstände verwenden.
1. Packen Sie das Gerät aus.
2. Entfernen Sie vorsichtig alle
Verpackungsteile, Kunststoffprofile, Klebestreifen und
Schaumpolster.
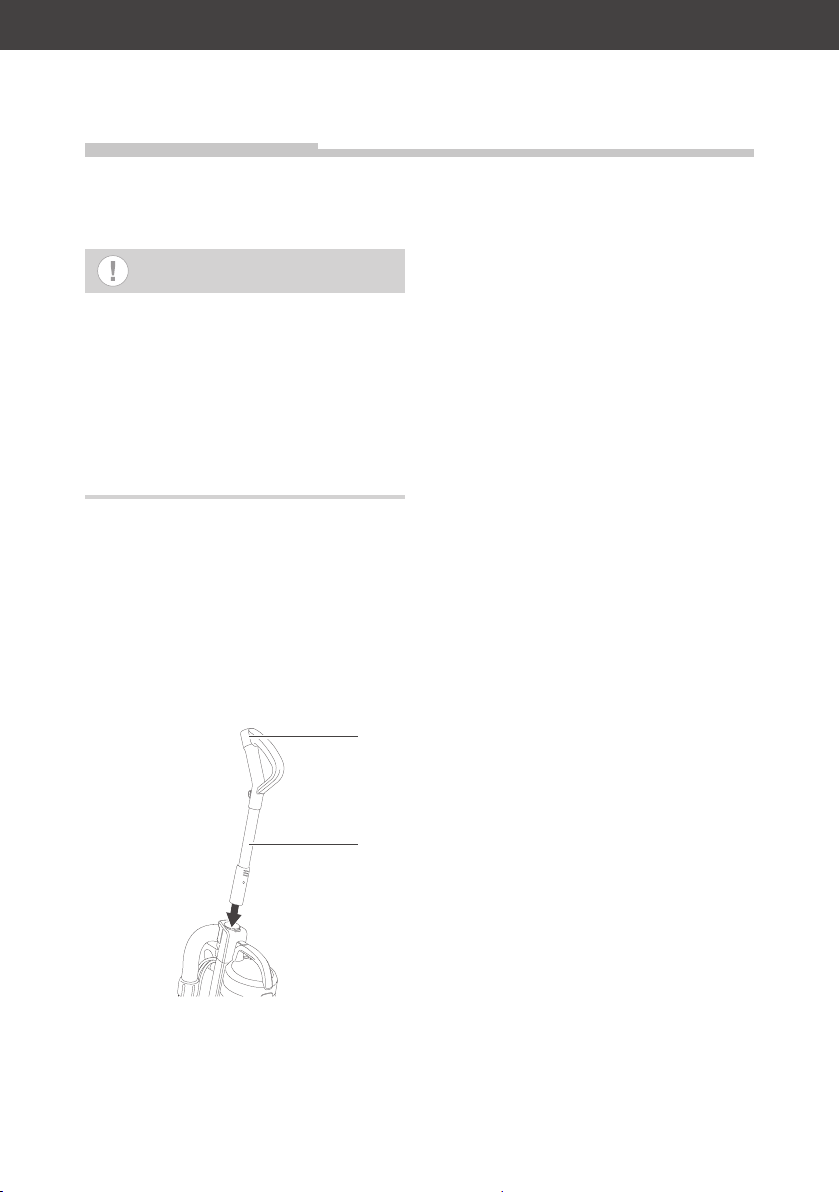
Griff aufstecken
(1)
Gerät einrichten
Alle Filter sind werkseitig bereits
ein ge legt, und Ihr Staubsauger ist
nun einsatzbereit.
(2)
• Stecken Sie den Griff (1) mit
Saugrohr (2) auf den Gerätekörper auf. Er rastet mit einem
„Klick“ ein.
Page 14

BedienungSeite DE-14
Bedienung
Sie können das Gerät benutzen,
wenn
– Sie das Kapitel „Sicherheit“
und die Sicherheitshinweise
gelesen haben (siehe Seite
DE-5).
– es eingerichtet ist, wie im Kapi-
tel „Inbetriebnahme“ beschrieben (siehe Seite DE-13).
Boden saugen
WARNUNG
Stromschlaggefahr!
Das Gerät arbeitet mit 220–
240 V~/50-60 Hz Netzspannung. Unsachgemäßer Umgang mit dem Gerät kann zu
schweren Verletzungen oder
zum Tod führen.
■ Weder glühende Asche,
brennende Zigaretten
oder Streichhölzer, noch
spitze Gegenstände, Glassplitter sowie Wasser oder
andere Flüssigkeiten aufsaugen. Glühende Asche,
brennende Zigaretten etc.
setzen den Filter in Brand,
Feuchtigkeit kann zum
Kurzschluss führen, spitze
Gegenstände beschädigen
den Filter und können zum
Kurzschluss führen.
VORSICHT
Gesundheitsgefahr!
Unsachgemäßer Umgang
mit dem Gerät kann zu
Beein trächtigungen der Gesundheit führen.
■ Das Gerät nicht benutzen,
wenn der Hygiene- oder der
Motorschutzfi lter fehlt oder
beschädigt ist. Der aufgesaugte Staub kann sonst in
das Gerät eindringen und
in die Raumluft gelangen.
HINWEIS
Beschädigungsgefahr!
Das Aufsaugen ungeeigneter
Materialien verstopft die Filter
und kann zu Beschädigungen
des Geräts führen.
■ Niemals Toner, Gips,
Zement, Steinstaub oder
Bohrstaub aufsaugen.
Page 15
Bedienung
Seite DE-15
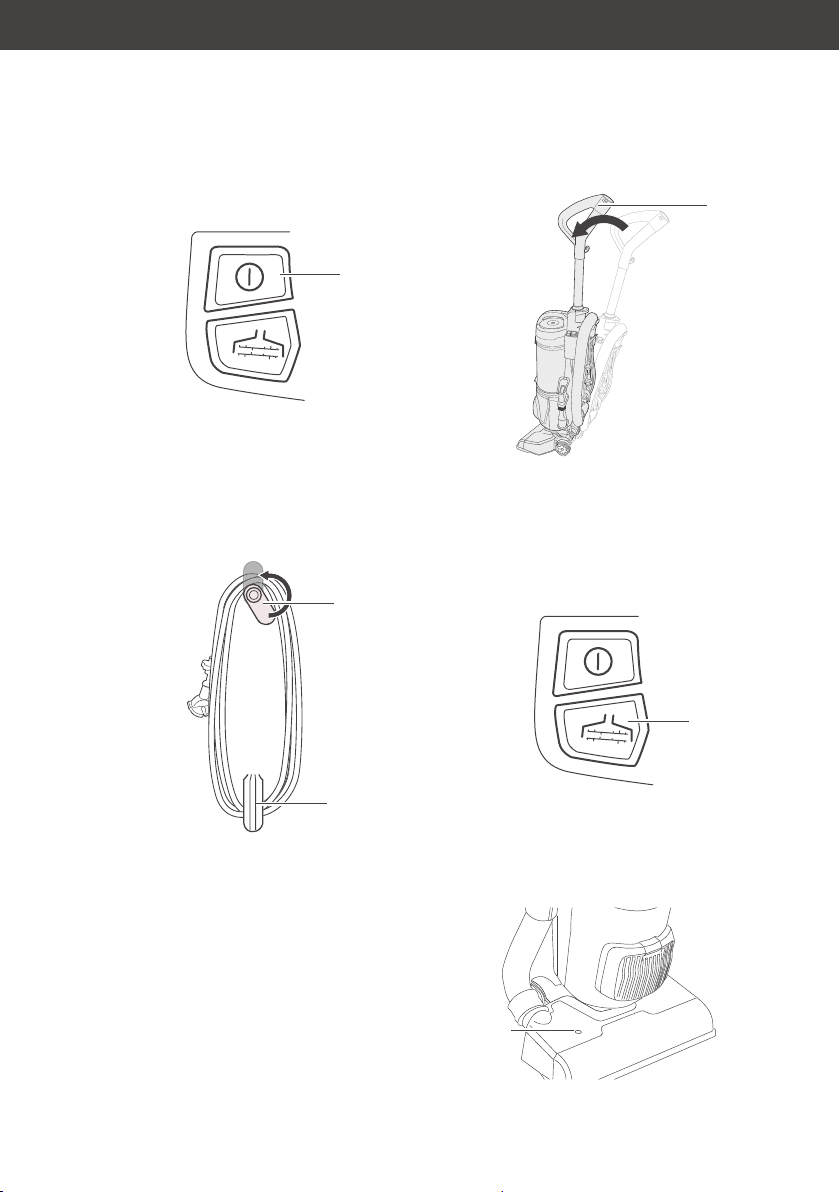
(5)
1. Drehen Sie die obere Netzkabelhalterung (5), um das Netzkabel freizugeben.
2. Stecken Sie den Netzstecker (9) in eine vorschriftsmäßig installierte Steckdose.
(1)
(12)
(6)
4. Betätigen Sie die Ein/Aus-Taste (6), um das Gerät einzuschalten.
5. Zum Saugen ziehen und schieben Sie die Düse über die
Fläch
e. Um die Ecken besser
zu erreichen, drehen Sie den
Handgriff (1) etwas. Hierdurch
stellt sich die Düse schräg.
In seltenen Fällen kann es
anfangs zu einem pfeifenden
Geräusch kommen. Dies ist keine
Fehlfunktion und verstummt nach
einiger Zeit.
3. Treten Sie mit den Fuß vorsichtig auf die Bodendüse/Turbobürste (12), und ziehen Sie den
Gerätekörper am Handgriff (1)
leicht auf sich zu.
Page 16
BedienungSeite DE-16
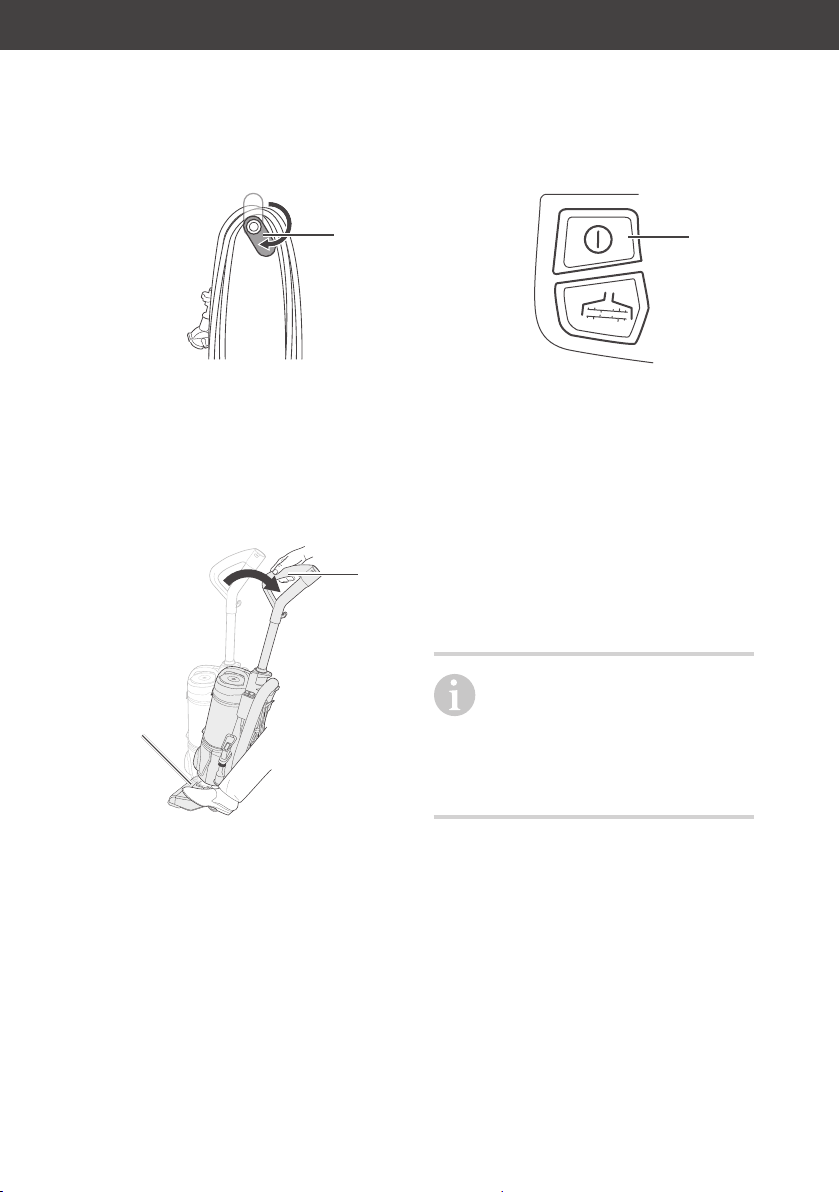
Saugen beenden
(6)
1. Betätigen Sie die Ein/Aus-Taste (6), um das Gerät auszuschalten.
2. Ziehen Sie den Netzstecker (9)
aus der Steckdose.
(5)
(1)
4. Lassen Sie den Gerätekörper
wieder einrasten.
Turbobür ste benut zen
(4)
(10)
3. Drehen Sie die obere Netzkabelhalterung (5) in die Ausgangsposition zurück, und wickeln Sie das Netzkabel um die
obere (5) und die untere (10)
Netzkabelhalterung.
• Um die Turbobürste zu benutzen, betätigen Sie die Zuschalttaste (4).
(14)
Die Leuchtanzeige (14) leuchtet
blau.
Page 17
• Um die Turbobürste wieder
auszuschalten, betätigen Sie
erneut die Zuschalttaste (4).
Die Leuchtanzeige (14) erlischt.
Die Turbobürste schaltet
sich nicht automatisch aus,
wenn das Gerät abgeschaltet
wird. Um nach Beenden des Saugens die Turbobürste auszuschalten, lassen Sie den Gerätekörper
einrasten, wie im Abschnitt „Saugen beenden“ auf Seite DE-16 beschrieben.
3-in-1-Düse benutzen
Die 3-in-1-Düse benutzen Sie
zusammen mit dem Saugschlauch (7).
Bedienung
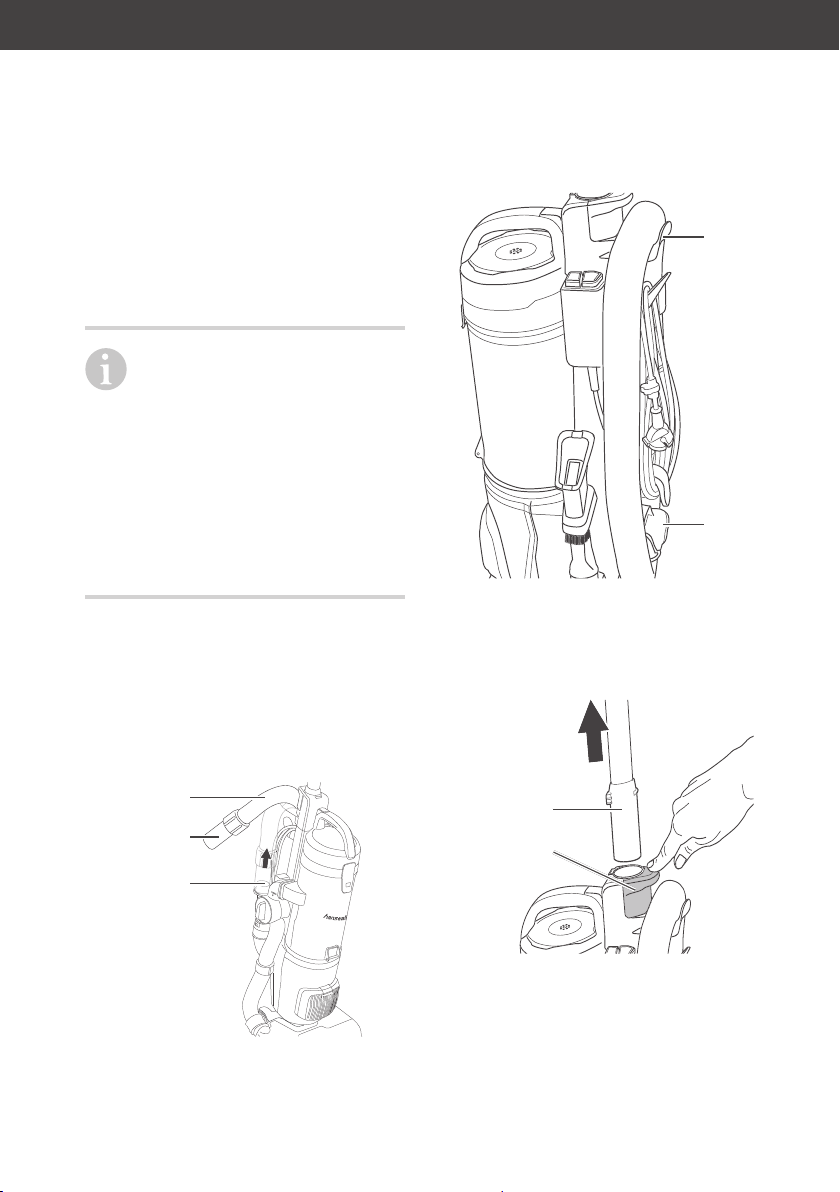
2. Nehmen Sie den Saugschlauch (7) von der oberen (23) und von der unteren
Saugschlauchhalterung (24) ab.
Seite DE-17
(23)
(24)
(7)
(20)
(21)
1. Ziehen Sie den Saugschlauch (7) am Griffstück (20)
aus der Parkhalterung (21).
(2)
(3)
3. Drücken Sie die Saugrohr-Freigabetaste (3), und ziehen Sie
das Saugrohr (2) ab.
Page 18
(1)
BedienungSeite DE-18
(20)
(19)
(22)(2)
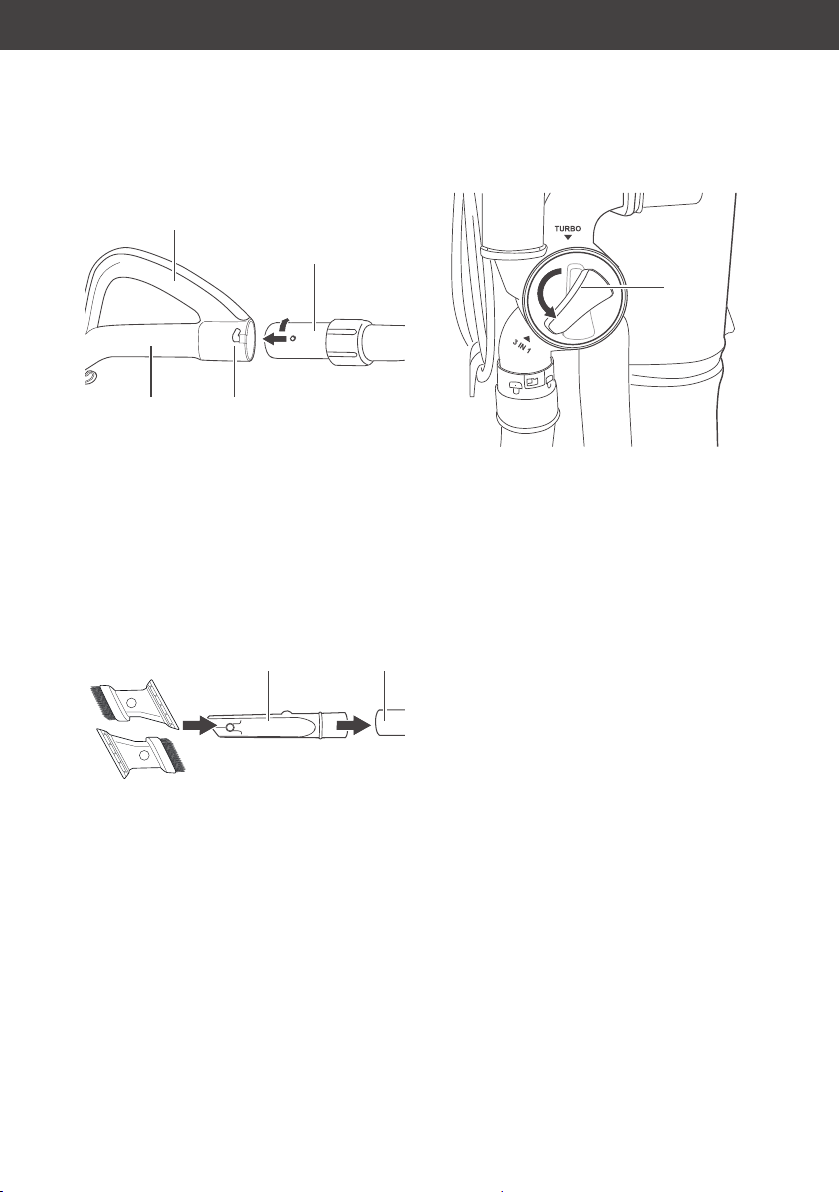
4. Führen Sie das Griffstück (20)
des Saugschlauchs (7) in den
Handgriff (1) des Saugrohrs (2)
ein, und lassen Sie den Bajonettverschluss (22) einrasten.
(18) (2)
5. Setzen Sie die Fugendüse (18)
und ggf. andere Komponenten
der 3-in-1-Düse auf.
6. Drehen Sie den Umschalter (19) gegen den Uhrzeigersinn in die Position „3IN1“.
7. Schalten Sie das Gerät ein, wie
im Abschnitt „Boden saugen“
auf Seite DE-14 beschrieben.
8. Wenn Sie die 3-in-1-Düse nicht
mehr benötigen, drehen Sie
den Umschalter (19) wieder in
die Position „TURBO“ zurück.
Page 19
Gerät transportieren
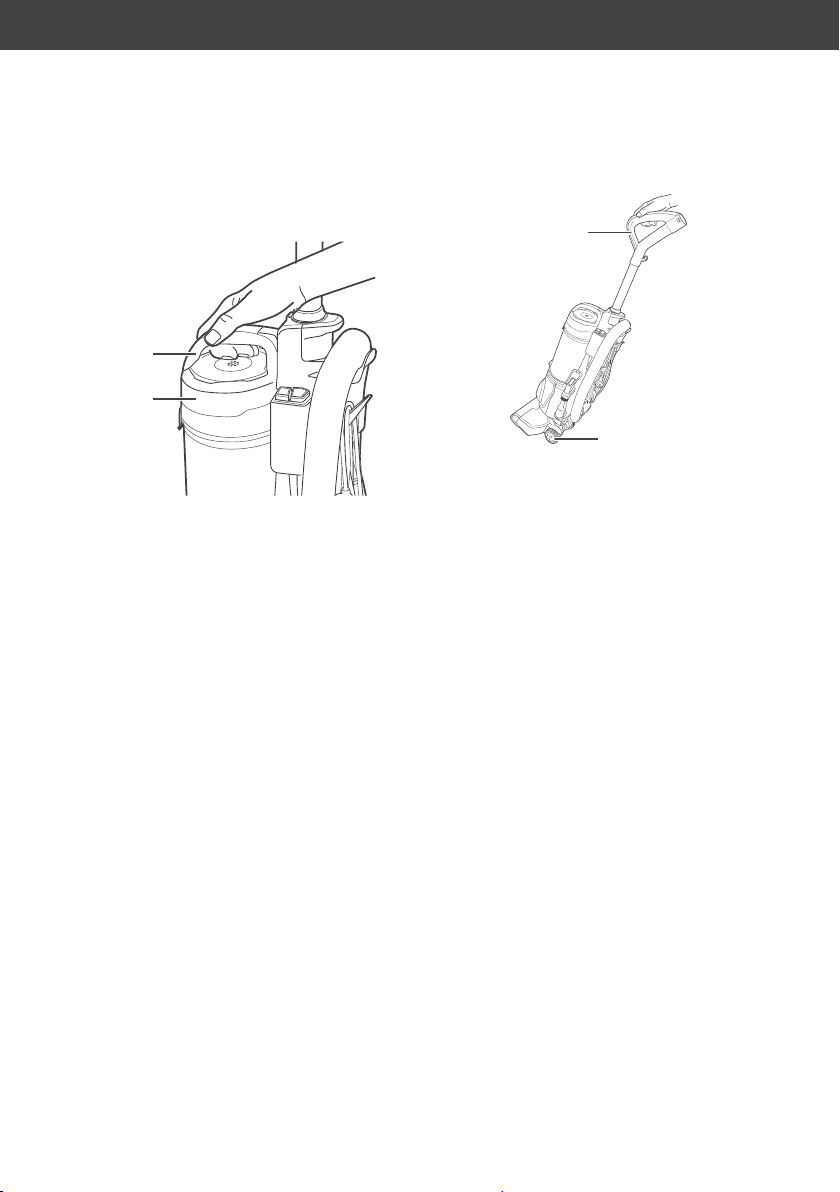
(26)
(25)
• Um das Gerät über kurze Strecken oder Treppen zu transportieren, heben Sie das Gerät am
Tragegriff (26) des Staubbehälterdeckels (25) hoch, um es zu
transportieren.
Bedienung
(1)
• Um das Gerät auf ebenen Flächen oder über längere Strecken zu transportieren, fassen
Sie es am Handgriff (1), kippen
Sie es leicht, und transportieren Sie es mithilfe der Laufräder (13).
Seite DE-19
(13)
Page 20
Abstellen und aufbewahrenSeite DE-20
Abstellen und aufbewahren
Damit das Gerät sicher steht,
treffen Sie bitte folgende Vorkehrungen:
• Ziehen Sie den Netzstecker
aus der Steckdose.
• Lassen Sie den Gerätekörper
einrasten, wie im Abschnitt
„Saugen beenden“ auf Seite
DE-16 beschrieben.
(7)
(23)
(5)
(9)
(10)
(24)
• Wickeln Sie das Netzkabel (9)
um die Netzkabelhalterungen
oben (5) und unten (10), und
bringen Sie die Netzkabelhalterung oben (5) wieder in die
Ausgangsposition.
• Führen Sie den Saugschlauch (7) sowohl um die
untere (24) wie auch um die
obere (23) Saugschlauchhalterung, und stecken Sie
den Saugschlauch mit dem
Griffstück (20) in die Parkhalterung (21).
Page 21
Pflege und Wartung
Pflege und Wartung
Seite DE-21
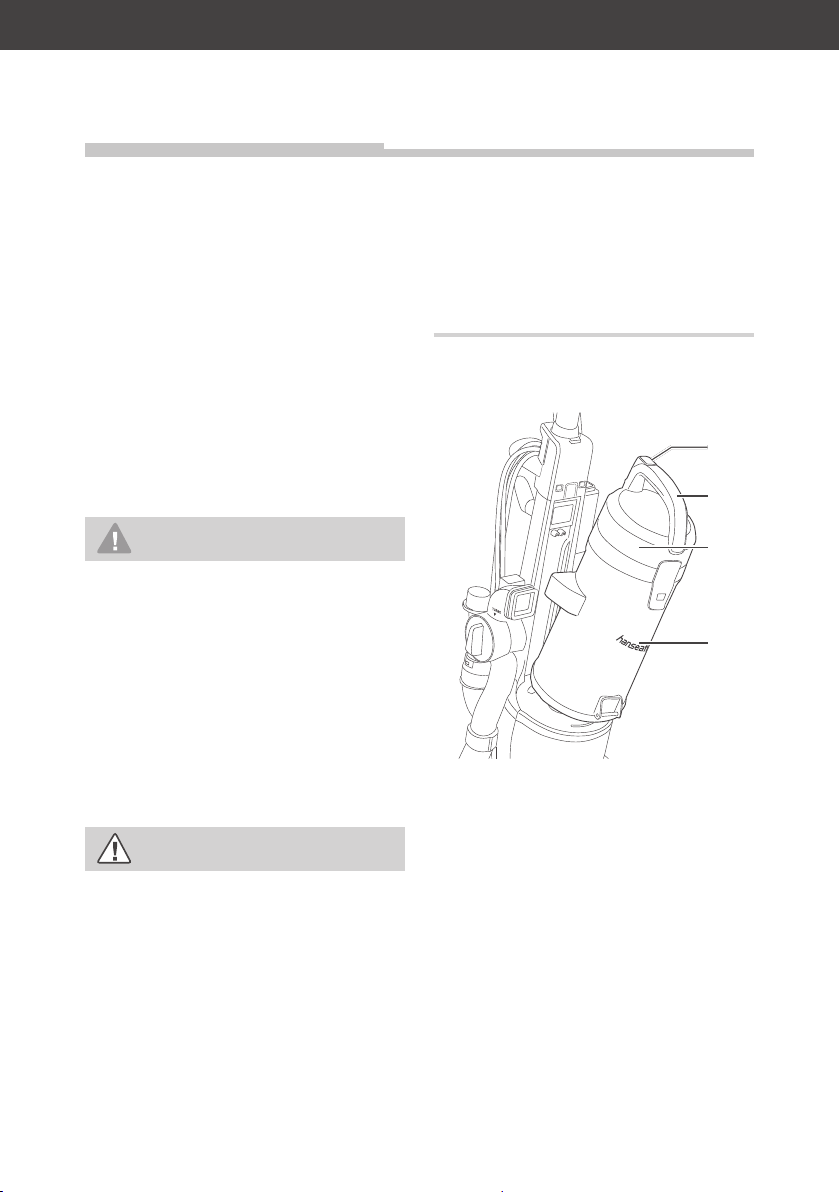
Staubbehälter entleeren
Der Bürstsauger arbeitet ohne
Staub beu tel. Stattdessen wird der
eingesaugte Schmutz durch Luftwirbel in den Staubbehälter (8)
gedrückt. Die Luft wird durch
einen waschbaren Grob-Filter
und einen Hygienefilter im Staubbehälter, ei nen Mo tor schutz fil ter
unterhalb des Staubbehälters und
einen Abluftfilter gereinigt.
WARNUNG
Stromschlaggefahr!
Unsachgemäßer Umgang
mit dem Gerät kann zu
schweren Verletzungen oder
zum Tod führen.
■ Vor dem Entleeren des
Staubbehälters immer den
Netzstecker aus der Steckdose ziehen.
VORSICHT
Gesundheitsgefahr!
Unsachgemäßer Umgang
mit dem Gerät kann zu Beeinträchtigungen der Gesundheit führen.
■ Den Staubbehälter nicht
in geschlossenen Räumen
entleeren. Zum Entleeren
des Staubbehälters auf den
Balkon gehen, oder den
Staubbehälter im Freien
direkt über der Mülltonne
entleeren.
1. Ziehen Sie den Netzstecker (9)
aus der Steckdose.
(27)
(26)
(25)
(8)
2. Drücken Sie die Freigabetaste (27) im Griff (26) des Staubbehälterdeckels (25), und nehmen Sie den Staubbehälter (8)
mit Staubbehälterdeckel (25)
ab.
3. Halten Sie den Staubbehälter (8) über einen Mülleimer.
Page 22

Pflege und WartungSeite DE-22
schweren Verletzungen oder
zum Tod führen.
■ Vor dem Wechseln oder
Reinigen des Motorschutz-
(28)
fi lters den Netzstecker
immer aus der Steckdose
(29)
ziehen.
HINWEIS
4. Lösen Sie die Verriegelung (28), lassen Sie den
Staubbehälterboden (29) nach
unten klappen, und entleeren
Sie den Staubbehälter (8) in
den Mülleimer.
5. Klappen Sie den Staubbehälterboden (29) wieder nach
oben, sodass die Verriegelung (28) einrastet.
6. Setzen Sie den Staubbehälter (8) wieder in den Staubsauger ein.
Motorschutzfilter
reinigen/wechseln
WARNUNG
Stromschlaggefahr!
Unsachgemäßer Umgang
mit dem Gerät kann zu
Beschädigungsgefahr!
Unsachgemäßer Umgang
mit dem Gerät kann zu Beschädigungen führen.
■ Immer die zum Gerät pas-
senden Filter verwenden,
da nur so die einwandfreie
Funktion des Staubsaugers
gewähr leistet ist.
■ Niemals ohne oder mit
beschädigtem Filter saugen. Der aufgesaugte
Staub würde in das Gerät
eindringen und den Motor
beschädigen.
■ Zum Waschen der Filter
nicht die Waschmaschine
oder den Geschirrspüler
verwenden.
1. Ziehen Sie den Netzstecker (9)
aus der Steckdose.
Page 23

Pflege und Wartung
Seite DE-23
2. Drücken sie die Freigabetaste (27) im Griff (26) des Staubbehälterdeckels (25), und nehmen Sie den Staubbehälter (8)
mit Staubbehälterdeckel (25)
ab, wie im Abschnitt „Staubbehälter entleeren“ auf Seite DE-21
beschrieben.
(25)
(30)
3. Lösen Sie die Verriegelung (30)
am Staubbehälterdeckel (25),
und klappen Sie den Staubbehälterdeckel (25) ab.
4. Entnehmen Sie den Motorschutzfilter (31).
5. Waschen Sie den Motorschutzfilter (31) unter fließendem
Wasser aus.
Wenn der Motorschutzfilter beschädigt sein sollte oder nicht
mehr ausreichend gereinigt
werden kann, muss er gegen
einen neuen ausgetauscht werden.
6. Lassen Sie den Motorschutzfilter (31) vollständig
durchtrocknen.
(31)
(25)
(31)
7. Setzen Sie den Motorschutzfilter (31) wieder in den Staubbehälterdeckel (25) ein.
Page 24

Pflege und WartungSeite DE-24
8. Klappen Sie den Staubbehälterdeckel (25) wieder zu, so
dass die Verriegelung (30) einrastet.
9. Setzen Sie den Staubbehälter (8) wieder ein.
Grobstaubfilter reinigen
1. Nehmen Sie den Staubbehälter (8) ab, wie im Abschnitt
„Staubbehälter entleeren“ auf
Seite DE-21 beschrieben, und
nehmen Sie den Staubbehälterdeckel (25) ab, wie im Abschnitt „Motorschutzfilter reinigen/wechseln“ auf Seite DE-22
beschrieben.
(32)
vorsichtig über einem Mülleimer aus.
(32)
(33)
4. Setzen Sie den Grobstaubfilter (32) wieder in den Staubbehälter (8) ein. Dabei auf die
Aussparungen (33) achten!
5. Klappen Sie den Staubbehälterdeckel (25) wieder zu, so
dass die Verriegelung (30) einrastet.
6. Setzen Sie den Staubbehälter (8) wieder ein.
2. Entnehmen Sie den
Grobstaubfilter (32).
3. Klopfen Sie Staubrückstände
aus dem Grobstaubfilter (32)
Page 25

Pflege und Wartung
Seite DE-25
Hygienefilter und
Abluftfilter reinigen/
wechseln
WARNUNG
Stromschlaggefahr!
Unsachgemäßer Umgang
mit dem Gerät kann zu
schweren Verletzungen oder
zum Tod führen.
■ Vor dem Wechseln oder
Reinigen des Hygienefi lters
und des Abluftfi lters immer
den Netzstecker aus der
Steckdose ziehen.
HINWEIS
Beschädigungsgefahr!
Unsachgemäßer Umgang
mit dem Gerät kann zu Beschädigungen führen.
■ Gerät nur mit eingebauten
Filtern benutzen.
■ Hygienefi lter niemals auf
einer Heizung oder mit
einem Haar- oder Wäschetrockner, etc. trocknen. Er
wird dadurch porös und
kann beschädigt werden.
■ Zum Waschen des Hygie-
nefi lters nicht die Waschmaschine verwenden.
■ Hygienefi lter nur an der
Raumluft trocknen lassen.
Wenn sich Geruchsbildung durch
das Reinigen nicht beseitigen
lässt oder der Filter zu stark
verschmutzt ist, muss er ausgetauscht werden.
1. Ziehen Sie den Netzstecker (9)
aus der Steckdose.
(36)
(35)
(38)
(34)
(37)
2. Drücken Sie die Verriegelung (35) der Filterabdeckung (34) herunter, und
nehmen Sie die Filterabdeckung (34) zusammen mit dem
Abluftfilter (36) ab.
Page 26

Pflege und WartungSeite DE-26
3. Drücken Sie die Verriegelung (38) des Hygienefilters (37), und heben Sie den
Hygienefilter (37) heraus .
4. Spülen Sie den Abluftfilter (36)
mit klarem Wasser, und lassen
Sie ihn anschließend vollstän-
dig trocknen.
5. Spülen Sie den Hygienefilter (37) nur mit klarem Wasser ab oder klopfen Sie ihn
aus bzw. reinigen Sie ihn mit
Druckluft. Verwenden Sie auf
keinen Fall Reinigungs- oder
Spülmittel zum Reinigen des
Hygienefilters.
6. Lassen Sie den Hygienefilter
vollständig durchtrocknen.
7. Setzen Sie den Hygienefilter
und die Filterabdeckung wieder
ein.
Die Artikelnummer zum
Nachbestellen von Inlet-
und Hygienefilter finden Sie
im Kapitel „Service“ auf Seite
DE-32.
Gerät reinigen
WARNUNG
Stromschlaggefahr!
Unsachgemäßer Umgang
mit dem Gerät kann zu
schweren Verletzungen oder
zum Tod führen.
■ Vor jeder Reinigung des
Geräts den Netzstecker aus
der Steckdose ziehen.
■ Darauf achten, dass kein
Wasser in das Gerät eindringt.
■ Gerät niemals in Wasser
tauchen.
■ Netzstecker erst in die
Steckdose stecken, wenn
alle Teile des Geräts vollkommen trocken sind.
HINWEIS
Beschädigungsgefahr!
Unsachgemäßes Reinigen
des Geräts kann die Oberfl äche angreifen.
■ Zum Reinigen des Geräts
keine scharfen Reiniger
(Scheuermittel, Verdünnung) verwenden.
Page 27

Pflege und Wartung
Seite DE-27
• Wischen Sie bei Bedarf
–das Gehäuse,
– den Staubbehälter (8),
– das Innere der Filterabde-
ckung
–das Zubehör
mit einem feuchten Tuch ab.
Dabei darf keine Flüssigkeit in
den Staubsauger gelangen.
• Säubern Sie die Filterabdeckung (34) von Zeit zu Zeit mit
einer weichen Bürste.
Bodendüse reinigen
• Saugen Sie gelegentlich die
Unterseite der Bodendüse (12)
mit der Fugendüse (18) ab.
Turbobür ste reinigen
Wenn die Turbobürste nicht mehr
richtig funktioniert:
1. Ziehen Sie den Netzstecker (3).
(39)
(40)
2. Entfernen Sie Fusseln und
Haare von den Bürsten (39)
und vom Luftschaufelrad (40).
VORSICHT
Verletzungsgefahr!
Unsachgemäßer Umgang
mit dem Gerät kann zu Verletzungen führen.
■ Niemals in sich bewegende
Teile des Geräts und des Zubehörs, z.B. Turbo bürsten,
fassen. Es besteht die Gefahr des Einklemmens.
Page 28

Pflege und WartungSeite DE-28
Antriebsriemen der
Bürste auswechseln
(41)
(41)
1. Lösen Sie die 5 Schrauben (41)
mit einem Kreuzschlitzschraubendreher.
(42)
(40)
3. Heben Sie das Luftschaufelrad (40) aus dem Turbobürstengehäuse.
(43)
(44)
(40)
2. Heben Sie die Schutzabdeckung (42) des Luftschaufelrads (40) ab.
4. Setzen Sie den neuen Antriebsriemen (43) auf die Antriebswalze (44) im Turbobürstengehäuse.
Page 29

Pflege und Wartung
Seite DE-29
(40)
(45)
(43)
5. Setzen Sie das Luftschaufelrad (40) so wieder in das Turbobürstengehäuse ein, dass
der Antriebsrieben (43) über
die Antriebswalze (45) am Luftschaufelrad geführt wird.
6. Bringen Sie die Schutzabdeckung (42) mithilfe der 5
Schrauben und des Kreuzschlitzschraubendrehers wieder an.
Page 30

FehlersuchtabelleSeite DE-30
Fehlersuchtabelle
Bei allen elektrischen Geräten können Störungen auf tre ten. Da bei
muss es sich nicht um ei nen Defekt am Gerät handeln. Prüfen Sie des halb bitte an hand der Ta bel le, ob Sie die Störung be sei ti gen können.
WARNUNG
Stromschlaggefahr bei unsachgemäßer Reparatur!
Nie mals versuchen, das de fek te – oder ver meint lich defekte –
Ge rät selbst zu re pa rie ren. Sie kön nen sich und spä te re Be nut zer in Gefahr brin gen. Nur au to ri sier te Fach kräf te dürfen
die se Re pa ra tu ren ausführen.
Problem Mögliche Ursache Lösungen, Tipps
Gerät arbeitet
nicht.
Fußschalter Ein/
Aus nicht betätigt.
Netzstecker sitzt
lose.
Steckdose defekt.
Netzkabel defekt.
Fußschalter Ein/Aus betätigen.
Festen Sitz des Netz stec kers in
der Steckdose kontrollieren.
Gerät an einer anderen Steckdose
ausprobieren.
Sicherungen bzw. den Sicherungsautomaten kontrollieren.
Netzkabel auf Beschädigungen
kontrollieren. Ggf. unseren Service
verständigen (siehe „Service“ auf
Seite DE-32).
Page 31

Fehlersuchtabelle
Problem Mögliche Ursache Lösungen, Tipps
Seite DE-31
Gerät schaltet
sich selbsttätig
aus.
Bürste/Düse verstopft.
Motorschutzfilter
verstopft. Überhitzungsschutz wurde
aktiviert.
Saugrohr / Saugschlauch verstopft.
Gegenstand verstopft die Düse.
Filter sind nicht
richtig eingesetzt
oder verschmutzt.
Fußschalter Ein/Aus betätigen,
Netzstecker ziehen, Bürste/Düse
säubern.
Fußschalter Ein/Aus betätigen,
Netzstecker ziehen, Gerät mindestens 1/2 Stunde abkühlen lassen
und Motorschutzfilter reinigen.
Fußschalter Ein/Aus betätigen,
Netzstecker ziehen, Teleskoprohr
und Saugschlauch auf Verstopfung prüfen und ggf. säubern.
Fußschalter Ein/Aus betätigen,
Netzstecker ziehen, Teleskoprohr
und Saugschlauch auf Verstopfung
prüfen. Gegenstand entfernen.
Filter richtig einsetzen bzw.
reinigen.
In seltenen Fällen kann es anfangs zu einem pfeifenden Geräusch kommen. Dies ist keine Fehlfunktion und verstummt
nach einiger Zeit.
Page 32

ServiceSeite DE-32
Service
Damit wir Ihnen schnell helfen können, nennen Sie uns bitte:
Gerätebezeichnung Modell Bestellnummer
Bürstsauger
Zubehör Bestell-
nummer
1× Inletfilter 7462 4117
1× Hygienefilter 9307 9911
Beratung, Bestellung
und Reklamation
Wenden Sie sich bitte an die Produktberatung Ihres Versandhauses, wenn
– die Lieferung unvollständig ist,
– das Gerät Transportschäden
aufweist,
– Sie Fragen zu Ihrem Gerät
haben,
– sich eine Störung nicht mithilfe
der Fehlersuchtabelle beheben
lässt,
– Sie weiteres Zubehör bestellen
möchten.
VUS30ASS50A
8757 8500
Ersatzteile
Kunden in Deutschland
– Wenden Sie sich bitte an die
Firma Hermes
Fulfilment GmbH:
Tel. (057 32) 99 66 00
Montag – Donnerstag 8 – 15 Uhr,
Freitag 8 – 14 Uhr
Kunden in Österreich
– Wenden Sie sich bitte an
das Kundencenter oder die
Produktberatung Ihres Versandhauses.
Bitte beachten Sie:
Sie sind für den einwandfreien
Zustand des Geräts und die fach ge rech te Benutzung im Haushalt
verantwortlich. Durch Nichtbeachtung dieser Anleitung ver ur sach te Schäden können leider
nicht anerkannt werden.
Page 33

Umweltschutz
Umweltschutz
Seite DE-33
Elektro-Altgeräte
umweltgerecht entsorgen
Elektrogeräte enthalten
Schadstoffe und wertvolle Ressourcen.
Jeder Verbraucher ist
deshalb gesetzlich verpflichtet,
Elektro-Altgeräte an einer zugelassenen Sammel- oder Rücknahmestelle abzugeben. Dadurch
werden sie einer umwelt- und
ressourcenschonenden Verwertung zugeführt.
Sie können Elektro- Altgeräte
kostenlos beim lokalen Wertstoff-/
Recyclinghof abgeben.
Für weitere Informationen zu
diesem Thema wenden Sie sich
direkt an Ihren Händler.
Verpackung
Unsere Verpackungen
wer den aus um welt freund li chen, wie der ver-
wert ba ren Materialien hergestellt:
– Außenverpackung aus Pappe
– Formteile aus ge schäum tem,
FCKW-freiem Po ly sty rol (PS)
– Folien und Beutel aus Poly-
äthylen (PE)
– Spannbänder aus Po ly pro py len
.
(PP)
Sollten es Ihre räumlichen Verhältnisse zulassen, empfehlen
wir Ihnen, die Verpackung zumindest während der Garantiezeit aufzubewahren. Sollte das
Gerät zur Reparatur eingeschickt
oder in eine der ReparaturAnnahmestellen gebracht werden
müssen, ist das Gerät nur in der
Originalverpackung ausreichend
geschützt.
Entsorgen Sie die Verpackung
umweltfreundlich.
Page 34

Technische Dat e nSeite DE-34
Tec hnische Daten
Hersteller
Gerätebezeichnung Bürstsauger
Modell VUS30ASS50A
Schallleistungspegel in dB(A) 77
Leistung in W 700
Versorgungsspannung in V~ / 50/60 Hz
Schutzklasse II
Gewicht (zusammengebaut) in kg, ca. 7
Bestellnummer 8757 8500
Hinweis: Der Staubsauger wurde als Universalstaubsauger getestet.
220–240
Page 35

VUS30ASS50A
Manual/version:
196640 GB 20191008
Article no.: 8757 8500
Reproduction, even of
excerpts, is not permitted!
User manual
Vacuum Cleaner
Page 36

Table of contentsPage GB-2
Table of contents
Delivery . . . . . . . . . . . . . . . GB-3
Package contents . . . . . . GB-3
Check the delivery. . . . . . GB-3
Safety . . . . . . . . . . . . . . . . . GB-4
Intended use . . . . . . . . . . GB-4
Explanation of terms . . . . GB-4
Explanation of symbols . . GB-5
Safety notices . . . . . . . . . GB-5
Appliance parts . . . . . . . . GB-10
Nozzles . . . . . . . . . . . . . GB-11
Start-up. . . . . . . . . . . . . . . GB-13
Unpacking the appliance GB-13
Insert handle . . . . . . . . . GB-13
Setting up the appliance GB-13
Operation . . . . . . . . . . . . . GB-14
Vacuuming floors. . . . . . GB-14
Finishing vacuuming . . . GB-15
Using the turbo brush . . GB-16
Using the 3-in-1 tool . . . GB-16
Moving the appliance . . GB-18
Cleaning/washing the
hygiene filter and
exhaust air filter. . . . . . . GB-23
Cleaning the appliance . GB-25
Cleaning the floor nozzle GB-25
Cleaning the turbo brush GB-26
Replacing the
brush drive belt . . . . . . . GB-26
Troubleshooting table. . . . GB-28
Service . . . . . . . . . . . . . . . GB-30
Advice, order and
complaint. . . . . . . . . . . . GB-30
Spare parts . . . . . . . . . . GB-30
Environmental protection . GB-31
Disposing of old
electrical devices
in an environmentally-
friendly manner . . . . . . . GB-31
Packaging . . . . . . . . . . . GB-31
Technical data . . . . . . . . . GB-32
Shutdown and storage. . . GB-19
Care and maintenance. . . GB-20
Emptying the dust bin . . GB-20
Cleaning/changing the
motor protection filter . . GB-21
Cleaning the
coarse dust filter . . . . . . GB-22
Page 37

Delivery
Delivery
Page GB-3
Package contents
– Vacuum Cleaner
– Suction hose with floor noz-
zle, turbo nozzle, dust bin and
mains cord
– Parquet nozzle/furniture brush
– Crevice nozzle
– User manual
Check the delivery
1. Move the appliance to a suitable
place and unpack it.
2. Check that all parts have been
delivered.
3. Check whether the appliance
was damaged during transit.
4. If any parts are missing or the
appliance has been damaged
in transit, please contact our
service team (see „Service“ on
page GB-30).
WARNING!
Do not operate the appli-
ance if it has visible dam-
age.
Page 38

Safety
SafetyPage GB-4
Please read through the
safety instructions and
user manual carefully
before using the appliance. This
is the only way you can use all
the functions reliably and safely.
Be absolutely sure to also observe the national regulations in
your country, which are also valid
in addition to the regulations
specified in this user manual.
Keep all safety notices and instructions for future reference.
Pass all safety notices and instructions on to the subsequent
user of the appliance.
Intended use
The appliance is intended for
vacuuming up loose and dry dirt,
such as dust, lint, crumbs on
floors and cushions around the
home and car. It is not suitable
for vacuuming hazardous dusts
or fluids.
The appliance is designed for
use in private households only
and is not designed for commercial use or multiple use (e.g.: use
by several families in an apartment building).
Use the appliance exclusively as
described in this user manual.
Any other use is deemed improper and may result in damage to
property or even personal injury.
The manufacturer accepts no
liability for damage caused by
improper use.
Explanation of terms
The following symbols can be
found in this user manual.
WARNING
This symbol indicates a
hazard with a medium level
of risk which, if not avoided,
could result in death or serious injury.
CAUTION
This symbol indicates a
hazard with a low level of risk
which, if not avoided, could
result in minor or moderate
injury.
NOTICE
This symbol warns against
possible damage to property.
This symbol refers to useful additional information.
Page 39

Safety
Page GB-5
Explanation of symbols
Products marked with
this symbol meet all
applicable Community
regulations for the European Economic Area
Protection class II
Dual insulation
Products marked with
the GS symbol meet the
requirements of the German Product Safety Act
(ProdSG).
Safety notices
In this chapter you will fi nd
general safety notices which
you must always observe for
your own protection and that
of third parties. Please also
observe the warning notices
in the individual chapters on
operation, cleaning, etc.
Risks in handling
household electrical
appliances
WARNING
Risk of electric shock!
Touching live parts may result in severe injury or death.
■ Only use the appliance in-
doors. Do not use in wet
rooms or in the rain.
■ Never expose the appli-
ance to effects of the
weather (rain, etc.).
■ Do not operate or continue
to operate the appliance,
■ if it shows signs of visible
damage, e.g. the mains
cable is defective.
■ if it starts smoking or
there is a smell of burning.
■ it makes unfamiliar nois-
es.
In this case, you should pull
the mains plug out of the
socket and have the appliance repaired (see „Service“ on page GB-30).
■ Only connect the appli-
ance to an easily accessible socket so that you can
quickly disconnect it from
Page 40

SafetyPage GB-6
the mains in the event of a
fault.
■ Keep the appliance, mains
plug and mains cord away
from open fl ames and hot
surfaces.
■ Do not kink, pinch or run
over the mains cord with
the appliance. This can result in a break in the cable.
■ If the mains cord of the
appliance is damaged, it
must be replaced by the
manufacturer, through customer service or by a qualifi ed specialist.
■ Never leave the appli-
ance unattended while the
mains plug is connected to
the socket.
■ Never pull the mains plug
out of the socket by the
mains cord, always hold
the mains plug itself.
■ In the event of a fault, and
before cleaning and maintenance (e.g. changing fi lter), always pull the mains
plug out of the socket.
■ Never touch the mains
plug with wet hands.
■ Please ensure that no wa-
ter seeps into the appli-
ance. Never immerse the
appliance in water.
■ Only insert the mains plug
into the socket if all appliance components are completely dry.
■ Changes and repairs to the
appliance may only be carried out by authorised specialists such as our service
team (see page GB-30). Unauthorised repairs to the
appliance can cause property damage and personal
injury, and invalidate liability and warranty claims.
Never try to repair a defective or suspected defective
appliance yourself.
■ This appliance contains
electrical and mechanical
parts which are essential
for protection against potential sources of danger.
Only parts corresponding
to the original appliance
specifi cations may be used
for repairs.
Page 41

Safety
Page GB-7
Risks to children
Risk of suffocation!
■ Do not allow children to
play with the packaging
fi lm. Children may get
caught in it or suffocate.
■ Prevent children from pull-
ing small parts off the appliance or putting them in
their mouths.
CAUTION
Risks for certain groups of
people
Dangers for children and
people with limited physical,
sensory or mental capacity!
■ This appliance may be
used by children aged
eight years and above, as
well as persons with reduced physical, sensory or
mental capacities or those
lacking experience and/
or knowledge, if they are
supervised or have been
instructed in how to safely
use the appliance and have
understood the dangers associated with operating it.
■ Children should not be
allowed to play with the
appliance nor should they
have access to the appliance when left unattended.
■ Do not leave the appliance
unsupervised while in operation.
■ Cleaning and maintenance
must not be carried out by
children unless they are supervised.
Even with the fi lters, the appliance exhaust air may still
contain small quantities of
dirt particles. If breathed in
by small children, these can
lead to allergic reactions.
■ Avoid vacuuming close to
children, wherever possible.
Risks when handling the
vacuum cleaner
Risk of injury!
Improper handling of the appliance may result in injury.
■ Never touch moving parts
of the appliance and accessories, for example, turbo
brushes. There is a risk of
fi ngers becoming trapped.
Page 42

SafetyPage GB-8
■ Always remove the turbo
brush from the telescopic
tube or suction hose before
cleaning.
■ Lay the mains cord in such
a way that no one trips
over it.
Fire hazard!
Vacuuming glowing ash,
burning cigarettes, etc. will
set the fi lter on fi re.
■ Do not vacuum glowing
ash, burning cigarettes or
matches.
Health hazard!
Improper handling of the appliance may result in health
hazards.
■ Do not use the appliance if
the hygiene or motor protection fi lter is missing or
damaged. Otherwise vacuumed dust can penetrate
the appliance and escape
into the ambient air.
NOTICE
Risk of damage!
Improper handling of the appliance can lead to property
damage.
■ Do not use sharp objects to
unpack it.
■ Never sit or stand on the
appliance.
■ Only use the appliance
with the motor protection
fi lter in place. The motor
protection fi lter may not be
damaged.
■ Only the original supplied
accessories and the specifi ed motor protection fi lter
and hygiene fi lter may be
used.
■ Never vacuum clay, plas-
ter, cement, masonry dust
or drilling dust. Vacuuming
these materials blocks the
fi lter.
■ Never vacuum water and
other liquids.
■ Never vacuum sharp ob-
jects e.g. glass fragments.
■ On freshly shampooed car-
pets, always wait until the
detergent is completely dry
before vacuuming.
Page 43

■ Never place the vacuum
cleaner directly next to a
heater or oven.
■ Never dry the hygiene fi lter
on a heater or with a hairdryer or tumble dryer. The
hygiene fi lter is porous and
can be damaged.
■ Never wash the fi lter in a
washing machine or dishwasher.
■ The fi lter must be air-dried
only.
■ Do not use any abrasive
cleaners (scouring or thinning agents) to clean the
appliance and accessories.
They could damage the
surface of the appliance.
Safety
Page GB-9
Page 44

Appliance partsPage GB-10
Appliance parts
(1)
(2)
(3)
(4)
(5)
(6)
(7)
(8)
(9)
(1)
Handle
(2)
Suction tube
(3)
Suction tube release button
(4)
Selector button for turbo
brush
(5)
Upper mains cord holder
(6)
On/Off button
(7)
Suction hose
(8)
Dust bin
(9)
Mains cord with mains
plug
(10)
Lower mains cord holder
(11)
3-in-1 tool
(12)
Floor nozzle with turbo
brush
(13)
Wheel
(10)
(11)
(12)
(13)
Page 45

Nozzles
The vacuum cleaner comes with
various nozzles designed for a
range of uses. Where required,
each nozzle can be attached to
the telescopic suction hose (7)
or the suction tube (2) before or
during vacuuming.
Floor nozzle/turbo brush
(12)
Appliance parts
Page GB-11
(4)
– For short-pile or smooth floors
such as needle felt, PVC, parquet or tiles:
Switch off the turbo brush:
Press selector button (4) until
the indicator light (14) goes
out.
(14)
The floor nozzle/turbo brush is
fixed. You will work with the floor
nozzle/turbo brush (12)most of
the time as it is deigned for large,
flat surfaces.
The rotating turbo brush is propelled by the vacuum air flow. It
is particularly suitable for vacuuming hair and thread from rugs
and carpeted floors.
Best vacuuming results are
achieved when you adapt the appliance to the floor surface using
the selector button (4).
– For long-pile rugs/carpets:
Switch on the turbo brush:
Press selector button (4) until
the indicator light (14) comes
on.
The selector button (4) can also
be readjusted during operation.
Parquet nozzle
(15)
The parquet nozzle end (15) of
the 3-in-1 tool (11) is suitable for
maintaining parquet and laminate
floors.
Page 46

Appliance partsPage GB-12
Furniture brush
(16)
You can dust books or fragile
items such as picture frames using the furniture brush end (16) of
the 3-in-1 tool (11).
Crevice nozzle
(18)
The crevice nozzle (18) of the
3-in-1 tool is suitable for vacuuming material folds, joints, corners and niches that cannot be
reached with the floor nozzle.
Page 47

Start-up
Start-up
Page GB-13
Unpacking the
appliance
NOTICE
Risk of damage!
Improper handling of the
appliance may result in damage.
■ Do not use sharp objects to
unpack it.
1. Unpack the appliance.
2. Carefully remove all parts of
the packaging, plastic profiles,
tape and foam padding.
Insert handle
(1)
Setting up the
appliance
All filters are pre-fitted in the factory, and your vacuum cleaner is
ready to use.
(2)
• Insert handle (1) with suction
tube (2) into the vacuum body.
It locks with a “click.”
Page 48

OperationPage GB-14
Operation
You can use the appliance if
– You have read the ‘Safety’
chapter and the safety information (see page GB-4).
– The appliance has been set up
as described in the ‘Start-up’
chapter (see page GB-13).
Vacuuming floors
WARNING
Risk of electric shock!
The appliance operates with
220–240 V~/50 Hz mains
voltage. Improper handling
of the appliance can lead to
serious injuries or to death.
■ Do not vacuum glowing
ash, burning cigarettes or
matches, sharp objects,
glass fragments, water or
other liquids. Glowing ash,
burning cigarettes, etc. set
the fi lter on fi re; moisture
can cause short circuits;
sharp objects damage the
fi lter and can cause short
circuits.
CAUTION
Health hazard!
Improper handling of the appliance may result in health
hazards.
■ Do not use the appliance if
the hygiene or motor protection fi lter is missing or
damaged. Otherwise vacuumed dust can penetrate
the appliance and escape
into the ambient air.
NOTICE
Risk of damage!
Vacuuming unsuitable materials blocks the fi lter and can
damage the appliance.
■ Never vacuum clay, plaster,
cement, masonry dust or
drilling dust.
(5)
1. Rotate the upper mains cord
holder (5) to release the mains
cord.
Page 49

2. Insert the mains plug (9) into a
properly installed socket.
(1)
(12)
3. Carefully press down on the
floor nozzle/turbo brush (12)
with your foot, and pull the
appliance handle (1) slightly
towards you.
Operation
In rare cases this can make
a whistling noise initially.
This is not a malfunction and
stops after a while.
Page GB-15
Finishing vacuuming
(6)
1. Press the On/Off button (6) to
switch off the appliance.
2. Pull the mains plug (9) out of
the socket.
(6)
4. Press the On/Off button (6) to
switch on the appliance.
5. To vacuum, push and pull the
nozzles across the
Rotate the handle (1) slightly to
reach corners better. This positions the nozzle diagonally.
surfac
e.
(5)
(10)
3. Rotate the upper mains cord
holder (5) back into the starting
Page 50

OperationPage GB-16
position, and wind the mains
cord around the upper (5) and
lower (10) mains cord holders.
(1)
4. Snap the vacuum body back
into the upright position.
Using the turbo brush
(4)
(14)
The indicator light (14) illuminates blue.
• To switch the turbo brush off,
press the selector button (4)
again. The indicator light (14)
goes out.
The turbo brush does not
switch off automatically
when the appliance is switched
off. To switch off the turbo brush
once you have finished vacuuming, snap the vacuum body back
into the upright position as described in Section „Finishing vacuuming“ on page GB-15.
• To use the turbo brush,
press the selector button (4).
Using the 3-in-1 tool
The 3-in-1 tool is used in conjunction with the suction hose (7).
Page 51

(7)
(20)
Operation
Page GB-17
(21)
1. Pull the suction hose (7) out
of the park holder (21) at the
hilt(20).
(23)
(24)
2. Remove the suction hose (7)
from the upper (23) and lower
suction hose holders (24).
(2)
(3)
3. Push the suction tube release
button (3), and pull the suction
tube (2) out.
(1)
(20)
(22)(2)
4. Insert the hilt (20) of the suction hose (7) into the handle (1) of the suction tube (2),
and let the bayonet (22) fitting
snap into place.
Page 52

OperationPage GB-18
(18) (2)
5. Attach the crevice nozzle (18)
and other components of the
3-in-1 tool, where required.
Moving the appliance
(26)
(25)
• To move the appliance over
short distances or stairs, lift the
appliance by the carrying handle (26) of the dust bin lid (25).
(19)
6. Rotate the toggle (19) anticlockwise to the position
“HOSE”.
7. Switch the appliance on, as
described in Section „Vacuuming floors“ on page GB-14.
8. If the 3-in-1 tool is no longer
required, rotate the toggle (19) back into the position
“FLOOR”.
(1)
(13)
• To move the appliance across
flat surfaces or longer distances, take it by the handle (1), tilt slightly and use the
wheels (13).
Page 53

Shutdown and storage
Shutdown and storage
Page GB-19
To secure the appliance, take the
following precautions:
• Pull the mains plug out of the
socket.
• Snap the vacuum body back
into the upright position, as
described in Section „Finishing
vacuuming“ on page GB-15.
(7)
(23)
(5)
(9)
(10)
(24)
• Wind the mains cord (9)around
the upper (5) and lower (10)
mains cord holders, and return
the upper (5)mains cord holder
to the starting position.
• Guide the suction hose (7)
around both the lower (24)
and upper (23) suction hose
holders, and insert the suction
hose hilt (20) into the park
holder (21).
Page 54

Care and maintenancePage GB-20
Care and maintenance
Emptying the dust bin
The vacuum cleaner operates
without dust bags. Instead the
vacuumed dirt is compressed
into the dust bin (8) by an air vortex. The air is purified by a washable coarse filter and a hygiene
filter in the dust bin, a motor protection filter below the dust bin
and an exhaust air filter.
WARNING
Risk of electric shock!
Improper handling of the
appliance can lead to serious
injuries or to death.
■ Before emptying the dust
bin, always pull the mains
plug out of the socket.
CAUTION
Health hazard!
Improper handling of the appliance may result in health
hazards.
■ Do not empty the dust bin
in enclosed spaces. Empty
the dust bin on a balcony,
or outdoors directly into
the waste bin.
1. Pull the mains plug (9) out of
the socket.
(27)
(26)
(25)
(8)
2. Push the release button (27)
on the handle (26) of the
dust bin lid (25), and remove
the dust bin (8) with dust bin
lid (25).
3. Hold the dust bin (8) over a
waste bin.
(28)
(29)
Page 55

Care and maintenance
Page GB-21
4. Release the locking mechanism (28), let the dust bin
base (29) fold downwards, and
empty the dust bin (8) into the
waste bin.
5. Push the dust bin base (29)
back up so the locking mechanism (28) engages.
6. Insert the dust bin (8) back into
the vacuum cleaner.
Cleaning/changing the
motor protection filter
WARNING
Risk of electric shock!
Improper handling of the
appliance can lead to serious
injuries or to death.
■ Always pull the mains plug
out of the socket prior to
changing or cleaning the
motor protection fi lter.
erwise the appliance may
not function optimally.
■ Never vacuum without
fi lters or with damaged fi lters. The vacuumed dust
would penetrate the appliance and damage the
motor.
■ Do not wash the fi lter in a
washing machine or a dishwasher.
1. Pull the mains plug (9) out of
the socket.
2. Push the release button (27)
on the handle (26) of the
dust bin lid (25), and remove
the dust bin (8) with dust bin
lid (25), as described in Section „Emptying the dust bin“ on
page GB-20.
(25)
NOTICE
Risk of damage!
Improper handling of the
appliance may result in damage.
■ Always use the correct fi l-
ter for the appliance, oth-
(30)
Page 56

Care and maintenancePage GB-22
3. Release the locking mechanism (30) on the dust bin
lid (25), and fold down the dust
bin lid (25).
(31)
4. Remove the motor protection
filter (31).
5. Wash the motor protection
filter (31) under running water.
Should the motor protection
filter be damaged or can no
longer be sufficiently cleaned,
it must be replaced with a new
one.
6. Let the motor protection filter (31) dry completely.
(31)
(25)
7. Insert the motor protection filter (31) back into the dust bin
lid (25).
8. Fold the dust bin lid (25) up
again so the locking mechanism (30) engages.
9. Reinsert the dust bin (8).
Cleaning the coarse
dust filter
1. Remove the dust bin (8) as
described in Section „Emptying the dust bin“ on page
GB-20, and remove the dust
bin lid (25) as described in
Section„Cleaning/changing the
motor protection filter“ on page
GB-21.
Page 57

(32)
Care and maintenance
5. Fold the dust bin lid (25) up
again so the locking mechanism (30) engages.
6. Reinsert the dust bin (8).
Page GB-23
Cleaning/washing
the hygiene filter and
exhaust air filter
WARNING
2. Remove the coarse dust filter (32).
3. Carefully tap residual dust
from the coarse dust filter (32)
over a waste bin.
(32)
(33)
4. Insert the coarse dust filter (32)
back into the dust bin (8). Observe the slots (33)!
Risk of electric shock!
Improper handling of the
appliance can lead to serious
injuries or to death.
■ Before changing or clean-
ing the hygiene fi lter and
the exhaust air fi lter, always pull the mains plug
out of the socket.
Page 58

Care and maintenancePage GB-24
NOTICE
Risk of damage!
Improper handling of the
appliance may result in damage.
■ Only use the appliance
with the fi lters installed.
■ Never dry hygiene fi lters on
a heater or with a hairdryer or tumble dryer, etc. It
is porous and can be damaged.
■ Never wash the hygiene fi l-
ter in a washing machine.
■ Only let the hygiene fi lter
air-dry.
If odours cannot be removed by
cleaning or the filter is too heavily
soiled, it must be replaced.
1. Pull the mains plug (9) out of
the socket.
(36)
(35)
(38)
(34)
(37)
2. Press down the locking mechanism (35) of the filter cover (34) and remove the filter
cover (34) along with the exhaust air filter (36).
3. Push the locking mechanism (38) of the hygiene filter (37), and lift the hygiene
filter (37) out.
4. Rinse the exhaust air filter (36)
with clean water and leave it to
dry out completely.
5. Only rinse the hygiene filter (37) with clean water, tap
it out and/or clean it with compressed air. Never use detergent or washing-up liquid to
clean the hygiene filter.
6. Let the hygiene filter dry out
completely.
Page 59

Care and maintenance
Page GB-25
7. Reinsert the hygiene filter and
the filter cover.
The article numbers for
re-ordering inlet and hy-
giene filters are provided in
Chapter „Service“ on page
GB-30.
Cleaning the appliance
WARNING
Risk of electric shock!
Improper handling of the
appliance can lead to serious
injuries or to death.
■ Before cleaning the appli-
ance, pull the mains plug
out of the socket.
■ Please ensure that no wa-
ter seeps into the appliance.
■ Never immerse the appli-
ance in water.
■ Only insert the mains plug
into the socket if all appli-
ance components are completely dry.
NOTICE
Risk of damage!
Improper cleaning of the
appliance can impair the
surface.
■ Do not use any abrasive
cleaners (scouring or thinning agents) to clean the
appliance.
• Wipe
– the housing,
– the dust bin (8),
– the inside of the filter cover
– the accessories
with a damp cloth as required.
Never allow liquid to penetrate
the vacuum cleaner.
• Occasionally clean the filter
cover (34) with a soft brush.
Cleaning the floor
nozzle
• Occasionally vacuum the underside of the floor nozzle (12)
with the crevice nozzle (18).
Page 60

Care and maintenancePage GB-26
Cleaning the turbo
brush
CAUTION
Risk of injury!
Improper handling of the appliance may result in injury.
■ Never touch moving parts
of the appliance and accessories, for example, turbo
brushes. There is a risk of
fi ngers becoming trapped.
If the turbo brush is no longer
working properly:
1. Pull out the mains plug (3).
(39)
Replacing the brush
drive belt
(41)
(41)
1. Loosen the 5 screws (41) with
a cross-slotted screwdriver.
(42)
(40)
2. Remove lint and hair from the
brushes (39) and from the air
blade wheel (40).
(40)
2. Lift off the protective cover (42)
of the air blade wheel (40).
Page 61

Care and maintenance
Page GB-27
(40)
3. Lift the air blade wheel (40)
from the turbo brush housing.
(43)
(44)
(40)
(43)
5. Reinsert the air blade
wheel (40) into the turbo brush
housing, ensuring that the
drive belt (43) is guided over
the drive roller (45) on the air
blade wheel.
6. Replace the protective cover (42) with the help of the 5
screws and the cross-slotted
screwdriver.
(45)
4. Fit the new drive belt (43) on
the drive roller (44) in the turbo
brush housing.
Page 62

Troubleshooting tablePage GB-28
Troubleshooting table
Malfunctions can occur in all electrical appliances. This does not
necessarily mean there is a defect in the appliance. For this reason,
please check the tables to see if you can correct the malfunction.
WARNING
Risk of electric shock in case of improper repair!
Never try to repair a defective or suspected defective appliance yourself. You can put your own and future users’ lives in
danger. Only authorised specialists are allowed to carry out
this repair work.
Problem Possible cause Solutions, tips
Appliance is not
working.
On/Off foot switch
was not actuated.
Mains plug is
loose.
The socket is defective.
Mains cord is defective.
Actuate On/Off foot switch.
Check that the mains plug is firmly
inserted into the socket.
Test the appliance with another
socket.
Check fuses and/or circuit breakers.
Check mains cord for damage.
Contact our Service Centre, where
necessary (see „Service“ auf Seite
GB-30).
Page 63

Troubleshooting table
Problem Possible cause Solutions, tips
Page GB-29
Appliance
switches itself
off.
Brush/nozzle
blocked.
Motor protection
filter blocked. Overheat protection was
activated.
Suction tube/suction hose blocked.
Object is blocking
the nozzle.
Filters are incorrectly inserted or
contaminated.
Actuate On/Off foot switch, pull out
mains plug, clean brush/nozzle.
Actuate On/Off foot switch, pull
out mains plug, leave appliance to
cool for at least 1/2 hour and clean
motor protection filter.
Actuate On/Off foot switch, pull out
mains plug, check telescopic tube
and suction hose for blockage,
and clean if necessary.
Actuate On/Off foot switch, pull out
mains plug, check telescopic tube
and suction hose for blockage.
Remove object.
Insert filters correctly and/or clean.
In rare cases this can make a whistling noise initially. This is not
a malfunction and stops after a while.
Page 64

ServicePage GB-30
Service
In order for us to help you quickly, please tell us:
Name of appliance Model Order number
Vacuum Cleaner
Accessories Order num-
ber
1× inlet filter 7462 4117
hygiene filter 9307 9911
1×
Advice, order and
complaint
Please contact your mail order
company’s customer service
centre if
– the delivery is incomplete,
– the appliance is damaged dur-
ing transport,
– you have questions about your
appliance,
– a malfunction cannot be recti-
fied using the troubleshooting
table,
– you would like to order further
accessories.
VUS30ASS50A
8757 8500
Spare parts
Customers in Germany
– Please contact the company
Hermes Fulfilment GmbH:
Tel. (057 32) 99 66 00 Monday–Thursday 8.00 a.m.–
3.00 p.m., Friday 8.00 a.m.–
2.00 p.m.
Customers in Austria
– Please contact your mail order
company’s customer service
centre or product advice centre.
Please note:
You are responsible for the condition of the appliance and its
proper use in the household.
Damage resulting from non-compliance with this manual unfortunately cannot be recognised.
Page 65

Environmental protection
Environmental protection
Page GB-31
Disposing of old
electrical devices in an
environmentally-friendly
manner
Electrical appliances
contain harmful substances as well as valua-
ble resources.
Every consumer is therefore required by law to dispose of old
electrical appliances at an authorised collection or return point.
They will thus be made available
for environmentally-sound, resource-saving recycling.
You can dispose of old electrical
appliances free of charge at your
local recycling centre.
Please contact your dealer directly for more information about
this topic.
Packaging
Our packaging is made
from environmentally
friendly, recyclable ma-
terials:
– Outer packaging made of
cardboard
– Moulded parts made of
foamed, CFC-free polystyrene
(PS)
– Films and bags made of poly-
ethylene (PE)
– Straps made of polypropylene
.
(PP)
If you have sufficient space, we
recommend keeping the packaging, at least during the warranty
period. If the appliance has to be
sent in for repair or brought to
one of the repair service points,
the appliance will only be adequately protected in the original
packaging.
Dispose of the packaging responsibly.
Page 66

Technical dataPage GB-32
Technical data
Manufacturer
Name of appliance Vacuum Cleaner
Model VUS30ASS50A
Sound power level in dB(A) 77
Output in W 700
Supply voltage in V~ / 50/60 Hz
Protection class II
Weight (assembled) in kg, ca. 7
Order number 8757 8500
Notice: The vacuum cleaner was tested as a universal vacuum cleaner.
220–240
Page 67

Page 68

 Loading...