

Page 1
Instruction Manual
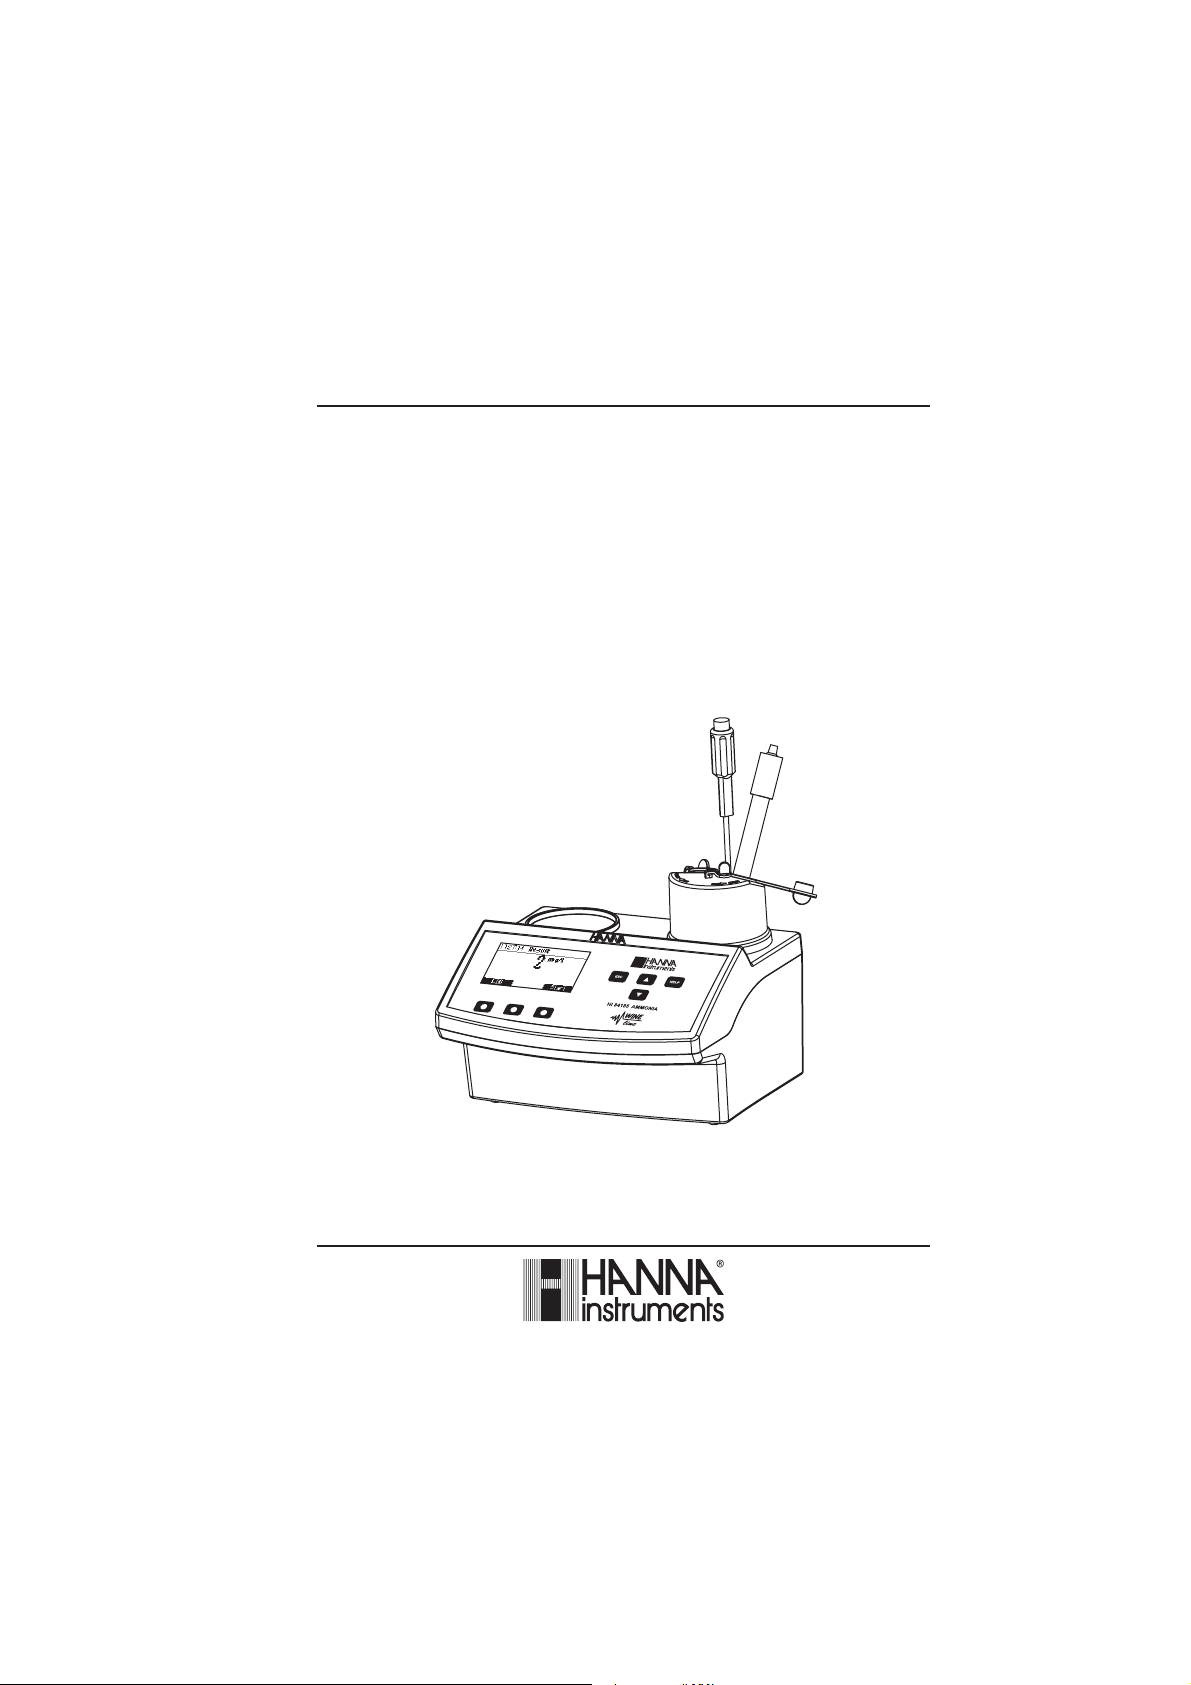
HI 84185
ISE Ammonia Nitrogen
Meter
www.hannainst.com
1
Page 2

Dear Customer,
Thank you for choosing a Hanna product. This manual will provide you with the necessary
information for the correct use of the instrument. Please read it carefully before using the meter.
If you need additional technical information, do not hesitate to e-mail us at tech@hannainst.com.
This instrument is in compliance with
directives.
TABLE OF CONTENTS
PRELIMINARY EXAMINATION................................................................................................. 3
GENERAL DESCRIPTION ........................................................................................................ 4
SPECIFICATIONS................................................................................................................... 5
PRINCIPLE OF OPERATION .................................................................................................... 6
FUNCTIONAL DESCRIPTION................................................................................................... 7
START UP ............................................................................................................................ 8
GUIDE TO DISPLAY CODES ..................................................................................................... 9
TIPS FOR AN ACCURATE MEASUREMENT ............................................................................. 16
MEASUREMENT PROCEDURE .............................................................................................. 16
FUSE REPLACEMENT .......................................................................................................... 18
ELECTRODE CONDITIONING AND MAINTENANCE .................................................................. 18
ACCESSORIES .....................................................................................................................22
WARRANTY........................................................................................................................23
MODEL IDENTIFICATION
Two models are available:
HI 84185-01 - 115 Vac power supply
HI 84185-02 - 230 Vac power supply
WARRA (NTY
All rights are reserved. Reproduction in whole or in part is prohibited without the written consent of the
copyright owner, Hanna Instruments Inc., Woonsocket, Rhode Island, 02895 , USA.
2
Page 3

PRELIMINARY EXAMINATION
Please examine this product carefully. Make sure that the instrument is not damaged. If any
damage occurred during shipment, please notify your Dealer.
Each HI 84185 instrument is supplied complete with:
• Reagents set for 20 tests
• One 1000 µL automatic pipette
• Six plastic tips for the 1000 µL automatic pipette
• Two 50 mL beakers
• HI 61101 Ammonia electrode
• HI 7662-T Temperature probe
• Stir bar (2 pcs.)
• Power cable
• HI 4001-40 Refilling solution (4×30 mL)
• HI 4001-51 Replacement membrane (10 pcs.)
• One HI 4000-47-4 and one HI 4000-47-7 pH 4 & 7 powder packets
• One 1 mL syringe
• One 1 mL pipette
• Instruction sheet
• Instruction manual
• One pair of tweezers
Note:Save all packing material until you are sure that the instrument works correctly.
Any defective item must be returned in its original packing.
3
Page 4

GENERAL DESCRIPTION
The HI 84185 is a low cost, easy to use, ammonia nitrogen (N-NH
) ISE instrument that performs
3
automatic analysis with all the necessary calculations assuring to the user a simple and effective
interface.
The instrument comes with a powerful and effective built-in algorithm to analyse the shape of the ISE
electrode response and to determine the reaction completion.
By simply pressing the Start key, the instrument performs automatic analysis, all the necessary
calculations and verifications. The result is immediately displayed in convenient units, then the
instrument is ready for another measurement.
SIGNIFICANCE OF USE
The nitrogenous compounds of must and wine are deriving from grapes and play important role in
fermentation, clarification, and potential microbial instability of wines. They are profoundly modified
during the alcoholic fermentation by the physiologic activity of yeast. Thus, yeast assimilates
60-70% of the must nitrogen, ammonium ion completely disappearing during the fermentation
and the total nitrogen being slightly reduced.
Ammonia is present in grapes as ammonium ion in a few milligrams amount and it serves as the
primary form of available nitrogen for yeast metabolism. So, the content of ammonium ion can
drastically decrease during the alcoholic fermentation, increasing again, especially in red wines, at the
end of the malolactic fermentation because the lactic bacteria release ammonia nitrogen in wine.
The amount of ammonium ion in must influences the rapidity of fermentation start and evolution.
The ammonia concentration ranges from 24 to 209 mg/L (ppm) in grapes and from a few mg/L
(ppm) to about 50 mg/L (ppm) in wine.
The HI 84185 ISE Ammonia Nitrogen meter measures the ammonia nitrogen (N-NH
) content in
3
wine using an ion selective electrode. The used method is double standard addition, a simple and
rapid method of analysis, and the result is readily displayed in ammonia nitrogen (N-NH3) mg/L
(ppm).
4
Page 5

SPECIFICATIONS
Range 0 to 50 mg/L (ppm) N-NH
Resolution 1 mg/L (ppm) N-NH
3
3
Accuracy ±5% of reading
Sample volume 50 mL
Temperature Compensation Automatic from 0 to 80 °C
Electrode HI 61101 Ammonia combined ISE
Temperature Probe HI 7662-T (included)
LOG feature 50 samples
Stirring speed 500 rpm
Environment 0 to 50 °C (32 to 122 °F); max 95% RH non-condensing
Power supply 220V/50Hz; 10VA
Dimensions 208 x 214 x 163 mm (8.2 x 8.4 x 6.4") (with beaker)
Weight 2200 g (77.6 oz.)
REQUIRED REAGENTS
Code Description Quantity/Test
HI 84185-0 ISA alkaline reagent 1 mL
HI 84185-1 Standard 1 1 mL
HI 84185-2 Standard 2 1 mL
5
Page 6

PRINCIPLE OF OPERATION
The determination of ammonia nitrogen concentration is made according to double standard addition
method. This technique enables an unknown concentration and the electrode’s slope factor to be
determined simultaneously.
The Automatic Temperature compensation is available using HI 7662-T temperature probe. By
setting the electrode isopotential point and enabling temperature compensation option in Setup
menu, the obtained concentration is temperature compensated.
The accuracy of the obtained result depends on the stability of the mV reading in every step of the
measurement.
Three selectable stability criteria can be selected in Setup menu. Select Medium or Accurate
criteria in order to have accurate analysis.
6
Page 7
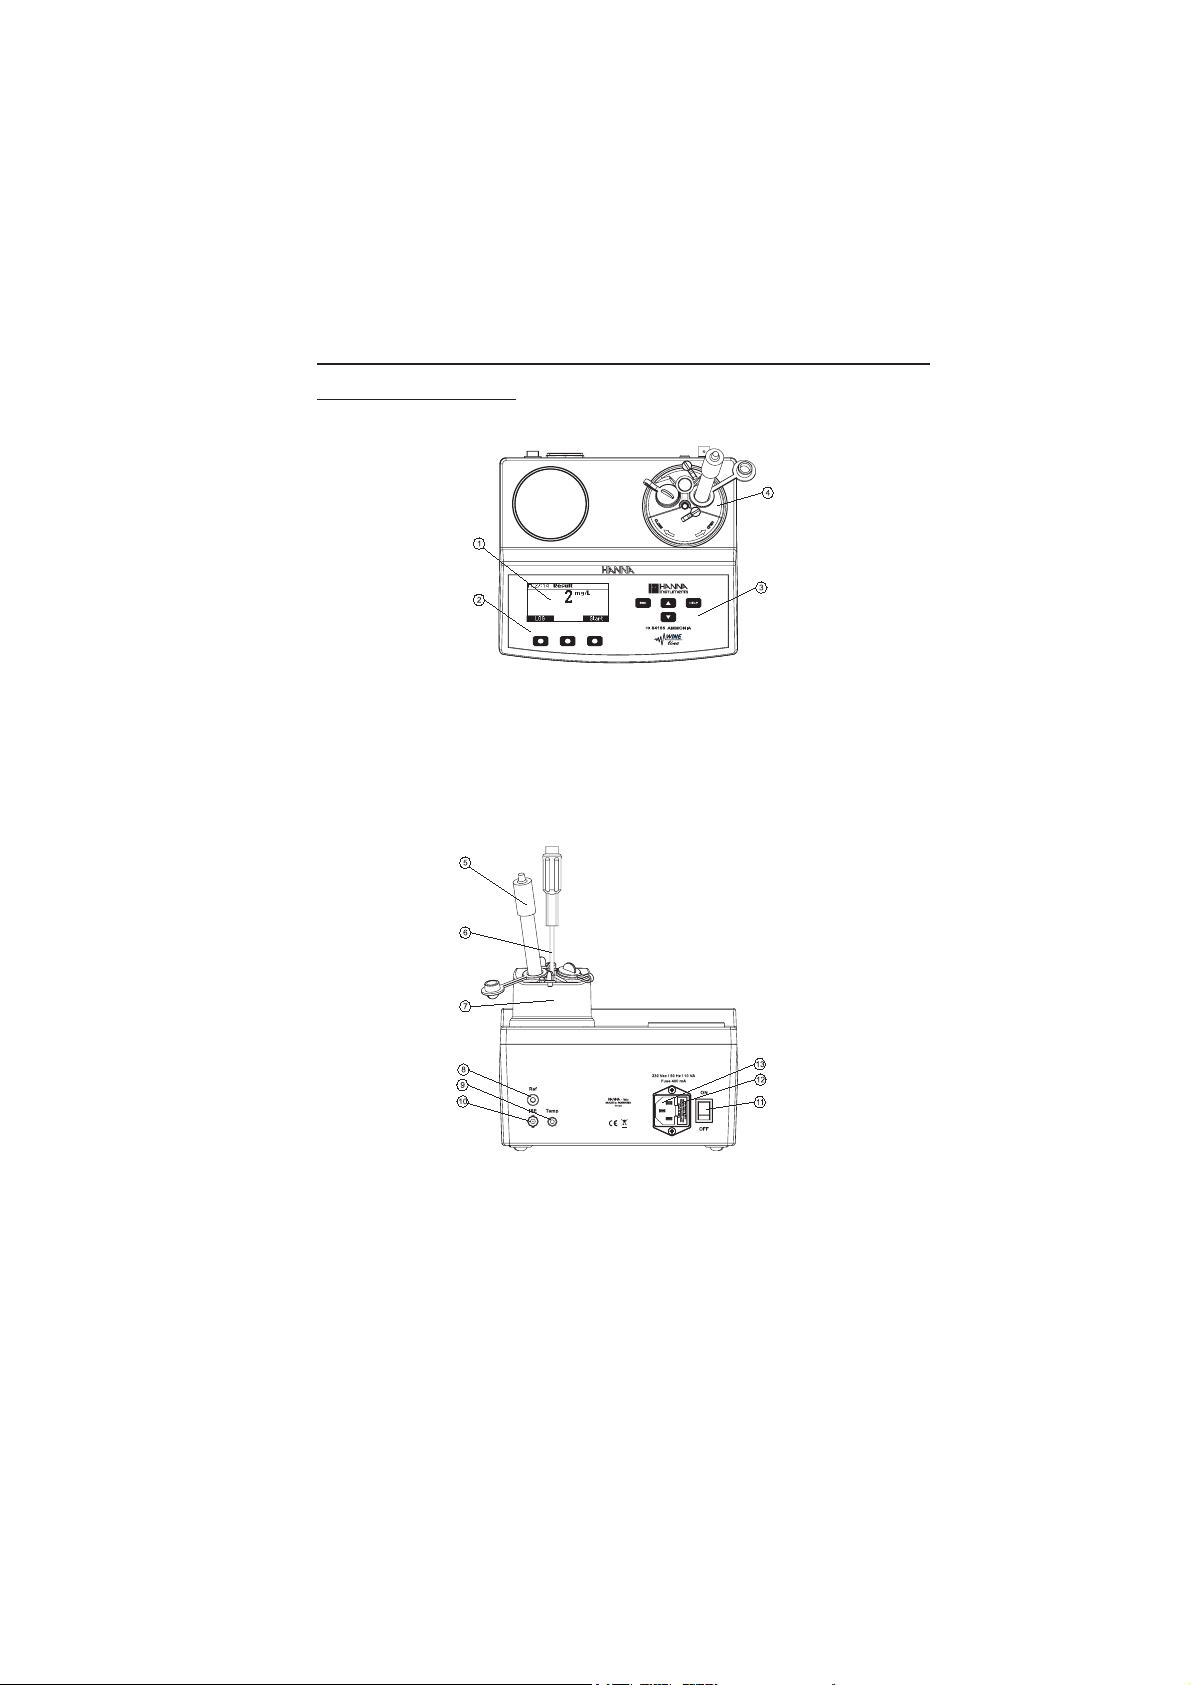
FUNCTIONAL DESCRIPTION
INSTRUMENT DESCRIPTION
FRONT PANEL
1) Graphic LCD
2) Functional keys
3) Keypad
4) Electrode holder
REAR PANEL
5) Ammonia electrode 10) BNC electrode connector
6) Temperature probe 11) Power switch
7) Electrode holder 12) Fuse
8) Reference socket 13) Power cable connector
9) Temperature probe socket
7
Page 8
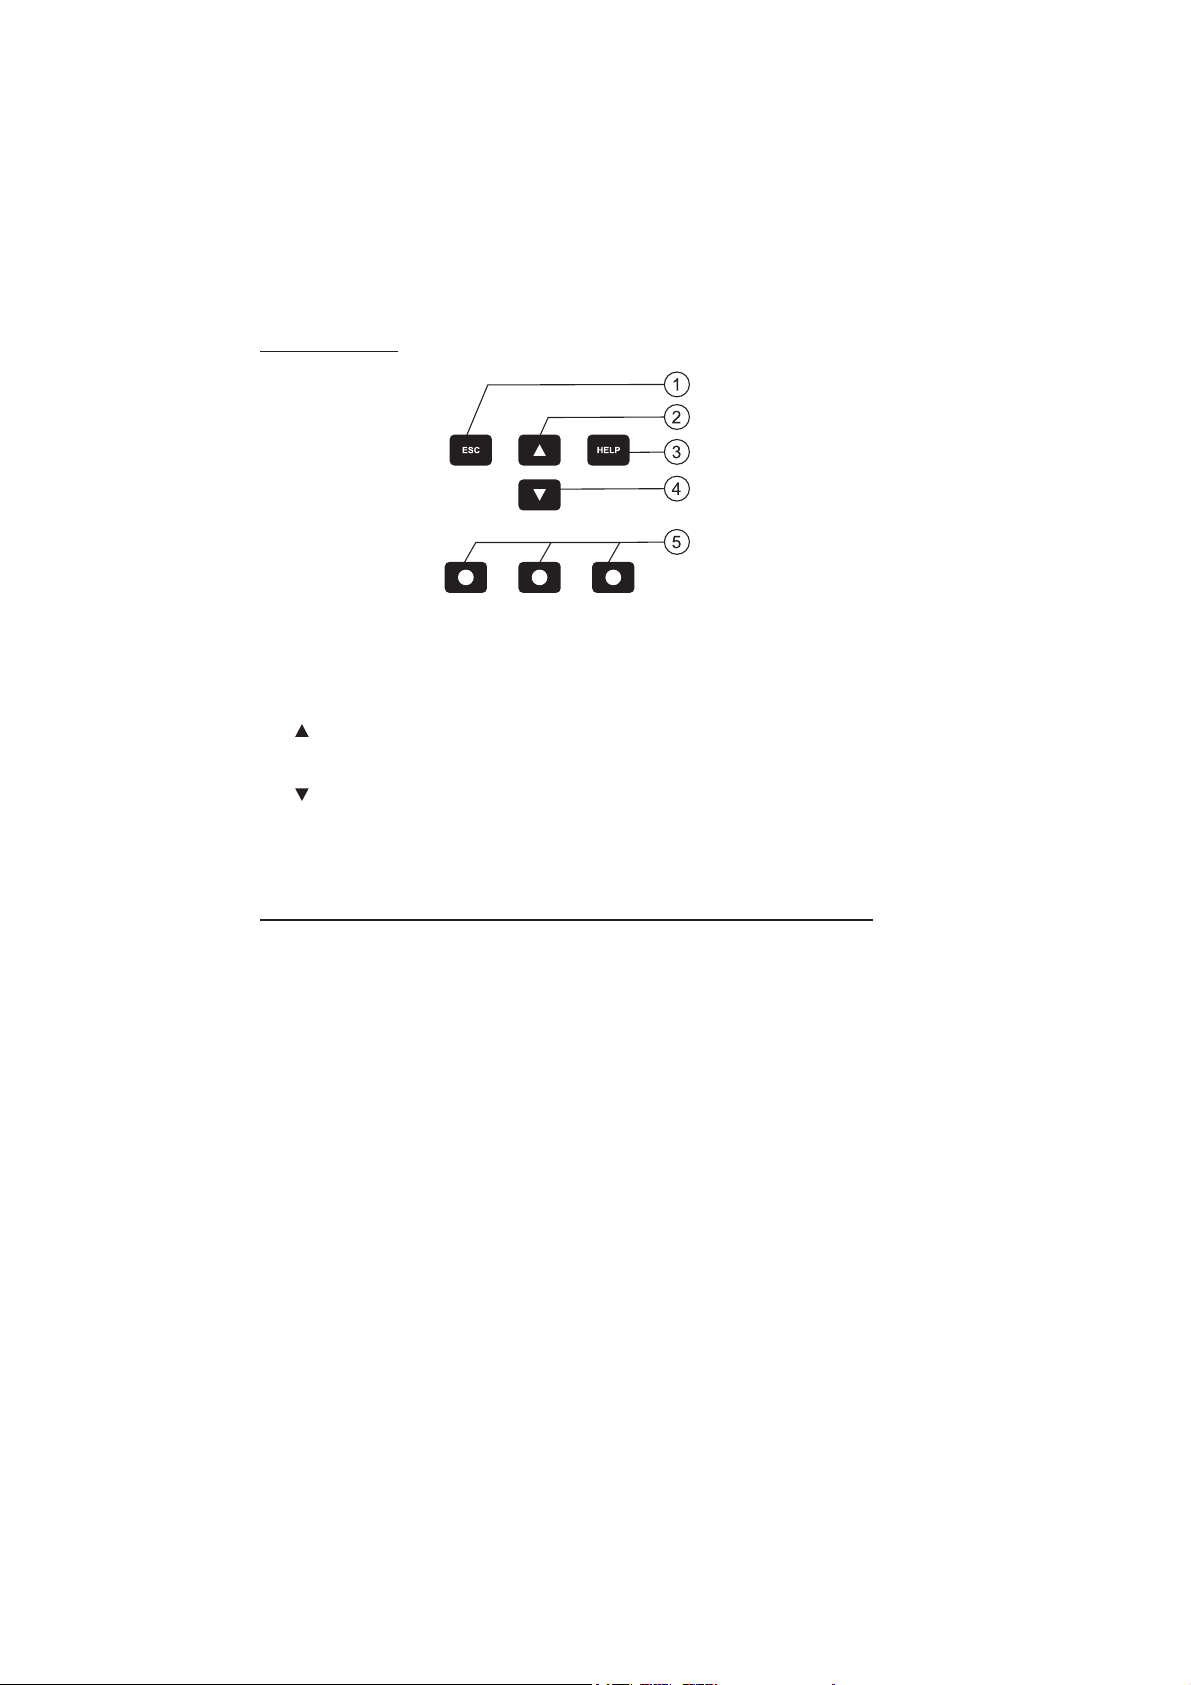
KEYPAD DESCRIPTION
1) ESC - to leave the current screen and to return either to the previous screen or to the
main screen. In the setup parameter modifying mode by pressing ESC the value is
not modified.
2)
3) HELP - to access/leave the instrument’s contextual help
4)
5) Functional Keys
- to modify a parameter value, to scroll the information from the instrument’s setup
- to modify a parameter value, to scroll the information from the instrument’s setup
START UP
• Place the instrument on a flat table. Do not place the instrument in direct sunlight.
• Connect the instrument to mains socket with ground connection and the correct voltage and
frequency. See the label on the instrument rear for this.
• Connect the HI 61101 ammonia electrode and the HI 7662-T temperature probe.
• Turn the instrument ON using the power switch from the rear panel of the instrument and
wait until main screen is displayed.
8
Page 9

GUIDE TO DISPLAY CODES
During the instrument’s operation a series of informations are displayed on the LCD.
1) current time information area
2) instrument status area
3) functional keys area
4) stability criteria
5) stirrer and reading status area
Icons from the stirrer and reading status area
When the input reading is unstable.
When the stirrer is on.
Temperature warning (only if the “Temperature compensation” is disabled). The
warning symbol will be displayed if the temperature difference between the temperature of
the sample confirmed at the first step and the subsequent readings is greater than 3 °C.
Measure screens
Main screen display
Press Setup to acces the instrument’s setup.
Press RCL to view logged data.
Press Start to begin a new measurement cycle.
Press HELP at any moment to view the contextual help.
Conditioning screen
A two minutes conditioning period is initiated.
Press Continue to stop this conditioning period and skip the
message.
Measure screen
Press ESC at any moment during the measurement cycle and
the instrument will return to the main screen.
Press Pause to pause the measurement process.
Press Stir to start/stop the stirrer.
9
Page 10

If the difference between the temperature of the sample
confirmed at the first step and the subsequent readings is
greater than 3°C and the temperature compensation feature is
disabled in Setup, the temperature warning icon will blink
and the message “WARNING: Large temperature change!”
will be displayed.
Pause screen
Press Resume to continue the measurement process.
Press Stir to start/stop the stirrer.
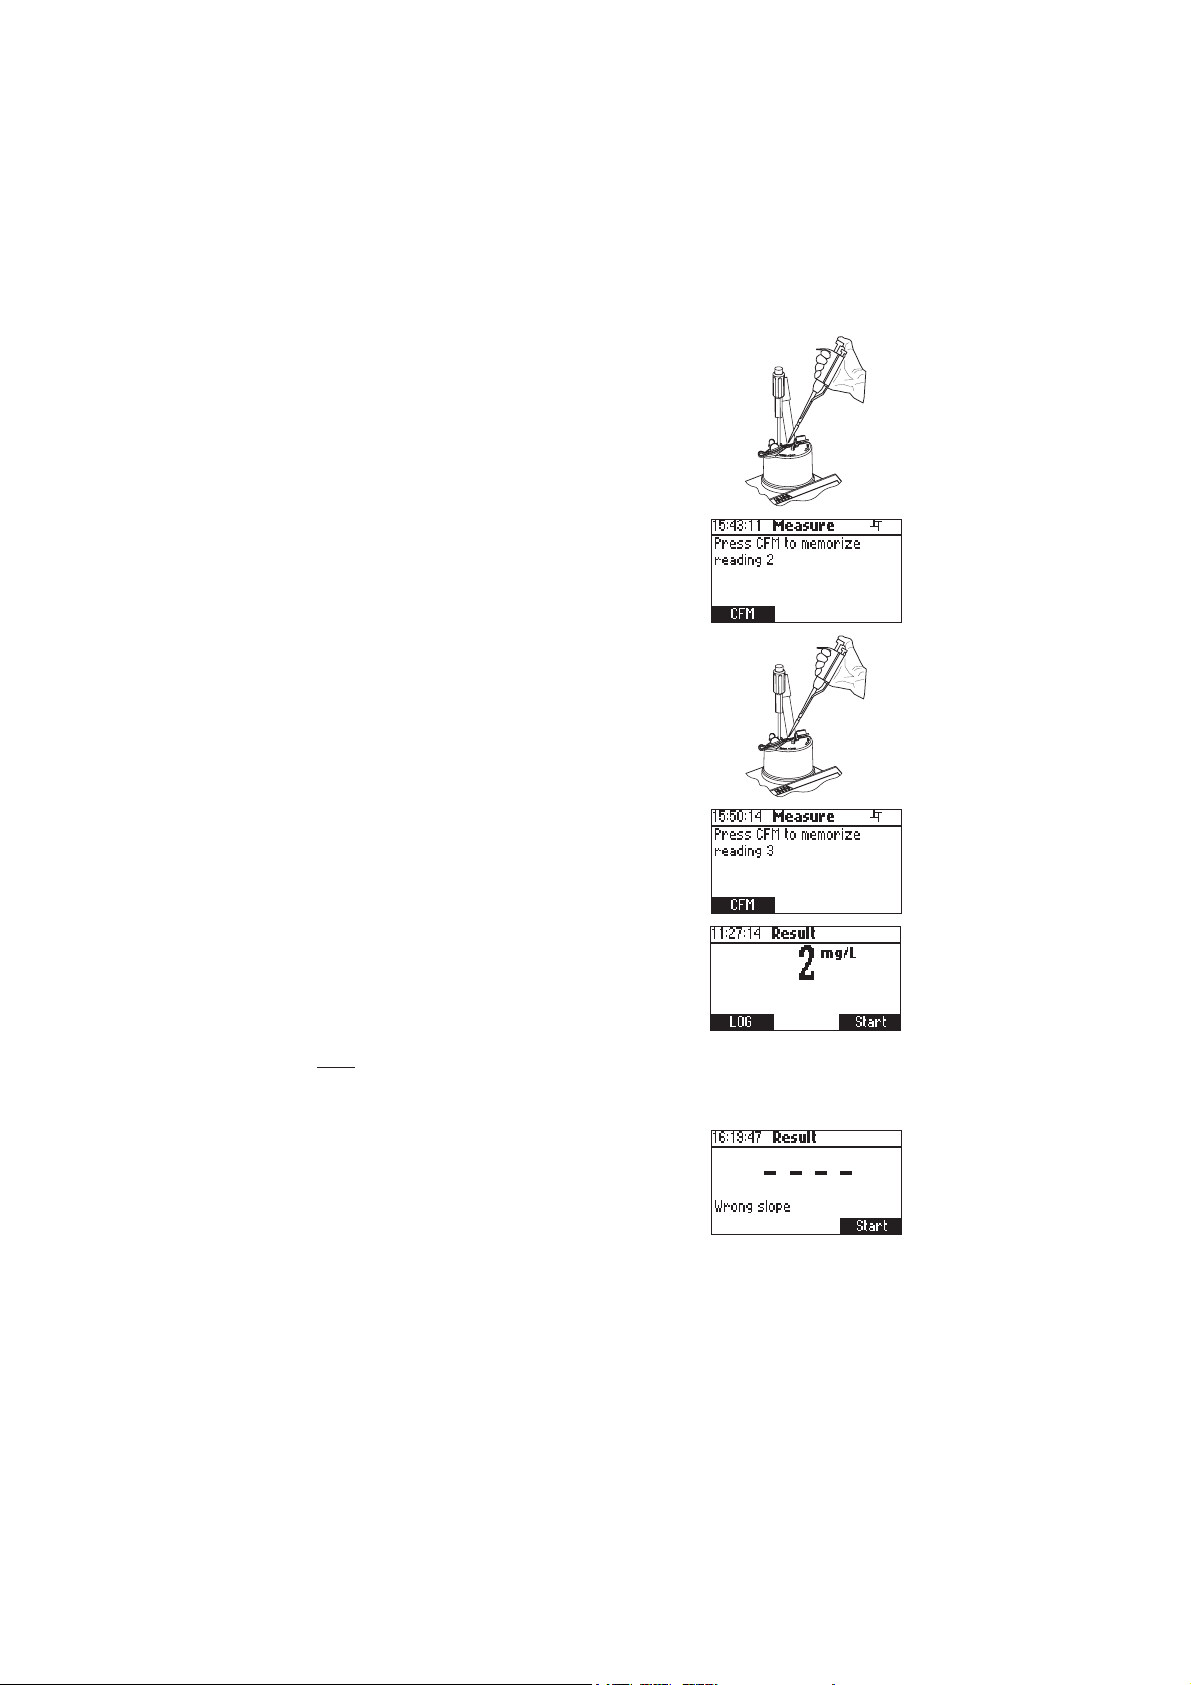
Sample reading confirm screen (only if this feature is enabled
in setup)
Press CFM to memorize the reading.
Wrong input error screen
This screen is displayed if the current reading is out of
±2000mV range.
Wrong standard error screen
This screen is displayed if step 2 and 3 of the current reading is
out of ±2000mV range or if the difference between the stable
readings from the current and the previous step is to small
(±3mV) or, if in auto confirm mode, the standard addition is
not detected.
Add standard screen
Add the corresponding standard. Press Read to start the next
step analysis if “Reading confirm” option is enabled in the
Setup menu. If “Reading confirm” option is disabled, the
instrument will start with the next step analysis.
10
Page 11

Result screen
The ion concentration is displayed in mg/L (ppm) N-NH
. If the
3
concentration is out of range, the instrument displays the upper
range limit blinking.
Press LOG to save the measured concentration. A message
indicating the free log space will be displayed for a few seconds.
If the free log space is under 10% this message will be
permanently displayed.
Press Start to begin a new measurement cycle.
Wrong slope screen
This screen appears if the computed slope is not in the
acceptable range. The acceptable range is 30% to 140%
default slope (-56mV/decade).
Press Start to begin a new measurement cycle.
Setup screens
While in the Setup menu it is possible to modify the instrument’s parameters. By pressing the
/ keys it is possible to move between the Setup options. Each menu item displays the
current option. Press HELP to view the contextual help.
Stability criteria
Options: Accurate, Medium, Fast.
Press the corresponding functional key to select the desired option.
Select Accurate for accurate measurements; long duration.
Select Medium for normal measurements.
Select Fast only for quick estimations; low accuracy in short time.
Temperature compensation
Options: Enable, Disable
Enable this feature only if HI 7662-T temperature probe is
connected and electrode isopotential point is known.
If enabled, the meter will take into account the temperature
of the readings when evaluating the final result.
If disabled, the computed concentration will not be temperature
compensated.
Press the functional key to select the desired option.
11
Page 12

Isopotential point
Options: 1.0 to 50.0 mg/L (ppm).
Press Modify to access the isopotential point concentration
modify screen.
Press
/ to increase/decrease the isopotential point
concentration.
Press Accept to confirm the value or ESC to return to the
Setup menu without saving.
If the temperature compensation feature is disabled the
meter will display “None” for the isopotential point, and the
isopotential point modify screen cannot be accessed.
Concentration unit
Options: mg/L, ppm.
Press the corresponding functional key to select the desired
concentration unit to be used in displaying measurements results.
Backlight
Options: On-Off, 1 to 8 levels.
Press Modify to access the backlight modify screen.
/
Press
or / in order to increase/decrease the display’s
backlight intensity.
Press Accept to confirm the value or ESC to return to the
Setup menu without saving.
Contrast
Options: 0 to 20.
Press Modify to access the contrast value modify screen.
/
Press
or /
in order to increase/decrease the
display’s contrast.
Press Accept to confirm the value or ESC to return to Setup
menu without saving.
12
Page 13

Date/Time
This option is used to set the instrument’s date and time.
Press Modify to access the date/time modify screen.
Date/Time modify screen
/
Press
to select the value to be modified (year, month,
day, hour, minute or second) and then press / in order to
increase/decrease the value.
Press Accept to confirm the new values or ESC to return to
Setup menu without saving.
Time format
Options: AM/PM or 24 hours.
Press the functional key in order to change the time format.
Date format
Press Modify to access the date format modify screen.
Press / or in order to select the desired date format.
Press Accept to confirm the value or ESC to return to the
Setup menu without saving.
Language
Options: Up to four languages
This option is used to change the instrument’s display language.
Press the corresponding functional key in order to select the
new option. If the new selected language cannot be loaded,
the previously selected language will be kept.
The HELP
information is not available if no language file can be loaded.
13
Page 14

Beep status
Options: Enable, Disable
This option enables/disables the beep feature.
Press the functional key in order to select the new option.
When enabled, beep sounds as a short beep every time a key
is pressed or when the reading must be confirmed.
In auto confirm mode the instrument will beep until the
standard addition is detected.
A long beep alerts that the pressed key is not active.
Reading confirm
Option: Enable, Disable
Enable this feature to manually confirm a stable reading. If
disabled, the instrument will automatically store a reading
when it becomes stable, and move to the next step of the
measurement cycle.
Press the functional key in order to select the new option.
Meter information
Press Select to view the firmware version, language version,
mV factory calibration date and time and temperature factory
calibration date and time.
14
Page 15

Recall screens
Displays the list of all the memorized results. This list
includes the record’s number, the concentration value, the
concentration unit and the date.
Press
/ to toggle between the stored records.
Press More to view a complete set of data corresponding to the
selected record. To return to the previous screen press ESC.
/ to toggle between complete record information
Press
screens.
Press Delete to erase the currently selected record from the
instrument’s memory. After pressing Delete the instrument
will ask for confirmation. Press CFM to delete the record or
ESC to return to the previous screen without deleting.
Deleting a record will reorganize the list of records.
Press Delete All to erase all the stored records. After pressing
Delete All the instrument will ask for confirmation. Press
CFM to delete all the records or ESC to return to the previous
screen without deleting.
If the log is empty the message “No Records!” will be
displayed.
15
Page 16

TIPS FOR AN ACCURATE MEASUREMENT
The instructions listed bellow should be carefully followed during analysis to ensure best accuracy.
• Rinse the electrode with distilled or deionized water between samples, and blot dry taking
care not to touch de membrane.
• Select the adequate stability criteria.
• Analyse the wine sample at room temperature.
MEASUREMENT PROCEDURE
• Fill the beaker up to the 50 mL mark with sample,
place the stir bar into the beaker and then place the
beaker in the appropriate place on the instrument top.
• Place the electrode holder on the top of the beaker
and secure it by turning clockwise. Close all unused
holes of the beaker holder.
• Immerse HI 61101 ammonia electrode and the
HI 7662-T temperature probe approximately 2 cm
(0.8“) into the sample to be tested paying attention
to not touch the stir bar, and press Start.
• Use the 1000 µL automatic pipette to add exactly 1 mL
HI 84185-0 ISA and immediately close the stopper.
• Wait until the reading is stable, CFM key displayed, if
the “Reading confirm” option is selected, and then
press CFM. If the “Reading confirm” option is
disabled the instrument automatically memorizes the
reading when this is stable and waits to add standard.
Until the standard addition is detected the instrument
will beep if beeper is enabled in Setup.
16
Page 17
• Use the 1000 µL automatic pipette to add exactly
1 mL of HI 84185-1 Standard and immediatly close
the stopper.
• Wait until the reading is stable, CFM key displayed, if
the “Reading confirm” option is selected, and then
press CFM. If the “Reading confirm” option is
disabled the instrument automatically memorizes the
reading when this is stable and waits to add standard.
Until the standard addition is detected the instrument
will beep if beeper is enabled in Setup.
• Use the 1000 µL automatic pipette to add exactly
1 mL of HI 84185-2 Standard and immediatly close
the stopper.
• Wait until the reading is stable, CFM key displayed, if
the “Reading confirm” option is selected, and then
press CFM. If the “Reading confirm” option is
disabled the instrument automatically memorizes the
reading when this is stable and computes result.
• At the end of the measurement procedure the result is
displayed as mg/L (ppm) N-NH
.
3
Notes:
• If the reading is out of range, the upper range value is
displayed blinking.
• If the evaluated slope is out of 30-140 % range the
instrument displays “- - - -” and “Wrong slope” message.
• If auto confirm mode is selected and beep feature is
enabled, the instrument will beep after reading is
confirmed until the addition of the standard is detected.
If the adding of the standard is not detected after a
period of time between 10 to 20 minutes, in according
with the stability criteria, “Wrong standard” message
will be displayed.
17
Page 18

FUSE REPLACEMENT
To change the fuse follow next steps:
• Disconnect the power cord from the rear panel of the
instrument.
• Pull out the fuse holder located near the power cord
connector.
• Replace the fuse with a similar one.
• Push the fuse holder with the fuse in the appropriate
place.
ELECTRODE CONDITIONING & MAINTENANCE
18
Page 19

INNER ELECTRODE CHECK
• Before assembling the electrode for the first time or reactivating it after storage, the inner
electrode assembly should be hydrated then tested as a pH electrode.
• Take two beakers and pour 50 mL de-ionized water in each of them.
• Add one powder packet of HI 4000-47-4 pH 4 in one of the beakers.
• Add one powder packet of HI 4000-47-7 pH 7 in the other beaker.
• Remove the protective shipping cap from the glass inner electrode. Handle the sensor by the
black cap, and use with care to prevent breaking the glass.
• Or unscrew the upper cap on the top of the electrode and carefully withdraw the internal glass
assembly. Do not touch the sensing portion with your fingers.
• If the sensor has been stored/shipped dry, it should be “conditioned” by soaking the pH glass
in a small sample of one of the buffers, prepared above, for 1 hour or longer. Immerse the
glass tip in small sample of the buffer while supporting the upper portion in an electrode
holder. Take care that the glass is fragile.
• Connect the BNC connector on the cable assembly to a pH/mV (ORP mode) meter. Carefully
immerse the sensor tip into the buffer. Record the mV in each solution once the values have
stopped changing. Pay attention to minus sign if it is present.
• Rinse tip in deionized water and blot dry between buffers.
• Calculate the difference in mV between the two solutions.
• The ideal difference is 175 mV. Values greater than 180 mV are acceptable (90% efficiency).
PREPARATION PROCEDURE
• Hold the probe vertically, unscrew the top cap and remove the glass electrode inner body from
the electrode outer body.
• Perform the inner electrode check.
• Unscrew membrane cap from outer body and install membrane using tweezers. Avoid touching
working area of membrane with your fingers as skin oil will change the hydrophobic
properties of the membrane. Discard paper backing between membranes. Drape membrane
over lower opening of outer body and hold one corner against the threads. Smooth excess
membrane material around the threads.
• Screw outer membrane cap onto body thus capturing the membrane between the cap and outer
body thread.
• Add 2 mL of Ammonia internal electrolyte HI 4001-40 into outer probe body.
• Insert and position the internal glass part into the outer body so that the anti-rotation key sits
in the cutout on the outer probe body.
19
Page 20

• Slide electrode cap and spring down cable and screw top cap onto outer body until fully
engaged. Afterwards, unscrew top cap two times. Do not invert electrode. Keep the membrane
side down.
• Gently pull spring loaded cable back and slowly release to allow filling solution to migrate
between membrane and glass electrode inner body. Screw top cap onto outer body until fully
engaged.
• Install assembled electrode in gas sensor test vessel or in electrode holder and connect cable
connector to the meter.
SAMPLE HANDLING
• Keep samples stored in tightly converted bottles to prevent ammonia loss or ammonia
contamination from other sources.
• Alkaline samples must be measured at once or acidified for storage. (HCl may be added to
bring pH to 6).
• Acidic samples such as wine or juice may require additional ISA quantity because the pH of
the sample should be arround 11 for measurement.
• Measure samples and standards quickly after adding ISA because ammonia gas will escape
from the solution.
• For solution containing oil, sluge and waste samples (which may contain surfactants), digest
sample first using a total Kjeldahl nitrogen (TKN) procedure.
• For samples found to penetrate or “wet” the membrane. Measurements may be made above
the sample in a small headspace of a closed system (flask). The system should be saturated
with water vapor, the membrane tip suspended in the vapor phase above the sample, and the
concentration of N-NH
greater than 10-3M. In this case a loger response time is expected.
3
• Reuse of standards with already added ISA is not advised, because loss of ammonia is expected.
CLEANING PROCEDURE
If the sensor slope just misses the suggested slope window, soaking the sensor in a standard for a
-2
period of time may solve the problem (choose 10
M or 1 000 ppm Ammonia standard).
Rinse in deionised water and blot dry.
20
Page 21

QUICK CHECK OF THE ELECTRODE SLOPE
• Connect the electrode and the reference electrode to the instrument.
• Press and hold down ESC,
until the instrument enters in the reading check mode.
• Fill a beaker with 50 mL of deionized water and put a stir bar inside. Place the beaker in
its appropriate place on the instrument top.
• Put the electrode holder and insert the electrode and temperature probe in the solution. Add
2 mL of HI 84185-0 ISA buffer. Close all holes.
• Add rapidly 1 mL of HI 84185-1 Standard taking care to close all holes immediately after
addition. Wait for the reading to stabilize and record the mV value.
• Add rapidly 10 mL of HI 84185-1 Standard like before taking care to close all holes
immediately after addition. Wait for the reading to stabilize and record the mV value.
• The difference between the two recorded mV values gives the slope of the electrode. An
accepted value for this slope is -56±4mV.
• If sensor does not change mV the internal glass may have broken.
• Press ESC to leave the reading check mode.
PERIODIC MAINTENANCE
Inspect the electrode and the cable. The cable used for connection to the instrument must be
intact and there must be no points of broken insulation on the cable, or cracks on the electrode
stem or bulb. Connectors must be perfectly clean and dry. If any scratches or cracks are present,
replace the electrode. Rinse electrode with deionized water between samples and blot dry with
lab wipe or other soft disposable absorbent towelling.
and HELP keys simultaneously and power on the meter. Wait
STORAGE PROCEDURE
The HI 61101 probe can be stored assembled in HI 4001-45 Ammonia Conditioning and
Storage solution overnight or short term. Gently pull on the cable to compress the spring
mechanism thus permitting electrolyte to exchange from the bulk to the thin film between the
membrane and glass before resuming use. For storage over a week, disassemble the sensor
completely and rinse off the inner pH/ref assembly, the outer body and the membrane cap.
Discard membrane. Cover the glass tip with the protective cover used in shipment and store parts
securely in the original shipping box. When reassembling the sensor follow the Preparation
Procedure section.
MALFUNCTIONING
• No slope (meter always reads the same value):
Repeat the measurement with a fresh ammonia electrode.
21
Page 22

ACCESSORIES
REAGENT SETS
HI 4001-40 Ammonia filling solution
HI 4001-45 Ammonia conditioning and storage solution
HI 4000-47 Buffer replacement kit
HI 84185-20 Reagent set
HI 84185-0 ISA for Ammonia electrode (500 mL)
HI 84185-1 Standard 1 for Ammonia electrode (500 mL)
HI 85185-2 Standard 2 for Ammonia electrode (500 mL)
OTHER ACCESSORIES
HI 61001-51 Membrane (20 pcs.)
HI 61101 Ammonia electrode
HI 731316 Stir bar (5 pcs.)
HI 731341 Automatic pipette 1000 µL
HI 731351 Tips for 1000 µL automatic pipette (25 pcs.)
HI 731355P Capilary pipette (20 pcs.)
HI 740036P Plastic beaker 50 mL (10 pcs.)
HI 70143 Syringe 1mL (6 pcs.)
HI 740144 Syringe tip (6 pcs.)
HI 7662-T Temperature probe
22
Page 23

WARRANTY
HI 84185 is warranted for two years against defects in workmanship and materials when used
for its intended purpose and maintained according to the instructions.
This warranty is limited to repair or replacement free of charge.
Damage due to accident, misuse, tampering or lack of prescribed maintenance is not covered.
If service is required, contact your dealer. If under warranty, report the model number, date of
purchase, serial number and the nature of the failure. If the repair is not covered by the warranty,
you will be notified of the charges incurred.
If the instrument is to be returned to Hanna Instruments, first obtain a Returned Goods
Authorization Number from the Customer Service Department and then send it with
shipment costs prepaid. When shipping any instrument, make sure it is properly packaged for
complete protection.
To validate your warranty, fill out and return the enclosed warranty card within 14 days from the
date of purchase.
Recommendations for Users
Before using this product, make sure that it is entirely suitable for your specific application and for the environment in which it is
used.
Operation of this instrument may cause unacceptable interferences to other electronic equipments, this requiring the operator to
take all necessary steps to correct interferences.
Any variation introduced by the user to the supplied equipment may degrade the instrument EMC performance.
To avoid damages or burns, do not put the instrument in microwave ovens. For yours and the instrument’s safety do not use or
store the instrument in hazardous environments.
WARRA (NTY
Hanna Instruments reserves the right to modify the design, construction and appearance of its products
without advance notice.
23
Page 24

SALES AND TECHNICAL SERVICE CONTACTSSALES AND TECHNICAL SERVICE CONTACTS
SALES AND TECHNICAL SERVICE CONTACTS
SALES AND TECHNICAL SERVICE CONTACTSSALES AND TECHNICAL SERVICE CONTACTS
Australia:
Tel. (03) 9769.0666 • Fax (03) 9769.0699
China:
Tel. (10) 88570068 • Fax (10) 88570060
Egypt:
Tel. & Fax (02) 2758.683
Germany:
Tel. (07851) 9129-0 • Fax (07851) 9129-99
Greece:
Tel. (210) 823.5192 • Fax (210) 884.0210
Indonesia:
Tel. (210) 4584.2941 • Fax (210) 4584.2942
Japan:
Tel. (03) 3258.9565 • Fax (03) 3258.9567
Korea:
Tel. (02) 2278.5147 • Fax (02) 2264.1729
Malaysia:
Tel. (603) 5638.9940 • Fax (603) 5638.9829
Singapore:
Tel. 6296.7118 • Fax 6291.6906
South Africa:
Tel. (011) 615.6076 • Fax (011) 615.8582
Taiwan:
Tel. 886.2.2739.3014 • Fax 886.2.2739.2983
Thailand:
Tel. 66.2619.0708 • Fax 66.2619.0061
10/06
United Kingdom:
Tel. (01525) 850.855 • Fax (01525) 853.668
USA:
Tel. (401) 765.7500 • Fax (401) 765.7575
For e-mail contacts and a complete list of Sales and Technical offices, please see
www.hannainst.com
.
24
MAN84185
 Loading...