

Page 1
SALES AND TECHNICAL SERVICE CONTACTSSALES AND TECHNICAL SERVICE CONTACTS
SALES AND TECHNICAL SERVICE CONTACTS
SALES AND TECHNICAL SERVICE CONTACTSSALES AND TECHNICAL SERVICE CONTACTS
Australia:
Tel. (03) 9769.0666 • Fax (03) 9769.0699
China:
Tel. (10) 88570068 • Fax (10) 88570060
Egypt:
Tel. & Fax (02) 2758.683
Germany:
Tel. (07851) 9129-0 • Fax (07851) 9129-99
Greece:
Tel. (210) 823.5192 • Fax (210) 884.0210
Indonesia:
Tel. (21) 4584.2941 • Fax (21) 4584.2942
Japan:
Tel. (03) 3258.9565 • Fax (03) 3258.9567
Korea:
Tel. (02) 2278.5147 • Fax (02) 2264.1729
Malaysia:
Tel. (603) 5638.9940 • Fax (603) 5638.9829
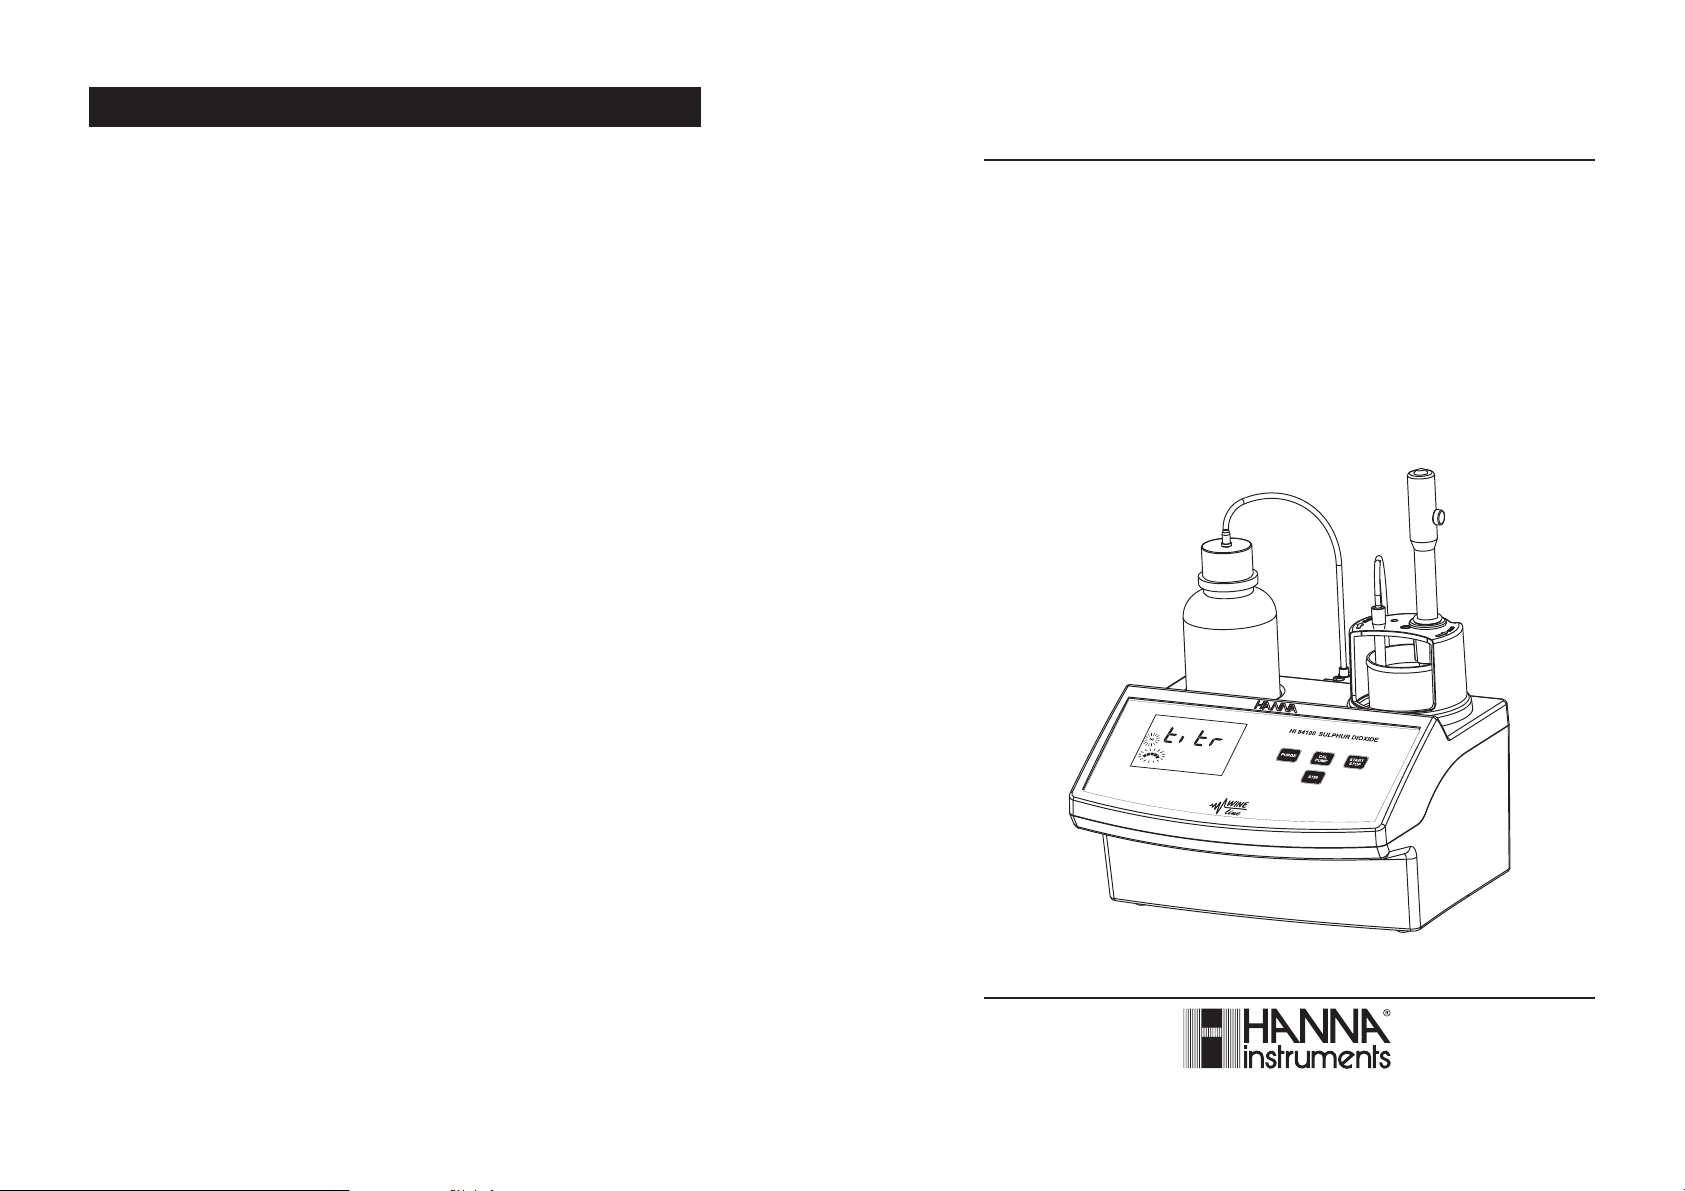
Instruction Manual
HI 84100
FREE & TOTAL SULPHUR DIOXIDE
MINITITRATOR
for wine analysis
Singapore:
Tel. 6296.7118 • Fax 6291.6906
South Africa:
Tel. (011) 615.6076 • Fax (011) 615.8582
Taiwan:
Tel. 886.2.2739.3014 • Fax 886.2.2739.2983
Thailand:
Tel. 66.2619.0708 • Fax 66.2619.0061
United Kingdom:
Tel. (01525) 850.855 • Fax (01525) 853.668
USA:
Tel. (401) 765.7500 • Fax (401) 765.7575
For e-mail contacts and a complete list of Sales and Technical offices, please see
www.hannainst.com
.
10/08
24
MAN84100
www.hannainst.com
1
Page 2

2 23
Page 3

WARRANTY
HI 84100 is warranted for two years against defects in workmanship and materials when used
for its intended purpose and maintained according to the instructions.
This warranty is limited to repair or replacement free of charge.
Damage due to accident, misuse, tampering or lack of prescribed maintenance is not covered.
If service is required, contact your dealer. If under warranty, report the model number, date of
purchase, serial number and the nature of the failure. If the repair is not covered by the warranty,
you will be notified of the charges incurred.
If the instrument is to be returned to Hanna Instruments, first obtain a Returned Goods Authorization
Number from the Customer Service Department and then send it with shipment costs prepaid.
When shipping any instrument, make sure it is properly packaged for complete protection.
To validate your warranty, fill out and return the enclosed warranty card within 14 days from the
date of purchase.
Dear Customer,
Thank you for choosing a Hanna product. This manual will provide you with the necessary
information for the correct use of the instrument. Please read it carefully before using the meter. If
you need additional technical information, do not hesitate to e-mail us at tech@hannainst.com.
This instrument is in compliance with
directives.
TABLE OF CONTENTS
PRELIMINARY EXAMINATION................................................................................................. 3
GENERAL DESCRIPTION ........................................................................................................ 3
SPECIFICATIONS ................................................................................................................... 5
PRINCIPLE OF OPERATION .................................................................................................... 6
FUNCTIONAL DESCRIPTION................................................................................................... 7
START UP ............................................................................................................................ 9
GUIDE TO DISPLAY CODES ................................................................................................... 10
TIPS FOR AN ACCURATE MEASUREMENT ............................................................................. 12
FREE SO
MEASUREMENT PROCEDURE................................................................................ 12
2
TOTAL SO
PUMP CALIBRATION PROCEDURE ........................................................................................ 15
PUMP TUBE REPLACEMENT ................................................................................................ 15
FUSE REPLACEMENT .......................................................................................................... 16
ELECTRODE CONDITIONING AND MAINTENANCE .................................................................. 16
ACCESSORIES ..................................................................................................................... 18
WARRANTY........................................................................................................................19
MEASUREMENT PROCEDURE .............................................................................. 13
2
WARRANTY
Hanna Instruments reserves the right to modify the design, construction and appearance of its products
without advance notice.
22
All rights are reserved. Reproduction in whole or in part is prohibited without the written consent
of the copyright owner, Hanna Instruments Inc., Woonsocket, Rhode Island, 02895 , USA.
3
Page 4

PRELIMINARY EXAMINATION
ACCESSORIES
Please examine this product carefully. Make sure that the instrument is not damaged. If any
damage occured during shipment, please notify your Dealer.
Each HI 84100 minititrator is supplied complete with:
• Reagents set for 20 titrations
• Two 50 mL beakers
• Two 20 mL beakers
• Scissors
• Tubes set with cap
• ORP probe
• Stir bar
• Power cable
• One 30 mL bottle of Refill Solution
• One 1 mL syringe
• Two sachets of cleaning solution for wine deposits
• Two sachets of cleaning solution for wine stains
• Instruction manual
Note:Save all packing material until you are sure that the instrument works correctly.
Any defective item must be returned in its original packing.
GENERAL DESCRIPTION
REAGENT SETS
HI 70300L Electrode storage solution (500 mL)
HI 70635L Cleaning solution for wine deposits (500 mL)
HI 70636L Cleaning solution for wine stains (500 mL)
HI 7082 Electrode filling solution (4 X 30 mL)
HI 84100-50 Titrant solution (100 mL)
HI 84100-51 Alkaline reagent (500 mL)
HI 84100-52 Acid reagent for Total SO
HI 84100-53 Acid reagent for Free SO
determination (500 mL)
2
determination (500 mL)
2
HI 84100-54 Stabilizer reagent (25 pcs.)
HI 84100-55 Calibration standard (500 mL)
OTHER ACCESSORIES
HI 3148B /50 ORP probe with 50 cm cable
HI 70483T Tube set with cap for titrant bottle and tip
HI 731319 Stir bar 25x7 (10 pcs.)
HI 740036P Beaker 50 mL (10 pcs.)
HI 740037P Beaker 20 mL (10 pcs.)
HI 740198 Power cable
The HI 84100 is a low-cost, easy to use, microprocessor-based automatic titrator that benefits
from Hanna’s years of experience as a manufacturer of analytical instrumentation.
The instrument incorporates a simple and reliable peristaltic pump which ensures high dosing
repeatability. Pump calibrations, performed with the provided Hanna standards, assure the
accuracy of the instrument.
The instrument comes pre-programmed with an analysis method designed for Free and Total
Sulphur Dioxide measurements for wine analysis. The instrument uses a powerful algorithm
which analyzes the shape of the electrode response in order to determine when the titration
reaction has reached completion.
The HI 84100 provides a simple user interface. Simply pressing the START STOP button
automates the analysis, performs all necessary calculations and immediately displays the
titration results in convenient units.
4
Recommendations for Users
Before using this product, ensure that it is suitable for both your application and for the
environment in which it will be used.
Operation of this instrument may cause unacceptable interferences to other electronic equipment.
This requires the operator to take all necessary steps to correct interferences.
Any variation introduced by the user to the supplied equipment may degrade the EMC
performance of the instrument.
To avoid damages or burns, do not put the instrument into a microwave oven. To ensure the
safety of the operator and the instrumentation do not use or store the instrument in hazardous
environments.
21
Page 5

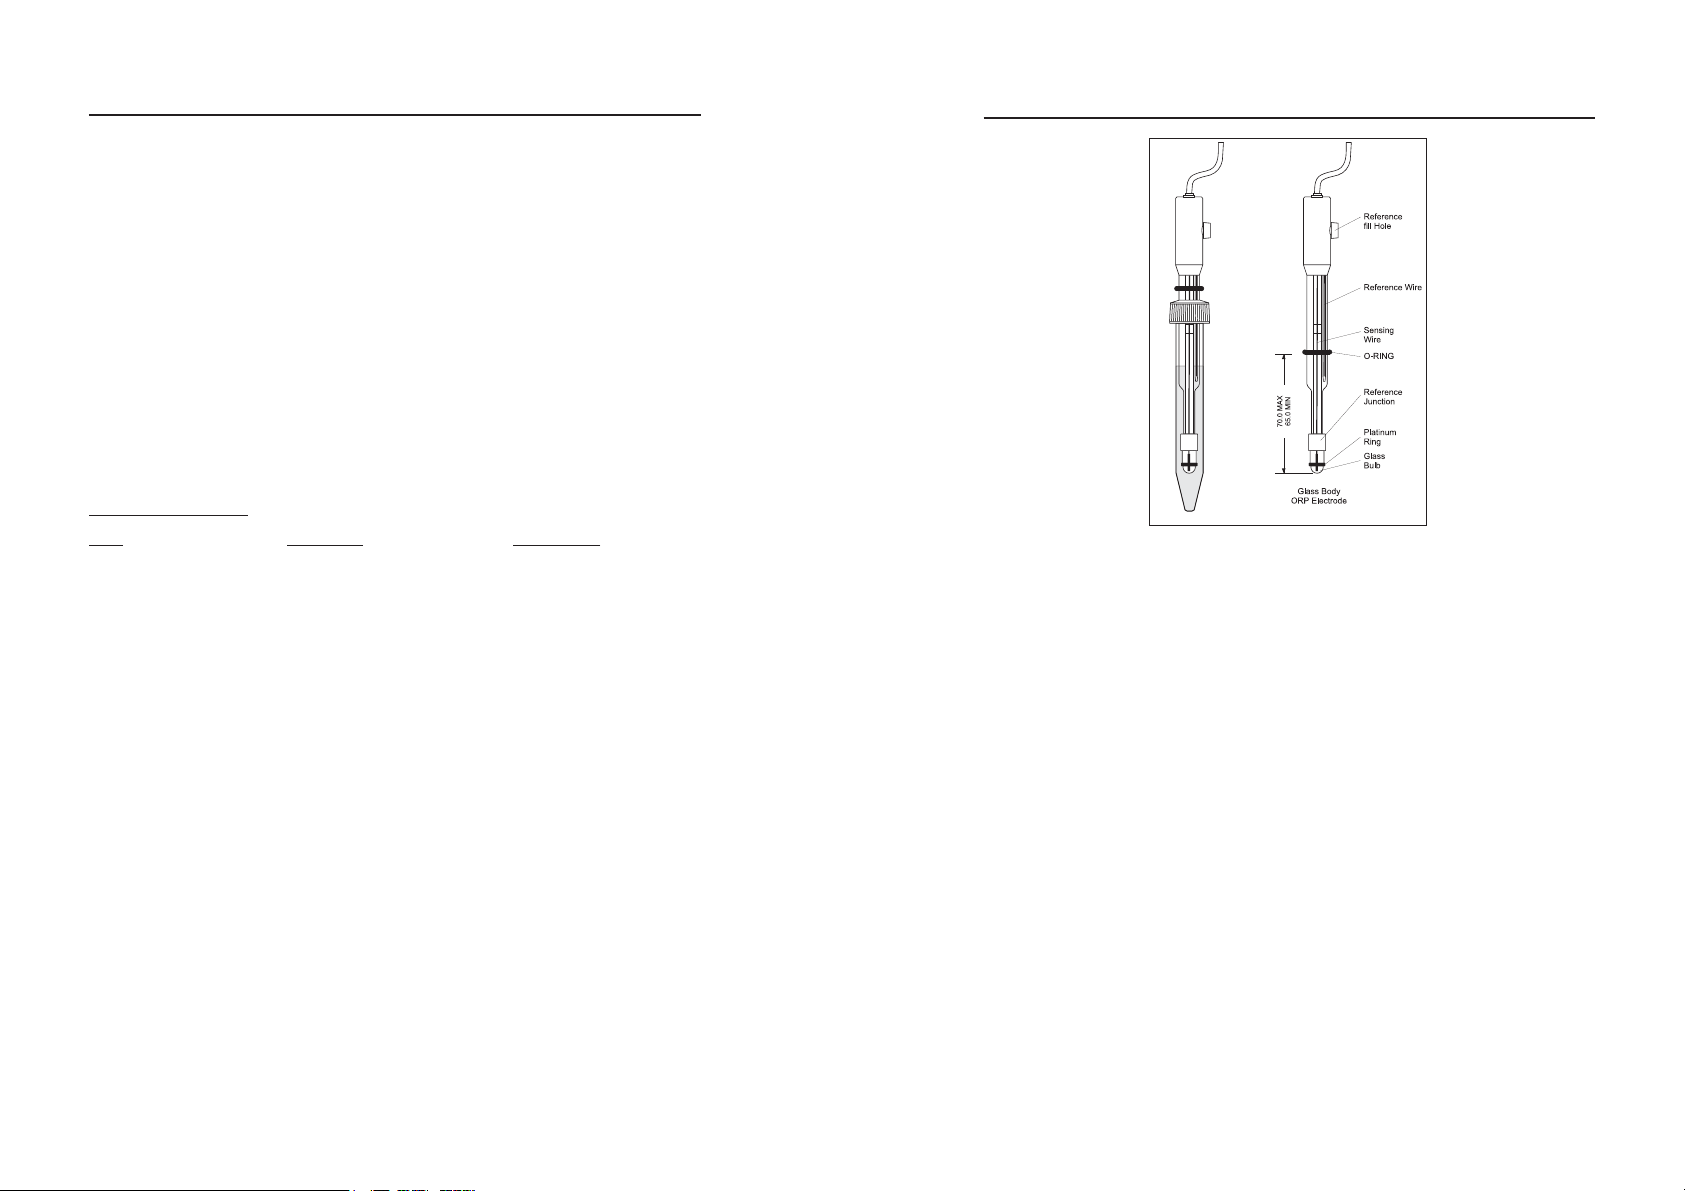
For faster response, unscrew the fill hole screw during measurements.
STORAGE PROCEDURE
To minimize clogging and assure a quick response time, the glass bulb and the junction of the
electrode should be kept moist and not allowed to dry out.
Replace the solution in the protective cap with a few drops of HI 70300 Storage Solution or, in its
absence, Filling Solution (HI 7082). Follow the Preparation Procedure before taking measurements.
Note: NEVER STORE THE ELECTRODE IN DISTILLED OR DEIONIZED WATER.
PERIODIC MAINTENANCE
Inspect the electrode and the cable. The cable used for connection to the instrument must be
intact and there must be no points of broken insulation on the cable or cracks on the electrode
stem or bulb. Connectors must be perfectly clean and dry. If any scratches or cracks are present,
replace the electrode. Rinse off any salt deposits with water.
Probe Maintenance
Refill the reference chamber with fresh electrolyte (HI 7082). Allow the electrode to stand
upright for 1 hour. Follow the Storage Procedure above.
CLEANING PROCEDURE
Wine deposits
•
•
Wine stains
Soak in Hanna HI 70635 cleaning solution for 15 minutes
Soak in Hanna HI 70636 cleaning solution for 15 minutes
IMPORTANT: After performing any of the cleaning procedures, rinse the electrode thoroughly
with distilled water, refill the reference chamber with fresh electrolyte and soak the electrode in
HI 70300 Storage Solution for at least 1 hour before taking measurements.
SIGNIFICANCE OF USE
Wine makers add sulphur dioxide to wine in order to inhibit bacteria and wild yeast, and to serve as
an antioxidant to prevent browning.
A small portion of the free sulphur dioxide, known as molecular SO
, is active and responsible for
2
protecting wine.
The relationship between the amount of SO
It is clear, however, that the relationship is largely governed by the total SO
The exact relationship between free and bound (total - free) SO
When SO
The remaining unbound SO
is added to wine some immediately becomes bound.
2
is called “free” and is divided in two parts.
2
The larger, and relatively ineffective free portion is called “bisulphite” (HSO
The smaller portion of the free sulphur dioxide, known as molecular SO
added and the amount of free SO2 in wine is complex.
2
content of the wine.
2
will vary from wine to wine.
2
¯).
3
, is active and resposible for
2
protecting wine.
The amount of molecular SO
For instance, at pH 3.2, the amount of free SO
in wine depends on both the level of free SO2 present as well as the pH.
2
for 0.8 ppm molecular SO2 is 22 ppm. At pH 3.5,
2
you will need 43 ppm free - essentially double.
Free SO
concentration (ppm) for 0.8 ppm molecular SO2:
2
Hp 0.31.32.33.34.35.36.37.38.39.3
418122825344559678901
OSeerF
2
In most bulk storage and at bottling situation 0.8 ppm molecular SO
provides adequate protection
2
from oxidation and bacterial action (including malolactic).
It is important to remember that the amount of free SO
in the wine depends on three things: how
2
much is added, how much was present before the addition and how much of your addition promptly
becomes bound.
The level at which molecular SO
can be detected by the human senses is about 2.0 ppm.
2
This is also the level which is needed for maximum protection of wine.
This is particularly true in the case of sweet, and most notably, botrytised wines.
The HI 84100 makes it possible to test free or total SO
in all the wines including the red, which are
2
difficult to test with manual methods due to the indistinct color changes associated with traditional
endpoint indication.
20
5
Page 6
SPECIFICATIONS
ELECTRODE CONDITIONING & MAINTENANCE
Range 0 to 400 ppm of SO
2
Resolution 1 ppm
Accuracy 5% of reading or
±1 ppm
Method Ripper titrimetric method
Principle Equivalence point redox titration
Sample volume 50 mL
ORP Electrode HI 3148B (included)
Pump debit 0.5 mL/min
Environment 0 to 50 °C (32 to 122 °F); max 95% RH non-condensing
Power supply 220V/50Hz; 10VA
Dimensions 208 x 214 x 163 mm (8.2 x 8.4 x 6.4") (with beaker)
Weight 2200 g (77.6 oz.)
REQUIRED REAGENTS
Code Description Quantity/test
HI 84100-50 Titrant (for Free & Total SO
HI 84100-51 Alkaline Reagent (for Total SO
HI 84100-52 Acid Reagent (for Total SO
HI 84100-53 Acid Reagent (for Free SO
HI 84100-54 Stabilizer (for Free & Total SO
HI 84100-55 Standard (for Free & Total SO
)
2
)5 mL
2
)5 mL
2
)5 mL
2
) 1 packet
2
) 50 mL
2
PREPARATION PROCEDURE
Remove the protective cap of the ORP electrode (HI 3148B).
DO NOT BE ALARMED IF SALT DEPOSITS ARE PRESENT. This is normal with electrodes. They will
disappear when rinsed with water.
During transport, tiny bubbles of air may form inside the glass bulb affecting proper functioning of
the electrode. These bubbles can be removed by “shaking down” the electrode as you would do
with a glass thermometer.
If the bulb and/or junction is dry, soak the electrode in HI 70300 Storage Solution for at least one hour.
If the filling solution (electrolyte) is more than 2½ cm (1”) below the fill hole, add HI 7082 3.5M
KCl Electrolyte Solution.
6
19
Page 7
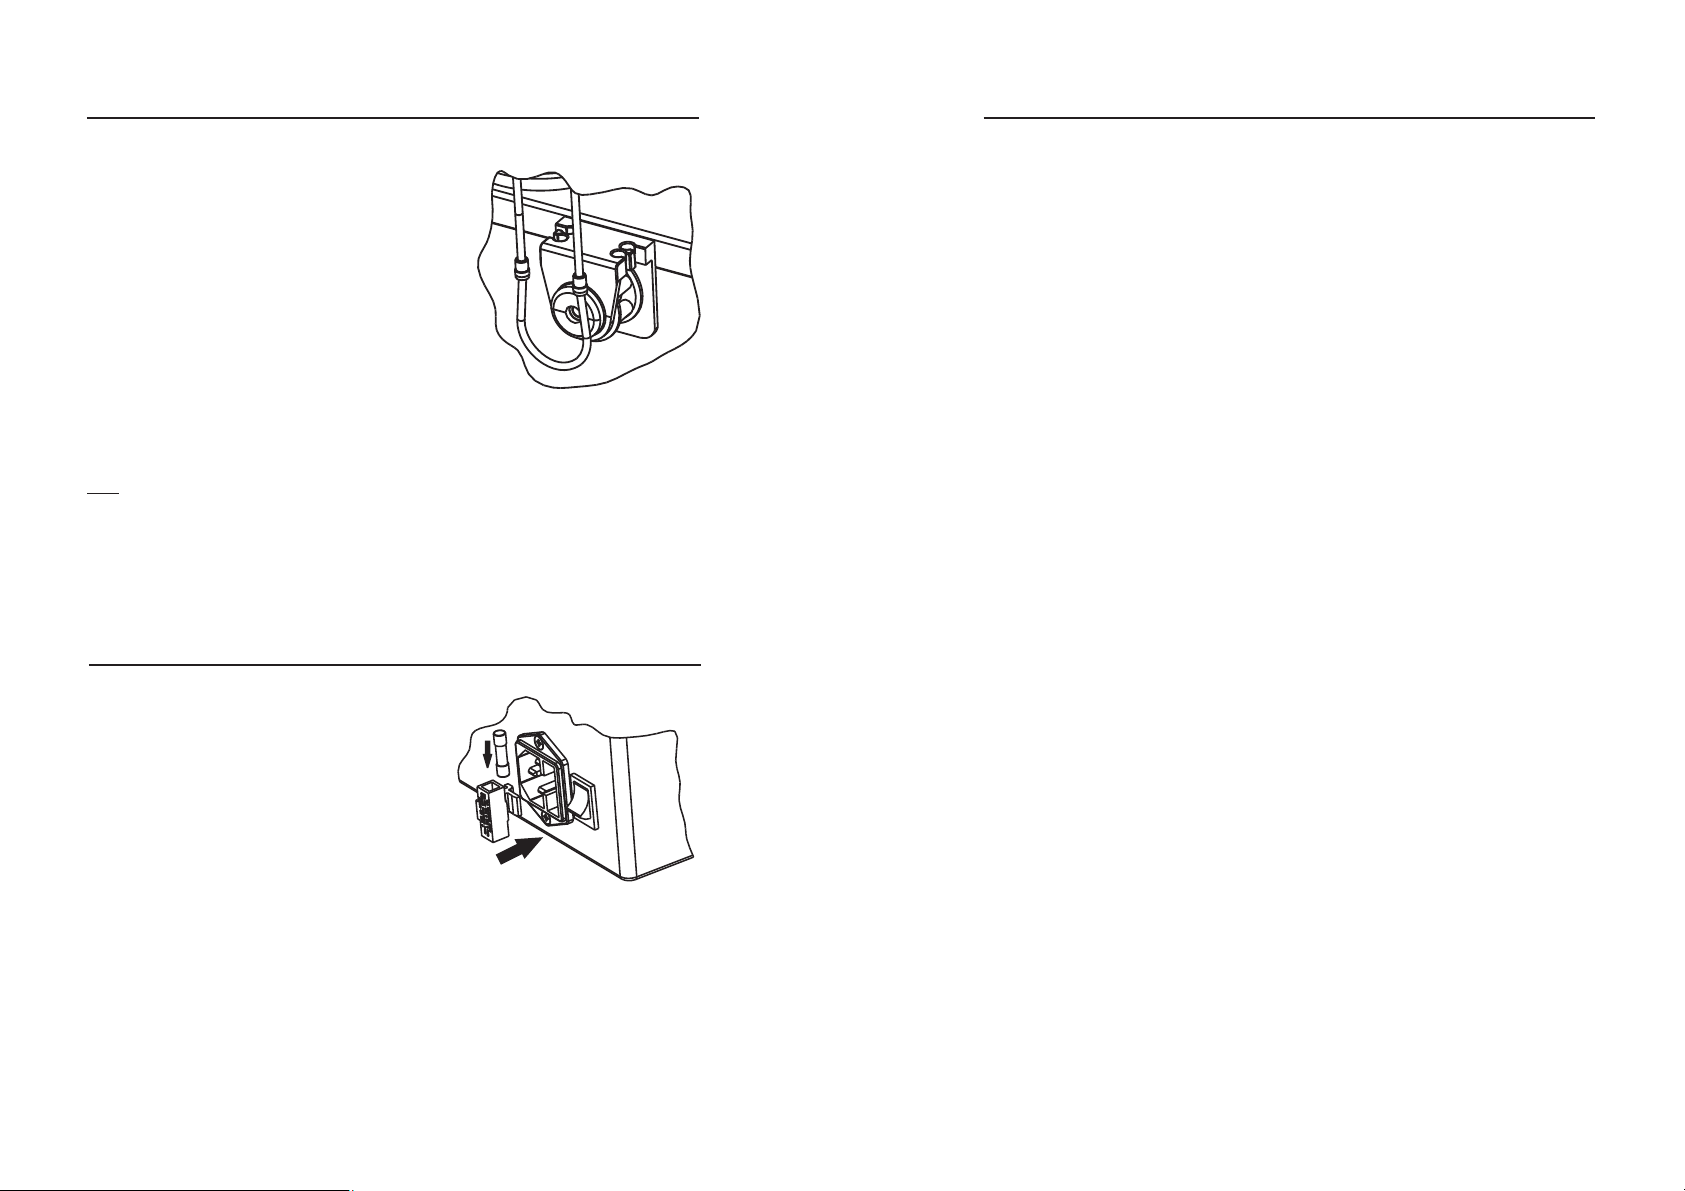
PUMP TUBE REPLACEMENT
PRINCIPLE OF OPERATION
Follow the step below to safely remove the paristaltic pump tubing:
• Detach the old tube system from the reagent bottle.
• Purge the pump to remove any residual titrant from the
tubing.
• Grasp one fixing ring of the peristaltic pump tube.
• Detach tubing from pump housing.
• Remove the other side of the tube.
Follow the step below to mount new peristaltic pump tubing:
• Position one peristaltic pump fixing ring on its location.
• Stretch the tube over the peristaltic pump cylinders.
• Fix the second pump fixing ring on its location.
• Attach the tube to the reagent bottle.
Note: Purge the peristaltic pump until drops of reagent appears on the dosing tip by pressing the
PURGE button.
FUSE REPLACEMENT
To change the fuse follow next steps:
• Disconnect the power cord from the rear panel of
the instrument.
• Pull out the fuse holder located near the power cord
connector.
• Replace the fuse with a similar one.
• Push the fuse holder with the fuse in the appropriate
place.
The HI 84100 determines the free and total sulphur dioxide concentration in wine using the Ripper
method. Execees iodide added to the wine sample reacts with iodate introduced by the titrant to
in situ
produce iodine
.
-
IO
+ 5I- + 6H
3
+
→ 3I2 + 3H2O
The iodine produced in the sample then reacts with sulphur dioxide in the wine according to the redox
reaction below:
+ I2 → H2SO4 + 2HI
H
2SO3
The HI 84100 utilizes an ORP electrode to monitor the above redox titration. The integrated
algorithm detects the equivalence point associated with reaction completion. The volume of titrant
required to reach the equivalence point is used, along with the titrant concentration, to calculate the
sulphur dioxide concentration in the wine sample.
18
7
Page 8

FUNCTIONAL DESCRIPTION
INSTRUMENT DESCRIPTION
FRONT PANELFRONT PANEL
FRONT PANEL
FRONT PANELFRONT PANEL
1) Titrant bottle
2) Liquid Crystal Display (LCD)
3) Keypad
4) Electrode holder
5) Peristaltic pump tube
REAR PANELREAR PANEL
REAR PANEL
REAR PANELREAR PANEL
• Place the probe holder on the top of the beaker and
secure by turning clockwise.
• Rinse the ORP electrode with deionized water, open
the refill cap and immerse into the stirring sample
until the teflon reference junction is completely
submerged. Be sure that the tip of the electrode is
not in the path of the stir bar.
• Purge the titrant into a waste beaker for 1-2 seconds
to ensure that the dosing tip is filled with fresh
titrant solution.
• Insert the dosing tip into the titrant tube sleeve. IT
IS CRITICAL THAT THE TIP BE IMMERSED
APPROXIMATELY 1.5 CM INTO THE SOLUTION BEING
TITRATED.
• Fill the 20 mL beaker up to the 5 mL mark with the
HI 84100-52 Acid Reagent, add the contents to
the 50 mL beaker containing the sample.
• Add the contents of one HI 84100-54 Stabilizer
powder packet to the beaker containing the sample.
• Press START STOP to start the titration. The LCD will
display “titr” as well as stirrer and pump tags to
indicate a titration in progress.
• At the end of the titration the sulphur dioxide
concentration is displayed in ppm (mg/L).
8
17
Page 9
• Add the contents of one packet of HI 84100-54
powder Stabilizer to the sample beaker.
• Press START STOP to start the titration. The LCD will
display “titr” as well as stirrer and pump tags to
indicate a titration in progress.
• At the end of the titration the sulphur dioxide
concentration is displayed in ppm (mg/L).
TOTAL SO2 MEASUREMENT PROCEDURE
6) ORP Electrode
7) Beaker
8) BNC electrode connector
9) Fuse
10) Power switch
11) Power cable connector
12) Peristaltic pump
KEYPAD DESCRIPTION
1) PURGE - to start/stop purging (max purging time is 5 min)
2) CAL PUMP - to enter pump calibration mode
3) START STOP - to start/stop titration or pump calibration
4) STIR - to start/stop the stirrer while in main screen or purging mode
• Fill the 50 mL beaker up to 50 mL mark with the
wine sample.
Note: It is important to be accurate in your
measurement of wine sample. Pipettes are
recommended.
• Place the stir bar in the beaker and put the beaker
in the minititrator top.
• Fill the 20 mL beaker up to the 5 mL mark with the
HI 84100-51 Alkaline Reagent, add the contents
to the 50 mL beaker containing the sample.
• Swirl the beaker and wait for 15 minutes.
• Place the beaker into the beaker holder.
16
LCD DESCRIPTION
1) Stability indicator: when the pump calibration is in progress
2) Stirrer active tags
3) Calibration messages
4) Pump active tags
5) Four digit secondary display
6) “Time” tag: when the time is displayed on the secondary display
7) “ppm” tag: when the titration result is displayed on the primary display
8) Four digit and half main display
9
Page 10

START UP
• Place the instrument on a flat surface. Do not place the instrument in direct sunlight.
• Plug the titrator into an outlet with a proper ground connection and the correct voltage and
frequency. (See the label on rear panel of instrument).
• Connect the peristaltic pump tubing to the pump. (See the Pump Tube Replacement Section).
• Remove the bottle cap shipped with the reagent and replace with the bottle cap included with
the tubing set.
• Place the reagent bottle in the appropriate place on the titrator top.
• Connect the inlet tube to the reagent bottle and the outlet tube to the dosing tip.
• Turn the instrument ON using the power switch located on the rear panel of the instrument
and wait until dashes are displayed on the LCD.
FREE SO2 MEASUREMENT PROCEDURE
• Using a clean pipette, fill the 50 mL beaker up to
50 mL mark with the wine sample.
Note: Failure to use clean pipettes will result in
erroneus readings.
• Place the stir bar in the beaker and put the beaker
in the minititrator top.
• Place the beaker into the beaker holder.
• Place the probe holder on the top of the beaker and
secure by turning clockwise.
• Rinse the ORP electrode with deionized water, open
the refill cap and immerse into the stirring sample
until the teflon reference junction is completely
submerged. Be sure that the tip of the electrode is
not in the path of the stir bar.
• Purge the titrant into a waste beaker for 1-2 seconds
to ensure that the dosing tip is filled with fresh
titrant solution.
• Insert the dosing tip into the titrant tube sleeve. IT
IS CRITICAL THAT THE TIP BE IMMERSED
APPROXIMATELY 1.5 CM (0.6”) INTO THE SOLUTION
BEING TITRATED.
10
• Fill the 20 mL beaker up to the 5 mL mark with the
HI 84100-53 Acid Reagent, add the contents to
the 50 mL beaker containing the wine sample.
Note: Be aware of any air bubbles in the tube it
could effect the results.
15
Page 11
• Rinse the ORP electrode with deionized water, open
the refill cap and immerse into the stirring sample
until the teflon reference junction is completely
submerged. Be sure that the tip of the electrode is
not in the path of the stir bar.
• Purge the titrant into a waste beaker for 1-2 seconds
to ensure that the dosing tip is filled with fresh
titrant solution.
• Insert the dosing tip into the titrant tube sleeve. IT
IS CRITICAL THAT THE TIP BE IMMERSED
APPROXIMATELY 1.5 CM (0.6”) INTO THE SOLUTION
BEING TITRATED.
• Fill the 20 mL beaker up to the 5 mL mark with the
HI 84100-53 Acid Reagent and add the content to
the 50 mL beaker.
• Add the contents of one packet of HI 84100-54
powder Stabilizer to the sample beaker.
GUIDE TO DISPLAY CODES
This prompt appears for a few seconds each time the instrument
is turned ON.
Main screen display.
Main screen display with stirrer active.
Purging mode message.
PUMP CALIBRATION MESSAGES
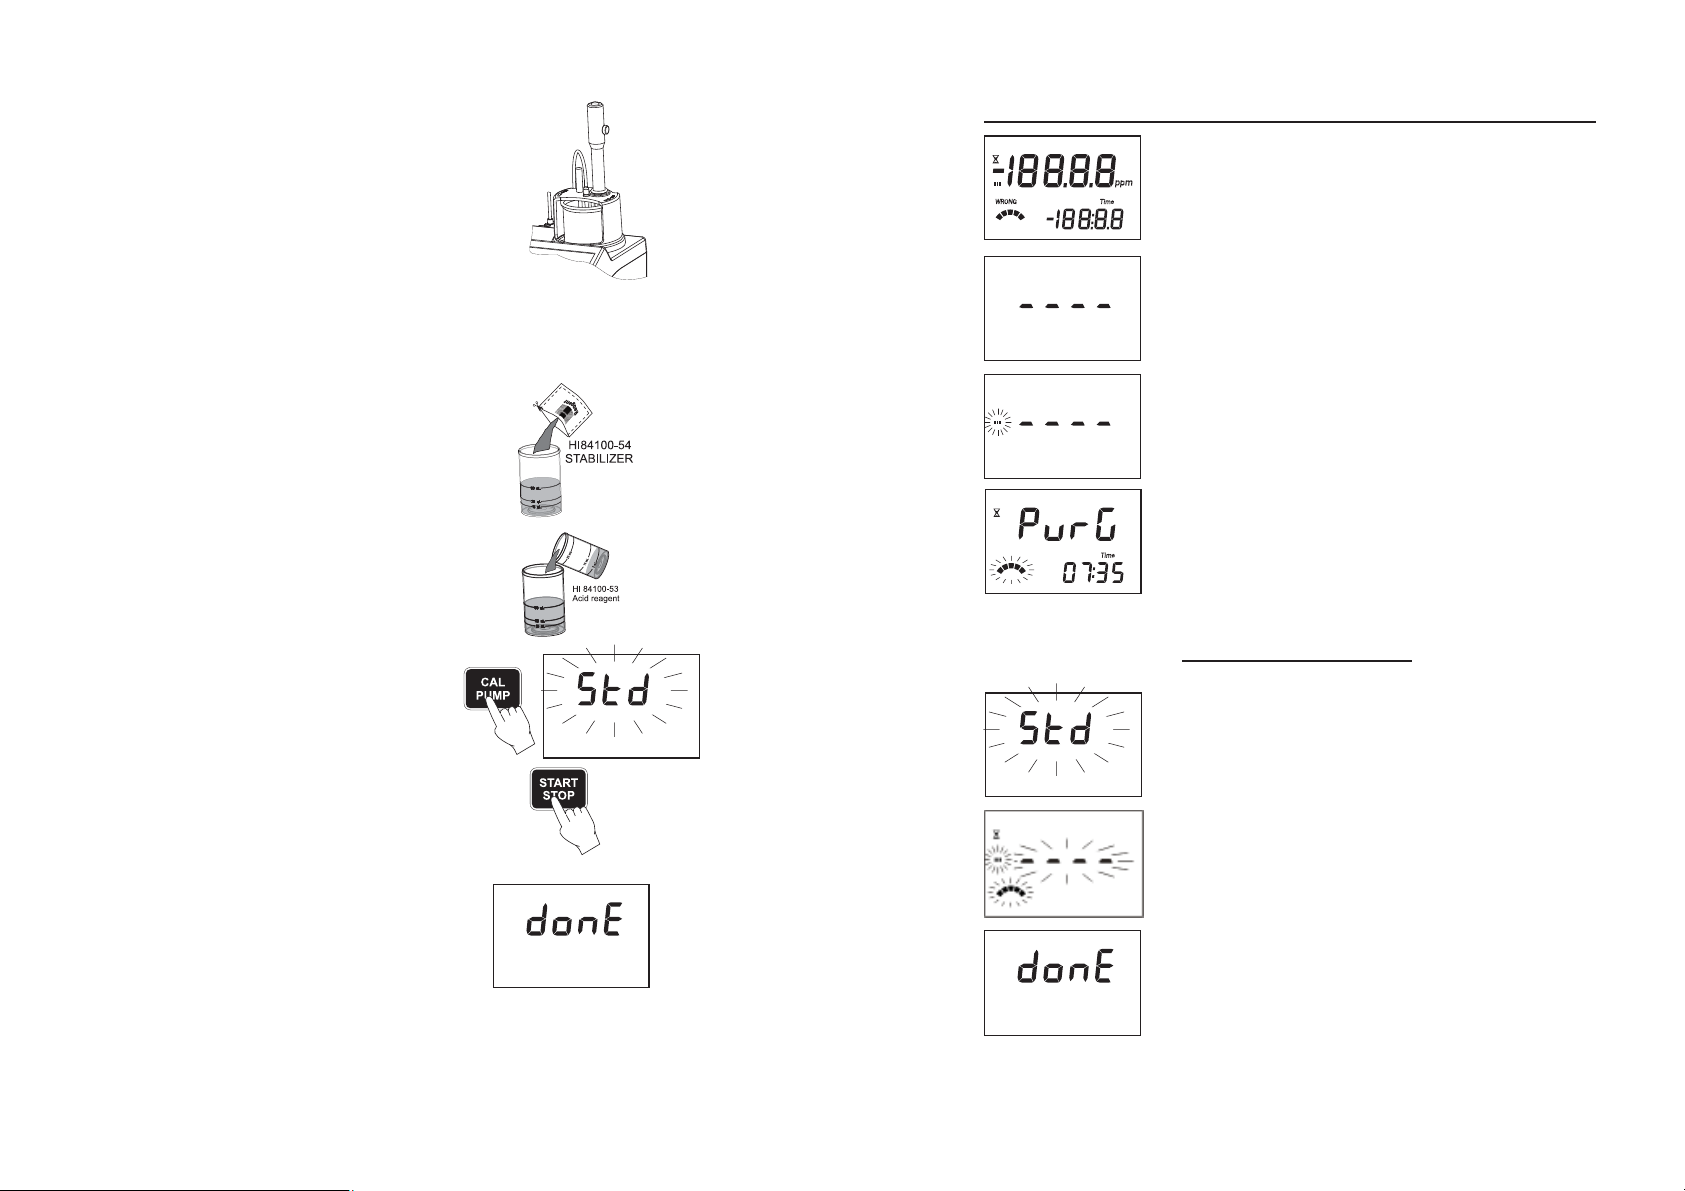
• Press CAL PUMP button “STD” will appear on display.
• Press START STOP in order to start the system
calibration.
• At the end of the calibration, DONE appears for a
few seconds and the meter returns to the measurement
mode.
• Promptly remove the probe and dispensing tip from
the sample solution and rinse with deionized water.
14
This screen appears when the meter enters pump calibration
mode. Pump calibration is initiated by pressing the START STOP
button.
This screen appears while pump calibration is in progress. Pressing
CAL PUMP or START STOP button, the minititrator returns to the
main screen.
This screen appears when pump calibration is complete.
11
Page 12

This error message appears during pump calibration when the
equivalence point can not be reached. Change the pump calibration
standard and try again.
TIPS FOR AN ACCURATE MEASUREMENT
The instructions listed below should be followed carefully to ensure measurements are conducted
with the highest possible accuracy and precision.
The calibration process was attempted using the wrong standard
solution.
This error message appears when the input reading (mV) exceeds
the input limits (0<input (mV)<1000).
TITRATION MESSAGES
This screen appears when the minititrator enters TITRATION mode.
Press the START STOP button to stop the titration and return to the
main screen.
The titration result, expressed as the concentration of sulphur dioxide
in ppm (mg/L), is displayed at the end of the titration process. Press
the START STOP button to return to the main screen.
This error message appears when the input reading (mV) exceeds
the input limits (0<input (mV)<300), when titration starts up
and (0<input (mV)<1000) during titration.
• IT IS CRITICAL THAT THE TIP BE IMMERSED APPROXIMATELY 1.5 CM INTO THE SOLUTION
BEING TITRATED.
• Use a clean, volumetric pipette to measure and transfer the 50 mL wine samples into the
titration beaker.
• The peristaltic pump must be allowed to complete a full 5 minutes purging cycle prior to
performing a pump calibration.
• Calibrate the peristaltic pump prior to each series of measurements.
• Calibrate the peristaltic pump if the meter is left idle for several hours.
• Analyze the wine sample immediately after the sample is obtained.
• Clean the electrode with HI 700635 or HI 700636 cleaning solutions specially designed for
the wine industry.
PUMP CALIBRATION PROCEDURE
Attention: Pump calibration must be performed each time the pump tube, the reagent bottle or the
ORP electrode is changed. A pump calibration is recomended before each set of measurements or
after the titrator is left idle for several hours.
• Using a clean pipette, fill the 50 mL beaker up to
the 50 mL mark with HI 84100-55 Standard.
Note: Failure to use clean pipettes will result in
erroneus readings.
• Place the stir bar in the beaker and put the beaker
in the minititrator top.
This screen appears when the sample concentration exceeds
400 ppm.
12
• Place the beaker into the beaker holder.
• Place the probe holder on the top of the beaker and
secure by turning clockwise.
13
 Loading...