

Page 1
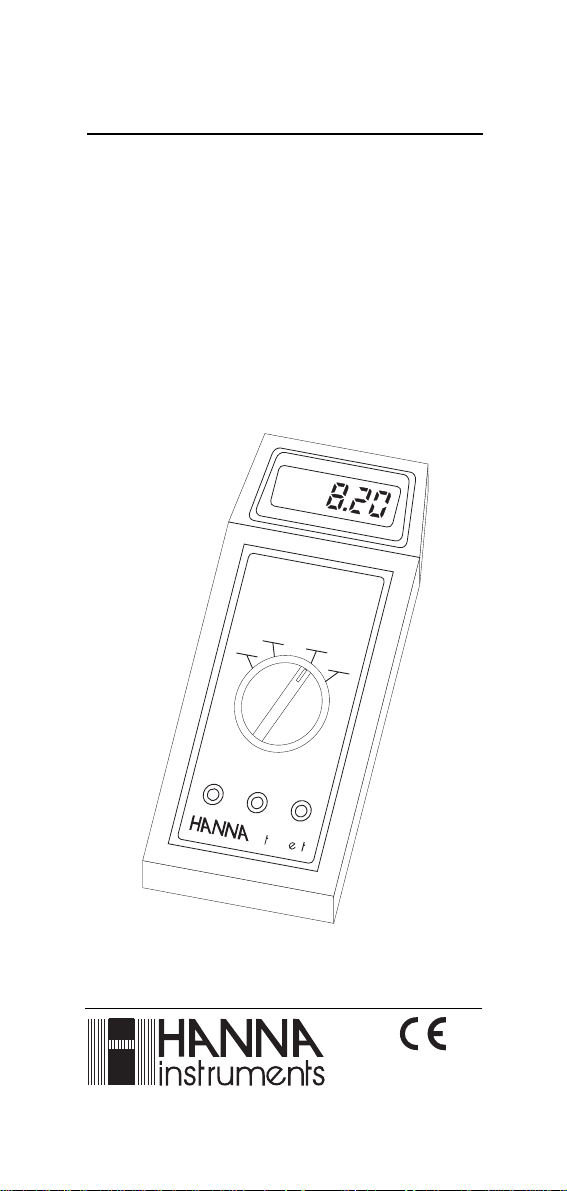
Instruction Manual
HI 8043
Portable
Dissolved Oxygen Meter
DO meter
HI 8043
STB
OFF
°C
O
2
ZERO
SLOPE
ins
rum
°C
n
s
This Instrument is in
Compliance with the CE
Directives
1
Page 2

Dear Customer,
Thank you for choosing a Hanna Instruments
Product.
Please read this instruction manual carefully
before using the instrument.
This manual will provide you with all the neces-
sary information for the correct use of the
instrument, as well as a more precise idea of its
versatility in a wide range of applications.
If you need additional technical information,
do not hesitate to e-mail us at
tech@hannainst.com.
This instrument is in compliance with the
directives.
TABLE OF CONTENTS
Preliminary Examination............................. 3
General Description .................................... 3
Functional Description Probe...................... 4
Functional Description Meter...................... 5
Specifications ............................................. 6
Initial Probe Preparation ............................. 7
Dissolved Oxygen Calibration ..................... 9
Temperature Calibration ............................ 15
Taking Measurements .............................. 16
Probe & Membrane Maintenance ............. 17
Battery Replacement ................................ 19
Accessories.............................................. 20
Warranty ................................................... 21
CE Declaration of Confirmity .................... 22
2
Page 3

PRELIMINARY EXAMINATION
Remove the instrument from the packing material and examine it to make sure that no
damage has occurred during shipping. If there
is any damage, notify your Dealer.
Each meter is supplied with:
• DO Meter
• DO Probe (HI 76401)
• Membrane cap (2 pcs)
• O-ring (2 pcs)
• Protective cap
• 30 mL electrolyte solution (HI 7041S)
• Screwdriver for calibration purposes
• 1 x 9V battery
• Instruction manual
Note: Save all packing material until you are
sure that the instrument functions
correctly. All defective items must be
returned in the original packaging with
the supplied accessories.
GENERAL DESCRIPTION
HI 8043 is a portable meter for Dissolved
Oxygen measurements.
It is housed in a lightweight case, with an
easy-to-read LCD.
Dissolved oxygen and temperature measurements can be performed in the field (wastewater treatment, fish-farming, water analysis,
etc.) as well as in the laboratory without
compromising accuracy.
Dissolved oxygen is indicated in mg/l (ppm)
and this value is compensated for the temperature effect (ATC).
The dissolved oxygen probe has a membrane
covering the polarographic sensors and a builtin thermistor for temperature measurements
and compensation. The thin permeable mem-
3
Page 4
brane isolates the sensor elements from the
sample tested, but allows oxygen to enter.
A voltage is applied across the sensor, and
the oxygen that has passed through the membrane reacts causing the current to flow, hence
determining a reading.
A convenient feature of the instrument is its
standby mode which keeps the probe polarized
and ready for instant measurements.
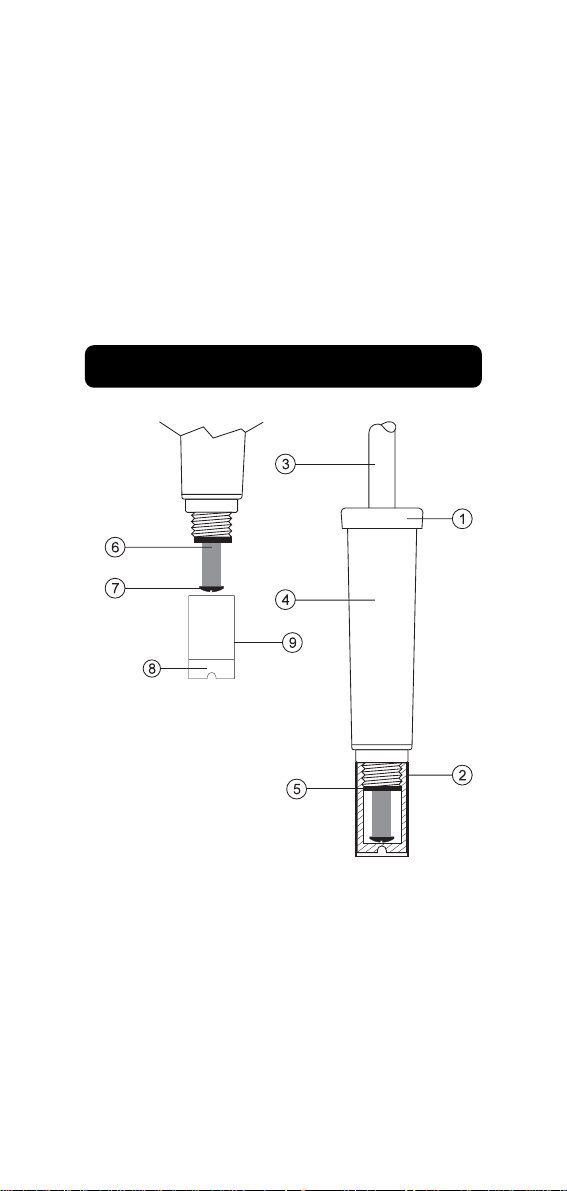
FUNCTIONAL DESCRIPTION PROBE
1. D.O. Probe
2. Protective Cap
3. Watertight Shielded Cable
4. Probe Body
5. O-Ring Seal
6. Silver Chloride Anode
7. Platinum Cathode (sensor)
8. Oxygen Permeable PTFE Membrane
9. Membrane Cap
4
Page 5
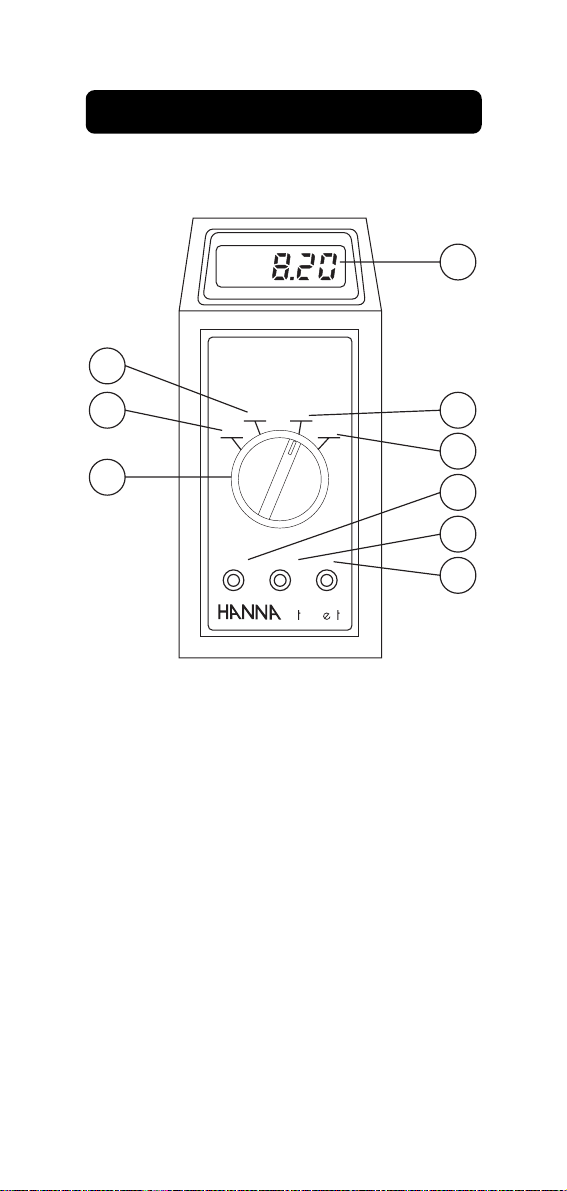
FUNCTIONAL DESCRIPTION
1
3
DO meter
STB
OFF
HI 8043
°C
O
2
42
5
9
6
7
ZERO SLOPE °C
8
s
ins
rum n
1.Liquid Crystal Display
2."OFF" (to switch the meter off)
3."STB" (to switch the meter on and polarize
the probe. Use this standby position without switching the meter off if you are
going to take further measurements)
4."°C" Measurement
5."O2" Measurement
6.ZERO Calibration Trimmer
7.SLOPE Calibration Trimmer
8.°C Calibration Trimmer
9.Rotary Switch
5
Page 6

SPECIFICATIONS
Range DO 0.00 to 19.99 mg/l
Resolution DO 0.01 mg/l
Accuracy DO ±1.5% of full scale
Typical EMC DO ±1.5% of full scale
Deviation °C ±1°C
Calibration Manual on 2 points
Temperature Automatic from 0 to 30°C
Compensation (32 to 86°F)
Probe HI 76401 polarographic
Battery 9V / 100 hours of continuous use
Environment 0 to 50°C (32 to 122°F); 95% RH
Dimensions 180 x 83 x 40 mm (7.1 x 3.3 x 1.6")
Weight 650 g (23 oz.) with probe and
°C 0.0 to 50.0°C (32 to 122 °F)
°C 0.1°C
°C ±0.5°C
with 3 m cable
soft carrying case
6
Page 7
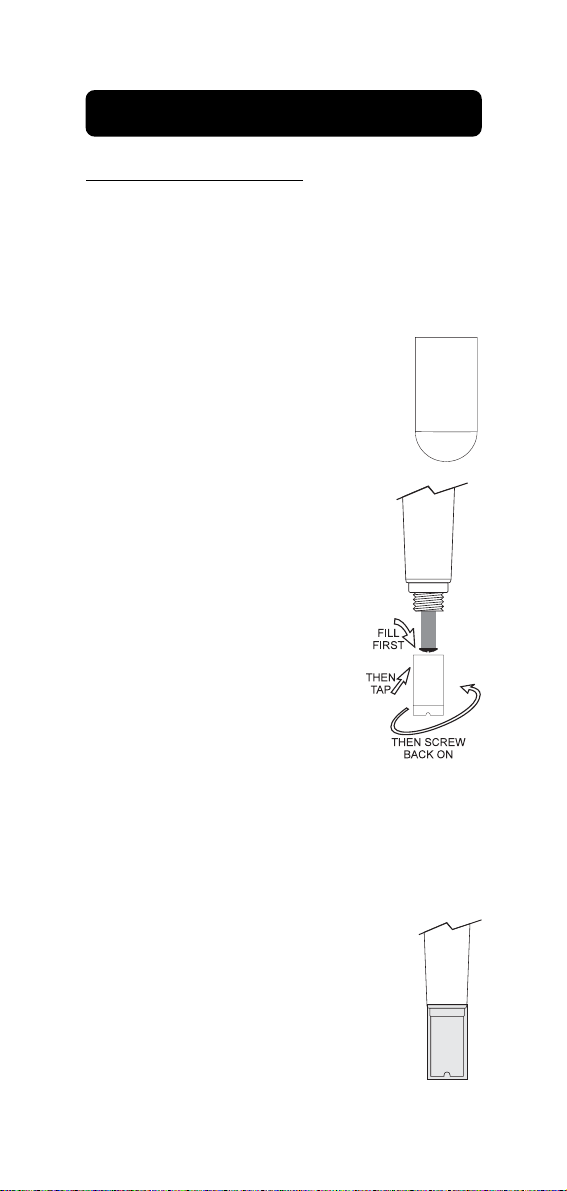
INITIAL PROBE PREPARATION
Shipping
PROBE PREPARATION
All probes shipped from Hanna Instruments
are dry. To hydrate the probe and prepare it
for use, connect it to the meter and proceed
as follows.
1 Remove the red and black
plastic cap. This cap is for
cap
shipping purposes and can
be thrown away.
2 Wet the sensor by soak-
black
ing the bottom 2½ cm (1")
of the probe in electrolyte
red
(HI 7041S) for 5 minutes.
3 Rinse the supllied mem-
brane (HI 76407A) with
electrolyte while shaking it
gently. Refill with clean
electrolyte.
4 Gently tap the sides of the
membrane with your finger
tip to ensure that no air
bubbles remain trapped. To
avoid damaging the membrane, do not tap the membrane directly on the bottom.
5 Make sure that the rubber O-ring sits prop-
erly inside the membrane cap.
6 With the sensor facing down, screw the
cap clockwise. Some electrolyte will overflow.
When not in use, place the
protective cap supplied in the
kit with the meter.
7
Page 8

PROBE POLARIZATION
When the probe is under polarization it is
continuously fed with a voltage of approximately 800 mV.
Probe polarization is essential for stable measurements to be taken with the same recurring degree of accuracy.
In the presence of the polarized probe, oxygen is continually "consumed" by passing
through the sensitive diaphragm and dissolving in the electrolyte solution contained in the
probe.
If this operation is interrupted, the electrolyte
solution continues to be enriched with oxygen until it reaches an equilibrium with the
surrounding solution.
Whenever measurements are taken with a
non-polarized probe, the oxygen level detected
by the meter is both that of the tested sample
as well as the oxygen present in the electrolyte solution itself.
By leaving the instrument in
OFF
STB
°C
O
the "STB" mode, which signifies keeping the probe in a
continual state of polarization, the oxygen which is
present in the electrolyte solution is progressively "consumed", and the following measurements detect only the quantity of oxygen
present in the sample to be tested.
Therefore, in order to keep the probe continuously polarized it is necessary to switch the
meter to the "STB" mode and wait for at least
30 minutes. This should be done with the
probe covered with the protective cap and
filled with some electrolyte solution.
STB
Polarization is not maintained
when the instrument is
OFF
°C
O
switched to the "OFF" position.
2
2
8
Page 9

DISSOLVED OXYGEN CALIBRATION
The calibration should be verified:
- After approximately 20 hours of use.
- Whenever the electrolyte or membrane is
changed and after cleaning the electrode.
- After excessive use in aggressive solu-
tions.
Accessories:
- 200 cc of HI 7040 solution
- 1 bottle of HI 7041 solution
Procedure for calibration at sea level:
• If you are starting from
the "OFF" position, switch
OFF
STB
°C
O
to "STB" and wait 30 minutes for complete polarization of the probe before proceeding to the calibration procedure.
2
ZERO CALIBRATION:
• Switch from "STB" posi-
tion to "O2" position.
• Remove the protective
cap and immerse the
probe in the HI 7040 zero
oxygen solution and wait
for approximately 5 minutes.
• The indications given by
the instrument must fall
to stabilization levels. If
the probe has not been
sufficiently polarized, the
readout will continue to
fluctuate.
9
OFF
STB
°C
O
2
Page 10

In this case, switch back
to "STB" position, place
OFF
STB
°C
O
the protective cap and
wait for a few hours for
complete polarization before proceeding.
• Using a small screwdriver, turn the Zero Cali-
bration screw until the display reads zero.
ZERO
SLOPE
°C
• If the zero point is
passed, "1" will appear
on the display. If you cannot get zero reading the probe is probably
defective, in which case you should check
the membrane, electrode and electrolyte
solution (see below).
Rinse the probe thoroughly with normal tap water
after the zero calibration has been completed.
2
SLOPE CALIBRATION:
In order to perform a highly
accurate calibration, take a
B.O.D. bottle and then fill with
water to a depth of 1 or 2 cm
(½ or ¾"), then seal the bottle
with the probe inside.
If this calibration is to be carried out with the bottle opened
to air rather than according to
the conditions described
above, the margin of error is
approximately 0.1 ppm.
• Switch the instrument to
"°C", wait for readings to
stabilize and then note the
temperature of the water.
10
OFF
STB
°C
O
2
Page 11

• Refer to Table 1 on page 10 for the corre-
sponding dissolved oxygen reading at that
temperature.
• Switch to "O2" position
and adjust the "Slope"
OFF
STB
°C
O
trimmer until the correct
reading is displayed; e.g.
at 20.5°C the trimmer
should be adjusted until
display reads 9.08.
ZERO
SLOPE
°C
CORRECTION FOR ALTITUDE EFFECT
If the calibration is not performed at sea level
a correction should be made for the difference in altitude according to Table 2 on page
11; e.g. if calibrated at 20.5°C at an altitude
of 300 m above sea level, the display should
be adjusted to 9.08 x 0.96 = 8.72.
2
ZERO
SLOPE
°C
CORRECTION FOR SALINITY EFFECT
Another correction has to be performed if the
sample presents significant salinity concentrations. In such case, the reading has to be
adjusted according to Table 3 on page 12;
e.g. if calibrated at 20.5°C and the sample
has a salinity content of 3 g/l, the display
should be set at 9.08 - (3 x 0.0478) = 8.94.
ZERO
SLOPE
°C
11
Page 12

Table 1
Dissolved Oxygen (ppm) in Fresh Water
as a function of Temperature (°C)
°C
0.0
0.1
0.2
0
14.62
14.58
1
14.23
14.19
2
13.84
13.80
3
13.48
13.45
4
13.13
13.10
5
12.80
12.77
6
12.48
12.45
7
12.17
12.14
8
11.87
11.84
9
11.59
11.33
11.08
10.83
10.60
10.37
10.15
9.95
9.74
9.54
9.35
9.17
8.99
8.83
8.68
8.53
8.38
8.22
8.07
7.92
7.77
7.63
7.50
7.40
7.30
7.20
7.10
7.00
6.90
6.80
6.70
6.60
6.50
6.40
6.30
6.20
6.10
6.00
5.90
5.80
5.70
5.60
11.56
11.31
11.06
10.81
10.58
10.35
10.13
9.93
9.72
9.52
9.33
9.15
8.97
8.82
8.67
8.52
8.36
8.21
8.06
7.91
7.76
7.62
7.49
7.39
7.29
7.19
7.09
6.99
6.89
6.79
6.69
6.59
6.49
6.39
6.29
6.19
6.09
5.99
5.89
5.79
5.69
5.59
10
11
12
13
14
15
16
17
18
19
20
21
22
23
24
25
26
27
28
29
30
31
32
33
34
35
36
37
38
39
40
41
42
43
44
45
46
47
48
49
50
14.54
14.15
13.77
13.41
13.06
12.74
12.42
12.11
11.81
11.54
11.28
11.03
10.78
10.55
10.33
10.11
9.91
9.70
9.50
9.31
9.13
8.96
8.80
8.65
8.50
8.35
8.19
8.04
7.89
7.74
7.60
7.48
7.38
7.28
7.18
7.08
6.98
6.88
6.78
6.68
6.58
6.48
6.38
6.28
6.18
6.08
5.98
5.88
5.78
5.68
5.58
0.3
14.50
14.11
13.73
13.38
13.03
12.70
12.39
12.08
11.79
11.51
11.26
11.01
10.76
10.53
10.30
10.09
9.89
9.68
9.48
9.30
9.12
8.94
8.79
8.64
8.49
8.33
8.18
8.03
7.88
7.73
7.59
7.47
7.37
7.27
7.17
7.07
6.97
6.87
6.77
6.67
6.57
6.47
6.37
6.27
6.17
6.07
5.97
5.87
5.77
5.67
5.57
0.4
14.46
14.07
13.70
13.34
13.00
12.67
12.36
12.05
11.76
11.49
11.23
10.98
10.74
10.51
10.28
10.07
9.87
9.66
9.46
9.28
9.10
8.93
8.77
8.62
8.47
8.32
8.16
8.01
7.86
7.71
7.58
7.46
7.36
7.26
7.16
7.06
6.96
6.86
6.76
6.66
6.56
6.46
6.36
6.26
6.16
6.06
5.96
5.86
5.76
5.66
5.56
0.5
14.43
14.03
13.66
13.31
12.97
12.64
12.33
12.02
11.73
11.46
11.21
10.96
10.72
10.49
10.26
10.05
9.84
9.64
9.44
9.26
9.08
8.91
8.76
8.61
8.46
8.30
8.15
8.00
7.85
7.70
7.57
7.45
7.35
7.25
7.15
7.05
6.95
6.85
6.75
6.65
6.55
6.45
6.35
6.25
6.15
6.05
5.95
5.85
5.75
5.65
5.55
0.6
14.39
14.00
13.62
13.27
12.93
12.61
12.29
11.99
11.70
11.43
11.18
10.93
10.69
10.46
10.24
10.03
9.82
9.62
9.43
9.24
9.06
8.89
8.74
8.59
8.44
8.28
8.13
7.98
7.83
7.69
7.55
7.44
7.34
7.24
7.14
7.04
6.94
6.84
6.74
6.64
6.54
6.44
6.34
6.24
6.14
6.04
5.94
5.84
5.74
5.64
5.54
0.7
14.35
13.96
13.59
13.24
12.90
12.58
12.26
11.96
11.67
11.41
11.16
10.91
10.67
10.44
10.22
10.01
9.80
9.60
9.41
9.22
9.04
8.88
8.73
8.53
8.53
8.27
8.12
7.97
7.82
7.67
7.54
7.43
7.33
7.23
7.13
7.03
6.93
6.83
6.73
6.63
6.53
6.43
6.33
6.23
6.13
6.03
5.93
5.83
5.73
5.63
5.53
0.8
14.31
13.92
13.55
13.20
12.87
12.54
12.23
11.93
11.65
11.38
11.13
10.89
10.65
10.42
10.19
9.99
9.78
9.58
9.39
9.21
9.03
8.86
8.71
8.56
8.41
8.25
8.10
7.95
7.80
7.66
7.53
7.42
7.32
7.22
7.12
7.02
6.92
6.82
6.72
6.62
6.52
6.42
6.32
6.22
6.12
6.02
5.92
5.82
5.72
5.62
5.52
0.9
14.27
13.88
13.52
13.17
12.83
12.51
12.20
11.90
11.62
11.36
11.11
10.85
10.62
10.39
10.17
9.97
9.76
9.56
9.37
9.19
9.01
8.85
8.70
8.55
8.40
8.24
8.09
7.94
7.79
7.64
7.51
7.41
7.31
7.21
7.11
7.01
6.91
6.81
6.71
6.61
6.51
6.41
6.31
6.21
6.11
6.01
5.91
5.81
5.71
5.61
5.51
12
Page 13

Table 2
Correction for measurements
at different altitude
ALTITUDE
(METERS)
Sea level
50
100
150
200
300
400
500
600
700
800
900
1000
1100
1200
1300
1400
1500
1600
1700
1800
1900
ATMOSPHERIC
PRESSURE
KPa
101.3
100.7
100.1
99.4
98.8
97.6
96.4
95.2
94.0
92.8
91.7
90.5
89.4
88.3
87.2
86.1
85.0
84.0
82.9
81.9
80.9
79.9
CORRECTION
FACTOR
1.00
0.99
0.99
0.98
0.98
0.96
0.95
0.94
0.93
0.92
0.90
0.89
0.88
0.87
0.86
0.85
0.84
0.83
0.82
0.81
0.80
0.79
13
Page 14

Table 3
Correction for salinity effect
Quantity to be
°C
subtracted per mg/l
of NaCl
0
1
2
3
4
5
6
7
8
9
10
11
12
13
14
15
16
17
18
19
20
21
22
23
24
25
0.0892
0.0861
0.0830
0.0802
0.0779
0.0749
0.0724
0.0701
0.0678
0.0657
0.0637
0.0618
0.0599
0.0582
0.0565
0.0549
0.0533
0.0519
0.0505
0.0491
0.0478
0.0466
0.0454
0.0442
0.0431
0.0421
°C
26
27
28
29
30
31
32
33
34
35
36
37
38
39
40
41
42
43
44
45
46
47
48
49
50
Quantity to be
subtracted per mg/l of
NaCl
0.0410
0.0400
0.0391
0.0382
0.0373
0.0364
0.0356
0.0348
0.0341
0.0333
0.0326
0.0319
0.0312
0.0306
0.0299
0.0293
0.0287
0.0281
0.0275
0.0270
0.0265
0.0259
0.0254
0.0249
0.0244
14
Page 15

TEMPERATURE CALIBRATION
The temperature should be calibrated at least
every 3 months or whenever the readings are
in doubt, using the following procedure:
• Immerse the bottom
60 mm (2.4") of the probe
in a beaker of water.
• Switch the instrument to
°C.
STB
°C
• Agitate the water for at
OFF
O
2
least 10 minutes until thermal equilibrium between the
probe and water is
achieved.
°
• Check the temperature
C
of the water using
ChecktempC or a thermometer with a resolution
of 0.1°C (e.g. 20.0°C).
• Adjust the °C trimmer until the display
reads the thermometer temperature value.
ZERO
SLOPE
°C
Note: It is important to ensure thermal
equilibrium between probe and the water
as 1 degree of temperature difference
entails an error of ±3% in dissolved
oxygen measurement.
15
Page 16

TAKING MEASUREMENTS
Make sure the meter has been
calibrated and the protective
cap has been removed.
Immerse the tip of the probe
in the sample to be tested.
For accurate dissolved oxygen
measurements a water movement of 0.3 m/sec is required
at a minimum. This is to ensure that the oxygen-depleted
membrane surface is constantly replenished. A moving
stream will provide adequate
circulation. To quickly check if the water
speed is sufficient, wait for the reading to be
stable and then move the D.O. probe. If the
reading is still stable, the measurement conditions are right, while if the reading increases
the water movement is too low.
During field measurements, this condition may
be met by manually agitating the probe. Accurate readings are not possible while the
liquid is at rest.
During laboratory measurements, the use of
a magnetic stirrer to ensure a certain velocity
in the fluid is recommended. In this way,
errors due to the diffusion of the oxygen
present in the air in the solution are reduced
to a minimum.
At all times, the time necessary for thermal
equilibrium to occur between the probe and
the sample must be allowed (a few minutes
for temperature difference of several degrees).
16
Page 17

PROBE & MEMBRANE MAINTENANCE
The oxygen probe body is made of reinforced
plastic for maximum durability.
A thermistor temperature sensor provides temperature measurements of the sample tested.
It is always recommended that the protective
cap be kept on the probe when the probe is
not in use to provide protection against damage and dirt.
To replace the membrane or refill it with
electrolyte, proceed as follows:
• Remove the protective
cap by gently twisting
and pulling it off the
body of the probe (see
fig. 1).
• Unscrew the membrane
TWIST
AND
PULL
by turning it counterclockwise with the
fig. 1
other hand (see fig.2)
• Wet the sensor by
soaking the bottom 2½
cm (1") of the probe in
electrolyte (HI 7041S)
for 5 minutes.
• Rinse the new mem-
brane (HI 76407A) supplied with the meter
with electrolyte while
shaking it gently. Refill
with clean electrolyte.
• Gently tap the sides of
the membrane with your
finger tip to ensure that
no air bubbles remain
trapped. Do no directly
tap the bottom with your
finger as this will damage the membrane.
17
Page 18

• Make sure that the rubber O-ring is seated
properly inside the membrane cap.
• With the sensor facing down, screw the
membrane cap clockwise. Some electrolyte will overflow.
The Platinum cathode (#8 in the Functional
Description at page 2) should always be bright
and untarnished. If it is tarnished or stained,
which could be due to contact with certain
gases or extended use with a loose or damaged membrane, the cathode should be
cleaned. You can use a clean lint-free cardboard or cloth. Rub the cathode very gently
side to side 4-5 times. This will be enough to
polish and remove any stains without damaging the platinum tip. Afterwards, rinse the
probe with deionized or distilled water and
install a new membrane cap using fresh electrolyte and follow the steps above. Recalibrate
the instrument.
Important: in order to have accurate and
stable measurements, it is important that the
surface of the membrane is in perfect condition. This semipermeable membrane isolates
the sensor elements from the environment
but allows oxygen to enter. If any dirt is
observed on the membrane, rinse carefully
with distilled or deionized water. If any imperfections still exist, or any damage is evident
(such as wrinkles or tears - holes), the membrane should be replaced. Make sure that the
O-Ring is properly seated in the membrane
cap.
18
Page 19

BATTERY REPLACEMENT
When the battery is rundown
"V" is displayed on the Liq-
V
uid Crystal Display to warn
the user.
This is to inform the user that the display will
be shut-off after about 4 hours of use to
prevent erroneous measurements being taken
due to low voltage.
Battery replacement must only take place in
a non hazardous area using the battery types
specified in this instruction manual (see
page 17).
In order to replace rundown batteries, simply
slide the cover off and replace the 9V battery
with a new one.
BATTERY
19
Page 20

ACCESSORIES
BATT9/P 9V battery (10 pcs)
HI 7040M Zero Oxygen calibration solu-
tion, 230 mL
HI 7040L Zero Oxygen calibration solu-
tion, 460 mL
HI 7041S Refilling Electrolyte solution,
30 mL
HI 76401 D.O. probe with 3 meters (10')
cable
HI 76407A/P 5 spare membranes
HI 76501/P Screwdrivers, length 90 mm for
calibration purposes (20 pcs)
20
Page 21

WARRANTY
All Hanna Instruments meters are warranted
for two years against defects in workman-
ship and materials when used for their intended purpose and maintained according to
the instructions. The probes are warranted
for a period of six months.
Damages due to accident, misuse, tampering or lack of prescribed maintenance are not
covered. This warranty is limited to repair or
replacement free of charge.
If service is required, contact the dealer from
whom you purchased the instrument. If under
warranty, report the model number, date of
purchase, serial number and the nature of the
failure. If the repair is not covered by the
warranty, you will be notified of the charge for
repair or replacement. If the instrument is to
be returned to Hanna Instruments, obtain a
Return Goods Authorization from the Customer Service Department first and then send
it with shipment cost prepaid. When shipping
any instrument, make sure it is properly packaged for complete protection.
All rights are reserved. Reproduction in whole
or in part is prohibited without the written
consent of the copyright owner.
Hanna Instruments reserves the right to
modify the design, construction and appearance of its products without advance notice.
21
Page 22

CE DECLARATION OF CONFORMITY
Recommendations for Users
Before using this product, make sure that it is entirely suitable for the environment
in which it is used.
Operation of this instrument in residential area could cause unacceptable interferences to radio and TV equipments, requiring the operator to take all necessary steps
to correct interferences.
Any variation introduced by the user to the supplied equipment may degrade the
instrument's EMC performance.
To avoid damages or burns, do not perform any measurement in microwave ovens.
22
Page 23

HANNA PRODUCTS
• CALIBRATION AND MAINTENANCE
SOLUTIONS
• CHEMICAL TEST KITS
• CHLORINE METERS
• CONDUCTIVITY/TDS METERS
• DISSOLVED OXYGEN METERS
• HYGROMETERS
• ION SPECIFIC METERS
• MAGNETIC STIRRERS
• Na/NaCl METERS
• pH/ORP/Na ELECTRODES
• PROBES (DO, µS/cm, RH, T, TDS)
• PUMPS
• REAGENTS
• SOFTWARE
• THERMOMETERS
• TITRATORS
• TRANSMITTERS
• TURBIDITY METERS
• Wide Range of Accessories
Most Hanna meters are available in the fol-
lowing formats:
• BENCH-TOP METERS
• POCKET-SIZE METERS
• PORTABLE METERS
• PRINTING/LOGGING METERS
• PROCESS METERS
(Panel- and Wall-mounted)
• WATERPROOF METERS
• METERS FOR FOOD INDUSTRY
For additional information, contact your dealer
or the nearest Hanna Customer Service Center.
You can also e-mail us at:
tech@hannainst.com
23
Page 24

Stay in Touch with the Manufacturer!
24
MAN8043R1
07/96
 Loading...