

Page 1

KHAKI AUTOMATIC
X-WI ND
INSTRUCTION MANUAL
Page 2

Page 3

English 02
Français 10
Deutsch 18
Italiano 26
Español 34
Português 42
Nederlands 50
58
Русский 66
Česky 74
82
90
98
113
© HAMILTON 2005 / KHAKI AUTOMATIC X-WIND 1
Page 4

1) Time/date/day setting crown
2) Chronograph start/stop button
3) Chronograph resetting button
4) 12-hour counter
Hamilton is delighted that you have chosen a time-
piece from its collection. You have acquired a small
technological marvel that will serve you faithfully for
many years. The most advanced technologies were
used throughout its manufacture and it underwent
stringent controls before it was released for sale.
5) 30-minute counter
6) Small second hand independent of chronograph
A) Exterior rotating bezel
B) Crown for adjusting C
C) Upper interior rotating bezel
D) Crown for adjusting E
E) Lower interior rotating bezel
Instructions for use
The Hamilton Khaki Automatic X-Wind has three screw-down crowns and two push-buttons.
(
1) crown for setting the time, the day and the date
B) crown for adjusting the upper interior rotating bezel (C)
(
(
D) crown for adjusting the lower interior rotating bezel (E)
(
2) button to start and stop the chronograph
(
3) button to reset the chronograph to zero
Setting the time
– Unscrew setting crown (1).
– Pull out the crown completely to position (
– Adjust the time by turning the crown in the desired direction.
– Push back the crown completely then screw it down again.
Setting the date / day
– Unscrew setting crown (1).
– Pull out the crown to the intermediate position (
– Turn the crown anticlockwise until the desired date appears, or clockwise for the desired day. Do not
perform this operation between 2000 and 0200 (8 p.m. and 2 a.m.).
– Push back the crown completely then screw it down again.
© HAMILTON 2005 / KHAKI AUTOMATIC X-WIND 32 © HAMILTON 2005 / KHAKI AUTOMATIC X-WIND
1b).
1a).
Page 5

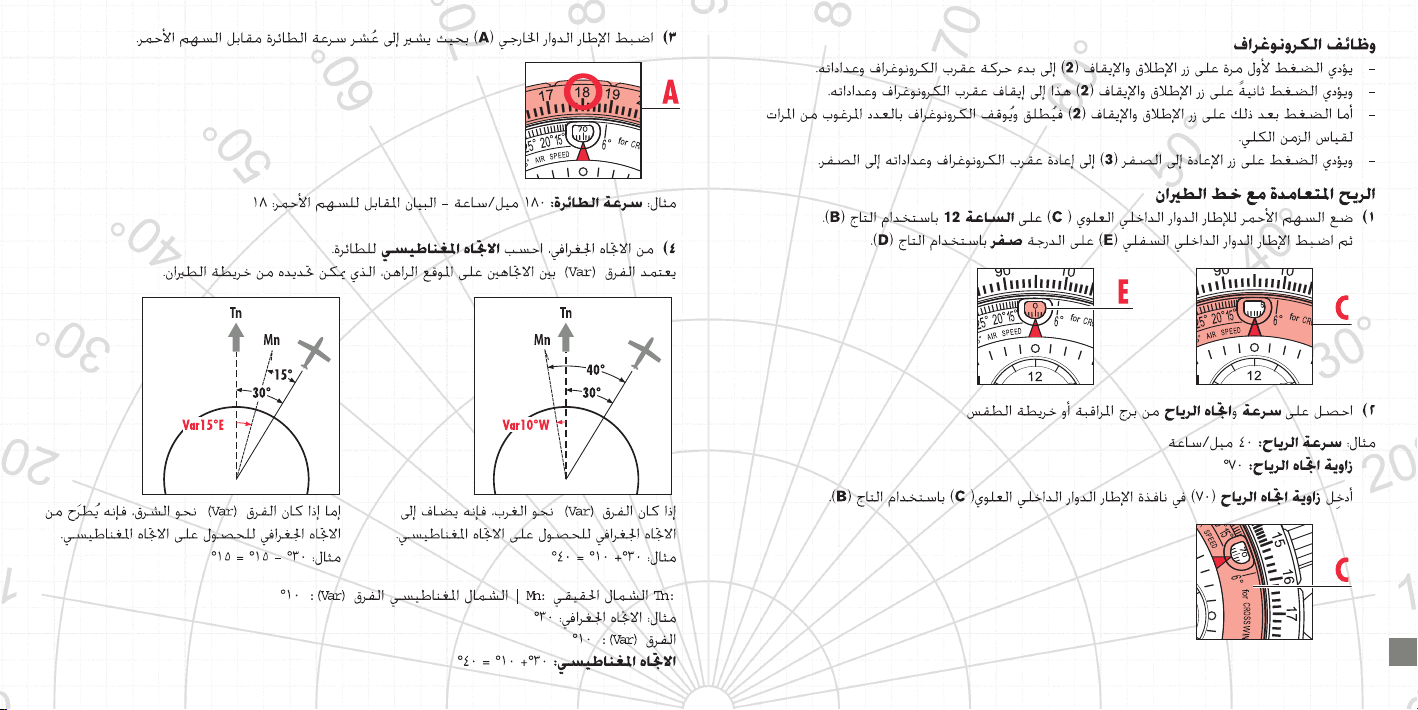
Chronograph functions
– First push of start/stop button (2) starts chronograph hand and counters.
– Second push of start/stop button (
– Subsequent operation of start/stop button (
2) stops chronograph hand and counters.
2) starts and stops the chronograph as many times as required
to measure a total time.
– Pushing reset button (
3) resets the chronograph hand and counters to zero.
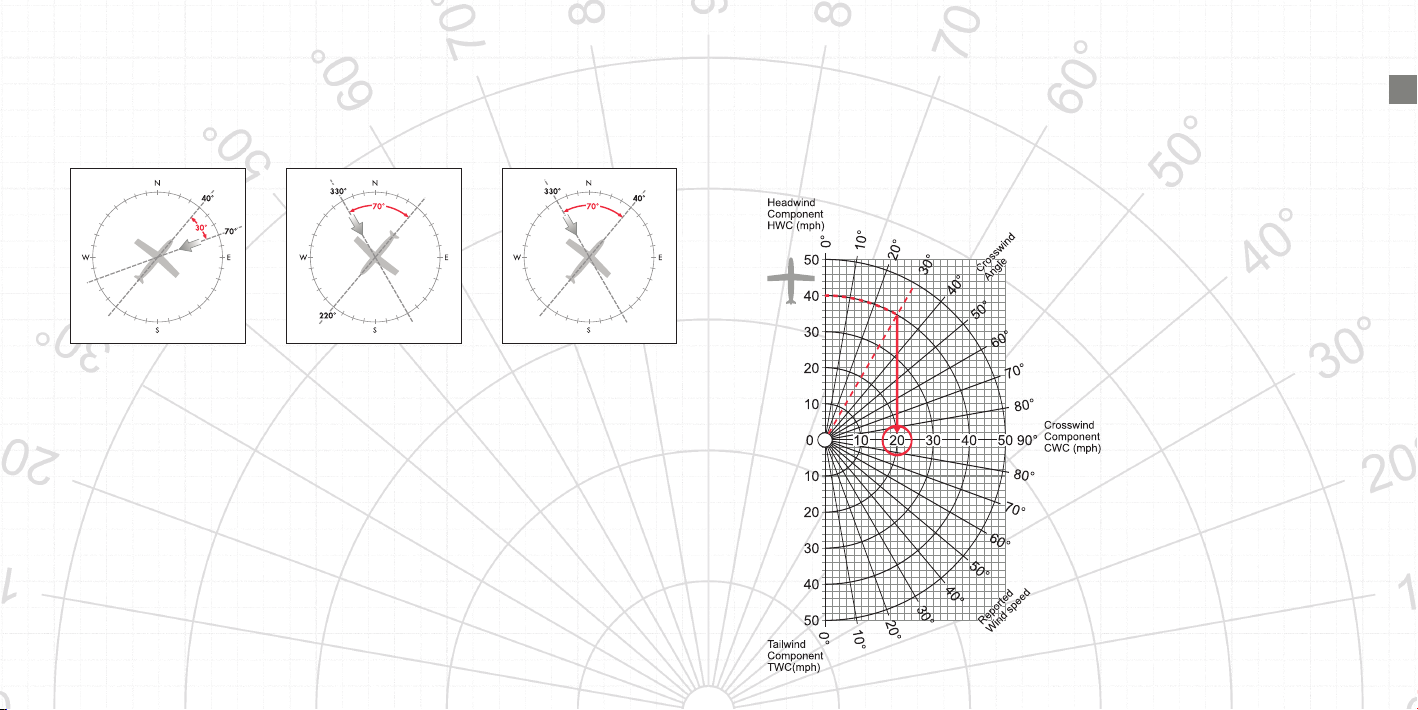
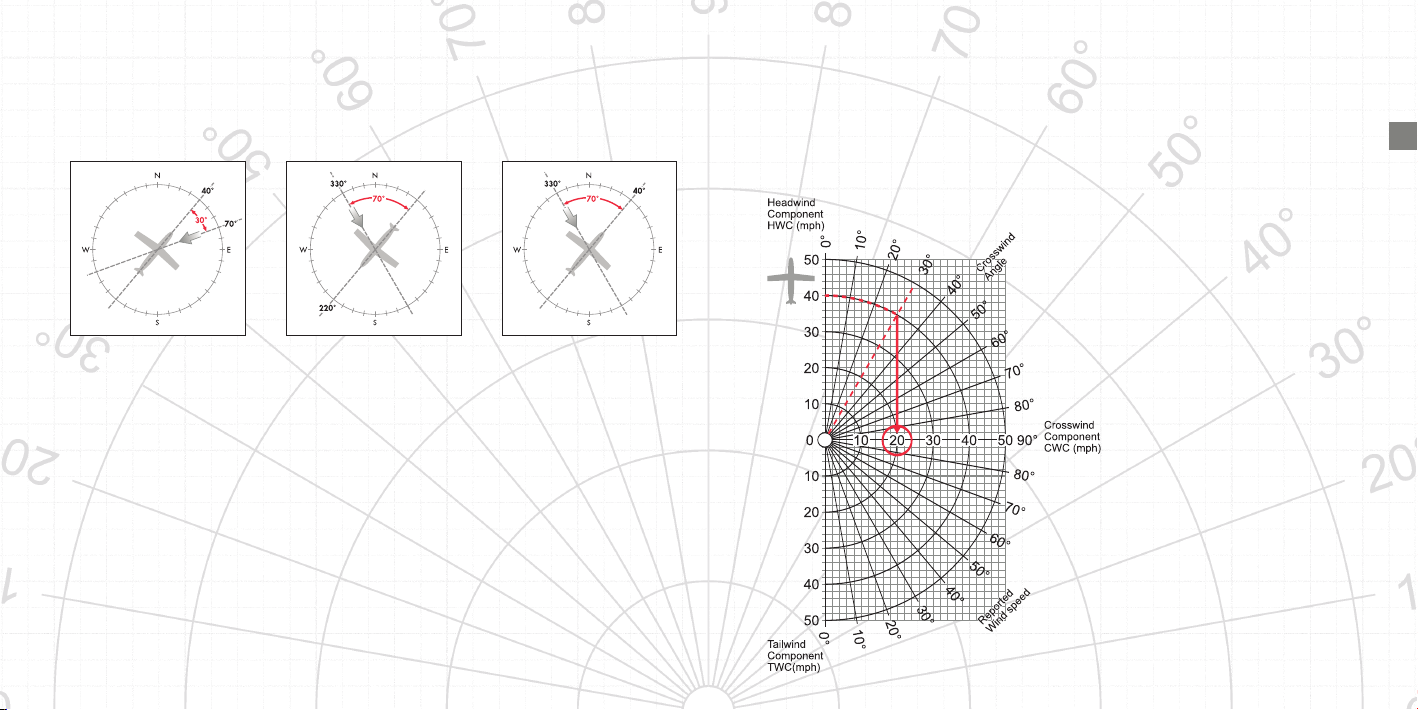
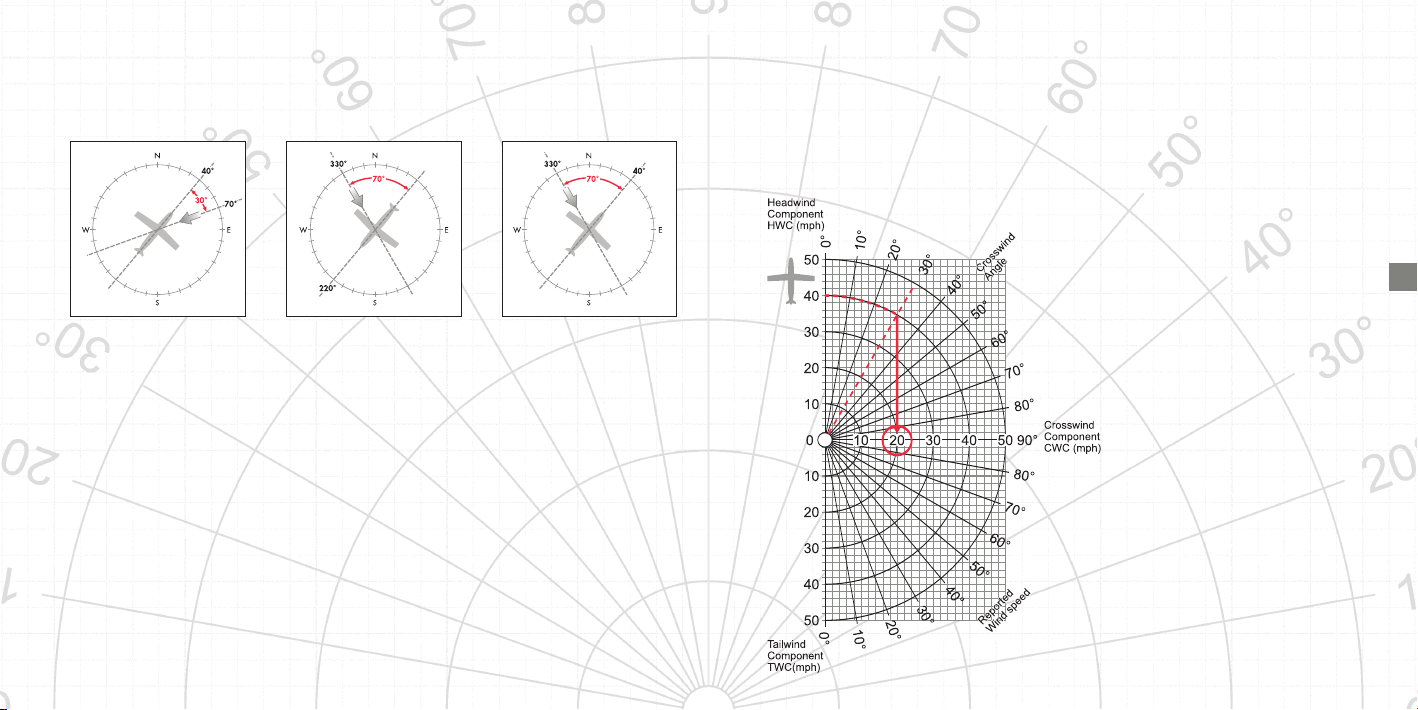
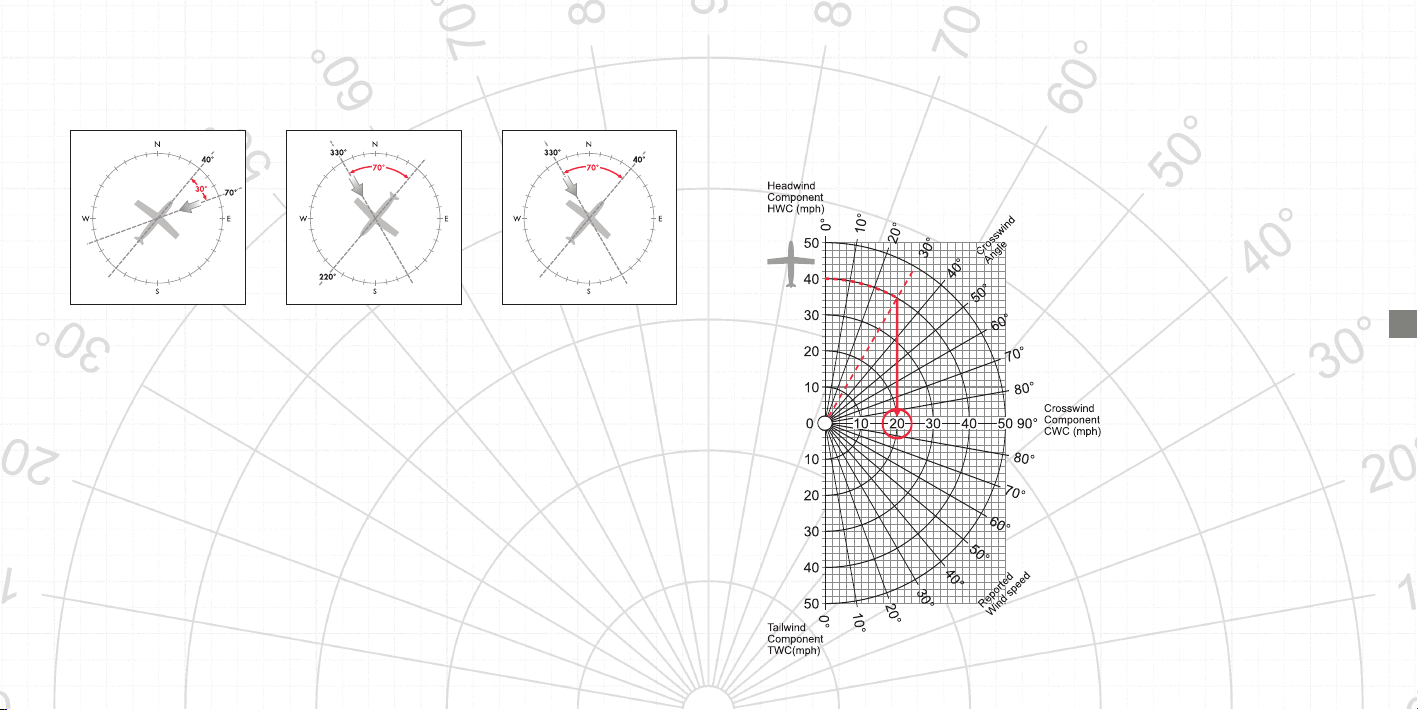
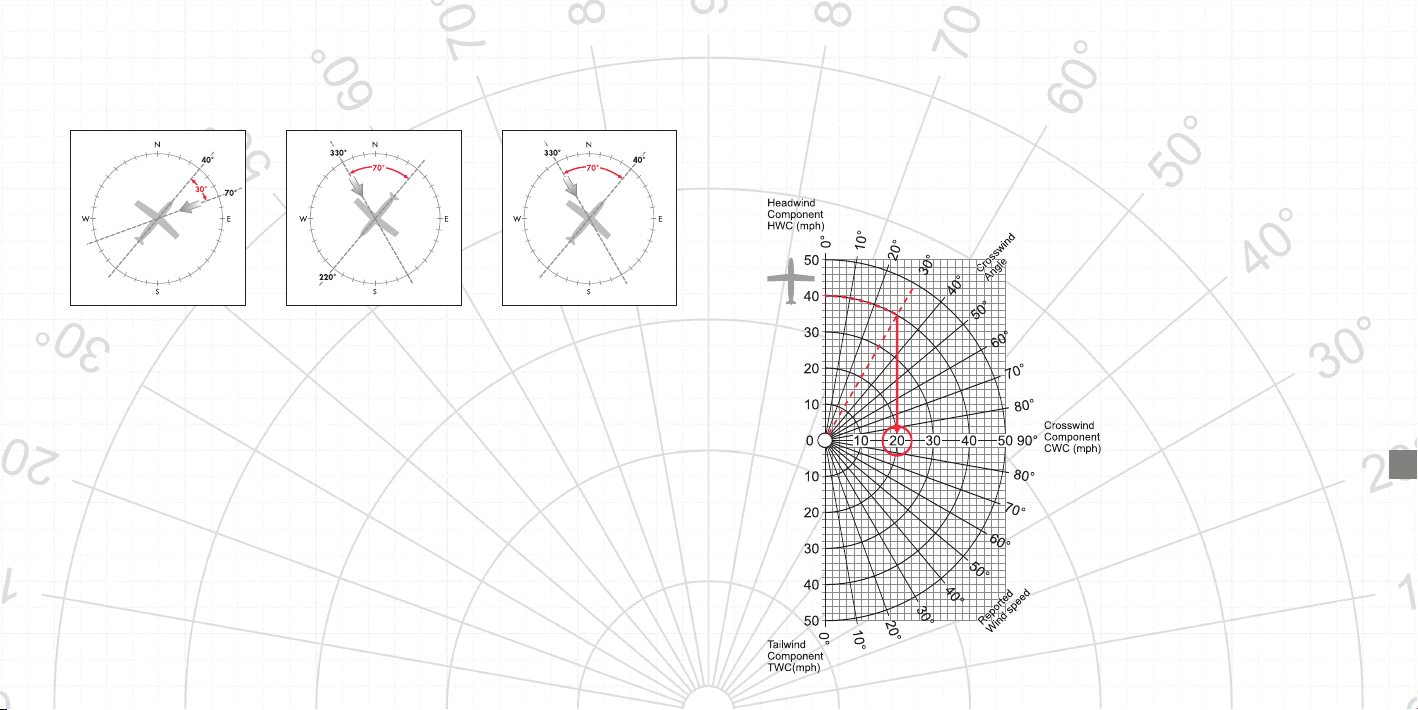
Crosswind
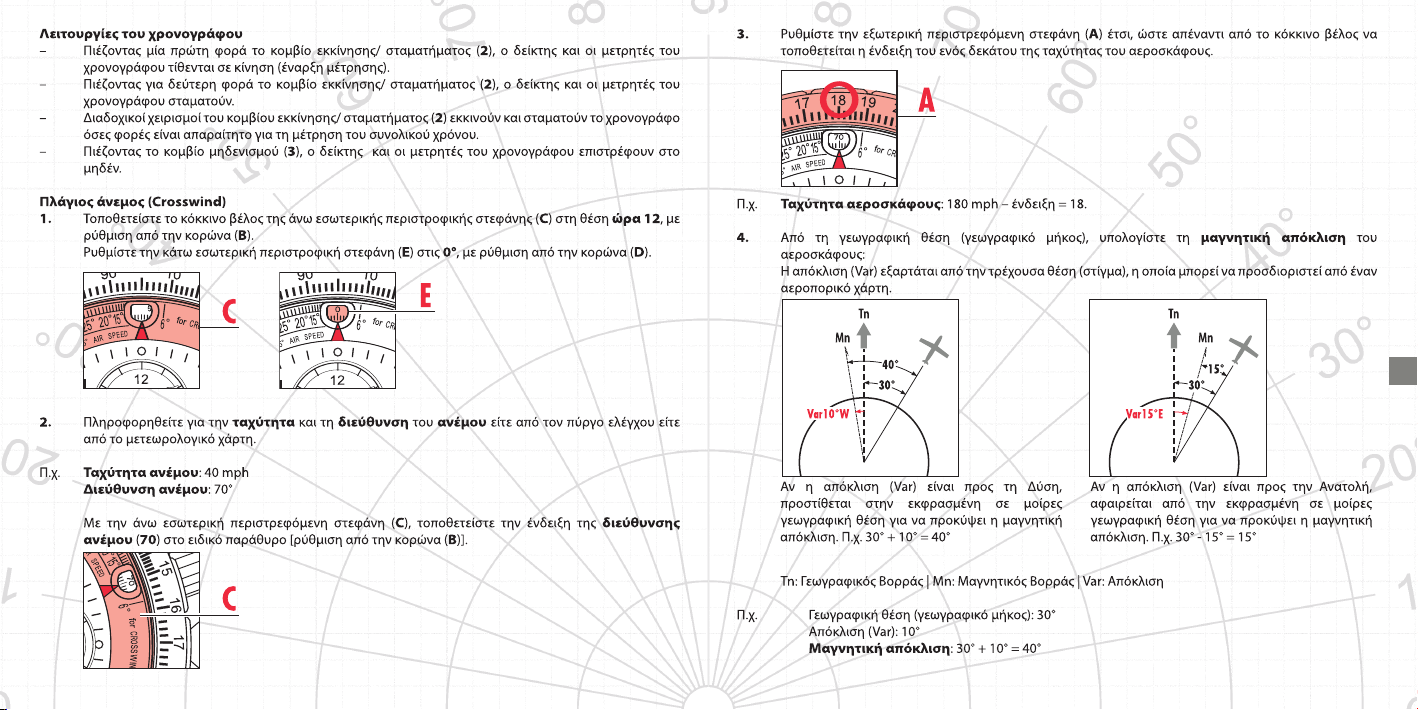
1. Position the red arrow of the upper interior rotating bezel (C) at 12 o'clock by adjusting with crown (B).
Adjust the lower interior rotating bezel (
E) to 0° by adjusting with crown (D).
2. Obtain wind speed and direction from control tower or weather chart.
Ex.
Wind speed: 40 mph
Wind direction: 70°
wind direction (70) in the window with the upper interior rotating bezel (C) by adjusting with crown
Indicate
(
B).
3. Adjust the exterior rotating bezel (A) so that one tenth of the speed of the aircraft is indicated opposite the
red arrow.
Ex. Aircraft speed: 180 mph – indicate 18.
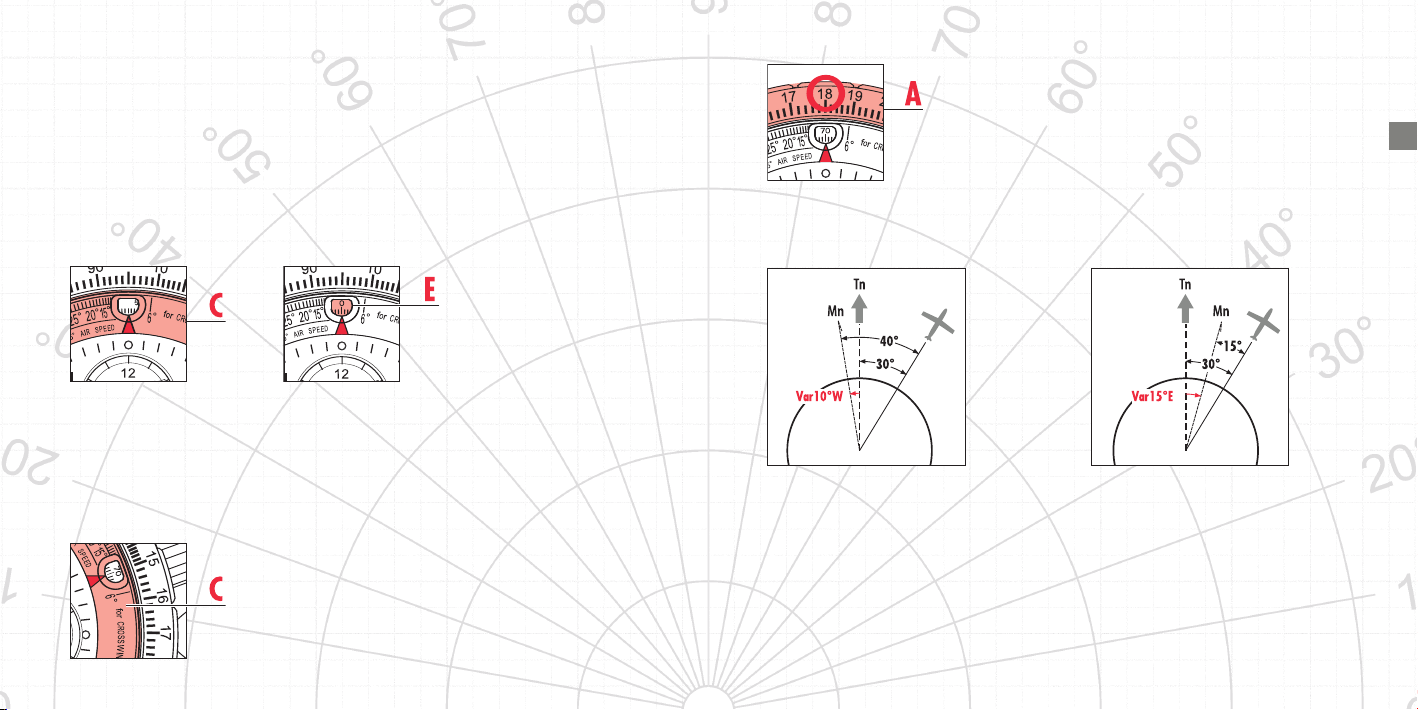
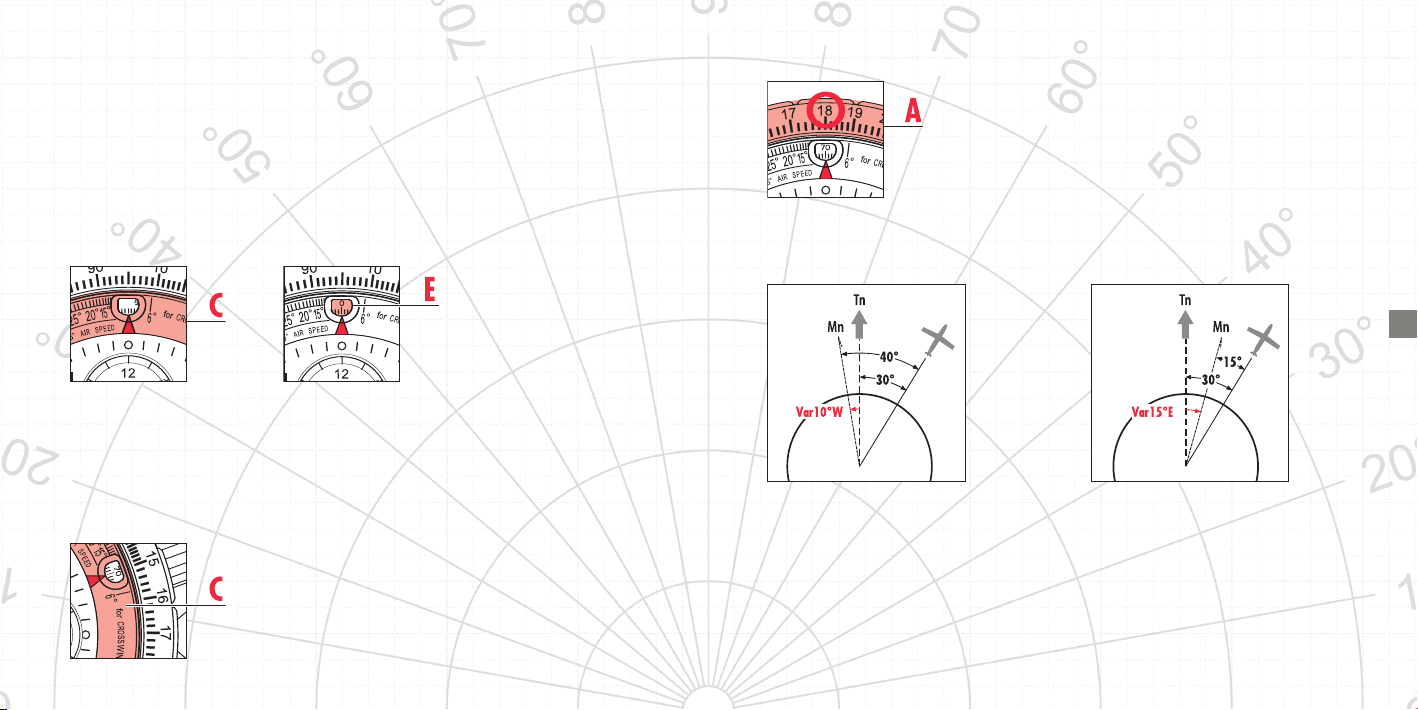
4. From the geographical bearing, calculate the magnetic bearing of the aircraft:
The variation (Var) depends on the current location, which can be determined from an aviation chart.
If the variation (Var) is to the West, it is added to
the geographical bearing to obtain the magnetic
bearing. Ex. 30° + 10° = 40°
Tn: True North | Mn: Magnetic North | Var: Variation
Ex. Geographical bearing: 30°
Variation (Var): 10°
Magnetic bearing: 30° + 10° = 40°
© HAMILTON 2005 / KHAKI AUTOMATIC X-WIND 54 © HAMILTON 2005 / KHAKI AUTOMATIC X-WIND
If the variation (Var) is to the East, it is subtracted
from the geographical bearing to obtain the
magnetic bearing. Ex. 30° - 15° = 15°
Page 6

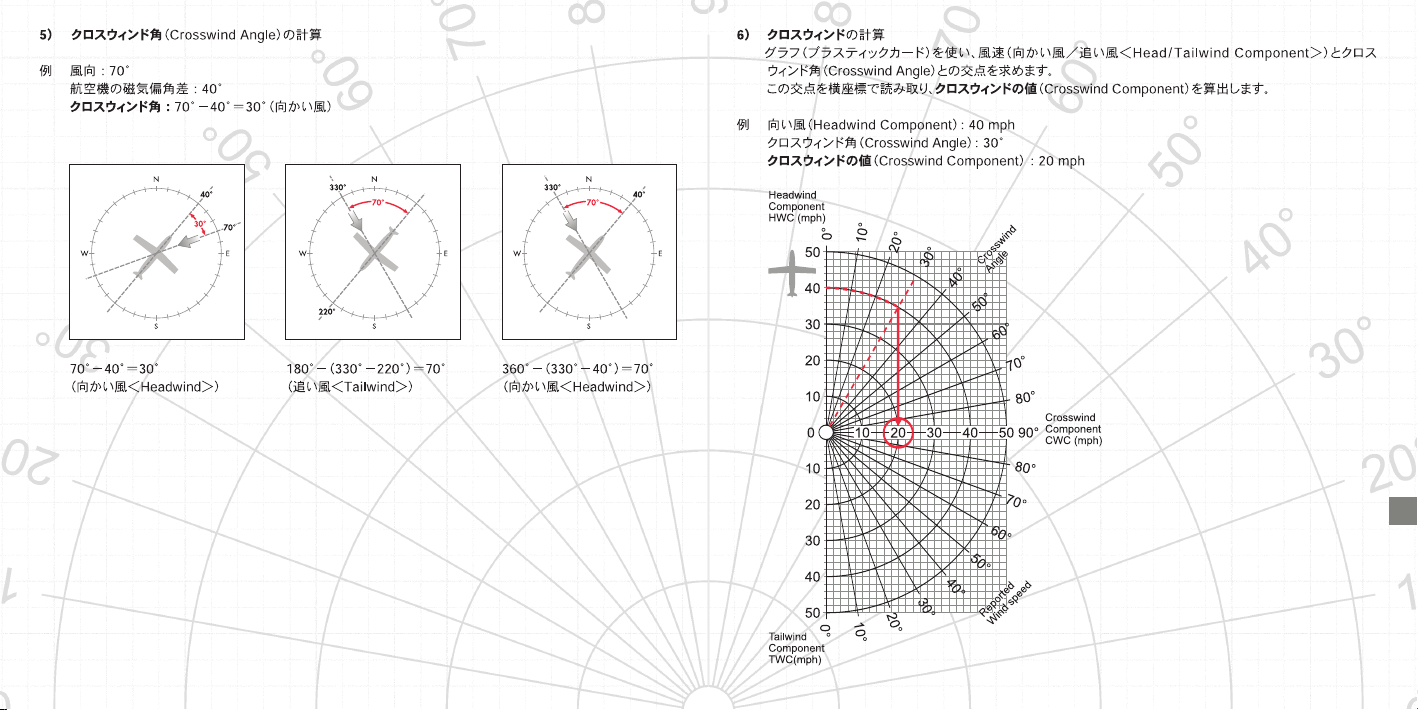
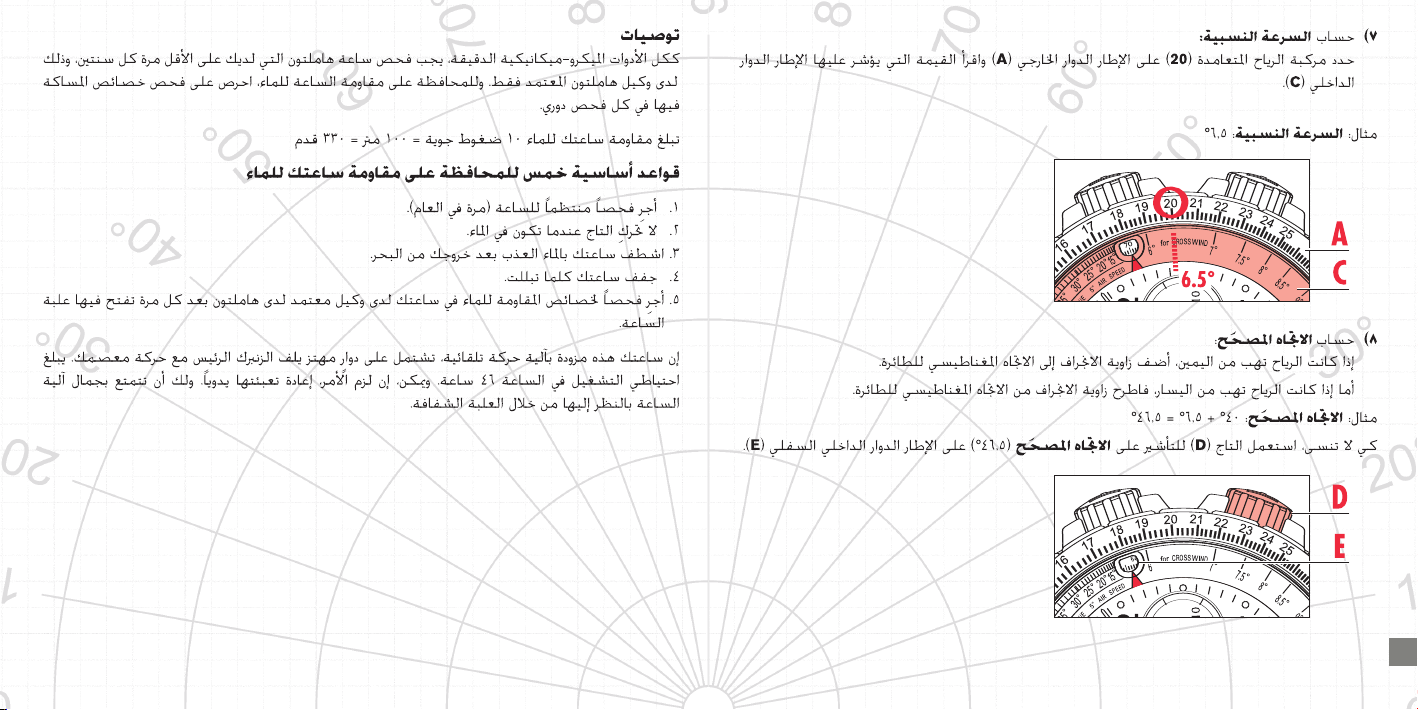
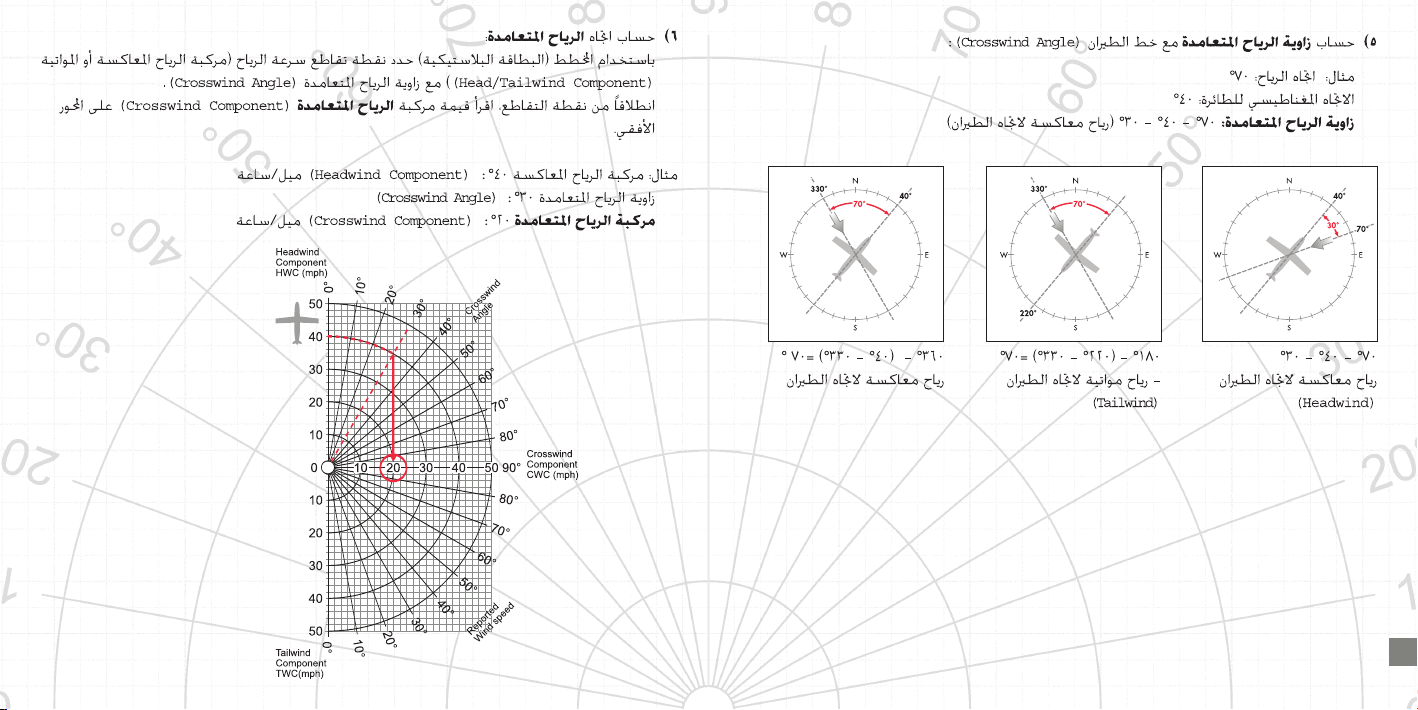
5. Calculation of crosswind angle.
Ex. Wind direction: 70°
Magnetic bearing of aircraft: 40°
Crosswind angle: 70° - 40° = 30° (headwind)
6. Calculation of crosswind:
Using the graph (plastic card) determine the point of intersection of the wind speed (head/tailwind
component) and the crosswind angle
Going from the point of intersection, read the value of the
Ex. Headwind component:
Crosswind angle:
Crosswind component
40 mph
30°
: 20 mph
crosswind component on the horizontal axis.
70° - 40° = 30°
(headwind)
180° - (330° - 220°) = 70°
(tailwind)
360° - (330° - 40°) = 70°
(headwind)
© HAMILTON 2005 / KHAKI AUTOMATIC X-WIND 76 © HAMILTON 2005 / KHAKI AUTOMATIC X-WIND
Page 7

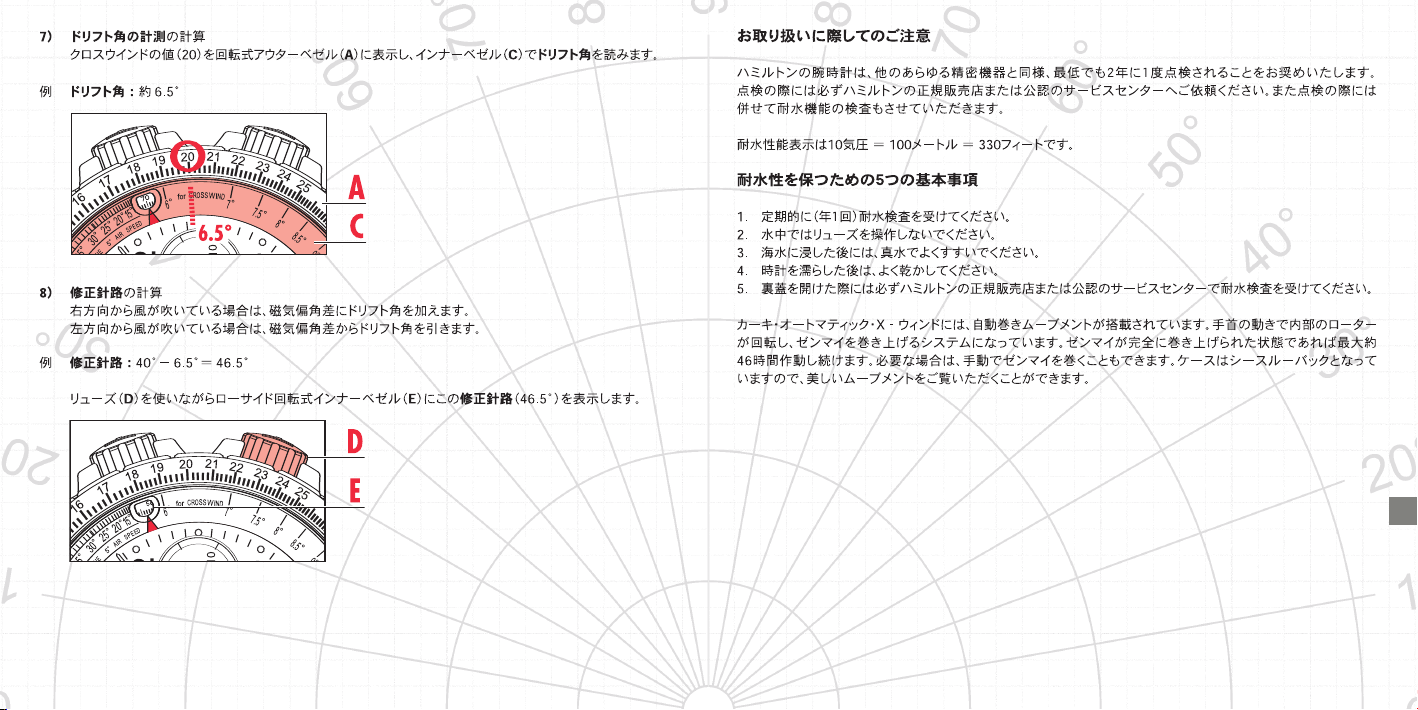
7. Calculate the angle of drift:
Locate the crosswind component (
interior bezel (
Ex.
Angle of drift: approx. 6.5°
C).
20) on the exterior rotating bezel (A) and read the value indicated on the
8. Calculation of corrected bearing:
If the wind is blowing from the right, add the angle of drift to the magnetic bearing.
If the wind is blowing from the left, subtract the angle of drift from the magnetic bearing.
Ex.
Corrected bearing: 40° + 6.5° = 46.5°
For memorization, use the crown (
rotating bezel (
E).
D) to indicate the corrected bearing (46.5°) on the lower interior
Recommendations
Like all micro-mechanical precision instruments, your Hamilton watch should be checked at least once every
two years. Entrust your watch only to an authorized Hamilton agent. To keep your watch water-resistant, make
sure that its sealing features are tested at every check-up.
The water-resistance of your watch is 10 ATM = 100 meters = 330 feet.
Five basic rules for maintaining the water-resistance of your watch
1. Have your watch checked regularly (once a year).
2. Do not move the crown when you are in water.
3. Rinse off your watch after having been in the sea.
4. Dry your watch whenever it gets wet.
5. Have your watch checked for water-resistance by an authorized Hamilton agent each time the case is
opened.
Your watch is fitted with an automatic movement. The mechanism of the watch includes an oscillating rotor that
winds the mainspring via the movement of your wrist. The running reserve is approximately 46 hours. If
necessary, the watch may be rewound manually. The beauty of the inner working of the watch movement can
be admired through the transparent case back.
© HAMILTON 2005 / KHAKI AUTOMATIC X-WIND 98 © HAMILTON 2005 / KHAKI AUTOMATIC X-WIND
Page 8
1) Couronne de réglage heure et date
2) Poussoir départ/arrêt du chronographe
3) Poussoir de remise à zéro du chronographe
4) Compteur 12 heures
Hamilton est heureux que vous ayez porté votre choix sur
un modèle de sa collection. Vous avez acquis une petite
merveille technique qui vous servira fidèlement pendant de
longues années. Les techniques les plus avancées ont été
appliquées tout au long de sa fabrication et des contrôles
très stricts ont précédé sa mise en vente.
5) Compteur 30 minutes
6) Petite seconde indépendante du chronographe
A) Lunette rotative extérieure
B) Couronne de réglage de C
C) Lunette rotative intérieure supérieure
D) Couronne de réglage de E
E) Lunette rotative intérieure inférieure
10 © HAMILTON 2005 / KHAKI AUTOMATIC X-WIND © HAMILTON 2005 / KHAKI AUTOMATIC X-WIND 11
Manuel d’utilisation
La montre Hamilton Khaki Automatic X-Wind est dotée de trois couronnes vissées et de deux poussoirs.
La couronne (
La couronne (
La couronne (
Le poussoir (
Le poussoir (
Réglage de l’heure
– Dévisser la couronne (1).
– Tirer entièrement la couronne en position (
– Régler l’heure en tournant la couronne dans le sens souhaité.
– Repousser entièrement la couronne puis la revisser.
Réglage date / jour
– Dévisser la couronne (1).
– Tirer la couronne en position intermédiaire (
– Tourner la couronne dans le sens contraire des aiguilles d’une montre pour que la
– Repousser entièrement la couronne puis la revisser.
1) sert à régler l’heure, le jour et la date.
B) actionne la lunette intérieure supérieure (C).
D) actionne la lunette intérieure inférieure (E).
2) lance et stoppe le chronographe.
3) met à zéro le chronographe.
1b).
1a).
apparaisse et dans le sens des aiguilles d’une montre pour que le
d’effectuer cette opération entre 20 heures et 02 heures.
jour souhaité apparaisse; éviter
date souhaitée
Page 9

Fonctions du chronographe
–(2) Première pression: enclenchement de l’aiguille du chronographe et des compteurs.
– Deuxième pression: arrêt de l’aiguille du chronographe et des compteurs.
– Les pressions suivantes permettent d’enclencher le chronographe et de l’arrêter autant de fois qu’il est
nécessaire de façon à obtenir un temps total.
–(
3) Poussoir de remise à zéro de l’aiguille du chronographe et des compteurs.
Vent de travers (crosswind)
1. Positionner la flèche rouge de la lunette rotative intérieure supérieure (C) sur 12 heures.
(Réglage par la couronne
Régler la lunette rotative intérieure inférieure (
B).
E) sur 0° (Réglage par la couronne D).
2. Connaître la vitesse du vent (force du vent) et la direction du vent (d’où vient le vent).
Information connue par la tour de contrôle ou sur la carte météo.
Ex.
Vitesse du vent: 40 mph
Direction du vent: 70°
Indiquer la
(Réglage par la couronne
12 © HAMILTON 2005 / KHAKI AUTOMATIC X-WIND
direction du vent (70) dans la fenêtre avec la lunette rotative intérieure supérieure (C)
B).
3. Indiquer la vitesse de l'avion au dixième sur la lunette rotative extérieure (A) en face de la flèche rouge.
Ex. Vitesse de l’avion: 180 mph – indiquer 18.
4. A partir du cap géographique, calculer le cap magnétique de l’avion:
La variation (Var) dépend de l’endroit où l’on se trouve, elle peut être lue sur une carte d’aviation.
Quand la variation (Var) est à l'ouest, elle est
ajoutée au cap géographique pour trouver le cap
magnétique. Ex. 30° + 10° = 40°
Quand la variation (Var) est à l'est, elle est
soustraite au cap géographique pour trouver le
cap magnétique. Ex. 30° - 15° = 15°
Tn: Vrai Nord | Mn: Nord Magnétique | Var: Variation
Ex. Cap géographique: 30°
Variation (Var): 10°
Cap magnétique: 30° + 10° = 40°
© HAMILTON 2005 / KHAKI AUTOMATIC X-WIND 13
Page 10
5. Calculer l’angle au vent de l’avion (Crosswind Angle). C’est-à-dire l’angle aigu entre l’axe du vent et l’axe
de l’avion.
Ex. Direction du vent: 70°
Cap magnétique de l’avion: 40°
Angle au vent: 70° - 40° = 30° (vent d’avant droite)
6. Calcul du vent de travers:
A l’aide de l’abaque (carte plastique), reporter la vitesse du vent (Head/Tailwind Component) et l’angle au
vent (Crosswind Angle).
Depuis l’intersection, lire la valeur du
vent de travers (Crosswind Component) sur l’abscisse (axe
horizontal).
Ex. Vitesse du vent (Headwind Component):
Angle au vent (Crosswind Angle):
Vent de travers
(Crosswind Component): 20 mph
40 mph
30°
70° - 40° = 30°
Vent avant droite (Headwind)
14 © HAMILTON 2005 / KHAKI AUTOMATIC X-WIND © HAMILTON 2005 / KHAKI AUTOMATIC X-WIND 15
180° - (330° - 220°) = 70°
Vent arrière droite (Tailwind)
360° - (330° - 40°) = 70°
Vent avant gauche (Headwind)
Page 11

7. Calculer l’angle de dérive:
Repérer la valeur du vent de travers (
sur la lunette intérieure (
Ex.
Angle de dérive: env. 6,5°.
C).
20) sur la lunette rotative extérieure (A) et relever la valeur indiquée
8. Calculer le cap corrigé:
Si le vent vient de droite, additionner l’angle de dérive au cap magnétique.
Si le vent vient de gauche, soustraire l’angle de dérive au cap magnétique.
Cap corrigé: 40° + 6,5° = 46,5°
Ex.
A l’aide de la couronne (
inférieure (
E).
D), indiquer pour mémoire le cap corrigé (46,5°) sur la lunette rotative intérieure
Recommandations
Votre montre Hamilton, comme toute micromécanique de précision, doit être contrôlée au moins une fois tous
les deux ans. Veillez à ne confier votre montre qu’à votre concessionnaire Hamilton. Pour préserver l’étanchéité
de votre montre, assurez-vous que ses dispositifs d’étanchéité sont vérifiés lors de chaque contrôle.
L’étanchéité de votre montre est de 10 ATM = 100 mètres.
Cinq règles de base pour préserver l’étanchéité de votre montre:
1. Faites contrôler régulièrement votre montre (une fois par an).
2. Ne touchez pas à la couronne lorsque vous êtes dans l’eau.
3. Rincez votre montre après vous être baigné.
4. Séchez votre montre chaque fois qu’elle présente des traces d’humidité.
5. Demandez à votre concessionnaire Hamilton de vérifier l’étanchéité de votre montre après toute ouverture
du boîtier.
Votre montre est équipée d’un mouvement automatique. Le mécanisme de la montre contient une masse
oscillante qui remonte le ressort par le mouvement de votre poignet. La réserve de marche est d’environ 46
heures. En cas de besoin, elle peut être remontée manuellement. La beauté du mécanisme peut être admirée
grâce au fond transparent du boîtier.
16 © HAMILTON 2005 / KHAKI AUTOMATIC X-WIND © HAMILTON 2005 / KHAKI AUTOMATIC X-WIND 17
Page 12
1) Krone zur Einstellung von Zeit/Datum/Wochentag
2) Start/Stopp Knopf für Stoppuhr
3) Nullrückstellungsknopf für Stoppuhr
4) 12 Stunden Zähler
Wir freuen uns, dass Ihre Wahl auf ein Modell aus der
Hamilton Kollektion gefallen ist. Sie haben ein kleines
Wunder der Technik erstanden, das Ihnen über viele Jahre
treue Dienste leisten wird. Diese Uhr wurde unter Einsatz
modernster Technik hergestellt und strengsten Kontrollen
unterworfen, bevor sie für den Verkauf freigegeben wurde.
5) 30 Minuten Zähler
6) Zweiter kleiner, von der Stoppuhr unabhängiger Zeiger
A) Äußerer Drehring
B) Krone zur Einstellung von C
C) Oberer innen liegender Drehring
D) Krone zur Einstellung von E
E) Unterer innen liegender Drehring
Gebrauchsanleitung
Die Hamilton Khaki Automatic X-Wind verfügt über drei feststellbare Kronen und zwei Knöpfe.
1) Krone zur Einstellung von Uhrzeit, Wochentag und Datum
B) Krone zur Einstellung des oberen innen liegenden Drehrings C
Krone zur Einstellung des unteren innen liegenden Drehrings E
D)
2)
Start/Stopp Knopf für Stoppuhr
3) Nullrückstellungsknopf der Stoppuhr
Einstellung der Uhrzeit
– Krone (1) lösen
– Krone vollständig in Position (
– Zeit durch Drehen der Krone in die gewünschte Richtung einstellen
– Krone wieder ganz eindrücken und festschrauben
Einstellung von Datum/Wochentag
– Krone (1) lösen
– Krone in Zwischenstellung (
– Krone gegen den Uhrzeigersinn drehen, bis das gewünschte
bis der gewünschte
erfolgen
– Krone wieder ganz eindrücken und festschraube
© HAMILTON 2005 / KHAKI AUTOMATIC X-WIND 1918 © HAMILTON 2005 / KHAKI AUTOMATIC X-WIND
1b) herausziehen
1a) herausziehen
Datum, oder mit dem Uhrzeigersinn drehen,
Wochentag erscheint. Dieser Vorgang sollte nicht zwischen 20.00 und 02.00 Uhr
Page 13
Funktionen der Stoppuhr
– Das erste Drücken des Start/Stopp Knopfes (2) setzt Zeiger und Zähler der Stoppuhr in Gang
– Beim zweiten Drücken des Start/Stopp Knopfes (
– Jede weitere Betätigung des Start/Stopp Knopfes (
2) werden Zeiger und Zähler der Stoppuhr gestoppt
2) startet und stoppt die Stoppuhr so häufig wie
erforderlich, um eine Gesamtzeit zu messen
– Durch Drücken des Nullrückstellungsknopfes (
3) werden Zeiger und Zähler der Stoppuhr auf Null zurück
gesetzt
3. Den äußeren Drehring (A) so einstellen, dass der rote Pfeil auf ein Zehntel der Fluggeschwindigkeit zeigt.
Seitenwind (Crosswind)
1. Den roten Pfeil des oberen innen liegenden Drehrings (C) mit Hilfe von Krone (B) auf 12 Uhr drehen.
Den unteren innen liegenden Drehring (
E) mit Hilfe von Krone (D) auf 0° bringen.
2. 2) Über Kontrollturm oder Wetterkarte Informationen zu Windgeschwindigkeit und Windrichtung einholen.
Beispiel:
Windgeschwindigkeit: 40 mph
Windrichtung: 70°
Windrichtung (70) im Fenster mit dem oberen innen liegenden Drehring (C) über Krone (B) einstellen.
Beispiel: Fluggeschwindigkeit 180 mph – auf 18 einstellen.
4. Die missweisende Peilung des Flugzeugs anhand der geographischen Peilung berechnen:
Die Abweichung (Var) ist ortsabhängig und kann anhand einer Luftfahrtkarte ermittelt werden.
Liegt eine Abweichung (Var) in westlicher
Richtung vor, wird sie zur geographischen Peilung
hinzu gerechnet, um die missweisende Peilung zu
ermitteln. Beispiel: 30° + 10 ° = 40°
Liegt eine Abweichung (Var) in östlicher Richtung
vor, wird sie von der geographischen Peilung
abgezogen, um die missweisende Peilung zu
ermitteln. Beispiel: 30° - 15 ° = 15 °
Tn: geographische Nordrichtung | Mn: magnetische Nordrichtung | Var: Abweichung
Beispiel: geographische Peilung: 30°
Abweichung (Var): 10°
Missweisende Peilung: 30° + 10°= 40°
© HAMILTON 2005 / KHAKI AUTOMATIC X-WIND 2120 © HAMILTON 2005 / KHAKI AUTOMATIC X-WIND
Page 14
5. Berechnung des Einfallswinkels des Seitenwindes (Crosswind Angle)
Beispiel:
Windrichtung: 70°
Missweisende Peilung des Flugzeugs: 40°
Einfallswinkel des Seitenwindes: 70° - 40° = 30° (Gegenwind)
6. Berechnung des Seitenwindes: Mit Hilfe des Graphen (Plastikkarte) den Schnittpunkt der
Windgeschwindigkeit (Gegenwind/Rückenwind Komponente) (Head/Tailwind Component) und des
Einfallswinkels des Seitenwindes (Crosswind Angle) ermitteln.
Ausgehend vom Schnittpunkt den Wert der
Seitenwindkomponente (Crosswind Component) von der
horizontal verlaufenden Achse ablesen.
Beispiel: Gegenwindkomponente (Headwind Component):
Einfallswinkel des Seitenwindes (Crosswind Angle):
Seitenwindkomponente
(Crosswind Component): 20 mph
40 mph
30°
70° - 40° = 30°
Gegenwind (Headwind)
180° - (330° - 220°) = 70°
Rückenwind (Tailwind)
360° - (330° - 40°) = 70°
Gegenwind (Headwind)
© HAMILTON 2005 / KHAKI AUTOMATIC X-WIND 2322 © HAMILTON 2005 / KHAKI AUTOMATIC X-WIND
Page 15

7. Berechnung des Abdriftwinkels:
Unter der auf dem äußeren Drehring (
Wert von dem innen liegenden Drehring (
Beispiel:
Abdriftwinkel: etwa 6,5°
A) angegebenen Seitenwindkomponente (20) den angegebenen
C) ablesen.
8. Berechnung der korrigierten Richtung:
Kommt der Wind von rechts, Abdriftwinkel und missweisende Peilung addieren.
Kommt der Wind von links, Abdriftwinkel von missweisender Peilung abziehen.
Korrigierte Richtung: 40° + 6,5° = 46,5°
Beispiel:
Die
korrigierte Richtung (46,5°) kann über die Krone (D) auf dem unteren innen liegenden Drehring (E)
festgehalten werden.
Empfehlungen:
Wie alle mikromechanischen Präzisionsinstrumente sollte auch Ihre Hamilton Uhr mindestens alle zwei Jahre
überprüft werden. Überlassen Sie Ihre Uhr nur einem autorisierten Hamilton Vertragshändler. Sorgen Sie dafür,
dass die Wasserdichtigkeit Ihrer Uhr bei jeder Überprüfung der Uhr mitgetestet wird.
Die Wasserdichtigkeit Ihrer Uhr beträgt 10 ATM = 100 m = 330 Fuß
Fünf grundlegende Regeln zur Wahrung der Wasserdichtigkeit Ihrer Uhr
1. Lassen Sie Ihre Uhr regelmäßig überprüfen (einmal jährlich)
2. Bewegen Sie die Krone nicht, wenn Sie im Wasser sind.
3. Spülen Sie Ihre Uhr, wenn sie mit Salzwasser in Kontakt gekommen ist.
4. Trocknen Sie Ihre Uhr, wenn sie nass geworden ist.
5. Lassen Sie immer die Wasserdichtigkeit Ihrer Uhr von einem autorisierten Hamilton Händler überprüfen,
wenn das Gehäuse geöffnet worden ist.
Ihre Uhr verfügt über ein automatisches Uhrwerk. Eine Schwungmasse im Uhrenmechanismus zieht die
Sprungfeder bei Bewegungen des Handgelenks auf. Die Laufzeit der Uhr beträgt dann etwa 46 Stunden. Falls
erforderlich, kann die Uhr auch manuell aufgezogen werden. Die Schönheit des Uhrenmechanismus können Sie
durch das transparente rückwärtige Gehäuse bewundern.
© HAMILTON 2005 / KHAKI AUTOMATIC X-WIND 2524 © HAMILTON 2005 / KHAKI AUTOMATIC X-WIND
Page 16

1) Corona di regolazione ora/data/giorno
2) Pulsante di avvio/arresto del cronografo
3) Pulsante di azzeramento del cronografo
4) Contatore 12 ore
Ci congratuliamo con Lei per aver acquistato un modello
della collezione Hamilton. Lei ha acquistato una piccola
meraviglia tecnologica che La servirà fedelmente per molti
anni. Questo pezzo è stato costruito seguendo le tecnologie
più avanzate e prima di essere messo in vendita è stato
sottoposto ai test più rigorosi.
5) Contatore 30 minuti
6) Lancetta indipendente per la misurazione dei secondi
A) Lunetta girevole esterna
B) Corona di regolazione C
C) Lunetta girevole interna superiore
D) Corona di regolazione E
E) Lunetta girevole interna inferiore
Istruzioni per l’uso
Il modello Khaki Automatic X-Wind della Hamilton è dotato di tre corone a vite e due pulsanti.
1) corona di regolazione dell’ora, del giorno e della data
B) corona di regolazione della lunetta girevole interna superiore C
D)
corona di regolazione della lunetta girevole interna inferiore E
2)
pulsante di avvio e arresto del cronografo
3) pulsante di azzeramento del cronografo
Regolazione dell’ora
– Svitare la corona di regolazione (1).
– Estrarla completamente fino a raggiungere la posizione
– Regolare l’ora girando la corona nella direzione desiderata.
– Spingere a fondo la corona e poi riavvitarla.
Regolazione della data / del giorno
– Svitare la corona di regolazione (1).
– Estrarre la corona fino a raggiungere la posizione intermedia
– Ruotare la corona in senso antiorario fino a quando appare la
desiderato. Si raccomanda di non eseguire questa operazione tra le 20:00 e le 02:00 (8 di sera, 2 del
mattino).
– Spingere a fondo la corona e poi riavvitarla.
© HAMILTON 2005 / KHAKI AUTOMATIC X-WIND 2726 © HAMILTON 2005 / KHAKI AUTOMATIC X-WIND
1b.
1a.
data desiderata, in senso orario per il giorno
Page 17

Funzioni del cronografo
– Premendo una volta il pulsante di avvio/arresto (2) partono i contatori e la lancetta del cronografo.
– Premendo una seconda volta il pulsante di avvio/arresto (
2) si fermano i contatori e la lancetta del
cronografo.
– Le successive pressioni del pulsante di avvio/arresto (
2) fanno partire e interrompono il cronografo tante
volte quanto necessario per misurare un tempo totale.
– Premendo il pulsante di reset (
3) la lancetta del cronografo e i contatori si riposizionano su zero.
Vento al traverso (Crosswind)
1. Girando la corona (B) posizionare la freccia rossa della lunetta girevole interna superiore (C) sulle ore 12.
Girando la corona (D) posizionare la lunetta girevole interna inferiore (E) su 0°.
2. Ricavare la velocità e la direzione del vento dalla torre di controllo o dalla carta del tempo.
Es.
Velocità del vento: 40 mph
Direzione del vento: 70°
Girando la corona (
superiore (
B) indicare la direzione del vento (70) nella finestrella della lunetta girevole interna
C).
3. Regolare la lunetta girevole esterna (A) in modo che davanti alla freccia rossa appaia un decimo della
velocità del velivolo.
Es. Velocità del velivolo: 180 mph – indicare 18.
4. Dal polo nord geografico calcolare il polo nord magnetico del velivolo. La declinazione magnetica (Var)
dipende dalla località in cui ci si trova e può essere determinata dalla carta aeronautica.
Se la declinazione magnetica (Var) è verso ovest,
si aggiunge al polo nord geografico per ottenere il
polo nord magnetico. Es. 30°+10° = 40°
Se la declinazione magnetica (Var) è verso est,
viene sottratta dal polo nord geografico per
ottenere il polo nord magnetico. Es. 30°-15° = 15°
Tn: Nord vero | Mn: Nord magnetico | Var: Declinazione magnetica
Es. Polo nord geografico: 30°
Declinazione magnetica (Var): 10°
Polo nord magnetico: 30° + 10° = 40°
© HAMILTON 2005 / KHAKI AUTOMATIC X-WIND 2928 © HAMILTON 2005 / KHAKI AUTOMATIC X-WIND
Page 18

5. Calcolo dell’angolo del vento al traverso (Crosswind Angle)
Es. Direzione del vento: 70°
Polo nord magnetico del velivolo: 40°
Angolo del vento al traverso: 70° - 40° = 30° vento di fronte
6. Calcolo del vento al traverso
Usando il grafico (carta plastificata) determinare il punto di intersezione fra la velocità del vento (di fronte/di
coda) (Headwind/Tailwind Component) e l’angolo al vento (Crosswind Angle)
Dal punto di intersezione, leggere il valore del
vento al traverso (Crosswind Component) sull’asse delle
ascisse (asse orizzontale).
Es. Velocità del vento (Headwind Component):
Angolo al vento (Crosswind Angle):
Vento al traverso
(Crosswind Component): 20 mph
40 mph
30°
70° - 40° = 30°
vento di fronte (Headwind)
180° - (330° - 220°) = 70°
vento di coda (Tailwind)
360° - (330° - 40°) = 70°
vento di fronte (Headwind)
© HAMILTON 2005 / KHAKI AUTOMATIC X-WIND 3130 © HAMILTON 2005 / KHAKI AUTOMATIC X-WIND
Page 19

7. Calcolo dell’angolo di deriva:
Individuare il vento al traverso (
girevole interna (
Es.
Angolo di deriva: 6,5° circa
C).
20) sulla lunetta girevole esterna (A) e leggere il valore indicato sulla lunetta
8. Calcolo della correzione della rotta:
Se il vento soffia da destra, sommare l’angolo di deriva al polo nord magnetico.
Se il vento soffia da sinistra, sottrarre l’angolo di deriva dal polo nord magnetico.
Es.
Correzione della rotta: 40° + 6,5° = 46,5°
Per memorizzare, usare la corona (
interna inferiore (
E).
D) per indicare la correzione della rotta (46,5°) sulla lunetta girevole
Raccomandazioni
Come tutti gli strumenti meccanici di precisione, l’orologio Hamilton dovrebbe essere revisionato almeno ogni
due anni. Si raccomanda di far revisionare l’orologio soltanto da un riparatore autorizzato Hamilton. Per
mantenere l’impermeabilità dell’orologio, assicurarsi che ad ogni revisione siano controllate le guarnizioni di
tenuta.
L’orologio è impermeabile fino a 10 ATM = 100 metri = 330 piedi.
Cinque regole base per mantenere l’impermeabilità dell’orologio
1. Far controllare l’orologio regolarmente (una volta l’anno).
2. Non muovere la corona quando si è in acqua.
3. Sciacquare l’orologio dopo le immersioni in mare.
4. Asciugarlo quando si bagna.
5. Ogni volta che si apre la cassa, fare controllare l’impermeabilità dell’orologio da un riparatore autorizzato
Hamilton.
L’orologio è dotato di un dispositivo di carica automatica. Il suo meccanismo include infatti un rotore che carica
la molla motrice con il movimento del polso. L’autonomia di marcia è di 46 ore circa. Se necessario, è possibile
caricare l’orologio manualmente. Si può ammirare la bellezza del meccanismo interno dell’orologio dal fondello
trasparente della cassa.
© HAMILTON 2005 / KHAKI AUTOMATIC X-WIND 3332 © HAMILTON 2005 / KHAKI AUTOMATIC X-WIND
Page 20

1) Corona de ajuste de fecha y hora.
2) Pulsador de accionamiento/ paro del cronógrafo.
3) Pulsador de puesta a cero del cronógrafo.
4) Contador de 12 horas
Hamilton se complace de que haya elegido un modelo de
su colección. Usted ha adquirido una pequeña maravilla
tecnológica que le servirá fielmente durante muchos años.
Las tecnologías más avanzadas han sido aplicadas en la
fabricación de su reloj sometiéndolo a los más estrictos
controles antes de su puesta a la venta.
5) Contador de 30 minutos.
6) Pequeño segundero independiente del cronógrafo.
A) Bisel rotatorio exterior
B) Corona de ajuste de C
C) Bisel rotatorio interior superior
D) Corona de ajuste de E
E) Bisel rotatorio interior inferior.
Instrucciones de uso
El reloj Hamilton Khaki Automatic X-Wind cuenta con tres coronas atornilladas y con dos pulsadores.
1) Corona para el ajuste de la hora, el día y la fecha.
B) Corona para el ajuste del bisel rotatorio interior superior C.
D) Corona para el ajuste del bisel rotatorio interior inferior E.
2) Pulsador de accionamiento y de paro del cronógrafo.
3) Pulsador de puesta a cero del cronógrafo.
Ajuste de la hora
– Destornille la corona (1).
– Tire completamente de la corona hasta la posición
– Ajuste la hora girando la corona en el sentido deseado.
– Presione completamente sobre la corona y vuelva a atornillar.
Ajuste de la fecha/ día
– Destornille la corona (1)
– Tire de la corona hasta la posición intermedia
– Gire la corona en sentido anti-horario hasta que aparezca la fecha deseada y en sentido horario para que
aparezca el día deseado. Evite realizar esta operación entre las 20 y las 02 horas.
– Presione completamente sobre la corona y vuelva a atornillar.
© HAMILTON 2005 / KHAKI AUTOMATIC X-WIND 3534 © HAMILTON 2005 / KHAKI AUTOMATIC X-WIND
1b.
1a
Page 21

Funciones del cronógrafo
– Una primera pulsación sobre el pulsador de accionamiento/ paro (2) pone en funcionamiento la aguja del
cronógrafo y de los contadores.
– Una segunda pulsación del pulsador de accionamiento/ paro (
2) detiene la aguja del cronógrafo y de los
contadores.
– Las pulsaciones siguientes del pulsador de accionamiento/ paro (
2) accionan y detienen el cronógrafo
tantas veces como se requiera para la medición de un tiempo total.
– Una pulsación sobre el botón de puesta a cero (
3) pone la aguja del cronógrafo y los contadores a cero.
3. Indique la velocidad del avión en el décimo situado sobre el bisel rotatorio exterior (A) frente a la flecha
roja.
Viento de costado (crosswind)
1. Posicione la fecha roja del bisel rotatorio interior superior (C) sobre las 12 horas ajustándola con la corona
B). Ajuste el bisel rotatorio interior inferior (E) a 0º con la corona (D).
(
2. Obtenga la velocidad y la dirección del viento a partir de la torre de control o del mapa del tiempo.
Ej.:
Velocidad del viento: 40 mph
Dirección del viento: 70º
Indique la
dirección del viento (70) en la ventana con el bisel rotario interior superior (C) ajustándolo con
la corona (
B).
Ej.: Velocidad del avión: 180 mph – indique 18.
4. A partir del rumbo geográfico, calcule el rumbo magnético del avión: La variación (Var) depende del lugar
donde Usted se encuentre, el cual se puede determinar a partir de la carta de navegación.
Cuando la variación (Var) se encuentre al oeste,
ésta se añade al rumbo geográfico para obtener el
rumbo magnético. Ej. : 30º + 10º = 40º
Cuando la variación (Var) se encuentre al este,
ésta se deduce del rumbo geográfico para
obtener el rumbo magnético. Ej.: 30º-15º = 15º
Tn: Verdadero norte/ Mn: Norte magnético/ Var: Variación
Ej.: Rumbo geográfico: 30º
Variación (Var): 10º
Rumbo magnético: 30º + 10º = 40º
© HAMILTON 2005 / KHAKI AUTOMATIC X-WIND 3736 © HAMILTON 2005 / KHAKI AUTOMATIC X-WIND
Page 22

5. Cálculo del ángulo del viento de costado.
Ej.: Dirección del viento: 70º
Rumbo magnético del avión: 40º
Ángulo del viento de costado: 70º- 40º = 30º (Viento contrario)
6. Cálculo del viento de costado:
Mediante el uso del gráfico (tarjeta de plástico) determine el punto de intersección de la velocidad del
viento (Head/ tailwind component) y el ángulo de viento de costado (Crosswind Angle).
Desde el punto de intersección, lea el valor del componente del viento de costado (Crosswind Component)
sobre el eje horizontal.
Ej.: Componente de viento contrario (Headwind Component):
Ángulo de viento de costado (Crosswind Angle):
Componente de viento de costado
(Crosswind Component): 20 mph
40 mph
30º
70° - 40° = 30°
Viento contrario (Headwind)
180° - (330° - 220°) = 70°
Viento de cola (Tailwind)
360° - (330° - 40°) = 70°
Viento contrario (Headwind)
© HAMILTON 2005 / KHAKI AUTOMATIC X-WIND 3938 © HAMILTON 2005 / KHAKI AUTOMATIC X-WIND
Page 23

7. Cálculo del ángulo de deriva:
Indique el componente de viento de costado (
el bisel interior (
Ej.
Ángulo de deriva: aprox. 6,5º
C).
20) en el bisel rotatorio exterior (A) y lea el valor indicado en
8. Cálculo del rumbo corregido:
Cuando el viento sople por la derecha, añada el ángulo de deriva al rumbo magnético.
Cuando el viento sople por la izquierda, reste el ángulo de deriva al rumbo magnético.
Rumbo corregido: 40º + 6,5º = 46,5º
Ej.:
Para su memorización, use la corona (
interior inferior (
E).
D) para indicar el rumbo corregido (46,5º) sobre el bisel rotatorio
Recomendaciones
Como cualquier instrumento de precisión micro-mecánica, su reloj Hamilton debe ser revisado al menos una vez
cada dos años. Sólo confíe su reloj a un agente autorizado por Hamilton. Para preservar la estanqueidad de su
reloj, asegúrese de que sus dispositivos de estanqueidad sean revisados en cada control.
La estanqueidad de su reloj es de 10 ATM = 100 metros = 330 pies.
Cinco reglas básicas para preservar la estanqueidad de su reloj
1. Controle de forma regular su reloj (Una vez al año)
2. No mueva la corona cuando esté en el agua.
3. Enjuague su reloj después de bañarse en el mar.
4. Seque su reloj cada vez que se humedezca.
5. Pida a su agente autorizado Hamilton que verifique la estanqueidad de su reloj cada vez que se abra la caja.
Su reloj está equipado con un movimiento automático. El mecanismo del reloj contiene un rotor oscilatorio que
le da cuerda al resorte mediante el movimiento de su muñeca. La reserva de marcha es de aproximadamente
46 horas. En caso de necesidad, se le puede dar cuerda al reloj de forma manual. La belleza del mecanismo de
su reloj puede admirarse a través del fondo transparente de la caja.
© HAMILTON 2005 / KHAKI AUTOMATIC X-WIND 4140 © HAMILTON 2005 / KHAKI AUTOMATIC X-WIND
Page 24
1) Coroa de regulação da hora/data/dia
2) Botão Ligar/Desligar do cronógrafo
3) Botão de reinicialização do cronógrafo
4) Contador 12 horas
Acaba de adquirir uma peça de relojoaria da colecção da
Hamilton. Esta pequena maravilha da tecnologia estará
fielmente ao seu serviço por longos anos. Durante a sua
concepção, foram utilizadas as tecnologias mais
avançadas e, antes de ser colocada à venda, foi submetida
aos controlos mais rigorosos.
5) Contador 30 minutos
6) Segundo ponteiro pequeno independente do cronógrafo
A) Luneta giratória exterior
B) Coroa para regular C
C) Luneta giratória interior, parte superior
D) Coroa para regular E
E) Luneta giratória interior, parte inferior
Instruções de utilização
O relógio Khaki Automatic X-Wind da Hamilton tem três coroas aparafusadas e dois botões de pressão.
1) Coroa para regular a hora, o dia e a data
B) Coroa para regular a luneta giratória interior (C), na parte superior
D) Coroa para regular a luneta giratória interior (E), na parte inferior
2) Botão para ligar ou desligar o cronógrafo
3) Botão para repor o cronógrafo a zero
Regulação da hora
– Desaperte a coroa de regulação (1);
– Puxe a coroa completamente para fora, para a posição
– Ajuste a hora rodando a coroa no sentido desejado;
– Reponha a coroa completamente para dentro e aperte-a novamente.
Regulação da data/do dia
– Desaperte a coroa de regulação (1);
– Puxe a coroa para a posição intermédia
– Rode a coroa no sentido contrário ao dos ponteiros do relógio até aparecer a data desejada, ou no sentido
dos ponteiros do relógio para seleccionar o dia da semana. Não execute esta operação entre 20:00 e
02:00 (8 da noite e 2 da manhã);
– Reponha a coroa completamente para dentro e aperte-a novamente.
© HAMILTON 2005 / KHAKI AUTOMATIC X-WIND 4342 © HAMILTON 2005 / KHAKI AUTOMATIC X-WIND
1a;
1b;
Page 25

Funções do cronógrafo
– Ao premir uma vez o botão ligar/desligar (2), o ponteiro do cronógrafo e os contadores são iniciados;
– Ao premir uma segunda vez esse mesmo botão (
– As pressões subsequentes no botão (
2), o ponteiro do cronógrafo e os contadores páram;
2) iniciam e páram o cronógrafo as vezes desejadas para
cronometrar um tempo total;
– Se premir o botão de reinicialização (
3), o ponteiro do cronógrafo e os contadores serão repostos a zero.
3. Regule a luneta giratória exterior (A) de modo a que um décimo da velocidade do avião seja indicado do
lado oposto à seta vermelha.
Vento cruzado (Crosswind)
1. Posicione a seta vermelha da luneta giratória superior (C) nas 12 horas, através da coroa (B).
Regule a luneta giratória inferior (
E) para 0° através da coroa (D);
2. Obtenha a velocidade e a direcção do vento a partir de uma torre de controlo ou de uma carta do tempo.
Ex.:
Velocidade do vento: 40 mph (milhas por hora)
Direcção do vento: 70°
Indique a
direcção do vento (70) na janela através da luneta giratória superior (C) regulando a coroa (B).
Ex.: Velocidade do avião: 180 mph – indica
18.
4. 4) A partir do mostrador geográfico, calcule o azimute magnético do avião:
A variação (Var) depende da localização actual, que pode ser fornecida por uma carta de aviação.
Se a variação (Var) está para Oeste, esta é
adicionada ao mostrador geográfico para obter o
azimute magnético. Ex.: 30° + 10° = 40°
Se a variação (Var) está para Este, esta é
subtraída ao mostrador geográfico para obter o
azimute magnético. Ex.: 30° - 15° = 15°
Tn: Norte Geográfico | Mn: Norte Magnético | Var: Variação
Ex.: Mostrador geográfico: 30°
Variação (Var): 10°
Azimute magnético: 30° + 10° = 40°
© HAMILTON 2005 / KHAKI AUTOMATIC X-WIND 4544 © HAMILTON 2005 / KHAKI AUTOMATIC X-WIND
Page 26
5. Cálculo do ângulo de vento cruzado. (Crosswind Angle)
Ex.: Direcção do vento: 70°
Azimute magnético do avião: 40°
Ângulo de vento cruzado: 70° - 40° = 30° vento de proa
6. Cálculo de ventos cruzados:
Com base no gráfico (cartão plástico), determine o ponto de intersecção da velocidade do vento
(componente do vento de proa/de popa) (Headwind/Tailwind Component) e o ângulo de vento cruzado.
Partindo do ponto de intersecção, leia o valor do
componente de vento cruzado (Crosswind Component)
no eixo horizontal.
Ex.: Componente do vento de proa (Headwind Component):
Ângulo de vento cruzado (Crosswind Angle):
Componente de vento cruzado
(Crosswind Component) : 20 mph
30°
40 mph
70° - 40° = 30°
vento de proa (Headwind)
180° - (330° - 220°) = 70°
vento de popa (Tailwind)
360° - (330° - 40°) = 70°
vento de proa (Headwind)
© HAMILTON 2005 / KHAKI AUTOMATIC X-WIND 4746 © HAMILTON 2005 / KHAKI AUTOMATIC X-WIND
Page 27

7. Calcule o ângulo de deriva:
Localize o componente de vento cruzado (
luneta interior (
Ex.:
Ângulo de derivação: aproximadamente 6,5°
C).
20) na luneta giratória exterior (A) e leia o valor indicado na
8. Cálculo do azimute corrigido:
Se o vento está a soprar da direita, adicione o ângulo de derivação ao azimute magnético.
Se o vento está a soprar da esquerda, subtraia o ângulo de derivação ao azimute magnético.
Ex.:
Azimute corrigido: 40° + 6,5° = 46,5°
Para memorizar o valor, utilize a coroa (
E), na parte inferior.
interior (
D) para indicar o azimute corrigido (46,5°) na luneta giratória
Recomendações
À semelhança de todos os outros instrumentos de precisão micro-mecânicos, o seu relógio Hamilton deve ser
submetido a um serviço de manutenção de dois em dois anos. O seu relógio deverá ser confiado exclusivamente
a um Agente Autorizado Hamilton. De modo a preservar a estanquecidade do seu relógio, certifique-se que as
juntas são verificadas a cada manutenção.
A resistência à água do seu relógio é de 10 ATM = 100 metros.
Cinco regras básicas para preservar a estanquecidade do seu relógio:
1. Mande verificar o seu relógio regularmente (uma vez por ano);
2. Não manipule a coroa quando se encontrar dentro de água;
3. Depois de um banho de mar, passe o seu relógio por água doce;
4. Seque o seu relógio sempre que este fique molhado;
5. Mande verificar a resistência à água do seu relógio num Agente Autorizado Hamilton, cada vez que a sua
caixa é aberta;
O seu relógio possui um mecanismo automático. Esse mecanismo inclui um rotor oscilante que faz girar a mola
mestra pelo movimento do seu pulso. A reserva de marcha é de aproximadamente 46 horas. Se necessário, a
corda do relógio pode ser manualmente restabelecida. A beleza interna do mecanismo do relógio pode ser
apreciada através da base da caixa com fundo à vista.
© HAMILTON 2005 / KHAKI AUTOMATIC X-WIND 4948 © HAMILTON 2005 / KHAKI AUTOMATIC X-WIND
Page 28

1) Kroon tijd/datum/dag
2) Start/stop knop chronograaf
3) Reset knop chronograaf
4) 12 urenteller
5) 30 minutenteller
Hamilton is bijzonder verheugd dat u een uurwerk uit haar
collectie heeft aangeschaft. U bent nu in het bezit van een
klein technologisch wonder dat u jarenlang trouw zal dienen.
Tijdens het fabricatieproces is van de meest geavanceerde
technologieën gebruik gemaakt en het horloge is aan
strenge controles onderworpen voordat het op de markt
werd gebracht.
6) Kleine secondewijzer onafhankelijk van de chronograaf
A) Draaibare buitenring
B) Kroon voor het instellen van C
C) Bovenste draaibare binnenring
D) Kroon voor het instellen van E
E) Onderste draaibare binnenring
Gebruiksaanwijzing
Het Hamilton Khaki Automatic X-Wind heeft drie schroefkronen en twee drukknoppen.
1) kroon voor het instellen van de tijd, de dag en de datum
B) kroon voor het instellen van de bovenste draaibare binnenring C
D)
kroon voor het instellen van de onderste draaibare binnenring E
2)
knop voor het starten en stoppen van de chronograaf
3) reset knop om de chronograaf op nul te zetten
Instellen van de tijd
– Draai de kroon los (1).
– Trek de kroon geheel uit tot stand
– Stel de tijd in door de kroon in de gewenste richting te draaien.
– Druk de kroon opnieuw volledig in en schroef haar vast..
Instellen van de dag/datum
– Draai de kroon los (1).
– Trek de kroon uit tot de middenstand
– Draai de kroon tegen de wijzers van de klok in tot de gewenste
de klok tot de gewenste dag verschijnt.
Gelieve deze manipulatie niet uit te voeren tussen 20.00 en 02.00.
– Druk de kroon opnieuw volledig in en schroef haar weer vast.
© HAMILTON 2005 / KHAKI AUTOMATIC X-WIND 5150 © HAMILTON 2005 / KHAKI AUTOMATIC X-WIND
1b.
1a.
datum verschijnt, of volgens de wijzers van
Page 29
Chronograaf functies
– Door één keer op de start/stop knop (2) te drukken starten de wijzer en de tellers van de chronograaf.
– Door een tweede keer op de start/stop knop (
2) te drukken stoppen de wijzer en de tellers van de
chronograaf.
– Deze handelingen van de start/stop knop (
2) starten en stoppen van de chronograaf zo vaak als nodig is
om een totale tijd te meten.
– Door op de reset knop (
3) te drukken worden de wijzer en de tellers van de chronograaf weer op nul gezet.
Zijwind (Crosswind)
1. Zet de rode pijl van de bovenste draaibare binnenring (C) op 12 uur met behulp van kroon (B).
Stel de onderste draaibare binnenring (
E) in op 0° met behulp van kroon (D).
2. Raadpleeg de controletoren of de weerkaart voor windsnelheid en windrichting.
Vb.
Windsnelheid: 40 mph (mijl per uur)
Windrichting: 70°
Geef de
windrichting (70) aan in het venster van de bovenste draaibare binnenring (C) met behulp van
kroon (
B).
3. Geef één tiende van de snelheid van het vliegtuig aan tegenover de rode pijl op de draaibare buitenring
(
A).
Snelheid vliegtuig: 180 mph - geef 18 aan.
Vb.
4. Berekenen van de magnetische ligging van het vliegtuig vanaf de geografische ligging:
De variatie (Var) hangt af van uw locatie. Deze kan met behulp van een luchtvaartkaart worden vastgesteld.
Indien de variatie (Var) westelijk is wordt deze
aan de geografische ligging toegevoegd om de
magnetische ligging te verkrijgen.
Vb. 30° + 10° = 40°
Indien de variatie (Var) oostelijk is wordt deze van
de geografische ligging afgetrokken om de
magnetische ligging te verkrijgen.
Vb. 30° - 15° = 15°
Tn: Ware Noorden | Mn: Magnetische Noorden | Var: Variatie
Vb. Geografische ligging: 30°
Variatie (Var): 10°
Magnetische ligging: 30° + 10° = 40°
© HAMILTON 2005 / KHAKI AUTOMATIC X-WIND 5352 © HAMILTON 2005 / KHAKI AUTOMATIC X-WIND
Page 30
5. Berekenen van de hoek van de zijwind (Crosswind Angle).
Vb. Windrichting: 70°
Magnetische ligging van het vliegtuig: 40°
Hoek zijwind: 70° - 40° = 30° (kopwind)
6. Berekenen van de zijwind:
Bepaal het intersectiepunt van de windsnelheid (Headwind/Tailwind Component) en de hoek van de
zijwind (Crosswind Angle) met behulp van de graaf (plastic kaart).
Vanaf het intersectiepunt leest u de waarde van de
Vb. Kopwind (Headwind component):
Hoek zijwind (Crosswind Angle):
(Crosswind Component): 20 mph
Zijwind
40 mph
30°
zijwind (Crosswind Component) op de horizontale as.
70° - 40° = 30°
Kopwind (Headwind)
180° - (330° - 220°) = 70°
Staartwind (Tailwind)
360° - (330° - 40°) = 70°
Kopwind (Headwind)
© HAMILTON 2005 / KHAKI AUTOMATIC X-WIND 5554 © HAMILTON 2005 / KHAKI AUTOMATIC X-WIND
Page 31

7. Berekenen van de drifthoek:
Zoek de zijwind (
aangegeven (
Vb.
Drifthoek: circa 6.5°
20) op de draaibare buitenring (A) en lees de waarde die op de draaibare binnenring wordt
C).
8. Berekenen van gecorrigeerde ligging:
Als de wind van rechts komt voegt u de drifthoek aan de magnetische ligging toe.
Als de wind van links komt trekt u de drifthoek van de magnetische ligging af.
Gecorrigeerde ligging: 40° + 6.5° = 46.5°
Vb.
Om deze niet te vergeten kunt u de
draaibare binnenring (
E) aangeven.
gecorrigeerde ligging (46.5°) met de kroon (D) op de onderste
Aanbevelingen
Zoals alle micromechanische precisie instrumenten dient uw Hamilton horloge tenminste om de twee jaar te
worden nagekeken. Vertrouw uw horloge alleen aan een erkende Hamilton dealer toe. U dient erop toe te zien
dat de waterbestendigheid van uw horloge bij elke controle wordt getest.
De waterbestendigheid van uw horloge is 10 ATM = 100 meter = 330 voet.
Vijf basisregels voor het behoud van de waterbestendigheid van uw
horloge.
1. Laat uw horloge regelmatig controleren (één keer per jaar).
2. Draai de kroon niet als u zich in het water bevindt.
3. Spoel uw horloge af wanneer u uit het water komt.
4. Droog uw horloge altijd af als het nat is.
5. Laat de waterbestendigheid van uw horloge elke keer dat de kast wordt geopend, door een erkende
Hamilton dealer controleren.
Uw horloge is uitgerust met een automatische beweging. Het mechanisme van het horloge omvat een
oscillerende rotor die de hoofdveer door middel van polsbewegingen opwindt. De gangreserve bedraagt
ongeveer 46 uur. Indien nodig kan het horloge met de hand worden opgewonden. De afwerking van het
binnenwerk van het horloge kan dankzij de transparante bodem worden bewonderd.
© HAMILTON 2005 / KHAKI AUTOMATIC X-WIND 5756 © HAMILTON 2005 / KHAKI AUTOMATIC X-WIND
Page 32

© HAMILTON 2005 / KHAKI AUTOMATIC X-WIND 5958 © HAMILTON 2005 / KHAKI AUTOMATIC X-WIND
Page 33
© HAMILTON 2005 / KHAKI AUTOMATIC X-WIND 6160 © HAMILTON 2005 / KHAKI AUTOMATIC X-WIND
Page 34

© HAMILTON 2005 / KHAKI AUTOMATIC X-WIND 6362 © HAMILTON 2005 / KHAKI AUTOMATIC X-WIND
Page 35

© HAMILTON 2005 / KHAKI AUTOMATIC X-WIND 6564 © HAMILTON 2005 / KHAKI AUTOMATIC X-WIND
Page 36

1) Заводная головка для установки времени/даты/дня
2) Кнопка запуска/остановки хронографа
3) Кнопка сброса состояния хронографа
4) 12-часовой счетчик
Фирма Hamilton рада, что Вы выбрали часы из ее коллекции. Вы
приобрели маленькое техническое чудо, которое верой и правдой
будет служить Вам многие годы. При его изготовлении
применялись самые передовые технологии, и оно подверглось
строгому контролю перед тем, как было выпущено в продажу.
5) 30-минутный счетчик
6) Независимая от хронографа малая секундная стрелка
A) Наружный поворотный безель
B) Заводная головка для регулировки C
C) Верхний внутренний поворотный безель
D) Заводная головка для регулировки E
E) Нижний внутренний поворотный безель
Инструкции по применению
Наручные часы Hamilton Khaki Automatic X-Wind имеют три завинчивающиеся заводные головки
и две нажимные кнопки.
1) заводная головка для установки времени, дня недели и даты
B) заводная головка для регулировки верхнего поворотного безеля C
D) заводная головка для регулировки нижнего поворотного безеля E
2) кнопка для запуска и остановки хронографа
3) кнопка для сброса хронографа на ноль
Установка времени
– Отвинтите установочную заводную головку (1).
– Полностью вытяните заводную головку в положение 1b.
– Установите время, поворачивая заводную головку в требуемом направлении.
– Полностью утопите заводную головку, затем снова завинтите ее.
Установка даты / дня
– Отвинтите установочную заводную головку (1).
– Вытяните заводную головку в промежуточное положение 1a.
– Поворачивайте заводную головку против часовой стрелки до тех пор, пока не появится
требуемая дата, либо по часовой стрелки до появления требуемого дня. Не выполняйте
этой операции между 20.00 и 02.00 (8 после полудня и 2 до полудня).
– Полностью утопите заводную головку, затем снова завинтите ее.
© HAMILTON 2005 / KHAKI AUTOMATIC X-WIND 6766 © HAMILTON 2005 / KHAKI AUTOMATIC X-WIND
Page 37

Функции хронографа
– Первое нажатие на кнопку запуска/остановки (2) запускает стрелку и счетчики
хронографа.
– Второе нажатие на кнопку запуска/остановки (2) останавливает стрелку и счетчики
хронографа.
– Последующие нажатия на кнопку запуска/остановки (
хронограф столько раз, сколько требуется для измерения полного времени.
– Нажатие на кнопку сброса (3) сбрасывает стрелку и счетчики хронографа на ноль.
2) запускают и останавливают
3. Установите наружный поворотный безель (A) таким образом, чтобы одна десятая скорости
самолета была указана напротив красной стрелки.
Боковой ветер
1. Поместите красную стрелку на верхнем внутреннем поворотном безеле (C) против цифры
12 на циферблате часов, производя регулировку заводной головкой (B).
Выставьте нижний внутренний поворотный безель (E) на 0°, производя регулировку
заводной головкой (D).
2. Получите скорость и направление ветра из контрольно-диспетчерского пункта или из
сводки погоды.
Пример:
Скорость ветра: 40 mph (миль в час)
Направление ветра: 70°
Укажите
безеля (
направление ветра (70) в окне при помощи верхнего внутреннего поворотного
C), производя регулировку заводной головкой (B).
Пример:
Скорость самолета: 180 mph (миль в час) – укажите 18.
4. Из географического азимута вычислите магнитный азимут самолета:
Склонение магнитной стрелки (Var) зависит от текущего местонахождения, которое можно
определить по авиационной карте.
Если магнитное склонение (Var) западное,
то для получения магнитного азимута оно
добавляется к географическому азимуту.
Пример: 30° + 10° = 40°
Если магнитное склонение (Var) восточное,
то для получения магнитного азимута оно
вычитается из географического азимута.
Пример: 30° - 15° = 15°
Tn: Истинный север | Mn: Магнитный север | Var: Магнитное склонение
Пример: Географический азимут: 30°
Магнитное склонение (Var): 10°
Магнитный азимут: 30° + 10° = 40°
© HAMILTON 2005 / KHAKI AUTOMATIC X-WIND 6968 © HAMILTON 2005 / KHAKI AUTOMATIC X-WIND
Page 38

5. Вычисление угла бокового ветра.
Пример: Направление ветра: 70°
Магнитный азимут самолета: 40°
Угол бокового ветра: 70° - 40° = 30° (встречный ветер)
6. Расчет влияния бокового ветра:
Используя график (пластиковую карту), определите точку пересечения скорости ветра
(встречная/попутная составляющая) и угла бокового ветра
Исходя из точки пересечения, прочитайте величину боковой составляющей на
горизонтальной оси.
Пример: Встречная составляющая:
40 mph (миль в час)
угол бокового ветра 30°
Боковая составляющая
: 20 mph (миль в час)
70° - 40° = 30°
(встречный ветер)
180° - (330° - 220°) = 70°
(попутный ветер)
360° - (330° - 40°) = 70°
(встречный ветер)
© HAMILTON 2005 / KHAKI AUTOMATIC X-WIND 7170 © HAMILTON 2005 / KHAKI AUTOMATIC X-WIND
Page 39

7. Вычислите угол сноса:
Определите составляющую бокового ветра (20) на наружном поворотном безеле (A) и
считайте значение на внутреннем поворотном безеле (C).
Пример:
Угол сноса: приблизительно 6,5°
8. Расчет азимута с поправкой:
Если ветер дует справа, то добавьте угол сноса к магнитному азимуту.
Если ветер дует слева, то вычтите угол сноса из магнитного азимута.
Пример: Азимут с поправкой: 40° + 6,5° = 46,5°
Для сохранения результата используйте заводную головку (
D), чтобы указать азимут с
поправкой (46,5°) на нижнем внутреннем поворотном безеле (E).
Рекомендации
Как и все микромеханические прецизионные инструменты, ваши часы фирмы Hamilton должны
подвергаться проверке не реже одного раза каждые два года. Доверяйте ваши часы только
уполномоченному представителю фирмы Hamilton. Для того чтобы ваши часы оставались
водостойкими, убедитесь в том, что уплотнительные элементы испытываются при каждой
проверке.
Водостойкость ваших часов обеспечивается при 10 ATM = 100 метров = 330 футов.
Пять основных правил для обеспечения водостойкости ваших часов
1. Регулярно проверяйте часы (один раз в год)
2. Не перемещайте заводную головку, когда находитесь в воде
3. Промойте часы после пребывания в морской воде.
4. Просушите часы, если в них попала влага.
5. Каждый раз после вскрытия корпуса выполняйте проверку водостойкости часов,
обращаясь к уполномоченному представителю фирмы Hamilton.
Ваши часы снабжены устройством автоподзавода. Механизм часов содержит в себе
качающийся ротор, который заводит ходовую пружину за счет движений вашего запястья.
Запас хода составляет приблизительно 46 часов. При необходимости часы можно завести
вручную. Полюбоваться красотой действия внутренней механики часов можно через
прозрачный с обратной стороны корпус.
© HAMILTON 2005 / KHAKI AUTOMATIC X-WIND 7372 © HAMILTON 2005 / KHAKI AUTOMATIC X-WIND
Page 40

1) korunka pro nastavení času/data/dne v týdnu
Firma Hamilton je potěšena, že jste si vybrali hodinky z její kolekce.
2) tlačítko pro spuštění/zastavení stopek
3) tlačítko pro vynulování stopek
4) čítač 12ti hodin
5) čítač 30ti minut
6) malá sekundová ručka nezávislá na stopkách
A) vnější otočný kroužek
B) korunka pro nastavení C
C) horní vnitřní otočný kroužek
D) korunka pro nastavení E
Získali jste malý technologický div, který vám bude věrně sloužit po
mnoho let. V celém procesu jejich výroby byly používány nejmod-
ernější technologie a před uvolněním k prodeji prošly přísným
testováním.
Návod k použití
Hodinky Hamilton Khaki Automatic X-Wind mají tři šroubovací korunky a dvě tlačítka.
1) korunka pro nastavení času, dne v týdnu a data
B) korunka pro nastavení horního vnitřního otočného kroužku C
D) korunka pro nastavení dolního vnitřního otočného kroužku E
2)
tlačítko pro spuštění a zastavení stopek
3) tlačítko pro vynulování stopek
Nastavení času
– Uvolněte vyšroubováním nastavovací korunku (1).
– Vytáhněte korunku zcela do polohy (1b).
– Nastavte čas otáčením korunky v požadovaném směru.
– Korunky úplně zasuňte nazpět a pak ji znovu dotáhněte zašroubováním.
Nastavení data a dne v týdnu
– Uvolněte vyšroubováním nastavovací korunku (1).
– Vytáhněte korunku do mezipolohy (1a).
– Otáčejte korunkou proti směru otáčení hodinových ručiček, dokud se neobjeví požadované datum,
nebo ve směru otáčení hodinových ručiček pro nastavení požadovaného dne v týdnu. Tuto operaci
neprovádějte mezi 20:00 a 02:00 (8 hodinami odpoledne a 2 hodinami ráno).
– Korunku úplně zasuňte nazpět a pak ji znovu dotáhněte zašroubováním.
E) dolní vnitřní otočný kroužek
© HAMILTON 2005 / KHAKI AUTOMATIC X-WIND 7574 © HAMILTON 2005 / KHAKI AUTOMATIC X-WIND
Page 41

Funkce stopek
– Prvním stiskem tlačítka pro spuštění a zastavení (2) spustíte ručičku a čítače stopek.
– Druhý stisk tlačítka pro spuštění a zastavení (2) ručičku a čítače zastaví.
– Následné operace s tlačítkem pro spuštění a zastavení (2) spustí a zastaví stopky tolikrát, kolikrát
bude třeba ke změření celkového času.
– Stiskem tlačítka reset (3) vrátíte ručičku stopek na nulu a vynulujete čítače.
Boční vítr
1. Umístěte červenou šipku horního vnitřního otočného kroužku (C) na 12. hodinu pomocí korunky (B).
Nastavte dolní vnitřní otočný kroužek (E) na 0° pomocí korunky (D).
2. Zjistěte si rychlost a směr větru z řídící věže nebo z povětrnostní mapy.
Např.: rychlost větru: 40 mph (mil za hodinu)
směr větru: 70°
Udejte směr větru (70) do okénka horního vnitřního otočného kroužku (C) pomocí koruny (B).
3. Nastavte vnější otočný kroužek (A) tak, aby desetina rychlosti letadla byla zapsána proti červené
šipce.
rychlost letadla: 180 mph (mil za hodinu) – udejte 18.
Např.:
4. Pomocí zeměpisného záměrného bodu vypočtěte magnetický azimut letounu:
Je-li odchylka (Var) k západu, přičte se k
zeměpisnému záměrnému bodu a výsledkem je
magnetický azimut. Např. 30° + 10° = 40°.
Je-li odchylka (Var) k východu, odečte se od
zeměpisného záměrného bodu a výsledkem je
magnetický azimut. Např. 30° -15° = 15°.
Odchylka (Var) závisí na aktuální poloze, kterou lze zjistit z letecké mapy.
Tn: skutečný sever | Mn: magnetický sever | Var: odchylka
Např.: zeměpisný záměrný bod: 30°
odchylka (Var): 10°
magnetický azimut: 30° + 10° = 40°
© HAMILTON 2005 / KHAKI AUTOMATIC X-WIND 7776 © HAMILTON 2005 / KHAKI AUTOMATIC X-WIND
Page 42
5. Výpočet úhlu bočního větru (crosswind angle)
Např.: směr větru: 70°
magnetický azimut letadla: 40°
úhel bočního větru: 70° - 40° = 30° (protivítr)
6. Výpočet bočního větru:
S použitím grafu (plastová kartička) stanovte bod průsečíku rychlosti větru (složka protivětru/větru do
zad – head/tailwind component) a úhlu bočního větru (crosswind angle)
Vycházejíce z bodu průsečíku odečtěte hodnotu složky bočního větru (crosswind component) na
vodorovné ose.
Např.: složka protivětru (headwind component): 40 mph (mil za hodinu)
úhel bočního větru (crosswind angle) 30°
složka bočního větru (crosswind component): 20 mph (mil za hodinu)
70° - 40° = 30°
(protivítr - headwind)
180° - (330° - 220°) = 70°
(vítr do zad - tailwind)
360° - (330° - 40°) = 70°
(protivítr - headwind)
© HAMILTON 2005 / KHAKI AUTOMATIC X-WIND 7978 © HAMILTON 2005 / KHAKI AUTOMATIC X-WIND
Page 43

7. Výpočet úhlu snosu:
Najděte složku bočního větru (
vnitřním kroužku (
C).
20) na vnějším otočném kroužku (A) a odečtěte hodnotu udanou na
Např.: Úhel snosu: cca 6,5°
8. Výpočet opraveného záměrného bodu:
Jestliže vítr fouká zprava, přičtěte úhel snosu k magnetickému azimutu.
Jestliže vítr fouká zleva, odečtěte úhel snosu od magnetického azimutu.
Např.: opravený záměrný bod: 40° + 6,5° = 46,5°
Pro uložení údajů použijte korunku (D) k zadání opraveného záměrného bodu (46,5°) na dolním
vnitřním otočném kroužku (E).
Doporučení
Jako všechny přesné přístroje na bázi jemné mechaniky by i vaše hodinky Hamilton měly být kontrolovány
alespoň jednou za dva roky. Svěřujte své hodinky pouze oprávněným zástupcům firmy Hamilton. Aby si
vaše hodinky zachovaly svou vodotěsnost zabezpečte, aby byly jejich těsnicí vlastnosti přezkoušeny při
každé kontrole.
vodotěsnost vašich hodinek je 10 ATM = 100 M = 330 stop.
Pět základních pravidel, jak zachovat vodotěsnost
1. Dávejte si své hodinky pravidelně zkontrolovat (jednou ročně).
2. Nepohybujte korunkou, když jste ve vodě.
3. Po pobytu v mořské vodě své hodinky opláchněte.
4. Kdykoliv se vaše hodinky namočí, osušte je.
5. Kdykoliv dojde k otevření pouzdra hodinek, dejte si své hodinky prověřit na vodotěsnost u zástupce
firmy Hamilton.
Vaše hodinky jsou vybaveny automatickým strojkem. Mechanismus hodinek obsahuje kmitavý rotor, který
natahuje hlavní pero pohybem vašeho zápěstí. Provozní záloha činí asi 46 hodin. V případě potřeby lze
hodinky natáhnout ručně. Krásu vnitřního provozu pohonu hodinek lze obdivovat průhledným zadním
víčkem.
© HAMILTON 2005 / KHAKI AUTOMATIC X-WIND 8180 © HAMILTON 2005 / KHAKI AUTOMATIC X-WIND
Page 44

© HAMILTON 2005 / KHAKI AUTOMATIC X-WIND 8382 © HAMILTON 2005 / KHAKI AUTOMATIC X-WIND
Page 45

© HAMILTON 2005 / KHAKI AUTOMATIC X-WIND 8584 © HAMILTON 2005 / KHAKI AUTOMATIC X-WIND
Page 46
© HAMILTON 2005 / KHAKI AUTOMATIC X-WIND 8786 © HAMILTON 2005 / KHAKI AUTOMATIC X-WIND
Page 47
© HAMILTON 2005 / KHAKI AUTOMATIC X-WIND 8988 © HAMILTON 2005 / KHAKI AUTOMATIC X-WIND
Page 48

© HAMILTON 2005 / KHAKI AUTOMATIC X-WIND 9190 © HAMILTON 2005 / KHAKI AUTOMATIC X-WIND
Page 49

© HAMILTON 2005 / KHAKI AUTOMATIC X-WIND 9392 © HAMILTON 2005 / KHAKI AUTOMATIC X-WIND
Page 50

© HAMILTON 2005 / KHAKI AUTOMATIC X-WIND 9594 © HAMILTON 2005 / KHAKI AUTOMATIC X-WIND
Page 51

© HAMILTON 2005 / KHAKI AUTOMATIC X-WIND 9796 © HAMILTON 2005 / KHAKI AUTOMATIC X-WIND
Page 52

© HAMILTON 2005 / KHAKI AUTOMATIC X-WIND 9998 © HAMILTON 2005 / KHAKI AUTOMATIC X-WIND
Page 53

© HAMILTON 2005 / KHAKI AUTOMATIC X-WIND 101100 © HAMILTON 2005 / KHAKI AUTOMATIC X-WIND
Page 54

© HAMILTON 2005 / KHAKI AUTOMATIC X-WIND 103102 © HAMILTON 2005 / KHAKI AUTOMATIC X-WIND
Page 55

© HAMILTON 2005 / KHAKI AUTOMATIC X-WIND 105104 © HAMILTON 2005 / KHAKI AUTOMATIC X-WIND
Page 56
© HAMILTON 2005 / KHAKI AUTOMATIC X-WIND 107106 © HAMILTON 2005 / KHAKI AUTOMATIC X-WIND
Page 57
© HAMILTON 2005 / KHAKI AUTOMATIC X-WIND 109108 © HAMILTON 2005 / KHAKI AUTOMATIC X-WIND
Page 58
© HAMILTON 2005 / KHAKI AUTOMATIC X-WIND 111110 © HAMILTON 2005 / KHAKI AUTOMATIC X-WIND
Page 59

© HAMILTON 2005 / KHAKI AUTOMATIC X-WIND 113112 © HAMILTON 2005 / KHAKI AUTOMATIC X-WIND
Page 60

© HAMILTON 2005 / KHAKI AUTOMATIC X-WIND
Page 61

www.hamiltonwatch.com
H860.000.021 - R2
 Loading...