

Page 1

00
136296
Radio Controlled Clock
Funkwecker
Руководство по эксплуатации
”RC 550“
Operating Instructions
Bedienungsanleitung
Mode d‘emploi
Instrucciones de uso
Istruzioni per l‘uso
Instrukcja obsługi
Návod k použití
Návod na použitie
Manual de utilizare
GB
D
F
E
RUS
I
PL
CZ
SK
RO
Page 2

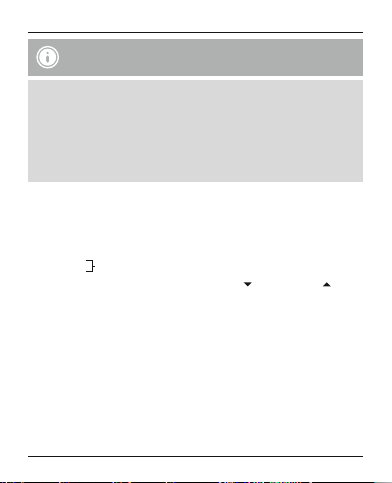
A
7
1
CLOCK ALARM ALARM
2
43
5 6 8
RESET
RCC
9
11
10
B
2
1
3
8
7
12
10
6 954
11
Page 3
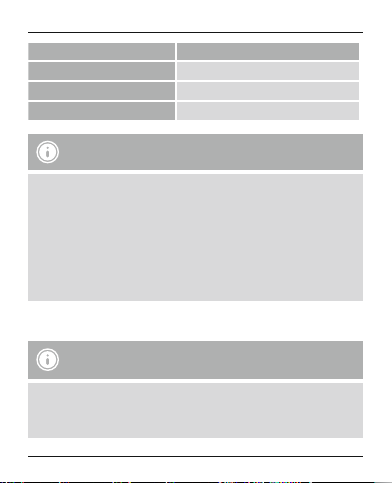
G Operating instruction
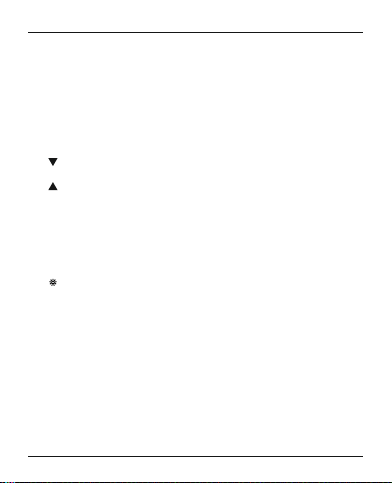
Controls and Displays
A Controls
1. Display
2. CLOCK button
= sets the time
3. ALARM button
= displays alarm time (approx. 5 seconds); used forsetting alarm
4. ALARM ON/OFF slide switch
= activates/deactivates the alarm
5. -button
= reduces the current setvalue
6. -button
= increases the currentset value
7. SNOOZE / LIGHT-button / twilight sensor
= activates the backlight (approx. 5 seconds)/postpones the alarm for 5 minutes
8. RESET button
= restores factory settings
9. RCC button
= activates/deactivates manual radio signal reception; switches between °C and °F
10. ON/ OFF slide switch
= activates/deactivates the twilight sensor
11. Battery compartment
B Display icons
1. Time
2. AM/PM (12-hour format)
3. Day
4. Month
5. Day of the week
6. Temperature
7. Signal strength
8. Summer time
9. Alarm time
2
Page 4

10. AM/PM (12-hour format) alarm time
11. Alarm clock icon
12. Alarm clock display icon
Thank you for choosing a Hama product.
Take your time and read the following instructions and information completely. Please
keep these instructions in a safe place for future reference. If you sell the device, please
pass these operating instructions on to the new owner.
1. Explanation of Warning Symbols and Notes
Warning
This symbol is used to indicate safety instructions or to draw your attention to
specic hazards and risks.
Note
This symbol is used to indicate additional information or important notes.
2. Package Contents
•RC 550 radio-controlled alarm clock
•2AA batteries
•These operating instructions
3. Safety Notes
•The product is intended for private, non-commercial use only.
•Protect the product from dirt, moisture and overheating, and only use it in a dry
environment.
•Do not use the product in areas where the use of electronic devices is not permitted.
•Do not place the product near interference elds, metal frames, computers, TVs,
3
Page 5

etc. Electronic devices and window frames can negatively affect the product’s
functionality.
•Do not drop the product and do not expose it to any major shocks.
•Do not attempt to service or repair the product yourself. Leave any and all service
work to qualied experts.
•Do not modify the product in any way. Doing so voids the warranty.
•Dispose of packaging material immediately according to locally applicable
regulations.
WARNING – Batteries
•Immediately remove and dispose of dead batteries from the product.
•Only use batteries (or rechargeable batteries) that match the specied type.
•Do not mix old and new batteries or batteries of a different type or make.
•When inserting batteries, note the correct polarity (+ and - markings) and insert
the batteries accordingly. Failure to do so could result in the batteries leaking or
exploding.
•Do not overcharge batteries.
•Keep batteries out of the reach of children.
•Do not short circuit the batteries/rechargeable batteries and keep them away
from uncoated metal objects.
4. Getting Started
•Open the battery compartment (11), insert two AA batteries with the correct
polarity and close the battery compartment (11).
•If nothing is shown on the LCD display after new batteries have been inserted, press
the RESET button (8) with a pointed object to restart the device.
4
Page 6
5. Operation
Note – Input
• Hold down the button (5) or the button (6) to select the values faster..
5.1. Automatic date/time setting using the DCF radio signal
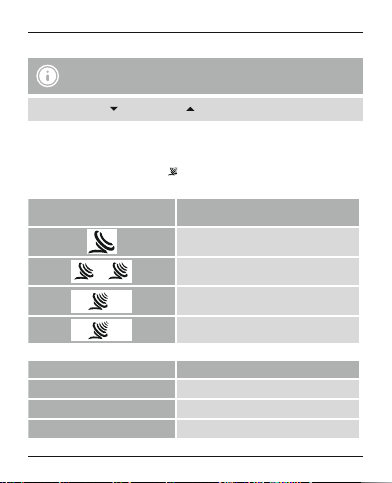
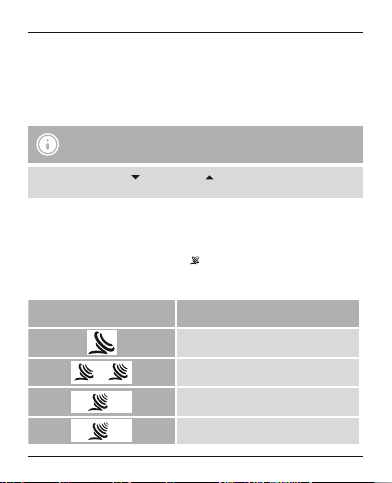
•Once you have inserted the batteries, the display is switched on, an acoustic signal
sounds and the alarm clock automatically starts searching for a DCF radio signal.
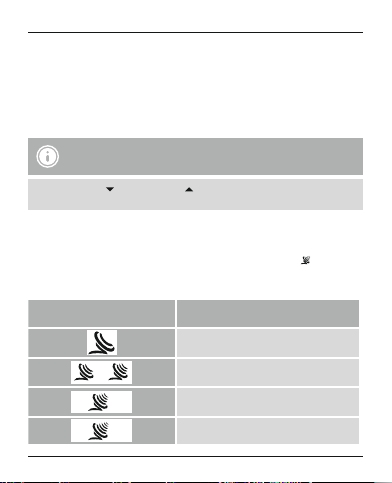
During the search, the radio icon will ash. This process can take 3 to 5 minutes.
•When the radio signal is received, the date and time are automatically set.
Radio icon Signal strength
No reception
Poor
Fair
Excellent
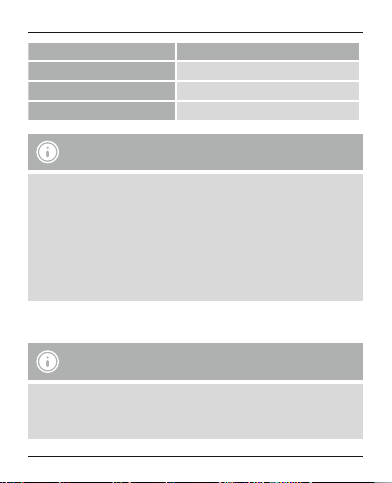
Radio icon appearance DCF radio signal search
Flashing Active
Displayed continuously Successful – signal is being received
No display Inactive
5
Page 7
Note – Time settings
•If, during initial setup of the device, a DCF radio signal is not received within
the rst few minutes, the search is aborted. The radio icon will go out.
•If there are reception problems, we recommend leaving the clock to sit
overnight, since interference is generally less at night.
•In the meantime, you can start a manual search for the DCF radio signal at
another location or you can manually set the time and date.
•The clock automatically continues to search for the DCF radio signal on a daily
basis. If the signal is received successfully, the manually-set time and date are
overwritten.
•If the station still does not receive a signal, press and hold the RCC button (9) for
approx. 3 seconds to start the manual search for the DCF radio signal.
Note – Manual search
•The manual search is automatically aborted after 6-12 minutes.
•Using the RCC button (9) frequently will drain the battery. We recommend only
using this function to seek out an optimal location for the device.
•Press and hold the RCC button (9) again for approx. 3 seconds to stop the manual
search.
Note – Summer time
•The clock automatically switches to summer time. (B – 8)
display as long as summer time is activated.
DST
appears on the
6
Page 8
5.2. Manually setting the date/time
•Press and hold the CLOCK button (2) for approx. 2 seconds until the year display
begins to ash.
•Set the following information in the order listed:
•Year (B – 1)
•Month (B – 4)
•Day (B – 3)
•12/24 hour format (B – 1)
•Hours
•Minutes
•Seconds (only zeros possible)
•Day of the week language (B – 5)
•To select the individual values, press the button (5) or the button (6) and
conrm each selection by pressing the CLOCK button (2).
•Press the CLOCK button (2) immediately to adopt the set value displayed and
skip ahead.
•If you do not make an entry for 30 seconds, the device automatically exits the
settings mode and the settings you made are saved.
Note – Day of the week
•You can choose from English (GB), French (FR), German (DE), Spanish (ES) and
Italian (IT) for the display of the day of the week.
Time (B – 1)
7
Page 9
Note – 12/24-hour format
•The time is displayed in 12-hour format as standard. The radio signal icon will
disappear as soon as you change the time display to 24-hours format. The
alarm clock will automatically search for the radio signal again at the next
interval (usually at 2:00/3:00 o’clock in the morning). The icon will be displayed
again as usual when a radio signal is received successfully.
•If the radio icon should still not appear, change the installation location
and avoid areas with possible sources of interference (cordless and mobile
telephones, wireless speakers, WLAN, etc.), if necessary.
5.3. Alarm
Setting the alarm time
•Press and hold the ALARM button (3) for approx. 2 seconds until the hours display
(B – 9) begins to ash.
•Set the following information in the order listed:
•Hours
Alarm time (B – 9)
•Minutes
•To select the individual values, press the button (5) or the button (6) and
conrm your selection by pressing the ALARM button (3).
•If you do not make an entry for 30 seconds, the device automatically exits the
settings mode and the settings you made are saved.
•Press the ALARM button (3) to display the set alarm time for approx. 5 seconds.
Activating/deactivating the alarm
•Move the ALARM ON/OFF slide switch (4) to the left to the ON position. A red
surface will be visible underneath the slide switch.
•The alarm is activated and the alarm clock icon (B – 11) is shown on the display (1).
•Move the ALARM ON/OFF slide switch (4) to the OFF position to the right until the
surface underneath the slide switch is black.
•The alarm is deactivated and the alarm clock icon (B – 11) disappears from the
display (1).
8
Page 10

Stopping the alarm/snooze function
•If the alarm is activated, it is triggered at the set time and an alarm signal sounds
for one minute. The alarm automatically stops after this time and is then triggered
again the next day at the set alarm time.
•To stop the alarm early, move the ALARM ON/OFF slide switch (4) to the OFF
position to the right until the surface underneath the slide switch is black. The alarm
is now deactivated.
•Move the ALARM ON/OFF slide switch (4) back to the ON position on the left
again to activate the alarm for the next day.
Note – Snooze function
•While the alarm signal is sounding, press the SNOOZE/LIGHT button (7) to
activate the snooze function. The alarm clock icon (B – 11) on the display (1)
begins to ash. The alarm signal will be stopped for 5 minutes, after which it
will sound again.
•The snooze function can be activated four consecutive times.
5.4. Temperature display
•Press the RCC button (9), to switch the temperature display (B – 6) between °C
and °F.
5.5. Backlight
•If you press the SNOOZE/LIGHT button (7), the display (1) will light up for approx.
5 seconds.
•The alarm clock is equipped with a twilight sensor (7) that automatically switches
on the backlight of the display (1) to a dimmed setting as soon as it gets dark.
•During the day or if there is enough light, the twilight sensor (7) automatically
switches off the dimmed backlight on the display (1).
•Move the ON/OFF slide switch (10) to the ON or OFF position to activate or
deactivate the twilight sensor (7).
9
Page 11

Note – Backlight
•We recommend deactivating the twilight sensor while the clock is not in use,
while it is packed during travel, etc.
•Continuous use of the twilight sensor will drain the battery.
5.6. Replacing the batteries
•Once the elements on the display (1) begin to dim, replace the batteries as
described in 4. Getting Started.
6. Care and Maintenance
•Only clean this product with a slightly moist, lint-free cloth, and do not use
aggressive cleaning agents. Make sure that water does not get into the product.
7. Warranty Disclaimer
Hama GmbH & Co. KG assumes no liability and provides no warranty for damage
resulting from improper installation/mounting, improper use of the product or from
failure to observe the operating instructions and/or safety notes.
8. Service and Support
Please contact Hama Product Consulting if you have any questions about this product.
Hotline: +49 9091 502-115 (German/English)
Further support information can be found here:
www.hama.com
10
Page 12

9. Technical Data
RC 550 radio-controlled alarm clock
Power supply
Measuring range
Temperature
10. Recycling Information
Note on environmental protection:
After the implementation of the European Directive 2012/19/EU and
2006/66/EU in the national legal system, the following applies: Electric
and electronic devices as well as batteries must not be disposed of with
household waste. Consumers are obliged by law to return electrical and
electronic devices as well as batteries at the end of their service lives to
the public collecting points set up for this purpose or point of sale. Details to this are
dened by the national law of the respective country. This symbol on the product, the
instruction manual or the package indicates that a product is subject to these
regulations. By recycling, reusing the materials or other forms of utilising old devices/
batteries, you are making an important contribution to protecting our environment.
11. Declaration of Conformity
Hereby, Hama GmbH & Co KG declares that the radio equipment type
[00136296] is in compliance with Directive 2014/53/EU. The full text of
the EU declaration of conformity is available at the following internet
address: www.hama.com -> 00136296 -> Downloads.
Frequency band(s) 77,5 kHz
3.0 V
2 x AA batteries
0 °C – +45 °C
32 °F – +113 °F
11
Page 13

D Bedienungsanleitung
A Bedienungselemente
1. Display
2. CLOCK-Taste
= Einstellung Uhrzeit
3. ALARM-Taste
= Anzeige Weckzeit (ca. 5 Sekunden) / Einstellung Wecker
4. ALARM ON/OFF-Schiebeschalter
= Aktivierung/ Deaktivierung Wecker
-Taste
5.
= Verringerung des aktuellen Einstellungswerts
6. -Taste
= Erhöhung des aktuellen Einstellungswerts
7. SNOOZE / LIGHT-Taste / Dämmerungssensor
= Aktivierung Hintergrundbeleuchtung (ca. 5 Sekunden) / Unterbrechung des
Wecksignals für 5 Minuten
8. RESET-Knopf
= Zurücksetzung auf Werkseinstellung
9. RCC-Taste
= Aktivierung/ Deaktivierung manueller Funksignal-Empfang / Wechsel zwischen
°C und °F
ON/ OFF-Schiebeschalter
10.
= Aktivierung/ Deaktivierung Dämmerungssensor
11. Batteriefach
B Displaysymbole
1. Uhrzeit
2. AM/PM (12-Stunden-Format)
3. Tag
4. Monat
5. Wochentag
6. Temperatur
7. Signalstärke
8. Sommerzeit
9. Weckzeit
12
Page 14
10. AM/PM (12-Stunden-Format) Weckzeit
11. Weckersymbol
12. Anzeigesymbol Wecker
Vielen Dank, dass Sie sich für ein Hama Produkt entschieden haben!
Nehmen Sie sich Zeit und lesen Sie die folgenden Anweisungen und Hinweise zunächst
ganz durch. Bewahren Sie diese Bedienungsanleitung anschließend an einem sicheren
Ort auf, um bei Bedarf darin nachschlagen zu können. Sollten Sie das Gerät veräußern,
geben Sie diese Bedienungsanleitung an den neuen Eigentümer weiter.
1. Erklärung von Warnsymbolen und Hinweisen
Warnung
Wird verwendet, um Sicherheitshinweise zu kennzeichnen oder um
Aufmerksamkeit auf besondere Gefahren und Risiken zu lenken.
Hinweis
Wird verwendet, um zusätzlich Informationen oder wichtige Hinweise zu
kennzeichnen.
2. Packungsinhalt
•Funkwecker RC 550
•2AA Batterien
•diese Bedienungsanleitung
13
Page 15

3. Sicherheitshinweise
•Das Produkt ist für den privaten, nicht-gewerblichen Haushaltsgebrauch
vorgesehen.
•Schützen Sie das Produkt vor Schmutz, Feuchtigkeit und Überhitzung und
verwenden Sie es nur in trockenen Umgebungen.
•Benutzen Sie das Produkt nicht in Bereichen, in denen elektronische Produkte nicht
erlaubt sind.
•Positionieren Sie das Produkt nicht in der Nähe von Störfeldern, Metallrahmen,
Computern und Fernsehern etc. Elektronische Geräte sowie Fensterrahmen
beeinträchtigen die Funktion des Produktes negativ.
•Lassen Sie das Produkt nicht fallen und setzen Sie es keinen heftigen
Erschütterungen aus.
•Versuchen Sie nicht, das Produkt selbst zu warten oder zu reparieren. Überlassen Sie
jegliche Wartungsarbeit dem zuständigen Fachpersonal.
•Nehmen Sie keine Veränderungen am Produkt vor. Dadurch verlieren sie jegliche
Gewährleistungsansprüche.
•Entsorgen Sie das Verpackungsmaterial sofort gemäß den örtlich gültigen
Entsorgungsvorschriften.
Warnung
•Entfernen und entsorgen Sie verbrauchte Batterien unverzüglich aus dem Produkt.
Verwenden Sie ausschließlich Akkus (oder Batterien), die dem angegebenen
Typ entsprechen.
•Mischen Sie alte und neue Batterien nicht, sowie Batterien unterschiedlichen
Typs oder Herstellers.
•Beachten Sie unbedingt die korrekte Po larität (Beschriftung + und -) der
Batterien und legen Sie diese entsprechend ein. Bei Nichtbeachtung besteht die
Gefahr des Auslaufens oder einer Explosion der Batterien.
•Laden Sie Batterien nicht.
•Bewahren Sie Batterien außerhalb der Reichweite von Kindern auf.
•Schließen Sie Akkus/Batterien nicht kurz und halten Sie sie von blanken
Metallgegenständen fern.
14
Page 16
4. Inbetriebnahme
•Öffnen Sie das Batteriefach (11), legen Sie zwei AA Batterien polrichtig ein und
schließen Sie das Batteriefach (11) wieder.
•Wird nach dem Einsetzen einer neuen Batterie nichts auf dem LC D-Display
angezeigt, drücken Sie mit einem spitzen Gegenstand den RESET-Knopf (8), um
einen Neustart zu generieren.
5. Betrieb
Hinweis – Eingabe
• Halten Sie die -Taste (5) oder die -Taste (6) gedrückt, um die Werte
schneller auswählen zu können.
5.1. Automatische Einstellung Datum/ Uhrzeit nach DCF-Funksignal
•Nach dem Einlegen der Batterie wird das Display eingeschaltet, es ertönt ein
akustisches Signal und der Wecker beginnt automatisch die Suche nach einem
DCF-Funksignal. Während des Suchvorgangs blinkt das Funksymbol . Dieser
Vorgang kann 3 bis 5 Minuten dauern.
•Bei Empfang des Funksignals werden Datum und Uhrzeit automatisch eingestellt.
Funksymbol Signalstärke
Kein Empfang
Schlecht
Annehmbar
Hervorragend
15
Page 17
Anzeige Funksymbol Suche nach Funksignal
Blinkende Anzeige Aktiv
Dauerhafte Anzeige Erfolgreich – Signal wird empfangen
Keine Anzeige Inaktiv
Hinweis – Uhrzeiteinstellung
•Wird innerhalb der ersten Minuten während der Ersteinrichtung kein DCFFunksignal empfangen, wird die Suche beendet. Das Funksymbol erlischt.
•Bei Empfangsstörungen wird empfohlen, die Uhr über Nacht stehen zu lassen,
da hier die Störsignale in der Regel geringer sind.
•Sie können währenddessen eine manuelle Suche nach dem DCF-Funksignal
an einem anderen Aufstellungsort starten oder die manuelle Einstellung von
Uhrzeit und Datum vornehmen.
•Die Uhr sucht automatisch weiterhin täglich nach dem DCF-Funksignal. Bei
erfolgreichem Signalempfang werden die manuell eingestellte Uhrzeit und das
Datum überschrieben.
•Drücken und halten Sie die RCC-Taste (9) für ca. 3 Sekunden, um die manuelle
Suche nach dem DCF-Funksignal zu starten.
Hinweis – manueller Suchvorgang
•Der manuelle Suchvorgang schaltet sich automatisch nach 6 – 12 Minuten ab.
•Eine häuge Nutzung der RCC-Taste (9) geht zu Lasten der Batteriekapazität.
Es wird empfohlen, diese Funktion nur zur Ausmachung eines optimalen
Aufstellungsorts zu nutzen.
16
Page 18

•Drücken und halten Sie die RCC-Taste (9) erneut für ca. 3 Sekunden, um den
manuellen Suchvorgang zu beenden.
Hinweis – Sommerzeit
•Die Uhrzeit stellt sich automatisch auf die Sommerzeit um. Solange die
Sommerzeit aktiv ist, wird auf dem Display
5.2. Manuelle Einstellung Datum/ Uhrzeit
•Drücken und halten Sie die CLOCK-Taste (2) für ca. 2 Sekunden, bis die
Jahresanzeige zu blinken beginnt.
•Stellen Sie die folgenden Informationen nacheinander ein:
•Jahr (B – 1)
•Monat (B – 4)
•Tag (B – 3)
•12/24-Stunden-Format (B – 1)
•Stunden
•Minuten
•Sekunden (nur Nullen möglich)
•Sprache Wochentag (B – 5)
•Drücken Sie zum Auswählen der einzelnen Werte die -Taste (5) oder die -Taste
(6) und bestätigen Sie die jeweilige Auswahl durch Drücken der CLOCK-Taste (2).
•Drücken Sie direkt die CLOCK-Taste (2), um den angezeigten Einstellungswert zu
übernehmen und zu überspringen.
•Erfolgt 30 Sekunden keine Eingabe, wird der Einstellungsmodus automatisch
verlassen und die vorgenommenen Einstellungen gespeichert.
DST
Uhrzeit (B-1)
(B – 8) angezeigt.
Hinweis – Wochentag
•Sie können für die Wochentaganzeige die Sprachen Englisch (GB), Französisch
(FR), Deutsch (DE), Spanisch (ES) oder Italienisch (IT) wählen.
17
Page 19
Hinweis – 12/24-Stunden Format
•Die Uhrzeit wird standardmäßig im 12-Stunden-Format angezeigt. Sobald Sie
diese Anzeige auf das 24-Stunden-Format umstellen, erlischt das Symbol des
Funksignals. Der Wecker sucht automatisch zum nächsten Zeitpunkt (meist
nachts gegen 2:00/ 3:00 Uhr) erneut nach dem Funksignal. Bei erfolgreichem
Empfang des Funksignals wird das Symbol wie gewohnt angezeigt.
•Sollte weiterhin kein Funksymbol angezeigt werden, verändern Sie ggfs.
den Aufstellort und vermeiden Sie Bereiche mit Störquellen (Schnurlos- und
Mobiltelefone, Funklautsprecher, WLAN etc.).
5.3. Wecker
Einstellung Weckzeit
•Drücken und halten Sie die ALARM-Taste (3) für ca. 2 Sekunden, bis die
Stundenanzeige (B – 9) zu blinken beginnt.
•Stellen Sie die folgenden Informationen nacheinander ein:
•Stunden
Weckzeit (B – 9)
•Minuten
•Drücken Sie zum Auswählen der einzelnen Werte die -Taste (5) oder die -Taste
(6) und bestätigen Sie die jeweilige Auswahl durch Drücken der ALARM-Ta ste (3).
•Erfolgt 30 Sekunden keine Eingabe, wird der Einstellungsmodus automatisch
verlassen und die vorgenommenen Einstellungen gespeichert.
•Drücken Sie die ALARM-Taste (3), um die eingestellte Weckzeit für ca. 5 Sekunden
anzuzeigen.
Aktivierung/ Deaktivierung Wecker
•Schieben Sie den ALARM ON/OFF-Schiebeschalter (4) nach links auf die Position
ON. Unter dem Schiebeschalter wird eine rote Fläche sichtbar.
Der Wecker ist aktiviert und auf dem Display (1) wird das Weckersymbol (B – 11)
angezeigt.
18
Page 20

•Schieben Sie den ALARM ON/OFF-Schiebeschalter (4) nach rechts auf die Position
OFF, bis die Fläche hinter dem Schiebeschalter schwarz ist.
Der Wecker ist deaktiviert und das Weckersymbol (B – 11) auf dem Display (1)
erlischt.
Wecker beenden/ Schlummerfunktion
•Ist der Wecker aktiviert, wird dieser zur entsprechenden Uhrzeit ausgelöst und
es ertönt für eine Minute ein Wecksignal. Danach wird der Wecker automatisch
beendet und am nächsten Tag zur eingestellten Weckzeit wieder ausgelöst.
•Um den Wecker vorzeitig zu beenden, schieben Sie den ALARM ON/OFFSchiebeschalter (4) nach rechts auf die Po sition OFF, bis die Fläche hinter dem
Schiebeschalter schwarz ist. Der Wecker ist nun deaktiviert.
•Schieben Sie den ALARM ON/OFF-Schiebeschalter (4) wieder nach links auf die
Position ON, um den Wecker für den nächsten Ta g zu aktivieren.
Hinweis – Schlummerfunktion
•Drücken Sie während des Wecksignals die SNOOZE / LIGHT-Taste (7),
um die Schlummerfunktion zu aktiveren. Auf dem Display (1) beginnt das
Weckersymbol (B – 11) zu blinken. Das Wecksignal wird für 5 Minuten
unterbrochen und dann erneut ausgelöst.
•Die Schlummerfunktion kann viermal hintereinander ausgelöst werden.
5.4. Anzeige Temperatur
•Drücken Sie die RCC-Taste (9), um bei der Temperaturanzeige (B – 6) zwischen °C
und °F zu wechseln.
5.5. Hintergrundbeleuchtung
•Drücken Sie die SNOOZE / LIGHT-Taste (7), wird das Display (1) für ca. 5 Sekunden
beleuchtet.
•Der Wecker ist mit einem Dämmerungssensor (7) ausgestattet, der automatisch bei
dunkleren Lichtverhältnissen eine gedämmte Hintergrundbeleuchtung des Displays
(1) einschaltet.
19
Page 21

•Bei Ta geslicht bzw. ausreichend hellen Lichtverhältnissen schaltet der
Dämmerungssensor (7) die gedämmte Hintergrundbeleuchtung des Displays (1)
automatisch aus.
•Schieben Sie den
um den Dämmerungssensor (7) zu aktivieren bzw. deaktivieren.
•Es wird empfohlen, den Dämmerungssensor während der Nichtbenutzung, auf
Reisen im Gepäck, usw. zu deaktivieren.
•Eine dauerhafte Nutzung des Dämmerungssensors geht zu Lasten der
Batteriekapazität.
5.6. Batteriewechsel
•Sobald die Anzeige auf dem Display (1) schwächer wird, wechseln Sie die Batterien
– wie in 4. Inbetriebnahme beschrieben – aus.
6. Wartung und Pflege
•Reinigen Sie dieses Produkt nur mit einem fusselfreien, leicht feuchten Tu ch und
verwenden Sie keine aggressiven Reiniger. Achten Sie darauf, dass kein Wasser in
das Produkt eindringt.
7. Haftungsausschluss
Die Hama GmbH & Co. KG übernimmt keinerlei Haftung oder Gewährleistung für
Schäden, die aus unsachgemäßer Installation, Montage und unsachgemäßem
Gebrauch des Produktes oder einer Nichtbeachtung der Bedienungsanleitung und/oder
der Sicherheitshinweise resultieren.
8. Service und Support
Bitte wenden Sie sich bei Fragen zum Produkt gerne an die Hama-Produktberatung.
Hotline: +49 9091 502-115 (Deu/Eng)
Weitere Supportinformationen nden sie hier:
www.hama.com
ON/ OFF-Schiebeschalter (10) auf die Position ON bzw. OFF,
Hinweis – Hintergrundbeleuchtung
20
Page 22
9. Technische Daten
Funkwecker RC 550
Stromversorgung
Messbereich
Temperatur
10. Entsorgungshinweise
Hinweis zum Umweltschutz:
Ab dem Zeitpunkt der Umsetzung der europäischen Richtlinien 2012/19/
EU und 2006/66/EG in nationales Recht gilt folgendes: Elektrische und
elektronische Geräte sowie Batterien dürfen nicht mit dem Hausmüll
entsorgt werden. Der Verbraucher ist gesetzlich verpichtet, elektrische
und elektronische Geräte sowie Batterien am Ende ihrer Lebensdauer an
den dafür eingerichteten, öffentlichen Sammelstellen oder an die Verkaufsstelle
zurückzugeben. Einzelheiten dazu regelt das jeweilige Landesrecht. Das Symbol auf
dem Produkt, der Gebrauchsanleitung oder der Verpackung weist auf diese
Bestimmungen hin. Mit der Wiederverwertung, der stoichen Verwertung oder
anderen Formen der Verwertung von Altgeräten/Batterien leisten Sie einen wichtigen
Beitrag zum Schutz unserer Umwelt.
11. Konformitätserklärung
Hiermit erklärt die Hama GmbH & Co KG, dass der Funkanlagentyp
[00136296] der Richtlinie 2014/53/EU entspricht. Der vollständige Text
der EU-Konformitätserklärung ist unter der folgenden Internetadresse
verfügbar: www.hama.com -> 00136296 -> Downloads.
Frequenzband/Frequenzbänder 77,5 kHz
3,0 V
2 x AA Batterie
0°C – +45°C
32°F – 113°F
21
Page 23

F Mode d‘emploi
Éléments de commande et d'affichage
A Éléments de commande
1. Écran
2. To uche CLOCK
= réglage de l‘heure
3. To uche ALARM
= achage de l’heure de réveil (pendant env. 5 secondes) / réglage du réveil
4. Sélecteur ALARM ON/OFF
= activation / désactivation du réveil
-Touche
5.
= diminution de la valeur en cours de réglage
6. -Touche
augmentation de la valeur en cours de réglage
7. To uche SNOOZE / LIGHT / Capteur de luminosité
= allumage du rétro-éclairage (pendant env. 5 secondes) / interruption de la
sonnerie de réveil pour 5 minutes
8. To uche RESET
= réinitialisation des réglages d‘usine
9. To uche RCC
= activation / désactivation de la réception manuelle du signal radio /
commutation entre °C et °F
10. Sélecteur
11. Compartiment à piles
B Symboles d’affichage
1. Heure
2. AM/PM (format 12 heures)
3. Jour
4. Mois
5. Jour de la semaine
6. Te mpérature
7. Intensité du signal
22
ON/ OFF
= activation / désactivation du capteur de luminosité
Page 24
8. Heure d‘été
9. Heure de réveil
10. AM/PM (format 12 heures) Heure de réveil
11. Symbole de réveil
12. Symboles d’achage du réveil
Nous vous remercions d’avoir choisi un produit Hama.
Veuillez prendre le temps de lire l‘ensemble des remarques et consignes suivantes.
Veuillez conserver ce mode d‘emploi à portée de main an de pouvoir le consulter en
cas de besoin. Transmettez-le au nouveau propriétaire avec l’appareil le cas échéant.
1. Explication des symboles d‘avertissement et des remarques
Avertissement
Ce symbole est utilisé pour indiquer des consignes de sécurité ou pour attirer votre
attention sur des dangers et risques particuliers.
Remarque
Ce symbole est utilisé pour indiquer des informations supplémentaires ou des
remarques importantes.
2. Contenu de l‘emballage
•Réveil radio-piloté RC 550
•2piles LR03 (AA)
•Mode d‘emploi
23
Page 25

3. Consignes de sécurité
•Ce produit est destiné à une installation domestique non commerciale
•Protégez le produit de toute saleté, humidité, surchauffe et utilisez-le uniquement
dans des locaux secs
•N'utilisez pas le produit dans les zones dans lesquelles l'utilisation d'appareils
électroniques est interdite
•Ne placez pas le produit à proximité de champs parasites, de cadres métalliques,
d’ordinateurs, de téléviseurs, etc. Les appareils électroniques ainsi que les cadres de
fenêtre ont une inuence négative sur le fonctionnement du produit
•Protégez le produit des secousses violentes et évitez tout choc ou toute chute
•Ne tentez pas de réparer l’appareil vous-même ni d’effectuer des travaux
d’entretien. Déléguez tous travaux d'entretien à des techniciens qualiés
•N’apportez aucune modication à l’appareil. Des modications vous feraient perdre
vos droits de garantie
•Recyclez les matériaux d’emballage conformément aux prescriptions locales en
vigueur
Avertissement concernant les piles
•Retirez les piles usagées immédiatement du produit pour les recycler.
•Utilisez exclusivement des batteries (ou des piles) du type indiqué.
•N’utilisez pas simultanément des piles usagées et des piles neuves ou des piles
de différents types.
•Respectez impérativement la polarité de la pile (marquage + et -) lors de
l'insertion dans le boîtier ; risques d'écoulement et d'explosion des piles si tel
n'est pas le cas.
•Ne surchargez pas les piles.
•Conservez les piles hors de portée des enfants.
•Ne court-circuitez pas les batteries/piles et éloignez-les des objets métalliques.
24
Page 26
4. Mise en service
•Ouvrez le compartiment à piles (11), Insérez deux piles LR03/AA conformément
aux indications de polarité, puis refermez le compartiment (11).
•Si, après l’insertion des piles, aucun achage n’apparaît à l’écran, appuyez avec un
objet pointu sur le bouton RESET (8) an de provoquer un redémarrage du réveil.
5. Fonctionnement
Remarque concernant la saisie
• Maintenez la touche (5) ou la touche (6) enfoncée an de faire déler
rapidement les chiffres.
5.1. Réglage automatique de la date / de l'heure sur la base du signal
horaire DCF
•L'écran s'allume après avoir inséré les piles ; un signal sonore retentit et le réveil
recherche automatiquement le signal horaire DCF. Le symbole radio clignote
pendant la recherche du signal horaire . Cette procédure dure de 3 à 5 minutes.
•La date et l‘heure sont réglées automatiquement dès que l‘unité détecte le signal
radio.
Icône radio Intensité du signal
Aucune réception
Mauvaise réception
Réception acceptable
Réception excellente
25
Page 27
Achage du symbole radio Recherche du signal horaire DCF
Achage clignotant Recherche active
Achage permanent
Aucun achage Inactif
Remarque concernant le réglage de l‘heure
•Le réveil interrompt la recherche en cas d'échec de réception du signal horaire DCF
pendant la minute suivant la première conguration. Le symbole radio s'éteint.
•En cas de problème de réception, nous vous conseillons d’attendre une nuit ; les
signaux parasites sont généralement plus faibles pendant la nuit.
•Vous pouvez lancer une nouvelle recherche manuelle du signal horaire DCF en
changeant l’emplacement du réveil, ou encore effectuer un réglage manuel de
l’heure et de la date.
•L'horloge continue à rechercher quotidiennement le signal horaire DCF. Les
réglages manuels de l'heure et de la date seront corrigés dès que la station reçoit
correctement le signal horaire.
•Appuyez sur la touche RCC (9) pendant environ 3 secondes an de lancer une
recherche manuelle du signal horaire DCF.
Remarque concernant la recherche manuelle
•La recherche manuelle se termine automatiquement au bous de 6 – 12 minutes.
•Une utilisation répétée de la touche RCC (9) épuise les piles. Nous vous
recommandons d’utiliser cette fonction uniquement an de localiser un
emplacement idéal.
Recherche aboutie - signal en cours de réception
26
Page 28

•Maintenez à nouveau la touche RCC (9) enfoncée pendant environ 3 secondes an
d’interrompre la recherche manuelle.
Remarque concernant l‘heure d‘été
•Le réveil s‘adapte automatiquement à l‘heure d‘été. (B – 8)
l’écran pendant la durée de l’heure d’été.
5.2. Réglage manuel de la date / de l'heure
•Appuyez sur la touche CLOCK (2) pendant env. 2 secondes jusqu’à ce que les
chiffres de l’année se mettent à clignoter.
•Vous pouvez régler successivement les valeurs suivantes :
•Année (B – 1)
•Mois (B – 4)
•Jour (B – 3)
•Format horaire 12/24 heures
•Heures
•Minutes
•Secondes (uniquement zéro)
•Langue des jours de la semaine (B – 5)
•Appuyez sur la touche (5) ou la touche (6) an d’effectuer le réglage, puis
conrmez votre sélection en appuyant sur la touche CLOCK (2).
•Appuyez directement sur la touche CLOCK (2) an d'adopter la valeur achée et
passer au réglage suivant.
•Le mode de réglage s‘interrompt automatiquement lorsque vous n‘appuyez sur
aucune touche pendant plus de 30 secondes.
Heure (B – 1)
DST
apparaît à
Remarque concernant l‘achage des jours de la semaine
•Vous pouvez acher le jour de la semaine dans les langues suivantes : anglais
(GB), français (FR), allemand (DE), espagnol (ES) ou italien (IT).
27
Page 29

Remarque concernant le format horaire 12/24
•Par défaut, l’heure est indiquée au format 12 heures. Le symbole du signal radio
s’éteint automatiquement dès que vous sélectionnez le format 24 heures. Le
réveil recherche automatiquement le signal horaire (généralement la nuit entre
2h00 et 3h00). Le symbole du signal horaire apparaît normalement à l'écran en
cas de réception conforme.
•SI ce symbole n’apparaît pas à l’écran, modiez l’emplacement du réveil et
évitez les sources d’interférences possibles (téléphones sans l et téléphones
portables, haut-parleurs sans l, WiFi, etc.).
5.3. Réveil
Réglage de l‘heure de réveil
•Appuyez sur la touche ALARM (3) pendant env. 2 secondes jusqu’à ce que les
chiffres de l’heure (B – 9) se mettent à clignoter.
•Vous pouvez régler successivement les valeurs suivantes :
•Heures
•Minutes
•Appuyez sur la touche ou sur la touche (5) an d’effectuer le réglage, puis
•Le mode de réglage s‘interrompt automatiquement lorsque vous n‘appuyez sur
•Appuyez sur la touche ALARM (3) an d’acher l’heure de réveil sélectionnée
Activation / désactivation du réveil
•Poussez le sélecteur ALARM ON/OFF (4) vers la gauche sur la position ON. Une
•Poussez le sélecteur ALARM ON/OFF (4) vers la droite en position OFF, jusqu’à ce
Heure de réveil (B – 9)
conrmez votre sélection en appuyant sur la touche ALARM (6).
aucune touche pendant plus de 30 secondes.
pendant environ 5 secondes.
surface rouge apparaît sous le sélecteur.
Le réveil est activé et le symbole de réveil (B – 11) apparaît à l’écran (1).
que la surface derrière le devienne noire.
Le réveil est désactivé et le symbole de réveil (B – 11) disparaît de l’écran (1).
28
Page 30
Arrêt de la sonnerie / fonction de répétition de la sonnerie
•Si le réveil est activé, une alarme sonore retentit pendant une minute. Le réveil
s’arrête ensuite automatiquement, puis retentit à nouveau le jour suivant à la
même heure.
•Pour arrêter le réveil, poussez le sélecteur ALARM ON/OFF (4) vers la droite en
position OFF, jusqu’à ce que la surface derrière le devienne noire. Le réveil est
alors désactivé.
•Poussez le sélecteur ALARM ON/OFF (4) à nouveau vers la gauche en position ON
an d’activer le réveil pour le jour suivant.
Remarque concernant la fonction de répétition de l‘alarme
•Appuyez sur la touche SNOOZE / LIGHT (7) pendant la sonnerie an d'activer
la fonction de répétition de l’alarme. Le symbole de réveil (B – 11) se met à
clignoter à l’écran. La sonnerie s'interrompt pendant 5 minutes, puis retentit
à nouveau.
•Vous pouvez proter de la fonction de répétition d’alarme quatre fois
successivement.
5.4. Affichage de la température
•Sur la touche RCC (9) an de commuter l’achage de la température (B – 6) entre
°C et °F.
5.5. Rétro-éclairage
•Appuyez sur la touche SNOOZE / LIGHT (7) an d’allumer l’écran (1) pendant
environ 5 secondes.
•Le réveil est équipé d‘un capteur de luminosité (7) qui allume automatiquement le
rétro-éclairage de l’écran (1) en veilleuse en cas de conditions lumineuses faibles.
•Le capteur de luminosité (7) éteint automatiquement le rétro-éclairage de l’écran (1)
pendant la journée ou lorsque les conditions lumineuses sont bonnes.
•Placez le sélecteur
désactiver le capteur de luminosité (7).
ON/ OFF (10) en position ON ou OFF an d’activer ou
29
Page 31

Remarque concernant le rétro-éclairage
•Nous vous recommandons de désactiver le capteur de luminosité en cas de
non-utilisation et au cours de voyages lorsque le réveil est dans votre bagage.
•Une utilisation permanente du capteur de luminosité épuise les piles.
5.6. Remplacement des piles
•Veuillez remplacer les piles dès que l’achage piles faibles apparaît à l’écran (1) ;
suivez les indications de 4. Mise en service.
6. Nettoyage et entretien
•Nettoyez ce produit uniquement à l’aide d’un chiffon non pelucheux légèrement
humide ; évitez tout détergent agressif. Veillez à ce qu’aucun liquide ne pénètre
dans le produit.
7. Exclusion de garantie
La société Hama GmbH & Co. KG décline toute responsabilité en cas de dommages
provoqués par une installation, un montage ou une utilisation non conformes du
produit ou encore provoqués par un non respect des consignes du mode d‘emploi et/
ou des consignes de sécurité.
8. Service et assistance
En cas de question concernant le produit, veuillez vous adresser au service de conseil
produits de Hama.
Ligne téléphonique directe : +49 9091 502-115 (allemand/anglais)
Vous trouverez ici de plus amples informations concernant l‘assistance : www.hama.
com
30
Page 32

9. Caractéristiques techniques
Réveil radio-piloté RC 550
Alimentation en électricité
Plage de mesure
Température
10. Consignes de recyclage
Remarques concernant la protection de l’environnement:
Conformément à la directive européenne 2012/19/EU et 2006/66/CE, et
an d‘atteindre un certain nombre d‘objectifs en matière de protection de
l‘environnement, les règles suivantes doivent être appliquées: Les
appareils électriques et électroniques ainsi que les batteries ne doivent pas
être éliminés avec les déchets ménagers. Le pictogramme “picto” présent
sur le produit, son manuel d‘utilisation ou son emballage indique que le produit est
soumis à cette réglementation. Le consommateur doit retourner le produit/la batterie
usager aux points de collecte prévus à cet effet. Il peut aussi le remettre à un
revendeur. En permettant enn le recyclage des produits ainsi que les batteries, le
consommateur contribuera à la protection de notre environnement. C‘est un acte
écologique.
11. Déclaration de conformité
Le soussigné, Hama GmbH & Co KG, déclare que l‘équipement
radioélectrique du type [00136296] est conforme à la directive 2014/53/
UE. Le texte complet de la déclaration UE de conformité est disponible à
l‘adresse internet suivante: www.hama.com -> 00136296 ->Downloads.
Bandes de fréquences 77,5 kHz
3,0 V
2 piles LR03/AA
0 °C – 45 °C
32 °F – 113 °F
31
Page 33

E Instrucciones de uso
Elementos de manejo e indicadores
A Elementos de manejo
1. Pantalla
2. Te cla CLOCK
= Ajuste de la hora
3. Te cla ALARM
= Visualización de la hora programada para el despertador (5 segundos) / ajuste
del despertador
4. Interruptor corredizo ALARM ON/OFF
= Activación/desactivación del despertador
5. Te cla
= Disminución del valor de ajuste actual
6. Te cla
= Aumento del valor de ajuste actual del despertador durante 5 minutos
7. Te cla SNOOZE / LIGHT / Sensor de atenuación
= Activación de la retroiluminación (aprox. 5 segundos) / interrupción de la señal
del despertador durante 5 minutos
8. Botón RESET
= Restauración de la conguración de fábrica
9. Te cla RCC
= Activación/desactivación de la recepción manual de la señal de radiofrecuencia/
conmutación entre °C y °F
10. Interruptor corredizo ON/ OFF
= Activación/desactivación del sensor de atenuación
11. Compartimento para pilas
B Símbolos de la pantalla
1. Hora
2. AM/PM (formato de 12 horas)
3. Día
4. Mes
5. Día de la semana
6. Te mperatura
32
Page 34

7. Intensidad de la señal
8. Horario de verano
9. Hora de alarma del despertador
10. Hora de alarma del despertador AM/PM (formato de 12 horas)
11. Símbolo del despertador
12. Símbolo de visualización para el despertador
Le agradecemos que se haya decidido por un producto de Hama.
Tómese tiempo y léase primero las siguientes instrucciones e indicaciones. Después,
guarde estas instrucciones de manejo en un lugar seguro para poder consultarlas
cuando sea necesario. Si vende el aparato, entregue estas instrucciones de manejo al
nuevo propietario.
1. Explicación de los símbolos de aviso y de las indicaciones
Aviso
Se utiliza para caracterizar las indicaciones de seguridad o para llamar la atención
sobre peligros y riesgos especiales
Nota
Se utiliza para caracterizar informaciones adicionales o indicaciones importantes.
2. Contenido del paquete
•Despertador por radiofrecuencia RC 550
•2pilas AA
•Estas instrucciones de manejo
.
33
Page 35

3. Instrucciones de seguridad
•El producto es para el uso doméstico privado, no comercial.
•Proteja el producto de la suciedad, la humedad y el sobrecalentamiento y utilícelo
sólo en recintos secos.
•No utilice el producto en áreas donde no se permitan aparatos electrónicos.
•No coloque el producto cerca de campos de interferencia, marcos de metal,
ordenadores y televisores, etc. Los dispositivos electrónicos y los marcos de ventanas
inuyen negativamente en el funcionamiento del producto.
•No deje caer el producto ni lo someta a sacudidas fuertes.
•No intente mantener o reparar el aparato por cuenta propia. Encomiende cualquier
trabajo de mantenimiento al personal especializado competente.
•No realice cambios en el aparato. Esto conllevaría la pérdida de todos los derechos
de la garantía.
•Deseche el material de embalaje en conformidad con las disposiciones locales sobre
el desecho vigentes.
Aviso – Pilas
•Retire y deseche de inmediato las pilas gastadas del producto.
•Utilice exclusivamente pilas recargables (o pilas) que sean del mismo tipo.
•No mezcle pilas viejas y nuevas, ni tampoco pilas de tipos o fabricantes
diferentes.
•Observe siempre la correcta polaridad (inscripciones + y -) de las pilas y coloque
éstas de forma correspondiente. La no observación de lo anterior conlleva el
riesgo de derrame o explosión de las pilas.
•No sobrecargue las pilas.
•Mantenga las pilas fuera del alcance de los niños.
•No cortocircuite las pilas recargables/baterías y manténgalas alejadas de
objetos metálicos.
34
Page 36

4. Puesta en funcionamiento
•Abra el compartimento para pilas (11), coloque dos pilas AA prestando
atención a que la polaridad sea correcta y vuelva a cerrar el compartimento
para pilas (11).
•Si tras colocar una pila nueva no se visualiza nada en la pantalla LCD, pulse, con un
objeto puntiagudo, el botón RESET (8) para reiniciar el dispositivo.
5. Funcionamiento
Nota – Introducción de datos
• Mantenga pulsadas las teclas (5) o la tecla (6) para seleccionar los
valores más rápidamente.
Ajuste automático de la fecha/hora según la señal de radiofrecuencia DCF
5.1.
•Cuando se colocan las pilas, se enciende la pantalla, suena una señal acústica y el
despertador empieza a buscar una señal de radiofrecuencia DCF automáticamente.
El símbolo de radiofrecuencia parpadea durante el proceso de búsqueda
proceso puede durar de 3 a 5 minutos.
•Cuando se recibe la señal de radiofrecuencia, la fecha y la hora se ajustan
automáticamente.
Símbolo de radiofrecuencia Intensidad de la señal
No hay recepción
Mala
Aceptable
Excelente
. Este
35
Page 37

Visualización del símbolo de
radiofrecuencia
Parpadea Activa
Visualización permanente
Ninguna visualización Inactivo
Nota – Ajuste de hora
•Su durante el primer minuto del ajuste inicial no se recibe señal de
radiofrecuencia DCFalguna, la búsqueda naliza. El símbolo de radiofrecuencia
se apaga.
•En caso de problemas en la recepción se recomienda no mover o manipular
el reloj durante la noche, ya que durante la misma se producen menos
interferencias.
•Mientras tanto, puede iniciar una búsqueda manual de la señal de
radiofrecuencia DCF desde otro lugar o llevar a cabo un ajuste manual de la
fecha y la hora.
•En cualquier caso, el reloj sigue buscando la señal de radiofrecuencia DCF
diariamente. En caso de recibirse la señal correctamente, la hora y la fecha
ajustadas se sobrescriben.
•Pulse y mantenga pulsada la tecla RCC (9) durante aprox. 3 segundos para iniciar
la búsqueda manual de la señal de radiofrecuencia DCF.
Búsqueda de señal de radiofrecuencia
La búsqueda ha nalizado con éxito, se
DCF
recibe la señal
36
Page 38

Nota – Procedimiento de búsqueda manual
•El procedimiento de búsqueda manual se desconecta automáticamente tras
6 – 12 minutos.
•El uso frecuente de la tecla RCC (9) se reeja en la carga de las pilas. Se
recomienda utilizar esta opción únicamente para la determinación de un lugar
de colocación óptimo.
•Pulse y mantenga pulsada nuevamente la tecla RCC (9) durante aprox. 3 segundos
para nalizar el proceso de búsqueda manual.
Nota – Horario de verano
•La hora se ajusta automáticamente al horario de verano. Durante el horario de
verano se muestra
5.2. Ajuste manual de fecha/hora
•Pulse y mantenga pulsada la tecla CLOCK (2) durante aprox. 2 segundos hasta que
comience a parpadear la visualización del año.
•Ajuste sucesivamente los siguientes datos:
•Año (B – 1)
•Mes (B – 4)
•Día (B – 3)
•Formato de 12/24 horas (B – 1)
•Horas
•Minutos
•Segundos (sólo es posible utilizar ceros)
•Idioma para el día de la semana (B – 5)
DST
(B – 8) en la pantalla.
Hora (B – 1)
37
Page 39

•Para seleccionar cada valor, pulse la tecla (5) o la tecla (6) y conrme la
selección correspondiente pulsando la tecla CLOCK (2).
•Pulse directamente la tecla CLOCK (2) para aceptar y saltar el valor de ajuste
visualizado.
•Si no se introduce ningún dato en 30 segundos, se sale automáticamente del modo
de ajuste y se guardan los ajustes realizado.
Nota – Día de la semana
•Para la indicación de los días de la semana, puede elegir entre los idiomas
inglés (GB), francés (FR), alemán (DE), español (ES) o italiano (IT).
Nota – Formato de 12/24 horas
•De manera estándar, la hora se muestra en formato de 12 horas. Si reajusta
dicha visualización al formato de 24 horas, el símbolo de la señal de
radiofrecuencia se apaga. El despertador vuelve a buscar automáticamente la
señal de radiofrecuencia llegado el siguiente momento establecido para ello
(generalmente en torno a las 2:00/3:00 de la madrugada). En caso de recepción
correcta de la señal de radiofrecuencia, el símbolo vuelve a visualizarse como
de costumbre.
•En caso de que siga sin visualizarse el símbolo de radiofrecuencia, cambie, de
ser posible, el lugar de colocación, evitando áreas con fuentes de interferencias
(teléfonos inalámbricos y móviles, altavoces inalámbricos, redes WLAN, etc.).
38
Page 40

5.3. Despertador
Ajuste de la hora programada para el despertador
•Pulse y mantenga pulsada la tecla ALARM (3) durante aprox. 2 segundos hasta
que comience a parpadear la visualización de la hora (B – 9).
•Ajuste sucesivamente los siguientes datos:
•Horas
Hora programada para el despertador (B – 9)
•Minutos
•Para seleccionar cada valor, pulse la tecla (5) o la tecla (6) y conrme la
selección correspondiente pulsando la tecla ALARM (3).
•Si no se introduce ningún dato en 30 segundos, se sale automáticamente del modo
de ajuste y se guardan los ajustes realizados.
•Pulse la tecla ALARM (3) para visualizar la hora programada para el despertador
durante aprox. 5 segundos.
Activación/desactivación del despertador
•Desplace el interruptor corredizo ALARM ON/OFF (4) hacia la izquierda hasta la
posición ON. Bajo el interruptor corredizo se aprecia una supercie roja.
El despertador se activa y en la pantalla (1) se muestra el símbolo del despertador
(B – 11).
•Desplace el interruptor corredizo ALARM ON/OFF (4) hacia la derecha hasta la
posición OFF hasta poder apreciar una supercie negra bajo el interruptor.
El despertador queda desactivado y el símbolo del despertador (B – 11) desaparece
de la pantalla (1).
Apagar el despertador/función de repetición de alarma
•Si el despertador está activado, se disparará a la hora correspondiente, sonando
una señal durante un minuto. Seguidamente, la alarma del despertador naliza
automáticamente, volviéndose a disparar al día siguiente, a la hora ajustada.
•Para apagar el despertador antes de que transcurra el minuto durante el cual suena
la alarma, desplace el interruptor corredizo ALARM ON/OFF (4) hacia la derecha
hasta la posición OFF hasta poder apreciar una supercie negra bajo el interruptor.
En ese momento, el despertador está desactivado.
Vuelva a desplazar el interruptor corredizo ALARM ON/OFF (4) hacia la izquierda
hasta la posición ON para volver a activar r para el día siguiente.
39
Page 41

Nota – Función de repetición de alarman
•Pulse, mientras suena la señal de alarma, la tecla SNOOZE/LIGHT (7) para
activar la función de repetición de alarma. El símbolo del despertador (B – 11)
de la pantalla (1) comienza a parpadear. La señal de alarma se interrumpe
durante 5 minutos, disparándose a continuación de forma automática.
•La función de repetición de alarma puede activarse hasta cuatro veces
consecutivas.
5.4. Visualización de la temperatura
•Pulse pulsada la tecla RCC (9) para alternar, en la visualización de la temperatura
(B – 6), entre °C y °F.
5.5. Retroiluminación
•Si pulsa la tecla SNOOZE / LIGHT (7),la pantalla (1) se ilumina durante aprox. 5
segundos.
•El despertador está equipado con un sensor de atenuación (7) que enciende
automáticamente la retroiluminación atenuada de la pantalla (1) cuando las
condiciones de luz son malas.
•Con la luz diurna o cuando las condiciones de luz son lo bastante claras, el
sensor de atenuación (7) apaga la retroiluminación atenuada de la pantalla (1)
automáticamente.
•Desplace el interruptor corredizo
activar o desactivar el sensor de atenuación (7).
ON/ OFF (10) hasta la posición ON u OFF para
40
Page 42

Nota – Iluminación de fondo
•Se recomienda desactivar el sensor de atenuación cuando no se utilice, cuando
se transporte en una maleta, etc.
•El uso continuado del sensor de atenuación desgasta la carga de la pila.
5.6. Cambio de la pila
•Cambie las pilas en cuanto disminuya el contraste de la visualización en pantalla (1)
tal y como se describe en 4. Puesta en funcionamiento.
6. Mantenimiento y cuidado
•Limpie este producto sólo con un paño que no suelte pelusas ligeramente
humedecido y no utilice limpiadores agresivos. Asegúrese de que no entre agua
en el productot.
7. Exclusión de responsabilidad
Hama GmbH & Co KG no se responsabiliza ni concede garantía por los daños que
surjan por una instalación, montaje o manejo incorrectos del producto o por la no
observación de las instrucciones de manejo y/o de las instrucciones de seguridad.
8. Servicio y soporte
Si tiene que hacer alguna consulta sobre el producto, diríjase al asesoramiento de
productos Hama.
Línea directa: +49 9091 502-115 (Alemán/Inglés)
Encontrar más información de soporte aquí:
www.hama.com
41
Page 43

9. Datos técnicos
Despertador por radiofrecuencia RC 550
Alimentación de corriente
Rango de medición
Temperatura
10. Instrucciones para desecho y reciclaje
Nota sobre la protección medioambiental:
Después de la puesta en marcha de la directiva Europea 2012/19/EU y
2006/66/EU en el sistema legislativo nacional, se aplicara lo siguiente: Los
aparatos eléctricos y electrónicos, así como las baterías, no se deben
evacuar en la basura doméstica. El usuario está legalmente obligado a
llevar los aparatos eléctricos y electrónicos, así como pilas y pilas
recargables, al nal de su vida útil a los puntos de recogida comunales o a devolverlos
al lugar donde los adquirió. Los detalles quedaran denidos por la ley de cada país. El
símbolo en el producto, en las instrucciones de uso o en el embalaje hace referencia a
ello. Gracias al reciclaje, al reciclaje del material o a otras formas de reciclaje de
aparatos/pilas usados, contribuye Usted de forma importante a la protección de
nuestro medio ambiente.
11. Declaración de conformidad
Por la presente, Hama GmbH & Co KG, declara que el tipo de equipo
radioeléctrico [00136296] es conforme con la Directiva 2014/53/UE. El texto
completo de la declaración UE de conformidad está disponible en la dirección
Internet siguiente: www.hama.com
Banda o bandas de frecuencia 77,5 kHz
->00136296->Downloads.
3,0 V
2 pilas AA
0 °C – +45 °C
32 °F – 113 °F
42
Page 44

R Руководство по эксплуатации
A Органы управления
1. Дисплей
2. Кнопка CLOCK
= настройка времени
3. Кнопка ALARM
= время срабатывания будильника (ок. 5 секунд) / настройка будильника
4. Ползунок ALARM ON/OFF
= включение и отключение будильника
5. Кнопка
= уменьшение значения текущего значения во время настройки
6. Кнопка
= увеличение значения текущего значения во время настройки (пауза 5
минут)
7. Кнопка SNOOZE / LIGHT / Датчик освещенности
= включение подсветки (ок .5 секунд) / автоповтор сигнала будильника
8. Кнопка RESET
= восстановление настроек по умолчанию
9. Кнопка RCC
= включение/выключение поиска радиосигнала вручную / установка
10. Ползунок
11. Отсек батарей
B Значки на дисплее
1. Время
2. AM/PM (12-часовой формат)
3. День
4. Месяц
5. День недели
6. Те мпература
7. Уровень приема сигнала
8. Индикация летнего времени
9. Время срабатывания будильника
10. AM/PM (12-часовой формат) Время срабатывания будильника
ON/ OFF
= включение и отключение датчика освещенности
43
Page 45

11. Значок будильника
12. Значок индикации будильника
Благодарим за покупку изделия фирмы Hama.
внимательно ознакомьтесь с настоящей инструкцией. Храните инструкцию в
надежном месте для справок в будущем. В случае передачи изделия другому
лицу приложите и эту инструкцию.
1. Предупредительные пиктограммы и инструкци
Внимание
Данным значком отмечены инструкции, несоблюдение которых может
привести к опасной ситуации.
Примечание
Дополнительная или важная информация.
2. Комплект поставки
•Будильник RC 550
•2батареи АА
•Настоящая инструкция
44
Page 46

3. Техника безопасности
•Изделие предназначено только для домашнего применения.
•Беречь от грязи, влаги и источников тепла. Эксплуатировать только в сухих
условиях.
•Не применять в запретных зонах.
•Не размещайте устройство рядом с магнитными полями, металлическими
рамами, компьютером, телевизором и т.д. Электронные приборы
отрицательно влияют на работу устройства.
•Не ронять. Беречь от сильных ударов.
•Запрещается самостоятельно ремонтировать устройство. Ремонт разрешается
производить только квалифицированному персоналу.
•Запрещается вносить изменения в конструкцию. В противном случае
гарантийные обязательства аннулируются.
•Утилизировать упаковку в соответствии с местными нормами.
Батареи. Техника безопасности
•Израсходованные батареи немедленно удалять из прибора и утилизировать.
•Разрешается применять аккумуляторы только указанного типа.
•Не применять различные типы или новые и старые батареи вместе.
•Соблюдать полярность батарей (+ и -). Несоблюдение полярности может
стать причиной взрыва батарей.
•Не подвергать аккумуляторы чрезмерной зарядке.
•Батареи хранить в безопасном месте и не давать детям.
•Не закорачивать контакты батарей. Не хранить рядом с металлическими
объектами.
4. Ввод в эксплуатацию
•Откройте отсек батарей (11), вставьте 2 батареи ААА, соблюдая полярность,
затем закройте отсек батарей (11).
•Если после загрузки батарей не произойдет включение дисплея, острым
предметом нажмите Кнопку RESET (8), чтобы выполнить перезагрузку.
45
Page 47

5. Эксплуатация
Ввод данных
• Чтобы ускорить изменение значения во время настройки,
удерживайтекнопку (5) или кнопку (6).
Автоматическая настройка времени и календаря по радиосигналу DCF.
5.1.
•После загрузки батарей включается дисплей и подается звуковой сигнал.
Затем прибор автоматически начинают поиск радиосигнала точного
времениDCF. Во время этого процесса на дисплее мигает значок радиосигнала
. Этот процесс длится 3-5 минут.
•Если сигнал принят часы автоматически настраивают время и календарную
дату.
Значок ко ррекции по
радиосигналу точного времени
Уровень приема сигнала
прием отсутствует
плохой сигнал
удовлетворительный
превосходный
46
Page 48

Значок радиосигнала Поиск радиосигнала DCF
мигает активный
горит непрерывно сигнал принят успешно
не горит неактивный
Настройка часов. Примечание
•Если в течение первых минут радиосигнал DCF принять не удается, поиск
радиосигнала отключается. Значок радиосигнала точного времени гаснет.
•При наличии помех поиск сигнала рекомендуется производить ночью, так
как, как правило, в это время уровень помех ниже.
•Имеется также возможность включить принудительный поиск
радиосигнала DCF, перенеся часы в другое местоположение, или
выполнить настройку часов вручную.
•Режим поиска радиосигнала DCF включается ежедневно автоматически.
При успешном приеме радиосигнала введенные вручную значения
времени и календаря заменяются.
•Если сигнал автоматически принять не удается, нажмите и ок. 3 секунд
удерживайте кнопку RCC (9), чтобы включить поиск радиосигнала DCF
вручную.
47
Page 49

Принудительный поиск радиосигнала. Примечание
•Принудительный поиск радиосигнала выключается автоматически через
6 - 12 минут.
•Частое нажатие кнопки RCC (9) приводит к разряду батареи. Данную
функцию рекомендуется применять, перенеся часы в оптимальное
местоположение.
•Чтобы принудительно завершить поиск радиосигнала, нажмите и ок. 3 секунд
удерживайте кнопку RCC (9).
Индикация летнего времени
•Переключение на летнее время происходит автоматически. Во время
индикации летнего времени на дисплее отображается
5.2. Настройка календаря и часов вручную
•Нажмите и ок. 2 секунд удерживайте кнопку CLOCK (2) , пока не начнет мигать
значение года.
•Настройка параметров осуществляется в следующей последовательности:
•Год (B – 1)
•Месяц (B – 4)
•Число (B – 3)
•12/24 - формат индикации времени
•Час
•Минуты
•Секунды (только «00»)
•Язык индикации дня недели (B – 5)
•Установите значение с помощью кнопки (5) или кнопки (6), затем
подтвердите выбор кнопкой CLOCK (2).
Время (B – 1)
DST
(B – 8).
48
Page 50

•Чтобы применить значение и перейти к следующему параметру, нажмите
кнопку CLOCK (2).
•Если нажатий на кнопки не производилось в течение 30 секунд, то прибор
сохраняет установленные значения и выходит из режима настройки.
День недели
•Дни недели могут отображаться на следующих языках: английский (GB),
французский (FR), немецкий (DE), испанский (ES), итальянский (IT).
12/24-часовой формат индикации времени
•По умолчанию время отображается в 12-часовом формате. При
переключении часов на 24-часовой формат индикации значок
радиосигнала отключается. Будильник автоматически возобновит поиск
радиосигнала в установленное время (обычно ночью между 2:00 и 3:00).
Если радиосигнал принят, на дисплее отобразится соответствующий
значок.
•Если значок радиосигнала не отображается, установите часы в другое
место во избежание помех (от беспроводных устройств, мобильных
телефонов, систем интернет-связи и др.)
5.3. Будильник
Настройка будильника
•Нажмите и ок. 2 секунд удерживайте кнопку (3) , пока не начнет мигать
значение часа (B – 9).
•Настройка параметров осуществляется в следующей последовательности:
•Час
•Минутыn
Время срабатывания будильника (B – 9)
49
Page 51

•Установите значение кнопкой (5) или кнопкой (6), затем подтвердите
выбор кнопкой ALARM (3)
•Если нажатий на кнопки не производилось в течение 30 секунд, то прибор
сохраняет установленные значения и выходит из режима настройки.
•Чтобы просмотреть текущее время срабатывания будильника, нажмите и ок. 5
секунд удерживайте кнопку ALARM (3).
Включение и отключение будильника
•Переведите ползунок ALARM ON/OFF (4) в положение ON. Под ползунком
виден красный индикатор.
Будильник теперь включен. На дисплее (1) отображается значок будильника
(B – 11).
•Переведите ползунок ALARM ON/OFF (4) в положение OFF. Под ползунком
теперь виден черный индикатор.
Будильник выключен. Значок (B – 11) на дисплее (1) не отображается.
тключение сигнала будильника. Автоповтор сигнала будильника
•Если будильник включен, то в установленное время он сработает и
будет подавать сигнал в течение одной минуты. После этого будильник
автоматически выключает сигнал и в следующий раз сработает через сутки.
•Чтобы принудительно отключить сигнал, переведите ползунок ALARM ON/
OFF (4) в положение OFF, так чтобы под ползунком отображался индикатор
черного цвета. Будильник теперь выключен. Переведите ползунок ALARM ON/
OFF (4) снова в положениеn ON, чтобы будильник сработал на следующий
день.
Автоповтор сигнала будильника
•Во время подачи сигнала будильника нажмите кнопку SNOOZE / LIGHT
(7), чтобы включить функцию автоповтора сигнала. На дисплее (1) начнет
мигать значок будильника (B – 11). Подача сигнала прерывается на 5
минут, после чего сигнал подается снова.
•Автоповтор можно активировать много раз подряд.
50
Page 52

5.4. Индикация температуры
•Нажмите и ок. 2 секунд удерживайте кнопку RCC (9), чтобы в режиме
индикации температуры (B – 6) установить единицу измерения температуры
(°C или °F).
5.5. Подсветка
•Нажмите кнопку SNOOZE / LIGHT (7), чтобы на 5 секунд включить дисплей (1).
•Зарядное устройство снабжено датчиком освещенности (7), который
автоматически срабатывает при пониженной окружающей освещенности и
включает подсветку (1).
•При дневном свете и достаточной освещенности датчик освещенности (7)
автоматически отключает подсветку (1).
•Переведите ползунок
включить или выключить датчик освещенности (7).
Подсветка. Примечание
•Если датчик освещенности не применяется, например когда прибор
находится в багаже, то его рекомендуется отключать.
•Длительная работа датчика освещенности приводит к более быстрому
разряду батареи
5.6. Порядок замены батареи
•Если индикация на дисплее (1) тускнеет, замените батарею (см. 4. Ввод в
эксплуатацию).
6. Техническое обслуживание и уход
•Чистку изделия производить только безворсовой слегка влажной салфеткой.
Запрещается применять. агрессивные чистящие средства. Следите за тем,
чтобы в устройство не попала вода.
ON/ OFF (10) в положение ON или OFF, чтобы
51
Page 53

7. Отказ от гарантийных обязательств
Компания Hama GmbH & Co. KG не несет ответственность за ущерб, возникший
вследствие неправильного монтажа, подключения и использования изделия не
по назначению, а также вследствие несоблюдения инструкции по эксплуатации и
техники безопасности.
8. Отдел техобслуживания
По вопросам ремонта или замены неисправных изделий обращайтесь к
продавцу или в сервисную службу компании Hama.
Горячая линия отдела техобслуживания:
+49 9091 502-115 (немецкий, английский)
Подробнее смотрите здесь: www.hama.com
9. Технические характеристики
Будильник RC 550
Питание
Диапазон измерения
Температура
3,0 В
2 батареи АА
0°C – +45°C
32°F – 113°F
52
Page 54

10. Инструкции по утилизации
Охрана окружающей среды:
С момента перехода национального законодательства на
европейские нормативы 2012/19/EU и 2006/66/EU действительно
следующее: Электрические и электронные приборы, а также батареи
запрещается утилизировать с обычным мусором. Потребитель,
согласно закону, обязан утилизировать электрические и электронные
приборы, а также батареи и аккумуляторы после их использования в специально
предназначенных для этого пунктах сбора, либо в пунктах продажи. Детальная
регламентация этих требований осуществляется соответствующим местным
законодательством. Необходимость соблюдения данных предписаний
обозначается особым значком на изделии, инструкции по эксплуатации или
упаковке. При переработке, повторном использовании материалов или при
другой форме утилизации бывших в употреблении приборов Вы помогаете
охране окружающей среды. В соответствии с предписаниями по обращению с
батареями, в Ге рмании вышеназванные нормативы действуют для утилизации
батарей и аккумуляторов.
11. Декларация производителя
Настоящим компания Hama GmbH & Co KG заявляет, что
радиооборудование типа [00136296] отвечает требованиям директивы
2014/53/ЕС. С полным текстом декларации о соответствии
требованиям ЕС можно ознакомиться здесь: www.hama.com -> 00136296 ->
Downloads.
Диапазон/диапазоны частот 77,5 kHz
53
Page 55

I Istruzioni per l‘uso
A Elementi di comando
1. Display
2. Ta sto CLOCK
= impostazione dell’ora
3. Ta sto ALARM
= indicazione ora sveglia (ca. 5 secondi) / regolazione sveglia
4. Interruttore scorrevole ALARM ON/OFF
= attivazione / disattivazione sveglia
5. Ta sto
= diminuzione del valore d’impostazione corrente
6. Ta sto
= aumento del valore d'impostazione corrente
7. Ta sto SNOOZE / LIGHT / Sensore crepuscolare
= attivazione della retroilluminazione (ca. 5 secondi) / interruzione del segnale di
sveglia per 5 minuti
8. Pulsante RESET
= ripristino delle impostazioni di fabbrica
9. Ta sto RCC
= alternanza tra °C e °F / attivazione/disattivazione manuale della ricezione di
segnale radio
Interruttore scorrevole ON/OFF
10.
= attivazione / disattivazione sensore crepuscolare
11. Vano batterie
B Simboli sul display
1. Ora
2. AM/PM (formato da 12 ore)
3. Giorno
4. Mese
5. Giorno della settimana
6. Te mperatura
7. Intensità del segnale
8. Ora legale
9. Ora sveglia
54
Page 56

10. AM/PM (formato da 12 ore) ora sveglia
11. Simbolo sveglia
12. Simbolo di indicazione sveglia
Grazie per avere acquistato un prodotto Hama!
Prima della messa in esercizio, leggete attentamente le seguenti istruzioni e
avvertenze, quindi conservatele in un luogo sicuro per una eventuale consultazione.
In caso di cessione dell‘apparecchio, consegnate anche le presenti istruzioni al nuovo
proprietario.
1. Spiegazione di simboli di attenzione e avvertenze
Attenzione
Viene utilizzato per contrassegnare le indicazioni di sicurezza oppure per rivolgere
l‘attenzione verso particolari rischi e pericoli.
Avvertenza
Viene utilizzato per contrassegnare informazioni supplementari o indicazioni
importanti.
2. Contenuto della confezione
•Sveglia con segnale orario via radio RC 550
•2batterie AA
•Queste istruzioni per l’uso
55
Page 57

3. Indicazioni di sicurezza
•Il prodotto è concepito per l’uso domestico privato, non commerciale.
•Proteggere il prodotto da sporcizia, umidità e surriscaldamento e utilizzarlo solo in
ambienti asciutti.
•Non utilizzare il prodotto in zone in cui non sono ammesse le apparecchiature
elettroniche.
•Non posizionare il prodotto nelle vicinanze di campi di disturbo, telai metallici,
computer e televisori ecc. Gli apparecchi elettronici compromettono negativamente
il funzionamento del prodotto.
•Non fare cadere il prodotto e non sottoporlo a forti scossoni!
•Non tentare di aggiustare o riparare l’apparecchio da soli. Fare eseguire qualsiasi
lavoro di riparazione al personale specializzato competente.
•Non apportare modiche all’apparecchio per evitare di perdere i diritti di garanzia.
•Smaltire immediatamente il materiale d'imballaggio attenendosi alle prescrizioni
locali vigenti.
Attenzione
•Rimuovere e smaltire immediatamente le batterie scariche.
•Utilizzare unicamente accumulatori (o batterie) conformi al tipo indicato.
•Non utilizzare batterie di tipi o costruttori diversi, né mischiare batterie vecchie
e nuove.
•Osservare sempre la corretta polarità (dicitura + e -) delle batterie e inserirle di
conseguenza. La mancata osservanza comporta la perdita di potenza o il rischio
di esplosione delle batterie.
•Non scaricare completamente le batterie.
•Conservare le batterie al di fuori della portata dei bambini.
•Non cortocircuitare le batterie e tenerle lontano da oggetti metallici
56
Page 58

4. Messa in esercizio
•Aprire il vano batterie (11), introdurre due batterie AAA osservandone la giusta
polarità e richiudere il vano batterie (11).
•Se dopo aver inserito una nuova batteria non appare nulla sul display LCD, premere
con un oggetto appuntito il pulsante RESET (8) per generare un riavvio.
5. Esercizio
Nota – Immissione
• Te nere premuto il tasto (5) o il tasto (6) per poter selezionare più
rapidamente i valori.
5.1. Impostazione automatica di data/ora dopo il segnale radio DCF
•Dopo avere inserito la batteria, il display si accende, viene emesso un segnale
acustico e la sveglia inizia automaticamente la ricerca di un segnale radio DCF.
Durante la ricerca lampeggia il simbolo della radio . Questo procedimento può
durare da 3 a 5 minuti.
•Durante la ricezione del segnale radio, la data e l'ora vengono impostate
automaticamente.
Simbolo radio Intensità del segnale
Nessuna ricezione
Cattiva
Accettabile
Eccellente
57
Page 59

Indicazione simbolo radio Ricerca del segnale radio DCF
Indicazione lampeggiante Attiva
Indicazione ssa Ricerca riuscita - il segnale viene ricevuto
Nessuna indicazione Non attivo
Nota – Impostazione dell'ora
•La ricerca viene terminata se non si riceve un segnale radio DCF. Il simbolo della
radio si spegne.
•In caso di disturbi di ricezione, si consiglia di lasciare accesa la radio tutta la
notte, poiché, in linea di massima, i segnali di disturbo di notte sono minori.
•Nel frattempo è possibile avviare una ricerca manuale del segnale radio DCF.
•L'orologio continua a ricercare automaticamente ogni giorno il segnale
radio DCF. Se il tentativo di ricezione ha successo, l'ora e la data impostate
manualmente vengono sovrascritte.
•Tenerepremuto il tasto RCC (9) per ca. 3 secondi, per avviare la ricerca manuale del
segnale radio DCF.
Nota – Ricerca manuale
•La ricerca manuale si disattiva automaticamente dopo 6 – 12 minuti.
•Un utilizzo frequente del tasto RCC (9) va a scapito della capacità delle batterie.
Si consiglia di ricorrere a questa funzione solo per localizzare un luogo di
installazione ottimale.
•Tenere nuovamente premuto il tasto RCC (9) per ca. 3 secondi per terminare la
ricerca manuale.
58
Page 60

Nota – Ora legale
•L'orario si regola automaticamente sull'ora legale. Finché è attiva l’ora legale,
sul display appare
5.2. Impostazione manuale data/ora
•Premere e tenere premuto il tasto CLOCK (2) per ca. 2 secondi, nché non inizia a
lampeggiare l’indicazione dell’anno.
•Impostare in sequenza le seguenti informazioni:
•Anno (B – 1)
•Mese (B – 4)
•Giorno (B – 3)
•Formato 12/24 ore (B – 1)
•Ore
•Minuti
•Secondi (possibili solo gli zeri)
•Lingua giorno della settimana (B – 5)
•Per selezionare i singoli valori premere il tasto (5) o il tasto (6) e confermare di
volta in volta la selezione con il tasto CLOCK (2).
•Premere direttamente il tasto CLOCK (2) per applicare il valore di impostazione
visualizzato e procedere oltre.
•Se per 30 secondi non hanno luogo immissioni, si esce automaticamente dalla
modalità di impostazione e vengono salvate le impostazioni eseguite.
DST
(B – 8).
Ora (B – 1)
Nota – Giorno della settimana
•Per l’indicazione dei giorni della settimana è possibile optare per le lingue
inglese (GB), francese (FR), tedesco (DE), spagnolo (ES) o italiano (IT).
59
Page 61

Nota – Formato 12/24 ore
•Come standard, l’ora viene visualizzata nel formato 12 ore. Quando si passa alla
visualizzazione nel formato 24 ore, il simbolo del segnale radio si spegne. La
sveglia cerca di nuovo automaticamente all’orario successivo (sostanzialmente
di notte, verso le 2:00/ 3:00) il segnale radio. Se il segnale radio viene ricevuto,
il simbolo viene visualizzato come di consueto.
•Se non dovesse essere ancora visualizzato il segnale radio, modicare il luogo
d’installazione e evitare i campi con sorgenti di disturbo (telefoni cordless e
cellulari, casse wireless, WLAN ecc.)
5.3. Sveglia
Impostazione ora sveglia
•Tenere premuto il tasto ALARM (3) per ca. 2 secondi nché non inizia a
lampeggiare l’indicazione dell’ora (B – 9).
•Impostare in sequenza le seguenti informazioni:
•Ore
Ora sveglia (B – 9)
•Minuti
•Per selezionare i singoli valori, premere il tasto (5) o il tasto (6) e confermare la
selezione corrispondente premendo il tasto ALARM (3).
•Se per 30 secondi non hanno luogo immissioni, si esce automaticamente dalla
modalità di impostazione e vengono salvate le impostazioni eseguite.
•Premere il tasto ALARM (3) per visualizzare per ca. 5 secondi l’ora impostata
della sveglia.
Attivazione / disattivazione sveglia
•Spingere l’interruttore scorrevole ALARM ON/OFF (4) verso sinistra sulla posizione
ON. Sotto l’interruttore scorrevole appare una supercie rossa.
La sveglia è attivata e sul display (1) appare il simbolo della sveglia (B – 11).
•Spingere l’interruttore scorrevole ALARM ON/OFF (4) verso destra sulla posizione
OFF, nché la supercie dietro l’interruttore scorrevole non è nera.
La sveglia è disattivata e il simbolo della sveglia (B – 11) sul display (1) si spegne.
60
Page 62

Disattivazione sveglia/funzione snooze
•Se è attivata, la sveglia scatta all’ora corrispondente e per la durata di un minuto
risuona un segnale di sveglia. Al termine, la sveglia si disattiva automaticamente
per scattare nuovamente il giorno successivo all’ora impostata.
•Per disattivare anticipatamente la sveglia, spingere l’interruttore scorrevole
ALARM ON/OFF (4) verso destra, sulla posizione OFF, nché la supercie dietro
l’interruttore scorrevole non è nera. La sveglia è ora disattivata.
Spingere nuovamente l’interruttore scorrevole ALARM ON/OFF (4) verso sinistra,
sulla posizione ON, per attivare la sveglia per il giorno successivo.
Nota – Funzione snooze
•Quando suona la sveglia, premere il tasto SNOOZE / LIGHT (7) per attivare
la funzione snooze. Il simbolo della sveglia (B – 11) sul display (1) inizia
a lampeggiare. La sveglia viene disattivata per 5 minuti, quindi suona
nuovamente.
•La funzione snooze viene attivata per quattro volte consecutivamente.
5.4. Indicazione temperatura
•Tenere il tasto RCC (9) per alternare l’indicazione della temperatura (B – 6) tra
°C e °F.
5.5. Retroilluminazione
•Se si preme il tasto SNOOZE / LIGHT (7), il display (1) si illumina per ca. 5 secondi.
•La sveglia è dotata di un sensore crepuscolare (7) che accende automaticamente
all’imbrunire una retroilluminazione isolata del display (1).
•Con la luce diurna o suciente luminosità, il sensore di crepuscolare (7) spegne
automaticamente la retroilluminazione isolata del display (1).
•Spingere l’interruttore scorrevole
attivare o disattivare il sensore crepuscolare (7).
ON/ OFF (10) sulla posizione ON o OFF per
61
Page 63

Nota – Retroilluminazione
•Si consiglia di disattivare il sensore crepuscolare in caso di non utilizzo, in
viaggio nella valigia ecc.
•Un utilizzo permanente del sensore crepuscolare va a scapito della capacità
delle batterie.
5.6. Sostituzione della batteria
•Non appena inizia a offuscarsi l’indicazione sul display (1) sostituire le batterie –
come descritto in 4. Messa in esercizio.
6. Manutenzione e cura
•Pulire il prodotto unicamente con un panno che non lascia pelucchi e appena
inumidito e non utilizzare detergenti aggressivi. Fare attenzione a non fare penetrare
acqua nel prodotto.
7. Esclusione di garanzia
Hama GmbH & Co.KG non si assume alcuna responsabilità per i danni derivati dal
montaggio o l‘utilizzo scorretto del prodotto, nonché dalla mancata osservanza delle
istruzioni per l‘uso e/o delle indicazioni di sicurezza.
8. Assistenza e supporto
In caso di domande sul prodotto, rivolgersi alla Consulenza prodotto Hama.
Hotline: +49 9091 502-115 (ted./ing.)
Ulteriori informazioni sul supporto sono disponibili qui: www.hama.com
62
Page 64

9. Dati tecnici
Sveglia con segnale orario via radio
RC 550
Alimentazione elettrica
Campo di misurazione
Temperatura
10. Indicazioni per lo smaltimento
Informazioni per protezione ambientale:
Dopo l’implementazione della Direttiva Europea 2012/19/EU e 2006/66/
EU nel sistema legale nazionale, ci sono le seguenti applicazioni: Le
apparecchiature elettriche ed elettroniche e le batterie non devono essere
smaltite con i riuti domestici. I consumatori sono obbligati dalla legge a
restituire I dispositivi elettrici ed elettronici e le batterie alla ne della loro
vita utile ai punti di raccolta pubblici preposti per questo scopo o nei punti vendita.
Dettagli di quanto riportato sono deniti dalle leggi nazionali di ogni stato. Questo
simbolo sul prodotto, sul manuale d’istruzioni o sull’imballo indicano che questo
prodotto è soggetto a queste regole. Riciclando, ri-utilizzando i materiali o utilizzando
sotto altra forma i vecchi prodotti/le batterie, darete un importante contributo alla
protezione dell’ambiente.
11. Dichiarazione di conformità
Il fabbricante, Hama GmbH & Co KG, dichiara che il tipo di
apparecchiatura radio [00136296] è conforme alla direttiva 2014/53/UE. Il
testo completo della dichiarazione di conformità UE è disponibile al
seguente indirizzo Internet: www.hama.com->00136296->Downloads.
Bande di frequenza 77,5 kHz
3,0 V
2 x AA Batterie
0°C – 45°C
32°F – 113°F
63
Page 65

P Instrukcja obsługi
A Elementy obsługi
12. Wyświetlacz
13. Przycisk CLOCK
= ustawianie godziny
14. Przycisk ALARM
= wyświetlanie czasu budzenia (ok. 5 sekund) / ustawianie budzika
15. Przełącznik suwakowy ALARM ON/OFF
= włączanie / wyłączanie budzikar
16. Przycisk
= zmniejszanie aktualnie ustawianej wartości
17. Przycisk
= zwiększanie aktualnie ustawianej wartości
18. Przycisk SNOOZE/LIGHT (drzemka / podświetlenie) / Czujnik zmierzchowy
= aktywacja podświetlenia ekranu (przez ok. 5 sekund) / przerywanie sygnału
budzenia na 5 minut
19. Przycisk RESET
= przywracanie ustawień fabrycznych
20. Przycisk RCC
= włączanie/ wyłączanie ręcznego odbioru sygnału radiowego / zmiana między
°C i °Fh
21. Przełącznik suwakowy
= włączanie / wyłączanie czujnika zmierzchowego
22. Schowek na baterię
B Wyświetlane symbole
1. Godzina
2. AM/PM (format 12-godzinny)
3. Dzień
4. Miesiąc
5. Dzień tygodnia
6. Te mperatura
7. Siła sygnału
8. Czas letni
9. Czas budzenia
64
ON/ OFF
Page 66

10. AM/PM (format 12-godzinny) czas budzenia
11. Symbol budzika
12. Wyświetlany symbol budzika
Dziękujemy za zakup naszego produktu!
Przed pierwszym użyciem należy dokładnie przeczytać instrukcję obsługi. Instrukcję
należy przechować, gdyż może być jeszcze potrzebna.
1. Objaśnienie symboli ostrzegawczych i wskazówek
Ostrzeżenie
Używane w celu zwrócenia uwagi na szczególne niebezpieczeństwo lub ryzyko.
Wskazówki
Używane w celu zwrócenia uwagi na szczególnie przydatne informacje.
2. Zawartość opakowania
•Budzik radiowy RC 550
•2baterie AA
•niniejsza instrukcja obsługi
3. Wskazówki bezpieczeństwa
•Produkt jest przeznaczony do prywatnego, niekomercyjnego użytku domowego.
•Chronić produkt przed zanieczyszczeniem, wilgocią i przegrzaniem oraz stosować go
tylko w suchym otoczeniu.
•Nie używać produktu w miejscach, gdzie nie jest dozwolone stosowanie urządzeń
elektronicznych.
65
Page 67

•Nie ustawiać produktu w pobliżu źródeł zakłóceń, ram metalowych, komputerów,
telewizorów itp. Urządzenia elektroniczne i futryny okienne wpływają negatywnie
na działanie produktu.
•Chronić produkt przed upadkiem i silnymi wstrząsami.
•Nie próbować naprawiać samodzielnie urządzenia. Prace serwisowe zlecać
wykwalikowanemu personelowi fachowemu.
•Nie modykować urządzenia. Prowadzi to do utraty wszelkich roszczeń z tytułu
gwarancji.
•Materiały opakowaniowe należy natychmiast poddać utylizacji zgodnie z
obowiązującymi przepisami miejscowymi.
Ostrzeżenie - baterie
•Natychmiast usunąć z produktu zużyte baterie i poddać je utylizacji.
•Używać wyłącznie akumulatorów (lub baterii) odpowiadających podanemu
typowi.
•Nie mieszać starych i nowych baterii ani baterii różnych typów lub producentów.
•Wkładając baterie, zwrócić koniecznie uwagę na właściwe podłączenie
biegunów (znak + i -). Nieprzestrzeganie grozi wyciekiem lub wybuchem baterii.
•Nie przeciążać baterii.
•Przechowywać baterie poza zasięgiem dzieci.
•Nie zwierać akumulatorów / baterii oraz trzymać je z dala od odkrytych
przedmiotów metalowych.
4. Uruchamianie
•Otworzyć schowek na baterie (11), włożyć dwie baterie AA, zwracając uwagę na
właściwą biegunowość i ponownie zamknąć schowek na baterie (11).
•Jeżeli po włożeniu nowych baterii na ekranie LCD nie pojawi się żaden komunikat,
nacisnąć za pomocą spiczastego przedmiotu przycisk RESET (8), aby wykonać
restart.
66
Page 68

5. Obsługa
Wskazówka – wprowadzanie danych
• Tr zymać wciśnięty przycisk (5) lub (6) , aby przyspieszyć nastawę wartości.
5.1.
Automatyczne ustawianie daty / godziny za pomocą sygnału radiowego DCF
•Po włożeniu baterii włączany jest ekran, rozlega się sygnał akustyczny i zegar
rozpoczyna automatycznie wyszukiwanie sygnału radiowego DCF. Podczas
wyszukiwania miga symbol sygnału radiowego
minut.
•Po odbiorze radiowego sygnału czasowego godzina i data są automatycznie
ustawiane.
Symbol sygnału radiowego Siła sygnału
. Proces ten może potrwać 3-5
Brak odbioru
Zły
Średni
Doskonały
67
Page 69

Wskaźnik symbolu radiowego Wyszukiwanie sygnału radiowego DCF
Migający wskaźnik Aktywne
Stały wskaźnik Proces powiódł się - sygnał jest odbierany
Brak symbolu Nieaktywny
Wskazówka – ustawianie zegara
•Jeżeli w trakcie pierwszych minut podczas pierwszej konguracji nie zostanie
odebrany sygnał radiowy DCF , wyszukiwanie zostanie zakończone. Symbol
sygnału radiowego gaśnie.
•Wrazie zakłóceń w odbiorze zaleca się pozostawienie zegara na noc, gdyż
wtedy zakłócenia są z reguły mniejsze.
•Wtym czasie można uruchomić ręczne wyszukiwanie sygnału radiowego DCF w
innym miejscu ustawienia lub ręcznie skongurować godzinę i datę.
•Zegar będzie codziennie szukał automatycznie sygnału radiowego DCF . Po
pomyślnym odbiorze sygnału ręcznie ustawiona godzina i data są nadpisywane.
•Nacisnąć i trzymać wciśnięty przycisk RCC (9) przez ok. 3 sekundy, aby uruchomić
ręczne wyszukiwanie sygnału radiowego DCF.
Wskazówka - proces ręcznego wyszukiwania
•Proces ręcznego wyszukiwania wyłącza się automatycznie po upływie 6-12
minut.
•Częste korzystanie z przycisku RCC (9) obciąża pojemność baterii. Zaleca się
stosowanie tej opcji tylko do ustalania optymalnego miejsca ustawienia.
68
Page 70

•Ponownie nacisnąć i trzymać wciśnięty przez ok. 3 sekundy przycisk RCC (9), aby
zakończyć proces ręcznego wyszukiwania.
Wskazówka – czas letni
•Godzina jest automatycznie przestawiany na czas letni. Gdy czas letni jest
aktywny, na ekranie wyświetlany jest symbol
5.2. Ręczne ustawianie daty / godziny
•Nacisnąć i trzymać wciśnięty przez ok. 2 sekundy przycisk CLOCK (2), aż zacznie
migać wskaźnik roku.
•Po kolei ustawić następujące informacje:
•Rok
•Miesiąc (B-4)
•Dzień (B-3)
•Format 12/24-godzinny
•Godziny
•Minuty
•Sekundy (tylko zera możliwe)
•Język, dzień tygodnia (B-5)
•Aby wybrać poszczególne wartości, nacisnąć przycisk (5) lub (6) i potwierdzić
wybór przyciskiem CLOCK (2).
•Bezpośrednio nacisnąć przycisk CLOCK (2), aby przejąć lub pominąć wyświetlaną
ustawioną wartość.
•Jeżeli w ciągu 30 sekund nie zostanie wprowadzona żadna wartość, tryb ustawiania
jest automatycznie zamykany i dokonane ustawienia są zapisywane.
Godzina (B-1)
DST
(B - 8) .
Wskazówka – dzień tygodnia
•Do wskazywania dnia tygodnia dostępne są następujące języki: angielski (GB),
francuski (FR), niemiecki (DE), hiszpański (ES) lub włoski (IT).
69
Page 71

Wskazówka – format 12/24-godzinny
•Godzina jest wskazywana domyślnie w formacie 12-godzinnym. Po
przestawieniu wskaźnika na format 24-godzinny gaśnie symbol sygnału
radiowego. Budzik wyszukuje automatycznie o najbliższej godzinie (zazwyczaj
między 2:00/ 3:00) sygnału radiowego. Po pomyślnym odbiorze sygnału
radiowego symbol jest wyświetlany jak opisano wyżej.
•Jeżeli symbol radiowy nadal nie będzie wyświetlany, zmienić ewentualnie
miejsce ustawienia budzika i unikać obszarów ze źródłami zakłóceń (telefony
bezprzewodowo i komórkowe, głośniki radiowe, WLAN itp.).
5.3. Budzik
Ustawianie czasu budzenia
•Nacisnąć i trzymać wciśnięty przez ok. 2 sekundy przycisk ALARM (3), aż zacznie
migać wskaźnik godzin (B - 9).
•Po kolei ustawić następujące informacje:
•Godziny
Czas budzenia (B - 9)
•Minuty
•Aby wybrać poszczególne wartości, nacisnąć przycisk (5) lub (6) i potwierdzić
wybór przyciskiem ALARM (3)
•Jeżeli w ciągu 30 sekund nie zostanie wprowadzona żadna wartość, tryb ustawiania
jest automatycznie zamykany i dokonane ustawienia są zapisywane.
•Nacisnąć przycisk ALARM (3), aby przez ok. 5 sekund wyświetlić ustawiony czas
budzenia.
Włączanie/wyłączanie budzika
•Przesunąć przełącznik suwakowyALARM ON/OFF (4) w lewo, na pozycję ON. Pod
przełącznikiem suwakowym widoczna jest czerwona powierzchnia.
Budzik jest aktywny, a na ekranie (1) wyświetlany jest symbol budzika (B – 11).
•Przesunąć przełącznik suwakowyALARM ON/OFF (11) w prawo na pozycję OFF, aż
powierzchnia z tyłu przełącznika suwakowego stanie się czarna.
70
Page 72

Budzik jest wyłączony i na ekranie (1) gaśnie symbol budzika (B – 11).
Wyłączanie budzika/ funkcja drzemki
•Jeżeli funkcja budzika jest aktywna, budzik włącza się o odpowiedniej godzinie
i przez minutę rozlega się sygnał budzenia. Następnie budzik wyłącza się
automatycznie i ponownie włącza się następnego dnia o ustawionej godzinie
budzenia.
•Aby wcześniej wyłączyć budzik, przesunąć przełącznik suwakowy ALARM ON/
OFF (4) w prawo na pozycję OFF, aż powierzchnia z tyłu przełącznika suwakowego
stanie się czarna. Budzik jest teraz wyłączony.
Przesunąć przełącznik suwakowy ALARM ON/OFF (4) ponownie w lewo, na
pozycję ON,, aby uaktywnić budzik na następny dzień.
Wskazówka – funkcja drzemki
•Wtrakcie sygnału alarmowego nacisnąć przycisk SNOOZE / LIGHT (7), aby
włączyć funkcję drzemki. Na ekranie (1) zaczyna migać symbol budzika (B – 11).
Sygnał budzika jest przerywany na 5 minut, a następnie ponownie wyzwalany.
•Funkcję drzemki można wyzwolić cztery razy pod rząd.
5.4. Wskaźnik temperatury
•Nacisnąć przez ok. 2 sekundy przycisk RCC aby przełączać wskaźnik temperatury
(B – 6) między °C i °F.
5.5. Podświetlenie
•Naciśnięcie przycisku SNOOZE / LIGHT (6) podświetla ekran (1) przez ok. 5 sekund.
•Budzik jest wyposażony w czujnik zmierzchowy (7), który automatycznie włącza
przyciemnione podświetlenie ekranu (1) w ciemnym otoczeniu.
•Przy świetle dziennym bądź w dostatecznie jasnym otoczeniu czujnik zmierzchowy
(7) automatycznie wyłącza przyciemnione podświetlenie ekranu (1).
•Przesunąć przełącznik suwakowy ON/ OFF (8) na pozycję ON lub OFF, aby włączyć
lub wyłączyć czujnik zmierzchowy (7).
71
Page 73

Wskazówka - podświetlenie
•Wrazie nie używania, podróży w bagażu itd. zaleca się wyłączenie czujnika
zmierzchowego.
•Długotrwałe używanie czujnika zmierzchowego obciąża pojemność baterii.
5.6. Wymiana baterii
Jeżeli wskaźnik na ekranie (1) staje się słabiej widoczny, należy zmienić baterie – jak
opisano w 4. Uruchamianie.
6. Konserwacja i czyszczenie
•Czyścić produkt tylko przy użyciu niestrzępiącej się, lekko zwilżonej szmatki i nie
stosować agresywnych detergentów. Uważać, aby do wnętrza produktu nie
wniknęła woda.
7. Wyłączenie odpowiedzialności
Hama GmbH & Co. KG nie udziela gwarancji ani nie odpowiada za szkody wskutek
niewłaściwej instalacji, montażu oraz nieprawidłowego stosowania produktu lub
nieprzestrzegania instrukcji obsługi i/lub wskazówek bezpieczeństwa.
8. Serwis i pomoc techniczna
W razie pytań dotyczących produktu prosimy zwrócić się do infolinii Hama.
Gorąca linia: +49 9091 502-115 (niem./ang.)
Dodatkowe informacje są dostępne na stronie: www.hama.com
72
Page 74

9. Dane techniczne
Budzik radiowy RC 550
Zasilanie elektryczne
Zakres pomiarowy
Temperatura
10. Informacje dotycząca recyklingu
Wskazówki dotyczące ochrony środowiska:
Od czasu wprowadzenia europejskiej dyrektywy 2012/19/EU i 2006/66/EU
do prawa narodowego obowiązują następujące ustalenia: Urządzeń
elektrycznych, elektronicznych oraz baterii jednorazowych nie należy
wyrzucać razem z codziennymi odpadami domowymi! Użytkownik
zobowiązany prawnie do odniesienia zepsutych, zniszczonych lub
niepotrzebnych urządzeń elektrycznych i elektronicznych do punktu zbiórki lub do
sprzedawcy. Szczegółowe kwestie regulują przepisy prawne danego kraju. Informuje o
tym symbol przekreślonego kosza umieszczony na opakowaniu. Segregując odpady
pomagasz chronić środowisko!
11. Deklaracja zgodności
Hama GmbH & Co KG niniejszym oświadcza, że typ urządzenia radiowego
[00136296] jest zgodny z dyrektywą 2014/53/UE. Pełny tekst deklaracji
zgodności UE jest dostępny pod następującym adresem internetowym:
www.hama.com-> 00136296 -> Downloads.
Częstotliwość transmisji 77,5 kHz
3,0 V
2 baterie typu AA
0°C – +45°C
32°F – 113°F
73
Page 75

C Návod k použití
A Ovládací prvky
1. Displej
2. Tlačítko CLOCK
= nastavení hodinového času
3. Tlačítko ALARM
= indikace doby buzení (cca 5 sekund) / nastavení budíku
4. Posuvný spínač ALARM ON / OFF
= aktivace/deaktivace budíku
5. Tlačítko
= snížení aktuální hodnoty nastavení
6. Tlačítko
= zvýšení aktuální hodnoty nastavení
7. Tlačítko SNOOZE / LIGHT / senzor stmívání
= aktivace osvětlení pozadí (cca 5 sekund) / přerušení signálu buzení na 5 minut
8. Ovladač RESET
= nastavení zpět na výrobní nastavení
9. Tlačítko RCC
= aktivace/deaktivace manuálního příjmu rádiového signálu/
a přepnutí jednotek °C a °F
10. Posuvný spínač ON / OFF
= aktivace/ deaktivace senzoru stmívání
11. Přihrádka na baterie
B Symboly na displeji
1. Hodinový čas
2. AM / PM (12hodinový formát)
3. Den
4. Měsíc
5. Den v týdnu
6. Te plota
7. Síla signálu
8. Letní čas
9. Doba buzení
10. Doba buzení AM/PM (12hodinový formát)
74
Page 76

11. Symbol budíku
12. Symbol budíku na displeji
Děkujeme, že jste si vybrali výrobek Hama.
Přečtěte si, prosím, všechny následující pokyny a informace. Uchovejte tento text pro
případné budoucí použití. Pokud výrobek prodáte, předejte tento text novému majiteli.
1. Vysvětlení výstražných symbolů a pokynů
Upozornění
Tento symbol označuje bezpečnostní upozornění, které poukazuje na určitá rizika
a nebezpečí.
Poznámka
Tento symbol označuje dodatečné informace nebo důležité poznámky.
2. Obsah balení
•Rádiový budík RC 550
•2baterie typu AA
•Tento návod k obsluze
75
Page 77

3. Bezpečnostní pokyny
•Výrobek je určen pro použití v soukromých domácnostech.
•Chraňte výrobek před znečištěním, vlhkostí a přehřátím a používejte ho pouze v
suchých prostorách.
•Výrobek nepoužívejte na místech, kde platí zákaz používání elektronických přístrojů.
•Výrobek neumisťujte v blízkosti rušivých polí, kovových rámů, počítačů a televizorů
atd. Elektronické přístroje a také okenní rámy negativně ovlivňují funkci výrobku.
•Zabraňte pádu výrobku a výrobek nevystavujte velkým otřesům.
•Do výrobku samovolně nezasahujte a neopravujte ho. Veškeré úkony údržby
přenechejte příslušnému odbornému personálu.
•Na výrobku neprovádějte žádné změny.Tím zanikají veškeré závazky ze záruky.
•Obalový materiál likvidujte ihned podle platných místních předpisů o likvidaci.
Upozornění
•Použité baterie odstraňte a likvidujte z výrobku ihned. Používejte výhradně
akumulátory (nebo baterie) odpovídající udanému typu.
•Staré a nové baterie nemíchejte, stejně tak nepoužívejte baterie různých typů
a výrobců.
•Při vkládání baterií vždy dbejte správné polarity (označení + a -) a baterie
vkládejte podle uvedené polarity. Při nedodržení hrozí nebezpečí vytečení baterií
nebo exploze.
•Baterie nenabíjejte.
•Baterie uchovávejte mimo dosah dětí.
•Akumulátory/baterie nezkratujte a zabraňte jejich umístění v blízkosti holých
kovových předmětů.
4. Uvedení do provozu
•Otevřete přihrádku na baterie (11), vložte dvě baterie AA se správným pólováním
a přihrádku na baterie (11) opět uzavřete.
•Pokud se po vložení nové baterie na LCD-displeji nic nezobrazí, stiskněte pomocí
špičatého předmětu tlačítko RESET (8) pro opětovné spuštění.
76
Page 78

5. Provoz
Upozornění – zadání
• Pro rychlejší zvolení hodnot držte stisknuto tlačítko (5) nebo tlačítko (6).
5.1. Automatické nastavení data/času podle signálu DCF
•Po vložení baterie se zapne displej, zazní akustický signál a budík začne automaticky
hledat DCF-rádiový signál. Během vyhledávání bliká rádiový symbol . To může
trvat 3 až 5 minut.
•Při příjmu rádiového signálu se automaticky nastaví datum a hodinový čas.
Rádiový Síla signálu
Žádný příjem
Špatný
Přijatelný
Výborný
Zobrazení rádiového symbolu Vyhledávání rádiového signálu
Blikající indikace Aktivní
Trvalá indikace Úspěšná– příjem signálu
Žádná indikace Neaktivní
77
Page 79

Upozornění – nastavení hodinového času
•Pokud během prvních minut během prvního nastavení nedojde k příjmu
rádiového signálu DCF, vyhledávání se ukončí. Rádiový symbol zhasne.
•Vpřípadě poruchy příjmu doporučujeme nechat hodiny přes noc stát, protože v
noci jsou rušivé signály zpravidla slabší.
•Během této doby můžete spustit manuální vyhledávání rádiového signálu DCF
na jiném místě nebo provést manuální nastavení hodinového času a data.
•Hodiny automaticky každý den vyhledávají signál DCF. V případě úspěšného
příjmu signálu se manuálně nastavený hodinový čas a datum přepíší.
•Pro spuštění manuálního vyhledávání rádiového signálu DCF stiskněte a držte
stisknuto tlačítko RCC (9) po dobu cca 3 sekund.
Upozornění – manuální vyhledávání
•Manuální vyhledávání se automaticky vypne po 6 až 12 minutách.
•Časté používání tlačítka RCC (9) zatěžuje kapacitu baterie. Doporučujeme tuto
funkci používat jen při zjišťování optimálního místa instalace.
•Stiskněte a po dobu cca 3 sekund držte stisknuto tlačítko (RCC) (9) pro ukončení
manuálního hledání.
Upozornění – letní čas
•Hodinový čas se automaticky přestaví na letní čas. V době letního času je na
displeji zobrazeno
DST
(B – 8).
78
Page 80

5.2. Manuální nastavení data / hodinového času
•Stiskněte a podržte stisknuté tlačítko CLOCK (2) po dobu cca 2 sekund, dokud
nezačne blikat indikace roku.
•Postupně nastavte tyto informace:
•Rok (B – 1)
•Měsíc (B – 4)
•Den (B – 3)
•12/24hodinový formát (B – 1)
•Hodiny
•Minuty
•Sekundy (možné jen nuly)
•Jazyk dne v týdnu (B – 5)
•Pro výběr jednotlivých hodnot stiskněte tlačítko (5) nebo tlačítko (6) a každý
výběr potvrďte stisknutím tlačítka CLOCK (2).
•Pro převzetí a přeskočení zobrazené nastavené hodnoty stiskněte přímo tlačítko
CLOCK (2).
•Pokud po dobu 30 sekund neproběhne žádné zadání, režim nastavení se
automaticky zavře a provedené nastavení se uloží.
Upozornění – den v týdnu
•Indikaci dnů v týdnu můžete zvolit v jazycích angličtina (GB), francouzština (FR),
němčina (DE), španělština (ES) nebo italština (IT).
Čas (B-1)
79
Page 81

Upozornění – formát 12/24 hodin
•Čas se bude standardně zobrazovat ve 12hodinovém formátu. Po změně
zobrazení na 24hodinový formát zhasne symbol rádiového signálu. Budík znovu
automaticky vyhledá k dalšímu okamžiku (většinou v noci kolem 2:00/3:00)
rádiový signál. Při úspěšném příjmu rádiového signálu se zobrazí symbol jako
obvykle.
•Pokud by se i nadále nezobrazoval žádný rádiový symbol, změňte umístění
hodin a vyhněte se zdrojům rušení (bezdrátové a mobilní telefony, bezdrátové
reproduktory, WLAN apod.).
5.3. Budík
Nastavení doby buzení
•Stiskněte a podržte stisknuté tlačítko ALARM (3) po dobu cca 2 sekund, dokud
nezačne blikat indikace hodin (B – 9).
•Postupně nastavte tyto informace:
•Hodiny
Doba buzení (B – 9)
•Minuty
•Pro výběr jednotlivých hodnot stiskněte tlačítko (5) nebo tlačítko (6) a každý
výběr potvrďte stisknutím tlačítka ALARM (3).
•Pokud po dobu 30 sekund neproběhne žádné zadání, režim nastavení se
automaticky zavře a provedené nastavení se uloží.
•Stiskněte tlačítko ALARM (3) pro zobrazení nastavené doby buzení na cca 5 sekund.
Aktivace/deaktivace budíku
•Posuňte posuvný spínač ALARM ON / OFF (4) doleva do polohy ON. Pod posuvným
spínačem je vidět červená plocha.
Budík je aktivován a na displeji (1) se zobrazí symbol budíku (B – 11).
80
Page 82

•Posuňte posuvný spínač ALARM ON / OFF (4) doprava do polohy OFF, dokud
nebude plocha za posuvným spínačem černá
Budík je deaktivován a na displeji (1) zhasne symbol budíku (B– 11).
Vypnutí budíku /funkce podřimování
•Je-li budík aktivován, pak se v odpovídající dobu aktivuje a zazní signál buzení po
dobu jedné minuty. Poté se buzení automaticky ukončí a znovu se spustí další den
v nastavený čas buzení.
•Chcete-li budík vypnout předčasně, posuňte posuvný spínač ALARM ON / OFF (4)
doprava do polohy OFF, dokud nebude plocha za posuvným spínačem černá. Budík
je nyní deaktivován.
•Posuňte posuvný spínač ALARM ON / OFF (4) znovu doleva do polohy ON, chceteli budík aktivovat na další den.
Upozornění – funkce podřimování
•Při zvonění budíku stiskněte tlačítko SNOOZE/ LIGHT (7) pro aktivaci funkce
podřimování. Na displeji (1) začne blikat symbol budíku (B –11). Signál buzení
se na 5 minut přeruší a poté se opět aktivuje.
•Funkce podřimování může být aktivována jen čtyřikrát za sebou.
5.4. Zobrazení teploty
•Stiskněte tlačítko RCC (9) pro přepnutí jednotek u indikace teploty (B – 6) z °C na °F.
5.5. Osvícení pozadí
•Když stiskněte tlačítko SNOOZE / LIGHT (7), displej (1) se rozsvítí na cca 5 sekund.
•Budík je vybaven senzorem stmívání (7), který při tmavších světelných podmínkách
automaticky zapne tlumené osvícení pozadí displeje (1).
•Při denním světle resp. dostatečně jasných světelných podmínkách senzor stmívání
(7) tlumené osvícení pozadí displeje automaticky vypne (1).
•Posuňte posuvný spínač
aktivaci resp. deaktivaci senzoru stmívání (7).
ON/ OFF (10) do polohy ON resp. do polohy OFF pro
81
Page 83

Upozornění – osvícení pozadí
•Doporučujeme senzor stmívání v případě nepoužívání např. na cestách v
cestovním zavazadle deaktivovat.
•Trvalé používání senzoru stmívání zatěžuje kapacitu baterie.
5.6. Výměna baterií
•Jakmile bude zobrazení na displeji (1) slabší, proveďte výměnu baterií – viz 4.
Uvedení do provozu popis – vyp.
6. Údržba a čištění
•Tento výrobek čistěte pouze mírně navlhčeným hadříkem nepouštějícím vlákna a
nepoužívejte agresivní čisticí prostředky. Dbejte na to, aby se do výrobku nedostala
voda.
7. Vyloučení záruky
Hama GmbH & Co. KG nepřebírá žádnou odpovědnost nebo záruku za škody
vzniklé neodbornou instalací, montáží nebo neodborným použitím výrobku nebo
nedodržováním návodu k použití a/nebo bezpečnostních pokynů.
8. Servis a podpora
Máte otázky k produktu ? Obraťte na na poradenské oddělení Hama.
Horká linka: +49 9091 502-115 (německy/anglicky)
Další podpůrné informace naleznete na adrese: www.hama.com
82
Page 84

9. Technické údaje
Rádiový budík RC 550
Napájení
Rozsah měření
Teplota
10. Pokyny k likvidaci
Ochrana životního prostředí:
Evropská směrnice 2012/19/EU a 2006/66/EU ustanovujete následující:
Elektrická a elektronická zařízení stejně jako baterie nepatří do domovního
odpadu. Spotřebitel se zavazuje odevzdat všechna zařízení a baterie po
uplynutí jejich životnosti do příslušných sběren. Podrobnosti stanoví zákon
příšlušné země. Symbol na produktu, návod k obsluze nebo balení na toto
poukazuje. Recyklací a jinými způsoby zužitkování přispíváte k ochraně životního
prostředí.
11. Prohlášení o shodě
Tímto Hama GmbH & Co KG prohlašuje, že typ rádiového zařízení
[00136296] je v souladu se směrnicí 2014/53/EU. Úplné znění EU
prohlášení o shodě je k dispozici na této internetové adrese:
www.hama.com-> 00136296 -> Downloads.
Kmitočtové pásmo (kmitočtová pásma) 77,5 kHz
3,0V
2 x baterie typu AA
0°C – +45°C
32°F – 113°F
83
Page 85

Q Návod na použitie
A Ovládacie prvky
1. Displej
2. Tlačidlo CLOCK
= nastavenie času
3. Tlačidlo ALARM
= zobrazenie času budenia (približne 5 sekúnd) / nastavenie budíka
4. Posuvný spínač ALARM ON / OFF
= aktivácia/deaktivácia budíka
5. Tlačidlo
= zníženie nastavenej hodnoty
6. Tlačidlo
= zvýšenie nastavenej hodnoty
7. Tlačidlo SNOOZE / LIGHT / senzor stmievania
= Aktivácia podsvietenia displeja (približne 5 sekúnd) /
prerušenie signálu budenia na 5 minút
8. Tlačidlo RESET
= obnovenie výrobných nastavení
9. Tlačidlo RCC
= aktivácia/deaktivácia manuálneho príjmu rádiového signálu/
možnosť výberu medzi °C a °F
10. Posuvný spínač
= aktivácia/deaktivácia senzora stmievania
11. Batériová priehradka
B Údaje na displeji
1. Čas
2. AM / PM (12-hodinový formát času)
3. Deň
4. Mesiac
5. Deň v týždni
6. Te plota
7. Intenzita signálu
8. Letný čas
9. Čas budenia
84
ON/OFF
Page 86

10. AM/ PM (12-hodinový formát času budenia)
11. Symbol budenia 1
12. Symbol budenia 2
Ďakujeme, že ste sa rozhodli pre výrobok Hama.
Prečítajte si všetky nasledujúce pokyny a informácie. Uchovajte tento návod na použitie
pre prípadné budúce použitie. Pokiaľ výrobok predáte, dajte tento návod novému
majiteľovi.
1. Vysvetlenie výstražných symbolov a upozornení
Upozornenie
Tento symbol označuje bezpečnostné upozornenie, ktoré poukazuje na určité riziká
a nebezpečenstva.
Poznámka
Tento symbol označuje dodatočné informácie, alebo dôležité poznámky.
2. Obsah balenia
•Budík riadený rádiovým signálom RC 550
•2AA batérie
•Návod na používanie
85
Page 87

3. Bezpečnostné upozornenia
•Výrobok je určený pre súkromné použitie v domácnosti, nie je určený na komerčné
použitie.
• Chráňte výrobok pred znečistením, vlhkosťou a prehriatím a používajte ho len v
suchom prostredí.
•Nepoužívajte výrobok v prostredí, v ktorom nie je používanie elektronických
prístrojov dovolené.
•Neumiestňujte produkt v blízkosti rušivých polí, kovových rámov, počítačov a
televízorov a pod. Elektronické prístroje a okenné rámy majú negatívny vplyv na
funkciu produktu.
•Výrobok nenechajte spadnúť a nevystavujte ho silným otrasom.
•Nepokúšajte sa prístroj samostatne ošetrovať alebo opravovať. Prenechajte
akékoľvek úkony údržby kompetentnému odbornému personálu.
•Na zariadení/prístroji nerobte žiadne zmeny. Má to za následok stratu akýchkoľvek
nárokov na plnenie zo záruky.
•Likvidujte obalový materiál okmžite podľa platných miestnych predpisov na
likvidáciu odpadov.
Upozornenie
•Spotrebované batérie bezodkladne odstráňte z výrobku a likvidujte ich. Používajte
výlučne nové akumulátory (alebo batérie) zodpovedajúce uvedenému typu.
•Použité batérie nemiešajte s novými, nepoužívajte rozličné typy batérií alebo
batérie od rôznych výrobcov.
•Dbajte bezpodmienečne na správnu polaritu batérií (značenie + a -) a vložte
ich príslušne. V prípade nerešpektovania hrozí nebezpečenstvo vytečenia alebo
výbuchu batérií.
•Batérie nenabíjajte.
•Batérie uchovávajte mimo dosahu detí.
•Akumulátory/batérie neskratujte a uchovávajte ich mimo dosahu holých
kovových predmetov.
86
Page 88

4. Uvedenie do prevádzky
•Otvorte batériovú priehradku (11), vložte dve batérie typu AA podľa polarity a
priehradku (11) zatvorte.
•Ak sa po vložení novej batérie nezobrazia na LCD displeji žiadne údaje, stlačte
pomocou zahroteného predmetu tlačidlo RESET (8) na opätovné spustenie
zariadenia.
5. Prevádzka
Upozornenie – zadávanie hodnôt
• Po držte stlačené tlačidlo (5) alebo tlačidlo (6) a hodnoty budete môcť
zadávať rýchlejšie.
5.1. Automatické nastavenie dátumu/času po príjme rádiového signálu DCF
•Po vložení batérie sa displej zapne, zaznie akustický signál a budík začne
automaticky vyhľadávať rádiový signál DCF. Počas vyhľadávania signálu bliká symbol
rádiového spojenia . Tento proces môže trvať 3 až 5 minút.
•Ak sa podarí prijať rádiový signál, dátum a čas sa nastavia automaticky.
Symbol Intenzita signálu
Žiadny signál
Slabý
Prijateľný
Vynikajúci
87
Page 89

Indikácia rádiového spojenia Vyhľadávanie rádiového signálu
Blikajúca indikácia Aktívne
Trvalá indikácia Úspešné - signál sa prijíma
Žiadna indikácia Neaktívne
Upozornenie - nastavenie času
•Ak počas prvého nastavenia nebude v priebehu pár minút prijatý žiadny rádiový
signál DCF, vyhľadávanie sa ukončí. Symbol rádiového spojenia zhasne.
•Pri rušení príjmu sa odporúča nechať hodiny cez noc zastavené, pretože v tomto
čase sú rušivé signály obvykle slabšie.
•Medzitým môžete spustiť manuálne vyhľadávanie rádiového signálu DCF na
inom mieste alebo manuálne nastaviť čas a dátum.
•Hodiny budú naďalej denne automaticky vyhľadávať rádiový signál DCF. Po
úspešnom prijatí signálu sa manuálne nastavené hodnoty času a dátumu
prestavia.
•Stlačte a podržte tlačidlo RCC (9) približne na 3 sekundy na spustenie manuálneho
vyhľadávania rádiového signálu DCF.
Upozornenie – manuálne vyhľadávanie
•Manuálne vyhľadávanie sa vypne automaticky po 6 – 12 minútach.
•Časté používanie tlačidla RCC (9) znižuje výdrž batérie. Odporúča sa používať
túto funkciu iba na zistenie optimálneho umiestnenia zariadenia.
•Na ukončenie manuálneho vyhľadávania signálu opäť stlačte a podržte tlačidlo RCC
(9) približne na 3 sekundy.
88
Page 90

Upozornenie – letný čas
•Prestavenie na letný čas prebieha automaticky. Pokiaľ je letný čas aktívny,
zobrazuje sa na displeji
5.2. Manuálne nastavenie dátumu/času
•Stlačte a podržte tlačidlo CLOCK (2) približne na 2 sekundy, kým nezačne blikať
zobrazenie roka.
•Nastavte postupne nasledujúce informácie:
•Rok (B – 1)
•Mesiac (B – 4)
•Deň (B – 3)
•12/24-hodinový formát času (B – 1)
•Hodiny
•Minúty
•Sekundy (je možné nastaviť len nuly)
•Jazyk zobrazeného dňa v týždni (B – 5)
•Na zvolenie jednotlivých hodnôt stlačte tlačidlo (5) alebo tlačidlo (6)a
príslušnú voľbu potvrďte stlačením tlačidla CLOCK (2).
•Ak chcete prevziať zobrazenú hodnotu a prejsť na ďalšiu, stlačte priamo tlačidlo
CLOCK (2).
•Ak v priebehu 30 sekúnd nezadáte žiadnu hodnotu, režim nastavenia sa
automaticky ukončí a vykonané nastavenia sa uložia.
DST
(B – 8).
Čas (B – 1)
Upozornenie – deň v týždni
•Na zobrazenie dňa v týždni môžete zvoliť jazyky angličtina (GB), francúzština
(FR), nemčina (DE), španielčina (ES) alebo taliančina (IT).
89
Page 91

Upozornenie - 12/24-hodinový formát času
•Čas sa štandardne zobrazuje v 12-hodinovom formáte. Keď zmeníte zobrazenie
času na 24-hodinový formát, zhasne symbol rádiového signálu. Budík začne
čoskoro (väčšinou v noci okolo 2.00/3.00 h) znova vyhľadávať rádiový signál. Po
úspešnom prijatí signálu sa zobrazí obvyklý symbol.
•Ak sa ani naďalej nezobrazuje symbol rádiového signálu, položte zariadenie
na iné miesto a vyhnite sa oblastiam so zdrojmi rušenia (bezdrôtové a mobilné
telefóny, rádiové reproduktory, WLAN atď.).
5.3. Budík
Nastavenie času budenia
•Stlačte a podržte tlačidlo ALARM (3) približne na 2 sekundy, kým nezačne blikať
zobrazenie hodín (B – 9).
•Nastavte postupne nasledujúce informácie:
•Hodiny
Čas budenia (B – 9)
•Minúty
•Na zvolenie jednotlivých hodnôt stlačte tlačidlo (5) alebo tlačidlo (6) a
príslušnú voľbu potvrďte stlačením tlačidla ALARM (3).
•Ak v priebehu 30 sekúnd nezadáte žiadnu hodnotu, režim nastavenia sa
automaticky ukončí a vykonané nastavenia sa uložia.
•Stlačením tlačidla ALARM (3) sa zobrazí nastavený čas budenia približne na 5
sekúnd.
Aktivácia/deaktivácia budíka
•Prepnite posuvný spínač ALARM ON / OFF (4) doľava do polohy ON. Pod posuvným
spínačom uvidíte červenú plochu.
Budík sa aktivuje a na displeji (1) sa zobrazí symbol budenia (B – 11).
•Prepnite posuvný spínač ALARM ON / OFF (4) doprava do polohy OFF tak, aby
bola plocha za spínačom čierna.
Budík sa deaktivuje a symbol budenia (B – 11) na displeji (1) zmizne.
90
Page 92

Ukončenie budíka /funkcia opakovaného budenia
•Ak je budík aktivovaný, spustí sa v nastavenom čase a na 1 minútu zaznie signál
budenia. Budík sa potom automaticky vypne a nasledujúci deň sa opäť spustí v
nastavenom čase.
•Ak chcete budík ukončiť predčasne, prepnite posuvný spínač ALARM ON/OFF
(4) doprava do polohy OFF tak, aby bola plocha za spínačom čierna. Budík sa
deaktivuje.
•Ak chcete budík aktivovať na nasledujúci deň, prepnite posuvný spínač ALARM
ON/OFF (4) späť doľava do polohy ON.
Upozornenie – funkcia opakovaného budenia
•Na aktiváciu funkcie opakovaného budenia stlačte počas zvonenia budíka
tlačidlo SNOOZE / LIGHT (7). Na displeji (1) začne blikať symbol budenia
(B–11). Signál budenia sa preruší na 5 minút a následne sa znova spustí.
•Funkcia opakovaného budenia sa môže aktivovať štyrikrát za sebou.
5.4. Indikácia teploty
•Na zmenu indikácie teploty (B - 6) v °C alebo °F stlačte tlačidlo RCC (9).
5.5. Podsvietenie displeja
•Stlačením tlačidla SNOOZE / LIGHT (7) sa podsvietenie displeja (1) aktivuje približne
na 5 sekúnd.
•Budík je vybavený senzorom stmievania (7), ktorý pri slabších svetelných
podmienkach automaticky zapne tlmené podsvietenie displeja (1).
•Pri dennom svetle, resp. pri dostatočných svetelných podmienkach senzor (7)
automaticky vypne tlmené podsvietenie displeja (1).
•Na aktiváciu, resp. deaktiváciu senzora stmievania (7) prepnite posuvný spínač
ON/ OFF (10) do polohy ON, resp. OFF.
91
Page 93

Upozornenie – podsvietenie displeja
•Odporúča sa senzor stmievania deaktivovať, ak ho nepoužívate, počas
cestovania v batožine a pod.
•Trvalé používanie senzora stmievania znižuje výdrž batérie.
5.6. Výmena batérie
•Ak je zobrazenie na displeji (1) slabšie, vymeňte batérie tak, ako je popísané v časti
4 Uvedenie do prevádzky.
6. Údržba a starostlivosť
•Na čistenie tohto výrobku používajte len navlhčenú utierku, ktorá nepúšťa vlákna
a nepoužívajte žiadne agresívne čistiace prostriedky. Dbajte na to, aby do výrobku
nevnikla voda.
7. Vylúčenie záruky
Firma Hama GmbH & Co KG neručí/nezodpovedá za škody vyplývajúce z neodbornej
inštalácie, montáže alebo neodborného používania výrobku alebo z nerešpektovania
návodu na používanie a/alebo bezpečnostných pokynov.
8. Servis a podpora
S otázkami týkajúcimi sa výrobku sa prosím obráťte na poradenské
oddelenie rmy Hama.
Hotline: +49 9091 502-115 (nem./angl.)
Ďalšie informácie o podpore nájdete tu: www.hama.com
92
Page 94

9. Technické údaje
Budík riadený rádiovým signálom RC 550
Napájanie
Merací rozsah
Teplota
10. Pokyny pre likvidáciu
Ochrana životného prostredia:
Európska smernica 2012/19/EU a 2006/66/EU stanovuje: Elektrické a
elektronické zariadenia, rovnako ako batérie sa nesmú vyhadzovať do
domáceho odpadu. Spotrebiteľ je zo zákona povinný zlikvidovať elektrické
a elektronické zariadenia, rovnako ako batérie na miesta k tomu určené.
Symbolizuje to obrázok v návode na použitie, alebo na balení výrobku.
Opätovným zužitkovaním alebo inou formou recyklácie starých zariadení/batérií
prispievate k ochrane životného prostredia.
11. Vyhlásenie o zhode
Hama GmbH & Co KG týmto vyhlasuje, že rádiové zariadenie typu
[00136296] je v súlade so smernicou 2014/53/EÚ. Úplné EÚ vyhlásenie o
zhode je k dispozícii na tejto internetovej adrese:
www.hama.com-> 00136296 -> Downloads.
Frekvenčné pásmo resp. pásma 77,5 kHz
3,0V
2 x batéria typu AA
0 °C – 45 °C
32 °F – 113 °F
93
Page 95

M Manual de utilizare
A Elemente de deservire
1. Display
2. Ta sta CLOCK
= Setare oră exactă
3. Ta sta ALARM
= Așaj oră deșteptare (cca 5 secunde) / Setare ceas deșteptător
4. Ta sta glisantă ALARM ON / OFF
= Activare / Dezactivare ceas deșteptător
5. Ta sta
= Micșorare valoare actuală setată
6. Ta sta
= Mărire valoare actuală setată
7. Ta sta SNOOZE / LIGHT / Senzor de crepuscul
= Activare iluminare de fundal (cca 5 secunde) / Întrerupere semnal de
deșteptare pentru 5 minute
8. Ta sta RESET
= Resetare la setarea din fabrică
9. Ta sta RCC
= Activare / Dezactivare recepție manuală semnal radio/ Alternanță între °C și °F
10. Tasta glisantă
= Activare / Dezactivare senzor de crepuscul
11. Compartiment baterii
B Simboluri pe display
1. Oră exactă
2. AM/PM (format 12 ore)
3. Zi
4. Lună
5. Zi a săptămânii
6. Te mperatură
7. Putere semnal
8. Oră de vară
9. Oră deșteptare
10. AM/PM (format 12 ore) Oră deșteptare
94
ON/OFF
Page 96

11. Simbol ceas deșteptător
12. Simbol așaj ceas deșteptător
Vă mulţumim că aţi optat pentru un produs Hama.
Pentru început vă rugăm să vă lăsați puțin timp și să citiți complet următoarele
instrucțiuni și indicații. Vă rugăm să păstraţi manualul de utilizare la loc sigur pentru o
consultare ulterioară în caz de nevoie. În caz de înstrăinare a aparatului vă rugăm să
predați și acest manual noului proprietar.
1. Explicarea simbolurilor de avertizare și indicații
Avertizare
Se folosește la marcarea instrucțiunilor de siguranță sau la concentrarea atenției în
caz de pericol și riscuri mari.
Instrucțiune
Se folosește pentru marcarea informațiilor și instrucțiunilor importante.
2. Conținutul pachetului
•Ceas deșteptător radio comandat RC 550
•2baterii AA
•Acest manual de utilizare
95
Page 97

3. Instrucțiuni de siguranță
•Produsul este conceput numai pentru utilizare privată și nu profesională.
•Protejaţi produsul de impurităţi, umiditate, supraîncălzire şi utilizaţi-l numai în
mediu uscat.
•Nu folosiţi produsul în zone unde nu sunt admise aparate electronice.
•Nu poziționați produsul în apropiere de câmpuri perturbatoare, rame metalice,
calculatoare și televizoare etc. Apratele electronice precum și ramele ferestrelor
inuențează negativ funcționarea produsului.
•Nu lăsați produsul să cadă și nu îl supuneți trepidațiilor puternice.
•Nu încercaţi să reparaţi sau să depanaţi aparatul. Operaţiile de reparaţii se execută
numai de personal de specialitate.
•Nu executaţi modicări la aparat. În acest fel pierdeţi orice drept la garanţie.
• Reciclarea materialului pachetului se execută comform normelor locale de
salubrizare în vigoare.
Avertizare
•Îndepărtați și salubrizați imediat bateriile folosite din produs. Utilizaţi numai
acumulatoare (sau baterii) corespunzătoare tipulului indicat.
•Nu amestecați bateriile vechi cu cele noi, precum și baterii de diferite tipuri și
producători diferiți.
•Atenţie în mod obligatoriu la polaritatea corectă (marcajele + şi -) și introducețile corespunzător cu acestea. În cazul nerespectării vă expuneți pericolului
scurgerilor sau exploziei bateriilor.
•Bateriile nu se încarcă.
•Păstraţi bateriile astfel încât să nu e la îndemâna copiilor.
•Nu scurtcircuitați bateriile/acumulatoarele și nu le apropiați de obiecte metalice
neizolate.
96
Page 98

4. Punere în funcțiune
•Deschideţi compartimentul bateriilor (11), introduceți două baterii AA cu
polaritatea corectă şi închideți compartimentul.
•Dacă după introducerea unei noi baterii nu se așează nimic pe display-ul LCD,
apăsați cu un obiect ascuțit butonul (8) RESET pentru pornirea unui nou start.
5. Funcționare
Hinweis – Eingabe
• Pe ntru selectarea mai rapidă a valorilor țineți apăsată tasta (5) sau (6) .
5.1. Setare automată Dată / Oră exactă conform semnalului DCF
•Display-ul se conectează după introducerea bateriilor, se emite un semnal acustic
și ceasul deșteptător începe automat căutarea unui semnal radio DCF. În timpul
procesului de căutare simbolul radio luminează intermitent
dura 3 până la 5 minute.
•La recepționarea semnalului radio data şi ora exactă se setează automat.
Simbol radio Putere semnal
. Acest proces poate
Fără recepție
Proastă
Acceptabilă
Excelentă
97
Page 99

Așaj semnal radio Căutare semnal radio
Așaj semnalizare intermitentă Activ
Așare semnalizare Succes – Se recepționează
Nicio așareInactiv
Indicație – Setare oră exactă
•Căutarea se încheie dacă în cursul primelor minute pe parcursul primei reglări
nu se recepționează nici un semnal radio DCF. Simbolul radio se stinge.
•În cazul deranjamentelor de recepție se recomandă să lăsați ceasul pe loc în
timpul nopții deoarece acum, de regulă, semnalele perturbatoare sunt mai
reduse.
•Între timp puteți încerca căutarea manuală a semnalului radio DCF în alt loc
sau să efectuați setarea manuală a orei exacte și datei.
•Ceasul caută automat în ecare zi semnalul radio DCF. Când s-a reușit
recepționarea semnalului, ora exactă și data setate manual se sincronizează.
•Pentru pornirea căutării manuale a semnalului radio DCF, apăsați cca 3 secunde
tasta (9) RCC.
Indicație – Proces de căutare manuală
•Procesul de căutare manuală se întrerupe automat după 6 - 12 minute.
•Utilizarea frecventă a tastei (9) RCC duce la scăderea capacității bateriei. Se
recomandă folosirea acestei funcții numai pentru identicarea unui punct de
plasare optim.
98
Page 100

•Pentru a încheia căutarea manuală apăsați cca 3 secunde tasta (9) RCC.
Indicație – Oră de vară
•Ceasul trece automat la ora de vară. Atâta timp cât ora de vară este activă, pe
display se așează
5.2. Setare manuală Dată / Oră exactă
•Apăsați cca 2 secunde tasta (2) CLOCK până când așajul anului începe să
lumineze intermitent.
•Setați succesiv următoarele informații:
•An (B – 1)
•Lună (B – 4)
•Zi (B – 3)
•Format 12/24 ore (B – 1)
•Ore
•Minute
•Secunde (posibil numai zerouri)
•Limbă Zi a săptămânii (B – 5)
•Pentru selectarea valorilor separate, apăsați tasta (5) sau (6) şi conrmați
ecare selecție prin apăsarea tastei (2) CLOCK.
•Pentru preluarea valorii setate așate și trecerea la poziția următoare apăsați tasta
(2) CLOCK.
•Dacă 30 de secunde nu se introduc nici un fel de date regimul de setare se
părăsește automat și setările efectuate se memorează.
DST
(B – 8).
Oră exactă (B-1)
Indicație - Zi a săptămânii
•Pentru așajul zilei săptămânii puteți alege între limbile engleză (GB), germană
(GE), italiană (IT), spaniolă (SP) sau franceză (FR).
99
 Loading...