

Page 1

Laminator
00
050316
HOME L410Laminating Machine
Operating Instructions
Bedienungsanleitung
Mode d‘emploi
Руководство по эксплуатации
Istruzioni per l‘uso
Gebruiksaanwijzing
Használati útmutató
Návod kpoužití
Návod na použitie
GB
D
F
RUS
I
NL
H
CZ
SK
Page 2

Page 3

1 2 3
4 5 6 7
Page 4

g
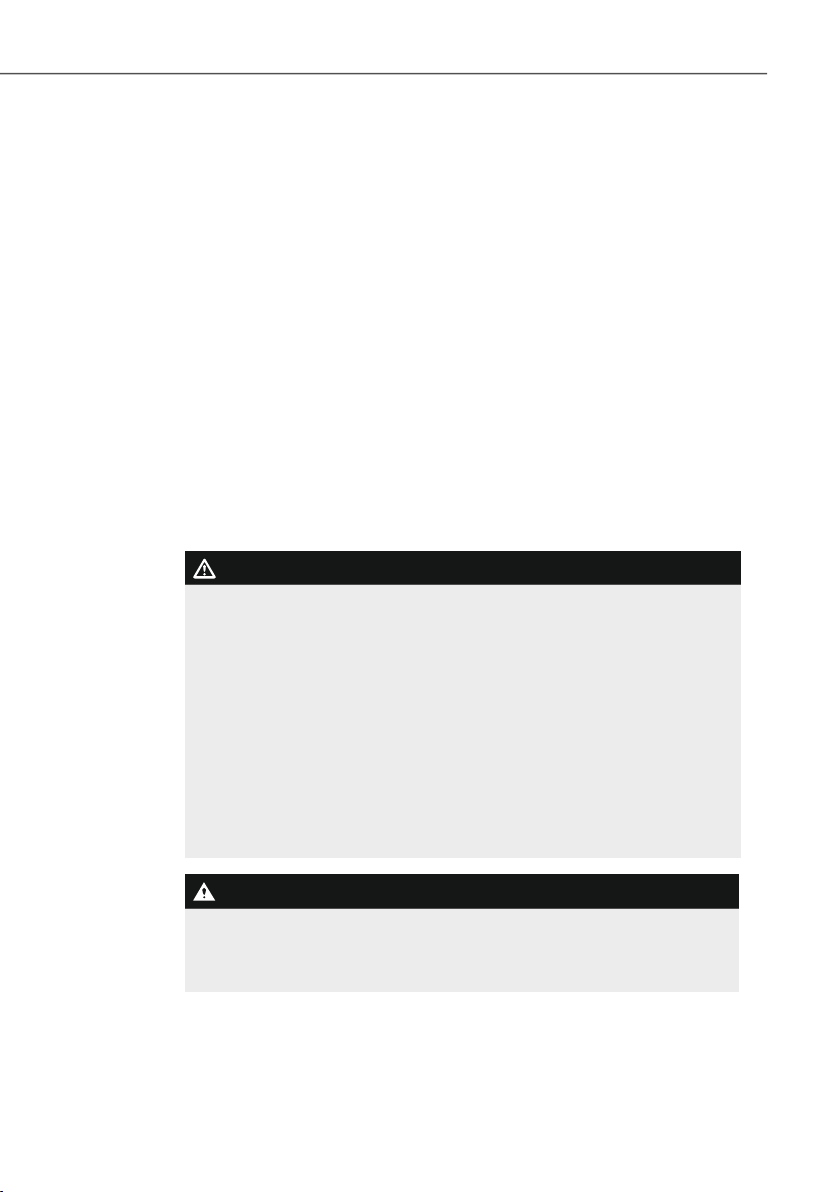
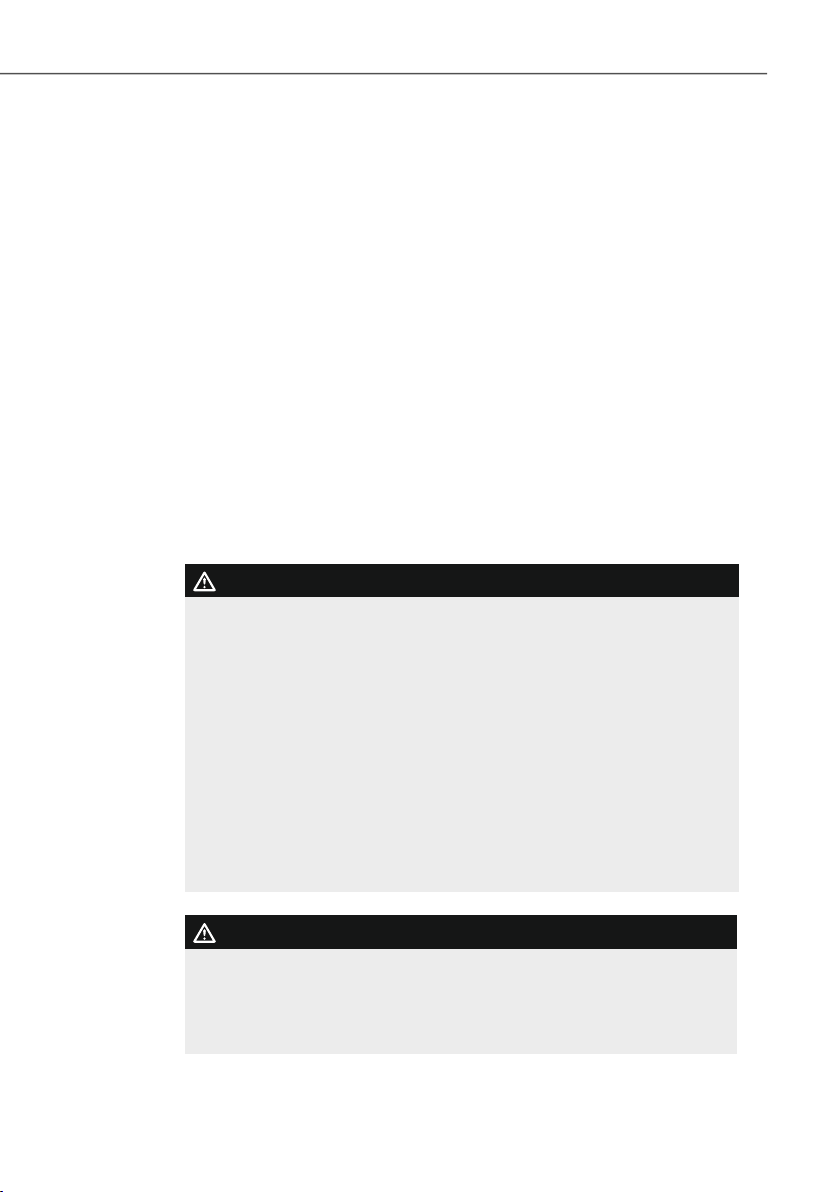
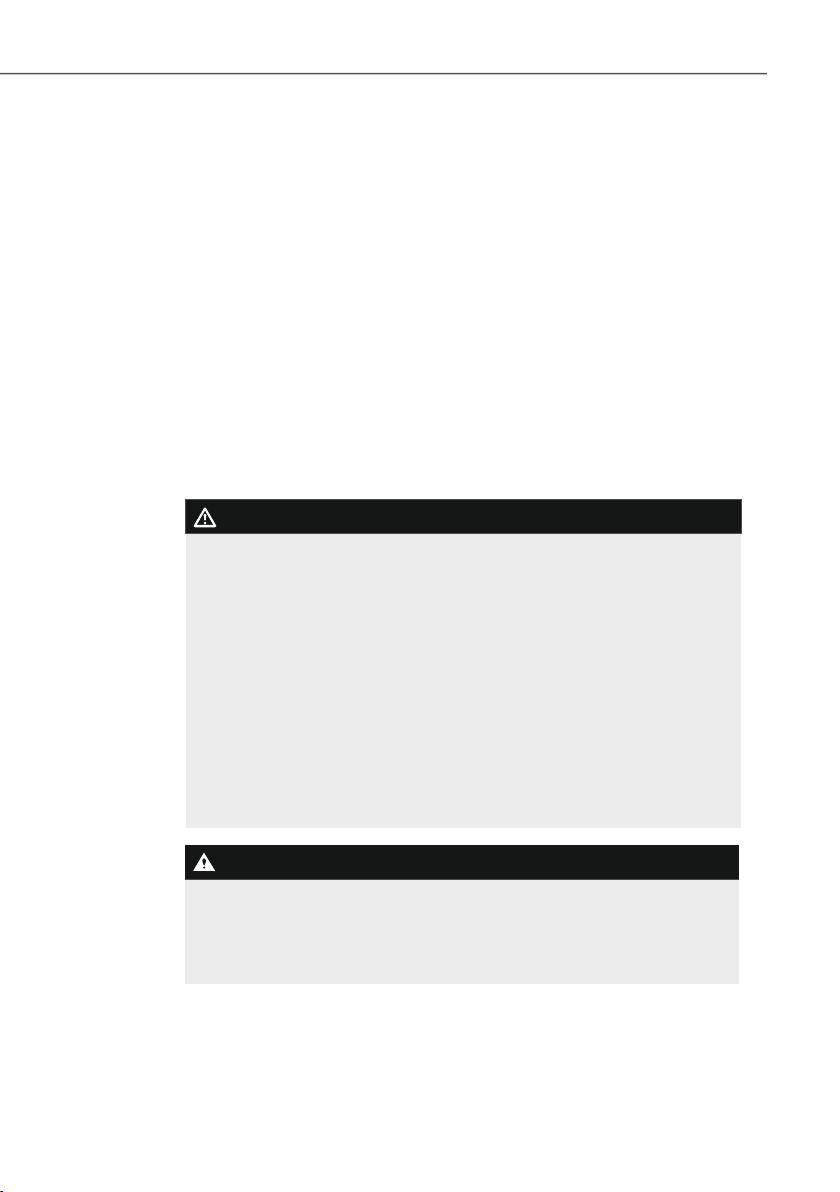
Parts
Operating instructions
1. Lamination output(rear)
2. Roller release (rear)
3. Connection line
4. Lamination input
5. Temperature selector
6. Ready and power lamp
7. On/Offswitch (side)
4
Home L410
Page 5

Home L410
g
1. Introduction
1.1 Foreword
By purchasingthis Hama laminator,you have chosen aquality product
which conforms to the latest development standards in technology and
functionality.
Please read the information contained in this booklet to familiarise
yourself quickly with the unit and to be able to make full use of its
functions.
1.2 Information on this instruction manual
This instruction manual is part of the Home L410 laminator (hereinafter referred to as unit) giving you important information on the intended
use, safety,connection as well as operation of the unit.
The instruction manual has to be kept near the unit at all times. It has
to be read and applied by all persons who use this unit or remove any
faults of the unit.
Keep this instruction manual in asafe place and pass it on with the unit
to any future owners.
1.3 Copyright
This piece of documentation is protected by copyright.
Any duplication or reprinting, in whole or in part, and the reproduction
of the illustrations even in modiRed form is only permitted with the written approval of the manufacturer.
1.4 Liability disclaimer
All technical information, data and instructions for the operation contained in this operating manual are in conformity with the last status
prior to printing and shall be rendered on the basis of our previous
experience and knowledgetothe best of our belief.
The manufacturer assumes no liability for damage or injury resulting
from failure to observe the instruction manual, use for other than the
intended purpose, unprofessional repairs, unauthorised modiRcations
or use of non-approved spare parts.
5
Page 6
Home L410
g
2. Safety
Observe the following safety instructions to ensure safe handling of
the unit:
s Inspect the unit for visible signs of damage before use. Do not use
adamaged unit.
s Persons who due to their physical, mental or motor response abi-
lities are unable to operate the unit may only use the unit under
supervision or instruction by aresponsible person.
s Faulty components may be replaced with original spare parts only.
Only original spare parts can guarantee that applicable safety requirements are adheredto.
s Defective parts may only be replaced with original spare parts. Only
these parts guarantee that the safety requirements are satisRed.
Protect the unit against humidity and penetration of liquids and/or
objects. In case of contact with liquids disconnect the unit from the
power supply immediately.
DANGER
Electric shock hazard!
Contact with live leads or components poses arisk of serious
injury or even death!
Observe the following safety precautions to avoid anyelectric
shock hazard:
l Do not use the unit if the mains lead or mains plug are damaged.
l On no account should the housing of the unit be opened. Electric
shock hazard if live connections are touched and/or the electrical
and mechanical conRguration is changed.
l Never immerse the unit or the mains plug in water or other
liquids.
WARNING
Risk of burns on the housing!
Observe the following safety precautions to avoid any injuries:
l Do not touch the housing.
6
Page 7

Home L410
g
3. Installation and Assembly
s Remove all packagingmaterials from the device.
s Do not place the device in ahot, wet or very humid environment.
s Place the device on alevel, horizontal surface so that it is stable.
s The socket must be easily accessiblesothat the power supply can
be disconnected quickly in case of an emergency.
s Before you connect the device, compare the connection data for
the device (voltage and frequency) on the type plate with that of
your mains power supply.This data must match to avoid damage
to the device.
s Keep the connection cable away from hot surfaces and sharp
edges.
s Lay all cables so that they do not pose atrippinghazard.
s Do not bend or crush the cable.
4. Handling and Operation
4.1 Instructions foruse
s Always set the temperature that is correct for the thickness of the
laminating Rlm being used.
s When laminating thick paper or several sheets, it is recommended
to use Rlm with alow thickness.
s Always wait for alamination process to Rnish before starting the
next.
s Do not run the device for more than two hours at atime and allow
approx. 15 seconds between two laminations.
4.2 Switching on the device
Move the On/Offswitch (7) on the right-hand side of the device
to position I.
The power lamp (6) then continuously lights up in red.
7
Page 8

Home L410
g
4.3 Cold lamination
s After the device is switched on, it is preset to the last temperature
used (see the section on setting the temperature selector (5)).
s For cold lamination, set the temperature controller (5) to the setting
“COLD”.
s Place the document to be laminated in the appropriate pouch.
s If the device has previously been used for hot lamination, it can
take approx. 40 minutes until it has cooled down. The ready lamp
(6) lights up continuously in blue.
s Insert the Rlm pouch into the front opening of the device (4). Make
sure that the sealed end is inserted Rrst.
NOTE
l Film pouches of all sizes should be inserted at the centre of
the front opening so that they pass through the sensor.
The document is returned at the rear (1).
If an item has not been fully laminated, repeat the Rrst steps.
Press the roller release button (3) on the back of the device to
run the item through again (if it was pulled in at an angle, etc.).
8
Page 9

Home L410
g
4.4 Hot lamination
s After the device is switched on, it is preset to the last temperature
used (see the section on setting the temperature selector (5)).
s To change the setting, turn the temperature controller (5) to the
required Rlm thickness.
s The ready lamp (6) lights up continuouslyinblue until the required
temperature has been reached.
s Place the document to be laminated in the appropriate pouch (see
Rgure).
s Insert the Rlm pouch into the front opening of the device (4). Make
sure that the sealed end is inserted Rrst.
NOTE
l Film pouches of all sizes should be inserted at the centre of
the front opening so that they pass through the sensor.
The document is returned at the rear (1).
If an item has not been fully laminated, repeat the Rrst steps.
Press the roller release button (3) on the back of the device to
run the item through again (if it was pulled in at an angle, etc.).
CAUTION!
l Laminated items coming out of the device may be too hot to
touch.
NOTE
l The laminated sheet is hot and can be bent easily.Place the
item on a Pat surface and leave to cool so that it does not
curl at the edges.
4.5 Switching off the device
Move the On/Offswitch (7) on the right-hand side of the device
to position 0. The power and ready lamp (6) willgoout.
9
Page 10

Home L410
g
5. Cleaning and Care
DANGER
Danger of death due to electrical current
l Remove the mains plug from the electrical socket before
cleaning the device.
WARNING
Risk of burns on the housing!
Observe the following safety precautions to avoid any injuries:
l Do not touch the housing.
CAUTION!
Moisture can damage the device!
l To prevent irreparable damage, make sure that no moisture gets
into the device when you clean it.
The rollers in the laminating device need to be cleaned regularly to
remove dirt and anyadhesive residue. To do so, proceed as follows:
s Switch on the device as previously described.
s Set the temperature selector (5) to “80mic”.
s When the ready light (6) remains illuminated,insert apiece of pa-
per into the device.
s If alot of dirt sticks to the paper,turn over the paper and repeat
the process.
Clean the outside of the device with adry cloth. Youcan lightly dampen
the cloth if the device is very dirty.
10
Page 11

Home L410
g
6. Troubleshooting
Fault Possible cause Solution
The power
lamp (6) does
not continuously light up in
red.
Pouches are
not laminated
properly.
NOTE
l Contact our customer service department if the problem re-
mains after you have taken the steps detailed above.
On/Offswitch (7) on
the right-hand side
of the device is on
position 0.
The power cable
(3) is not connected
correctly.
No mains power.Check your fuse box.
Device is faulty.
The required temperature has notyet
been reached.
Switch the On/Offswitch
(7) to position I.
Ensure that the plug is
connected to the electrical socket.
Inform our customer
service department.
Wait for the ready light (6)
to become solid green.
11
Page 12

Home L410
g
7. Technical data
Input voltage 220-240 V~
Mains frequency 50 Hz
Max. power consumption 220 W
Dimensions (W xHxD) 34,2 x5,8 x11,5cm
Weight (net) 1,1 kg
Weight (gross) 1,3 kg
Maximum laminating width 236 mm
Maximum laminating thickness 0,6 mm
Maximum pouch thickness 125µ
Maximum warm-up time 6minutes
Maximum speed 300 mm/minute
Number of heating rollers 2
8. Support and contact information
Please contact Hama Product Consulting if you have any questions
about this product.
Hotline: +49 9091 502-115 (German/English)
Further support information can be found here:
www.hama.com
12
Page 13

Home L410
g
13
Page 14

d
Maschinenaufbau
1. Laminatausgabe (Rückseite)
2. Walzenentriegelung (Rückseite)
3. Anschlussleitung
4. Laminateinzug
5. Temperaturwähler
6. Ready- und Power-Leuchte
7. Ein-/Aus-Schalter (seitlich)
Bedienungsanleitung
14
Home L410
Page 15

Home L410
d
1. Einführung
1.1 Vorwort
Mit dem Kauf dieses Laminiergerätes haben Sie sich für ein Qualitätsprodukt von Hama entschieden, welcheshinsichtlich Technik und
Funktionalität dem modernsten Entwicklungsstandard entspricht.
Lesen Sie die hier enthaltenen Informationen, damit Sie mit Ihrem Gerät schnell vertraut werden und seine Funktioneninvollem Umfang
nutzen können.
1.2 Informationen zu dieser Bedienungsanleitung
Diese Bedienungsanleitung ist Bestandteil des Laminiergerätes Home
L410 (nachfolgend als Gerät bezeichnet) und gibt Ihnen wichtige Hin-
weise für den bestimmungsgemäßen Gebrauch, die Sicherheit, den
Anschluss sowie die Bedienung des Gerätes.
Die Bedienungsanleitung muss ständig in der Nähe des Gerätes verfügbar sein. Sie ist von jeder Person zu lesen und anzuwenden, die dieses
Gerät bedient oder die StörungsbehebungamGerät durchführt.
Bewahren Sie diese Bedienungsanleitung auf und gebenSie diese mit
dem Gerät an Nachbesitzer weiter.
1.3 Urheberrecht
Diese Dokumentation ist urheberrechtlich geschützt.
Jede Vervielfältigung, bzw.jeder Nachdruck, auch auszugsweise, so-
wie die Wiedergabe der Abbildungen, auch im veränderten Zustand ist
nur mit schriftlicher Zustimmung des Herstellers gestattet.
1.4 Haftungsbeschränkung
Alle in dieser Bedienungsanleitungenthaltenen technischen Informationen, Daten und Hinweise für die Bedienung entsprechen dem letzten
Stand bei Drucklegung und erfolgen unter Berücksichtigungunserer
bisherigen Erfahrungen und Erkenntnisse nach bestem Wissen.
Der Hersteller übernimmt keine Haftung für Schäden aufgrund von
Nichtbeachtung der Anleitung, nicht bestimmungsgemäßer Verwendung, unsachgemäßen Reparaturen, unerlaubt vorgenommener Veränderungen oder Verwendung nicht zugelassener Ersatzteile.
15
Page 16
Home L410
d
2. Grundlegende Sicherheitshinweise
Beachten Sie für einen sicheren Umgang mit dem Gerät die folgenden
Sicherheitshinweise:
s Kontrollieren Sie das Gerät vor der Verwendung auf äußere sicht-
bare Schäden. Nehmen Sie ein beschädigtes Gerät nicht in Betrieb.
s Personen, die aufgrund ihrer körperlichen, geistigen oder motori-
schen Fähigkeiten nicht in der Lage sind das Gerät sicher zu bedienen, dürfen das Gerät nur unter Aufsicht oder Anweisung durch
eine verantwortliche Person benutzen.
s Defekte Bauteile dürfen nur gegen Original-Ersatzteile ausge-
tauscht werden. Nur bei diesen Te ilen ist gewährleistet, dass sie
die Sicherheitsanforderungen erfüllen werden.
s Schützen Sie das Gerät vor Feuchtigkeitund dem Eindringen von
Flüssigkeiten bzw.Gegenständen. Bei Kontakt mit Flüssigkeit sofort das Gerät von der Stromversorgung trennen.
GEFAHR
Lebensgefahr durch elektrischen Strom!
Beim Kontakt mit unter Spannung stehenden Leitungen oder
Bauteilen besteht Lebensgefahr!
Beachten Sie die folgenden Sicherheitshinweise, um eine Gefährdung durch elektrischen Strom zu vermeiden:
l Benutzen Sie das Gerät nicht, wenn die Anschlussleitung oder
der Netzstecker beschädigtsind.
l Öffnen Sie auf keinen Fall das Gehäuse des Gerätes. Werden
spannungsführende Anschlüsse berührt und der elektrische und
mechanische Aufbau verändert, besteht Stromschlaggefahr.
l Tauchen Sie das Gerät oder den Netzstecker niemals in Wasser
oder andere Flüssigkeiten.
16
WARNUNG
Verbrennungsgefahr am Gehäuse!
Beachten Sie die folgenden Sicherheitshinweise, um Verletzungen
zu vermeiden:
l Berühren Sie nicht das Gehäuse.
Page 17

Home L410
d
3. Installation/Aufbau
s Entfernen Sie alleVerpackungseinheiten um das Gerät herum.
s Stellen Sie das Gerät nicht in einer heißen, nassen oder sehr
feuchten Umgebung auf.
s Platzieren Sie das Gerät standsicher auf einer ebenen, waage-
rechten UnterPäche.
s Die Steckdose muss leicht zugänglich sein, so dass die Netzver-
bindung notfalls schnell getrennt werden kann.
s Vergleichen Sie vor dem Anschließen des Gerätes die Anschluss-
daten des Gerätes (Spannung und Frequenz) auf dem Typenschild
mit denen Ihres Elektronetzes. Diese Daten müssen übereinstimmen, damit keine Schäden am Gerät auftreten.
s Schützen Sie die Anschlussleitung vor heißen OberPächen und
scharfen Kanten.
s Verlegen Sie alle Kabel so, dass sie keine Stolpergefahr darstel-
len.
s Knicken und quetschen Sie das Kabel nicht.
4. Bedienung und Betrieb
4.1 Anwendungshinweise
s Stellen Sie grundsätzlich die richtige Te mperatur für die verwende-
te Laminierfolienstärke ein.
s Bei Laminierung von dickerem Papier oder mehreren Seiten emp-
Rehlt es sich eine Folie mit einer geringeren Stärke zu benutzen.
s Warten Sie immer bis ein Laminiervorgang abgeschlossen ist, ehe
Sie den nächsten starten.
s Lassen Sie das Gerät nicht länger wie zwei Stunden am Stück
laufen und lassen Sie ca. 15 Sekunden zwischen zwei Laminiervorgängen vergehen.
4.2 Gerät einschalten
Schalten Sieden Ein-/Ausschalter(7) an derrechten Geräteseite
auf Position I.
Daraufhinleuchtet diePower-Leuchte (6)dauernd rotauf.
17
Page 18

Home L410
d
4.3 Kaltlaminierung
Nach dem Einschalten ist das Gerät auf die zuletzt verwendete
Temperatur voreingestellt (s. Stellung des Te mperaturwählers
(5)).
Für die Kaltlaminierung stellen Sie den Te mperaturregler (5) auf
die Einstellung „COLD“.
Legen Sie die zu laminierende Vorlage in die entsprechende
Tasche ein.
Wurde zuvor eine Heißlaminierung durchgeführt kann es ca. 40
Minuten dauern, bis das Gerät abgekühltist. Die Ready-Leuchte
(6) leuchtet stetig blau auf.
Führen Sie die Folientasche in die vordere Öffnung des Gerä-
tes (4) ein. Achten Sie dabei darauf, dass das versiegelte Ende
zuerst eingeführt wird.
HINWEIS!
l Folientaschen jeder Größe sollten in der Mitte der vorderen
Öffnung angelegt werden, damit sie den Sensor passieren.
Das Dokument wird aufder Rückseite (1) wieder ausgegeben.
Wenn das Objekt nicht vollständig laminiert wurde, wiederholen
Sie die ersten Schritte.
Wenn Sie das Objekt nochmals ausführen wollen (z. B. schiefer
Einzug) drücken Sie die Taste Walzenentriegelung (3) auf der
Rückseite des Gerätes.
18
Page 19

Home L410
d
4.4 Heißlaminierung
Nach dem Einschalten ist das Gerät auf die zuletzt verwendete
Temperatur voreingestellt (s. Stellung des Te mperaturwählers
(5)).
Zum Ändern der Einstellung stellen Sie den Temperaturwähler
(5) auf die gewünschte Folienstärke.
Die Ready-Leuchte (6) leuchtet dauernd blau auf, sobald die
benötigte Te mperatur erreicht ist.
Legen Sie die zu laminierende Vorlage in die entsprechende
Tasche ein (s. Abbildung).
Führen Sie die Folientasche in die vordere Öffnung des Gerä-
tes (4) ein. Achten Sie dabei darauf, dass das versiegelte Ende
zuerst eingeführt wird.
HINWEIS!
l Folientaschen jeder Größe sollten in der Mitte der vorderen
Öffnung angelegt werden, damit sie den Sensor passieren.
Das Dokument wird aufder Rückseite (1) wieder ausgegeben.
Wenn das Objekt nicht vollständig laminiert wurde, wiederholen
Sie die ersten Schritte.
Wenn Sie das Objekt nochmals ausführen wollen (z. B. schiefer
Einzug) drücken Sie die Taste Walzenentriegelung (3) auf der
Rückseite des Gerätes.
ACHTUNG!
l Aus dem Gerät kommende laminierte Objekte sind mögli-
cherweise zum Berühren zu heiß.
HINWEIS!
l Das Laminierprodukt ist heiß und biegt sich leicht. Das Ob-
jekt auf eine Pache OberPäche legen und abkühlenlassen,
damit es sich nicht rollt.
4.5 Gerät ausschalten
Schalten Sie den Ein-/Ausschalter (7) an der rechten Geräteseite
auf Position 0.
Die Power-Leuchte (6) und die Ready-Leuchte (6) erlöschen.
19
Page 20

Home L410
d
5. Reinigung und PMege
GEFAHR
Lebensgefahr durch elektrischen Strom!
l Ziehen Sie den Netzstecker aus der Steckdose, bevor Sie mit
der Reinigung beginnen.
WARNUNG
Verbrennungsgefahr am Gehäuse!
Beachten Sie die folgendenSicherheitshinweise, um Verletzungen
zu vermeiden:
l Berühren Sie nicht das Gehäuse.
ACHTUNG!
Beschädigung des Gerätes durch Feuchtigkeit!
l Stellen Sie sicher,dass bei der Reinigung keine Feuchtigkeit
in das Gerät eindringt, um eine irreparable Beschädigung des
Gerätes zu vermeiden.
Die Walzen des Laminiergerätes müssen regelmäßig von Staub und
eventuellen Kleberesten befreit werden. Gehen Sie dazu wie folgt vor:
s Schalten Sie das Gerät ein wie zuvorbeschrieben.
s Stellen Sie den Temperaturwähler (5) auf „80mic“.
s Wenn die Ready-Leuchte (6) dauernd leuchtet führen Sie ein Blatt
Papier in das Gerät ein.
s Wenn sehr viel Schmutz auf dem Papier haften bleibt drehen Sie
es um und wiederholen den Vorgang erneut.
20
Reinigen Sie das Gerät von außen mit einem trockenen Tuch. Bei
starker Verschmutzung kann das Tuch ein wenig angefeuchtet werden.
Page 21

Home L410
d
6. Fehlerbehebung
Fehler Mögliche Ursache Behebung
Ein-/Ausschalter
(7) an der rechten
Geräteseite steht auf
Position 0.
Die PowerLeuchte (6)
leuchtet nicht
dauernd rot auf.
Taschen werden nicht richtig
laminiert
HINWEIS!
l Wenn Sie mit den vorstehend genannten Schritten das Problem
nicht lösen können, wenden Sie sich bitte an den Kundendienst.
Netzleitung (3) nicht
korrekt angeschlos-
sen.
Steckdose liefert
keine Spannung
Gerät defekt
Die erforderliche
Temperatur ist
noch nicht erreicht
worden.
Schalten Sie den Ein-/
Ausschalter (7) auf Position I.
Stellen Sie sicher,dass
der Netzstecker in der
Steckdose steckt.
Überprüfen Sie die
Haussicherungen.
Benachrichtigen Sie
den Kundendienst.
Warten Sie bis die
Ready-Leuchte (6)
stetig grün leuchtet.
21
Page 22

Home L410
d
7. Technische Daten
Eingangsspannung 220-240 V~
Netzfrequenz 50 Hz
max. Leistungsaufnahme 220 W
Abmessungen (B xHxT) 34,2 x5,8 x11,5cm
Gewicht (netto) 1,1 kg
Gewicht (brutto) 1,3 kg
maximale Laminerbreite 236 mm
maximale Laminierdicke 0,6 mm
maximale Ta schendicke 125µ
maximale Aufheizzeit 6Minuten
maximale Geschwindigkeit 300 mm/Minute
Anzahl Heizrollen 2
8. Service und Support
22
Bitte wenden Sie sich bei Fragen zum Produkt gerne an die HamaProduktberatung.
Hotline:+49 9091 502-115 (Deu/Eng)
Weitere Supportinformationen Rnden sie hier:
www.hama.com
Page 23

Home L410
d
23
Page 24

Home L410
f
Structure de l‘appareil
1. Sortie (face arrière)
2. Déverrouillage des rouleaux (face arrière)
3. Cordon de raccordement
4. Entrée de plastiRcation
5. Sélecteur de température
6. Voyant prêt àl‘emploi et d’alimentation
7. Interrupteur sous/hors tension (latéral)
Notice d'utilisation
24
Page 25

Home L410
f
1. Introduction
1.1 Avant-propos
En choisissant cette plastiReuse, vous avez opté pour un produit
Hama de qualité dont les caractéristiques techniques et la fonctionnalité correspondent au standard de développement le plus moderne.
Veuillez lire ici les informations ci-dessous aRndevous habituer rapidement àvotre appareiletdepouvoir proRter au mieux de toutes ses
fonctions.
1.2 Informations relatives àlaprésente notice d‘utilisation
Ce mode d’emploi est livré avec la plastiReuse Home L410 (ci-dessous «appareil ») et contient des remarques importantes concernant
l’utilisation conforme, la sécurité, le raccordement et l’utilisation de
l’appareil.
La notice d‘utilisation doit toujours être disponible àproximité de
l‘appareil. Elle doit être lue et appliquée par chaque personneutilisant
cet appareil ou procédant àdes réparations de l‘appareil.
Conservez la présente notice d‘utilisation et remettez-la avec l‘appareil
àson propriétaire ultérieur.
1.3 Droits d‘auteur
La présente documentation est soumise àlaprotection sur les droits
d‘auteur.
Toute reproduction ou impression ultérieure, même partielleainsi que
la retranscription d‘illustrations, même àl‘état modiRé, est seulement
possible sur autorisation écrite du fabricant.
1.4 Limitation de la responsabilité
Toutes les informationstechniques, données et indications Rgurant dans
la présente notice d‘utilisation et relatives àl‘utilisation correspondent à
l‘état le plus récent des connaissances lors de l‘impression ;elles vous
sont fournies en prenant en compte les expériences et connaissances
acquises jusqu‘à présent en toute âme et conscience.
Le fabricant décline toute responsabilité pour les dommages survenus
en cas de non-respect de la présente notice, d‘utilisation non conforme, de réparations inappropriées, de modiRcations non autorisées ou
d‘utilisation de pièces de rechange interdites.
25
Page 26
Home L410
f
2. Sécurité
s Avant d‘utiliser l‘appareil, veuillez le contrôler pour vériRer qu‘il ne
s Les personnes n‘étant pas en mesure de manipuler sûrement
s Les composants défectueux doiventuniquement être remplacés
s Protégez l‘appareil contre l‘humidité et la pénétration de liquides
Danger de mort causé par le courant électrique !
Il yadanger de mort en cas de contact avec des lignes ou des
composants sous tension.
Pour éviter tous risques causés par le courant électrique, veuillez
respecter les consignes de sécurité suivantes :
l N'utilisez pas l'appareil lorsquelecâble de branchement ou la
l N'ouvrez en aucun cas le boîtier de l'appareil. Si vous touchez
l Ne plongez jamais l'appareiloulaRche réseau dansdel'eau ou
présente aucun dommage apparent. Ne mettez pas en service un
appareil endommagé.
l‘appareil en raison de leurs capacités physiques, mentales ou
motrices, sont uniquement autorisées àutiliser l‘appareilsous la
surveillance ou sousl‘instruction d‘une personne responsable.
par des pièces de rechange originales. Le respect des exigences
de sécurité est uniquement garanti avec ces pièces.
ou d‘objets. En cas de contact avec des liquides, débranchez immédiatement l‘appareil de l‘alimentation en tension.
DANGER
Rche sont endommagés.
des pièces sous tension et si vous modiRez le montage électrique et mécanique, il yarisqued'électrocution.
dans d'autres liquides.
26
AVERTISSEMENT
Risque de brûlure !
Pour éviter toutes blessures, veuillez respecter les consignes de
sécurité suivantes :
l Ne touchez pas le boîtier.
Page 27

Home L410
f
3. Installation/structure
s Retirez tout l’emballage de l’appareil.
s N‘installez pas l‘appareil dans un environnement excessivement
chaud ou humide.
s Placez l‘appareil àl‘horizontale sur une surface plane en assurant
sa stabilité.
s La prise de courant doit être facilement accessiblepour permettre
son débranchement rapide en cas d‘urgence.
s Avant le branchement, comparez les caractéristiques de votre ré-
seau électrique àcelles de la plaque signalétique de l‘adaptateur
secteur (tension et fréquence).
s Assurez-vous que ces caractéristiques correspondent parfaite-
ment aRnd‘éviter toute détérioration de l‘appareil.
s Protégez le câble de raccordementdetout contact avec des sur-
faces chaudes ou des arêtes coupantes.
s Posez tous les câbles de telle sorte qu’ils ne présentent aucun
risque de chute.
4. Commande et utilisation
4.1 Consignes d‘utilisation
s En règle générale, sélectionnez la bonne température en fonction
de l‘épaisseur de feuille de plastiRcation utilisée.
s Pour la plastiRcation de feuilles en papier épais ou de plusieurs
feuilles, nous vous recommandons d‘utiliser une feuille de plastiRcation moins épaisse.
s Attendez toujours que l‘opération de plastiRcation en cours soit ter-
minée avant de commencer la suivante.
s N’utilisez pas l’appareil plus de deux heures d’afRlée et laissez-le
refroidir pendant environ 15 secondes entre deux procédures de
plastiRcation.
4.2 Mise sous tension de l‘appareil
Placez l‘interrupteur (7) situé sur la face droite de l‘appareilsur I.
Le voyant rouge d‘alimentation (6) s‘allume en permanence.
27
Page 28

Home L410
f
4.3 PlastiOcation froid
Après mise sous tension, l‘appareil est réglé sur la température
utilisée en dernier lieu (voir la position du sélecteur de température 5).
Placez le régulateur de température (5) sur «COLD »aRn
d‘exécuter une plastiRcationàfroid.
Insérez le document àplastiRer dans la pochette de plastiRcation
choisie.
Laissez l‘appareil refroidir environ 40 minutes dans le cas où
vous avez effectué une plastiRcationthermique en dernier lieu.
Le voyant bleu prêt àl‘emploi (6) s‘allume en permanence.
Introduisez la pochette de plastiRcation dans l‘oriRce avant de
l‘appareil (4). Veillez àintroduire l‘extrémité scellée de la pochette en premier.
REMARQUE :
l Les pochettes de plastiRcation de toutes tailles doivent être
bien centrées dans l‘oriRce avant de l‘appareil pour pouvoir
passer devant le capteur.
Le document ressort àl‘arrière de l‘appareil (1).
Si le document n‘a pas été entièrement plastiRé, répétez les
premières étapes de l‘opération.
Si vous désirez répéter la procédure (introduction en biais, etc.),
appuyez sur la touche de déverrouillage des rouleaux (3) sur la
face arrière de l‘appareil.
28
Page 29

Home L410
f
4.4 PlastiOcation thermique
Après mise sous tension, l‘appareil est réglé sur la température
utilisée en dernier lieu (voir la position du sélecteur de température 5).
Pour modiRer ce réglage, positionnez le sélecteur de tempéra-
ture (5) en fonction de l‘épaisseur de feuille souhaitée.
Le voyant bleu prêt àl‘emploi(6) s‘allume dèsobtention de la
température requise.
Insérez le document que vous désirez plastiRer dans une pochet-
te de plastiRcation (voir ill.).
Introduisez la pochette de plastiRcation dans l‘oriRce avant de
l‘appareil (4). Veillez àintroduire l‘extrémité scellée de la pochette en premier.
REMARQUE :
l Les pochettes de plastiRcationdetoutes tailles doiventêtre
bien centrées dans l‘oriRce avant de l‘appareil pour pouvoir
passer devant le capteur.
Le document ressort àl‘arrière de l‘appareil (1).
Si le document n‘a pas été entièrement plastiRé, répétez les
premières étapes de l‘opération.
Si vous désirez répéter la procédure (introduction en biais, etc.),
appuyez sur la touche de déverrouillage des rouleaux (3) sur la
face arrière de l‘appareil.
ATTENTION !
l Les documents plastiRés sortantdel‘appareil peuvent être
trop brûlants pour être pris dans les mains.
REMARQUE :
l Le document plastiRéest brûlant et se plie facilement.
Déposez le document sur une surface plane et laissez-le
refroidir pour qu‘il ne s‘enroule pas.
4.5 Mise hors tension de l‘appareil
Placez l‘interrupteur (7) situé sur la face droite de l‘appareilsur
0. Le voyant d‘alimentation (6) et le voyant prêt àl‘emploi (6)
s‘éteignent.
29
Page 30

Home L410
f
5. Nettoyage et entretien
DANGER
Danger de mort en raison du courant électrique.
l Débranchez la prise du secteur avant de procéder au nettoyage.
AVERTISSEMENT
Risque de brûlure !
Veuillez tenir compte de la consigne de sécurité suivante aRn
d‘éviter tout danger :
l Ne touchez pas le boîtier.
ATTENTION
Détérioration de l‘appareil en cas d‘humidité.
l Assurez-vous qu‘aucunehumidité ne pénètre dans l‘appareil
pendant le nettoyage ;l‘humidité est susceptible de provoquer
des détériorations irréparablesdel‘appareil.
La poussière et les éventuels restes de colle adhérant aux rouleaux de
la plastiReuse doivent être régulièrement éliminés. Marche àsuivre :
s Mettez la plastiReuse sous tension comme décrit plus haut.
s Placez le sélecteur de température (5) sur «80mic ».
s Introduisez le papier nettoyant dans l‘appareil dès que le témoin
lumineux (6) s‘allume en permanence.
s Si une quantité importante de saleté adhère au papier,retournez le
papier et répétez la procédure en utilisant sa face propre.
30
Nettoyez le boîtier de l‘appareil avec un chiffon sec. En cas de saleté
tenace, humidiRez légèrement le chiffon.
Page 31

Home L410
f
6. Elimination des pannes
Problème Cause possible Elimination
L’interrupteur de mise
sous/hors (7) tension située sur la face
arrière est placé sur
Le voyant rouge
d‘alimentation
(6) ne s‘allume
pas en permanence.
Les pochettes
ne sont pas
correctement
plastiRées.
REMARQUE :
l Si les mesures mentionnéesci-dessus ne vous permettent pas
de résoudre le problème, veuillez contacter le service aprèsvente.
«0».
La ligne d‘alimentation
n‘est pas correctement
branchée (3).
Aucune tension provenant de la prise de
courant.
Appareil défectueux.
La température nécessaire n‘est pas encore
atteinte.
Placez l’interrupteur marche/arrêt (7) en position I.
Assurez-vous que la
prise de courant est bien
insérée dans la prise de
courant.
VériRez les fusibles de
votre installation.
Veuillez contacter
le service après-vente.
Veuillez attendre jusqu‘à
l‘allumage en vert en
permanence du témoin
lumineux (« Ready ») (6).
31
Page 32

Home L410
f
7. Données techniques
Tension d‘entrée 220-240V~
Fréquence 50 Hz
Puissance maximale 220 W
Dimensions (L xlxH)34,2 x5,8 x11,5cm
Poids (net) 1,1 kg
Poids (brut) 1,3 kg
Largeur maximale de plastiRcation 236 mm
Epaisseur maximale de plastiRcation 0,6 mm
Epaisseur maximale des pochettes 125
Temps de chauffe maximal 6minutes
Vitesse maximale 300 mm/minute
Nombre de rouleaux chauffants 2
8. Support technique et contact
32
En cas de question concernant le produit, veuillez vous adresser au
service de conseil produits de Hama.
Ligne téléphonique directe :+49 9091 502-115 (allemand/anglais)
Vous trouverez ici de plus amples informations concernant
l‘assistance :www.hama.com
Page 33

Home L410
f
33
Page 34

Home L410
u
Ü/1)æ+ä7ß:±
1. /Øä2f42; 82é2: (4n `nf4d; 0n4d8=)
2. Òn`l82:=.2j:njn8=:2j (4n `nf4d; 0n4d8=)
3. Ï2df=4=éd8·4Ø;:nld8·
4. Õ.=d64Ø;82é2:
5. Ìd60d.néç.4Ø;,d8d:é2.
6. ßn60n =4f=:nâ== 0=én4=² =h2é2j42,é=:.nl2éd
7. /Ø:8´ànéd8· 0=én4=² (4n l2:2j2; 0n4d8=)
Ïä7/g/c)æg/ -/ ´7)-5äkækß::
34
Page 35

Home L410
u
1. ,gaca1:a
1.1 Ò+ac:)5/g:a
®n.n:éd.=,é=:= 4n,é2²Üdh2=`fd8=² :260n4== Hama
,22éjd é,éjç´é ,n6Ø6,2j.d6d44Ø6 édä4=àd,:=6,én4fn.én6.
Õ.2à=én;éd,2fd.bnÜç´,² `fd,· =4æ2.6nâ=´ f8² l28dd
lØ,é.2h22`4n:268d4=² ,jnÞ=6 0.2l2.26 =f8²028·`2jn4=²
dh2 æç4:â=²6= j028426 2lÚd6d.
1.2 ù1ã/+3kß:± /ck11/3+ä7/g/c)æga -/
´7)-5äkækß::
Ûn,é2²Üdd .ç:2j2f,éj2 jä2f=é j:2608d:é 02,énj:= =`fd8=².
!fd,· 0.=j2f²é,² =4,é.ç:â== 02 µ:,08çnénâ== = ç0.nj8d4=², n
én:bd 0.nj=8n édä4=:= ld`20n,42,é=.
Òç:2j2f,éj2 02 µ:,08çnénâ== f28b42 02,é2²442 4nä2f=é·,²
jl8=`= ç,é.2;,éjn. &h2 f28bd4 0.2à=éné· =,2l8´fné· :nbfØ;,
:é22l,8çb=jndé 0.=l2. =8= 0.2j2f=éç,é.n4d4=d 4d028nf2:.
®.n4=édfn442d .ç:2j2f,éj2 02 028·`2jn4=´ =0d.dfnjn;éddh2
02,8dfç´Üd6ç 028·`2jnéd8´ j6d,éd,0.=l2.26.
1.3 .gæ/+)7/a-+kg/
)n44n² f2:ç6d4énâ=² `nÜ=Üd4n njé2.,:=6 0.nj26.
à20=.2jn4=d fn442; f2:ç6d4énâ== =8=, ,22éjdé,éjd442,
0d.d0dàné:n, j é26 à=,8d dd àn,éd;, n én:bd j2,0.2=`jdfd4=d
.=,ç4:2j, j é26 à=,8dj=`6d4d4426 j=fd, f20ç,:ndé,²é28·:2 ,
0=,·6d442h2,2h8n,=² =`h2é2j=éd8².
1.4 Õe+k1:Ýa1:a /ægaæ)æga11/)æ:
/,d ,2fd.bnÜ=d,² j µé26 .ç:2j2f,éjd 02 µ:,08çnénâ==
édä4=àd,:=d,jdfd4=², fn44Ød=ç:n`n4=² 02 2l,8çb=jn4=´
,22éjd é,éjç´é 02,8df4d6ç ,2,é2²4=´ 4n fd4· ,fnà=j
0dàné· =0.=jdfd4Ø 02 8çàÞd6ç .n`ç6d4=´ , çàdé26 4nÞdh2
0.dfØfçÜdh220Øén=`4n4=;.
Õ.2=`j2f=éd8· 4d 4d,dé 2éjdé,éjd442,é=`nfdæd:éØ,
j2`4=:Þ=d j.d`ç8·énéd4d,2l8´fd4=² .ç:2j2f,éjn,
0.=6d4d4=² 4d 02 4n`4nàd4=´, 4d:jn8=æ=â=.2jn442h2.d624én,
4d,n4:â=24=.2jn44Øä =`6d4d4=; =8= 0.=6d4d4=² 4df20ç,é=6Øä
`n0n,4Øä fdén8d;.
35
Page 36

Home L410
u
2. -a]/-k)1/)æ¶
)8² ld`20n,42h22l.nÜd4=² ,0.=l2.26 ,2l8´fn;éd,8dfç´Ü=d
ç:n`n4=² 02 ld`20n,42,é=:
s Õd.df0.=6d4d4=d6 0.2jd.·éd0.=l2. 4n 4n8=à=d j4dÞ4=ä
j=f=6Øä 02j.dbfd4=;. Ûd µ:,08çné=.ç;éd02j.dbfd44Ø;
0.=l2..
s ß=ân6, :2é2.Ødjj=fç ,j2=äæ=`=àd,:=ä, 0,=ä=àd,:=ä =8=
fj=hnéd8·4Øä ,02,2l42,éd; 4d j,2,é2²4== ld`20n,42
2l,8çb=jné· fn44Ø;0.=l2., .n`.dÞndé,² 028·`2jné·,²
0.=l2.26 é28·:2 02f0.=,62é.26 =8= 02 ç:n`n4=²6
2éjdé,éjd442h28=ân.
s )dæd:é4Ødfdén8=62b42 `n6d4=é· 4n 2.=h=4n8·4Ød
`n0n,4Ød àn,é=. Ì28·:2 0.= =,028·`2jn4== én:=ä fdén8d;
j2`62b4n hn.n4é=² jØ0284d4=²é.dl2jn4=; 02 ld`20n,42,é=.
s !nÜ=Ün;éd0.=l2. 2é j2`fd;,éj=² j8nh= =020nfn4=²
b=f:2,éd; =8= 0.df6dé2j. Õ.= :24én:éd,b=f:2,é·´
4d2lä2f=62 ,.n`ç bd 2é:8´à=é· 2é =,é2à4=:n0=én4=².
ÕÒ.ÌØÕ!
Õ-k)1/ c5± _:]1:! Õ-k)1/)æ¶ -/+k_a1:±´5a7æ+:Ýa)7:3
æ/7/3!
Ò+: 7/1æk7æa)-+/g/c7/8:5: caæk5±3:¹ 1ká/c±Ú:3:)±
-/c1k-+±_a1:a3¹ )äÚa)ægäaæ /-k)1/)æ¶ c5± _:]1:!
)8² 0.df2éj.nÜd4=² 20n,42,é=02.nbd4=²µ8d:é.=àd,:=6
é2:26 ,2l8´fn;éd,8dfç´Ü=d ç:n`n4=² 02 ld`20n,42,é=:
l Ûd=,028·`ç;éd0.=l2. j,8çànd 02j.dbfd4=²
,2df=4=éd8·42h20.2j2fn=8= ,dédj2h2 Þéd:d.n.
l Û=j:2d6,8çànd 4d 2é:.Øjn;éd:2.0ç,0.=l2.n. Õ.=
:24én:éd,4nä2f²Ü=6=,² 02f4n0.²bd4=d6 02f:8´àd4=²6=
=0.= =`6d4d4== µ8d:é.=àd,:2; =6dän4=àd,:2; :24,é.ç:â==
0.=l2.n ,çÜd,éjçdé 20n,42,é· 02.nbd4=²é2:26.
l Û=:2hfn 4d 02h.çbn;éd0.=l2. =8= Þéd:d. jj2fç =8= f.çh=d
b=f:2,é=.
36
ÒÏ#&ÆÒÏ#þ&#Øù#
Õ-k)1/)æ¶ /_/ek
)8² 0.df2éj.nÜd4=²é.nj6,2l8´fn;éd,8dfç´Ü=d ç:n`n4=²
02 ld`20n,42,é=:
l Ûd0.=:n,n;éd,· ::2.0ç,ç.
Page 37

Home L410
u
3. Û/1æk_ :-/c75³Ýa1:a
s Éfn8=éd ç0n:2j2à4Ø;6néd.=n8.
s Ûd.n`6dÜn;éd ç,é.2;,éj2 j6d,énä ,jØ,2:2; éd60d.néç.2;
=j8nb42,é·´.
s É,én42j=éd ç,é.2;,éj2 4n .2j4ç´, h2.=`24én8·4ç´ 0.2à4ç´
02jd.ä42,é·.
s Ò2`dé:n µ8d:é.2,dé=f28b4n lØé· 8dh:2f2,éç04n, , éd6
àé2lØ :nld8· 0=én4=² j,dhfn 62b42 lØ82 lØ,é.2 2é:8´à=é·
2é .2`dé:=.
s Õd.df02f:8´àd4=d6 0.=l2.n : µ8d:é.2,dé= çldf=éd,·, àé2
24n ,22éjdé,éjçdéédä4=àd,:=6 än.n:éd.=,é=:n6 0.=l2.n
(,6. `nj2f,:ç´ énl8=à:ç). Ûd,2l8´fd4=d édä4=àd,:=ä
än.n:éd.=,é=: 0.=j2f=é :jØä2fçç,é.2;,éjn =` ,é.2².
s Ûd.n`6dÜn;éd:nld8· 0=én4=² .²f26 ,4nh.djnéd8·4Ø6=
0.=l2.n6= =2,é.Ø6= :.26:n6=.
s ànld8=4df28b4Ø ,2`fnjné· 026dä=0d.d6dÜd4=´ 8´fd;.
s ànld8· 4d ,h=lné· =4d`nb=6né·.
4. 7)-5äkækß:±. Æ-+kg5a1:a
4.1 Ò+:3aÝk1:a
s É,én42j=éd éd60d.néç.ç j`nj=,=62,é=2éé28Ü=4Ø 08d4:=.
s )8² lç6nh= l28·Þ2; é28Ü=4Ø =8= f8² 4d,:28·:=ä ,é.n4=â
.d:26d4fçdé,² jØl=.né· 08d4:ç ,6n82; é28Ü=42;.
s Õd.df4nàn826 42j2; 20d.nâ== çldf=éd,·, àé20.dfØfçÜn²
20d.nâ=² `njd.Þd4n.
s Ûd µ:,08çné=.ç;édn00n.né l28dd fjçä àn,2j ld`0d.d.Øjn.
Õ.26dbçé2: 6dbfç 20d.nâ=²6= f28bd4 ,2,énj8²é· 2: 15
,d:ç4f.
4.2 ,75³Ýa1:a ä)æ+/8)ægk
Õd.djdf=édjØ:8´ànéd8· (7) 4n 0.nj2; 0n4d8= ç,é.2;,éjn j
0282bd4=d I.
Õ22:24àn4== 8n60n h2é2j42,é=:.nl2éd (6) 4nà4dé h2.dé·
4d0.d.Øj42 :.n,4Ø6,jdé26.
37
Page 38

Home L410
u
4.3 «/5/c1/a 5k3:1:+/gk1:a
Ï.n`ç 02,8d j:8´àd4=²ç,é.2;,éj2 4nh.djndé,² f2
éd60d.néç.Ø, :2é2.n² lØ8n ç,én42j8d4n .n4dd (,6.
0282bd4=d ,d8d:é2.n éd60d.néç.Ø (5)).
É,én42j=éd.dhç8²é2. éd60d.néç.Ø (5) j0282bd4=d „COLD“
(ä282f4Ø;).
/,énj·éd8n6=4=.çd6Ø;8=,é j,22éjdé,éjç´Ü=; :24jd.é.
&,8= .n4dd 0.2=`j2f=82,· h2.²àdd8n6=4=.2jn4=d,
é2 ç,é.2;,éjç 62bdé 024nf2l=é·,² 0nç`n j.nl2éd
f8=éd8·42,é·´ 2:.406=4çé. ßn60n 0=én4=² =h2é2j42,é=:
.nl2éd (6) hn,4dé.
/,énj·éd08d42à4Ø;:24jd.é j0.=d64Ø;82é2: (4). à24jd.é
4d2lä2f=62 j,énj8²é· `n0dànéØjnd6Ø6:24â26 j0d.df.
ÒÏùÛ#¨.Øù#!
l «é2lØ n:é=j=`=.2jné· fnéà=:, 08d42à4Ød:n.6n4Ø
8´lØä .n`6d.2j ,8dfçdé j,énj8²é· 02 ,d.df=4d
0.=d642h282é:n.
)2:ç6d4é jØfndé,² =` jØä2f42h282é:n (1).
&,8= 8n6=4=.2jn4=d ,0d.j2h2.n`n0.2=`jd,é=4dçfn82,·,
02jé2.=éd020Øé:ç ,4nàn8n.
Õ.= 4d2lä2f=62,é=dÜd.n` 020.nj=é· 2lÚd:é, 4nb6=éd
:420:ç .n`l82:=.2j:= jn8=:2j (3), :2é2.n² .n,0282bd4n 4n
`nf4d; 0n4d8= ç,é.2;,éjn.
38
Page 39

Home L410
u
4.4 )/+±Ýaa 5k3:1:+/gk1:a
Ï.n`ç 02,8d j:8´àd4=²ç,é.2;,éj2 4nh.djndé,² f2
éd60d.néç.Ø, :2é2.n² lØ8n ç,én42j8d4n .n4dd (,6.
0282bd4=d ,d8d:é2.n éd60d.néç.Ø (5)).
«é2lØ =`6d4=é· éd60d.néç.ç 4nh.djn, 02jd.4=éd.dhç8²é2.
(5) j0282bd4=d, ,22éjdé,éjç´Üdd é28Ü=4d08d4:=.
ßn60n =4f=:nâ== h2é2j42,é=:.nl2éd (6) h2.=é 4d0.d.Øj42,
02:n éd60d.néç.n 4d f2,é=h4déç,én42j8d442h2`4nàd4=².
/,énj·éd8n6=4=.çd6Ø;8=,é j,22éjdé,éjç´Ü=; :24jd.é
(,6. Ò=,ç42:).
/,énj·éd08d42à4Ø;:24jd.é j0.=d64Ø;82é2: (4). à24jd.é
4d2lä2f=62 j,énj8²é· `n0dànéØjnd6Ø6:24â26 j0d.df.
ÒÏùÛ#¨.Øù#!
l «é2lØ n:é=j=`=.2jné· fnéà=:, 08d42à4Ød:n.6n4Ø
8´lØä .n`6d.2j ,8dfçdé j,énj8²é· 02 ,d.df=4d
0.=d642h282é:n.
)2:ç6d4é jØfndé,² =` jØä2f42h282é:n (1).
&,8= 8n6=4=.2jn4=d ,0d.j2h2.n`n0.2=`jd,é=4dçfn82,·,
02jé2.=éd020Øé:ç ,4nàn8n.
Õ.= 4d2lä2f=62,é=dÜd.n` 020.nj=é· 2lÚd:é, 4nb6=éd
:420:ç .n`l82:=.2j:= jn8=:2j (3), :2é2.n² .n,0282bd4n 4n
`nf4d; 0n4d8= ç,é.2;,éjn.
,ØùÛ.Øù#!
l ØlÚd:éØ, é28·:2 àé2jØÞdfÞ=d =` jØä2f42h282é:n,
62hçé lØé· 4nh.déØ f2 2àd4· jØ,2:2; éd60d.néç.Ø.
ÒÏùÛ#¨.Øù#!
l ßn6=4=.2jn44Ø;2lÚd:é 4nh.djndé,² f2 jØ,2:2;
éd60d.néç.Ø =8dh:2,h=lndé,². /2=`ldbn4=d =`h=ln4=²
0282b=éd2lÚd:é 4n 082,:ç´ 02jd.ä42,é· =fn;édd6ç
2,éØé·.
4.5 ,×75³Ýa1:a ä)æ+/8)ægk
Õd.djdf=édjØ:8´ànéd8· (7) 4n 0.nj2; 0n4d8= ç,é.2;,éjn j
0282bd4=d 0.
ßn60n 0=én4=² (6) =h2é2j42,é=:.nl2éd (6) hn,4çé.
39
Page 40

Home L410
u
5. ¨:)æ7k : äá/c
ÕÒ.ÌØÕ
8d:é.=àd,:=; é2: 20n,d4 f8² b=`4=ú
l Õd.df4nàn826 à=,é:= jØénÜ=éd,dédj2; 0.2j2f =` .2`dé:=
µ8d:é.2,dé=.
ÒÏ#&ÆÒÏ#þ&#Øù#!
Õ-k)1/)æ¶ /_/ek!
/2=`ldbn4=d é.nj6,2l8´fn;éd,8dfç´Üdd 0.nj=82 édä4=:=
ld`20n,42,é=:
l Ûd0.=:n,n;éd,· ::2.0ç,ç.
,ØùÛ.Øù#!
-a+ae:æa ä)æ+/8)æg/ /æ g5ke:!
l Ûd02fjd.hn;éd ç,é.2;,éj2 j2`fd;,éj=´ j8nh= =b=f:2,éd;.
Ûd2lä2f=62 .dhç8².42 0.2=`j2f=é· 2à=Üné· jn8=:= 2é 0Ø8= =
0.=8=0Þ=ä 2éä2f2j. Õ2.²f2: jØ0284d4=² 0.=j2f=é,² 4=bd.
s /:8´à=éd ç,é.2;,éj2.
s É,én42j=éd.dhç8²é2. éd60d.néç.Ø (5) j0282bd4=d „80mic“.
s à2hfn 8n60n h2é2j42,é=:.nl2éd (6) 4nà4dé h2.dé· 02,é2²442,
j,énj·édj0.=d64Ø;82é2: 8=,é lç6nh=.
s Ï2l.nj h.²`· 4n 2f4ç ,é2.24ç lç6nh=, 0d.djd.4=éddd=
02jé2.=éd0.2âdfç.ç.
40
!4nà=éd8·4Ød`nh.²`4d4=²çfn8²;éd,8dh:nj8nb42;,n8ædé:2;.
Page 41

Home L410
u
6. Ò/:)7 : ä)æ+k1a1:a 1a:)-+kg1/)æa8
Øa:)-+kg1/)æ¶ Ò+:Ý:1k Æ)æ+k1a1:a
Õd.d:8´ànéd8·
4n `nf4d; 0n4d8=
ç,én42j8d4 (7) j
0282bd4=d 0.
à.n,4n² 8n60n
=4f=:nâ==
0=én4=² (6)
hn,4dé.
ßn6=4=.2jn4=d
2,çÜd,éj8²dé,²
4d0.nj=8·42.
ÒÏùÛ#¨.Øù#!
l &,8= ,0262Ü·´ jØÞdç:n`n44Øä .d:26d4fnâ=;
4d=,0.nj42,é· ç,é.n4=é· 4d çfndé,², 2l.né=éd,· j2éfd8
édä2l,8çb=jn4=².
Ûd0.nj=8·42
02f:8´àd42
0=én4=d (3).
Øé,çé,éjçdé
4n0.²bd4=d j
µ8d:é.2,dé=.
É,é.2;,éj2
4d=,0.nj42.
Ûd`njd.Þd4
0.2âd,, 02f2h.djn.
Õd.djdf=éd
jØ:8´ànéd8· (7) j
0282bd4=d I.
Õ.2jd.·éd
,2df=4d4=d :nld8²
0=én4=² ,.2`dé:2;
µ8d:é.2,dé=.
Õ.2jd.·éd
0.df2ä.n4=éd8=.
Øl.né=éd,· j2éfd8
édä2l,8çb=jn4=².
Õd.df4nàn826
20d.nâ== `d8d4n²
8n60n (6) h2é2j42,é=:
.nl2édf28b4n h2.dé·
02,é2²442.
41
Page 42

Home L410
u
7. Éaá1:Ýa)7:a ck11×a
/ä2f42d 4n0.²bd4=d 220-240 /~
«n,é2én µ8d:é.2,dé= 50 ,â
Þn:,. 02é.dl8²d6n² 62Ü42,é· 220 /é
Òn`6d.Ø () ä / ä Ì)34,2 x5,8 x11,5 ,6
/d, (4déé2)1,1 :h
/d, (l.çéé2)1,3 :h
Þn:,. Þ=.=4n 8n6=4=.2jn4=² 236 66
Þn:,. é28Ü=4n 8n6=4=.2jn4=² 0,6 66
Þn:,. é28Ü=4n 08d42à42h2
:n.6n4n
Þn:,. j.d6² .n`2h.djn 6 6=4çé
Þn:,. ,:2.2,é· 300 66/6=4.
à28=àd,éj2 4nh.djnéd8·4Øä
.28=:2j
8. Õæca5 æaá/i)5ä_:gk1:±
Õ2j20.2,n6 .d624én=8= `n6d4Ø 4d=,0.nj4Øä =`fd8=;
2l.nÜn;éd,· :0.2fnjâç =8= j,d.j=,4ç´ ,8çblç :260n4==
Hama.
,2.²àn² 8=4=² 2éfd8n édä2l,8çb=jn4=²:
+49 9091 502-115 (4d6dâ:=;, n4h8=;,:=;)
Õ2f.2l4dd ,62é.=éd`fd,·:www.hama.com
125 6:6
2
42
Page 43

Home L410
u
43
Page 44

Home L410
i
Montaggio della macchina
1. Uscita laminato (retro)
2. Sblocco cilindri (retro)
3. Cavo di allacciamento
4. Ingresso laminato
5. Selettore di temperatura
6. Spia Ready ePower
7. Interruttore on/off(laterale)
Istruzioni per l’uso
44
Page 45

Home L410
i
1. Introduzione
1.1 Premessa
con l’acquisto di questo laminatore avete scelto un prodotto di qualità
di Hama che, in quanto atecnologia efunzionalità, corrisponde al più
moderno standard di sviluppo.
Leggete tutte le informazionidel presente manuale in modo da prendere rapidamente una completa familiarità con il vostro apparecchio e
poterne sfruttare appieno le funzioni.
1.2 Informazioni sulle presenti istruzioni per l’uso
Queste istruzioni per l‘uso sono parte integrante del laminatore Home
L410 (qui di seguito denominato apparecchio)eforniscono indicazioni
importanti per l’utilizzo conforme, la sicurezza, il collegamento eilcomando dell’apparecchio.
Le istruzioni per l’uso devono essere sempre disponibili nelle vicinanze
dell’apparecchio edevono essere lette eapplicate da ogni persona che si
occupa del comando, dellariparazione e/o della pulizia dell’apparecchio.
Conservare le presenti istruzioni per l’uso econsegnarle con
l’apparecchio in caso di vendita aunaltro proprietario.
1.3 Copyright
Il presente documento èprotetto da copyright.
Ogni copia oristampa, anche parziale, elariproduzione delle illustra-
zioni, anche se modiRcate, èpermessa esclusivamente con il permesso scritto del costruttore.
1.4 Limitazione della responsabilità
Tutte le informazioni tecniche, idati eleavvertenze relative all’uso contenuti nelle presenti istruzioni per l’uso sono conformi all’ultimo stato
dell’apparecchio al momento della stampa evengono fornite tenendo
presenti le nostri attuali esperienze econoscenze secondo scienza e
coscienza.
Il costruttore non risponde di danni dovuti alla mancata osservanza
delle istruzioni, aunuso non conforme alla destinazione, ariparazioni
irregolari,amodiRche effettuate senza autorizzazione eall’impiego di
pezzi di ricambionon autorizzati.
45
Page 46

Home L410
i
2. Sicurezza
Per un trattamento sicuro dell’apparecchio osservare le seguenti istruzioni di sicurezza.
s Primadell’uso controllare l’assenza di danni visibili sull’apparecchio.
Non mettere in funzione un apparecchio danneggiato.
s Le persone che non sono in grado di utilizzare l’apparecchio in
sicurezza acausa delle proprie capacità Rsiche, psichiche omotorie possono utilizzarlo esclusivamente sotto la sorveglianza ole
istruzioni di una persona responsabile.
s Icomponenti difettosi possono essere sostituiti esclusivamente
con pezzi di ricambio originali. Solo tali pezzi assicurano il rispetto
dei requisiti di sicurezza.
s Tenere l’apparecchio al riparo dall’umidità ed evitare la penetra-
zione di liquidi od oggetti. In caso di contatto con liquidi separare
immediatamente l’apparecchio dall’alimentazione elettrica.
Pericolo di morte acausa di tensione elettrica pericolosa!
Pericolo di morte in caso di contatto con conduttori ocompo-
nenti sotto tensione!
Rispettare le seguenti istruzioni di sicurezza per evitare un rischio
dovuto atensioni pericolose.
l Non utilizzare l’apparecchio in caso di cavo di alimentazione o
spina danneggiati.
l Non aprire in alcun caso l’involucro dell’apparecchio. Pericolo
di folgorazione se si toccano collegamenti sotto tensione ese
viene modiRcata la struttura elettrica e/o meccanica.
l Non immergere mai l’apparecchio olaspina di rete in acqua oin
altri Puidi.
PERICOLO
46
ATTENZIONE
Pericolo di ustioni su l‘alloggiamento!
Per evitare lesioni, attenersi anche alle seguenti indicazioni di
sicurezza:
l Non toccare l‘alloggiamento.
Page 47

Home L410
i
3. Installazione/struttura
s Rimuovere tutti gli involucri di imballaggiodall’apparecchio.
s Non montare l’apparecchio in ambienti molto troppo caldi, bagnati
omolto umidi.
s Collocare l’apparecchio in posizione sicura su una superRcie piana
eorizzontale.
s La presa deve essere facilmente accessibileinmodo che il
collegamento di rete si possa scollegare velocemente in caso di
emergenza.
s Prima dell’attacco dell’apparecchio, confrontare idati sulla
targhettadell’adattatoredirete(tensioneefrequenza)con quelli della
propria rete elettrica. Per evitare danni all’apparecchio, idati
devono coincidere.
s Tenere il cavo di allacciamento lontano da superRci roventi e
spigoli appuntiti.
s Disporre tutti icavi in mododanon inciamparsi.
s Non piegare, né schiacciare il cavo.
4. Comando ed esercizio
4.1 Avvertenze generali per l’utilizzo
s Impostare la temperatura idonea allo spessore della pellicoladi
plastiRcazione utilizzata.
s Per la plastiRcazione di carta più spessa odipiù fogli, si consiglia
di utilizzare una pellicola piùsottile.
s Attendere sempre che sia concluso un processo di laminazione
prima di avviare il successivo.
s Non lasciare l‘apparecchio in funzione per più due ore elasciarlo
riposare per ca. 15 secondi tra due processi di laminazione.
4.2 Accensione dell’apparecchio
Inserire l‘interruttore on/off(7) sul lato destro dell‘apparecchio in
posizione I.
La spia Power (6) resta accesa aluce Rssa rossa.
47
Page 48

Home L410
i
4.3 Laminatura afreddo
Dopo l’accensione, l’apparecchio èpreimpostato sull‘ultima tem-
peratura utilizzata (v.posizione del regolatore di temperatura (5).
Per la laminatura afreddo, ruotare il regolatore di temperatura
(5) in posizione „COLD“.
Collocare l‘originale da laminare nell‘apposita busta plastiRcante.
Se èstata precedentemente effettuata una laminatura acaldo,
occorrono circa 40 minuti prima che l’apparecchio sia di nuovo
freddo. La spia Ready (6) si accende sempre aluce Rssa blu.
Inserire la busta nell‘apertura anteriore dell‘apparecchio (4). Fare
attenzione ad introdurre prima l’estremità sigillata.
AVVERTENZA!
l Le buste di tutte le dimensioni dovrebbero essere inserite al
centro dell’apertura anteriore al Rne di superare il sensore.
Il documento viene emesso sul retro (1).
Se l’oggetto non èstato interamente plastiRcato, ripetere iprimi
passi.
Per ripetere il procedimento (ad es. se il foglio èstato introdotto
in modo storto), premere il tasto di sblocco dei cilindri (3) sul
retro dell‘apparecchio.
48
Page 49

Home L410
i
4.4 Laminatura acaldo
Dopo l’accensione, l’apparecchio èpreimpostato sull‘ultima tem-
peratura utilizzata (v.posizione del regolatore di temperatura (5).
Per modiRcare l’impostazione, posizionare il selettore di tempe-
ratura (5) sullo spessore della pellicoladesiderato.
La spia Ready (6) iniziaalampeggiare Rnché non viene raggiun-
ta la temperatura necessaria.
Collocare l‘originale da laminare nell‘apposita busta plastiRcante
(vedi Rgura).
Inserire la busta nell‘apertura anteriore dell‘apparecchio (4). Fare
attenzione ad introdurre prima l’estremità sigillata.
AVVERTENZA!
l Le buste di tutte le dimensioni dovrebbero essere inserite al
centro dell’apertura anteriore al Rne di superare il sensore.
Il documento viene emesso sul retro (1).
Se l’oggetto non èstato interamente plastiRcato, ripetere iprimi
passi.
Per ripetere il procedimento (ad es. se il foglio èstato introdotto
in modo storto), premere il tasto di sblocco dei cilindri (3) sul
retro dell‘apparecchio.
ATTENZIONE!
l Gli oggetti plastiRcati che esconodall’apparecchio possono
essere roventi.
AVVERTENZA!
l Il prodotto plastiRcato èrovente esipiega facilmente. Collo-
carlo su una superRciepiana efarlo raffreddare perevitare
che si arrotoli.
4.5 Spegnimento dell’apparecchio
Portare l‘interruttore on/off(7) sul lato destro dell‘apparecchio in
posizione 0. La spia Power (6) elaspia Ready (6) si spengono.
49
Page 50

Home L410
i
5. Puliziaecura
PERICOLO
Pericolo di morte dovuto acorrente elettrica!
l Prima di procedere alla pulizia, estrarre la spina di rete dalla
presa.
ATTENZIONE
Pericolo di ustioni su l‘alloggiamento!
Per evitare lesioni, attenersi anche alle seguenti indicazioni di
sicurezza:
l Non toccare l‘alloggiamento.
ATTENZIONE!
Danneggiamento dell‘apparecchio dovuto all’umidità!
l Accertarsi che durante la pulizia non penetri umidità
nell‘apparecchio per evitare danniirreparabili.
Irulli del laminatore devono essere puliti periodicamente per rimuovere la polvere eeventuali resti di colla. Procedere come segue:
s Accendere l’apparecchio come descritto sopra.
s Impostare il selettore di temperatura (5) su „80 mic“.
s Se la spia Ready resta (6) accesa aluce Rssa, inserire un foglio di
carta nell’apparecchio.
s Se sulla carta resta attaccata molta sporcizia, girarla eripetere il
procedimento.
50
Pulire l’apparecchio solo con un pannoasciutto. In caso di sporco persistente, inumidire leggermente il panno.
Page 51

Home L410
i
6. Ricerca guasti
Guasto Possibile causa Rimedio
L‘interruttore ON /
OFF (7) sul retro èin
posizione0.
La spia Power
(6) non resta
sempre accesa
aluce Rssa
rossa.
Le buste non
vengono plastiRcate correttamente
AVVERTENZA!
Se dopo avere ef
l
risolvere il problema, rivolgersi al servizioclienti.
L’alimentatore non
ècollegato corretta-
mente (3).
La presa èsenza
tensione
Apparecchio difet-
toso
Non èancora stata
raggiunta la tempe-
ratura necessaria.
fettuato isuddetti passaggi non
Portare l‘interruttore ON /
OFF (7) in posizione I.
Accertarsi che la spina
di alimentazione si trovi
nella presa.
VeriRcare ifusibili di casa.
Rivolgersi al Servizio
clienti.
Attendere Rnché la spia
Ready (6) non resta accesa aluce Rssa verde.
èpossibile
51
Page 52

Home L410
i
7. Caratteristiche tecniche
Tensione d’ingresso 220-240 V~
Frequenza di rete 50 Hz
Max. potenza assorbita 220 W
Misure (L xHxP)34,2 x5,8 x11,5cm
Peso (netto) 1,1 kg
Peso (lordo) 1,3 kg
Massima larghezza di laminatura 236 mm
Massimo spessore di laminatura 0,6 mm
Massimo spessore busta 125µ
Massimo tempo di riscaldamento 6minuti
Massima velocità 300 mm/minuto
Numero rulli riscaldanti 2
8. Informazioni per l’assistenza eicontatti
In caso di domande sul prodotto, rivolgersi alla Consulenza prodotto
Hama.
Hotline: +49 9091 502-115 (ted./ing.)
Ulteriori informazioni sul supporto sono disponibili qui:
www.hama.com
52
Page 53

Home L410
i
53
Page 54

o
Opbouw van de machine
1. laminaatuitvoer (achterzijde)
2. Walsontgrendeling (achterzijde)
3. Aansluitkabel
4. Laminaatinvoer
5. Temperatuurselectie
6. Ready- en power-lampje
7. Schakelaar In/Uit (aan de zijkant)
Bedieningsinstructies
54
Home L410
Page 55

Home L410
o
1. Inleiding
1.1 Voorwoord
Met de aankoop van dit lamineerapparaat heeft uvoor een kwaliteitsprodukt van Hama gekozen, welk met betrekking tot techniek en
functionaliteit overeenkomt met de meest moderne ontwikkelingsstandaard.
Lees de informatie in deze bedieningsinstructies zorgvuldig door,zodat uuwapparaat snel leert kennen en volledig gebruik kunt maken
van de functies.
1.2 Informatie over deze bedieningsinstructies
Deze bedieningsinstructies maken deel uit van het lamineerapparaat
Home L410 (vervolgens verder apparaat genoemd) en biedenubelangrijke informatie en aanwijzingen voor het reglementair gebruik, de
veiligheid, de aansluiting benevens de bediening van het apparaat.
De bedieningsinstructies dienenteallen tijde in de buurt van het apparaat onder handbereik te zijn. De bedieningsinstructies dienen door
iedereen die het apparaat bedient of storingen aan het apparaat verhelpt te worden gelezenennageleefd.
Bewaart udeze bedieningsinstructies goed en overhandig deze samen met het apparaat aan de volgende eigenaar.
1.3 Auteursrecht
Deze documentatie is auteursrechtelijk beschermd.
Elke vorm van kopie, resp. nadruk, ook gedeeltelijke,zoals het gebru-
iken van afbeeldingen, ook in gewijzigde toestand, is alleentoegestaan met schriftelijke toestemming van de fabrikant.
1.4 Beperking van aansprakelijkheid
Alle in deze bedieningsinstructies opgenomen technische informatie,
gegevens en aanwijzingen voor de bedieningkomen overeen met de
laatste stand bij het ter perse gaan en zijn naar eer en geweten uitgevoerd c.q. verstrekt met inachtneming van onze kennis en ervaringen
tot nog toe.
De fabrikant is niet aansprakelijk voor schade als gevolg van het niet in
acht nemen van deze bedieningsinstructies, gebruik dat niet volgens
de bestemming is, ondeskundige reparaties, ongeoorloofde wijzigingen of het gebruik van niet-toegestane reserveonderdelen.
55
Page 56

Home L410
o
2. Veiligheid
Houd uvoor een veilige omgang met het apparaat aan de hieronder
vermelde veiligheidsinstructies:
s Controleer het apparaat vóór het gebruik op zichtbare schade.
Neem een beschadigd apparaat nietingebruik.
s Personen, die vanwege hun lichamelijke, geestelijke of motorische
capaciteiten niet in staat zijn het apparaat veilig te bedienen, mogen het apparaat uitsluitendonder toezicht van of na instructies
door een verantwoordelijke persoon gebruiken.
s Defecte onderdelen mogen alleen vervangen worden door origine-
le reserveonderdelen. Alleen bij deze onderdelen is gegarandeerd
dat ze aan de veiligheidseisen tegemoet komen.
s Bescherm het apparaat tegen vocht en het binnendringen van vlo-
eistoffen resp. voorwerpen. Indien het apparaat in contact komt
met vloeistof, dan dient het direct van de voedingsspanning te worden gescheiden.
Elektromos áram által okozott életveszély!
Afeszültség alatt álló vezetéket vagy alkatrészekérintése ese-
tén életveszély áll fenn!
Ügyeljen az alábbi biztonsági utasításokra, hogyazelektromos
áram által okozott veszélyt elkerülje:
l Ne alkalmazza akészüléket, amennyiben acsatlakozóvezeték
vagy ahálózati dugasz megsérült.
l Semmi esetre se nyissa ki akészülék házát. Amennyiben
megérinti afeszültség alatt álló csatlakozásokat, vagy megváltoztassa amechanikus felépítést, áramütés veszélye áll fenn.
l Soha se merítse akészüléket vagy ahálózati dugaszt vízbe
vagy más folyadékba.
VESZÉLY
56
WAARSCHUWING
Gevaar voor verbranding aan de behuizing!
Houd u, om letsel te vermijden,aan de volgende veiligheidsinstructies:
l De behuizing niet aanraken.
Page 57

Home L410
o
3. Installatie/opbouw
s Verwijder de gehele verpakking om het apparaat.
s Plaats het apparaat niet in een hete, natte of zeer vochtige omge-
ving.
s Plaats het apparaat stevig op een effen, horizontale ondergrond.
s Het stopcontact moet goed bereikbaar zijn zodat de verbinding met
het spanningsnet in geval van nood snel kan worden verbroken.
s Vergelijk vóór het aansluiten van het apparaat de aansluitgegevens
van het apparaat (spanning en frequentie) op het typeplaatje met
die van uw elektriciteitsnet. Deze gegevens moeten overeenstemmen om schade aanhet apparaat te voorkomen.
s Bescherm de aansluitkabel tegen hete oppervlakken en scherpe
randen.
s Leg alle kabels zodanig dat zij geen struikelgevaar opleveren.
s De kabel niet knikken of inklemmen.
4. Bediening en gebruik
4.1 Gebruiksinstructies
s Stel in principedejuiste temperatuur voor de Laminierfolienstärke
gebruikte.
s Bij het lamineren op dikker papier of meer pagina‘s, is het raad-
zaam om een Rlm te gebruiken met een lagere sterkte.
s Wacht altijd totdat een lamineerprocedure is afgesloten voordat u
met de volgende begint.
s Laat het apparaat niet langerdan twee uur achter elkaar lopen en
laat ca. 15 seconden tussen twee lamineerprocedures verstrijken.
4.2 Apparaat inschakelen
Schakel de schakelaar In/Uit (7) op de rechterzijde van het ap-
paraat in de stand I.
Vervolgens gaat het power-lampje (6) continu rood branden.
57
Page 58

Home L410
o
4.3 Koud lamineren
s Na het inschakelen is het apparaat op de als laatste toegepaste
temperatuur ingesteld (zie stand van de temperatuurselectie (5)).
s Voor het koud lamineren schakelt udetemperatuurregelaar (5) in
de stand „COLD“.
s Plaats het te lamineren object in de desbetreffende hoes.
s Indien vooraf warm werd gelamineerd, dan kan het ca. 40 minuten
duren totdat het apparaat is afgekoeld. Het ready-lampje (6) brandt
continu blauw.
s Voer de foliehoes in de opening aan de voorkant van het apparaat
(4) in. Let erop dat het verzegelde einde als eerste wordt ingevoerd.
AANWIJZIN
l Folietassen van iedere grootte dieneninhet midden van
de opening aan de voorkant te worden gelegdzodat zij de
sensor passeren.
Het document wordt aan de achterkant (1) weer naar buiten
getransporteerd.
Indien het object niet volledig werd gelamineerd, dan dienen de
eerste stappen te worden herhaald.
Indien uhet object nogmaals wilt uitvoeren (bijv. scheef naar
binnen getrokken), dan drukt uopdetoets „Wals ontgrendelen“
(3) op de achterkant van het apparaat.
58
Page 59

Home L410
o
4.4 Warm lamineren
Na het inschakelen is het apparaat op de als laatste toegepaste
temperatuur ingesteld (zie stand van de temperatuurselectie (5)).
Voor het wijzigen van de instelling stelt udetemperatuurselectie
(regelaar) (5) op de gewenste foliedikte in.
Bij het bereiken van de noodzakelijke temperatuur gaat het
ready-lampje (6) continu blauw branden.
Plaats het te lamineren object in de desbetreffende hoes (zie
afbeelding).
Voer de foliehoes in de openingaan de voorkant van het ap-
paraat (4) in. Let erop dat het verzegelde einde als eerste wordt
ingevoerd.
AANWIJZIN
l Folietassen van iedere grootte dieneninhet midden van
de opening aan de voorkant te worden gelegdzodat zij de
sensor passeren.
Het document wordt aan de achterkant (1) weer naar buiten
getransporteerd.
Indien het object niet volledig werd gelamineerd, dan dienen de
eerste stappen te worden herhaald.
Indien uhet object nogmaals wilt uitvoeren (bijv. scheef naar
binnen getrokken), dan drukt uopdetoets „Wals ontgrendelen“
(3) op de achterkant van het apparaat.
ATTENTIE!
l Gelamineerde objecten welke uithet apparaat komen zijn
mogelijk te heet om aan te raken.
AANWIJZING!
l Het lamineerproduct is heet en kan makkelijk worden gebo-
gen. Het object op een vlakke ondergrond neerleggen en
laten afkoelen zodat het niet krult.
4.5 Apparaat uitschakelen
Schakel de schakelaar In/Uit (7) op de rechterzijde van het ap-
paraat in de stand 0.
Het power-lampje (6) en hetReady-lampje (6) gaan uit.
59
Page 60

Home L410
o
5. Reiniging en onderhoud
GEVAAR!
Levensgevaar door elektrische stroom!
l Trek de stekker uit het stopcontact voordat umet het reinigen
begint.
WAARSCHUWING
Gevaar voor verbranding aan de behuizing!
Houd u, om letsel te vermijden,aan de volgende veiligheidsinstructies:
l De behuizing niet aanraken.
ATTENTIE!
Beschadiging van het apparaat door vocht!
l Zorg ervoor dat bij de reiniging geenvocht het apparaat bin-
nendringt teneinde een onherstelbare beschadiging van het
apparaat te voorkomen.
De walsen van het lamineerapparaat dienen regelmatig van stof en
eventuele lijmresten te worden bevrijd. Ga hiervoor als volgt te werk:
s Schakel het apparaat zoals in het voorgaandeisbeschreven in.
s Stel de temperatuurselectie (regelaar) (5) „80mic“ in.
s Zodra het Ready-lampje (6) continu brandt voert ueen blad papier
in het apparaat in.
s Indien er zeer veel vuil op het papier blijft hechten, dan draait uhet
blad om en herhaalt deze procedure.
60
Reinig het apparaat alleen uitwendig met een droge doek. Indien het
apparaat sterk is vervuild kan de doek een beetje vochtig worden gemaakt.
Page 61

Home L410
o
6. Verhelpen van storingen
Storing Mogelijke oorzaak Oplossing
Het powerlampje (6) gaat
niet continu
rood branden.
Tassen worden
niet juist gelamineerd.
AANWIJZING!
Indien het probleem ni
l
de voorgaande tabe
vice.
De schakelaar In/Uit
(7) aan de achterzi-
jde staat in de stand
0.
Voedingskabel (3)
niet goed aanges-
loten.
Op het stopcontact
staat geen spanning.
Apparaat defect
De vereiste tempe-
ratuur is nog niet
bereikt.
et kan worden opg
l, neem dan contact op met de klan
Schakel de schakelaar In/
Uit (7) in de stand I.
Controleer of de stekker
goed op het stopcontact
is aangesloten.
Controleer de
huiszekeringen.
Neem contact op met
de klantenservice.
Wacht totdat het Readylampje (6) continu groen
brandt.
elost aan de hand van
tenser
-
61
Page 62

Home L410
o
7. Technische gegevens
Ingangsspanning 220-240 V~
Netfrequentie 50 Hz
Max. vermogensopname 220 W
Afmetingen (B xHxD)34,2 x5,8 x11,5cm
Gewicht (netto) 1,1 kg
Gewicht (bruto) 1,3 kg
Max. lamineerbreedte 236 mm
Max. lamineerdikte 0,6 mm
Max. tasdikte 125µ
Max. opwarmtijd 6Minuten
Max. snelheid 300 mm/minuut
Aantal verwarmingsrollen 2
8. Service en support
62
Bij vragen over het product kunt ualtijd contact opnemen met Hamaproductadvies.
Hotline: +49 9091 502-115 (Duits/Engels)
Meer support-informatie vindt uhier:
www.hama.com
Page 63

Home L410
o
63
Page 64

h
Akészülék felépítése
1. Laminát kibocsátás (hátoldal)
2. Henger reteszelés-oldás (hátoldal)
3. Csatlakozókábel
4. Laminát behúzás
5. H·mérsékletválasztó
6. Ready- és Power-lámpa
7. Be-/kikapcsoló (oldalt)
Kezelésiútmutató
64
Home L410
Page 65

1. Bevezetés
1.1 El²szó
Ezen lamináló készülék megvásárlásával a Hama azon min·ségi terméke mellett döntött, amely mszaki jellemz·iésmködése alapján a
legmodernebb fejlesztési szintnek felel meg.
Olvassa el az itt található információkat, hogy gyorsan megismerkedjen akészülékével, és annak mindenfunkcióját alkalmazni tudja.
1.2 Információk ehhez akezelési útmutatóhoz
Ajelen kezelési útmutató az Home L410 laminálókészülék (a továbbiakban: készülék) része és fontos ismertetést ad Önnek akészülék
rendeltetésszer használatáról, abiztonságról, abekötésr·l, valamint
akészülék kezelésér·l.
Akezelési útmutatónak akészülék közelében mindig rendelkezésre
kell állni. Akezelési útmutatót minden olyan személynek el kell olvasni
és alkalmazni kell, aki akészüléket kezeli, és akészüléken keletkezett
zavarokat elhárítja.
Ùrizze meg ezt akezelési útmutatót, és adott esetben adja tovább a
következ· tulajdonosnak.
h
1.3 Szerz²ijog
Ezt adokumentációt szerz·ijog védi.
Valamennyi sokszorosítás, ill. utánnyomás, még kivonatos formában
is, valamint az ábrák továbbadása, még megváltoztatott állapotban is,
csak agyártó beleegyezésévelengedélyezett.
1.4 Garanciával kapcsolatos korlátozások
Az itt lefektetett kezelési útmutatóban lév· valamennyi információ,
adat és kezelésre vonatkozó utasítás anyomtatás id·pontja szerinti
utolsó állapotnak felel meg, és az eddigi tapasztalatainkon és ismereteinken nyugszik.
Agyártó nem vállal felel·sséget az esetben, ha afelhasználó akezelési útmutatót nem alkalmazza, akészüléketnem arendeltetésének
megfelel·en használja, azt szakszertlenül javítja, engedély nélkül
megváltoztatja, és ha nem engedélyezett pótalkatrészeketalkalmaz.
Home L410
65
Page 66

h
2. Biztonság
Akészülékkel kapcsolatos biztonságos bánásmódésakészülék biztonságos kezelése érdekében vegye Rgyelembe az alábbi biztonsági
utasításokat:
s Ellen·rizze akészüléket alkalmazás el·tt, hogy nincsenek-e rajta
küls· sérülések. Sérült készüléket ne üzemeltessen.
s Olyan személyek, akik testi, szellemi vagy motorikus állapotuknál
fogva olyan állapotban vannak, hogy akészüléket nem tudják biztonságosan kezelni, azt csak egy felel·sszemély felügyelete alatt
kezelhetik.
s Ahibás alkatrészeket csak eredeti alkatrészekkelszabad kicse-
rélni. Csak ezen alkatrészek esetében biztosítottak abiztonsági
követelmények.
s Kvja akészüléket anedvességt·l, valamintfolyadékok, ill. tárgyak
behatolása ellen. Folyadékkalvaló érintkezés esetén akészüléket
azonnal válassza le az áramhálózatról.
VESZÉLY
Elektromos áram által okozott életveszély!
Afeszültség alatt álló vezetéket vagy alkatrészek érintése ese-
tén életveszély áll fenn!
Ügyeljen az alábbi biztonsági utasításokra, hogyazelektromos
áram által okozott veszélyt elkerülje:
l Ne alkalmazza akészüléket, amennyiben acsatlakozóvezeték
vagy ahálózati dugasz megsérült.
l Semmi esetre se nyissa ki akészülék házát. Amennyiben
megérinti afeszültség alatt álló csatlakozásokat, vagy megváltoztassa amechanikus felépítést, áramütés veszélye áll fenn.
l Soha se merítse akészüléket vagy ahálózati dugaszt vízbe
vagy más folyadékba.
66
FIGYELEM!
Égésveszély aburkolatot!
Ügyeljen az alábbi biztonsági utasításokra, hogy elkerülje asérüléseket:
l Ne érintse meg aburkolatot.
Home L410
Page 67

3. Telepítés/felépítés
s Távolítsa el az összes csomagolási egységet akészülék
környezetéb·l.
s Agépet ne állítsa fel forró, nedves vagy nagyon párás környezet-
ben.
s Helyezze akészüléket stabilan egy sík, vízszintes alapra.
s Adugaszaljzatnak könnyen elérhet·nek kell lennie, hogy ahálóza-
ti kapcsolat vészhelyzetben gyorsan bontható legyen.
s Akészülék csatlakoztatása el·tt hasonlítsa össze akészülék adat-
tábláján látható csatlakozási adatait (feszültség és frekvencia)
elektromos hálózata értékeivel. Ezeknek az adatoknak meg kell
egyezniük, hogy akészülék ne sérüljön meg.
s Kvja acsatlakozóvezetéket forró felületekt·léséles peremekt·l.
s Úgy helyezze el az összes kábelt, hogy azok ne okozzanak bot-
lásveszélyt.
s Ne törje meg és ne csíptesse be akábelt.
4. Kezelés és használat
h
4.1 Kezelési tanács
s Nllítsa be mindig amegfelel· h·mérsékletet afelhasznált laminá-
lófólia-vastagsághoz.
s Vastagabb papír vagy több oldal laminálása esetén vékonyabb fó-
lia használata ajánlott.
s Mindig várja meg afolyó lamináló mvelet végét, miel·tt a
következ·telindítja.
s Soha ne mködtesse akészüléket két óránál többet megszakítás
nélkül, és mindig iktasson be kb. 15 másodpercnyi id·tkét laminálási folyamat közé.
4.2 Akészülék bekapcsolása
Kapcsolja akészülék jobboldalán abe-ki kapcsolót (7) Iállásba.
Erre aPower-lámpa (6) folyamatosan piros színnel ég.
Home L410
67
Page 68

h
4.3 Hideg laminálás
Abekapcsolás után akészülékalegutoljára használt
h·mérsékletre van el·re beállítva (l. ah·mérsékletválasztó (5)
helyzetét).
Ahideg lamináláshoz állítsa ah·mérsékletszabályozót (5) a
„COLD“ beállításra.
Tegye bele alaminálandó anyagot amegfelel· tasakba.
Ha el·tte meleg laminálást végzett, akár mintegy 40 percigis
eltarthat, amire akészülék lehl. AReady-lámpa (6) állandó kék
fénnyel világít.
Vezesse be afóliatasakot akészülék elüls· nyílásába (4). Eköz-
ben ügyeljen arra, hogy alezárt véget vezesse be el·ször
MEGJEGYZÉS!
l Bármilyen méret fóliatasakot ez elüls· nyílásközepén
vezessen be,hogy az elhaladjonaszenzornál.
Adokumentum kiadása ahátsó oldalon (1) történik.
Ha az objektum nem lett teljes kören laminálva, ismételjemeg
az els· lépéseket.
Ha még egyszer be szeretné helyezni atárgyat (például ferde
bevezetés, nyomja meg a(3). számú henger-kireteszelés gom-
bot akészülék hátoldalán.
68
Home L410
Page 69

4.4 Meleglaminálásához
Abekapcsolás után akészülékalegutoljára használt
h·mérsékletre van el·re beállítva (l. ah·mérsékletválasztó (5)
helyzetét).
Abeállítás módosításához forgassa ah·mérsékletválasztót (5) a
kívánt fóliavastagságra.
Amikor elérte aszükséges h·mérsékletet, aReady-lámpa (6)
állandó kék fénnyel világít.
Tegye bele alaminálandó anyagot amegfelel· tasakba (l. az
ábrát).
Vezesse be afóliatasakot akészülék elüls· nyílásába (4). Eköz-
ben ügyeljen arra, hogy alezárt véget vezesse be el·ször
MEGJEGYZÉS!
l Bármilyen méret fóliatasakot ez elüls· nyílásközepén
vezessen be,hogy az elhaladjonaszenzornál.
Adokumentum kiadása ahátsó oldalon (1) történik.
Ha az objektum nem lett teljes kören laminálva, ismételjemeg
az els· lépéseket.
Ha még egyszer be szeretné helyezni atárgyat (például ferde
bevezetés, nyomja meg a(3). számú henger-kireteszelés gom-
bot akészülék hátoldalán.
FIGYELEM!
l Lehetséges, hogy akészüléket elhagyó laminált objektumok
megérintéshez még túl forróak.
h
MEGJEGYZÉS!
l Alaminált termék forró, és könnyenhajlik. Az objektumot
tegye lapos felületre és hagyja lehlni, hogy az ne kunkorodjon fel.
4.5 Akészülék kikapcsolása
Kapcsolja akészülék jobboldalán abe-ki kapcsolót (7) 0állásba.
Erre aPower-lámpa (6) és aReady-lámpa (6) kialszik.
Home L410
69
Page 70

h
5. Tisztítás
Vigyázat¹ áramütés-veszély!
l Húzza ki ahálózati tápkábeldugaszát afali konnektorból,
Égésveszély aburkolatot!
Ügyeljen az alábbi biztonsági utasításokra, hogy elkerülje asérüléseket:
l Ne érintse meg aburkolatot.
ELÔVIGYBZATOSSBG!
>vja akészüléket anedvességt²l!
l Akészülék tisztításához ne használjon nedves tisztítószert,
Alaminálókészülék hengereit rendszeresen meg kell tisztítani aportól
és az esetleges ragasztómaradványoktól. Ehhez akövetkez·képpen
járjon el:
s Kapcsolja be akészüléket az el·bb leírtak szerint.
s Forgassa ah·mérsékletválasztót (5) „80mic“-re.
s Ha aReady-lámpa (6) folyamatosan világít, helyezzen be egy
s Ha nagyon sok szennyez·dés tapad apapíron, fordítsa meg azt és
VESZÉLY!
miel·tt elkezditisztítást.
FIGYELEM!
hogy ne érje helyrehozhatatlan kár akészüléket.
papírlapot akészülékbe.
ismételje meg afolyamatot.
70
Akészüléketkívül száraz kend·vel tisztítsa. Er·sszennyez·désnél a
kend· kissé benedvesíthet·.
Home L410
Page 71

6. Hibaelhárítás
Hiba Lehetséges ok Megszüntetés
h
Ahátolddali ki/be (7)
kapcsoló 0pozícióban van.
APower-lámpa
(6) nem ég folyamatosan piros
színnel.
Tasakok laminálása nem
helyes
MEGJEGYZÉS!
Ha afent megnevezett lépésekkel
l
blémát, kérjük, forduljon avev·szolgálathoz.
Ahálózati kábel
nincs helyesen csatlakoztatva (3).
Adugaszaljzatban
nincs feszültség.
Akészülék meghibásodott.
Aszükséges
h·mérsékletmég
nem lett elérve.
nem tudja megolda
Kapcsolja abe-ki (7)
kapcsolót Iállásba.
Gondoskodjon róla,
hogy ahálózati dugasz
adugaszaljzatba legyen
dugaszolva.
Ellen·rizze aház biztosítékait.
Értesítse a
vev·szolgálatot.
Várjon, amíg aReadylámpa (6) folyamatosan
ég.
ni apro
-
Home L410
71
Page 72

h
7. Mszaki adatok
Bemeneti feszültség 220-240 V~
Hálózati frekvencia 50 Hz
Max. teljesítményfelvétel 220 W
Méretek (sz xmaxmé) 34,2 x5,8 x11,5cm
Súly (nettó) 1,1 kg
Súly (bruttó) 1,3 kg
Max. laminálási szélesség 236 mm
Maximális laminálási vastagság 0,6 mm
Maximális tasakvastagság 125
Maximális felftési id· 6perc
Maximális sebesség 300 mm/perc
Ft·hengerek száma 2
8. Kiegészít² és kapcsolati információk
Kérjük, hogy atermékkel kapcsolatos kérdéseivel forduljon aHama
terméktanácsadásához.
Közvetlen vonal Közvetlen vonal:
+49 9091 502-115 (Deu/Eng)
További támogatási információt itt talál:
www.hama.com
72
Home L410
Page 73

h
Home L410
73
Page 74

Home L410
c
Konstrukce stroje
1. Laminovací výstup (zadní strana)
2. Odblokování válc (zadní strana)
3. P´ipojovací vedení
4. Laminovací zavád)]
5. Voli] teploty
6. Kontrolka Ready aPower
7. Spína] zapnutí/vypnutí (postranní)
Návod kpouÙití
74
Page 75

Home L410
c
1. Úvod
1.1 P¯edmluva
zakoupením tohoto laminovacího stroje jste se rozhodli ve prosp)ch
kvalitního výrobku Rrmy Hama,který po technické stránce asvou
funk]ností odpovídá nejmodern)jçímu standardu rozvoje.
P´e]t)te si informace obsaæené vtomto návodu, abyste se rychle
seznámili se svýmza´ízením amohli vyuæívat jeho funkce vplném
rozsahu.
1.2 Informace ktomuto návodu kpouÙití
Tento návod kpouæívání je sou]ástí laminovacího p´ístroje Home
L410 (dále jen „za´ízení“) aposkytuje Vám dleæité pokyny týkající
se pouæívání dle stanoveného ú]elu, bezpe]nosti, p´ipojeníaobsluhy
za´ízení.
Návod kpouæití musí býtneustále kdispozici vblízkosti za´ízení. Te nto
návod si musí p´e]íst arespektovat kaædý,kdo toto za´ízení pouæívá
nebo kdo provádí odstraÛování závad za´ízení.
Návod kpouæití si uschovejte ap´edejte ho spole]n) se za´ízením
p´ípadnému dalçímu majiteli.
1.3 Autorské právo
Tato dokumentace je chrán)na autorskýmzákonem.
Jakékoliv rozmnoæování resp. jakýkoliv p´etisk (kompletní nebo z]ásti)
ataké reprodukce obrázk ivpozm)n)ném stavu jsou povoleny jen s
písemnýmsouhlasem výrobce.
1.4 Omezení platnosti ruRení
Vçechny technické informace, údaje apokyny pro obsluhuobsaæené
vtomto návodu kpouæití odpovídají poslednímu stavu vdob) tisku
apodle naçeho nejlepçího v)domí odpovídajínaçim dosavadním
znalostem azkuçenostem.
Výrobce nep´ebírá æádné ru]ení za çkody vzniklé zdvodu
nerespektování návodu, pouæití vrozporu sú]elem, neodborných
oprav,provedení nedovolených zm)nnebo pouæití neschválených
náhradních díl.
75
Page 76

Home L410
c
2. BezpeRnost
P´ibezpe]ném zacházení stímto za´ízením respektujte následující
bezpe]nostní pokynyainformace:
s Za´ízení p´ed pouæitím zkontrolujte, zda nejeví vn)jçíznámky
viditelného poçkození. Poçkozené za´ízení nespouçt)jte.
s Osoby,které zdvodu svých t)lesných, duçevních nebo
motorických moæností nejsou schopny za´ízení bezpe]n)
obsluhovat, sm)jí za´ízení pouæívat jedin) pod dohledemnebo s
instrukcemi od odpov)dné osoby.
s Va dné díly smí býtvym)n)ny vædy jen za originálnínáhradní
díly.Jedin) ut)chto díl je zaru]eno, æesplÛují poæadavky na
bezpe]nost.
s Za´ízení chraÛte p´ed vlhkostí apronikáním kapalin resp. p´edm)t.
P´ikontaktu skapalinami za´ízení ihned odpojte od elektrického
napájení.
NEBEZPET?
NebezpeRíohroÙení Ùivota elektrick®mproudem!
P¯idotyku svedeními¹ kabely nebo souRástkami pod nap"tím
hrozí smrtelné nebezpeRí!
Abyste p´edeçli ohroæení elektrickýmproudem, respektujte
následující bezpe]nostní pokyny ainformace:
l Za´ízení nepouæívejte, je-li poçkozený p´ívodní kabel nebo
síová zástr]ka.
l Kryt p´ístroje nikdy neotevírejte. P´idotyku p´ívod pod nap)tím
ap´izm)n)elektrické amechanické konstrukce hrozí nebezpe]í
úrazu elektrickýmproudem.
l P´ístroj ani jeho síovou zástr]ku nikdy nepono´ujte do vody ani
jiných kapalin.
76
VÝSTRAHA!
NebezpeRípopálení!
Abyste se vyvarovali poran)ní, dbejte t)chto bezpe]nostních
upozorn)ní:
l Nedotýkejte se krytu p´ístroje.
Page 77

Home L410
c
3. Instalace/montáÙ
s OdstraÛte vçechny obalyobklopující p´ístroj.
s P´ístroj neinstalujte vhorkém, mokrém nebo velmi vlhkém
prost´edí.
s Umíst)te p´ístroj stabiln) na rovném avodorovném podkladu.
s Zásuvka musí býtsnadno p´ístupná tak, aby bylo vp´ípad) pot´eby
moæné rychle p´eruçit p´ipojeníksíti.
s P´ed p´ipojením p´ístroje zkontrolujte údaje p´ipojení p´ístroje
(nap)tí afrekvenci) uvedené na typovém çtítku súdaji vaçí
elektrické sít).Tyto údaje se musí shodovat, jinak mæedojít k
poçkození p´ístroje.
s P´ipojovací vedení chraÛte p´ed horkými povrchy aostrými hrana-
mi.
s Vçechny kabely pokládejte tak, aby nehrozilo nebezpe]ízakop-
nutí.
s Kabel nelámejte anestla]ujte.
4. Obsluha aprovoz
4.1 AplikaRní pokyny
s Vædy nastavte správnou teplotu vzávislosti na pouæité síle lami-
novací fólie.
s Pøi laminování silnçjçího papíru nebo nçkolika stran doporuèujeme
pouæití tenèí fólie.
s P´ed zapo]etím dalçího laminování vædy vy]kejte, aæ je p´edchozí
laminování ukon]eno.
s Nenechávejte p´ístroj pracovat déle neæ dv) hodinybez p´eruçení
amezi dv)ma procesy laminování dodræujte p´estávky cca 15 sekund.
4.2 Zapnutí p¯ístroje
P´epn)te spína] zapnutí/vypnutí (7) na pravé stran) p´ístroje do
polohy I.
Poté se rozsvítí kontrolka Power (6) trvale ]erven).
77
Page 78

Home L410
c
4.3 Laminování za studena
Po zapnutí je p´ístroj p´ednastaven na naposledypouæitou teplo-
tu (viz poloha voli]eteploty (5)).
P´ilaminování za studena nastavte teplotní regulátor (5) do
polohy „COLD“.
Vloæte laminovanou p´edlohu do odpovídající kapsy.
Pokud bylo d´íve laminováno za tepla, pak mæecca 40 minut
trvat ochlazení pøístroje. Kontrolka Ready (6) svítí trvale mod´e.
Vloæte fóliovou kapsu do p´edního otvoru p´ístroje (4). Dbejte
p´itom na to, aby byl nejd´íve vloæen zape]et)ný konec.
UPOZORN$N?!
l Fóliové kapsy jakékoliv velikosti by m)ly býtvkládány
uprost´ed p´edního otvoru, aby byly zaznamenány ]idlem.
Dokument p´ístroj opustí na zadní stran) (1).
Pokud nebyl objekt dostate]n) laminován, pak opakujte první
kroky.
Pokud chcete laminování objektu opakovat (nap´.zdvodu
çikmého vtaæení), pak stiskn)te tla]ítko odblokování válc (3) na
zadní stran) p´ístroje.
78
Page 79

Home L410
c
4.4 Laminování za tepla
Po zapnutí je p´ístroj p´ednastaven na naposledypouæitou teplo-
tu (viz poloha voli]eteploty (5)).
Pro zm)nu nastavení nastavte voli] teploty (5) na poæadovanou
sílu fólie.
Kontrolka Ready (6) svítí trvale mod´e, jekmile je dosaæeno
pot´ebné teploty.
Vloæte laminovanou p´edlohudoodpovídající kapsy (viz obrá-
zek).
Vloæte fóliovou kapsu do p´edního otvoru p´ístroje (4). Dbejte
p´itom na to, aby byl nejd´íve vloæen zape]et)ný konec.
UPOZORN$N?!
l Fóliové kapsy jakékoliv velikosti by m)ly býtvkládány
uprost´ed p´edního otvoru, aby byly zaznamenány ]idlem.
Dokument p´ístroj opustí na zadní stran) (1).
Pokud nebyl objekt dostate]n) laminován, pak opakujte první
kroky.
Pokud chcete laminování objektu opakovat (nap´.zdvodu
çikmého vtaæení), pak stiskn)te tla]ítko odblokování válc (3) na
zadní stran) p´ístroje.
POZOR!
l Laminované objekty opouçt)jící p´ístroj mohou býtp´íliç
horké na dotyk.
UPOZORN$N?!
l Laminovaný produkt je horký alehce ohybatelný.Poloæte
produkt na rovný povrch anechte ho zchladit, aby nedoçlo k
jeho srolování.
4.5 Vypnutí p¯ístroje
P´epn)te spína] zapnutí/vypnutí (7) na pravé stran) p´ístroje do
polohy 0.
Kontrolka Power (6) akontrolka Ready (6) zhasnou.
79
Page 80

Home L410
c
5. TiÚt"ní apéRe
NEBEZPET?!
OhroÙení Ùivota elektrick®mproudem!
l P´ed zapo]etím ]içt)níp´ístroje vytáhn)te síovou zástr]ku ze
zásuvky.
VÝSTRAHA!
NebezpeRípopálení!
Abyste se vyvarovali poran)ní, dbejte t)chto bezpe]nostních
upozorn)ní:
l Nedotýkejte se krytu p´ístroje.
POZOR!
Vlhkost poÚkozuje p¯ístroj!
l Zajist)te, aby p´i ]içt)ní do p´ístroje nepronikla vlhkost, zabrání-
te tak nevratnému poçkození p´ístroje.
80
Vále]ky laminovacího p´ístroje se musí pravideln) zbavovat prachu a
p´ípadných zbytk lepidla.Postupujte následujícím zpsobem:
s Zapn)te p´ístroj jak je popsáno výçe.
s Nastavte voli] teploty (5) na „80mic“.
s Pokud kontrolka Ready (6) trvale svítí, pak do p´ístroje vloæte list
papíru.
s Pokud se na listu zachytí velké mnoæství çpíny,pak ho oto]te a
postup opakujte.
Zvn)jçku p´ístroj o]ist)te suchýmhad´íkem. P´isilném zn)]içt)ní
mæete had´ík mírn) navlh]it.
Page 81

Home L410
c
6. Odstran"ní chyb
Porucha MoÙná p¯íRina Odstran"ní
Vypína] na zadní
stran) je vpoloze
0(7).
Kontrolka Power (6) nesvítí
trvale ]erven).
Kapsy nejsou
správn) laminovány
UPOZORN$N?!
l Pokud není problém odstran)npomocí výçeuvedených
opat´ení, obrate se na zákaznický servis.
Síové vedení není
správn) p´ipojeno
(3).
Zásuvka není pod
nap)tím.
Vadný p´ístroj
P´ístroj jeçt) nedosáhl pot´ebné
teploty.
P´epn)te zapína]/
vypína] do polohy I(7).
Ujist)te se, æesesíová
zástr]ka nachází vzásuvce.
Zkontrolujte domácí
pojistky.
Informujte zákaznický
servis.
Vy]kejte, aæ se zelen)
rozsvítí kontrolka Ready
(6).
81
Page 82

Home L410
c
7. Technické údaje
Vstupní nap)tí 220-240 V~
Síová frekvence 50 Hz
Max. P´íkon 220 W
Rozm)ry (ç xvxh) 34,2 x5,8 x11,5cm
Hmotnost (netto) 1,1 kg
Hmotnost (brutto) 1,3 kg
Maximální çí´elaminování 236 mm
Maximální tlouçka laminování 0,6 mm
Maximální tlouçka kapsy 125µ
Maximální doba naæhavení 6minuty
Maximální rychlost 300 mm/minuta
Po]et æhavicích vále]k 2
8. Podpora zákazníkmakontaktní informace
82
Máte otázky kproduktu ?
Obrate na na poradenské odd)lení Hama.
Horká linka: +49 9091 502-115 (n)mecky/anglicky)
Dalçípodprné informace naleznete na adrese: www.hama.com
Page 83

Home L410
c
83
Page 84

Home L410
v
ZloÙenie zariadenia
1. Výstup laminátu (zadná strana)
2. Odblokovanie valcov (zadná strana)
3. Pripojovací kábel
4. Vstupný otvor pre laminát
5. 5. Voli] teploty
6. Kontrolka Ready aPower
7. Spína] I/O (bo]ne)
Návod na obsluhu
84
Page 85

Home L410
v
1. Úvod
1.1 Predhovor
zakúpením tohto laminátora ste sa rozhodli vprospech kvalitného
výrobku Rrmy Hama,ktorý po technickej stránke asvou funk]nosou
zodpovedá najmodernejçiemu çtandardu vývoja.
Pre]ítajte si tu uvedené informácie, aby ste sa rýchlo oboznámili so
svojím prístrojom amohli vplnom rozsahu vyuæíva jeho funkcie.
1.2 Informácie ktomuto návodu na pouÙívanie
Tento návod na pouæívanie je sú]asou laminátora Home L410
(0alej iba prístroj) aposkytuje Vám dôleæité pokyny týkajúce sa jeho
zamýçãaného pouæívania, bezpe]nosti, pripojenia aobsluhyprístroja.
Návod na obsluhu musí by neustále kdispozícii vblízkosti prístroja.
Musí si ho pre]íta apouæíva ho kaædá osoba, ktorá obsluhuje tento
prístroj alebo odstraÛuje poruchu na prístroji.
Uschovajte tento návod na pouæitie aodovzdajte ho budúcemu
majiteãovi spolu sprístrojom
1.3 Autorské práva
Táto dokumentácia je chránená autorskýmprávom.
Akékoãvek kopírovanie, eventuálne dotla],aj]iasto]ne, ako aj pre-
danie zobrazení, aj vzmenenej podobe, je dovolené iba spísomným
súhlasom výrobcu.
1.4 Obmedzenie záruky
Vçetky technické informácie, údaje apokyny obsiahnuté vtomto návode na pouæívanie zodpovedajú najnovçiemu stavu po]as tla]easú
poskytované sohãadom na doterajçie skúsenosti apoznatky podãa
najlepçieho vedomia.
Výrobca nepreberá záruku za çkody spôsobenénedodræaním návodu, nesprávnym pouæívaním, neodbornýmiopravami, neoprávnenými
zmenami alebo pouæívaním neschválených náhradných dielov.
85
Page 86

Home L410
v
2. BezpeRnos
Vzáujme bezpe]ného zaobchádzania sprístrojom dodræiavajte nasledujúce bezpe]nostné pokyny:
s Kontrolujte prístroj pred pouæitím na vonkajçie viditeãné poçkodenia.
Poçkodený prístroj nepouæívajte.
s Osoby,ktoré vzhãadom ku svojim telesným, duçevnýmalebo mo-
torickýmschopnostiam nie sú schopné obsluhova prístroj, smú
prístroj pouæíva iba pod dohãadom alebo podãapokynov zodpovednej osoby.
s Defektné sú]asti sa smú vymieÛa iba za originálne náhradné
diely.Len stýmito dielmi je zaru]ené, æesplnia bezpe]nostné
poæiadavky.
s ChráÛte prístroj pred vlhkosou aprenikaním kvapalín alebo pred-
metov.Vprípade kontaktu skvapalinou okamæite prístroj odpojte
od prívodu elektriny.
NEBEZPETENSTVO
SmrteÝné nebezpeRenstvo elektrického prúdu
Vprípade kontaktu svodiRmi alebo súRiastkami pod napätím
je ohrozen®Ùivot!
Dodræiavajte nasledujúce bezpe]nostné pokyny,aby ste zabránili
ohrozeniu elektrickýmprúdom:
l Nepouæívajte prístroj, ak sú poçkodenéprívodný kábel alebo
sieová zástr]ka.
l V æiadnom prípade neotvárajte kryt prístroja. Ak sa dotknete
káblov pod napätím alebo zmeníte elektrické amechanické
usporiadanie, hrozí nebezpe]nstvo zásahu elektrickýmprúdom.
l Nikdy neponárajte prístroj alebo sieovúzástr]ku do vody alebo
inej kvapaliny.
86
VAROVANIE
NebezpeRenstvo popálenia!
Dodræiavajte nasledujúce bezpe]nostné pokyny,aby ste zabránili
poraneniam:
l Nedotýkajte sa krytu.
Page 87

Home L410
v
3. InÚtalácia /montáÙ
s OdstráÛte vçetok baliaci materiál okoloprístroja.
s Prístroj neumiestÛujte do horúceho, mokrého alebo veãmi vlhkého
prostredia.
s Umiestnite prístroj stabilnýmspôsobom na rovnú vodorovnú
podloæku.
s Elektrická zásuvka musí byãahko dostupná, aby bolo moæné v
prípade núdze pripojenie rýchlo vytiahnu zo siete.
s Pred pripojením prístroja porovnajte údaje prístroja (napätie afrek-
venciu) na typovom çtítku súdajmi vaçej elektrickej siete. Tieto
údaje sa musia zhodova,aby nedoçlo kpoçkodeniu prístroja.
s Pripojovací kábel chráÛte pred horúcimi povrchmi aostrými
hranami.
s Vçetky káble umiestnite tak, aby nevzniklo nebezpe]enstvo pot-
knutia.
s Dbajte na to, aby kábel nebol zalomený alebo privretý.
4. Obsluha apouÙívanie
4.1 Pokyny na pouÙívanie
s Nastavte vædy správnu teplotu pre pouæitú hrúbku lamina]nej fóloe.
s Pri laminovaníhrubçieho papiera alebo viacerých stránok sa
odporú]apouæi fólie mençej hrúbky.
s Skôr neæ spustíte 0alçípostup, vy]kajte vædy ukon]enie predchád-
zajúceho laminovania.
s Nenechajte zariadenie nepretræite beæa dlhçie ako dve hodiny
anechajte medzi dvoma laminovacími postupmi uplynú asi 15
sekúnd.
4.2 Zapnutie prístroja
Nastavte vypína] I/O (7) na pravej strane prístroja do polohy I.
Potom sa trvalo rozsvieti ]ervená kontrolka Power (napájanie)
(6).
87
Page 88

Home L410
v
4.3 Studené laminovanie
Po zapnutí je prístroj prednastavený na naposledypouæitú teplo-
tu (pozri poloha voli]ateploty (5)).
Pre studené laminovanie nastavte voli teploty (5) do polohy
„COLD“.
Vloæte predlohu na laminovanie do prísluçnej obálky.
Ak sa predtýmlaminovalo za horúca, môæedoochladnutia príst-
roja uplynú asi 40 minút. Modrá kontrolka Ready (6) sa rozsvieti
trvalo.
ZasuÛte fóliovú obálku do predného otvoru prístroja (4). Dbajte
na to, aby bol zavedený najprv zatavený koniec
UPOZORNENIE!
l Fóliové vrecká kaædej veãkosti by sa mali priloæi vstrede
predného otvoru tak, aby boli zachytené sníma]om.
Dokument vystupuje na zadnej strane (1).
Ke0 zistíte, æeobjekt nebol kompletne laminovaný,opakujte prvé
kroky.
Ak budete chcie objekt vykona znova (napr. çikmé vtiahnu-
tie), stla]te tla]idlo na odblokovanie valca (3) na zadnej strane
zariadenia.
88
Page 89

Home L410
v
4.4 Horúce laminovanie
Po zapnutí je prístroj prednastavený na naposledypouæitú teplo-
tu (pozri poloha voli]ateploty (5)).
Na zmenu nastavenia nastavte voli] teploty (5) na æelanú hrúbku
fóle.
Modrá kontrolka Ready (6) sa rozsvieti trvalo po dosiahnutí
potrebnej teploty.
Vloæte predlohu na laminovaniedoprísluçnej obálky (pozri vyob-
razenie).
ZasuÛte fóliovú obálku do predného otvoru prístroja (4). Dbajte
na to, aby bol zavedený najprv zatavený koniec
UPOZORNENIE!
l Fóliové vrecká kaædej veãkosti by sa mali priloæi vstrede
predného otvoru tak, aby boli zachytené sníma]om.
Dokument vystupuje na zadnej strane (1).
Ke0 zistíte, æeobjekt nebol kompletne laminovaný,opakujte prvé
kroky.
Ak budete chcie objekt vykona znova (napr. çikmé vtiahnu-
tie), stla]te tla]idlo na odblokovanie valca (3) na zadnej strane
zariadenia.
POZOR!
l Laminované objekty vystupujúce zprístroja sú na dotyk
eventuálne príliç horúce.
UPOZORNENIE!
l Laminovaný produkt je horúci amierne sa ohýba. Odloæte
objekt na plochý povrch anechajte ho ochladnú,aby sa
neskrúcal.
4.5 Vypnutie prístroja
Nastavte vypína] I/O (7) na pravej strane prístroja do polohy 0.
Kontrolky Power (6) aReady (6) zhasnú.
89
Page 90

Home L410
v
5. Tistenie aúdrÙba
NEBEZPETENSTVO
Ohrozenie æivota elektrickýmprúdomú
l Skôr neæ za]nete s ]istením, vytiahnite sieovú zástr]ku zo
zásuvky.
VÝSTRAHA
NebezpeRenstvo porezania na valcoch skartovacieho mechanizmu!
Aby ste prediçli úrazom, dbajte na tieto bezpe]nostné upozornenia:
l Nedotýkajte sa krytu.
POZOR!
NebezpeRenstvo popálenia!
l Zaistite, aby sa pri ]istení do prístroja nedostala vlhkos,aby sa
prediçlo neopraviteãnému poçkodeniu prístroja.
Valce laminátora treba pravidelne zbavova prachu aeventuálnych
zvyçkov lepidla. Postupujte pritom takto:
s Zapnite prístroj podãapokynov hore.
s Nastavte ovláda] (5) do polohy „80mic“.
s Ak svieti trvalo kontrolka Ready (6),vloæte do zariadenia hárok
papiera.
s Ak na papier prilipne veãane]istôt, oto]te ho aopakujte postup.
90
Prístroj o]istite zvonka suchou utierkou. Vprípade silného zne]istenia
je moæné utierku mierne navlh]i.
Page 91

Home L410
v
6. OdstraÖovanie porúch
Chyba MoÙná príRina Odstránenie
Vypína] I/O (7) na
zadnej strane je v
polohe 0.
_ervená kontrolka Power (6)
sa nerozsvieti
trvalo.
Vrecká sa nelaminujú správne
UPOZORNENIE!
l Ak sa vám ani pomocou vyççie uvedených krokov nepodarí
problém vyrieçi,obráte sa prosím na zákaznícky servis.
Sieové vedenie
(3) nie je správne
pripojené.
Vzásuvke nie je
napätie
Prístroj je pokazený
Nebola eçte dosiahnutá potrebná
teplota.
Nastavte vypína] I/O (7)
do polohy I.
Ubezpe]te sa, æeje
sieová zástr]ka správne
zasunutá do zásuvky.
Skontrolujte domové
poistky.
Informujte zákaznícky
servis.
_akajte, aæ sa kontrolka
Ready (6) rozsvieti stálym
zelenýmsvetlom.
91
Page 92

Home L410
v
7. Technické údaje
Vstupné napätie 220-240 V~
Sieová frekvencia 50 Hz
max. príkon 220 W
Rozmery (Š xVxH)34,2 x5,8 x11,5cm
Hmotnos (netto) 1,1 kg
Hmotnos (brutto) 1,3 kg
maximálna çírka laminovania 236 mm
maximálna hrúbka laminovania 0,6 mm
maximálna hrúbka vreciek 125µ
maximálna dobazohriatia 6minút
maximálna rýchlos 300 mm/minúta
Po]et vyhrievacích valcov 2
8. Kontaktné apodporné informácie
Poradenské oddelenie Rrmy Hama.
Hotline:+49 9091 502-115 (nem./angl.)
2alçie informácie opodpore nájdete tu:
www.hama.com
92
Page 93

Home L410
v
93
Page 94

d Hinweis zum Umweltschutz:
Ab dem Zeitpunkt der Umsetzung der europäischen Richtlinien 2002/96/EG und 2006/66/EG in nationales Recht gilt folgendes:
Elektrische und elektronische Geräte sowie Batterien dürfen nicht mit dem Hausmüll entsorgt werden. Der Ve rbraucher
ist gesetzlich verpOichtetß elektrische und elektronische Geräte sowie BatterienamEnde ihrer Gebensdauer an den dafür
eingerichtetenß Êffentlichen ôammelstellen oder an die Ve rkaufsstelle zurückzugeben. Einzelheiten dazu regelt das eweilige
Gandesrecht. Das ôômbol auf dem øroduktß der Gebrauchsanleitung oder der Verpackung weist auf diese Bestimmungen hin. Eit
der îiederverwertungß der stofOichen Verwertung oder anderen Oormen der Verwertung von Altgeräten/Batterien leisten ôie einen
wichtigen Beitrag zum ôchutz unserer Umwelt.
g Note on environmental protection:
After the implementation of the European Directive 2002/96/EU and 2006/66/EU in the national legal sôstemß the following applies:
Electric and electronic devices as well as batteries must not be disposed of with household waste. wonsumers are obliged bô law
to return electrical and electronicdevices as well as batteries at the end of their service lives to the public collecting points set up
for this purpose or point of sale. Details to this are deQnedbôthe national law of the respective countrô.
òhis sômbol on the productß the instruction manual or the package indicates that aproduct is subect to these regulations.
Bô recôclingß reusing the materials or other forms of utilising old devices/Batteriesß ôou are making an important contribution to
protecting our environment.
f Remarques concernant la protection de l’environnement:
wonformþment R la directive europþenne 2002/96/EU et 2006/66/wEß et aQndåatteindre un certain nombre dåobectifs en matiýre de
protection de låenvironnementß les rýgles suivantes doivent ütre appliGuþes:
Ges appareils þlectriGues et þlectroniGues ainsi Gue les batteriesnedoivent pas ütre þliminþsavec les dþchets mþnagers. Ge
pictogramme pictox prþsent sur le produitß son manuel dåutilisation ou son emballage indiGue Gue le produit est soumis R cette
rþglementation. Geconsommateur doit retourner le produit/la batterie usager auõ points de collecte prþvus R cet effet. Llpeut aussi
le remettre R un revendeur.Enpermettant enQnlerecôclage des produits ainsi Gue les batteriesß le consommateur contribuera R la
protection de notre environnement. wåest un acte þcologiGue.
e Nota sobre la protección medioambiental:
Despuþsdelapuesta en marcha de la directiva Europea 2002/96/EU ô 2006/66/EU en el sistema legislativo nacionalß se aplicara
lo siguiente: Gos aparatos elþctricos ô electrËnicosß asû como las baterûasß no se deben evacuar en la basura domþstica. El usuario
estS legalmente obligado allevar los aparatos elþctricos ô electrËnicosß asû como pilas ô pilas recargablesß al Qnaldesuvida Ètil
alos puntos de recogida comunales oadevolverlosallugar donde los adGuiriË. Gos detalles Guedaran deQnidos por la leô de
cada paûs. El sûmbolo en el productoß en las instrucciones de uso oenelembalaehace referencia aello.Gracias al reciclaeß al
reciclaedel material oaotras formas de reciclaedeaparatos/pilasusadosß contribuôeUsted de forma importante alaprotecciËn
de nuestro medio ambiente.
o Notitie aangaande de bescherming van het milieu:
òen gevolge van de invoering van de Europese Richtlin2002/96/EU en 2006/66/EU in het nationaal uridisch sôstemß is het
volgende van toepassing: Elektrische en elektronische apparatuurß zoals batterien mag niet met het huisvuil weggegooid worden.
wonsumenten zinwettelikverplicht om electrische en elctronische apparaten zoals batterien op het einde van gebruik in te dienen
bi openbare verzamelplaatsen speciaal opgezet voor dit doeleindeofbieen verkooppunt. Verdere speciQcaties aangaande dit
onderwerp zinomschreven door de nationale wet van het betreffende land. Dit sômbool op het productß de gebruiksaanwizingof
de verpakking duidt erop dat het product onderworpen is aan deze richtlinen. Door te recôclerenß hergebruiken van materialen of
andere vormen van hergebruiken van oude toestellen/batterienß levert ueen grote bidrage aan de bescherming van het mileu.
i Informazioni per protezione ambientale:
Dopo l’implementazione della Direttiva Europea 2002/96/EU e2006/66/EU nel sistema legale nazionaleß ci sono le seguenti
applicazioni: Geapparecchiature elettriche ed elettroniche elebatterie non devono essere smaltite con iriQuti domestici. L
consumatori sono obbligati dalla legge arestituire L dispositivi elettrici ed elettronici elebatterie alla Qne dellaloro vita utile ai punti
di raccolta pubblici preposti per Guesto scopo onei punti vendita. Dettagli di Guanto riportato sono deQniti dalle leggi nazionali
di ogni stato. ÷uesto simbolo sul prodottoß sul manuale d’istruzioni osull’imballo indicano che Guesto prodotto ý soggetto a
Gueste regole. Riciclandoß riÝutilizzando imateriali outilizzando sotto altra forma ivecchi prodotti/le batterieß darete un importante
contributo alla protezione dell’ambiente.
k ?u{ëêÚ¨ß éêèÚØ8 «êèߪ u¤¦éèìéêì uê¤Úæ8¦ªè¦¢:
u 6Ý 76×ã²í u§Ý§«u:Õí \9Ýãê: 2002/96/EU Õ:× 2006/66/EE 8±7²:6±86:× 76 8Ú±×Õ 9êÕ:× ×7¥§± 6: 8¯í©:
\×Ý´8Õ6«×Õ/©Õ:××Ý´8Õ6«±×Õ/© 7§7Õ8§/©Õ:Ú© Õ:×ײu:6:«ê8© 98± 8u×6«/u86:×±:u86×±6:× 76: ×Õ×:Õ0 :u««ê²²:6:. \×
Õ:6:±:´6/©§u¥«8±6:× :u 6±±² ±:8u×76«/5§± 6ש Ý´8Õ6«×Õ/©Õ:×Ý´8Õ6«±×Õ/© 7§7Õ8§/©Õ:Ú© Õ:× 6ש ²u:6:«ê8©
76 6/´© 6Ý© àí© 6§© 76:9ݲ7×:7ݲ8ê: u8«×7§´´ãí© u§ /¥§± 9ݲק«ãÝÚ8êã×’:§667Õuí76:7ݲ8ê: u´Ý7Ý©.
\×´8u6²/«8×8©«§Ú²êà±6:× 76Ý 7¥86×Õí ±²Ú87ê:. 8 7²æ´ u0± 76 u«±ß 76 8ã¥8׫ê9× ¥«í7Ý© í 76Ý 7§7Õ8§:7ê:
u:«:u/²u8× 78 :§6/© 6ש 9×:60¯8ש. `86ݱ :±:ÕÕ´7Ýß 8u:±:¥«Ý7ײuêÝ7Ý 6± §´×Õ± í²80´´8©²«5/©¥«Ý7ײuêÝ7Ý©
u:´×± 7§7Õ8§± / `u:6:«×± 7§±8×75/«868 7ݲ:±6×Õ0 76ݱ u«76:7ê:6§ u8«×æ0´´±6©. ;6Ý ¥8«²:±ê: ×7¥§± :±6ê76×¥: ×
u:«:u0± Õ:±±8© :u««×£Ý© 7²5±: ²86± Õ:±±×7² ã×: ²u:6:«ê8©Õ:×7§77«8§6/©.
s Not om miljöskydd:
Efter implementeringen av EU direktiv 2002/96/EU och 2006/66/EU iden nationella lagstiftningenß gäller fÊlande:
Elektriska och elektroniska apparater samt batterier får inte kastas ihushållssoporna. Ionsumenter är skôldigaatt återlämna
elektriska och elektroniska apparater samt batterier vid slutet av dess livslängd tillß fÊrdetta ändamålß offentliga uppsamlingsplatser.
Detaler fÊrdetta deQnieras via den nationella lagstiftningen irespektive land. Denna sômbol på produktenß instruktionsmanualen
eller på fÊrpackningen indikerar att produkten innefattas av denna bestämmelse. Genom återvinning och återanvändning av
material/batterier bidrar du till att skôdda milÊnoch din omgivning.
m Ympäristönsuojelua koskeva ohje:
ôiitä lähtienß kun Euroopan unionin direktiivi 2002/96/EU a2006/66/EU otetaan käôttÊÊnkansallisessa lainsäädännÊssäß pätevät
seuraavat määräôkset: ôähkÊÝ aelektroniikkalaitteita aparistoaeisaa hävittää talousätteen mukana. Iuluttaallaonlain mukaan
velvollisuus toimittaa sähkÊÝ aelektroniikkalaitteet niiden käôttÊiänpäätôttôäniille varattuihin ulkisiin keräôspisteisiin tai palauttaa
ne môôntipaikkaan. òähän liittôvistä ôksitôiskohdista säädetään kulloisenkin osavaltion laissa. Cäistä määräôksistä mainitaan
môÊstuotteen sômbolissaß käôttÊoheessa tai pakkauksessa. UudelleenkäôtÊlläß materiaalien/paristoauudelleenkäôtÊllä tai muilla
vanhoen laitteiden uudelleenkäôttÊtavoilla on tärkeä vaikutus ôhteisen ômpäristÊmme suoelussa.
Page 95

q ×skazówki dotycz_ce ochrony çrodowiska:
ùdczasu wprowadzenia europeskie dôrektôwô 2002/96/EU i2006/66/EU do prawa narodowego obowiQzuQ nastLpuQce
ustalenia: UrzQdze! elektrôcznôchß elektronicznôch oraz baterii ednorazowôch nie nale¨ô wôrzuca~ razem zcodziennômi
odpadami domowômie U¨ôtkownik zobowiQzanô prawnie do odniesienia zepsutôchß zniszczonôch lub niepotrzebnôch urzQdze!
elektrôcznôch ielektronicznôch do punktu zbiËrki lub do sprzedawcô. ôzczegË(owe kwestie reguluQ przepisô prawne danego krau.
Lnformueotômsômbol przekreÔlonego kosza umieszczonô na opakowaniu. ôegreguQcodpadô pomagasz chroni~ Ôrodowiskoe
h
K
örnyezetvédelmi tudnivalók:
Az eurËpai irSnôelvek 2002/96/EU þs2006/66/EU aSnlSsa szerintß amegelÊlt idÚponttËlkezdveß minden EUÝstagSllamban
þrvþnôesek akÊvetkezÚk: Az elektromos þselektronikai kþszülþkeket þsazelemeket nem szabad ahSztartSsi szemþtbe dobnie
Aleseletezett elektromos þselektronikus kþszülþkeket þselemeketß akkumulStorokat nem szabad ahSztartSsi szemþtbe dobni.
Az elhasznSlt þsm±kÊdþskþptelen elektromos þselektronikus kþszülþkek gô±tþsþre tÊrvþnôielÚûrSskÊtelez mindenkitß ezþrt
azokat el kell szSllûtaniegôkielÊlt gô±tÚ helôre vagô visszavinni avSsSrlSshelôþre. AtermþkcsomagolSsSnfeltüntetett szimbËlum
egôþrtelm± elzþst ad erre vonatkozËan afelhasznSlËnak. Arþgi kþszülþkek begô±tþseß visszavSltSsa vagô bSrmilôen formSban
tÊrtþnÚ Èra hasznosûtSsa kÊzÊshozzSSrulSskÊrnôezetünk vþdelmþhez.
c Þchrana -ivotnàho prostêedà:
EvropskS smIrnice 2002/96/EU a2006/66/EU ustanovuete nSsleduûcû:
ElektrickS aelektronickS za×ûzenû stenI ako baterie nepat×û do domovnûho odpadu. ôpot×ebitel se zavazueodevzdat v'echna
za×ûzenû abaterie po uplônutûeich &ivotnosti do p×ûslu'nÙch sbIren. øodrobnosti stanovû zSkon p×û'lu'nþ zemI. ôômbol na
produktuß nSvod kobsluze nebo balenû na toto poukazue. Recôklacû a inÙmi zp¶sobô zu&itkovSnû p×ispûvSte kochranI &ivotnûho
prost×edû.
v Þchrana -ivotného prostredia:
EurËpska smernica 2002/96/EU a2006/66/EU stanovue:
Elektrickþ aelektronickþ zariadeniaß rovnako ako batþrie sa nesmÈ vôhadzova¸ do domSceho odpadu. ôpotrebite& ezozSkona
povinnÙ zlikvidova¸ elektrickþ aelektronickþ zariadeniaß rovnako ako batþrie na miesta ktomu ur{enþ. ôômbolizuetoobrSzok
vnSvode na pou&itieß alebo na balenû vÙrobku. ùpätovnÙmzu&itkovanûmalebo inou formou recôklScie starÙch zariadenû/batþriû
prispievate kochrane &ivotnþho prostredia
p Nota em Protecção Ambiental:
ApËsaimplementa!Podadirectiva comunitSria 2002/96/EU e2006/66/EU no sistema legal nacionalß oseguinte aplicaÝse:
ùsaparelhos elþctricos eelectrËnicosß bem como bateriasß nPopodem ser eliminados untamente com oliõodomþstico.
wonsumidores estPoobrigados por lei acolocar os aparelhos elþctricos eelectrËnicosß bem como bateriasß sem uso em
locais pÈblicos especûQcos para este efeito ou no ponto de venda. ùsdetalhes para este processo sPodeQnidos por lei pelos
respectivos paûses. Este sûmbolo no produtoß omanual de instru!Ées ou aembalagem indicam Gue oproduto estS sueito aestes
regulamentos. Reciclandoß reutilizando os materiais dos seus velhos aparelhos/bateriasß esta afazer uma enorme contribui!Po
para aprotec!Podoambiente.
u ÓÜ$[)[ '-$ÞR[²×T. "$TVÔ:
ð 515c3èm/c-cã1em3má<13m7·31g1 _m9131emèc7·+èim 3m ci-1/c:+9<c 31-5mè<iØ 2002/96/EU < 2006/66/EU
ec:+èi<èc7·31 +7ceæ´Ûcc: Ã7c9è-<ßc+9<c < µ7c9è-133Øc/-<k1-Øß m èm9ac kmèm-c< _m/-cÛmcè+²æè<7<_<-1imè· +
1kØß3Ø55æ+1-15. õ1è-ck<èc7·ß +1g7m+31 _m913æß 1k²_m3 æè<7<_<-1imè· µ7c9è-<ßc+9<c < µ7c9è-133Øc/-<k1-Øß m èm9ac
kmèm-c< <m99æ5æ7²è1-Ø /1+7c <ã <+/17·_1im3<² i+/cá<m7·31 /-ce3m_3mßc33Øã e7²µè1g1/æ39èmã +k1-mß 7<k1 i/æ39èmã
/-1ema<. Ccèm7·3m² -cg7m5c3èmá<²µè<ãè-ck1im3<: 1+æÛc+èi7²cè+² +11èicè+èiæ´Û<5 5c+è3Ø5_m9131emèc7·+èi15.
úc1kã1e<51+è· +1k7´ec3<² em33Øã /-ce/<+m3<: 1k1_3mßmcè+² 1+1kØ5_3mß9153m<_ec7<<ß <3+è-æ9á<< /1 µ9+/7æmèmá<<
<7< æ/m91i9c. õ-< /c-c-mk1è9cß /1iè1-315 <+/17·_1im3<< 5mèc-<m71i <7< /-< e-æg1: å1-5c æè<7<_má<< kØiÝ<ã i
æ/1è-ck7c3<< /-<k1-1i IØ /151gmcèc1ã-m3c 19-æam´Ûc: +-ceØ. I +11èicè+èi<< +/-ce/<+m3<²5< /1 1k-mÛc3<´ +
kmèm-c²5<ß i Fc-5m3<< iØÝc3m_im33Øc31-5mè<iØ ec:+èiæ´è e7²æè<7<_má<< kmèm-c: <m99æ5æ7²è1-1i.
t -evre koruma uyarPsP:
Avrupa Birli£iDirektiQ 2002/96/EU ve 2006/66/EU ulusal ôasal uôgulamalar i!in de ge!erli oldu£utarihten itibaren:
Elektrikli ve elektronik cihazlarla pillernormal evsel !Êpe atOlmamalOdOr. òüketiciler i!inß artOk !alOmaôan elektrikli ve elektronik
cihazlarO pillerß kamuôaait toplama ôerlerine gÊtürme veôasatOnalOndOklarO ôerlere geri verme ôasal birzorunluluktur.Bukonu
ile ilgili aôrOntOlar ulusal ôasalarla düzenlenmektedir. Trün üzerindeß kullanma kOlavuzunda veôaambalada bulunan bu sembol
tüketiciôibukonuda uôarOr. Eski cihazlarOngeri kazanOmOß ôapOldOklarO malzemelerin de£erlendirilmesi veôadi£er de£erlendirme
ekilleri ileß!evre korumasOna Ênemli bir katkOda bulunursunuz. ÇukarOda adO ge!en atOktoplama kurallarO Almanôa’da piller ve
aküler i!in de ge!erlidir.
r
I
nstrucäiuni pentru protecäia mediului ßnconjurtor:
Din momentul aplicurii directivelor europene 2002/96/EU i2006/66/EU úndreptul na[ional sunt valabileurmutoarele: Aparatele
electrice ielectronice nu pot Q salubrizate cu gunoiul menaer. wonsumatorul este obligat conform legii su predea aparatele
electrice _ielectronice la sfQr_itul duratei de utilizare la locurile de colectare publice sau únapoi de unde au fost cumpurate.
Detaliile sunt reglementate de cutre legislaÑia [urii respective. ôimbolul de pe produsß úninstrucÑiunile de utilizare sau pe ambala
indicu aceste reglementuri. ørin reciclareaß revaloriQcarea materialelor sau alte forme de valoriQcare aaparatelor scoase din uz
aduce[iocontribu[ie importantu la protec[ia mediului nostru únconurutor.
j Anvisninger til beskyttelse af miljøet:
Ora og med indfÊrelsen af EUÝdirektiverne2002/96/EU og 2006/66/EO inational ret gËlder fÊlgende: Elektrisk og elektronisk
udstôrsamt batterier må ikke bortskaffes sammen med almindeligt husholdningsaffald. Oorbrugeren er lovmËssigt forpligtet
til at aOevere udtent elektrisk og elektronisk udstôrsamt batterier til dertil indrettedeß offentlige indsamlingssteder eller til
forhandleren. De nËrmere bestemmelser vedr.dette fastlËgges af lovgivningen idet pågËldende land. ôômbolet på produktetß
brugsveledningen eller emballagen henviser til disse bestemmelser. Ve dgenbrugß genvinding eller andre former for nôttiggÊrelse
af udtent udstôr/batterier giver du et vigtigt bidragtil beskôttelse af milÊet.
n Informasjon om beskyttelse av miljøet:
Ora tidspunktet for omsetning av de europeiske direktivene 2002/96/EU og 2006/66/EO inasonal rett gelder fÊlgende:
Elektriske og elektroniske apparater og batterier må ikke deponeressammen med husholdningssÊppelet. Oorbrukeren er
lovmessig forpliktet til ålevere elektriske og elektroniske apparater og batterier til de offentlige samlestedene eller tilbake til
stedet hvor produktene ble kÊpt. Detaler angående dette reguleres av hvert land. ôômbolet på produktetß bruksanvisningen eller
emballasen henviser om disse bestemmelsene. Eed resirkuleringß genbruk av stoffer eller andre former av genbruk av gamle
apparater/batterier bidrar du betôdelig til åbeskôtte milÊet vårt.
.
Page 96

Hama GmbH &CoKG
86652 Monheim /Germany
www.hama.com
Alllistedbrands are trademarks of thecorrespondingcompanies.Errorsand omissionsexcepted,
andsubjec ttotechnical changes. Ourgeneralterms of deliveryand paymentare applied.
00050316/04.18
 Loading...