

Page 1
00054861
(IT900MBT)
Digital Tuner
Digitaltuner
Quick Guide
Kurzanleitung
Notice d’utilisation
Instrucciones breves
Краткое руководство
Istruzioni brevi
Beknopte bedieningsinstructies
Σύντομες οδηγίες
Krótka instrukcja obsługi
Rövid útmutató
Stručný návod
Stručný návod
Instruções resumidas
Kısa kullanımkılavuzu
Instrucțiuni scurte
Snabbguide
Lyhyt ohje
Kort vejledning
Kortveiledning
GB
D
F
E
RUS
I
NL
GR
PL
H
CZ
SK
P
TR
RO
S
FIN
DK
N
Page 2
Technical data/
Technische Daten
Digitaltuner
Connectivity
/
Verbindung
Encryption/
Verschlüsselung
Power Input/
Stromeingang
Power
Consumption/
Stromaufnahme
Input &Output/
Anschlüsse
Package Content/
Verpackungsinhalt
Dimension/ Größe
(WxHxD)
DAB
-
WiFi, 2.4. GHz (b/g/n), 5GHz (a/n), Bluetooth V4.1 (Bluetooth Prole A2DPv1.2, AVRCPv1.0,
HFPv1.5)
WEP,WPA,WPA2
5V
Operation/
Betrieb
Digital OUT,Line OUT 3.5mm, USB Playback/Update Port, DC Socket
Streaming Tuner “IT900MBT”, MicroUSB Charger,MicroUSB Cable, Jack Cable 3.5 mm,
Short Manual, Spotify Flyer
108 x20x108 mm
Weight/ Gewicht 157 g
DAB+
-
1A
max. 2.5 W
FM
-
Standby/
Bereitschaft
Internet
ü
<0.3 W
Spotify
ü
Page 3
1
2
DC 5V LINE OUT /UPDATEO PTICAL OUT
3 4 5 6
Page 4

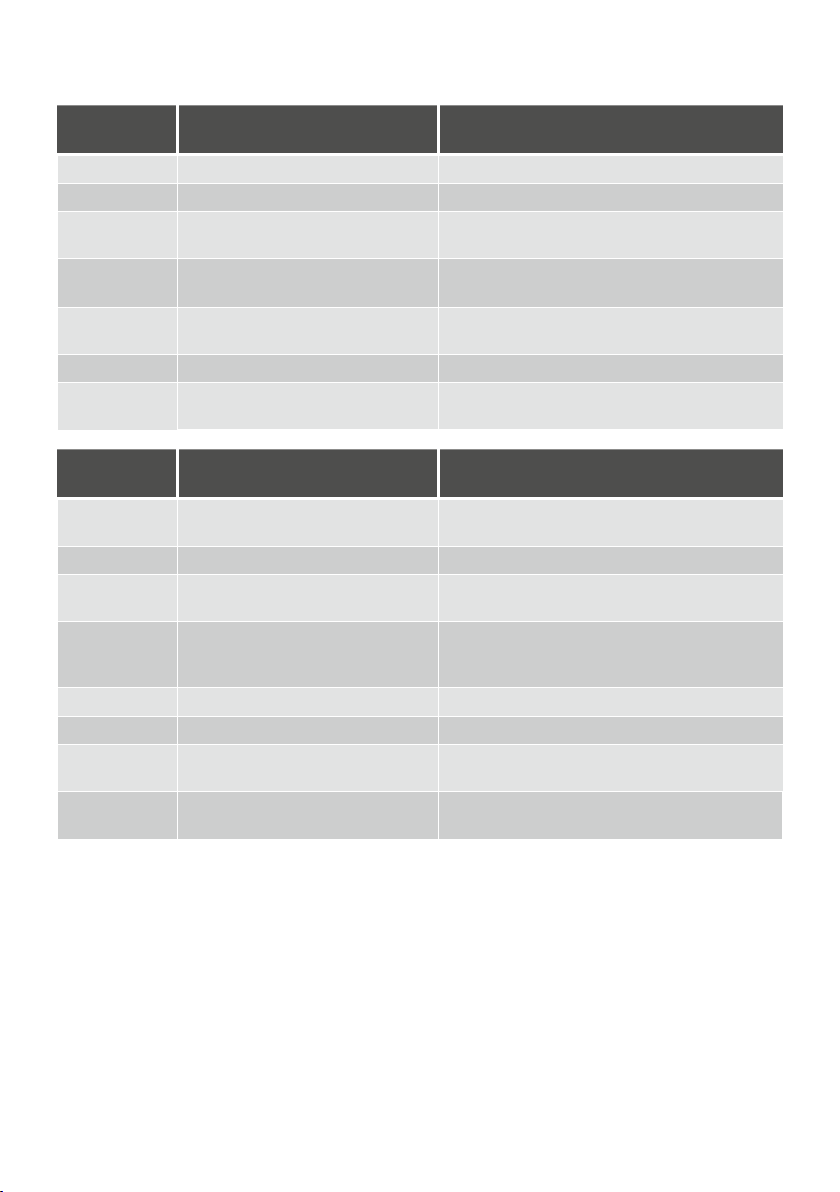
LED indicator
Mode Indicator Description
IR Mode
Spotify Mode
Local Music
Mode
Music Player
Mode
Bluetooth
Mode
Bluetooth
Multiroom
Mode
Steadily lit white Tuner is in IR Mode.
Steadily lit green Tuner is in Spotify Mode.
Steadily lit purple as soon as local music
is played
Steadily lit yellow Tuner is in Music Player Mode.
Flashing blue
Steadily lit blue Tuner is in Bluetooth mode. Music can be played.
Steadily lit light blue when tuner has been
added to Multiroom group successfully
Tuner is in Local Music Mode.
Tuner is in Bluetooth Pairing Mode. Tuner is ready for
connection with another device.
Tuner is in Multiroom Mode.
Status Indicator Description
WLAN pairing
Mode
WLAN
UNDOK Mode
UNDOK initial
setup Mode
WPS Mode
Standby Mode
Software
Update
Software
Update
running Mode
According to selected Mode, LED lights up
Steadily lit white WLAN pairing has been successful.
Flashing white Connection to UNDOK Access Point can be done.
Flashing fast white three times
Flashing fast white PBC is active.
Steadily lit red Tuner is in Standby Mode.
Lit light blue Tuner is in SoftwareUpdate Mode. Update can be done.
Flashing light blue,till SoftwareUpdate
is nished
WLAN Pairing Mode is running. Tuner is searching for
connection with another device.
Connection to Access Point has been successful. Device is
ready for initial setup in UNDOK app.
SoftwareUpdate is running.
Page 5
Verhalten der LED-Anzeige
Modus Zustand Beschreibung
IR Modus
Spotify Modus
Lokale Musik
Modus
Musikabspieler
Modus
Bluetooth
Modus
Bluetooth
Multiroom
Modus
leuchtet dauerhaft weiß Der Tuner bendet sich im IR Modus.
leuchtet dauerhaft grün Der Tuner bendet sich im Spotify Modus.
leuchtet dauerhaft lila,sobald lokale Musik
abgespielt wird
leuchtet dauerhaft gelb Der Tuner bendet sich im Musikabspieler Modus.
blinkt dunkelblau
leuchtet dauerhaft dunkelblau Die Bluetooth Verbindung wurde erfolgreich hergestellt.
leuchtet dauerhaft hellblau,sobald Gerät
einer Multiroom-Gruppe hinzugefügt wird
Der Tuner bendet sich im Lokale Musik Modus.
Der Tuner bendet sich im Bluetooth Pairing Modus. Das
Endgerät kann nun mit dem Lautsprecher verbunden werden.
Der Tuner bendet sich im Multiroom Modus.
Status Zustand Beschreibung
WLAN Pairing
Modus
WLAN
Ersteinrichtung
(UNDOK)
bereit für
Ersteinrichtung
(UNDOK)
WPS Modus
Standby Modus
Software
Update
Software
Update läuft
Die LED/LEDs des gewählten Modus blinkt/
blinken.
leuchtet dauerhaft weiß Die WLAN Verbindung wurde erfolgreich hergestellt..
blinkt weiß
blinkt wiederholt 3x schnell
blinkt schnell weiß PBC ist aktiv.
leuchtet dauerhaft rot Der Tuner bendet sich im Standby Modus.
leuchtet dauerhaft hellblau
blinkt hellblau Ein SoftwareUpdate wirdgerade durchgeführt.
weiß
Der WLAN Pairing Modus ist aktiv.Der Lautsprecher sucht
nach einer Verbindung.
Die Ersteinrichtung über UNDOK kann nun vorgenommen
werden.
Die Verbindung mit AP ist hergestellt. Das Endgerät
kann direkt über WLAN mit dem Lautsprecher verbunden
werden, um die Ersteinrichtung durchzuführen.
Der Tuner bendet sich im Update Modus. Ein Update
kann durchgeführt werden.
Page 6
G Quick Guide
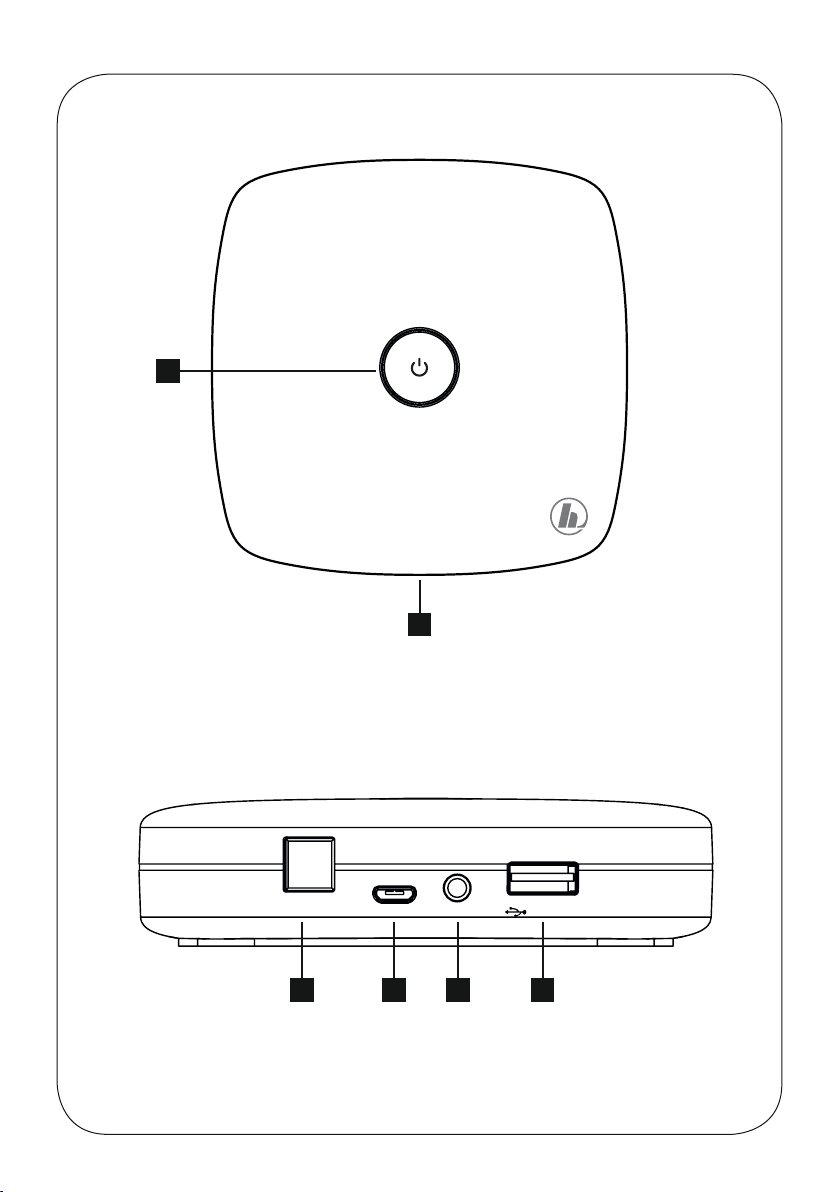
Controls and Displays
Radio
Front
1. [POWER] button
2. Status LED
Rear
3. Optical connection
4. Power connection (Micro-USB)
5. Line-out socket
6. USB playback /update port
1. Explanation of Warning Symbols and Notes
Risk of electric shock
This symbol indicates product parts energized with a
dangerous voltage of sucient magnitude to constitute
arisk of electric shock.
Warning
This symbol is used to indicate safety instructions or to
draw your attention to specichazards and risks.
Note
This symbol is used to indicate additional information or
important notes.
2. Package Contents
• ‘IT900MBT’ streaming tuner
• Micro-USB charger
• Micro-USB cable
• 3.5 mm jack cable
• Operating instructions
• Spotify yer
3. Safety instructions
• This product is intended for private, non-commercial
use only.
• Protect the product from dirt, moistureand overheating,
and only use in dry locations.
• Keep this product, as all electrical products, out of the
reach of children!
• Do not drop the product and do not expose it to any
major shocks.
• Do not operate the product outside the power limits
given in the specications.
• Keep children away from the packaging material as there
is arisk of suffocation.
• Dispose of packaging material immediately according to
locally applicable regulations.
• Do not modify the device in any way.Doing so voids the
warranty.
Risk of electric shock
• Do not open the device or continue to operate it if it
becomes damaged.
• Do not use the product if the
• AC adapter,adapter cable or power cable is
damaged.
• Do not attempt to service or repair the product
yourself.Leave all service work to qualied experts.
4. Information and notes before initial startup
Preparing the network connection /Internet
connection
Youcan integrate this tuner into alocal network and
access home servers or other shared resources. To receive
Internet radio
or access non-local media contents (streaming, such as
Spotify Connect), the network must be connected to the
Internet.
WLAN/WiFi connection (wireless network)
• Make surethat the router is on and that you have an
Internet connection.
• If it is not already activated, activate the WLAN
connection of your router.
• If you have questions about router conguration,
please consult the operating manual of the router for
troubleshooting.
• Adetailed description of how to congurethe WLAN
connection is given in the Wireless connection section.
2
Page 7

5. Before getting started
Notes on use
The streaming tuner is operated only using the UNDOK
app and your smartphone.
Note
Adetailed description of the
UNDOK app and the full
scope of functions can be found
in our UNDOK guide at:
www.hama.com->00054861->Downloads
6.Getting started
6.1 Connections
• 1xLine out 3.5 mm
• 1xOptical connection
• 1xUSB Type-Aplayback /update port
• 1xPower supply (Micro-USB)
6.2 Turning on the product
• Connect the supplied Micro-USB charging cable to the
tuner’sMicro-USB port (4).
• Connect the unused connector on the Micro-USB
charging cable to the USB charger.
Hinweis
• Wait until the tuner initialisation procedurehas nished.
• Brieypress the [POWER] button (1) on the device.
Note –Turning on for the rst time
• When you turn on the device for the rst time, the
tuner starts in SETUP mode.
• The status LED (2) begins to ash white. The tuner
can be connected to your smartphone only using the
UNDOK app.
• If connection problems occur,you can switch the
tuner back to SETUP mode by pressing and holding
the [POWER] button (1).
Adjusting/muting the volume
Entering passwords, search terms, and so on
Entry is only using the UNDOK app.
Turning on/off /Standby /Microaccess point
• Press [POWER] to turn the tuner on. Alternatively,the
tuner may be switched on using the UNDOK app.
• Press [POWER] to turn the tuner off (standby). Once a
network connection has been set up, it too will be kept in
standby mode, to enable the device to be turned on using
the UNDOK app.
Note
To completely switch off the device, disconnect it from
the power supply.
7. UNDOK –everything in the palm of your hand
Only use original accessories (or accessories approved
by Hama), to prevent damage to the product.
• Connect the power cable /power supply unit to a
properly installed socket.
Warning
• Only connect the product to asocket that has been
approved for the device. The electrical socket must
always be easily accessible.
• When using amulti-socket power strip, make sure
that the sum power draw of all the connected devices
does not exceed its maximum throughput rating.
• The electrical socket must always be easily accessible.
• If you will not be using the product for along period
of time, disconnect it from mains power.
The UNDOK app, developed by Frontier Silicon, gives you
full control of radios and speakers from your smartphone.
Whether you aresetting up the device for the rst time,
specifying settings for multi-room, or managing your
favourite stations –the UNDOK app lets you access all the
features from your smartphone or tablet.
Below is an explanation of how to set up the tuner for the
rst time with UNDOK. The full range of functions of the
device can be accessed only using the UNDOK app.
3
Page 8

7.1 First-time setup of the device with UNDOK
The rst time you switch on an UNDOK-enabled product
from Hama, or when you have set it to the factory settings,
it creates amicroaccess point –aseparate WiFi network
that you can connect to with your tablet or smartphone.
This access point is shown in the format ‘Setup Hama
PRODUCTNAME MACaddress’, to enable clear
identication of the product.
Note
The UNDOK app uses the language selected in your
smartphone’ssystem.
7.2 Open/unsecured network
Note
• We recommend against establishing unsecured
connections and advise you to always protect your
network against unauthorised access.
• If your desired network has no safeguards, it is
enough to select the network from the list and
conrm your selection. The tuner then promptly
connects to the access point.
7.2.1 Procedure for iOS users
• Open the UNDOK app on your iPhone or iPad.
• Tapthe ‘Set up audio system’ menu item.
• Make surethat the tuner is in SETUP mode. If the device
is not in SETUP mode, press and hold the [Power] button
for 5seconds to switch the device to SETUP mode.
• The UNDOK app now prompts you to connect to the
product’sWiFi network. Select the WiFi network (for
example, Setup Hama IT900MBT). Then switch back to
UNDOK and press “Continue”. Then return to the UNDOK
app and tap ‘Next’.
• Now choose aname for the tuner (for example, Oce
IT900MBT) and conrm your entry with ‘Next’.
• In the subsequent language selection, you can specify
the system language of the tuner.Click ‘Next’ to conrm
your selection.
• The various network conguration options arethen
offered to you (whereapplicable, WiFi, WPS and
Ethernet). Tapthe desired method; the UNDOK app
switches to the next window.
• Depending on the selected
• method, you can now select and congurethe desired
WiFi network, or set up aWPS connection.
• Finally,the tuner connects to the network; by tapping
‘Start using my
• audio system’, you will be able to use the device in
UNDOK.
• The network connection LED indicator (1) is now
constantly lit.
• After successful conguration of the
• tuner,you must connect aplayback device (speaker)
using the analogue (5) or digital (3) connection. The
music group is controlled only using UNDOK.
7.2.2 Procedure for Android users
• Open the UNDOK app on your tablet or smartphone.
• Tapthe ’Set up audio system’ menu item.
• Make surethat the tuner is in SETUP mode. If the device
is not in SETUP mode, press and hold the [Power] button
for 5seconds to switch the device to SETUP mode.
• The UNDOK app now prompts you to connect to the
product’sWiFi network. Select the WiFi network (for
example, Setup Hama IT900MBT). Then return to the
UNDOK app and tap ‘Next’.
• Now choose aname for the tuner (for example, Oce
IT900MBT) and conrm your entry with ‘Next’.
• In the subsequent language selection, you can specify
the language of the tuner.Click ‘Next’ to conrm your
selection.
• The various network conguration options arethen
offered to you (whereapplicable, WiFi, WPS and
Ethernet). Tapthe desired method; the UNDOK app
switches to the next window.
• Depending on the selected method, you can now select
and congurethe desired WiFi network, or set up aWPS
connection.
• Finally,the tuner connects to the network; by tapping
“Start using my audio system”, you willbeable to use the
device in the UNDOK app.
• The network connection LED indicator (1) is now
constantly lit.
• After successful conguration of the tuner,you must
connect aplayback device (speaker) using the analogue
(5) or digital (3) connection. The music group is controlled
only using UNDOK.
4
Page 9
8. Connections
Note
• Connections that use an optical signal cable areless
sensitive to electrical or magnetic interference than
those using a3.5-mm audio cable.
8.1 Connection via Optical OUT
Youcan use the digital audio output to connect your
speakers to the tuner,for example, and play its audio
signals through the speakers.
Note
• Switch off the tuner beforeconnecting aterminal
device.
• Remove the protective caps from both ends of the
optical signal cable beforeconnection.
• Do not bend or crush the cable.
• Forplayback via the optical audio connection, connect an
optical signal cable to the tuner‘s optical audio output (3)
and to the speaker‘s optical audio input.
• Press [POWER] (1) to switch on the tuner.
• The tuner‘s audio signal is now played through the
speakers.
8.2 Connection via LINE OUT
Youcan use the analogue audio output to connect your
speakers to the tuner,for example, and play its audio
signals through the speakers.
Note
• Switch off the tuner beforeconnecting aterminal
device.
• Do not bend or crush the cable.
• Forplayback via the analogue audio connection, connect
a3.5-mm RCAcable to the tuner‘s analogue audio
output (5) and to the speaker‘s analogue audio input.
• Press [POWER] (1) to switch on the tuner.
• The tuner‘s audio signal is now played through the
speakers.
9.Factory settings
To reset the tuner to the factory default settings, proceed as
follows:
• Press and hold the [POWER] button (1) for about 5
seconds.
• All settings you made aredeleted.
Note
• Resetting to the factory settings can solve some
problems and malfunctions.
• However,all settings made previously,such as custom
equaliser presets, favourites, and network proles, are
permanently deleted.
10. Software updates
We areconstantly developing new softwarefeatures
and improvements for our tuners to xproblems, add
functionality,etc.
We recommend that you keep your tuner’ssoftwareupto
date.
Warning
• Make surethereisastable power supply beforeyou
start asoftwareupdate.
• Power supply failureduring asoftwareupdate can
cause irreparable damage to the radio.
11. Care and Maintenance
• Only clean this product with aslightly damp, lint-free
cloth and do not use aggressive cleaning agents.
• If you do not use the product for along time, turn off the
device and disconnect it from the power supply.Storeitin
aclean, dry place out of direct sunlight.
12. Warranty Disclaimer
Hama GmbH &CoKGassumes no liability and provides no
warranty for damage resulting from improper installation/
mounting, improper use of the product or from failureto
observe the operating instructions and/ or safety notes.
5
Page 10
13. Service and Support
Please contact Hama Product Consulting if you have any
questions about this product
Hotline: +49 9091 502-115 (German/English)
Further support information can be found here:
www.hama.com
14. Recycling Information
Note on environmental protection:
After the implementation of the European Directive
2012/19/EU and 2006/66/EU in the national legal
system, the following applies: Electric and
electronic devices as well as batteries must not be
disposed of with household waste. Consumers areobliged
by law to return electrical and electronic devices as well as
batteries at the end of their service lives to the public
collecting points set up for this purpose or point of sale.
Details to this aredened by the national law of the
respective country.This symbol on the product, the
instruction manual or the package indicates that aproduct
is subject to these regulations. By recycling, reusing the
materials or other forms of utilising old devices/batteries,
you aremaking an important contribution to protecting our
environment.
15. Declaration of Conformity
Hereby,Hama GmbH &CoKGdeclares that the
radio equipment type [00054861] is in compliance
with Directive 2014/53/EU.The full text of the EU
declaration of conformity is available at the following
internet address:
www.hama.com->00054861->Downloads
Bluetooth: 2.402 -2.480GHz
Frequency band(s)
Maximum radio-frequency
power transmitted
Restrictions or Requirements in
Belgium, Bulgaria, Czech Republic, Denmark, Germany,
Estonia, Ireland, Greece, Spain, France, Croatia, Italy,
Cyprus, Latvia, Lithuania, Luxembourg, Hungary,Malta, the
Netherlands, Austria, Poland, Portugal, Romania, Slovenia,
Slovakia, Finland, Sweden, United Kingdom
Note
WiFi: 2.412 -2.472GHz
WiFi: 5.150 -5.350 GHz
WiFi: 5.470 -5.725 GHz
Bluetooth: 4dBm (EIRP)
WiFi: 2.4GHz
WiFi: 5GHz /17.8dBm (EIRP)
/19.3dBm (EIRP)
If channels 36–64 (frequency 5.150–5.350 GHz) are
used in a5-GHz WLAN, the product may only be used
in closed rooms.
6
Page 11
D Schnellstartanleitung
Bedienungselemente und Anzeigen
Frontseite
1. [POWER]-Taste
2. Status LED
Rückseite
3. Optischer Anschluss
4. Stromanschluss (MicroUSB)
5. LINE Out Buchse
6. USB Playback /Update Port
1. Erklärung von Warnsymbolen und Hinweisen
Gefahr eines elektrischen Schlages
Dieses Symbol weist auf eine Berührungsgefahr mit nicht
isolierten Teilen des Produktes hin, die möglicherweise
eine gefährliche Spannung von solcher Höhe führen,
dass die Gefahr eines elektrischen Schlags besteht.
Warnung
Wirdverwendet, um Sicherheitshinweise zu
kennzeichnen oder um Aufmerksamkeit auf besondere
Gefahren und Risiken zu lenken.
Hinweis
Wirdverwendet, um zusätzlich Informationen oder
wichtige Hinweise zu kennzeichnen.
2. Packungsinhalt
• Streaming Tuner “IT900MBT”
• MicroUSB Charger
• MicroUSB Kabel
• 3.5 mm Klinkenkabel
• Bedienungsanleitung
• Spotify Flyer
3. Sicherheitshinweise
• Das Produkt istfür denprivaten, nicht-gewerblichen
Haushaltsgebrauch vorgesehen.
• SchützenSie dasProdukt vorSchmutz, Feuchtigkeit und
Überhitzung und verwendenSie es nur in trockenen Räumen.
• DiesesProduktgehört, wiealleelektrischen Produkte,nicht
in Kinderhände!
• Lassen Siedas Produkt nichtfallenund setzenSie es keinen
heftigenErschütterungen aus.
• Betreiben Siedas Produkt nicht außerhalb seiner in den
technischen Datenangegebenen Leistungsgrenzen.
• Halten Sie Kinder unbedingt von dem Verpackungsmaterial
fern,esbesteht Erstickungsgefahr.
• Entsorgen Sie das Verpackungsmaterialsofort gemäß den
örtlichgültigenEntsorgungsvorschriften.
• Nehmen Sie keineVeränderungen am Gerätvor.Dadurch
verlierensie jegliche Gewährleistungsansprüche.
Gefahr eines elektrischen Schlages
• Öffnen Sie das Produkt nicht und betreiben Sie es bei
Beschädigungen nicht weiter.
• Verwenden Sie das Produkt nicht, wenn der
AC-Adapter,das Adapterkabel oder die Netzleitung
beschädigt sind.
• Versuchen Sie nicht, das Produkt selbst zu warten
oder zu reparieren. Überlassen Sie jegliche Wartungsarbeit dem zuständigen Fachpersonal.
4.Informationen und Hinweise vor Inbetriebnahme
Netzwerkverbindung /Internetverbindung
vorbereiten
Sie haben die Möglichkeit, diesen Tuner in ein lokales
Netzwerk zu integrieren und damit auf Home-Server oder
andereFreigabequellen zuzugreifen. Um Internetradio
zu empfangen oder auf nicht lokal gespeicherte
Medieninhalte (Streaming –z.B. Spotify Connect)
zuzugreifen, wirdindem Netzwerk zusätzlich eine
Internetverbindung benötigt.
WLAN/Wi-Fi-Verbindung (drahtloses Netzwerk)
• Stellen Sie sicher,dass der Router eingeschalten ist und
eine Verbindung zum Internet besteht.
• Aktivieren Sie, falls noch nicht geschehen, die WLANVerbindung Ihres Routers.
• Sollten Fragen zur Konguration des Routers auftreten,
nutzen Sie bitte die Bedienungsanleitung des Routers zur
Fehlersuche /Problemlösung.
• Eine genaue Kongurationsanleitung der WLAN-
Verbindung, wirdimAbschnitt Drahtlose Verbindung
beschrieben.
5.Vor der Inbetriebnahme
Hinweis
Die Bedienung des Streaming Tuners erfolgt
ausschließlich mithilfe der UNDOK App über Ihr
Smartphone.
7
Page 12
Hinweis
Hinweis –beim ersten Einschalten
Eine ausführliche Beschreibung der
UNDOK-App und des vollen
Funktionsumfangs nden Sie in unserem
UNDOK-Guide unter:
www.hama.com->00054861->Downloads
6.Inbetriebnahme
6.1 Anschlüsse
• 1x LINE Out 3.5 mm
• 1x Optischer Anschluss
• 1x USB- TypAPlayback /Update Port
• 1x Stromversorgung (MicroUSB)
6.2 Einschalten
• Schließen Sie das mitgelieferte Micro-USB Ladekabel am
Micro-USB Anschluss (4) des Tuners an.
• Schließen Sie den freien Stecker des MicroUSB
Ladekabels am USB Ladegerät an.
Hinweis
Verwenden Sie ausschließlich Originalzubehör (oder: von
Hama freigegebenes Zubehör), um Schäden am Produkt
zu vermeiden.
• Verbinden Sie das Netzkabel /Netzteil mit einer
ordnungsgemäß installierten Steckdose
Warnung
• Beim ersten Einschalten startet der Tuner im SETUPModus.
• Die Status-LED (2) beginnt weiß zu blinken und der
Tuner kann nur mithilfe der UNDOK-App mit Ihrem
Smartphone verbunden werden.
• FallsVerbindungsprobleme auftreten, können Sie den
Tuner durch langes Drücken der [POWER]- Taste (1)
erneut in den SETUP-Modus bringen
Lautstärke anpassen /Mute
Eingabe von Passwörtern, Suchtexten, etc.
Die Eingabe erfolgt ausschließlich über die UNDOK App.
Ein-/ Ausschalten /Standby /MicroAccess Point
• Drücken Sie [POWER], um den Tuner einzuschalten.
Alternativ kann der Tuner über die UNDOK App
eingeschaltet werden.
• Drücken Sie [POWER] um den Tuner auszuschalten
(Standby). Nach Einrichtung einer Netzwerkverbindung
wirddiese auch im Standby Modus aufrecht zu erhalten,
um das Einschalten per UNDOK App zu ermöglichen.
Hinweis
Trennen Sie das Gerät von der Stromversorgung, um es
vollständig auszuschalten.
7. UNDOK –Alles in Ihrer Hand
• Betreiben Sie das Produkt nur an einer dafür
zugelassenen Steckdose. Die Netzsteckdose muss
jederzeit leicht erreichbar sein.
• Achten Sie bei Mehrfachsteckdosen darauf,dass
die angeschlossenen Verbraucher die zulässige
Gesamtleistung nicht überschreiten.
• Die Netzsteckdose muss jederzeit leicht erreichbar
sein.
• Trennen Sie das Produkt vom Netz, wenn Sie es
längereZeit nicht benutzen.
• Warten Sie, bis die Initialisierung des Tuners
abgeschlossen ist.
• Drücken Sie die kurz [POWER]-Taste (1) am Gerät.
8
Die von Frontier Silicon entwickelte UNDOK-Applikation
(App) bringt Ihnen die volle Kontrolle von Radios und
Speakern auf Ihr Smartphone.
Egal ob bei der Ersteinrichtung des Gerätes, den
Kongurationen von Equalizer und Multiroom oder bei der
Verwaltung Ihrer Lieblingssender –UNDOK bietet Ihnen
alle Features auf dem Smartphone oder Tablet.
Im Folgenden wirddie Ersteinrichtung des Tuners mit
UNDOK erklärt. Den vollen Funktionsumfang des Gerätes
erreichen Sie nur durch die UNDOK App.
Page 13
7.1 Ersteinrichtung des Gerätes mit UNDOK
Alle UNDOK-fähigen Produkte von Hama erzeugen
beim ersten Einschalten, bzw.nachdem Sie diese auf
Werkseinstellungen gesetzt haben, einen sogenannten
Micro-Access-Point– also ein eigenes WLAN-Netz, über
welches Sie sich mit Ihrem Tablet oder Smartphone
verbinden können. Dieser Access-Point wirdimFormat
„Setup Hama PRODUKTBEZEICHNUNG MAC-Adresse“
dargestellt, um eine eindeutige Identikation des Produktes
zu ermöglichen.
Hinweis
Die UNDOK-App verwendet die im System Ihres
Smartphones gewählte Sprache.
7.2 Offenes Netzwerk /Ungeschütztes Netzwerk
Hinweis
• Wir empfehlen Ihnen, keine ungesicherte Verbindung
zu erstellen und Ihr Netzwerk immer gegen fremde
Zugriffe abzusichern.
• Sollte das von Ihnen gewünschte Netzwerk über keine
Sicherungsmaßnahmen verfügen, genügt es das
Netzwerk aus der Liste zu wählen und zu bestätigen.
Das Radio verbindet sich dann umgehend mit dem
Zugangspunkt.
7.2.1 Vorgehen für iOS-Nutzer
• Öffnen Sie die UNDOK-App auf Ihrem iPhone oder iPad
• Drücken Sie auf den Menüpunkt Audiosystem einrichten
• Stellen Sie sicher,dass sich der Tuner im SETUP-Modus
benden. Falls sich das Gerät nicht im SETUP-Modus
bendet, drücken und halten Sie die [Power]-Taste für 5
Sekunden, um das Gerät in den SETUP-Modus zu bringen.
• UNDOK fordert Sie nun auf,sich über die iPhone/iPadEinstellungen mit dem WLAN des Produktes zu verbinden
–wechseln Sie dazu in die Systemeinstellungen des
iPhones und wählen Sie das WLAN-Netzwerk (z.B. Setup
Hama IT900MBT) aus. Wechseln Sie anschließen zurück
zu UNDOK und Drücken Sie auf Weiter
• Vergeben Sie nun eine gewünschte Bezeichnung für
den Tuner (z.B. BüroIT900MBT) und Bestätigen Sie die
Eingabe mit Weiter.
• Bei der anschließenden Sprachauswahl können Sie die
Systemsprache des Tuners festlegen. Bestätigen Sie Ihre
Auswahl mit „Weiter“.
• Nun stehen Ihnen die verschiedenen Möglichkeiten der
Netzwerkkonguration zur Verfügung (ggf.WLAN, WPS
und Ethernet). Klicken Sie die gewünschte Methode an
und UNDOK wechselt zum nächsten Fenster
• Abhängig von der gewählten Methode, können Sie
nun das gewünschte WLAN-Netzwerk auswählen und
kongurieren, oder eine WPS Verbindung herstellen.
• Abschließend verbindet sich der Tuner mit dem Netzwerk
und Sie können durch Drücken von „Mein
• Audiosystem“ das Gerät in UNDOK verwenden
• Die LED-Anzeige (1) der Netzwerkverbindung leuchtet
nun dauerhaft
• Nach erfolgreicher Kongurierung des Tuners muss ein
Wiedergabegerät (Speaker) analog (5) oder digital (3)
angeschlossen werden. Die Steuerung der Musikgruppe
erfolgt ausschließlich über UNDOK.
7.2.2 Vorgehen für Android-Nutzer
• Öffnen Sie die UNDOK-App auf Ihrem Tablet oder
Smartphone
• Drücken Sie auf den Menüpunkt Audiosystem einrichten
• Stellen Sie sicher,dass sich der Tuner im SETUP-Modus
benden. Falls sich das Gerät nicht im SETUP Modus
bendet, drücken und halten Sie die [Power]-Taste für 5
Sekunden, um das Gerät in den SETUP-Modus zu bringen.
• UNDOK fordert Sie nun auf,sich über die iPhone/iPadEinstellungen mit dem WLAN des Produktes zu verbinden
–wechseln Sie dazu in die Systemeinstellungen des
iPhones und wählen Sie das WLAN-Netzwerk (z.B. Setup
Hama IT900MBT) aus. Wechseln Sie anschließen zurück
zu UNDOK und Drücken Sie auf Weiter
• Vergeben Sie nun eine gewünschte Bezeichnung für
den Tuner (z.B. BüroIT900MBT) und Bestätigen Sie die
Eingabe mit Weiter
• Bei der anschließenden Sprachauswahl können Sie die
Sprache des Tuners festlegen. Bestätigen Sie IhreAuswahl
mit „Weiter“.
• Nun stehen Ihnen die verschiedenen Möglichkeiten der
Netzwerkkonguration zur Verfügung (ggf.WLAN, WPS
und Ethernet). Klicken Sie die gewünschte Methode an
und UNDOK wechselt zum nächsten Fenster
• Abhängig von der gewählten Methode, können Sie
nun das gewünschte WLAN-Netzwerk auswählen und
kongurieren, oder eine WPS-Verbindung herstellen.
• Abschließend verbindet sich der Tuner mit dem Netzwerk
und Sie können durch Drücken von „Mein Audiosystem
verwenden“ das Gerät in UNDOK verwenden
• Die LED-Anzeige (1) der Netzwerkverbindung leuchtet
nun dauerhaft.
• Nach erfolgreicher Kongurierung des Tuners muss ein
Wiedergabegerät (Speaker) analog 5) oder digital (3)
angeschlossen werden. Die Steuerung der Musikgruppe
erfolgt ausschließlich über UNDOK.
9
Page 14
8. Verbindungen
Hinweis
• Verbindungen, die mithilfe eines optischen
Signalkabels hergestellt werden, sind unempndlicher
gegenüber elektrischen oder magnetischen Störungen
als Verbindungen, die mithilfe eines 3.5mm
Audiokabels geschlossen werden.
8.1 Verbindung über Optical OUT
Über den digitalen Audioausgang können Sie z.B. Ihre
Lautsprecher an den Tuner anschließen und dessen
Audiosignal über die Lautsprecher wiedergeben.
Hinweis
• Schalten Sie den Tuner aus, bevor Sie ein Endgerät
daran anschließen.
• Entfernen Sie vor dem Anschließen die Schutzkappen
von beiden Enden des optischen Signalkabels.
• Knicken und quetschen Sie das Kabel nicht.
• Für eine Wiedergabe über den optischen Audioanschluss
schließen Sie ein optisches Signalkabel am optischen
Audioausgang (3) des Tuners und am optischen
Audioeingang des Lautsprechers an.
• Drücken Sie [POWER] (1), um den Tuner einzuschalten.
• Das Audiosignal des Tuners wirdnun über die
Lautsprecher wiedergegeben.
8.2 Verbindung über LINE OUT
Über den analogen Audioausgang können Sie z.B. Ihre
Lautsprecher an den Tuner anschließen und dessen
Audiosignal über die Lautsprecher wiedergeben.
Hinweis
• Schalten Sie den Tuner aus, bevor Sie ein Endgerät
daran anschließen.
• Knicken und quetschen Sie das Kabel nicht.
• Für eine Wiedergabe über den analogen Audioanschluss
schließen Sie ein 3.5mm Cinchkabel am analogen
Audioausgang (5) des Tuners und am analogen
Audioeingang des Lautsprechers an.
• Drücken Sie [POWER] (1), um den Tuner einzuschalten.
• Das Audiosignal des Tuners wirdnun über die
Lautsprecher wiedergegeben.
9.Werkseinstellungen
Um den Tuner auf die Werkseinstellung
(Auslieferungszustand) zurückzusetzen, gehen Sie bitte wie
folgt vor:
• Drücken und halten Sie die [POWER]-Taste (1) für
ca. 5Sekunden.
• Alle vorgenommenen Einstellungen werden gelöscht.
Hinweis
• Probleme und Fehlfunktionen können möglicherweise
durch Rücksetzung auf die Werkseinstellungen
behoben werden.
• Es werden jedoch alle Voreinstellungen wie Equalizer,
Favoriten und die Netzwerkprole unwiderruich
gelöscht.
10. Softwareaktualisierung
Es werden ständig Verbesserungen und neue Features für
die Softwareunserer Tuner entwickelt, um mögliche Fehler
zu beheben, den Funktionsumfang zu erweitern usw.
Wir empfehlen Ihnen, stets die zur Verfügung gestellten
Updates auf Ihrem Tuner zu installieren.
Warnung
• Achten Sie darauf,dass eine stabile Stromversorgung
besteht, bevor Sie ein Softwareupdate starten.
• Die Stromunterbrechung während eines SoftwareUpdates kann irreparable Schäden am Radio
hervorrufen!
11. Wartung und Pflege
• Reinigen Sie dieses Produkt nur mit einem fusselfreien,
leicht feuchten Tuch und verwenden Sie keine aggressiven
Reiniger.
• Sollten Sie das Produkt längereZeit nicht nutzen,
schalten Sie das Gerät aus und trennen es von der
Stromversorgung. Lagern Sie es an einem sauberen,
trockenen Ort ohne direkte Sonneneinstrahlung.
12. Haftungsausschluss
Die Hama GmbH &CoKGübernimmt keinerlei Haftung
oder Gewährleistung für Schäden, die aus unsachgemäßer
Installation, Montage und unsachgemäßem Gebrauch
des Produktes oder einer Nichtbeachtung der
Bedienungsanleitung und/oder der Sicherheitshinweise
resultieren.
10
Page 15
13. Service und Support
Bitte wenden Sie sich bei Fragen zum Produkt gerne an die
Hama-Produktberatung.
Hotline: +49 9091 502-115 (Deu/Eng)
WeitereSupportinformationen nden Sie hier:
www.hama.com
14. Entsorgungshinweise
Hinweis zum Umweltschutz:
Ab dem Zeitpunkt der Umsetzung der europäischen
Richtlinien 2012/19/EU und 2006/66/EG in
nationales Recht gilt folgendes: Elektrische und
elektronische Geräte sowie Batterien dürfen nicht
mit dem Hausmüll entsorgt werden. Der Verbraucher ist
gesetzlich verpichtet, elektrische und elektronische Geräte
sowie Batterien am Ende ihrer Lebensdauer an den dafür
eingerichteten, öffentlichen Sammelstellen oder an die
Verkaufsstelle zurückzugeben. Einzelheiten dazu regelt das
jeweilige Landesrecht. Das Symbol auf dem Produkt, der
Gebrauchsanleitung oder der Verpackung weist auf diese
Bestimmungen hin. Mit der Wiederverwertung, der
stoichen Verwertung oder anderen Formen der
Verwertung von Altgeräten/Batterien leisten Sie einen
wichtigen Beitrag zum Schutz unserer Umwelt.
15. Konformitätserklärung
Hiermit erklärt die Hama GmbH &CoKG, dass der
Funkanlagentyp [00054861] der Richtlinie
2014/53/EU entspricht. Der vollständige Text der
EU-Konformitätserklärung ist unter der folgenden
Internetadresse verfügbar:
www.hama.com-> 00054861 -> Downloads.
Frequenzband/
Frequenzbänder
Abgestrahlte maximale
Sendeleistung
Bluetooth: 2.402 -2.480GHz
WiFi: 2.412 -2.472GHz
WiFi: 5.150 -5.350 GHz
WiFi: 5.470 -5.725 GHz
Bluetooth: 4dBm (EIRP)
WiFi: 2.4GHz /19.3dBm (EIRP)
WiFi: 5GHz /17.8dBm (EIRP)
Beschränkungen oder Anforderungen in
Belgien, Bulgarien, Tschechische Republik, Dänemark,
Deutschland, Estland, Irland, Griechenland, Spanien,
Frankreich, Kroatien, Italien, Zypern, Lettland, Litauen,
Luxemburg, Ungarn, Malta, Niederlande, Österreich,
Polen, Portugal, Rumänien, Slowenien, Slowakei, Finnland,
Schweden, Vereinigtes Königreich
Hinweis
Wenn Kanal 36-64 (Kanäle der Frequenz
5150 MHz -5350 MHz) verwendet wird, darf das Gerät
nur in geschlossenen Räumen verwendet werden.
11
Page 16
F Notice d’utilisation
Éléments de commande et d'affichage
Face avant
1. Touche [POWER]
2. LED d’état
Face arrière
3. Connexion optique
4. Connexion électrique (microUSB)
5. Sortie audio (LINE OUT)
6. Port USB de lecture/demise àjour
1. Explication des symboles d‘avertissement et des
remarques
Avertissement
Ce symbole est utilisé pour indiquer des consignes de
sécurité ou pour attirer votreattention sur des dangers et
risques particuliers.
Remarque
Ce symbole est utilisé pour indiquer des informations
supplémentaires ou des remarques importantes.
Risque d’électrocution
Ce symbole indique un risque de contact avec des
parties non isolées du produit susceptibles de conduire
un courant électrique capable de provoquer un risque
d‘électrocution.
2. Contenu de l’emballage
• Tuner streaming “IT900MBT”
• Télécommande
• Chargeur microUSB
• Câble microUSB
• Câble jack 3,5 mm
• Mode d’emploi
• Prospectus Spotify
3. Consignes de sécurité
• Ce produit est destiné àunusage domestiquenon
commercial.
• Protégez-le de toute saleté, humidité,surchauffe et
utilisez-le uniquement dans deslocaux secs.
• Cet appareil, comme tout appareil électrique, doit être
tenu hors de portée des enfants.
• Protégez le produit de toute chute et secousses violentes.
• N‘utilisez pas le produit au delà des indications
mentionnées dans les caractéristiques techniques.
• Conservez les matériaux d’emballages hors de portée des
enfants, risque d‘étouffement.
• Recyclez les matériaux d‘emballage conformément aux
prescriptions locales en vigueur.
• N’apportez aucune modication àl’appareil. Des
modications vous feraient perdrevos droits de garantie.
Risque d’électrocution
• Ne tentez pas d‘ouvrir l‘appareil et cessez de l‘utiliser
en cas de détérioration.
• Cessez de l‘utiliser en cas de détérioration de
l‘adaptateur CA,ducâble adaptateur ou du câble
d‘alimentation.
• Ne tentez pas de réparer l’appareil vous-même ni
d’effectuer des travaux d’entretien. Faites appel àdes
techniciens qualiés pour effectuer tous les travaux
d’entretien.
4.Informations et indications avant la mise en
service
connexion réseau /
préparation de la connexion Internet
Vous pouvez intégrer ce tuner àunréseau local et accéder
ainsi àvotreserveur domestique ou àd’autres sources
de partage. Une connexion Internet supplémentaireest
nécessairedans le réseau
anderecevoirdes stations de radio internet ou accéder à
des contenus médiatiques non enregistrés localement (ux
streaming -Spotify Connect, etc.).
Connexion WLAN/WiFi (réseau sans l)
• Veuillez contrôler que votrerouteur est bien sous tension
et que la connexion Internet est bien établie.
• Activez la connexion WiFi de votrerouteur si celle-ci n’est
pas encoreactivée.
• Pour toute question concernant la conguration de votre
routeur,veuillez consulter le mode d’emploi du routeur
(recherche de pannes /solutions.
• Vous trouverez un guide de conguration pour la
connexion WiFi au chapitre Connexion sans l.
5.Avant la mise en service
Consignes d’utilisation
Vous ne pourrez piloter le tuner de ux streaming
qu’avec l’application UNDOK installée sur votre
smartphone.
12
Page 17
Remarque
Une description détaillée de
l’application UNDOK et de toutes les
fonctions est disponible dans notre
guide UNDOK sur :
www.hama.com->00054861->Downloads
6.Mise en service
6.1 Connexions
• 1sortie audio LINE Out 3,5 mm
• 1connexion optique
• 1port USB type Adelecture/demise àjour
• 1prise d’alimentation électrique (microUSB)
6.2 Mise sous tension
• Insérez la che microUSB du câble de charge fourni dans
le port microUSB (4) du tuner.
• Insérez la che libreducâble de charge microUSB dans
le port du chargeur USB.
Hinweis
Utilisez exclusivement des accessoires d‘origine (ou
des accessoires autorisés par Hama) and‘éviter tout
endommagement du produit.
• Branchez le câble /bloc secteur àune prise de courant.
Avertissement
Remarque concernant la premièremise sous
tension
• Lors de la premièremise sous tension, le tuner
démarreenmode SETUP (conguration).
• La LED d’état (2) se met àclignoter en blanc ;letuner
ne peut êtreconnecté àvotresmartphone qu’avec
l’application UNDOK.
• En cas de problème de connexion, remettez le tuner
en mode SETUP (conguration) en maintenant la
touche [POWER] (1) enfoncée.
Réglage du volume /sourdine
Saisie de mots de passe, textes de recherche, etc
La saisie s’effectue exclusivement via l’application UNDOK.
Mise sous /hors tension /Mode veille /MicroAccess
Point
• Appuyez sur [POWER] pour mettreletunersous tension.
Vous pouvez également mettreletuner sous tension à
l’aide de l’application UNDOK.
• Appuyez sur la touche [POWER] pour mettreletunerhors
tension (mode veille). Après conguration de la
connexion réseau, la connexion est conservée, même sur
un appareil en veille, andepermettreune réactivation à
l’aide de l’application UNDOK.
Remarque
Coupez l’alimentation de l’appareil pour le mettre
totalement hors tension.
7. NDOK –tout àportée de main
• Utilisez le produit uniquement branché àune prise
de courant appropriée. La prise de courant doit être
facilement accessible àtout moment.
• En cas de prises multiples, veillez àceque les
consommateurs branchés ne dépassent pas la
puissance absorbée totale admissible.
• La prise de courant doit êtrefacilement accessible à
tout moment.
• Débranchez l’appareil si vous ne comptez pas l’utiliser
pendant un certain temps.
• Veuillez patienter jusqu’à la ndelaprocédure
d‘initialisation du tuner.
• Appuyez brièvement sur la touche [POWER] (1) de
l’appareil.
L’applicationUNDOK,développée par FrontierSilicon, vous
donne le contrôle total de radios ou de haut-parleursdepuis
votre smartphone.
UNDOK vous propose toutes les fonctions nécessairessur
votre smartphoneouvotre tablette, qu’il s’agissed’effectuer
la premièreconguration de votreappareil, de réglerl’option
multi-pièces ou de gérervos stations préférées.
Le chapitresuivant vous explique comment procéderàla
premièreconguration du tuneravec UNDOK.Vousne
pouvez accéder àtoutesles fonctions de l’appareilqu’avec
l’applicationUNDOK.
13
Page 18
7.1 Première configuration de l’appareil avec
UNDOK
Lors de leur premièremise sous tension ou après le
rétablissement des paramètres par défaut, tous les produits
de Hama compatibles avec UNDOK génèrent ce que
l’on appelle un micro-point d’accès (MicroAccess Point)
:ils’agit d’un réseau WiFi propreàl’aide duquel vous
pouvez vous connecter avec votresmartphone ou votre
tablette. Ce point d’accès apparaît au format „Setup Hama
adresse MACNOM DU PRODUIT” andepermettreune
identication formelle de votreproduit.
Remarque
L’application UNDOK utilise la langue sélectionnée dans
le système de votresmartphone.
7.2 Réseau ouvert /Réseau non sécurisé
Remarque
• Nous vous recommandons de ne pas établir de
connexion non sécurisée et de protéger votreréseau
contretout accès non autorisé.
• Supprimez un réseau ne disposant pas de mesures de
sécurité de la liste, puis conrmez la suppression de
ce réseau. La radio se connecteraautomatiquement
au point d’accès.
7.2.1 Procédure pour les utilisateurs d’iOS
• Ouvrez l’application UNDOK sur votreiPhone ou iPad
• Appuyez sur l’option de menu Congurer un système
audio
• Assurez-vous que le tuner est bien en mode SETUP
(conguration). Si l’appareil n’est pas en mode SETUP,
maintenez la touche [Power] enfoncée pendant 5
secondes pour mettrel’appareil en mode SETUP.
• UNDOK vous demande de vous connecter au réseau
WiFi du produit en passant par les paramètres de votre
iPhone/iPad :sélectionnez les Paramètres système de
votreiPhone, puis le réseau WiFi (Setup Hama IT900MBT
ou autre). Retournez ensuite sur UNDOK et appuyez sur
Suivant
• Donnez un nom àvotretuner (Bureau IT900MBT ou
autre), puis conrmez votresaisie avec Suivant.
• Sélectionnez ensuite la langue que vous souhaitez utiliser
pour votretuner.Conrmez votresélection avec Suivant.
• Différentes possibilités de conguration du réseau
(WiFi, WPS et Ethernet) sont disponibles. Sélectionnez
la méthode souhaitée ;UNDOK passe alors àlafenêtre
suivante.
• En fonction de la méthode choisie, vous pouvez
sélectionner et congurer le réseau WiFi ou établir une
connexion WPS.
• Le tuner se connecteraauréseau et vous pourrez utiliser
l’appareil dans UNDOK en appuyant sur “Mon système
audio”.
• Le voyant LED (1) de la connexion réseau reste allumé en
permanence
• Après conguration conforme du tuner,vous devrez
connecter un appareil de lecture(haut-parleur)
analogique (5) ou numérique (3). Vous ne pouvez piloter
l’ensemble que sur l’application UNDOK.
7.2.2 Procédure pour les utilisateurs d’Android
• Ouvrez l ’application UNDOK sur votretablette ou
smartphone
• Appuyez sur l’option de menu Conguration du système
audio
• Assurez-vous que le tuner est bien en mode SETUP
(conguration). Si l’appareil n’est pas en mode SETUP,
maintenez la touche [Power] enfoncée pendant 5
secondes pour mettrel’appareil en mode SETUP.
• UNDOK vous demande alors de vous connecter au
réseau WiFi de votreproduit dans les paramètres de votre
smartphone/tablette :
ouvrez les paramètres système de votresmartphone et
sélectionnez le réseau WiFi (Setup Hama IT900MBT ou
autre). Retournez ensuite sur UNDOK et appuyez sur
Suivant
• Donnez un nom àvotretuner (Bureau IT900MBT ou
autre), puis conrmez votresaisie avec Suivant.
• Réglage de la langue :
sélectionnez la langue que vous souhaitez utilisez pour
votretuner.Conrmez votresélection avec Suivant.
• Différentes possibilités de conguration du réseau (WiFi,
WPS et Ethernet) sont alors disponibles. Sélectionnez
la méthode souhaitée ;UNDOK passe alors àlafenêtre
suivante.
• En fonction de la méthode choisie, vous pouvez
sélectionner et congurer le réseau WiFi ou établir une
connexion WPS.
• Le tuner se connecte alors au réseau et vous pouvez
utiliser l’appareil dans UNDOK en appuyant sur “Utiliser
mon système audio”.
• Le voyant LED (1) de laconnexion réseau reste allumé en
permanence.
• Après conguration conforme du tuner,vous devrez
connecter un appareil de lecture(haut-parleur)
analogique (5) ou numérique (3). Vous ne pouvez piloter
l’ensemble que sur l’application UNDOK.
14
Page 19

8. Connexions
Remarque
• Les connexions réalisées avec un câble optique sont
plus insensibles aux perturbations électriques ou
magnétiques que les connexions réalisées avec un
câble audio de 3,5 mm.
8.1 Connexion avec Optical OUT
La sortie audio numérique vous permet, par exemple, de
connecter votrehaut-parleur au tuner et de lireson signal
audio via le haut-parleur.
Remarque
• Mettez le tuner hors tension avant d‘y brancher un
appareil.
• Avant toute connexion, retirez les capuchons de
protection des deux extrémités du câble optique.
• Faites attention ànepas plier ni coincer les câbles.
• Pour lirevotrecontenu via des ports audio optiques,
branchez un câble optique àlasortie audio optique (3)
du tuner et àl‘entrée audio optique du haut-parleur.
• Appuyez sur [POWER] (1) pour mettreletuner sous
tension.
• Le signal audio du tuner est désormais lu par les hautparleurs.
8.2 Connexion avec LINE OUT
La sortie audio analogique vous permet, par exemple, de
connecter votrehaut-parleur au tuner et de lireson signal
audio via le haut-parleur.
Remarque
• Mettez le tuner hors tension avant d‘y brancher un
appareil.
• Faites attention ànepas plier ni coincer les câbles.
• Pour lirevotrecontenu via des ports audio analogiques,
branchez un câble RCAde3,5 mm àlasortie audio
analogique (5) du tuner et àl‘entrée audio analogique du
haut-parleur.
• Appuyez sur [POWER] (1) pour mettreletuner sous
tension.
• Le signal audio du tuner est désormais lu par les hautparleurs.
9.Réglages d’usine
Procédez comme suit pour rétablir les paramètres par
défaut (état de livraison) du récepteur :
• Maintenez la touche [POWER] (1) enfoncée pendant env.
5secondes.
• Tous vos réglages seront supprimés.
Remarque
• Certains problèmes et dysfonctionnements peuvent
éventuellement êtreréparés par le rétablissement des
paramètres par défaut.
• Tous les préréglages, comme l’égaliseur,les favoris et
les prols réseaux, seront cependant irrévocablement
supprimés.
10. Mise àjour du logiciel
Les logiciels de nos tuners sont optimisés en permanence
et nous développons de nouvelles caractéristiques ande
pallier àd’éventuelles pannes et augmenter les fonctions
de nos appareils.
Nous vous recommandons donc de toujours installer les
mises àjour disponibles pour votretuner.
Avertissement
• Veuillez contrôler la stabilité de l‘alimentation
électrique avant de lancer une mise àjour du logiciel.
• Une interruption de l‘alimentation pendant une mise
àjour est susceptible de provoquer une détérioration
irréparable de la radio.
11. Nettoyage et entretien
• Nettoyez ce produit uniquement àl’aide d’un chiffon
non pelucheux légèrement humide ;évitez tout détergent
agressif.
• Débranchez l‘adaptateur CA de la source de courant si
vous ne comptez pas utiliser l‘appareil pendant un certain
temps. Entreposez-le dans un local sec, propreetprotégé
des rayons directs du soleil.
12. Exclusion de garantie
La société Hama GmbH &CoKGdécline toute
responsabilité en cas de dommages provoqués par une
installation, un montage ou une utilisation non conformes
du produit ou encoreprovoqués par un non respect des
consignes du mode d‘emploi et/ou des consignes de
sécurité.
15
Page 20
13. Service et assistance
En cas de question concernant le produit, veuillez vous
adresser au service de conseil produits de Hama.
Ligne téléphonique directe :+49 9091 502-115 (allemand/
anglais)
Vous trouverez ici de plus amples informations concernant
l‘assistance :www.hama.com
14. Consignes de recyclage
Remarques concernant la protection de
l’environnement:
Conformément àladirective européenne
2012/19/EU et 2006/66/CE, et and‘atteindreun
certain nombred‘objectifsenmatièredeprotection
de l‘environnement, les règles suivantes doivent
êtreappliquées: Les appareils électriques et électroniques
ainsi que les batteries ne doivent pas êtreéliminés avec les
déchets ménagers. Le pictogramme “picto” présent sur le
produit, son manuel d‘utilisation ou son emballage indique
que le produit est soumis àcette réglementation. Le
consommateur doit retourner le produit/la batterie usager
aux points de collecte prévus àcet effet. Il peut aussi le
remettreàunrevendeur.Enpermettant ennlerecyclage
des produits ainsi que les batteries, le consommateur
contribueraàla protection de notreenvironnement. C‘est
un acte écologique.
15. Déclaration de conformité
Le soussigné, Hama GmbH &CoKG, déclare que
l‘équipement radioélectrique du type [00054861]
est conforme àladirective 2014/53/UE. Le texte
complet de la déclaration UE de conformité est disponible à
l‘adresse internet suivante:
www.hama.com->00054861->Downloads.
Bluetooth: 2.402 -2.480GHz
Bandes de fréquences
Puissance de
radiofréquence maximale
WiFi: 2.412 -2.472GHz
WiFi: 5.150 -5.350 GHz
WiFi: 5.470 -5.725 GHz
Bluetooth: 4dBm (EIRP)
WiFi: 2.4GHz /19.3dBm (EIRP)
WiFi: 5GHz /17.8dBm (EIRP)
Restrictions ou exigences en
Belgique, Bulgarie, République tchèque, Danemark,
Allemagne, Estonie, Irlande, Grèce, Espagne, France,
Croatie, Italie, Chypre, Lettonie, Lituanie, Luxembourg,
Hongrie, Malte, Pays-Bas, Autriche, Pologne, Portugal,
Roumanie, Slovénie, Slovaquie, Finlande, Suède, RoyaumeUni
Remarque
Si les canaux 36-64 (fréquence 5,150GHz –5,350GHz)
sont employés dans le réseau Wi-Fi 5GHz, ce produit ne
doit êtreutilisé que dans des espaces fermés.
16
Page 21
E Instrucciones breves
Elementos de manejo eindicadores
Lado fronta
1. Tecla [Power]
2. LED de estado
Parte posterior
3. Conexión óptica
4. Conexión eléctrica (MicroUSB)
5. Conector hembraLINE Out
6. USB Playback /puerto de actualización
1. Explicación de los símbolos de aviso ydelas
indicaciones
Aviso
Se utiliza paracaracterizar las indicaciones de
seguridad oparallamar la atención sobrepeligros y
riesgos especiales.
Nota
Se utiliza paracaracterizar informaciones adicionales o
indicaciones importantes.
Peligrodesufrir una descarga eléctrica
Este símbolo hace referencia al peligrodecontacto con
partes no aisladas del producto que pueden conducir
una tensión peligrosa de una intensidad tal que puede
provocar una descarga eléctrica.
2. Contenido del paquete
• Sintonizador de streaming “IT900MBT”
• Mando adistancia
• Cargador MicroUSB
• Cable MicroUSB
• Cable con jack de 3,5 m
• Instrucciones de uso
• Flyer Spotify
3. Instrucciones de seguridad
• El producto es para el usodoméstico privado, no comercial.
• Proteja el productodelasuciedad,lahumedad, el calor
excesivo yutilícelo sólo en recintos secos.
• Este producto, como todoslos productoseléctricos, no debe
estar en manos de los niños.
• No deje caer el producto ni lo someta asacudidasfuertes.
• No opereelproductofuera de loslímites de potencia
indicados en los datos técnicos.
• Mantenga el material de embalajefueradel alcancedelos
niños, existe peligrodeasxia.
• Deseche el materialdeembalajeenconformidad conlas
disposiciones localessobreeldesecho vigentes.
• No realice cambios en el aparato.Estoconllevaría la pérdida
de todos los derechosdelagarantía.
Peligrodesufrir una descarga eléctrica
• No abraelproducto ynolosiga operando de
presentar deterioros.
• No utilice el producto si el adaptador de AC,el
adaptador del cable oelcable eléctrico están
dañados.
• No intente mantener oreparar el producto por
cuenta propia. -Encomiende cualquier trabajo de
mantenimiento al personal especializado competente.
4.Información ynotas relevantes antes de la puesta
en marcha
Conexión de red/Preparación de la conexión a
Internet
Tiene la posibilidad de integrar este sintonizador radio en
una redlocal, accediendo así aunservidor doméstico u
otras fuentes habilitadas. Para recibir radio por Internet
oacceder acontenidos multimedia no almacenados
localmente (de tipo streaming, p. ej. Spotify Connect), se
requiereadicionalmente una conexión aInternet en la red.
Conexión WLAN/Wi-Fi (red inalámbrica)
• Asegúrese de que el router está encendido ydeque se ha
establecido una conexión aInternet/a la red.
• Si no lo ha hecho todavía, active la conexión WLAN de
su router.
• Si surgieran preguntas sobrelaconguración del router,
emplee las instrucciones de uso del router paradetectar
el fallo/solucionar el problema.
• Encontrará instrucciones precisas paralaconguración
de la conexión WLAN en el apartado Conexión
inalámbrica.
5.Antes de la puesta en funcionamiento
Instrucciones de manejo
El manejo del sintonizador de streaming se efectúa
exclusivamente mediante la aplicación UNDOK de su
smartphone.
17
Page 22
Nota
Nota –Alencender por primeravez
Encontrará una descripción detallada
de la aplicación UNDOK ydel alcance
completo de sus funciones en nuestra
guía UNDOK, en:
www.hama.com->00054861->Downloads
6.Puesta en funcionamiento
6.1 Conexiones
• 1LINE Out 3,5 mm
• 1conexión óptica
• 1USB tipo APlayback /puerto de actualización
• 1suministrodecorriente (MicroUSB)
6.2 Encendido
• Conecte el cable de carga microUSB suministrado al
puerto microUSB (4) del sintonizador.
• Conecte el conector libredel cable de carga microUSB al
cargador USB.
Hinweis
Utilice únicamente accesorios originales (o: accesorios
autorizados por Hama) paraevitar daños en el producto.
• Conecte el cable de red/la fuente de alimentación con
una toma de corriente correctamente instalada.
Aviso
• En el primer encendido, el sintonizador se inicia en el
modo SETUP.
• El LED de estado (2) comienza aparpadear de color
blanco yelsintonizador solo puede conectarse con su
smartphone mediante la aplicación UNDOK.
• En caso de producirse problemas de conexión, puede
retornar al modo SETUP del sintonizador manteniendo
pulsada la tecla
Regular el volumen/mute
Introducción de contraseñas, textos de búsqueda,
etc.
La introducción se efectúa exclusivamente através de la
aplicación UNDOK.
Encendido/apagado/ Standby /MicroAccess Point
• Pulse [POWER] paraencender el sintonizador.
Alternativamente, es posible encender el sintonizador a
través de la aplicación UNDOK.
• Pulse [POWER] paraapagar el sintonizador (Standby).
Una vez congurada una conexión de red, esta se
mantiene incluso en el modo Standby parafacilitar el
encendido através de la aplicación UNDOK.
Nota
Desconecte el dispositivo de la alimentación de corriente
paraapagarlo totalmente.
7. UNDOK –Todo en la palma de su mano
• Utilice el producto sólo conectado auna toma de
corriente autorizada. La toma de corriente debe estar
fácilmente accesible en todo momento.
• En caso de tomas de corriente múltiples, asegúrese de
que los consumidores conectados no sobrepasan el
total de potencia admisible.
• La toma de corriente debe estar fácilmente accesible
en todo momento.
• Desconecte el producto de la redsinovaaemplearse
durante un tiempo prolongado.
• Espereaque haya concluido la inicialización del
sintonizador.
• Pulse brevemente la tecla [POWER] (1) del dispositivo.
18
La aplicación (app) UNDOK desarrollada por Frontier Silicon
traslada asusmartphone el control pleno de radios y
altavoces.
Tanto si desea llevar acabo la conguración inicial del
dispositivo como si desea congurar multisala (Multiroom)
o, incluso, gestionar sus emisoras favoritas: UNDOK le
ofrece todas las características en el smartphone otablet.
En el siguiente apartado se explica la conguración inicial
del sintonizador mediante UNDOK. La aplicación UNDOK
es la única forma de disfrutar del alcance completo del
dispositivo.
Page 23

7.1 Configuración inicial del dispositivo con UNDOK
Todos los productos de Hama compatibles con UNDOK
generan, con el primer encendido ouna vez restablecidos
sus ajustes de fábrica, lo que se denomina un Micro
Access Point, es decir,una redWLAN propia através de la
cual puede conectarse con su tablet osmartphone. Este
Access Point se representa con el formato «Setup Hama
DENOMINACIÓN DEL PRODUCTO dirección MAC» para
permitir una identicación inequívoca del producto.
Nota
• La aplicación UNDOK emplea el idioma seleccionado
en el sistema de su smartphone.
7.2 Red abierta/no protegida
Nota
• Le recomendamos no crear una conexión no
protegida yasegurarse de proteger su redentodo
momento frente aaccesos no autorizados.
• Si la reddeseada no cuenta con medidas de
seguridad, basta con seleccionar dicha redenlalista
yconrmar.Laradio se conecta inmediatamente con
el punto de acceso.
7.2.1 Procedimiento para usuarios de iOS
• Abralaaplicación UNDOK en su iPhone oiPad
• Pulse el punto de menú Congurar sistema de audio
• Asegúrese de que el sintonizador se encuentraenel
modo SETUP.Sieldispositivo no se encuentraenelmodo
SETUP,pulse ymantenga pulsada la tecla [Power] durante
5segundos parallevar al dispositivo al modo SETUP.
• UNDOK le solicita ahoraconectarse, através de los
ajustes de iPhone/iPad, con la redWLAN del producto.
Para ello, pase alos ajustes de sistema del iPhone y
seleccione la redWLAN (p. ej. Setup Hama IT900MBT).
Seguidamente, vuelva aUNDOK ypulse Siguiente
• Ahora, otorgue la denominación que desee parael
sintonizador (p. ej., Ocina IT900MBT) yconrme con
Siguiente.
• En la selección de idioma que sigue acontinuación
puede establecer el idioma de sistema del sintonizador.
Conrme la selección con «Siguiente».
• Ahoratiene asudisposición las diferentes posibilidades
de conguración de la red(según el caso, WLAN, WPS y
Ethernet). Haga clic en el método deseado yUNDOK pasa
alasiguiente ventana
• Según el método elegido, ahorapuede seleccionar
ycongurar la redWLAN deseada oestablecer una
conexión WPS.
• Finalmente, el sintonizador se conecta con la red,
pudiendo usted utilizar el dispositivo en UNDOK pulsando
«Mi sistema de audio»
• El indicador LED (1) de la conexión de redluce ahora
permanentemente.
• Tras la correcta conguración del
• sintonizador,esnecesario conectar un dispositivo de
reproducción (altavoz) analógico (5) odigital (3). El
control del grupo musical se efectúa exclusivamente a
través de UNDOK.
7.2.2 Procedimiento para usuarios de Android
• Abralaaplicación UNDOK en su tablet osmartphone
• Pulse la ooción de menú Congurar sistema de audio
• Asegúrese de que el sintonizador se encuentraenel
modo SETUP.Sieldispositivo no se encuentraenelmodo
SETUP,pulse ymantenga pulsada la tecla [Power] durante
5segundos parallevar al dispositivo al modo SETUP.
• UNDOK le solicita conectarse con la redWLAN del
producto através de los ajustes de iPhone/iPad.
Para ello, acuda alos ajustes de sistema del iPhone y
seleccione la redWLAN (p. ej.. Setup Hama IT900MBT) .
Seguidamente, vuelva aUNDOK ypulse Siguiente
• Ahora, otorgue la denominación que desee parael
sintonizador (p.ej., Ocina IT900MBT) yconrme con
Siguiente
• En la selección de idioma que sigue acontinuación
puede establecer el idioma del sintonizador.Conrme la
selección con «Siguiente».
• Ahora, tiene asudisposición las diferentes posibilidades
de conguración de la red(según el caso, WLAN, WPS y
Ethernet). Haga clic en el método deseado yUNDOK pasa
alasiguiente ventana
• Según el método elegido, ahorapuede seleccionar
ycongurar la redWLAN deseada oestablecer una
conexión WPS.
• Finalmente, el sintonizador se conecta con la redyusted
puede emplear el dispositivo desde UNDOK pulsando
«Emplear mi sistema de audio»
• El indicador LED (1) de la conexión de redluce ahorade
forma permanente.
• Tras la correcta conguración del sintonizador,es
necesario conectar un dispositivo de reproducción
(altavoz) analógico (5) odigital (3). El control del grupo
musical se efectúa exclusivamente através de UNDOK.
19
Page 24
8. Conexiones
Nota
• Las conexiones que se establecen mediante un
cable óptico de señal son menos sensibles frente
alas interferencias eléctricas omagnéticas que las
conexiones que se establecen con un cable de audio
de 3,5mm.
8.1 Conexión mediante Optical OUT
La salida digital de audio le permite conectar p. ej. sus
altavoces al sintonizador yreproducir su señal de audio a
través de los altavoces.
Nota
• Apague el sintonizador antes de conectar un terminal
al mismo.
• Antes de proceder alaconexión, retirelas caperuzas
protectoras que se encuentran en ambos extremos del
cable de señal óptico.
• No doble ni aplaste el cable.
• Para una reproducción mediante la conexión óptica de
audio, conecte un cable óptico de señal alasalida óptica
de audio (3) del sintonizador yala entrada óptica de
audio del altavoz.
• Pulse [POWER] (1) paraencender el sintonizador.
• La señal de audio del sintonizador se reproduce ahoraa
través de los altavoces.
8.2 Conexión mediante LINE OUT
La salida analógica de audio le permite conectar p. ej. sus
altavoces al sintonizador yreproducir su señal de audio a
través de los altavoces.
Nota
• Apague el sintonizador antes de conectar un terminal
al mismo.
• No doble ni aplaste el cable.
• Para una reproducción mediante la conexión analógica
de audio, conecte un cable RCAde3,5 mm alasalida
analógica de audio (5) del sintonizador yala entrada
analógica de audio del altavoz.
• Pulse [POWER] (1) paraencender el sintonizador.
• La señal de audio del sintonizador se reproduce ahoraa
través de los altavoces.
9.Ajustes de fábrica
Para restablecer el sintonizador alos ajustes de fábrica
(estado de suministro), proceda como sigue:
• Pulse ymantenga pulsada la tecla [POWER] (1) durante
aprox. 5segundos.
• Todos los ajustes realizados se borran.
Nota
• Algunos problemas yfallos en el funcionamiento
pueden solucionarse restableciendo los ajustes de
fábrica.
• Sin embargo, todos los ajustes previos, como el
ecualizador,los favoritos ylos perles de redse
borran denitivamente.
10. Actualización del software
Continuamente se desarrollan mejoras ynuevas
características paraelsoftwaredenuestros sintonizadores,
parasolucionar posibles errores, ampliar la funcionalidad,
etc.
Le recomendamos que instale siemprelas actualizaciones
disponibles en su sintonizador.
Aviso
• Verique la estabilidad y abilidad de la alimentación
de corriente antes de iniciar una actualización de
software.
• La interrupción de la alimentación de corriente
durante una actualización de softwarepuede
provocar daños irreparables en la radio.
11. Mantenimiento ycuidado
• Limpie este producto sólo con un paño ligeramente
humedecido que no deje pelusas ynoutilice detergentes
agresivos.
• Si no va autilizar el producto durante un periodo
prolongado de tiempo, apague el aparato ydesconéctelo
de la alimentación de corriente. Guárdelo en un lugar
limpio yseco que no esté expuesto alaradiación directa
del sol.
12. Exclusión de responsabilidad
Hama GmbH &CoKGnose responsabiliza ni concede
garantía por los daños que surjan por una instalación,
montaje omanejo incorrectos del producto opor la no
observación de las instrucciones de manejo y/o de las
instrucciones de seguridad.
20
Page 25

13. Servicio ysoporte
Si tiene que hacer alguna consulta sobreelproducto,
diríjase al asesoramiento de productos Hama.
Línea directa: +49 9091 502-115 (Alemán/Inglés)
Encontrar más información de soporte aquí:
www.hama.com
14. Instrucciones para desecho yreciclaje
Nota sobrelaprotección medioambiental:
Después de la puesta en marcha de la directiva
Europea 2012/19/EU y2006/66/EU en el sistema
legislativo nacional, se aplicaralosiguiente: Los
aparatos eléctricos yelectrónicos, así como las
baterías, no se deben evacuar en la basuradoméstica. El
usuario está legalmente obligado allevar los aparatos
eléctricos yelectrónicos, así como pilas ypilas recargables,
al nal de su vida útil alos puntos de recogida comunales
oadevolverlos al lugar donde los adquirió. Losdetalles
quedaran denidos por la ley de cada país. El símbolo en el
producto, en las instrucciones de uso oenelembalaje hace
referencia aello. Gracias al reciclaje, al reciclaje del
material oaotras formas de reciclaje de aparatos/pilas
usados, contribuye Usted de forma importante ala
protección de nuestromedio ambiente.
15. Declaración de conformidad
Porlapresente, Hama GmbH &CoKG, declaraque
el tipo de equipo radioeléctrico [00054861] es
conforme con la Directiva 2014/53/UE. El texto
completo de la declaración UE de conformidad está
disponible en la dirección Internet siguiente:
www.hama.com->00054861->Downloads.
Banda obandas de
frecuencia Banda o
bandas de frecuencia
Potencia máxima de
radiofrecuencia
Restricciones oRequisitos en
Bélgica, Bulgaria, República Checa, Dinamarca, Alemania,
Estonia, Irlanda, Grecia, España, Francia, Croacia, Italia,
Chipre, Letonia, Lituania, Luxemburgo, Hungría, Malta,
Países Bajos, Austria, Polonia, Portugal, Rumanía,
Eslovenia, Eslovaquia, Finlandia, Suecia, Reino Unido
Nota
Bluetooth: 2.402 -2.480GHz
WiFi: 2.412 -2.472GHz
WiFi: 5.150 -5.350 GHz
WiFi: 5.470 -5.725 GHz
Bluetooth: 4dBm (EIRP)
WiFi: 2.4GHz /19.3dBm (EIRP)
WiFi: 5GHz /17.8dBm (EIRP)
Si se emplean los canales 36-64 (frecuencia 5,150GHz
–5,350GHz) en la redWLAN de 5GHz, el producto
solo deberá utilizarse en espacios cerrados.
21
Page 26
R Краткое руководство
Органы управления ииндикации
Передняя панель
1. Кнопка [POWER] (питание)
2. Светодиодный индикаторсостояния
Задняя панель
3. Оптическое соединение
4. Разъем питания (Micro-USB)
5. Гнездо LINE Out
6. Порт USB для воспроизведения/обновления
1. Предупредительные пиктограммы и
инструкции
Внимание
Данным значком отмечены инструкции,
несоблюдение которых можетпривести копасной
ситуации.
Примечание
Дополнительная или важная информация.
Опасность поражения электрическим
током
Значок предупреждает об опасности поражения
высоким напряжением вслучае касания
неизолированных токоведущих деталей.
2. Содержимое упаковки
• Тюнер для потоковой передачи IT900MBT
• Пультдистанционногоуправления
• Зарядное устройство Micro-USB
• Кабель Micro-USB
• Аудиокабель 3,5 мм
• Инструкция по эксплуатации
• Листовка Spotify
3. Указания по технике безопасности
• Изделие предназначено толькодля домашнего
применения.
• Беречь от грязи, влаги иисточников тепла.
Эксплуатировать тольковсухих помещениях.
• Также,как илюбые электроприборы, не давайте
изделие детям!
• Не ронять. Беречь от сильных ударов.
• Соблюдатьтехнические характеристики.
• Упаковку не давать детям: опасность асфиксии.
• Сразу утилизировать упаковку всоответствии с
местными нормами.
• Запрещается вносить изменения вконструкцию.
Впротивном случае гарантийные обязательства
аннулируются.
Опасность поражения током
• Изделие не открывать. Запрещается
эксплуатировать неисправное изделие.
• Запрещается эксплуатация при неисправном блоке
питания или поврежденном кабеле питания.
• Запрещается самостоятельно выполнять
техническое обслуживание или ремонт устройства.
Любые работы по техническому обслуживанию
или ремонту разрешается выполнять только
квалифицированному персоналу.
4.Информация иуказания перед вводом в
эксплуатацию
подключением ксети /
Подготовкаинтернет-соединения
Этот тюнерможно интегрировать влокальную
сеть сдоступом кдомашнему серверу или другим
источникам. Для приема интернет-радио
или доступа ксохраненным на других носителях
мультимедийным материалам (потоковая передача,
например,Spotify Connect) всети необходимо настроить
интернет-соединение.
Подключение WLAN/Wi-Fi (беспроводная сеть)
• Убедитесь втом, чтомаршрутизаторвключен, и
установлено соединение синтернетом.
• При необходимости включите на маршрутизаторе
беспроводное соединение WLAN.
• Вслучае возникновения вопросов относительно
настройки маршрутизатора обратитесь кинструкции
по эксплуатации маршрутизатора, втом числе главе
по поиску иустранению неисправностей.
• Точное описание настройки подключения WLAN
содержится вразделе Беспроводное подключение.
5.Перед вводом вэксплуатацию
Инструкции по эксплуатации
Управление потоковым тюнером осуществляется
исключительно спомощью приложения UNDOK для
смартфона.
22
Page 27
Примечание
Примечание — первое включение
Подробное описание приложения
UNDOK иего функциональных
возможностей смотрите всправке
UNDOK по адресу:
www.hama.com->00054861->Downloads
6.Ввод вэксплуатацию
6.1 Разъемы
• 1 разъем LINE Out 3,5 мм
• 1 оптическое соединение
• 1 порт USB для воспроизведения/обновления
• 1 разъем питания (Micro-USB)
6.2 Включение
• Подключите зарядный кабель микро-USB (в
комплекте) кразъему микро-USB (4) тюнера.
• Подсоедините другой конец зарядногокабеля микро-
USB ксовместимому зарядному устройству спортом
USB.
Hinweis
Во избежание повреждения изделия разрешается
применять толькозаводские принадлежности (или с
сертификатомкомпании Hama).
• Вставьте вилку кабеля питания / блок питания в
розетку, установленную надлежащим образом.
Внимание
• При первом включении тюнер находится врежиме
настройки (SETUP).
• Светодиодный индикаторсостояния (2) начинает
мигатьбелым цветом, иможно подключить тюнер
ксмартфону спомощью приложения UNDOK .
• Вслучае проблем подключения можно снова
перевести тюнер врежим настройки (SETUP),
нажав иудерживая кнопку
Регулирование/отключение громкости
Вводпаролей, тексты для поискаит.п.
Вводосуществляется исключительно спомощью
приложения UNDOK.
Включение / выключение / режим ожидания /
микроточкадоступа
• Для того чтобы включить тюнер нажмите кнопку
[POWER] (питание). Можно такжевключить тюнер с
помощью приложения UNDOK.
• Для того чтобы выключить тюнер нажмите кнопку
[POWER] (режим ожидания). После настройки
подключения ксети тюнер такжеостается врежиме
ожидания, чтобы можно было включить егос
помощью приложения UNDOK.
Примечание
Для того чтобы полностью выключить устройство
отключите егоотсети
7. UNDOK — все вваших руках
• Подключайте устройство толькокрозеткам,
которые разрешено использовать втаких целях.
Розетка должна находиться влегкодоступном
месте.
• При подключении кколодке снесколькими
розетками убедитесь, чтообщая мощность
потребителей не превышает допустимую.
• Розетка должна находиться влегкодоступном
месте.
• Если устройство не используется втечение
длительноговремени,
• Дождитесь, пока завершится инициализация тюнера.
• Коротконажмите кнопку [POWER] (питание)(1)
устройства.
Приложение UNDOK, разработанное компанией Frontier
Silicon, позволяет полностью контролировать работу
радиоприемников идинамиков со смартфона.
Будь то сопряжение сустройством, настройка
системы «мультирум» или управление любимыми
радиостанциями —UNDOK позволяет вам
использовать всеэти функции со смартфона или
планшета.
Порядок настройки тюнера спомощью приложения
UNDOK описан ниже. Доступ ко всем функциям
устройства возможентолькоспомощью приложения
UNDOK.
23
Page 28

7.1 Первое сопряжение устройства с
приложением UNDOK
Всеустройства Hama споддержкойприложения UNDOK при
первом включении или послевосстановления заводских
настроексоздаю твиртуальную точку доступа, т. е. собственную
беспроводную сеть, через которую можно установить
соединениеспланшетом илисмартфоном. Этаточкадоступа
представлена вформате «Setup Hama НАИМЕНОВАНИЕ
ИЗДЕЛИЯ MAC-адрес» для идентификации изделия.
Примечание
Язык интерфейса приложения UNDOK будет
соответствовать языку, выбранному внастройках
смартфона.
7.2 Общественная/незащищенная сеть
Примечание
• Мы рекомендуем не создавать незащищенные
подключения ивсегдазащищать сеть от
несанкционированногодоступа.
• Если ваша сеть не требует мер защиты, достаточно
простовыбрать сеть из списка иподтвердить.
После этого радиоприемник подключится кточке
доступа.
7.2.1 Порядок действий для пользователей iOS
• Откройте приложение UNDOK на iPhone или iPad
• Выберите пункт меню Audiosystem einrichten
(«Настройка аудиосистемы»).
• Убедитесь втом, чтотюнер находится врежиме
настройки (SETUP). Если устройство не находится в
режиме настройки, нажмите иудерживайте кнопку
[Power] (Питание) втечение 5 сдля перевода
устройства врежим настройки (SETUP).
• Вприложении UNDOK появится запрос на
подключение кбеспроводной сети устройства
через настройки iPhone/iPad. Для этого перейдите
всистемные настройки iPhone ивыберите
беспроводную сеть (например,Setup Hama IT900MBT).
Затем вернитесь вприложение UNDOK инажмите
кнопку Weiter («Далее»).
• Введите обозначение тюнера (например,Oce
IT900MBT) инажмите кнопку Weiter («Далее») для
подтверждения.
• При последующем выборе языка можно настроить
язык системы для тюнера. Нажмите кнопку Weiter
(«Далее») для подтверждения.
• На следующем этапе вам предстоит выбрать
технологию передачи данных для сети (WLAN,
WPS и Ethernet). После выбора предпочтительной
технологии связи приложение UNDOK перейдет к
следующему экрану.
• Взависимости от выбранной технологии вы
сможете выбрать беспроводную сеть или настроить
защищенное соединение по протоколу WPS.
• После этого тюнер подключится ксети, иим
можно будет управлять спомощью меню «Моя
аудиосистема» вприложении UNDOK.
• Индикаторсетевогосоединения (1) будет светиться
непрерывно.
• После успешной настройки тюнера необходимо
подключить аналоговое (5) или цифровое (3)
устройство воспроизведения (громкоговоритель).
Управление аудиосистемой осуществляется
исключительно спомощью приложения UNDOK.
7.2.2 Порядок действий для пользователей
Android
• Откройте приложение UNDOK на своем планшете или
смартфоне
• Выберите пунктменю «Настройка аудиосистемы»
• Убедитесьвтом, чтотюнер находится врежиме
настройки (SETUP). Если устройство не находится в
режиме настройки, нажмите иудерживайтекнопку
[Power] (питание) втечение 5 сдля перевода устройства
врежим настройки (SETUP).
• Приложение UNDOK предложит спомощью настроек
iPhone/iPad подключиться кбеспроводной сети изделия.
Для этогонеобходимо войтивменюсистемных настроек
iPhone ивыбрать беспроводнуюсеть (например,
настройка HamaIT900MBT). Затемвернитесьв
приложение UNDOK инажмите кнопку Weiter («Далее»).
• Введите обозначение тюнера (например,Oce
IT900MBT) инажмите кнопку Weiter(«Далее») для
подтверждения.
• При последующем выборе языка можно настроить язык
системы для тюнера. Нажмите кнопку Weiter («Далее»)
дляподтверждения.
• На следующем этапе вампредстоитвыбрать технологию
передачи данныхдля сети (WLAN, WPS и Ethernet). После
выбора предпочтительнойтехнологиисвязи приложение
UNDOK перейдеткследующемуэкрану.
• Взависимости от выбранной технологии вы сможете
выбратьбеспрово дную сеть или настроить защищенное
соединение по протоколу WPS.
• Взаключениетюнерподключится ксети, ивысможете
использовать устройство вприложении UNDOK, нажав
кнопку «MeinAudiosystem verwenden» («Использовать
мою аудиосистему»).
• Светодиодный индикатор (1) сетевогосоединениягорит
непрерывно.
• После успешной настройки тюнеранеобходимо
подключить аналоговое (5) илицифровое (3) устройство
воспроизведения (громкоговоритель). Управление
аудиосистемойосуществляется исключительно с
помощьюприложения UNDOK.
24
Page 29
8. Соединение
Примечание
• Соединения, созданные спомощью оптического
сигнальногокабеля, менее подвержены
электрическим или магнитным помехам,
чем соединения для которых используется
аудиокабель сразъемом 3,5 мм.
8.1 Подключение спомощью оптического
выхода Optical OUT
Через цифровой аудиовыход вы можете подключить к
тюнеру динамики ивоспроизводить егосигнал через
этиустройства.
Примечание
• Перед подключением внешнегоустройства
выключите питание тюнера.
• Перед подключением снимите защитные колпачки
собоих концов оптическогосигнальногокабеля.
• Не сгибайте инезажимайте кабель.
• Для воспроизведения через оптический аудиовход
подключите оптический сигнальный кабель к
оптическому аудиовыходу (3) тюнера икоптическому
аудиовходудинамика.
• Нажмите кнопку [POWER] (питание)(1), чтобы
включить тюнер.
• Аудиосигнал тюнера воспроизводится через динамик.
8.2 Подключение спомощью выхода LINE OUT
Через аналоговый аудиовыход вы можете подключить
ктюнеру динамики ивоспроизводить егосигнал через
этиустройства.
Примечание
• Перед подключением внешнегоустройства
выключите питание тюнера.
• Не сгибайте инезажимайте кабель.
• Для воспроизведения через аналоговый аудиовход
подключите кабель сразъемом 3,5 мм каналоговому
аудиовыходу (5) тюнера иканалоговому аудиовходу
динамика.
• Нажмите кнопку [POWER] (питание)(1), чтобы
включить тюнер.
• Аудиосигнал тюнера воспроизводится через динамик.
9. Заводские настройки
Для восстановления заводских настроек тюнера
(состояния при поставке) выполните следующие
действия:
• Нажмите иудерживайте кнопку [POWER] (1) около 5
секунд.
• Всем измененным параметрам будут присвоены
значения по умолчанию.
Примечание
• Probleme und Fehlfunktionen können möglicherweise
durch Rücksetzung auf die Werkseinstellungen
behoben werden.
• Es werden jedoch alle Voreinstellungen wie Equalizer,
Favoriten und die Netzwerkprole unwiderruich
gelöscht.
10. Обновление программного обеспечения
Мы постоянно совершенствуем иразрабатываем
новые функции для программногообеспечения
наших тюнеров, чтобы исправить возможные ошибки,
расширить возможности ит.д.
Мы рекомендуем вам всегда устанавливать на ваш
тюнер вседоступные обновления.
Внимание
• Перед запуском обновления программного
обеспечения убедитесь втом, чтоисточник
питания работает стабильно.
• Отключение питания во время обновления
программногообеспечения можетпривести к
необратимым повреждениям радиоприемника!
11. Уход итехобслуживание
• Чистку изделия производить толькобезворсовой
слегка влажной салфеткой. Запрещается применять
агрессивные чистящие средства.
• Если изделие не используется на протяжении долгого
времени, выключите егоиотключите от сети. Храните
еговчистом сухом месте, недоступном для прямого
солнечногоизлучения.
12. Отказ от гарантийных обязательств
Компания Hama GmbH &CoKGне несет ответственность
за ущерб, возникший вследствие неправильного
монтажа, подключения ииспользования изделия не
по назначению, атакже вследствие несоблюдения
инструкции по эксплуатации итехники безопасности.
25
Page 30
13. Отдел техобслуживания
По вопросам ремонтаили замены неисправных
изделий обращайтесь кпродавцу или всервисную
службукомпании Hama.
Горячая линия отдела техобслуживания:
+49 9091 502-115 (немецкий, английский)
Подробнее смотрите здесь:www.hama.com
13. Инструкции по утилизации
Охрана окружающей среды:
Смоментапереходанационального
законодательства на европейские нормативы
2012/19/EU и 2006/66/EU действительно
следующее: Электрические иэлектронные
приборы, атакже батареи запрещаетсяутилизировать с
обычныммусором. Потребитель, согласно закону, обязан
утилизироватьэлектрическиеиэлектронные приборы, а
такжебатареи иаккумуляторы после их использования в
специально предназначенных для этого пунктах сбора,
либо впунктах продажи. Детальная регламентация этих
требований осуществляется соответствующимместным
законодательством. Необходимость соблюдения данных
предписаний обозначается особым значком на изделии,
инструкции по эксплуатацииили упаковке. При
переработке, повторномиспользовании материалов или
при другой формеутилизации бывшихвупотреблении
приборов Вы помогаете охране окружающей среды. В
соответствииспредписаниями по обращению с
батареями, вГермании вышеназванные нормативы
действуют дляутилизации батарейиаккумуляторов.
Ограничения или требования в
Бельгия, Болгария, Чешская Республика, Дания,
Германия, Эстония, Ирландия, Греция, Испания,
Франция, Хорватия, Италия, Кипр, Латвия, Литва,
Люксембург, Венгрия, Мальта, Нидерланды, Австрия,
Польша, Португалия, Румыния, Словения, Словакия,
Финляндия, Швеция, Великобритания
Примечание
При использовании каналов 36—64 (частота
5,150—5,350 ГГц) вбеспроводной сети (WLAN) с
частотой 5 ГГцизделие разрешено применять только
взакрытых помещениях.
14. Декларация производителя
Настоящим компания Hama GmbH &CoKG
заявляет, чторадиооборудование типа
[00054861] отвечает требованиям директивы
2014/53/ЕС. Сполным текстом декларации о
соответствии требованиям ЕС можно ознакомиться
здесь:
www.hama.com->00054861->Downloads.
Диапазон/диапазоны
частот
Максимальная
излучаемая мощность
Bluetooth: 2.402 -2.480GHz
WiFi: 2.412 -2.472GHz
WiFi: 5.150 -5.350 GHz
WiFi: 5.470 -5.725 GHz
Bluetooth: 4dBm (EIRP)
WiFi: 2.4GHz /19.3dBm (EIRP)
WiFi: 5GHz /17.8dBm (EIRP)
26
Page 31

I Istruzioni brevi
Elementi di comando eindicazioni
Lato anteriore
1. Tasto [POWER]
2. LED di stato
Lato posteriore
3. Attacco ottico
4. Attacco elettrico (microUSB)
5. Presa LINE out
6. Playback USB /Porta aggiornamento
1. Spiegazione dei simboli di avvertimento edelle
indicazioni
Attenzione
Viene utilizzato per contrassegnareleindicazioni
di sicurezza oppureper rivolgerel‘attenzione verso
particolari rischi epericoli.
Nota
Viene utilizzato per contrassegnareinformazioni
supplementari oindicazioni importanti.
Pericolo dovuto ascossa elettrica
Questo simbolo indica un pericolo dovuto al contatto
con parti non isolate del prodotto che potrebbero
provocareuna tensione pericolosa di entità tale da
generareilpericolo di una scossa elettrica.
2. Contenuto della confezione
• Tuner streaming “IT900MBT”
• Telecomando
• Caricabatterie microUSB
• 1cavo USB
• cavo jack 3,5 mm
• Istruzioni per l’uso
• BrochureSpotify
• Non mettereinesercizio il prodotto al di fuori dei suoi
limiti di rendimento indicati nei dati tecnici.
• Tenereilmateriale d’imballaggio lontano dalla portata
dei bambini, pericolo di soffocamento.
• Smaltireimmediatamente il materiale d‘imballaggio
attenendosi alle prescrizioni locali vigenti.
• Non apportaremodiche all’apparecchio. Così facendo
non si perdono idiritti di garanzia.
Pericolo dovuto ascossa elettrica
• Non aprireilprodotto enon utilizzarlo più se
danneggiato
• Non utilizzareilprodotto se l‘adattatoreAC, ilcavo
adattatoreoil cavo di rete sono danneggiati.
• Non tentarediaggiustareoripararel’apparecchio da
soli. Fare eseguirequalsiasi lavorodiriparazione al
personale specializzato competente.
4.Informazioni eindicazioni prima della messa in
esercizio
Connessione di rete/
Preparazione della connessione Internet
Èpossibile integrarequesto tuner in una rete locale per
accederealserver domestico oadaltresorgenti abilitate.
Perriceverelaradio via internet
oaccedereacontenuti non salvati localmente (streaming –
ad es. Spotify Connect), nella rete, ènecessaria anche una
connessione Internet.
Connessione WLAN/Wi-Fi (rete wireless)
• Vericareche il router sia acceso eche vi sia una
connessione Internet attiva.
• Se non ègià attiva, attivarelaconnessione Wi-FI del
proprio router.
• In caso di domande sulla congurazione del router,
consultareilmanuale delle istruzioni per la ricerca degli
errori/la soluzione dei problemi.
• Una guida dettagliata alla congurazione della
connessione Wi-Fi èdescritta al capitolo Connessione
wireless.
5.Prima della messa in funzione
3. Avvertenze di sicurezza
• Il prodotto èconcepito per l’uso domestico privato, non
commerciale.
• Proteggereilprodotto da sporcizia, umidità e
surriscaldamento eutilizzarlo solo in locali asciutti.
• Tenerequesto prodotto, come tutte le apparecchiature
elettriche, lontano dalla portata dei bambini!
• Non farecadereilprodotto enon sottoporlo aforti
scossoni.
Indicazioni per l‘uso
L’uso del tuner streaming avviene esclusivamente conla
app UNDOK del proprio smartphone.
27
Page 32

Nota
Nota –Prima accensione
La descrizione dettagliata della
app UNDOK editutte le funzioni
èdisponibile nella nostra
UNDOK-Guide in:
www.hama.com->00054861->Downloads
6.Messa in funzione
6.1 Attacchi
• 1x LINE Out 3,5 mm
• 1x Attacco ottico
• 1xPlayback USB Tipo A/Porta aggiornamento
• 1x Alimentazione elettrica (microUSB)
6.2 Accensione
• Collegareilcavo di carica microUSB in dotazione
all‘attacco microUSB (4) del turner.
• Collegarelaspina liberadel cavo di carica microUSB a
un caricabatterie USB idoneo.
Hinweis
Utilizzareesclusivamente accessori originali (oppure:
accessori autorizzati da Hama), per evitaredanni al
prodotto.
• Collegareilcavo di alimentazione /l‘alimentatoreauna
presa correttamente installata.
Attenzione
• Alla prima accensioneil tuner si attiva in modalità
SETUP.
• Il LED di stato(2) iniziaa lampeggiarea luce bianca eil
tuner può esseresolo collegato con la app UNDOK al
proprio smartphone.
• Nel caso si avesserodei problemi di collegamento,
èpossibile, premendo il tasto [POWER](1), portareil
tuner nuovamente nella modalità SETUP
Regolazione del volume /Mute
Immissione di password, testi di ricerca ecc.
L’immissione avviene esclusivamente con la app UNDOK.
Accendere/Spegnere/Standby /Punto di accesso
micro
• Peraccendereiltuner premere[POWER]. In alternativa si
può accendereiltuner tramite la app UNDOK.
• Perspegnereil tuner premere[POWER] (Standby). Dopo
aver creato una connessione di rete rimarrà invariata
anche nella modalità Standby,inmodo da permetteredi
attivarelaapp UNDOK.
Nota
Scollegareildispositivo dall’alimentazione di rete per
spegnerlo completamente.
7. UNDOK –Tutto aportata di mano
• Perazionareilprodotto avvalersi solo di una presa
abilitata atale scopo. La presa di rete deve essere
semprefacilmente accessibile.
• Se si utilizzano prese multiple, prestareattenzione che
le utenze collegate non superino la potenza totale
assorbita.
• La presa di rete deve esseresemprefacilmente
accessibile.
• Scollegarelaradio dalla presa di rete se non la si
utilizza per lungo tempo.
• Attendereche sia completata la proceduradi
inizializzazione del tuner.
• Premerebrevemente il tasto [POWER] (1) sul dispositivo.
28
L’applicazione (app) UNDOK sviluppata da Frontier Silicon
offreilcontrollo totale della radio edegli altoparlanti
direttamente dal proprio smartphone.
Indipendentemente dal tipo di impostazione del dispositivo,
dalla congurazione dell’equalizzatoreedal multi-room,
edalla gestione delle proprie emittenti preferite, la app
UNDOK offretutte le funzioni direttamente sul proprio
smartphone otablet garantendo anche il massimo comfort.
Di seguito viene illustrata l’impostazione del tuner con la
app UNDOK. La funzionalità completa dell’apparecchio si
otterrà solamente con la app UNDOK.
Page 33

7.1 Prima impostazione dell’apparecchio con la app
UNDOK
Tutti iprodotti compatibili con la app UNDOK realizzati da
Hama generano un così detto Micro-Access-Point (punto di
accesso micro) alla prima accensione odopo l’attivazione
delle impostazioni di fabbrica. Si tratta di una rete Wi-Fi
autonoma alla quale si può collegarelosmartphone
oiltablet. Questo punto di accesso viene riprodotto
col formato “Setup Hama indirizzo MACDESCRIZIONE
PRODOTTO”per garantirel’identicazione univoca del
prodotto.
Nota
La app UNDOK utilizza la lingua impostata nello
smartphone.
7.2 Rete aperta /Rete non protetta
Nota
• Consigliamo di non stabilireconnessioni non sicure
ediproteggeresemprelapropria rete da accessi
esterni.
• Se la rete desiderata non fosse protetta, èsuciente
selezionarla dall’elenco econfermarla. La radio si
connette immediatamente al punto di accesso.
7.2.1 Procedura per gli utenti iOS
• Aprirelaapp UNDOK sul proprio iPhone oiPad.
• Premeresulla voce menu impostazione sistema audio
• Vericarecheil tuner sia in modalità SETUP.Nel caso il
dispositivo non si trovasse in modalità SETUP,premeree
tenerepremuto il tasto [Power] per 5secondi in modo da
portareildispositivo in modalità SETUP.
• La app UNDOK chiede tramite le impostazioni iPhone o
iPad il collegamento con il WiFi del prodotto -modicare
quindi le impostazioni dell’iPhone eselezionarelarete
WiFi (ad es. Setup Hama IT900MBT) .Quindi tornare
indietrosulla app UNDOK epremereAvanti
• Impostareladescrizione desiderata per il tuner (ad es.
Ucio IT900MBT) econfermarecon Avanti
• Quindi si può selezionarelalingua impostando la lingua
del sistema per il tuner.Confermarelaselezione con
Avanti.
• Adesso si avranno adisposizione diverse possibilità
per congurarelarete (ad es. Wi-Fi, WPS ed Ethernet).
Cliccaresul metodo desiderato elaapp. UNDOK passerà
alla nestrasuccessiva
• In base al metodo, sarà possibile selezionaree
congurarelarete Wi-Fi oppurestabilireuncol legamento
WPS.
• Quindi il tuner si collega alla rete premendo “Il mio
sistema audio”, utilizzareildispositivo con la app.
UNDOK
• Aquesto punto l’indicatoreLED (1) del collegamento di
rete rimane acceso
• Dopo aver ultimato la congurazione del tuner è
necessario collegareunapparecchio di riproduzione
(cassa audio) analogico (5) oppuredigitale (3). Il
comando del gruppo audio avviene solo tramite la app.
UNDOK.
7.2.2 Procedura per gli utenti Android
• Aprirelaapp UNDOK sul proprio tablet osmartphone
• Premeresul menu il punto Impostazione sistema audio
• Vericarecheil tuner sia in modalità SETUP.Nel caso che
il dispositivo non si trovasse in modalità SETUP,premeree
tenerepremuto il tasto [Power] per 5secondi in modo da
portareildispositivo in modalità SETUP.
• La app. UNDOK richiede orailcollegamento tramite
le impostazioni su iPhone/iPad al Wi-Fi del prodotto andareperciò alle impostazioni di sistema su iPhone e
selezionarelarete Wi-Fi (ad es. Setup Hama IT900MBT)
.Quindi tornareindietrosulla app UNDOK epremere
Avanti
• Impostareladescrizione desiderata per il tuner (ad es.
Ucio IT900MBT) econfermarecon Avanti
• Di seguito èpossibile selezionareeimpostarelalingua
del tuner.Confermarelaselezione con Avanti.
• Orasono adisposizione diverse possibilità per congurare
la rete (per es. Wi-Fi, WPS ed Ethernet). Cliccaresul
metodo desiderato elaapp. UNDOK passerà alla nestra
successiva
• In base al metodo, sarà possibile selezionaree
congurarelarete Wi-Fi oppurestabilireuncollegamento
WPS.
• Quindi il tuner si collegherà con la rete esarà possibile
premeresu“Utilizza il mio sistema audio” del dispositivo
dall’interfaccia UNDOK.
• L’indicatoreLED (1) del collegamento di rete rimane
acceso.
• Dopo aver ultimato la congurazione del tuner è
necessario collegareunapparecchio di riproduzione
(altoparlante) analogico (5) oppuredigitale (3). Il
comando del gruppo audio avviene solo tramite la app.
UNDOK.
29
Page 34

8. Collegamenti
Nota
• Icollegamenti effettuati con un cavo di segnale
ottico, sono più stabili in caso di interferenze
magnetiche oelettriche rispetto ai collegamenti
effettuati con un cavo audio 3,5 mm.
8.1 Collegamento tramite OUT ottico
Con l’uscita digitale audio èpossibile ad es. collegarele
proprie casse al tuner eriprodurne il segnale audio tramite
gli altoparlanti stessi.
Nota
• Spegnereiltuner prima di collegareunterminale.
• Prima del collegamento, staccareilcappuccio
protettivo dalle estremità del cavo di segnale ottico.
• Non piegare, né schiacciareilcavo.
• Perlariproduzione tramite il collegamento audio ottico,
collegareuncavo audio ottico all’uscita audio ottica (3)
del tuner eall’entrata audio ottica della cassa.
• Peraccendereiltuner premere[POWER] (1).
• Il segnale audio del tuner viene quindi riprodotto tramite
l’altoparlante.
8.2 Collegamento tramite LINE OUT
Con l’uscita digitale audio èpossibile ad es. collegarele
proprie casse al tuner eriprodurne il segnale audio tramite
l’altoparlante.
Nota
• Spegnereiltuner prima di collegareunterminale.
• Non piegare, né schiacciareilcavo.
• Perlariproduzione tramite il collegamento audio
analogico, collegareuncavo cinch da 3,5 mm all’uscita
audio analogica (5) del tuner eall’entrata audio
analogica dell’altoparlante.
• Peraccendereiltuner premere[POWER] (1).
• Il segnale audio del tuner viene quindi riprodotto tramite
l’altoparlante.
9.Impostazioni di fabbrica
Perripristinareleimpostazione di fabbrica del tuner (stato
di consegna) procederesegue:
• Premereetenerepremuto il tasto (1) [POWER] per circa
5secondi.
• Tutte le impostazioni effettuate vengono cancellate.
Nota
• Riportando il dispositivo alle impostazioni di
fabbrica, èpossibile risolvereproblemi edifetti di
funzionamento.
• Tuttavia tutte le preimpostazioni come equalizzatore,
preferiti eiproli di rete vengono cancellati
denitivamente.
10. Aggiornamento software
Perfezioniamo esviluppiamo costantemente nuove funzioni
per il softwaredel nostrotuner,per risolverepossibili
problemi eaggiungerenuove feature.
Vi consigliamo di installaresempresul proprio tuner gli
update disponibili.
Attenzione
• Prima di avviareunaggiornamento del software,
vericareche l’alimentazione elettrica sia stabile.
• L’ interruzione di corrente durante un aggiornamento
del softwarepuò causaredanni irreparabili alla radio!
11. Cura emanutenzione
•Pulirequesto prodotto solo con un panno umido e
che non lascia pelucchi enon utilizzaremai detergenti
aggressivi.
•Senon si utilizza il prodotto per un lungo periodo di
tempo, spegnereildispositivo escollegarlo dalla rete
elettrica. Conservarlo. In un luogo pulito, asciutto e
lontano dalla luce diretta del sole.
12. Esclusione di garanzia
Hama GmbH &CoKGnon si assume alcuna responsabilità
per idanni derivati dal montaggio ol‘utilizzo scorretto del
prodotto, nonché dalla mancata osservanza delle istruzioni
per l‘uso e/o delle indicazioni di sicurezza.
30
Page 35

13. Assistenza esupporto
In casodidomande sulprodotto,rivolgersialla Consulenza
prodotto Hama.
Hotline:+49 9091 502-115 (ted./ing.)
Ulteriori informazioni sul supportosonodisponibiliqui:
www.hama.com
14. Indicazioni di smaltimento
Informazioni per protezione ambientale:
Dopo l’implementazione della Direttiva Europea
2012/19/EU e2006/66/EU nel sistema legale
nazionale, ci sono le seguenti applicazioni: Le
apparecchiatureelettriche ed elettroniche ele
batterie non devono esseresmaltite con iriuti domestici. I
consumatori sono obbligati dalla legge arestituireI
dispositivi elettrici ed elettronici elebatterie alla ne della
lorovita utile ai punti di raccolta pubblici preposti per
questo scopo onei punti vendita. Dettagli di quanto
riportato sono deniti dalle leggi nazionali di ogni stato.
Questo simbolo sul prodotto, sul manuale d’istruzioni o
sull’imballo indicano che questo prodotto èsoggetto a
queste regole. Riciclando, ri-utilizzando imateriali o
utilizzando sotto altraforma ivecchi prodotti/le batterie,
darete un importante contributo alla protezione
dell’ambiente.
15. Dichiarazione di conformità
Il fabbricante, Hama GmbH &CoKG, dichiarache il
tipo di apparecchiaturaradio [00054861] è
conforme alla direttiva 2014/53/UE. Il testo
completo della dichiarazione di conformità UE èdisponibile
al seguente indirizzo Internet:
www.hama.com->00054861->Downloads.
Bluetooth: 2.402 -2.480GHz
Bande di frequenza
Massima potenza
aradiofrequenza
trasmessa
WiFi: 2.412 -2.472GHz
WiFi: 5.150 -5.350 GHz
WiFi: 5.470 -5.725 GHz
Bluetooth: 4dBm (EIRP)
WiFi: 2.4GHz /19.3dBm (EIRP)
WiFi: 5GHz /17.8dBm (EIRP)
Restrizioni oRequisiti in
Belgio, Bulgaria, Repubblica Ceca, Danimarca, Germania,
Estonia, Irlanda, Grecia, Spagna, Francia, Croazia, Italia,
Cipro, Lettonia, Lituania, Lussemburgo, Ungheria, Malta,
Paesi Bassi, Austria, Polonia, Portogallo, Romania,
Slovenia, Slovacchia, Finlandia, Svezia, Regno Unito
Nota
Se si utilizzano icanali 36-64 (frequenza 5,150GHz –
5,350GHz) con WiFi 5GHz, il prodotto può solo essere
utilizzato in locali chiusi.
31
Page 36

N Beknopte bedieningsinstructies
Bedieningselementen en indicaties
Voorzijde
1. [Power]-toets
2. Statusledje
Achterzijde
3. Optische aansluiting
4. Aansluitpunt spanning (Micro-USB)
5. Line OUT-poort
6. USB playback /update-poort
1. Verklaring van waarschuwingssymbolen en
instructies
Waarschuwing
Wordtgebruikt voor veiligheidsinstructies of om de
aandacht te trekken op bijzonderegevaren en risico‘s.
Aanwijzing
Wordtgebruikt voor extrainformatie of belangrijke
informatie.
Gevaar voor een elektrische schok
Dit symbool duidt op gevaar bij aanraking van nietgeïsoleerde onderdelen van het product, welke mogelijk
onder een zodanig gevaarlijke spanning staan, dat het
gevaar voor een elektrische schok aanwezig is.
2. Inhoud van de verpakking
• Streaming tuner “IT900MBT”
• Afstandsbediening
• Micro-USB-oplader
• Micro-USB-kabel
• Stereokabel 3,5 mm
• Bedieningsinstructies
• Spotify yer
3. Veiligheidsinstructies
• Het product is bedoeld voor niet-commercieel
privégebruik in huiselijke kring.
• Bescherm het product tegen vuil, vocht en oververhitting
en gebruik het alleen in droge ruimtes.
• Dit product dient, zoals alle elektrische producten, buiten
het bereik van kinderen te worden gehouden!
• Laat het product niet vallen en stel het niet bloot aan
zwareschokken of stoten.
• Gebruik het product niet buiten de in de technische
gegevens vermelde vermogensgrenzen.
• Het verpakkingsmateriaal mag absoluut niet in handen
van kinderen komen in verband met verstikkingsgevaar.
• Voer het verpakkingsmateriaal direct en overeenkomstig
de lokaal geldende afvoervoorschriften af.
• Verander niets aan het product. Daardoor vervalt elke
aanspraak op garantie.
Gevaar voor een elektrische schok
• Open het product niet en gebruik het niet meer bij
beschadigingen.
• Gebruik het product niet indien de AC-adapter,de
adapterkabel of de voedingskabel is beschadigd.
• Probeer het product niet zelf te onderhouden
of te repareren. Laat onderhouds- en
reparatiewerkzaamheden door vakpersoneel uitvoeren.
4.Informatie en instructies voor inbedrijfstelling
Netwerkverbinding /
Internetverbinding voorbereiden
Ukunt deze tuner integreren in een lokaal netwerk en
daarmee toegang krijgen tot de homeserver of andere
bronnen. Om internetradio
te kunnen ontvangen of toegang te krijgen tot niet lokaal
opgeslagen media-inhoud (streaming, bijvoorbeeld Spotify
Connect), heeft het netwerk ook een internetverbinding
nodig.
WLAN-/wi-verbinding (draadloos netwerk)
• Controleer of de router is ingeschakeld en er een
verbinding met het internet is.
• Activeer,indien dit nog niet is gedaan, de WLANverbinding van uw router.
• Raadpleeg bij vragen over de conguratie van de router
de bedieningsinstructies van de router voor het oplossen
van problemen.
• Een gedetailleerde conguratiehandleiding voor de
WLAN-verbinding staat in de paragraaf Draadloze
verbinding beschreven.
5.Vóór de inbedrijfstelling
Bedieningsinstructies
De bediening van de streaming tuner wordt uitsluitend
met behulp van de UNDOK-app via uw smartphone
uitgevoerd.
32
Page 37

Aanwijzing
Aanwijzing –bij de eerste maal inschakelen
Een uitvoerige beschrijving van de
UNDOK-app en alle beschikbare
functies vindt uinonze UNDOK-
guide onder:
www.hama.com->00054861->Downloads
6.Inbedrijfstelling
6.1 Aansluitingen
• 1x Line OUT 3,5 mm
• 1x optische aansluiting
• 1x USB- Type Aplayback /update-poort
• 1x stroomvoorziening (Micro-USB)
6.2 Inschakelen
• Sluit de meegeleverde Micro-USB-oplaadkabel op de
Micro-USB-aansluiting (4) van de tuner aan.
• Sluit de vrije stekker van de Micro-USB-oplaadkabel op de
USB-oplader aan.
Hinweis
Gebruik uitsluitend de originele toebehoren (of:
door Hama vrijgegeven toebehoren), teneinde
beschadigingen aan het product te voorkomen.
• Sluit de voedingskabel /voedingsadapter op een
deugdelijk geïnstalleerdstopcontact aan.
Waarschuwing
• Bij de eerste maal inschakelen start de tuner in de
SETUP-modus.
• Het statusledje (2) begint wit te knipperen en de tuner
kan alleen met behulp van de UNDOK-app met uw
smartphone worden verbonden.
• Indien er verbindingsproblemen optreden, kunt ude
tuner door lang op de [POWER]-toets (1) te drukken
opnieuw in de SETUP-modus brengen
Volume aanpassen /Mute
Wachtwoorden, zoektermen, enz. invoeren
De invoer wordt uitsluitend via de UNDOK-app uitgevoerd.
In-/ uitschakelen /Stand-by /MicroAccess Point
• Druk op [POWER] om de tuner in te schakelen. Alternatief
kan de tuner via de UNDOK-app worden ingeschakeld.
• Druk op [POWER] om de tuner uit te schakelen (standby). Na het congureren van een netwerkverbinding blijft
deze ook in de stand-by-modus gehandhaafd om het
inschakelen per UNDOK-app mogelijk te maken.
Aanwijzing
Trek de stekker uit het stopcontact om het apparaat
volledig uit te schakelen.
7. UNDOK –alles in uw hand
• Sluit het product alleen aan op een daarvoor geschikt
en intact stopcontact. Het stopcontact moet altijd
gemakkelijk bereikbaar zijn.
• Let er bij tafelcontactdozen op dat de aangesloten
verbruikers het toegestane totale vermogen niet
overschrijden.
• Het stopcontact moet altijd gemakkelijk bereikbaar
zijn.
• Indien het product gedurende langeretijd niet wordt
gebruikt, trek dan de stekker uit het stopcontact.
• Wachten a.u.b. totdat het initialiseren van de tuner is
voltooid.
• Druk kort op de [POWER]-toets (1) op het apparaat.
De door Frontier Silicon ontwikkelde UNDOK-app biedt
uvolledige controle over de radio en luidsprekers op uw
smartphone.
Of het nu gaat om de eerste conguratie van het apparaat,
de conguraties voor multiroom of het beheren van uw
favoriete zenders –UNDOK levert ualle mogelijkheden op
uw smartphone of tablet.
Onderstaand wordt de eerste conguratie van de tuner met
UNDOK uitgelegd. De volledige functionele omvang van
het apparaat kunt ualleen via de UNDOK-app benutten.
33
Page 38

7.1 Eerste configuratie van het apparaat met
UNDOK
Alle producten van Hama met UNDOK-functies creëren
bij de eerste conguratie of na het resetten op de
fabrieksinstellingen een zogenaamd Micro-Access-Point
–een eigen WLAN-netwerk dus, waarmee uverbinding
kunt maken met uw tablet of smartphone, Dit access-point
wordt in het formaat „Setup Hama PRODUCTBENAMING
MAC-adres“ weergegeven om een unieke identicatie van
het product mogelijk te maken.
Aanwijzing
De UNDOK-app gebruikt de in het systeem van uw
smartphone geselecteerde taal.
7.2 Open netwerk /Onbeveiligd netwerk
Aanwijzing
• Wij raden uaan om geen onbeveiligde verbinding tot
stand te brengen en uw netwerk altijd te beveiligen
tegen ongeautoriseerde toegang.
• Als het gewenste netwerk niet over
beveiligingsmaatregelen beschikt, kan worden
volstaan met het selecteren en bevestigen van
een netwerk uit de lijst. De radio maakt dan direct
verbinding met het AP.
7.2.1 Procedure voor iOS-gebruikers
• Open de UNDOK-app op uw iPhone of iPad
• Druk op het menu-onderdeel Audiosysteem congureren
• Controleer of etuner zich in de SETUP-modus bevindt.
Indien het apparaat zich niet in de SETUP-modus
bevindt, houdt ude[Power]-toets gedurende 5seconden
ingedrukt om het apparaat in de SETUP-modus te
brengen.
• UNDOK vraagt unuomvia de iPhone-/iPad-instellingen
verbinding te maken met de wi van het product. Ga
daarvoor naar de systeeminstellingen van de iPhone en
selecteer het WLAN-netwerk (bijvoorbeeld Setup Hama
IT900MBT). Ga vervolgens terug naar UNDOK en druk op
Volgende
• Geef de tuner nu een benaming naar keuze (bijvoorbeeld
Kantoor IT900MBT) en bevestig uw invoer met Volgende
• Bij de daaropvolgende taalselectie kunt udesysteemtaal
van de tuner vastleggen. Bevestig uw selectie met
„Volgende“.
• Nu krijgt uverschillende mogelijkheden om het netwerk
te congureren (zoals WLAN, WPS en Ethernet). Klik op
de gewenste methode; UNDOK gaat naar het volgende
venster
• Afhankelijk van de geselecteerde methode kunt unuhet
gewenste WLAN-netwerk selecteren en congureren of
een WPS-verbinding tot stand brengen.
• Totslot verbindt de tuner zich met het netwerk en kunt u
door op „Mijn audiosysteem“ te drukken, het apparaat in
UNDOK gebruiken
• De led-indicator (1) van de netwerkverbinding brandt nu
constant
• Na het succesvol congureren van de tuner moet er een
weergaveapparaat (luidspreker) analoog (5) of digitaal (3)
worden aangesloten. De besturing van de muziekgroep
wordt uitsluitend via UNDOK uitgevoerd.
7.2.2 Procedure voor Android-gebruikers
• Open de UNDOK-app op uw tablet of smartphone
• Druk op het menu-onderdeel Audiosysteem congureren
• Controleer of de tuner zich in de SETUP-modus bevindt.
Indien het apparaat zich niet in de SETUP-modus
bevindt, houdt ude[Power]-toets gedurende 5seconden
ingedrukt om het apparaat in de SETUP-modus te
brengen.
• UNDOK verzoekt unuomvia de iPhone/iPad-instellingen
met de WLAN van het product een verbinding tot
stand te brengen –schakel daartoe over naar de
systeeminstellingen van de iPhone om vervolgens
het WLAN-netwerk (bijv.Setup Hama IT900MBT) te
selecteren. Ga vervolgens terug naar UNDOK en druk op
Volgende
• Geef de tuner nu een benaming naar keuze (bijvoorbeeld
Kantoor IT900MBT) en bevestig uw invoer met Volgende
• Bij de daaropvolgende taalselectie kunt udetaal van de
tuner vastleggen. Bevestig uw selectie met „Volgende“.
• Nu krijgt uverschillende mogelijkheden om het netwerk
te congureren (zoals WLAN, WPS en Ethernet). Klik op
de gewenste methode; UNDOK gaat naar het volgende
venster
• Afhankelijk van de geselecteerde methode kunt unuhet
gewenste WLAN-netwerk selecteren en congureren of
een WPS-verbinding tot stand brengen.
• Totslot verbindt de tuner zich met het netwerk en kunt
uhet apparaat in UNDOK gebruiken door op „Mijn
audiosysteem gebruiken“ te drukken
• De ledindicator (1) van de netwerkverbinding brandt nu
constant
• Na het succesvol congureren van de tuner moet er een
weergaveapparaat (luidspreker) analoog (5) of digitaal (3)
worden aangesloten. De besturing van de muziekgroep
wordt uitsluitend via UNDOK uitgevoerd.
34
Page 39

8. Verbindingen
Aanwijzing
• Verbindingen die met behulp van een optische
signaalkabel tot stand worden gebracht, zijn
ongevoeliger voor storende elektrische of magnetische
invloeden dan verbindingen die met behulp van een
3,5 mm audiokabel worden gemaakt.
8.1 Verbinding via Optical OUT
Via de digitale audio-uitgang kunt ubijv.uwluidsprekers
op de tuner aansluiten en het signaal daarvan via de
luidsprekers weergeven.
Aanwijzing
• Schakel de tuner uit voordat ueen eindtoestel daarop
aansluit.
• Verwijder vóór het aansluiten de beschermkapjes van
beide uiteinden van de optische signaalkabel.
• De kabel niet knikken of inklemmen.
• Voor een weergave via de optische audio-aansluiting sluit
ueen optische signaalkabel op de optische audio-uitgang
(3) van de tuner en de optische audio-ingang van de
luidspreker aan.
• Druk op [POWER] (1) om de tuner in te schakelen.
• Het audiosignaal van de tuner wordt nu via de
luidsprekers weergegeven.
8.2 Verbinding via LINE OUT
Via de analoge audio-uitgang kunt ubijv.uwluidsprekers
op de tuner aansluiten en het signaal daarvan via de
luidsprekers weergeven.
Aanwijzing
• Schakel de tuner uit voordat ueen eindtoestel daarop
aansluit.
• De kabel niet knikken of inklemmen.
• Voor een weergave via de analoge audio-aansluiting sluit
ueen 3,5 mm cinch-kabel op de analoge audio-uitgang
(5) van de tuner en de analoge audio-ingang van de
luidspreker aan.
• Druk op [POWER] (1) om de tuner in te schakelen.
• Het audiosignaal van de tuner wordt nu via de
luidsprekers weergegeven.
9.Fabrieksinstellingen
Om de tuner naar de fabrieksinstellingen (toestand bij
levering) te resetten, gaat uals volgt te werk:
• Houd de toets [POWER] (1) gedurende ca. 5seconden
ingedrukt.
• Al uw persoonlijke instellingen worden gewist.
Aanwijzing
• Problemen en storingen kunnen mogelijk worden
opgelost door naar de fabrieksinstellingen te resetten.
• De equalizer-instellingen, uw favorieten en de
opgeslagen netwerkproelen worden echter wel
permanent gewist.
10. Software-update
Er worden voortdurend verbeteringen en nieuwe functies
voor de softwarevan onze tuners ontwikkeld om mogelijke
fouten te verhelpen, de functies uit te breiden, enz.
Wij adviseren ualtijd de beschikbaar gestelde updates op
uw tuner te installeren.
Waarschuwing
• Zorgervoor dat er een stabiele spanningsvoorziening
is voordat ueen software-update start.
• Een onderbreking van de voeding tijdens het
uitvoeren van een software-update kan leiden tot
onherstelbareschade aan de tuner!
11. Onderhoud en verzorging
• Reinig dit product alleen met een pluisvrije, iets vochtige
doek en gebruik geen agressieve reinigers.
• Indien uhet product gedurende langeretijd niet gebruikt,
dan schakelt uhet toestel uit en trekt de stekker uit
het stopcontact. Berghet toestel op een schone, droge
plaats op alwaar het niet aan directe zonnestraling wordt
blootgesteld.
12. Uitsluiting van garantie en aansprakelijkheid
Hama GmbH &CoKGaanvaardt geen enkele
aansprakelijkheid of garantieclaims voor schade of
gevolgschade, welke door ondeskundige installatie,
montage en ondeskundig gebruik van het product ontstaan
of het resultaat zijn van het niet in acht nemen van de
bedieningsinstructies en/of veiligheidsinstructies.
35
Page 40

13. Service en support
Neem bij vragen over het product contact op met de
afdeling Productadvies van HAMA.
Hotline: +49 9091 502-115 (Duits/Engels)
Meer support-informatie vindt uhier:
www.hama.com
14. Aanwijzingen over de afvalverwerking
Notitie aangaande de bescherming van het milieu:
Tengevolge van de invoering van de Europese
Richtlijn 2012/19/EU en 2006/66/EU in het
nationaal juridisch system, is het volgende van
toepassing: Elektrische en elektronische
apparatuur,zoals batterijen mag niet met het huisvuil
weggegooid worden. Consumenten zijn wettelijk verplicht
om electrische en elctronische apparaten zoals batterijen
op het einde van gebruik in te dienen bij openbare
verzamelplaatsen speciaal opgezet voor dit doeleinde of bij
een verkooppunt. Verderespecicaties aangaande dit
onderwerp zijn omschreven door de nationale wet van het
betreffende land. Dit symbool op het product, de
gebruiksaanwijzing of de verpakking duidt erop dat het
product onderworpen is aan deze richtlijnen. Door te
recycleren, hergebruiken van materialen of anderevormen
van hergebruiken van oude toestellen/batterijen, levert u
een grote bijdrage aan de bescherming van het mileu.
15. Conformiteitsverklaring
Hierbij verklaar ik, Hama GmbH &CoKG, dathet
type radioapparatuur [00054861] conform is met
Richtlijn 2014/53/EU.Devolledige tekst van de
EU-conformiteitsverklaring kan worden geraadpleegd op
het volgende internetadres:
www.hama.com->00054861->Downloads.
Bluetooth: 2.402 -2.480GHz
Frequentieband(en)
Maximaal radiofrequent
vermogen
WiFi: 2.412 -2.472GHz
WiFi: 5.150 -5.350 GHz
WiFi: 5.470 -5.725 GHz
Bluetooth: 4dBm (EIRP)
WiFi: 2.4GHz /19.3dBm (EIRP)
WiFi: 5GHz /17.8dBm (EIRP)
Beperkingen of voorschriften in
België, Bulgarije, Tsjechische Republiek, Denemarken,
Duitsland, Estland, Ierland, Griekenland, Spanje, Frankrijk,
Kroatië, Italië, Cyprus, Letland, Litouwen, Luxemburg,
Hongarije, Malta, Nederland, Oostenrijk, Polen, Portugal,
Roemenië, Slovenië, Slowakije, Finland, Zweden, Verenigd
Koninkrijk
Aanwijzing
Indien de kanalen 36-64 (frequentie 5,150GHz –
5,350GHz) in een 5GHz WLAN worden gebruikt, dan
mag het product alleen in gesloten ruimtes worden
gebruikt.
36
Page 41

J Σύντομες οδηγίες
Στοιχεία χειρισμού καιενδείξεις
Πρόσοψη
1. Πλήκτρο [Power]
2. Λυχνία LED κατάστασης
Πίσω πλευρά
3. Οπτική υποδοχή
4. Υποδοχή ρεύματος (microUSB)
5. Υποδοχή LINE Out
6. Θύρα USB αναπαραγωγής/ενημέρωσης
1. Επεξήγηση συμβόλων προειδοποίησης και
υποδείξεων
Προειδοποίηση
Χρησιμοποιείται για τη σήμανση υποδείξεων ασφαλείας
ήγια να επιστήσει την προσοχήσειδιαίτερους κινδύνους.
Υπόδειξη
Χρησιμοποιείται για τη σήμανση επιπλέον πληροφοριών
ήσημαντικών υποδείξεων.
Κίνδυνος ηλεκτροπληξίας
Αυτό το σύμβολο προειδοποιεί για κίνδυνοαπό επαφή
με μη μονωμέναεξαρτήματατου προϊόντος, τα οποία
μπορεί να φέρουν τόση τάση ώστε να προκληθεί
ηλεκτροπληξία.
2. Περιεχόμενα συσκευασίας
• Δέκτης μετάδοσης μέσω ροής „IT900MBT”
• Τηλεχειριστήριο
• Φορτιστής microUSB
• Καλώδιο microUSB
• Καλώδιο ίσιου βύσματος 3,5 mm
• Εγχειρίδιο χειρισμού
• Φυλλάδιο για το Spotify
3. Υποδείξεις ασφαλείας
• Το προϊόν προορίζεται γιαιδιωτική, οικιακή χρήση καιόχι για
εμπορικούς σκοπούς.
• Προστατεύετε το προϊόν από βρομιά, υγρασία και
υπερθέρμανση καιχρησιμοποιείτετομόνοσεστεγνούς
χώρους.
• Αυτό το προϊόν, όπως καιταάλλαηλεκτρικάπροϊόντα, δεν
είναι παιχνίδι για τα παιδιά!
• Μηναφήνετε το προϊόν να πέσει κάτω καιμην το υποβάλλετε
σε ισχυρούς κραδασμούς.
• Μηνχρησιμοποιείτετοπροϊόνεκτός τωνορίων ισχύος που
περιγράφονταιστα τεχνικάχαρακτηριστικά.
• Τα παιδιά δεν επιτρέπεταιναέρχονταισεεπαφή με τα υλικά
τηςσυσκευασίας, καθώς υπάρχεικίνδυνοςασφυξίας.
• Απορρίψτεκατευθείαν τα υλικάσυσκευασίας σύμφωναμε
τους ισχύοντες τοπικούς κανονισμούς απόρριψης.
• Μην κάνετε μετατροπές στησυσκευή. Κατ‘ αυτόντον τρόπο
παύουνναισχύουν οι απαιτήσειςπου απορρέουν απότην
εγγύηση.
Κίνδυνος ηλεκτροπληξίας
• Μην ανοίγετε τη συσκευή καιμην τη χρησιμοποιείτε
αν χαλάσει.
• Μην χρησιμοποιείτε τη συσκευή αν έχουν
υποστεί ζημιά ομετασχηματιστής, το καλώδιο του
μετασχηματιστή ήτοκαλώδιοτου ρεύματος.
• Μην επιχειρήσετε να συντηρήσετε ήναεπισκευάσετε
τη συσκευή εσείς οι ίδιοι. Οι εργασίες συντήρησης
πρέπει να γίνονται από εξειδικευμέναάτομα.
4. Πληροφορίες και υποδείξεις για τη σύνδεση στο
ρεύμα πριν από την έναρξη χρήσης
Προετοιμασία για τη σύνδεση στο Internet
Μπορείτε να συνδέσετε αυτόν τονδέκτη σε ένατοπικό
δίκτυο και, επομένως να αποκτήσετε πρόσβαση στον
οικιακόδιακομιστή ήάλλες πηγές αναπαραγωγής. Γιανα
πραγματοποιήσετε λήψη διαδικτυακού ραδιοφώνου
ήνααποκτήσετε πρόσβαση σε περιεχόμενομέσων που δεν
είναι αποθηκευμένοσετοπικές συσκευές (μέσω ροής – π.χ.
Spotify Connect), απαιτείται επίσης σύνδεση στο Internet.
Σύνδεση σε WLAN/Wi-Fi (ασύρματοδίκτυο)
• Βεβαιωθείτε ότι οδρομολογητής είναι ενεργοποιημένος
καιότι υπάρχεισύνδεση στο internet.
• Ενεργοποιήστε τη σύνδεση WLAN τουδρομολογητή σας,
αν δεν είναι ήδη ενεργοποιημένη.
• Αν έχετε απορίες σχετικάμετηρύθμιση τουδρομολογητή,
ανατρέξτε στις οδηγίες λειτουργίας τουδρομολογητή για
αναζήτηση σφαλμάτων/αντιμετώπιση προβλημάτων.
• Γιατις λεπτομερείς οδηγίες ρύθμισης της σύνδεσης
WLAN, ανατρέξτε στοκεφάλαιο Ασύρματη σύνδεση.
5.Πριν από την έναρξη χρήσης
Οδηγίες χειρισμού
Οχειρισμός τουδέκτημετάδοσης μέσω ροής
πραγματοποιείται αποκλειστικάμέσω της εφαρμογής
UNDOK από το smartphone.
37
Page 42

Υπόδειξη
Υπόδειξη – Κατά την πρώτη ενεργοποίηση
Γιατην αναλυτική περιγραφή της
εφαρμογής UNDOK καιόλωντων
λειτουργιών της, ανατρέξτε στον
Οδηγό UNDOK, στον ιστότοπο
www.hama.com->00054861->Downloads
6. Έναρξη χρήσης
6.1 Υποδοχές σύνδεσης
• 1x LINE Out 3,5 mm
• 1x οπτική υποδοχή
• 1x θύρα USB τύπου A αναπαραγωγής/ενημέρωσης
• 1x υποδοχή παροχής ρεύματος (microUSB)
6.2 Ενεργοποίηση
• Συνδέστε το παρεχόμενοκαλώδιοφόρτισης microUSB
στην υποδοχή microUSB (4) τουδέκτη.
• Συνδέστε το ελεύθερο βύσμα τουκαλωδίου φόρτισης
microUSB στον φορτιστή USB.
Hinweis
Χρησιμοποιείτε αποκλειστικάγνήσια εξαρτήματα
(ήεξαρτήματαεγκεκριμένααπό τη Hama), για να
αποφύγετε βλάβες στη συσκευή.
• Συνδέστε το καλώδιο ρεύματος/ τροφοδοτικόσεμια
κατάλληλαεγκατεστημένη πρίζαρεύματος.
Προειδοποίηση
• Κατά την πρώτη ενεργοποίηση οδέκτης ξεκινάστη
λειτουργία ρύθμισης (SETUP).
• Ηλυχνία LED κατάστασης (2) ξεκινάνααναβοσβήνει
με λευκόχρώμα καιοδέκτης μπορεί να συνδεθεί
με το smartphone σας μόνομέσω της εφαρμογής
UNDOK.
• Αν παρουσιαστούν προβλήματαμετησύνδεση,
μπορείτε να επαναφέρετε τονδέκτη στη λειτουργία
ρύθμισης (SETUP) πατώντας παρατεταμένατοπλήκτρο
[POWER] (1)
Ρύθμιση έντασης ήχου / Σίγαση
Εισαγωγή κωδικώνπρόσβασης, όρων αναζήτησης
κ.λπ.
Ηεισαγωγή εκτελείται μέσω της εφαρμογής UNDOK.
Ενεργοποίηση/ Απενεργοποίηση/ Αναμονή/ Σημείο
πρόσβασης micro
• Πατήστε το πλήκτρο [POWER], για να ενεργοποιήσετε
τονδέκτη. Εναλλακτικά, μπορείτε να ενεργοποιήσετε τον
δέκτη μέσω της εφαρμογής UNDOK.
• Πατήστε το πλήκτρο [POWER], για να απενεργοποιήσετε
τονδέκτη (αναμονή). Μετάτην επιτυχή σύνδεση στο
δίκτυο, ησυσκευή θα παραμείνει στη λειτουργία
αναμονής, προκειμένου να είναι δυνατή ηενεργοποίηση
μέσω της εφαρμογής UNDOK.
Υπόδειξη
Αποσυνδέστε τη συσκευή από την παροχή ρεύματος, για
να την απενεργοποιήσετε πλήρως.
7. UNDOK – Όλα στα χέρια σας
• Το προϊόν πρέπει να λειτουργεί μόνοότανείναι
συνδεδεμένοσεκατάλληλη πρίζα. Ηπρίζαρεύματος
πρέπει πάνταναείναι εύκολαπροσβάσιμη.
• Σταπολύπριζαπροσέξτε ώστε οι συνδεδεμένες
συσκευές να μην ξεπερνούν τη συνολική επιτρεπόμενη
ισχύ.
• Ηπρίζαρεύματος πρέπει πάνταναείναι εύκολα
προσβάσιμη.
• Αποσυνδέστε το προϊόν από το δίκτυο ρεύματος,
εάν δεν πρόκειται να το χρησιμοποιήσετε για μεγάλο
χρονικόδιάστημα.
• Περιμένετε μέχρι να ολοκληρωθεί ηπροετοιμασία του
δέκτη.
• Πατήστε στιγμιαία το πλήκτρο [POWER] (1) στη συσκευή.
38
Ηεφαρμογή UNDOK πουέχειαναπτυχθείαπό την Frontier
Silicon μεταφέρειτον πλήρηχειρισμό τουραδιοφώνου και
των ηχείων στο smartphone.
Είτεπρόκειταιγια την πρώτηεγκ ατάστασητης συσκευής, είτε
τις ρυθμίσεις Multiroom είτε τη διαχείρισητου αγαπημένου
σας σταθμού, με την εφαρμογή UNDOK μπορείτε να
χειριστείτε όλες τιςλειτουργίες από το smartphone ήτοtablet.
Παρακάτω επεξηγείται ηπρώτη ρύθμισητου δέκτημέσωτης
εφαρμογής UNDOK. Μπορείτε να αποκτήσετε πρόσβαση στις
πλήρεις λειτουργίες τηςσυσκευήςμόνομέσωτης εφαρμογής
UNDOK.
Page 43

7.1 Πρώτη ρύθμιση της συσκευής με την εφαρμογή
UNDOK
Όλαταπροϊόντατης Hama που υποστηρίζουν το UNDOK,
κατά την πρώτη ενεργοποίησή τους ήμετάτην επαναφορά
τους στις εργοστασιακές ρυθμίσεις, δημιουργούν ένα
λεγόμενοσημείο πρόσβασης micro– δηλαδή, έναδικότους
δίκτυο WLAN μέσω τουοποίου μπορούν να συνδεθούν με
το tablet ήτοsmartphone σας. Αυτό το σημείο πρόσβασης
υποδεικνύεται με τη μορφή „Setup Hama ΟΝΟΜΑΣΙΑ
ΠΡΟΪΟΝΤΟΣ, Διεύθυνση MAC”, ώστε να είναι δυνατή η
σαφής αναγνώριση τουπροϊόντος.
Υπόδειξη
• Ανάλογα με τη μέθοδο που έχετε επιλέξει, μπορείτε να
επιλέξετε καιναδιαμορφώσετετοεπιθυμητόδίκτυο
WLAN ήναδημιουργήσετε μια σύνδεση WPS.
• Έπειτα, οδέκτης θα συνδεθεί με το δίκτυο καιμπορείτε να
χρησιμοποιήσετε τη συσκευή
• από την εφαρμογή UNDOK πατώντας „Το ηχοσύστημά
μου”
• Ηενδεικτική λυχνία LED (1) της σύνδεσης δικτύου ανάβει
τώρα σταθερά
• Μετάτην επιτυχή διαμόρφωση τουδέκτη, πρέπει να
συνδέσετε μια συσκευή αναπαραγωγής (ηχείο) αναλογικά
(5) ήψηφιακά (3). Οχειρισμός της κατηγορίας μουσικής
πραγματοποιείται μόνοαπό την εφαρμογή UNDOK.
Ηεφαρμογή UNDOK χρησιμοποιεί τη γλώσσα που έχετε
επιλέξει στοσύστημα του smartphone σας.
7.2 Ελεύθερο δίκτυο / Δίκτυο χωρίς προστασία
Υπόδειξη
• Συνιστάται να μην δημιουργείτε μη ασφαλείς
συνδέσεις καιναπροστατεύετε πάντατοδίκτυό σας
από μη εξουσιοδοτημένη πρόσβαση.
• Αν το επιθυμητόδίκτυο δεν διαθέτει μέτρα ασφαλείας,
αρκεί να επιλέξετε το δίκτυο από τη λίστακαι
να επιβεβαιώσετε την επιλογή σας. Κατόπιν, το
ραδιόφωνοθασυνδεθεί αμέσως με το σημείο
πρόσβασης.
7.2.1 Διαδικασία για χρήστες iOS
• Ανοίξτε την εφαρμογή UNDOK στο iPhone ήστο iPad
• Πατήστε το στοιχείο μενού „Δημιουργία ηχοσυστήματος”
• Βεβαιωθείτε ότι οδέκτης βρίσκεται στη λειτουργία
ρύθμισης (SETUP). Αν ησυσκευή δεν βρίσκεται στη
λειτουργία ρύθμισης (SETUP), πατήστε παρατεταμένατο
πλήκτρο [Power] για 5 δευτερόλεπτα, για να θέσετε τη
συσκευή στη λειτουργία ρύθμισης (SETUP).
• Κατόπιν, το UNDOK θα σας ζητήσει να συνδεθεί με το
WLAN τουπροϊόντος μέσω των ρυθμίσεων iPhone/iPad.
Γιαναγίνει αυτό, μεταβείτε στις ρυθμίσεις συστήματος
του iPhone καιεπιλέξτε το δίκτυο WLAN (π.χ.Setup
Hama IT900MBT). Έπειτα, μεταβείτε ξανάστο UNDOK και
πατήστε „Επόμενο”
• Δώστε, στη συνέχεια, την ονομασία που θέλετε για τον
δέκτη (π.χ. Γραφείο IT900MBT) καιεπιβεβαιώστε την
καταχώρηση πατώντας „Επόμενο”.
• Κατά την επακόλουθη επιλογή γλώσσας μπορείτε να
ορίσετε τη γλώσσα συστήματος τουδέκτη. Επιβεβαιώστε
την επιλογή με το πλήκτρο „Επόμενο”.
• Έπειτα, έχετε στη διάθεσή σας διάφορες δυνατότητες για
τη διαμόρφωση τουδικτύου (WLAN, WPS και Ethernet,
εάν χρειάζεται). Κάντε κλικ στην επιθυμητή μέθοδο καιτο
UNDOK θα μεταβεί στοεπόμενοπαράθυρο
7.2.2 Διαδικασία για τους χρήστες Android
• Ανοίξτε την εφαρμογή UNDOK στο tablet ήτο
smartphone σας
• Πατήστε το στοιχείο μενού „Δημιουργία νέου
ηχοσυστήματος”
• Βεβαιωθείτε ότι οδέκτης βρίσκεται στη λειτουργία
ρύθμισης (SETUP). Αν ησυσκευή δεν βρίσκεται στη
λειτουργία ρύθμισης (SETUP), πατήστε παρατεταμένατο
πλήκτρο [Power] για 5 δευτερόλεπτα, για να θέσετε τη
συσκευή στη λειτουργία ρύθμισης (SETUP).
• Κατόπιν, ηεφαρμογή UNDOK θα σας ζητήσει να συνδεθεί
στο WLAN τουπροϊόντος μέσω των ρυθμίσεων του
iPhone/iPad. Γιαναγίνει αυτό, μεταβείτε στις ρυθμίσεις
συστήματος του iPhone καιεπιλέξτε το δίκτυο WLAN
(π.χ.Setup Hama IT900MBT). Έπειτα, μεταβείτε ξανάστο
UNDOK καιπατήστε „Επόμενο”
• Δώστε, στη συνέχεια, την ονομασία που θέλετε για τον
δέκτη (π.χ. Γραφείο IT900MBT) καιεπιβεβαιώστε την
καταχώρηση πατώντας „Επόμενο”Κατά την επακόλουθη
επιλογή γλώσσας μπορείτε να ορίσετε τη γλώσσα
τουδέκτη. Επιβεβαιώστε την επιλογή με το πλήκτρο
„Επόμενο”.
• Έπειτα, έχετε στη διάθεσή σας διάφορες δυνατότητες για
τη διαμόρφωση τουδικτύου (WLAN, WPS και Ethernet,
εάν χρειάζεται). Κάντε κλικ στην επιθυμητή μέθοδο καιτο
UNDOK θα μεταβεί στοεπόμενοπαράθυρο
• Ανάλογα με τη μέθοδο που έχετε επιλέξει,
• μπορείτε να επιλέξετε καιναδιαμορφώσετε το επιθυμητό
δίκτυο WLAN ήναδημιουργήσετε μια σύνδεση WPS.
• Κατόπιν, οδέκτης θα συνδεθεί με το δίκτυο καιμπορείτε
να χρησιμοποιήσετε τη συσκευή από την εφαρμογή
UNDOK πατώντας „Χρήση τουηχοσυστήματός μου”
• Ηενδεικτική λυχνία LED (1) της σύνδεσης δικτύου ανάβει
τώρα σταθερά.
• Μετάτην επιτυχή διαμόρφωση τουδέκτη, πρέπει να
συνδέσετε μια συσκευή αναπαραγωγής (ηχείο) αναλογικά
(5) ήψηφιακά (3). Οχειρισμός της κατηγορίας μουσικής
πραγματοποιείται μόνοαπό την εφαρμογή UNDOK.
39
Page 44

8. Συνδέσεις
Υπόδειξη
• Οι συνδέσεις οι οποίες πραγματοποιούνται μέσω
οπτικού καλωδίου σήματος έχουν μεγαλύτερη
ατρωσία στις ηλεκτρικές ήμαγνητικές παρεμβολές σε
σύγκριση με τις συνδέσεις που πραγματοποιούνται
μέσω ενός καλωδίου ήχου 3,5 mm.
8.1 Σύνδεση μέσω της υποδοχής Optical OUT
Μέσω της ψηφιακής εξόδου ήχου μπορείτε να συνδέσετε το
ηχείο σας στον δέκτη καινααναπαραγάγετε το σήμα ήχου
τουμέσω τουηχείου.
Υπόδειξη
• Απενεργοποιήστε τονδέκτη, προτού συνδέσετε μια
συσκευή.
• Πριν από τη σύνδεση αφαιρέστε το προστατευτικό
κάλυμμα από τα δύο άκρα τουκαλωδίου οπτικού
σήματος.
• Μην τσακίζετε καιμην συνθλίβετε το καλώδιο.
• Γιααναπαραγωγή μέσω της οπτικής υποδοχής ήχου,
συνδέστε το καλώδιο οπτικού σήματος στην οπτική έξοδο
ήχου (3) τουδέκτη καιστην οπτική είσοδο ήχου του
ηχείου.
• Πατήστε το πλήκτρο [POWER] (1), για να ενεργοποιήσετε
τονδέκτη.
• Το σήμα ήχου τουδέκτη μπορεί να αναπαραχθεί μέσω
τουηχείου.
8.2 Σύνδεση μέσω της υποδοχής LINE OUT
Μέσω της αναλογικής εξόδου ήχου μπορείτε π.χ. να
συνδέσετε το ηχείο σας στον δέκτη καινααναπαραγάγετε
το σήμα ήχου τουμέσω τουηχείου.
Υπόδειξη
• Απενεργοποιήστε τονδέκτη, προτού συνδέσετε μια
συσκευή.
• Μην τσακίζετε καιμην συνθλίβετε το καλώδιο.
• Γιααναπαραγωγή μέσω της αναλογικής υποδοχής ήχου,
συνδέστε ένακαλώδιο RCA3,5 mm στην αναλογική έξοδο
ήχου (5) τουδέκτη καιστην αναλογική είσοδο ήχου του
ηχείου.
• Πατήστε το πλήκτρο [POWER] (1), για να ενεργοποιήσετε
τονδέκτη.
• Το σήμα ήχου τουδέκτη μπορεί να αναπαραχθεί μέσω
τουηχείου.
9.Εργοστασιακές ρυθμίσεις
Γιαναεπαναφέρετε τονδέκτη στις εργοστασιακές ρυθμίσεις
(κατάσταση παράδοσης), ακολουθήστε την εξής
διαδικασία:
• Πατήστε παρατεταμένατοπλήκτρο [POWER] (1) για 5
δευτερόλεπταπερίπου.
• Όλες οι ρυθμίσεις που έχουν εκτελεστεί θα διαγραφούν.
Υπόδειξη
• Τυχόνπροβλήματακαι βλάβες μπορούν ενδεχομένως
να επιλυθούν με επαναφορά στις εργοστασιακές
ρυθμίσεις.
• Ωστόσο, θα διαγραφούν μόνιμα όλες οι
προεπιλεγμένες ρυθμίσεις, όπως οισοσταθμιστής, τα
αγαπημένακαι το προφίλ δικτύου.
10. Ενημέρωση λογισμικού
Εκδίδουμε συνεχώς βελτιώσεις καινέες λειτουργίες για το
λογισμικότου δέκτη μας, προκειμένου να επιδιορθώσουμε
τυχόν σφάλματα, να επεκτείνουμε τις λειτουργίες κ.λπ.
Συνιστάται να εγκαθιστάτε πάντατις διαθέσιμες ενημερώσεις
στον δέκτη σας.
Προειδοποίηση
• Φροντίστε ώστε να υπάρχεισταθερή σύνδεση με την
παροχή ρεύματος, προτού ξεκινήσετε μια ενημέρωση
λογισμικού.
• Τυχόνδιακοπή τουρεύματος κατά τη διάρκεια μιας
ενημέρωσης λογισμικού μπορεί να προκαλέσει
ανεπανόρθωτες βλάβες στοραδιόφωνο!
11. Συντήρηση και φροντίδα
• Καθαρίζετε αυτή τη συσκευή μόνομεένα ελαφρώς
βρεγμένοπανί χωρίς χνούδια καιμην χρησιμοποιείτε
καυστικάκαθαριστικά.
• Αν πρόκειται να μη χρησιμοποιήσετε τη συσκευή για
μεγάλοδιάστημα απενεργοποιήστε την καιαποσυνδέστε
τη από το ηλεκτρικόρεύμα. Φυλάσσετε τη σε καθαρό,
ξηρό μέρος χωρίς κατευθείαν ηλιακή ακτινοβολία.
12. Απώλεια εγγύησης
Ηεταιρεία Hama GmbH &CoKGδεν αναλαμβάνει καμία
ευθύνη ήεγγύηση για ζημιές, οι οποίες προκύπτουν
από λανθασμένη εγκατάσταση καισυναρμολόγηση ή
λανθασμένη χρήση τουπροϊόντος ήμητήρηση των οδηγιών
λειτουργίας και/ήτων υποδείξεων ασφαλείας.
40
Page 45

13. Σέρβις και υποστήριξη
Γιαερωτήσεις σχετικάμετοπροϊόν απευθυνθείτε στην
υπηρεσία εξυπηρέτησης πελατών της Hama.
Γραμμή υποστήριξης:+49 9091 502-115 (Γερμανικά/
Αγγλικά)
Περισσότερες πληροφορίες υποστήριξης θα βρείτε στη
διεύθυνση:www.hama.com
14. Υποδείξεις απόρριψης
Υπόδειξη σχετικάμετην προστασία περιβάλλοντος:
Από τη στιγμή που ηΕυρωπαϊκή Οδηγία
2012/19/EU και 2006/66/EE ενσωματώνεται στο
εθνικόδίκαιο ισχύουν τα εξής: Οι ηλεκτρικές καιοι
ηλεκτρονικές συσκευές καθώς καιοιμπαταρίες δεν
επιτρέπεται να πετιούνται σταοικιακάαπορρίμματα. Οι
καταναλωτές υποχρεούνται από τοννόμοναεπιστρέφουν
τις ηλεκτρικές καιηλεκτρονικές συσκευές καθώς καιτις
μπαταρίες στοτέλος της ζωής τους σταδημόσια σημεία
περισυλλογής που έχουν δημιουργηθεί γι’ αυτότοσκοπό ή
στασημεία πώλησης. Οι λεπτομέρειες ρυθμίζονται στη
σχετική νομοθεσία. Το σύμβολο πάνω στοπροϊόν, στο
εγχειρίδιο χρήσης ήστη συσκευασία παραπέμπει σε αυτές
τις διατάξεις. Με την ανακύκλωση, επαναχρησιμοποίηση
των υλικών ήμεάλλες μορφές χρησιμοποίησης παλιών
συσκευών / Μπαταριών συνεισφέρετε σημαντικάστην
προστασία τουπεριβάλλοντος. Στη Γερμανία ισχύουν
αντίστοιχαοιπαραπάνω κανόνες απόρριψης σύμφωναμε
τονκανονισμό για μπαταρίες καισυσσωρευτές.
15. Δήλωση συμμόρφωσης
Με την παρούσα ο/η Hama GmbH &CoKG,
δηλώνει ότι οραδιοεξοπλισμός [00054861] πληροί
την οδηγία 2014/53/ΕΕ. Το πλήρες κείμενοτης
δήλωσης συμμόρφωσης ΕΕ διατίθεται στην ακόλουθη
ιστοσελίδα στοδιαδίκτυο:
www.hama.com->00054861->Downloads.
Ζώνη συχνοτήτων/Ζώνες
συχνοτήτων
Μέγιστη εκπεμπόμενη
ισχύς
Bluetooth: 2.402 -2.480GHz
WiFi: 2.412 -2.472GHz
WiFi: 5.150 -5.350 GHz
WiFi: 5.470 -5.725 GHz
Bluetooth: 4dBm (EIRP)
WiFi: 2.4GHz /19.3dBm (EIRP)
WiFi: 5GHz /17.8dBm (EIRP)
Περιορισμοί ήαπαιτήσεις
Βέλγιο, Βουλγαρία, Τσεχική Δημοκρατία, Δανία, Γερμανία,
Εσθονία, Ιρλανδία, Ελλάδα, Ισπανία, Γαλλία, Κροατία,
Ιταλία, Κύπρος, Λετονία, Λιθουανία, Λουξεμβούργο,
Ουγγαρία, Μάλτα, Ολλανδία, Αυστρία, Πολωνία,
Πορτογαλία, Ρουμανία, Σλοβενία, Σλοβακία, Φινλανδία,
Σουηδία, ΗνωμένοΒασίλειο
Υπόδειξη
Όταν χρησιμοποιούνται τα κανάλια 36-64 (συχνότητες
5,150GHz –5,350GHz) στη ζώνη 5GHz WLAN,
μπορείτε να συνδέσετε το προϊόν μόνοσεκλειστούς
χώρους.
41
Page 46

P Krótka instrukcja obsługi
Elementy obsługi isygnalizacji
Przód
1. Przycisk zasilania [Power]
2. Dioda LED stanu
Tył
3. Przyłącze optyczne
4. Przyłącze zasilania (microUSB)
5. Gniazdo Line-Out
6. Port USB Playback/Update
1. Objaśnienie symboli ostrzegawczych iwskazówek
Ostrzeżenie
Używane wcelu zwrócenia uwagi na szczególne
niebezpieczeństwo lub ryzyko.
Wskazówki
Używane wcelu zwrócenia uwagi na szczególnie
przydatne informacje.
Ryzyko porażenia prądem
elektrycznym
Symbol ten wskazuje niebezpieczeństwo dotknięcia
nieizolowanych części produktu, którą mogą być pod
napięciem grożącym porażeniem prądem elektrycznym.
2. Zawartość opakowania
• Radio strumieniowe „IT900MBT”
• Pilot zdalnego sterowania
• Ładowarka microUSB
• Kabel microUSB
• Kabel jack 3,5 mm
• Instrukcja obsługi
• Ulotka oSpotify
3. Wskazówki bezpieczeństwa
• Produkt jest przeznaczony do prywatnego,
niekomercyjnego użytku domowego.
• Chronić produkt przed zanieczyszczeniem, wilgocią
iprzegrzaniem oraz stosować go tylko wsuchych
pomieszczeniach.
• Trzymać ten produkt, jak wszystkie urządzenia
elektryczne, zdala od dzieci!
• Chronić produkt przed upadkiem isilnymi wstrząsami.
• Nie stosować produktu poza zakresem mocy podanym w
danych technicznych.
• Materiałyopakowaniowe trzymać koniecznie zdala od
dzieci –ryzyko uduszenia.
• Materiałyopakowaniowe należynatychmiast poddać
utylizacji zgodnie zobowiązującymi miejscowymi
przepisami.
• Nie modykować urządzenia. Prowadzi to do utraty
wszelkich roszczeń ztytuługwarancji.
Ryzyko porażenia prądem elektrycznym
• Nie otwierać produktu inie używać go, gdy jest
uszkodzony.
• Nie używać produktu, jeżeli zasilacz sieciowy,kabel
zasilacza bądź przewód sieciowy są uszkodzone.
• Nie próbować samodzielnie naprawiać produktu.
Prace serwisowe zlecać wykwalikowanemu
personelowi fachowemu.
4.Informacje iwskazówki przed uruchomieniem
Połączenia sieciowego /
Przygotowanie połączenia internetowego
Istnieje możliwość włączenia tego radia wlokalną sieć,a
tym samym uzyskania dostępu do serweradomowego lub
innych źródeł udostępnionych źródeł.Aby odbierać radio
internetowe
lub uzyskać dostępdomediów niezapisanych lokalnie
(strumień –np. Spotify Connect), wymagane jest
dodatkowo połączenie internetowe.
Połączenie WLAN/WiFi (sieć bezprzewodowa)
• Sprawdzić,czy ruter jest włączony iczy zostałonawiązane
połączenie zInternetem.
• Jeśli to jeszcze nie nastąpiło, włączyć połączenie WiFi
rutera.
• Wprzypadku pojawienia się pytań związanych z
konguracją ruteranależyskorzystać zinstrukcji obsługi
ruterawzakresie wyszukiwania błędów/rozwiązaywania
problemów.
• Dokładna instrukcja konguracji połączenia WiFi opisana
zostaławrozdziale Połączenie bezprzewodowe.
5.Przed uruchomieniem
Uwagi dotyczące obsługi
Obsługa strumienia radia odbywa się wyłącznie poprzez
aplikację UNDOK zainstalowaną na smartfonie.
42
Page 47

Wskazówki
Wskazówka –pierwsze włączenie
Szczegółowy opis aplikacji
UNDOK ipełnego zakresu funkcji
można znaleźć wprzewodniku
UNDOK na stronie:
www.hama.com->00054861->Downloads
6.Uruchamianie
6.1 Przyłącza
• 1x LINE Out 3,5 mm
• 1x przyłącze optyczne
• 1x Port USB -Typ APlayback /Update
• 1x zasilacz sieciowy (microUSB)
6.2 Włączanie
• Podłączyć dołączony kabel ładujący microUSB do gniazda
microUSB (4) radia.
• Podłączyć wolny wtyk kabla ładującego microUSB do
ładowarki USB.
Hinweis
Stosować wyłącznie oryginalne akcesoria (bądź
akcesoria autoryzowane przez rmę Hama), aby uniknąć
uszkodzenia produktu.
• Połączyć kabel sieciowy /zasilacz sieciowy zprawidłowo
zainstalowanym gniazdem wtykowym.
Ostrzeżenie
• Podczas pierwszego włączenia radio uruchamia się w
trybie SETUP.
• Dioda LED stanu(2) zaczyna migać na biało, aradio
można połączyć ze smartfonem wyłącznie za pomocą
aplikacji UNDOK.
• Wprzypadku problemów zpołączeniem można
ponownie przywrócić tryb SETUP radia, wciskając
długo przycisk [POWER] (1).
Regulacja głośności /Wyciszanie
Wprowadzanie haseł,tekstów wyszukiwanych itp.
Wprowadzanie danych odbywa się wyłącznie za pomocą
aplikacji UNDOK.
Włączanie /Wyłączanie /Standby /Punkt dostępu
micro
• Aby włączyć radio, wcisnąć przycisk [POWER]..
Opcjonalnie można włączyć radio poprzez aplikację
UNDOK.
• Aby wyłączyć radio (Standby), wcisnąć przycisk [POWER].
Po nawiązaniu połączenia sieciowego zostanie ono
zachowane również wtrybie Standby,coumożliwi
włączenie poprzez aplikację UNDOK.
Wskazówki
Aby całkowicie wyłączyć urządzenie, należyodłączyć je
od zasilania.
7. UNDOK –wszystko pod kontrolą
Podłączać produkt tylko do odpowiedniego gniazda
•
wtykowego. Gniazdo wtykowe musi być wkażdej
chwili łatwo dostępne.
• Wprzypadku wielu gniazd wtykowych zwracać
uwagę,aby podłączone urządzenia nie przekraczały
dopuszczalnej mocy całkowitej.
• Gniazdo wtykowe musi być wkażdej chwili łatwo
dostępne.
• Wprzypadku nieużywania produktu przez dłuższy czas
odłączyć go od prądu.
• Poczekać do zakończenia inicjalizacji radia.
• Wcisnąć krótko przycisk [POWER] (1) znajdujący się na
urządzeniu.
Zaprojektowana przez Frontier Silicon aplikacja UNDOK
pozwala na zachowanie pełnej kontroli nad stacjami
radiowymi igłośnikami na smartfonie.
Bez względu na to, czy chodzi opierwszą kongurację
urządzenia, kongurację Multiroomu czy też ozarządzanie
ulubionymi stacjami –UNDOK zapewnia dostępdo
wszystkich funkcji na smartfonie lub tablecie.
Wdalszej części objaśniona zostałapierwsza konguracja
radia za pomocą UNDOK. Pełny zakres funkcji dostępny jest
wyłącznie poprzez aplikację UNDOK.
43
Page 48

7.1 Pierwsza konfiguracja urządzenia za pomocą
UNDOK
Wszystkie produkty HAMA kompatybilne zUNDOK tworzą
podczas pierwszego włączenia lub po przywróceniu
ustawień fabrycznych tzw.punkt dostępu micro, czyli
własną sieć WiFi, za pomocą której można się połączyć z
tabletem lub smartfonem. Taki punkt dostępu wyświetlany
jest wformacie „Ustawienia NAZWAPRODUKTU Hama
adres MAC”, co umożliwia jednoznaczną identykację
produktu.
Wskazówki
Waplikacji UNDOK stosowany jest język wybrany w
systemie smartfona.
7.2 Sieć otwarta /Sieć niezabezpieczona
Wskazówki
• Zalecamy,aby nie nawiązywać połączeń
niezabezpieczonych, iaby chronić swoją sieć przed
dostępem osób trzecich.
• Jeśli wybrana sieć nie jest zabezpieczona, wystarczy
wybrać ją zlisty ipotwierdzić wybór.Radio łączy się
wówczas niezwłocznie zpunktem dostępu.
7.2.1 Sposób postępowania dla użytkowników
systemu iOS
• Otworzyć aplikację UNDOK na iPhonie lub iPadzie.
• Wcisnąć punkt menu Konguracja systemu audio.
• Upewnić się, żeradio znajduje się wtrybie SETUP.Jeśli
urządzenie nie znajduje się wtrybie SETUP,należy
wcisnąć iprzytrzymać przez 5sprzycisk [Power], aby
przełączyć urządzenie wtryb SETUP.
• UNDOK zażąda połączenia zsiecią WiFi produktu poprzez
ustawienia iPhone’a/iPada. Wtym celu należyprzejść do
ustawień systemowych iPhone’a iwybrać sieć WiFi (np.
Setup Hama IT900MBT). Następnie wrócić do UNDOK i
wcisnąć Dalej.
• Nadać radiu wybraną nazwę (np. BiuroIT900MBT) i
potwierdzić wpis przyciskiem Dalej.
• Następnie pojawia się okno wyboru języka, wktórym
można ustalić język systemu. Potwierdzić wybór
przyciskiem „Dalej”.
• Dostępne są różne możliwości konguracji sieci (np. WiFi,
WPS iEthernet). Wcisnąć wybraną metodę,aUNDOK
przekieruje do następnego okna.
• Zależnie od wybranej metody można teraz dokonać
wyboru odpowiedniej sieci WiFi iskongurować ją lub też
nawiązać połączenie WPS.
• Na koniec radio łączy się zsiecią,awciskającprzycisk
„Mój system audio” można używać urządzenia poprzez
UNDOK.
• Dioda LED (1) połączenia sieciowego świeci światłem
ciągłym.
• Po pomyślnej konguracji radia należypodłączyć
urządzenie odtwarzające (głośnik) wsposób analogowy
(5) lub cyfrowy (3). Sterowanie grupą odtwarzającą
muzykę odbywa się wyłącznie poprzez UNDOK.
7.2.2 Sposób postępowania dla użytkowników
systemu Android
• Otworzyć aplikację UNDOK na tablecie lub smartfonie.
• Wcisnąć przycisk Konguracja systemu audio.
• Upewnić się, żeradio znajduje się wtrybie SETUP.Jeśli
urządzenie nie znajduje się wtrybie SETUP,wówczas
wcisnąć iprzytrzymać przez 5sprzycisk [Power], aby
przełączyć urządzenie wtryb SETUP.
• UNDOK zażąda połączenia zsiecią WiFi produktu poprzez
ustawienia iPhone’a/iPada –Wtym celu przejść do
ustawień systemowych iPhone’a iwybrać sieć WiFi (np.
Setup Hama IT900MBT). Następnie wrócić do UNDOK i
wcisnąć Dalej.
• Nadać radiu wybraną nazwę (np. BiuroIT900MBT) i
potwierdzić wpis przyciskiem Dalej.
• Następnie pojawia się okno wyboru języka, wktórym
można ustalić język radia. Potwierdzić wybór przyciskiem
„Dalej”.
• Dostępne są różne możliwości konguracji sieci (np. WiFi,
WPS iEthernet). Wcisnąć wybraną metodę,aUNDOK
przekieruje do następnego okna.
• Zależnie od wybranej metody można teraz dokonać
wyboru odpowiedniej sieci WiFi iskongurować ją lub też
nawiązać połączenie WPS.
• Następnie radio łączy się zsiecią.Powciśnięciu przycisku
„Zarządzanie systemem audio” można korzystać z
urządzenia wUNDOK.
• Dioda LED (1) połączenia sieciowego świeci światłem
ciągłym.
• Po pomyślnej konguracji radia należypodłączyć
urządzenie odtwarzające (głośnik) wsposób analogowy
(5) lub cyfrowy (3). Sterowanie grupą odtwarzającą
muzykę odbywa się wyłącznie poprzez UNDOK.
44
Page 49

8. Połączenia
Wskazówki
• Połączenia utworzone za pomocą optycznego kabla
sygnałowego są mniej wrażliwe na zakłócenia
elektryczne imagnetyczne niż połączenia przesyłane
kablem audio 3,5 mm.
8.1 Połączenie poprzez gniazdo Optical OUT
Za pomocą cyfrowego wyjścia audio można przykładowo
podłączyć głośniki do radia iwten sposób odtwarzać jego
sygnał audio.
Wskazówki
• Przed podłączeniem urządzenia końcowego wyłączyć
radio.
• Przed podłączeniem usunąć osłony ochronne zobu
końców optycznego kabla sygnałowego.
• Nie zginać ani nie zakleszczać kabla.
• Wcelu odtwarzania poprzez optyczne złącze audio
podłączyć optyczny kabel sygnałowy do optycznego
wyjścia audio (3) radia ioptycznego wejścia audio
głośnika.
• Aby włączyć radio, wcisnąć przycisk [POWER] (1).
• Sygnał audio radia będzie odtwarzany przez głośnik.
8.2 Połączenie poprzez gniazdo LINE OUT
Za pomocą analogowego wyjścia audio można
przykładowo podłączyć głośniki do radia iwten sposób
odtwarzać jego sygnał audio.
Wskazówki
• Przed podłączeniem urządzenia końcowego wyłączyć
radio.
• Nie zginać ani nie zakleszczać kabla.
• Wcelu odtwarzania poprzez analogowe złącze audio
podłączyć kabel 3,5 mm zwtykiem jack do analogowego
wyjścia audio (5) radia ianalogowego wejścia audio
głośnika.
• Aby włączyć radio, wcisnąć przycisk [POWER] (1).
• Sygnał audio radia będzie odtwarzany przez głośnik.
9.Ustawienia fabryczne
Aby przywrócić tuner do ustawień fabrycznych (ustawienia
początkowe), postępować wnastępujący sposób:
• Nacisnąć itrzymać wciśnięty przycisk [POWER] (1) przez
ok. 5sekund.
• Wszystkie wprowadzone ustawienia zostaną usunięte.
Wskazówki
• Problemy ibłędne działanie można usunąć,resetując
urządzenie do stanu ustawień fabrycznych.
• Wtedy jednak są usuwane bezpowrotnie wszystkie
wcześniejsze ustawienia, takie jak Equalizer,Ulubione
czy Prole sieciowe.
10. Aktualizacja oprogramowania
Nieustannie trwają prace projektowe nad usprawnieniem
inowymi funkcjami oprogramowania radia, co pomaga
usuwać możliwe błędy,rozszerza zakres funkcji itd.
Zalecamy zawsze instalować wradiu udostępnione
aktualizacje.
Ostrzeżenie
• Przed uruchomieniem aktualizacji oprogramowania
zwrócić uwagę na podłączenie do stabilnego źródła
zasilania.
• Przerwanie zasilania podczas aktualizacji
oprogramowania możespowodować nieodwracalne
uszkodzenie radia!
11. Czyszczenie
• Czyścić produkt tylko przy użyciu niestrzępiącej się,
lekko zwilżonej szmatki inie stosować agresywnych
detergentów.
• Wprzypadku dłuższego nieużywania wyłączyć
urządzenie iodłączyć od sieci prądu. Przechowywać
produkt wczystym, suchym miejscu bez bezpośredniego
promieniowania słonecznego.
12. Wyłączenie odpowiedzialności
Hama GmbH &CoKGnie udziela gwarancji ani nie
odpowiada za szkody wskutek niewłaściwej instalacji,
montażuoraznieprawidłowego stosowania produktu
lub nieprzestrzegania instrukcji obsługi i/lub wskazówek
bezpieczeństwa.
45
Page 50

13. Serwis ipomoc techniczna
Wrazie pytań dotyczących produktu prosimy zwrócić się do
infolinii Hama.
Gorąca linia: +49 9091 502-115 (niem./ang.)
Dodatkowe informacje są dostępne na stronie:
www.hama.com
14. Informacje dotycząca recyklingu
Wskazówki dotyczące ochrony środowiska:
Od czasu wprowadzenia europejskiej dyrektywy
2012/19/EU i2006/66/EU do prawa narodowego
obowiązują następujące ustalenia: Urządzeń
elektrycznych, elektronicznych oraz baterii
jednorazowych nie należywyrzucać razem zcodziennymi
odpadami domowymi! Użytkownik zobowiązany prawnie
do odniesienia zepsutych, zniszczonych lub niepotrzebnych
urządzeń elektrycznych ielektronicznych do punktu zbiórki
lub do sprzedawcy.Szczegółowe kwestie regulują przepisy
prawne danego kraju. Informuje otym symbol
przekreślonego kosza umieszczony na opakowaniu.
Segregującodpady pomagasz chronićśrodowisko!
15. Deklaracja zgodności
Hama GmbH &CoKGniniejszym oświadcza, żetyp
urządzenia radiowego [00054861] jest zgodny z
dyrektywą 2014/53/UE. Pełny tekst deklaracji
zgodności UE jest dostępny pod następującym adresem
internetowym:
www.hama.com->00054861->Downloads.
Bluetooth: 2.402 -2.480GHz
Częstotliwość transmisji
Maksymalna moc
transmisji
Ograniczenia lub wymagania w
Belgia, Bułgaria, Czechy,Dania, Niemcy,Estonia, Irlandia,
Grecja, Hiszpania, Francja, Chorwacja, Włochy,Cypr, Łotwa,
Litwa, Luksemburg, Węgry,Malta, Holandia, Austria,
Polska, Portugalia, Rumunia, Słowenia, Słowacja, Finlandia,
Szwecja, Zjednoczone Królestwo
Wskazówka
WiFi: 2.412 -2.472GHz
WiFi: 5.150 -5.350 GHz
WiFi: 5.470 -5.725 GHz
Bluetooth: 4dBm (EIRP)
WiFi: 2.4GHz /19.3dBm (EIRP)
WiFi: 5GHz /17.8dBm (EIRP)
Jeżeli kanały36–64 (zakres częstotliwości 5,150
GHz –5,350 GHz) używane są wsieci WLAN 5GHz,
produktu można używać wyłącznie wzamkniętych
pomieszczeniach.
46
Page 51

H Rövid útmutató
Kezelőelemek és kijelzők
Elülső oldal
1. [Power] gomb
2. Állapotjelző LED
Hátoldal
3. Optikai csatlakozás
4. Tápcsatlakozó (MicroUSB)
5. LINE Out aljzat
6. USB-lejátszás/frissítés port
1. Figyelmeztető szimbólumok és előírások
ismertetése
Figyelmeztetés
Figyelmeztető jeleket használunk abiztonsági tényezők
bemutatására, ill. felhívjuk a gyelmet akülönleges
veszélyekreéskockázatokra.
Hivatkozás
Az itt látható gyelmeztető jeleket használjuk fel,
ha kiegészítő információkat közlünk vagy fontos
tudnivalókrahívjuk fel a gyelmet.
Áramütés veszélye
Ez aszimbólum atermék azon nem szigetelt részeinek
megérintésérevonatkozó veszélyreutal, amelyek olyan
szintű veszélyes feszültségen lehetnek, ami miatt
áramütés veszélye áll fenn.
2. Acsomag tartalma
• Átviteli tuner „IT900MBT”
• Távirányító
• MicroUSB-töltő
• MicroUSB-kábel
• 3,5 mm-es kapcsolókábel
• Kezelési útmutató
• Spotify Flyer
3. Biztonsági utasítások
• Atermék magánháztartási, nem üzleti célú alkalmazásra
készül.
• Védje aterméket szennyeződés, nedvesség és
túlmelegedés elől, és azt csak száraz helyiségben
használja.
• Ez atermék, mint minden elektromos termék, nem
gyermekek kezébe való!
• Ne ejtse le aterméket és ne tegye ki heves rázkódásnak.
• Ne üzemeltesse aterméket aműszaki adatokban szereplő
teljesítményhatárokon kívül.
• Feltétlenül tartsa távol agyermekeket a
csomagolóanyagtól, mert fulladásveszély állfenn.
• Azonnal ártalmatlanítsa acsomagolóanyagot ahelyileg
érvényes ártalmatlanítási előírások szerint.
• Ne végezzen módosításokat akészüléken. Ebben az
esetben minden garanciaigény megszűnik.
Áramütés veszélye
• Ne nyissa ki aterméket és sérülés esetén ne
üzemeltesse tovább.
• Ne használja aterméket, ha az AC-adapter,az
adapterkábel vagy ahálózati kábel megsérült.
• Ne kísérelje meg akészülék saját karbantartását
vagy javítását. Bármely karbantartási munkát bízzon
illetékes szakemberre.
4.4. Információk és megjegyzések ahálózati
kapcsolat üzembevétele előtt
internetkapcsolat előkészítése
Ezt atunert rákapcsolhatja egy helyi hálózatra, és így
hozzáférhet az otthoni szerverhez vagy más engedélyezési
forráshoz. Az internetrádió
fogásához vagy anem helyi mentett médiatartalmak
(adatfolyam –pl. Spotify Connect) eléréséhez ezenkívül a
hálózatban még internetkapcsolat is szükséges.
WLAN/Wi-Fi-kapcsolat (vezeték nélküli hálózat)
• Bizonyosodjon meg róla, hogy arouterbevan kapcsolva,
és van internetes kapcsolat.
• Ha ez még nem történt meg, aktiválja arouter WLANkapcsolatát.
• Ha kérdése van arouterkongurálásával kapcsolatban, a
hibakereséshez/problémamegoldáshoz használja arouter
használati útmutatóját.
• AWLAN-kapcsolat pontos kongurációs útmutatója a
Vezeték nélküli kapcsolat című szakaszban olvasható.
5.Üzembevétel előtt
Kezelési tudnivalók
Az átviteli tuner kizárólag azUNDOK alkalmazással, az
okostelefonján keresztül használható.
47
Page 52

Hivatkozás
Hivatkozás –Első bekapcsoláskor
Az UNDOK-App részletes leírását
és ateljes funkcionalitást az UNDOK-
Guide-ban találja:
www.hama.com->00054861->Downloads
6.Üzembe helyezés
6.1 Csatlakozók
• 1xLINE Out 3,5 mm
• 1xoptikai csatlakozás
• 1xUSB- Atípusú lejátszás/frissítés port
• 1xtápellátás (MicroUSB)
6.2 Bekapcsolás
• Csatlakoztassa amellékelt MicroUSB töltőkábelt atuner
MicroUSB csatlakozójához (4).
• Csatlakoztassa aMicroUSB töltőkábel szabad
csatlakozódugóját az USB töltőkészülékre.
Hinweis
Kizárólag eredeti (vagy aHama által engedélyezett
egyéb) tartozékot használjon atermék károsodásának
elkerülésére.
• Kösse össze ahálózati kábelt/tápegységet egy
szabályszerűen szerelt dugaszaljzattal.
Figyelmeztetés
• Az első bekapcsoláskor atuner SETUP módban van.
• Az állapotjelző LED (2) elkezd fehéren villogni,
és atuner csak az UNDOK alkalmazással, az
okostelefonján keresztül csatlakoztatható.
• Kapcsolódási problémák esetén atunert ismét SETUP
módba állíthatja a[POWER] gomb (1) újbóli hosszú
megnyomásával.
Hangerő beállítása/Némítás
Jelszók, keresési szövegek stb. megadása
Amegadás kizárólag az UNDOK alkalmazáson keresztül
történik.
Be-/kikapcsolás/készenlét/mikrohozzáférési pont
• Atuner bekapcsolásához nyomja meg a[POWER]
gombot. Atuner az UNDOK alkalmazással is
bekapcsolható.
• Atuner kikapcsolásához nyomja meg a[POWER] gombot
(készenlét). Ahálózati kapcsolat beállítását követően
ezt készenléti módban is függőlegesen kelltartani, hogy
akészüléket az UNDOK alkalmazással is be lehessen
kapcsolni.
Hivatkozás
Ateljes kikapcsoláshoz válassza le akészüléket a
tápellátásról.
7. UNDOK –minden egy kézben
• Aterméket csak az arraacélrajóváhagyott dugaszoló
aljzatról működtesse. Ahálózati dugaszolóaljzatnak
bármikor könnyen elérhetőnek kell lennie.
• Dugaszsor esetén ügyeljen rá, hogy acsatlakoztatott
fogyasztók ne lépjék túl amegengedett összesített
teljesítményt.
• Ahálózati dugaszolóaljzatnak bármikor könnyen
elérhetőnek kell lennie.
• Ha hosszabb ideig nem használja aterméket, válassza
le ahálózatról.
• Várja meg, míg lejár atuner inicializálása.
• Röviden nyomja meg akészüléken lévő [POWER] gombot
(1).
48
AFrontier Silicon által kifejlesztett UNDOK alkalmazás
(App) arádiók és hangszórók teljes körű vezérlését teszi
lehetővé az okostelefonról.
Akár az eszköz első beállításáról, aMultiroom
kongurálásáról vagy akedvenc adók kezelésérőlvan szó,
az UNDOK minden funkciót biztosít az okostelefonon vagy
atáblagépen.
Az alábbiakban elmagyarázzuk atuner első beállítását az
UNDOK segítségével. Az eszköz teljes funkcionalitása csak
az UNDOK alkalmazással érhető el.
Page 53

7.1 Az eszköz első beállítása UNDOK-kal
AHama UNDOK-kompatibilis termékei az első
bekapcsoláskor,illetveagyári beállításokravaló
visszaállítás után, létrehoznak egy úgynevezett Micro
Access Point hozzáférési pontot, vagyis egy saját
Wi-Fi hálózatot, amelyen keresztül csatlakoztatható a
táblagép vagy az okostelefon. Ez ahozzáférési pont a
következő formátumban jelenik meg: „Beállítás Hama
TERMÉKMEGJELÖLÉS MAC-cím”, hogy aterméket
egyértelműen lehessen azonosítani.
Hivatkozás
Az UNDOK alkalmazás az okostelefonján kiválasztott
nyelvet használja.
7.2 Nyitott hálózat/nem támogatott hálózat
Hivatkozás
• Javasoljuk, hogy ne hozzon létrenem biztosított
kapcsolatot, és hogy ahálózatát védje meg az idegen
hozzáférés ellen.
• Ha akívánt hálózat nem rendelkezik biztonsági
intézkedésekkel, elég ahálózatot alistából
kiválasztani és nyugtázni. Arádió ekkor azonnal
kapcsolódik ahozzáférési ponthoz.
7.2.1 Eljárás iOS-felhasználók számára
• Nyissa meg az UNDOK alkalmazást az iPhone-ján vagy
iPad-jén.
• Válassza az Audiorendszer beállítása menüpontot
• Győződjön meg róla, hogy atuner SETUP módban van.
Ha az eszköz nem SETUP módban van, tartsa lenyomva
5másodpercig a[Power] gombot, és állítsa az eszközt
SETUP módba.
• Az UNDOK most felszólítja, hogy az iPhone/iPadbeállításokkal atermék Wi-Fi hálózatához csatlakozzon
–ehhez lépjen be az iPhone rendszerbeállításaiba, és
válassza ki aWi-Fi hálózatot (pl. Setup Hama IT900MBT).
Ezután váltson vissza az UNDOK-ba, és nyomja meg a
Tovább gombot
• Adjon meg egy tetszőleges nevet atunernek (pl.
iroda IT900MBT), és erősítse meg aTovább gomb
megnyomásával.
• Ezután anyelvválasztásnál rögzítheti atuner
rendszernyelvét. Erősítse meg akiválasztást a„Tovább”
gombbal.
• Most megjelennek akülönböző hálózati kongurációk (pl.
WLAN, WPS és Ethernet). Kattintson akívánt módra, és
az UNDOK akövetkező ablakravált
• Akiválasztott módszertőlfüggően most kiválaszthatja és
kongurálhatja akívánt Wi-Fi hálózatot, vagy létrehozhat
egy WPS-kapcsolatot.
• Végül atuner csatlakozik ahálózathoz, és a„Saját
audiorendszer“ megnyomásával az eszközt az UNDOK-kal
használhatja.
• Ahálózati kapcsolat LED-kijelzője (1) folyamatosan világít
• Atuner sikeres kongurálását követően csatlakoztatni kell
egy lejátszóeszközt (hangszórót) analóg (5) vagy digitális
(3) módon. Azenecsoport vezérlése kizárólag az UNDOKon keresztül lehetséges.
7.2.2 Eljárás Android-felhasználók számára
• Nyissa meg az UNDOK alkalmazást atáblagépén vagy az
okostelefonján
• Nyomja meg az Audiorendszer beállítása menüpontot
• Győződjön meg róla, hogy atuner SETUP módban van.
Ha az eszköz nem SETUP módban van, tartsa lenyomva
5másodpercig a[Power] gombot, és állítsa az eszközt
SETUP módba.
• Az UNDOK most felszólítja, hogy az iPhone/iPadbeállításokkal atermék Wi-Fi hálózatához csatlakozzon
–ehhez lépjen be az iPhone rendszerbeállításaiba, és
válassza ki aWi-Fi hálózatot (pl. Setup Hama IT900MBT).
Ezután váltson vissza az UNDOK-ba, és nyomja meg a
Tovább gombot
• Adjon meg egy tetszőleges nevet atunernek (pl.
iroda IT900MBT), és erősítse meg aTovább gomb
megnyomásával
• Ezután anyelvválasztásnál rögzítheti atuner nyelvét.
Erősítse meg akiválasztást a„Tovább” gombbal.
• Most megjelennek akülönböző hálózati kongurációk (pl.
WLAN, WPS és Ethernet). Kattintson akívánt módra, és
az UNDOK akövetkező ablakravált
• Akiválasztott módszertőlfüggően most kiválaszthatja és
kongurálhatja akívánt Wi-Fi hálózatot, vagy létrehozhat
egy WPS-kapcsolatot.
• Végül atuner csatlakozik ahálózathoz, és a„Saját
audiorendszer használata”megnyomásával az eszközt az
UNDOK-kal használhatja.
• Ahálózati kapcsolat LED-kijelzője (1) folyamatosan világít
• Atuner sikeres kongurálását követően csatlakoztatni kell
egy lejátszóeszközt (hangszórót) analóg (5) vagy digitális
(3) módon. Azenecsoport vezérlése kizárólag az UNDOKon keresztül lehetséges.
49
Page 54

8. Kapcsolatok
Hivatkozás
• Az optikai jelkábellel készült csatlakozások
kevésbé érzékenyek az elektromos vagy mágneses
interferenciára, mint a3,5 mm-es hangkábellel
történő csatlakozások.
8.1 Csatlakozás optikai kimeneten át
Adigitális audiobemeneten keresztül csatlakoztathatja pl.
hangszóróját atunerhez és lejátszhatja annak audio jelét a
hangszórón keresztül.
Hivatkozás
• Aterminál csatlakoztatása előtt kapcsolja ki atunert.
• Arögzítés előtt távolítsa el avédősapkát az optikai
jelkábel mindkét végéről.
• Ne törje meg és ne csíptesse be akábelt.
• Az optikai audio csatlakozón keresztül történő
lejátszáshoz csatlakoztasson egy optikai jelkábelt atuner
optikai audio bemenetéhez (3) és ahangszóró optikai
audio kimenetéhez.
• Nyomja meg a[POWER] (1) gombot atuner
bekapcsolásához.
• Atuner audio jelét lejátszhatja ahangszórókon keresztül.
8.2 Csatlakozás LINE OUT-tal
Az analóg audiobemeneten keresztül csatlakoztathatja pl.
hangszóróját atunerhez és lejátszhatja annak audio jelét a
hangszórón keresztül.
Hivatkozás
• Aterminál csatlakoztatása előtt kapcsolja ki atunert.
• Ne törje meg és ne csíptesse be akábelt.
• Az analóg audio csatlakozón keresztül történő
lejátszáshoz csatlakoztasson egy 3,5 mm-es RCAkábelt
atuner analóg audio bemenetéhez (5) és ahangszóró
analóg audio kimenetéhez.
• Nyomja meg a[POWER] (1) gombot atuner
bekapcsolásához.
• Atuner audio jelét lejátszhatja ahangszórókon keresztül.
9. Gyári beállítások
Atuner gyári beállításainak (szállításkori állapot)
visszaállításához akövetkezőképpen járjon el:
• Nyomja meg és tartsa lenyomva a[POWER] gombot (1)
körülbelül 5másodpercig.
• Ezzel minden elvégzett beállítás törlődik.
Hivatkozás
• Aproblémák és ahibás funkciók agyári beállítások
visszaállításával feltehetően helyrehozhatók.
• Viszont minden előzetes beállítás, mint például a
hangszínszabályzó, akedvencek és ahálózati prolok
visszavonhatatlanul törlődnek.
10. Szoftver aktualizálása
Az esetleges hibák kijavítása, afunkciók bővítése stb.
érdekében tunerünk szoftveréhez folyamatosan jobb
verziókat és új funkciókat fejlesztünk ki.
Azt javasoljuk Önnek, hogy mindig telepítse atunerjéreaz
elérhető frissítéseket.
Figyelmeztetés
• Ügyeljen arra, hogy aszoftverfrissítés elkezdése előtt
az áramellátás stabil legyen.
• Ha aszoftverfrissítés közben megszakad az
áramellátás, az helyrehozhatatlan károsodásokat
okozhat arádióban!
11. Karbantartás és ápolás
• Ezt aterméket csak szöszmentes, kissé benedvesített
kendővel tisztítsa, és ne használjon agresszív tisztítószert.
• Amennyiben aterméket hosszabb ideig nem használja,
kapcsolja ki akészüléket és válassza le az elektromos
hálózatról. Tárolja tiszta, száraz, közvetlen napfénytől
védett helyen.
12. Szavatosság kizárása
AHama GmbH &CoKGsemmilyen felelősséget vagy
szavatosságot nem vállal atermék szakszerűtlen
telepítéséből, szerelésébőlésszakszerűtlen használatából,
vagy akezelési útmutató és/vagy abiztonsági előírások be
nem tartásából eredő károkért.
50
13. Szerviz és támogatás
Kérjük, hogy atermékkel kapcsolatos kérdéseivel forduljon
aHama terméktanácsadásához.
Közvetlen vonal Közvetlen vonal:
+49 9091 502-115 (Deu/Eng)
További támogatási információt itt talál:
www.hama.com
Page 55

14. Ártalmatlanítási előírások
Környezetvédelmi tudnivalók:
Az európai irányelvek 2012/19/EU és 2006/66/EU
ajánlása szerint, amegjelölt időponttól kezdve,
minden EU-s tagállamban érvényesek a
következők: Az elektromos és elektronikai
készülékeket és az elemeket nem szabad aháztartási
szemétbe dobni! Aleselejtezett elektromos és elektronikus
készülékeket és elemeket, akkumulátorokat nem szabad a
háztartási szemétbe dobni. Az elhasznált és
működésképtelen elektromos és elektronikus készülékek
gyűjtéséretörvényi előírás kötelez mindenkit, ezért azokat
el kell szállítani egy kijelölt gyűjtő helyrevagy visszavinni a
vásárlás helyére. Atermék csomagolásán feltüntetett
szimbólum egyértelmű jelzést ad errevonatkozóan a
felhasználónak. Arégi készülékek begyűjtése, visszaváltása
vagy bármilyen formában történő újrahasznosítása közös
hozzájárulás környezetünk védelméhez.
15. Megfelelőségi nyilatkozat
Hama GmbH &CoKGigazolja, hogy a[00054861]
típusú rádióberendezés megfelel a2014/53/EU
irányelvnek. Az EU-megfelelőségi nyilatkozat teljes
szövege elérhető akövetkező internetes címen:
www.hama.com->00054861->Downloads.
Az(ok) a
frekvenciasáv(ok)
Maximális jelerősség
Korlátozások vagy követelmények
Ausztria, Belgium, Bulgária, Ciprus, Csehország,
Dánia, Egyesült Királyság, Észtország, Finnország,
Franciaország, Görögország, Hollandia, Horvátország,
Írország, Lengyelország, Lettország, Litvánia, Luxemburg,
Magyarország, Málta, Németország, Olaszország,
Portugália, Románia, Spanyolország, Svédország, Szlovákia,
Szlovénia
Hivatkozás
Bluetooth: 2.402 -2.480GHz
WiFi: 2.412 -2.472GHz
WiFi: 5.150 -5.350 GHz
WiFi: 5.470 -5.725 GHz
Bluetooth: 4dBm (EIRP)
WiFi: 2.4GHz /19.3dBm (EIRP)
WiFi: 5GHz /17.8dBm (EIRP)
A36-64 csatornák (5,150 GHz –5,350 GHz) 5GHz-es
WiFi sávban történő használata esetén atermék csak
zárt helyiségekben használható.
51
Page 56

C Stručný návod
Ovládání aindikace
Přední strana
1. Tlačítko [Power]
2. Stavová LED dioda
Zadní strana
3. Optická přípojka
4. Přípojka napájení (microUSB)
5. Konektor Line Out
6. USB port propřehrávání /aktualizaci
1. Vysvětlení výstražných symbolů apokynů
Upozornění
Tento symbol označuje bezpečnostní upozornění, které
poukazuje na určitá rizika anebezpečí.
Poznámka
Tento symbol označuje dodatečné informace nebo
důležité poznámky.
Nebezpečíporanění elektrickým proudem
Tento symbol upozorňuje na nebezpečípřidotyku
neizolovaných částí produktu, které by mohly vést
nebezpečné napětí otakové síle, že hrozí nebezpečí
poranění elektrickým proudem.
2. Obsah balení
• Streamingový tuner „IT900MBT“
• Dálkový ovladač
• Nabíječka microUSB
• MicroUSB kabel
• Kabel skonektorem jack 3,5 mm
• Návod kobsluze
• Leták Spotify
• Obalový materiál likvidujte ihned podle platných místních
předpisů olikvidaci.
• Na přístroji neprovádějte žádné změny.Vtakovém
případě zanikají veškeré závazky ze záruky.
Nebezpečíporanění elektrickým proudem
• Výrobek neotvírejte avpřípadě poškození již dále
nepoužívejte.
• Výrobek nepoužívejte, pokud je napájecí adaptér,
kabel adaptéru nebo síťové vedení poškozeno.
• Do výrobku samovolně nezasahujte aneopravujte
ho. Veškeré úkony údržby přenechejte příslušnému
odbornému personálu.
4. Informace apokyny před uvedením do provozu
Připojení do sítě /Internetové připojení
Máte možnost tuner integrovat do lokální sítě, čímž získáte
přístup na domácí server nebo na jiné zdroje přehrávání.
Propříjem internetového rádia
nebo propřístup kmediálním obsahům, které nejsou
uloženy lokálně (streaming –např.Spotify Connect), je v
rámci sítě nutné internetové připojení.
Připojení WLAN/Wi-Fi (bezdrátová síť)
• Ujistěte se, že je router zapnutý ažejeaktivní připojení
kinternetu.
• Pokud jste tak ještě neučinili, aktivujte připojení WLAN
routeru.
• Pokud by se vyskytly otázky týkající se kongurace
routeru, použijte provyhledání chyby /vyřešení problému
návod kobsluze routeru.
• Přesný návod na konguraci spojení WLAN je popsán v
odstavci Bezdrátové připojení.
5.Před uvedením do provozu
Pokyny kpoužívání
Ovládání streamingového tuneru se provádí výlučně
pomocí aplikace UNDOK přes smartphone.
3. Bezpečnostní pokyny
• Výrobek je určen propoužití vsoukromých domácnostech.
• Chraňte výrobek před znečištěním, vlhkostí apřehřátím a
používejte ho pouze vsuchýchprostorách.
• Tento produkt, stejně jako všechny ostatní elektrické
produkty,nepatřídorukou dětem!
• Zabraňte pádu výrobku avýrobek nevystavujte velkým
otřesům.
• Výrobek neprovozujte mimo meze výkonu uvedené v
technických údajích.
• Obalový materiál nepatřídorukou dětem, hrozí nebezpečí
udušení.
52
Page 57

Poznámka
Poznámka –připrvním zapnutí
Podrobný popis aplikace UNDOK a
celého rozsahu funkcí najdete vnašem
návodu UNDOK na:
www.hama.com->00054861->Downloads
6.Uvedení do provozu
6.1 Přípojky
• 1 × LINE Out 3,5 mm
• 1 × optická přípojka
• 1 × USB port typ Apro přehrávání /aktualizaci
• 1 × napájení (microUSB)
6.2 Zapnutí
• Připojte dodaný nabíjecí kabel mikroUSB do zdířky mikro
USB (4) tuneru.
• Připojte volnou zástrčku nabíjecího kabelu mikroUSB do
USB nabíječky.
Hinweis
Používejte výhradně originální příslušenství (nebo
příslušenství schválené rmou Hama), aby se zabránilo
poškození výrobku.
• Připojte síťový kabel /napájecí zdroj do řádně instalované
zásuvky.
Upozornění
• Připrvním zapnutí se tuner spustí vrežimu SETUP
(nastavení).
• Stavová LED dioda (2) začne blikat bíle atuner lze
přes aplikaci UNDOK propojit se smartphonem.
• Pokud dojde kproblémůmspřipojením, můžete tuner
znovu přepnout do režimu nastavení (SETUP) delším
stisknutím tlačítka [POWER] (1)
Nastavení hlasitosti /ztlumení zvuku (mute)
Zadávání hesel, textů kvyhledávání atd.
Zadání se provádí výlučně přes aplikaci UNDOK.
Zapnutí /vypnutí /standby /MicroAccess Point
• Prozapnutí tuneru stiskněte tlačítko [POWER].
Alternativně lze tuner zapnout přes aplikaci UNDOK.
• Provypnutí tuneru (standby) stiskněte tlačítko [POWER].
Po nastavení síťového připojení bude toto nastavení
zachováno ivrežimu standby,což umožňuje nové zapnutí
pomocí aplikace UNDOK.
Poznámka
Proúplné vypnutí vypojte zařízení zelektrické sítě.
7. UNDOK –vše po ruce
• Výrobek je povoleno připojovat pouze do schválené
zásuvky vhodné prototo zařízení. Zásuvka musí být
vždy snadno přístupná.
• Uvícenásobných zásuvek dbejte na to, aby připojené
spotřebičenepřekročily přípustný celkový výkon.
• Zásuvka musí být vždy snadno přístupná.
• Vypojte produkt ze sítě,pokud ho delšídobu
nepoužíváte.
• Vyčkejte, dokud není ukončena inicializace tuneru.
• Krátce stiskněte tlačítko [POWER] (1) na zařízení.
Aplikace UNDOK vyvinutá společností Frontier Silicon
umožňuje úplné ovládání tunerů areproduktorů pomocí
chytrého telefonu.
Ať už se jedná oprvní nastavení přístroje, konguraci
systému Multiroom nebo správu oblíbených stanic –
UNDOK vám nabízí všechny funkce na smartphonu nebo
tabletu.
Níže je detailněji popsáno první nastavení tuneru pomocí
aplikace UNDOK. Plný rozsah funkcí zařízení je dostupný
pouze vaplikaci UNDOK.
53
Page 58

7.1 První nastavení přístroje sUNDOK
Všechny výrobky společnosti Hama, které podporují aplikaci
UNDOK, vytvořípoprvním zapnutí, popř.poté, co jste
aplikaci nastavili do továrního nastavení, tzv.microaccess
point –tedy vlastní WLAN síť,dokteré se můžete připojit
se svým tabletem nebo smarphonem. Tento přístupový bod
se zobrazí ve formátu „Setup Hama OZNAČENÍ PRODUKTU
MAC-adresa“, který umožní jednoznačnou identikaci
produktu.
Poznámka
Aplikace UNDOK používá jazyk zvolený vsystému
smartphonu.
7.2 Otevřená síť /nechráněná síť
Poznámka
• Doporučujeme neprovádětnezabezpečené připojení,
abyste ochránili svou síť proti cizím zásahům.
• Pokud nemá požadovaná síť žádné zabezpečení, stačí
vybrat síť ze seznamu apotvrdit. Rádio se ihned spojí
spřístupovým bodem.
7.2.1 Postup pro uživatele se systémem iOS
• Otevřete aplikaci UNDOK ve svém zařízení iPhone nebo
iPad.
• Stiskněte bod menu Vytvoření audio systému
• Ujistěte se, že se tuner nachází vrežimu SETUP.Pokud
zařízení není vrežimu nastavení (SETUP), stiskněte a
přidržte tlačítko [Power] na 5sekund prouvedení zařízení
do režimu nastavení (SETUP).
• Aplikace UNDOK vás nyní vyzve, abyste se pomocí
nastavení přístroje iPhone/iPad spojili se sítí WLAN
výrobku –přejděte proto do nastavení systému v
přístroji iPhone avyberte síť WLAN (např.Setup Hama
IT900MBT). Poté přejděte zpětdoaplikace UNDOK a
stiskněte tlačítko Další
• Nyní zadejte požadované označení protuner (např.
kancelář IT900MBT) apotvrďte zadání tlačítkem Další.
• Přinásledujícím výběru jazyka můžete nastavit jazyk
systému. Výběrpotvrďte stisknutím „Další“.
• Nyní máte kdispozici různé možnosti kongurace sítě
(popř.WLAN, WPS aethernet). Klikněte na požadovanou
metodu aaplikace UNDOK zobrazí dalšíokno.
• Vzávislosti na zvolené metodě můžete nyní vybrat a
kongurovat požadovanou síť WLAN nebo vytvořit spojení
WPS.
• Následně se tuner spojí se sítí apostisknutí „Můj
audiosystém“ můžete začít používat zařízení vaplikaci
UNDOK
• LED kontrolka (1) spojení se sítí nyní svítí trvale
• Po úspěšné konguraci tuneru je třeba analogově
(5) nebo digitálně (3) připojit přehrávací zařízení
(reproduktor). Ovládání audio skupiny se provádí pouze
pomocí aplikace UNDOK.
7.2.2 Postup pro uživatele se systémem Android
• Otevřete aplikaci UNDOK na tabletu nebo smartphonu
• Stiskněte bod menu Nastavení audiosystému
• Ujistěte se, že se tuner nachází vrežimu SETUP.Pokud
zařízení není vrežimu nastavení (SETUP), stiskněte a
přidržte tlačítko [Power] na 5sekund prouvedení zařízení
do režimu nastavení (SETUP).
• Aplikace UNDOK vás vyzve, abyste se vnastavení
vašeho zařízení připojili kWLAN síti produktu -zobrazte
nastavení sítí avyberte síť WLAN (např.Setup Hama
IT900MBT). Poté přejděte zpětdoaplikace UNDOK a
stiskněte tlačítko Další
• Nyní zadejte požadované označení protuner (např.
kancelář IT900MBT) apotvrďte zadání stisknutím Další
• Unásledujícího výběru jazyka můžete nastavit jazyk
tuneru. Výběrpotvrďte stisknutím „Další“.
• Nyní máte kdispozici různé možnosti kongurace sítě
(popř.WLAN, WPS aethernet). Klikněte na požadovanou
metodu aaplikace UNDOK zobrazí dalšíokno.
• Vzávislosti na zvolené metodě můžete nyní vybrat a
kongurovat požadovanou síť WLAN nebo vytvořit spojení
WPS.
• Následně se tuner spojí se sítí avymůžete stisknutím
tlačítka „Používat můjaudiosystém“ použít zařízení v
aplikaci UNDOK
• LED kontrolka (1) spojení se sítí nyní svítí trvale.
• Po úspěšné konguraci tuneru je třeba analogově
(5) nebo digitálně (3) připojit přehrávací zařízení
(reproduktor). Ovládání audio skupiny se provádí pouze
pomocí aplikace UNDOK.
54
Page 59

8. Připojení
Poznámka
• Připojení, která jsou provedena pomocí optického
signálního kabelu, jsou odolnějšívůčielektrickým a
magnetickým rušením než připojení pomocí 3,5 mm
audio kabelu.
8.1 Připojení přes optický výstup OUT
Přes digitální audio výstup lze připojit např.reproduktory
ktuneru aprostřednictvím nich tak přehrávat audio signál
ztuneru.
Poznámka
• Před připojením koncového zařízení nejprve vypněte
tuner.
• Před připojením odstraňte ochranné pojistky zobou
konců optického signálního kabelu.
• Kabel nelámejte anestlačujte.
• Propřehrávání přes optickou audio přípojku propojte
optický signální kabel soptickým audio výstupem (3) na
tuneru aoptickým audio vstupem na reproduktoru.
• Tuner zapněte stisknutím tlačítka [POWER] (1).
• Reproduktory nyní budou přehrávat audio signál tuneru.
8.2 Připojení přes výstup LINE OUT
Přes analogový audio výstup lze připojit např.reproduktory
ktuneru aprostřednictvím nich tak přehrávat audio signál
ztuneru.
Poznámka
• Před připojením koncového zařízení nejprve vypněte
tuner.
• Kabel nelámejte anestlačujte.
• Propřehrávání přes analogovou audio přípojku propojte
3,5 mm cinch kabel sanalogovým audio výstupem (5) na
tuneru aanalogovým audio vstupem na reproduktoru.
• Tuner zapněte stisknutím tlačítka [POWER] (1).
• Reproduktory nyní budou přehrávat audio signál tuneru.
9.Obnovení výrobního nastavení
Pronastavení tuneru zpětnanastavení zvýroby (stav při
dodání), postupujte takto:
• Stiskněte apřidržte tlačítko [POWER] (1) po dobu cca 5
sekund.
• Všechna provedená nastavení budou vymazána.
Poznámka
• Některé problémy achybné funkce je možné odstranit
vrácením nastavení na tovární hodnoty.
• Dojde však knevratnému vymazání všech předvoleb,
např.ekvalizéru, oblíbených položek asíťových
prolů.
10. Aktualizace softwaru
Neustále vyvíjíme vylepšení anové doplňky prosoftware
našeho tuneru, abychom odstranili případné chyby,rozšířili
funkce atd.
Doporučujeme Vám, abyste si na svém tuneru průběžně
instalovali dostupné aktualizace.
Upozornění
• Dbejte na to, aby bylo napájení elektrickou energií
stabilní, než spustíte aktualizace softwaru.
• Přerušení napájení elektrickou energií vprůběhu
aktualizace softwaru může způsobit neopravitelná
poškození rádia!
11. Údržba a čištění
• Tento výrobek čistěte pouze mírně navlhčeným hadříkem
nepouštějícím vlákna anepoužívejte agresivní čisticí
prostředky.
• Pokud nebudete výrobek po delšídobu používat, přístroj
vypněte aodpojte ho od napájení. Skladujte ho na
čistém, suchém místě bez přímého slunečního záření.
12. Vyloučení záruky
Hama GmbH &CoKGnepřebírá žádnou odpovědnost nebo
záruku za škody vzniklé neodbornou instalací, montáží
nebo neodborným použitím výrobku nebo nedodržováním
návodu kpoužití a/nebo bezpečnostních pokynů.
13. Servis apodpora
Máte otázky kproduktu ? Obraťte na na poradenské
oddělení Hama.
Horká linka: +49 9091 502-115 (německy/anglicky)
Dalšípodpůrné informace naleznete na adrese:
www.hama.com
55
Page 60

14. Pokyny klikvidaci
Ochrana životního prostředí:
Evropská směrnice 2012/19/EU a2006/66/EU
ustanovujete následující: Elektrická aelektronická
zařízení stejně jako baterie nepatřídodomovního
odpadu. Spotřebitel se zavazuje odevzdat všechna
zařízení abaterie po uplynutí jejich životnosti do příslušných
sběren. Podrobnosti stanoví zákon příšlušné země.Symbol
na produktu, návod kobsluze nebo balení na toto
poukazuje. Recyklací ajinými způsoby zužitkování přispíváte
kochraně životního prostředí.
15. Prohlášení oshodě
Tímto Hama GmbH &CoKGprohlašuje, že typ
rádiového zařízení [00054861] je vsouladu se
směrnicí 2014/53/EU. Úplné znění EU prohlášení o
shodě je kdispozici na této internetové adrese:
www.hama.com->00054861->Downloads.
Kmitočtové pásmo
(kmitočtová pásma)
Maximální
radiofrekvenční výkon
vysílaný
Omezení nebo požadavky v/na
Belgie, Bulharsko, Česká republika, Dánsko, Německo,
Estonsko, Irsko, Řecko, Španělsko, Francie, Chorvatsko,
Itálie, Kypr,Lotyšsko, Litva, Lucembursko, Maďarsko, Malta,
Nizozemí, Rakousko, Polsko, Portugalsko, Rumunsko,
Slovinsko, Slovensko, Finsko, Švédsko, Spojené Království
Poznámka
Bluetooth: 2.402 -2.480GHz
WiFi: 2.412 -2.472GHz
WiFi: 5.150 -5.350 GHz
WiFi: 5.470 -5.725 GHz
Bluetooth: 4dBm (EIRP)
WiFi: 2.4GHz /19.3dBm (EIRP)
WiFi: 5GHz /17.8dBm (EIRP)
Jestliže se kanály 36-64 (frekvence 5,150 GHz -5,350
GHz) používají ve WLAN 5GHz, je povoleno výrobek
používat pouze vuzavřených prostorech.
56
Page 61

Q Stručný návod
Ovládanie aindikácia
Predná strana
1. Tlačidlo [Power]
2. Stavová LED dióda
Zadná strana
3. Optická prípojka
4. Prípojka napájania (microUSB)
5. Konektor Line Out
6. USB port preprehrávanie /aktualizáciu
1. Vysvetlenie výstražných symbolov aupozornení
Upozornenie
Tento symbol označuje bezpečnostné upozornenie, ktoré
poukazuje na určité riziká anebezpečenstva.
Poznámka
Tento symbol označuje dodatočné informácie, alebo
dôležité poznámky.
Nebezpečenstvo elektrického úderu
Tento symbol upozorňuje na nebezpečenstvo dotyku
neizolovaných častí výrobku, ktoré sú eventuálne pod tak
vysokým nebezpečným napätím, že hrozí nebezpečenstvo
elektrického úderu.
2. Obsah balenia
• Streaming tuner “IT900MBT”
• Diaľkový ovládač
• Nabíjačka microUSB
• MicroUSB kábel
• Kábel skonektorom jack 3,5 mm
• Návod na použitie
• Leták Spotify
3. Bezpečnostné upozornenia
• Tentovýrobok je určený na súkromné použitievdomácnosti,
niejeurčený na komerčnépoužitie.
• Výrobokchráňte pred znečistením, vlhkosťou aprehriatíma
používajteholen vsuchých priestoroch.
• Tentovýrobok, rovnako akovšetky elektrickévýrobky,nepatrí
do detských rúk!
• Výroboknenechajte spadnúť anevystavujte ho silným
otrasom.
• Výrobokneprevádzkujte mimo medze výkonu uvedeného v
technických údajoch.
• Obalový materiáluchovávajte mimo dosahudetí, hrozí
nebezpečenstvoudusenia.
• Obalovýmateriál likvidujte ihneď podľaplatných miestnych
predpisovolikvidácii.
• Na prístroji nerobtežiadne zmeny.Vopačnom prípade stratíte
akékoľveknár oky na poskytnutie záruky.
Nebezpečenstvo elektrického úderu
• Výrobok neotvárajte aneprevádzkujte ho ďalej, ak je
poškodený.
• Výrobok nepoužívajte, ak sú poškodené AC adaptér,
adaptérový kábel alebo sieťové vedenie.
• Nepokúšajte sa výroboksamostatne ošetrovať alebo
opravovať.Prenechajte akékoľvek úkony údržby
kompetentnému odbornému personálu.
4.Informácie apokyny pred uvedením do prevádzky
Pripojenie do siete /Internetové pripojenie
Tento tuner môžete začleniť do lokálnej siete azískať
tak prístup na domovský server alebo kiným zdrojom
uvoľnených súborov.Aby ste mohli prijímať internetové
rádio alebo získať prístup kiným ako lokálne uloženým
mediálnym obsahom (streaming –napr.Spotify Connect), je
vrámci siete nutné internetové pripojenie.
Pripojenie cez WLAN/Wi-Fi (bezdrôtová sieť)
• Presvedčte sa, čijerouter zapnutý a čijevytvorené
internetové pripojenie.
• Ak ste tak ešte neurobili, aktivujte WLAN pripojenie vášho
routera.
• Vprípade otázok týkajúcich sa kongurácie routera
použite návod na používanie routeranavyhľadanie
poruchy/riešenie problému.
• Podrobný návod na konguráciu WLAN pripojenia je
opísaný v časti Bezdrôtové pripojenie.
5.Pred uvedením do prevádzky
Pokyny na obsluhu
Streamovací tuner sa ovláda výlučne pomocou aplikácie
UNDOK prostredníctvom smartfónu.
57
Page 62

Poznámka
Poznámka –pri prvom zapnutí
Podrobný popis aplikácie UNDOK
avšetkých funkcií nájdete v
našej príručke kaplikácii UNDOK
na adrese:
www.hama.com->00054861->Downloads
6.Uvedenie do prevádzky
6.1 Prípojky
• 1 × LINE Out 3,5 mm
• 1 × optická prípojka
• 1 × USB port typ Apre prehrávanie /aktualizáciu
• 1 × napájanie (MicroUSB)
6.2 Zapnutie
• Pripojte dodaný mikroUSB nabíjací kábel do mikroUSB
prípojky (4) tunera.
• Pripojte voľný konektor mikroUSB nabíjacieho kábla do
USB nabíjačky.
Hinweis
Používajte výhradne originálne príslušenstvo (alebo
príslušenstvo schválené rmou Hama), aby sa zabránilo
poškodeniu výrobku.
• Pripojte sieťový kábel /napájací zdroj do riadne
inštalovanej zásuvky.
Upozornenie
• Pri prvom zapnutí sa tuner zapne vrežime SETUP.
• Stavová LED dióda (2) začne blikať nabielo atuner je
možné spojiť so smartfónom len pomocou aplikácie
UNDOK.
• Ak sa vyskytnú problémy spripojením, môžete tuner
opäť uviesť do režimu SETUP dlhým stlačením tlačidla
[POWER] (1).
Nastavenie hlasitosti/stlmenie zvuku (mute)
Zadávanie hesiel, vyhľadávaných textov atď.
Zadávanie sa uskutočňuje výlučne prostredníctvom
aplikácie UNDOK.
Zapnutie/vypnutie/pohotovostný režim/MicroAccess
Point
• Na zapnutie tunerastlačte tlačidlo [POWER]. Tuner
môžete alternatívne zapnúť prostredníctvom aplikácie
UNDOK.
• Na vypnutie (pohotovostný režim) tunerastlačte tlačidlo
[POWER]. Sieťové pripojenie sa po vytvorení zachová
aj vpohotovostnom režime, aby bolo možné zapnutie
prostredníctvom aplikácie UNDOK.
Poznámka
Na úplné vypnutie odpojte zariadenie od elektrickej
siete.
7. UNDOK –všetko máte vo vlastných rukách
• Výrobok je povolený pripájať len do schválenej
zásuvky vhodnej pretoto zariadenie.
• Vprípade viacnásobných zásuviek dávajte pozor
na to, aby pripojené spotrebičeneprekročili celkový
dovolený výkon.
• Zásuvka musí byť vždy ľahko dostupná.
• Ak výrobok dlhšiu dobu nepoužívate, odpojte ho od
elektrickej siete.
• Počkajte na ukončenie inicializácie tunera.
• Krátko stlačte tlačidlo [POWER] (1) na zariadení.
58
Aplikácia UNDOK vyvinutá spoločnosťou Frontier Silicon
umožňuje úplné ovládanie tunerov areproduktorov
pomocou mobilného telefónu.
Nezáleží na tom, čiprvýkrát nastavujete zariadenie,
kongurujete multiroom alebo spravujete svoje obľúbené
stanice –aplikácia UNDOK ponúka všetky funkcie na
smartfóne alebo tablete.
Vnasledujúcej časti je vysvetlené prvé nastavenie tunera
pomocou aplikácie UNDOK. Plný rozsah funkcií zariadenia
dosiahnete len cez aplikáciu UNDOK.
Page 63

7.1 Prvé nastavenie zariadenia pomocou aplikácie
UNDOK
Všetky výrobky Hama, ktoré podporujú aplikáciu UNDOK,
vytvoria pri prvom zapnutí, resp. keď ich nastavíte na
továrenské nastavenia, takzvaný microaccess point –teda
vlastnú WLAN sieť,doktorej sa môžete pripojiť so svojim
mobilným telefónom alebo tabletom. Tento prístupový bod
sa zobrazí vo formáte „Setup Hama OZNAČENIE PRODUKTU
MAC-adresa“, ktorý umožní jednoznačnú identikáciu
produktu.
Poznámka
Aplikácia UNDOK používa jazyk systému vo vašom
smartfóne.
7.2 Otvorená sieť/nezabezpečená sieť
Poznámka
• Odporúčame vám, aby ste nikdy nevyužívali
nezabezpečené pripojenie aaby ste svoju sieť vždy
chránili pred prístupom cudzích osôb.
• Ak vami požadovaná sieť nie je chránená
bezpečnostnými opatreniami, stačí, ak sieť vyberiete
zo zoznamu avýber potvrdíte. Rádio sa potom ihneď
spojí sprístupovým bodom.
7.2.1 Postup pre používateľov iOS
• Otvorte aplikáciu UNDOK na svojom zariadení iPhone
alebo iPad.
• Stlačte položku ponuky Vytvoriť audiosystém.
• Uistite sa, že tuner sa nachádza vrežime SETUP.Aksa
zariadenie nenachádza vrežime SETUP,podržte stlačené
tlačidlo [Power] na 5sekúnd, aby ste zariadenie uviedli
do režimu SETUP.
• Aplikácia UNDOK vás vyzve, aby ste sa cez nastavenia
zariadenia iPhone/iPad spojili so sieťou WLAN výrobku –
na tento účel prejdite do systémových nastavení iPhonu
avyberte sieť WLAN (napr.Setup Hama IT900MBT).
Následne prejdite späť do aplikácie UNDOK astlačte
možnosťĎalej.
• Zadajte želané označenie tunera(napr.kancelária
IT900MBT) azadanie potvrďte stlačením možnosti Ďalej.
• Pri následnom výberejazyka môžete stanoviť systémový
jazyk tunera. Svoj výber potvrďte možnosťou „Ďalej“.
• Máte kdispozícii rôzne možnosti kongurácie siete (podľa
potreby WLAN, WPS aEthernet). Kliknite na želanú
metódu aaplikácia UNDOK prejde do nasledujúceho
okna.
• Vzávislosti od zvolenej metódy môžete zvoliť a
nakongurovať požadovanú sieť WLAN alebo vytvoriť
spojenie WPS.
• Na záver sa tuner spojí so sieťou avymôžete stlačením
možnosti „Môj audiosystém“ používať zariadenie v
aplikácii UNDOK.
• LED indikácia (1) spojenia so sieťou teraz svieti trvalo.
• Po úspešnej kongurácii tunerasamusí analógovo
(5) alebo digitálne (3) pripojiť prehrávacie zariadenie
(reproduktor). Ovládanie audio skupiny sa vykonáva len
pomocou aplikácie UNDOK.
7.2.2 Postup pre používateľov Android
• Otvorte aplikáciu UNDOK na svojom tablete alebo
smartfóne.
• Stlačte položku ponuky Vytvorenie audio systému.
• Uistite sa, že tuner sa nachádza vrežime SETUP.Aksa
zariadenie nenachádza vrežime SETUP,podržte stlačené
tlačidlo [Power] na 5sekúnd, aby ste zariadenie uviedli
do režimu SETUP.
• Aplikácia UNDOK vás vyzve, aby ste sa vnastavení vášho
zariadenia pripojili kWLAN sieti produktu -zobrazte
nastavenie sietí avyberte sieť WLAN (napr.Setup Hama
IT900MBT) .Následne prejdite späť do aplikácie UNDOK
astlačte možnosťĎalej.
• Zadajte želané označenie tunera(napr.kancelária
IT900MBT) azadanie potvrďte stlačením možnosti Ďalej.
• Pri následnom výberejazyka môžete nastaviť jazyk
tunera. Svoj výber potvrďte možnosťou „Ďalej“.
• Terazmáte kdispozícii rôzne možnosti kongurácie
siete (podľapotreby WLAN, WPS aEthernet). Kliknite
na želanú metódu aaplikácia UNDOK prejde do
nasledujúceho okna.
• Vzávislosti od zvolenej metódy môžete zvoliť a
nakongurovať požadovanú sieť WLAN alebo vytvoriť
spojenie WPS.
• Na záver sa tuner spojí so sieťou astlačením možnosti
„Použiť môj audiosystém“ môžete zariadenie používať v
aplikácii UNDOK.
• LED indikácia (1) spojenia so sieťou teraz svieti trvalo.
• Po úspešnej kongurácii tunerasamusí analógovo
(5) alebo digitálne (3) pripojiť prehrávacie zariadenie
(reproduktor). Ovládanie audio skupiny sa vykonáva len
pomocou aplikácie UNDOK.
59
Page 64

8. Pripojenia
Poznámka
• Pripojenia, ktoré sa vytvoria pomocou optického
signálneho kábla, sú odolnejšie vočielektrickému
alebo magnetickému rušeniu ako pripojenia, ktoré sú
vytvorené pomocou 3,5 mm audio kábla.
8.1 Pripojenie cez optický VÝSTUP
Cez digitálny audio výstup môžete napr.pripojiť
reproduktory ktuneru aprehrávať jeho audiosignál cez
reproduktory.
Poznámka
• Pred pripojením koncového zariadenia tuner vypnite.
• Pred pripojením odstráňte ochranné kryty zobidvoch
koncov optického signálneho kábla.
• Dbajte na to, aby kábel nebol zalomený alebo
stlačený.
• Na prehrávanie cez optickú audio prípojku pripojte
optický signálny kábel do optického audio výstupu (3)
tuneraado optického audio vstupu reproduktora.
• Na zapnutie tunerastlačte tlačidlo [POWER] (1).
• Audiosignál tunerasateraz prehráva cez reproduktory.
8.2 Pripojenie cez výstup LINE OUT
Cez analógový audio výstup môžete napr.pripojiť
reproduktory ktuneru aprehrávať jeho audiosignál cez
reproduktory.
Poznámka
• Pred pripojením koncového zariadenia tuner vypnite.
• Dbajte na to, aby kábel nebol zalomený alebo
stlačený.
• Na prehrávanie cez analógovú audio prípojku pripojte 3,5
mm cinch kábel do analógového audio výstupu (5) tunera
adoanalógového audio vstupu reproduktora.
• Na zapnutie tunerastlačte tlačidlo [POWER] (1).
• Audiosignál tunerasateraz prehráva cez reproduktory.
9.Továrenské nastavenia
Na obnovenie výrobného nastavenia tunera(stav pri
dodaní) postupujte nasledovne:
• Stlačte apodržte stlačené tlačidlo [POWER] (1) asi 5
sekúnd.
• Všetky uskutočnené nastavenia sa vymažú.
Poznámka
• Niektoré problémy achybné funkcie je možné
odstrániť obnovením továrenských nastavení.
• Všetky prednastavenia, ako ekvalizér,obľúbené
stanice asieťové proly sa nenávratne vymažú.
10. Aktualizácia softvéru
Softvér prenašetunery neustále zdokonaľujeme a
dopĺňame onové vlastnosti, aby sme odstránili prípadné
chyby arozšírili rozsah funkcií atď.
Odporúčame vám, aby ste dostupné aktualizácie vždy
nainštalovali na svojom tuneri.
Upozornenie
• Skôr,ako spustíte aktualizáciu softvéru, zabezpečte
stabilné napájanie.
• Prerušenie napájania počas aktualizácie softvéru
môže viesť ktrvalému poškodeniu rádia!
11. Údržba astarostlivosť
• Na čistenie tohto výrobku používajte len navlhčenú
utierku, ktorá nepúšťavlákna anepoužívajte žiadne
agresívne čistiace prostriedky.
• Ak výrobok nebudete dlhšiu dobu používať,vypnite
zariadenie aodpojte ho od napájania. Uschovajte ho na
čistom, suchom mieste bez priameho slnečného žiarenia.
12. Vylúčenie záruky
Firma Hama GmbH &CoKGneručí/nezodpovedá za
škody vyplývajúce zneodbornej inštalácie, montáže alebo
neodborného používania výrobku alebo znerešpektovania
návodu na používanie a/alebo bezpečnostných pokynov.
13. Servis apodpora
Sotázkami týkajúcimi sa výrobku sa prosím obráťte na
poradenské oddelenie rmy Hama.
Hotline: +49 9091 502-115 (nem./angl.)
Ďalšie informácie opodporenájdete tu:
www.hama.com
60
Page 65

14. Pokyny pre likvidáciu
Ochrana životného prostredia:
Európska smernica 2012/19/EU a2006/66/EU
stanovuje: Elektrické aelektronické zariadenia,
rovnako ako batérie sa nesmú vyhadzovať do
domáceho odpadu. Spotrebiteľ je zo zákona
povinný zlikvidovať elektrické aelektronické zariadenia,
rovnako ako batérie na miesta ktomu určené. Symbolizuje
to obrázok vnávode na použitie, alebo na balení výrobku.
Opätovným zužitkovaním alebo inou formou recyklácie
starých zariadení/batérií prispievate kochrane životného
prostredia.
15. Vyhlásenie ozhode
Hama GmbH &CoKGtýmto vyhlasuje, že rádiové
zariadenie typu [00054861] je vsúlade so
smernicou 2014/53/EÚ. Úplné EÚ vyhlásenie o
zhode je kdispozícii na tejto internetovej adrese:
www.hama.com->00054861->Downloads.
Frekvenčné pásmo resp.
pásma
Maximálny
vysokofrekvenčný
Obmedzenia alebo požiadavky na
Belgicko, Bulharsko, Česká republika, Dánsko, Nemecko,
Estónsko, Írsko, Grécko, Španielsko, Francúzsko,
Chorvátsko, Taliansko, Cyprus, Lotyšsko, Litva,
Luxembursko, Maďarsko, Malta, Holandsko, Rakúsko,
Poľsko, Portugalsko, Rumunsko, Slovinsko, Slovensko,
Fínsko, Švédsko, Spojené kráľovstvo
Poznámka
Bluetooth: 2.402 -2.480GHz
WiFi: 2.412 -2.472GHz
WiFi: 5.150 -5.350 GHz
WiFi: 5.470 -5.725 GHz
Bluetooth: 4dBm (EIRP)
WiFi: 2.4GHz /19.3dBm (EIRP)
WiFi: 5GHz /17.8dBm (EIRP)
Keď sa používajú kanály 36-64 (frekvencia 5,150 GHz –
5,350 GHz) v5GHz WLAN, môže sa výrobok používať
len vuzavretých priestoroch.
61
Page 66

O Instruções resumidas
Elementos de comando eindicadores
Parte frontal
1. Botão[Power]
2. LED de estado
Parte traseira
3. Ligaçãoótica
4. Ligaçãoàcorrente (microUSB)
5. Tomada LINE Out
6. Porta USB de atualização/playback
1. Descrição dos símbolos de aviso edas notas
Aviso
Éutilizado paraidenticar informações de segurança ou
chamar aatençãoparaperigos eriscos especiais.
Nota
Éutilizado paraidenticar informações adicionais ou
notas importantes.
Perigo de choque eléctrico
Este símbolo remete paraumperigo de toque de partes
nãoisoladas do produto eventualmente condutoras de
tensãoperigosa que poderãorepresentar um perigo de
choque eléctrico.
2. Conteúdo da embalagem
• Sintonizador de streaming „IT900MBT”
• Telecomando
• Carregador microUSB
• Cabo microUSB
• Cabo jack 3.5 mm
• Manual de instruções
• Paneto Spotify
3. Indicações de segurança
• Oprodutodestina-se apenas autilizaçãodomésticaenão
comercial.
• Proteja oprodutocontrasujidade,humidade e
sobreaquecimento eutilize-o somente em espaçossecos.
• Este produto nãodeveser manuseado por crianças, talcomo
qualquer produto elétrico!
• Nãodeixecair oproduto nemosubmeta aimpactos fortes.
• Nãoutilize oproduto forados limites de desempenho
indicados nas especicaçõestécnicas.
• Mantenha omaterialdaembalagem foradoalcancedas
crianças.Existeperigo de asxia.
•
mine
Eli
confo
rmi
• Nãoefetuemodicações noaparelho. Caso contrário, perde
todos os direitos de garantia.
Perigo de choque elétrico
• Nãoabraoproduto, nem ocontinue autilizar em
caso de danos.
• Nãoutilize oproduto se otransformador CA,o
cabo adaptador ou ocabo de alimentaçãoestiver
danicado.
• Nãotente fazer qualquer manutençãooureparação
do produto. Qualquer trabalho de manutençãodeve
ser executado por técnicos especializados.
4.Informações eindicações antes da colocação em
funcionamento
Ligação àrede/ligação àInternet
Temapossibilidade de integrar este sintonizador numa
rede local eaceder,assim, ao servidor doméstico ou a
outras fontes de emissão. Para receber rádio da Internet
ou aceder aconteúdos multimédia nãoguardados
localmente (streaming –por ex., Spotify Connect), é
adicionalmente necessária uma ligaçãoàInternet na rede.
Ligação WLAN/Wi-Fi (rede sem os)
• Certique-se de que orouter está ligado eque existe uma
ligaçãoàInternet.
• Se ainda nãoestiver ligada, ative aligaçãoWLAN do seu
router.
• Caso tenha dúvidas relativamente àconguraçãodo
router,utilize omanual de instruções do router parao
diagnóstico de falhas/resoluçãodeproblemas.
• Éapresentada uma descriçãoprecisa da conguraçãoda
ligaçãoWLAN na secçãoLigaçãosem os.
5.Antes da colocação em funcionamento
Instruções de operação
Aoperaçãodosintonizador de streaming érealizada
exclusivamente através da aplicaçãoUNDOK no seu
smartphone.
menteomater
imediata
dadecomasnormaslocaisap
ialdaembalagemem
lic
áveis
.
62
Page 67

Nota
Nota –primeiraligação
Para uma descriçãodetalhada da
aplicaçãoUNDOK edetodas as
funções, consulte onosso guia
UNDOK em:
www.hama.com->00054861->Downloads
6.Colocação em funcionamento
6.1 Ligações
• 1LINE Out 3,5 mm
• 1ligaçãoótica
• 1porta USB de atualização/playback tipo A
• 1fonte de alimentação(MicroUSB)
6.2 Ligar
• Ligue ocabo de carregamento microUSB fornecido à
entrada microUSB (4) do sintonizador.
• Ligue a cha livredocabo de carregamento microUSB ao
carregador USB.
Hinweis
Para evitar adanicaçãodoproduto, utilize
exclusivamente acessórios originais (ou acessórios
autorizados pela Hama).
• Ligue ocabo de alimentação/fonte de alimentaçãoauma
tomada instalada corretamente.
Aviso
• Durante aprimeiraligação, osintonizador éiniciado
no modo SETUP.
• OLED de estado (2) começa apiscar abranco eo
sintonizador pode ser ligado ao seu smartphone
através da aplicaçãoUNDOK.
• Se ocorrerem problemas de ligação, pode colocar o
sintonizador novamente no modo SETUP cando a
pressionar obotão[POWER] (1)
Regular ovolume de som/modo silencioso
Introdução de palavras-passe, textos de pesquisa,
etc.
Aintroduçãoéfeita exclusivamente através da aplicação
UNDOK.
Ligar/desligar/modo standby/MicroAccess Point
• Pressione [POWER] paraligar osintonizador.Em
alternativa, osintonizador pode ser ligado através da
aplicaçãoUNDOK.
• Pressione [POWER] paradesligar osintonizador
(standby). Após aconguraçãodeuma ligaçãoderede,
esta também émantida durante omodo de standby para
permitir aligaçãotravés da aplicaçãoUNDOK.
Nota
Desligue oaparelho da alimentaçãoelétrica parao
desligar na totalidade.
7. UNDOK –tudo na palma da sua mão
• Ligue oproduto apenas auma tomada elétrica
adequada. Atomada elétrica deve estar sempre
facilmente acessível.
• Em caso de tomadas múltiplas, certique-se de que
os aparelhos ligados nãoexcedem apotência total
permitida.
• Atomada elétrica deve estar semprefacilmente
acessível.
• Desligue oproduto da rede elétrica quando nãoo
utilizar durante um longo período.
• Aguarde até que ainicializaçãodosintonizador esteja
concluída.
• Pressione obotão[POWER] (1) no dispositivo.
Aaplicação(App) UNDOK desenvolvida pela Frontier
Silicon permite ocontrolo total de rádios ealtifalantes no
seu smartphone.
Quer seja na primeiracolocaçãoemfuncionamento do
aparelho, nas congurações multiroom ou na gestãoda
sua emissorafavorita, aUNDOK disponibiliza todas as
funções no seu smartphone ou tablet.
Em seguida éexplicada aprimeiracolocaçãoem
funcionamento do sintonizador.Oconjunto total de
funções do aparelho só está disponível através da aplicação
UNDOK.
63
Page 68

7.1 Primeira configuração do aparelho com UNDOK
Todos os produtos da Hama compatíveis com UNDOK
geram, durante aprimeiraativaçãooudepois da reposição
paraasdenições de fábrica, um designado MicroAccess
Point, isto é, uma rede WLAN própria através da qual pode
estabelecer uma ligaçãoaoseu tablet ou smartphone.
Este Access Point éapresentado no formato „Setup Hama
DESIGNAÇÃODOPRODUTOENDEREÇOMAC”para
permitir uma identicaçãoclaradoproduto.
Nota
AaplicaçãoUNDOK utiliza alíngua selecionada no
sistema do seu smartphone.
7.2 Rede aberta/rede desprotegida
Nota
• Recomendamos que nãoestabeleça qualquer ligação
desprotegida eque proteja sempreasua rede contra
oacesso por estranhos.
• Caso arede que pretende nãopossua quaisquer
medidas de segurança, basta selecionar arede na
lista econrmar.Deseguida, orádio liga-se de
imediato ao ponto de acesso.
7.2.1 Procedimento para utilizadores de iOS
• AbraaaplicaçãoUNDOK no seu iPhone ou iPad
• Prima oitem de menu Congurar sistema áudio
• Certique-se de que osintonizador se encontrano
modo SETUP.Seoaparelho nãoestiver no modo SETUP,
pressione emantenha premido obotão[Power] durante 5
segundos paracolocar oaparelho no modo SETUP.
• Agora, aaplicaçãoUNDOK solicita aligaçãoàWLAN
do produto através das congurações do iPhone/iPad –
paraisso, abraascongurações do sistema do iPhone
eselecione arede WLAN (por exemplo, Setup Hama
IT900MBT). Em seguida, volte paraaaplicaçãoUNDOK e
prima Continuar
• Atribua agoraadesignaçãopretendida ao sintonizador
(por exemplo, escritório IT900MBT) econrme a
introduçãocom Continuar.
• Na seleçãodeidioma subsequente, pode denir oidioma
de sistema do sintonizador.Conrme aseleçãocom
„Continuar”.
• Agorasãodisponibilizadas as diferentes possibilidades
paraaconguraçãodarede (event. WLAN, WPS e
Ethernet). Clique no método pretendido eaaplicação
UNDOK abreajanela seguinte
• Dependendo do método selecionado, agorapode
escolher econgurar arede WLAN pretendida ou
estabelecer uma ligaçãoWPS.
• Finalmente, osintonizador liga-se àrede, podendo
utilizar oaparelho na UNDOK pressionando „O meu
sistema áudio”
• Oindicador LED (1) da ligaçãoderede acende agora
permanentemente
• Após aconguraçãocorreta do sintonizador,énecessário
ligar um dispositivo de reprodução(altifalante) analógico
(5) ou digital (3). Ocontrolo do sistema de música é
realizado exclusivamente através do UNDOK.
7.2.2 Procedimento para utilizadores Android
• AbraaaplicaçãoUNDOK no seu tablet ou smartphone
• Pressione oitem de menu Congurar sistema áudio
• Certique-se de que osintonizador se encontrano
modo SETUP.Seoaparelho nãoestiver no modo SETUP,
pressione emantenha premido obotão[Power] durante 5
segundos paracolocar oaparelho no modo SETUP.
• AUNDOK solicita agoraaligaçãoàWLAN do produto
através das congurações do iPhone/iPad –paraisso,
abraascongurações do sistema do iPhone eselecione
arede WLAN (por exemplo, Setup Hama IT900MBT).
Em seguida, volte paraaaplicaçãoUNDOK eprima
Continuar
• Atribua agoraadesignaçãopretendida ao sintonizador
(por exemplo, escritório IT900MBT) econrme a
introduçãocom Continuar
• Na seleçãodoidioma subsequente, pode denir oidioma
do sintonizador.Conrme aseleçãocom „Continuar”.
• Agorasãodisponibilizadas as diferentes possibilidades
paraaconguraçãodarede (event. WLAN, WPS e
Ethernet). Clique no método pretendido eaaplicação
UNDOK abreajanela seguinte
• Dependendo do método selecionado, agorapode
escolher econgurar arede WLAN pretendida ou
estabelecer uma ligaçãoWPS.
• Finalmente, osintonizador liga-se àrede eoaparelho
pode ser utilizado na aplicaçãoUNDOK premindo
„Utilizar omeu sistema áudio”
• Oindicador LED (1) da ligaçãoderede acende agora
permanentemente.
• Após aconguraçãocorreta do sintonizador,énecessário
ligar um dispositivo de reprodução(altifalante) analógico
(5) ou digital (3). Ocontrolo do sistema de música é
realizado exclusivamente através do UNDOK.
64
Page 69

8. Ligações
Poznámka
• As ligações estabelecidas através de um cabo de sinal
óptico sãomenos sensíveis ainterferências elétricas
ou magnéticas do que ligações com cabo áudio de
3,5 mm.
8.1 Ligação através de Optical OUT
Asaída de áudio digital permite, por ex. ligar asua coluna
aumsintonizador ereproduzir orespetivo sinal de áudio
através da mesma.
Poznámka
• Desligue osintonizador antes de lheligar um
dispositivo.
• Antes da ligação, retireastampas de proteçãode
ambas as extremidades do cabo de sinal óptico.
• Nãodobrenem esmague ocabo.
• Para reproduçãoatravés da ligaçãodeáudio óptica, ligue
um cabo de sinal óptico àsaída de áudio óptica (3) do
sintonizador eàentrada de áudio óptica da coluna.
• Pressione [POWER] (1) paraligar osintonizador.
• Osinal de áudio do sintonizador éagorareproduzido
através da coluna.
8.2 2Ligação através de LINE OUT
Asaída de áudio analógica permite, por ex. ligar asua
coluna aumsintonizador ereproduzir orespetivo sinal de
áudio através da mesma.
Poznámka
• Desligue osintonizador antes de lheligar um
dispositivo.
• Nãodobrenem esmague ocabo.
• Para reproduçãoatravés da ligaçãodeáudio analógica,
ligue um cabo 3,5 mm RCAàsaída de áudio analógica
(5) do sintonizador eàentrada de áudio analógica da
coluna.
• Pressione [POWER] (1) paraligar osintonizador.
• Osinal de áudio do sintonizador éagorareproduzido
através da coluna.
9. Definições de fábrica
Para repor osintonizador paraasdenições de fábrica
(estado de fornecimento), proceda do seguinte modo:
• Prima emantenha obotão[POWER] (1) premido durante
cerca de 5segundos.
• Todas as denições efetuadas sãoeliminadas.
Nota
• Eventuais problemas eanomalias podem ser
resolvidos através da reposiçãoparaasdenições de
fábrica.
• No entanto, todas as predenições, como
equalizador,favoritos eospersderede, são
eliminadas de forma denitiva.
10. Atualização do software
Sãoconstantemente desenvolvidas melhorias enovas
funcionalidades paraosoftwaredos nossos sintonizadores,
a mderesolver possíveis falhas, alargar oconjunto de
funções, etc.
Recomendamos-lhe que instale sempreasatualizações
disponibilizadas paraoseu sintonizador.
Aviso
• Certique-se de que existe uma alimentaçãoelétrica
estável antes de iniciar uma atualizaçãodesoftware.
• Ainterrupçãodaalimentaçãodurante uma
atualizaçãodesoftwarepode provocar danos
irreparáveis no rádio!
11. Manutenção econservação
Limpe oproduto apenas com um pano sem pelos
ligeiramente humedecido enãoutilize produtos de limpeza
agressivos.
Caso nãopretenda utilizar oproduto durante um período
prolongado, desligue-o eretireacha da tomada elétrica.
Armazene-o num local limpo eseco, sem exposiçãosolar
direta.
12. Exclusão de responsabilidade
AHama GmbH &CoKGnãoassume qualquer
responsabilidade ou garantia por danos provocados por
uma instalação, montagem ou manuseamento incorreto
do produto ou pelo nãocumprimento das instruções de
utilizaçãoe/ou das informações de segurança.
65
Page 70

13. Contactos eapoio técnico
Em caso de dúvidas sobreoproduto, contacte oserviço de
assistência ao produto da Hama.
Linha direta: +49 9091 502-115 (alemão/inglês)
Para mais informações de assistência, visite:
www.hama.com
14. Indicações de eliminação
Indicação relativa àproteção do ambiente:
Apartir do momento da implementaçãodas
diretivas comunitárias 2012/19/EU e2006/66/CE
na legislaçãonacional, aplica-se oseguinte: Os
aparelhos elétricos eeletrónicos, bem como pilhas
ebaterias nãopodem ser eliminados juntamente com olixo
doméstico. Oconsumidor élegalmente obrigado adevolver
aparelhos elétricos eeletrónicos, assim como pilhas e
baterias, no mdasua vida útil, aos pontos de recolha
públicos instalados paraoefeito ou ao posto de venda. As
particularidades sãoregulamentadas pela respetiva
legislaçãonacional. Osímbolo no produto, nas instruções
de utilizaçãoounaembalagem remete paraestas
disposições. Com areciclagem, areutilizaçãodemateriais
ou outras formas de reutilizaçãodeaparelhos/pilhas/
baterias velhos, está acontribuir paraaproteçãodonosso
meio ambiente.
15. Declaração de conformidade
O(a) abaixo assinado(a) Hama GmbH &CoKG
declaraque opresente tipo de equipamento de
rádio [00054861] está em conformidade com a
Diretiva 2014/53/UE. Otexto integral da declaraçãode
conformidade está disponível no seguinte endereço de
Internet:
www.hama.com->00054861->Downloads.
Bluetooth: 2.402 -2.480GHz
Banda(s) de frequências
Potência máxima
transmitida
WiFi: 2.412 -2.472GHz
WiFi: 5.150 -5.350 GHz
WiFi: 5.470 -5.725 GHz
Bluetooth: 4dBm (EIRP)
WiFi: 2.4GHz /19.3dBm (EIRP)
WiFi: 5GHz /17.8dBm (EIRP)
Restrições ou Requisitos
Bélgica, Bulgária, República Checa, Dinamarca, Alemanha,
Estónia, Irlanda, Grécia, Espanha, França, Croácia, Itália,
Chipre, Letónia, Lituânia, Luxemburgo, Hungria, Malta,
Países Baixos, Áustria, Polónia, Portugal, Roménia,
Eslovénia, Eslováquia, Finlândia, Suécia, Reino Unido
Nota
Bluetooth: 4dBm (EIRP)
WiFi: 2.4GHz /19.3dBm (EIRP)
WiFi: 5GHz /17.8dBm (EIRP)
66
Page 71

T Kısa kullanımkılavuzu
Kumanda ve gösterge elemanları
Ön yüzü
1. [Power] tuşu
2. Durum LED‘i
Arka yüz
3. Optik bağlantı
4. Elektrik bağlantısı (MicroUSB)
5. LINE Out yuvası
6. USB yürütme /güncelleme portu
1. Uyarı sembollerinin ve uyarılarınaçıklanması
Uyarı
Güvenlik uyarılarını işaretlemek veya özellikle tehlikeli
durumlaradikkat çekmek için kullanılır.
Not
Ek bilgileri veya önemli uyarıları işaretlemek için
kullanılır.
Elektrik çarpması tehlikesi
Bu sembol üründeki yalıtılmamış parçalaratemas etme
tehlikesine işaret etmektedir.Buparçalar bir elektrik
çarpması tehlikesi oluşturabilecek yükseklikte tehlikeli
gerilimler taşıyor olabilir.
2. Paketin içindekiler
• Streaming Tuner „IT900MBT”
• Uzaktan kumanda
• MicroUSB şarj cihazı
• MicroUSB kablosu
• 3.5 mm jak kablosu
• Kullanma kılavuzu
• Spotify broşürü
•
alajmalz
Amb
toplamaya
• Cihazda herhangi bir değişiklik yapmayınız. Aksi takdirdeher
türlü garanti hakkınızkaybolur.
Elektrik çarpması tehlikesi
• Ürünün içini açmayınvehasarlı ürünleri çalıştırmayın.
• AC adaptörü, adaptör kablosu veya şebeke kablosu
arızalı olan ürünü kullanmayın.
• Ürünü kendiniz onarmaya veya bakımını yapmaya
çalışmayın. Tüm bakımçalışmalarını yetkili uzman
personele yaptırın.
4.Devreye almadan önce bilgi ve uyarılar
Ağ bağlantısı /
İnternet bağlantısınınhazırlanması
Bun alıcıyı yerel bir ağaentegreederek ana sunucuya veya
başka yayınkaynaklarına erişmeniz olanaklıdır. İnternet
radyosu
yayınlarını almak için veya yerel olarak kayıtlı olmayan
medya içeriklerine (Streaming –örn. Spotify Connect)
erişmek için, ağda ayrıca bir internet bağlantısı gereklidir.
WLAN/Wi-Fi bağlantısı (kablosuz ağ)
• Yönlendiricinin açıkveinternete bir bağlantınınkurulu
olduğundan emin olun.
• Henüz etkin değilse, yönlendiricinizin WLAN bağlantısını
etkinleştirin.
• Yönlendiricinin yapılanması ile ilgili sorunlar olursa, lütfen
hata arama /sorun giderme için yönlendiricinin kullanma
kılavuzundan yararlanın.
• WLAN bağlantısınıntam bir yapılandırma talimatı
Kablosuz bağlantı bölümünde açıklanır.
5.Devreye almadan önce
Kullanma uyarıları
Streaming alıcınınkullanımı yalnızca akıllı
telefonunuzdan UNDOK uygulaması yardımıyla yapılır.
leriniyerelkurallarau
eme
in.
ver
ygunolarakatık
3. Güvenlik uyarıları
• Bu ürün ticari olmayan özel evsel kullanımiçin öngörülmüştür.
• Cihazı pisliklere, neme veaşırıısınmaya karşı koruyunuzve
sadecekurumekanlardakullanınız.
• Buürün, her türlüelektrikli ürün gibi, çocuklar tarafından
kullanılmamalıdır!
• Ürünü yere düşürmeyinveçok aşırı sarsıntılara maruz
bırakmayın.
• Bu ürünü teknik bilgilerde verilen kapasitesınırları dışında
kullanmayın.
• Çocukları ambalaj malzemelerindenuzak tutun, boğulma
tehlikesimevcuttur.
67
Page 72

Not
Not – İlk kez çalıştırma
UNDOK uygulamasınınvetam
fonksiyon kapsamınınayrıntılı bir
açıklamasını UNDOK kılavuzumuzun bu
adresinde bulabilirsiniz:
www.hama.com->00054861->Downloads
6.Devreye alma
6.1 Bağlantılar
• 1x LINE Out 3.5 mm
• 1x Optik bağlantı
• 1x USB TipAyürütme /güncelleme portu
• 1x Elektrik beslemesi (MicroUSB)
6.2 Çalıştırmak
• Birlikte verilmiş olan Micro-USB şarj kablosunu alıcının
Micro-USB bağlantısına (4) takın.
• Micro-USB şarj kablosunun diğer ucunu USB şarj cihazına
takın.
Hinweis
Sadece orijinal aksesuarlar (veya: Hama tarafından
onaylanmış aksesuarlar) kullanarak üründe hasar
oluşmasını önleyin.
• Elektrik kablosunu /adaptörü kurallaragöremonte
edilmiş bir prize takın.
Uyarı
• İlk kez çalıştırıldığında alıcı SETUP modunda başlar.
• Durum LED‘i (2) beyaz renkte yanıpsönmeye başlar ve
alıcı yalnızca UNDOK uygulamasınınyardımıyla akıllı
telefonunuza bağlanabilir.
• Bağlantı sorunlarınınçıkması durumunda, [POWER]
tuşuna (1) uzunca basarak alıcıyı yeniden SETUP
moduna getirebilirsiniz
Ses seviyesini uyarlama /Mute
Şifreleri, arama metinlerini, vs. girme
Giriş yalnızca UNDOK uygulaması üzerinden yapılır.
Açma /Kapatma /Standby /MicroAccess Point
• Alıcıyı açmak için [POWER] üzerine basınız. Alternatif
olarak alıcı UNDOK uygulamasından açılabilir.
• Alıcıyı kapatmak için [POWER] üzerine basınız(Standby).
Bir ağ bağlantısınınkurulmasından sonraStandby
modunda da bağlantı sürdürülür ve böylece UNDOK
uygulaması yoluyla cihaz çalıştırılabilir..
Not
Cihazı tamamen kapatmak için elektrik kaynağından
ayırın.
7. UNDOK –Herşey elinizde
• Ürünü sadece bu amaç için izin verilen bir prizde
çalıştırın. Şebeke prizine daima kolayca erişmek
mümkün olmalıdır.
• Çoklu prizlerde bağlı olan tüketicilerin izin verilebilir
toplam güç saryatını aşmamalarına dikkat edin.
• Şebeke prizine daima kolayca erişmek mümkün
olmalıdır.
• Ürünü uzun sürekullanmadığınızda şebekeden ayırın.
• Alıcınınilklendirme işlemlerini tamamlamasını bekleyin.
• Cihazdaki [POWER] tuşuna (1) kısaca basın.
68
Frontier Silicon tarafından geliştirilen UNDOK uygulaması
(App) radyolarınvehoparlörlerin akıllı telefonunuzda tam
kontrolünü sağlar.
İster cihazınilk kurulumunda olsun, ister Multiroom
kongürasyonlarında ya da favori radyo istasyonlarınızın
yönetiminde olsun –UNDOK akıllı telefonunuzda veya
tablette tüm özellikleri sunar.
Aşağıda alıcınınUNDOK ile ilk kurulumu açıklanmaktadır.
Cihazıntam işlev kapsamını sadece UNDOK uygulamasıyla
elde edebilirsiniz.
Page 73

7.1 CihazınUNDOK ile ilk kurulumu
Hama’nıntüm UNDOK uyumlu ürünleri ilk kez
çalıştırıldığında veya fabrika ayarlarına ayarlamanızdan
sonrabir Micro-Access-Point oluşturur –yani tabletinize
veya akıllı telefonunuza bağlanmanızı sağlayan bağımsız
bir WLAN ağını kurar.Buerişim noktası „Setup Hama
ÜRÜN TANIMLAMASI MACadresi” formatında gösterilerek,
ürünün belirli bir kimliğisağlanır.
Not
UNDOK uygulaması akıllı telefonunuzun sisteminde
seçilen dili kullanır.
7.2 Açıkağ/korunmasızağ
Not
• Güvenli olmayan bir bağlantı kurmamanızı ve ağınızı
her zaman yabancı erişimlerekarşı korumanızı
öneririz.
• İstediğiniz ağda güvenlik önlemlerinin bulunmaması
durumunda, ağı listeden seçmek ve onaylamak
yeterlidir.Sonraradyo anında bu giriş noktasına
bağlanır.
7.2.1 iOS kullanıcıları için işlem
• Phone veyaiPadüzerindeUNDOK uygulamasını açın
• Menüde Ses sistemini kurma öğesine basın
• AlıcınınSETUP modunda bulunduğundan emin olun. Eğer
cihaz SETUPmodunda bulunmuyorsa, [Power] tuşuna5
saniye basıptutarak cihazı SETUP moduna getirin.
• UNDOK şimdi iPhone/iPad ayarları üzerinden ürünün
WLANağına bağlanmanızı talep eder –buamaçla
iPhone’unsistem ayarlarına girin ve WLAN ağını (örn.
Setup Hama IT900MBT) )seçin. SonraUNDOK’a geri gidin
ve İleri üzerine basın
• Şimdialıcı içinistediğiniz bir adı (örn. Büro IT900MBT)
belirleyin ve İleri ile girişionaylayın.
• Sonraki dil seçiminde alıcınınsistem dilinibelirleyebilirsiniz.
Seçiminizi „İleri” ileonaylayın.
• Şimdiağyapılandırmasınındeğişik seçeneklerini
kullanabilirsiniz (gerekirse WLAN, WPSveEthernet).
İstediğiniz yönteme tıkladıktan sonraUNDOKsonraki
pencereye geçiş yapar
• Seçilenyönteme bağlı olarak şimdiistediğiniz WLAN ağını
seçip yapılandırabilir veya birWPS bağlantısı kurabilirsiniz.
• Son olarak alıcı ağabağlanırve„Ses sistemim” üzerine
basarak cihazı UNDOK‘takullanabilirsiniz
• Ağ bağlantısınınLED göstergesi(1) artıksürekliyanar
• Alıcınınbaşarıylayapılandırılmasından sonrabir yürütme
aygıtı (hoparlör) analog (5)veyadijital(3) olarak
bağlanmalıdır. Müzikgrubunun kumandası yalnızca
UNDOK üzerinden uygulanır.
7.2.2 Android kullanıcıları için işlem
• Tabletinizde veya akıllı telefonunuzda UNDOK
uygulamasını açınız
• Menüde Ses sistemini kurma öğesine basınız
• AlıcınınSETUP modunda bulunduğundan emin olun. Eğer
cihaz SETUP modunda bulunmuyorsa, [Power] tuşuna 5
saniye basıptutarak, cihazı SETUP moduna getirin.
• UNDOK şimdi iPhone/iPad ayarları üzerinden ürünün
WLAN ağına bağlanmanızı talep eder –buamaçla
iPhone‘un sistem ayarlarına girin ve WLAN ağını (örn.
Setup Hama IT900MBT) seçin. SonraUNDOK’a geri gidin
ve İleri üzerine basın
• Şimdi alıcı için istediğiniz bir adı (örn. BüroIT900MBT)
belirleyin ve girişi İleri ile onaylayın
• Sonraki dil seçiminde alıcınındilini belirleyebilirsiniz.
Seçiminizi „İleri” ile onaylayın.
• Şimdi ağ yapılandırmasınındeğişik seçeneklerini
kullanabilirsiniz (gerekirse WLAN, WPS ve Ethernet).
İstediğiniz yönteme tıkladıktan sonraUNDOK sonraki
pencereye geçiş yapar
• Seçilen yönteme bağlı olarak şimdi istediğiniz WLAN
ağını seçip yapılandırabilir veya bir WPS bağlantısı
kurabilirsiniz.
• Son olarak alıcı ağabağlanırve“Ses sistemimi kullan“
üzerine basarak cihazı UNDOK’ta kullanabilirsiniz
• Ağ bağlantısınınLED göstergesi (1) şimdi sürekli yanar.
• Alıcınınbaşarıyla yapılandırılmasından sonrabir yürütme
aygıtı (hoparlör) analog (5) veya dijital (3) olarak
bağlanmalıdır. Müzik grubunun kumandası yalnızca
UNDOK üzerinden uygulanır.
8. Bağlantılar
Not
• Optik bir sinyal kablosu yardımıyla kurulan bağlantılar,
bir 3,5 mm ses kablosuyla oluşturulan bağlantılara
kıyasla elektriksel veya manyetik girişimlerekarşı daha
az duyarlıdır.
69
Page 74

8.1 Optical OUT üzerinden bağlantı
Dijital ses çıkışı üzerinden alıcıya örn. hoparlörlerinizi
bağlayabilir ve hoparlörler üzerinden ses sinyalini
yayınlayabilirsiniz.
Not
• Bir uç cihazı bağlamadan önce alıcıyı kapatın.
• Bağlamadan önce optik kablonun her iki ucundan
koruyucu kapakları çıkarın.
• Kablo bükülmemeli ve herhangi bir yere
sıkıştırılmamalıdır.
• Optik ses bağlantısı üzerinden bir yayıniçin bir optik
kabloyu alıcınınoptik ses çıkışına (3) ve hoparlörün optik
ses girişine bağlayın.
• Alıcıyı açmak için [POWER] (1) üzerine basın.
• Alıcınınses sinyali şimdi hoparlörleriniz üzerinden
yayınlanır.
8.2 LINE OUT üzerinden bağlantı
Analog ses çıkışı üzerinden alıcıya örn. hoparlörlerinizi
bağlayabilir ve hoparlörler üzerinden ses sinyalini
yayınlayabilirsiniz.
Not
• Bir uç cihazı bağlamadan önce alıcıyı kapatın.
• Kablo bükülmemeli ve herhangi bir yere
sıkıştırılmamalıdır.
• Analog ses bağlantısı üzerinden bir yayıniçin bir 3,5
mm Cinch kabloyu alıcınınanalog ses çıkışına (5) ve
hoparlörün analog ses girişine bağlayın.
• Alıcıyı açmak için [POWER] (1) üzerine basın.
• Alıcınınses sinyali şimdi hoparlörleriniz üzerinden
yayınlanır.
9.Fabrika ayarları
Ses ayarlama düğmesini fabrika ayarlarına (teslimat
durumu) döndürmek için lütfen şuadımları uygulayın:
• [POWER] tuşuna (1) basınveyakl. 5saniye basılı tutun.
• Yapılan tüm ayarlar silinir.
Not
10. Yazılımgüncellemesi
Alıcılarımızınyazılımı için sürekli iyileştirmeler ve yeni
özellikler geliştirilerek, olası hatalar giderilir,işlev kapsamı
genişletilir vs.
Hazırlanan güncellemeleri her zaman alıcınıza kurmanızı
öneririz.
Uyarı
• Bir yazılımgüncellemesini başlatmadan evvel, sağlam
bir elektrik beslemesinin mevcut olmasına dikkat
ediniz.
• Bir yazılımgüncellemesi esnasında gerçekleşen
elektrik kesintisi radyoda onarılamayan hasarlara
neden olabilir!
11.Bakımvetemizlik
Bu ürünü sadece lif bırakmayan, hafnemli bir bezle silin
ve agresif temizleyiciler kullanmayın.
Ürünü uzunca bir sürekullanmayacaksanızcihazı kapatıp
elektrik şini çekin. Ürünü, doğrudan güneş almayan temiz,
kuru bir yerde saklayın.
12. Sorumsuzluk beyanı
Hama GmbH &CoKGşirketi yanlış kurulum, montaj ve
ürünün amacına uygun olarak kullanılmaması durumunda
veya kullanımkılavuzu ve/veya güvenlik uyarılarına
uyulmaması sonucu oluşan hasarlar için sorumluluk kabul
etmez ve bu durumda garanti hakkı kaybolur.
13. Servis ve destek
Ürünle ilgili herhangi bir sorunuz varsa, lütfen HAMA ürün
danışmanlığına başvurunuz.
Destek hattı:+49 9091 502-115 (Alm/İng)
Diğer destek bilgileri için, bkz.:
www.hama.com
• Sorunlar ve hatalı işlevler bazı durumlarda fabrika
ayarlarına sıfırlama ile giderilebilir.
• Fakat tüm ön ayarlar,örneğin Equalizer,favoriler ve
ağ prolleri tamamen silinir.
70
Page 75

14. Atıktoplama bilgileri
Çevrekoruma uyarısı:
2012/19/EU ve 2006/66/AB Avrupa direktierinin
ulusal mevzuata geçirildiğitarihten itibaren
aşağıdaki kurallar geçerlidir: Elektrikli cihazlar,
elektronik cihazlar ve piller normal evsel çöpe
atılamaz. Tüketiciler,kullanımömürlerinin sonuna gelmiş
elektrikli ve elektronik cihazları ve pilleri, kamuya ait
toplama yerlerine veya satınalındıkları yerlereiade etmekle
yükümlüdürler.Bukonu ile ilgili ayrıntılar ulusal yasalarla
düzenlenmektedir.Ürün üzerinde, kullanımkılavuzunda
veya ambalajda bulunan bu sembol tüketiciyi bu konuda
uyarır. Eski cihazların/pillerin geri kazanımı,yapıldıkları
malzemelerin değerlendirilmesi veya diğer değerlendirme
şekilleri ile, çevrekorumasına önemli bir katkıda
bulunursunuz.
15. Uygunluk beyanı
İş bu belge ile Hama GmbH &CoKGkablosuz
sistem tipin [00054861] 2014/53/AB sayılı direktife
uygun olduğunu beyan eder.ABUygunluk
Beyanınıntam metni aşağıdaki internet adresinde
incelenebilir:
www.hama.com->00054861->Downloads.
Frekans bandı/frekans
bantları
İletilen maksimum radyo
frekans gücü
Kısıtlama veya gerekliliklerin olduğuülkeler
Belçika, Bulgaristan, Çek Cumhuriyeti, Danimarka,
Almanya, Estonya, İrlanda, Yunanistan, İspanya, Fransa,
Hırvatistan, İtalya, Kıbrıs, Letonya, Litvanya, Lüksemburg,
Macaristan, Malta, Hollanda, Avusturya, Polonya, Portekiz,
Romanya, Slovenya, Slovakya, Finlandiya, İsveç, Birleşik
Krallık
Not
Bluetooth: 2.402 -2.480GHz
WiFi: 2.412 -2.472GHz
WiFi: 5.150 -5.350 GHz
WiFi: 5.470 -5.725 GHz
Bluetooth: 4dBm (EIRP)
WiFi: 2.4GHz /19.3dBm (EIRP)
WiFi: 5GHz /17.8dBm (EIRP)
5GHz WLAN ağında 36-64 (frekans 5,150GHz –
5,350GHz) kanalları kullanıldığında, ürün yalnızca
kapalı mekanlar içerisinde kullanılmalıdır.
71
Page 76
M Instrucțiuni scurte
Elemente de comandășiașaje
Față
1. Tasta [Power]
2. LED de statut
Spate
3. Racordoptic
4. Racorddecurent (microUSB)
5. RacordLINE Out
6. USB Playback/Update Port
1. Explicarea simbolurilor de avertizare șiindicații
Avertizare
Se folosește la marcarea instrucțiunilor de siguranță sau
la concentrarea atenției în caz de pericol șiriscuri mari.
Indicație
Se folosește pentru marcarea suplimentară a
informațiilor șiinstrucțiunilor importante.
Pericol de electrocutare
Acest simbol semnalizează pericol la atingerea
componentelor neizolate ale produsului carepot avea o
tensiune atât de înaltă încât pot duce la electrocutare.
2. Conținutul pachetului
• Streaming Tuner “IT900MBT”
• Telecomandă
• Încărcător microUSB
• Cablu microUSB
• Cablu Jack 3,5 mm
• Instrucțiuni de folosire
• Spotify Flyer
• Reciclarea materialuluipachetului se execută conform
normelor locale de salubrizareînvigoare.
• Nu facețimodicări la aparat. Înacest felpierdețioricedrept
la garanție.
Pericol de electrocutare
• Nu deschidețiaparatul șinu-l utilizațiîncontinuareîn
caz de deteriorare.
• Nu utilizațiprodusul dacă adaptorul AC,cablul
adaptor sau conductorul rețelei sunt deteriorate.
• Nu încercațisăreparațisau să depanațiaparatul.
Operațiile de reparații se execută numai de personal
de specialitate.
4.Informații șiindicații înaintea punerii în funcțiune
Conectarelarețea/
Pregătireconectarelainternet
Tunerul se poate integraîntr-o rețea localășiaccesa Home-
Server șialte surse de acces. Pentru recepție radio
prin internet sau accesarea conținuturilor mediatice
nememorate local (Streaming –deex. Spotify Connect), în
rețea este nevoie de oconectaresuplimentară la internet.
Conexiune WLAN/Wi-Fi (rețea fărăr)
• Asigurați-vă că routerul este pornit șieste conectat la
internet.
• Activațiconexiunea WLAN arouterului.
• Dacă avețiîntrebări cu privirelacongurarea routerului
căutațiînmanualul de utilizarelacăutareerori/soluții
probleme.
• Instrucțiuni pentru congurarea conexiunii WLAN găsițiîn
capitolul Conexiune fără r.
5.Înaintea punerii în funcțiune
Indicații de deservire
Deservirea Streaming Tuner se face exclusiv cu ajutorul
aplicației UNDOK de pe Smartphone.
3. Instrucțiuni de siguranță
• Produsul este conceput numai pentru utilizare privatășinu
profesională.
• Protejațiprodusul de impurități, umiditate, supraîncălzire și
utilizați-lnumai în încăperi uscate.
• Produsul,cadealtfeltoată produseleelectrice, nu arece
căutaînmâinile copiilor!
• Nu lăsațiprodusulsăcadășinuîlsupunețitrepidațiilor
puternice.
• Nu exploatațiprodusulînafara limitelordeputere indicate în
datele tehnice.
• Nu lăsațicopiiisăse joace cu materialul pachetului, prezintă
pericol de sufocare.
72
Page 77

Indicație
Indicație -Prima pornire
Descriereamănunțită a
aplicației UNDOK șiaîntregului
volum funcțional ogăsițiîn
ghidul UNDOK la:
www.hama.com->00054861->Downloads
6.Punere în funcțiune
6.1 Racorduri
• 1xLINE Out 3.5 mm
• 1xracordoptic
• 1xUSB- TypAPlayback/Update Port
• 1xalimentarecucurent (microUSB)
6.2 Pornire
• Conectațicablul de încărcaremicroUSB livrat, la portul
microUSB (4) al tunerului.
• Conectați șaliberă acablului de încărcaremicroUSB la
un încărcător USB.
Hinweis
Utilizaținumai accesorii originale (sau: accesorii
recomandate de Hama), pentru aevita daune la produs.
• Conectațicablul de racordarelarețea/elementul de rețea
cu opriză instalată regulamentar.
Avertizare
• La prima porniretunerul se aă în regim SETUP.
• LED-ul de statut (2) începe să lumineze alb șitunerul
se poate conecta numai cu ajutorul aplicației UNDOK
de pe Smartphone.
• Dacă apar probleme tunerul se poate readuce în
regimul SETUP prin apăsarelungă pe tasta [POWER]
(1).
Adaptarevolum sonor/dezactivaresunet
Introducereparole, căutaretexte, etc.
Introducerea se face exclusiv prin aplicație UNDOK.
Pornire/Oprire/Standby/MicroAccess Point
• Pentru pornirea tunerului apăsați[POWER]. Alternativ se
poate porni prin aplicația UNDOK.
• Pentru oprirea tunerului apăsați[POWER](Standby).
După crearea unei conexiuni la rețea, pentru pornirea
prin aplicația UNDOK, conexiunea se menține în regim
standby.
Indicație
Pentru oprirecompletă scoatețiaparatul din priza de
curent.
7. UNDOK –Totul la îndemână
• Exploatațiprodusul numai la opriză aprobată în acest
sens. Priza trebuie să epermanent ușor accesibilă.
• Consumatorii conectațilaprize multiple nu trebuie să
depășească puterea totală admisibilă.
• Priza trebuie să epermanent ușor accesibilă.
• Deconectațiprodusul de la rețea dacă nu este folosit
timp mai îndelungat.
• Așteptațiîncheierea inițializării tunerului.
• Apăsațiscurt tasta [POWER] (1) la aparat.
Aplicația UNDOK dezvoltată de Frontier Silicon, vă asigură
prin Smartphone controlul asupraaparatelor de radio și
difuzoarelor.
Indiferent dacă la congurarea inițială aaparatului, la
congurarea Multiroom sau la administrarea emisiunilor
preferate -UNDOK vă oferă toate Features pe Smartphone
sau tabletă.
Congurarea inițială Tuner cu UNDOK. Întreaga capacitate
funcțională aaparatului se atinge numai cu aplicație
UNDOK.
73
Page 78

7.1 Configurare inițială aaparatului cu UNDOK
Toate produsele Hama compatibile UNDOK generează
la prima pornire, respectiv după ce au fost trecute la
setările din fabrică,unașanumit Micro-Access-Point -o
rețea proprie WLAN cu ajutorul căreia vă putețiconecta
cu tableta sau Smartphone-ul. Acest Access-Point este
prezentat în format „Setup Hama PRODUKTBEZEICHNUNG
MAC-Adresse“, pentru identicarea clară aprodusului.
Indicație
Aplicația UNDOK utilizează limba sistemului din
Smartphone.
7.2 Rețea deschisă/Rețea neprotejată
Indicație
• Vă recomandămsănu creațioconexiune neasigurată
șisăvăasigurațirețeaua contraatacurilor externe.
• Dacă rețeaua dorită nu dispune de nici omăsură
de siguranță,este sucient să oselectațipentru
îndepărtarea de pe listășisăconrmați. Aparatul de
radio se conectează imediat cu punctul de acces.
7.2.1 Procedură pentru utilizatori iOS
• Deschidețiaplicația UNDOK pe iPhone sau iPad.
• Înmeniu apăsațipepunctul Conguraresistem audio.
• Tunerul trebuie să eînregimSETUP.Pentru aducerea
tunerului în regim SETUP apăsați5secunde tasta [Power].
• UNDOK vă solicită să vă conectațicuWLAN-ul produsului
prin setările iPhone/iPad -pentru aceasta trecețiîn
setările sistemului din iPhone șiselectațirețeaua WLAN
(de ex. Setup Hama IT900MBT). RevenițiînUNDOK și
apăsațiContinuați.
• Repartizațitunerului denumirea dorită (de ex. Birou
IT900MBT) șiconrmațiintroducerea cu Continuați.
• Prin selectarea limbii putețistabilii limba sistemului
tunerului. Conrmațiselecția cu Continuați.
• Avețiladispoziție posibilitățidiferite pentru congurarea
rețelei (dacă este cazul WLAN, WPS șiEthernet). Dațiclic
pe metoda doritășiUNDOK trece la fereastraurmătoare.
• Dependent de metoda aleasă,
• putețiselecta șicongurarețeaua WLAN dorită sau să
efectuațioconexiune WPS.
• Tunerul se conectează la rețea și, prin apăsarea pe
„Sistemul meu audio“, putețisăfolosițiaparatul în
UNDOK.
• Așajul LED (1) de conectarelarețea luminează continuu.
• După congurarea tunerului, trebuie conectat un
aparat de redare(difuzor) analogic (5) sau digital (3).
Comanda grupei muzicale se face exclusiv prin UNDOK.
7.2.2 Procedură pentru utilizatori Android
• Deschidețiaplicația UNDOK pe tabletă sau Smartphone.
• Înmeniu apăsațipepunctul Conguraresistem audio.
• Tunerul trebuie să eînregim SETUP.Pentru aducerea
tunerului în regim SETUP apăsați5secunde tasta
[Power].
• UNDOK vă solicită să vă conectațicuWLAN-ul produsului
prin setările iPhone/iPad -pentru aceasta trecețiîn
setările sistemului din iPhone șiselectațirețeaua WLAN
(de ex. Setup Hama IT900MBT). RevenițiînUNDOK și
apăsațiContinuați.
• Repartizațitunerului denumirea dorită (de ex. Birou
IT900MBT) șiconrmațiintroducerea cu Continuați.
• Prin selectarea limbii putețistabilii limba sistemului
tunerului. Conrmațiselecția cu Continuați.
• Avețiladispoziție posibilitățidiferite pentru congurarea
rețelei (dacă este cazul WLAN, WPS șiEthernet). Dațiclic
pe metoda doritășiUNDOK trece la fereastraurmătoare.
• Dependent de metoda aleasă,putețiselecta șicongura
rețeaua WLAN dorită sau să efectuațioconexiune WPS.
• Tunerul se conectează la rețea și, prin apăsarea pe
„Sistemul meu audio“, putețisăfolosițiaparatul în
UNDOK.
• Așajul LED (1) de conectarelarețea luminează continuu.
• După congurarea tunerului, trebuie conectat un
aparat de redare(difuzor) analogic (5) sau digital (3).
Comanda grupei muzicale se face exclusiv prin UNDOK.
74
Page 79

8. Conexiuni
Indicație
• Conexiunile caresunt realizate cu ajutorul unui cablu
optic de semnale sunt mai insensibile la perturbații
electrice sau magnetice decât conexiunile caresunt
efectuate cu ajutorul unui cablu audio de 3,5 mm.
8.1 Conexiune prin Optical OUT
Prin ieșirea audio digitală putețiconecta de ex. difuzoarele
la tuner șiputețireda prin difuzoaresemnalul audio al
acestuia.
Indicație
• Oprițitunerul înainte de aconecta un aparat terminal
la acesta.
• Înaintea conectării îndepărtațicapacele de protecție
de la capetele cablului optic de semnale.
• Nu îndoiți șinustrivițicablul.
• Pentru redarea prin racordul audio optic, conectațiun
cablu optic la ieșirea audio optică (3) atunerului șila
intrarea audio optică adifuzorului.
• Pentru pornirea tunerului apăsați[POWER] (1).
• Acum semnalul audio al tunerului va redat prin
difuzoare.
8.2 Conexiune prin LINE OUT
Prin ieșirea audio analogică putețiconecta de ex.
difuzoarele la tuner șiputețireda prin difuzoaresemnalul
audio al acestuia.
Indicație
• Oprițitunerul înainte de aconecta un aparat terminal
la acesta.
• Nu îndoiți șinustrivițicablul.
• Pentru redarea prin racordul audio analogic, conectațiun
cablu Cinch de 3,5 mm la ieșirea audio analogică (5) a
tunerului șilaintrarea audio analogică adifuzorului.
• Pentru pornirea tunerului apăsați[POWER] (1).
• Acum semnalul audio al tunerului va redat prin
difuzoare.
9.Setări din fabrică
Pentru repunerea tunerului la setările din fabrică
(statut la livrare), procedațiînfelul următor:
• Apăsațicca 5secunde tasta [POWER] (1).
• Toate setările executate anterior se șterg.
Indicație
• Probleme șierori în funcționarepot îndepărtate
uneori, prin resetarea la setarea din fabrică.
• Toate presetările precum Equalizer,Favorite șiProle
se ștergireversibil.
10. Actualizare program
Dezvoltămpermanent îmbunătățiri șiFeaturenoi pentru
programul tunerului, pentru înlăturarea posibilelor erori,
pentru dezvoltarea capacității funcționale ș.a.m.d.
Vă recomandămsăinstalațipermanent pe tuner noile
Update puse la dispoziție.
Avertizare
• Pentru Update este necesar oalimentarestabilă cu
curent.
• Întreruperea alimentării cu curent în timpul Update
poate produce deteriorări ireparabile aparatului de
radio.
11. Revizie șiîntreținere
Limpe oproduto apenas com um pano sem pelos
ligeiramente humedecido enãoutilize produtos de limpeza
agressivos.
Caso nãopretenda utilizar oproduto durante um período
prolongado, desligue-o eretireacha da tomada elétrica.
Armazene-o num local limpo eseco, sem exposiçãosolar
direta.
12. Excluderea responsabilității
Hama GmbH &CoKGnuîșiasumă nici orăspundere
sau garanție pentru pagube cauzate de montarea,
instalarea sau folosirea necorespunzătoareaprodusului
sau nerespectarea instrucțiunilor de folosire și/sau a
instrucțiunilor de siguranță.
13. Service șisuport
Dacă avețiîntrebări adresați-vă la Hama consultanță pentru
produse.
Hotline: +49 9091 502-115 (Ger/Ang)
Alte informații de suport găsițiaici:
www.hama.com
75
Page 80

14. Informații pentru salubrizare
Instrucțiuni pentru protecția mediului înconjurător:
Din momentul aplicării directivelor europene
2012/19/EU şi2006/66/CE în dreptul național sunt
valabile următoarele: Aparatele electrice şi
electronice precum şibateriile nu pot salubrizate
cu gunoiul menajer.Consumatorul este obligat prin lege să
înapoieze aparatele electrice şielectronice precum şi
bateriile la sfârşitul duratei lor de folosință la locurile de
colectarelocale amenajate special pentru acestea sau de
unde au fost cumpărate. Detaliile sunt reglementate de
cătrelegislația ecărei țări. Simbolul de pe produs, în
instrucțiunile de utilizaresau pe ambalaj indică această
reglementare. Prin reciclarea, valoricarea materială sau
alte forme ale valoricării aparatelor vechi/bateriilor uzate
contribuițiînmaremăsură la protecția mediului nostru
înconjurător.
15. Declarație de conformitate
Prin prezenta, Hama GmbH &CoKG, declară că
tipul de echipamente radio [00054861] este în
conformitate cu Directiva 2014/53/UE. Textul
integral al declarației UE de conformitate este disponibil la
următoarea adresă internet:
www.hama.com->00054861->Downloads.
Banda (benzile) de
frecvențe
Puterea maximă
Restricții sau Cerințeîn
Belgia, Bulgaria, Republica Cehă,Danemarca, Germania,
Estonia, Irlanda, Grecia, Spania, Franța, Croația, Italia,
Cipru, Letonia, Lituania, Luxemburg, Ungaria, Malta,
Olanda, Austria, Polonia, Portugalia, România, Slovenia,
Slovacia, Finlanda, Suedia, Marea Britanie
Indicație
Bluetooth: 2.402 -2.480GHz
WiFi: 2.412 -2.472GHz
WiFi: 5.150 -5.350 GHz
WiFi: 5.470 -5.725 GHz
Bluetooth: 4dBm (EIRP)
WiFi: 2.4GHz /19.3dBm (EIRP)
WiFi: 5GHz /17.8dBm (EIRP)
При использовании каналов 36—64 (частота
5,150—5,350 ГГц) вбеспроводной сети (WLAN) с
частотой 5 ГГцизделие разрешено применять только
взакрытых помещениях.
76
Page 81

S Snabbguide
Manöverelement och indikeringar
Framsidan
1. [POWER]-knapp
2. Statuslysdiod
Baksidan
3. Optisk anslutning
4. Strömanslutning (MicroUSB)
5. LINE Out-uttag
6. USB Playback /Update Port
1. Förklaring av varningssymboler och anvisningar
Varning
Används för att markerasäkerhetshänvisningar eller för
att rikta uppmärksamhet mot speciella faror och risker.
Information
Används för att markerainformation eller viktiga
anvisningar.
Fara för elektrisk stöt
Denna symbol hänvisar till faravid beröring av
oisolerade produktdelar som kan ha en så pass hög
spänning att det nns risk för elektrisk stöt.
2. Förpackningens innehåll
• Streaming Tuner ”T900MBT”
• Fjärrkontroll
• MicroUSB Charger
• MicroUSB kabel
• 3,5 mm telehanekabel
• Bruksanvisning
• Spotify Flyer
• Kasseraomedelbart förpackningsmaterialetenligt de lokalt
gällande bestämmelserna om avfallshantering.
• Ändra ingenting på produkten. Annars upphör garantin att
gälla.
Fara för elektrisk stöt
• Öppna inte produkten och använd den inte mer om
den är skadad.
• Använd inte produkten om AC-adaptern,
adapterkabeln eller elsladden är skadade.
• Försök inte utföraservice på produkten själv eller
repareraden. Överlåtallt servicearbete tillkompetent
fackpersonal.
4.Information och anvisningar inför idrifttagning
Nätverksanslutning /Internetanslutning
Det är möjligt att integreraden här tunern iett lokalt
nätverk och på så sätt fååtkomst tillHome Server eller
andratillståndskällor.För att ta emot internetradio
eller fååtkomst tillmedieinnehåll som inte har sparats
lokalt (strömning– t.ex. Spotify Connect) behöver man även
ha tillgång till en internetanslutning inätverket.
WLAN/Wi-Fi-anslutning (trådlöst nätverk)
• Kontrolleraatt routern är påslagen och att det har
upprättatsen internetanslutning.
• Aktiveraiförekommande fall routerns WLAN- anslutning.
• Vid frågor om routerns konguration ska man ta hjälp av
routerns bruksanvisning för felsökning/problemlösning.
• Ikapitlet Trådlös anslutning nns det en beskrivning av
en exakt kongurationsanvisning för WLAN-anslutningar.
5.Före första användningen
Bruksanvisning
Strömnings-tunernmanövreras endast med hjälp av
UNDOK-appen via smartphonen.
3. Säkerhetsanvisningar
• Produkten är avseddför privat, icke yrkesmässigt hemmabruk.
• Skydda produkten motsmuts, fukt och överhettningsamt
användden endastitorra lokaler.
• Precis som alla andraelprodukterska inteheller denhär
produkten hanterasavbarn!
• Tappainte produkten och utsätt den inte för häftiga
vibrationer.
• Användinteprodukten utanför de kapacitetsgränser somär
angivna för den iden tekniskadatan.
• Barn fårunder inga omständigheterkomma ikontakt med
förpackningsmaterialet, eftersom de kankvävas.
77
Page 82

Information
Information -vid första påslagningen
En utförlig beskrivning av UNDOK-appen
och alla funktioner nns ivår
UNDOK-guide på:
www.hama.com->00054861->Downloads
6.Idrifttagning
6.1 Anslutningar
• 1x LINE Out 3,5 mm
• 1x Optisk anslutning
• 1x USB- TypAPlayback /Update Port
• 1x Strömförsörjning (MicroUSB)
6.2 Påslagning
• Anslut den medföljande MicroUSB-laddkabeln tillMicro
USB-anslutningen (4) på tunern.
• Anslut den lediga kontakten på MicroUSB-laddkabeln till
USB-laddaren.
Information
Använd endast originaltillbehör (eller: tillbehör som
Hama godkänt) för att undvika skador på produkten.
• Förbind nätkabeln/nätaggregatet med ett korrekt
installerat eluttag.
Varning
• Första gången tunern slåspåstartar den iSETUPläget.
• Statuslysdioden (2) börjar att blinka med vitt sken
ochtunern kan endast förbindas med din smartphone
via UNDOK-appen.
• Om du skulle få problem med förbindelsen kan du
återställa tunern tillSETUP-läget genom att återigen
trycka länge på [POWER]-knappen (1)
Justeravolymen/mute
Ange lösenord, söktexter osv.
Inmatningen sker endast via UNDOK-appen.
Till-/frånkoppling/standby/MicroAccess Point
• Tryck på [POWER] för att slå på tunern .Det är också
möjligt att slå på tunern via UNDOK-appen.
• Tryck på [POWER] för att stänga av tunern (standby). När
man har upprättat en nätverksförbindelse ska man inte
heller bryta förbindelsen när tunern är istandbyläge så
att det är möjligt att starta via UNDOK-appen.
Information
Koppla bort apparaten frånströmförsörjningen för att
stänga av den helt.
7. UNDOK –Allt på ett och samma ställe
• Använd endast produkten med ett godkänt eluttag.
Det måste alltid varaenkelt att komma åteluttaget .
• Om grenuttag används, var noga med att de anslutna
förbrukarna inte överskrider tillåten total förbrukning.
• Det måste alltid varaenkelt att komma åteluttaget.
• Koppla bort produkten frånelnätet om den inte ska
användas under en längretid.
• Vänta tills tunern har startat helt.
• Tryck kort på [POWER]-knappen (1) på apparaten.
78
Den av Frontier Silicon utvecklade UNDOK-applikationen
(appen) ger dig full kontrollöver radio och högtalarepådin
smartphone.
Oavsett om det handlar om installation av enheten,
konguration av Multiroom eller hantering av dina
favoritkanaler –med UNDOK fårdualla funktioner på din
smartphone eller surfplatta.
Nedan förklarar vi hur det gårtillatt installeratunern
med UNDOK för första gången. För att kunna utnyttja alla
enhetsfunktioner måste man använda sig av UNDOKappen.
Page 83

7.1 Första installation av enheten med UNDOK
Alla UNDOK-aktiverade produkter frånHama skapar vid
första användningen resp. vid fabriksinställningarna en så
kallad mikro-access-punkt -d.v.s. ett eget WiFi-nätverk, till
vilket du kan ansluta med din surfplatta eller smartphone.
Den här åtkomstpunkten visas iformatet ”Setup Hama
PRODUKTBETECKNING MAC-adress”, så att man alltid utan
någratvivel kan identieraprodukten.
Information
För UNDOK-appen används det språksom du har valt i
smartphonesystemet.
7.2 Öppet nätverk/oskyddat nätverk
Information
• Vi avråder frånatt man upprättar någon form
av osäker förbindelse och att man alltid skyddar
nätverket mot extern åtkomst.
• Om man inte har vidtagit någrasäkerhetsåtgärder för
att skydda nätverket räcker det med att man väljer
nätverket ilistan och bekräftar.Radion ansluts sedan
direkt till åtkomstpunkten.
7.2.1 Tillvägagångssätt för iOS-användare
• Öppna UNDOK-appen på din iPhone eller iPad
• Tryck på menypunkten Installera ljudsystem
• KontrolleraatttunernäriSETUP-läget.Omenheteninteär
iSETUP-läget ska mantrycka in och hålla [Power]-knappen
intryckti5sekunderför attställa in enheten på SETUP-läget.
• UNDOKber nu digatt anslutaprodukten via iPhone/
iPad-inställningar till dettrådlösanätverket –byt till
inställningarna för iPhone-enheten ochväljdet trådlösa
nätverket(t.ex. Setup Hama IT900MBT) .Växla därefter
tillbaka till UNDOK ochtryck på Fortsätt
• Namnge nu tunern (t.ex.kontorIT900MBT) och bekräfta
inmatningen med Fortsätt.
• När du sedan väljer språkkan du bestämma vilketspråkdu
vill användaför tunern. Bekräfta valet med ”Fortsätt”.
• Du harnutillgång till olika sätt att kongurera nätverketpå
(i förekommande fallWLAN,WPS och Ethernet). Klicka på
önskadmetod så växlarUNDOK till nästa fönster.
• Beroende på vald metod,kan du nu välja och kongurera
önskatWLAN-nätverk eller upprätta enWPS-förbindelse.
• Sedan ansluts tunern tillnätverket och detärmöjligt att
användaenheten iUNDOK genom atttryckapå ”Mitt
ljudsystem”
• LED-indikeringen (1)för nätverksförbindelsen lyser nu
konstant
• När man harkongurerat tunern måsteman ansluta en
uppspelningsenhet (speaker)analogt (5)ellerdigitalt.
Musikgruppen styrs endast viaUNDOK.
7.2.2 Tillvägagångssätt för användare av Androidenheter
• Öppna UNDOK-appen på surfplattan eller smartphonen
• Tryck på menypunkten Skapa ljudsystem
• Kontrolleraatttunern är iSETUP-läget. Om enheten inte
är iSETUP-läget ska man trycka in och hålla [Power]knappen intryckt i5sekunder för att ställa in enheten på
SETUP-läget.
• Du fårnuenuppmaning frånUNDOK att skapa en
förbindelse via iPhone/iPad-inställningarna med
produktens WLAN –växla tilliPhone-enhetens
systeminställningar och välj WLAN-nätverk (t.ex. Setup
Hama IT900MBT) .Växla därefter tillbaka till UNDOK och
tryck på Fortsätt
• Inästa steg ska du namnge tunern (t.ex. Kontoret
IT900MBT) och bekräfta inmatningen med Fortsätt
• När du sedan väljer språkkan du bestämma vilket språk
du vill använda för tunern. Bekräfta valet med ”Fortsätt”.
• Du kan nu kongureranätvereket på eraolika sätt (i
förekommande fall WLAN, WPS eller Ethernet). Klicka på
önskad metod så växlar UNDOK till nästa fönster.
• Beroende på vald metod, kan du nu välja och kongurera
önskat WLAN-nätverk eller upprätta en WPS-förbindelse.
• Till sist ansluts tunern till nätverket och du kan använda
enheten iUNDOK genom att trycka på ”Använda mitt
ljudsystem”
• Nu lyser nätverksförbindelsens LED-indikering (1) med ett
fast sken.
• När man har kongurerat tunern måste man ansluta en
uppspelningsenhet (speaker) analogt (5) eller digitalt (3).
Musikgruppen styrs endast via UNDOK.
8. Anslutningar
Information
• Anslutningar som upprättas med hjälp av en optisk
signalkabel är mindrekänsliga mot elektriska eller
magnetiska störningar än anslutningar som upprättas
via en 3,5 mm ljudkabel.
79
Page 84

8.1 Anslutning via Optical OUT
Via den digitala ljudutgången kan man t.ex. ansluta
högtalaretill en tuner och återge ljudsignalen via
högtalarna.
Information
• Stäng av tunern innan du ansluter en enhet till den.
• Ta bort skyddskåporna fråndebåda ändarna på den
optiska signalkabeln föreanslutningen.
• Böj eller kläm inte kabeln.
• För återgivning via den optiska ljudutgången ansluter
man en optisk signalkabel tillden optiska ljudutgången
(3) på tunern och till den optiska ljudingången på
högtalaren.
• Tryck på [POWER] (1) för att slå på tunern.
• Tunerns ljudsignal återges nu via högtalarna.
8.2 Anslutning via LINE OUT
Via den analoga ljudutgången kan man t.ex. ansluta
högtalaretill en tuner och återge ljudsignalen via
högtalarna.
Information
• Stäng av tunern innan du ansluter en enhet till den.
• Böj eller kläm inte kabeln.
• För återgivning via den analoga ljudutgången ansluter
man en 3,5 mm RCA-kabel till den analoga ljudutgången
(5) på tunern och till den analoga ljudingången på
högtalaren.
• Tryck på [POWER] (1) för att slå på tunern.
• Tunerns ljudsignal återges nu via högtalarna.
9.Fabriksinställningar
För att återställa tunern tillfabriksinställningen
(inställningen vid leverans), gör på följande sätt:
• Tryck på och håll [POWER]-knappen (1) nedtryckt ica5
sekunder.
• Alla gjorda inställningar raderas.
Information
10. Uppdatering av programvara
Programvaran ivåra tuner-enheter vidareutvecklas och
förbättras ständigt för att åtgärda eventuella fel, utöka
antalet funktioner och så vidare.
Vi rekommenderar därför att du alltid installerar de senaste
uppdateringarna på tunern.
Varning
• Se till att strömförsörjningen är stabil innan
programvaran uppdateras.
• Om det blir strömavbrott under uppdateringen kan
radion förstöras!
11. Underhåll och skötsel
• Använd baraenluddfri, lätt fuktad trasa för att rengöra
produkten och använd inga aggressiva rengöringsmedel.
• Stäng av radion och draursladden om den inte ska
användas på ett tag. Förvaraden på en renoch torr plats
utan direkt solljus.
12. Garantifriskrivning
Hama GmbH &CoKGtar inget ansvar eller ger ingen
garanti för skador som beror på olämplig installation eller
montering och olämplig produktanvändning eller på att
bruksanvisningen och/eller säkerhetshänvisningarna inte
följts.
13. Service och support
Kontakta gärna Hamas produktrådgivning om du har frågor
om produkten.
Support: +49 9091 502-115 (ty/eng)
Du hittar mer supportinformation här:
www.hama.com
• Problem och funktionsfel kan ivissa fall åtgärdas
genom att man återställer tillfabriksinställningarna .
• Alla förinställningar som eqalizer,favoriter och
nätverksproler raderas emellertid permanent.
80
Page 85

14. Kasseringsinformation Miljöskydd:
Frånden tidpunkt när de europeiska direktiven
2012/19/EU och 2006/66/EG började gälla iden
nationella lagstiftningen gäller följande: Elektriska
och elektroniska apparater samt batterier fårinte
kastas ihushållssoporna. Förbrukaren har enligt lag
skyldighet att lämna elektriska och elektroniska apparater
samt batterier till inrättade, allmänna insamlingsställen
eller tillinköpsstället när produkterna nårslutet av sin
livslängd. Detaljer regleras idet aktuella landets
lagstiftning. Symbolen på produkten, bruksanvisningen eller
förpackningen pekar på dessa bestämmelser.Med
återanvändningen, materialåtervinningen eller andra
former av återvinning av gamla produkter/batterier,bidrar
du till att skydda vårmiljö.
15. Försäkran om överensstämmelse
Härmed försäkrar Hama GmbH &CoKG, att denna
typ av radioutrustning [00054861] överensstämmer
med direktiv 2014/53/EU.Den fullständiga texten
tillEU-försäkran om överensstämmelse nns på följande
webbadress:
www.hama.com->00054861->Downloads.
Bluetooth: 2.402 -2.480GHz
Eller de frekvensband
Maximala
radiofrekvenseffekt
Restriktioner eller krav i
Belgien, Bulgarien, Tjeckien, Danmark, Tyskland, Estland,
Irland, Grekland, Spanien, Frankrike, Kroatien, Italien,
Cypern, Lettland, Litauen, Luxemburg, Ungern, Malta,
Nederländerna, Österrike, Polen, Portugal, Rumänien,
Slovenien, Slovakien, Finland, Sverige, Storbritannien
Information
WiFi: 2.412 -2.472GHz
WiFi: 5.150 -5.350 GHz
WiFi: 5.470 -5.725 GHz
Bluetooth: 4dBm (EIRP)
WiFi: 2.4GHz /19.3dBm (EIRP)
WiFi: 5GHz /17.8dBm (EIRP)
Om kanalerna 36–64 (frekvens 5,150 GHz–5,350 GHz)
används i5GHz WLAN fårprodukten endast användas
inomhus.
81
Page 86

L Lyhyt ohje
Käyttöelementit ja näytöt
Etupuoli
1. [Power]-painike
2. Tila-LED
Takapuoli
3. Optinen liitäntä
4. Virtaliitäntä (Micro-USB)
5. LINE Out -pistorasia
6. USB Playback/Update-portti
1. Varoitusten ja ohjeiden selitykset
Varoitus
Käytetään turvaohjeiden merkitsemiseen ja huomion
kiinnittämiseen erityisiin vaaroihin ja riskeihin.
Ohje
Käytetään lisätietojen tai tärkeiden ohjeiden
merkitsemiseen.
Sähköiskun riski
Tämä symboli viittaa tuotteen eristämättömien osien
kosketusta aiheutuvaan vaaraan, joka saattaa aiheuttaa
niin suuren jännitteen, että on olemassa sähköiskun
vaara.
2. Pakkauksen sisältö
• Streaming-viritin ”IT900MBT”
• Kaukosäädin
• MicroUSB Charger
• Micro-USB-johto
• 3.5 mm:n stereojohto
• Käyttöohje
• Spotify Flyer
3. Turvallisuusohjeita
• Tuote on tarkoitettu yksityiseen, ei-kaupalliseen
kotikäyttöön.
• Tuote tulee suojata lialta, kosteudelta ja
ylikuumenemiselta. Käyttö on sallittua vain kuivissa
tiloissa.
• Tuote, kuten muutkaan sähkökäyttöiset tuotteet, ei kuulu
lasten käsiin!
• Tuotetta ei saa päästää putoamaan eikä sitä saa altistaa
voimakkaalle tärinälle.
• Tuotetta ei saa käyttää sen teknisissä tiedoissa
ilmoitettujen tehojen ulkopuolella.
• Pakkausmateriaalit voivat aiheuttaa tukehtumisvaaran ja
ne on siksi pidettävä pois lasten ulottuvilta.
• Pakkausmateriaalit tulee hävittää heti paikallisten
jätehuoltomääräysten mukaisesti.
• Laitteeseen ei saa tehdä muutoksia. Muutosten
tekeminen johtaa takuun raukeamiseen.
Sähköiskun riski
• Älä avaa tuotetta, äläkä käytä sitä enää, jos se on
vaurioitunut.
• Älä käytä tuotetta, jos AC-adapteri, adapterin johto tai
virtajohto on vaurioitunut.
• Älä yritä huoltaa tai korjata tuotetta itse. Jätä kaikki
huoltotyöt vastuulliselle ammattihenkilöstölle
4.Tietoja ja ohjeita ennen käyttöönottoa
Verkkoyhteyden/
internetyhteyden valmistelu
Voit integroidavirittimen paikalliseen verkkoon, minkä
jälkeen sinulla on pääsy kotipalvelimelle tai muihin
lähteisiin. Internet-radion
vastaanottamiseksi tai ei paikallisesti tallennettuihin
mediasisältöihin (Streaming –esim. Spotify Connect)
pääsemiseksi tarvitaan verkossa lisäksi internetyhteys.
WLAN/Wi-Fi-yhteys (langaton verkko))
• Varmista, että reititin on kytkettynä päälle ja yhteys
internetiin/verkkoon on muodostettu.
• Aktivoi reitittimen WLAN-yhteys, jos se ei vielä ole
aktivoituna.
• Mikäli sinulla on kysyttävää reitittimen konguraatiosta,
käytä vian etsintään /ongelman ratkaisuun reitittimen
käyttöohjetta.
• WLAN-yhteyden tarkka kongurointiohje on kuvattu
osiossa Langaton yhteys.
5.Ennen käyttöönottoa
Käyttöohjeet
Streaming-vahvistinta käytetään ainoastaan
älypuhelimen UNDOK-sovelluksella.
82
Page 87

Ohje
Yksityiskohtainen kuvaus UNDOK-
sovelluksen ominaisuuksista ja koko
toimintolaajuudesta on UNDOK-
ohjeessa sivulle:
www.hama.com->00054861->Downloads
6.Käyttöönotto
6.1 Liitännät
• 1x LINE Out 3.5 mm
• 1x Optinen liitäntä
• 1x USB tyyppi APlayback/Update-portti
• 1x virransyöttö (Micro-USB)
6.2 Kytkeminen päälle
• Liitä mukana toimitettu Micro-USB -latausjohto virittimen
Micro-USB-liitäntään (4).
• Liitä Micro-USB-latausjohdon vapaa pistoke sopivaan
USB-laturiin.
Hinweis
Käytä ainoastaan alkuperäisiä lisävarusteita (tai Haman
hyväksymiä) tuotevaurioiden välttämiseksi.
• Yhdistä verkkokaapeli /verkkolaite asianmukaisesti
asennettuun pistorasiaan.
Varoitus
Ohje –ensimmäisen käyttöönoton
yhteydessä
• Viritin käynnistyy ensimmäisen käyttöönoton
yhteydessä SETUP-tilassa.
• Tila-LED (2) alkaa vilkkumaan valkoisena ja virittimen
voi liittää älypuhelimeen vain UNDOK-sovelluksella.
• Mikäli yhteysongelmia ilmenee, virittimen voi
palauttaa uudelleen SETUP-tilaan [POWER]-painiketta
(1) painamalla.
Äänenvoimakkuuden sopeuttaminen /mykistys
Salasanojen, hakutekstien, yms. syöttö
Tietoja syötetään ainoastaan UNDOK-sovelluksella.
Päälle-/poiskytkeminen /standby /MicroAccess
Point
• Paina [POWER]-painiketta virittimen kytkemiseksi päälle.
Vaihtoehtoisesti virittimen voi kytkeä päälle UNDOKsovelluksella.
• Paina [POWER]-painiketta virittimen kytkemiseksi
pois päältä. Verkkoyhteyden luomisen jälkeen yhteys
säilytetään myös standby-tilassa päällekytkennän
mahdollistamiseksi UNDOK-sovelluksella.
Ohje
• Erota laite sähköverkosta kytkeäksesi sen kokonaan
pois päältä.
7. UNDOK –kaikki samassa sovelluksessa
• Tuotteeseen saa syöttää virtaa ainoastaan
tarkoitukseen soveltuvasta pistorasiasta. Pistorasian
tulee olla aina helposti käden ulottuvilla.
• Monipaikkaisia pistorasioita käytettäessä on otettava
huomioon, että kytketyt laitteet eivät saa ylittää
sallittua kokonaisottotehoa.
• Pistorasian tulee olla aina helposti käden ulottuvilla.
• Kytke tuote irti verkosta, mikäli sitä ei käytetä
pidempään aikaan.
• Odota, kunnes virittimen alustus on suoritettu loppuun.
• Paina lyhyesti laitteen [POWER]-painiketta (1).
Frontier Siliconin kehittämällä UNDOK-sovelluksella radioita
ja kaiuttimia voi hallita suoraan älypuhelimesta.
UNDOK mahdollistaa kaikkien ominaisuuksien käytön
älypuhelimella tai tabletilla, olipa kyseessä laitteen
ensimmäinen käyttöönotto, Multiroomin määritys tai
suosikkikanavien hallinta.
Seuraavassa on kuvattu virittimen ensiasetukset UNDOKsovelluksella. Laitteen täyden toimintalaajuuden saavuttaa
vain UNDOK-sovelluksella.
83
Page 88

7.1 Ensimmäinen käyttöönotto UNDOK-sovelluksella
Kaikki Haman UNDOK-yhteensopivat tuotteet luovat
laitteen ensimmäisen käynnistyksen yhteydessä ja/tai
tehdasasetusten palauttamisen yhteydessä niin kutsutun
Micro-Access-Pointin, eli oman WLAN-verkon, johon
voi muodostaa yhteyden tabletilla tai älypuhelimella.
Kyseinen Access-Point kuvataan muodossa ”Setup Hama
TUOTEKUVAUS MAC-osoite“ tuotteen mahdollisimman
tarkan tunnistuksen mahdollistamiseksi.
Ohje
UNDOK-sovellus käyttää älypuhelimen
käyttöjärjestelmän kieltä.
7.2 Avoin verkko /suojaamaton verkko
Ohje
• Emme suosittele suojaamattoman yhteyden
muodostamista. Lisäksi suosittelemme aina oman
verkon suojaamista vieraiden pääsyn estämiseksi.
• Jos haluttu verkko ei ole suojattuna millään
toimenpiteellä, riittää kun verkko valitaan listasta ja
vahvistetaan. Radio muodostaa silloin välittömästi
yhteyden liityntäpisteeseen.
7.2.1 iOS-käyttäjien menettelytapa
• Avaa UNDOK-sovellus iPhonesta tai iPadista.
• Paina valikkokohtaa Audio-järjestelmän asetusten teko
• Varmista, että viritin on SETUP-tilassa. Mikäli laite ei
ole SETUP-tilassa, paina ja pidä [Power]-painiketta
painettuna laitteen asettamiseksi SETUP-tilaan.
• UNDOK pyytää nyt muodostamaan yhteyden iPhone-/
iPad-asetuksilla tuotteen WLANin kanssa –siirry sitä
varten iPhonen järjestelmäasetuksiin ja valitse WLANverkko (esim. Setup Hama IT900MBT). Siirry sen jälkeen
takaisin UNDOK-sovellukseen ja paina Jatka
• Anna virittimelle haluamasi nimi (esim. toimisto
IT900MBT) ja vahvista syötetyt tiedot valitsemalla Jatka.
• Virittimen järjestelmäkielen voi valita seuraavaksi näkyviin
ilmestyvästä kielivalinnasta. Vahvista valinta valitsemalla
”Jatka”.
• Nyt valittavissa on erilaisia verkkomääritysmahdollisuuksia
(esim. WLAN, WPS ja Ethernet). Klikkaa haluamaasi
tapaa, niin UNDOK siirtyy seuraavaan ikkunaan.
• Valitusta tavasta riippuen voit nyt valita haluamasi
WLAN-verkon ja tehdä konguroinnin tai luoda WPSyhteyden.
• Viritinluo sen jälkeen yhteyden verkon kanssa ja
laitetta voi käyttää UNDOK-sovelluksella kohdan ”Oma
audiojärjestelmä” painamisen jälkeen.
• Verkkoyhteyden LED-näyttö (1) palaa nyt jatkuvasti.
• Kunvirittimen kongurointi on suoritettu loppuun,
toistolaite (Speaker) on liitettävä analogisesti (5) tai
digitaalisesti (3). Musiikkiryhmän ohjaus tapahtuu
ainoastaan UNDOK-sovellusta.
7.2.2 Android-käyttäjien menettelytapa
• Avaa UNDOK-sovellus tabletista tai älypuhelimesta
• Paina valikkokohtaa Audiojärjestelmän asetusten teko
• Varmista, että viritin on SETUP-tilassa. Mikäli laite ei
ole SETUP-tilassa, paina ja pidä [Power]-painiketta
painettuna laitteen asettamiseksi SETUP-tilaan.
• UNDOK pyytää nyt luomaan yhteyden iPhonen/iPadin
asetuksista tuotteen WLANin kanssa –siirry sitä varten
iPhonen järjestelmäasetuksiin ja valitse WLAN-verkko
(esim. Setup Hama IT900MBT) .Siirry sen jälkeen takaisin
UNDOK-sovellukseen ja paina Jatka
• Anna virittimelle haluamasi nimi (esim. toimisto IT900MB)
ja vahvista syötetyt tiedot valitsemalla Jatka
• Seuraavaksi näkyviin ilmestyy kielivalinta, josta voi
määrittää virittimen kielen. Vahvista valinta valitsemalla
”Jatka”.
• Nyt valittavissa on useita eri
verkkomääritysmahdollisuuksia (esim. WLAN, WPS ja
Ethernet). Klikkaa haluamaasi tapaa, niin UNDOK siirtyy
seuraavaan ikkunaan.
• Valitusta tavasta riippuen voit nyt valita haluamasi
WLAN-verkon ja tehdä konguroinnin tai luoda WPSyhteyden.
• Sen jälkeen viritin luo yhteyden verkkoon ja laitetta voi
käyttää UNDOK-sovelluksella valitsemalla valikkokohdan
”Oman audio-järjestelmän käyttäminen”.
• Verkkoyhteyden oranssi LED-valo (1) palaa nyt jatkuvasti.
• Kunvirittimen kongurointi on suoritettu loppuun,
toistolaite (Speaker) on liitettävä analogisesti (5) tai
digitaalisesti (3). Musiikkiryhmän ohjaus tapahtuu
ainoastaan UNDOK-sovellusta.
8. Yhteydet
Ohje
• Yhteydet, jotka on luotu optisella signaalikaapelilla,
eivät ole yhtä herkkiä sähköisille tai magneettisille
häiriöille kuin yhteydet, jotka on luotu 3.5 mm:n
audiokaapelia käyttäen.
84
Page 89

8.1 Yhteys Optical OUT -liitännän kautta
Digitaalisella audiolähdöllä voi esimerkiksi liittää kaiuttimet
virittimeen ja toistaa sen audiosignaalin kaiuttumilla.
Ohje
• Kytke viritin pois päältä, ennen kuin kytket siihen
päätelaitteen.
• Poista suojakannet optisen signaalikaapelin
molemmista päistä ennen kytkentää.
• Älä taita johtoa äläkä aseta sitä puristuksiin.
• Mikäli musiikkia halutaan toistaa optisella
audioliitännällä, kytke optinen signaalikaapeli virittimen
optiseen audiolähtöön (3) ja kaiuttimen optiseen
audiotuloon.
• Paina [POWER]-painiketta virittimen kytkemiseksi päälle.
• Virittimen audiosignaali toistetaan nyt kaiuttimista.
8.2 Yhteys LINE OUT -liitännän kautta
Analogisella audiolähdöllä voi esimerkiksi liittää kaiuttimet
virittimeen ja toistaa sen audiosignaalin kaiuttumilla.
Ohje
• Kytke viritin pois päältä, ennen kuin kytket siihen
päätelaitteen.
• Älä taita johtoa äläkä aseta sitä puristuksiin.
• Mikäli musiikkia halutaan toistaa analogisella
audioliitännällä, kytke 3,5 mm:n cinch-kaapeli virittimen
analogiseen audiolähtöön (5) ja kaiuttimen analogiseen
audiotuloon.
• Paina [POWER]-painiketta virittimen kytkemiseksi päälle.
• Virittimen audiosignaali toistetaan nyt kaiuttimista.
9.Tehdasasetukset
Jotta virittimeen voi palauttaa tehdasasetukset
(toimitustila), menettele seuraavasti:
• Paina ja pidä [POWER]-painiketta (1) painettuna viiden
sekunnin ajan.
• Kaikki tehdyt asetukset poistetaan.
Ohje
10. Ohjelmistopäivitys
Virittimen ohjelmistoon kehitetään jatkuvasti parannuksia ja
uusia ominaisuuksia mahdollisten virheiden korjaamiseksi,
toimintojen laajentamiseksi jne.
Suosittelemme aina asentamaan virittimeen saatavilla
olevat päivitykset.
Varoitus
• Varmista, että saatavilla on vakaa virransyöttö, ennen
kuin käynnistät ohjelmistopäivityksen.
• Ohjelmistopäivityksen aikana tapahtuva sähkökatkos
voi aiheuttaa radioon vakavia vaurioita, joita ei voi
korjata!
11. Hoito ja huolto
• Puhdista tämä tuote ainoastaan nukkaamattomalla,
kevyesti kostutetulla liinalla äläkä käytä syövyttäviä
puhdistusaineita.
• Mikäli et käytä tuotetta pidempään aikaan, kytke
laite pois päältä ja erota se sähköverkosta. Varastoi
se puhtaassa, kuivassa tilassa ilman suoraa auringon
säteilyä.
12. Vastuun rajoitus
Hama GmbH &CoKGeivastaa millään tavalla vahingoista,
jotka johtuvat epäasianmukaisesta asennuksesta tai
tuotteen käytöstä eikä käyttöohjeen ja/tai turvaohjeiden
vastaisesta toiminnasta.
13. Huolto ja tuki
Tuotetta koskevissa kysymyksissä pyydämme kääntymään
Haman tuoteneuvonnan puoleen.
Hotline: +49 9091 502-115 (saksa/englanti)
Lisää tukitietoja on osoitteessa
www.hama.com
• Ongelmat ja virhetoiminnot voidaan mahdollisesti
korjata palauttamalla laitteen tehdasasetukset.
• Kuitenkin kaikki esiasetukset kuten taajuuskorjain,
suosikit ja verkkoproilit poistetaan
peruuttamattomasti.
85
Page 90

14. Hävittämisohjeet
Ympäristönsuojelua koskeva ohje:
Siitä lähtien, kun Euroopan unionin direktiivit
2012/19/EU ja 2006/66/EY otettiin käyttöön
kansallisessa lainsäädännössä, pätevät seuraavat
määräykset: Sähkö- ja elektroniikkalaitteita ja
paristoja ei saa hävittää talousjätteen mukana. Kuluttajalla
on lain mukaan velvollisuus toimittaa sähkö- ja
elektroniikkalaitteet sekä akut niiden käyttöiän päätyttyä
niille varattuihin julkisiin keräyspisteisiin tai palauttaa ne
myyntipaikkaan. Tähän liittyvistä yksityiskohdista säädetään
kulloisenkin osavaltion laissa. Näistä määräyksistä
mainitaan myös tuotteen symbolissa, käyttöohjeessa tai
pakkauksessa. Uudelleenkäytöllä, materiaalien
uudelleenkäytöllä tai muilla vanhojen laitteiden/akkujen
uudelleenkäyttötavoilla on tärkeä vaikutus yhteisen
ympäristöömme.
15. Vaatimustenmukaisuusvakuutus
Hama GmbH &CoKGvakuuttaa, että
radiolaitetyyppi [00054861] on direktiivin 2014/53/
EU mukainen.
EU-vaatimustenmukaisuusvakuutuksen täysimittainen teksti
on saatavilla seuraavassa internetosoitteessa:
www.hama.com->00054861->Downloads.
Bluetooth: 2.402 -2.480GHz
Radiotaajuudet
Suurin mahdollinen
lähetysteho
radiotaajuuksilla
Käyttöä koskee rajoituksia tai vaatimuksia:ssa/ssä
Belgia, Bulgaria, Tsekin tasavalta, Tanska, Saksa, Viro,
Irlanti, Kreikka, Espanja, Ranska, Kroatia, Italia, Kypros,
Latvia, Liettua, Luxemburg, Unkari, Malta, Alankomaat,
Itävalta, Puola, Portugali, Romania, Slovenia, Slovakia,
Suomi, Ruotsi, Yhdistynyt kuningaskunta
Ohje
WiFi: 2.412 -2.472GHz
WiFi: 5.150 -5.350 GHz
WiFi: 5.470 -5.725 GHz
Bluetooth: 4dBm (EIRP)
WiFi: 2.4GHz /19.3dBm (EIRP)
WiFi: 5GHz /17.8dBm (EIRP)
Mikäli kanavia 36-64 (taajuus 5,150 GHz –5,350 GHz)
käytetään 5GHz:n WLAN:issa, tuotetta saa käyttää vain
suljetuissa tiloissa.
86
Page 91

K Kort vejledning
Betjeningselementer og visninger
Forside
1. [POWER]-tast
2. Status-LED
Bagside
3. Optisk tilslutning
4. Strømtilslutning (MicroUSB)
5. LINE OUT-stik
6. USB Playback /Update Port
1. Forklaring af advarselssymboler og henvisninger
Advarsel
Anvendes til at markeresikkerhedshenvisninger eller til
at gøre opmærksom på særlige farer og risici.
Bemærkning
Anvendes til at markereyderligereinformationer eller
vigtige henvisninger.
Fare for elektrisk stød
Dette symbol henviser til farefor berøring med
produktets uisolerede dele, som muligvis leder en farlig
spænding, der er så kraftig, at der er farefor elektrisk
stød.
2. Pakkens indhold
• Streaming Tuner “IT900MBT”
• Fjernbetjening
• MicroUSB Charger
• MicroUSB-kabel
• 3,5 mm jackkabel
• Betjeningsvejledning
• Spotify Flyer
3. Sikkerhedshenvisninger
• Produktet er beregnet tilprivat, ikke-erhvervsmæssig
husholdningsbrug.
• Beskyt produktet mod smuds, fugtighed og overophedning,
og anvend detkun itørreomgivelseromgivelser.
• Dette produktskal som alleelektriskeprodukter opbevares
utilgængeligt for børn!
• Tabikke produktet, og udsætdet ikke forkraftige rystelser.
• Anvend ikkeproduktet uden for dets ydelsesgrænser,der er
angivet idetekniske data.
• Hold ubetinget børn bortefra emballeringsmaterialet,der er
farefor kvælning.
•Bortskafstrakse
ldendeforskri
gæ
• Undlad at foretage ændringer på apparatet. Derved bortfalder
alle garantikrav.
Fare for elektrisk stød
• Åbn ikke produktet, og anvend det ikke længereved
beskadigelser.
• Anvend ikke produktet, hvis AC-adapteren,
adapterkablet eller netledningen er beskadiget.
• Forsøgaldrig selv at vedligeholde eller reparere
produktet. Overlad alle vedligeholdelsesarbejder til det
ansvarlige fagpersonale.
4.Informationer og henvisninger før ibrugtagning af
Netværksforbindelsen/
Forberedelse af internetforbindelse
Du har mulighed for at integreredenne tuner ietlokalt
netværk og dermed at få adgang til home-servereeller
andrefrigivelseskilder.For at modtage
internetradio eller at få adgang til medieindhold, der ikke
er gemt lokalt (streaming –f.eks. Spotify Connect), er der
derudover brug for en internetforbindelse.
WLAN/Wi-Fi-forbindelse (trådløst netværk)
• Kontrollér,atrouteren er tændt, og at der er en
forbindelse til internettet/netværket.
• Aktivér din routers WLAN-forbindelse, hvis det endnu ikke
er sket.
• Hvis du har spørgsmålvedrørende kongurationen af
routeren, skal du anvende betjeningsvejledningen til
routeren til fejlsøgning/problemløsning.
• En nøjagtig kongurationsvejledning til WLAN-
forbindelsen beskrives iafsnittet Trådløs forbindelse.
5.Før ibrugtagningen
Betjeningshenvisninger
Streaming-tuneren betjenes udelukkende ved hjælp af
UNDOK-appen på din smartphone.
gsmaterialetihen
mballerin
fterforbortskaffels
e.
holdtildelokal
t
87
Page 92

Bemærkning
En udførlig beskrivelse af
UNDOK-appen og hele
funktionsomfanget ndes ivores
UNDOK-guide under:
www.hama.com->00054861->Downloads
6.Inbetriebnahme
6.1 Tilslutninger
• 1x LINE Out 3,5 mm
• 1x optisk tilslutning
• 1x USB Playback /Update Port
• 1x strømforsyning (MicroUSB)
6.2 Tilkobling
• Tilslut det medfølgende Micro-USB-ladekabel til MicroUSB-tilslutning (4) på tuneren.
• Tilslut det fri stik på Micro-USB-ladekablet til USBopladeren.
Bemærkning
Anvend udelukkende originalt tilbehør(eller: tilbehør,
der er frigivet af Hama) for at undgå skader på
produktet.
• Forbind netkablet/netdelen med en korrekt installeret
stikdåse.
Advarsel
Bemærkning –når radioen tændes første
gang
• Nårtuneren tændes første gang, starter tuneren i
SETUP-modus.
• Statuslysdioden (2) begynder at blinke hvidt, og
tuneren kan kun forbindes med din smartphone ved
hjælp af UNDOK-appen.
• Hvis der forekommer forbindelsesproblemer,kan
indstille tuneren på SETUP-modus ved at trykke længe
på [POWER]-tasten (1)
Tilpasning af lydstyrke/mute
Indtastning af adgangskoder,søgetekster,etc.
Indtastningen foretages udelukkende med UNDOK-appen.
Til-/frakobling/standby/MicroAccess Point
• Tryk på [POWER] for at tænde tuneren. Som alternativ
kan tuneren tændes med UNDOK-appen.
• Tryk på [POWER] for at slukke tuneren (standby). Efter
indstilling en netværksforbindelse opretholdes den også
istandby-modus for at gøre det muligt at tænde med
UNDOK-appen.
Bemærkning
Afbryd enheden frastrømforsyningen for at slukke det
fuldstændigt.
7. UNDOK –duhar det hele idin hånd
• Tilslut kun produktet til en stikdåse, der er godkendt
til det. Det skal altid være nemt at nå netstikdåsen.
• Værved multistikdåser opmærksom på,atde
tilsluttede forbrugereikke overskrider det tilladte
samlede effektforbrug.
• Det skal altid være nemt at nå netstikdåsen.
• Afbryd produktet franettet, hvis du ikke bruger det i
længeretid.
• Vent, indtil initialiseringen af tuneren er afsluttet.
• Tryk kortvarigt på [POWER]-tasten (1) på enheden.
88
UNDOK-applikationen (app), der blev udviklet af Frontier
Silicon, giver dig fuld kontrol over radioer og højttalerepå
din smartphone.
Uanset om det er ved den første indstilling af enheden,
kongurationerne for multiroom eller ved administrationen
af dine favoritstationer –UNDOK giver dig alle features på
din smartphone eller tablet.
Efterfølgende forklares den første indstilling af tuneren med
UNDOK. Du nårkun enhedens fulde funktionsomfang med
UNDOK-appen.
Page 93

7.1 Første indstilling af enheden med UNDOK
Alle UNDOK-kompatible produkter fraHama opretter et
såkaldt micro-access-point, dvs. et eget WLAN-net, hvor
du kan forbinde dig med din tablet eller smartphone,
nårdetændes første gang, eller du har indstillet dem på
fabriksindstillingen. Dette access-point vises iformatet
„Setup Hama PRODUKTBETEGNELSE MAC-adresse“ for at
muliggøre en entydig identikation af produktet.
Bemærkning
UNDOK-appen anvender sproget, der er valgt isystemet
på din smartphone.
7.2 Åbent netværk/ubeskyttet netværk
Bemærkning
• Vi anbefaler,atdu ikke etablerer en usikret
forbindelse, og at du altid sikrer dit netværk mod
fremmed adgang.
• Hvis netværket, som du ønsker,ikke har
sikkerhedsforanstaltninger,erdet tilstrækkeligt at
vælge det ilisten og bekræfte det. Radioen forbindes
derefter omgående med adgangspunktet.
7.2.1 Fremgangsmåde for iOS-brugere
• Åbn UNDOK-appen på din iPhone eller iPad.
• Tryk på menupunktet Indstil audiosystem
• Sørg for,attuneren bender sig iSETUP-modus. Hvis
enheden ikke bender sig SETUP-modus, skal du trykke
på [Power]-tasten og holde den inde i5sekunder for at
indstille enheden på SETUP-modus.
• UNDOK opfordrer dig nu til at forbinde dig med
produktets WLAN via iPhone/iPad-indstillingerne –skift
iden forbindelse til systemindstillingerne på din iPhone,
og vælg WLAN-netværket (f.eks. Setup Hama IT900MBT).
Skift derefter tilbage til UNDOK, og tryk på Fortsæt
• Indtast nu en ønsket betegnelse for tuneren (f.eks. Kontor
IT900MBT), og bekræft indtastningen med Fortsæt.
• Veddet efterfølgende sprogvalg kan du fastlægge
tunerens systemsprog. Bekræft dit valg med „Fortsæt“.
• Nu stårdeforskellige muligheder for
netværkskonguration til rådighed (evt. WLAN, WPS og
Ethernet). Klik på den ønskede metode, og UNDOK skifter
til det næste vindue
• Afhængigt af den valgte metode kan du nu vælge og
kongureredet ønskede WLAN-netværk eller oprette
forbindelsen via en WPS-forbindelse.
• Efterfølgende forbindes tuneren med netværket, og du
kan anvende enheden iUNDOK ved at trykke på „Mit
audiosystem“
• Netværksforbindelsens lysdiodeindikator (1) lyser nu
konstant.
• Efter afsluttet kongurering af tuneren skal der tilsluttes
en afspilningsenhed (speaker) analogt (5) eller digitalt
(3). Musikgruppen styres udelukkende med UNDOK.
7.2.2 Fremgangsmåde for Android-brugere
• Åbn UNDOK-appen på din tablet eller smartphone
• Tryk på menupunktet Indstil audiosystem
• Sørg for,attuneren bender sig iSETUP-modus. Hvis
enheden ikke bender sig iSETUP-
• modus, skal du trykke på [Power]-tasten og holde den
inde i5sekunder for at indstille enheden på SETUPmodus.
• UNDOK opfordrer dig nu til at forbinde dig med
produktets WLAN via iPhone/iPad-indstillinger –skift til
iPhonens systemindstillinger,ogvælg WLAN-netværket
(f.eks. Setup Hama IT900MBT). Skift derefter tilbage til
UNDOK, og tryk på Fortsæt
• Indtast nu en ønsket betegnelse for tuneren (f.eks. Kontor
IT900MBT), og bekræft indtastningen med Fortsæt
• Veddet efterfølgende sprogvalg kan du fastlægge
tunerens sprog. Bekræft dit valg med „Fortsæt“.
• Nu stårdeforskellige muligheder for
netværkskonguration til rådighed (evt. WLAN, WPS og
Ethernet). Klik på den ønskede metode, og UNDOK skifter
til det næste vindue
• Afhængigt af den valgte metode kan du nu vælge og
kongureredet ønskede WLAN-netværk eller oprette
forbindelsen via en WPS-forbindelse.
• Derefter forbindes tuneren med netværket, og du kan
anvende enheden iUNDOK ved at trykke på „Anvend mit
audiosystem“
• Lysdiodeindikatoren (1) på netværksforbindelsen lyser nu
konstant.
• Efter afsluttet kongurering af tuneren skal der tilsluttes
en afspilningsenhed (speaker) analogt (5) eller digitalt
(3). Musikgruppen styres udelukkende med UNDOK.
8. Forbindelser
Bemærkning
• Forbindelser,der etableres ved hjælp af et optisk
signalkabel, er mindrefølsomme over for elektriske
eller magnetiske forstyrrelser end forbindelser,der
tilsluttes ved hjælp af et 3,5 mm-audiokabel.
89
Page 94

8.1 Forbindelse via Optical OUT
Via den digitale audioudgang kan du f.eks. tilslutte dine
højttaleretil tuneren og afspille dets audiosignal over
højttalerne.
Bemærkning
• Sluk tuneren, førdutilslutter en slutenhed til den.
• Fjern beskyttelseskapperne frabegge det optiske
kabels ender,førdutilslutter det.
• Knækogklem ikke kablet.
• Foratafspille via den optiske audiotilslutning skal
du tilslutte et optisk signalkabel til tunerens optiske
audioudgang (3) og til højttalerens optiske audioindgang.
• Tryk på [POWER] (1) for at tænde tuneren.
• Tunerens audiosignal afspilles nu over højttalerne.
8.2 Forbindelse via LINE OUT
ia den analoge audioudgang kan du f.eks. tilslutte dine
højttaleretil tuneren og afspille dets audiosignal over
højttalerne.
Bemærkning
• Sluk tuneren, førdutilslutter en slutenhed til den.
• Knækogklem ikke kablet.
• Foratafspille via den analoge audiotilslutning
skal du tilslutte et 3,5 mm-cinchkabel til tunerens
analoge audioudgang (5) og til højttalerens analoge
audioindgang.
• Tryk på [POWER] (1) for at tænde tuneren.
• Tunerens audiosignal afspilles nu over højttalerne.
9.Fabriksindstillinger
Foratnulstille tuneren til fabriksindstillingen
(leveringstilstand) skal du gå frem på følgende måde:
• Tryk og hold [POWER]-knappen (1) inde ica. 5sekunder.
• Alle foretagede indstillinger slettes.
Bemærkning
10. Softwareaktualisering
Der udvikles konstant forbedringer og nye features til
vores tuneres softwarefor at udbedremulige fejl, udvide
funktionsomfanget osv.
Vi anbefaler altid at installeredeupdates, der stilles til
rådighed, på din tuner.
Advarsel
• Sørg for,atder ndes en stabil strømforsyning, førdu
starter en software-update.
• En strømafbrydelse under en software-update kan
fremkalde skader på radioen, der ikke kan repareres!
11. Vedligeholdelse og pleje
• Rengørkun dette produkt med en fnugfri, let fugtet klud,
og anvend ikke aggressive rengøringsmidler.
• Hvis du ikke anvendes produktet ilængeretid, skal du
slukke apparatet og afbryde det frastrømforsyningen.
Opbevar det på et rent, tørt sted uden sollys.
12. Udelukkelse af garantikrav
Hama GmbH &CoKGpåtager sig ikke ansvar eller garanti
for skader,der skyldes ukorrekt installation, montering og
ukorrekt brug af produktet eller manglende overholdelse af
betjeningsvejledningen og/eller sikkerhedshenvisningerne.
13. Service og support
Kontakt venligst Hama-produktrådgivningen, hvis du har
spørgsmålvedrørende produktet.
Hotline: +49 9091 502-115 (tysk/engelsk)
Du nder eresupportinformationer på:
www.hama.com
• Problemer og fejlfunktioner kan muligvis udbedres
ved at resette til fabriksindstillingerne.
• Alle forindstillinger som f.eks. equalizer,favoritter og
netværksprolerne slettes dog uigenkaldeligt.
90
Page 95

14. Bortskaffelseshenvisninger
Henvisninger vedrørende miljøbeskyttelse:
Fraogmed indførelsen af EU-direktiverne 2012/19/
EU og 2006/66/EF inational retgælder følgende:
Elektrisk og elektronisk udstyr samt batterier må
ikke bortskaffes sammen med almindeligt
husholdningsaffald. Forbrugeren er lovmæssigt forpligtet til
at aevereudtjent elektrisk og elektronisk udstyr samt
batterier til dertil indrettede, offentlige indsamlingssteder
eller til forhandleren. De nærmerebestemmelser vedr.dette
fastlægges af lovgivningen idet pågældende land.
Symbolet på produktet, brugsvejledningen eller emballagen
henviser til disse bestemmelser.Ved genbrug, genvinding
eller andreformer for nyttiggørelse af udtjent udstyr/
batterier giver du et vigtigt bidrag til beskyttelse af miljøet.
15. Overensstemmelseserklæring
Hermed erklærerHama GmbH &CoKG, at
radioudstyrstypen [00054861] er i
overensstemmelse med direktiv 2014/53/EU.
EU-overensstemmelseserklæringens fulde tekst kan ndes
på følgende internetadresse:
www.hama.com-> 00054861 -> Downloads.
Bluetooth: 2.402 -2.480GHz
Frekvensbånd
Maksimal
radiofrekvenseffekt
WiFi: 2.412 -2.472GHz
WiFi: 5.150 -5.350 GHz
WiFi: 5.470 -5.725 GHz
Bluetooth: 4dBm (EIRP)
WiFi: 2.4GHz /19.3dBm (EIRP)
WiFi: 5GHz /17.8dBm (EIRP)
Begrænsninger eller krav i
Belgien, Bulgarien, Tjekkiet, Danmark, Tyskland, Estland,
Irland, Grækenland, Spanien, Frankrig, Kroatien, Italien,
Cypern, Letland, Litauen, Luxembourg, Ungarn, Malta,
Nederlandene, Østrig, Polen, Portugal, Rumænien,
Slovenien, Slovakiet, Finland, Sverige, Storbritannien
Bemærkning
Hvis kanalerne 36-64 (frekvens 5,150 GHz –5,350
GHz) anvendes i5GHz WLAN, må produktet kun
anvendes ilukkede rum.
91
Page 96

V Kortveiledning
Betjeningselementer og indikatorer
Forside
1. [Power]-knapp
2. Status-LED
Bakside
3. Optisk tilkopling
4. Strømforbindelse (mikroUSB)
5. LINE OUT kontakt
6. USB Playback /update port
1. Forklaring av faresymboler og merknader
Advarsel
Benyttes for å merke sikkerhetsinformasjon eller for å
rette oppmerksomheten mot spesielle farer og risikoer.
Merknad
Benyttes for å merke informasjon eller viktige merknader
ytterligere.
Fare for elektrisk støt
Dette symbolet viser til farefor berøring av produktdeler
som ikke er isolert og som potensielt leder farlig
spenning med en styrke som kan forårsake elektriske
støt.
2. Pakkeinnhold
• Streaming Tuner «IT900MBT»
• Fjernkontroll
• MikroUSB charger
• MikroUSB kabel
• 3.5 mm jack kabel
• Bruksanvisning
• Spotify yer
3. Sikkerhetsanvisninger
• Produktet er konstruert forprivat, ikke-yrkesmessig bruk i
hjemmet.
• Produktet må beskyttes mot smuss, fuktighet og
overoppheting, og det må barebrukesitørrerom.
• Detteproduktet skal, som alleelektriskeapparater,
oppbevares utilgjengelig for barn!
• Produktet skal ikkefallened frahøyder, og må ikke utsettes
forkraftig risting.
• Produktet skal ikkebenyttes utenfordeytelsesgrensene som
er angittunder tekniske spesikasjoner.
• På grunn avfarefor kvelningskalsmåbarnholdes unna
emballasjen.
• Fjernemballasjen umiddelbart ihenhold tilgyldige lokale
forskrifter for avfallshåndtering.
• Foreta aldri endringer påapparatet. Hvis dette blir gjort, har
duikke kravpånoen som helstgaranti.
Fare for elektrisk støt
• Produktet skal ikke åpnes og ikke benyttes dersom det
er skadet.
• Produktet skal ikke benyttes dersom AC-adapteren,
adapterkabelen eller nettledningen er skadet
• Prøvaldri å vedlikeholde eller reparereproduktet på
egenhånd. Vedlikeholdsarbeid skal kun utføresav
ansvarlig fagpersonell.
4. Informasjoner og henvisninger før idriftsettelse
Nettverksforbindelse /Internettforbindelse
Du har muligheten til å integreredenne tuner ietlokalt
nettverk og dermed få tilgang til home-server eller andre
frigitte kilder.For å motta Internettradio
eller få tilgang til media innhold (streaming -f.eks. Spotify
Connect) som ikke er lagret lokalt, er det itillegg nødvendig
med en Internettforbindelse.
WLAN/Wi-Fi-forbindelse (trådløst nettverk)
• Kontroller at ruteren er innkoblet og det nnes en
forbindelse til Internett.
• Aktiver WLAN-forbindelsen til ruteren din, dersom dette
ikke er gjort.
• Dersom det oppstårspørsmålangående kongurasjon av
ruter,såbruker du bruksanvisningen til ruteren for feilsøk
/problemløsning.
• En nøyaktig kongurasjonsveiledning for WLAN
forbindelsen beskrives iavsnittet Trådløsforbindelse .
5.Før idriftsettelse
Informasjon om bruk
Betjening av streaming tuneren gjøreskun med hjelp av
UNDOK appen over smarttelefonen din.
92
Page 97

Merknad
Merknad -ved første gangs innkobling
En utførlig beskrivelse av
UNDOK-appen og hele
funksjonsomfanget nner du ivår
UNDOK-guide under:
www.hama.com->00054823, 00054829,
00054855, 00054856 ->Downloads
6.Idriftsettelse
6.1 Tilkoblinger
• 1x LINE Out 3.5 mm
• 1x optisk tilkopling
• 1x USB -type Aplayback /update port
• 1x strømforsyning (mikroUSB)
6.2 Innkobling
• Levert mikro-USB-ladekabel kobles til tunerens mikroUSB-forbindelse (4).
• Den ledige pluggen til mikro-USB ladekabelen forbindes
med USB ladeapparatet.
Hinweis
Bruk kun originaltilbehør(eller tilbehørsom er godkjent
av Hama) for å unngå skader på produktet.
• Koble nettkabelen /nettdelen til en forskriftsmessig
installert stikkontakt.
Advarsel
• Vedførste gangs innkobling starter tuneren iSETUPmodus.
• Status-LED (2) begynner å blinke hvitt og tuneren kan
nå,med hjelp av UNDOK-appen, forbindes med din
smarttelefon.
• Dersom det oppstårforbindelseproblemer kan du
sette tuneren iSETUP-modus igjen ved å trykke lenge
på [POWER]-knappen (1).
Tilpasse lydstyrke /mute
Inntasting av passord, søketekster osv.
Inntastingen gjøreskun over UNDOK appen.
Inn-/ utkobling /standby /MicroAccess Point
• Trykk på [POWER] for å slå på tuneren .Som alternativ
kan tuneren slåspåover UNDOK appen.
• Trykk på [POWER] for å slå av tuneren (standby). Etter
innretting av en nettverksforbindelse opprettholdes denne
også istandby modus, for å gjøre det mulig å slå på over
UNDOK appen.
Merknad
Apparatet separeres frastrømforsyningen for å slå det
helt av.
7. UNDOK –alt ienhånd
• Produktet må barekobles til en stikkontakt som er
godkjent for dette. Stikkontakten må alltid være lett
tilgjengelig..
• Vedmultiple stikkontakter må du se til at tilkoplede
forbrukereikke overskrider totalt effektopptak.
• Stikkontakten må alltid være lett tilgjengelig.
• Produktet må skilles franettet nårdet ikke brukes
over lengretid.
• Vent til installering av tuner er avsluttet.
• Trykk kort på [POWER]-knappen (1) på enheten.
UNDOK-applikasjonen (app) utviklet av Frontier Silicon
gir deg full kontroll av radioer og høyttalerepådin
smarttelefon.
Uansett om det er første innretning av enheten,
kongurasjoner av multiroom eller ved redigering av
dine favorittstasjoner -UNDOK gir deg alle funksjoner på
smarttelefon eller nettbrett.
Nedenfor forklares første innretting av tuner med UNDOK.
Fulltfunksjonsomfang til enheten fårdukun med UNDOK
appen.
93
Page 98

7.1 Første innretning av enheten med UNDOK
Alle produkter fraHama med UNDOK-evne lager et såkalt
Micro-Access-Point ved første innkopling eller etter at
du har tilbakestilt til fabrikkinnstillinger -altså et eget
WLAN-nett som du kan forbinde nettbrettet ditt eller
smarttelefonen din med. Dette Access-Point vises iformat
«Setup Hama PRODUKTBETEGNELSE MAC-adresse», for å
kunne identisereproduktet tydelig.
Merknad
UNDOK-appen bruker språket som er valgt isystemet til
smarttelefonen din.
7.2 Åpent nettverk/ubeskyttet nettverk
Merknad
• Vi anbefaler deg ikke å opprette usikreforbindelser og
å alltid beskytte nettverket ditt mot fremmed tilgang.
• Skulle ikke ditt ønsket nettverk ha noen
sikkerhetstiltak, så er det nok å velge nettverket ut fra
listen og bekrefte. Radioen forbindes øyeblikkelig med
tilgangspunktet.
7.2.1 Fremgangsmåte for iOS-brukere
• Åpne UNDOK-appen på din iPhone eller iPad.
• Trykk på menypunktet innrette lydsystem
• Se til attuneren er iSETUP-modus. Dersom enheten ikke
er iSETUP-modus, så trykker og holder du nede [Power]knappen i5sekunder,for å sette enheten iSETUP-modus.
• UNDOK vil nå at du skal forbinde deg med WLAN til
produktet over iPhone/iPad-innstillingene –skift til
systeminnstillingene til iPhone og velg WLAN-nettverket(f.
eks. Setup Hama IT900MBT) .Skift deretter tilbake til
UNDOK og trykk på videre
• Gi radioen nå et valgfritt navn for tuner (f.eks. kontor
IT900MBT) og bekreft inntastingen med videre.
• Vedspråkvalget kan du så bestemme systemspråket til
tuneren. Bekreft valget ditt med «videre».
• Nå har du forskjellige muligheter for
nettverkkongurasjon (ev.WLAN, WPS og Eternett). Klikk
påønsket metode og UNDOK skifter til neste vindu
• Avhengig av valgt metode kan du nå velge ut ønsket
WLAN-nettverk og kongurereeller opprette en WPSforbindelse.
• Deretter forbindes tuneren med nettverket og du kan, ved
å trykke på «Mitt lydsystem», bruke enheten iUNDOK
• LED-indikatoren (1) til nettverkforbindelsen lyser nå
permanent
• Etter vellykket kongurering av tuneren må en
avspillingsenhet (speaker) forbindes analogt (5) eller
digitalt (3). Styringen av musikkgruppen gjøreskun om
UNDOK.
7.2.2 Fremgangsmåte for Android-brukere
• Åpne UNDOK-appen på ditt nettbrett eller din
smarttelefon
• Trykk på menypunktet Innrette lydsystem
• Se til attuneren er iSETUP-modus. Dersom enheten ikke
er iSETUP modus, så trykker og holder du nede [Power]knappen i5sekunder,for å sette enheten iSETUP-modus.
• UNDOK oppfordrer deg nå til å forbinde deg med WLAN
til produktet over iPhone/iPad-innstillingene– skift da til
systeminnstillingene til iPhonen og velg WLAN-nettverket
(f.eks. Setup Hama IT900MBT) .Skift deretter tilbake til
UNDOK og trykk på videre
• Gi nå et valgfritt navn for tuner (f.eks. kontor IT900MBT)
og bekreft inntastingen med videre.
• Ispråkvalget deretter kan du bestemme tunerens språk.
Bekreft valget ditt med «videre».
• Nå har du forskjellige muligheter for
nettverkkongurasjon (ev.WLAN, WPS og Eternett). Klikk
påønsket metode og UNDOK skifter til neste vindu
• Avhengig av valgt metode kan du nå velge ut ønsket
WLAN-nettverk og kongurereeller opprette en WPSforbindelse.
• Deretter forbindes tuneren med nettverket og ved å trykke
på «Bruk mitt lydsystem» kan enheten brukes iUNDOK
• LED-indikatoren (1) til nettverkforbindelsen lyser nå
permanent.
• Etter vellykket kongurering av tuneren må en
avspillingsenhet (speaker) forbindes analogt (5) eller
digitalt (3). Styringen av musikkgruppen gjøreskun om
UNDOK.
8. Forbindelser
Bemærkning
• Forbindelser som opprettes med hjelp av en optisk
signalkabel er ikke ømtålig ovenfor elektriske eller
magnetiske forstyrrelser,som lukkes med hjelp av en
3.5 mm audiokabel.
8.1 Forbindelse over optical OUT
Over den digitale lydutgangen kan du f.eks. forbinde
høyttalerne dine med tuneren og spille av lydsignalene over
høyttalerne.
94
Page 99

Bemærkning
• Slå av tuneren førdukopler en sluttenhet til den.
• Fjern korkene frabegge ender på den optiske
signalkabelen førforbindelsen.
• Ikke knekk og klem kabelen.
• Foravspilling over den optiske lydforbindelsen forbinder
du en optisk signalkabel med den optiske lydutgangen
(3) til tuneren og på den optiske lydinngangen til
høyttaleren.
• Trykk på [POWER] (1) for å slå på tuneren.
• Lydsignalet til tuneren spilles nå av over høyttalerne.
8.2 Forbindelse over LINE OUT
Over den analoge lydutgangen kan du f.eks. forbinde
høyttalerne dine med tuneren og spille av lydsignalene over
høyttalerne.
Bemærkning
• Slå av tuneren førdukopler en sluttenhet til den.
• Ikke knekk og klem kabelen.
• Foravspilling over den analoge lydforbindelsen forbinder
du en 3.5 mm cinchkabel med den analoge lydutgangen
(5) til tuneren og på den analoge lydinngangen til
høyttaleren.
• Trykk på [POWER] (1) for å slå på tuneren.
• Lydsignalet til tuneren spilles nå av over høyttalerne.
9.Fabrikkinnstillinger
For å stille tuneren tilbake til fabrikkinnstilling
(leveringstilstand), gå vennligst frem slik:
• Trykk og hold knappen [POWER] (1) ica. 5sekunder.
• Alle foretatte innstillinger slettes.
Merknad
10. Oppdatering av programvare
Det utvikles stadig forbedringer og nye funksjoner for
programvaren til tunerene våre.For å rette feil, utvide
funksjonsomfanget osv.
Vi anbefaler deg å alltid installeredetilgjengelige
oppdateringene på tuneren din.
Advarsel
• Kontroller at strømforsyningen er stabil førdustarter
programvareoppdateringer.
• Strømbrudd under programvareoppdateringene kan
føre til irreparable skader på radioen!
11. Vedlikehold og pleie
• Dette produktet skal kun rengjøresmed en lofri, lett
fuktet klut, uten aggressive rengjøringsmidler.
• Hvis produktet ikke skal benyttes på en stund, må det
kobles ut og kobles frastrømforsyningen. Produktet må
lagres på et rent, tørt sted, uten direkte solinnstråling.
12. Fraskrivelse av ansvar
Hama GmbH &CoKGovertar ingen form for ansvar
eller garanti for skader som kan tilbakeførestil ukyndig
installering eller montering eller ukyndig bruk av produktet
eller som følge av at produktet har blitt benyttet uten at
bruksveiledningen og/eller sikkerhetsanvisningene er tatt
hensyn til.
13. Service og support
Hama-produktservice hjelper deg gjerne videredersom du
har spørsmålomproduktet.
Telefonsupport: +49 9091 502-115 (tysk/engelsk)
Her nner du ytterligeresupportinformasjon:
www.hama.com
• Problemer og feilfunksjoner kan muligens rettes ved å
stille tilbake til standardinnstilling.
• Men da blir alle innstillinger som equalizer,favoritter
og nettverkproler slettet for godt.
95
Page 100

14. Avfallshåndtering
Informasjon om miljøvern
Fratidspunktet for omsetning av europeisk direktiv
2012/19/EU og 2006/66/EF inasjonal lov,gjelder
følgende: Elektriske og elektroniske apparater og
batterier skal ikke deponeres sammen med
husholdningsavfall. Forbrukeren er lovmessig forpliktet til å
levereinn elektriske og elektroniske apparater og batterier
til de offentlige samlestedene eller til salgsstedet nårde
ikke virker lenger.Detaljer angående dette reguleres i
brukslandet. Symbolet på produktet, bruksveiledningen
eller emballasjen henviser til denne bestemmelsen. Med
gjenvinningen, resirkuleringen av stoff eller andreformer
for resirkulering av gamle apparater/batterier bidrar du
betydelig for å beskytte miljøet vårt.
15. Samsvarserklæring
Hermed erklærerHama GmbH &CoKGat
radioanleggtypen [00054861] tilsvarer direktiv
2014/53/EU.Den komplette teksten til EUsamsvarserklæringen nnes på følgende Internettadresse:
www.hama.com-> 00054861 -> Downloads.
Frekvensbånd/
frekvensbånd
Avstrålt maksimal
sendeeffekt
Innskrenkninger eller krav i
Belgia, Bulgaria, Tsjekkisk republikk, Danmark, Tyskland,
Estland, Irland, Hellas, Spania, Frankrike, Kroatia, Italia,
Kypros, Lettland, Litauen, Luxemburg, Ungarn, Malta,
Nederland, Østerrike, Polen, Portugal, Romania, Slovenia,
Slovakia, Finland, Sverige, Det forente Kongerike
Merknad
Nårkanalene 36-64 (frekvens 5,150GHz –5,350GHz)
brukes i5GHz WLAN, fårproduktet kun brukes i
lukkede rom.
Bluetooth: 2.402 -2.480GHz
WiFi: 2.412 -2.472GHz
WiFi: 5.150 -5.350 GHz
WiFi: 5.470 -5.725 GHz
Bluetooth: 4dBm (EIRP)
WiFi: 2.4GHz /19.3dBm (EIRP)
WiFi: 5GHz /17.8dBm (EIRP)
96
 Loading...