

Hama IR360 operation manual
00054837 (IR360MBT)
Streaming Radio
Streaming Radio
Quick Guide
Kurzanleitung
Notice d’utilisation
Instrucciones breves
Краткое руководство
Istruzioni brevi
Beknopte bedieningsinstructies
Σύντομες οδηγίες
Krótka instrukcja obsługi
Rövid útmutató
Stručný návod
Stručný návod
Instruções resumidas
Kısa kullanımkılavuzu
Instrucțiuni scurte
Snabbguide
Lyhyt ohje
Kort vejledning
Kortveiledning
GB
D
F
E
RUS
I
NL
GR
PL
H
CZ
SK
P
TR
RO
S
FIN
DK
N
Technical data/
Technische Daten
Radio Receiver/
Radio Empfänger
Connectivity/
Konnektivität
Encryption/
Verschlüsselung
Speaker/
Lautsprecher
Encryption/
Verschlüsselung
Subwoofer
Power input/
Stromeingang
Power Consumption/
Stromaufnahme
Input &Output/
Anschlüsse
Presets/
Favoriten
UI Languages/
UI Sprachen
Package Content/
Verpackungsinhalt
DAB
-
LAN (10/100), WiFi 2.4GHz (b/g/n) /5GHz (a/n), Bluetooth® 4.1 &LE
WEP,WPA,WPA2, WPS
3"
10 WRMS (2x 5W)
3" 20 WRMS
Wood MDF
2Aswitch mode power supply
18 V
Operation/ Betrieb max. 36 WStandby <2W(network standby)
AUX IN, Line Out, RJ45, Optical audio socket
Internet:
30
English
IR360MBT,PowerSupply,Remote Control, Batteries, Quick Start Guide
DAB+
-
Spotify Connect:
10
FM
-
Internet
ü
Spotify
ü
Further information and features areavailable on/
WeitereInformationen und Features nden Sie hier
00054837: www.hama.com/54837#downloads

1 2 3 3 4 56 87
999
12
13 14 15 16 17
10
18
11

2
1
4 5
3
7
8
11
12
15
18
19
21
25
26
6
10
14
16
17
20
22
27
9
13
23
24

G Quick Guide
Controls and Displays
Front
1. [MODE] button
2. [PLAY/PAUSE] button
3. [VOLUME]+/- buttons
4. [MUTE] button
5. [MEMORY] button
6. Bluetooth
7. Network LED indicator
8. AUX-In LED indicator
9. Presets LED indicator
®
LED indicator
Rear
10. Slide switch for mono/L/R
11. [SETUP/PRESET] button
12. Mains power supply
13. AUX-In socket
14. LAN connection
15. Line-out socket
16. Optical-out socket
17. Slide switch for backlight
18. Update port
Remote Control
1. [POWER] button
2. [MUTE] button
3. Internet Radio -Mode
4. DABRadio -Mode
5. FM Radio -Mode
6. AUX -Mode
7. Backlight Level
8. Media-Player -Mode
9. [MODE] button
10. [EQUALIZER] button
11. [ALARM] button
12. [SLEEP] button
13. [SNOOZE] button
14. [MENU] button
15. [PREVIOUS] button
16. [NEXT] button
17. Navigation buttons
▲ Up
▼ Down
◄ Back
► Forward, okay
18. [SELECT] (Enter/OK) button
19. [REWIND] button
20. [FAST-FORWARD] button
21. [VOLUME] +/- buttons
22. Presets Up/Down buttons
23. [PLAY/PAUSE] button
24. [BACK] button
25. Presets buttons (1-10)
26. [PRESETS /FAVORITES] Menu
27. [INFO] button
Important note –Operating instructions:
• This is aquick guide to provide you with the most important basic information, such as safety warnings and how to
get started using the product.
• Forthe sake of protecting the environment and saving resources, Hama dispenses with printed operating instructions
and provides them only in the form of PDF les /eManuals on www.hama.com.
• Use the search function with the item number of your product to easily nd the product documentation.
• Save the operating instructions to your computer’sharddrive for futurereference, or print it out if necessary.
2
1. Explanation of Warning Symbols and Notes
Warning
This symbol is used to indicate safety instructions or to
draw your attention to specichazards and risks.
Note
This symbol is used to indicate additional information or
important notes.
Risk of electric shock
This symbol indicates product parts energized with a
ous voltage of sucient magnitude to constitute
danger
arisk of electric shock.
2. Package Contents
• Internet Radio IR360MBT
• Remote control
• 2x AAA batteries
• AC/DC adapter
• Quick guide, brochure
3. Safety Notes
• The product is intended for private, non-commercial use
only.
• Protect the product from dirt, moistureand overheating
and use it in dry rooms only.
• As with all electrical devices, this device should be kept
out of the reach of children.
• Do not drop the product and do not expose it to any
major shocks.
• Do not operate the product outside the power limits
given in the specications.
• Keep the packaging material out of the reach of children
due to the risk of suffocation.
• Dispose of packaging material immediately according to
locally applicable regulations.
• Do not modify the device in any way.Doing so voids the
warranty.
Risk of electric shock
• Do not open the device or continue to operate it if it
becomes damaged.
• Do not use the product if the AC adapter,adapter
cable or power cable is damaged.
• Do not attempt to service or repair the device
yourself.Leave any service work to qualied experts.
Warning –Batteries:
• When inserting batteries, note the correct polarity (+
and -markings) and insert the batteries accordingly.
Failuretodosocould result in the batteries leaking
or exploding.
• Do not allow children to change batteries without
supervision.
• Do not mix old and new batteries or batteries of a
different type or make.
• Remove the batteries from products that arenot
being used for an extended period
• Do not short-circuit batteries.
• Do not charge batteries.
• Do not throw batteries in a re.
• Keep batteries out of the reach of children.
4. Before getting started
Note
Adetailed description of the UNDOK app and
the full scope of functions can be found in our
UNDOK guide at:
www.hama.com->00054837->Downloads
3
Notes on use
Note –Turningonfor the rst time
• Beforeyou can use the streaming radio, you need
to set it up (see Chapter 6) by smartphone using the
UNDOK app.
Getting started with the remote control
Open the battery compartment cover.Itis located on the
rear of the remote control and can be opened by sliding it
in the direction indicated.
TwoAAA batteries areincluded in the delivery,they should
be inserted in the battery compartment of the remote
control. Observe the correct polarity when inserting
batteries. The polarity (+ /-)is indicated in the battery
compartment.
5. Getting started
Note
• Optional, switchable light sources or brightness
sensors result in higher power consumption in the
switched-on state.
5.1 Turning on the product
• Connect the power cable to aproperly installed socket.
Warning
• Only connect the product to asocket that has been
approved for the device. The electrical socket must
always be easily accessible.
• Disconnect the product from the power supply using
the on/off switch –ifthis is not available, unplug the
power cordfromthe socket.
• When you turn on the device for the rst time, the
speaker starts in SETUP mode.
• The LEDs (6-8) begin to ash, the LEDs (9) are
constantly lit and the speaker can be connected to
your smartphone using the UNDOK app.
6. UNDOK –everything in the palm of your hand
The UNDOK app, developed by Frontier Silicon, gives you
full control of radios and speakers from your smartphone.
Whether you aresetting up the device for the rst time,
specifying settings for the equaliser and multi-room, or
managing your favourite stations –the UNDOK app lets
you access all the features from your smartphone or tablet,
thereby offering you greater convenience.
• Wait until the speaker initialisation procedurehas
nished.
• Press the [PLAY/PAUSE] button
speaker.
►II to turn on the
4
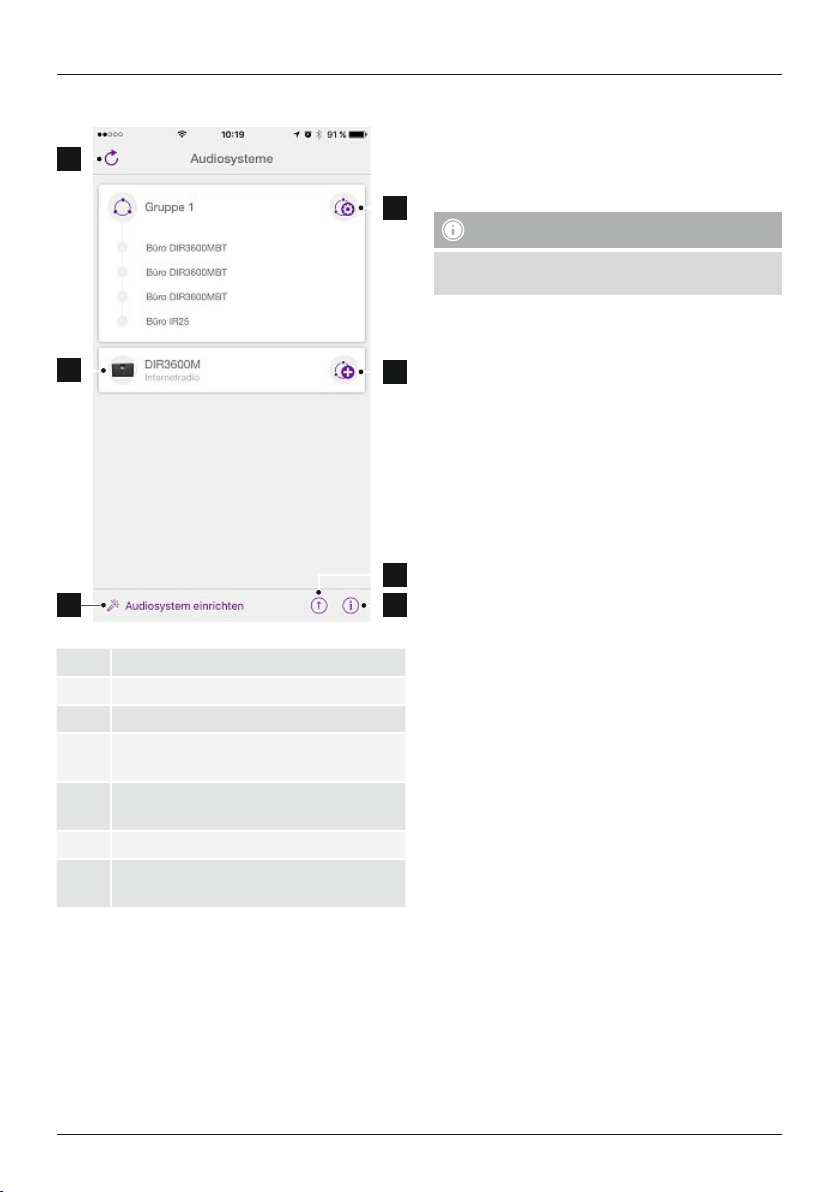
6.1 Interface/layout of the UNDOK home screen
1
2
3
1 Update the audio system list
2 Preview for ungrouped radios
3 Set up new audio system
Icon for managing an existing multi-room
4
group
Create anew multi-room group with this
5
device
6 Check for system update for all devices
Further information, such as app info, change
7
app theme, and data logging
6.2 First-time setup of the device with UNDOK
The rst time you switch on an UNDOK-enabled product
from Hama, or when you have set it to the factory settings,
it creates amicroaccess point –aseparate WiFi network
that you can connect to with your tablet or smartphone.
4
Note
• The UNDOK app uses the language selected in your
smartphone’ssystem.
6.2.1 Procedure for iOS users
• Open the UNDOK app on your iPhone or iPad.
5
• Tapthe Set up audio system menu item.
• Make surethat the radio or speaker is in SETUP mode.
Set the product to the factory settings, if necessary.
Conrm the query with Next.
• The UNDOK app now prompts you to connect to the
product’sWiFi network using the iPhone/iPad settings
–todoso, switch to the system settings on your iPhone
and select the WiFi network (for example, Setup Hama
DIR3120LED). Then return to the UNDOK app and tap
Next.
• Now choose aname for the radio (for example, Oce
6
DIR3120) and conrm your entry with Next.
• The various network conguration options arethen
7
offered to you (whereapplicable, WiFi, WPS and
Ethernet). Tapthe desired method; the UNDOK app
switches to the next window.
• Depending on the selected method, you can now select
and congurethe desired WiFi network, set up aWPS
connection or set up the connection using aLAN cable.
• Finally,the radio connects to the network; by tapping
Start using my audio system, you will be able to use the
device in the UNDOK app.
• The network connection LED indicator (7) is now
constantly lit.
5

6.2.2 Procedure for Android users
• Open the UNDOK app on your tablet or smartphone.
• Tapthe Set up audio system menu item.
• Make surethat the radio or speaker is in SETUP mode.
Set the product to the factory settings, if necessary.
Conrm the query with Next.
• On the following page, you will nd alist of all
available WiFi networks as well as the suggested
audio systems; the Hama product (for example, Setup
Hama DIR3120LED) should be listed here. Tapthe
corresponding WiFi network.
• Now choose aname for the radio (for example, Oce
DIR3120) and conrm your entry with Next.
• The various network conguration options arethen
offered to you (whereapplicable, WiFi, WPS and
Ethernet). Tapthe desired method; the UNDOK app
switches to the next window.
• Depending on the selected method, you can now select
and congurethe desired WiFi network, set up aWPS
connection or set up the connection using aLAN cable.
• Finally,the radio connects to the network; by tapping
‘Start using my audio system’, you will be able to use the
device in the UNDOK app.
• The network connection LED indicator (7) is now
constantly lit.
7. Auxiliary Input
Youcan use the analogue audio input (AUX IN socket) to
connect mobile devices (for example, smartphone, tablet
PC, MP3 player,etc.) to the radio and play your audio les
using the radio.
• Repeatedly press [M]/[MODE]toactivate the Auxiliary
Input (Aux in) mode on the speaker:
[ ]
Alternatively,press [AUX]onthe remote control to switch
directly to this operating mode.
8. Bluetooth
Youcan pair your terminal device with the radio using
Bluetooth®and use it as aplayback device. Youcan
control playback directly on the terminal device. Youcan
adjust the volume on the radio, as well.
• Check whether your mobile device (smartphone,
tablet, etc.) is Bluetooth®-capable.
• Note that the maximum range for Bluetooth®is 10
metres without obstacles such as walls, people, etc.
• The Bluetooth®connection may be disrupted by other
Bluetooth®devices/connections in the vicinity.
• It is only possible to connect the radio to one
terminal device.
• Note that compatibility depends on the supported
Bluetooth®proles as well as the Bluetooth®versions
being used. (See Technical specications, operating
instructions of the terminal device in use)
Repeatedly press [M]/[MODE]toactivate the Bluetooth
operating mode on the radio:
®
Note –Bluetooth
®
[ ]
8.1 Bluetooth®first connection (pairing)
• Make surethat your Bluetooth®-capable terminal device
is on and Bluetooth
• Repeatedly press [M]/[MODE]toactivate the
Bluetooth
®
is activated.
®
operating mode on the radio:
[ ]
®
• The AUX-In connection LED indicator (8) begins to ash.
• Connect your mobile device to the audio input (the AUX
IN socket) of the radio using a3.5-mm audio cable (jack
cable).
• The AUX-In connection LED indicator (8) is now
constantly lit.
• Start and control audio playback using the controls of
the connected terminal device.
6

• The Bluetooth®connection LED indicator (6) begins to
ash.
• Open the Bluetooth®settings on your terminal device
and wait until IR360MBT appears in the list of
Bluetooth®devices found.
• If necessary,start searching for Bluetooth®devices on
your terminal device.
• Select IR360MBT and wait until the radio is shown as
connected in the Bluetooth®settings on your terminal
device.
• The Bluetooth®connection LED indicator (6) is now
constantly lit.
• Start and control audio playback using the controls of
the terminal device.
Note –Bluetooth®password
• Some terminal devices requireapasswordinorder to
connect to another Bluetooth
®
device.
• If your terminal device requests apasswordfor
connection to the speaker,enter 0000.
9. Care and Maintenance
• Only clean this product with aslightly damp, lint-free
cloth and do not use aggressive cleaning agents.
• If you do not use the product for along time, turn off
the device and disconnect it from the power supply.
Storeitinaclean, dry place out of direct sunlight.
10. Warranty Disclaimer
Hama GmbH &CoKGassumes no liability and provides no
warranty for damage resulting from improper installation/
mounting, improper use of the product or from failureto
observe the operating instructions and/or safety notes.
11. Service and Support
Please contact Hama Product Consulting if you have any
questions about this product.
Hotline: +49 9091 502-115 (German/English)
Further support information can be found here:
www.hama.com
12. Recycling Information
Note on environmental protection:
After the implementation of the European
Directive 2012/19/EU and 2006/66/EU in the
national legal system, the following applies:
Electric and electronic devices as well as batteries
must not be disposed of with household waste. Consumers
areobliged by law to return electrical and electronic
devices as wellasbatteries at the end of their service lives
to the public collecting points set up for this purpose or
point of sale. Details to this aredened by the national
law of the respective country.This symbol on the product,
the instruction manual or the package indicates that a
product is subject to these regulations. By recycling,
reusing the materials or other forms of utilising old
devices/Batteries, you aremaking an important
contribution to protecting our environment.
13. Declaration of Conformity
Hereby,Hama GmbH &CoKGdeclares that the
radio equipment type [00054837] is in compliance
with Directive 2014/53/EU.The fulltext of the EU
declaration of conformity is available at the following
internet address:
www.hama.com->00054837->Downloads.
Bluetooth: 2.402 -2.480GHz
Frequency band(s)
WiFi: 2.412 -2.472GHz
WiFi: 5.150 -5.350 GHz
WiFi: 5.470 -5.725 GHz
Maximum radio-frequency
power transmitted
Bluetooth: 6dBm (EIRP)
WiFi: 2.4GHz /17dBm (EIRP)
WiFi: 5GHz /16.5dBm (EIRP)
Restrictions or Requirements in
Belgium, Bulgaria, Czech Republic, Denmark, Germany,
Estonia, Ireland, Greece, Spain, France, Croatia, Italy,
Cyprus, Latvia, Lithuania, Luxembourg, Hungary,Malta,
the Netherlands, Austria, Poland, Portugal, Romania,
Slovenia, Slovakia, Finland, Sweden, United Kingdom
Note
If channels 36–64 (frequency 5.150–5.350 GHz) are
used in a5-GHz WLAN, the product may only be used
in closed rooms.
7

D Schnellstartanleitung
Bedienungselemente und Anzeigen
Frontseite
1. [MODE]-Taste
2. [PLAY/ PAUSE]-Taste
3. [VOLUME]+/--Tasten
4. [MUTE]-Taste
5. [MEMORY]-Taste
6. LED-Anzeige Bluetooth
7. LED-Anzeige Netzwerk
8. LED-Anzeige AUX-In
9. LED Anzeige Presets
®
Rückseite
10. Schiebeschalter für Mono /L/R
11. [SETUP/ PRESET]-Taste
12. Netzzuleitung
13. AUX-In Buchse
14. LAN-Anschluss
15. Line-Out Buchse
16. Optical-Out Buchse
17. Schiebeschalter für Hintergrundbeleuchtung
18. Update Port
Fernbedienung
1. [POWER]-Taste
2. [MUTE]-Taste
3. Internet Radio -Modus
4. DABRadio -Modus (ohne Funktion)
5. FM Radio -Modus (ohne Funktion)
6. AUX -Modus
7. Backlight Level (ohne Funktion)
8. Media-Player -Modus
9. [MODE]-Taste
10. [EQUALIZER] Taste (ohne Funktion)
11. [ALARM]-Taste (ohne Funktion)
12. [SLEEP]-Taste (ohne Funktion)
13. [SNOOZE]-Taste (ohne Funktion)
14. [MENU]-Taste (ohne Funktion)
15. [PREVIOUS]-Taste
16. [NEXT]-Taste
17. Navigationstasten (ohne Funktion)
▲ Hoch
▼ Runter
◄ Back/Zurück
► Vorwärts, Okay
18. [SELECT] (Enter/OK)-Taste (ohne Funktion)
19. [REWIND]-Taste
20. [FAST-FORWARD]-Taste
21. [VOLUME] +/- -Tasten
22.Presets Up /Down-Tasten
23. [PLAY/PAUSE] Taste
24. [BACK] (Zurück)-Taste
25. Preset-Tasten (1-10)
26. [PRESETS /FAVORITES] Menu (ohne Funktion)
27. [INFO] Taste (ohne Funktion)
Wichtiger Hinweis -Bedienungsanleitung:
• Dies ist eine Kurzanleitung, die Sie mit wichtigen Basis-Informationen, wie Sicherheitshinweisen und der
Inbetriebnahme ihres Produktes versorgt.
• Aus Gründen desUmweltschutzes und der Einsparungwertvoller Rohstoffe verzichtet die Firma Hama aufeine gedruckte
Bedienungsanleitungund bietet diese ausschließlich alsPDF-Download /eManualunter www .hama.com an.
• Nutzen Sie zum leichteren Aunden die Suchfunktion und als Suchbegriff die Artikelnummer um die
Produktdokumentation zu erreichen.
• SpeichernSie dieseBedienungsanleitung zumNachschlagen aufIhrem Computerund drucken SiediesenachMöglichkeit aus.
8
1. Erklärung von Warnsymbolen und Hinweisen
Warnung
Wirdverwendet, um Sicherheitshinweise zu
kennzeichnen oder um Aufmerksamkeit auf besondere
Gefahren und Risiken zu lenken.
Hinweis
Wirdverwendet, um zusätzlich Informationen oder
wichtige Hinweise zu kennzeichnen.
Gefahr eines elektrischen Schlages
Dieses Symbol weist auf eine Berührungsgefahr mit nicht
isolierten T
eine gefährliche Spannung von solcher Höhe führen,
dass die Gefahr eines elektrischen Schlags besteht.
2. Packungsinhalt
• Internetradio IR360MBT
• Fernbedienung
• 2x AAA Batterien
• Netzteil
• Schnellstartanleitung, Flyer
3. Sicherheitshinweise
• Das Produkt ist für den privaten, nicht-gewerblichen
• Schützen Sie das Produkt vor Schmutz, Feuchtigkeit und
• Dieses Produkt gehört, wie alle elektrischen Produkte,
• Lassen Sie das Produkt nicht fallen und setzen Sie es
• Betreiben Sie das Produkt nicht außerhalb seiner in den
• Halten Sie Kinder unbedingt von dem
• Entsorgen Sie das Verpackungsmaterial sofort gemäß den
• Nehmen Sie keine Veränderungen am Gerät vor.Dadurch
eilen des Pr
Haushaltsgebrauch vorgesehen.
Überhitzung und verwenden Sie es nur in trockenen
Räumen.
nicht in Kinderhände!
keinen heftigen Erschütterungen aus.
technischen Daten angegebenen Leistungsgrenzen.
Verpackungsmaterial fern, es besteht Erstickungsgefahr.
örtlich gültigen Entsorgungsvorschriften.
verlieren sie jegliche Gewährleistungsansprüche.
oduktes hin, die möglicherweise
Gefahr eines elektrischen Schlages
• Öffnen Sie das Produkt nicht und betreiben Sie es bei
Beschädigungen nicht weiter.
• Verwenden Sie das Produkt nicht, wenn der
AC-Adapter,das Adapterkabel oder die Netzleitung
beschädigt sind.
• Versuchen Sie nicht, das Produkt selbst zu warten oder
zu reparieren. Überlassen Sie jegliche Wartungs-arbeit
dem zuständigen Fachpersonal.
Warnung –Batterien
• Beachten Sie unbedingt die korrekte Polarität
(Beschriftung +und -) der Batterien und legen Sie
diese entsprechend ein. Bei Nichtbeachtung besteht
die Gefahr des Auslaufens oder einer Explosion der
Batterien.
• Gestatten Sie Kindern nicht ohne Aufsicht das
Wechseln von Batterien.
• Mischen Sie alte und neue Batterien nicht, sowie
Batterien unterschiedlichen Typs oder Herstellers.
• Entfernen Sie Batterien aus Produkten, die längereZeit
nicht benutzt werden.
• Schließen Sie die Batterien nicht kurz.
• Laden Sie Batterien nicht.
• Werfen Sie Batterien nicht ins Feuer.
• Bewahren Sie Batterien außerhalb der Reichweite von
Kindern auf.
4. Vor der Inbetriebnahme
Hinweis
Eine ausführliche Beschreibung der
UNDOK-App und des vollen
Funktionsumfangs nden Sie in unserem
UNDOK-Guide unter:
www.hama.com->00054837->Downloads
9

Bedienungshinweise
Hinweis –beim ersten Einschalten
• Die Bedienung des Streaming Radios erfolgt nach
erfolgreicher Ersteinrichtung (siehe Kapitel 6) mithilfe
der UNDOK App über ihr Smartphone.
Fernbedienung in Betrieb nehmen
Öffnen Sie die Abdeckung des Batteriefachs. Diese bendet
sich auf der Rückseite der Fernbedienung und kann
durch schieben in die gekennzeichnete Richtung geöffnet
werden.
Zum Lieferumfang gehören zwei AAA-Batterien, welche
Sie für die Inbetriebnahme in das Batteriefach einlegen
müssen. Achten Sie beim Einlegen darauf,dass die
Batterien mit der richtigen Polarität eingelegt werden.
Die vorgegebene Polarität (+ /-)ist im Batteriefach
gekennzeichnet.
5. Inbetriebnahme
Hinweis
• Optional vorhandene, zuschaltbareLichtquellen
oder Helligkeitssensoren führen im eingeschalteten
Zustand zu einer höheren Leistungsaufnahme.
5.1 Einschalten
• Verbinden Sie das Netzkabel mit einer ordnungsgemäß
installierten Steckdose.
Warnung
• Betreiben Sie das Produkt nur an einer dafür
zugelassenen Steckdose. Die Netzsteckdose muss
jederzeit leicht erreichbar sein.
• Trennen Sie das Produkt mittels des Ein-/Ausschalters
vom Netz –wenn dieser nicht vorhanden ist, ziehen
Sie die Netzleitung aus der Steckdose.
• Beim ersten Einschalten startet der Lautsprecher im
SETUP-Modus.
• Die LEDs (6-8) beginnen zu blinken, die LEDs (9)
leuchten dauerhaft und der Lautsprecher kann nur
mithilfe der UNDOK-App mit Ihrem Smartphone
verbunden werden.
6. UNDOK –Alles in Ihrer Hand
Die von Frontier Silicon entwickelte UNDOK-Applikation
(App) bringt Ihnen die volle Kontrolle von Radios und
Speakern auf Ihr Smartphone.
Egal ob bei der Ersteinrichtung des Gerätes, den
Kongurationen von Equalizer und Multiroom oder bei der
Verwaltung Ihrer Lieblingssender –UNDOK bietet Ihnen
alle Features auf dem Smartphone oder Tablet und bietet
Ihnen damit noch mehr Komfort.
• Warten Sie, bis die Initialisierung des Lautsprechers
abgeschlossen ist.
• Drücken Sie die [PLAY/PAUSE]-Taste ►I
Lautsprecher einzuschalten.
I,umden
10
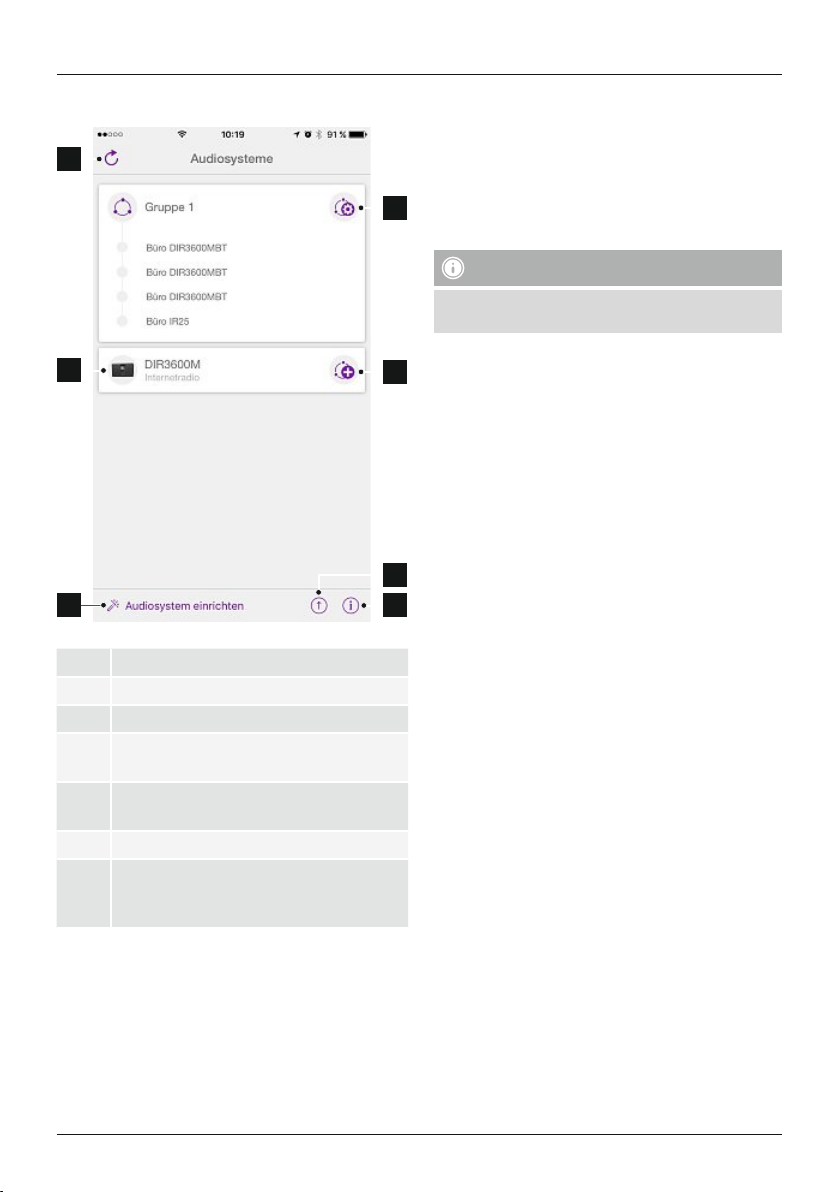
6.1 Interface /Aufbau des UNDOK Startbildschirms
1
6.2 Ersteinrichtung des Gerätes mit UNDOK
Alle UNDOK-fähigen Produkte von Hama erzeugen
beim ersten Einschalten, bzw.nachdem Sie diese auf
Werkseinstellungen gesetzt haben, einen sogenannten
Micro-Access-Point –also ein eigenes WLAN-Netz, über
welches Sie sich mit Ihrem Tablet oder Smartphone
4
verbinden können.
Hinweis
• Die UNDOK-App verwendet die im System Ihres
Smartphones gewählte Sprache.
2
3
1 Aktualisieren der Audiosystemliste
2 Vorschau für ungruppierte Radios
3 Neues Audiosystem einrichten
Verwaltungssymbol für eine bestehende
4
Multiroom-Gruppe
Erstellen einer neuen Multiroom-Gruppe mit
5
diesem Gerät
6 Auf Systemaktualisierung aller Geräte prüfen
WeitereInformationen wie App-Info,
7
Theme (Design) der App wechseln und
Datenprotokollierung
6.2.1 Vorgehen für iOS-Nutzer
5
• Öffnen Sie die UNDOK-App auf Ihrem iPhone oder iPad
• Drücken Sie auf den Menüpunkt Audiosystem
einrichten
• Stellen Sie sicher,dass sich das Radio bzw.der Speaker
im SETUP-Modus benden. Setzen Sie gegebenenfalls
das Produkt auf Werkseinstellung. Bestätigen Sie die
Abfrage mit Weiter
• UNDOK fordert Sie nun auf,sich über die iPhone/iPadEinstellungen mit dem WLAN des Produktes zu verbinden –wechseln Sie dazu in die Systemeinstellungen des
6
iPhones und wählen Sie das WLAN-Netzwerk (z.B. Setup
Hama DIR3120LED) aus. Wechseln Sie anschließen
7
zurück zu UNDOK und Drücken Sie auf Weiter
• Vergeben Sie nun eine gewünschte Bezeichnung für
das Radio (z.B. BüroDIR3120) und Bestätigen Sie die
Eingabe mit Weiter
• Nun stehen Ihnen die verschiedenen Möglichkeiten der
Netzwerkkonguration zur Verfügung (ggf.WLAN, WPS
und Ethernet). Klicken Sie die gewünschte Methode an
und UNDOK wechselt zum nächsten Fenster
• Abhängig von der gewählten Methode, können Sie
nun das gewünschte WLAN-Netzwerk auswählen und
kongurieren, eine WPS-Verbindung herstellen oder die
Verbindung per LAN-Kabel herstellen.
• Abschließend verbindet sich das Radio mit dem
Netzwerk und Sie können durch Drücken von Mein
Audiosystem verwenden das Gerät in UNDOK
verwenden
• Die LED-Anzeige (7) der Netzwerkverbindung leuchtet
nun dauerhaft.
11
6.2.2 Vorgehen für Android-Nutzer
• Öffnen Sie die UNDOK-App auf Ihrem Ta blet oder
Smartphone
• Drücken Sie auf den Menüpunkt Audiosystem
einrichten
• Stellen Sie sicher,dass sich das Radio bzw.der Speaker
im SETUP-Modus benden. Setzen Sie gegebenenfalls
das Produkt auf Werkseinstellung. Bestätigen Sie die
Abfrage mit Weiter
• Auf der folgenden Seite nden Sie eine Liste aller
verfügbaren WLAN-Netzwerke und ebenfalls die
vorgeschlagenen Audiosysteme, hier sollte das HamaProdukt (z.B. Setup Hama DIR3120LED) aufgeführt sein.
Drücken Sie auf das entsprechende WLAN-Netzwerk.
• Vergeben Sie nun eine gewünschte Bezeichnung für
das Radio (z.B. BüroDIR3120) und Bestätigen Sie die
Eingabe mit Weiter
• Nun stehen Ihnen die verschiedenen Möglichkeiten der
Netzwerkkonguration zur Verfügung (ggf.WLAN, WPS
und Ethernet). Klicken Sie die gewünschte Methode an
und UNDOK wechselt zum nächsten Fenster
• Abhängig von der gewählten Methode, können Sie
nun das gewünschte WLAN-Netzwerk auswählen und
kongurieren, eine WPS-Verbindung herstellen oder die
Verbindung per LAN-Kabel herstellen.
• Abschließend verbindet sich das Radio mit dem Netzwerk
und Sie können durch Drücken von „Mein Audiosystem
verwenden“ das Gerät in UNDOK verwenden
• Die LED-Anzeige (7) der Netzwerkverbindung leuchtet
nun dauerhaft.
7. Auxiliary Input
Über den analogen Audioeingang (AUX IN Buchse)
können Sie mobile Endgeräte (z.B. Smartphone, Tablet
PC, MP3-Player,etc.) an das Radio anschließen und die
Audiodateien über das Radio wiedergeben.
• Aktivieren Sie –durch wiederholtes Drücken von [M]/
[MODE]–den Betriebsmodus Auxiliary Input (Aux in)
auf dem Lautsprecher:
• Die LED-Anzeige (8) der AUX-In-Verbindung beginnt zu
blinken
• Verbinden Sie Ihr mobiles Endgerät und den
Audioeingang (AUX IN Buchse) des Radios mittels eines
3,5mm Audiokabels (Klinkenkabel).
• Die LED-Anzeige (8) der AUX-In-Verbindung leuchtet nun
dauerhaft.
• Starten und steuern Sie die Audiowiedergabe
entsprechend über das angeschlossene Endgerät.
8. Bluetooth
®
Via Bluetooth können Sie IhreEndgeräte mit dem Radio
verbinden und dieses als Wiedergabegerät nutzen. Die
Steuerung der Wiedergabe erfolgt dabei direkt über das
Endgerät. Die Lautstärke lässt sich auch am Radio selbst
regeln.
Hinweis –Bluetooth
®
• Prüfen Sie, ob Ihr mobiles Endgerät (Smartphone,
Tablet-PC, etc.) Bluetooth-fähig ist.
• Beachten Sie, dass die Reichweite von Bluetooth
®
max. 10 Meter beträgt, ohne Hindernisse wie Wände,
Personen, etc.
• Es kann vorkommen, dass die Verbindung durch
weitereBluetooth
®
-Geräte/ Verbindungen in der
Umgebung gestört wird.
• Das Radio kann immer nur mit einem Endgerät
gekoppelt werden.
• Beachten Sie, dass die Kompatibilität von den
unterstützten Bluetooth
®
Prolen sowie der
verwendeten Bluetooth®Versionen abhängig ist.
(siehe: Technische Daten, Bedienungsanleitung des
verwendeten Endgeräts)
Aktivieren Sie durch wiederholtes Drücken von
]/[MODE]den Betriebsmodus Bluetooth®auf dem
[
Radio:
[ ]
Alternativ drücken Sie [AUX]auf der Fernbedienung um
direkt auf diesen Betriebsmodus umzuschalten.
12
[ ]
8.1 Bluetooth®Erstverbindung (Pairing)
• Stellen Sie sicher,dass Ihr Bluetooth®fähiges Endgerät
eingeschaltet ist und dass Bluetooth®aktiviert ist.
• Aktivieren Sie durch wiederholtes Drücken von
]/[MODE]den Betriebsmodus Bluetooth®auf dem
[
Radio:
[ ]
• DIe LED-Anzeige (6) der Bluetooth®-Verbindung beginnt
zu blinken.
• ÖffnenSie aufIhrem Endgerät dieBluetooth
Einstellungen undwarten Sie,bis in derListe der
gefundenenBluetooth
®
Geräte IR360MBT angezeigt
wird.
• Starten Sie ggf.die Suche nach Bluetooth®Geräten auf
Ihrem Endgerät.
• Wählen Sie IR360MBT aus und warten Sie, bis das
Radio als verbunden in den Bluetooth
Ihres Endgerätes angezeigt wird.
• Die LED-Anzeige (6) der Bluetooth®-Verbindung leuchtet
nun dauerhaft.
• Starten und steuern Sie die Audiowiedergabe
entsprechend über das Endgerät.
Hinweis –Bluetooth®Passwort
Manche Endgeräte benötigen für die Einrichtung der
Verbindung mit einem anderen Bluetooth
Passwort.
• Geben Sie für die Verbindung mit dem Lautsprecher
das Passwort 0000 ein, wenn Sie zur Eingabe von
Ihrem Endgerät aufgefordert werden.
9. Wartung und Pflege
• Reinigen Sie dieses Produkt nur mit einem fusselfreien,
leicht feuchten Tuch und verwenden Sie keine
aggressiven Reiniger.
• Sollten Sie das Produkt längereZeit nicht nutzen,
schalten Sie das Gerät aus und trennen es von der
Stromversorgung. Lagern Sie es an einem sauberen,
trockenen Ort ohne direkte Sonneneinstrahlung.
10. Haftungsausschluss
Die Hama GmbH &CoKGübernimmt keinerlei Haftung
oder Gewährleistung für Schäden, die aus unsachgemäßer
Installation, Montage und unsachgemäßem Gebrauch
des Produktes oder einer Nichtbeachtung der
Bedienungsanleitung und/oder der Sicherheitshinweise
resultieren.
®
®
Einstellungen
®
Gerät ein
11. Service und Support
Bitte wenden Sie sich bei Fragen zum Produkt gerne an die
Hama-Produktberatung.
Hotline: +49 9091 502-115 (Deu/Eng)
WeitereSupportinformationen nden sie hier: www.hama.com
12. Entsorgungshinweise
Hinweis zum Umweltschutz:
Ab demZeitpunkt der Umsetzung der europäischen
Richtlinien 2012/19/EU und 2006/66/EG in
nationalesRecht gilt folgendes:Elektrische und
elektronische Geräte sowieBatterien dürfen nicht
mit demHausmüll entsorgt werden.Der Verbraucher ist
gesetzlich verpichtet, elektrische undelektronische Geräte
sowie Batterien am Endeihrer Lebensdauer an den dafür
eingerichteten, öffentlichenSammelstellenoder an die
Verkaufsstelle zurückzugeben. Einzelheitendazuregelt das
jeweilige Landesrecht. Das Symbol aufdem Produkt,der
Gebrauchsanleitung oder der Verpackung weist aufdiese
Bestimmungenhin.Mit der Wiederverwertung, der
stoichen Verwertungoderanderen Formen der
Verwertungvon Altgeräten/Batterien leisten Sieeinen
wichtigenBeitrag zum Schutz unserer Umwelt.
13. Konformitätserklärung
Hiermit erklärt die Hama GmbH &CoKG, dass der
Funkanlagentyp [00054837] der Richtlinie
2014/53/EU entspricht. Der vollständige Text der
EU-Konformitätserklärung ist unter der folgenden
Internetadresse verfügbar:
www.hama.com->00054837->Downloads.
Bluetooth: 2.402 -2.480GHz
Frequenzband/
Frequenzbänder
WiFi: 2.412 -2.472GHz
WiFi: 5.150 -5.350 GHz
WiFi: 5.470 -5.725 GHz
Abgestrahlte maximale
Sendeleistung
Bluetooth: 6dBm (EIRP)
WiFi: 2.4GHz /17dBm (EIRP)
WiFi: 5GHz /16.5dBm (EIRP)
Beschränkungen oder Anforderungen in
Belgien, Bulgarien, Tschechische Republik, Dänemark,
Deutschland, Estland, Irland, Griechenland, Spanien,
Frankreich, Kroatien, Italien, Zypern, Lettland, Litauen,
Luxemburg, Ungarn, Malta, Niederlande, Österreich,
Polen, Portugal, Rumänien, Slowenien, Slowakei, Finnland,
Schweden, Vereinigtes Königreich
Hinweis
Wenn Kanal 36-64 (Kanäle der Frequenz
5150 MHz -5350 MHz) verwendet wird, darf das Gerät
nur in geschlossenen Räumen verwendet werden.
13

F Notice d’utilisation
Éléments de commande et d'affichage
Face avant
1. Touche [MODE]
2. Touche [PLAY/ PAUSE]
3. Touches +/- [VOLUME]
4. Touche [MUTE]
5. Touche [MEMORY]
6. Voyant LED Bluetooth
7. Voyant LED réseau
8. Voyant LED Aux In
9. Voyant LED préréglages
®
Face arrière
10. Sélecteur Mono /L/R
11. Touche [SETUP/ PRESET]
12. Alimentation
13. Prise Aux In
14. Connexion LAN
15. Prise Line Out
16. Prise sortie optique (Optical-Out)
17. Sélecteur pour rétroéclairage
18. Port de mise àjour (Update Port)
Télécommande
1. Touche [POWER]
2. Touche [MUTE]
3. Mode radio Internet
4. Mode radio DAB
5. Mode radio FM
6. Mode AUX
7. Niveau de rétro-éclairage
8. Mode Media Player
9. Touche [MODE]
10. Touche [EQUALIZER]
11. Touche [ALARM]
12. Touche [SLEEP]
13. Touche [SNOOZE]
14. Touche [MENU]
15. Touche [PREVIOUS]
16. Touche [NEXT]
17. Touches de navigation
▲ vers le haut
▼ vers le bas
◄ back/retour
► vers l‘avant, OK
18. Touche [SELECT] (Enter/OK)
19. Touche [REWIND]
20. Touche [FAST-FORWARD]
21. Touches de [VOLUME] +/-
22. Préréglages, touches haut/bas
23. Touche [PLAY/PAUSE]
24. Touche [BACK] (retour)
25. Touches de préréglage (1-10)
26. Menu [PRESETS/FAVORITES]
27. Touche [INFO]
Remarque importante –mode d’emploi :
• Ceci est une notice d’utilisation qui vous fournit des informations de base importantes, par ex. des consignes de
sécurité et des informations concernant la mise en service de votreproduit.
• Pour des raisons écologiques et and’économiser de précieuses matières premières, l’entreprise Hama renonce à
imprimer le mode d’emploi et propose de télécharger celui-ci au format PDF /eManual sur www.hama.com.
• Utilisez la fonction de recherche et saisissez le numérodel’article souhaité pour trouver plus facilement la
documentation du produit.
• Enregistrez ce mode d’emploi sur votreordinateur pourleconsulterultérieurement et imprimez-le, dans la mesure du possible.
14

1. Explication des symboles d‘avertissement et des
remarques
Avertissement
Ce symbole est utilisé pour indiquer des consignes de
sécurité ou pour attirer votreattention sur des dangers
et risques particuliers.
Remarque
Ce symbole est utilisé pour indiquer des informations
supplémentaires ou des remarques importantes.
Risque d’électrocution
Ce symbole indique un risque de contact avec des
parties non isolées du pr
un courant électrique capable de provoquer un risque
d‘électrocution.
2. Contenu de l‘emballage
• Radio internet IR360MBT
• Télécommande
• 2piles LR03/AAA
• Bloc secteur
• Notice d’utilisation, prospectus
3. Consignes de sécurité
• Ce produit est destiné àunusage domestique non
commercial.
• Protégez-le de toute saleté, humidité, surchauffe et
utilisez-le uniquement dans des locaux secs.
• Cet appareil, comme tout appareil électrique, doit être
tenu hors de portée des enfants.
• Protégez-le des secousses violentes et évitez tout choc
ou toute chute.
• N‘utilisez pas le produit au delà des indications
mentionnées dans les caractéristiques techniques.
• Tenez les emballages d‘appareils hors de portée des
enfants, risque d‘étouffement.
• Recyclez les matériaux d‘emballage conformément aux
prescriptions locales en vigueur.
• N’apportez aucune modication àl’appareil. Des
modications vous feraient perdrevos droits de garantie.
oduit susceptibles de conduir
e
Risque d’électrocution
• Ne tentez pas d‘ouvrir l‘appareil et cessez de l‘utiliser
en cas de détérioration.
• Cessez de l‘utiliser en cas de détérioration de
l‘adaptateur CA,ducâble adaptateur ou du câble
d‘alimentation.
• Ne tentez pas de réparer l’appareil vous-même ni
d’effectuer des travaux d’entretien. Faites appel àdes
techniciens qualiés pour effectuer tous les travaux
d’entretien.
Avertissement concernant les piles
• Respectez impérativement la polarité des piles
(indications +et-)lors de leur insertion dans le
boîtier.Risques d‘écoulement et d‘explosion des piles
si tel n‘est pas le cas.
• Ne laissez pas des enfants remplacer les piles d‘un
appareil sans surveillance.
• N’utilisez pas simultanément des piles usagées et des
piles neuves ou des piles de différents types.
• Retirez les piles des produits que vous ne comptez
pas utiliser pendant un certain temps
• Ne court-circuitez pas les piles.
• Ne tentez pas de recharger les piles.
• Ne jetez pas de piles au feu.
• Conservez les piles hors de portée des enfants.
4. Avant la mise en service
Remarque
Une description détaillée de
l’application UNDOK et de toutes les
fonctions est disponible dans notre
guide UNDOK sur :
www.hama.com->00054837->Downloads
15

Consignes d’utilisation
• La commande de la radio internet est possible après
la premièremise en service réussie (cf.chapitre6)à
l’aide de l’application UNDOK via votresmartphone.
Mise en service de la télécommande
Ouvrez le couvercle du compartiment àpiles. Ce
compartiment est situé sur la face arrièredela
télécommande ;faites glisser le couvercle dans la direction
indiquée andel’ouvrir.
Deux piles LR03/AAA sont fournies ;insérez ces piles dans
le compartiment avant la premièremise en service. Veuillez
respecter les indications de polarité lors de l’insertion
des piles ;lapolarité (+ /-)est indiquée àl’intérieur du
compartiment.
5. Mise en service
Remarque
Remarque concernant la premièremise sous
tension
• Lors de la premièremise sous tension, le haut-parleur
démarreenmode SETUP (conguration).
• Les LED (6-8) se mettent àclignoter ;les LED (9)
s’allument en permanence ;lehaut-parleur peut être
uniquement connecté àvotresmartphone au moyen
de l’application UNDOK.
6. UNDOK –tout est entre vos mains
• Le branchement d’autres sources lumineuses ou
de capteurs de luminosité disponibles en option
augmentent la consommation électrique.
5.1 Mise sous tension
• Branchez le câble secteur àune prise de courant.
Avertissement
• Utilisez le produit uniquement branché àune prise
de courant appropriée. La prise de courant doit être
facilement accessible àtout moment.
• Mettez le produit hors tension au moyen de
l’interrupteur On/Off -sicelui-ci n’est pas disponible,
débranchez le câble d’alimentation de la prise de
courant.
• Veuillez patienter jusqu’à la ndelaprocédure
d'initialisation du haut-parleur.
• Appuyez sur la touche [PLAY/PAUSE]
le haut-parleur sous tension.
►II andemettre
L’application UNDOK, développée par Frontier Silicon,
vous permet de commander entièrement des radios et des
haut-parleurs depuis votresmartphone.
UNDOK vous propose toutes les fonctions nécessaires
sur votresmartphone ou votretablette et vous offreainsi
une excellente facilité de commande, qu’il s’agisse de
congurer votreappareil pour la premièrefois, de régler
l’égaliseur,l’option multi-pièces ou de gérer vos stations
préférées.
16

6.1 Interface /disposition de l’écran de démarrage
UNDOK
1
6.2 Première configuration de l’appareil avec UNDOK
Lors de leur premièremise sous tension ou après le
rétablissement des paramètres par défaut, tous les
produits de Hama compatibles avec UNDOK génèrent ce
que l’on appelle un micro-point d’accès (MicroAccess
Point) :ils’agit d’un réseau WiFi propreàl’aide duquel
vous pouvez vous connecter avec votresmartphone ou
4
votretablette.
Remarque
• L’ application UNDOK utilise la langue sélectionnée
dans le système de votresmartphone.
2
3
1 Actualisation de la liste du système audio
2 Aperçu des radios non groupées
3 Conguration d’un nouveau système audio
Icône de gestion pour un groupe multi-pièces
4
existant
Création d’un nouveau groupe multi-pièces
5
avec cet appareil
Vérication de la mise àjour du système de
6
tous les appareils
Informations supplémentaires (informations sur
7
l’application, changement du thème (design)
de l’application, enregistrement des données)
6.2.1 Procédure pour les utilisateurs d’iOS
5
• Ouvrez l’application UNDOK sur votreiPhone ou iPad.
• Appuyez sur l’entrée de menu Congurer un système
audio.
• Assurez-vous que la radio ou le haut-parleur sont bien
en mode de réglage (SETUP). Le cas échéant, rétablissez
les paramètres par défaut du produit. Conrmez la
requête en cliquant sur Suivant.
• UNDOK vous demande alors de vous connecter au
réseau WiFi du produit àl’aide des paramètres de votre
iPhone/iPad :ouvrez les paramètres système de votre
6
iPhone, puis sélectionnez le réseau WiFi (Setup Hama
DIR3120LED, par exemple). Retournez ensuite sur
7
UNDOK et cliquez sur Suivant.
• Donnez un nom àvotreradio(Bureau DIR3120 ou
autre), puis conrmez votresaisie en cliquant sur
Suivant.
• Différentes possibilités de conguration du réseau (le cas
échéant WiFi, WPS et Ethernet) sont alors disponibles.
Cliquez sur la méthode souhaitée ;UNDOK passe alors à
la fenêtresuivante.
• En fonction de la méthode choisie, vous pouvez
sélectionner et congurer le réseau WiFi souhaité, créer
une connexion WPS ou établir la connexion par câble
LAN.
• La radio se connecte alors au réseau et vous pouvez
utiliser l’appareil dans UNDOK en appuyant sur Utiliser
mon système audio.
• Le voyant LED (7) de la connexion au réseau est
désormais allumé en permanence.
17

6.2.2 Procédure pour les utilisateurs d’Android
• Ouvrez l’application UNDOK sur votresmartphone ou
votretablette.
• Appuyez sur l’entrée de menu Congurer un système
audio.
• Assurez-vous que la radio ou le haut-parleur sont bien
en mode de réglage (SETUP). Le cas échéant, rétablissez
les paramètres par défaut du produit. Conrmez la
requête en cliquant sur Suivant.
• Vous trouverez, àlapage suivante, une liste de tous les
réseaux WiFi disponibles ainsi que les systèmes audio
proposés ;leproduit Hama (Setup Hama DIR3120LED
ou autre) devrait y gurer.Sélectionnez le réseau WiFi
concerné.
• Donnez un nom àvotreradio(Bureau DIR3120 ou
autre), puis conrmez votresaisie en cliquant sur
Suivant.
• Différentes possibilités de conguration du réseau (le cas
échéant WiFi, WPS et Ethernet) sont alors disponibles.
Cliquez sur la méthode souhaitée ;UNDOK passe alors à
la fenêtresuivante.
• En fonction de la méthode choisie, vous pouvez
sélectionner et congurer le réseau WiFi souhaité, créer
une connexion WPS ou établir la connexion par câble
LAN.
• La radio se connecte alors au réseau et vous pouvez
utiliser l’appareil dans UNDOK en appuyant sur “Utiliser
mon système audio”.
• Le voyant LED (7) de la connexion au réseau est
désormais allumé en permanence.
7. Auxiliary Input (entrée auxiliaire)
Vous pouvez connecter des appareils mobiles
(smartphone, tablette, lecteur MP3, etc.) àlaradio et ylire
des chiers audio au moyen de l’entrée audio analogique
(prise AUX IN).
• Vous pouvez activer le mode de service Auxiliary Input
(Aux In) sur le haut-parleur en appuyant plusieurs fois
sur la touche [M]/[MODE]:
• Le voyant LED (8) de la connexion Aux In se met à
clignoter.
• Connectez votreappareil mobile àl’entrée audio (prise
AUX IN)delaradio au moyen d’un câble audio de 3,5
mm (jack).
• Le voyant LED (8) de la connexion Aux In est désormais
allumé en permanence.
• Vous pouvez démarrer et commander la lectureaudio via
l'appareil connecté.
8. Bluetooth
Via Bluetooth®,vous pouvez connecter vos appareils
àlaradio et utiliser cette dernièrecomme appareil
de lecture. La commande de la lectures‘effectue
directement sur l‘appareil. Le volume peut être
également réglé sur la radio.
• Veuillez contrôler que votreappareil portable
(téléphone portable, etc.) est bien compatible
Bluetooth
• Veuillez noter que la portée maximale de la
connexion Bluetooth®est de 10 mètres sans
obstacles tels que parois, personnes, etc.
• Il est possible que la connexion soit gênée par
d‘autres appareils/ d‘autres connexions Bluetooth
dans votreenvironnement.
• La radio ne peut êtrecouplée qu‘à un seul appareil
àlafois.
• Veuillez noter que la compatibilité dépend des prols
Bluetooth
utilisées. (voir: Caractéristiques techniques, mode
d‘emploi de l‘appareil utilisé)
En appuyant de nouveau sur [
mode Bluetooth®sur la radio :
®
Remarque –Bluetooth
®
.
®
supportés et des versions Bluetooth
®
®
®
]/[MODE], activez le
[ ]
[ ]
En alternative, appuyez sur la touche [AUX]dela
télécommande pour accéder directement àcemode de
service.
18
8.1 Première connexion Bluetooth®(couplage)
• Assurez-vous que votreappareil Bluetooth est bien sous
tension et que sa fonction Bluetooth est bien activée.
• Activez le mode Bluetooth sur la radio en appuyant
plusieurs fois sur [ ]/[MODE]:
[ ]

• Le voyant LED (6) de la connexion Bluetooth®se met à
clignoter.
• Ouvrez le menu des paramètres Bluetooth®sur votre
appareil portable et attendez que le modèle IR360MBT
apparaisse dans la liste des appareils Bluetooth
®
détectés.
• Le cas échéant, lancez une recherche d'appareils
Bluetooth
®
sur votrepériphérique mobile.
• Sélectionnez IR360MBT,puis patientez jusqu’à ce
que la radio apparaisse comme connectée dans les
paramètres Bluetooth
®
de votreappareil.
• Le voyant LED (6) de la connexion Bluetooth®est
désormais allumé en permanence.
• Vous pouvez démarrer et commander la lectureaudio via
l'appareil connecté.
Remarque –Mot de passe Bluetooth
®
Certains appareils requièrent un mot de passe pour
l`établissement de la connexion avec un appareil
®
Bluetooth
.
• Saisissez le mot de passe 0000 lors de la connexion
avec des radio dans le cas où l´appareil exige la saisie
d´un mot de passe.
9. Nettoyage et entretien
• Nettoyez ce produit uniquement àl’aide d’un chiffon
non pelucheux légèrement humide ;évitez tout
détergent agressif.
• Débranchez l‘adaptateur CA de la source de courant
si vous ne comptez pas utiliser l‘appareil pendant un
certain temps. Entreposez-le dans un local sec, propreet
protégé des rayons directs du soleil.
10. Exclusion de garantie
La société Hama GmbH &CoKGdécline toute
responsabilité en cas de dommages provoqués par une
installation, un montage ou une utilisation non conformes
du produit ou encoreprovoqués par un non respect des
consignes du mode d‘emploi et/ou des consignes de
sécurité.
11. Service et assistance
En cas de question concernant le produit, veuillez vous
adresser au service de conseil produits de Hama.
Ligne téléphonique directe :+49 9091 502-115
(allemand/anglais)
Vous trouverez ici de plus amples informations concernant
l‘assistance :www.hama.com
12. Consignes de recyclage
Remarques concernant la protection de
l’environnement:
Conformément àladirective européenne
2012/19/EU et 2006/66/CE, et and‘atteindreun
certain nombred‘objectifs en matièrede
protection de l‘environnement, les règles suivantes
doivent êtreappliquées: Les appareils électriques et
électroniques ainsi que les batteries ne doivent pas être
éliminés avec les déchets ménagers. Le pictogramme
“picto” présent sur le produit, son manuel d‘utilisation ou
son emballage indique que le produit est soumis àcette
réglementation. Le consommateur doit retourner le
produit/la batterie usager aux points de collecte prévus à
cet effet. Il peut aussi le remettreàunrevendeur.En
permettant ennlerecyclage des produits ainsi que les
batteries, le consommateur contribueraàla protection de
notreenvironnement. C‘est un acte écologique.
13. Déclaration de conformité
Le soussigné, Hama GmbH &CoKG, déclare que
l‘équipement radioélectrique du type [00054837]
est conforme àladirective 2014/53/UE. Le texte
complet de la déclaration UE de conformité est disponible
àl‘adresse internet suivante:
www.hama.com->00054837->Downloads.
Banda obandas de
frecuencia Banda o
bandas de frecuencia
Potencia máxima de
radiofrecuencia
Bluetooth: 2.402 -2.480GHz
WiFi: 2.412 -2.472GHz
WiFi: 5.150 -5.350 GHz
WiFi: 5.470 -5.725 GHz
Bluetooth: 6dBm (EIRP)
WiFi: 2.4GHz /17dBm (EIRP)
WiFi: 5GHz /16.5dBm (EIRP)
Restricciones oRequisitos en
Bélgica, Bulgaria, República Checa, Dinamarca, Alemania,
Estonia, Irlanda, Grecia, España, Francia, Croacia, Italia,
Chipre, Letonia, Lituania, Luxemburgo, Hungría, Malta,
Países Bajos, Austria, Polonia, Portugal, Rumanía,
Eslovenia, Eslovaquia, Finlandia, Suecia, Reino Unido
Nota
Si se emplean los canales 36-64 (frecuencia 5,150GHz
–5,350GHz) en la redWLAN de 5GHz, el producto
solo deberá utilizarse en espacios cerrados.
19

E Instrucciones breves
Elementos de manejo eindicadores
Lado frontal
1. Tecla [MODE]
2. Tecla [PLAY/ PAUSE]
3. Teclas [VOLUME]+/-
4. Tecla [MUTE]
5. Tecla [MEMORY]
6. Indicador LED Bluetooth®
7. Indicador LED red
8. Indicador LED AUX In
9. Indicador LED preajustes
Parte posterior
10. Interruptor corredizo paramono/L/R
11. Tecla [SETUP/ PRESET]
12. Cable de corriente
13. Conector hembraAUX In
14. Puerto LAN
15. Puerto Line Out
16. Puerto Optical Out
17. Interruptor corredizo pararetroiluminación
18. Puerto paraactualización
Mando adistancia
1. Tecla [POWER]
2. Tecla [MUTE]
3. Modo radio Internet
4. Modo radio DAB
5. Modo radio FM
6. Modo AUX
7. Nivel retroiluminación
8. Modo reproductor multimedia
9. Tecla [MODE]
10. Tecla [EQUALIZER]
11. Tecla [ALARM]
12. Tecla [SLEEP]
13. Tecla [SNOOZE]
14. Tecla [MENU]
15. Tecla [PREVIOUS]
16. Tecla [NEXT]
17. Teclas de navegación
▲ Arriba
▼ Abajo
◄ Back/Volver
► Adelante, OK
18. Tecla [SELECT] (Enter/OK)
19. Tecla [REWIND]
20. Tecla [FAST-FORWARD]
21. Teclas de [VOLUME] +/-
22. Teclas preajustes arriba/abajo
23. Tecla [PLAY/PAUSE]
24. Tecla [BACK] (volver)
25. Teclas preajuste (1-10)
26. Menú [PRESETS/FAVORITES]
27. Tecla [INFO]
Nota importante –Instrucciones de manejo:
• Éstas son unas instrucciones breves que le facilitan las informaciones básicas importantes, como las indicaciones de
seguridad ylapuesta en funcionamiento de su producto.
• Pormotivos de protección medioambiental yparaahorrar valiosas materias primas, la empresa Hama prescinde de
instrucciones de manejo impresas yofrece éstas únicamente como descarga de PDF /eManual en www.hama.com.
• Para encontrarlas con más facilidad, utilice la función de búsqueda eintroduzca como término de búsqueda el
númerodeartículo parallegar aladocumentación del producto.
• Guarde estas instrucciones de manejo en su ordenador para nes de consulta eimprímalas de ser posible.
20

1. Explicación de los símbolos de aviso ydelas
indicaciones
Aviso
Se utiliza paracaracterizar las indicaciones de
seguridad oparallamar la atención sobrepeligros y
riesgos especiales.
Nota
Se utiliza paracaracterizar informaciones adicionales o
indicaciones importantes.
Peligrodesufrir una descarga eléctrica
Este símbolo hace referencia al peligrodecontacto con
partes no aisladas del pr
una tensión peligrosa de una intensidad tal que puede
provocar una descarga eléctrica.
2. Contenido del paquete
• Radio por Internet IR360MBT
• Mando adistancia
• 2pilas AAA
• Fuente de alimentación
• Instrucciones breves, prospecto
3. Instrucciones de seguridad
• El producto es paraeluso doméstico privado, no
comercial.
• Proteja el producto de la suciedad, la humedad, el calor
excesivo yutilícelo sólo en recintos secos.
• Este producto, como todos los productos eléctricos, no
debe estar en manos de los niños.
• No deje caer el producto ni lo someta asacudidas
fuertes.
• No opereelproducto fueradelos límites de potencia
indicados en los datos técnicos.
• Mantenga el material de embalaje fueradel alcance de
los niños, existe peligrodeasxia.
• Deseche el material de embalaje en conformidad con las
disposiciones locales sobreeldesecho vigentes.
• No realice cambios en el aparato. Esto conllevaría la
pérdida de todos los derechos de la garantía.
oducto que pueden conducir
Peligrodesufrir una descarga eléctrica
• No abraelproducto ynolosiga operando de
presentar deterioros.
• No utilice el producto si el adaptador de AC,el
adaptador del cable oelcable eléctrico están
dañados.
• No intente mantener oreparar el producto por
cuenta propia. -Encomiende cualquier trabajo de
mantenimiento al personal especializado competente.
Aviso –Pilas
• Respete siemprelapolaridad correcta (símbolos +
y-)delas pilas ycolóquelas como corresponda. La
no observación de lo anterior conlleva el riesgo de
derrame oexplosión de las pilas.
• No permita alos niños cambiar las pilas sin la
supervisión de una persona adulta.
• No mezcle pilas viejas ynuevas, ni tampoco pilas de
tipos ofabricantes diferentes.
• Saque las pilas de los productos que no se vayan a
utilizar durante un periodo prolongado de tiempo.
• No cortocircuite las pilas.
• No cargue las pilas.
• No arroje las pilas al fuego.
• Mantenga las pilas fueradel alcance de los niños.
4. Antes de la puesta en funcionamiento
Nota
Encontrará una descripción detallada
de la aplicación UNDOK ydel alcance
completo de sus funciones en nuestra
guía UNDOK, en:
www.hama.com->00054837->Downloads
21

Instrucciones de manejo
Nota –Alencender por primeravez
• El manejo de la radio de streaming se efectúa, una
vez realizada correctamente la primeraconguración
inicial (véase el capítulo 6), através de su
smartphone, mediante la aplicación UNDOK.
Puesta en funcionamiento del mando adistancia
Retirelacubierta del compartimento de pilas. Esta se
encuentraenellado posterior del mando adistancia yse
puede abrir deslizándola en el sentido marcado.
El volumen de suministroincluye dos pilas AAA que se
deben colocar paraponer en funcionamiento el mando a
distancia. Asegúrese de colocar las pilas con la polaridad
correcta. La polaridad correcta (+ /-)viene marcada en el
compartimento de pilas.
5. Puesta en funcionamiento
Nota
• En estado encendido, las fuentes de luz olos
sensores de luminosidad de conexión yadquisición
opcionales conllevan un consumo energético mayor.
5.1 Encender
• Conecte el cable de corriente con una toma de corriente
correctamente instalada.
Aviso
• Utilice el producto sólo conectado auna toma de
corriente autorizada. La toma de corriente debe estar
fácilmente accesible en todo momento.
• Desconecte el producto de la redeléctrica mediante
el interruptor on/off; de no existir éste, desenchufe el
cable eléctrico de la toma de corriente.
• En el primer encendido, el altavoz se inicia en el
modo SETUP.
• LosLEDs (6-8) comienzan aparpadear,los LEDs (9)
se encienden de forma continua yelaltavoz puede
ahoraconectarse con su smartphone empleando la
aplicación UNDOK.
6. UNDOK -Todo en la palma de su mano
La aplicación (app) UNDOK desarrollada por Frontier
Silicon traslada asusmartphone el control pleno de radios
yaltavoces.
Tanto si desea llevar acabo la conguración inicial del
dispositivo como si desea congurar ecualizadores y
multisala (Multiroom) o, incluso, gestionar sus emisoras
favoritas: UNDOK le ofrece todas las características en el
smartphone otablet y, con ello, aún más confort.
• Espereaque haya concluido la inicialización del altavoz.
• Pulse la tecla [PLAY/PAUSE]
►II paraencender el altavoz.
22

6.1 Interfaz /estructura de la pantalla de inicio
UNDOK
1
2
3
1 Actualizar la lista de sistemas de audio
2 Vista previa pararadios no agrupadas
3 Congurar nuevo sistema de audio
Símbolo de gestión paraungrupo multisala
4
existente
Crear un nuevo grupo multisala con este
5
dispositivo
Comprobar la actualización de los sistemas de
6
todos los dispositivos
Otros datos, como la información sobrela
7
app, cambiar el tema (diseño) de la app y
protocolización de datos
6.2 Configuración inicial del dispositivo con UNDOK
Todos los productos de Hama compatibles con UNDOK
generan, con el primer encendido ouna vez restablecidos
sus ajustes de fábrica, lo que se denomina un Micro
Access Point, es decir,una redWLAN propia através de la
cual puede conectarse con su tablet osmartphone.
4
Nota
• La aplicación UNDOK emplea el idioma seleccionado
en el sistema de su smartphone.
6.2.1 Procedimiento para usuarios de iOS
• Abralaaplicación UNDOK en su iPhone oiPad
• Pulse el punto de menú Congurar sistema de audio
5
• Asegúrese de que la radio oelaltavoz se encuentraen
el modo SETUP.Asimismo, restablezca el producto alos
ajustes de fábrica. Conrme, cuando se le consulte, con
Siguiente
• UNDOK le solicita ahoraconectarse, através de
los ajustes de iPhone/iPad, con la redWLAN del
producto. Para ello, pase alos ajustes de sistema del
iPhone yseleccione la redWLAN (p. ej. Setup Hama
DIR3120LED). Seguidamente, vuelva aUNDOK ypulse
Siguiente
6
• Ahora, otorgue la denominación que desee alaradio (p.
ej. Ocina DIR3120) yconrme con Siguiente
7
• Ahoratiene asudisposición las diferentes posibilidades
de conguración de la red(según el caso, WLAN, WPS
yEthernet). Haga clic en el método deseado yUNDOK
pasa alasiguiente ventana
• Según el método elegido, ahorapuede seleccionar
congurar la redWLAN deseada, establecer una
conexión WPS oestablecer la conexión mediante cable
LAN.
• Finalmente, la radio se conecta con la redyusted puede
emplear el dispositivo desde UNDOK pulsando Emplear
mi sistema de audio
• El indicador LED (7) de la conexión de redseenciende
ahoradeforma continua.
23

6.2.2 Procedimiento para usuarios de Android
• Abralaapp UNDOK en su tablet osmartphone
• Pulse el punto de menú Congurar sistema de audio
• Asegúrese de que la radio oelaltavoz se encuentraen
el modo SETUP.Asimismo, restablezca el producto alos
ajustes de fábrica. Conrme, cuando se le consulte, con
Siguiente
• En la siguiente página encontrará una lista de todas
las redes WLAN disponibles, así como los sistemas de
audio propuestos, entrelos que debería encontrarse el
producto Hama (p. ej. Setup Hama DIR3120LED). Pulse
sobrelared WLAN correspondiente.
• Ahora, otorgue la denominación que desee alaradio (p.
ej. Ocina DIR3120) yconrme con Siguiente
• Ahoratiene asudisposición las diferentes posibilidades
de conguración de la red(según el caso, WLAN, WPS
yEthernet). Haga clic en el método deseado yUNDOK
pasa alasiguiente ventana
• Según el método elegido,ahorapuede seleccionar
congurarlared WLAN deseada, establecer una conexión
WPSoestablecer la conexión mediante cableLAN.
• Finalmente, la radio se conecta con la redyusted puede
emplear el dispositivo desde UNDOK pulsando «Emplear
mi sistema de audio».
• El indicador LED (7) de la conexión de redseenciende
ahoradeforma continua.
7. Entrada auxiliar
La entrada de audio analógica (puerto AUX IN)permite
conectar dispositivos móviles (p. ej. smartphones, tabletas,
reproductores MP3, etc.) alaradio yreproducir los
archivos de audio através de la radio.
8. Bluetooth®
Puede conectar sus terminales alaradio vía Bluetooth
emplearla como dispositivo de reproducción. En tal caso,
el control de la reproducción se realiza directamente desde
el terminal. El volumen también se puede regular desde
la radio.
®
en la radio:
®
Nota –Bluetooth
• Compruebe si su terminal móvil (smartphone, tableta,
etc.) es compatible con Bluetooth®.
• Tenga en cuenta que el alcance de la tecnología
• Pueden producirse interferencias en la conexión
• La radio solo puede sincronizarse con un único
• Tenga en cuenta que la compatibilidad depende de
Pulse repetidamente [M]/[MODE]paraactivar el modo
operativo Bluetooth
®
Bluetooth
obstáculos, como pueden ser las paredes, personas,
etc.
debido aotros dispositivos oconexiones Bluetooth
presentes en el entorno.
terminal.
los perles Bluetooth®compatibles ydelas versiones
Bluetooth®empleadas. (Véase: Datos técnicos,
instrucciones de manejo del terminal empleado)
es de máx. 10 metros, en ausencia de
®
®
[ ]
y
• Active, pulsando repetidamente [M]/[MODE], el modo
operativo Auxiliary Input (entrada auxiliar o AUX IN)en
el altavoz:
[ ]
Alternativamente, pulse [AUX]enelmando adistancia,
paraconmutar automáticamente adicho modo operativo.
• El indicador LED (8) de la conexión AUX In comienza a
parpadear.
• Conecte su dispositivo móvil ylaentrada de audio
(puerto AUX IN) de la radio mediante un cable de audio
de 3,5 mm (cable con jack).
• El indicador LED (8) de la conexión AUX In se enciende
ahoradeforma continua.
• Inicie ycontrole la reproducción de audio según
corresponda mediante el terminal conectado.
24
8.1 Conexión inicial Bluetooth®(sincronización)
• Asegúrese de que su terminal compatible con
Bluetooth®está encendido ydeque se ha activado
®
Bluetooth
• Pulse repetidamente [M]/[MODE]paraactivar el modo
operativo Bluetooth
.
®
en la radio:
[ ]

• El indicador LED (6) de la conexión Bluetooth®comienza
aparpadear.
• En el terminal, abralaconguración Bluetooth®yespere
hasta que se muestre IR360MBT en la lista de los
dispositivos Bluetooth®encontrados.
• De ser necesario, inicie la búsqueda de dispositivos
Bluetooth®desde su terminal.
• Seleccione IR360MBT yesperehasta que la radio se
muestrecomo conectada en la conguración Bluetooth
de su terminal.
• El indicador LED (6) de la conexión Bluetooth®se
enciende ahoradeforma continua.
• Inicie ycontrole la reproducción de audio según
corresponda mediante el terminal.
Nota –Contraseña Bluetooth
®
• Algunos terminales requieren una contraseña parala
conguración de la conexión con otros dispositivos
®
Bluetooth
.
• Introduzca la contraseña 0000 paralaconexión con
el altavoz si el terminal lo requiriese.
9. Mantenimiento ycuidado
• Limpie este producto sólo con un paño ligeramente
humedecido que no deje pelusas ynoutilice detergentes
agresivos.
• Si no va autilizar el producto durante un periodo
prolongado de tiempo, apague el aparato y
desconéctelo de la alimentación de corriente. Guárdelo
en un lugar limpio yseco que no esté expuesto ala
radiación directa del sol.
10. Exclusión de responsabilidad
Hama GmbH &CoKGnose responsabiliza ni concede
garantía por los daños que surjan por una instalación,
montaje omanejo incorrectos del producto opor la no
observación de las instrucciones de manejo y/o de las
instrucciones de seguridad.
11. Servicio ysoporte
Si tiene que hacer alguna consulta sobreelproducto,
diríjase al asesoramiento de productos Hama.
Línea directa: +49 9091 502-115 (Alemán/Inglés)
Encontrar más información de soporte aquí:
www.hama.com
12. Instrucciones para desecho yreciclaje
®
Nota sobrelaprotección medioambiental:
Después de la puesta en marcha de la directiva
Europea 2012/19/EU y2006/66/EU en el sistema
legislativo nacional, se aplicaralosiguiente: Los
aparatos eléctricos yelectrónicos, así como las
baterías, no se deben evacuar en la basuradoméstica. El
usuario está legalmente obligado allevar los aparatos
eléctricos yelectrónicos, así como pilas ypilas recargables,
al nal de su vida útil alos puntos de recogida comunales
oadevolverlos al lugar donde los adquirió. Losdetalles
quedaran denidos por la ley de cada país. El símbolo en
el producto, en las instrucciones de uso oenelembalaje
hace referencia aello. Gracias al reciclaje, al reciclaje del
material oaotras formas de reciclaje de aparatos/pilas
usados, contribuye Usted de forma importante ala
protección de nuestromedio ambiente.
13. Declaración de conformidad
Porlapresente, Hama GmbH &CoKG, declara
que el tipo de equipo radioeléctrico [00054837]
es conforme con la Directiva 2014/53/UE. El texto
completo de la declaración UE de conformidad está
disponible en la dirección Internet siguiente:
www.hama.com->00054837->Downloads.
Banda obandas de
frecuencia Banda o
bandas de frecuencia
Potencia máxima de
radiofrecuencia
Bluetooth: 2.402 -2.480GHz
WiFi: 2.412 -2.472GHz
WiFi: 5.150 -5.350 GHz
WiFi: 5.470 -5.725 GHz
Bluetooth: 6dBm (EIRP)
WiFi: 2.4GHz /17dBm (EIRP)
WiFi: 5GHz /16.5dBm (EIRP)
Restricciones oRequisitos en
Bélgica, Bulgaria, República Checa, Dinamarca, Alemania,
Estonia, Irlanda, Grecia, España, Francia, Croacia, Italia,
Chipre, Letonia, Lituania, Luxemburgo, Hungría, Malta,
Países Bajos, Austria, Polonia, Portugal, Rumanía,
Eslovenia, Eslovaquia, Finlandia, Suecia, Reino Unido
Nota
Si se emplean los canales 36-64 (frecuencia 5,150GHz
–5,350GHz) en la redWLAN de 5GHz, el producto
solo deberá utilizarse en espacios cerrados.
25

R Краткое руководство
Органы управления ииндикации
Передняя панель
1. Кнопка [MODE]
2. Кнопка [PLAY/ PAUSE]
3. Кнопки [VOLUME]+/−
4. Кнопка [MUTE]
5. Кнопка [MEMORY]
6. Индикатор Bluetooth
7. Индикаторсетевогосоединения
8. Индикаторвхода AUX IN
9. Индикаторпресета
®
Задняя панель
10. Переключатель стремя положениями:Mono /L/R
11. Кнопка [SETUP/ PRESET]
12. Кабель питания
13. Разъем AUX IN
14. Разъем LAN
15. Разъем Line-Out
16. Разъем Optical-Out
17. Переключатель режимов фоновой подсветки
18. Портдля обновления
Пультдистанционногоуправления
1. Кнопка [POWER]
2. Кнопка [MUTE]
3. Режим интернет-радио
4. Режим DAB-радио
5. Режим ЧМ-радио
6. Режим AUX
7. Яркость подсветки
8. Режим медиаплеера
9. Кнопка [MODE]
10. Кнопка [EQUALIZER]
11. Кнопка [ALARM]
12. Кнопка [SLEEP]
13. Кнопка [SNOOZE]
14. Кнопка [MENU]
15. Кнопка [PREVIOUS]
16. Кнопка [NEXT]
17. Кнопки перемещения по пунктам меню
▲ Вверх
▼ Вниз
◄ Назад
► Вперед,OK
18. Кнопка [SELECT] (Enter/OK)
19. Кнопка [REWIND]
20. Кнопка [FAST-FORWARD]
21. Кнопки перемещения [VOLUME] +/-
22. Кнопки предустановки ВВЕРХ / ВНИЗ
23. Кнопка [PLAY/PAUSE]
24. Кнопка [BACK] (Назад)
25. Кнопки предустановки (1-10)
26. Меню [PRESETS/FAVORITES]
27. Кнопка [INFO]
Важное примечание — Руководство по эксплуатации:
• Этократкое руководство, вкотором содержатсяважные базовые сведения, такие как указания по техникебезопасности ивводу
вэксплуатацию устройства.
• Из соображений охраны окружающей среды иэкономии ценных сырьевых ресурсов фирма Hama отказывается от
использования печатных руководств по эксплуатации ипредлагает их исключительно для загрузки вформате PDF или ввиде
электронногоруководства на сайте www .hama.com.
• Чтобы легче найти нужную информацию, используйте функцию поиска. Встрокепоиска введите номер изделия, чтобы
получить доступ кдокументации по этому изделию.
• Сохраните настоящее руководство по эксплуатации на компьютере, чтобы при необходимости всегда была возможность им
воспользоваться, иповозможности распечатайте его.
26
 Loading...