

Hama EWS-165 User Manual [ru]
Wetterstation
00
092659
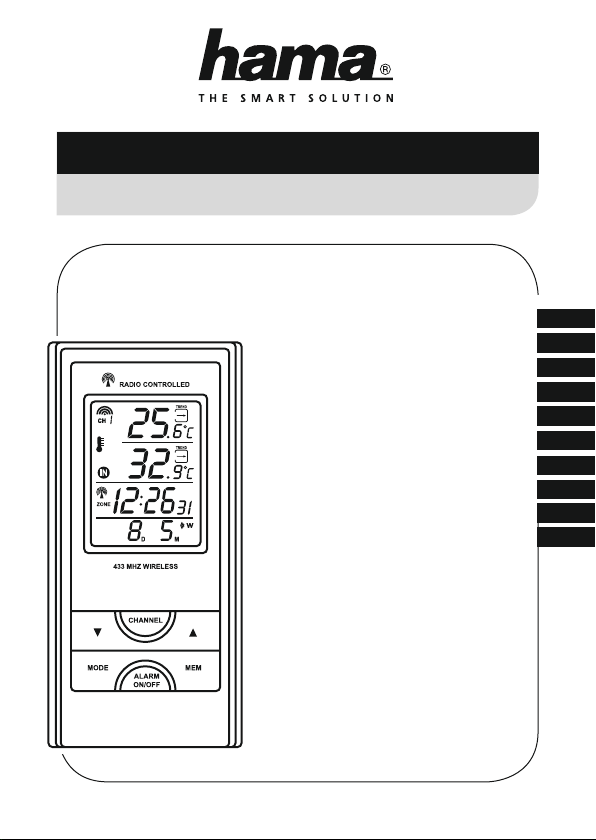
EWS-165Weather Station
Operating Instructions
Bedienungsanleitung
Instrucciones de uso
Руководство по эксплуатации
Istruzioni per l‘uso
Οδηγίες χρήσης
Instrukcja obsługi
Návod k použití
Návod na použitie
Manual de utilizare
GB
D
E
RUS
I
GR
PL
CZ
SK
RO
A
20
1
2
3
4
5
6
7
14
17
8
9
10
11
12
13
15
16
19
18
21
23
22
B
25
26
27
24
28
G Operating instruction
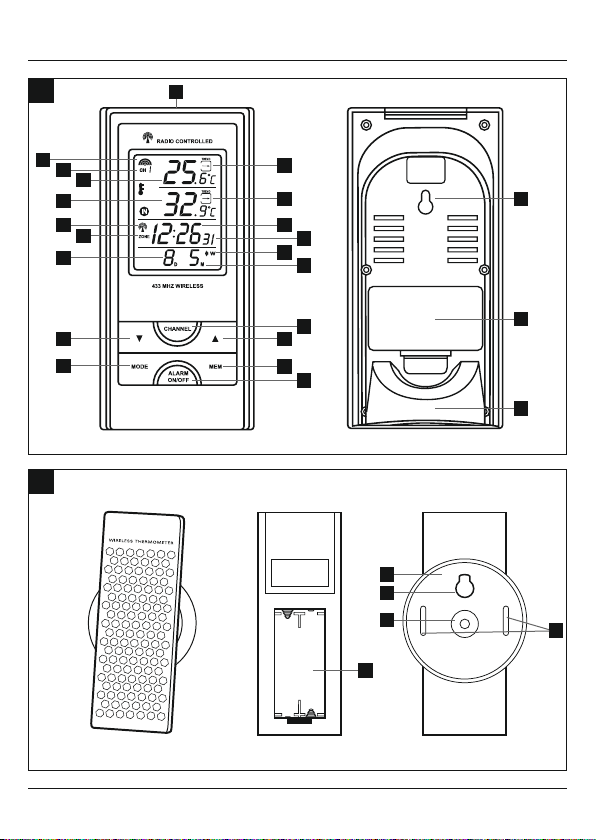
Controls and Displays
A Base station
1.
Measuring station wir
2. Channel display
3. Outdoor temperature
4. Room temperature
5. Wireless symbol
6. Time zone
7. Day
8. Outdoor temperature trend
9. Room temperature trend
10. Time
11. Weekday / seconds
12. Alarm symbol
13. Month
14. button
= reducing the current setting / manually searching for
the signal from the measuring station
15. CHANNEL button
= channel selection
16. ▲ button
= increasing the current setting / activating/ deactivating
manual radio signal reception
17. MODE button
= Einstellungen / Bestätigung des Einstellungswerts
/ Wechsel zwischen Sekunden-, Wochentag- und
Zeitzonenanzeige
18. ALARM ON/OFF button
= display / setting alarm modes
19. MEM button
= accessing/ resetting the stored maximum/minimum
values
20. SNOOZE button
= stops the alarm
21. Opening for wall mounting
22. Base
23. Battery compartment
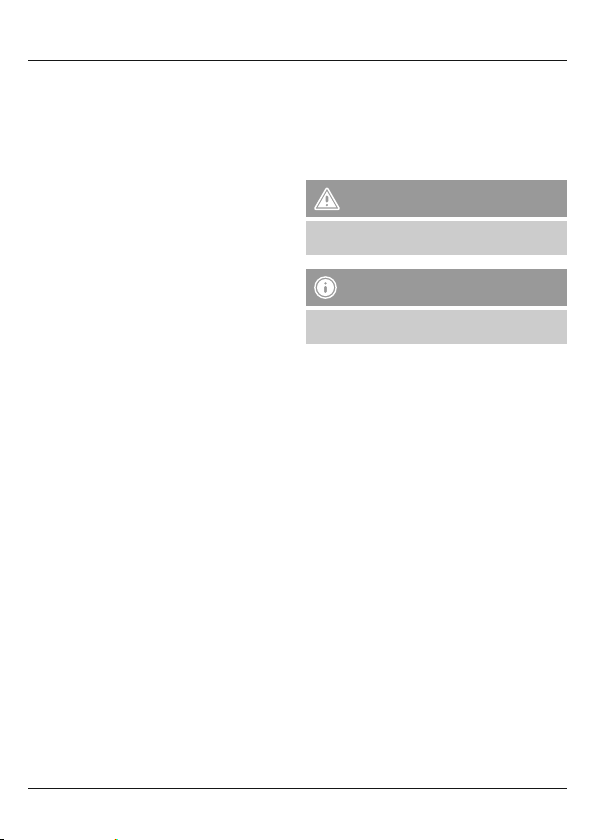
B Measuring station
24. Battery compartment
25. Mounting plate
26. Cut-out for vertical mounting
27. Cut-out for horizontal mounting
28. Clips
eless symbol
Thank you for choosing a Hama product.
Take your time and read the following instructions and
information completely. Please keep these instructions in a
safe place for future reference. If you sell the device, please
pass these operating instructions on to the new owner.
1. Explanation of Warning Symbols and Notes
Warning
This symbol is used to indicate safety instructions or to
draw your attention to specic hazards and risks.
Note
This symbol is used to indicate additional information or
important notes.
2. Package Contents
•Weather station EWS-165
(base station for indoor/outdoor measuring station)
•Base
•2x AAA batteries
•2x AA batteries
•These operating instructions
3. Safety Instructions
•The product is intended for private, non-commercial use
only.
•Do not operate the product outside the power limits given
in the specications.
•Do not use the product in moist environments and avoid
splashes.
•Do not use the product in the immediate vicinity of heaters
or other heat sources or in direct sunlight.
•Do not use the product in areas where the use of electronic
devices is not permitted.
•Do not place the product near interference elds, metal
frames, computers, TVs, etc. Electronic devices and window
frames can negatively affect the product’s functionality.
•Do not drop the product and do not expose it to any
major shocks.
•Do not open the device or continue to operate it if it
becomes damaged.
•Do not attempt to service or repair the product yourself.
Leave any and all service work to qualied experts.
2
•Keep the packaging material out of the reach of children
due to the risk of suffocation.
•Dispose of packaging material immediately according to
locally applicable regulations.
•Do not modify the product in any way. Doing so voids the
warranty.
Warning – Batteries
•Immediately remove and dispose of dead batteries from
the product.
•Only use batteries (or rechargeable batteries) that
match the specied type.
•Do not mix old and new batteries or batteries of a
different type or make.
•When inserting batteries, note the correct polarity (+
and - markings) and insert
the batteries accordingly. Failure to do so could result in
the batteries leaking or exploding.
•Do not charge batteries.
•Keep batteries out of the reach of children.
•Do not short circuit the batteries/rechargeable batteries
and keep them away from uncoated metal objects.
4. Getting Started
4.1. Inserting the batteries
Measuring station
•Open the battery compartment (24) and remove the
contact breaker. Replace the battery compartment cover.
Base station
•Open the battery compartment (23) and remove the
contact breaker. Replace the battery compartment cover.
4.2. Replacing the batteries
Measuring station
•Open the battery compartment (24), remove and properly
dispose of the dead batteries and insert two new AAA
batteries with the correct polarity. Replace the battery
compartment cover.
Base station
•Open the battery compartment (23), remove and properly
dispose of the dead batteries and insert two new AA
batteries with the correct polarity. Replace the battery
compartment cover.
Note
Before use, ensure you insert the batteries in the
measuring station rst and then in the base station.
5. Installation
Note – Installation
•We recommend initially placing the base and
measuring stations in the intended locations without
installing them and making all the settings described in
6. Operation – to do.
•Only install the stations once the appropriate settings
have been made and a stable wireless connection is
established.
Note
•The wireless transmission range between the measuring
and base stations is up to 30 m in open spaces.
•Before installation, ensure that wireless transmission
will not be disrupted by interference or obstacles like
buildings, trees, vehicles, high-voltage lines, etc.
•Before the nal installation, ensure that there is
sucient reception between the intended installation
locations.
•When installing the measuring station, ensure that it is
protected from direct sunlight and rain.
•The international standard height for measuring air
temperature is 1.25 m (4 ft) above ground.
Warning
•Buy special or suitable installation material from a
specialised dealer for wall-mounting.
•Ensure that no faulty or damaged parts are installed.
•Never apply force during installation. This could
damage the product.
•Before installation, ensure that the chosen wall is
suitable for the weight to be mounted, and make sure
that there are no electrical wires, water, gas or other
lines at the installation site on the wall.
3

5.1. Base station
•Use the base (22) to position the base station on a level
surface.
•Alternatively, you can install the base station on a wall
using the opening (21) on the back.
5.2. Measuring station
•You can fasten the measuring station horizontally or
vertically to an outer wall using a mounting plate (25).
•If you want to mount the measuring station horizontally,
use rawl plugs, screws, etc. to fasten the mounting plate
(25) using the central cut-out (27) to the wall intended
for installation.
•If you want to mount the measuring station vertically, use
rawl plugs, screws, etc. in the wall intended for installation
and hang the mounting plate (25) using cut-out (26).
•Gently push the measuring station until you hear a latching
sound (“click”) as it engages with the clips (28).
6. Operation
Note – Input
Hold down the ▲ button (16) or the button (14) to
select the values faster.
6.1. Connection to the measuring station
•After you insert the batteries, the base station automatically
searches for a connection to the measuring station and
performs initial setup.
Note
•Initial setup takes approx. 2 minutes.
•During connection, the wireless symbol on the
measuring station will ash (1).
•Do not press any buttons during setup. Otherwise,
values may not be transmitted correctly and there is a
risk of value errors and inaccuracies.
•The setup process is completed when the indoor (4)
and outdoor (3) measurement data is displayed.
•The measured value is automatically updated by the
base device about every 45 seconds.
•If the temperature is outside of the measuring range,
--.- (lower than minimum temperature) or --.- (higher
than maximum temperature) will appear on the
temperature display.
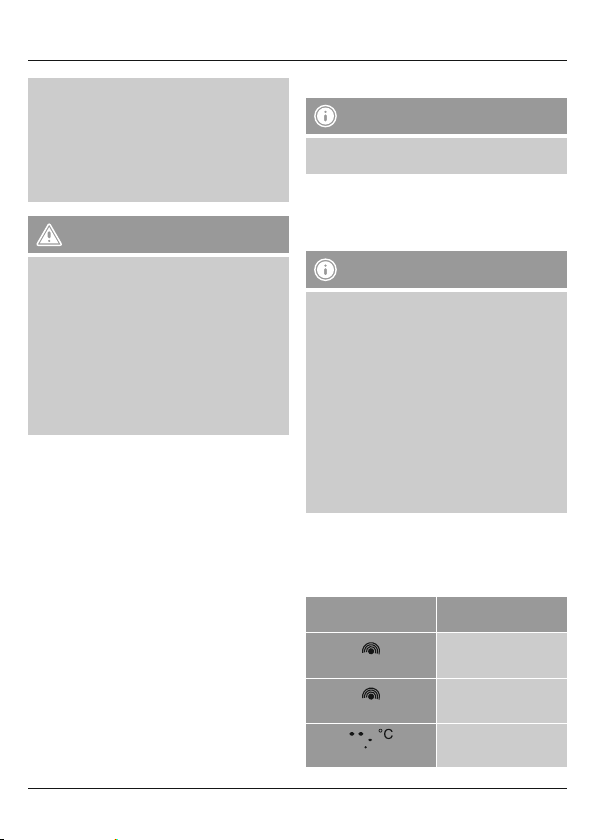
•If the base station still does not receive a signal from the
measuring station, press and hold the button (14) for
approx. 3 seconds to start the manual search for th
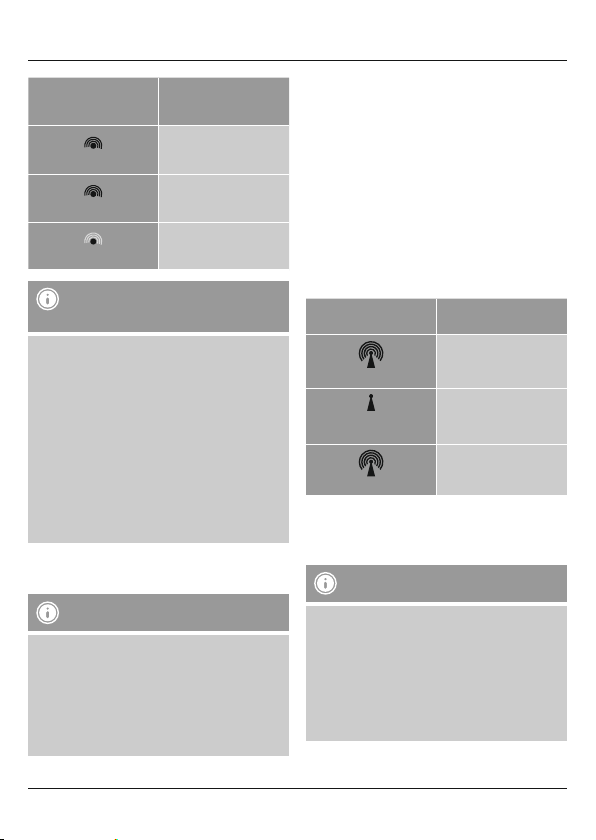
Display
Display ashing
Displayed continuously
Displayed continuously
Note – Faulty transfer of measured values
•In isolated cases, interference - e.g. from a WLAN
network, a computer or a television set - can cause the
transfer of measured values between the measuring
station and the base station to fail.
•In this case, you must resynchronise the stations by
briey removing the batteries from both stations and
reinserting them.
•If the measured values are not transferred again once
the batteries are inserted, replace the batteries with
new ones.
•If necessary, select a new location for the base station
in order to avoid possible interference in the future.
6.2. Selecting the channel/other measuring stations
Note
•You can install two more measuring stations in addition
to the included measuring station. Ensure that the base
and measuring stations are set to the same channel.
Visit www.hama.com for suitable measuring stations.
•The transmission channel on the supplied measuring
station cannot be changed/set (CH1).
•Press the CHANNEL button (15) repeatedly to set the
channel to that set on the respective measuring station.
CH1, CH2 or CH3 (2)is displayed.
Search for a signal from the
measuring station
Active
Successful –
signal is being received
Inactive –
no signal reception
4

•Select CH1 if you are only using the measuring station
supplied.
•The base station now shows the data measured (3) on the
selected measuring station (2).
6.3. Basic and manual settings
Automatic setting using the DCF signal
After the rst time the base station is switched on and
successful transmission is established between the base
station and the measuring station, the clock will automatically
search for a DCF signal. During the search, the wireless
symbol (5) will ash.
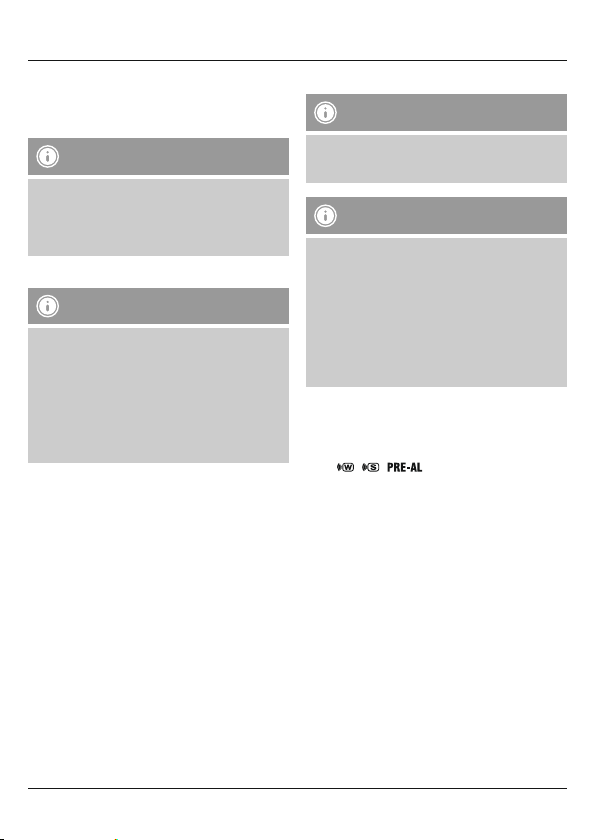
Display Searching for the DCF signal
Display ashing
No display /
Displayed continuously
Displayed continuously
•If the station still does not receive a signal, press and
hold the ▲ button (16) for approx. 3 seconds to start the
manual search for the DCF signal. The wireless symbol (5)
will start to ash.
Note – Time settings
•The search process takes about 3-10 minutes. If the
search fails, it ends and is repeated at the next clock
hour.
•In the meantime you can, however, set the time and
the date manually.
•The clock automatically continues to search for the DCF
signal every hour. If the signal is received successfully,
the manually set time and date are overwritten. The
clock automatically continues to search for the DCF
signal every hour. If the signal is received successfully,
the manually set time and date are overwritten.
Active
Inactive –
no signal reception
Successful –
signal is being received
•Press and hold the ▲ button (16) again for approx. 3
seconds to stop the manual search. The wireless symbol
(5) will go out.
Note – Summer time
•The clock automatically switches to summer time.
•Please note that DCF signal reception is required for
automatic summer time switch-over. If necessary, start
the DCF signal search manually.
Manually setting the date/time
Note – Time and time zone
•In press the MODE button(17) repeatedly to toggle
between the following different displays:
•Time with seconds display, time with weekday display,
time adjusted according to time zone with weekday
display, time adjusted according to time zone with
seconds display
•The time zone symbol (6) is displayed when the time
has been adjusted according to the time zone.
•Press and hold the MODE button (17) for approx. 3
seconds to make the following settings one after the other:
•Year (10)
•Month (13)
•Day (7)
•D/M – M/D (7/13) display
•12/24 hour format (10)
•Hours (10)
•Minutes (10)
•Weekday (11)
•Time zone (10)
•Temperature unit (°C / °F) (11)
•To select the individual values, press the ▲ button (16) or
the button (14) and conrm each selection by pressing
the MODE button (17).
•Press the MODE button (17) to adopt the set value
displayed and to skip.
•If you do not make an entry for 2 minutes, you
automatically exit the setup mode.
5

Note – Weekday
You can choose from German (DE), English (EN), Swedish
(SW), Dutch (DU), Spanish (SP), Italian (IT) or French (FR)
for the weekday display.
Setting the time zone
Note – Time zone
•The DCF signal can be received over long distances,
but always transmits the current Central European
Time in Germany. Make sure you account for the time
difference in countries with another time zone.
•If you are in Moscow, the time is 3 hours later than in
Germany. This means that you should set +3 for the
time zone. The clock then automatically sets the time to
3 hours after the DCF signal received or relative to the
manually set time.
Alarm
•In repeatedly press the ALARM ON/OFF button (18) to
display the different alarms. The respective alarm symbols
(12) / / and the corresponding alarm
time/time interval and/or OFF are displayed.
•Press and hold the ALARM ON/OFF button (18) for
approx. 3 seconds to set the alarm time of the alarm
displayed. The hours display/time interval starts to ash.
•Press the ▲ button (16) or the button (14) to select
the hour for the alarm time/time interval and conrm your
selection by pressing the ALARM ON/OFF button (18).
The minutes display begins to ash. The early alarm is
already activated after conrming the time interval.
•Repeat the process to set the minutes for the alarm time.
•Press the ALARM ON/OFF button (18) repeatedly to also
set the other alarm mode or return to the time display (10).
•If you do not make an entry for 2 minutes, you
automatically exit the setup mode.
Note – Alarm
•When activated, the weekday alarm only triggers an
alarm on weekdays (Monday to Friday). The alarm
symbol (12)
•When activated, the once-only alarm only triggers an
alarm once. The alarm symbol (12)
if this alarm is activated. This alarm is automatically
deactivated after the alarm has sounded.
•When activated and when the outside temperature is <
0°C/ 32°F, the early alarm triggers an alarm 15, 30, 45,
60 or 90 minutes before the actual alarm (
alarm is activated.
•To determine whether the alarm should be triggered,
the set alarm time is compared to the currently
displayed time (whether normal or time zone-shifted).
•In the corresponding display, press the ▲ button (16) or
the button (14) to activate/deactivate the corresponding
alarm.
The alarm symbol (12) will appear/not appear.
The early alarm can only be activated if at least one of
the two alarm functions ( / ) has already been
activated.
•If the alarm is triggered, the alarm symbol (12) will begin
to ash and an alarm will sound.
•Press the ALARM ON/OFF button (18) to stop the alarm.
Otherwise, it will stop automatically after 2 minutes.
Otherwise, after two minutes snooze mode is activated
automatically.
•While the alarm signal is sounding, press the SNOOZE
button (20) to activate the snooze function. The alarm
symbol (12) begins to ash in the display. The alarm
signal is stopped for 8 minutes, after which it will
sound again.
•The snooze function can be activated three consecutive
times.
is displayed if this alarm is activated.
is displayed
). The alarm symbol (12) is displayed if this
Note – Early alarm
Note – Snooze function
and/or
6

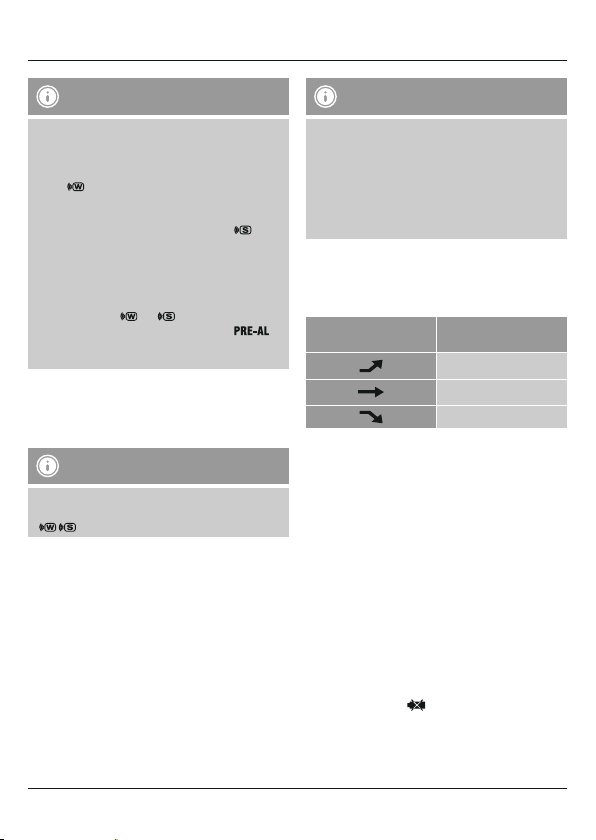
6.4. Weather
•The weather station indicates a trend as to how the values
for the outdoor temperature (8), room temperature (9) are
likely to develop over the next few hours.
Display Trend
Increasing
Constant
Decreasing
6.5. Maximum and minimum temperature values
•The base station automatically stores the maximum and
minimum outdoor/indoor temperature.
•Repeatedly press the MEM button(19) to switch between
the current temperature, minimum temperature (MIN)
and maximum temperature (MAX). The maximum and
minimum temperatures are displayed for 10 seconds.
•Press and hold the MEM button (19) for approx. 3 seconds
to reset the stored maximum and minimum values.
6.6 Low battery capacity
Measuring station
If the batteries need to be replaced, the symbol for low
battery charge will appear next to the outdoor
temperature display on the base device. Replace the batteries
immediately.
Base station
If the batteries need to be replaced, the symbol for low
battery charge will appear next to the time display on
the base device. Replace the batteries immediately.
Note – Replacing the batteries
•Note that the stations have to be resynchronised each
time after you change the batteries in the measuring
or base station.
•To do this, remove the batteries from the other station
and then reinsert them, or change them as required.
7. Care and Maintenance
Only clean this product with a slightly damp, lint-free cloth
and do not use aggressive cleaning agents. Make sure that
water does not get into the product.
8. Warranty Disclaimer
Hama GmbH & Co KG assumes no liability and provides no
warranty for damage resulting from improper installation/
mounting, improper use of the product or from failure to
observe the operating instructions and/or safety notes.
9. Service and Support
Please contact Hama Product Consulting if you have any
questions about this product.
Hotline: +49 9091 502-115 (German/English)
Further support information can be found here:
www.hama.com
10. Technical Data
Base station
Power supply
Measuring range
Temperature
Measurement
increments
Temperature
Temperature
measurement cycle
Radio-controlled
DCF clock
Max. number of
measuring stations
Frequency 433 MHz
3,0 V
2 x AA batteries
-5°C – +50°C/
23°F – 122°F
0,1°C / 0,2°F 0,1°C / 0,2°F
~ 45 s~45 s
Measuring station
3,0 V
2 x AAA batteries
-10°C – +60°C/
14°F – 140°F
YesNo
3
Range ≤ 30 m
7
11. Recycling Information
Note on environmental protection:
After the implementation of the European
Directive 2012/19/EU and 2006/66/EU in the
national legal system, the following applies:
Electric and electronic devices as well as batteries
must not be disposed of with household waste.
Consumers are obliged by law to return electrical and
electronic devices as well as batteries at the end of their
service lives to the public collecting points set up for this
purpose or point of sale. Details to this are dened by the
national law of the respective country. This symbol on the
product, the instruction manual or the package indicates that
a product is subject to these regulations. By recycling, reusing
the materials or other forms of utilising old devices/batteries,
you are making an important contribution to protecting our
environment.
12. Declaration of Conformity
Hereby, Hama GmbH & Co KG declares that the
radio equipment type [00092659] is in compliance
with Directive 2014/53/EU. The full text of the EU
declaration of conformity is available at the following internet
address: www.hama.com ->00092659 -> Downloads.
Frequency band(s) 433,05-434,790 MHz
Maximum radio-frequency
power transmitted
8
3,02 µW

D Bedienungsanleitung
Bedienungselemente und Anzeigen
A Basisstation
1. Funksymbol Messstation
2. Kanalanzeige
3. Außentemperatur
4. Raumtemperatur
5. Funksymbol
6. Zeitzone
7. Tag
8. Außentemperaturtendenz
9. Raumtemperaturtendenz
10. Uhrzeit
11. Wochentag / Sekunde
12. Alarmsymbol
13. Monat
14. -Taste
= Verringerung des aktuellen Einstellungswertes /
Manuelle Suche nach Signal von der Messstation
15. CHANNEL-Taste
= Kanalauswahl
16. ▲-Taste
= Erhöhung des aktuellen Einstellungswertes /
Aktivierung/ Deaktivierung manueller FunksignalEmpfang
17. MODE-Taste
= Einstellungen / Bestätigung des Einstellungswerts /
Wechsel zwischen Sekunden-, Wochentag- und
Zeitzonenanzeige
18. ALARM ON/OFFF-Taste
= Anzeige / Einstellung Alarm-Modi
19. MEM-Taste
= Abruf/ Reset der gespeicherten Höchst-/ Tiefstwerte
20. SNOOZE-Taste
= Unterbrechung des Wecksignals
21. Aussparung für Wandmontage
22. Standfuß
23. Batteriefach
B Messstation
24. Batteriefach
25. Montageplatte
26. Aussparung für senkrechte Befestigung
27. Aussparung für waagerechte Befestigung
28. Clips
Vielen Dank, dass Sie sich für ein Hama Produkt entschieden
haben!
Nehmen Sie sich Zeit und lesen Sie die folgenden
Anweisungen und Hinweise zunächst ganz durch. Bewahren
Sie diese Bedienungsanleitung anschließend an einem
sicheren Ort auf, um bei Bedarf darin nachschlagen zu
können. Sollten Sie das Gerät veräußern, geben Sie diese
Bedienungsanleitung an den neuen Eigentümer weiter.
1. Erklärung von Warnsymbolen und Hinweisen
Warnung
Wird verwendet, um Sicherheitshinweise zu kennzeichnen
oder um Aufmerksamkeit auf besondere Gefahren und
Risiken zu lenken.
Hinweis
Wird verwendet, um zusätzlich Informationen oder
wichtige Hinweise zu kennzeichnen.
2. Packungsinhalt
•Wetterstation EWS-165
(Basisstation für den Innenbereich / Messstation für den
Außenbereich)
•Standfuß
•2AAA Batterien
•2AA Batterien
•diese Bedienungsanleitung
3. Sicherheitshinweise
•Das Produkt ist für den privaten, nicht-gewerblichen
Haushaltsgebrauch vorgesehen.
•Betreiben Sie das Produkt nicht außerhalb seiner in den
technischen Daten angegebenen Leistungsgrenzen.
•Verwenden Sie das Produkt nicht in einer feuchten
Umgebung und vermeiden Sie Spritzwasser.
•Betreiben Sie das Produkt nicht in unmittelbarer Nähe
der Heizung, anderer Hitzequellen oder in direkter
Sonneneinstrahlung.
•Benutzen Sie das Produkt nicht in Bereichen, in denen
elektronische Produkte nicht erlaubt sind.
9
•Positionieren Sie das Produkt nicht in der Nähe von
Störfeldern, Metallrahmen, Computern und Fernsehern etc.
Elektronische Geräte sowie Fensterrahmen beeinträchtigen
die Funktion des Produktes negativ.
•Lassen Sie das Produkt nicht fallen und setzen Sie es keinen
heftigen Erschütterungen aus.
•Öffnen Sie das Produkt nicht und betreiben Sie es bei
Beschädigungen nicht weiter.
•Versuchen Sie nicht, das Produkt selbst zu warten oder zu
reparieren. Überlassen Sie jegliche Wartungsarbeit dem
zuständigen Fachpersonal.
•Halten Sie Kinder unbedingt von dem Verpackungsmaterial
fern, es besteht Erstickungsgefahr.
•Entsorgen Sie das Verpackungsmaterial sofort gemäß den
örtlich gültigen Entsorgungsvorschriften.
•Nehmen Sie keine Ve ränderungen am Produkt vor. Dadurch
verlieren sie jegliche Gewährleistungsansprüche.
Warnung – Batterien
•Entfernen und entsorgen Sie verbrauchte Batterien
unverzüglich aus dem Produkt.
•Verwenden Sie ausschließlich Akkus (oder Batterien),
die dem angegebenen Ty p entsprechen.
•Mischen Sie alte und neue Batterien nicht, sowie
Batterien unterschiedlichen Typs oder Herstellers.
•Beachten Sie unbedingt die korrekte Polarität
(Beschriftung + und -) der Batterien und legen Sie
diese entsprechend ein. Bei Nichtbeachtung besteht
die Gefahr des Auslaufens oder einer Explosion der
Batterien.
•Laden Sie Batterien nicht.
•Bewahren Sie Batterien außerhalb der Reichweite von
Kindern auf.
•Schließen Sie Akkus/Batterien nicht kurz und halten Sie
sie von blanken Metallgegenständen fern.
4. Inbetriebnahme
4.1. Batterien einlegen
Messstation
•Öffnen Sie das Batteriefach (24) und entfernen
Sie den Kontaktunterbrecher. Schließen Sie die
Batteriefachabdeckung anschließend.
Basisstation
•Öffnen Sie das Batteriefach (23) und entfernen
Sie den Kontaktunterbrecher. Schließen Sie die
Batteriefachabdeckung anschließend.
4.2. Batterien wechseln
Messstation
•Öffnen Sie das Batteriefach (24), entnehmen und
entsorgen Sie die verbrauchten Batterien und legen Sie
zwei neue AAA Batterien polrichtig ein. Schließen Sie die
Batteriefachabdeckung anschließend.
Basisstation
•Öffnen Sie das Batteriefach (23), entnehmen und
entsorgen Sie die verbrauchten Batterien und legen Sie
zwei neue AA Batterien polrichtig ein. Schließen Sie die
Batteriefachabdeckung anschließend.
Hinweis
Beachten Sie, dass Sie bei der Inbetriebnahme immer
zuerst die Batterien in die Messstation, und dann in die
Basisstation einlegen.
5. Montage
Hinweis – Montage
•Es wird empfohlen, die Basis- und Messstation
zunächst an den gewünschten Aufstellorten ohne
Montage zu platzieren und alle Einstellungen - wie in
6. Betrieb beschrieben – vorzunehmen.
•Montieren Sie erst nach korrekter Einstellung und
stabiler Funkverbindung die Station/en.
Hinweis
•Die Reichweite der Funkübertragung zwischen der
Mess- und Basisstation beträgt im freien Gelände bis
zu 30m.
•Achten Sie vor der Montage darauf, dass die
Funkübertragung nicht durch Störsignale oder
Hindernisse wie Gebäude, Bäume, Fahrzeuge,
Hochspannungsleitungen, u.a. beeinusst wird.
10
•Stellen Sie vor der endgültigen Montage sicher, dass
zwischen den gewünschten Aufstellorten ausreichender
Empfang besteht.
•Achten Sie bei der Montage der Messstation darauf,
dass diese vor direkter Sonne und Regen geschützt
positioniert ist.
•Die internationale Standardhöhe für die Messung der
Lufttemperatur beträgt 1,25 m (4 ft) über Grund.
Warnung
•Besorgen Sie sich spezielles bzw. geeignetes
Montagematerial im Fachhandel für die Montage an
der vorgesehenen Wand.
•Stellen Sie sicher, dass keine fehlerhaften oder
beschädigten Teile montiert werden.
•Wenden Sie bei der Montage niemals Gewalt oder hohe
Kräfte an. Diese können das Produkt beschädigen.
•Prüfen Sie vor Montage die Eignung der vorgesehenen
Wand für das anzubringende Gewicht und vergewissern
Sie sich, dass sich an der Montagestelle in der Wand
keine elektrischen Leitungen, Wasser-, Gas- oder
sonstige Leitungen benden.
5.1. Basisstation
•Stellen Sie die Basisstation mithilfe des Standfußes (22) auf
einer ebenen Fläche auf.
•Alternativ können Sie die Basisstation mithilfe der
Aussparung (21) auf der Rückseite an einer Wand
montieren.
5.2. Messstation
•Sie können die Messstation mithilfe der Montageplatte
(25) waagerecht oder senkrecht an einer Außenwand
befestigen.
•Für eine waagerechte Anbringung der Messstation
befestigen Sie die Montageplatte (25) an der mittigen
Aussparung (27) mit Dübel, Schraube, etc. in der dafür
vorgesehenen Wand.
•Für eine senkrechte Anbringung der Messstation befestigen
Sie die Dübel, Schraube, Nagel, etc. in der dafür
vorgesehenen Wand und hängen die Montageplatte (25)
mit der Aussparung (26) daran ein.
•Drücken Sie die Messstation mit leichtem Druck bis zum
deutlichen Einrasten („Klick“) in die Clips (28) ein.
6. Betrieb
Hinweis – Eingabe
Halten Sie die ▲-Taste (16) oder die -Taste (14)
gedrückt, um die Werte schneller auswählen zu können
6.1. Verbindung zur Messstation
•Nach dem Einlegen der Batterien sucht die Basisstation
automatisch nach einer Verbindung zur Messstation und
führt die Ersteinrichtung durch.
Hinweis
•Die Ersteinrichtung dauert ca. 2 Minuten.
•Während dem Verbindungsversuch blinkt das
Funksymbol Messstation (1) auf.
•Vermeiden Sie in dieser Zeit jegliche Betätigung
der Tasten! Andernfalls können Fehler und
Ungenauigkeiten bei den Werten und deren
Übertragung entstehen.
•Der Vorgang ist beendet, sobald die Messdaten für
Innen- (4) und Außenbereich (3) angezeigt werden.
•Der Messwert wird vom Basisgerät etwa alle 45
Sekunden automatisch aktualisiert.
•Liegt der Temperaturwert außerhalb des Messbereichs,
wird in der Te mperaturanzeige --.- (für Temperaturen
unterhalb des Messbereichs) bzw. --.- (für Te mperaturen
oberhalb des Messbereichs) angezeigt.
•Wird wiederholt kein Signal von der Messstation
empfangen, drücken und halten Sie die -Taste (14) für
ca. 3 Sekunden, um die manuelle Suche nach dem Signal
zu starten.
Anzeige
Blinkende Anzeige
Dauerhafte Anzeige
Dauerhafte Anzeige
Suche nach Signal von der
Messstation
Aktiv
Erfolgreich –
Signal wird empfangen
Inaktiv –
Kein Signalempfang
11

Hinweis – fehlerhafte Übertragung
der Messwerte
•In einzelnen Fällen kann es aufgrund von Störsignalen
– z.B. durch ein WLAN-Netzwerk, Computer,
Fernseher, etc. – vorkommen, dass die Übertragung
der Messwerte zwischen Basis- und Messstation
fehlschlägt.
•Synchronisieren Sie dann die Stationen neu, indem Sie
die Batterien beider Stationen kurz herausnehmen und
erneut einsetzen.
•Sollten die Messwerte anschließend erneut nicht
übertragen werden, wechseln Sie die Batterien durch
neue aus.
•Wählen Sie ggfs. einen neuen Aufstellort für die
Basisstation, um die möglichen Störsignale zukünftig
zu umgehen.
6.2. Kanalauswahl/ Weitere Messstationen
Hinweis
•Sie können zusätzlich zu der mitgelieferten Messstation
zwei weitere Messstationen installieren. Achten Sie
hierbei auf die identische Kanaleinstellung an Basisund jeweiliger Messstation.
•Passende Messstationen nden Sie unter
www.hama.com
•Der Sendekanal der mitgelieferten Messstation lässt
sich nicht verändern/ einstellen (CH1).
•Drücken Sie wiederholt die CHANNEL-Taste (15), um
denselben Kanal wie an der jeweiligen Messstation
einzustellen. Es wird CH1, CH2 oder CH3 (2) angezeigt.
•Wählen Sie CH1 für den Fall, dass Sie nur die mitgelieferte
Messstation verwenden.
•Die Basisstation zeigt nun die gemessenen Daten (3) der
ausgewählten Messstation (2) an.
6.3. Grundeinstellungen und manuelle Einstellungen
Automatische Einstellung nach DCF-Signal
•Nach dem ersten Einschalten der Basisstation und
erfolgreicher Übertragung zwischen Basis- und
Messstation, beginnt die Uhr automatisch die Suche nach
einem DCF-Signal. Während des Suchvorgangs blinkt das
Funksymbol (5) auf.
Anzeige Suche nach DCF-Signal
Blinkende Anzeige
Keine Anzeige/
dauerhafte Anzeige
Dauerhafte Anzeige
•Wird wiederholt kein Signal empfangen, drücken und
halten Sie die ▲-Taste (16) für ca. 3 Sekunden, um die
manuelle Suche nach dem DCF-Signal zu starten. Das
Funksymbol (5) beginnt zu blinken.
Hinweis – Uhrzeiteinstellung
•Der Suchvorgang dauert etwa 3-5 Minuten. Falls dieser
fehlschlägt, wird die Suche beendet und zur nächsten
vollen Stunde wiederholt. Das Funksymbol (5) erlischt.
•Sie können währenddessen eine manuelle Einstellung
von Uhrzeit und Datum vornehmen.
•Die Uhr sucht automatisch weiterhin stündlich nach
dem DCF-Signal. Bei erfolgreichem Signalempfang
werden die manuell eingestellte Uhrzeit und das Datum
überschrieben.
•Drücken und halten Sie die ▲-Taste (16) erneut für ca. 3
Sekunden, um den manuellen Suchvorgang zu beenden.
Das Funksymbol (5) erlischt.
Hinweis – Sommerzeit
•Die Uhrzeit stellt sich automatisch auf die Sommerzeit
um.
•Beachten Sie, dass für eine automatische Umstellung
das DCF-Signal erfolgreich empfangen werden muss.
Starten Sie ggfs. die manuelle Suche nach dem
DCF-Signal.
Aktiv
Inaktiv –
Kein Signalempfang
Erfolgreich –
Signal wird empfangen
12

Manuelle Einstellung Datum/ Uhrzeit
Hinweis – Uhrzeit und Zeitzone
•Drücken Sie wiederholt die MODE-Taste (17), um
zwischen den verschiedenen Anzeigen zu wechseln:
•Uhrzeit mit Sekundenanzeige, Uhrzeit mit
Wochentaganzeige, zeitzonenversetzte Uhrzeit mit
Wochentaganzeige, zeitzonenversetzte Uhrzeit mit
Sekundenanzeige.
•Bei der zeitzonenversetzten Uhrzeit wird das Symbol
Zeitzone (6) angezeigt.
•Drücken und halten Sie die MODE-Taste (17) für ca.
3 Sekunden, um folgende Einstellungen nacheinander
vorzunehmen:
•Jahr (10)
•Monat (13)
•Tag (7)
•Anzeige D/M – M/D (7/13)
•12/24-Stunden-Format (10)
•Stunden (10)
•Minuten (10)
•Wochentag (11)
•Zeitzone (10)
•Temperatureinheit (°C/°F) (11)
•Drücken Sie zum Auswählen der einzelnen Werte die
▲-Taste (16) oder die -Taste (14) und bestätigen Sie die
jeweilige Auswahl durch Drücken der MODE-Taste (17).
•Drücken Sie direkt die MODE-Taste (17), um den
angezeigten Einstellungswert zu übernehmen und zu
überspringen.
•Erfolgt 2 Minuten keine Eingabe, wird der
Einstellungsmodus automatisch verlassen.
Hinweis – Wochentag
Sie können für die Wochentaganzeige die Sprachen
Deutsch (DE), Englisch (EN), Schwedisch (SW),
Niederländisch (DU), Spanisch (SP), Italienisch (IT) oder
Französisch (FR) wählen.
Hinweis – Zeitzone
•Das DCF-Signal kann weitläug empfangen werden,
entspricht jedoch immer der MEZ, die in Deutschland
gilt. Beachten Sie daher, dass Sie in Ländern mit
anderer Zeitzone die Zeitverschiebung beachten.
•Benden Sie sich in Moskau, ist es dort bereits 3
Stunden später als in Deutschland. Stellen Sie daher
bei der Zeitzone +3 ein. Die Uhr stellt sich dann immer
nach Empfang des DCF-Signals bzw. in Bezug auf die
manuell eingestellte Uhrzeit automatisch 3 Stunden
weiter.
Wecker
•Drücken Sie wiederholt die ALARM ON/OFF-Taste (18),
um die verschiedenen Alarme anzuzeigen.
•Es werden die jeweiligen Alarmsymbole (12) / /
und die entsprechende Weckzeit/ Zeitintervall bzw.
OFF angezeigt.
•Drücken und halten Sie die ALARM ON/OFF-Taste (18) für
ca. 3 Sekunden, um die Weckzeit des angezeigten Alarms
einzustellen. Die Stundenanzeige/ das Zeitintervall beginnt
zu blinken.
•Drücken Sie die ▲-Taste (16) oder die -Taste (14), um
die Stunden der Weckzeit/ das Zeitintervall auszuwählen
und bestätigen Sie die Auswahl durch Drücken der ALARM
ON/OFF-Taste (18).
•Die Minutenanzeige beginnt zu blinken.
•Der vorzeitige Alarm ist bereits nach Bestätigung des
Zeitintervalls aktiviert.
•Wiederholen Sie diesen Vo rgang für die Minuten der
Weckzeit.
•Drücken Sie wiederholt die ALARM ON/OFF-Taste (18),
um den anderen Alarmmodus ebenfalls einzustellen oder
zurück zur Anzeige der Uhrzeit (10) zu gelangen.
•Erfolgt 2 Minuten keine Eingabe, wird der
Einstellungsmodus automatisch verlassen.
13

Hinweis – Wecker
•Der Alarm an Werktagen löst – wenn aktiviert – nur
an Wochentagen (Montag bis Freitag) ein Wecksignal
aus. Ist dieser Alarm aktiv, wird das Alarmsymbol (12)
angezeigt.
•Der einmalige Alarm löst – wenn aktiviert – nur
einmalig ein Wecksignal aus. Ist dieser Alarm aktiv,
wird das Alarmsymbol (12) anzeigt. Nach
erfolgtem Wecksignal wird dieser Alarm automatisch
deaktiviert.
•Der vorzeitige Alarm löst – wenn aktiviert und
Außentemperatur < 0°C/ 32°F – 15, 30, 45, 60 oder
90 Minuten vor dem eigentlichen Alarm ( und/
oder ) ein Wecksignal aus. Ist dieser Alarm aktiv,
wird das Alarmsymbol (12) angezeig
•Die eingestellte Weckzeit bezieht sich immer auf die
angezeigte (normale/ zeitzonenversetzte) Uhrzeit.
•Drücken Sie während der jeweiligen Anzeige die -Taste
(16) oder die -Taste (14), um den jeweiligen Alarm zu
aktivieren/ deaktivieren.
•Das Alarmsymbol (12) wird angezeigt/ nicht angezeigt.
Hinweis – Vorzeitiger Alarm
Der vorzeigte Wecksignal kann nur dann aktiviert werden,
wenn mindestens eine der beiden Weckfunktionen ( /
) bereits aktiviert ist.
•Wird der Wecker entsprechend ausgelöst, beginnt das
Alarmsymbol (12) zu blinken und ein Wecksignal ertönt.
•Drücken Sie die ALARM ON/OFF-Taste (18), um den Alarm
zu beenden. Andernfalls wird nach 2 Minuten automatisch
die Schlummerfunktion aktiviert.
Hinweis – Schlummerfunktion
•Drücken Sie während des Wecksignals die SNOOZETaste (20), um die Schlummerfunktion zu aktivieren. Auf
dem Display beginnt das Alarmsymbol (12) zu blinken.
Das Wecksignal wird für 8 Minuten unterbrochen und
dann erneut ausgelöst.
•Die Schlummerfunktion kann dreimal hintereinander
ausgelöst werden.
6.4. Wetter
•Die Wetterstation gibt für Außentemperatur (8) und
Raumtemperatur (9) eine Te ndenz an, wie sich diese
Werte wahrscheinlich für die nächsten Stunden entwickeln
werden.
Anzeige Tendenz
Steigend
Beständig
Fallend
6.5. Höchst- und Tiefstwerte der Temperatur
•Die Basisstation speichert die Höchst- und Tiefstwerte der
Temperatur im Außen- und Raumbereich automatisch ab.
•Drücken Sie wiederholt die MEM-Taste (19), um zwischen
der Anzeige von aktueller Temperatur, niedrigster
Temperatur (MIN) und höchster Te mperatur (MAX) zu
wechseln.
•Die Höchst- und Tiefstwerte werden 10 Sekunden
angezeigt.
•Drücken und halten Sie die MEM-Taste (19) für ca. 3
Sekunden, um die abgespeicherten Höchst- und Tiefstwerte
zurückzusetzen.
6.6. Niedrige Batteriekapazität
Messstation
Wenn die Batterien ausgetauscht werden müssen, erscheint
neben der Außentemperaturanzeige des Basisgeräts das
Symbol für niedrigen Batteriestand
Batterien umgehend aus.
Basisstation
Wenn die Batterien ausgetauscht werden müssen, erscheint
neben Uhrzeit/ Datum am Basisgerät das Symbol für niedrigen
Batteriestand . Wechseln Sie die Batterien umgehend aus.
. Wechseln Sie die
14

Hinweis – Batteriewechsel
•Beachten Sie, dass Sie nach jedem Batteriewechsel an
Mess- oder Basisstation eine neue Synchronisation der
Stationen erfolgen muss.
•Nehmen Sie dazu die Batterien der anderen Station
heraus und setzen Sie erneut ein oder wechseln Sie
diese bei Bedarf ebenfalls aus.
7. Wartung und Pflege
Reinigen Sie dieses Produkt nur mit einem fusselfreien, leicht
feuchten Tu ch und verwenden Sie keine aggressiven Reiniger.
Achten Sie darauf, dass kein Wasser in das Produkt eindringt.
8. Haftungsausschluss
Die Hama GmbH & Co KG übernimmt keinerlei Haftung
oder Gewährleistung für Schäden, die aus unsachgemäßer
Installation, Montage und unsachgemäßem Gebrauch
des Produktes oder einer Nichtbeachtung der
Bedienungsanleitung und/oder der Sicherheitshinweise
resultieren.
9. Service und Support
Bitte wenden Sie sich bei Fragen zum Produkt gerne an die
Hama-Produktberatung.
Hotline: +49 9091 502-115 (Deu/Eng)
Weitere Supportinformationen nden sie hier:
www.hama.com
10. Technische Daten
Basisstation Messstation
Stromversorgung
Messbereich
Temperatur
Messschritte
Temperatur
Messzyklus
Temperatur
3,0 V
2 x AA Batterie
-5°C – +50°C/
23°F – 122°F
0,1°C / 0,2°F 0,1°C / 0,2°F
~ 45 s~45 s
3,0 V
2 x AAA Batterie
-10°C – +60°C/
14°F – 140°F
DCF-Funkuhr Ja Nein
Max. Anzahl
Messstationen
Frequenz 433 MHz
Reichweite ≤ 30 m
11. Entsorgungshinweise
Hinweis zum Umweltschutz:
Ab dem Zeitpunkt der Umsetzung der
europäischen Richtlinien 2012/19/EU und
2006/66/EG in nationales Recht gilt folgendes:
Elektrische und elektronische Geräte sowie
Batterien dürfen nicht mit dem Hausmüll entsorgt
werden. Der Verbraucher ist gesetzlich verpichtet, elektrische
und elektronische Geräte sowie Batterien am Ende ihrer
Lebensdauer an den dafür eingerichteten, öffentlichen
Sammelstellen oder an die Verkaufsstelle zurückzugeben.
Einzelheiten dazu regelt das jeweilige Landesrecht. Das
Symbol auf dem Produkt, der Gebrauchsanleitung oder der
Verpackung weist auf diese Bestimmungen hin. Mit der
Wiederverwertung, der stoichen Verwertung oder anderen
Formen der Verwertung von Altgeräten/Batterien leisten Sie
einen wichtigen Beitrag zum Schutz unserer Umwelt.
12. Konformitätserklärung
Hiermit erklärt die Hama GmbH & Co KG, dass der
Funkanlagentyp [00092659] der Richtlinie
2014/53/EU entspricht. Der vollständige Text der
EU-Konformitätserklärung ist unter der folgenden
Internetadresse verfügbar:
www.hama.com-> 00092659 -> Downloads.
Frequenzband/Frequenzbänder 433,05-434,790 MHz
Abgestrahlte maximale
Sendeleistung
3
3,02 µW
15
E Instrucciones de uso
Elementos de manejo e indicadores
A Estación base
1.
2. Visualización del canal
3. Temperatura exterior
4. Temperatura ambiente
5. Símbolo de radiofrecuencia
6. Zona horaria
7. Día
8. Tendencia de la temperatura exterior
9. Tendencia de la temperatura ambiente
10. Hora
11. Día de la semana/segundo
12. Símbolo de alarma
13. Mes
14. Tecla
15. Tecla CHANNEL
16. Tecla
17. Tecla MODE
18. Tecla ALARM ON/OFF
19. Tecla MEM
20. Tecla SNOOZE
21. Aberturapara el montaje en pared
22. Pie
23. Compartimento para pilas
B Estación de medición
24. Compartimento para pilas
25. Placa de montaje
26. Aberturapara la jación vertical
27. Aberturapara la jación horizontal
28. Clips
adiofr
Símbolo de r
= Disminución del valor de ajuste actual /búsqueda
manual de la señal de la estación de medición
= Selección de canal
= Aumento del valor de ajuste actual / activación/
desactivación de la recepción manual de la señal de
radiofrecuencia
= Ajustes/conrmación del valor de ajuste/conmutación
entre la visualización de los segundos, el día de la
semana y la zona horaria
= Visualización/ajuste de los modos de alarma
= Consulta/reseteo de los valores máximos/mínimos
almacenados
= Interrupción de la señal del despertador
ecuencia estación de medición
Le agradecemos que se haya decidido por un producto de
Hama.
Tómese tiempo y léase primero las siguientes instrucciones e
indicaciones. Después, guarde estas instrucciones de manejo
en un lugar seguro para poder consultarlas cuando sea
necesario. Si vende el aparato, entregue estas instrucciones
de manejo al nuevo propietario.
1. Explicación de los símbolos de aviso y de las
indicaciones
Aviso
Se utiliza para caracterizar las indicaciones de seguridad o
para llamar la atención sobre peligros y riesgos especiales.
Nota
Se utiliza para caracterizar informaciones adicionales o
indicaciones importantes.
2. Contenido del paquete
•Estación meteorológica EWS-165
(Estación base para interior/estación de medición para
el exterior)
•Pie
•2pilas AAA
•2pilas AA
•Estas instrucciones de manejo
3. Instrucciones de seguridad
• Elproducto es para el uso doméstico privado, no comercial.
• Noopere el producto fuera de los límites de potencia
indicados en los datos técnicos.
• Noutilice el producto en entornos húmedos y evite el
contacto con las salpicaduras de agua.
• Noopere el producto en las inmediaciones de la
calefacción, de otras fuentes de calor o bajo la radiación
directa del sol.
• Noutilice el producto en áreas donde no se permitan
aparatos electrónicos.
• Noposicione el producto en las proximidades de campos
de interferencia, marcos de metal, ordenadores, televisores,
etc. Los dispositivos electrónicos y los marcos de las
ventanas afectan negativamente al funcionamiento del
producto.
16

• Nodeje caer el producto ni lo someta a sacudidas fuertes.
• Noabra el producto y no lo siga operando de presentar
deterioros.
• Nointente mantener o reparar el aparato por cuenta
propia. Encomiende cualquier trabajo de mantenimiento al
personal especializado competente.
• Mantengael material de embalaje fuera del alcance de los
niños, existe peligro de asxia.
• Desecheel material de embalaje en conformidad con las
disposiciones locales sobre el desecho vigentes.
• Norealice cambios en el aparato. Esto conllevaría la
pérdida de todos los derechos de la garantía.
Aviso – Pilas
• Retire y deseche de inmediato las pilas gastadas del
producto.
• Utiliceexclusivamente pilas recargables (o pilas) que
sean del mismo tipo.
• Nomezcle pilas viejas y nuevas, ni tampoco pilas de
tipos o fabricantes diferentes.
• Observesiempre la correcta polaridad (inscripciones
+ y -) de las pilas y coloque éstas de forma
correspondiente. La no observación de lo anterior
conlleva el riesgo de derrame o explosión de las pilas.
• Nosobrecargue las pilas.
• Mantengalas pilas fuera del alcance de los niños.
• Nocortocircuite las pilas recargables/baterías y
manténgalas alejadas de objetos metálicos.
4. Puesta en funcionamiento
4.1. Colocación de las pilas
Estación de medición
•Abra el compartimento para baterías (24) y retire el
separador de contacto. A continuación, cierre la cubierta
del compartimento para pilas.
Estación base
•Abra el compartimento para baterías (23) y retire el
separador de contacto. A continuación, cierre la cubierta
del compartimento para pilas.
4.2. Cambio de las pilas
Estación de medición
•Abra el compartimento de pilas (24), retire y deseche las
pilas gastadas y coloque dos pilas AAA nuevas atendiendo
a la correcta polaridad de las mismas. A continuación,
cierre la cubierta del compartimento para pilas.
Estación base
•Abra el compartimento de pilas (23), retire y deseche las
pilas gastadas y coloque dos pilas AA nuevas atendiendo a
la correcta polaridad de las mismas. A continuación, cierre
la cubierta del compartimento para pilas.
Nota
En la puesta en funcionamiento, es importante que
coloque las pilas en la estación de medición, en primer
lugar, y, seguidamente, en la estación base.
5. Montaje
Nota – Montaje
•Se recomienda colocar primero, sin montar, la estación
de base y la estación de medición, en los lugares de
instalación deseados y llevar a cabo todos los ajustes
tal y como se describe en 6. Funcionamiento.
•Proceda a montar la(s) estación(es) únicamente cuando
haya podido realizar correctamente los ajustes y cuente
con una conexión inalámbrica estable.
17
Nota
•El alcance de la transmisión por radio entre la estación
base y la estación de medición al aire libre es de
hasta 30 m.
•Antes de proceder al montaje, preste atención a que
la transmisión por radio no se vea inuida, entre otros,
por interferencias u obstáculos tales como edicios,
árboles, vehículos o líneas de alta tensión.
•Antes de proceder al montaje denitivo, asegúrese de
que cuenta con recepción suciente entre los lugares
de instalación deseados.
•Al montar la estación de medición, procure situarla de
manera que quede protegida de la radiación directa del
sol y de la lluvia.
•La altura estándar internacional para la medición de
la temperatura del aire es de 1,25 m (4 pies) sobre
el suelo.
Aviso
•Adquiera material de montaje especial o adecuado
en un comercio especializado para el montaje en la
pared prevista.
•Compruebe que no haya piezas deterioradas o
defectuosas.
•No ejerza nunca fuerza durante el montaje. El producto
podría verse dañado.
•Antes de empezar con el montaje, compruebe que la
pared puede soportar el peso que se va a montar y
asegúrese de que por el punto de montaje de la pared
no pasan cables eléctricos ni tuberías de agua, gas o
de otro tipo.
5.1. Estación base
•Coloque la estación base sobre una supercie plana
utilizando el pie (22).
•Obien fíjela a una pared utilizando la abertura (21) situada
en la parte posterior.
5.2. Estación de medición
•Puede jar la estación de medición vertical u
horizontalmente a una pared exterior mediante la placa
de montaje (25).
•Para jar la estación de medición horizontalmente, je la
placa de montaje (25) utilizando la abertura central (27) a
la pared prevista mediante taco, tornillo, etc.
•Para jar la estación de medición verticalmente, je el taco,
tornillo, clavo, etc. a la pared prevista y cuelgue de ellos la
placa de montaje (25) utilizando la abertura (26).
•Ejerza una ligera presión sobre la estación de medición
hasta que la oiga encajar en los clips (28) (mediante un
„clic”).
6. Funcionamiento
Nota – Introducción de datos
Mantenga pulsadas las teclas (16) o (14) para
seleccionar los valores más rápidamente.
6.1 Conexión con la estación de medición
•Realizados los ajustes previos, la estación base busca
automáticamente una conexión con la estación de
medición, realizando entonces el ajuste inicial.
Nota
•El ajuste inicial dura aprox. 2 minutos.
•Durante el intento de conexión, el símbolo de
radiofrecuencia comienza a parpadear (1).
•No pulse ninguna tecla mientras dure el ajuste. De lo
contrario, pueden producirse fallos o imprecisiones en
los valores y su transmisión.
•El proceso naliza en cuanto se visualizan los valores
de medición registrados para interior (4) y exterior (3).
•La unidad base actualiza los valores de medición cada
45 segundos aproximadamente.
•Si el valor de la temperatura se encuentra fuera
del rango de medición, en la visualización de
la temperatura se visualiza --.- (en el caso de
temperaturas por debajo del rango de medición) o
--.- (en el caso de temperaturas por encima del rango
de medición).
•Si no se recibe ninguna señal de la estación de medición
repetidamente, mantenga pulsada la tecla (14) durante
aprox. 3 segundos para iniciar la búsqueda manual de
la señal.
18
Visualización
Parpadea
Visualización permanente
Visualización permanente
Nota – transmisión incorrecta de los valores
de medición
•En algunos casos concretos, puede ocurrir que la
transmisión de los valores de medición entre la
estación base y la estación de medición falle debido
a interferencias, p. ej. las de una red WLAN, un
ordenador, un televisor, etc.,
•En tales casos, resincronice las estaciones retirando
brevemente las pilas de ambas estaciones y volviendo
a colocarlas.
•Si a continuación todavía no se transmitieran los
valores de medición, reemplace las pilas por unas
pilas nuevas.
•Puede ser necesario escoger un lugar de colocación
nuevo para la estación base, evitando posibles
interferencias.
6.2. Selección de canal/estaciones de medición
adicionales
Nota
•Además de la estación de medición suministrada,
puede instalar dos estaciones de medición adicionales.
Al hacerlo, preste atención a realizar ajustes de canal
idénticos en la estación de base y la estación de
medición correspondiente. Encontrará estaciones de
medición adecuadas en www.hama.com
•No es posible modicar/ajustar el canal de emisión de
la estación de medición suministrada (CH1).
Búsqueda de la señal de la
estación de medición
Activa
La búsqueda ha nalizado
con éxito, se recibe la señal
Inactiva –
Sin recepción de señal desde
•Pulse repetidamente la tecla CHANNEL (15) para
ajustar el mismo canal que en la estación de medición
correspondiente. Se visualiza CH1, CH2 o CH3 (2).
•Seleccione CH1 en caso de utilizar únicamente la estación
de medición suministrada.
•La estación base muestra ahora los datos medidos (3) en la
estación de medición seleccionada (2).
6.3. Ajustes básicos y ajustes manuales
Ajuste automático según la señal DCF
Encendida la estación base por primera vez y tras una
transmisión correcta entre la estación base y la estación de
medición, el reloj inicia automáticamente la búsqueda de
una señal DCF. El símbolo de radiofrecuencia (5) parpadea
durante el proceso de búsqueda.
Visualización Búsqueda de señal DCF
Parpadea
Visualización permanente/
Visualización permanente
Visualización permanente
•Si no se recibiera señal repetidamente, pulse y mantenga
pulsada la tecla (16) durante aprox. 3 segundos para
iniciar la búsqueda manual de la señal DCF. El símbolo de
radiofrecuencia (5) comienza a parpadear.
Nota – Ajuste de hora
•El proceso de búsqueda dura aproximadamente 3-5
minutos. Si la búsqueda falla, ésta se termina y se
repite a la siguiente hora en punto. El símbolo de
radiofrecuencia (5) se apaga.
•Mientras tanto, puede realizar un ajuste manual de la
hora y la fecha.
•Tenga en cuenta que para un ajuste automático es
necesario recibir correctamente la señal DCF. De ser
necesario, inicie una búsqueda manual de la señal DCF.
Activa
Inactiva –
Sin recepción de señal en
La búsqueda ha nalizado con
éxito, se recibe la señal
19
•Pulse y mantenga pulsada nuevamente la tecla (16)
durante aprox. 3 segundos para nalizar el proceso de
búsqueda manual. El símbolo de radiofrecuencia (5) se
apaga.
Nota – Horario de verano
•La hora se ajusta automáticamente al horario de
verano.
•Tenga en cuenta que para un ajuste automático es
necesario recibir correctamente la señal DCF. De ser
necesario, inicie una búsqueda manual de la señal DCF.
Ajuste manual de fecha/hora
Nota – Hora y zona horaria
•En pulse repetidamente la tecla MODE (17) para
alternar entre las diferentes visualizaciones:
•Hora con visualización de los segundos, hora con
visualización del día de la semana, hora en una
zona horaria diferente con visualización del día de
la semana, hora en una zona horaria diferente con
visualización de los segundos.
•Con la hora en una zona horaria diferente se muestra el
símbolo de zona horaria (6).
•Pulse y mantenga pulsada la tecla MODE (17) durante
aprox. 3 segundos para realizar los siguientes ajustes,
consecutivamente:
•Año (10)
•Mes (13)
•Día (7)
•Visualización D/M – M/D (7/13)
•Formato 12/24 horas (10)
•Horas (10)
•Minutos (10)
•Día de la semana (11)
•Zona horaria (10)
•Unidad para la temperatura (°C / °F) (11)
•Para seleccionar cada valor, pulse la tecla (16) o la tecla
(14) y conrme la selección correspondiente pulsando
la tecla MODE (20).
•Pulse directamente la tecla MODE (17) para aceptar y
saltar el valor de ajuste visualizado.
•Si no se introduce ningún dato en 2 minutos, se abandona
automáticamente el modo de ajuste.
Nota – Día de la semana
Para la visualización del día de la semana puede elegir
entre los idiomas alemán (DE), inglés (EN), sueco (SW),
neerlandés (DU), español (SP) o francés (FR).
Nota – Zona horaria
•La señal DCF puede recibirse a gran distancia,
correspondiéndose siempre con la HCE vigente
en Alemania. Por ello, tenga en cuenta la posible
diferencia horaria en países situados en otra zona
horaria.
•Si se encuentra en Moscú, la diferencia es de 3
horas de adelanto con respecto a Alemania. Por
ello, debe ajustar la zona horaria +3. Se sumarán
automáticamente 3 horas a la hora recibida o ajustada
manualmente tras la recepción de la señal DCF.
Despertador
•En pulse repetidamente la tecla ALARM ON/OFF (18)para
mostrar las diferentes alarmas.
Se visualizan los símbolos de alarma correspondientes
(12) / / así como la hora de alarma/el
intervalo de tiempo u OFF.
•Pulse y mantenga pulsada la tecla ALARM ON/OFF(18)
durante aprox. 3 segundos para ajustar la hora de alarma
de la alarma visualizada. La visualización de la hora/el
intervalo de tiempo comienza a parpadear.
•Pulse la tecla (16) o la tecla (14) para seleccionar
las horas de la hora de alarma/el intervalo de tiempo
y conrme la selección pulsando la tecla ALARM ON/
OFF (18).
La visualización de los minutos comienza a parpadear.
La alarma previa queda activa tras la conrmación del
intervalo de tiempo.
•Repita este proceso para los minutos de la hora de alarma
del despertador.
•Pulse repetidamente la tecla ALARM ON/OFF (18) para
ajustar igualmente el otro modo de alarma o retornar a la
visualización de la hora (10).
•Si no se introduce ningún dato en 2 minutos, se abandona
automáticamente el modo de ajuste.
20
Nota – Despertador
•La alarma 1 para días laborables activa, en caso de
estar activada, una señal de alarma solo en los días
laborables de la semana (de lunes a viernes). Si esta
alarma está activa se visualiza el símbolo de alarma
(12) .
a alarma puntual activa, de estar activada, una
•L
señal de alarma una única vez. Si esta alarma está
activa se visualiza el símbolo de alarma (12) .
Efectuada la señal de alarma, esta alarma se desactiva
automáticamente.
•La alarma previa, de estar activada y darse una
temperatura exterior < 0°C/ 32°F, activa una señal de
alarma 15, 30, 45, 60 o 90 minutos antes de la alarma
correspondiente ( y/o ). Si esta alarma está
activa se visualiza el símbolo de alarma (12)
•La hora de alarma ajustada siempre se reere a la hora
mostrada (normal/en una zona horaria diferente).
•Pulse, durante la visualización correspondiente, la tecla
(16) o la tecla (14) para activar/desactivar la alarma
correspondiente.
El símbolo de alarma (12) se visualiza/deja de visualizarse.
Nota – Alarma previa
La señal de alarma previa solo puede activarse de
encontrarse activa una de las funciones de despertador
( / ) como mínimo.
•Si se activa el despertador como corresponde, el símbolo
de alarma (12) comienza a parpadear y suena una señal
de alarma.
•Pulse la tecla ALARM ON/OFF (18) para cancelar la
alarma. De otro modo, ésta naliza automáticamente
pasados 2 minutos. De lo contrario, tras 2 minutos se
activará automáticamente la función de repetición de
alarma.
Nota – Función de repetición de alarman
•Pulse, mientras suena la señal de alarma, la tecla
SNOOZE (20) para activar la función de repetición de
alarma. En la pantalla comienza a parpadear el símbolo
de alarma (12). La señal de alarma se interrumpe
durante 8 minutos, disparándose a continuación de
forma automática.
•La función de repetición de alarma puede activarse
hasta tres veces consecutivas.
6.4 Meteorológica
•La estación meteorológica indica la tendencia que podrían
mostrar la temperatura exterior (8), la temperatura
ambiente (9) en las siguientes horas.
.
Visualización Tendencia
6.5. Valores máximos y mínimos de la temperatura
La estación base almacena automáticamente los valores
máximos y mínimos de la temperatura, tanto interiores como
exteriores.
•Pulse repetidamente la tecla MEM (19) para alternar entre
la visualización de la temperatura actuales, la temperatura
mínimas (MIN) y la temperatura máximas (MAX).
•Los valores máximos y mínimos se muestran durante 10
segundos.
•Pulse y mantenga pulsada la tecla MEM (19) durante
aprox. 3 segundos para poner a cero los valores máximos y
mínimos almacenados.
6.6. Capacidad de pilas baja
Estación de medición
Cuando es necesario cambiar las pilas, junto al indicador de
temperatura exterior de la unidad base se muestra el símbolo
de nivel bajo de batería
inmediata.
. Sustituya las pilas de forma
En aumento
Constante
En descenso
21
 Loading...