

Page 1
00054896
(DR36SBT)
00054231
(DR36SBT)
Digital Radio
Digitalradio
Руководство по эксплуатации/ Istruzioni per l‘uso / Gebruiksaanwijzing / Οδηγίες χρήσης / Instrukcja obsługi /
Manual de utilizare / Bruksanvisning / Käyttöohje / Работна инструкция / Betjeningsvejledning / Manuelt stasjonssøk
Operating Instructions / Bedienungsanleitung / Mode d‘emploi / Instrucciones de uso /
Használati útmutató / Návod k použití / Návod na použitie/ Manual de instruções/ Kullanma kılavuzu/
Page 2

G Operating Instructions
Technical data
Radio Receiver
Connectivity Bluetooth Standard (5.0), USB (Charge)
Display 4.16" (10.57 cm) Starburst, Liquid Crystal Display (LCD)
DAB Frequencies 174.928 – 239.200 MHz
FM Frequencies 87.5 – 108 MHz
Power input 5 V
Power Consumption Operation max. 15 WStandby < 1 W
Input & Output DC Socket, 3.5 mm Earphone Jack, USB Port, Update Port
Presets
Codec DAB: MP2, AAC
UI Languages
Package Content DR36SBT, Short Manual, Power Supply
DAB
ü
3.0 A
DAB /DAB+:
30
English, German, Danish, Dutch, Finnish, French, Italian, Norwegian, Polish, Swedish,Turkish,
Czech, Slovak
DAB+
ü
FM:
30
FM
ü
Internet
-
Spotify
-
Page 3
A
1 2 3 4
5
6 7 8 9
10
B
11 12 13 14
Page 4
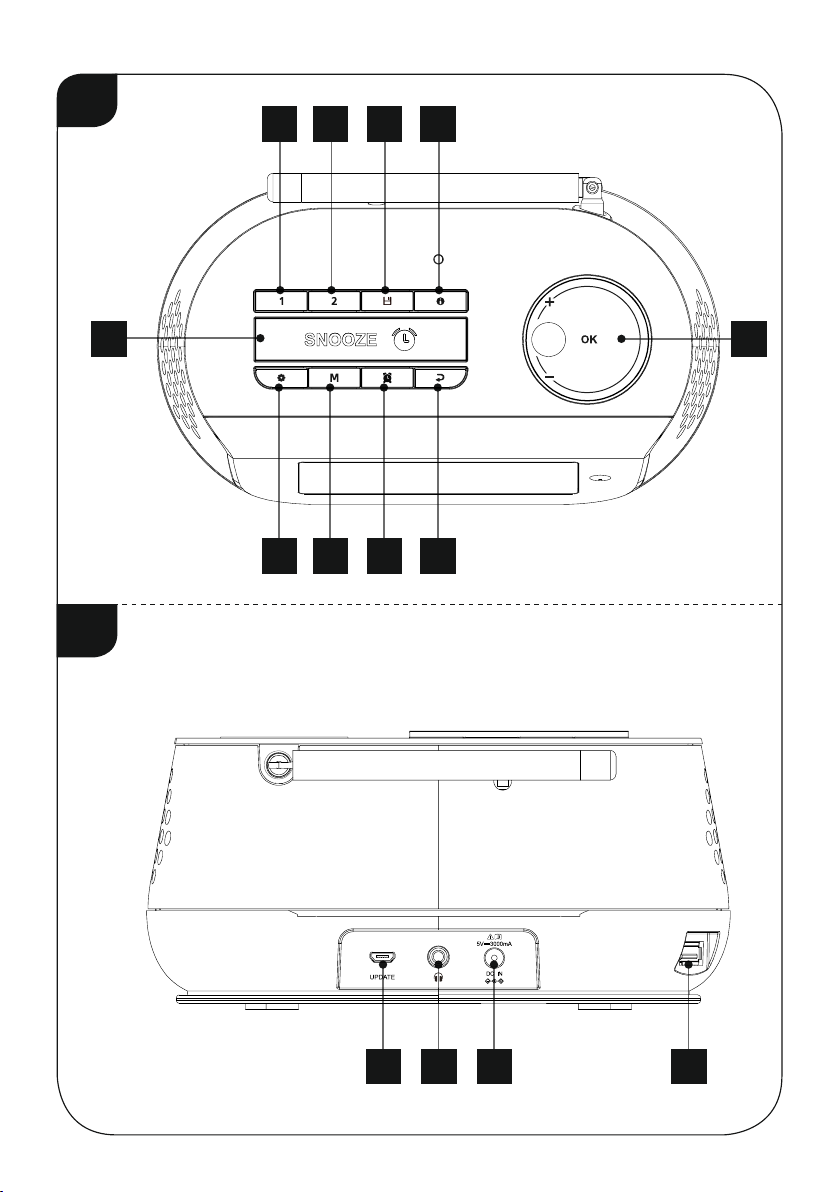
Controls and displays
1
2
3
4
5
6
7
8
9
10 + / OK / -
A: Front
[PRESET 1] button
Memory slot 1
[PRESET 2] button
Memory slot 2
[PRESET] button
Save / access favourites
[INFO] button
Display additional information
[SNOOZE/SLEEP] button
Activate snooze / Sleep setting
[MENU/SETTINGS] button
Direct access to settings / menu
[MODE] button
Change operating mode
(FM, DAB+, Bluetooth)
[ALARM] button
Direct access to alarm settings /
alarm activation
[BACK] button
Back one menu level
[ + / OK / - ]
On/Off switch; Volume control;
Selection conrmation; Navigation
11
12
13
14
B: Rear
Update port
Headphone jack
Mains power supply
USB interface
Page 5

Content
1. Explanation of warning symbols and notes ...4
2. Package contents........................4
3. Safety instructions.......................4
4. General notes on use.....................5
4.1 Switch On / Off / Standby ................... 5
4.2 Navigation and control..................... 5
4.3 Volume adjustment .......................5
4.4 Additional information ....................5
5. Informations and notes before getting started...5
6. Getting started .........................5
7. Language ..............................6
8. DAB ..................................6
8.1 Search / Automatic search ..................6
8.2 Station list .............................. 6
8.3 Edit station list ...........................6
8.4 Favourites .............................. 7
8.4.1 Save favourites........................7
8.4.2 Retrieving favourites....................7
8.5 DRC (Dynamic Range Control) ............... 7
9. FM ...................................7
9.1 Search setting ........................... 7
9.2 Audio setting ............................8
9.3 Automatic station search ................... 8
9.4 Manual station search ..................... 8
9.5 Favourites .............................. 8
9.5.1 Save favourites........................8
9.5.2 Retrieving favourites....................8
10. Bluetooth ............................9
10.1. BIuetooth pairing .......................9
®
10.2 Automatic Bluetooth
connection
(after successful pairing)..................9
11. Other connection options ...............10
11.1 Connection via headphone jack ............ 10
11.2 Connection via USB interface
(quick charge function)................... 10
12. Alarm ...............................10
12.1 Settings .............................. 10
12.2 Activating / deactivating the alarm ..........11
12.3 Stopping the alarm / Snooze function ........11
13. Sleep ...............................11
14. More settings.........................11
14.1 Time / date settings .....................11
14.2 Equaliser ............................. 12
14.3 Timer ................................12
14.4 Backlight ............................. 13
14.5 Factory reset........................... 13
14.6 Info / software version ................... 13
14.7 Software update........................ 13
15. Care and Maintenance. . . . . . . . . . . . . . . . . .14
16. Warranty Disclaimer ...................14
17. Disposal instructions – Note on environmental
protection ..............................14
18. Declaration of Conformity ...............14
Page 6
Menu structure
DAB
FM
Bluetooth
Settings*
Station List
Scan
DRC
DRC off
DRC high
DRC low
Prune
Settings*
Scan settings
All Stations
Strong Stations only
Audio
Mono
Stereo
Settings*
BT disconnect
Settings*
Timer
Equaliser
Time/Date
Set Time/Date
Set 12/24 hour
Set date format
Clock Sync.
Backlight
Timeout
On level
Dim level
Language
Factory Reset
Update
Version
3
Page 7

Thank you for choosing a Hama product. Take your time
and read the following instructions and information
completely. Please keep these instructions in a safe place
for future reference. If you sell the device, please pass
these operating instructions on to the new owner.
1. Explanation of warning symbols and notes
Risk of electric shock
This symbol indicates a risk of electric shock from
touching product parts carrying hazardous voltage.
Warning
This symbol is used to indicate safety instructions
or to draw your attention to specic hazards and risks.
Note
This symbol is used to indicate additional information
or important notes.
2. Package contents
• Digital clock radio DR36SBT
• Power supply unit
• Quick Guide
3. Safety instructions
• The product is intended for private, non-commercial
use only.
• Do not use the product in areas in which electronic
products are not permitted.
• Protect the product from dirt, moisture and overheating
and use it in dry rooms only.
• As with all electrical products, this device should be kept
out of the reach of children.
• Do not drop the product and do not expose it to any
major shocks.
• Do not operate the product outside the power limits
specied in the technical data.
• Keep the packaging material out of the reach of children
due to the risk of suffocation.
• Dispose of packaging material immediately in
accordance with the locally applicable regulations.
• Do not modify the device in any way. Doing so voids
the warranty.
• Use the product only for the intended purpose.
• Do not use the product in the immediate vicinity
of heaters, other heat sources or in direct sunlight.
• Do not use the product in a damp environment and avoid
splashing water.
• Only use the article under moderate climatic conditions.
Risk of electric shock
• Do not open the device or continue to operate it
if it becomes damaged.
• Do not use the product if the AC adapter, adapter
cable or power cable is damaged.
• Do not attempt to service or repair the product yourself.
Leave any and all service work to qualied experts.
4
Page 8

4. General notes on use
Notes on use
• If various buttons are available for selection (for
example, Y or N), the button currently selected ashes.
• In menus offering a variety of different options
(such as DRC, Language and so on), the currently
selected option is marked with *.
4.1 Switch On / Off / Standby
• Press [+/OK/-] (10) to switch the radio on.
• Press [+/OK/-] (10) for approx. 3 seconds to switch
the radio off (Standby).
• To completely switch off the device, disconnect it from
the power supply.
4.2 Navigation and control
• After pressing a shortcut button, navigate through the
menu items using.
• Select individual menu items by turning [+/OK/-] (10).
• Conrm the selection by pressing [+/OK/-] (10).
Note
• If you are in the playback display, use [ ] (9) to switch
between the volume control and the station list selection.
4.3 Volume adjustment
• You can turn the volume up (right) or down (left) by
turning [+/OK/-] (10) accordingly.
4.4 Additional information
Press [
] (4) to display additional information when
you are in the playback screen. The information shown
depends on the operating mode as well as the radio
station and music les.
• Description
Indicates the radio station, the current programme,
contents, subjects, etc.
• Programme genre/country
Indicates the genre (music style) and the country
or region of the station.
• Sampling rate
Species the sampling rate, or the frequency with which
the audio signal is polled (sampling / sample rate) within
a certain period of time.
• Playback buffer
The signal strength of the received station is displayed
via a bar and its length.
• Today’s date
• Time
• Signal error
• Service not available
Is displayed if there is currently no DAB reception.
5. Informations and notes before getting started
Note – Optimising reception
Please note:
• Always pull the antenna out completely.
• We recommend you adjust the antenna vertically
to ensure optimal reception.
• Try various different positions if necessary to get
the best reception.
6. Getting started
Warning
• Only operate the product from a socket that has been
approved for the device. The socket must be installed
close to the product and must be easily accessible.
• Disconnect the product from the power supply using the
On/Off switch – if this is not available, unplug the power
cord from the socket.
• If using a multi-socket power strip, make sure that the
total power consumption of all connected devices does
not exceed the power strip's maximum throughput rating.
• If you will not be using the product for a prolonged
period, disconnect it from mains power.
• Bit rate
The currently received digital bit rate of the received
station is displayed.
• Codec
Species the encoding scheme used to digitise the data
or signal such as MP3 or WMA.
Connect the power supply to the mains connection (13)
on the back of the radio alarm clock.
Connect the network cable to a properly installed and
easily accessible network socket.
The power supply unit is suitable for mains voltages
between 100 and 240 V, and is thus operable on almost
any AC power grid. Please note that a country-specic
adapter may be necessary.
5
Page 9

You can nd an appropriate selection of Hama products
at www.hama.com.
• Wait until the radio has initialised fully.
• Press [+/OK/-] (10) to switch the radio on.
Initial setup
When you switch the radio on for the rst time, the station
search is started automatically in DAB operating mode.
English is the default language for the radio’s menu structure.
Set up your desired language as described in 7. Language.
7. Language
When started for the rst time, the radio uses English.
To change this, proceed as follows:
• Press [
• Use [+/OK/-] (10) to navigate to the "Settings" menu item.
• Conrm the selection by pressing [+/OK/-] (10).
• Use [+/OK/-] (10) to navigate to the "Language" menu
• Use [+/OK/-] (10) to select your preferred system
• The language setting currently selected is marked with
8. DAB
The radio receives all established digital radio frequencies
in the range of 174,928 MHz to 239,200 MHz (band III,
channel 5A to 13F).
• Press [M] (7) repeatedly to activate DAB operating mode
8.1 Search / Automatic search
The automatic DAB channel search scans the DAB band
III for available stations. After the station search, all
interference-free stations are saved in alphabetical order.
The automatic DAB station search starts automatically
when DAB mode is started for the rst time; it is indicated
by Scanning…
] (6) to access the Settings menu.
item. Conrm the selection by pressing [+/OK/-] (10).
language.
an asterisk (*).
Note
• The following languages are available: English, Danish,
French, German, Italian, Norwegian, Finnish, Swedish,
Turkish, Polish, Slovak, Czech
on the radio:
If you would like to start the search again, proceed as
follows:
• Press [
• Conrm the selection by pressing [+/OK/-] (10).
8.2 Station list
You can call up the station list in DAB mode at any time.
There are two options for doing this.
a)
• When you are in the playback screen, press [
• Turn [+/OK/-] (10) to navigate through the list.
• Call up the required station by pressing [+/OK/-] (10).
b)
• Press [
• Press [+/OK/-] (10) to navigate through the list.
• Call up the required station by pressing [+/OK/-] (10).
Note
The list of stations contains all stations that were found
on the last station search. A station's reception quality
depends on factors such as the weather, location and
orientation of the aerial. If a station shown in the list
of stations is not available, changing the orientation
of the aerial or the location of the radio may help.
Stations that are no longer available can be removed
from the list of stations as described in Section 8.3.
8.3 Edit station list
To remove stations that are not currently in the reception
area, from your station list, proceed as follows:
• Press [
• Conrm the selection by pressing [+/OK/-] (10).
If you answer the subsequent security prompt with OK,
then all currently unavailable stations will be removed
from the station list.
] (6) and navigate to the "Scan" menu item
to start a new station search.
Wait until the search process has completed.
] (9) to
access the current list of stations in alphabetical order.
] (6) and select the menu item "Station list".
] (6) and navigate to the menu item "Delete
inactive stations".
6
Page 10

8.4 Favourites
You can save up to 30 of your favourite stations for quick
and direct access.
8.4.1 Save favourites
Set the station that you would like to save to a favourites
memory slot.
If the station is received, proceed as follows:
• Press and hold [ ] (3) until the Favourites list opens.
• Navigate to the preferred memory slot and conrm your
selection by pressing [+/OK/-] (10).
•
The selection wil
"Program (1-30) saved".
Note
It is not possible to delete a saved station. You can
only replace a saved station with another station and
overwrite the previous favourite.
• Alternatively, press and hold one of the [PRESET]
buttons (1/2) for approx. 3 seconds to save the station
to the required [PRESET] button.
8.4.2 Retrieving favourites
Proceed as follows to open the overview with the
favourites memory slots:
• Press [
• Navigate to the preferred station and conrm your
selection with [+/OK/-] (10).
• Press one of the [PRESET] buttons (1/2) to play the
favourites saved to the [PRESET] button.
8.5 DRC (Dynamic Range Control)
Some DAB network radio stations support a volume control
feature that actively takes effect during playback. If the
volume suddenly increases, DRC automatically lowers it.
If the volume suddenly becomes quieter, DRC automatically
raises it. The same happens when playback is suddenly
quiet. The radio then increases the volume again.
DRC high:
total equalisation of different volumes. Strong compression
can audibly reduce the dynamics of a music title.
l be conrmed by the display showing
] (3) to call up the Favourites list.
DRC low:
partial equalisation of different volumes. More subtle
compression, without too much loss of dynamics.
DRC off:
no equalisation.
Proceed as follows to do the settings:
Note
By default, DRC volume adjustment is disabled.
• Press [ ] (6) and navigate to the menu item "DRC".
• Conrm your selection by pressing [+/OK/-] (10).
• Select the required option and conrm this by pressing
[+/OK/-] (10).
9. FM
Press [M] (7) repeatedly to activate FM operating mode
on the radio.
9.1 Search setting
The search setting allows you to determine whether
stations with low signal strength are ignored during
the automatic search.
Proceed as follows:
• Press [
• Conrm your selection with [+/OK/-] (10).
• Select "Strong stations only" in order to only stop during
• Pressing [
Note
By default, the "Strong stations only" method is selected.
Select Strong stations only to stop only on stations
with a strong signal in the automatic search. Otherwise
(All stations), the search will stop at every station for
which a signal is received.
] (6) to access the "Search settings" menu item.
the automatic search on stations with a strong signal.
Otherwise, the search run will stop at every station for
which a signal is received.
] (9) returns you to the playback screen.
7
Page 11

9.2 Audio setting
Some radio stations transmit their station signal in stereo
quality. This radio uses stereo signals by default and
playback is optimised for this.
For some stations with a weak signal, quality can be slightly
improved by playing them in mono quality. You can enable
this function in the menu, and the radio will automatically
switch to mono reception when signal quality is poor.
To change the audio setting, proceed as follows:
• Press [
• Select "Mono only" and conrm the entry with [+/OK/-]
9.3 Automatic station search
• When you are in the playback screen, press [+/OK/-] (10)
• The radio stops the search and starts playback when
• Repeatedly pressing [+/OK/-] (10) continues the search
] (6) and navigate to the "Audio" menu item.
Conrm the selection by pressing [+/OK/-] (10).
(10).
until the automatic station search starts.
it nds a station.
process until the next station is found.
9.5 Favourites
You can save up to 30 of your favourite stations for quick
and direct access.
9.5.1 Save favourites
Set the station that you would like to save to a favourites
memory slot.
If the station is received, proceed as follows:
• Press and hold [
• Navigate to the preferred memory slot and conrm your
selection by pressing [+/OK/-] (10).
• The selection will be conrmed by the display showing
"Program (1-30) saved".
Note
It is not possible to delete a saved station. You can
only replace a saved station with another station and
overwrite the previous favourite.
Alternatively, press and hold one of the [PRESET] buttons
(1/2) for approx. 3 seconds to save the station to the
required [PRESET] button.
] (3) until the Favourites list opens.
9.4 Manual station search
When you make station settings manually, you can dene
the desired frequency yourself and tune into stations that
were ignored during automatic station search because
their signals were too weak.
• When you are in the playback screen, press [
to access the manual station settings.
• Turn [+/OK/-] (10) ( - : -0.05 MHz / + : +0.05 MHz) until
the desired frequency is displayed. Wait a moment until
playback of the received station signal begins.
] (9)
9.5.2 Retrieving favourites
Proceed as follows to open the overview with the
favourites memory slots:
• Press [
• Navigate to the preferred station and conrm your
• Press one of the [PRESET] buttons (1/2) to play the
] (3) to call up the Favourites list.
selection with [+/OK/-] (10).
favourites saved to the [PRESET] button.
8
Page 12

10. Bluetooth
You can pair your terminal device with the radio using
Bluetooth and use it as a playback device. You can control
playback directly on the terminal device. You can adjust the
volume on the radio, as well.
Note – Bluetooth
• Check whether your mobile device (smartphone, tablet
PC. etc.) is Bluetooth-capable.
• Note that the maximum range for Bluetooth is
10 metres without obstacles such as walls, people, etc.
• The Bluetooth connection may be disrupted by other
Bluetooth devices/connections in the vicinity.
• It is only possible to connect the radio to one terminal
device.
• Note that compatibility depends on the supported
Bluetooth proles as well as the Bluetooth versions
being used. (See: Technical data in the operating
instructions for the respective device)
] (7) repeatedly to activate Bluetooth operating
Press [
mode on the radio.
10.1. BIuetooth pairing
• Press [ ] (6) and navigate to the "Setup Bluetooth" menu
item. Conrm the selection by pressing [+/OK/-] (10).
• Ensure your Bluetooth-enabled device is switched on
and that Bluetooth is activated.
• Open the Bluetooth settings on your device and wait until
the list of found Bluetooth devices shows DR36SBT.
• If necessary, start searching for Bluetooth devices on
your device.
• Select DR36SBT and wait until radio is listed as
connected in the Bluetooth settings of your device.
• Your device is also shown as connected on the radio
display.
• Start and control audio playback using the controls
on your device.
Note – Bluetooth password
Some terminal devices require a password in order to
connect to another Bluetooth device.
• If your device requests a password to connect to
the radio, enter 0000.
10.2 Automatic Bluetooth®connection
(after successful pairing)
• Devices already paired with the radio are automatically
saved on the radio.
• If you are pairing the terminal device with the radio for
the rst time, proceed as described in 10.1 BIuetooth
pairing.
• Ensure your Bluetooth-enabled device is switched on and
that Bluetooth is activated.
• The connection will be established automatically.
• If necessary, open the Bluetooth settings on your terminal
device and select DR36SBT.
• Start and control audio playback using the controls on
your device.
Note - connection impaired
After the radio and terminal device have been paired,
a connection is established automatically. If the
Bluetooth connection is not established automatically,
check the following:
• In your device's Bluetooth settings, check that
DR36SBT is connected. If not, repeat the steps listed
under Bluetooth pairing.
• Check that your device and the radio are less than
10 metres apart. If not, move them closer together.
• Check whether obstacles are impairing the range.
If so, move the devices closer together.
9
Page 13

11. Other connection options
11.1 Connection via headphone jack
You can connect your headphones to the radio's
headphone jack and play its audio signals via the
headphones.
Warning - high volume
• High sound pressure!
• There is a risk of hearing damage.
• To prevent any loss of hearing, avoid listening at loud
volumes for prolonged periods.
• Always keep the volume at a sensible level.
Loud volumes, even over short periods,
can cause hearing loss.
Note
• Reduce the volume of the radio.
• Switch the radio off before connecting headphones
to it.
• Note the warning and safety information included
in the operating instructions of your headphones.
• Do not bend or crush the cable.
• For playback via the headphone jack, connect the
3.5 mm RCA plug from your headphones to the
headphone jack (12) on the radio.
• Press [+/OK/-] (10) to switch the radio on.
• The radio's audio signal is now output via the headphones.
11.2 Connection via USB interface
(quick charge function)
The USB interface (14) allows you to connect your device
to the radio and charge it.
Warning – Connection of devices
• Before connecting a device, check whether it can be
adequately supplied with the charger's current delivery.
• Ensure that the output of the connected device does
not exceed 12 W.
• The automatic adjustment of the charging current
ensures that your device is charged with the best
performance.
• Note the instructions in your device's operating manual.
Note
] (8)
lights up
.
• If the charging current is > 30 mA,
in the display.
• If the charging current is < 30 mA, the symbol goes
out. Your device will continue to charge.
• The charging process is displayed on your device.
• Connect your device to the radio's USB charging socket
(14) using a suitable USB cable. To do this, consult the
operating instructions for the USB cable you are using.
• Once the device is fully charged, the charging process
is ended automatically.
• Disconnect the device from the USB charging socket
if you wish to interrupt the charging process or when
the device is fully charged.
12. Alarm
The radio has two individually adjustable alarm times.
12.1 Settings
• Alarm 1 and alarm 2 are congured identically and allow
two separate alarm times to be saved. Select alarm 1
repeatedly
or 2 - by
• Conrm the selection by pressing [+/OK/-] (10).
Activation / deactivation:
Select On to activate the alarm and to make the alarm
settings.
Select Off to deactivate the alarm.
Conrm the selection by pressing [+/OK/-] (10).
Time:
First choose the hour, then the minute at which the alarm
is to activate.
Conrm the selection by pressing [+/OK/-] (10).
Buzzer
/ DAB / FM:
Dene whether you wish to be woken by a buzzing sound
(Buzzer), DAB or FM.
Conrm the selection by pressing [+/OK/-] (10).
Programme:
If you selected DAB/ FM, enter which station you wish to
be woken with. You can choose from the 30 favourites
memory slots or Last listened.
Conrm the selection by pressing [+/OK/-] (10).
pressing
[
10
Page 14

Mode:
Choose when the alarm is to activate:
Daily – Once – Weekdays – Weekends
Conrm the selection by pressing [+/OK/-] (10).
Date:
If you selected Once, enter the date for the one-off alarm.
Conrm the selection by pressing [+/OK/-] (10).
Volume:
You can set the volume at which the alarm sound should
be played. This setting makes it irrelevant how loud you
last listened to the radio.
Conrm the selection by pressing [+/OK/-] (10).
Note
It is recommended to allow the radio to update the
time automatically. This ensures that the time is always
correct even if there is a separation of power supply –
for example a power cut.
Following successful activation, the alarm symbol (alarm 1
or alarm 2) appears at the right-hand edge of the screen.
12.2 Activating / deactivating the alarm
To activate / deactivate the alarm, proceed as follows:
• Select alarm 1 or 2 - by repeatedly pressing [
• Conrm the selection by pressing [+/OK/-] (10).
• Select ONto activate the alarm and make the alarm
settings. Conrm the selection by pressing [+/OK/-] (10).
• Select OFFto deactivate the alarm.
by pressing [+/OK/-] (10).
12.3 Stopping the alarm / Snooze function
• When the alarm activates, press [ ] (8) to stop it.
• Press [ ] (5) to activate snooze.
• Select the required snooze duration (5/10/15/20/25/30
minutes) by repeatedly pressing [ ] (5).
Conrm the selection
] (8).
13. Sleep
The radio has a timer function, which switches the radio
to standby mode after a pre-dened length of time.
• Make sure the radio is switched on.
• Press [
(5/10/15/30/45/60 minutes) using [+/OK/-] (10).
• Conrm the input with [+/OK/-] (10).
• During playback, the sleep symbol appears at the
left-hand edge of the screen.
14. More settings
14.1 Time / date settings
• Press [ ] (6) and navigate to the "Settings" menu item.
• Select "Time" and conrm by pressing [+/OK/-] (10).
• Choose between "Set time/date" and "Auto update time"
and conrm by pressing [+/OK/-] (10).
Set Time/ Date
Set the time (hh:mm) and date (DD-MM-YYYY/
MM-DD-YYYY) manually using [+/OK/-] (10).
Autoupdate
• Update from FM / Update from DAB
If automatic time and date adjustment is activated,
the device receives time and date information from the
station over the FM/DAB/DAB+ radio network. This is
the best way to ensure that the clock will run accurately
and the alarm will trigger at the correct time, even after
power outages.
• Update from Any
It is recommended to use this setting (Update from
FM and DAB) for the automatic update.
• No update
The time and date (DD-MM-YYYY/MM-DD-YYYY) must
be set manually; no automatic calibration takes place.
] (5) to set the required time interval
11
Page 15

14.2 Equaliser
The equaliser allows you to adjust the sound of the radio
to suit your preferences by amplifying or reducing the
amount of bass or treble in the audio .
You can choose from precongured proles, adjusted
to suit a variety of music genres, or create your own
custom prole.
14.3 Timer
The radio has a timer which emits an alarm tone after
a pre-dened length of time has elapsed.
• Press [
• Select "Timer" and conrm the selection by pressing
] (6) and navigate to the "Settings" menu item.
[+/OK/-] (10).
To set the equaliser, proceed as follows:
• Press [
• Select "Equaliser" and conrm by pressing [+/OK/-] (10).
• Select one of the precongured proles with [+/OK/-]
• To create your own equaliser prole, choose the My EQ
• This takes you to the bass, treble and loudness
• To adjust a particular value, press [+/OK/-] (10) on
• Conrm the selection by pressing [+/OK/-] (10) again.
• Once you have made all of the settings, press [
• To use the new prole, choose the My EQ option.
] (6) and navigate to the "Settings" menu item.
(10).
setting option.
settings (volume amplication).
the corresponding selection and change the values by
turning [+/OK/-] (10) left or right. If playback is already
started when you modify these settings, you can hear the
changes in the audio immediately.
] (9) on
the radio and conrm that the settings are to be saved by
pressing [+/OK/-] (10).
Turn [+/OK/-] (10) to select the desired countdown time
(0-99 min).
• Press [+/OK/-] (10) or [
once the time interval has elapsed. Otherwise, the alarm
will stop automatically after 30 minutes.
• Set the time interval to 0 minutes to turn the timer off.
] (9) to stop the alarm tone
12
Page 16

14.4 Backlight Manual settings
The backlight can be congured for each operating mode
(Operation Mode, Standby Mode) separately.
Proceed as follows:
• Press [
• Select "Backlight" and conrm by pressing [+/OK/-] (10).
• For the Operation and Standby modes, select from
Automatic settings (Sensor)
With the sensor enabled, the backlight is automatically
adjusted to the environment and its brightness.
In complete darkness (for example, at night in the
bedroom), the backlight completely turns off.
] (6) and navigate to the "Settings" menu item.
various brightness settings.
14.5 Factory reset
To reset the radio to the factory default settings, proceed as
follows:
• Press [
• Select "Factory reset" and conrm by pressing [+/OK/-]
Conrm the following prompt with [+/OK/-] (10) to reset
the radio to the factory settings.
All settings made previously are deleted.
Note
• Resetting to the factory default settings can remedy
• However, all settings made previously, such as
] (6) and navigate to the "Settings" menu item.
(10).
some problems and malfunctions.
favourites and station lists, are permanently deleted.
To activate the automatic setting (sensor), proceed as
follows:
• Press [
• Select "Backlight" and conrm by pressing [+/OK/-] (10).
• Select the "Automatic" setting to activate the brightness
] (6) and navigate to the "Settings" menu item.
sensor.
14.6 Info / software version
To have the radio display information about its software,
proceed as follows:
• Press [ ] (6) and navigate to the "Settings" menu item.
• Select "Version" and conrm by pressing [+/OK/-] (10).
14.7 Software update
Improvements and new features are always constantly
being developed for the software used in our radios to
resolve potential errors, increase the range of functions,
and so on. We recommend that you always install any
available updates on your radio.
Warning
• Make sure that the radio has a stable power supply
before you start a software update.
• Power supply failure during a software update can
cause irreparable damage to the radio.
Update port
The update port allows you to load software updates
manually.
Note
• Available updates and instructions on how to install
them can be found at: www.hama.com -> 00054896,
00054231
13
Page 17

15. Care and Maintenance
• Only clean this product with a slightly damp, lint-free
cloth and do not use aggressive cleaning agents.
• If you do not plan to use the product for a prolonged
period, turn off the device and disconnect it from the
power supply. Store it in a clean, dry place away from
direct sunlight.
18. Declaration of Conformity
Hama GmbH & Co KG hereby declares that the
radio equipment type [00054896, 00054231]
is in compliance with Directive 2014/53/EU.
The full text of the EU declaration of conformity is
available at the following internet address: www.hama.com
->00054896, 00054231 ->Downloads.
16. Warranty Disclaimer
Hama GmbH & Co KG assumes no liability and provides no
warranty for damage resulting from improper installation/
mounting, improper use of the product or from failure to
observe the operating instructions and/or safety notes.
17. Disposal instructions – Note on environmental protection:
After the implementation of the European
Directives 2012/19/EU and 2006/66/EU in the
national legal system, the following applies:
electrical and electronic devices as well as batteries
must not be disposed of with household waste. Consumers
are obliged by law to return electrical and electronic
devices as well as batteries to the designated public
collection points or to the point of sale at the end of their
service lives. Detailed information on this topic is dened
in the national laws of the respective country. This presence
of the above symbol on the product, operating instructions
or package indicates that the product is subject to these
regulations. By recycling, reusing the materials or other
forms of utilising old devices/batteries, you are making an
important contribution to protecting our environment.
Frequency band(s)
Bluetooth: 2,402 – 2,480GHz 5dBm (EIRP)
Maximum radiofrequency power
transmitted
14
Page 18

Hama GmbH & Co KG
86652 Monheim
/ Germany
Service & Support
www.hama.com
+49 9091 502-115
DG
The Bluetooth
any use of such marks by Hama GmbH & Co KG is under license. Other trademarks and trade names
are those of their respective owners.
All listed brands are trademarks of the corresponding companies. Errors and omissions excepted,
and subject to technical changes. Our general terms of delivery and payment are applied.
®
word mark and logos are registered trademarks owned by Bluetooth SIG, Inc. and
00054896_54231/08.19
 Loading...