

Page 1

LED LCD TV RECEIVER
USER MANUAL
Please read this manual carefully before using
your television and keep this manual in a good
place for future reference.
MODEL:
LEY26C600
LEY32C600
Page 2

01 Safety and warnings
Welcome …………………………………………………………………………
Important information ……………………………………………………………
Safety notice ……………………………………………………………………
Warnings and cautions …………………………………………………………
02 Introduction
Main Parameter …………………………………………………………………
Base Stand Assembly Instruction …………………………………………… P. 0 8
Wall Mounting Installation Guidelines ……………………………………… P. 0 9
Control Panel ……………………………………………………………………
Rear/Side Sockets ………………………………………………………………
Connecting your TV ………………………………………………………………
Common interface …………………………………………………………………
03 Remote Control
Remote Control …………………………………………………………………
04 Operation
Installation Guide …………………………………………………………………
05 DVD Operation
DVD Side Panel …………………………………………………………………
Remote Control-DVD section …………………………………………………
Meun Operation …………………………………………………………………
Protect your DVD discs ………………………………………………………
P. 0 2
P. 0 2
P. 0 3
P. 0 5
P. 0 6
P. 1 0
P. 1 0
P. 11
P. 1 2
P. 1 3
P. 1 5
P. 2 3
P. 2 4
P. 2 5
P. 2 6
06 DVD Trouble shooting
DVD Trouble shooting …………………………………………………………
07 Trouble shooting
Trouble shooting ………………………………………………………………
Specification ……………………………………………………………………
P. 2 7
P. 2 8
P. 3 0
Page 3

Thanks for buying this 26"/32" LED LCD TV with DVD Player.
This guide will help you set up and begin using your TV.
26" Full HD 1080P Digital LED LCD TV with DVD Player 32" Full HD 1080P Digital LED LCD TV with DVD Player
Remote control
AAA ba x2
ttery
Instruction Manual
Quick start guide
Scart cable x1
Pedestal Pedestal
Now you can get star
IMPOR
READ ALL INSTRU
CAUTION
TO REDUCE THE RISK OF ELECTRIC SHOCK, DO NOT REMOVE COVER (OR BACK).NO USER SERVICEABLE PARTS INSIDE.
FOR ANY PROBLEMS, REFER SERVICING TO THE CUSTOMER HELP LINE. THERE IS A LIGHTNING ARROW SYMBOL IN
THE TRIANGLE: THIS SYMBOL INDICATES HIGH VOLTAGE IS PRESENT INSIDE. IT IS DANGEROUS TO MAKE ANY KIND OF
CONTACT WITH ANYINSIDE PART OF THIS PRODUCT.
THERE IS A EXCLAMATION MARK IN THE TRIANGLE: THIS SYMBOL ALERTS YOU THAT IMPORTANT LITERATURE
CONCERNING OPERATION AND MAINTENANCE HAS BEEN INCLUDED WITH THIS PRODUCT.
SOURCES OF HUMIDITY. DO NOT USE ANY ABRASIVE CLEANERS WHICH MAY SCRATCH OR DAMAGE
THE LCD SCREEN. AVOID CONTACT WITH OBJECTS THAT MAY SCRATCH THE LCD SCREEN.
DAMAGE. REFER ALL SERVICING TO THE CUSTOMER HELPLINE.
VISIBLE AND INVISIBLE LASER RADIATION WHEN OPENED. AVOID EXPOSURE TO BEAM
(WARNING LOCATION: INSIDE ON LASER COVER SHIELD).
ted!
TANT INFORMATION
CTIONS BEFORE USE AND KEEP FOR FUTURE REFERENCE.
CAUTION:TO REDUCE THE RISK OF ELECTRIC SHOCK AND FIRE, DO NOT PUT THE TV SET NEAR
NOTE: SERVICING THE UNIT YOURSELF IS UNAUTHORISED AND COULD LEAD TO INJURY OR PRODUCT
Remote control
AAA ba x2
ttery
Instruction Manual
Quick start guide
Scart cable x1
REGION MANAGEMENT INFORMATION
This DVD player is designed and manufactured to respond to the Region Management
Information that is recorded on a DVD disc. If the Region number described on the DVD
disc does not correspond to the Region number of this DVD Player, this DVD player can
not play that disc.
This Region number of this DVD player is
This TV is optimised for use in the United Kingdom. It is not certified to work in other countries
and some features and signal inputs may not work as described in the documentation.
P. 0 2
Page 4

P. 0 3
the
accessable.
Page 5

UK Only 13A Plug Connection.
If your TV is connected to the mains supply using a 3 pin 13 amp plug , the voltage rating is 220240 volts and should be protected by a 3 amp f use i n the plug.
Should the fuse require replacement for any reason, the fuse must be replaced with a f use
rated at 3 am ps an d manufactured and approved to Bs1362.
If the mai ns pl ug is u nsuitable for the socket outlet in your home or is rem oved for any other
rea son , then the cut off plug s hou ld have its f use removed an d be disposed of safely to prevent
the haza rd of elect ric s hoc k.
There is a d anger of elect ric s hoc k if the cut off plu g is in ser ted into any 13 amp socket out let .
How to wire a 13 amp plug.
Important
The wire s in the mains lead on a TV are colour code d in ac cordanc e wit h the follo win g code.
Green and yellow Earth Not re qui red on TV's as the y are double insula ted.
Blue Neu tral
Bro wn Live
Double insulated appliances
Applia nce w ith d ouble insulatio n, have a symbol than means that t hey do not have an earth
wire (green and yel low ), so on these applia nce s onl y have t wo wires a blue an d a brown.
If the col ours do not correspond with the mar kin gs identifying th e terminals in your p lug ,
pro cee d as follows.
The green and yellow wire, not required on double insulated appliances, must be c onnected to
the term ina l in the plug which is ma rked w ith t he letter E o r wit h the earth symb ol or
col oured green an d yellow.
The blue wire must be conn ected to th e ter minal marked N or colo ured Blue or Black
The brown wire must b e connected to the termin al ma rked L o r coloured Brown or Re d
P. 0 4
Page 6

WARNINGS AND CAUTIONS
Warning
High voltages are used in the operation
of this television receiver. Do not remove
the cabinet back from your set. Refer
servicing to qualified service personnel.
Caution
Do not trap the power supply cord under
the television receiver.
Warning
To prevent fire or electrical shock
hazard, do not expose the television
receiver to rain or moisture.
Warning
Do not drop or push objects into the
television cabinet slots or openings.
Never spill any kind of liquid on the
television receiver.
Caution
Do not block the ventilation holes in the
back cover. Adequate ventilation is
essential to prevent failure of electrical
components.
Caution
Never stand on, lean on, or suddenly push
the television or its stand. You should pay
special attention to children. Serious injury
may result if it should fall.
Caution
Do not place your television on an unstable
cart, stand, shelf or table. Serious injury to
an individual , and damage to the
television, may result if it should fall.
Cauti on
When the television receiver is not
used fo r an exte nded pe riod of time , it
is advisable to disconnect the AC power
cord fr om the AC ou tlet.
Dim:515*320mm(不包括底座)
Caution
If the television is to be built into a
compartment or similar enclosure, the
minimum distances must be maintained.
Heat build-up can reduce the service life of
your television, and can also be dangerous.
Safety and warnings
01
P. 0 5
Page 7

02
Introduction
CAUTION
Never tamper with any components inside
the TV, or any other adjustment controls
not mentioned in this manual. All LED-TVs
are high voltage instruments. When you
clean up dust or water drops on the LED
PANEL or CABINET, the power cord should
be pulled out from the receptacle, then
wipe the TV with a dry soft cloth. During
thunder and lighting, unplug the power cord
and antenna cord to prevent damage to
your TV. All repairs to this TV should only
be performed by qualified TV service
personnel.
INSTALLATION
*Locate the TV in the room where light
does not strike the screen directly.
*Total darkness or a reflection on the
picture screen can cause eyestrain. Soft
and indirect lighting is recommended for
comfortable viewing.
*Allow enough space between the TV and
the wall to permit ventilation.
*Avoid excessively warm locations to
prevent possible damage to the cabinet or
premature component failure.
*Do not cover the ventilation openings
when using theTV.
Main features
Used as Television, display terminal,
1
PC display;
High luminance, wide viewing
2
Angle;
HDMI interfac e and SCA RT
3
Inter face;
4 NICAM;
5 T ;ime-shift
Main parameter
Panel
TV System
Video Signal System PAL/SECAM
I
nput Power Voltage AC 100V-240V 50/60Hz
Power consumption
Audio
Output Power (THD 7%)
Signal Input
Horizontal definition(TV line)
26"
PAL-B/G、I、D/K
SECAM- B/G、D/K、L、 L
55W
2x5W
Analog RGB(PC)x1
High-Definition Multimedia Interface (HDMI) x 2
Vdieo Input x1
Audio Input x2
USB Input x1
YPbPr x1
SCART x 1
COMMON IN INTERFACE(CI)
PC audio x1
Composite Video
YPbPr >=400
32"
'
90W
2x8W
input >=350
P. 0 6
Page 8

PC
PRESET MODE
RESOLUTION
V.Freq.(Hz) H.Freq.(KHz)
1
2
3
4
5
6
640x480
800x600
1024x768
1360x768
1280x1024
1920x1080
60
60
60
60
60
60
31.47
37.88
48.36
47.7
63.98
66.64
Introduction
02
P. 0 7
Page 9

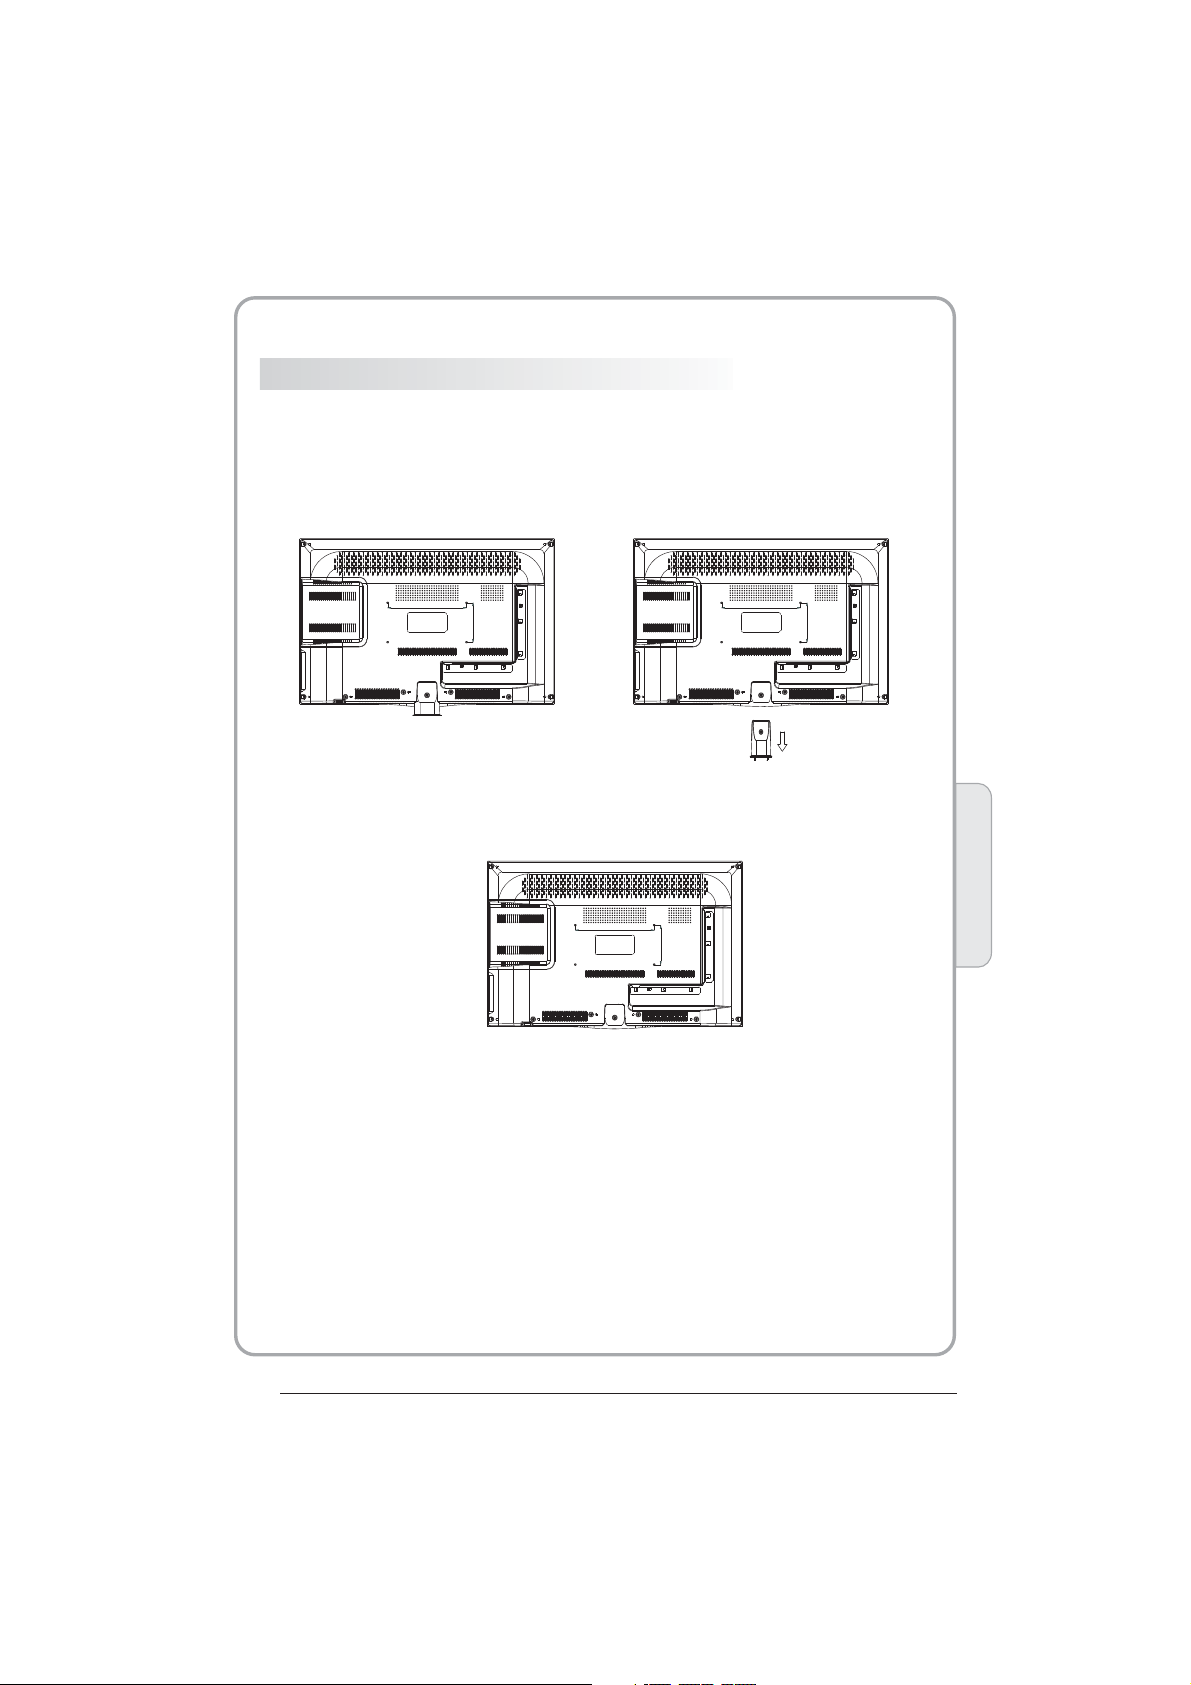
Base Stand Assembly Instruction
1. Insert the stand support pillar into the stand as the arrow indicated
direction, and then fastened with three screws.
2. Insert the stand Ass'y into back cover as the arrow indicated direction,
and then fast ened with o ne screw.
INSTALLATION NOT ES
Locat e the TV in a room w here li ght doe s not strike t he scre en dire ctly. Total d arkne ss
or a refl ectio n on the sc reen can cau se eyes train . Soft and ind irect l ighti ng is
recommended for comfortable viewing.
Allow enough space between the TV and the wall to permit ventilation.
Avoid excessive ly warm l ocati ons to preve nt poss ible da mage to the ca binet o r
premature component failure.
P. 0 8
Page 10
WALL MOUNTING INSTALLATI ON GUIDELIN ES
This television can be wall mounted as follows:
1.Pla ce the LE D LCD Tel evisi on onto a s olid surfa ce. Ple ase pla ce some soft m ateri al
over the front of the screen to protect it from any damage.
2.Rem ove the s crews f rom the lowe r part of t he tele vision, wh ere the b ase joi ns to the
TV, an d take aw ay the stand ( put the s tand so mewhere safe for fu ture us e).
200.00
100.00
200.00
100.00
3.Use t he four s crews p rovided to f ix the TV onto a w all mou nting bracket (not i ncluded)
via the four VESA standard holes on the back of the television.
200.00
100.00
Introduction
02
P. 0 9
Page 11

Front control panel
SOURCE
1
MENU
2
CH+
3
3
1
CH-
VOL+
VOL-
STANDBY
4
5
2
1
Remote control sensor.
Indicator LED:
2
BLUE: POWER ON. RED: STAND BY.
Key board.
3
Rear/Side Sockets
AC-INPUT
100-240V~ 50/60Hz
3
HDMI1
USB
6 7 8
AV
1
L/R AUDIO
2
AC Power Source
3
YPbPr
4
HDMI2
5
HDMI1
6
AV L RAV L R Y
1 2
COMMON INTERFACE (CI)
PC AUDIO
9
input
input
input
input
input
input
1
2
3
4
SOURCE
MENU
CH+/CH-
VOL+/VOL-
Display the input source menu.
Display main MENU.
In TV mode,press CH+ or CH- to change
the channel up and down.
In MENU, press CH+ or CH- to select items .
In standby mode, it can Turn on the TV.
Adjust sound level.
In MENU,adjust the item that you Selected.
STANDBY
5
Pb
Pb
PrY
Pr
HDMI2
4
SCART
10
USB
7
PC AUDIO input
8
COMMON INTERFACE(CI)
9
SCART
10
VGA INPUT
11
ANT
12
5
VGA ANT
11
12
input
Intput
Intput
Input
input
P. 1 0
Page 12

Connecting to your Haier TV
Connecti ng a DV D pla yer / S ate lli te / ca ble
set top box receiver / games console / PC or
Laptop
There are se ver al op tio ns to c onn ect ing a D VD
player / Satellite or Cable set top box receiver /
games cons ole / P C or La pto p to yo ur TV.
Option 1 SCART
Connect a SCART c able (not supplied)
from the SCA RT soc ket o n the T V to th e DVD
player / Satellite or cable set top box receiver or
games consol.
To select the device connected with the
SCART cable press the SOURCE but ton o n the
remote and u se th e key s to select SCART
and press th e OK b utt on.
Note:- The TV w ill d efa ult t o the SCART
connection when the TV is switched on.
Option 2 HDMI
If the device you w ant t o connect to the TT
is switche d on, s wit ch off the devi ce fi rst .
Connect a HDMI cable (no t supplied) from
the HDMI socket on the TV to the DVD player /
Satellite or cable receiver or games consol.
Switch on the dev ice y ou ha ve ju st
connected to the TV
To select the device connected with the
HDMI cable p res s the SOURCE bu tto n on th e
remote and u se th e key s to select HDMI and
press the OK button.
Option 3 AV Audio Visual
(Yellow/White/Red)
Make sure that bo th TV and the device are
switched off before connecting.
Connect the AV cables (not supplied) from
the Video (yellow) and Audio (white, red)
sockets on the TV to the DVD player or games
console etc.
To select the device connected with the
AVI ca ble press the SOURCE button on the
remote and u se th e key s to se lec t AV and
press the OK b utt on.
Option 4 COMPONENT
(Green/Blue/Red)+(White/Red)
Make sure that bo th TV and the device are
switched off before connecting.
Connect the cables (not supplied) from the
COMPONENT IN sockets Y, Pb, Pr (green,
blue, red) a nd L- Aud io- R (wh ite , red ) on th e TV
to the DVD player or games console etc.
To sele ct the device connected with the AVI
cable pres s the S OUR CE bu tto n on th e rem ote
and use the ke ys to s ele ct CO MPO NEN T
and press th e OK b utt on.
Option 5 VGA (15p in Su b-D )
Connect a VGA c abl e (no t sup p
VGA socket on t he TV to the PC / Laptop.
To sele ct the PC / Laptop connected with the
VGA cable press the SOURCE button on the
remote and u se th e key s to select PC and
press the OK button.
Note VGA is video only. For audio from your
PC/Lapto p you n eed t o con nec t a sep ara te
cable from t he PC Au dio ( 3.5 mm ja ck) t o the
headphone socket on you PC/Laptop (3.5mm
jack)
Option 6 USB
Most USB sticks c an be c onn ect ed to y our T V
and some digital cameras may also work.
Connect USB stick (not supplied) or a USB
cable (not supplied) to the TV.
To select the USB device connected to the TV,
press the SO URC E but ton o n the r emo te an d
use the keys to select USB and press the
OK button.
Note1:- On ly *. jpg a nd *. mp3 f ile s wil l wor k,
other file t ype s are n ot gu ara nte ed an d may n ot.
Note 2. Apple iPhones and iPods are not
compatible with you TV.
Note 3. When c onn ect ing a ny de vic e to th e USB
connecti on, k eep t he US B cab le le ngt h as sh ort
as possible.
lied) from the
Introduction
02
P. 1 1
Page 13

COMMON INTERFACE
< >
The common interface (CI) slot is designed to
accept the conditional Access (CA) Module
and Smart ca rd in o rde r to vi ew th e pay T V
programmes and additional services.
Contact your Common Interface service
provider to get more information about the
modules and subscription.
Please noted that CA modules and smart
cards are neither supplied nor optional
accessories from us.
CHANNEL
Auto Tuning
DTV Manual Tuning
ATV Manual Tunin g
Programme Edit
Signal Information
CI In forma tion
Softw are U pdate (OAD)O ff
Softw are U pdate (USB)
P. 1 2
Page 14

03
03
Remote control
Remote control
1:POWER:Press to turn the un it on or off .
POWER MUTE
TV/RADIO
HOLD
RECALL/GOTO
PIC
FAV INFO
PBCA-B TITLE
DVD AUDIO
LIST
TV AUDIO
TEXT
ANGLE
SUBTITLE
INDEX
FREEZE
1OK2 3
4 5 6
7 8 9 0
TV MENU SOURCE
DVD MENU SOUND EXIT
+
VOL
_
SLEEP ASPECT
DVD SETUP
EPG
RETURN
DISPLAY
REVEAL
SUBPAGE SIZE MIX
+
CH
_
2:NUMERIC KEY:Press f or di rect access to cha nnel s.
3:TV MENU:Press t o displ ay TV M ain Men u.
4:CURSOR:Press to scrol l throug h the Men u.
6:VOL+/- :Press to adj ust t he sou nd leve l.
7:PIC:Press to swi tch be twee n pict ure mod es.
8:SLEEP:Press to set S lee p Timer .
9.REC:Press to reco rd the T V program you are watchi ng in
DTV Mode.
10:TV/RADIO:Pr ess t o swi tch be twee n TV and R adio modes.
11: EPG:Pr ess to displ ay the 7 D ay El ectr onic P rogram Gui de
For infor mati on on t he sho w you are watchi ng.
12:FAV:P ress to acc ess you r favo urit e cha nnel s list in TV or
DTV mode
15:REWIND:Pr ess t o rew ind pl ay in U SB Mod e and Tim eshift
Mode.
16: FAST FORWARD:Press to Fast Forw ard pl ay in US B mode
or Timeshift Mode.
17:PLAY: Press the P lay B utt on in USB Mod e or Tim e Shi ft
Mod e to be gin or con tinu e Playb ack .
18:PAUSE:Press the Pau se Butt on to st art timesh ift fun ction
or pa use m edi a play in DMP m ode.
19:TELETEXT KEYS:Refer to pa ge 12 .
20:MUTE:Pr ess t o disab le or en able t he sou nd ou tpu t.
21:TV/AUDIO:To sel ect t he ava ilab le audi o langu age of T V
program s .
22:RECALL/GOTO:Pr ess to retur n to the previ ou sly vi ewed
cha nnel .
23:SOURCE:Pr ess t o displ ay the Input Sou rce Li st.
24:OK:Pr ess t o con firm M enu sel ecti ons.
25:EXIT:To exi t the m ain m enu, press the Exi t Butt on or to
can cel sett ing sel ecti ons.
26:SOUND:Pr ess t o swi tch be twee n the sou nd mod es.
27:CH+/C H-: Press to scrol l throug h you r Chann el List .
28:ASPECT:Pr ess t o cha nge the pict ure asp ect rati o.
29:TEXT:Pr ess t o ent er or exi t TELE TEX T mode.
30:INFO:To displ ay the program infor mati on of t he sho w you
are watchi ng, press the Info Butt on.
33:SKIP FORWARD:Pr ess to skip t he ne xt fi le or track i n
USB Mode.
34: SKIP BACKWARD:Press to ski p the previ ou s file or
Track in USB M ode
35:SUBTITLE:To turn on Sub titl es press the S ubti tle B utt on
in DTV mod e.
36. :
Time Shift.
37:FREEZE:Pr ess t o free ze the pi cture you are watchi ng .
Remote Control
03
Press to st op playi ng in U SB mod e, or press to st op
NOTE:
1) With no ope ration for 4 h our s, the unit wi ll
go into the standby mode automatically.
2) For the DVD section, please refer to page . 23
P. 1 3
Page 15

REMOTE CONTROL
TELETEXT
Teletext is an information system broadcast by certain channels which ca n be
consu lted li ke a news paper. It als o offers acc ess to su btitl es for viewers with hearing
problems or who are not familiar with the transmission language(cable networks,
satellite channels, etc.)
Press:
T
EXT
SELECTING A PAGE
You will obtain :
This is used to call or exit teletext modes. The summary appears with
a list of i tem s that can be ac ces sed . Each item ha s a cor responding
3 digit p age n umber. If the c hannel selected does not broadcast
teletext, theindication 100 will be displayed and the screen will
remain blank (in this case, exit teletext and select another channel).
Enter the number of the page required using the 0 to 9 u p/down.
Example: page 120, enter 120. The number is displayed top left, the
counter turns and then the page is displayed. Repeat this operatio n to
view another page. If the c ounter continues to search, this means
that th e pag e is not trans mit ted . Select another n umb er.
E
DIRECT ACCESS
TO THE ITEMS
INDEX
SUB PAGE
HOLD
REVEAL
LIST
Coloured are as are displayed at the bottom of the screen. The 4
coloured keys are used to access the items or corresponding pages.
The col our ed areas fla sh wh en th e item or the pa ge is n ot yet
available.
This returns to the contents page (usually page 100).
Certain pages contain sub-pages which are automatically
displayed successively. This key is used to stop or resume subpage acquisition. The indication appears top left.
To freeze the page.
To display or hide the concealed information (games solutions).
The user can set four favorite pages to be directly linked to the fou r
color keys. While list mode is activated, it is not possibility to use TOP
or FLOF navigation with the colorkeys. The favorite page numbers
should be stored and restored to/from nonvolatile memory for each
channel by the system software.
P. 1 4
Page 16

04
_
+
< >
OPERATION
Installation Guide
Please select an OSD Language
Magyar
Nederlands
Norsk
Swit zerla nd
UK
NewZealand
PolskiEnglish
Portugues
Pycck
Morocco
Tunis
Algeria
Cesky
Dansk
Deutsch
Home Mode
Shop Mode
Norway
Poland
Portugal
This scree n onl y app ear s the f irs t tim e the T V
is turn on, or r ese t to fa cto ry se t.You can choose
language,energy-saving mode and country,
auto turni ng pr ogr ams . And a fte r tur nin g the
screen will skip to the firs t DTV p rog ram .
~
Espanol
E ka
Rumania
Russian
Serbia
Fran ais
Hrvatski
Italiano
OK
Mode Select
OK
Country
Slovenia
Spain
Sweden
OK
1.CHANNEL MENU
The first item of the MENU i s channe l menu( for
TV or DTV source only).
Auto Tuning
DTV Manual Tuning
ATV Manual Tunin g
Pro gramm e Edit
CHANNEL
Signal Information
CI Information
Softw are U pdate (OAD)O ff
Softw are U pdate (USB)
You can search channels and edit programs her e.
1).Auto tuning:
Search all the channels automatically(you can
select ATV and DTV)
Tune Ty pe DTV+ ATV
Germany
Greece
Hungary
Please press to select country at firs t , the n
press OK but ton t o sta rt au to tu nin g .
Italy
Luxembourg
Net herla nds
MENU
Channel Tuning
TV : 0 Pr ogram me(s)
DTV : 0 Programme(s)
Radio : 0 Prog ramme (s)
Data: 0 Programme(s)
96% U HF CH 68 DT V
Norway
Poland
Portugal
NOTE:
All the channels including ATV, DTV and Radio
can be tuning by one time, if the Tune Type is
DTV+ATV .
All the stored channels will be disappear after
auto tuning .
After auto tuning , the channel will skip to
the first DTV channel.
2).DTV Manual tuning:
You can select a DTV channel then find the
program in this channel.
Pls press to select the channel , th en press
OK to search the programs .
NOTE:
Bad Normal Good means signal intensity.
DTV Manual Tuning
VHF C H 5
Press OK to search
Bad N omal
3). ATV Manual tuning :
You can change the sound system to search
the analog TV channels and fine tune the
channels , then storag e the chan nels you
selected.
Good
Operation
04
P. 1 5
Page 17

< >
< >
ATV Manual Tuning
_
+
Storage To 1
System BG
Current CH 1
Search
Fine-Tune
Frequency 255.25 MHz
Sav e MENU
NOTE:
Press teletext red button to storage to channels
after manual tuning .
4). Program edit:
You can Delete ,Rename ,Move, Skip , FAV any
programs.
Delet e
Press teletext red button , the program in cursor
will delete.
Rename:
Only can rename ATV programs .
Move the cursor to the pro gram, pr ess teletext
green button to rename the program.
Press to choose the character. Press to
move the cursor .
Press MENU button to exi t edit , Pre ss EXIT to
exit the menu.
Note: ATV pro grams name only can be 5 ,
DTV programs name can be 2 5
Use the Arrow Buttons to select the channel you
wish to move . Then press the Yellow But ton t o
select Move function. Once active, enter the
number but ton a nd th en pr ess O K to co nfi rm.
Press to choose the program , press teletext
blue button to skip this p rogram , The will
show on the right side of th e progra m .
Choose the skipped program, press blue button
again , you can cancel the skip ,The will
disappear .
characters long
characters long.
Favourite
Press to choose the program , press FAV
button , it will show on the r ight sid e of the
program.Choose the FAV program , press
FAV button again , you can can cel the FAV,
the will disappear .
Once your favorite group is created, you can
press the FAV key to quickly access your favorite
channel.
5). CI information: (optional)
This menu can display th e CI card' s i nformation.
2. PICTURE MENU
The second item of the MENU is PICTURE MENU.
You can adjust picture effect here, such as
contrast, brightness, etc.
Press OK to move, press OK to adjust .
Picture Mode Standard
Color Temperature
Aspect Ratio
PICTURE
Pic ture Mo de Stan dard
Contrast 82
Brightness 50
Colo r 50
Sharpness 50
Tint 5 0
MENU
NOTE:
1).Tint is available in NTSC system only.
2).There are four colors temperature modes
can be selected medium , warm, co ol,user
3).Screen is available in PC mode on ly which,
can adjust Horizontal position, vertical
position, size and pha se.
Noise Reduction
Screen
Color Temperature Medium
Red 40
Green 31
Blue 50
MENU
3.SOUND MENU
The third item of the MENU i s the SOUN D
MENU.
You can adjust the sound effec t here such as
treble, bass, balance etc.
Press to move, press OK to adjust.
Sound Mode Standard
Balance
SOUND
Note:
Auto volume: only avai lable when the input
signal volume is too large or distortion.
Auto Volume
4.TIME MENU
The forth item of the menu i s the TIME MENU
You can adjust the clock, power on/off time,
sleep time etc Press to move, pres s OK to
adjust
P. 1 6
Page 18

< >
< >
NOTE:
< >
_
+
Within 15 minutes ther e is no sign al, the TV
will auto sleep , if Auto Slee p is set ON. The
clock time can get from th e DTV syst em auto.
5.OPTION MENU
The fifth item of the MENU is the OPTION
MENU. You can adjust the Menu la nguage,
Audio language,Subtitle language etc.
OPTION
In PVR File sy ste m men u you c an se t up US B
disk for PVR .
Select D isk C :
Check PVR File System Start
USB Disk
Format
Time Shift Size
Speed
Free Record Limit 6 Hr.
NOTE:
Restore fa cto ry de fau lt wi ll cl ear a ll th e pro gra ms
and password.
6.LOCK ME NU
The sixth item of the menu i s the LOCK M ENU
You can lock system, set password, block prog ram
and set parental guida nce Once y ou set the lock
system on you can not sear ch the cha nnels or
change any programs.
LOCK
TIME
OSD Language English
Audio Languages UK
Subtitle Languages UK
Country UK
PVR File System
Restore Factory Default
Set Password
Blo ck Prog ram
Parental Guidance Off
Clo ck -- -- -- - -
Off Time
On Tim e
Sleep Timer
Auto Sleep
Time Zon e
Lock System
NOTE:
The default pass word is 0000, If you forget the
password, you can use the super password:9443.
Block program: Press to choose the
program ,press telet ext gree n button to block
the program. If you want unblock the progra m,
pls enter the main menu , in put the pa ssword,
then press green butto n again.Parental
guidance: Press to cho ose rati ng.
7.EPG Menu(Electronic Program
Guide).
The EPG menu is used to look a t what is be ing
broadcasted on DTV or Radio channel in the day.
To access the EPG menu, press th e EPG
botton,the followi ng menu will be displayed:
PRO GRAMM E GUIDE T IME
28 Apr
800 SZTVM01 No Information
801 SZTVM02
802 SZTVM03
803 SZTVM04
804 Date
OK
INFO
1.
Use to choose the programs , Press
INFO key, you can display the highlight program's
information.
Schedule
2.
Press the teletext yel low key, It can list
all the reminder sched ule, press to choose
the list, press red key to delete th e
schedule list, Press E PG to retu rn to EPG menu.
Sch edule Li st 04:55 28th Ap r Delete
Time Date
3. Record
Press the red key ,It can se t the prog ram
to be recorded.
Remind
4.
Press the blue key to choo se one pro gram
and set up one reminder time, the TV screen will
skip to the choosed program in the reminder time
automatically.
04:39
No Information
No Information
No Information
No Information
ScheduleRecord INFO
DELETE
Program m e Title
Reminder setting
802 SZTVM03
08 Minute
05 Hour
Apr Month
28 Date
Once Mode
OK
Remind
INDEX
Chann el Nam e
BACK
Operation
04
P. 1 7
Page 19

8.PVR function
< >
1.Prepar e to re cor d the p rog ram
From OPTION MEN U ent er in to PV R Fil e
System In “OPTIO N MEN U”, ple ase
choose “check PVR File System”. Click
“OK”, until “checking”change into
“Success”.
Note: please check the term “speed”. If it
is “HD support”, that means the speed of
USB device is available for time shift and
record. If not, please format the device, to
make sure the device available. The default
“Free Record Limit” is 6 hour, if the space
on the disk is b ig en oug h. If t he sp ace i s not
big enough, the record time should be
shorter, depends on the room on the
device. During the “check PVR File
System” checking, please do not take any
other operation until it finished.
The recordings have to be done with TV PVR
system. It can on ly be p lay ed in t he sa me TV,
not in any oth er ki nd of d evi ces ( com put er,
DVD, etc...) which doesn't be compatible
with .TS. Fo rma t.
See that in or der t o car ry ou t any k ind o f
recording, the TV will oblige you to format the
connected device to store the recording.
WARNING. WHEN YOU FORMAT, THE
EXTERNAL DEVICE WILL LOSE ALL THE
FILES AND INFORMATION YOU STORAGE
IN THE DEVICE.
From OPTION MEN U ent er in to PV R Fil e
System as below:
OSD Language Eng lish
Audio Languages
Subtitle Language
Cou ntry UK
OPTION
PVR File System
Restore Factory Default
Sele ct Dis k C:
Check PVR File System Sta rt
USB Disk
Format
Time S hift Siz e
Speed
Fre e Recor d Limit 6 H r.
Select Disk:select w hich dis c to save the
record file.
Sele ct Dis k
USB 0
Dis k C:
Check PVR File System: check if the PVR File
System set up in the USB device or not.
MENU
OK
Format:
File System Size
PVR F ile Sys tem Type H i Speed F S
PVR F ile Sys tem Siz e All
SD 10 4 Mins
HD 29 M ins
MENU
File System Size
PVR F ile Sys tem Type FAT3 2
PVR F ile Sys tem Siz e All
SD 10 4 Mins
HD 29 M ins
OK
P. 1 8
Page 20

(Suggest to format the format the device by
“High Speed Fs...”, which can speed up
the record.)
Format disk
Format disk
Warn ing! All d ata will be lost.
Sta rt Exit
Format disk
2.Record the program
As playing t he DT V sou rce , cho ose t he
channel and click “record”, the record
frame will p op up . Cli ck “record” again,
the record frame will disappear and the
“REC” icon still on t he le ft to p. It w ill
disappear until you click “stop”.
3.Play the record
In “USB”, the record prog ram w ill b e
saved in the folder “_MSTPVR” on the
device.
Do not unplug USB device.
Formatting,please wait
below menu appear after Format finish:
Sele ct Dis k C:
Check PVR File System Che cking
USB D isk Pas s
For mat Pas s
Time S hift Siz e All
Spe ed Chec king
Fre e Recor d Limit 6 H r.
Sele ct Dis k C:
Check PVR File System SUC CESS
USB D isk Pas s
For mat Pas s
Time S hift Siz e All
Spe ed HD sup port 20 48 KB/s
Fre e Recor d Limit 6 H r.
If you select the “Hi Speed FS ”format mode,
then you can change the ti me shift s ize:
Time S hift Dis k Size 5 12 MB
MENU
MENU
Time S hift Siz e
SB 14 M ins
HD 4 Min s
1. The USB storage size needs to be the
size between 4GB to 500GB.
2. Video may become pixelated when Video
bit rate is to o low.
3. Not all USB d evi ces a re co mpa tib le.
Below is a lis t of re com mended USB
drvies.Models that are not listed may be
compatible, but it is not guaranteed to work.
The USB support list are the same as
Tim esh ift f unc tio n ,se e the fol low ing pag es
for det ails.
Operation
04
P. 1 9
Page 21

9.Timeshift function
DISPLAY
DVD AUDIO
ANGLEPBCA B TITLE
SUBPAGE SIZE MIX
REVEAL
HOLD
LIST
INDEX
RETURN
SUBTITLE
FREEZE
1.Prepar e to re cor d the p rog ram
This TV allows you to pause and record the
currently watched digital program to a USB
storage device, and to resume to the point
where it was paused.
NOTE:
Formatti ng a US B 2.0 s tor age d evi ce will
be needed. Save your original data
before for mat tin g. All t he da ta st ore d in
the USB devi ce wi ll be e ras ed af ter
formatting.
Sleep time r wil l be su spe nde d if it h ad
been set bef ore a cti vat ing t he Tim e Shi ft
function.
USB Drive Storage Format
Select to format the USB device and
allocate the amount of space for the Time
Shift function.
NOTE:
The format p roc ess w ill t ake a t lea st 2
minutes. Please do not turn off the power
or remove th e USB d evi ce du rin g
formatting.
During for mat tin g, a sp eed t est w ill b e
done on the US B dev ice . If it f ail s, it
means the USB device may not support
the Time Shif t fun cti on.
Record a paused DT V progr am to
USB stora ge devi ce
1. While in th e DTV i npu t sou rce , ins ert
USB storag e dev ice t o the U SB po rt on t he
side of your TV.
2. Press PAUSE 18 to start Time Shift
function. The TV program paused. The Time
Shift OSD appears, and starts recording.
3. Press STOP 36 to st op Tim e Shi ft
function and stop recording program.
Play Stop
FF Prev . NextFB
Pause
NOTE:
Please do not unplug the USB storage
device whe n the Ti me Sh ift f unc tio n is
activated.
Approximately 4GB of memory buffers
about offer 140 minutes.
00:00:33/00:04:22
18
36
P. 2 0
Page 22

Time Shift limitations:
1. When the Tim e Shi ft fe atu re is a cti vat ed,
only the PLAY/PAUSE/STOP/FWD/REV/
VOL+/VOL -/M UTE k eys a nd so me ba sic
operation keys (ENTER/EXIT/navigation
keys) are available.
2. Video playback may not be smooth and
skip if USB re cor din g spe ed do es no t mee t
the minimum requirements .
3. Do Not remo ve US B dis k or sw itc h off the
power during Time Shift operations. It will
abort once the signal is lost.
4. Do Not remove the signal source during
Time Shift operations.
5. Do Not quickly and repeatedly change
operations between
PLAY/PAUSE/FWD/REV.
6. Sleep timer will be terminated if it had
been set bef ore Ti me Sh ift .
7. Video may become pixelated when Video
bit rate is to o low.
8. Not all USB devices are compatible, The
USB hard disk drive electricty should be
< 500MA.
Below is a lis t of re com men ded U SB dr vie s.
Models that are not listed may be
compatible, but it is not guaranteed to work.
Operation
9. This feature is not available for all digital
TV,such as scrambled or audio only
channels.
P. 2 1
04
Page 23

10.USB Player
Press sour ce ke y, and selsct USB in soure
list, pres s OK bu tto n to en ter t he US B men u.
Pause FF Prev . NextFB Stop
00:00:33/00:04:22
Info.
Repeat ALL
USB 2.0
PHO TO MUSIC M OVIE TE XT
Please make sure that the USB device have
plugged in the slot.There are four type media
item can be selected, such as photo, music,
Movie, and text. Select the type media item by
pressing , pres s OK b utt on to e nte r
the disk selection menu.
1/1
Ret urn C
Press the to sele ct th e rig ht di sk an d pre ss
OK to display me dia f ile s and f old er li st or
choose Return to back to the media type
selection menu.
Press to select the function icon, press OK
button to confirm the function.
Press or EXIT button to exit the control b ar.
NOTE:
You can adjust the audio track, or program in the
Info menu while Playing the video file.Choose the
Info icon an d pre ss OK c an di spl ay th e Inf o MEN U.
Sample1.ts
Resolution: 720x576
AudioTrack: 1/2
Subtitle : 1/1
Program: 1/6
Size: 30574 KBytes
Close
1/1
Return
Movies
Sample1.ts
Sample1.ts Sample2.ts
Select the media file by pressing or , then
the previe w fra me wi ll po p up. Pre ss th e but ton
to play the media f ile i n ful l scr een .Wh en th e
media file (photo,music, Movie, or text type) is
playing, press the OK or Info button can display
the control bar.
Resolution: 688x412
AudioTrack: 1/2
Sub title : 1/1
Pro gram: 1 /5
Siz e: 51145 7 KByte s
Sample3.ts Sample4.ts
P. 2 2
Page 24

DVD OPERATION
05
DVD SIDE PANEL
MPEG4 files on discs
9
Multi-angle
OPEN/CLOSE
PLAY/PAUSE
This DVD Player has a Class 1 laser which
may be harmful to your eyes. Do not
attempt to disassemble the cabinet or make
And adjustments.
Refer all servicing to a qualified
prefessional.
Features
Disc formats supported by this player:
Caution
32
Dolby Digital
KOD AK pict ure C D
MP3 f iles on
CD-R/CD-RW
DVD video
This product incorporates copyright
protection technology that is protected
by method cl aim s of ce rta in
U.S.patents and other intellectual
property rights owned by Macro vision
Corporation and other rights owners.
Use of this co pyr igh t pro tec tio n
technology must be authorized by
Macro vision Corporation, and is
intended for home and other limited
viewing uses only. Unless otherwise
authorized by Macro vision Corporation.
Reverse engineering or disassembly is
prohibited.
The product complies with the KODAK
Picture CD f orm at an d wil l dis pla y
KODAK Pict ure C Ds. The "KODAK
Picture CD Compatible" logo is a
trademark of Eastman Kodak Company
and is used with permission.
Manufactured under license from Dolby
Laboratories."Dolby" and the double-D
symbol are trademarks of Dolby
Laboratories. Confidential Unpublished
Works. 1992-1997 Dolby Laboratories, Inc.
All rights reserved.
Subtitle choices
8
Audio choices
LB
16:9
TV Aspect
Ratio modes
R
RESTRICTED
Parental Lock
DVD Operation
05
P. 2 3
Page 25

Remote Control - DVD secti on
POWER MUTE
SOUND
PIC
TV/RADIO
FAV IN FO
PBCA-B TITLE
DVD AUDIO
LIST
TV AUDIO
RECALL/GOTO
EXIT
+
CH
_
TEXT
ANGLE
SUBTITLE
INDEX
FREEZE
1OK2 3
4 5 6
7 8 9 0
TV MENU SOURCE
DVD MENU
+
VOL
_
SLEEP ASPECT
DVD SETUP
EPG
RETURN
DISPLAY
REVEAL
HOLD
SUBPAGE SIZE MIX
2:Numeri c key s:Pr ess t o set t he tim e, se lec t titl e, ch apter or tr ack
you wish t o pla y. Pres s the E NTER /OK B utt on to co nfi rm. When a
VCD is pla yin g (wit h PBC o ff), p res s the N umer ic ke ys to s elec t a
track directly.
5:DVD MENU :Du ring D VD pl ayb ack, p res s MEN U to dis pla y the
disc menu.
9:DVD SETUP: Press to en ter t he sys tem s ett ing me nu. P res s agai n
to exit th e men u.
11: Play/Pause:Pr ess to b egi n pla y of the D VD of m edi a you wi sh to
view. Pre ss ag ain to p aus e pla y.
12:STOP:Pr ess t o stop p lay o f the D VD you a re wa tch ing at a nyt ime .
13: A-B: Press to re pea t a segment of the disc you are watching
between A and B. (DVD mode)
TITLE:Press to display the DVD Main Menu.
14:
15:REV:Press to rewind play in DVD, CD MP3 or VCD mode. Press
repeatedly to scroll through rewind speeds. Press the Play/Pause
Button t o res ume pl ay.
16:FWD:Press t o fas t-fo rwa rd pl ay in DV D, CD M P3 or V CD mod e.
Press repeatedly to scroll through fast-forward speeds. Press the
Play/P aus e Butt on to r esu me pla y
17:RETURN:Press t o ret urn to t he Ma in Me nu.
18:DISPLAY:Pre ss to show th e inf orma tio n of th e curr ent p lay ing
disc.
To open the di sc tr ay, pre ss OP EN/C LOS E;To cl ose th e
21: :
disc tray, press OPEN/CLOSE again.
22:GOTO:For DVD discs, press to choose the desired title and
chapte r and s earc h the d esi red ti tle , tim e and ch apt er time. Fo r
Super VCD,VCD,CD discs, press this button to search the desired
disc tim e and t rack t ime a nd ch oose t he de sir ed tra ck.
Note: Du rin g VCD pl ayb ack , the PB C mod e mus t be set t o OFF.
24:OK:Press t o con firm .
31:ANGLE:Press t o vie w scen es sh ot fr om dif fer ent an gle s. (Disc
support is required)
32:PBC:Durin g VCD /SVC D pla yba ck, pr ess P BC to c ontr ol PB C
ON/OFF.
33:NEXT:Durin g DVD ,CD, MP3 , or VC D play bac k, pr ess NEXT to
play the n ext c hapt er, ti tle o r trac k.
34:PREV:Durin g DVD , CD,M P3, o r VCD p layb ack , pre ss PREV
to play the previous chapter, titl e or tr ack.
35:SUBTITLE:Press to choose different captions (Requires support
from disc).
FREEZE:Press to freeze the picture you are watching.
37:
P. 2 4
Page 26

DVD OPERATION
MENU OPERATION
Press the SE TUP button on the remote con tro l,
the SETUP MENU will be displayed. After
accessing the setup menu, press the direction
buttons fo r up an d dow n mov eme nt to s ele ct an
item desired, and press RIGHT direction button
to select the lower item. Then press the OK
button to confirm. Press LEFT direction button
return to th e men u of up per l eve l. To exi t the
setup, press the SETUP button again. In the
SETUP MENU, you may choose any of the
following options as you like.
LANGUAGE SETUP
Select Language in the setup menu, and display
the Language submenu:
OSD Language
Use this item to select the language of the setup
menu and screen display.
Subtitle
This option provides the preset subtitle
language.
MPEG4 Subtitle(optional)
Select different MPEG4 subtitle encoding
option.
Note: Not all players support this item.
Audio
Select the built-in disc dubbing language
options.
DVD Menu
This option provides the film's menu language
options.
VIDEO SETUP
Select Video in t he se tup m enu, and display the
Video submenu:
SYSTEM SETUP
Aspect Ratio
Select the aspect ratio.
Notes:
The image display ratio is related to the
recorded disc format. Some disc can not
display im age s in th e asp ect r ati o you c hoo se.
If you play a di sc re cor ded i n 4:3 f orm at on a
wide screen TV, black bars will appear on the
left and rig ht si de of t he sc ree n. You mu st
adjust the screen setting depending on the
type of the television you have.
TV System
Select the d ifferent TV sy ste m.
Note: The DV D player setting should be
matched to y our TV set.
of output fo rma t, re fer t o the i nst ruc tio ns or
your TV set.
For more information
RATING SETUP
Select Rating in the setup me nu, and
displ ay the Ra ting su bmenu:
Parental C ont rol
Set the pare nta l con tro l fea tur e of th e player
Note: Password is needed before setting
Parental C ont rol .
Set Passwo rd
Input four d igi ts (p ass wor d), t hen p res s
ENTERto confirm.
Note: If you forget you r pas swo rd, p lease
use the universal password 666 6 to unlock.
MISC SETUP
Select MISC in the setup me nu, and
displ ay the su bmenu :
DVD Operation
05
P. 2 5
Use Def ault Se ttings
Reset s etup da ta to fac tory defau lt
value.
Page 27

DVD OPERATION
MP3/WMA/JPEG/MPEG4 PLAYBACK
The MP3/WM A/M PEG 4 dis c has s uch a
directory structure as shown .
Press Direction key to choose the root
director y and t hen p res s OK bu tto n to en ter
into the sub directory. Press Direction key to
choose the desired track and then pressOK or
PLAY to enjoy the music or movie. If you want
to return to the upper menu, press Direction
key to choose the icon and pressOK
button.
Filter: Allows selecting the categories of files
displayed in the browser list.
Repeat: To switch different repeat playing
mode
Mode: Select different playing mode as
follows:
Normal: Shuffle mode is cancelled.
Shuffle: Shuffle mode enabled. When
playback reaches th e end o f the
currentchapter/track, playback jumps to a
random chapter/track. As the end of each
chapter/track is reached, another random
chapter/track will be played until all
tracks/chapters have been played or the
Shuffle mode is cancelled by toggling to a
different Mode Option.
PICTURE CD PLAYBACK
The PICTUR E CD di sc ha s suc h a directory
structure structure as shown in the following
picture.
picture above
Press Direction key to ch oose the roo t
direc tory an d then pr ess OK butto n to
enter i nto the s ub dire ctory. Press
Direction key to choose the desired
picture and then press OK or PLAY to
enjoy t he pict ure. If y ou want to ret urn to
the upp er menu , press Direction key to
choose the icon an d press OK button.
Image rotation
In pict ure pla y state , press Direction
key to rotate t he pict ure.
Protect your DVD
discs
c.
ROPERLY
ft
HANDLE DISCS P
Do not touch the playback side of the disc."
Do not attach paper or tape to the disc."
HOW TO CLEAN A DISC
Fingerprints and dust on the disc cause pictu"
sound deteriation. Wipe the disc with a soft cloth
from the centre outwards
If you cannot wipe off the dust with a soft cloth, "
wipe the disc lightly with a slightly moistened so
cloth and ?nish with a d ry cloth.
Do not use any type of solvent such as thinner, "
benzine, commercially available cleaners or
antiseptic spray for vinyl LPs. It may damage
the dis
P. 2 6
Page 28

06
DVD Trouble shooting
If you ha ve any qu estio ns, please c onsul t the tro ubleshoo ting guide below:
NO PICT URE OR SO UND
Ensur e the pow er butt on is on.
Ensur e the pow er outl et is operat ional .
Ensur e the pow er cord i s not damage d.
Ensur e the pow er plug i s connecte d
firml y to the ou tlet.
PICTU RE BUT NO S OUND
Ensur e the aud io is not s et to mute.
Ensur e you hav e set the p layer s AUDIO
settings correctly.
POOR PI CTURE O R SOUND
Ensure you have set the player s AUDI O
settings correctly
Ensur e the dis c is not sc ratched or
stained.
“BAD DIS C”DISPLAYED
Ensure the disc is not warped,
damaged or deformed.
Ensur e the dis c is not ba dly staine d or
damaged.
Ensur e the dis c forma t is compati ble
with the player.
Please check whether you have tried to
play a so ftwar e CD. If so , please res tart
the player.
REMOT E NOT WOR KING
Make sure th e Mai n uni t s POW ER bu tto n is on
Ensure the remote batteries are working.
Point the re mot e con tro l dir ect ly at t he pl aye r s
IRsensor.
Remove any o bst acl es be twe en th e remote
and theIR sensor.
UNIT NOT WORKING
Tur n off t he powe r, and the n turn it on
again.
“NO DISC”DISPLAYED
Ensure you have put the disc on the tray.
Ensure the disc is not upside down.
Ensur e the dis c is not di storted, s taine d or
scratched.
DVD Trouble shooting
06
P. 2 7
Page 29

07
Trouble shooting
Trouble phenomenon Symptom
Picture Audio
Snow Noise
Ghost
Interference
Normal Picture
No pict ure Mute
No colo ur Norma l aud io Colour control
Norma l aud io
Noise
Mute
Inspection Check
antenna position, direction
or connection
antenna position, direction
or connection
electronic equipment,car/
motorcycle,fluorescent light
Volume(ch eck i f mut e is
activate d or if t he au dio s yst em
connections are not correct)
Power cord i s not i nse rte d
Power swit ch is n ot op ene d
Contrast and brightness/volume
setup
Press standby key on the remote
control for inspecting
Trouble shooting
07
Picture
break ing up
No colo ur
The re is b lac k bar
on top and b ott om
Norma l aud io
or weak
Noise
Norma l aud io
retune channel
TVsystem
Change aspect to zoom
P. 2 8
Page 30

Trouble Shooting Digital TV Problems and possible Solutions.
A typical exam ple o f a rec ept ion problem includes the br eak up of pictur es (pixilation) or the picture
freezing, someti mes t her e are clicking or squeaking sou nds o r the s ound drops out o r the re is NO
reception at all.
Your picture may break into pixels due to the digital video signal dropping. The signal dropping may occur
because of either problems with weak signals (see TV Aerials) or if you are connected by cable a weak cable
signal. If the problem is weak signals, use an amplifier to strengthen the signal. A cable technician can help
you inst all a n inl ine a mpl ifier or a pre-a mpl ifi er. This wil l boost your signal strength and fix the pixel problem.
If you are receiving your TV signal by satellite, check your dish has not moved following high winds, or that
the sign al is b loc ked b y tre es. Trees can be a pr oblem as the TV signal can change depending if a tree
between the satellite dish and satellite is in bare or in full leaf.
Missing channels
It may be th at yo u fin d tha t the re are channels missing, or you're receiving channels from the wrong region.
Someti mes t he interactive services (red button) doesn't work. This is usually caused by weak signal, see
TV Aerials
TV Aerials
Digital terrestrial television (Freeview) comes to your TV via an a eri al, The old aeri al th at wa s goo d for
analogue TV may not work well for digital so may need upgrading. If yo u are g ett ing s ome b ut not all of t he
digital channels on DTV (Freeview) for example you get BBC1, BBC2, Channel 4 ,but not ITV or C hannel 5,
this is us ual ly be cau se yo ur aerial is a nar row band type, and needs to be changed to a wide band type.
Faulty Leads and Cables
Check your TV. Are the leads at the back - to the mai ns, t he ae ria l, th e set-top b ox, t he vi deo o r DVD p layer or
recorder properly connected? SCART leads are known to work loose over time and can result in both audio
and video (picture) problems. Either left or right or both audio is missing and the colours are poor or muddy
looking. Push the SCART plugs firmly in, this should fix the problem.
HDMI plu gs ne ed to b e pus hed i n firmly; it's o nly t he la st mi llimetre tha t the c ont act s make. Typi cal ly th e bla ck
plastic part of the HDMI plug should be very close or touching t he bo dy of the TV or c omp one nt.
When plugging in any HDMI cables you may experience problems if the HDMI cables are plugged in when the
TV or the other component is switched on. Always switch off both the TV and the component you are plugging
in. If you have checked the plugs and sockets, switch off the TV and whatever you have plugged in to the TV
and then s wit ch th em on a gai n.
I have con nec ted m y PC to t he TV. Th ere i s no so und.
If you connect your PC or Laptop to the TV using a VGA (15 p in Su b D) cable there is no audio, you need to
connect a separate audio cable to the TV from the PC or laptop.
Unnatural Colours and Flesh Tones
Unnatural flesh tones and other colours could present another problem even in a new HDTV. This is d ue to
the TV pic tur e set tings, which a re op tim ize d for a showroom e nvironment. Fix this by changing the picture
mode to natural in the picture menu. For more precision, try manually setting the colour, co ntr ast a nd
brightness options in the picture menu.
White Outlines
White outlines around objects and people generally appear either if the TV sharpness is set to very high, or if
your television set uses some edge-enhancement processing technology. Go to the picture menu and adjust
the sharpness till the white outline disappears. If edge-enhancement is enabled, try to disable it using the
service menu.
Choppy Video
At times the video might become choppy. When this happens, chec
the sign al is s tro ng th e pro blem is with the c abl e ope rat or. If the signal s tre ngt h is we ak, try boosti ng th e
signal strength with the help of an amplifier.
The pict ure d oes n ot fi ll th e screen
When connecting PC's or laptops to the TV, the picture may not fil l the s creen. Check t he di spl ay se ttings on
your PC or laptop (Windows > Star t > Con trol Panel > Appearance and Personalization > Display settings)
and select the best resolution. On your TV select:- TV Menu > Pi ctu re > Se ttings and the n try AU TO, ZOOM1
or ZOOM2 for the best display.
USB Connection
The USB connection will work with *.jpg (photo) and *.mp3 (music) files. Please note the TV does not
recognize Apple iPhone, or iPod's connected to the USB connector on the TV. The T V may play ot her f ile s, bu t
due to the m ult ipl e different fi le fo rma ts, t here is no guara nte e tha t the se other file fo rma ts wi ll wo rk.
Pictur e Bre aks i nto P ixe ls
k whethe r the s ign al is s tro ng enough. If
P. 2 9
Page 31

Specification
26" Full HD 1080P Digital LED LCD TV with DVD Player
Full H D
Television picture quality:
Connectivity:
Integrated digital.
Screen Size: 66"cm
Res oluti on 1920 x 1 080 pixels 50 Hz.
2 HDM I socke ts.
1 SCA RT socket.
PC input socket.
Component video socket.
Composite.
1 USB p ort.
Sound quality:
Digital features:
Additional features:
NIC AM stereo sou nd system.
2 x 8 wat ts RMS power output.
Digitally interactive.
Digital text.
Digital video broadcasting (DVB) subtitles available.
Auto setup.
Auto scan for new channels.
Now and next programme guide.
7 day e lectr onic programme guide (E PG).
Top up TV compatible.
CI slot.
Audio description compatible.
UHF/VHF tuner.
Sleep timer.
Child lock.
Picture and text.
Rem ote control batteries required 2 x AAA (included).
VES A Mount S ize 200 x 1 00 mm
Package Size (WxHxD): 730 x130mmx520
Set Size (WxHxD) with Stand: 647 x180mmx461
Set Size (WxHxD) without Stand: 647 x40mmx420
Package weigh t : 7.8 kg
Set w eight w ith sta nd: 6.5 k g
Set w eight w ithou t stand : 5.94 kg
Trouble shooting
07
P. 3 0
Page 32

Specification
32" Full HD 1080P Digital LED LCD TV with DVD Player
Full H D
Television picture quality:
Connectivity:
Integrated digital.
Screen Size: 81"cm
Res oluti on 1920 x 1 080 pixels 50 Hz.
2 HDM I socke ts.
1 SCA RT socket.
PC input socket.
Component video socket.
Composite.
1 USB p ort.
Sound quality:
Digital features:
Additional features:
NIC AM stereo sou nd system.
2 x 8 wat ts RMS power output.
Digitally interactive.
Digital text.
Digital video broadcasting (DVB) subtitles available.
Auto setup.
Auto scan for new channels.
Now and next programme guide.
7 day e lectr onic programme guide (E PG).
Top up TV compatible.
CI slot.
Audio description compatible.
UHF/VHF tuner.
Sleep timer.
Child lock.
Picture and text.
Rem ote control batteries required 2 x AAA (included).
VES A Mount S ize 200 x 1 00 mm
Package S ize (W xHxD) : 864 x125 mmx590
Set Size (WxHxD) with Stand: 775 x180mmx537
Set Size (WxHxD) without Stand: 775 x43mmx503
Package weigh t : 10.77 k g
Set w eight w ith sta nd: 9.3 7 kg
Set w eight w ithou t stand : 8.81 kg
P. 3 1
Page 33

 Loading...