

Page 1
Page 2
Welcome
Important Information
01 Safety Warnings
2
2
Safety notice
Warning and cautions
3
4
Main Parameter
Base Stand Assembly Instruction
02 Introduction
5
7
Wall Mounting Installation Guidelines
Control Panel
8
9
Rear/Side Sockets
9
Connecting your Haier TV
Common Interface
10
11
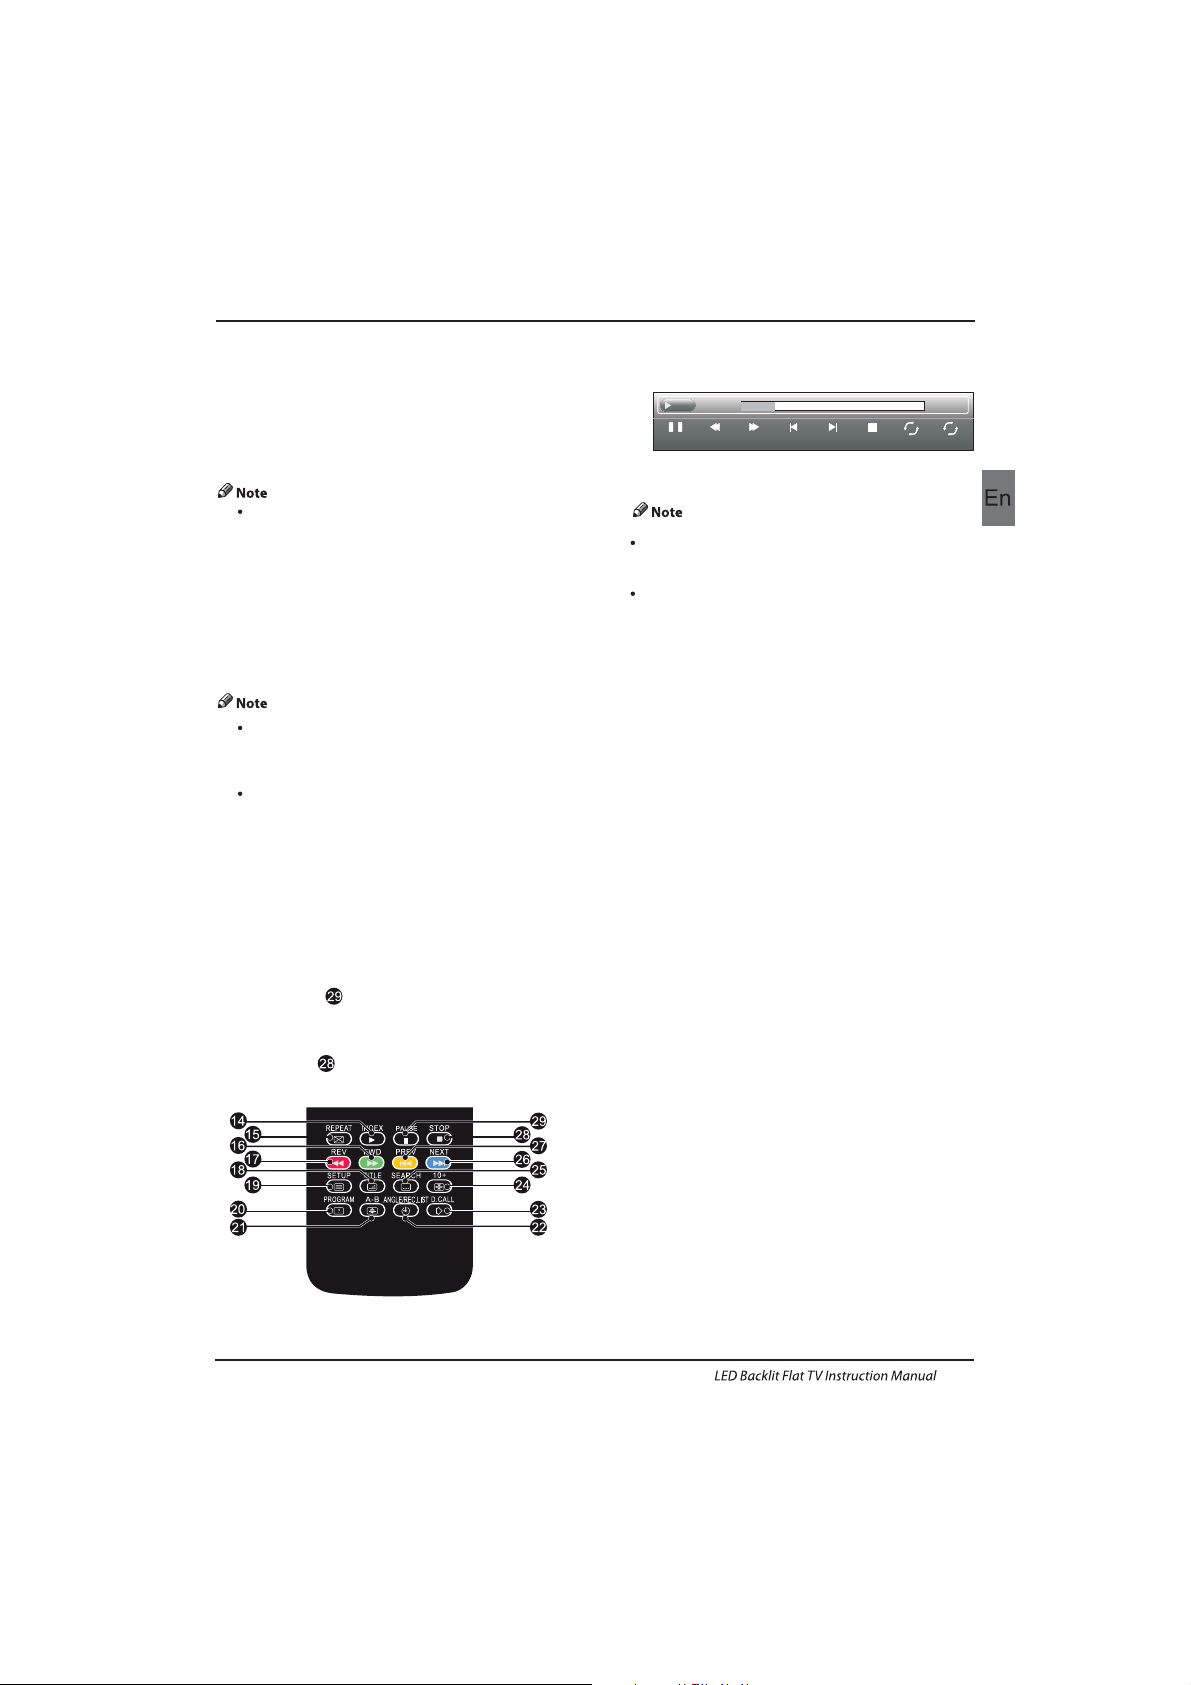
Remote Control
03 Remote Control
12
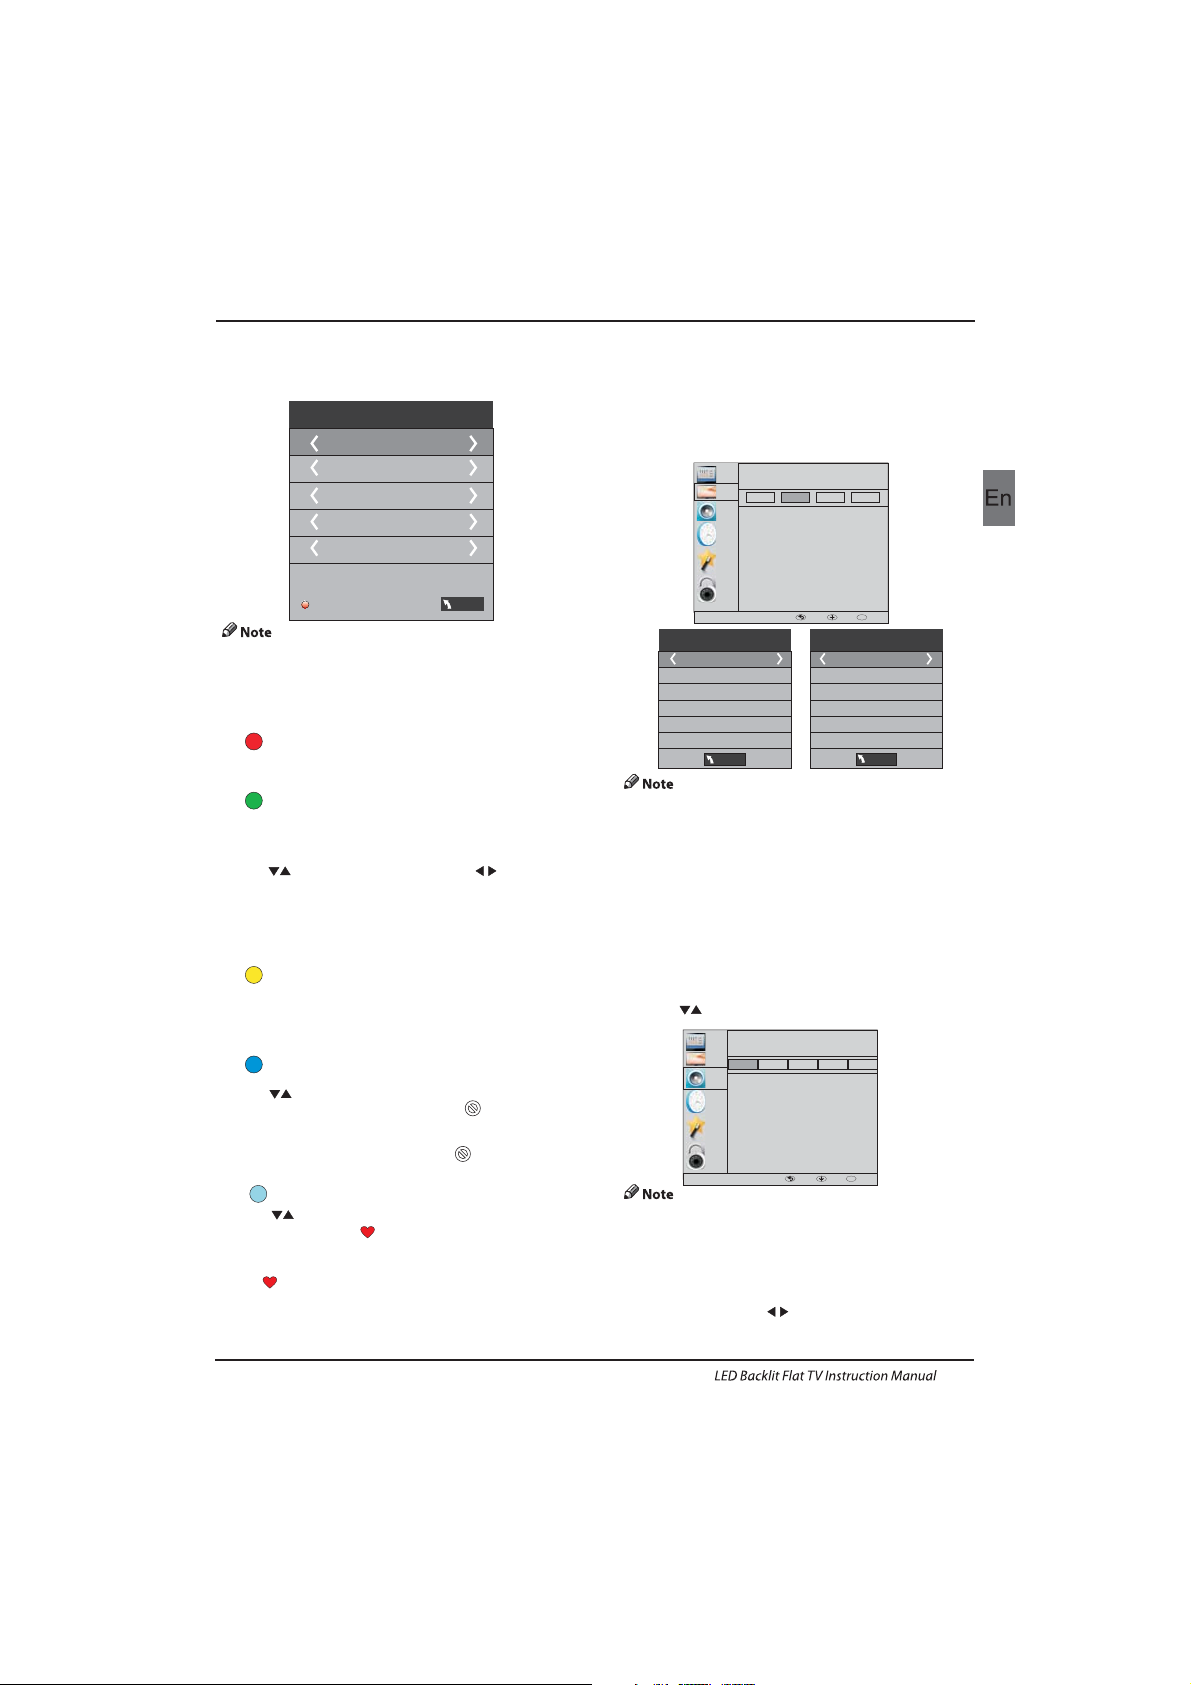
Teletext
13
Installation Guide
04 Operation
14
CHANNEL MENU 15
Auto Tuning (DVB-T) 15
Auto Tuning (DVB-C) 16
DTV Manual Tuning (DVB-T)
DTV Manual Tuning (DVB-C)
ATV Manu al Tuning
17
17
18
PICTURE MENU 18
19
SOUND MENU
18
TIME
MENU
18
OPTION MENU
LOCK MENU
EPG Menu(Electronic Program Guide)
19
PVR function
20
Prepare to record the program
20
19
Rec ord the program
21
Play the record
21
Timeshift function
22
Prepare to record the program
22
USB D rive Storage Form at
22
Rec ord a paused DTV pro gram
to USB storage device
22
Timeshift limitations
23
USB Player
24
Trouble shooting
05 Trouble shooting
25
Specification 28
Program edit
CI information
18
18
Page 3
Thanks for buying this 46" LED LCD TV . This guide will help you set up and
begin using your TV.
IMPOR
TANT INFORMATION
READ ALL INSTRU
CTIONS BEFORE USE AND KEEP FOR FUTURE REFERENCE.
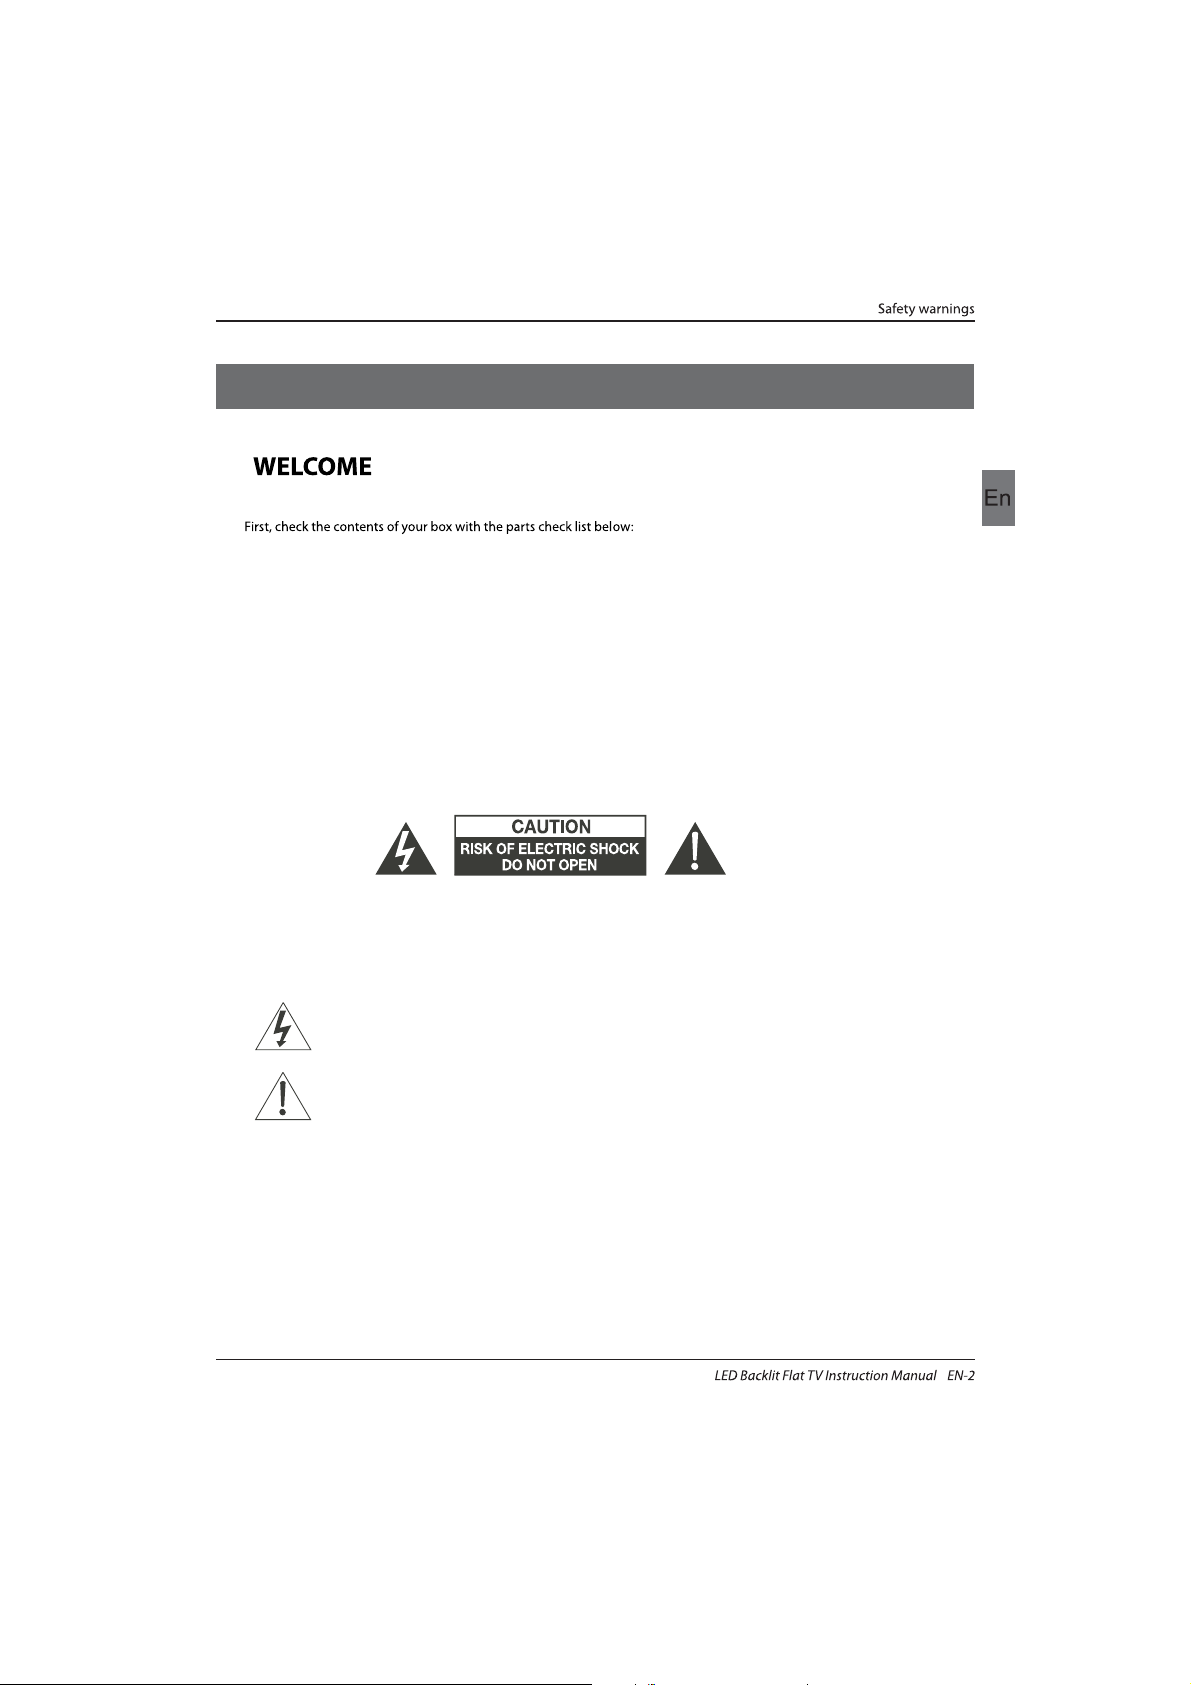
CAUTION
TO REDUCE THE RISK OF ELECTRIC SHOCK, DO NOT REMOVE COVER (OR BACK).NO USER SERVICEABLE PARTS INSIDE.
FOR ANY PROBLEMS, REFER SERVICING TO THE CUSTOMER HELP LINE. THERE IS A LIGHTNING ARROW SYMBOL IN
THE TRIANGLE: THIS SYMBOL INDICATES HIGH VOLTAGE IS PRESENT INSIDE. IT IS DANGEROUS TO MAKE ANY KIND OF
CONTACT WITH ANYINSIDE PART OF THIS PRODUCT.
THERE IS A EXCLAMATION MARK IN THE TRIANGLE: THIS SYMBOL ALERTS YOU THAT IMPORTANT LITERATURE
CONCERNING OPERATION AND MAINTENANCE HAS BEEN INCLUDED WITH THIS PRODUCT.
CAUTION:TO REDUCE THE RISK OF ELECTRIC SHOCK AND FIRE, DO NOT PUT THE TV SET NEAR
SOURCES OF HUMIDITY. DO NOT USE ANY ABRASIVE CLEANERS WHICH MAY SCRATCH OR DAMAGE
THE LCD SCREEN. AVOID CONTACT WITH OBJECTS THAT MAY SCRATCH THE LCD SCREEN.
NOTE: SERVICING THE UNIT YOURSELF IS UNAUTHORISED AND COULD LEAD TO INJURY OR PRODUCT
DAMAGE. REFER ALL SERVICING TO THE CUSTOMER HELPLINE.
Now you can get star
ted!
01 Safety warnings
46" Full HD 1080P Digital
Remote control
Instruction Manual
Quick start guide
AAA ba x2ttery
LED LCD TV
Scart Cable x 1
Stand
Page 4
the
Safety notice
EN-3
Page 5
Dim:515*320mm(不包括底座)
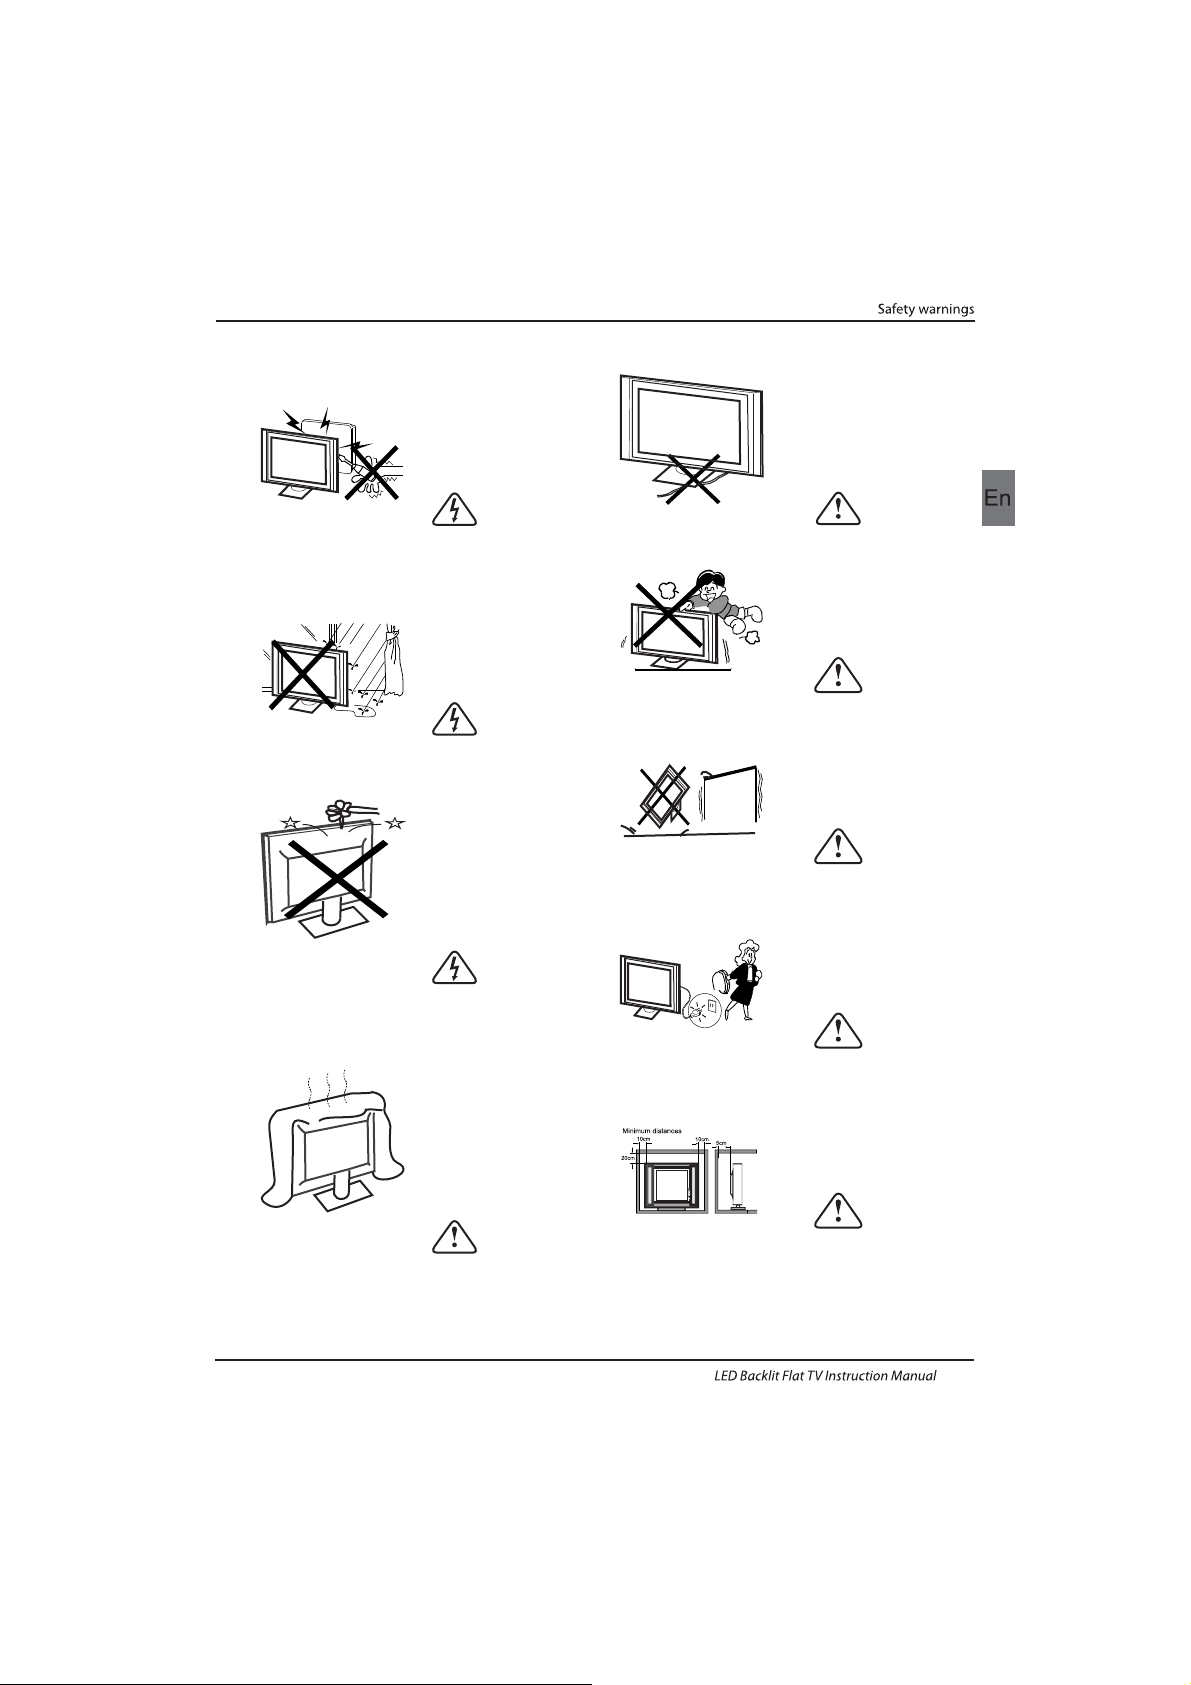
Warning
High voltages are used in the operation of this
television receiver. Do not remove the cabinet
back from your set. Refer servicing to qualified
service personnel.
Warning
To prevent fire or electrical shock hazard, do
not expose the television receiver to rain or
moisture.
Warning
Do not drop or push objects into the
television cabinet slots or openings. Never
spill any kind of liquid on the television
receiver.
Caution
Do not block the ventilation holes in the back
cover. Adequate ventilation is essential to
prevent failure of electrical components.
Caution
Do not trap the power supply cord under the
television receiver.
Caution
Never stand on, lean on, or suddenly push the
television or its stand. You should pay special
attention to children. Serious injury may result if
it should fall.
Caution
Do not place your television on an unstable cart,
stand, shelf or table. Serious injury to an
individual , and damage to the television, may
result if it should fall.
Caution
When the television receiver is not used for an
extended period of time, it is advisable to
disconnect the AC power cord from the AC
outlet.
Caution
If the television is to be built into a compartment
or similar enclosure, the minimum distances must
be maintained. Heat build-up can reduce the
service life of your television, and can also be
dangerous.
WARNING AND CAUTIONS
EN-4
Page 6
INSTALLATIONCAUTION
*Locate the TV in the room where light does
not strike the screen directly.
*Total darkness or a reflection on the picture
screen can cause eyestrain. Soft and indirect
lighting is recommended for comfortable
viewing.
*Allow enough space between the TV and the
wall to permit ventilation.
*Avoid excessively warm locations to prevent
possible damage to the cabinet or premature
component failure.
*Do not cover the ventilation openings when
using theTV.
Main parameter
Main features
4 NICAM;
5 T ;ime-shift
3
HDMI interface and SCART
Inter face;
High luminance, wide viewing
angle;
2
Used as Television, display terminal,
PC display;
1
Never tamper with any components inside the
TV, or any other adjustment controls not
described in this manual. All LED-TV's are high
voltage electrical equipment.
When you clean dust or any water drops off the
SCREEN or CABINET or around any of the
buttons or connectors, the power cabled should
be removed from the power socket. Wipe the TV
with a soft, dry, dust free cloth.
During thunderstorms, unplug the power cable
and aerial / antenna cable to prevent damage to
your TV and any other devices connected to it.
All repairs to this TV should only be performed
by qualified TV service
personnel.
02 Introdution
Introduction
EN-5
Panel
TV System
PAL-B/G 、I、D/K
SECA M- B/G 、D/K、L、 L
Video Signal System PAL/SECAM
I
nput Power V oltage AC 100-240 V 50/60Hz
Power consumption
Audio
Output Power (THD 7% )
2x8W
Signal Input
Analog RGB(PC) x1; PC audio x1
High-Definition Multimedia Interface (HDMI)x2
Video I nput x1
Audio Input x1
YPb Prx1
Mini SCART x 1
98W
46
'
CI x 1
USB x 1
RF Co-Ax x 1
Standby Power consumption
<0.5W
Horizontal definitio n(TV line)
Composite Video
input >=350
YPbPr >=400
Page 7
PRESET MODE
PC
3
5
1024x768
1280x1024
60
60
1
640x480
60
31.47
2
800x600
60
37.88
48.36
63.98
RESOLUTION
V.Freq.(KHz) H.Freq.(KHz)
4
1360x768
60
47.7
Introduction
EN-6
6
1920x1080
60
66.64
Page 8
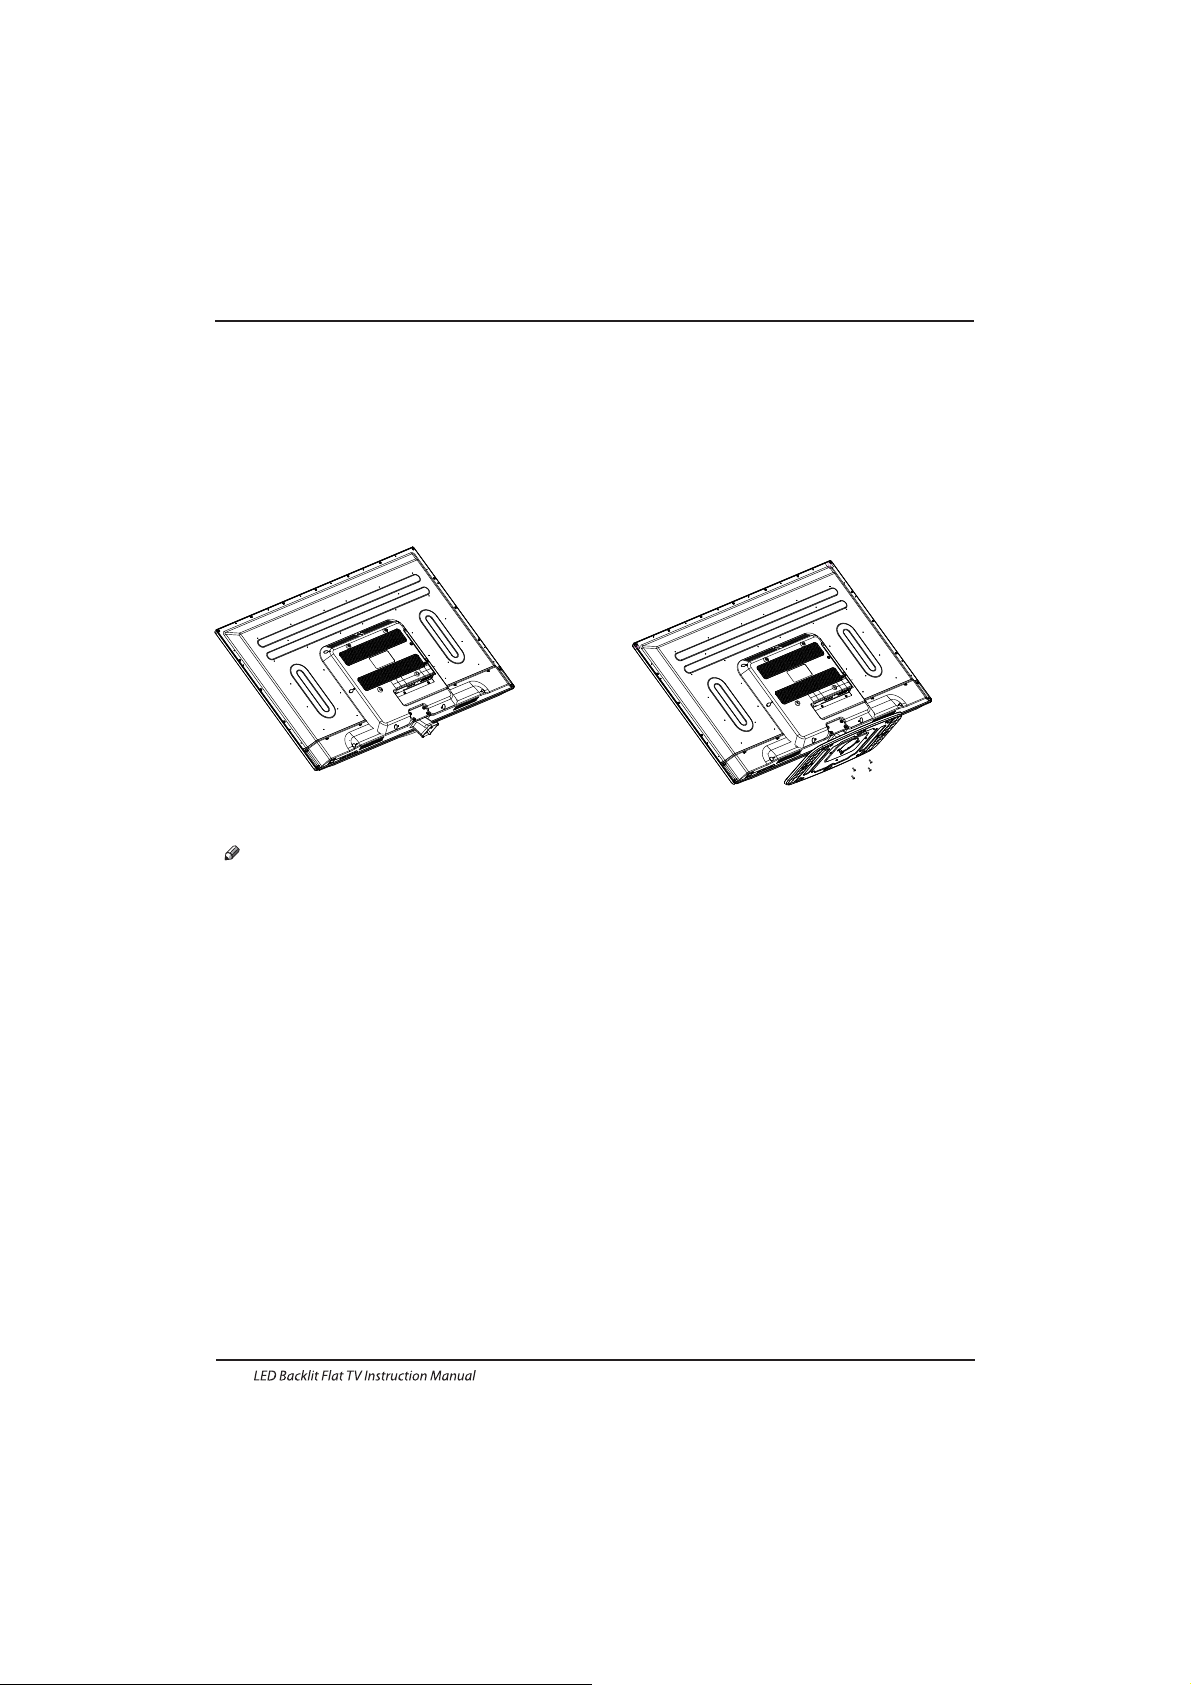
Base Stand Assembly Instruction
1. Place the TV with the display side down on a
flat surface. Use a cloth to protect .the
display Position the stand base plate onto the
bottom of the stand pole.
2. Attach the stand base plate to the stand pole
by firmly tightening the supplied screws.
INSTALLATION NOTES
Locate the TV in a room where light does not strike the screen directly. Total darkness or a
reflection on the screen can cause eyestrain. Soft and indirect lighting is recommended for
comfortable viewing.
Allow enough space between the TV and the wall to permit ventilation.
Avoid excessively warm locations to prevent possible damage to the cabinet or premature
component failure.
Please do not attempt to rotate the TV on the stand.
Introduction
EN-7
Page 9
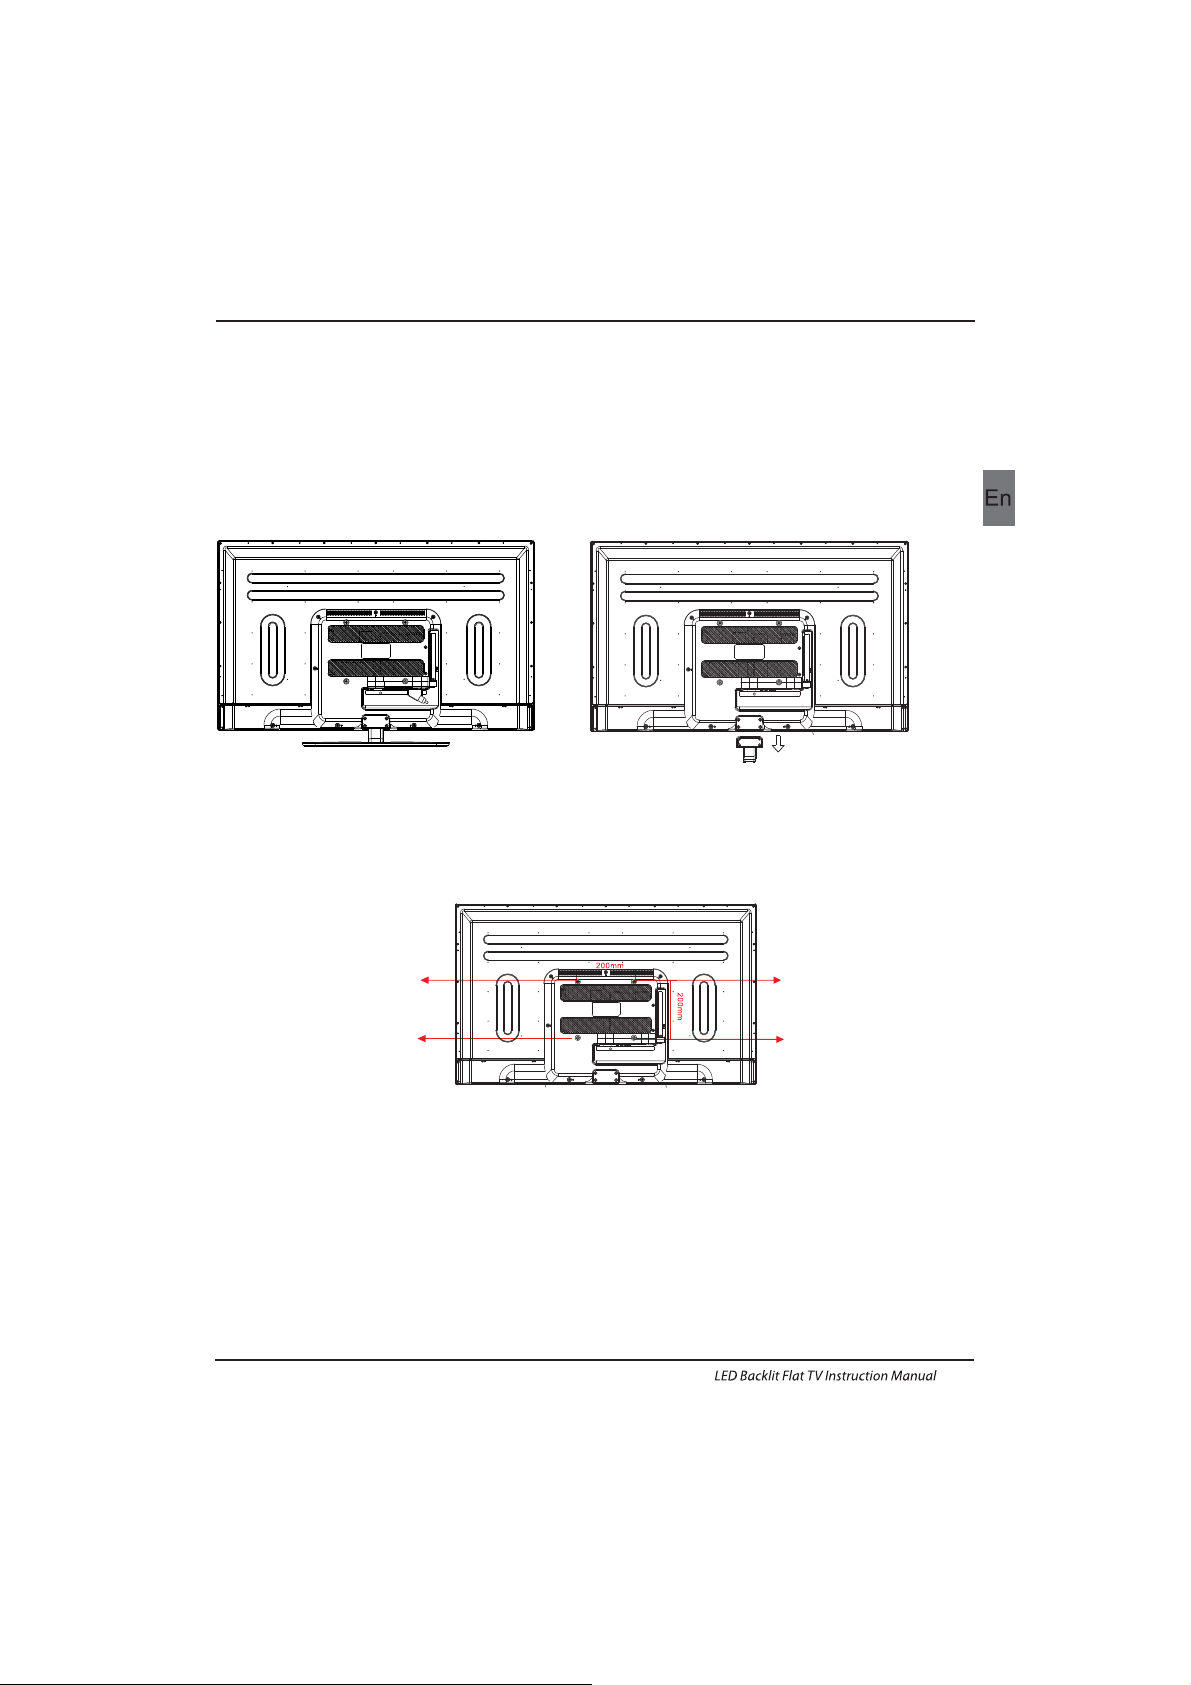
WALL MOUNTING INSTALLATION GUIDELINES
2.Remove the screws from the lower part of the
television, where the base joins to the TV, and take
away the stand (put the stand somewhere safe for
future use).
1.Place the LED LCD Television onto a solid
surface. Please place some soft material
over the front of the screen to protect it
from any damage.
3.Use the four screws provided to fix the TV onto a wall mounting bracket (not included)
via the four VESA standard holes on the back of the television.
Introduction
EN-8
This television can be wall mounted as follows:
M6x9
M6x9
M6x9
M6x9
Page 10
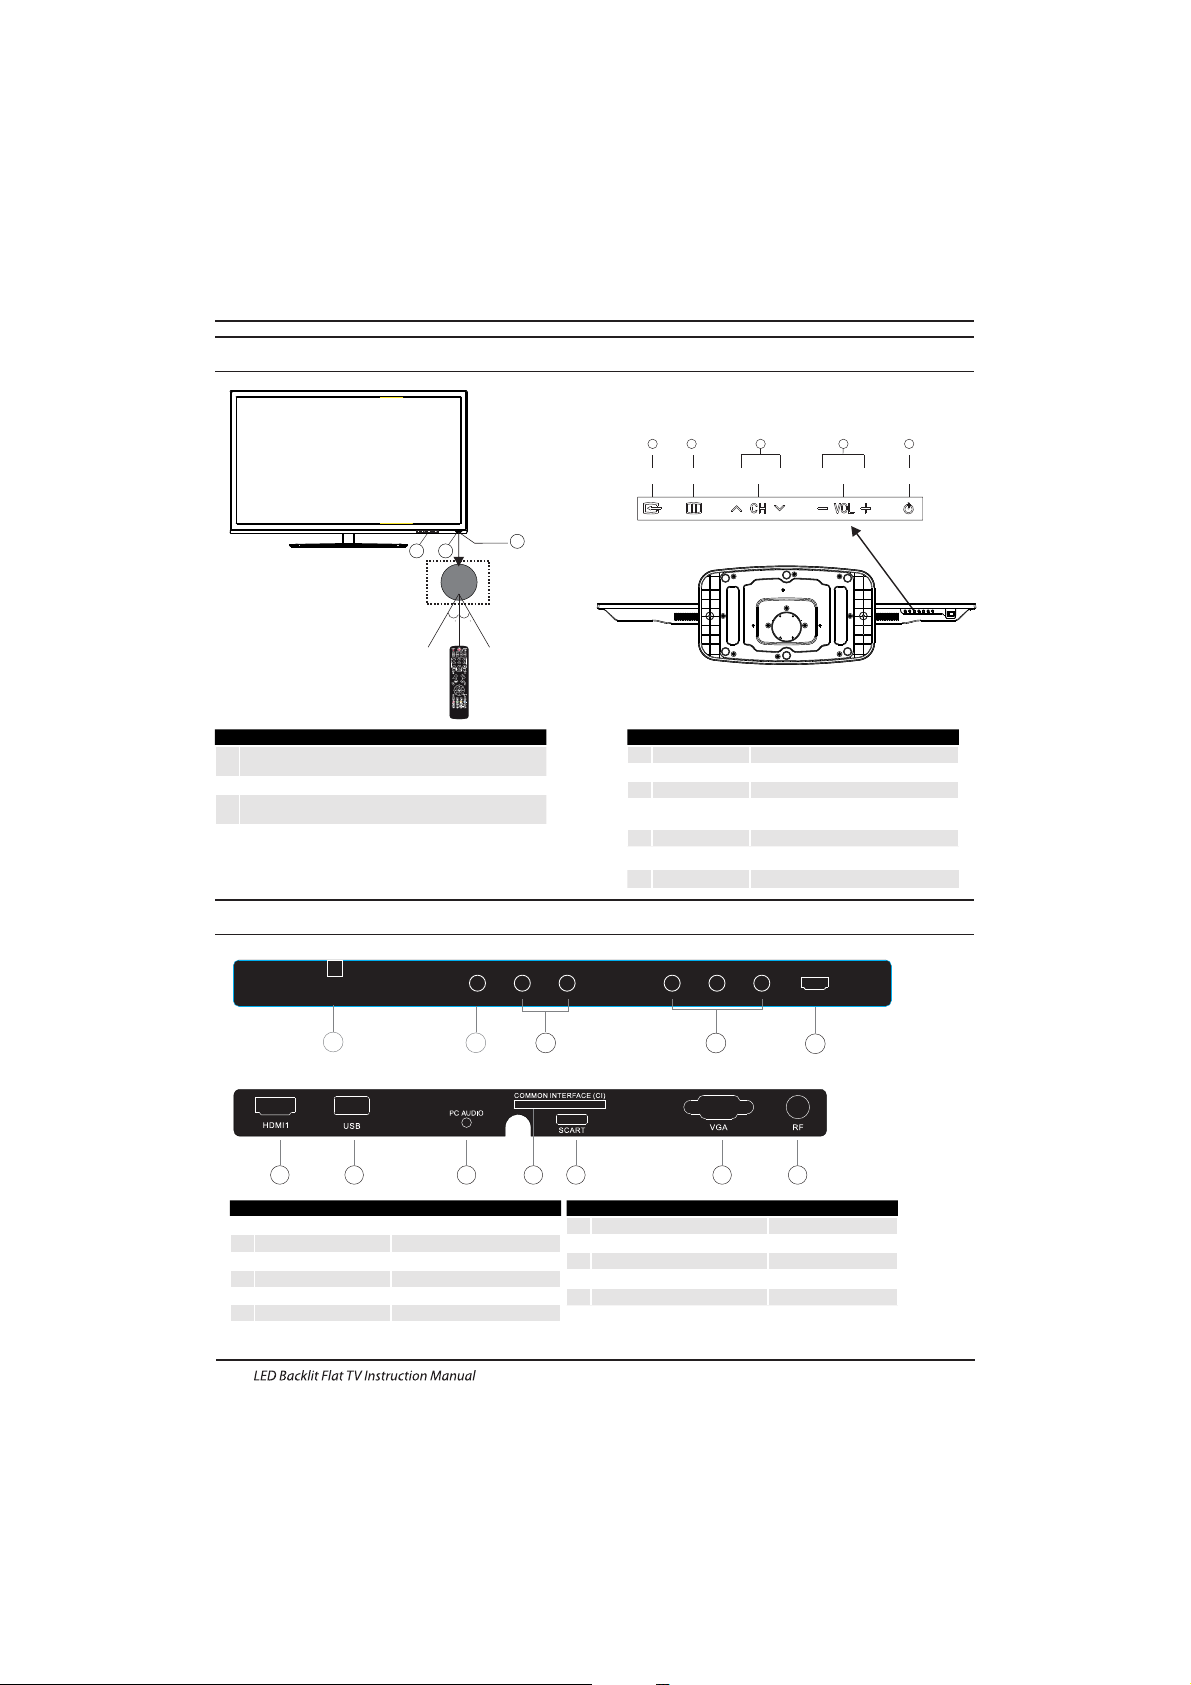
AC-INPUT
100-240V~50/60Hz
Y
Pb
PrVIDEO L R HDMI2
Rear/Side Sockets
1
2
3
Remote control sensor.
Indicator LED:
BLUE: POWER ON. RED: STAND BY.
Key board.
1
SOURCE
Display the input source menu.
MENU
Display main MENU.
3
4
CH+/CH-
In TV mode,press CH+ or CH- to change
the channel up and down.
In MENU, press CH+ or CH- to select items .
STANDBY
2
VOL+/VOL-
Adjust sound level.
In MENU,adjust the item that you selected.
5
Introduction
Front control panel
EN-9
30 30
1
23
SOURCE
1
MENU
CH+ CH- VOL+ STANDBYVOL-
2 3 4 5
1
AV
2
input
3
YPbPr
input
4
input
5
input
input
7
SCART
input
8
PC AUDIO input
9
L/R AUDIO
Intput
10
11
Input
12
input
1
2
3
4
5
6 7 8
10
9
11
12
AC Power Source
HDMI2
6
input
HDMI1
USB
COMMON INTERFACE(CI)
VGA INPUT
ANT
Intput
Page 11
Introduction
EN-10
Connecting a DVD p layer / Sa tellite / cabl e
set t op box rec eiver / game s conso le / PC or
Laptop
The re are several op tions t o conne cting a D VD
pla yer / Satellite or Cable set top box rec eiver /
games console / PC or Lap top to your TV.
Option 1 SCART
Connect a SC ART cable (not supplied)
from the SCART socket on the TV to the DVD
pla yer / Satellite or cable set top box receiver or
games consol.
To select the device connected with the
SCA RT cable press t he SOURCE butto n on the
remote and use the keys t o selec t SCART
and p ress th e OK button.
Note:- The TV will default to the SCART
connection when the TV is switched on.
Option 2 HDMI
If th e device you want to connect to the
is switched on, switch off the device first.
Connect a HD MI cable (not supplied) from
the HDMI socket on the TV to the DVD player /
Satellite or cable receiver or games consol.
Swi tch on the device you have just
con necte d to the TV
To select the device connected with the
HDMI cable press the SOURCE button on the
remote and use the keys t o selec t HDMI and
press the OK button.
Option 3 AV Audio Visual
(Yellow/White/Red)
Mak e sure th at both T V and the d evice are
switched off before connecting.
Connect the AV cables (not supplied) from
the Video (yellow) and Audio (white, red)
sockets on the TV to the DVD player or games
console etc.
To select the device connected with the
AVI cable press the SOURCE button on the
remote and use the keys t o selec t AV and
pre ss the OK b utton.
Option 4 COMPONENT
(Green/Blue/Red)+(White/Red)
Mak e sure th at both T V and the device are
switched off before connecting.
TV
Connect th e cable s (not su pplie d) from t he
COMPONENT IN sockets Y, Pb, Pr (green,
blue, red) and L-Audio-R (white, red) on the T V
to th e DVD player o r games c onsol e etc.
To select th e devic e connected with the AVI
cab le pres s the SOU RCE but ton on the rem ote
and u se the ke ys to select COMPONENT
and p ress th e OK button.
Opt ion 5 VGA (15pin S ub-D)
Connect a VGA cab le (not s uppli ed) from the
VGA s ocket o n the TV to t he PC / Laptop.
To select th e PC / Lapt op conn ected w ith the
VGA c able pr ess the SOURCE b utton o n the
rem ote and use th e keys to select PC and
press the OK button.
Not e VGA i s video o nly. For au dio fro m your
PC/Laptop you need to connect a sep arate
cable from the PC Audio (3.5mm jack) to the
headphone socket on you PC/Laptop (3.5mm
jack)
Opt ion 6 USB
Most USB sticks can be connected to your TV
and s ome dig ital ca meras may al so work .
Connect US B stick ( not sup plied ) or a USB
cable (not supplied) to the TV.
To select the USB device connected to the TV,
pre ss the SO URCE bu tton on the re mote an d
use t he keys to select USB and press the
OK button.
Note1:Only *.jpg and *.mp3 files will work,
oth er file t ypes ar e not gua ranteed an d may not .
Note 2. Apple iPhones and iPods are not
compatible with your TV.
Note 3. When connecting any device to the USB
connection, keep the USB cable length as short
as possible.
Connecting to your Haier TV
Page 12
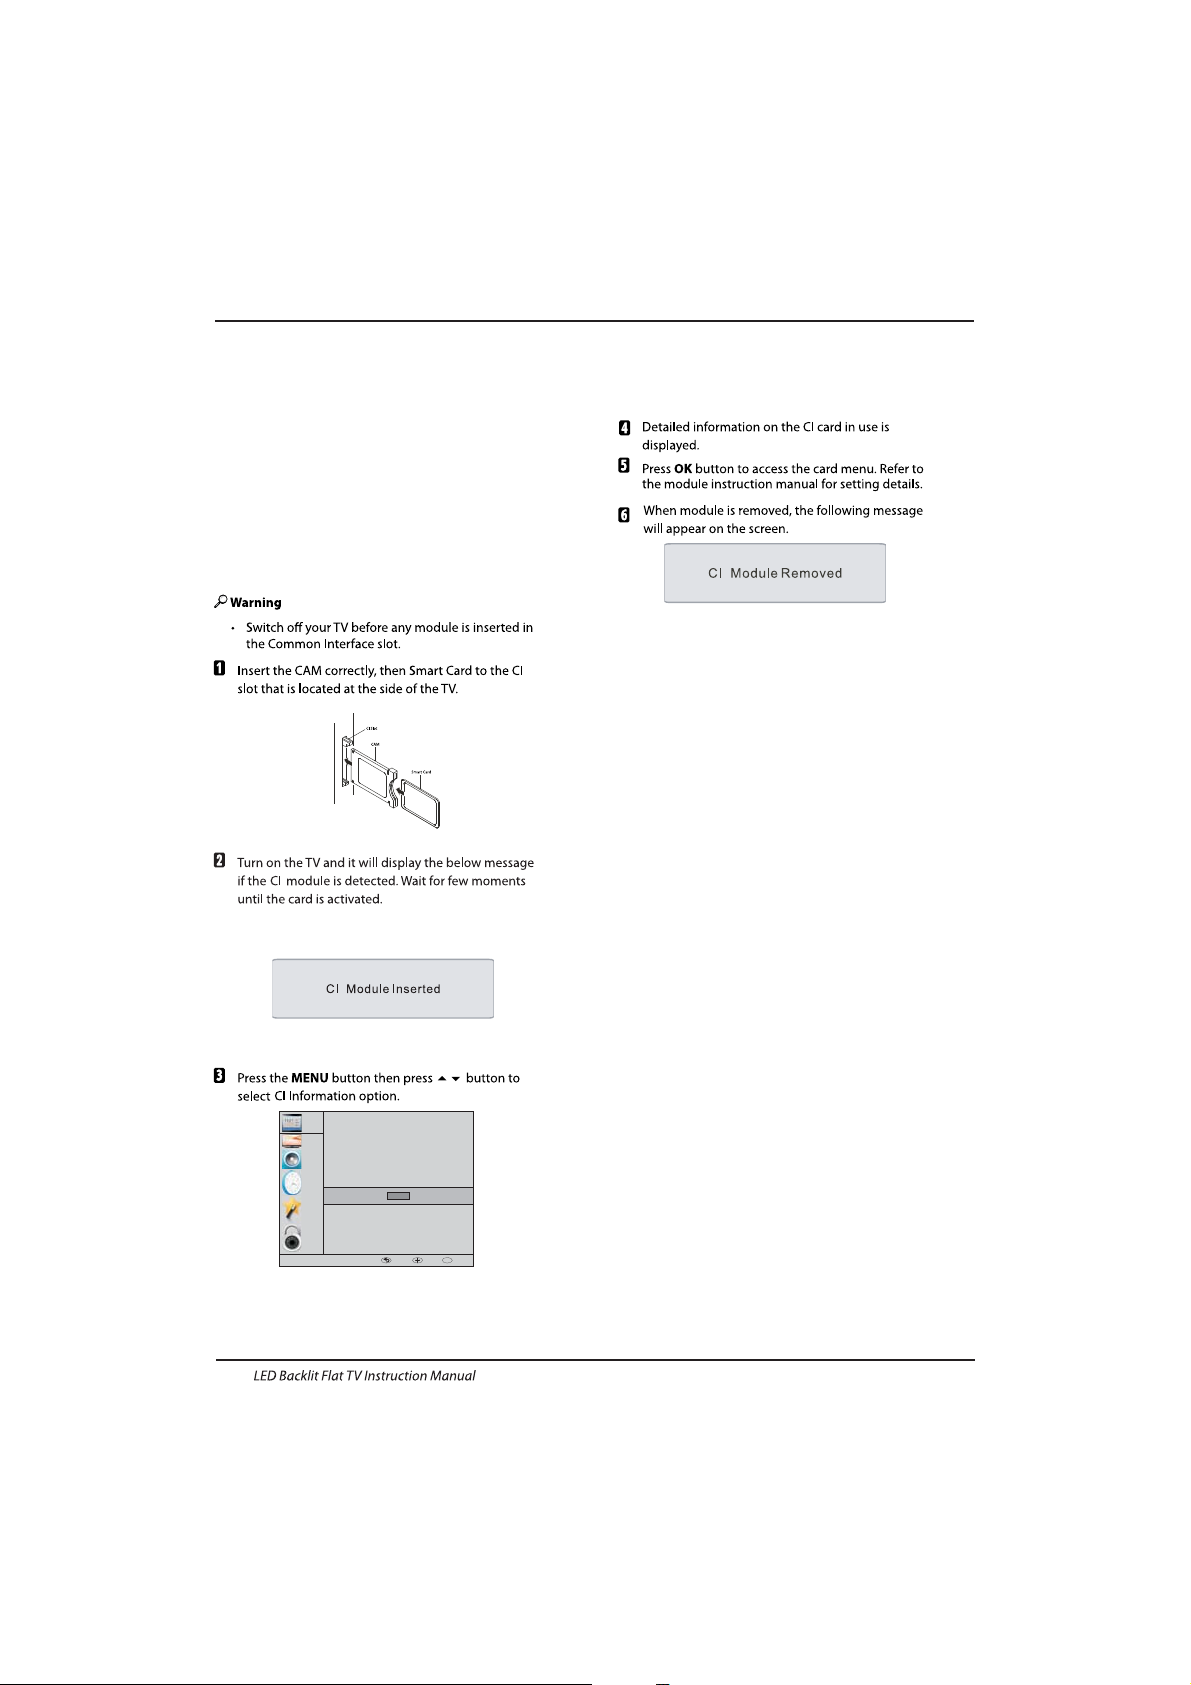
The common i nterface (CI ) slot is d esign ed to
accept the conditional Access (CA) Module and
Smart card in order to view the pay TV
programmes and additional services.
Contact your Common Interface service provider
to ge t more infor matio n about t he modu les and
subscription.
Please noted that CA modules and smart cards
are neither supplied nor optional accessories
from us.
COMMON INTERFACE
CHANNEL
PICTURE
SOUND
TIME
OPTION
LOCK
Auto Tuning
ATV Man ual Tuni ng
Programme Edit
Signal Information
DTV Manual Tuning
Software Update(USB)
CI Information
OK
OK
MENU MOVE OK
Introduction
EN-11
Page 13
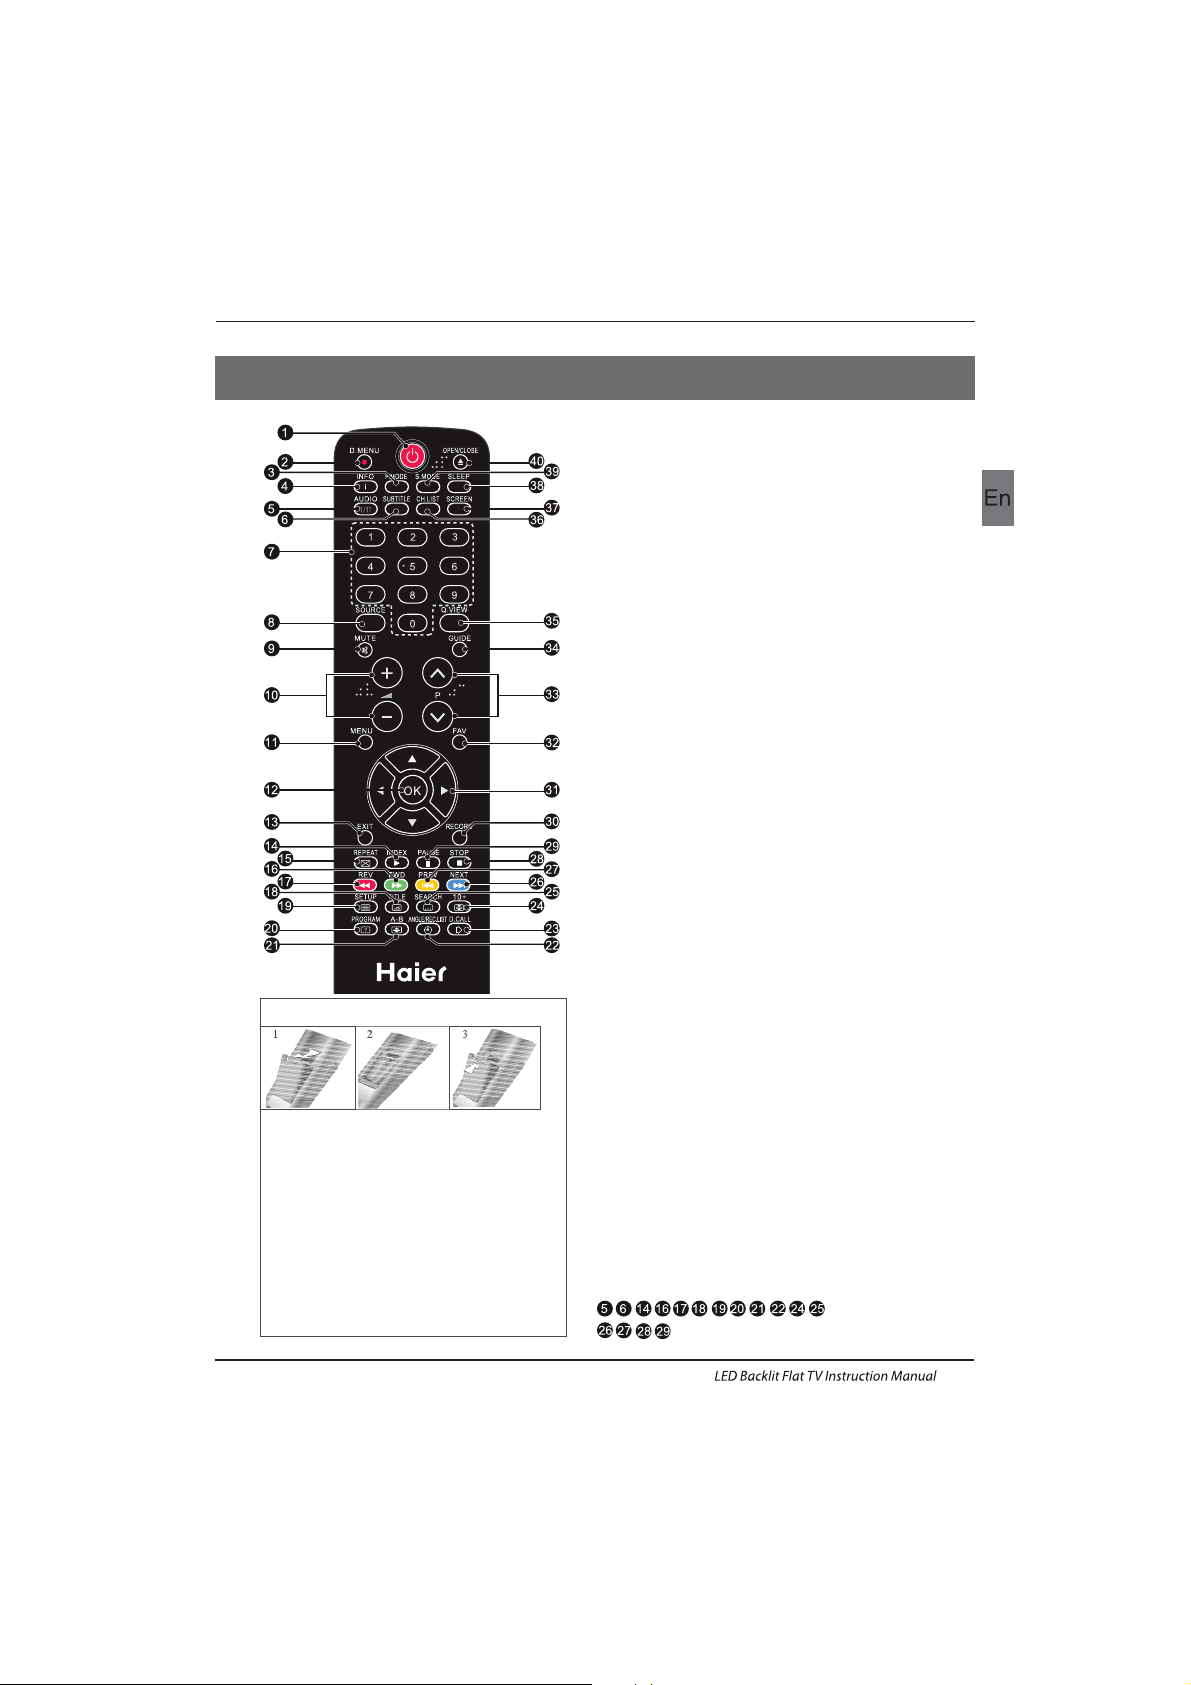
1.POWER:Pres s to turn o n the TV.
2.D.MENU:No function.
3.P.Mode:To switch picture mode.
4.INFO:Press to d isplay the c urren t signa l
status,including input source and channel audio
mode.
5.AUDIO I/II: Press to se lect MONO,Nicam stereo for
ATV ch annel . Selec t Audio l angua ge for DT V chann el.
6.SUBTITLE:Pres s to turn t he subt itle On or Off.
7.Number Buttons:For dire ct acce ss to cha nnels .
8.SOURCE:To select i nput so urce.
9.MUTE:To disabl e or enab le the so und out put.
10.Volume Control:To adjust sound level.
11.MENU:To display TV me nu.
12.OK:To confirm selection.
13.EXIT:To retur n to the pr eviou s menu or e xit men u.
14.Teletext Index/USB PLAY
15.REPEAT:No fu nction
16. Tele text Gr een But ton / USB Fast Forwa rd
17. Tele text Re d Butto n / USB Fast R ewind
18.Teletext Mix
19.Teletext Text
20.Teletext Reveal
21.Teletext Size
22.Teletext Time/ANGLE/REC.LIST(tele text ti me is no
function)
23.Teletext Mode:No function
24.Teletext Hold
25.Teletext Subcode:Teletext Subpage
26. Tele text Bl ue Butt on / USB Nex t File
27.Teletext Yellow Button / USB Pre vious File
28.USB STOP
29.USB PAUSE
30.START RECORD
31.UP,DOWN,LEFT,RIGHT Cursor:Pre ss to naviga te
your selection.
32.Fav:To acces s your favou rite ch annel s list in T V or
DTV mod e.
33.Select Programme:Press
▲▼ Butto n to sele ct the
nex t or prev ious TV c hanne l.
34.GUIDE:Press to d isplay ele ctron ic prog ramme
gui de in TV mo de.
35.Q.View:To acc ess the p revio usly viewe d chann el.
36.CH.LIST: Press to dis play th e chann el list.
37.Screen:To change picture aspect ratio.
38.Sleep :Set timer to turn of f the TV.
39.S.Mode:To switch sound mo de.
40.OPEN/CLOSE:No Functi on
:No DVD function
Remote Control
03 Remote Control
Insert Batteries Into the Remote Control
1. Remove the battery cover.
2. Inserting the 2 AAA 1.5V batteries making
sure the polarity(+ or -) of the batteries matches
the polarity marks inside the unit
3. Mount the battery cover. Replace with new
batteries when the TV set begins to show the
following symptoms: Operation is unsteady or
erratic. Sometimes the TV set does not function
with Remote Control Unit.
Remark:
1) Alkaline Battery Recommeded.
2) Remove batteries when they are exhausted
or if the remote control is not to be used for long
time.
EN-12
Page 14
E
TEXT
SELECTING A PAGE
DIRECT ACCESS
TO THE ITEMS
INDEX
SUB PAGE
HOLD
REVEAL
Press:
You will obtain :
LIST
TELETEXT
Enter the number of the page required using the 0 to 9 up/down. Example:
page 120, enter 120. The number is displayed top left, the counter turns and
then the page is displayed. Repeat this operation to view another pa ge. If
the counte r continues to s earch, this mean s that the page is not
transmitted. Select another number.
Coloured a re as are displayed a t the bot tom of the scree n. The 4 coloured
keys are used to access the items or corresponding pages. The coloured
areas flash when the item or the page is not yet available.
This returns to the contents page (usually page 100).
Cer tain page s contain sub-page s which a re automatically disp layed
successively. This key is used to stop or resume sub-page acq uisition.
The indication appears top left.
To freeze the page.
To display or hide the concealed information (games solutions).
The user can set four favorite p ages to be direc tly linke d to the four co lor
keys. While l ist mod e is activated, it is not possi bilit y to use TOP or FLOF
navigation with the colorkeys. The favorite page numbers should be sto red
and restored to/f rom nonvol atile memory for eac h chann el by the system
software.
This is used to call or exit teletext modes. The summary appears with a list
of items that can be accessed. Each item has a corresponding 3 digit pa ge
num ber. If th e chann el sele cted do es not broadcast telete xt, theindication
100 w ill be di splayed and th e screen will remain blan k (in thi s case, exit
teletext and select another channel).
Teletext is an information system broadcast by certain channels which can be consulted like
a newspaper. It also offers access to subtitles for viewers with hearing problems or who are
not familiar with the transmission language(cable networks, satellite channels, etc.)
Remote Control
EN-13
Page 15
Operation
04 OPERATION
Please select on OSD language
OK
Czech
English
French
Italian
Greek
Spanish
Deutsch
Magyar
Nederlands
Polski
Russian
Romanian
Password
Please enter old password
Please enter new password
Confirm new password
Home Mode
Mode Sele ct
OK
Shop Mode
The installation guide only appear when the TV first
time turn on or reset to factory set.
Installation Guide
1).Press the ▲▼ buttons to navigate the menu and
change the settings. Press the OK button to confirm.
Select your desired language ,Home/Shop Mode to be
displayed on the menu.
2). Press the buttons to select DVB-T/DVB-C and
then press the OK button to confirm.
OK
French
Italy
Greece
Nederlands
Poland
Germany
Hungary
Luxembourg
Norway
a. If you select DVB-T, the next step is to selec t the
Tune type and country then press the OK button to
start tuning.
b. If you select DVB-C, the next step is to config the
DVB-C system like (scan type / Frequency/ Network
ID/Sy mbol(KS/S) then press OK button to into the
tune type and country select menu, this step is the
same as DVB-T, select the tune type (DT V/ATV).
Choose the right country, press OK button to start
tuning.
HOM E or SHOP m odes
1. Ho me Mode i s an ener gy-savin g Mode. H ome
Mode is recommended for normal viewing setting and
is se t as defa ult dur ing man ufacturer.
2. Shop Mode is an option for retailers for
Advertising or product presentation.
Sho p Mode ha s a brigh ter ima ge than H ome Mod e.
3. You may s witch b etwee n Home or S hop Mod e
as yo u choos e.If you cho ose Sho p Mode ,i t will en ter
HDM I1 sour ce automat icall y,and yo u wil press Ex it key
to ex it POP me nu.
EN-14
Note: The default password is 6666.
Page 16
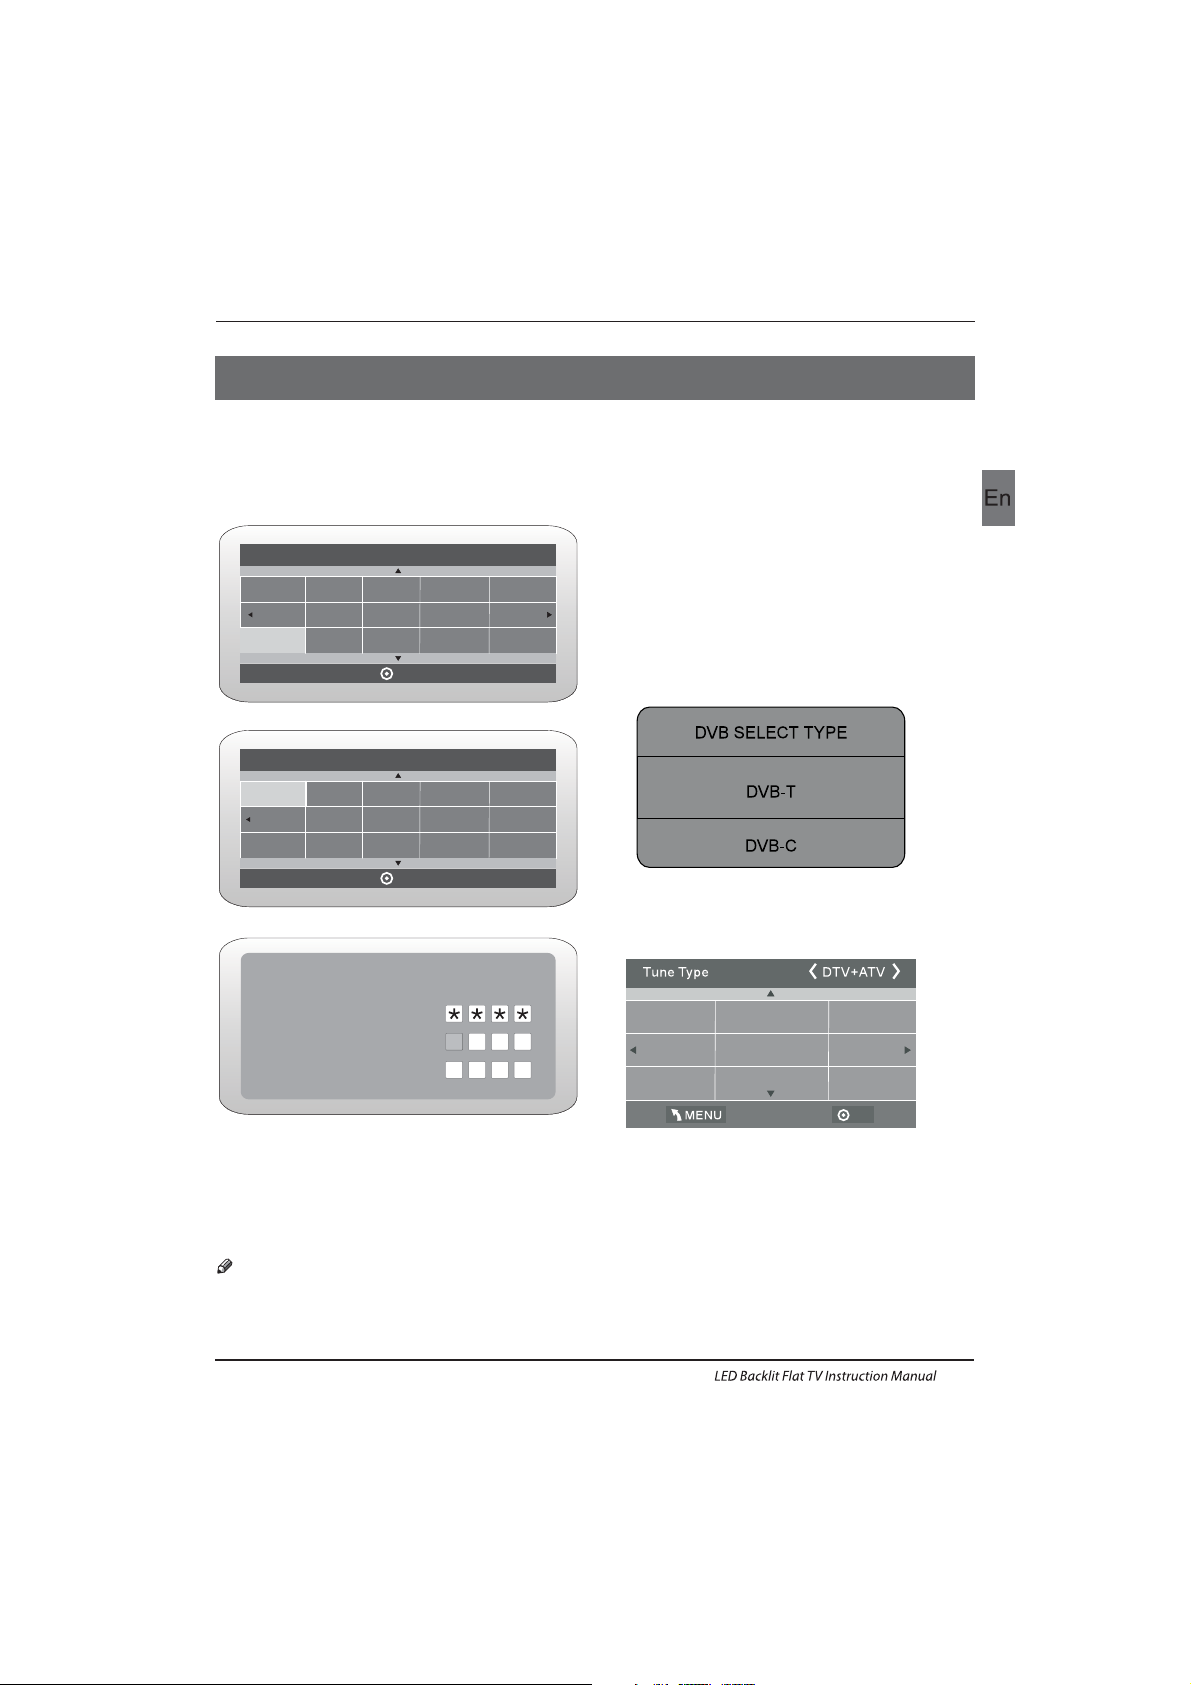
1. 1)Auto Tuning (DVB-T)
1. CHANNEL MENU
CHANNEL
PICTURE
SOUND
TIME
OPTION
LOCK
Auto Tuning
ATV Manual Tuning
Prog ramme E dit
Signal Information
DTV Manual Tuning
Software Update(USB)
CI Information
OK
Programme(s)
Programme(s)
Programme(s)
Programme(s)
1
OK
MENU MOVE OK
1). Press the MENU button and then press the
buttons to select the CHANNEL menu
and then press the OK button.
2). Press the buttons to select Auto Tuning
and then press the OK button.
3). Channel tuning will commence. This operation
may take up to 6 minutes. The display will show
the progress of the tuning and the number of
channels found.
4). If you want to skip the ATV tuning, press the
MENU button to interrupt the tuning half way.
A pop-up screen will be displayed, press the
button to select YES to confirm. You will then go
straight to DTV tuning.
You may repeat the above step if you also want
to skip the DTV tuning. A n installation reminder
will appear the next time you turn on the TV.
5). After tuning is complete, the channels are
arranged in a preset order. If you wish to skip channels,
modify the preset order or rename
channels, select
Programme Edit under the
Channel menu.
6) Congratulations
Congratulations!!!
Completed Initial Quick Setup.
Enjoy your Haier TV
Press OK to Exit
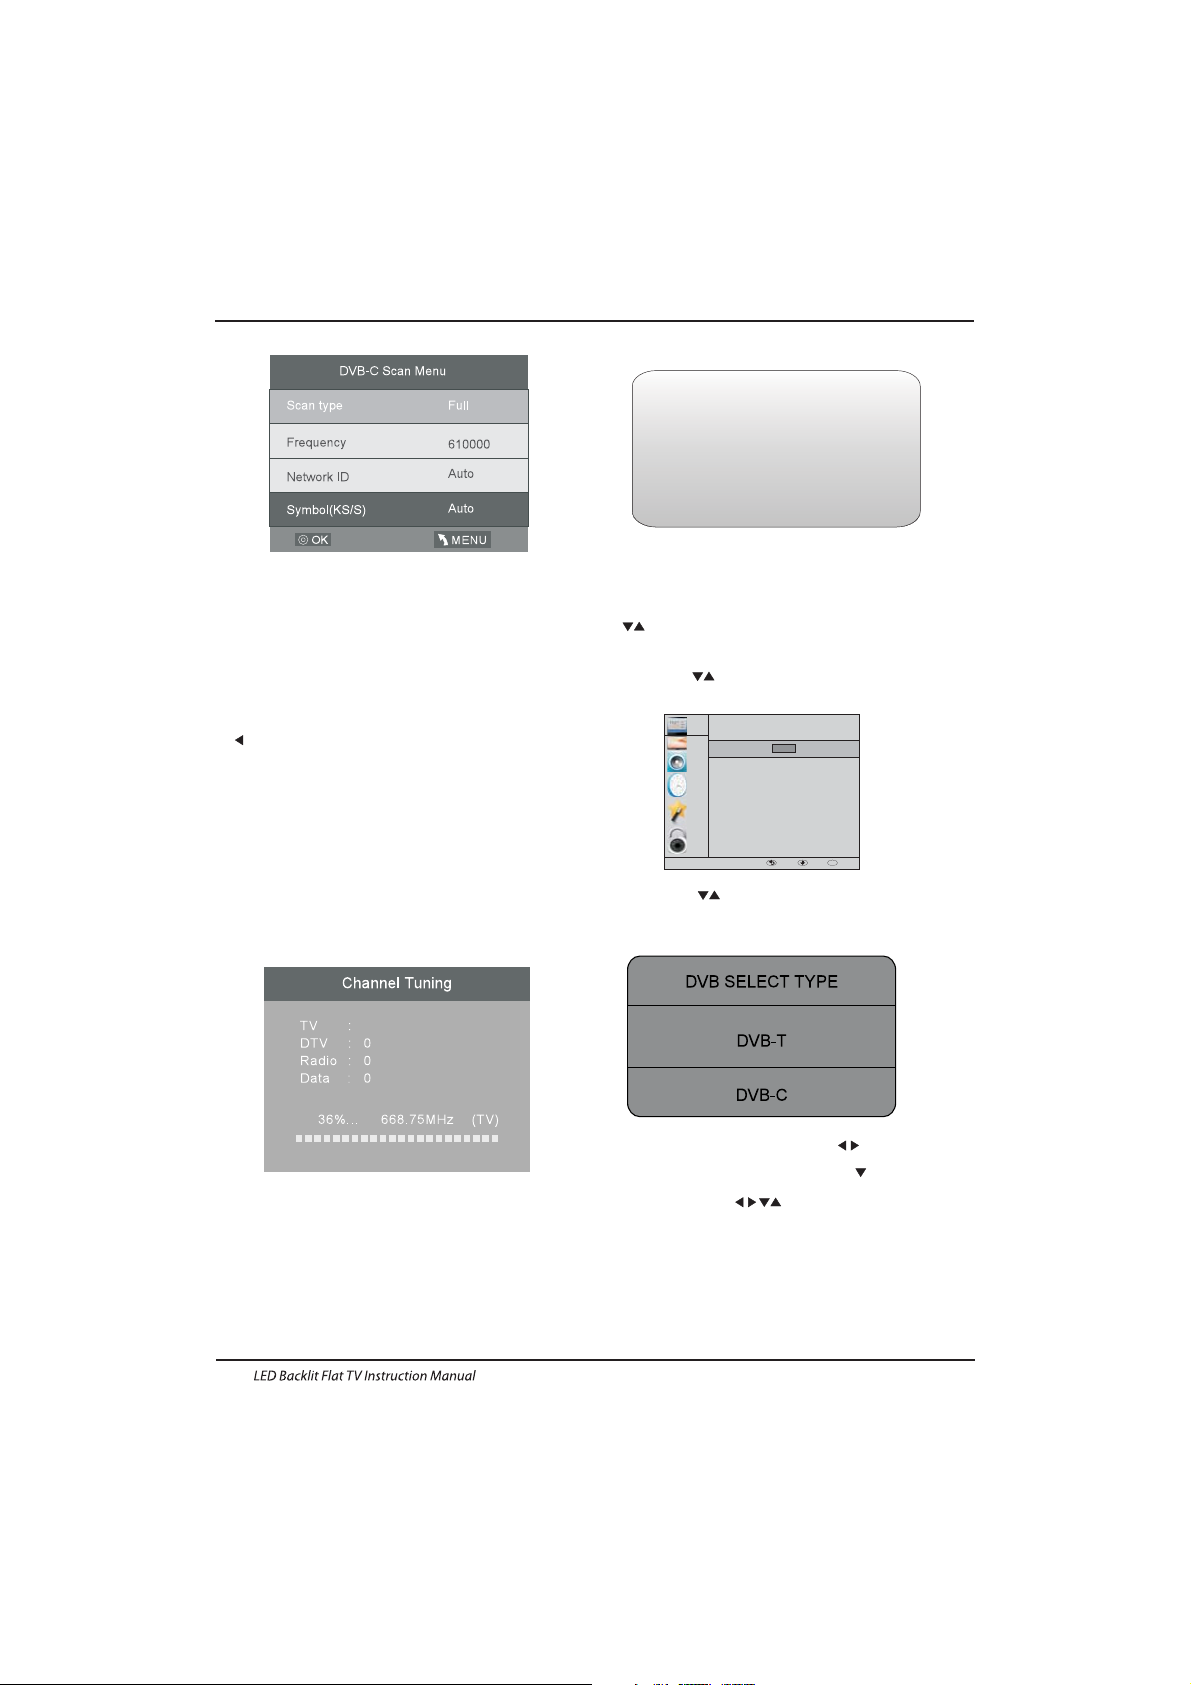
3). Press the buttons to select DVB-T/
DVB-C Press select DVB-T and then press
the OK button to confirm.
4). In the Tune Type menu, press the buttons to
select ATV / DTV / DTV + ATV. Press the button
and then press the buttons to select the
country where you will operate the TV. Press the
OK button to confirm
Operation
EN-15
Page 17

5). Channel tuning will commence. This
operation may take up to 6 minutes. The display
will show the progress of the tuning and the
number of channels found.
6). If you want to sk ip the ATV tuning, press the
MENU button to interrupt the tuning half way. A
pop-up screen will be displayed, press the
button to select YES to confirm. You will then go
straight to DTV tuning. You may repeat the
above step if you also want to skip the DTV
tuning. An installation reminder will appear the
next time you turn on the TV.
7). After tuning is complete, the channels are
arranged in a preset order. If you wish to skip
channels, modify the preset order or rename
channels, select P
rogramme Edit under the
channel menu.
1.2 )Auto Tuning (DVB-C)
2). Press the buttons to select Auto Tuning and
then press the OK button.
3). Press the buttons to select DVB-T/DVB-C
Press select DVB-C and then press the OK button
to confirm.
4). Press buttons to select Scan type/Symbol
(Ks/S) press the OK button to confirm.
5). In the Tune Type menu, press the buttons to
select ATV / DTV / DTV + ATV. Press the button
and then press the buttons to select the
country where you will operate the TV. Press the
OK button to confirm.
Programme(s)
Programme(s)
Programme(s)
Programme(s)
1
CHANNEL
PICTURE
SOUND
TIME
OPTION
LOCK
Auto Tuning
ATV Manual Tuning
Programme Edit
Signal Information
CADTV Manual Tuning
Software Update(USB)
CI Information
OK
OK
MENU MOVE OK
OK
French
Italy
Greece
Nederlands
Poland
Germany
Hungary
Luxembourg
Norway
1). Press the MENU button and then press the
buttons to select the CHANNEL menu and then
press the OK button.
OK
French
Italy
Greece
Nederlands
Poland
Germany
Hungary
Luxembourg
Norway
Operation
EN-16
Page 18

6). Channel tuning will commence. This operation may
take up to 6 minutes. The display will show the
progress of the tuning and the number of channels
found.
7). If you want to sk ip the ATV tuning, press the MENU
button to interrupt the tuning half way. A pop-up screen
will be displayed, press the button to select YES to
confirm. You will then go straight to DTV tuning. You
may repeat the above step if you also want to sk ip the
DTV tuning. An installation reminder will appear the
next time you turn on the TV.
8). After tuning is complete, the channels are arranged
in a preset order. If you wish to skip channels, modify
the preset order or rename channels, select P
rogramme
Edit under the channel menu.
2. 1 )DTV Manual Tuning (DVB-T)
All the channels including ATV, DTV and Radio
can be tuning by one time,if the Tune Type is
DTV+ATV .
All t he stored ch annel s will be d isapp ear after
auto tuning .
After auto tuning , the channel will skip to
the first DTV channel.
2). Press the buttons to select DT V Manual Tuning
and then press the OK button.
4). Press the MENU button to return back to the
main menu.
5). Press the EXIT button to exit the menu.
2. 2 )DTV Manual Tuning (DVB-C)
1). Press the MENU button and then press the
buttons to select the CHANNEL menu and then
press the OK button.
3). The DTV M anual Tuning screen will pop up.
Press the buttons to select the desired UHF
channel and then press the OK button to
commence the search of that channel. When the
signal has been tuned, the picture and signal
strength will be displayed on the screen.
1). Press the MENU button a nd then press th e
buttons to select the CHANNEL menu and then
press the O K button.
2). Press the buttons to select CADTV Manual
Tuning and then press the OK button.
3). The CADTV Manual Tuning screen will pop up.
Press the buttons to s elect(Frequency /Symbol
(ks/s/QAM Type QAM) press the OK button to
commence the search of that channel. When the
signal has bee n tuned, the picture and sign al
strength will be displayed on the screen.
4). Press the MENU button to return back to t he
main menu.
5). Press the EXIT button to exit the menu.
Programme(s)
Programme(s)
Programme(s)
Programme(s)
1
490000
16
NO SIGNAL
CHANNEL
PICTURE
SOUND
TIME
OPTION
LOCK
Auto Tuning
ATV Manual Tuning
Programme Edit
Signal Information
CADTV Manual Tuning
Software Update(USB)
CI Information
OK
OK
MENU MOVE OK
CHANNEL
PICTURE
SOUND
TIME
OPTION
LOCK
Auto Tuning
ATV Man ual Tuni ng
Programme Edit
Signal Information
DTV Manual Tuning
Software Update(USB)
CI Information
OK
OK
MENU MOVE OK
D
Operation
EN-17
Page 19
5). CI information: (optional)
This menu can display the CI card' s information.
Ren ame:
Use t he Arrow But tons to s elect t he chan nel you
wis h to move. Th en pres s the Yellow Button to
sel ect Move functio n. Once a ctive u se the Ar row
But tons to move a nd then p ress OK to con firm.
Only can rename ATV programs .
Move the cursor to the program, press teletext
green button to rename the program.
Press to choose the character. Press to
move the cursor .
Press MENU button to exit edit , Press EXIT to
exit the menu.
Note: ATV programs name only can be 5 charac ter,
DTV programs name can be 25 character.
Press teletext red button to storage to channels
after manual tuning .
4). Prog ram edit:
You can Delete ,Rename ,Move, Skip , FAV any
programs.
Delete
Press teletext red button , the program in cursor
will delete.
Press to choose the program , press teletext
blue button to skip this program, The will
show on the right side of the program .
Choose the skipped program, press blue button
again , you can cancel the skip ,The will
disappear .
ATV Manual Tuning
Storage To 1
Sys tem BG
Cur rent CH 1
Search
Fine-Tune
Frequency 424.25 MHz
3) ATV Manual tuning :
You can change the sound system to search the
analog TV channels and fine tune the channels ,
then storage the channels you selected.
Favourite:
Press to choose the program , press FAV
button , it will show on the right side of the
program.Choose the FAV program , press
FAV button again , you can cancel the FAV,
the will disappear .
Once your favorite group is created, you can
press the FAV key to quickly access your favorite
channel.
1).Tint is available in NTSC system only.
2).There are four colors temperature modes
can be selected medium, warm, cool,user
3).Screen is available in PC mode only which
can adjust Horizontal position, vertical
position, size and phase.
3.SOUND MENU
The third item of the MENU is the SOUND
MENU.
You can adjust the sound effect here such as
treble, bass, balance etc.
Press to move, press OK to adjust.
Auto volume: only available when the input
signal volume is too large or distortion.
Pic ture Mo de Stan dard
Con trast 5 0
Brightness 50
Color 50
Sharpness 75
Tint 5 0
Col or Tempera ture Me dium
Red 5 0
Green 50
Blu e 50
4.TIME MENU
The forth item of the menu is the TIME MENU
You can adjust the clock, power on/off time,
sleep time etc Press to move, press OK to
adjust.
The second item of the MENU is PIC TURE MENU.
You can adjust picture effect here, such as
contrast, brightness, etc.
Press OK to move, press OK to adjust.
2. PICTUREMENU
Sav e MENU
MENU
MENU
CHANNEL
PICTURE
SOUND
TIME
OPTION
LOCK
Sound Mode
Auto Vo lume
Surround Sound
Balance
Standard
Music
Theater
Sports
User
CHANNEL
PICTURE
SOUND
TIME
OPTION
LOCK
Picture Mode
Aspect Ratio
Noise Reduction
Screen
Color Temperature
Eco
Mild
User
Stsndard
OK
MENU MOVE OK
OK
MENU MOVE OK
Operation
Move:
Skip:
EN-18
Page 20
5.OPTION MENU
The fifth item of the MENU is the OPTION
MENU. You can adjust the Menu language,
Audio language,Subtitle language etc.
Within 15 minutes there is no signal, the TV
will auto sleep , if Auto Sleep is set ON. The
clock time can get from the DTV system auto.
6.LOCK MENU
The sixth item of the menu is the LOCK MENU
You can lock system, set password, block program
and set parental guidance Once you set the lock
system on you can not search the channels or
change any programs.
The default pass word is 0000, If you forget the
password, you can use the super password:9443.
Block program: Press to choose the
program ,press teletext green button to block
the program. If you want unblock the program,
pls enter the main menu , input the password,
then press green button again.Parental
guidance: Press to choose rating.
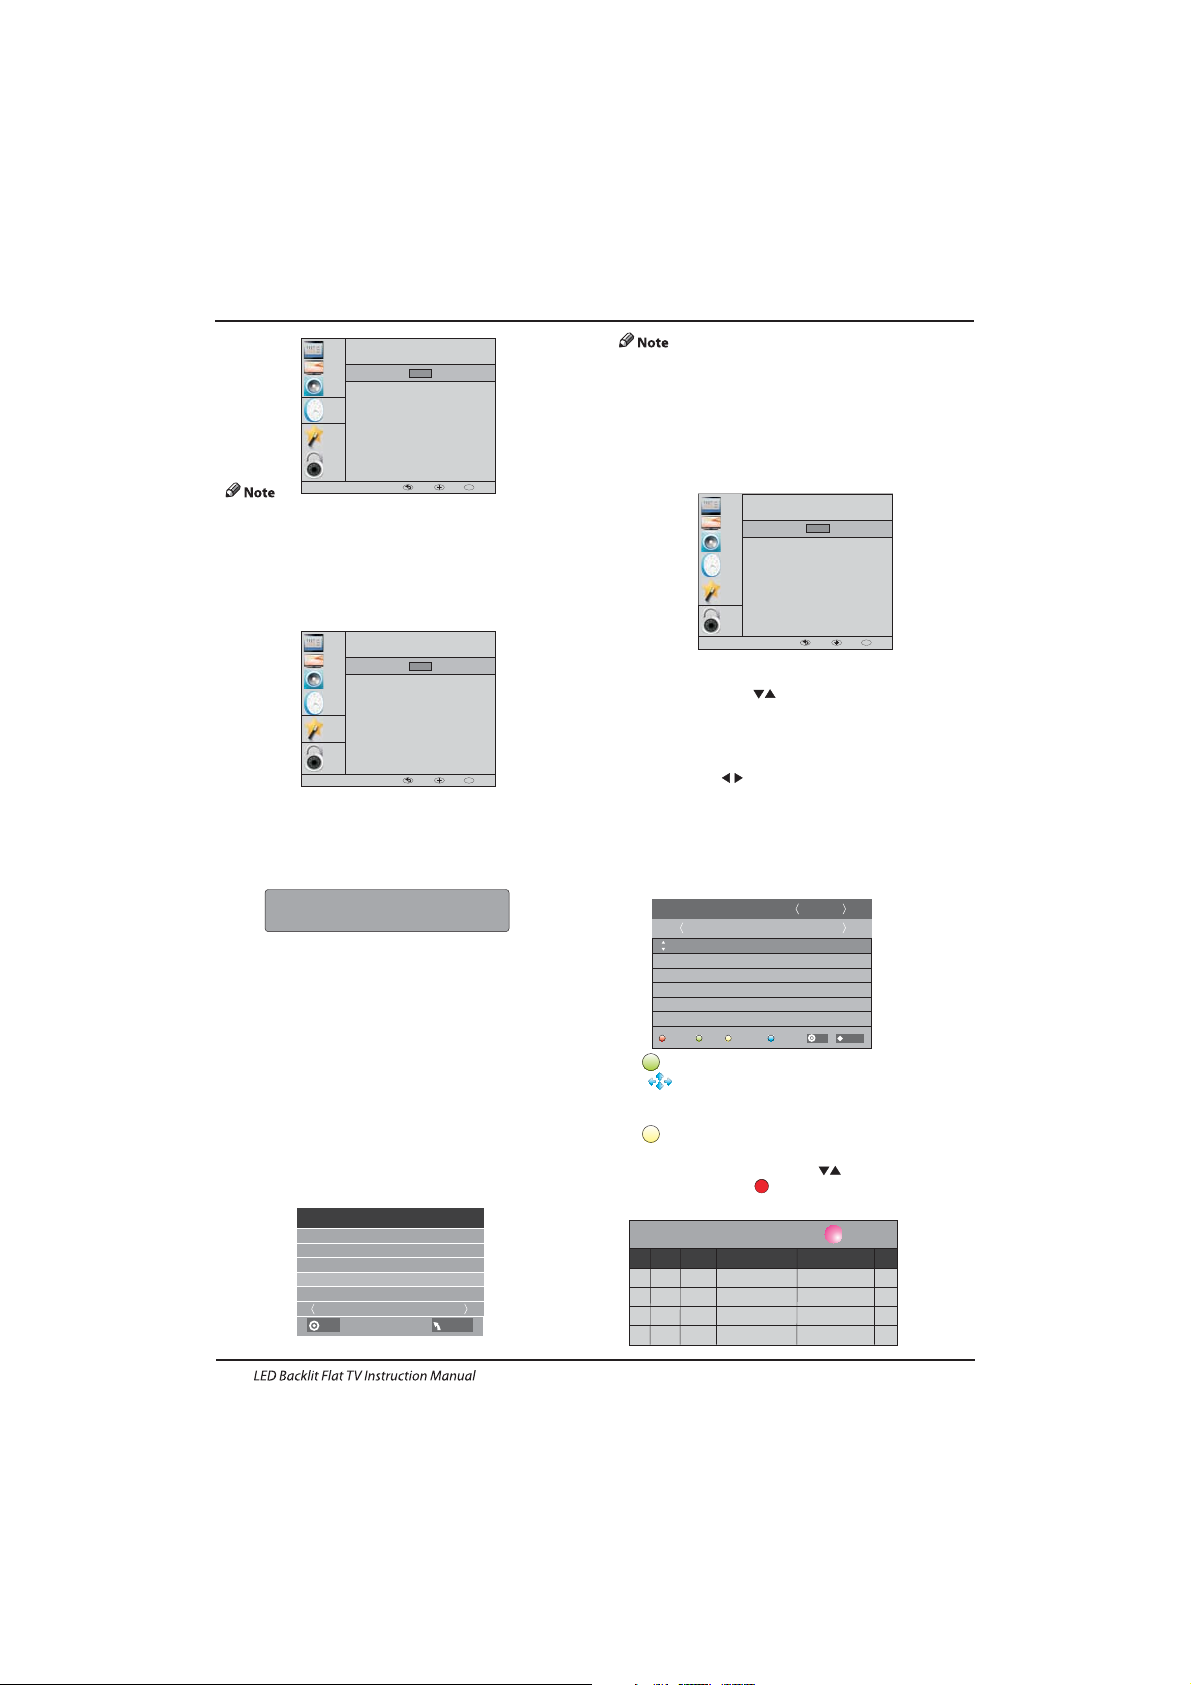
7.EPG Menu(Electronic Program
Guide).
The EPG menu is used to look at what is being
broadcasted on DTV or Radio channel in the day.
To access the EPG menu, press the EPG
botton,the following menu will be displayed:
1.
Use to choose the programs , Press
INFO key, you can display the highlight program's
information.
INFO
2.
Press the teletext yellow key, It can list
all the reminder schedule, press to choose
the list, press red key to delete the
schedule list.
Schedule
DELETE
Sch edule L ist 04: 55 28th Ap r Delete
Time Date
Programme Title
Channel Name
Restore factory default will clear all the programs
and password.
In PV R File syste m menu you can s et up USB
dis k for PVR.
Automatic Power-down
1.I f after 4 hours from switch on and no changes have
been made to the TV, for example no channel or volume
changes,the T V will start the automatic power down
sequence.
And pop-up window will appear on screen.
After 150 seconds the TV will automatically switch to
standby. To override the automatic shutdown press any
button on the remote control.
2. To cancel the automatic power-down
On the Option Menu select Automatic power-down(4H)
Press OK . A pop-up me ssage will appear
“Are yo u sure you wan t to enable au tomat ic powerdown?”
Use t he righ t arrow key to s elect N O
The T V screen ret urns to t he Opti on Menu a nd the
Automatic power-down(4H) option will display.
Automatic power-down(4H) OFF
To return to auto shutdown after 4 hour s repeat the
abo ve excep t
use t he left a rrow ke y to sele ct YES.
XXX’s to automatic power- down
Please press any Key to Cancel
CHANNEL
PICTURE
SOUND
TIME
OPTION
LOCK
Lock System
Block Program
Parental Guidance
Set Password
OK
OK
MENU MOVE OK
CHANNEL
PICTURE
SOUND
TIME
OPTION
LOCK
OSD Language
Subtitle Language
Country
PVR Fi le Syst em
Restore Factory Default
Automatic power-down(4h)
Home/Shop Mode
DCR
Audio Languages
OK
OK
MENU MOVE OK
CHANNEL
PICTURE
SOUND
TIME
OPTION
LOCK
Clock
Off Time
Sleep Timer
Auto Sleep
Time Z one
On Time
OK
OK
MENU MOVE OK
26/Jan
11: 40
1 TV3
Club/Super3-Naturalmen..
No Information
No Information
PROGRAMME GUIDE
Schedule
Record
INFO
Remind
TIME
2 3/2 4
3 TVC HD
OK
INDEX
USB Disk
Time S hift Si ze
Speed
Sel ect Dis k C:
Che ck PVR Fi le Syst em Star t
Format
Fre e Recor d Limit 6 H r.
OK
MENU
Operation
EN-19
Page 21

CHANNEL
PICTURE
SOUND
TIME
OPTION
LOCK
OSD Language
Subtitle Language
Country
Restore Factory Default
Automatic power-down(4h)
Home/Shop Mode
DCR
Audio Languages
OK
OK
MENU MOVE OK
3. Record
Press the red key ,I t can set the program
to be recorded.
4.
Press the blue key to choose one program
and set up one reminder time, the TV screen will
skip to the choosed program in the reminder time
automatically.
Remind
Check PVR File System: check if the PVR File
System set up in the USB device or not.
Format:
Sel ect Dis k
USB 0
Dis k C:
PVR File System Type Hi Spe ed FS
PVR F ile Sys tem Siz e All
SD 10 4 Mins
HD 29 M ins
File System Size
Selec t Disk:select which disc to save the
record file.
PVR File System Type FAT32
SD 10 4 Mins
HD 29 M ins
File System Size
1.Prepare to record the program
8.PVR function
PVR function only works in DTV.
From OPTION MENU enter into PVR File System
In “OPTION MENU”, please choose “check
PVR File S ystem”. Click “OK”, unti l
“checking”change i nto “Success”.
Note: please check the term “speed”. I f it is
“HD support”, that me ans the s peed of U SB
device is available for time shift and record. If
not, please format the device, to make sure the
device available. The default “Free Re cord
Limit” is 6 hou r, if the sp ace on th e disk is b ig
eno ugh. If t he spac e is not
big enough, the record time should be shorter,
depends on the room on the device. During the
“che ck PVR File Syste m” check ing, pl ease do
not take any other operation until it finished.
The reco rding s must be d one wit h the TV PVR
sys tem. It c an only b e played in th e same TV,
not i n any other kind o f devic e (comp uter,
DVD, e tc.) wh ich is no t compatib le with .
TS. f ile format .
Please note that in order to carry out any kind of
record ing, the TV wi ll requ ire you to format t he
connected USB device to store the recording.
WARNING. WHEN YOU FORMAT, THE
EXT ERNAL U SB DEVICE YOU WI LL LOSE AL L
THE FILES AND INFORMATION YOU HAVE
STORAGE ON THE DEV ICE.
The U SB file s ystem will l imit th e size of t he
storage size.
File sys tem: NTFS up t o 2TB
FAT32 with up t o 192GB
FAT16 with up to 2GB
From OPTION MENU enter into PVR File
System a s below :
1 TV3
37 Mi nute
11 Hou r
Jan M onth
26 Da te
Onc e Mode
Reminder
BACK
OK
PVR Fi le Syst em
OK
OK
OK
USB D isk
Time S hift Si ze
Speed
Sel ect Dis k C:
Che ck PVR Fi le Syst em Star t
Format
Fre e Recor d Limit 6 H r.
OK
MENU
Operation
EN-20
Page 22
below menu appear after Format finish:
2.Record the program
3.Play the record
(Suggest to format the device by “High Speed Fs...”,
which can speed up the record.)
Format disk
If you select the “Hi Speed FS ”format mode,
then you can change the time shift size:
Do no t unplu g USB dev ice.
Formatting,please wait
Format disk
As pl aying the DT V source, choo se the ch annel
and c lick “record”, the rec ord frame wi ll pop
up. Click “record” again , the record f rame will
disappear and the “REC” icon stil l on the le ft
top. It wi ll disa ppear u ntil yo u click “stop”.
The p rogram record ed on the “US B”wil l be
saved in the folder “_MSTPVR” on the
device.
1.Th e USB storag e size ca n be betw een
128 MB and 50 0GB in si ze, but fo r practic al use
2GB t o 500GB i s recommen ded.
2. Video may become pixelated when Video
bit r ate is too low. Th is can be c aused by
con necti ng a USB ex tensi on cabl e inste ad of
plu gging t he USB di rectl y into the TV
3. No t all USB d evice s are compat ible.
Bel ow is a lis t of recomme nded US B drive s.
Models that are not listed may be compatible,
but i t is not gu aranteed t o work.
The U SB supp ort list are the sam e as Timeshif t
function,see the following pages for details.
Sta rt Exit
Format disk
Warn ing! All d ata wil l be lost .
OK
USB Disk
Time S hift Si ze
Sel ect Dis k C:
Check PVR File System SUCCESS
Format
Pass
Pass
All
Spe ed HD Support
2730KB/S
Fre e Recor d Limit 6 H r.
USB Disk
Time S hift Si ze
Sel ect Dis k C:
Check PVR File System Checking
Format
Pass
Pass
All
Speed
Checking
Fre e Recor d Limit 6 H r.
OK
MENU
OK
MENU
Time S hift Si ze
Time S hift Di sk Size 5 12 MB
SB 14 M ins
HD 4 Mi ns
OK
Operation
EN-21
Page 23
Prepare to record the program
9.Timeshift function
This T V allows you to pause and record the
cur rentl y watched di gital p rogram to a US B
storage device, and to resume to the point
where it was paused.
Formatting a USB 2.0 stora ge device will
be needed. Save your original data
before formatting. All the data stored in
the U SB devi ce will b e erased after
formatting.
USB Drive Storage Format
Select to format the USB device and allocate the
amount of space for the Time Shift function.
The format process will take at least 2
minutes. Please do not turn off the power or
remove the USB device during formatting.
During formatting, a spe ed test w ill be do ne
on the USB device. If it fails, it means the USB
device may not support the Time Shift
function.
Record a paused DTV program to
USB storage device
Ple ase do no t unplu g the USB s torage dev ice
whe n the Time Shift fu nction is a ctiva ted.
App roximately 4GB of m emory buf fers
about offer 140 minutes.
1. Whi le in the DTV i nput so urce, inse rt
USB storage device to the USB port on the
sid e of your TV.
2. Press PAUSE to start Tim e Shift
function. The TV program paused. The Time
Shift OSD appears, and starts recording.
3. Press S TOP to sto p Time Shi ft
function and stop recording program.
Pause FF Prev. NextFB Stop
Repeat ALL
00:04:22
Set A
AB
play
00:04:22
Operation
EN-22
Page 24

8. Thi s feature is n ot availab le for al l digital
TV,such as scrambled or audio only channels.
Time Shift limitations:
1. Whe n the Time S hift featu re is activate d, only
the PLAY/PAUSE/STOP/FWD/REV/
VOL+/VOL-/MUTE keys and some basic
operation keys (ENTER/EXIT/navigation keys)
are available.
2. Video playback may not be smooth and skip if
USB r ecording s peed do es not me et the
minimum requirements .
3. Do N ot remove US B disk or s witch o ff the
power du ring Tim e Shift ope rations. I t will
abort once the signal is lost.
4. Do N ot remove th e signa l source dur ing Time
Shift operations.
5. Do N ot quic kly and rep eatedly ch ange
operations between PLAY/PAUSE/FWD/REV.
6. Vid eo may becom e pixelate d when Video bit
rate is to o low.
7. No t all USB d evice s are compat ible, The USB
hard disk drive electricty should be
< 500 MA.
Bel ow is a lis t of recomme nded US B drvies.
Mod els tha t are not l isted may be c ompat ible,
but it is not guaranteed to work.
San D isk Extreme® Contou r™ USB Flash
Dri ve - 8GB SD CZ8 - 819 2 - E75
San D isk Extreme® Contou r™ USB Flash
Dri ve - 16GB S DCZ8 - 01 6 G - A75
Kin gston D ata Traveler 4 10 USB 2. 0
Flash Dr ive - 16G B DT410/16 GB
Kin gston D ata Traveler 4 10 USB 2. 0
Flash Dr ive-8 GB DT410 /8 GB
OCZ Technology ATV USB 2.0 Flash
Dri ve - 8GB OC ZUSBAT V - 8GB
OCZ Technology Rally 2 US B 2.0 Flash
Dri ve - 4GB OCZUSBR2DC - 4 GB
OCZ Technology Rally 2 US B 2.0 Flash
Dri ve - 8GB OCZUSBR2DC - 8 GB
SZMSUNG - Hm5 00 JI -50 0 G
Operation
EN-23
Page 25
Press so urce key, and s elect USB i n source
list, press OK button to enter the USB menu.
10.USB Player
Please make sure that the USB device have
plugged in the slot.There are four type media
item can be selected, such as photo, music,
Movie, and text. Select the type media item by
pressing , press OK but ton to enter
the disk selection menu.
Press th e to select the right disk and press
OK to display media files and folder list or
cho ose Ret urn to ba ck to the m edia ty pe
selection menu.
Select the media file by pressing or , then
the preview frame will pop up.Press the button
to pl ay the media f ile in fu ll scre en.Wh en the
media file (photo, Movie, or text type) is playing,
press the OK or Info butt on can di splay t he control
bar.
Press to s elect t he func tion icon , press OK
button to confirm the function.
Press or E XIT but ton to exit th e control ba r
except for musi c.
You can a djust t he audi o track , or prog ram in th e
Inf o menu wh ile Playin g the vid eo file .Choo se the
Inf o icon an d press OK can d ispla y the Inf o MENU.
USB playback is supported for the following photo
file formats:
-JPEG( JPEG fo rmat, f iles wi th the ex tensi on ".jpg" )
-BM P (file s with th e exten sion ".bmp")
-PNG (files with the extension ".png")
USB playback is supported for the following music
file formats:
-MP 3 (file s with th e exten sion ".mp3")
-WAV (fi les wit h the exten sion ".wav ")
USB playback is supported for the following text
file formats:
-TXT (files with the extension ".txt")
USB p layba ck is sup porte d for the foll owing m ovie
file formats:
-AVI (file with the extension".avi")
-TS (MPEG 2 & H.264)
Pause FF Prev. NextFB Stop
Repeat ALL
00:04:22
Set A
AB
play
00:04:22
PHOTO MUSIC TEXT MOVIE
Haier Innovation Life
USB2.0 Back
MENU
Move Select
OK
Return C
Haier Innovation Life
Back
MENU
Move Select
OK
Picture
Back
MENU
Move Select
OK
Return 720 480 1080Up Fol der 0021.JPG
0021.JPG
SUB-10.avi
Resolution: 720x 40 0
Subt it le :
Prog ra m:
Size: 4142 KBy te s
Close
AudioTrack: 1 /1
OFF
--/0
Operation
EN-24
Page 26
Picture Audio
Snow Noi se
antenna position, direction
or co nnect ion
Inspection Check
Inter ference
Noise
electronic equipment,car/
motorcycle,fluorescent light
Normal Picture
Mut e
Volume( check i f mute is
activ ated or if the a udio sy stem
con necti ons are n ot correct)
No pi cture Mut e
Powe r cord is not in serted
Powe r switc h is not op ened
Contrast and brightness/volume
setup
Press st andby k ey on the remo te
con trol for i nspec ting
No colour Normal audio Colour control
Picture
breaking up
Normal audio
or weak
retune channel
No colour
Noise
TVsystem
Normal audio
antenna position, direction
or connection
Trouble phenomenon Symptom
Ghost
Normal audio
Change aspect to zoom
Ther e is blac k bar
on top and bottom
Trouble Shooting
05 Trouble shooting
EN-25
Page 27
Trouble Shooting
EN-26
My TV does not display the picture
on my laptop / PC when connected.
Most PC's and laptops when connected with a VGA Plug (the
blue 15 pin plug on your PC or laptop) require you to press
some buttons on your key board to get a pic ture on a TV or
other external display. This is usually the F7 (Dell) or F4 (HP /
Samsung) or F5 (Toshiba). On laptops, you have to press the
“Fn” key at the same time as the “F” key.
I have connected my PC/Laptop to
the TV and get a picture but no
sound. Why ?
The VGA cable only carries the video or picture information.
You need to connect a separate cable connected to the
earphone socket (3.5mm jack) on you PC/Laptop to the 3.5m
(PC Audio IN) socket on your TV. You will need to select “PC”
using the Source button on your remote.
Alternatively connect your PC/Laptop using a HDMI cable if
you PC/Laptop has a HDMI connector. HDMI is both audio and
video.
The picture is not auto resizing
when changing channels.
Check that the TV picture Aspect Ratio is set to 'Auto' on all
inputs ATV, DTV, SCART, HDMI 1, 2 etc.
To set the aspect ratio, (Auto, 4:3 or 16:9). Press Source button
start at ATV and repeat the sequence below for all input
sources ATV, DTV, SCART, HDMI 1 and 2 as each input source is
controlled separately.
Press TV Menu button
Press Right Arrow to access Picture sub menu
Press Down Arrow to select Aspect Ratio
Select Auto
Press Exit
Repeat for all input sources.
I have just plugged in a DVD player
or another item into my TV and it
doesn't work.
This is applicable to any item of equipment plugged to the TV
1. Turn both TV & DVD player off (plugs out of the wall socket,
not standby).
2. Turn off any equipment connected to the SCART socket.
3. Disconnect the SCART plug from the TV.
4. Plug in and turn TV on
5. Plug in and turn DVD player on
6. Select HDMI from Source Menu
7. Press play on DVD player and check movie plays ok
NOTE: The SCART socket has priority over HDMI and it is
important that the equipment connected to the SCART socket
on the TV is switched OFF (not in standby).
Please follow this information. If the advice works and the
DVD player wor ks, the TV is OK it is just a bit confused.
Probably HDMI plugs have been removed and plugged back in
when the TV is switched on.
Never remove or plug in HDMI cables or any digital equipment
with the equipment switched on.
Always switch off all equipment when unplugging or
connecting any digital equipment.
Trouble Shooting
Page 28

Trouble Shooting
EN-27
Pic ture Br eaks in to Pixel s
A typical example of a rec eptio n probl em incl udes th e break up o f pict ures (pixi latio n) or the picture freezing,
sometimes there are cli cking o r squea king sounds or the sound drops out or ther e is NO reception at all.
Your pi cture m ay brea k into pi xels due t o the dig ital vi deo sig nal dropping. The signal dropping may occur because of
either problems with weak sign als (se e TV Aeri als) or i f you are connected by cable a weak c able si gnal. If the p roble m
is weak signals, use an amplifier to strengthen the signal. A cabl e techn ician c an help you in stall a n inlin e ampli fier or a
pre-amplifier. This will boost your signal strength and fix the pixe l probl em.
If you are receiving your TV signal by satellite, check your dish has no t moved fo llowi ng high w inds, or tha t the sig nal is
blocked by trees. Trees can be a prob lem as th e TV s ignal c an chan ge depending if a tre e betwe en the sa tellite di sh and
satellite is in bare or in full leaf.
Missing channels
It ma y be that y ou find t hat the re are channels missing, or you're receiving channels from the wrong region.
Sometimes the inter activ e servi ces (re d button ) does n't work . Thi s is usua lly cau sed by we ak sign al, see TV Aer ials
TV Aerials
Digital terrestrial television (Freeview) comes to your TV via an aerial, The old aerial that was good for analogue TV may
not w ork wel l for digi tal so ma y need up gradi ng. If you a re gett ing som e but not a ll of the d igita l chann els on DT V
(Freeview) for example you get BBC1, BBC2, Channel 4 ,bu t not IT V or Chan nel 5, th is is usu ally be cause your a erial i s a
nar row ban d type, a nd need s to be change d to a wide b and typ e.
Faulty Leads and Cables
Che ck your T V. Are t he lead s at the ba ck - to the m ains, t he aeri al, the set- top box, t he vide o or DVD pl ayer or r ecorde r
properly connected? SCART leads are known to work loose over time an d can res ult in bo th audi o and vid eo (pic ture)
problems. Either left or right or both audio is missing and the colours are poor or muddy looking. Push the SCART
plugs firmly in, this should fix the problem.
HDMI plugs need to be pushed in firmly; it's only the last millime tre tha t the con tacts m ake. Typi cally t he blac k plast ic
part of the HDMI plug should be very close or touching the body of the TV or component.
When plugging in any HDMI cables you may experience problems if the HD MI cabl es are pl ugged i n when th e TV o r the
other component is switched on. Always switch off both the T V and the co mpone nt you ar e plugg ing in. I f you have
checked the plugs and sockets, switch off the TV and whatever you have plugged in to the TV and then switch them on
again.
I have connected my PC to the TV. There is no sound.
If you connect your PC or Laptop to the TV using a VGA ( 15 pin Su b D) cabl e there i s no audi o, you nee d to conn ect a
separate audio cable to the TV from the PC or laptop.
Unnatural Colours and Flesh Tones
Unnatural flesh tones and other colours could present another pr oblem e ven in a ne w HDTV. Thi s is due to t he TV
picture settings, which are optimized for a showr oom enviro nment. Fix th is by cha nging t he pict ure mod e to natu ral in
the picture menu. For more precision, try manually setting the colour, contrast and brightness options in the picture
menu.
White Outlines
White outlines around objects and people generally appear either if the TV sharpness is set to very high, or if your
television set uses some edge-enhancement processing technology. Go to the picture menu and adjust the sharpness
till the white outline disappears. If edge-enhancement is enabled, try to disable it using the service menu.
Choppy Video
At times the video might become choppy. When this happens, check whether the signal is strong enough. If the signal
is strong the problem is with the cable operator. If the signal strength is weak, try boosting the signal strength with the
help of an amplifier.
The p ictur e does no t fill th e scree n
When connecting PC's or laptops to the TV, the picture may not fill the screen. Check the display settings on your PC or
laptop (Windows > Star t > Contro l Panel > Appearance and Personalization > Displ ay
settings) and select the best
resolution. On your TV select:- TV Menu > Pict ure > Settings and then try AUTO, ZOOM1 or ZOOM2 for the best display.
USB Connection
The USB connection will work with *.jpg (photo) and *.mp3 (music) file s. Please no te the TV d oes not reco gnize Ap ple
iPhone, or iPod's connected to the USB connector on the TV. The TV ma y play ot her fil es, but d ue to the m ultip le
different file formats, there is no guarantee that these other fil e forma ts will w ork.
Trouble Shooting Digital TV Problems and possible Solutions.
Page 29
EN-28
Specification
Television picture quality:
FUL L HD
Integrated digital.
Screen Size: cm117
Res oluti on 1920 x 1 080 pixels 50H z.
46" Full HD 1080P Digital LED LCD TV
Additional features:
NIC AM stereo so und sys tem.
2 x 8 wat ts RMS power o utput .
Digitally interactive.
Dig ital text.
Digital video broadcasting (DVB) subtitles available.
Auto setup.
Auto sca n for new c hanne ls.
Now a nd next p rogramme g uide.
7 day electronic programme guide (EPG).
Top up TV compat ible.
CI sl ot.
Audio description compatible.
Sound quality:
Digital features:
Standby Power
consumption
<0.5W
* The part specifications of this TV set provided here
are for reference only.
Difierences may occur as product technology is updated.
Design and specifications are subject to change without notice.
Scart Output description :
1. When current source is AT V/AV/SCART, scart output signal is ATV .
2. When current source is DTV, scart output signal is DTV.
3. Other source have no scart output signal.
UHF/VHF tuner.
Sleep timer.
Child lock.
Pic ture and tex t.
Rem ote contro l batte ries requi red 2 x AAA ( inclu ded).
VES A Mount S ize: 20 0 x 200 mm
Package Si ze (Wx HxD): 1 285x7 80 mmx170
Package weight : 17kg
Set weight without stand: kg 11 .8
Set w eight w ith sta nd: k g13.7
Connectivity:
2 HDMI sockets.
1 SCA RT socket .
PC input socket.
Component video socket.
Composite.
1 USB p ort.
Trouble Shooting
Set S ize (W xHxD) w ith Sta nd: 107 4x703 mmx280
Set Size (WxHxD) without Stand: 1074x645 mmx78
Page 30

Page 31

Bitte lesen Sie diese Bedienungsanleitung vor der Inbetriebnahme des
Geräts sorgfältig durch und bewahren Sie diese für späteres Nachschlagen
auf.
LCD-Fernseher mit dem LED-Bildschirm
BEDIENUNGSANLEITUNG
Page 32

01 Sicherheits- und Warnhinweise
VIDEOTEXT
13
KANALMENÜ 15
Automatischer Kanalsuchlauf (DVB-T) 15
Automatischer Kanalsuchlauf (DVB-C) 16
DTV Manueller Kanalsuchlauf (DVB-T)
DTV Manueller Kanalsuchlauf (DVB-C)
ATV Manueller Kanalsuchlauf
17
17
18
BILDMENÜ
18
19
TONMENÜ
18
ZEITMENÜ
18
EINSTELLUNGSMENÜ
SPERRMENÜ
EPG-Menü (Elektronische Programmzeitschrift)
19
PVR-Funktion
20
Vorbereitung der Aufnahme
20
19
Programm aufzeichnen
21
Aufnahme wiedergeben
21
TimeShift-Funktion
22
Vorbereitung der Aufnahme
22
USB-Laufwerk formatieren
22
Unterbrochenes DTV-Programm auf
USB-Gerät zwischenspeichern
22
Limitierungen der TimeShift-Funktion
23
USB-Media-Player
24
Störungserkennung
05 Störungserkennung
26
Spezifikationen 29
Willkommen
Wichtige Informationen
2
2
Sicherheitshinweise
Warnhinweise
3
4
Parameter
Standfuß montieren
02 Einleitung
5
7
Wandmontage
Vorderes Bedienfeld
8
9
TV-Anschlussfeld
9
Fernseher anschließen
Common Interface
10
11
Fernbedienung
03 Fernbedienung
12
Installation
04 Bedienungshinweise
14
Inhaltsverzeichnis
Inhaltsverzeichnis
Kanal bearbeiten:
CI-Informationen
18
18
HOTEL-MODUS
25
DE-1 LCD-Fernseher mit dem LED-Bildschirm Bedienungsanleitung
Page 33

Vielen Dank, dass Sie sich für diesen 46".Zoll LED LCD-Fernseher entschieden haben. Diese
Anleitung hilft Ihnen bei der Einstellung und Bedienung Ihres Fernsehers.
Vergewissern Sie sich zunächst, dass alle Zubehörteile mitgeliefert wurden:
LESEN SIE VOR DER VERWENDUNG DIE GESAMTE ANLEITUNG DURCH, UND BEWAHREN SIE SIE ZUR
SPÄTEREN VERWENDUNG AUF.
VORSICHT
Nun können Sie beginnen!
01 Sicherheits- und Warnhinweise
Sicherheits- und Warnhinweise
WILLKOMMEN
46" Full HD 1080P digitaler LED LCD-Fernseher
Fernbedienung
2 x AAA-Batterien
Benutzerhandbuch
Kurzanleitung
1 x SCART-Kabel
Standfuß
WICHTIGE INFORMATIONEN
STROMSCHLAGGEFAHR
NICHT ÖFFNEN
ZUR VERMEIDUNG VON STROMSCHLÄGEN ÖFFNEN SIE DAS GERÄTEGEHÄUSE NICHT. ES BEFINDEN
SICH KEINE VOM VERBRAUCHER WARTBAREN TEILE IM INNEREN DES GERÄTS. WENDEN SIE SICH MIT
PROBLEMEN UND FRAGEN ZUR WARTUNG AN DEN KUNDENDIENST.
DER BLITZ IM GLEICHSEITIGEN DREIECK BEDEUTET, DASS IM GERÄT HOCHSPANNUNGSGEFAHR
BESTEHT.
DAS AUSRUFUNGSZEICHEN IM GLEICHSEITIGEN DREIECK BEDEUTET, DASS WICHTIGE WARTUNGSUND BEDIENUNGSHINWEISE IN DER BEDIENUNGSANLEITUNG GEFUNDEN WERDEN.
VORSICHT: ZUR VERMEIDUNG VON STROMSCHLAG UND FEUER SETZEN SIE DEN FERNSEHER
KEINER FEUCHTIGKEIT AUS. REINIGEN SIE DAS GERÄT UND DEN BILDSCHIRM NICHT MIT
SCHEUERMITTELN; DAS FÜHRT ZU KRATZERN.
BITTE BEACHTEN SIE: REPARIEREN SIE DAS GERÄT NICHT SELBST, DAS KANN ZU
VERLETZUNGEN UND SCHÄDEN AM GERÄT FÜHREN. WENDEN SIE SICH MIT WARTUNGSUND REPARATURARBEITEN STETS AN DEN AUTORISIERTEN KUNDENDIENST.
De
LCD-Fernseher mit dem LED-Bildschirm Bedienungsanleitung DE-2
Page 34

SICHERHEITSHINWEISE
Sicherheits- und Warnhinweise
Warnung: Zur Vermeidung von Feuer und
Stromschlag öffnen Sie nicht das
Gerätegehäuse. Es befinden sich keine vom
Verbraucher wartbaren Teile im Innern des
Gerätes. Wenden Sie sich mit Wartungs- und
Reparaturarbeiten stets an den autorisierten
Kundendienst.
Warnung: Zur Vermeidung von Feuer und
Stromschlag setzen Sie das Gerät nicht Regen
oder Feuchtigkeit aus.
Setzen Sie Netzteil und Gerät nicht Spritzwasser
oder Tropfwasser aus und stellen Sie keine mit
Wasser gefüllten Gegenstände (wie Vasen) auf
dem Gerät ab.
Schützen Sie das Gerät vor direkter
Sonneneinstrahlung und Hitze (Heizkörper,
Herd).
Blockieren Sie nicht die Ventilationsöffnungen,
sie werden zur Belüftung benötigt. Stellen Sie
das Gerät nicht auf einem Kissen, Sofa oder
ähnlichen Flächen ab.
Stellen Sie das Gerät nicht auf einem unstabilen
Wagen, Aufsteller, Stativ, Tisch oder einer
Halterung ab. Es kann herunterfallen und
Verletzungen und Schäden verursachen.
Stellen Sie keine schweren oder scharfkantigen
Gegenstände auf dem Gerät ab.
Ziehen Sie nach der Benutzung den
Netzstecker.
Entsorgen Sie Batterien umweltgerecht.
WARNUNG: Übermäßiger Schalldruck von
Ohrhörern oder Kopfhörern kann zu
Hörschäden führen.
Dieses Symbol zeigt an, dass das Gerät nicht mit
dem Hausmüll entsorgt werden darf. Zur
Vermeidung von Gesundheits- und
Umweltschäden durch unkontrollierte
Entsorgung muss das Gerät recycelt werden.
Geben Sie das Gerät bitte an einer Sammelstelle
für Elektroaltgeräte ab oder wenden Sie sich an
Ihren Fachhändler.
DE-3 LCD-Fernseher mit dem LED-Bildschirm Bedienungsanleitung
Page 35

Dim:515*320mm(不包括底座)
Warnung
Dieser Fernseher wird mit Hochspannung
betrieben. Öffnen Sie nicht das Gerätegehäuse.
Wenden Sie sich mit Wartungs- und
Reparaturarbeiten stets an den autorisierten
Kundendienst.
Zur Vermeidung von Feuer und Stromschlag
setzen Sie das Gerät nicht Regen oder
Feuchtigkeit aus.
Warnung
Führen Sie keine Fremdkörper in das Gerät
ein, stoßen Sie es nicht stark an. Verschütten
Sie keine Flüssigkeiten auf Ihrem Fernseher.
Warnung
Blockieren Sie nicht die
Ventilationsöffnungen, sie werden zur
Belüftung benötigt.
Vorsicht
Vorsicht
Klemmen Sie das Netzkabel nicht unter dem
Fernseher ein.
Stehen Sie nicht auf dem Fernseher, lehnen Sie
sich nicht gegen den Fernseher, stoßen Sie ihn
nicht an. Achten Sie auch besonders auf Kinder.
Der Fernseher kann schwere Verletzungen und
Schäden verursachen, wenn er umfällt.
Vorsicht
Stellen Sie das Gerät nicht auf einem unstabilen
Wagen, Aufsteller, Stativ, Tisch oder einer
Halterung ab. Es kann herunterfallen und
Verletzungen und Schäden verursachen.
Vorsicht
Bei längerer Nichtbenutzung des Fernsehers
ziehen Sie bitte das Netzkabel ab.
Vorsicht
Wird der Fernseher eingebaut, so achten Sie bitte
auf die Mindestabstände. Hitzestau kann die
Lebensdauer Ihres Fernsehers verkürzen und ist
gefährlich.
Vorsicht
WARNHINWEISE
Sicherheits- und Warnhinweise
Mindestabstände
De
LCD-Fernseher mit dem LED-Bildschirm Bedienungsanleitung DE-4
Page 36

INSTALLATION
ACHTUNG
* Stellen Sie den Fernseher vor direkter
Sonneneinstrahlung geschützt auf.
* Dunkelheit und Reflektionen auf dem
Bildschirm können zu einer Überforderung
der Augen führen. Weiche und indirekte
Beleuchtung wird für komfortables
Fernsehen empfohlen.
* Lassen Sie auf der Rückseite des Fernsehers
ausreichend Platz zur Ventilation.
* Vermeiden Sie besonders warme Standorte,
um einen Hitzestau im Gerät und vorzeitige
Schäden zu vermeiden.
* Decken Sie die Lüftungsöffnungen während
des Betriebs nicht ab.
Parameter
Ausstattungsmerkmale
4 NICAM;
5 TimeShift
3
HDMI- und SCART-Anschluss
Hohe Leuchtkraft, breiter Betrachtungswinkel
2
Nutzbar als Fernseher oder PC-Monitor
1
Bildschirm
AC 100-240V 50/60Hz
2x8W
Analog RGB (PC) x1;
High-Definition Multimedia Interface (HDMI) x 2
Videoeingang x 1
Audioeingang x2
YPbPr x 1
SCART x 1
46
CI x 1
USB-Port x 1
RF Co-Ax x 1
Komposit-Videoeingang>=350
YPbPr >=400
Machen Sie sich nicht an Bauteilen im Fernsehgerät
oder an irgendwelchen anderen
Einstellungssteuerungen zu schaffen, die nicht in
diesem Handbuch beschrieben sind. Alle LEDFernsehgeräte sind elektrische
Hochspannungsgeräte.
Wenn Sie Staub oder Wassertropfen von dem
Bildschirm oder dem Gehäuse oder um die Knöpfe
oder Anschlüsse herum abwischen, sollte das
Stromkabel aus der Steckdose aus gesteckt sein.
Wischen Sie das Fernsehgerät mit einem weichen,
trockenen, staubfreien Tuch ab.
Trennen Sie während Gewittern das Stromkabel und
das Antennenkabel, um Schäden an Ihrem
Fernsehgerät und anderen angeschlossenen Geräten
zu vermeiden.
Alle Reparaturen sollten nur von qualifiziertem
Fernsehgeräte Servicepersonal durchgeführt werden.
02 Einleitung
Spannungsversorgung
Audio-Ausgangsleistung(Klirrfaktor 7%)
Anschlüsse
Horizontale Auflösung (TV-Zeilen)
Einleitung
98W
DE-5 LCD-Fernseher mit dem LED-Bildschirm Bedienungsanleitung
Page 37

VGA-Timingtabelle
PC
3
5
1024x768
1280x1024
60
60
1
640x480
60
31.47
2
800x600
60
37.88
48.36
63.98
Auflösung
V. Freq. (kHz) H. Freq. (kHz)
4
1360x768
60
47.7
Einleitung
De
LCD-Fernseher mit dem LED-Bildschirm Bedienungsanleitung DE-6
6
1920x1080
60
66.64
Page 38

Montageanleitung für den Standfuß
1. Legen Sie den Fernseher mit dem Bildschirm
auf eine flache Arbeitsfläche. Legen Sie ein
Tuch unter, um den Bildschirm zu schützen.
Setzen Sie den Standfuß unten an.
2. Sch rau ben Sie d en Stan dfu ß von unt en
mit der Schraube fest an.
HINWEISE ZUR INSTALLATION
Stellen Sie den Fernseher vor direkter Sonneneinstrahlung geschützt auf. Dunkelheit und
Reflektionen auf dem Bildschirm können zu einer Überforderung der Augen führen. Weiche
und indirekte Beleuchtung wird für komfortables Fernsehen empfohlen.
Lassen Sie auf der Rückseite des Fernsehers ausreichend Platz zur Ventilation.
Hinweis: Der TV-Standfuß ist nicht schwenkbar.
Vermeiden Sie besonders warme Standorte, um einen Hitzestau im Gerät und vorzeitige
Schäden zu vermeiden.
Einleitung
DE-7 LCD-Fernseher mit dem LED-Bildschirm Bedienungsanleitung
Page 39

WANDMONTAGE
2.Schrauben Sie die Halterung für den Standfuß
unten am Fernseher ab (bewahren Sie den
Standfuß für späteren Gebrauch auf).
1.Legen Sie den Fernseher mit dem
Bildschirm auf eine flache Arbeitsfläche.
Legen Sie ein Tuch unter, um den
Bildschirm zu schützen.
3.Schrauben Sie den Fernseher mit den vier vorgesehenen Schrauben an eine VESA-Wandhalterung
(nicht mitgeliefert).
Einleitung
Dieser Fernseher kann wie folgt an der Wand montiert werden:
De
LCD-Fernseher mit dem LED-Bildschirm Bedienungsanleitung DE-8
M6x9
M6x9
M6x9
M6x9
Page 40

AC-INPUT
100-240V~50/60Hz
Y
Pb
PrVIDEO L R HDMI2
30 30
1
23
SOURCE
1
MENU
CH+ CH- VOL+ STANDBYVOL-
2 3 4 5
TV-Anschlussfeld
1
2
3
Sensor für Fernbedienung
Status-LED:
BLAU: eingeschaltet ROT: Stand-by-Modus
Funktionstasten
1
SOURCE
Menü der Eingangsquellen anzeigen.
MENU
Hauptmenü anzeigen.
3
4
CH+/CH-
Im TV-Modus schalten Sie mit CH+ oder CHzwischen den Kanälen auf und ab.
Im MENÜ wählen Sie mit CH+ oder CH- einen
Menüpunkt.
STANDBY
2
VOL+/VOL-
Lautstärke einstellen.
Im MENÜ stellen Sie den gewählten Menüpunkt ein.
5
Vorderes Bedienfeld
Einleitung
Schaltet den Fernseher in den Standby-Betrieb.
DE-9 LCD-Fernseher mit dem LED-Bildschirm Bedienungsanleitung
1
AV
2
3
YPbPr
4
5
Eingang
7
SCART
8
PC AUDIO
9
L/R AUDIO
10
11
12
1
2
3
4
5
6 7 8
10
9
11
12
DC Netzteil
HDMI2
6
HDMI1
USB
COMMON INTERFACE(CI)
VGA INPUT
ANTENNE/KABEL
Eingang
Eingang
Eingang
Eingang
Eingang
Eingang
Eingang
Eingang
Eingang
Eingang
Eingang
Page 41

Anschließen eines DVD-Players / Satellits / Ka bel-S etTop-Box- Recei vers / einer Spielkonsole / e ines PC s
oder Laptops.
Es gibt mehrere Optionen zum Anschließen eines DVDPlayer s / Satelliten- oder Kabel-Set-Top-Box-Receivers /
ein er Spie lkons ole / ein es PCs od er Lapt ops an Ih ren
Fernseher.
Option 1 SCART
Schließen Sie ein SCART-Kabel (nicht mitgeliefert)
über die SCART-Buchse des Fernsehers an den DVDPlayer / S atelliten- oder Kabel-Set-Top-Box-Receiver oder
die Spielkonsole an.
Um da s mit dem S CART-K abel angeschlossene Gerät
auszuwählen, drücken Sie die SOURCE-Taste auf der
Fernbedienung und verwenden Sie die Tasten , um
SCA RT auszuw ählen u nd die Taste O K zu drüc ken.
Hinweis: Der Fernseher wird standardmäßig zum SCARTAnschluss, wenn der Fernseher eingeschaltet ist.
Option 2 HDMI
Wenn das Ge rät, mi t dem Sie e ine Verbi ndung
herstellen möchten, eingeschaltet ist, schalten Sie das
Ger ät zuer st aus.
Schließen Sie ein HDMI-Kabel (nicht mitgeliefert)
über die HDMI-Buchse des Fernsehers an den DVD-Player
/ Satelliten- oder Kabel-Receiver oder die Spielkonsole
an.
Sch alten S ie das Ge rät ein , das Sie s oeben a n den
Fernseher angeschlossen haben.
Um da s mit dem H DMI-K abel angeschlossene Gerät
auszuwählen, drücken Sie die SOURCE-Taste auf der
Fernbe dienu ng und verwend en Sie di e Tasten , um
HDMI auszuwählen und die Taste OK zu drücken.
Option 3 AV Audiovisuell
(Gelb/Weiß/Rot)
Stellen Sie sicher, dass sowohl der Fernseher als auch
das Gerät vor dem Anschließen ausgeschaltet sind.
Schließen Sie die AV-Kabel (nicht mitgeliefert) über
die Video- (gelb) und Audio- (weiß, rot) Buchsen des
Fernsehers an den DVD-Player oder die Spielkonsole usw.
an.
Um da s mit dem AVI-Kabel a ngesc hloss ene Ger ät
auszuwählen, drücken Sie die SOURCE-Taste auf der
Fernbedienung und verwenden Sie die Tasten , um
AV auszuwäh len und d ie Tast e OK zu drü cken.
Option 4 COMPONENT
(Grün/Blau/Rot) + (We iß/Ro t)
Stellen Sie sicher, dass sowohl der Fernseher als auch
das Gerät vor dem Anschließen ausgeschaltet sind.
▼▲
▼▲
▼▲
Schließen Sie die Kabel (nicht mitgeliefert) über die
COMPONENT-IN-Buchsen Y, Pb, Pr (grün, blau, rot) und LAudio-R (weiß, rot) des Fernsehers an den DVD-Player
oder die Spielkonsole usw. a n.
Um da s mit dem AVI-Kabel a ngeschlossene Gerät
auszuwählen, drücken Sie die SOURCE-Taste auf der
Fernbe dienu ng und verwend en Sie di e Tasten
▼▲, um
COMPONENT auszuwählen und die Taste OK zu drücken.
Opt ion 5 VGA (15pin Sub-D)
Sch ließen Sie ein VGA-Kabel (nicht mitgeliefert) über
die VG A-Buc hse des Fern seher s an den PC / L aptop a n.
Um de n mit dem VG A-Kabel a ngeschlossenen PC /
Lap top aus zuwäh len, drücken S ie die SO URCE-Taste auf
der Fern bedie nung un d verwe nden Si e die Tasten
▼▲,
um PC auszuwählen und die Taste OK zu drücken.
Hinweis:VGA ist nur ein Video.Für Aud io über I hren PC /
Lap top müs sen Sie e in sepa rates K abel vom PC- Audio
(3, 5mm Kli nke) an d ie Kopf hörer buchs e auf Ihrem PC /
Laptop (3,5mm Klinke) anschließen.
Opt ion 6 USB
Die meisten USB -Sticks können an Ihren Fernseher
angeschlossen werden, und einige Digitalkameras
können auch funktionieren.
Sch ließe n Sie ein en USB-Stick (ni cht mitgeliefert)
oder ein USB-Kabel (nicht mitgeliefert) an den Fernseher
an.
Um das an den Fernseher angeschlossene USB-Gerät
auszuwählen, drücken Sie die SOURCE-Tast e auf der
Fernbe dienu ng und verwend en Sie di e Tasten ▼▲,um
USB auszuwählen und die Taste OK zu drüc ken.
Hin weis 1: Nur *.jp g- und *. mp3-D ateien fun ktion ieren ,
andere Dateitypen sind nicht garantiert und können nicht
funktionieren.
Hinweis 2: iPhones und iPods von Apple sind mit Ihrem
Fernseher nicht kompatibel.
Hin weis 3: Wen n Sie ein b elieb iges Ge rät an de n USBAnschluss anschließen möchten, halten Sie die USBKabellänge so kurz wie möglich.
Anschließen an Ihren Haier
Fernseher
Einleitung
De
LCD-Fernseher mit dem LED-Bildschirm Bedienungsanleitung DE- 10
Page 42

Der Schacht Common Interface (CI) dient der
Aufnahme des Conditional Access Moduls (CAM)
und der SmartCard für Bezahlsender. Bitte
wenden Sie sich an Ihren Dienstanbieter für
weitere Informationen. Bitte beachten Sie, dass
CI- Modul e und Sma rtCards von un s nicht
geliefert werden.
COMMON INTERFACE
CHANNEL
PICTURE
SOUND
TIME
OPTION
LOCK
Auto Tuning
ATV Man ual Tuni ng
Programme Edit
Signal Information
DTV Manual Tuning
Software Update(USB)
CI Information
OK
OK
MENU MOVE OK
Einleitung
Warnung
Schalten Sie den Fernseher aus, bevor Sie das
Mod ul in den C ommon I nter face Schac ht
einschieben.
Setzen Sie zunächst das CI-Modul und dann die
SmartCard im CI-Schacht an der Seite des
Fernsehers ein.
Schalten Sie den Fernseher ein, die
nachstehende Meldung wird angezeigt, wenn
das CI-Modul erkannt wird. Warten Sie einen
Moment ab, bis die Karte aktiviert ist.
Drücken Sie MENU und dan n ▲▼
zur Anzeige
der CI-Informationen.
Detaillierte Informationen zur benutzten CIKarte werden angezeigt.
Drü cken Si e OK, um da s Kart enmen ü
aufzurufen. Finden Sie detaillierte Anleitungen
in der Bedienungsanleitung des Moduls.
Nac h dem Abz iehen d es Modu ls wird d ie
nachstehende Meldung angezeigt.
CI-Schacht
CI-Modul
SmartCard
DE-11 LCD-Fernseher mit dem LED-Bildschirm Bedienungsanleitung
Page 43

1. EIN/AUS: Drück en Sie di e Tast e zum Ein - und Aussch alten d es
Fernsehgerätes.
2.D.MENÜ: Kei ne Funktion.
3.P. Mod us: Umschalten des Bildmodus.
4.INFO: Drüc ken Sie d ie Tas te, um den a ktuel len Sig nalst atus,
inklusive der Eingangsquelle und dem Kanal-Audio-Modus
anzuzeigen.
5.AU DIO l/l l: Drüc ken Sie d ie Taste, um M ONO, Ni cam Stereo f ür
den AT V Kanal aus zuwäh len. Stell en Sie di e Audio sprache fü r den
DTV K anal e in.
6.UNTERTITEL: Drück en Sie di e Taste, um d en Unter tite l AN oder
AUS zu s chalt en.
7.Zifferntasten: Für den di rekten Z ugrif f auf die K anäle.
8.QUELLE: Zur Auswahl der Eingangsquelle.
9.STUMM: Um die Tonausg abe zu de aktiv ieren bzw. zu aktivieren.
10.Lautstärke: Zum Ein stellen de r Lauts tärke .
11.MENÜ: Zur Anzeige des Fernsehhauptmenüs.
12.OK: Zur Bestätigung der Auswahl.
13.SCHLIESSEN: Zurück zum vorherigen Menüpunkt oder Menü
schließen und Rückkehr zum TV-Bild.
14.Videotext: Aufruf des Videotexts.
15.WIEDERHOLEN: Keine Fu nktion
16.Teletext-Taste: Grüne Taste / USB -Funktion:Schnellvorlauf
17. Tele text-Tas te: Rot e Taste / U SB-Funktion: Schnellrücklauf
18.Teletext: Mix Bild/Text
19.Teletext: Tex t
20.Teletext: Öffnen
21.Teletext: Größe
22. Tele text Ze it (kein e Funkt ion) / Auf nahme liste
23.Teletext Modus: Kei ne Funktio n
24.Teletext: Halten
25.Teletext Untercode: Teletext Unterseite
26. Teletext-Taste: Blaue Taste / U SB-Funktion: Nächste Datei
27.Teletext-Taste: Gelb e Tast e / USB-Fu nktion: Vorherige Datei
28.USB-Funktion: STOPP
29.USB-Funktion: ABSPIELEN/PAUSE
30.AUFNAHME STARTEN
31.Navigationstasten: NAC H OBEN, N ACH UNT EN, NACH LIN KS,
NAC H RECHTS: Dr ücken S ie die Taste n, um zu Ihre r Auswah l zu
gelangen.
32.Favoriten: Zugr iff auf die L iste mi t den Favor itenk anälen.
33.Programmauswahl: Drü cken Si e die Taste n, um zum
nächsten oder vorherigen Fernsehprogramm zu gelangen.
34.EPG: Zeigt den Programmführer.
35. Q. View : Schnelle Umschaltung zum vorherigen Programm.
36.Kanalliste: Anzeige der Kanalliste.
37.Bildformat: Zur Änderung des Bildseitenverhältnisses.
38.Sleep-Timer: Stelle n Sie die Z eitsc haltu hr ein.
39.Tonmodus: Änderung des Tonmodus.
40.ÖFFNEN/SCHLIESSEN: Keine Fu nktion
:Keine DVD Funktion
Fernbedienung
03 Fernbedienung
Batterien in die Fernbedienung einsetzen
1. Öffnen Sie das Batteriefach.
2. Setzen Sie 2 AAA 1,5-V-Batterien mit korrekter
Polarität ein, so wie im Batteriefach angezeigt.
3. Schließen Sie das Batteriefach wieder. Tauschen
Sie die Batterien aus, wenn die Reichweite der
Fernbedienung nachlässt.
Bitte beachten Sie:
1) Benutzen Sie Alkali-Batterien.
2) Bei längerer Nichtbenutzung oder wenn die
Batterien erschöpft sind, entnehmen Sie sie bitte
aus der Fernbedienung.
De
LCD-Fernseher mit dem LED-Bildschirm Bedienungsanleitung DE-12
Page 44

E
TEXT
SEITE WÄHLEN
UNTERSEITEN DIREKT
AUFRUFEN
INDEX
SUB PAGE
HOLD
REVEAL
Drücken Sie:
Sie haben folgende Funktion:
LIST
VIDEOTEXT
Mit 0 bis 9 u nd den Navigat ionstasten aufwärts/abwärts rufen Sie die Seite
auf. Beispiel: Für Seite 120 geben Sie 1-2-0 ein. Die Nummer wird oben links
im Bild angezeigt. Zum Aufrufen einer neuen Seite geben Sie die
entsprechende Nummer ein. Ist die gewählte Seite nicht vorhanden, so
läuft die Seitenzahl weiter.
Die Fa rbtas ten entsprechen den Farbmarkierun gen unten auf de r Seite
und dienen als Schnelltasten zum Aufrufen. Der farbige Bereich blinkt,
wenn die Seite noch nicht zur Ver fügung steht.
Inhaltsverzeichnis aufrufen (gewöhnlich Seite 100).
Einige Seiten haben Unterseiten, die nacheinander angezeigt
werden. Mit dieser Taste blättern Sie um oder halten Sie die
Unterseite. Die Seitenzahl wird oben links im Bild angezeigt.
Mit dieser Taste halten Sie eine Seite, sie wird nicht umgeblättert.
Versteckte Informationen anzeigen oder verbergen (Spielauflösungen).
Mit den v ier Farb tasten können vi er Favoritenseiten markiert werden. In
diesem Modus ist eine weitere Navigation mit den Farbtasten nicht
möglich.
Mit dieser Taste rufen Sie den Videotext auf oder Sie verlassen ihn. Eine
Liste mit Menüpunkten wird angezeigt. Jede Seite hat eine 3-stellige
Nummer. Wird kein Videotext übertragen, so wird die Zahl 100 angezeigt,
ansonsten bleibt der Bildschirm leer (verlassen Sie diesen Kanal).
Videotext ist ein Informationssystem, das von einigen Sendern übertragen wird und wie eine
Zeitung aufgebaut ist. Hier haben Sie ebenfalls Untertitel für Hörgeschädigte
(Kabelnetzwerke, Satellitenkanäle usw.).
Fernbedienung
DE-13 LCD-Fernseher mit dem LED-Bildschirm Bedienungsanleitung
Page 45

BEDIENUNGSHINWEISE
04 BEDIENUNGSHINWEISE
Please select on OSD language
OK
Czech
English
French
Italian
Greek
Spanish
Deutsch
Magyar
Nederlands
Polski
Russian
Romanian
Password
Please enter old password
Please enter new password
Confirm new password
Home Mode
Mode Select
OK
Shop Mode
Der Installationsmodus erscheint nur beim ersten Start des
Fernsehers oder nach Zurücksetzen des Fernsehers auf
Werkseinstellungen.
Installation
1).Drücken Sie▲▼ die Tasten, um im Menü zu navigieren
und die Einstellungen zu ändern. Drücken Sie die OK Taste,
um die Auswahl zu bestätigen.Wählen Sie die gewünschte
Sprache aus, in der das Menü angezeigt werden soll und
wählen Sie zwischen Zuhause- oder Geschäftsmodus.
Achtung: Das voreingestellte Passwort ist 6666.
2). Drücken Sie die Tasten, um DVB-T/DVB-C auszuwählen
und drücken Sie dann die OK Taste, um zu bestätigen.
OK
French
Italy
Greece
Nederlands
Poland
Germany
Hungary
Luxembourg
Norway
a. Wenn Sie DVB-T ausgewählt haben, wählen Sie im
nächsten Schritt den Tuning Typ und das Land aus und
drücken Sie dann die OK Taste, um mit dem Suchlauf zu
beginnen.
b. Wenn Sie DVB-C ausgewählt haben, konfigurieren Sie im
nächsten Schritt das DVB-C System, wie Such-Typ,
Frequenz, Netzwerk ID, Symbol (KS/S) und drücken Sie
dann die OK Taste. Wählen Sie im Anschluss den Tuning
Typ (DTV/ATV) und Ihr Land aus.
Bestätigen Sie mit OK , um mit dem Suchlauf zu beginnen.
Zuhause- oder Geschäftsmodus
①.Der Zuhause-Modus ist ein Energiesparmodus. Der
Zuh ause- Mod us wird f ür alle n ormal en
Ansichtseinstellungen empfohlen und wird beim
Hersteller als Standard eingestellt.
②.Der Geschäftsmodus ist eine Option für
Wieder verk äufer, die fü r Werbun g oder fü r
Produktpräsentation genutzt werden kann. Der
Geschäftsmodus hat ein helleres Bild als der ZuhauseModus.
③.Sie können zwischen Zuhause- und Geschäftsmodus
hin- und herschalten. Wenn der Geschäftsmodus
eingestellt ist, wird automatisch die Eingangsquelle HDMI
1 ausgewählt. Sie können das Menü mit Exit verlassen.
De
LCD-Fernseher mit dem LED-Bildschirm Bedienungsanleitung DE- 14
Page 46

1. 1) Automatischer Kanalsuchlauf (DVB-T)
1.KANALMENÜ
CHANNEL
PICTURE
SOUND
TIME
OPTION
LOCK
Auto Tuning
ATV Manual Tuning
Prog ramme E dit
Signal Information
DTV Manual Tuning
Software Update(USB)
CI Information
OK
Programme(s)
Programme(s)
Programme(s)
Programme(s)
1
OK
MENU MOVE OK
1). Drücken Sie die MENU Taste und drücken Sie
anschließend die ▲▼ Tasten um das Menü KANAL
auszuwählen und drücken Sie dann die OK Taste.
2). Drücken Sie die
▲▼ Tasten, um den Automatischen
Suchlauf auszuwählen und drücken Sie dann die OK Taste.
3). Kanalsuchlauf beginnt. Dies kann bis zu 6 Minuten
dauern. In der Anzeige sehen Sie den Fortschritt und
die Anzahl der gefundenen Kanäle.
4). Wenn Sie den ATV-Suchlauf überspringen
möchten, drücken Sie die MENU Taste, um den
Suchlauf während des Vorgangs zu unterbrechen. Ein
Pop-Up Fenster wird angezeigt, drücken Sie die
Taste, um OK auszuwählen. Gehen Sie dann direkt
weiter zum DTV-Suchlauf. Sie können den Schritt
wiederholen, wenn Sie auch den DTV-Suchlauf
überspringen möchten. Eine Installationserinnerung
wird angezeigt, wenn Sie das nächste Mal Ihr
Fernsehgerät einschalten.
5). Nachdem der Suchlauf abgeschlossen ist, werden
die Kanäle in einer vorgegebenen Reihenfolge
angeordnet. Wenn Sie Kanäle überspringen möchten,
ändern Sie die voreingestellte Reihenfolge oder
nennen Sie die Kanäle um, wählen Sie Programme
bearbeiten im Kanalmenü
6) Glückwünsche
Congratulations!!!
Completed Initial Quick Setup.
Enjoy your Haier TV
Press OK to Exit
3). Wählen Sie DVB-T aus und bestätigen Sie mit OK.
4). Im Tuning Typ Menü drücken Sie die Tasten , um
ATV, DTV oder DT V + ATV auszuwählen.. Drücken Sie die
Taste und drücken Sie dann die Tasten , um
das Land auszuwählen in welchem das Fernsehgerät
betrieben wird. Drücken Sie die OK Taste, um die Auswahl
zu bestätigen.
BEDIENUNGSHINWEISE
DE-15 LCD-Fernseher mit dem LED-Bildschirm Bedienungsanleitung
Page 47

5).Kanalsuchlauf beginnt. Dies kann bis zu 6 Minuten
dauern. In der Anzeige sehen Sie den Fortschritt und die
Anzahl der gefundenen Kanäle.
6. Wenn Sie den ATV-Suchlauf überspringen möchten,
drücken Sie die MENU Taste, um den Suchlauf während des
Vorgangs zu unterbrechen. Ein Pop-Up Fenster wird
angezeigt, drücken Sie die Taste, um OK auszuwählen.
Gehen Sie dann direkt weiter zum DTV-Suchlauf. Sie
können den Schritt wiederholen, wenn Sie auch den DTV-
Suchlauf überspringen möchten. Eine
Installationserinnerung wird angezeigt, wenn Sie das
nächste Mal Ihr Fernsehgerät einschalten.
7. Nachdem der Suchlauf abgeschlossen ist, werden die
Kanäle in einer vorgegebenen Reihenfolge angeordnet.
Wenn Sie Kanäle überspringen möchten, ändern Sie die
voreingestellte Reihenfolge oder nennen Sie die Kanäle
um, wählen Sie Programme bearbeiten im Kanalmenü.
1.2 ) Automatischer Kanalsuchlauf (DVB-C)
2). Drücken Sie die Tasten, um den Automatischen
Suchlauf auszuwählen und drücken Sie dann die OK Taste.
▲▼
Programme(s)
Programme(s)
Programme(s)
Programme(s)
1
CHANNEL
PICTURE
SOUND
TIME
OPTION
LOCK
Auto Tuning
ATV Manual Tuning
Programme Edit
Signal Information
CADTV Manual Tuning
Software Update(USB)
CI Information
OK
OK
MENU MOVE OK
OK
French
Italy
Greece
Nederlands
Poland
Germany
Hungary
Luxembourg
Norway
1). Drücken Sie die MENU Taste und drücken Sie
anschließend die Tasten um das Menü Kanal
auszuwählen und drücken Sie dann die OK Taste.
▲▼
OK
French
Italy
Greece
Nederlands
Poland
Germany
Hungary
Luxembourg
Norway
BEDIENUNGSHINWEISE
3).Wählen Sie DVB-C aus und bestätigen Sie mit OK.
4).Drücken Sie die Tasten , um den Such-Typ,
Frequenz, Netzwerk ID und Symbol (Ks/S)
auszuwählen und drücken Sie die OK Taste zum
Bestätigen.
▲▼
5).Im Tuning Typ Menü drücken Sie die Tasten , um
ATV, DT V oder DT V + ATV auszuwählen. Drücken Sie
die Taste und drücken Sie dann die Tasten ,
um das Land auszuwählen in welchem das
Fernsehgerät betrieben wird. Drücken Sie die OK
Taste, um die Auswahl zu bestätigen.
▼
De
LCD-Fernseher mit dem LED-Bildschirm Bedienungsanleitung DE-16
Page 48

6). Kanalsuchlauf beginnt. Dies kann bis zu 6 Minuten
dauern. In der Anzeige sehen Sie den Fortschritt und die
Anzahl der gefundenen Kanäle.
7).Wenn Sie den ATV-Suchlauf überspringen möchten,
drücken Sie die MENU Taste, um den Suchlauf während
des Vorgangs zu unterbrechen. Ein Pop-Up Fenster wird
angezeigt, drücken Sie die Taste, um OK auszuwählen.
Gehen Sie dann direkt weiter zum DTV-Suchlauf. Sie
können den Schritt wiederholen, wenn Sie auch den
DTV-Suchlauf überspringen möchten. Eine
Installationserinnerung wird angezeigt, wenn Sie das
nächste Mal Ihr Fernsehgerät einschalten.
8).Nachdem der Suchlauf abgeschlossen ist, werden die
Kanäle in einer vorgegebenen Reihenfolge angeordnet.
Wenn Sie Kanäle überspringen möchten, ändern Sie die
voreingestellte Reihenfolge oder nennen Sie die Kanäle
um, wählen Sie Programme bearbeiten im Kanalmenü.
2. 1) DTV Manueller Kanalsuchlauf (DVB-T)
Alle Kanäle inklusive ATV, DTV und Radio können
gleichzeitig durchsucht werden, wenn der Such-Typ
DTV+ATV ist.
Alle gespeicherten Kanäle gehen nach dem
automatischen Suchlauf verloren.
Nach dem automatischen Suchlauf, springt der Kanal
zum ersten DTV-Kanal.
2). Drücken Sie die
▲▼ Tasten, um den DT V Manuellen
Suchlauf auszuwählen und bestätigen Sie mit OK.
4). Drücken Sie die Taste MENU, um zum Hauptmenü
zurückzukehren.
5). Drücken Sie die Taste EXIT, um das Menü zu verlassen.
2. 2) DTV Manueller Kanalsuchlauf (DVB-C)
1). Drücken Sie die MENU Taste und drücken Sie
anschließend die Tasten um das Menü KANAL
auszuwählen und drücken Sie dann die OK Taste.
▲▼
3). Der DT V Bildschirm für den manuellen Suchlauf wird
angezeigt. Drücken Sie die Tasten, um den
gewünschten UHF Kanal auszuwählen und drücken Sie
dann die OK Taste, um mit der Suche nach diesem Kanal
zu beginnen. Wenn das Signal gefunden wurde, wird das
Bild und die Signalstärke auf dem Bildschrim angezeigt.
1). Drücken Sie die MENU-Taste und drücken Sie dann die
Tasten um, das Menü KANAL auszuwählen und drücken
Sie dann di e OK Taste.
2). Drücken Sie die Tasten, um den CADTV Manuellen
Suchlauf auszuwählen und bestätigen Sie mit OK.
3). Der Bildschirm für den CADTV Manuallen Suchlauf wird
angezeigt. Drücken Sie die Tasten
4). Drücken Sie die Taste MENU, um zum Hauptmenü
zurückzukehren.
5). Drücken Sie die Taste EXIT, um das Menü zu verlassen.
▲
▼
▲▼
▲▼
, um folgendes
auszuwählen (Frequenz, Symbol (Ks/S), QAM Type QAM16)
und drücken Sie dann die OK Taste, um die Suche nach
diesem Kanal zu starten. Wenn das Signal gefunden wurde,
wird das Bild und die Signalstärke auf dem Bildschirm
angezeigt.
Programme(s)
Programme(s)
Programme(s)
Programme(s)
1
490000
16
NO SIGNAL
CHANNEL
PICTURE
SOUND
TIME
OPTION
LOCK
Auto Tuning
ATV Manual Tuning
Programme Edit
Signal Information
CADTV Manual Tuning
Software Update(USB)
CI Information
OK
OK
MENU MOVE OK
CHANNEL
PICTURE
SOUND
TIME
OPTION
LOCK
Auto Tuning
ATV Man ual Tuni ng
Programme Edit
Signal Information
DTV Manual Tuning
Software Update(USB)
CI Information
OK
OK
MENU MOVE OK
D
HINWEIS:
BEDIENUNGSHINWEISE
DE-17 LCD-Fernseher mit dem LED-Bildschirm Bedienungsanleitung
Page 49

5). CI-Informationen (optional)
In diesem Menü zeigen Sie die Informationen auf Ihrer CI-Karte an.
Umb enennen
Mit den Navigationstasten wählen Sie den zu
verschiebenden Kanal, dann drücken Sie die gelbe
Taste. Mit den Navigationstasten verschieben Sie den
Kanal, mit OK bestätigen Sie die neue Position.
Sie können nur ATV-Kanäle umbenennen.
Navigieren Sie zu dem gewünschten Kanal und drücken Sie die
grüne Taste, um den Kanal umzubenennen.
Drücken Sie▲▼zur Auswahl der Schriftzeichen. Drücken Sie ,
um zu navi gieren.
Drücken Sie MENU, um die Bearbeitung zu beenden und drücken
Sie EXIT, um das Menü z u verlassen.
Bitte beachten Sie: ATV-Kanäle können bis zu 5 Schrif tzeichen
haben, DTV-
Kanäle bis zu 25 Schriftzeichen.
Drücken Sie die rote Videotexttaste zum Speichern eines
manuell gesuchten Kanals.
4). Kanal bearbeiten:
Sie können Kanäle löschen, umbenennen, verschieben,
überspringen und als Favoriten hinterlegen.
Löschen
Drücken Sie die rote Taste zum Löschen eines Kanals.
Drücken Sie zur Auswahl des Kanals und drücken Sie
die blaue Taste, um diesen Kanal zu überspringen. Rechts
vom Kanal wird angezeigt. Zur Anzeige des
übersprungenen Kanals drücken Sie zunächst wieder die
blaue Taste, um die Funktion aufzuheben. Das Symbol
erlischt.
▲▼
ATV Manual Tuning
Storage To 1
Sys tem BG
Cur rent CH 1
Search
Fine-Tune
Frequency 424.25 MHz
3) ATV Manueller Kanalsuchlauf:
Stellen Sie das Tonsystem zur Suche nach Analogkanälen
ein, dann nehmen Sie die Feinabstimmung vor und
speichern Sie den gewählten Kanal.
Favoriten
Drücken Sie zur Auswahl des Kanals und drücken Sie
FAV, damit wird rechts vom Kanal das Symbol angezeigt.
Zur Auswahl eines Favoritenkanals drücken Sie FAV. Zum
Löschen des Kanals in der Favoritenliste drücken Sie FAV,
damit erlischt das Symbol .
▲▼
Drücken Sie FAV zum Aufrufen Ihrer Favoritenliste.
1). Tint (Hautfarbe) haben Sie nur für das NTSC-System.
2). Ihnen stehen vier Farbtemperaturen (Color
Temperature) zur Verfügung: mittel (medium) ,warm, kühl
(cool) und benutzerdefiniert (user).
3). Die Option Bildschirm (Screen) steht Ihnen nur im PCModus zur Verfügung, hier stellen Sie die horizontale und
vertikale Position, Größe und Phase ein.
3.TONMENÜ
Das dritte Menü ist das Tonmenü (SOUND).
Hier stellen Sie die Klangeffekte wie Höhen, Bässe, Balance
usw. ein.
Drücken Sie zur Navigation und OK zur Bestätigung.▲▼
Automatische Lautstärkenregelung (Auto Volume) steht
Ihnen nur zur Verfügung, wenn die Lautstärke des
Eingangssignals zu hoch oder das Signal verzerrt ist.
Pic ture Mo de Stan dard
Con trast 5 0
Brightness 50
Color 50
Sharpness 75
Tint 5 0
Col or Tempera ture Me dium
Red 5 0
Green 50
Blu e 50
4.ZEITMENÜ
Das vierte Menü ist das Zeitmenü (TIME). Hier stellen Sie
Uhrzeit, Ein- und Ausschaltzeit, SleepTimer usw. ein.
Drücken Sie zur Navigation und OK zur Bestätigung.
Das zweite Menü ist das Bildmenü (PICTURE). Hier stellen
Sie Kontrast, Helligkeit usw. ein.
Mit OK bestätigen Sie Ihre Einstellung.
2.BILDMENÜ
Sav e MENU
MENU
MENU
CHANNEL
PICTURE
SOUND
TIME
OPTION
LOCK
Picture Mode
Aspect Ratio
Noise Reduction
Screen
Color Temperature
Eco
Mild
User
Stsndard
OK
MENU MOVE OK
CHANNEL
PICTURE
SOUND
TIME
OPTION
LOCK
Sound Mode
Auto Vo lume
Surround Sound
Balance
Standard
Music
Theater
Sports
User
OK
MENU MOVE OK
Verschieben
Überspringen
BEDIENUNGSHINWEISE
BITTE BEACHTEN SIE:
BITTE BEACHTEN SIE:
Bitte beachten Sie:
De
LCD-Fernseher mit dem LED-Bildschirm Bedienungsanleitung DE-18
Page 50

5.EINSTELLUNGSMENÜ
Das fünfte Menü ist das Einstellungsmenü (OPTION). Hier
stellen Sie die Menüsprache, Audio- und Untertitelsprache
usw. ein.
Der Fernseher schaltet sich automatisch aus, wenn für 15
Minuten kein Signal eingeht, sofern Auto Sleep aktiviert
ist. Die Uhrzeit kann über den DTV-K anal automatisch
eingestellt werden.
6.SPERRMENÜ
Das sechste Menü ist das Sperrmenü (LOCK). H ier sperren
Sie das System, stellen Sie das Passwor t ein, blockieren Sie
Programme und stellen Sie die Kindersicherung ein. Nach
Aktivierung der Sperre können Sie den Kanal nicht mehr
auswählen.
Das Standardpasswort lautet 0000. Sollten Sie Ihr Passwort
einmal vergessen, so benutzen Sie das Superpasswort 9443.
Kanal blockieren (Block Program): Drücken Sie
▲▼ zur
Auswahl des Kanals, dann drücken Sie die grüne Taste zur
Block ierung. Zum Entsperren rufen Sie das Hauptmenü auf,
geben Sie das Passwort ein und drücken Sie die grüne Taste
erneut.
Kindersicherung (Parental Guidance): Drücken Sie zur
Auswahl der Bewertungsstufe.
7.EPG-Menü (Elektronische Programmzeitschrift)
Das EPG-Menü dient der Anzeige der Programmvorschau für
DTV- und Radio kanäle des Tages.
Zum Aufrufen des EPG-Menüs drücken Sie EPG:
1.
Mit wählen Sie den Kanal, Drücken Sie INFO, um die
Programminformationen zu markieren.
INFO
2.
Drücken Sie die gelbe Taste, um die Planungsliste
(Schedule) anzuzeigen, drücken Sie zur Auswahl der
Liste und drücken Sie die rote Taste zum Löschen der
Planungsliste.
▲▼
Planung
Sch edule L ist 04: 55 28th Ap r Delete
Time Date
Programme Title
Channel Name
Mit Zurücksetzen auf Werkseinstellung (Restore Fac tory
Default) werden alle Kanäle und das Passwort gelöscht.
1. Wenn n ach 4 Stunden nach dem Einschalten an dem TV
Gerät keine Änderungen vorgenommen wurden, d.h. es
wurde kein Kanal gewechselt oder keine Lautstärke geregelt,
schaltet sich das Gerät automatisch in den Ruhemodus.
Ein Informations-Fenster erscheint auf dem Bildschirm.
Nach 150 Sekunden schaltet das Fernsehgerät automatisch in
den Ruhemodus um. Um das automatische Abschalten zu
verhindern, drücken Sie irgendeine Taste auf der
Fernbedienung.
2. Um die automatische Abschaltung zu deaktivieren, wählen
Sie die Automatische Abschaltung (4h) im Optionsmenü aus
und drücken Sie die OK Taste. Eine Info-Nachricht erscheint
„Ar e you sure y ou want t o enabl e automati c powerd own?”
(Sind Sie sicher, dass die automatische Abschaltung aktiviert
sein soll?)
Drücken Sie auf die rechte Pfeiltaste und wählen Sie Nein (NO)
aus.
Der TV Bildschirm kehrt zum Optionsmenü zurück und die
Option automatisches Abschalten (4h) wird angezeigt.
Automatische Abschaltung (4h) AUS
Automatic power-down(4H) OFF
Um zum automatischen Abschalten nach 4 Stunden
zurückzukehren, wiederholen Sie den oben beschriebenen
Vorgang, nur dass Sie die linke Pfeiltaste drücken, um JA (YES)
auszuwählen.
Im Menü PVR-Dateisystem (PVR File System) stellen Sie das
USB-Laufwerk für die PVR-Aufnahme ein.
XXX’s to automatic power-down
Please press any Key to Cancel
CHANNEL
PICTURE
SOUND
TIME
OPTION
LOCK
Lock System
Block Program
Parental Guidance
Set Password
OK
OK
MENU MOVE OK
CHANNEL
PICTURE
SOUND
TIME
OPTION
LOCK
OSD Language
Subtitle Language
Country
PVR Fi le Syst em
Restore Factory Default
Automatic power-down(4h)
Home/Shop Mode
DCR
Audio Languages
OK
OK
MENU MOVE OK
CHANNEL
PICTURE
SOUND
TIME
OPTION
LOCK
Clock
Off Time
Sleep Timer
Auto Sleep
Time Z one
On Time
OK
OK
MENU MOVE OK
26/ Jan
11: 40
1 TV3
Club/Super3-Naturalmen..
No Information
No Information
PROGRAMME GUIDE
Schedule
Record
INFO
Remind
TIME
2 3/2 4
3 TVC HD
OK
INDEX
USB Disk
Time S hift Si ze
Speed
Sel ect Dis k C:
Che ck PVR Fi le Syst em Star t
Format
Fre e Recor d Limit 6 H r.
OK
MENU
BEDIENUNGSHINWEISE
BITTE BEACHTEN SIE:
BITTE BEACHTEN SIE:
BITTE BEACHTEN SIE:
DE-19 LCD-Fernseher mit dem LED-Bildschirm Bedienungsanleitung
Page 51

CHANNEL
PICTURE
SOUND
TIME
OPTION
LOCK
OSD Language
Subtitle Language
Country
Restore Factory Default
Automatic power-down(4h)
Home/Shop Mode
DCR
Audio Languages
OK
OK
MENU MOVE OK
3. Aufnahme
Drücken Sie die rote Taste, um die Aufnahme des
Programms einzustellen.
4.
Drücken Sie die blaue Taste und stellen Sie eine
Erinnerungszeit ein. Der Fernseher schaltet dann
automatisch auf das gewählte Programm um.
Erinnerung
Prüfe PVR-Dateisystem (Check PVR File System): Vergewissern
Sie sich, dass das PVR-Dateisystem richtig konfiguriert ist.
Format:
Sel ect Dis k
USB 0
Dis k C:
PVR File System Type Hi Spe ed FS
PVR F ile Sys tem Siz e All
SD 10 4 Mins
HD 29 M ins
File System Size
Laufwerk wählen (Select Disk): Wählen Sie das Laufwerk
zur Aufnahme.
PVR File System Type FAT32
SD 10 4 Mins
HD 29 M ins
File System Size
1.Vorbereitung der Aufnahme
8.PVR-Funktion
Die Aufnahme- und Time-Shift-Funktion funktionieren
nur bei digitalem Fernsehempfang (DVB-T, -C oder S2).
Rufen Sie im Optionsmenü PVR-Dateisystem (PVR File
System) auf, hier wählen Sie „Prüfe PVR-Dateisystem“
(Check PVR File System). Drücken Sie OK, bis „Prüfung
läu ft“ (Ch ecking) z u „Prüf ung erfol greich“ (S ucces s)
umschaltet.
Bitte beachten Sie: Überprüfen Sie den Punkt
Geschwindigkeit (Speed). Bei Einstellung auf „HD
Sup port“ ste ht Ihnen da s USB-S peich ermed ium für
TimeShift und Aufnahme zur Verfügung. Anderenfalls
formatieren Sie bitte das Gerät. Das „Freie
Aufnahmelimit“ (Free Record Limit) ist standardgemäß
auf 6 S tunde n einge stellt, sofern die Speicherkapazität
ausreichend ist. Anderenfalls ist die Aufnahmezeit
kürzer. Während der Überprüfung gemäß „Prüfe PVRDateisystem“ (Check PVR File System) drücken Sie bitte
keine weiteren Tasten.
Die Eingaben müssen im TV PVR System vorgenommen
werden. Es kann nur auf demselben Fernsehgerät
abgespielt werden und nicht auf irgendeinem anderen
Gerät (Computer, DVD, usw.),, das nicht mit dem .TSDatei Format kompatibel ist.
Bitte beachten Sie, das Fernsehgerät wird Sie für die
Aufnahme auffordern, das angeschlossene USB-Gerät
vorher zu formatieren, um die Aufzeichnung
abspeichern zu können.
WARNUNG WENN SIE FORMATIEREN GEHEN DIE DATEIEN
UND INFORMATIONEN, DIE AUF DEM EXTERNEN USB
GERÄT GESPEICHERT SIND, VERLOREN.
AUF DEM GERÄT SPEICHERN.
Das U SB Date isystem be grenzt die G röße de r
Speichergröße.
Dateisystem NTFS bis zu 2TB
FAT32 mit bis z u 192GB
FAT16 mit bis z u 2GB
Rufen Sie da s PVR-D ateisyst em wie un ten beschr ieben
vom Einstellungsmenü aus auf.
1 TV3
37 Mi nute
11 Hou r
Jan M onth
26 Da te
Onc e Mode
Reminder
BACK
OK
PVR Fi le Syst em
OK
OK
OK
USB D isk
Time S hift Si ze
Speed
Sel ect Dis k C:
Che ck PVR Fi le Syst em Star t
Format
Fre e Recor d Limit 6 H r.
OK
MENU
BEDIENUNGSHINWEISE
De
LCD-Fernseher mit dem LED-Bildschirm Bedienungsanleitung DE-20
Page 52

Nach Beendigung der Formatierung erhalten Sie
nachstehendes Menü:
2.Programm aufzeichnen
3.Aufnahme wiedergeben
(Wir empfehlen, das Gerät mit „High Speed FS“
zu formatieren, wodurch sich die Aufnahme beschleunigt.)
Format disk
Bei Auswahl von „Hi Speed FS“ können Sie die
TimeShift-Größe einstellen:
Do no t unplu g USB dev ice.
Formatting,please wait
Format disk
Währ end der DTV-Wiede rgabe w ählen S ie den
gewünschten Kanal, dann drücken Sie „Aufnahme“
(Record) zur Anzeige des Aufnahmemenüs. Drücken Sie
erneut „Aufnahme“ (Record). Das Aufnahmemenü
erlischt und „REC“ wird oben links im Bild angezeigt. Das
Symbol erlischt, nachdem Sie die Stopptaste drücken
und damit die Aufnahme stoppen.
Das a uf dem US B-Gerät a ufgezeic hnete Program m wird
im Ordner „_MSTPVR” auf dem Gerät gespeichert.
1. Die USB-Speichergröße kann zwischen 128MB und
500 GB lieg en, abe r für den p rakti schen G ebrau ch wird
ein e Größe von 2G B bis 500 GB empf ohlen .
2. Vid eos ers chein en gepixel t, wenn die Vid eo Bitr ate zu
ger ing ist . Dies kann v erurs acht werde n, wenn ein US B
Verlängerungskabel verwendet wird, anstatt das USBGerät direkt am Fernsehgerät anzuschließen.
3. Nicht alle USB-Geräte sind kompatibel.
Im Folgenden finden Sie eine Liste der empfohlenen USB
Festplatten.
Modelle die nicht unten aufgelistet sind, können
kom patib el sein , aber es w ird keine Gara ntie für deren
Funktion übernommen.
Sta rt Exit
Format disk
Warn ing! All d ata wil l be lost .
OK
USB Disk
Time S hift Si ze
Sel ect Dis k C:
Check PVR File System SUCCESS
Format
Pass
Pass
All
Spe ed HD Support
2730KB/S
Fre e Recor d Limit 6 H r.
USB Disk
Time S hift Si ze
Sel ect Dis k C:
Check PVR File System Checking
Format
Pass
Pass
All
Speed
Checking
Fre e Recor d Limit 6 H r.
OK
MENU
OK
MENU
Time S hift Si ze
Time S hift Di sk Size 5 12 MB
SB 14 M ins
HD 4 Mi ns
OK
BEDIENUNGSHINWEISE
DE-21 LCD-Fernseher mit dem LED-Bildschirm Bedienungsanleitung
Page 53

Vorbereitung der Aufnahme
9.TimeShift-Funktion
Mit dieser Funktion können Sie das aktuelle Programm
unterbrechen und auf einem USB-Speichermedium
zwischenspeichern. Sie können die Sendung zu einem
späteren Zeitpunkt weitersehen. Die Wiedergabe startet
zeitversetzt, ab der Unterbrechung.
Das USB 2.0 Speichermedium muss formatiert
sein. Erstellen Sie vor der Formatierung
Sicherungskopien, da alle Daten von dem USBGerät gelöscht werden. Die TimeShift-Funktion
wird bei Analogsendern (ATV) nicht unterstützt.
USB-Laufwerk formatieren
Wählen Sie die Formatierung des USBSpeichermediums und ordnen Sie den Speicherplatz
für die TimeShift-Funktion zu.
Die Form atier ung dau ert etwa 2 Minu ten. Sc halte n Sie
das G erät wä hrend dies es Zeit raums nicht au s und
trennen Sie das USB-Speichermedium nicht vom
Fernseher.
Während der Formatierung wird für das USBSpeichermedium ein Geschwindigkeitstest
durchgeführt. Schlägt dieser fehl, so kann das USBSpeichermedium nicht für die TimeShift-Funktion
benutzt werden.
Unterbrochenes DTV-Programm auf
USB-Gerät zwischenspeichern
Ziehen Sie das USB-Speichermedium während der
aktivierten TimeShift-Funktion nicht ab.
4 GB Sp eiche r puffern ca. 14 0 Minut en.
1. Im DTV -Modu s schli eßen Si e das USB -
Speichermedium am USB-Port seitlich am Fernseher
an.
2. Drücken Sie PAUSE (29), um die TimeShift-Funktion
zu starten. Das Fernsehprogramm wird angehalten.
Das TimeShift-Menü wird angezeigt und die Sendung
zeitversetzt aufgenommen.
3. Dr ücken S ie STOPP (28 ), um die TimeS hift-Fun ktion
zu be enden u nd die ze itver setzte Wied ergab e zu
starten.
Pause FF Prev. NextFB Stop
Repeat ALL
00:04:22
Set A
AB
play
00:04:22
BITTE BEACHTEN SIE:
BITTE BEACHTEN SIE:
BITTE BEACHTEN SIE:
BEDIENUNGSHINWEISE
De
LCD-Fernseher mit dem LED-Bildschirm Bedienungsanleitung DE-22
Page 54

8. Diese Funktion gilt nicht für alle digitalen
Fernsehprogramme, wie verschlüsselte oder reine
Audiokanäle.
Limitierungen der TimeShift-Funktion:
1. Bei aktivierter TimeShift-Funktion stehen Ihnen nur
WIEDERGABE/PAUSE/STOPP/VORLAUF/RÜCKLAUF/VOL+
/VOL-/MUTE sowie einige allgemeine Funktionstasten
(ENTER/EXIT/Navigation) zur Verfügung.
2. Die Videowiedergabe ist nicht gleichmäßig und kann
springen, falls die USB-Aufnahmegeschwindigkeit nicht
den Mindestanforderungen entspricht.
3. Ziehen Sie das USB-Speichermedium nicht ab,
schalten Sie das Gerät während der TimeShift-Funktion
nicht aus. Bei Verlust des Signals schaltet sich das Gerät
aus.
4. Än dern Si e während de r Tim eShif t-Funk tion ni cht die
Signalquelle.
5. Schalten Sie nicht schnell zwischen
WIEDERGABE/PAUSE/VORLAUF/RÜCKLAUF um.
6. Da s Video kann v erpixeln , falls d ie Bitr ate zu ni edrig
eingestellt ist.
7. Nicht alle USB-Speichermedien sind kompatibel. Das
USB-Laufwerk sollte < 500 mA ha ben.
Nachstehende Liste mit empfohlenen USB-Laufwerken.
Nicht aufgeführte Modelle sind möglicherweise
kompatibel, das ist jedoch nicht garantiert.
San Disk Ex treme ® Contour™ U SB Flas h
Dri ve - 8GB SD CZ8-8 192-E 75
San Disk Ex treme ® Contour™ U SB Flas h
Drive -16GB SDCZ8-016G-A75
Kin gston D ataTravele r 410 USB 2 . 0 Flash
Drive -16GB DT410/16GB
Kin gston D ataTravele r 410 USB 2 . 0 Flash
Dri ve - 8GB DT410/8GB
OCZ Techno logy ATV U SB 2. 0 Flash
Dri ve - 8GB OCZUSBATV-8GB
OCZ Techno logy Ra lly2 US B 2. 0 Flas h
Dri ve - 4GB OC ZUSBR 2DC-4 GB
OCZ Techno logy Ra lly2 US B 2. 0 Flas h
Dri ve - 8GB OC ZUSBR 2DC-8 GB
SAMSUNG-HM500JI-500G
BEDIENUNGSHINWEISE
DE-23 LCD-Fernseher mit dem LED-Bildschirm Bedienungsanleitung
Page 55

Drücken Sie die SOURCE-Taste (Eingangsquellen)
auf Ihrer Fernbedienung um die Signalquellen anzuzeigen
und wählen Sie „USB“ aus. Drücken Sie dann OK, um das
USB-Menü aufzurufen.
10.USB-Media-Player
Ein USB-Speichermedium muss angeschlossen sein.
Wählen Sie zwischen Foto, Musik, Film und Text. Nutzen
Sie d ie Tasten z ur Auswahl d es Medi ums und
bestätigen mit OK.
Drücken Sie zur Auswah l des Lau fwerk s, dann
drücken Sie OK zur Anzeige der Mediendateien und
Ordner. Mit „Zurück“ (Return) kehren Sie zur
Medienauswahl zurück.
Wähl en Sie mi t oder die gewü nscht e Datei aus.
Das Vorschaufenster wird angezeigt. Drücken Sie um
die Datei im Vollbildmodus wiederzugeben.Während der
Wiedergabe (Foto, Film oder Text) drücken Sie OK oder
INFO zur Anzeige der Steuerungsleiste.
▲▼
Drü cken Si e zur Auswah l der Funkti on und OK z ur
Bestätigung.
Drü cken Si e oder EX IT auf Ih rer Fernbe dienu ng um die
Ste uerle iste zu verl assen . (Außer bei M usik.)
USB Wiedergabe wird unterstützt für folgende
Bildformate :
-JPEG (JPEG Format, Dateien mit der Endung ".jpg")
-BMP ( Dateien mit de r Endun g ".bmp ")
-PNG (Dateien mit der Endung ".png")
USB Wiedergabe wird unterstützt für folgende
Audioformate:
-MP3 ( Dateien mit de r Endun g ".mp3 ")
-WAV (Dat eien mi t der End ung ".wav" )
USB Wiedergabe wird unterstützt für folgende
Tex tf orm ate :
-TXT (Dateien mit der Endung ".txt")
USB Wiedergabe wird unterstützt für folgende
Videoformate:
-AVI (Dateien mit der Endung ".avi")
- TS (MP EG2 & H.2 64)
Pause FF Prev. NextFB Stop
Repeat ALL
00:04:22
Set A
AB
play
00:04:22
PHOTO MUSIC TEXT MOVIE
Haier Innovation Life
USB2.0 Back
MENU
Move Select
OK
Return C
Haier Innovation Life
Back
MENU
Move Select
OK
Picture
Back
MENU
Move Select
OK
Return 720 480 1080Up Fold er 0021.JPG
0021.JPG
SUB-10.avi
Resolution: 720x 40 0
Subt it le :
Prog ra m:
Size: 4142 KBy te s
Close
AudioTrack: 1 /1
OFF
--/0
BEDIENUNGSHINWEISE
BITTE BEACHTEN SIE:
Sie k önnen d en Audiotrack oder da s Progra mm während
der Videowiedergabe einstellen. Mit Info oder OK zeigen
Sie das Infomenü an.
De
LCD-Fernseher mit dem LED-Bildschirm Bedienungsanleitung DE-24
Page 56

Hotel-Modus:
Hotel-Menü: Hier können Sie den Hotel-Modus
aktivieren oder deaktivieren. Wenn der Hotel-Modus
aktiviert ist, sind die nachfolgenden Funktionen für den
Nutzer nicht verfügbar.
Hotel Menu
Hotel Mode
Panel key lock
Max volume
Start Source
Start Channel
Setup Menu display
Input source change
Save To USB
Loading
OFF
OFF
100
TV
1
Yes
Yes
Um in den Hotel-Modus zu gelangen, geben Sie bitte
die folgenden Tastenkombinationen auf Ihrer
Fernbedienung ein: Drücken Sie erst „Source“ und geben
auf dem Ziffernfeld „1001“ ein.
Volume default
0
BEDIENUNGSHINWEISE
Automatischer Kanalsuchlauf
Farbtemperatur
Ton-Balance
Tonmodus
Automatische Lautstärkenregelung
Manueller Kanalsuchlauf
Uhrzeit
Tastenfeld-Sperre: Wird diese Funktion auf „Ein“
geschaltet, lässt sich das Tastenfeld nicht mehr
bedienen.
Standardquelle: Voreinstellung der Signalquelle
möglich. Bitte wählen Sie mittels der Pfeile ◄ ►
zwischen: TV, AV, Komponenten, VGA, HDMI, um
die gewünschte Quelle auszuwählen.
Standardprogramm: Im TV-Modus können Sie
eine Kanalnummer voreinstellen. Bitte wählen
Sie mittels der Pfeile ◄ ► die gewünschte
Kanalnummer aus.
Menüanzeige: Sie können den Menüaufruf für
den Nutzer sperren, indem Sie diese Option auf
„Aus“ stellen.
Signalquellen-Sperre: Sie können mit dieser
Einstellung verhindern, dass der Nutzer die
Signalquelle wechselt, indem Sie die Option auf
„Aus“ stellen.
TV-Daten auf USB: Speichern Sie mit dieser
Funktion die TV-Einstellungen auf einem USBGerät ab. (Name der Backup Datei: Database.bin)
USB-Daten auf TV: Übertragen Sie die auf dem
USB-Gerät gespeicherten TV-Einstellungen auf
einen Fernseher. Der Fernseher vollzieht einen
Neustart nach abgeschlossenem Datentransfer.
Standardlautstärke: Mit dieser Funktion lässt sich
mittels der Pfeile ◄ ► die gewünschte
Lautstärke voreinstellen.
DE-25 LCD-Fernseher mit dem LED-Bildschirm Bedienungsanleitung
Page 57

Bild Ton
verschneit gestört
Antennenposition, -ausrichtung
oder -anschluss
Überprüfen
Störungen
ges tört
Ele ktron ische G eräte, Fa hrzeu g/
Motorrad Neonlicht können den
den Empfang stören
n or ma l es Bi ld stummgeschaltet
Lautstärke (stummgeschaltet oder
Audioanschlüsse nicht korrekt)
kein Bild
Kein Netzanschluss, Gerät ausgeschaltet,
Kontrast und Helligkeit/Lautstärke
einstellen.
Drücken Sie STANDBY auf der
Fernbedienung.
kei ne Farbe normaler Ton Far be im Bil dmodu s überp rüfen
Bild verschwindet
normaler Ton
oder leise
Kanal neu konfigurieren
kei ne Farbe
ges tört
Schlechtes TV-Signal
normaler Ton
Antennenposition, -ausrichtung
oder -anschluss
Problem
Schatten
normaler Ton
Zoom-Ansicht ändern
Sie sehen einen
schwarzen Balken
oben und unten.
Störungserkennung
05 Störungserkennung
stummgeschaltet
De
LCD-Fernseher mit dem LED-Bildschirm Bedienungsanleitung DE-26
Page 58

Mein Fernseher zeigt nicht das Bild auf
meinem Laptop/PC, wenn er
eingeschaltet ist.
Wenn m it eine m VGA -Stec ker (de r blaue 1 5-pol ige Stecke r auf Ihrem P C
oder Laptop) angeschlossen sind, benötigen die meisten PCs und
Laptops, dass Sie einige Tasten auf Ihrer Tastatur drücken, um ein Bild
auf e inem Ferns eher od er eine m anderen ex ternen Di splay z u
bek ommen . Dies is t norma lerweis e die F7 (D ell) od er F4 (HP / S amsung)
ode r F5 (Toshib a). Auf Laptops müsse n Sie die " Fn"-Taste z ur gleichen
Zeit wie die " F"-Taste d rücke n.
Ich habe meinen PC/Laptop an den
Fernseher angeschlossen und empfange
ein Bild, aber keinen Ton. Warum?
Das VGA-Kabel überträgt nur die Video- oder Bildinformationen. Sie
müssen ein separates Kabel anschließen, das mit dem
Kopfhöreranschluss (3,5mm Klinke) auf Ihrem PC/Laptop und mit der
3,5 m (PC Audio-IN ) Buchs e auf Ihrem Fe rnseh er verb unden i st. Sie
müssen den "PC" auswählen, indem Sie die Source-Taste auf Ihrer
Fernbedienung verwenden. Alternativ schließen Sie Ihren PC/Laptop
mit einem HDMI-Kabel an, wenn Ihr PC/Laptop einen HDMI-Anschluss
hat . HDMI is t sowohl Audio als au ch Video.
Das B ild hat k eine au tomatisc he
Größenanpassung beim Senderwechsel.
Prüfen Sie, ob das Fernsehbild-Seitenverhältnis auf 'Auto' auf allen
Ein gänge n ATV, DT V, SCAR T, HDMI 1, 2 u sw. eingestellt ist. Um das
Seitenverhältnis (Auto, 4:3 oder 16:9) einzustellen, drücken Sie die
Taste Sou rce, begin nend be i ATV, und wi ederh olen Si e die unt en
aufgeführte Reihenfolge für alle Eingangsquellen ATV, DTV, SCART,
HDM I 1 und 2, da j ede Ein gangsquelle separat gesteuert wird.
Drücken Sie die Fernseher-Menütaste.
Drü cken Si e Pfeil nach r echts, um au f Bild- Unter menü zu zugreife n.
Drü cken Si e Pfeil nach unten, u m Bildf ormat z u wählen.
Wähl en Sie Au to.
Drü cken Si e Ende.
Wiederholen Sie dies für alle Eingangsquellen.
Ich habe gerade an einen DVD-Player
oder einen anderen Artikel in meinem
Fernseher angeschlossen, und er
funktioniert nicht.
Die s gilt fü r jeden A rtikel de r Geräte, di e an den Fer nseher
angeschlossen sind.
1.S chalt en Sie so wohl den Fernse her als a uch DVD -Play er aus (z iehen
Sie den Stecker aus der Steckdose, kein Bereitschaftsmodus).
2.Schalten Sie alle Geräte aus, die an die SCART-Buchse angeschlossen
sind.
3.Trennen S ie den SC ART-Stecker von de m Fernsehe r.
4.Schließen Sie an und schalten Sie den Fernseher ein.
5.S chlie ßen Sie a n und sch alten S ie den DV D-Pla yer ein.
6.Wä hlen Si e HDMI au s dem Source- Menü.
7.D rücke n Sie Wied ergabe auf d em DVD-Pl ayer und prü fen Sie, ob die
Filme ordnungsgemäß wiedergegeben werden.
HIN WEIS: D ie SCAR T-Buch se hat Priorit ät über H DMI, un d es ist wichtig,
das s die Ger äte AUSG ESCHA LTET s ind, di e an die SC ART-Bu chse au f
dem Fernseher angeschlossen sind (nicht im Bereitschaftsmodus).
Bitte befolgen Sie diese Informationen. Wenn die Anzeige funktioniert,
und d er DVD-Pl ayer funkt ionie rt, ist der Fe rnseher O K und ein b isschen
verwirrt.
Wahrscheinlich wurden die HDMI-Stecker entfernt und wieder
eingesteckt, wenn das Fernsehgerät eingeschaltet ist.
Entfernen oder schließen Sie niemals die HDMI-Kabel oder ein
beliebiges Digitalgerät an das eingeschaltete Gerät an.
Sch alten S ie imme r alle Ge räte aus, we nn ein be liebi ges Digita lgerät
entfernt oder angeschlossen wird.
Fehlerbehebung
Störungserkennung
DE-27 LCD-Fernseher mit dem LED-Bildschirm Bedienungsanleitung
Page 59

Bil d zerle gt sich i n Pixel
Ein typisches Beispiel für ein Empfangsproblem stellt das Auseinanderbrechen von Bildern (Pix ilati on) ode r das Ein frier en der
Bilder dar, manchmal gibt es Klick- oder quietschende Geräusche oder der Ton fällt aus ode r es gibt g ar KEINEN Empfang. Ihr
Bild kann in Pixel aufgrund des digitalen Videosignalausfalls brechen. Die Signalausfälle können entweder wegen der Probleme
mit schwachen Signalen (siehe TV-Antennen) auftreten, oder wenn Sie pe r Kabel m it eine m schwa chen Ka bel-S ignal v erbun den
sind. Wenn das Problem schwacher Signale auftritt, verwenden Sie ein en Verstä rker, um d as Sign al zu ver stärk en. Ein K abel-
Techniker kann Ihnen bei der Installation eines Inline-Verstärkers o der Vorv erstä rkers h elfen . Dies wi rd Ihre Sign alstä rke ste igern
und das Pixel-Problem lösen.
Wenn S ie Ihr TV-Sign al über S atellit em pfang en, prü fen Sie, o b sich Ihre S chüss el nach s tarke m Win d bewegt wur de, oder o b das
Signal durch Bäume blockiert wurde. Bäume können ein Problem verursachen, da sich das TV-Signal je nachdem ändern kann, ob
ein Baum zwischen dem Satellitenschüssel und dem Satellit ohne Laub od er dich t belau bt ist.
Fehlende Kanäle
Vielleicht stellen Sie fest, dass es Kanäle fehlen, oder dass Sie die Kanäle aus der falschen Region empfangen. Manchmal
funktionieren die interaktiven Dienste (rote Taste) nicht. Dies wi rd durch e in schw aches S ignal v erurs acht, sieh e TV-An tennen.
TV-Antennen
Digitales terrestrisches Fernsehen (DVB-T) kommt zu Ihrem Fernsehgerät über eine Antenne; eine alte Antenne, die für analoges
Fernsehen gut war, braucht eventuell eine Aktualisierung für digit ales Fer nsehe n. Wenn Si e immer e inige, abe r nicht a lle der
digitalen Kanäle auf DTV (DVB-T) erhalten, zum Beispiel, Sie erha lten BBC1, B BC2, Ka nal 4, ab er nich t ITV od er Kanal 5, l iegt dies
mei stens d aran, d ass die A ntenne ein s chmal er Band typ ist , und mus s mit ein em brei ten Bandty p gewec hselt w erden.
Fehlerhafte Leitungen und Kabel
Überprüfen Sie Ihren Fernseher. Sind die Leitungen auf der Rückse ite - an das Net z, die An tenne, d ie Set-Top -Box, den Vi deo- oder
DVD-Player oder Recorder richtig angeschlossen? SCART-Kabel sind dafü r beka nnt, dass si e sich mi t der Zeit loc kern un d sowoh l zu
Audio- als auch Video-(Bild)-Problemen führen. Entweder linkes oder rec htes ode r beide A udios f ehlen , und die Fa rben sehen arm
oder schlammig aus. Stecken Sie den Scart-Stecker fest ein, dies soll das Problem beheben.
HDMI-Stecker müssen fest eingesteckt werden; es ist nur der letzte Millimeter, der die Kontakte knüpft. Typischerweise soll das
schwarze Plastikteil des HDMI-Steckers sehr nahe dem Fernseher-Körper oder der Komponente sein oder ihn/sie berühren.
Beim Einstecken der beliebigen HDMI-Kabel können Probleme auftreten, f alls di e HDMI- Kabel e inges teckt w erden, w enn der
Fernseher oder andere Komponente eingeschaltet ist. Schalten Sie immer sowohl den Fernseher als auch die Komponente aus, die
Sie einstecken möchten. Wenn Sie die Stecker und Steckdosen überprüf t haben , schal ten Sie d en Ferns eher un d alles , was Sie a n
den Fernseher angeschlossen haben, aus, und dann schalten Sie sie wieder ein.
Ich h abe mei nen PC an d en Ferns eher an gesch losse n. Es gib t keinen Ton.
Wenn Sie Ihren PC oder Laptop an den Fernseher über ein VGA (15 Pin D-Sub)-Kabel anschließen, und es gibt kein Audio, müssen
Sie ein separates Audio-Kabel aus dem PC oder Laptop an den Fernseher anschließen.
Unnatürliche Farb en und Ha utfar ben
Unnatürliche Hauttöne und andere Farb en könn ten noch ein a ndere s Proble m auch in e inem neuen HDTV darstellen. Dies
geschieht aufgrund der Fernsehbildeinstellungen, die für die Umgebung eines Ausstellungsraums optimiert werden. Sie werden
dieses Problem beheben, indem Sie den Bildmodus in den natürlichen Modu s im Bild menü än dern. Fü r mehr Pr äzisi on nehm en Sie
eine manuelle Einstellung der Farben-, Kontrast- und Helligkeit-Optionen im Bildmenü vor.
Weiße Umrisse
Weiße Ränder um Objekte und Personen erscheinen in der Regel, wenn die Fernsehschärfe auf sehr hoch eingestellt ist, oder wenn
Ihr Fernsehgerät verwendet eine Verarbeitungstechnologie der Kantenschärfung verwendet. Gehen Sie zum Bildmenü und passen
Sie die Schärfe an, bis die weiße Umrandung verschwindet. Wenn die Ka ntens chär fung ak tivie rt ist, v ersuc hen Sie e s, mit de m
Service-Menü zu deaktivieren.
Video flackert
Zeitweise könnte das Video flackern. Wenn dies der Fall i st, übe r
prüfen Sie, ob das Signal stark genug ist. Wenn das Signal stark ist ,
liegt das Problem bei dem Kabelnetzbetreiber. Wenn die Signalstärke z u schwach is t, versuch en Sie, d ie Signals tärke m it Hilf e eines
Verstärkers zu steigern.
Kein Vollbild auf dem Bildschirm
Beim Anschluss eines PCs oder Laptops an den Fernseher, füllt das Bil d mögli cher weise ni cht den g esamt en Bild schir m aus.
Überprüfen Sie die Displayeinstellungen auf Ihrem PC oder Laptop (Win dows > Start > System steuerung > D arstellu ng und
Anpassung > Displayeinstellungen) und wählen Sie die beste Auflösung. Wählen Si e auf Ihr em Ferns eher: TV-Men ü > Bild >
Einstellungen, und dann versuchen Sie AUTO, ZOOM1 oder ZOOM2 für die b este An zeige.
USB-Anschluss
Der USB-Anschluss funktioniert mit *.jpg (Foto)- und *.mp3 (Musik)-Dateien. Bitte beachten Sie, dass der Fernseher das iPhone
oder den iPod von Apple, die an den USB-Anschluss des Fernsehers angeschlossen sind, nicht erkennt. Der Fernseher kann andere
Dateien wiedergeben, aber aufgrund der vielen verschiedenen Dateif ormat en, gib t es kein e Garan tie, dass di ese and eren
Dateiformate funktionieren.
Problembehandlung bei dem Digitalfernsehen und möglich Lösungen
Störungserkennung
De
LCD-Fernseher mit dem LED-Bildschirm Bedienungsanleitung DE-28
Page 60

Spezifikationen
Fernsehbildqualität:
46" Full HD 1080P digitaler LED LCD-Fernseher
Weitere Funktionen:
NICAM Stereo-Soundsystem.
2 x 8 Watt RMS- Ausgangs leistung .
Tonqualität:
Digitale Funktionen:
Stromverbrauch
(Standby)
<0.5W
*
Konnektivität:
Störungserkennung
FUL L HD
Integriert digital.
Bildschirmgröße:
Auflösun g 1920 x 10 80 Pixel 5 0Hz.
117cm
2 HDMI-Anschlüsse.
1 SCART-Anschluss.
PC-Eingang.
Component-Video-Anschluss.
Composite.
1 USB-Anschluss.
Digital interaktiv.
Digitaler Text.
Digital Video Broadcasting (DVB)-Untertitel sind verfügbar.
Auto-Setup.
Automatische Suche nach neuen Kanälen.
Aktueller und nächster Programmführer.
Ele ktron ischer Progra mmfüh rer für 7 Tage (EP G).
Kompatibel mit dem Top up TV.
CI-Slot.
Kompatibel mit der Audiobeschreibung.
UHF/VHF-Tuner.
Sleep-Timer.
Kindersicherung.
Bild und Text.
Bat terie n für die Fe rnbed ienun g benöt igt 2 x AAA ( im Lief erumf ang
enthalten).
VES A-Hal tergrö ße: 200 x 2 00 mm
Paketgröße (BxHxT): mm
Set-Größe (BxHxT) mit Standfuß: mm
Set-Größe (BxHxT) ohne Standfuß: mm
Paketgewicht: kg
Set-Gewicht mit Standfuß: kg
Set-Gewicht ohne Standfuß: kg
1285x780x170
1074x703x280
1074x645x78
17
13.7
11.8
Einige der Spezifikationen dienen nur als Referenz.
Abweichungen vom tatsächlichen Gerät nicht ausgeschlossen.
Änderungen im Design und Spezifikationen vorbehalten.
Scart-Ausgang:
1. Ist der Eingang ATV/AV/SCART, so ist das Signal am Scart-Ausgang ATV.
2. Wenn der Eingang DTV ist, so ist das Signal am Scart-Ausgang DTV.
3. Andere Quellen haben kein Scart-Ausgangssignal.
DE-29 LCD-Fernseher mit dem LED-Bildschirm Bedienungsanleitung
Page 61

Lisez attentivement ces instructions avant d'utiliser l'appareil et
conservez-les pour toute référence ultérieure.
Téléviseur à écran plat à LED
GUIDE D'UTILISATION
Page 62

Guide d'installation
04 Utilisation
14
MENU CANAL 15
Recherche automatique (DVB-T ) 15
Recherche automatique (DVB-C) 16
Recherche manuelle DTV (DVB-T)
Recherche manuelle DTV (DVB-C)
Recherche manuelle de programmes
analogiques (ATV)
17
17
19
Menu Audio
18
Menu Temps
18
Menu Options
Menu Verrouillage
Menu EPG (Guide Électronique des Programmes)
19
Fonction PVR
20
Préparer l'enregistrement d'un programme
20
19
Enr egistrer l e programm e
21
Lire l'enregistrement
21
Fonction Timeshift (lecture décalée)
22
Préparer l'enregistrement d'un programme
22
Format d e stock age du lecteur USB
22
Enregistrer une émission DTV (télévision
num ériqu e) mise e n pause s ur le dis posit if
de stockage USB
22
Limites du TimeShift
23
Lecteur USB
24
Dépannage
05 Dépannage
25
Spécification 28
Bienvenue
Information Importante
01 Avertissment de sécurité
2
2
Instruction de sécurité
Avertissements et mise en garde
3
4
Principaux Caractéristiques
Installation Murale
02 Introduction
5
7
Wandmontage
Panneau de commande avant et latéral
8
9
Prises arrières
9
Connexion du Téléviseur
Interface commune : Canal Ready
10
11
Présentation de la Télécommande
03 Télécommande
12
Installation des piles dans la Télécommande
Télétexte
12
13
Menu Image 18
18
Table des Matières
Table des Matières
Modification des programmes
Informations sur la CI
18
18
FR-1 Ecran télé plat à LED Guide d'utilisation
Page 63

Nous vous remercions d'avoir acheté ce téléviseur LCD LED 46" . Ce guide va vous aider à régler
et utiliser votre téléviseur.
Commencez par vérifier le contenu de votre boîte avec la liste des pièces ci-dessous :
LISEZ ENTIÈREMENT CE MANUEL AVANT L'UTILISATION ET CONSERVEZ-LE POUR TOUTE RÉFÉRENCE ULTÉRIEURE
ATTENTION
Maintenant vous pouvez commencer !
01 Avertissements et mesures de sécurité
Avertissements et mesures de sécurité
BIENVENUE
Téléviseur numérique LCD LED 46" Full HD 1080p
Télécommande et 2 piles AAA ;
Guide d'utilisation
Guide de démarrage rapide
Câble péritel x 1
Pied du TV
INFORMATION IMPORTANTE
RISQUES D'ELECTROCUTION
NE PAS OUVRIR
Pour obtenir des performances optimales, consultez attentivement le présent mode d'emploi, puis
rangez-le dans un endroit facilement accessible pour pouvoir vous y reporter ultérieurement.
Les chiffres et les données communiqués au sujet de l'écran dans le présent mode d'emploi peuvent,
suite aux innovations technologiques apportées, ne pas correspondre tout à fait aux caractéristiques
de votre modèle.
Tout démontage, sans approbation préalable, du présent produit est strictement interdit, elle
entrainerait l'annulation de la garantie Haier.
AVERTISSEMENT : pour éviter tout risque d'incendie, tenez bougies et autres sources de flammes
ouver tes à distance du produit en toutes circonstances.
AVERTISSEMENT: afin d'éviter tout risque d'incendie ou de décharge électrique, n'installez
jamais votre téléviseur dans un lieu humide. Redoublez d'attention lorsque vous manipulez
l'écran pour ne pas le rayer par inadvertance ou l'endommager d'une autre façon. Veillez à
ne pas obstruer les orifices d'aération de votre téléviseur avec des journaux, nappes,
rideaux, etc
ATTENTION : La fiche électrique doit rester facilement accessible.
Consultez attentivement le présent mode d'emploi avant utilisation, puis rangez-le dans un
endroit facilement accessible pour pouvoir vous y reporter ultérieurement.
FR
Ecran télé plat à LED Guide d'utilisation FR-2
Page 64

INSTRUCTIONS DE SÉCURITÉ
Attention : Pour réduire le risque
d'électrocution, ne pas ouvrir le capot arrière.
Aucun des éléments internes ne peut être
réparé par l'utilisateur. Confiez l'entretien à un
technicien qualifié.
Attention : POUR REDUIRE LES RISQUES
D'INCENDIE OU D'ELECTROCUTION, N'EXPOSEZ
PAS CET APPAREIL A LA PLUIE OU A L'HUMIDITE.
N'exposez pas l'appareil au ruissellement ni à la
projection d'eau, et ne placez aucun objet
contenant un liquide (tel qu'un vase) au dessus
de l'appareil.
Éloignez le produit de la lumière directe du
soleil et de toute source de chaleur telle que
radiateurs ou poêles.
N'obstruez jamais les fentes d'aération. Les
fentes et ouvertures sur l'unité sont prévues
pour la ventilation. Ces fentes ne doivent jamais
être obstruées en plaçant l'appareil sur un
canapé, un tapis ou toute autre surface
similaire.
Ne placez pas cet appareil sur un chariot, un
support, un trépied ou une table instable.
L'appareil pourrait tomber, causant des
dommages ou des blessures.
Ne placez jamais d'objets lourds ou tranchants
sur le panneau ou le cadre.
Débranchez la prise de courant lorsque
l'appareil n'est pas utilisé.
Il faut tenir compte de la protection de
l'environnement lors de l'élimination des piles.
AVERTISSEMENT : L'utilisation d'un casque ou
d'écouteurs avec un volume sonore trop for t
peut causer une perte auditive.
Ce symbole indique que ce produit ne doit pas
être mis au rebut avec les déchets ménagers et
ce dans tous les pays de l'Union Européenne. En
aidant à la récupération séparée, vous aidez à
garantir que les produits seront recyclés d'une
façon appropriée et ainsi à préserver les
ressources naturelles et à protéger
l'environnement et la santé humaine. Ramenez
donc cet appareil aux points de collecte
appropriées ou retournez-le au revendeur
auprès duquel vous l'avez acheté. Ainsi il sera
rec yclé et contribue à préser ver
l'environnement.
Avertissements et mesures de sécurité
FR-3 Ecran télé plat à LED Guide d'utilisation
Page 65

Dim:515*320mm(不包括底座)
Des hautes tensions dangereuses existent à
l'intérieur de cet appareil. Ne retirer pas le
panneau de sécurité à l'arrière du téléviseur.
Pour toute réparation, veuillez faire appel à un
technicien qualifié.
Avertissement
Pour prévenir tout risque d'incendie ou
d'électrocution, n'exposez pas cet appareil à
la pluie et à l'humidité.
Avertissement
N'introduisez pas d'objets étrangers par les
fentes des panneaux du téléviseur. Ne
renversez jamais de liquide sur le récepteur
du téléviseur .
Avertissement
Ne bloquez pas les fentes d'aération du
panneau arrière. L'aération est essentielle
pour éviter que les composants électriques
ne tombent en panne.
Attention
Ne coincez pas le cordon d'alimentation sous le
récepteur de télévision.
Attention
Ne montez jamais sur le téléviseur, ne vous
appuyez pas dessus et ne le poussez pas
brusquement sur son socle. Prêtez une attention
particulière aux enfants. Risque de blessures
graves en cas de chute.
Attention
Ne placez pas le téléviseur sur un chariot, une
étagère ou une table instable. Le téléviseur
risque de tomber et peut provoquer des
blessures graves et des dommages matériels
importants.
Attention
Débranchez le téléviseur du secteur s'il ne va pas
être utilisé pour une longue période.
Attention
Si le téléviseur est placé dans un compartiment
fermé, il faut veiller à respecter les distances
minimales. L'accumulation de chaleur réduit la
durée de vie de service de votre téléviseur et peut
aussi être dangereuse.
Attention
Avertissements et mise en garde
Distances minimales
Avertissements et mesures de sécurité
FR
Ecran télé plat à LED Guide d'utilisation FR-4
Page 66

INSTALLATION
ATTENTION
* Placez le téléviseur dans une pièce où la
lumière ne frappe pas directement sur l'écran.
* L'obscurité totale ou une réflexion sur
l'écran peut provoquer une fatigue visuelle.
Un éclairage doux et indirect est
recommandé pour une visualisation
confortable.
* Prévoyez suffisamment d'espace entre le
téléviseur et le mur pour permettre la
ventilation.
* Évitez les endroits trop chauds pour éviter
tout dommage possible à l'enceinte ou une
défaillance prématurée des composants.
* Ce téléviseur peut être connecté à une prise
secteur de 100-240 volts. 50/60 Hz. Ne le
branchez jamais sur une prise de courant CC
ou de n'importe quel autre type.
* Ne couvrez pas les fentes de ventilation lors
de l'utilisation du téléviseur.
Données principales
Caractéristiques principales
NICAM;
4
Time-shift
5
3
Interface HDMI et péritel
Grande luminance et large angle de la visualisation
2
Ecran de télévision, moniteur d'affichage ou
écran pour PC
1
Taille d'écran
PAL/SECAM
46
YPbPr >=400
Entrée vidéo composite >= 350
Ne modifiez aucun composant interne et bouton de
commande du téléviseur non décrit dans ce manuel.
Tous les téléviseurs à LED sont des équipements de
haute tension électrique.
Il faut débrancher le téléviseur avant de nettoyer de
la poussière ou des gouttes d'eau sur l'écran, du
boîtier ou autour de l'un des boutons ou des
connecteurs.
Utilisez un chiffon doux et sec et non pelucheux pour
essuyer le téléviseur.
Pendant les orages, débranchez le câble
d'alimentation et le câble d'antenne pour éviter
d'endommager votre téléviseur et les autres appareils
connectés.
Toutes les opérations de réparation de ce téléviseur
ne doivent être effectuées que par du personnel
qualifié.
02 Introduction
Système TV
Système du signal vidéo
Tension d'entrée
Définition horizontale (lignes TV)
Introduction
PAL-B/G, I, D/K
SECAM-B/G, D/K, L, L'
100-240V CA 50/60Hz
Consommation d'énergie
98 W
Consommation électrique en veille
Puissance de sortie audio
(Taux de distorsion dynamique ≤ 7%)
<0.5W
2 x 8W
Signal d'entrée
1 RVB analogique (PC) ; 1 audio PC
2 Interface HDMI (High Definition Multimedia Interface)
1 Entrées Vidéo
1 Entrées audio
YPbPrx1
1 Péritel
1 CI
1 USB
1 RF Co-Ax
FR-5 Ecran télé plat à LED Guide d'utilisation
Page 67

MODE PRÉDÉFINI
PC
3
5
1024x768
1280x1024
60
60
1
640x480
60
31.47
2
800x600
60
37.88
48.36
63.98
RESOLUTION
V. Fréq. (KHz) H. Fréq. (KHz)
4
1360x768
60
47.7
Introduction
FR
Ecran télé plat à LED Guide d'utilisation FR-6
6
1920x1080
60
66.64
Page 68

Instructions pour l'assemblage du support
1. Placez le téléviseur sur une surface plane
avec l'écran orienté vers le bas. Utilisez un
chiffon pour le protéger. Localisez la base du
socle.
2. Fixez le socle TV en serrant les vis au
maximum.
REMARQUES SUR L'INSTALLATION
Placez le téléviseur dans une pièce où la lumière ne frappe pas directement sur l'écran.
L'obscurité totale ou une réflexion sur l'écran peut provoquer une fatigue visuelle. Un
éclairage doux et indirect est recommandé pour une visualisation confortable.
Prévoyez suffisamment d'espace entre le téléviseur et le mur pour permettre la ventilation.
S'il vous plaît ne pas tourner ce téléviseur!
Évitez les endroits trop chauds pour éviter tout dommage possible à l'enceinte ou une
défaillance prématurée des composants.
Introduction
FR-7 Ecran télé plat à LED Guide d'utilisation
Page 69

DIRECTIVES D'INSTALLATION DU SUPPORT MURAL
2. Retirez les vis de la partie inférieure du
téléviseur, où le socle est fixé au téléviseur, et
enlevez le socle (rangez le socle dans un endroit
sûr pour une utilisation ultérieure).
1. Placez le téléviseur LCD LED sur une
surface solide. Mettez un matériau souple
à l'avant de l'écran pour le protéger contre
tout dommage.
3. Utilisez les quatre vis fournies pour fixer le téléviseur sur un support mural (non inclus) par les
quatre trous VESA standard à l'arrière du téléviseur.
Introduction
Ce téléviseur peut être accroché au mur en suivant la procédure suivante :
FR
Ecran télé plat à LED Guide d'utilisation FR-8
M6x9
M6x9
M6x9
M6x9
Page 70

AC-INPUT
100-240V~50/60Hz
Y
Pb
PrVIDEO L R HDMI2
Prises arrières/latérales
1
2
3
Capteur de télécommande
Témoins
BLEU : ALLUMÉ ROUGE : VEILLE
Touches
1
SOURCE
Pour afficher le Menu Source
MENU
Pour ouvrir le Menu principal
3
4
CH+/CH-
En mode TV, appuyez sur CH+ ou CH- pour
passer au canal suivant ou précédent.
Dans MENU, appuyez sur CH+ ou CH- pour
sélectionner des fonctions.
VEILLE
2
VOL+/VOL-
Pour régler le niveau sonore.
Dans MENU, permet de régler l'élément sélec tionné.
5
Panneau frontal
Introduction
FR-9 Ecran télé plat à LED Guide d'utilisation
30 30
1
23
SOURCE
1
MENU
CH+ CH- VOL+ STANDBYVOL-
2 3 4 5
1
AV
2
3
YPbPr
4
5
Entrée
7
PERITEL
8
PC AUDIO
9
Audio Gauche/Droite
10
11
12
1
2
3
4
5
6 7 8
10
9
11
12
Sources d'alimentation CC
HDMI2
6
HDMI1
USB
INTERFACE COMMUNE (CI)
Entrée VGA
ANT
Entrée
Entrée
Entrée
Entrée
Entrée
Entrée
Entrée
Entrée
Entrée
Entrée
Entrée
Page 71

Connexion d'un lecteur DVD / d écode ur satelli te /
câb le / console de jeux / PC ou ordin ateur
portable
Il y a plusieurs options pour la connexion d'un
lec teur DV D / décodeur satellite ou par câble /
con sole de j eux / PC ou o rdinateu r portabl e à votre
téléviseur.
Option 1 SCART
Branchez un câble péritel (non fourni) de la
prise péritel du téléviseur au lecteur DVD / décodeu r
satellite ou par câble ou console de jeux.
Pour sélectionner le dispositif connecté avec le
câble péritel, appuyez sur la touche SOURCE de la
télécommande et utilisez les touches ▼▲ p our
sélectionner SCART puis appuyez sur la touche OK.
Remarque : Le téléviseur se connecte par défaut au
péritel lorsqu’il est allumé.
Option 2 HDMI
Ete ignez d ’abord l'appareil que vous souhaitez
connecter au téléviseur s’il est allumé.
Branchez un câble HDMI (non fourni) de la prise
HDMI du téléviseur au lecteur DVD / décodeu r
satellite ou par câble ou console de jeux.
Allumez l'appareil que vous venez de connecter
au téléviseur .
Pour sélectionner le dispositif connecté avec le
câble HDMI, appuyez sur la touche SOURCE de la
télécommande et utilisez les touches ▼▲ p our
sélectionner HDMI puis appuyez sur la touche OK.
Option 3 AV Audio Visual
(Jaune/Blanc/Rouge)
Ete ignez le téléviseur et l'appareil avant de
procéder aux connexions.
Connectez les câbles AV (non fournis) des
connecteurs vidéo (jaune) et audio (blanc, rouge)
du téléviseur au lecteur DVD ou console de jeux etc.
Pour sélectionner le dispositif connecté avec le
câble AVI, appuyez sur la touche SOURCE de la
télécommande et utilisez les touches ▼▲ pour
sélectionner AV puis appuyez sur la touche OK.
Option 4 COMPONENT
(Vert/Bleu/Rouge) + (B lanc/Rouge)
Ete ignez le téléviseur et l'appareil avant de
procéder aux connexions.
Bra nchez l es câbl es (non four nis) de l ’entrée
COMPONENT IN Y, Pb, Pr (vert, bleu, rouge) et LAudio-R (blanc, rouge) du téléviseur au lecteur DVD
ou co nsole d e jeux etc.
Opt ion 5 VGA (Sub-D 15 broch es)
Connectez un câble VGA (non fourni) du connecteur
VGA du téléviseur au PC/ordinateur portable.
Remarque : VGA tr ansmet uniquement de la vidéo. Pour
l'a udio de v otre PC/or dinateur p ortable vous dev ez
connecter un câble audio séparé du PC (connecteur 3,5
mm) à l a prise c asque d e votre PC/o rdina teur port able
(connecteur 3,5 mm)
Opt ion 6 USB
La pl upart des c lés USB p euven t être conne ctés à vo tre
téléviseur et certains appareils photo numériques
peuvent aussi être compatibles.
Connectez une clé USB (non fournie) ou un câble USB
(no n fourn i) au télévi seur.
Remarque 1 : Seu ls les fi chier s *.jpg et *.mp3 sont
compatibles, d'autres types de fichiers risquent de ne pas
marcher.
Rem arque 2 : L’iPhon e et iPod d'Apple ne s ont pas
compatibles avec votre téléviseur.
Remarque 3 : Lorsqu e vous connectez un dispositif
que lconq ue au por t USB, es sayez d ’avoir u n câble U SB
aus si cour t que possi ble.
Pour sélectionner le dispositif connecté avec le
câble AVI, appuyez sur la touche SOURCE de la
télécommande et utilisez les touches ▼▲ pour
sélectionner COMPONENT puis appuyez sur la
touche OK.
Pour sélectionner le PC/Portable connecté avec
le câble VGA, appuyez sur la touche SOURCE de la
télécommande et utilisez les touches ▼▲ pour
sélectionner PC puis appuyez sur la touche OK.
Pour sélectionner le dispositif USB connecté à
votre téléviseur, appuyez sur la touche SOURCE de
la télécommande et utilisez les touches ▼▲ pour
sélectionner USB puis appuyez sur la touche OK.
Connexion à votre TV Haier
Introduction
FR
Ecran télé plat à LED Guide d'utilisation FR-10
Page 72

Le logement de l'interface commune (CI) est
destiné à un mo dule d' accès cond ition nel (CA) et
une c arte à puce p our pou voir regarder des
programmes télé et des services supplémentaires
payants. Contactez votre câble opérateur pour
obtenir plus d'informations sur les modules et
l'abonnement. Notez que les modules CA et les
car tes à puce ne s ont ni fourn is ni des a ccess oires
en option.
INTERFACE COMMUNE
CHANNEL
PICTURE
SOUND
TIME
OPTION
LOCK
Auto Tuning
ATV Man ual Tuni ng
Programme Edit
Signal Information
DTV Manual Tuning
Software Update(USB)
CI Information
OK
OK
MENU MOVE OK
Introduction
Avertissement
Eteignez votre téléviseur avant d'insérer un
module dans le logement d'interface commune
Eteignez correctement le CAM (module d'accès
conditionnel), puis la carte à puc e dans le l ogeme nt
CI qu i se trou ve sur le cô té du tél évise ur.
Allumez le téléviseur, le message ci-dessous
s'affiche si un module CA est détecté. Attendez
quelques instants jusqu'à ce que la carte soit
activée.
Appuyez sur la touche MENU puis appuyez sur la touche
▲▼ pour sélectionner l'option Informations CI
Des i nform ation s détai llées s ur la car te CI en
cours d'utilisation seront affichées
Appuyez sur OK pour accéder au menu de la
carte. Reportez-vous au manuel d'utilisation du
mod ule pou r régle r les dét ails
Lor sque le m odule e st retiré, le m essag e
suivant apparaît sur l'écran.
LOGEMENT D'INTERFACE COMMUNE
CAM (module d'accès conditionnel)
Car te à puce
Module CI inséré
Module CI retiré
FR-11 Ecran télé plat à LED Guide d'utilisation
Page 73

1. Ma rche/ Arrêt : Appuyez pour allumer le téléviseur.
2. D.M ENU : Touche inactive.
3. P.Mod e : Pour changer le mode image.
4. IN FO : Appuyez pour afficher l'état courant, dont la source
d'e ntrée et le mo de audi o de la cha îne.
5. AUD IO l/ll : Appuyez pour sélectionner MONO, Nicam stéréo
pou r les cha înes TV. S élect ion de la l angue a udio de s chaîn es
numériques.
6. SU BTITL E (SOUS -TITRAG E) : Appuyez sur pour
activer/désactiver le sous-titrage.
7. Touches numériques : Pour a ccéde r direc temen t aux cha înes.
8. SO URCE : Pour sélectionner la source d'entrée
9. MU TE : Pour couper/rétablir le son.
10. Touches Volume : Pour rég ler le ni veau so nore.
11. M ENU : Pour afficher le menu T V.
12. O K : pour confirmer la sélection.
13. E XIT : pour retourner au menu précédent ou quitter le menu.
14. I ndex de t élétex te
15. R EPEAT (RE PETER) : Au cun rôle
16. Touc he télé texte ve rte / ava nce rap ide USB
17. Touc he télé texte ro uge / ret our rap ide USB
18. M ixage t éléte xte
19 . Te xt e Tél ét ex te
20. R évéler l e télét exte
21. Tail le du tél étext e
22. H eure té létext e / REC.L IST (He ure tél étext e n'a auc un rôle)
23. M ode Téléte xte : Touche inactive
24. Fi ger le té létex te
25. S ous- code tél étext e : Sous-page de télétexte
26. Touc he télé texte b leue / fi chier s uivant U SB
27. Touc he télé texte j aune / fi chier p récéde nt USB
28. A rrêt US B
29. PLAY/PAUSE (Lecture/Pause)
30. DEMARRER L'ENREGISTREMENT
31. TOUCHES DE DEPLACEMENT
(HAU T/BAS /DROI TE/GAU CHE) : Appuyez pour atteindre votre
sélection.
32. Fa v : Pour acc éder à vo tre liste de c haîne s favori tes en mo de
TV o u DTV.
33. S élec tion de p rogram me: Uti lisez p our sél ectionner la
cha îne sui vante o u précéd ente.
34. G UIDE : Appuyez pour afficher le guide électronique des
pro grammes en m ode TV.
35. Q. View : Pou r retour ner à la de rnièr e chaîn e regar dée.
36. C H.LIS T : Appuyez pour afficher la liste des chaînes.
37. S creen : Po ur chan ger le fo rmat d' image .
38. S leep : Pou r défin ir l'he ure d'a rrêt du t élévi seur.
39. S.Mode: Pour changer le mode audio.
40. OPEN/CLOSE : Auc un rôle
:pas de fonction DVD
Télécommande
03 Télécommande
Insertion des piles dans la télécommande
1. Ouvrez le compartiment des piles.
2. Insérez 2 piles AAA 1,5 V en respectant les
indications de polarité (+/-) des piles à l'intérieur du
compartiment.
3. Remettez le couvercle du compartiment des piles
en place. Remplacez par des piles neuves en cas de
dysfonctionnement de télécommande et que le
téléviseur ne réponde pas à la télécommande.
Remarque:
1) Utilisation de piles alcalines conseillée.
2) Retirez les piles lorsqu'elles sont usées ou si la
télécommande ne va pas être utilisée sur une période
prolongée.
Batterien erschöpft sind, entnehmen Sie sie bitte
aus der Fernbedienung.
FR
Ecran télé plat à LED Guide d'utilisation FR-12
Page 74

E
TEXTE
SÉLECTION D'UNE PAGE
ACCÈS DIRECT AUX
ÉLÉMENTS
INDEX
SUB PAGE
HOLD
REVEAL
Appuyez sur :
Vous obtenez
LIST
TÉLÉTEXTE
Ent rez le numéro de la page dési rée à l'aide de to uches 0 à 9 e t haut/bas.
Exemple: p age 120 , tapez 1 20. Le numéro est affiché e n haut à ga uche, le
compteur tourne, puis la page est affichée. Répétez cette opération pour
aff icher u ne autre page. Si le compteur continue à chercher, cela sign ifie
que la page n'est pas transmise. Sélectionnez un autre numéro.
Les touche s de couleur sont comme ell es sont a ffich ées en ba s de l'écran.
Les 4 touche s colorées per mette nt d'accéder a ux rubr iques o u aux pag es
correspondantes. Les zones colorées clignotent lorsque la rubrique ou la
page n'est pas encore disponible.
Cela renvoie à la p age som maire (généralement l a page 100)
Certaines pages contiennent des sous-pages qui sont automatiquement
affichées successivement. Cette touche permet d'arrêter ou reprendre la
sous-page. L'indication apparaît en haut à gauch e
Pour figer la page
Pour afficher ou masquer les informations cachées (solutions de jeux)
L'utilisateur peut dé finir q uatre pages préférées à être directement liées aux
qua tre touches de couleur. Lorsq ue que le m ode lis te est ac tivé, il n'e st pas
possible d'utiliser la navigation Haut et Bas avec les touches de couleur. Les
numéros des pages préférées sont conservés et restaurés dans/de la
mém oire non volatile pour ch aque ca nal par l e logiciel du système
Il est utilisé pour appeler ou quitter le mode télétexte. Le sommaire
apparaît avec une liste d'éléments qui peuvent être accédés. Chaque
élé ment a un n uméro de page co rrespondante de 3 chiffres. Si la chaîne
sélectionnée ne diffuse pas de télétexte, l'indication 100 s'affiche et l'é cran
reste noir (dans ce cas, quittez le télétexte et sélectionnez un autre canal).
Le télétexte est un système d'information diffusé par certaines chaînes, qui se consulte comme
un journal. Il offre également l'accès aux sous-titrages pour les personnes malentendantes ou
qui ne sont pas familiers avec la langue de transmission (réseaux câblés, chaînes satellites, etc.)
Télécommande
FR-13 Ecran télé plat à LED Guide d'utilisation
Page 75

Utilisation
04 Utilisation
Please select on OSD language
OK
Czech
English
French
Italian
Greek
Spanish
Deutsch
Magyar
Nederlands
Polski
Russian
Romanian
Password
Please enter old password
Please enter new password
Confirm new password
Home Mode
Mode Select
OK
Shop Mode
le guide d'installation apparait seulement quand le
téléviseur est mise en marche pour la première fois ou
lorsque qu'il est réstauré en paramétrage usine.
Guide d'installation
1).Appuyez sur les touches ◀▶▼▲ pour naviguer dans les
menus et modifier les paramètres. Appuyez sur OK pour
confirmer.Sélectionnez la langue souhaitée des menus.
Selectionner la langue désirée, Mode domestique / Mode
magasin pour l'afficher sur le menu.
Nota: Le mot de passe par défaut est 6666.
2). Appuyez sur les touches pour sélectionner DVB-T/DVB-C
puis appuyez sur OK pour confirmer
OK
French
Italy
Greece
Nederlands
Poland
Germany
Hungary
Luxembourg
Norway
a. Si vous sélectionnez DVB-T, l'étape suivante consiste à
sélectionner le type de Recherche et le pays puis appuyez
OK pour lancer la recherche.
b. Si vous sélectionnez DVB-C, l'étape suivante consiste à
configurer le système DVB-C tel que (le type de
recherche/Fréquence/ID Réseau /Symbole (KS/S), puis
d'appuyer sur OK pour accéder au menu de sélection du
type de recherche et du pays ; cette étape est la même que
celle pour DVB-T, sélectionnez le type de recherche
(DTV/ATV).
Sélec tionnez le bon pays, appuyez sur OK pour lancer la
recherche.
Mod es Accueil o u Bouti que
①.Le mode Accueil est un mode d'économie d'énergie. Le
mode Accueil est recommandé pour une utilisation
nor male, c 'est le régl age par d éfaut .
②.Le mode Boutique est utilisé par les revendeurs pour
une m ise en dé monst ratio n ou en présen tatio n du
pro duit. Le mod e Bouti que off re une im age plu s
lumineuse que le mode Accueil.
③.Vo us pouvez ch oisir d e passe r en mode D omest ique
au mode magasin. Si vous choisissez le le mode magasin,
la so urce sera au tomat iquem ent sur HDMI 1 e t vous
pouvez retirez les affichages POP en appuyant sur la
touche Exit de la télécommande.
FR
Ecran télé plat à LED Guide d'utilisation FR-14
Page 76

1. 1) Recherche automatique (DVB-T)
CHANNEL
PICTURE
SOUND
TIME
OPTION
LOCK
Auto Tuning
ATV Manual Tuning
Prog ramme E dit
Signal Information
DTV Manual Tuning
Software Update(USB)
CI Information
OK
Programme(s)
Programme(s)
Programme(s)
Programme(s)
1
OK
MENU MOVE OK
1). ▲▼ Appuyez sur la touche MENU puis sur les touches
pour sélectionner le menu CHANNEL puis sur la touche OK.
2). Appuyez sur les touches pour sélectionner Auto
Tuning (recherche automatique) puis sur OK.
▲▼
3). La recherche des chaînes démarre. Cette opération
peut prendre jusqu'à 6 minutes. L'écran affiche l'état
d'avancement de la recherche et le nombre de chaînes
trouvées.
4). Si vous voulez ignorer la recherche ATV, appuyez
sur la touche MENU pour l'interrompre. Un écran
s'affiche, appuyez sur la touche◀pour sélectionner
YES (OUI) pour confirmer. Vous serez redirigez
directement à la recherche DTV. Vous pouvez répéter
l'étape ci-dessus si vous voulez ignorer recherche DTV.
Un rappel d'installation apparaîtra la prochaine fois
vous allumez le téléviseur.
5). Une fois la recherche terminée, les chaînes seront
disposées dans un ordre préétabli. Si vous souhaitez
ignorer des chaînes, modifier l'ordre des chaînes
préréglées ou les renommer, sélectionnez Programme
Edit (Modifier les programmes) dans le menu Channel.
6)
Congratulations!!!
Completed Initial Quick Setup.
Enjoy your Haier TV
Press OK to Exit
3). Appuyez sur les touches pour sélectionner DVB-
T/DVB-C, appuyez pour sélectionner DVB-T puis sur OK
pour confirmer.
▲▼
4). Dans le menu Tune Type (type de recherche), appuyez
sur les touches◀▶pour sélectionner ATV/DTV/DTV +
ATV. Appuyez sur la touche▼puis sur les touches
◀▶
pour sélectionner le pays d'utilisation du téléviseur.
Appuyez sur OK pour confirmer.
▼▲
Utilisation
1.MENU CANAL
FR-15 Ecran télé plat à LED Guide d'utilisation
Page 77

5).La recherche des chaînes démarre. Cette opération
peut prendre jusqu'à 6 minutes. L'écran affiche l'état
d'avancement de la recherche et le nombre de chaînes
trouvées
6). Si vous voulez ignorer la recherche ATV, appuyez sur la
touche MENU pour l'interrompre. Un écran s'affiche,
appuyez sur la touche◀pour sélectionner YES (OUI) pour
confirmer. Vous serez redirigez directement à la recherche
DTV. Vous pouvez répéter l'étape ci-dessus si vous voulez
ignorer recherche DTV. Un rappel d'installation apparaîtra
la prochaine fois vous allumez le téléviseur.
7). Une fois la recherche terminée, les chaînes seront
disposées dans un ordre préétabli. Si vous souhaitez
ignorer des chaînes, modifier l'ordre des chaînes
préréglées ou les renommer, sélectionnez Programme
Edit (Modifier les programmes) dans le menu Channel.
1.2) Recherche automatique (DVB-C)
2). ▲▼ Appuyez sur les touches pour sélectionner Auto
Tuning (recherche automatique) puis sur OK.
Programme(s)
Programme(s)
Programme(s)
Programme(s)
1
CHANNEL
PICTURE
SOUND
TIME
OPTION
LOCK
Auto Tuning
ATV Manual Tuning
Programme Edit
Signal Information
CADTV Manual Tuning
Software Update(USB)
CI Information
OK
OK
MENU MOVE OK
OK
French
Italy
Greece
Nederlands
Poland
Germany
Hungary
Luxembourg
Norway
1). Appuyez sur la touche MENU puis sur les touches
pour sélectionner le menu CHANNEL puis sur la
touche OK.
▲▼
OK
French
Italy
Greece
Nederlands
Poland
Germany
Hungary
Luxembourg
Norway
Utilisation
3). Appuyez sur les touches pour sélectionner
DVB-T/DVB-C puis appuyez sur OK pour confirmer
▲▼
4).Drücken Sie die Tasten , um den Such-Typ,
Frequenz, Netzwerk ID und Symbol (Ks/S)
auszuwählen und drücken Sie die OK Taste zum
Bestätigen.
▲▼
5). Dans le menu Tune Type (type de recherche),
appuyez sur les touches ◀▶pour sélectionner
ATV/DT V/DTV + ATV. Appuyez sur la touche ▼puis
sur les touches
◀▶▼▲pour sélectionner le pays
d'utilisation du téléviseur. Appuyez sur OK pour
confirmer.
FR
Ecran télé plat à LED Guide d'utilisation FR-16
Page 78

6). La recherche des chaînes démarre. Cette opération
peut prendre jusqu'à 6 minutes. L'écran affiche l'état
d'avancement de la recherche et le nombre de chaînes
trouvées.
7).Si vous voulez ignorer la recherche ATV, appuyez sur la
touche MENU pour l'interrompre. Un écran s'affiche,
appuyez sur la touche ◀ pour sélectionner YES (OUI)
pour confirmer. Vous serez redirigez directement à la
recherche DTV. Vous pouvez répéter l'étape ci-dessus si
vous voulez ignorer recherche DTV. Un rappel
d'installation apparaîtra la prochaine fois vous allumez le
téléviseur.
8).Une fois la recherche terminée, les chaînes seront
disposées dans un ordre préétabli. Si vous souhaitez
ignorer des chaînes, modifier l'ordre des chaînes
préréglées ou les renommer, sélectionnez Programme
Edit (Modifier les programmes) dans le menu Channel.
2. 1) R echerche manuelle DTV (DVB-T)
Toutes les chaînes, y compris ATV, DTV et radio peuvent
être recherchées en une fois, si le type de recherche est
DTV + ATV.
Toutes les chaînes mémorisées seront effacées après
une recherche automatique.
Après la recherche automatique, le téléviseur se
syntonise à la première chaîne numérique (DTV).
2). Appuyez sur les touches
▲▼ pour sélectionner DTV
Manual Tuning (recherche manuelle DTV ) puis sur OK.
4). Appuyez sur la touche MENU pour retourner au menu
principal.
5). Appuyez sur la touche EXIT pour quitter le menu.
2. 2) Recherche manuelle DTV (DVB-C)
1). Appuyez sur la touche MENU puis sur les touches
pour sélectionner le menu CHANNEL puis sur la
touche OK.
▲▼
3). L'écran DTV Manual Tuning (recherche manuelle
DTV) s'affiche. Appuyez sur les touches ◀▶ pour
sélectionner UN canal UHF puis sur la touche OK pour
lancer la recherche dans ce canal. Lorsque le signal est
accordé, l'image et la force du signal sont affichées à
l'écran.
1). Appuyez sur la touche MENU puis sur les touches
pour sélectionner le menu CHANNEL puis sur la touche OK.
2). Appuyez sur les touches pour sélectionner CADTV
Manual Tuning (recherche manuelle CADTV) puis sur OK.
3). L'écran CADTV Manual Tuning (recherche manuelle
CADTV) s'affiche. Appuyez sur les touches
4). Appuyez sur la touche MENU pour retourner au menu
principal.
5). Appuyez sur la touche EXIT pour quitter le menu.
▲▼
▲▼
▲▼
pour
sélectionner (Fréquence/Symbole (ks/s/QAM type QAM)
puis sur OK pour lancer la recherche dans ce canal. Lorsque
le signal est accordé, l'image et la force du signal sont
affichées à l'éc ran.
Programme(s)
Programme(s)
Programme(s)
Programme(s)
1
490000
16
NO SIGNAL
CHANNEL
PICTURE
SOUND
TIME
OPTION
LOCK
Auto Tuning
ATV Manual Tuning
Programme Edit
Signal Information
CADTV Manual Tuning
Software Update(USB)
CI Information
OK
OK
MENU MOVE OK
CHANNEL
PICTURE
SOUND
TIME
OPTION
LOCK
Auto Tuning
ATV Man ual Tuni ng
Programme Edit
Signal Information
DTV Manual Tuning
Software Update(USB)
CI Information
OK
OK
MENU MOVE OK
D
Remarque:
Utilisation
FR-17 Ecran télé plat à LED Guide d'utilisation
Page 79

5). Informations sur la CI : (en option)
Ce menu peut afficher des informations sur la carte CI.
Ren ame (Re nommer)
Utilisez les touches fléchées pour sélectionner la chaîne
que vous souhaitez déplacer. Ensuite, appuyez sur la
touche jaune pour sélectionner la fonction Déplacer.
Une fois activée, utilisez les touches fléchées pour se
déplacer et appuyez sur OK pour confirmer.
Vous ne pouvez renommer que les programmes ATV.
Déplacez le curseur sur le programme, appuyez sur la touche
télétexte verte pour renommer le programme.
Appuyez sur▲▼pour choisir un caractère. Appuyez sur◀▶
pour déplacer le curseur.
Appuyez sur la touche Menu pour quitter la modification,
appuyez sur EXIT pour quitter le menu.
Remarq ue : Les noms des programmes ATV ne peuvent être que
de 5 carac tères, les noms des programmes DT V peuvent êtr e de
25 caractères.
Appuyez sur la touche télétexte rouge pour mémoriser les
chaînes après la recherche manuelle.
4). Modification des programmes :
Vous pouvez supprimer, renommer, déplacer, ignorer et
rendre favori tout programme.
Delete (Supprimer)
Appuyez sur la touche télétexte rouge, le programme
pointé par le curseur sera supprimé.
Appuyez sur pour choisir le programme, appuyez sur
la touche télétexte bleue pour ignorer ce programme, le
symbole apparaît sur le côté droit du programme.
Choisissez le programme ignoré, appuyez à nouveau sur la
touche bleue pour annuler ignorer, le symbole va
disparaître.
▲▼
ATV Manual Tuning
Storage To 1
System BG
Cur rent CH 1
Search
Fine-Tune
Fre quenc y 424.2 5 MHz
3) Recherche manuelle de programmes
analogiques (ATV) :
Vous pouvez changer le système audio pour rechercher les
chaînes de télévision analogiques puis affiner les canaux
sélectionnés
Favorite (Favoris)
Appuyez sur pour choisir le programme, appuyez sur
la touche FAV, le symbole apparaît sur le côté droit du
programme. Choisissez le programme FAV, appuyez à
nouveau sur la touche FAV pour annuler FAV, le symbole
disparaît.
▲▼
Une fois votre groupe favori créé, vous pouvez appuyer sur
la touche FAV pour accéder rapidement à votre programme
favori.
1). Teinte n'est disponible qu'avec le système NTSC.
2). Il y a quatre modes de température des couleurs
disponibles : moyen, chaud, froid, et personnalisé
3). L'écran est disponible en mode PC uniquement qui
permet de régler la position horizontale, verticale, la taille
et la phase.
3. Menu Audio
Le troisième élément du Menu principal est le Menu audio.
Ici vous pouvez régler l'effet sonore tel que aigus, graves,
balance, etc.
Appuyez sur
▲▼ pour se déplacer, appuyez sur OK pour
régler.
Volume automatique : disponible uniquement lorsque le
volume du signal d'entrée est trop élevé ou présente une
distorsion.
Pic ture Mo de Standard
Contrast 50
Brightness 50
Color 50
Sharpness 75
Tint 5 0
Color Temperature Medi um
Red 5 0
Gre en 50
Blu e 50
4. Menu Temps
Le quatrième élément du Menu principal est le Menu
Temps ; vous pouvez régler l'heure, l'heure marche/arrêt,
le temps de veille automatique, etc. Appuyez sur◀▶pour
se déplacer, appuyez sur OK pour régler
Le second élément du Menu principal est le Menu Image.
Ce menu permet de régler les paramètres de l'image tels
que contraste, luminosité, etc.
Appuyez sur OK pour se déplacer, appuyez sur OK pour
régler.
Sav e MENU
MENU
MENU
CHANNEL
PICTURE
SOUND
TIME
OPTION
LOCK
Picture Mode
Aspect Ratio
Noise Reduction
Screen
Color Temperature
Eco
Mild
User
Stsndard
OK
MENU MOVE OK
CHANNEL
PICTURE
SOUND
TIME
OPTION
LOCK
Soun d Mode
Auto Vo lume
Surround Sound
Balance
Standard
Music
Theater
Sports
User
OK
MENU MOVE OK
Move (Déplacer)
Skip (Ignorer)
Utilisation
Remarque :
Remarque:
Remarque:
2. Menu Image
FR
Ecran télé plat à LED Guide d'utilisation FR-18
Page 80

5.Menu Options
Le cinquième élément du Menu principal est le Menu
Options. Vous pouvez choisir la langue des menus, la
langue audio, la langue de sous-titres, etc.
Dans 15 minutes, il n'y aura pas de signal, le téléviseur
passe en veille automatiquement, si Veille automatique est
activée (ON). L'heure peut être obtenue automatiquement
via le système DT V
6. Menu Verrouillage
Le sixième élément du Menu principal est le Menu
verrouillage. Vous pouvez verrouiller le système, définir un
mot de passe, verrouiller des programmes et définir le
contrôle parental, après avoir activé le système de
verrouillage, vous ne pouvez pas rechercher les chaînes ou
modifier les programmes.
Le mot de passe par défaut est 0000. En cas d'oubli du mot de
passe, il est possible d'utiliser le super mot de passe : 9443.
Verrouillage de programmes : Appuyez sur
▲▼ pour choisir
le programme, appuyez sur la touche télétexte verte pour
verrouiller le programme. Si vous voulez déverrouiller le
programme, accédez au menu principal, entrez le mot de
passe, puis appuyez sur la touche verte. Contrôle parental :
Appuyez sur◀▶ de choisir une classification.
7. Menu EPG (Guide Électronique des Programmes)
Le Menu EP G est utilisé pour avoir une idée sur les programmes
télé et ra dio de la journé e.
Pour accé der au Menu EPG, a ppuyez sur la tou che EPG, le menu
suivant s'affiche :
1.
Utilisez pour choisir les programmes, appuyez sur la
touche INFO, pour afficher les informations du
programme mis en surbrillance.
INFO
2.
Appuyez sur la touche télétexte jaune pour lister tout le
Programme, appuyez sur pour choisir la liste,
appuyez sur la touche rouge DELETE pour supprimer la
liste de programmes
▲▼
Schedule (Programme)
Sch edule L ist 04: 55 28th Ap r Delete
Time Date
Programme Title
Channel Name
La restauration des paramètres par défaut, efface tous les
pro grammes et m ot de pas se.
1. Le téléviseur lance la séquence d'arrêt automatique, si au
bou t de 4 heur es de mis e en marche au cun cha ngement n'est
apporté, par exemple changement de chaîne ou de volume.
Une fenêtre apparaîtra à l'écr an.
Au bout de 150 secondes, le téléviseur passe
automatiquement en mode veille. Appuyez sur une touche
quelconque de la télécommande pour éviter l'arrêt
automatique.
2. Sélectionnez Automatic powerdown (4H) dans le menu
Options pour annuler l'arrêt automatique.
Appuyez sur OK. Un message apparaîtra “Are you sure you
want to enable automatic powerdown?” (Etes-vous sûr de
vouloir activer l'arrêt automatique ?)
Utilisez la touche vers la droite pour sélectionner NO (NON).
L'écran du téléviseur retourne au menu Options et l'option
arrêt automatique (4H) s'affiche.
Automa tic power- down (4 H) OFF (d ésact iver l' arrêt
automatique)
Pour r etour ner à l'arrêt automatique après 4 heures répéter ce
qui précède, en utilisant la touche vers la gauche pour
sélectionner YES (OUI)
Dans le système de fichiers PVR, vous pouvez configurer le
disque USB pour PVR.
XXX’s to automatic power-down
Please press any Key to Cancel
CHANNEL
PICTURE
SOUND
TIME
OPTION
LOCK
Lock System
Block Program
Parental Guidance
Set Password
OK
OK
MENU MOVE OK
CHANNEL
PICTURE
SOUND
TIME
OPTION
LOCK
OSD Language
Subtitle Language
Country
PVR Fi le Syst em
Restore Factory Default
Automatic power-down(4h)
Home/Shop Mode
DCR
Audio Languages
OK
OK
MENU MOVE OK
CHANNEL
PICTURE
SOUND
TIME
OPTION
LOCK
Clock
Off Time
Sleep Timer
Auto Sleep
Time Z one
On Time
OK
OK
MENU MOVE OK
26/Jan
11: 40
1 TV3
Club/Super3-Naturalmen..
No Information
No Information
PROGRAMME GUIDE
Schedule
Record
INFO
Remind
TIME
2 3/24
3 TVC HD
OK
INDEX
USB Disk
Time S hift Si ze
Speed
Sel ect Dis k C:
Che ck PVR Fi le Syst em Star t
Format
Fre e Recor d Limit 6 H r.
OK
MENU
Utilisation
Remarque:
Remarque:
Remarque:
Arrêt automatique
FR-19 Ecran télé plat à LED Guide d'utilisation
Page 81

CHANNEL
PICTURE
SOUND
TIME
OPTION
LOCK
OSD Language
Subtitle Language
Country
Restore Factory Default
Automatic power-down(4h)
Home/Shop Mode
DCR
Audio Languages
OK
OK
MENU MOVE OK
3. Record (Enregistrer)
Appuyez sur la touche rouge pour choisir le programme à
enregistrer.
4.
Appuyez sur la touche bleue pour choisir un programme
et mettre en place une heure de rappel, le téléviseur passe
automatiquement au programme choisi à l'heure de rappel.
Reminder (Rappel)
Vérifier le système de fichiers PVR : vérifiez si le système de
fichiers PVR est défini dans le dispositif USB ou pas.
Formater:
Sel ect Dis k
USB 0
Dis k C:
PVR File System Type Hi Spe ed FS
PVR F ile Sys tem Siz e All
SD 10 4 Mins
HD 29 M ins
File System Size
Sélec tion de disque : sélec tionnez le disque pour
enregistrer le fichier d'enregistrement.
PVR File System Type FAT32
SD 10 4 Mins
HD 29 M ins
File System Size
1.Préparer l'enregistrement d'un programme
8. Fonction PVR
la fonctio n PVR fon ction ne uniq uemen t sur la TNT.
Ent rez dans le sy stème d e fichi ers PVR d ans le me nu
Options, choisissez "Vérifier le système de fichiers PVR".
Cliquez sur "OK", jusqu'à ce que "Vérifier" se transforme
en "Réussi".
Remarque : sélectionnez le terme "Vitesse". S'il prend en
charge "HD", cela signifie que la vitesse du dispositif USB
peut supporter l'enregistrement décalé (TimeShift).
Dans le cas contraire, formatez le dispositif pour
s'assurer qu'il la prendra en charge. La valeur par défaut
"Limite d'enregistrement" est 6 heures, si l 'espa ce sur le
disque est suffisant. Si l'espace n'est pas suffisant, le
temps d'enregistrement devrait être réduit en fonction
de l'espace disponible sur le disque. Pendant le
processus "Vérifier le système de fichiers PVR", ne faites
aucune opération jusqu'à ce qu'il soit terminé.
Les enregistrements doivent être faits avec le système TV
PVR. Ils ne peuvent être regardés que sur le même
téléviseur et non avec n'importe quel autre type de
dispositif (ordinateur, lecteur DVD, etc.) qui n'est pas
compatible avec les fichiers de format .TS.
Notez que pour réaliser des enregistrements de tout
type, le téléviseur vous obligera à format er le dis posit if
USB connecté pour stocker l'enregistrement.
AVERTISSEMENT VOUS PERDREZ TOUS LES FICHIERS ET
INFORMATIONS SUR LE DISPOSITIF USB EXTERNE LORS
DU FORMATAGE.
CAPACITE DE STOCKAGE DU DISPOSITIF.
Le système de fichiers USB limitera la taille la capacité de
stockage.
Système de fichiers : NTFS jusq u'à 2 To
FAT32 jusqu 'à 192 Go
FAT16 jusqu 'à 2 Go
Dan s le menu O ption s entrez dan s le syst ème de fi chier s
PVR comme indiqué ci-dessous :
1 TV3
37 Mi nute
11 Hou r
Jan M onth
26 Da te
Onc e Mode
Reminder
BACK
OK
PVR Fi le Syst em
OK
OK
OK
USB D isk
Time S hift Si ze
Speed
Sel ect Dis k C:
Che ck PVR Fi le Syst em Star t
Format
Fre e Recor d Limit 6 H r.
OK
MENU
Utilisation
FR
Ecran télé plat à LED Guide d'utilisation FR-20
Page 82

Le menu ci-dessous apparaît une fois le formatage terminé :
2. Enregistrer le programme
3. Lire l'enregistrement
(Suggestions du format de formatage du dispositif en "FS
grande vitesse ..." ce qui peut accélérer l'enregistrement.)
Format disk
Si vous sélectionnez l'option mode de formatage "FS
grande vitesse", vous pouvez modifier la taille de lecture
décalée (TimeShift) :
Do no t unplu g USB dev ice.
Formatting,please wait
Format disk
En co urs de le cture d e source DTV, choisiss ez le can al et
cliquez sur "Enregistrer", l'écran d'enregistrement
app araît . Cliqu ez à nouveau s ur "Enr egistrer ", l 'écran
d'enregistrement disparaît et le symbole "REC" reste
affiché dans le coin supérieur gauche. Il disparaîtra
lor sque vo us cliquez sur " stop"
Le programme se ra sauvega rdé dan s le doss ier
"_MSTPVR" du dispositif USB.
1. La capacité de stockage USB peut être comprise entre
128 e t 500 Go, mais p our des r aison s prati ques, il est
recomm andé d' utili ser 2 Go à 500 Go.
2. La v idéo ri sque de d eveni r pixélisé e si le déb it vidé o
est t rop fai ble. Cel a peut êt re dû à la co nnexion d'un
câb le à rallonge USB au lieu d'une connexion directe du
tél évise ur via un c âble US B
3. Les dis posit ifs USB n e sont pa s tous compa tible s.
Voic i une lis te des le cteur s USB rec omman dés.
Les modè les qui n e sont pa s listé s peuvent êt re
compatibles, mais ce n'est pas garanti.
La li ste de di sposi tifs USB sup portés es t la même q ue
celle de la fonction Timeshift (lecture décalée), reportezvou s aux pag es suivant es pour p lus de dé tails.
Sta rt Exit
Format disk
Warn ing! All d ata wil l be lost .
OK
USB Disk
Time S hift Si ze
Sel ect Dis k C:
Check PVR File System SUCCESS
Format
Pass
Pass
All
Spe ed HD Support
2730KB/S
Fre e Recor d Limit 6 H r.
USB Disk
Time S hift Si ze
Sel ect Dis k C:
Check PVR File System Checking
Format
Pass
Pass
All
Speed
Checking
Fre e Recor d Limit 6 H r.
OK
MENU
OK
MENU
Time S hift Si ze
Time S hift Di sk Size 5 12 MB
SB 14 M ins
HD 4 Mi ns
OK
Utilisation
FR-21 Ecran télé plat à LED Guide d'utilisation
Page 83

Préparer l'enregistrement d'un programme
9.Fonction Timeshift (lecture décalée)
Ce téléviseur vous permet de faire une pause et
d'e nregistr er le progra mme num ériqu e en cour s dans un
dispositif de stockage USB, et de reprendre au point où il
s'était arrêté.
Le formatage d'un dispositif de stockage USB
2.0 serait nécessaire. Sauvegardez vos données
avant de formater. Toutes les données stockées
dans le dispositif USB seront effacées après un
formatage.
Format de stockage du lecteur USB
Sélectionnez cette option pour formater le dispositif
USB et pour allouer l'espace pour la fonction
TimeShift (lecture décalée).
Le processus de formatage prendra au moins 2
min utes. N'ét eignez pas l'a ppareil et n e retirez pa s le
dispositif USB pendant le formatage.
Lors du formatage, un test de vitesse sera effectué sur
le dispositif USB. S'il échoue, cela signifie que le
dispositif USB peut ne pas supporter la fonction
TimeShift (lecture décalée).
Enregistrer une émission DTV
(télévision numérique) mise en pause sur le
dispositif de stockage USB
Ne dé branc hez pas l e dispo sitif d e stock age USB
lor sque la foncti on TimeS hift es t en cour s.
Enviro n 4 Go de mém oire ta mpon of fre 140 minu tes
d'enregistrement.
1. En m ode sou rce d'entrée DT V, insérez le dis posit if
de st ockage US B dans le p ort USB sit ué sur le c ôté de
votre téléviseur.
2. Ap puyez sur PAUSE (29 ) pour dé marre r la fonc tion
TimeShift (lecture décalée). Le programme TV en
pause. L'OSD TimeShift apparaît, et l'enregistrement
démarre.
3. Ap puyez sur STOP (2 8) pour a rrête r la fonc tion
TimeShif t et arrê ter l'enre gistreme nt du pro gramme.
Pause FF Prev. NextFB Stop
Repeat ALL
00:04:22
Set A
AB
play
00:04:22
REMARQUE:
REMARQUE:
REMARQUE:
Utilisation
FR
Ecran télé plat à LED Guide d'utilisation FR-22
Page 84

8. Cette fonctionnalité n'est pas disponible pour toutes
les TV numériques, tels que les canaux brouillés ou audio
seulement.
Limites du TimeShift :
1. Lorsque la fonction TimeShift est activée, seules les
touches PLAY/PAUSE/STOP/FWD/REV/ VOL+/VOL-/MUTE
et quelques touches de fonctionnement de base
(ENTRER / EXI T / navig ation) sont disponi bles.
2. La l ecture vidéo p eut ne pa s être co ntinue et peut
présenter des sauts si la vitesse d'enregistrement USB ne
répond pas aux exigences minimales.
3. Ne retirez pas le dispositif USB et n'éteignez pas
l'appareil pendant l'opération TimeShift. L'opération sera
abandonnée dès que le signal est perdu.
4. Ne r etirez pas l a source du signal lors d e l'opérat ion
TimeShift.
5. Ne changez pas rapidement et de façon répétée les
opérations entre PLAY/PAUSE/FWD/REV.
6. La v idéo ri sque de devenir pixélisée si le débit vidéo
est trop faible.
7. Pas tou s les dis posit ifs USB sont c ompat ibles, le
courant électrique des disques durs USB devrait être
<50 0 mA.
Voici une liste des lecteurs USB recommandés. Les
mod èles qu i ne sont p as listés peuvent ê tre compat ibles ,
mais ce n'est pas garanti.
Clé U SB Flash San Disk Ex treme® Conto ur™ SDCZ8-8192-E75 8Go
Clé U SB Flash San Disk Ex treme® Conto ur™ SDCZ8-016G-A75 16Go
Clé U SB 2.0 Flash K ingston D ataTrave ler
410 DT410/16Go
Clé U SB 2.0 Flash K ingston D ataTrave ler
410 - DT410/ 8Go
Clé U SB 2.0 Flash O CZ Techno logy ATV OCZUSBATV-8Go
Clé U SB 2.0 Flash O CZ Techno logy Ra lly2 OCZUSBR2DC-4Go
Clé U SB 2.0 Flash O CZ Techno logy Ra lly2 OCZUSBR2DC-8Go
SAMSUNG-HM500JI-500G
Utilisation
FR-23 Ecran télé plat à LED Guide d'utilisation
Page 85

Cliquez sur l'icone de la source, et sélectionnez l'USB
dans la liste, pressez le bouton OK pour entrer dans le
menu USB.
10. Lecteur USB
Assurez-vous que le dispositif USB est inséré dans la
fente. Il existe quatre types d'éléments multimédia qui
peuvent être sélectionnés, tels que photo, musique, film
et texte. Sélectionnez l'élément multimédia en appuyant
sur◀▶,appuyez sur OK pour accéder au menu de
sélection de disque.
Appuyez sur la touche ◀▶ pour sé lecti onner l e bon
disque et appuyez sur OK pour afficher les fichiers et
dossiers multimédias ou choisir Retour pour revenir au
menu de sélection du type multimédia.
Sélectionnez le fichier multimédia en appuyant sur◀▶
ou ▼▲,pour afficher l'image de prévisualisation.
Appuyez sur la touche▶ pour lire le fichier multimédia
en plein écran. Lorsque le fichier multimédia (photo,
fil m, ou tex te) est e n cours d e lectu re, appuye z sur la
touche OK ou sur la touche Info pour afficher la barre de
contrôle.
App uyez sur◀▶pour s électio nner l' icône d e la
fonction , appuy ez sur la touche O K pour va lider l a
fonction.
Appuyer sur▼o u sur le bo uton Ex it pour q uitte r la barre
de co ntrôle except er pour l a musiq ue.
La le cture U SB est pr ise en ch arge po ur les formats d e
fichiers photo suivants :
- JPE G (form at JPEG, les f ichie rs avec l 'extension ".Jp g")
- BMP ( fichi ers avec l'e xtens ion ".Bmp" )
- PNG ( fichi ers avec l'e xtens ion ".Png" )
La le cture U SB est pr ise en ch arge po ur les formats d e
fichiers audio suivants:
- MP3 ( fichi ers avec l'e xtens ion ".Mp3")
- WAV (fichie rs avec l'ex tensi on ".Wav")
La le cture U SB est pr ise en ch arge po ur les formats d e
fichiers texte suivants :
- TXT (fichi ers avec l'extens ion ".Txt" )
La le cture U SB est pr ise en ch arge po ur les formats d e
fichiers vidéo suivants :
- AVI (fichier avec l'extension ".Avi")
- TS (MP EG2 et H. 264)
Pause FF Prev. NextFB Stop
Repeat ALL
00:04:22
Set A
AB
play
00:04:22
PHOTO MUSIC TEXT MOVIE
Haier Innovation Life
USB2.0 Back
MENU
Move Select
OK
Return C
Haier Innovation Life
Back
MENU
Move Select
OK
Picture
Back
MENU
Move Select
OK
Return 720 480 1080Up Fold er 0021.JPG
0021.JPG
SUB-10.avi
Resolution: 720x 40 0
Subt it le :
Prog ra m:
Size: 4142 KBy te s
Close
AudioTrack: 1 /1
OFF
--/0
Utilisation
REMARQUE:
Vous p ouvez régler l a piste audio, ou progra mme dan s le
menu Info pendant la lecture du fichier vidéo. Choisissez
l'i cône In fo et app uyez sur OK po ur affi cher le M enu Info.
FR
Ecran télé plat à LED Guide d'utilisation FR-24
Page 86

Image Audio
Neige Bruit
position de l'antenne, direction
ou co nnexi on
Vérification Inspection
Interférence
Bruit
équipements électroniques,
voi ture / moto, lumi ère fluore scente
I ma ge no r ma le Son coupé
Volu me (vér ifiez s i muet es t activé
ou si l es conn exion s du système
aud io ne son t pas cor rects )
Pas d'image
Le cordon d'alimentation n'est pas inséré.
L'interrupteur d'alimentation n'est pas
ouvert. Configuration du contraste,
luminosité/volume.
Appuyez sur la touche standby (veille) de
la télécommande pour inspection.
Pas de couleur Audio norma Contrôle d es coul eurs
Rupture de l'image
Audio normal
ou fa ible
Recherchez le canal
Pas de couleur
Bruit
Système TV
Audio normal
position de l'antenne, direction
ou co nnexi on
Symptôme du problème
fantôme
Audio normal
Changer le format d'image en zoom
Il y a un e barre noire
en ha ut et en ba s
Dépannage
05 Dépannage
Son coupé
FR-25 Ecran télé plat à LED Guide d'utilisation
Page 87

Ma télé n'affiche pas l'image sur
mon ordinateur portable/PC
lorsqu’il est connecté.
Pour la plupar t des PC et ordinateurs portables c onnec tés avec un
connecteur VGA (c onnec teur bleu à 15 broch es de votre PC ou
ordinate ur portable ) il faut a ppuyer sur quelq ues touches du votre
clavier pour o btenir une image s ur un téléviseur o u un autre écran
externe. En général, il s’agit de la touche F7 (Dell), F4 (HP/Samsung)
ou F5 ( Toshiba). Su r les ordinateurs portables, vous de vez appuyer
sur l a touche « Fonction » en mê me temps que la touche "F".
J'ai connecté mon PC/ordinateur
portable au téléviseur et j'obtiens
une image mais pas de son.
Pourquoi ?
Le câble VGA ne transporte que des i nformations vidéo ou imag e.
Vous devez connecter un autre câble à la prise écouteurs
(connecteur 3, 5 mm) de votre PC/ ordinateur p ortable au
connecteur 3,5mm (entrée Audio PC) de votre téléviseur. Vous
devez sélectionner « PC » en utilisant la touche Source de votre
télécommande. Vous pouvez également connecter votre
PC/ ordinateur p ortable via u n câble H DMI si celui-ci dispos e d'un
connecteur HDM I. HDMI t ransmet à la foi s de l’audio et de la vidéo.
L'image n'est pas redimensionnée
automatiquement lors de
changement de chaînes.
Vérifi ez que le format de l’i mage té lé est réglé sur « Auto » pour
toutes les entrées ATV, DTV, Pé ritel, HDMI 1, 2, etc.
Pour définir le for mat de l’ima ge (Auto, 4:3 ou 16:9). Appuyez sur la
touche Démarrer sur l’ATV et répétez la séquence ci- dessous p our
toutes les sources d'entré e ATV, DT V, Péritel, HDM I 1 et 2 car
chaque source d'entrée est contrôlée séparément.
App uyez sur la touc he TV Menu
Appuyez sur la flèche droite pour accéder au sous-menu Image
App uyez sur la flèche vers le bas pour sélectio nner As pect Ratio
(Forma t d’image)
Sélectionnez Auto (Automatique)
App uyez sur (Quit ter)
Répétez l'opération pour toutes les sources d'entrée.
Dès que je connecte un lecteur DVD
ou un autre appareil à ma télévision,
ce dernier ne fonctionne plus.
Ceci est applicable à tout appareil connecté au téléviseur
Eteignez le téléviseur et le lecteur D VD (déb ranchez de la prise
murale, et n on mise e n veille).
Éteignez tout appareil connecté à la pri se péri tel.
Déc onnec tez la pris e péritel du télév iseur.
Branchez et al lumer l e télév iseur
Branchez et al lumer l e lecteur D VD
Sélec tionnez HDMI à partir du menu So urce
App uyez sur Lec ture du lec teur DV D et de vérifier que l a vidéo
fonctionne
Rem arque : La prise péritel est priori taire sur HDMI et il est
important que l'appareil connecté à la prise péritel du téléviseur
soit éteint (pas en veille).
Veuill ez suiv re les instruction s ci-dess ous. Si l'appareil et le lecteur
DVD fonctionnent, le téléviseur est en bon état de marche sauf
qu’il est un pe u confus.
Probablement les connecteurs HDMI ont été retirés et reconnectés
lor sque le télévise ur est al lumé.
Ne retirez /connectez jamai s des câb les HDM I ou tout autre
appareil numérique lorsque l'appareil est allumé.
Eteignez toujours tous les appareils lors de
connexion/déconnexion ou d’un équipement numérique.
Dépannage
Dépannage
FR
Ecran télé plat à LED Guide d'utilisation FR-26
Page 88

Un exemple typique de problème de réception comprend la déco mposi tion de l 'imag e en pixel s (pixi latio n) ou blo cage d' image ,
par fois il y a d es grincements ou crissements ou ba isse de s on ou pas d e récep tion du t out.
Votr e image p eut se dé compo ser en pi xels à cause d e la dégr adation du s ignal v idéo nu mériq ue. La dégra dation du si gnal pe ut due à
des signaux faibles (voir Antennes TV) ou si vous êtes connecté par câb le, à un si gnal de c âble fa ible. S’i l s’agit d e signa ux faibles,
utilisez un amplificateur pour renforcer le signal. Consultez un tec hnici en de câb les pou r insta ller un a mplif icate ur ou un
préamplificateur dans le câble. Ceci permet de renforcer la puissanc e du sign al et rés oudre le p roblè me de pix elati on.
Si vo us recev ez votr e signal TV pa r satel lite, vé rifie z que vot re parabole n’a pas bougé suite à des ven ts viol ents, o u que le si gnal est
bloqué par des arbres. Les arbres peuvent être un problème car le signal TV peut changer selon que l’arbre entre l'antenne
parabolique et le satellite est nue ou avec feuilles.
Chaînes manquantes
Vous pouvez constater que certaines chaînes sont manquantes ou que vous r ecevez d es chaî nes de ré gion in corre cte.
Parfois, les services interactifs (bouton rouge) ne fonctionnent pas. Cela est généralement dû à un sig nal fai ble, vo ir Antennes TV.
Antennes TV
Un téléviseur utilise une antenne pour recevoir la télévision numé rique terr estre ( TNT ), l'an cienn e anten ne qui re cevait
correctement la télévision analogique, ne le fait plus pour le num érique et i l faut la m ettre à n iveau. S i vous re cevez ce rtai nes chaînes
numériques, mais pas toutes, de la télévision numérique (TNT) par exemple BBC1, BBC2, Channel 4, mais pas ITV ou Channel 5, c'est
gén érale ment pa rce que vo tre ant enne es t à bande é troite e t doit êt re chan gée en la rge ban de.
Fils et câbles défectueux
Vérifiez votre téléviseur. Est-ce que les fils du secteur, de l'antenne, du décodeur, du lecteur vidéo ou DVD ou l’enregistreur son t
correctement connectés ? Les fils d 'une pr ise pér itel se d esser rent av ec le temps et p euvent con duire à des pr oblèm es audi o et vidé o
(image). L'audio gauche ou droite ou les deux sont manquantes et les couleurs sont mauvaises ou pas nettes. Le problème sera résolu
en insérant fermement les prises Péritel.
Les connecteurs HDMI doivent également être insérés fermement, c'est q ue les co ntact s se font par le d ernie r milli mètre.
Généralement, la partie en plastique noir du connecteur HDMI doit être très proche ou touche le téléviseur ou le composant.
Vous pouvez rencontrer des problèmes lors du branchement des câbles HDMI s’ils s ont bra nchés l orsqu e le télé viseu r ou composa nt
est allumé. Eteignez toujours le téléviseur et le composant que vous br anche z.
Si vous branchez des fiches et des prises, éteignez le téléviseur et t out ce qu e vous ave z branc hé à ce der nier, pu is rall umez-les.
J'ai connecté mon PC au téléviseur. Pas de son.
Si en connectant votre PC ou ordinateur portable au téléviseur en utilis ant un câ ble VGA (S ub-D 15 b roche s) il n'y a p as d’au dio, vous
devez connecter un câble audio séparé au la télévision à part ir du PC/ ordin ateur p ortab le.
Couleurs anormales et couleurs chair
Les couleurs chair et autres couleurs anormales peuvent présenter un aut re probl ème, mê me avec un nou veau télév iseur H D. Cela
est d û à des rég lages de l'image télé, qui sont optimisées pour un environnement d'exposition. Vous pouvez corriger cela en
changeant le mode d'image en naturel dans le menu Image. Pour plus de précision, essayez de régler manuellement les couleurs, le
contraste et la luminosité dans le menu image.
Contours blancs
Des contours blancs autour des objets et des personnes apparaissent généralement si la netteté du téléviseur est très élevée, ou si
votre téléviseur utilise une technologie d'amélioration des bords. Allez dans le menu image et réglez la netteté jusqu'à ce que les
contours blancs disparaissent. Si l'amélioration de bord est activé e, essa yez de la d ésact iver en u tilis ant le me nu serv ice.
Vidéo instable
À certains moments, la vidéo peut devenir instable. Lorsque cela s e produ it, vér ifiez s i le sign al est su ffisa mment fo rt. Si l e signal est
suffisamment fort, le problème est dû au câblodistributeur. Si la force du s ignal est fa ible, u tilis ez un amp lific ateur po ur renforcer le
signal.
L'image ne remplit pas l'écran
Lors de la connexion d’un PC/ordinateur portable au téléviseur, l'i mage pe ut ne pas r empli r l'écran. Vér ifiez l es para mètre s
d'affichage sur votre PC/ordinateur portable (Windows > Déma rrer > Pan neau de c onfig urati on > Appa rence et per sonnalisation >
Paramètres d'affichage) et sélectionnez la meilleure résolution. Sur votre téléviseur, sélectionnez : Menu T V > Pictu re (Ima ge) >
Settings (Réglages) puis essayez AUTO, ZOOM1 ou ZOOM2 pour obtenir le meilleur affichage.
Connexion USB
La connexion USB fonctionne avec des fichiers *.jpg (photo) et *.mp3 ( audio ). Il convie nt de not er que le télé viseu r ne reconna ît pas
un iP hone/ iPod d'Ap ple con necté a u port US B du télé viseu r. Le télévis eur peu t lire d' autres f ichie rs, mai s à cause d es dive rs formats
de fichiers, il n'y a aucune garantie que cela fonctionne.
Dépannage des problèmes de télévision numérique et solutions possibles
Dépannage
Décomposition de l'image en pixels
FR-27 Ecran télé plat à LED Guide d'utilisation
Page 89

Dépannage
FR
Spécification
Qualité d'image du
téléviseur :
FUL L HD
Numérique intégré.
Taille d'écran :
Résolution 1920x1080 pixels 50Hz.
117cm
Téléviseur numérique LCD LED 46" Full HD 1080p
Autres caractéristiques :
NIC AM stereo so und sys tem.
2 x 8 wat ts RMS power o utput .
Qualité sonore:
Caractéristiques
numériques :
Consommation en veille
<0.5W
Connectivité :
2 pri ses HDM I.
1 pri se péri tel.
Prise d'entré e PC.
Prise vidéo composante.
Composite.
1 por t USB.
Interactivité numérique.
Texte numérique.
Sous-titrage Digital Video Broadcasting (radiodiffusion vidéonumérique) (DVB)
disponible.
Configuration automatique.
Recherche automatique des nouvelles chaînes.
Gui de prog ramme en cou rs et sui vant.
Gui de élec troni que des p rogramme s (EPG) d e 7 jours.
Récepteur numérique intégré.
Log ement de car te CI.
Compatible Description audio.
Tune r UHF/V HF.
Mise en veille programmable.
Verrouillage enfants.
Ima ge et tex te.
2 Pil es AAA de l a téléco mmand e (incl uses) .
Dimensions du support de montage VESA : 200 x 200 mm
Dim ensio ns du paq uet (Lx HxP) : mm
Dim ensio ns du pos te (LxH xP) avec soc le : mm
Dim ensio ns du pos te (LxH xP) san s socle : mm
Poids du paquet : kg
Poid s du post e avec so cle : kg
Poid s du post e sans so cle : kg
1285x780x170
1074x703x280
1074x645x78
17
13.7
11.8
* Les spécifications de ce téléviseur ne sont fournies ici qu'à titre de référence.
Des différences peuvent apparaître car la technologie du produit est en amélioration continue.
La conception et les caractéristiques sont sujettes à modification sans préavis.
Description de sortie Péritel :
1. Lorsque la source en cours est ATV/AV/SCART, le signal de sortie péritel est ATV.
2. Lorsque la source en cours est DTV, le signal de sortie péritel est DTV.
3. Une autre source n'a pas de signal de sortie péritel.
Ecran télé plat à LED Guide d'utilisation FR-28
Page 90

Page 91

Lees deze handleiding zorgvuldig door alvorens het toestel te gebruiken en
bewaar het voor latere naslag.
LED-achtergrondverlichte platte TV
GEBRUIKSAANWIJZING
Page 92

Installatiegids
04 DE WERKING
14
KANAAL MENU 15
Automatisch afstemmen (DVB-T) 15
Automatisch afstemmen (DVB-C) 16
DTV handmatig afstemmen (DVB-T)
DTV handmatig afstemmen (DVB-C)
ATV handmatig afstemmen
17
17
18
19
GELUID MENU
18
TIJD MENU
18
INSTEL MENU
KINDERSLOT MENU
EPG-MENU (electronische programmagids)
19
PVR-FUNCTIE
20
Voorbereiding om een programma op te nemen
20
19
Het programma opnemen
21
Een nummer afspelen
21
Functie om de tijd te verschuiven
22
Voorbereiding om een programma op te nemen
22
USB-DRIVE OPSLAG FORMATTEREN
22
OPN EMEN VAN EEN GEPAUZEERD DTVPRO GRAMMA NAAR EEN US BOPSLAGAPPARAAT
22
TIJDVERPLAATS-beperkingen:
23
USB-speler
24
Oplossen van problemen
05 Oplossen van problemen
25
Specificatie 28
BEELD MENU 18
Welkom
Belangrijke informatie
01 Veiligheid en waarschuwingen
2
2
Mededeling over de veiligheid
Waarschuwingen en voorzichtigheid
3
4
Belangrijkste kenmerken
Montagewijze van het voetstuk
02 Introductie
5
7
Richtlijnen voor monteren aan een muur
Het voorpaneel
8
9
AV-verbindingen
9
Het aansluiten van uw tv
Gemeenschappelijke interface
10
11
Afstandsbediening
03 Afstandsbediening
12
TÉLÉTEXTE
13
Inhoud
Inhoud
Insertion des piles dans la télécommande
12
Programma wijzigen
CI-informatie
18
18
DU-1 LED-achtergrondverlichte platte TV Gebruiksaanwijzing
Page 93

Hartelijk dank voor de aanschaf van deze 46” LED/LCD-tv. Deze handleiding zal u helpen bij het
opzetten en het gebruik van uw tv.
Controleer eerst de inhoud van de doos, met de onderdelen die vermeld staan op de
onderstaande lijst:
LEES EERST ALLE INSTRUCTIES DOOR EN BEWAAR DEZE HANDLEIDING VOOR LATERE VERWIJZING.
LET OP!
Nu kunt u beginnen!
01 Veiligheid en waarschuwingen
Veiligheid en waarschuwingen
WELKOM
46” volledige HD 1080P LED/LCD-tv
Afstandsbediening
2x AAA batterijen
Handleiding
Snelle startgids
scart kabel*1
Stand
BELANGRIJKE INFORMATIE
KANS OP EEN ELEKTRISCHE SCHOK
NIET OPENEN
LET OP!
MAAK DE AFDEKPLAAT (OF ACHTERKANT) NIET OPEN, DIT OM HET RISICO VAN EEN ELEKTRISCHE
SCHOK TE VOORKOMEN. ER BEVINDEN ZICH GEEN GEBRUIKERSONDERDELEN IN DIT APPARAAT. NEEMT
U CONTACT OP MET DE KLANTENDIENST VOOR EVENTUELE PROBLEMEN. ER BEVINDT ZICH EEN
BLIKSEMSCHICHT/PIJLSYMBOOL IN DE DRIEHOEK. DIT SYMBOOL GEEFT AAN DAT ER ZICH EEN HOOG
VOLTAGE BINNENIN BEVINDT. HET KAN GEVAARLIJK ZIJN OM ELKE VORM VAN CONTAC T TE MAKEN MET
DE ONDERDELEN BINNENIN DIT PRODUCT.
ER BEVINDT ZICH EEN UITROEPTEKEN IN DE DRIEHOEK: DIT SYMBOOL ATTENDEERT U EROP DAT ER
BELANGRIJKE LITERATUUR MEEGELEVERD IS BIJ DIT PRODUCT BETREFFENDE HET ONDERHOUD EN
INBEDRIJFSTELLING.
LET OP:PLAATS HET TV-TOESTEL NIET IN DE BUURT VAN VOCHTIGHEID, DIT OM HET RISICO
VAN ELEKTRISCHE SCHOKKEN EN BRAND TE VERMIJDEN. GEBRUIK GEEN SCHURENDE
SCHOONMAAKMIDDELEN DIE KRASSEN OF SCHADE AAN HET LCD-SCHERM KUNNEN
AANBRENGEN. VOORKOM CONTACT MET VOORWERPEN DIE HET LCD-SCHERM KUNNEN
BESCHADIGEN.
OPMERKING:HET ONDERHOUDEN VAN HET APPARAAT DOOR UZELF IS NIET TOEGESTAAN
EN KAN TOT LETSEL LEIDEN, OF TOT SCHADE AAN HET PRODUCT. NEEM CONTACT OP MET DE
KLANTENDIENST VOOR AL HET ONDERHOUD.
DU
LED-achtergrondverlichte platte TV Gebruiksaanwijzing DU-2
Page 94

KENNISGEVING OVER
DE VEILIGHEID
Waarschuwing: Verwijder de afdekplaat of
achterkant niet om het risico van een
elektrische schok te voorkomen. Er bevinden
zich geen gebruikersonderdelen binnen in het
apparaat. Laat onderhoud over aan
gekwalificeerd personeel.
Waarschuwing: Het apparaat mag niet
blootgesteld staan aan regen of vocht om brand
of een elektrische schok te voorkomen.
Stel de product niet bloot aan water (druppels
of spatten) en plaats geen objecten gevuld met
vloeistoffen zoals vazen op het apparaat.
Houd het product uit de buurt van direct
zonlicht en warmtebronnen zoals radiatoren of
kachels.
Blokkeer de ventilatie-openingen niet. Sleuven
en openingen van het apparaat zijn bedoeld
voor ventilatie. De openingen mogen nooit
geblokkeerd worden door uw product op een
kussen, bank of soortgelijk oppervlak te
plaatsen.
Gebruik het product niet op een onstabiel
karretje, standaard, statief, beugel of tafel. Het
apparaat kan vallen wat resulteert in mogelijke
schade of mogelijk letsel.
Plaats nooit zware of scherpe voorwerpen op
het paneel of frame.
Haal de stekker uit het stopcontact wanneer het
apparaat niet in gebruik is.
Er moet speciale aandacht besteed worden aan
milieu-aspecten bij inzameling van batterijen.
WAARSCHUWING: de batterijen (of accu's)
mogen niet blootgesteld worden aan extreme
hitte zoals zonlicht, vuur en dergelijke.
Deze afbeelding geeft aan dat dit product niet
weggegooid mag worden met ander
huishoudelijk afval in de gehele Europese
Gemeenschap. Zorg voor verantwoord recyclen
zodat het duurzaam hergebruik van
grondstoffen bevorderd wordt en om mogelijke
schade aan het milieu of de menselijke
gezondheid te voorkomen door
ongecontroleerde afvalverwijdering. Breng uw
gebruikte apparaat naar het grofvuil of neem
contact op met uw winkelier waar dit product
gekocht is om uw gebruikte apparaat in te
leveren. Zij kunnen voor een milieuveilige
recycling van dit product zorgen.
Veiligheid en waarschuwingen
DU-3 LED-achtergrondverlichte platte TV Gebruiksaanwijzing
Page 95

Dim:515*320mm(不包括底座)
Waarschuwing
Deze televisie-ontvanger gebruikt hoge
spanningen tijdens de werking. Verwijder de
afdekplaat of achterkant van dit apparaat niet.
Laat onderhoud aan gekwalificeerd personeel
over.
Stel de televisie-ontvanger nooit bloot aan
regen of vocht om brand of een elektrische
schok te vermijden.
Waarschuwing
Laat dit product niet vallen, duw geen
objecten in de gleuven of openingen van de
televisie. Mors nooit enige vloeistof op de
televisieontvanger.
Waarschuwing
Voorzorgsmaatregelen
Blokkeer de ventilatie-openingen aan de
achterkant niet. Voldoende ventilatie is
essentieel om te voorkomen dat elektrische
componenten falen.
Zorg ervoor dat het snoer zich nooit onder de
televisie-ontvanger bevindt.
Voorzorgsmaatregelen
Leun of sta nooit op de televisie of standaard, of
druk er niet plotseling tegenaan. Besteed
speciale aandacht aan kinderen. Een ernstig letsel
kan veroorzaakt worden indien het toestel valt.
Voorzorgsmaatregelen
Plaats uw televisie niet op een onstabiel karretje,
standaard, plank of tafel. Een ernstig letsel aan
een individu of schade aan de televisie kan
veroorzaakt worden indien het valt.
Voorzorgsmaatregelen
Het is raadzaam om de stekker uit het stopcontact te
halen wanneer de televisie-ontvanger langere tijd niet
gebruikt wordt.
Voorzorgsmaatregelen
Indien de televisie ingebouwd wordt in een
compartiment of soortgelijke behuizing, moeten
de minimum afstanden gehandhaafd worden.
Warmte-ontwikkeling kan de levensduur van uw
televisie verkorten en kan ook gevaarlijk zijn.
Voorzorgsmaatregelen
WAARSCHUWINGEN EN
VOORZICHTIGHEID
Minimum afstanden
Veiligheid en waarschuwingen
DU
LED-achtergrondverlichte platte TV Gebruiksaanwijzing DU-4
Page 96

INSTALLATIE
OPGELET
* Plaats de tv in de kamer waar het licht niet
rechtstreeks in aanraking komt met het
scherm.
* Totale duisternis of een reflectie op het
beeldscherm kan leiden tot vermoeide ogen.
Zachte en indirecte verlichting wordt
aanbevolen voor meer kijkcomfort.
* Laat voldoende ruimte tussen de tv en de
muur om ventilatie mogelijk te maken.
* Vermijd uitzonderlijk warme plaatsen om
schade aan de kast of voortijdig falen van een
component te voorkomen.
* Bedek de ventilatie-openingen niet
wanneer de tv in gebruik is.
Belangrijkste kenmerken
Belangrijkste kenmerken
HDMI-interface en SCART-interface;
4
NICAM;
5
3
Tijdsverschuiving;
Hoge helderheid, brede kijkhoek;
2
Kan gebruikt worden als televisie,
beeldscherm, pc-scherm;
1
Paneel
PAL/SECAM
46
YPbPr >=400
Samengestelde video-ingang
Knoei nooit met onderdelen binnenin de TV of
andere instelknoppen die niet in deze handleiding
beschreven zijn.Alle LED-TV's zijn hoogspanning
elektrische apparatuur.
Wanneer u afstoft of er water aan het scherm, de kast,
rond de knoppen of aansluitingen komt, moet het
netsnoer uit het stopcontact worden verwijderd.
Veeg de TV af met een zachte, droge, stofvrije doek.
Ontkoppel het netsnoer en de antenne/antennekabel
tijdens onweer om schade aan uw TV en eventuele
andere aangesloten apparaten te voorkomen.
Alle reparaties aan deze TV mogen alleen door
gekwalificeerd TV-onderhoudspersoneel worden
uitgevoerd.
02 Introductie
tv-systeem
Signaal videosysteem
Ingang voedingsspanning
Horizontale definitie (TV-lijn)
Introductie
PAL-B/G, I, D/K
SECAM-B/G, D/K, L, L'
AC 100-240V 50/60Hz
Energieverbruik
98 W
Energieverbruik Stand-by
Vermogen audio-uitgang
(THD ≤ 7%)
<0.5W
2 x 8W
Ingangs signaal
Analoge RGB(PC) x1; PC audio x1
Hoge definitie multi-media interface (HDMI) x2
Video-ingang x1
Audio-ingang x1
Y/Pb/Prx1
Scart x1
CI x 1
USB x 1
Tuner x 1
RF Co-Ax x 1
>=350
DU-5 LED-achtergrondverlichte platte TV Gebruiksaanwijzing
Page 97

VOORAF INGESTELD
PC
3
5
1024x768
1280x1024
60
60
1
640x480
60
31.47
2
800x600
60
37.88
48.36
63.98
RESOLUTIE
V.Freq. (KHz) H. . (KHz)Freq
4
1360x768
60
47.7
Introductie
DU
LED-achtergrondverlichte platte TV Gebruiksaanwijzing DU-6
6
1920x1080
60
66.64
Page 98

Montagewijze van het voetstuk
1. Plaats de tv, met het scherm naar beneden,
op een vlakke ondergrond. Gebruik een doek
om het scherm te beschermen. Zoek het
schroefgat aan de onderkant.
2. Bevestig de onderkant door de schroef
stevig op de voet aan te draaien.
INSTALLATIE-OPMERKINGEN
Zoek een plek voor de tv in een kamer waar er geen rechtstreeks licht op het scherm valt.
Totale duisternis of een reflectie op het scherm kan leiden tot vermoeidheid van de ogen.
Zachte en indirecte verlichting wordt aanbevolen voor meer kijkcomfort.
Laat voldoende ruimte tussen de tv en de muur om ventilatie mogelijk te maken.
Deze televisie niet draaien a.u.b.!
Vermijd uitzonderlijk warme plaatsen om schade aan de kast of voortijdig falen van een
component te voorkomen.
Introductie
DU-7 LED-achtergrondverlichte platte TV Gebruiksaanwijzing
Page 99

RICHTLIJNEN VOOR MONTEREN AAN EEN MUUR
2. Verwijder de schroeven uit het onderste deel
van de tv, daar waar de voet de televisie verbindt
en haal de voet weg (zet de voet op een veilige
plaats voor toekomstig gebruik).
1. Plaats de LED-LCD-televisie op een
stevige ondergrond. Plaats een zachte
doek over de voork ant van het scherm om
het tegen eventuele schade te
beschermen.
3. Gebruik de vier meegeleverde schroeven om de tv vast te zetten aan de wandbeugel (niet
meegeleverd) via de vier VESA-standaardgaten aan de achterzijde van de televisie.
Deze televisie kan als volgt aan de muur gemonteerd worden:
Introductie
DU
LED-achtergrondverlichte platte TV Gebruiksaanwijzing DU-8
M6x9
M6x9
M6x9
M6x9
Page 100

AC-INPUT
100-240V~50/60Hz
Y
Pb
PrVIDEO L R HDMI2
Achter/zijcontacten
1
2
3
Sensor van de afstandsbediening.
LED-wijzer:
BLAUW: VERMOGEN AAN. ROOD: STANDBY.
Toetsen.
1
BRON
Laat het broningangsmenu zien.
MENU
Laat het hoofdmenu zien.
3
4
CH+/CH-
In de TV-instelling, druk op CH+ of CH- om
naar een hoger of lager kanaal te veranderen.
In MENU, druk op CH+ of CH- om uit
geselecteerde onderdelen te kiezen.
STANDBY
2
VOL+/VOL-
Aanpassen geluidsniveau.
In MENU, past het onderdeel aan dat u
geselecteerd heeft.
5
Het voorpaneel
Introductie
DU-9 LED-achtergrondverlichte platte TV Gebruiksaanwijzing
1
AV
2
3
YPbPr
4
5
Ingang
7
SCART
input
8
PC AUDIO input
9
L/R AUDIO
Intput
10
11
Input
12
input
1
2
3
4
5
6 7 8
10
9
11
12
DC-vermogen
HDMI2
6
HDMI1
USB
GEMEENSCHAPPELIJKE IN INTERFACE (CI)
VGA-INGANG
ANT
Intput
30 30
1
23
SOURCE
1
MENU
CH+ CH- VOL+ STANDBYVOL-
2 3 4 5
Ingang
Ingang
Ingang
Ingang
Ingang
 Loading...