

Page 1

LED LCD TV RECEIVER
USER MANUAL
Please read this manual carefully before using
your television and keep this manual in a good
place for future reference.
MODEL:
LET19C430
LET22C430
LET24C430
Page 2

Page 3
Thanks for buying this 19"/ 22"/24" LED LCD TV. This guide will help you set up and begin using your TV.
19" HD Ready LED LCD TV.
Remote control
AAA ba x2
ttery
Instruction Manual
Quick start guide
Scart cable x1
Adaptor
22" Full HD 1080P Digital LED LCD TV
Remote control
AAA ba x2
ttery
Instruction Manual
Quick start guide
Scart cable x1
Adaptor
24" Full HD 1080P Digital LED LCD TV
Remote control
AAA ba x2
ttery
Instruction Manual
Quick start guide
Scart cable x1
Adaptor
P. 0 2
Page 4

P. 0 3
Page 5
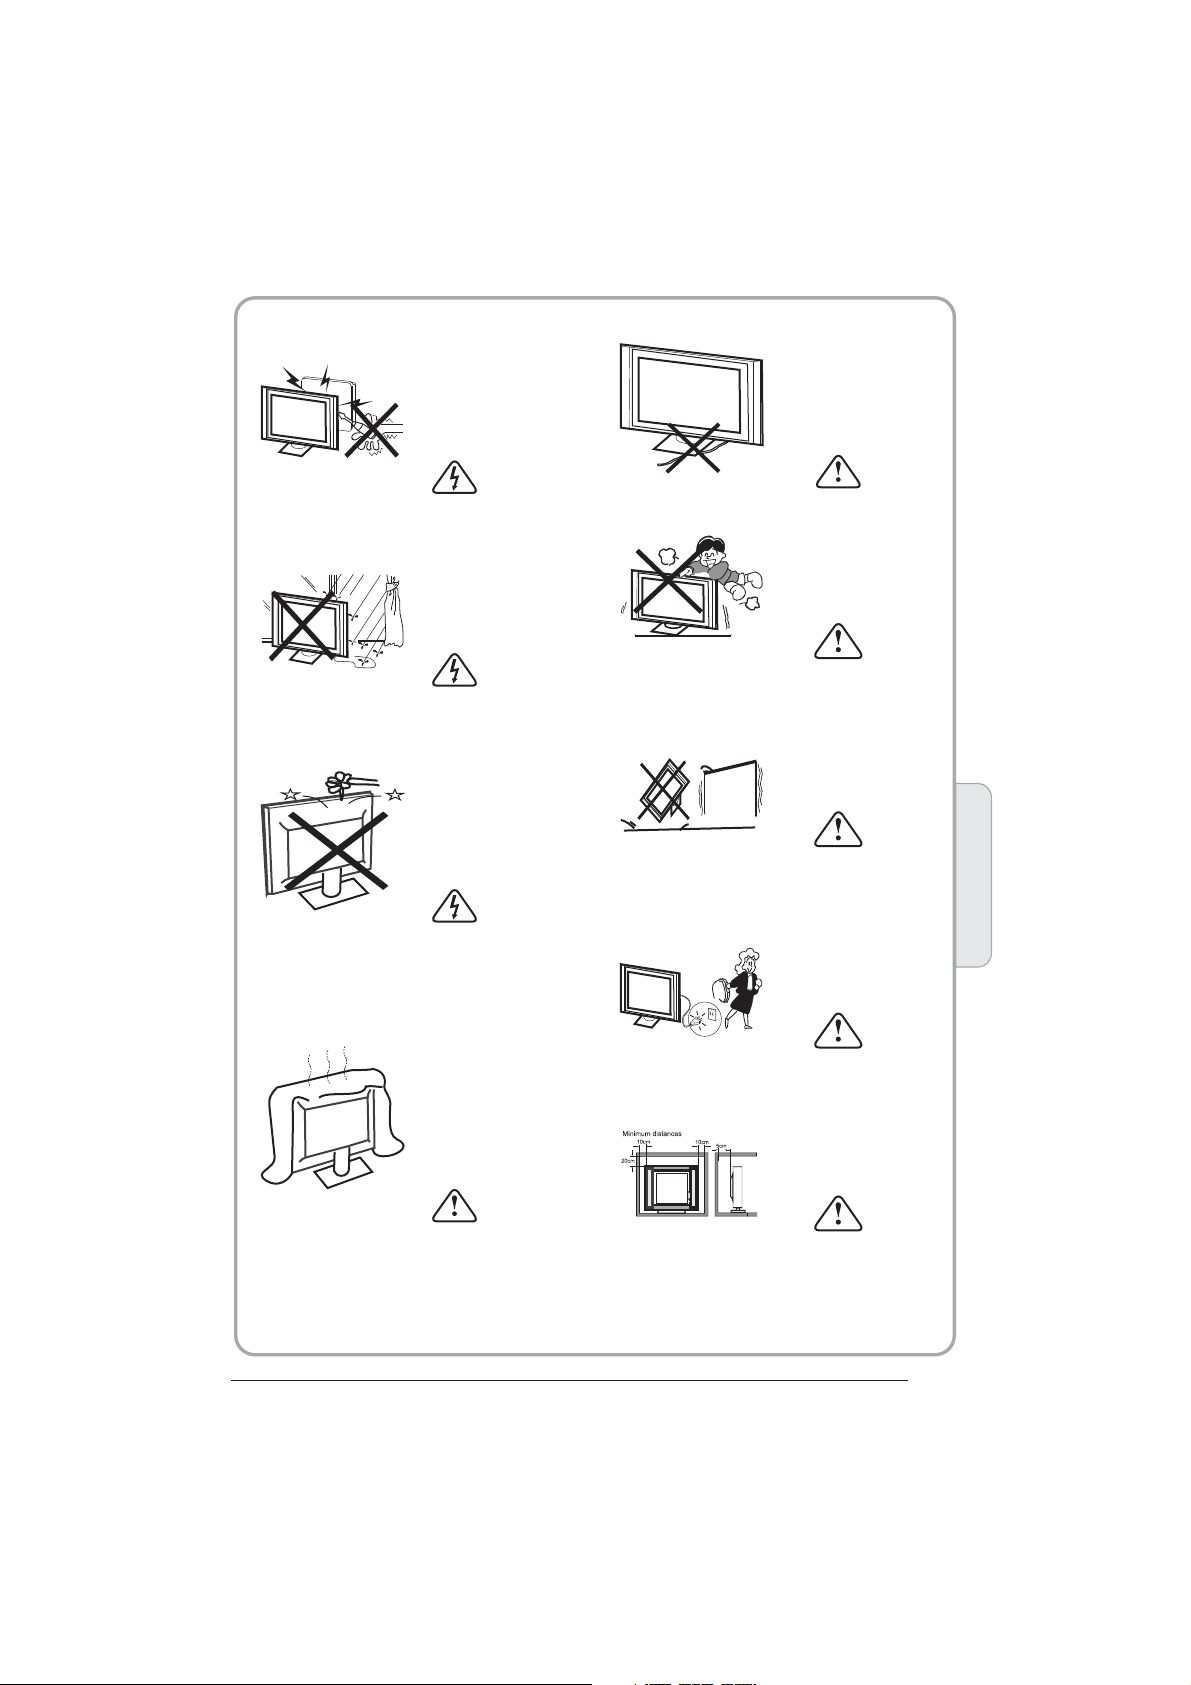
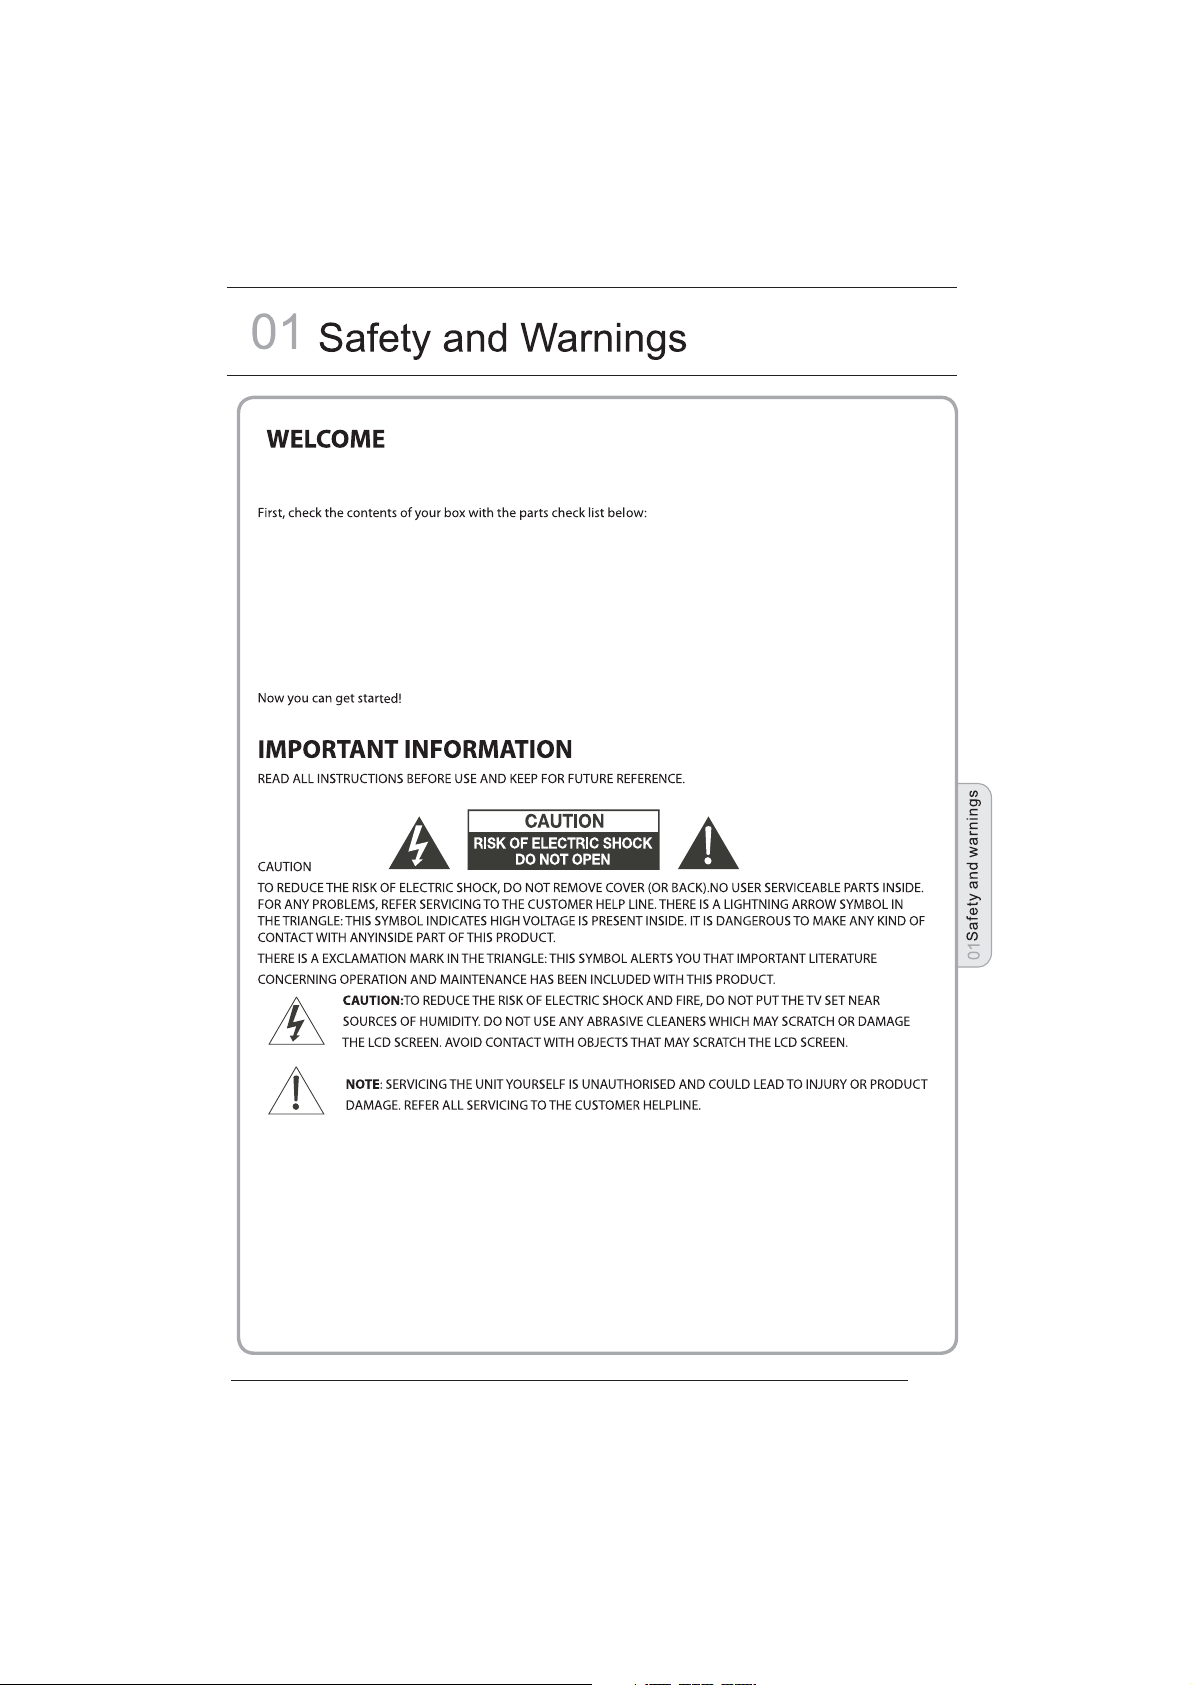
WARNINGS AND CAUTIONS
Warning
High voltages are used in the operation
of this television receiver. Do not remove
the cabinet back from your set. Refer
servicing to qualified service personnel.
Caution
Do not trap the power supply cord under
the television receiver.
Warning
To prevent fire or electrical shock
hazard, do not expose the television
receiver to rain or moisture.
Warning
Do not drop or push objects into the
television cabinet slots or openings.
Never spill any kind of liquid on the
television receiver.
Caution
Do not block the ventilation holes in the
back cover. Adequate ventilation is
essential to prevent failure of electrical
components.
Caution
Never stand on, lean on, or suddenly push
the television or its stand. You should pay
special attention to children. Serious injury
may result if it should fall.
Caution
Do not place your television on an unstable
cart, stand, shelf or table. Serious injury to
an individual , and damage to the
television, may result if it should fall.
Cauti on
When the television receiver is not
used fo r an exte nded pe riod of time , it
is advisable to disconnect the AC power
cord fr om the AC ou tlet.
Dim:515*320mm(不包括底座)
Caution
If the television is to be built into a
compartment or similar enclosure, the
minimum distances must be maintained.
Heat build-up can reduce the service life of
your television, and can also be dangerous.
Safety and warnings
01
P. 0 4
Page 6

02
Introduction
CAUTION
Never tamper with any components inside
the TV, or any other adjustment controls
not mentioned in this manual. All LED-TVs
are high voltage instruments. When you
clean up dust or water drops on the LED
PANEL or CABINET, the power cord should
be pulled out from the receptacle, then
wipe the TV with a dry soft cloth. During
thunder and lighting, unplug the power cord
and antenna cord to prevent damage to
your TV. All repairs to this TV should only
be performed by qualified TV service
personnel.
Main features
① Used as Television, d ispla y termi nal,
PC display;
② High luminance, wide viewing
Angle;
Main parameter
Panel
Power supply
Audio Output Power
Terminals:
(THD 7%)
18.5"/21.5"/23.6"
DC 12V, 3A (Powe r adaptor supplie d)
2x3W
Analog RGB(PC)x1
High-Definition Multimedia Interface (HDMI) x 2
Vdeo Input x1i
Audio Input x2
USB Input x1
YPbPr x1
Mini SCART x 1
COMMON IN INTERFACE(CI)
INSTALLATION
*Locate the TV in the room where light
does not strike the screen directly.
*Total darkness or a reflection on the
picture screen can cause eyestrain. Soft
and indirect lighting is recommended for
comfortable viewing.
*Allow enough space between the TV and
the wall to permit ventilation.
*Avoid excessively warm locations to
prevent possible damage to the cabinet or
premature component failure.
*Do not cover the ventilation openings
when using theTV.
3 HDMI in terfa ce and SC ART
Inter face;
4 NICAM;
Horizontal definition (TV line)
Composite Video input >=350
YPbPr >=400
P. 0 5
Page 7
PC
PRESET MODE
RESOLUTION
V.Freq.(Hz) H.Freq.(KHz)
1
2
3
4
5
6
640x480
800x600
1024x768
1360x768
1280x1024
1920x1080
(Olny for 21.5",23.6")
60
60
60
60
60
60
31.47
37.88
48.36
47.7
63.98
66.64
Introduction
02
P. 0 6
Page 8

Base Stand Assembly Instruction
1. Place the TV with the display side down
on a flat s urfac e.Use a c loth to protect.
Locat e the bot tom at th e stand.
2. Fix the bottom with turning the screw
tight ly on the s tand.
INSTALLATION NOT ES
Locat e the TV in a room w here li ght doe s not strike t he scre en directly. Total darkness
or a refl ectio n on the screen can cause eyestrain. Soft and indirect lighting is
recommended for comfortable viewing.
Allow enough space between the TV and the wall to permit ventilation.
Avoid excessively warm locations to prevent possible damage to the cab inet or
premature component failure.
P. 0 7
Page 9
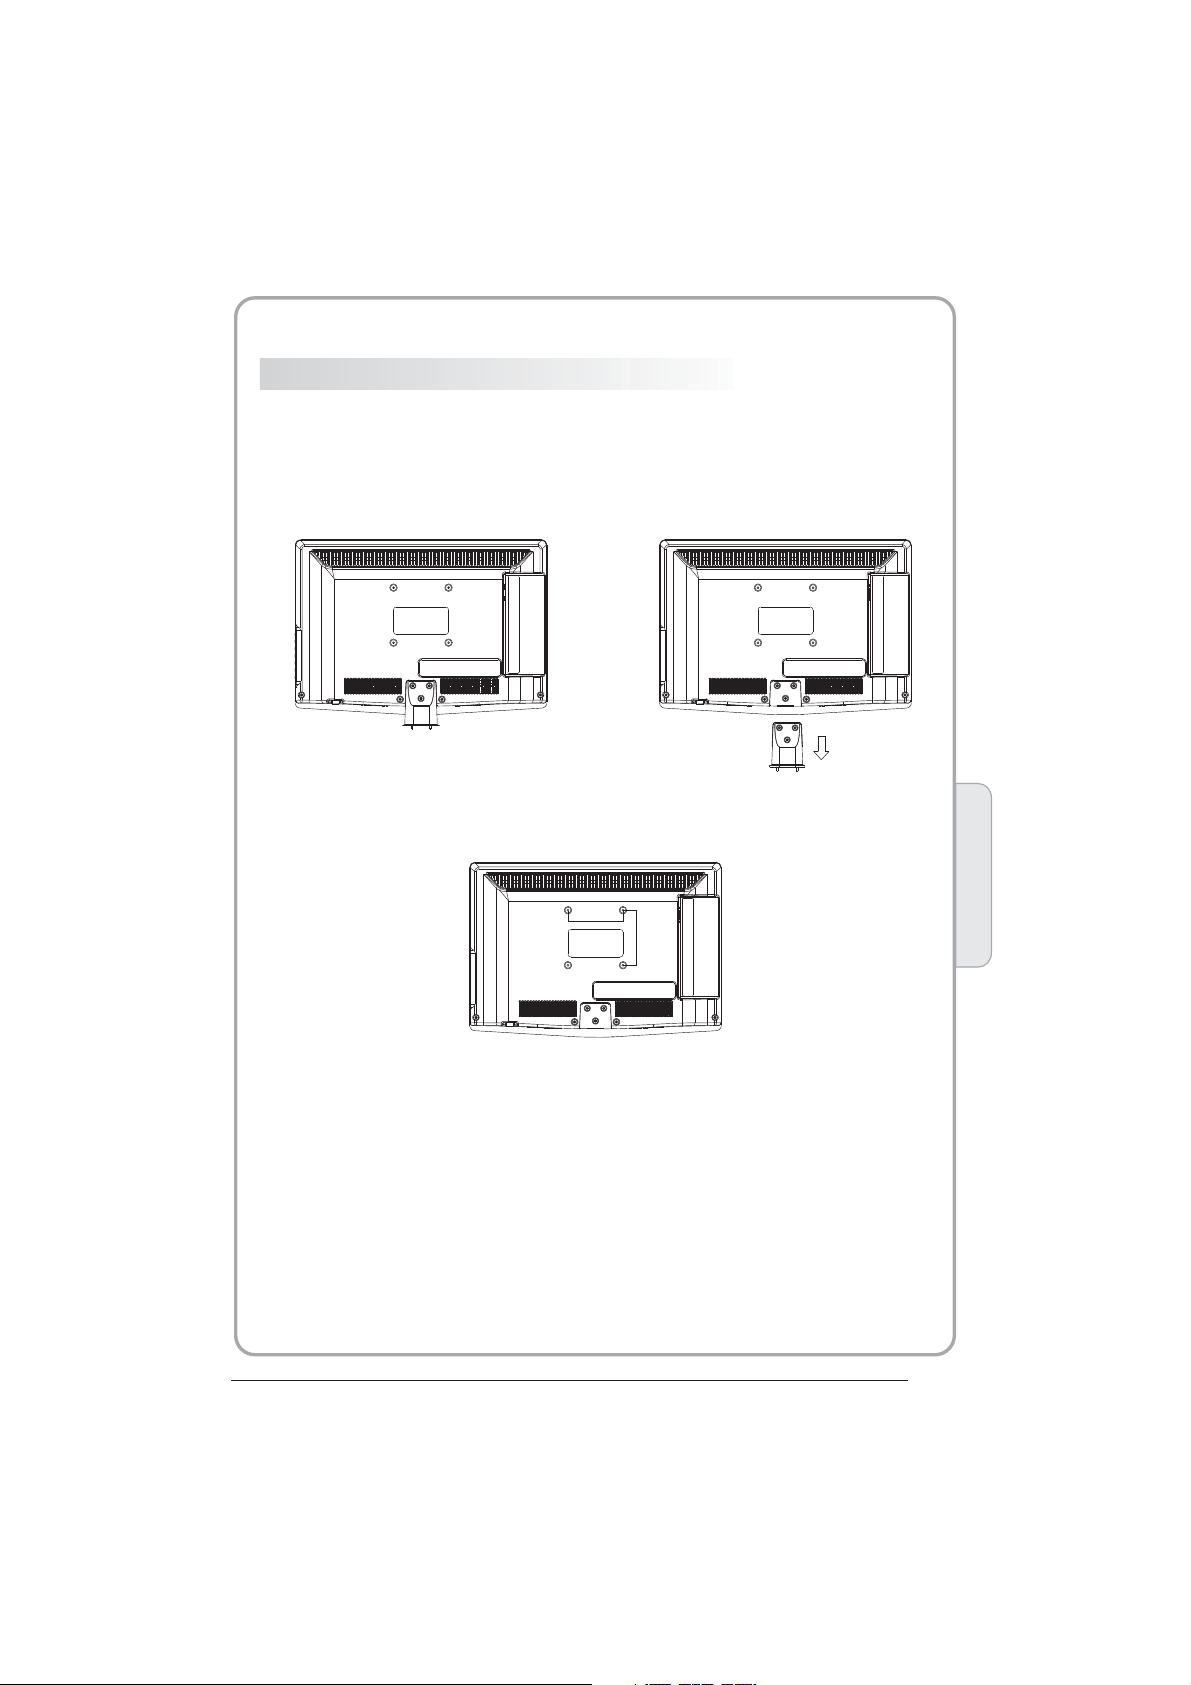
WALL MOUNTING INSTALLATI ON GUIDELIN ES
This television can be wall mounted as follows:
1.Pla ce the LE D LCD Tel evisi on onto a s olid surfa ce. Ple ase pla ce some soft material
over the front of the screen to protect it from any damage.
2.Rem ove the s crews f rom the lowe r part of t he tele vision, wh ere the b ase joi ns to the
TV, and take away the stand (put the stand somewhere safe for future use).
3.Use t he four s crews p rovided to f ix the TV onto a w all mounting bracket (not in clude d)
via the f our VES A standa rd holes on th e back of t he tele vision.
100mm
100mm
Introduction
02
P. 0 8
Page 10

Remote Control
Front control panel
SOURCE
MENU
CH+
CH-
3
1
VOL+
VOL-
STANDBY
2
1
Remote control sensor.
Indicator LED:
2
BLUE: POWER ON. RED: STAND BY.
Key board.
3
Rear/Side Sockets
AV L R Y
1 2 3 4 5
HDMI1
6 7 8
AV
1
L/R AUDIO
2
DC Power Source
3
YPbPr
4
HDMI2
5
HDMI1
6
USB
input
input
input
input
input
input
PC AUDIO
1
2
3
4
5
Pb
Pr
COMMON INTERFACE (CI)
SCART
10
9
7
8
9
10
11
12
SOURCE
MENU
CH+/CH-
VOL+/VOL-
Display the input source menu.
Display main MENU.
In TV mode,press CH+ or CH- to change
the channel up and down.
In MENU, press CH+ or CH- to select items .
In standby mode, it can Turn on the TV.
Adjust sound level.
In MENU,adjust the item that you Selected.
STANDBY
HDMI2
VGA ANT
11
USB
PC AUDIO input
COMMON IN INTERFACE(CI)
SCART
VGAINPUT
ANT
12
input
Intput
Intput
Input
input
P. 0 9
Page 11

Introduction
02
P. 1 0
Page 12

COMMON INTERFACE
< >
The common interface (CI) slot is designed to
accept the conditional Access (CA) Module
and Smart ca rd in o rde r to vi ew th e pay T V
programmes and additional services.
Contact your Common Interface service
provider to get more information about the
modules and subscription.
Please noted that CA modules and smart
cards are neither supplied nor optional
accessories from us.
CHANNEL
P. 1 1
Auto Tuning
DTV Manual Tuning
ATV Manual Tunin g
Programme Edit
Signal Information
CI In forma tion
Softw are U pdate (OAD)O ff
Softw are U pdate (USB)
Page 13

03
Remote control
1
2
3
4
5
6
7
8
9
10
11
12
30
31
32
33
POWER
1OK2 3
4 5 6
7 8 9 0
TV MENU SOURCE
CH
.LIST
+
VOL
_
SLEEP ASPECT
REVEAL
SUBPAGE SIZE MIX SUBTITLE
MUTE
AUDIO
RECALL
EXIT
SOUND
+
CH
PIC
_
TEXTTV/RADIOFREEZE
INFOFAVEPG
INDEX
LIST
HOLD
REC/REP
1:POWER:To set the TV to standby or power on.
13
14
15
16
17
18
19
20
21
22
23
24
25
26
27
28
29
2:NUMERIC KEY:
3:TV MENU:To display TV menu.
4:CURSOR:To move withi n the m enu .
5:CH.LIST:To display the channels list.
6:VOL+/- :To adjust sound level.
7:PIC:To switch pic tur e mod e.
8:SLEEP:S
9:FREEZE : To fr eez e the picture.
10:EPG:T
program be ing v iew ed an d wha t's o n nex t in
DTV mode.
11: FAV:T
in TV o r DTV m ode.
12:TELETEXT KEYS: Please refer to next page.
13:MUTE:To disable or enable the sound output.
14: AUDIO:To select the available audio
/languag e of TV programs .
15: RECALL: To access the previously viewed
channel.
16: SOURCE: To sel ect i nput source.
17: OK:To confirm selection.
18: EXIT:T
or exit menu.
19: SOUND:To switch sound m ode .
20: CH+/CH-:To access the next or previous
channels.
21: ASPECT: To cha nge p icture aspect ratio.
22:TV/RADIO:In DVB mode , it is u
between digital TV channels and radio
stations.
information .
23: TEXT:To enter or exit TELETEXT.
24: INFO:T
c
about the progr am wh en in s mal l EPG
screen in DTV mode.
25: SUBTITLE:T
subtitles in DT V mod e.
26. To skip to the next file in USB mode.
27. To sk ip to the previous file in USB mod e.
28.
are watching in DTV Mode or press to repeat play
in USB Mode.
29. Stop the media player in USB mode.
30. To scan in reverse, during USB, USB playback.
31. To sc an in forward, during USB, USB p lay bac k.
32. Play the m edia player in USB mode.
33. Pause th e med ia pl aye r in US B mod e,t ime s hif t
in DTV mode.
o access your favourite channels list
hannel being viewed or further information
REC/REP:Press to record the TV program you
For direct a cce ss to c han nel s.
et timer to turn off the TV.
o display information about the
o return to th e pre vio us me nu
sed to switc h
Display/remove
the programme
o display information about the
o switch between different
Remote Control
03
NOTE:
With no operation for 4 hours, t he un it wi ll
swift into the st and by mo de au tom ati cal ly.
P. 1 2
Page 14

REMOTE CONTROL
TELETEXT
Teletext is an information system broadcast by certain channels which ca n be
consu lted li ke a news paper. It als o offers acc ess to su btitl es for viewers with hearing
problems or who are not familiar with the transmission language(cable networks,
satellite channels, etc.)
Press:
T
EXT
SELECTING A PAGE
You will obtain :
This is used to call or exit teletext modes. The summary appears with
a list of i tem s that can be ac ces sed . Each item ha s a cor responding
3 digit p age n umber. If the c hannel selected does not broadcast
teletext, theindication 100 will be displayed and the screen will
remain blank (in this case, exit teletext and select another channel).
Enter the number of the page required using the 0 to 9 u p/down.
Example: page 120, enter 120. The number is displayed top left, the
counter turns and then the page is displayed. Repeat this operatio n to
view another page. If the c ounter continues to search, this means
that th e pag e is not trans mit ted . Select another n umb er.
E
DIRECT ACCESS
TO THE ITEMS
INDEX
SUB PAGE
HOLD
REVEAL
LIST
Coloured are as are displayed at the bottom of the screen. The 4
coloured keys are used to access the items or corresponding pages.
The col our ed areas fla sh wh en th e item or the pa ge is n ot yet
available.
This returns to the contents page (usually page 100).
Certain pages contain sub-pages which are automatically
displayed successively. This key is used to stop or resume subpage acquisition. The indication appears top left.
To freeze the page.
To display or hide the concealed information (games solutions).
The user can set four favorite pages to be directly linked to the fou r
color keys. While list mode is activated, it is not possibility to use TOP
or FLOF navigation with the colorkeys. The favorite page numbers
should be stored and restored to/from nonvolatile memory for each
channel by the system software.
P. 1 3
Page 15

04
_
+
< >
OPERATION
Installation Guide
Please select an OSD Language
Cesky
Espanol
Dansk
Deutsch
E ka
Home Mode
Shop Mode
Norway
Poland
Portugal
This screen only appear when the TV first time
turn on or reset to factory set.You can choose
language,energy-saving mode and country,
auto turning programs .And after turning the
screen will skip to the fi rst DTV pr ogram.
1.CHANNEL MENU
The first item of the MENU i s channe l menu( for
TV or DTV source only).
CHANNEL
You can search channels and edit programs her e.
1).Auto tuning:
Search all the channels automatically(you can
select ATV and DTV)
~
Rumania
Russian
Serbia
Magyar
Fran ais
Nederlands
Hrvatski
Norsk
Italiano
OK
Mode Select
OK
Country
Swit zerla nd
Slovenia
Spain
UK
NewZealand
Sweden
OK
Auto Tuning
DTV Manual Tuning
ATV Manual Tunin g
Pro gramm e Edit
Signal Information
CI Information
Softw are U pdate (OAD)O ff
Softw are U pdate (USB)
PolskiEnglish
Portugues
Pycck
Morocco
Tunis
Algeria
Tune Ty pe DTV+ ATV
Germany
Greece
Hungary
Pls press to select country at fir st , then
press OK button to start a uto tuni ng .
Italy
Luxembourg
Net herla nds
MENU
Channel Tuning
TV : 0 Pr ogram me(s)
DTV : 0 Programme(s)
Radio : 0 Prog ramme (s)
Data: 0 Programme(s)
96% U HF CH 68 DT V
Norway
Poland
Portugal
NOTE:
All the channels including ATV, DTV and Radio
can be tuning by one time, if the Tune Type is
DTV+ATV .
All the stored channels will be disappear after
auto tuning .
After auto tuning , the channel will skip to
the first DTV channel.
2).DTV Manual tuning:
You can select a DTV channel then find the
program in this channel.
Pls press to select the channel , th en press
OK to search the programs .
NOTE:
Bad Normal Good means signal intensity.
DTV Manual Tuning
VHF C H 5
Press OK to search
Bad No mal
3). ATV Manual tuning :
You can change the sound system to search
the analog TV channels and fine tune the
channels , then storag e the chan nels you
selected.
Good
Operation
04
P. 1 4
Page 16

< >
< >
ATV Manual Tuning
_
+
Storage To 1
System BG
Current CH 1
Search
Fine-Tune
Frequency 255.25 MHz
Sav e MENU
NOTE:
Press teletext red button to storage to channels
after manual tuning .
4). Program edit:
You can Delete ,Rename ,Move, Skip , FAV any
programs.
Delet e
Press teletext red button , the program in cursor
will delete.
Rename:
Only can rename ATV programs .
Move the cursor to the pro gram, pr ess teletext
green button to rename the program.
Press to choose the character. Press to
move the cursor .
Press MENU button to exi t edit , Pre ss EXIT to
exit the menu.
Note: ATV pro grams name only can be 5 character,
DTV programs name can be 2 5 character.
Use the Arrow Buttons to select the channel you
wish to move . Then press the Yellow But ton t o
select Move function. Once active, enter the
number but ton a nd th en pr ess O K to co nfi rm.
Press to choose the program , press teletext
blue button to skip this p rogram , The will
show on the right side of th e progra m .
Choose the skipped program, press blue button
again , you can cancel the skip ,The will
disappear .
Favourite
Press to choose the program , press FAV
button , it will show on the r ight sid e of the
program.Choose the FAV program , press
FAV button again , you can can cel the FAV,
the will disappear .
P. 1 5
Once your favorite group is created, you can
press the FAV key to quickly access your favorite
channel.
5). CI information: (optional)
This menu can display th e CI card' s i nformation.
2. PICTURE MENU
The second item of the MENU is PICTURE MENU.
You can adjust picture effect here, such as
contrast, brightness, etc.
Press OK to move, press OK to adjust .
Picture Mode Standard
Color Temperature
Aspect Ratio
PICTURE
Pic ture Mo de Stan dard
Contrast 82
Brightness 50
Colo r 50
Sharpness 50
Tint 5 0
MENU
NOTE:
1).Tint is available in NTSC system only.
2).There are four colors temperature modes
can be selected medium , warm, co ol,user
3).Screen is available in PC mode on ly which,
can adjust Horizontal position, vertical
position, size and pha se.
Noise Reduction
Screen
Color Temperature Medium
Red 40
Green 31
Blue 50
MENU
3.SOUND MENU
The third item of the MENU i s the SOUN D
MENU.
You can adjust the sound effec t here such as
treble, bass, balance etc.
Press to move, press OK to adjust.
Sound Mode Standard
Balance
SOUND
Note:
Auto volume: only avai lable when the input
signal volume is too large or distortion.
Auto Volume
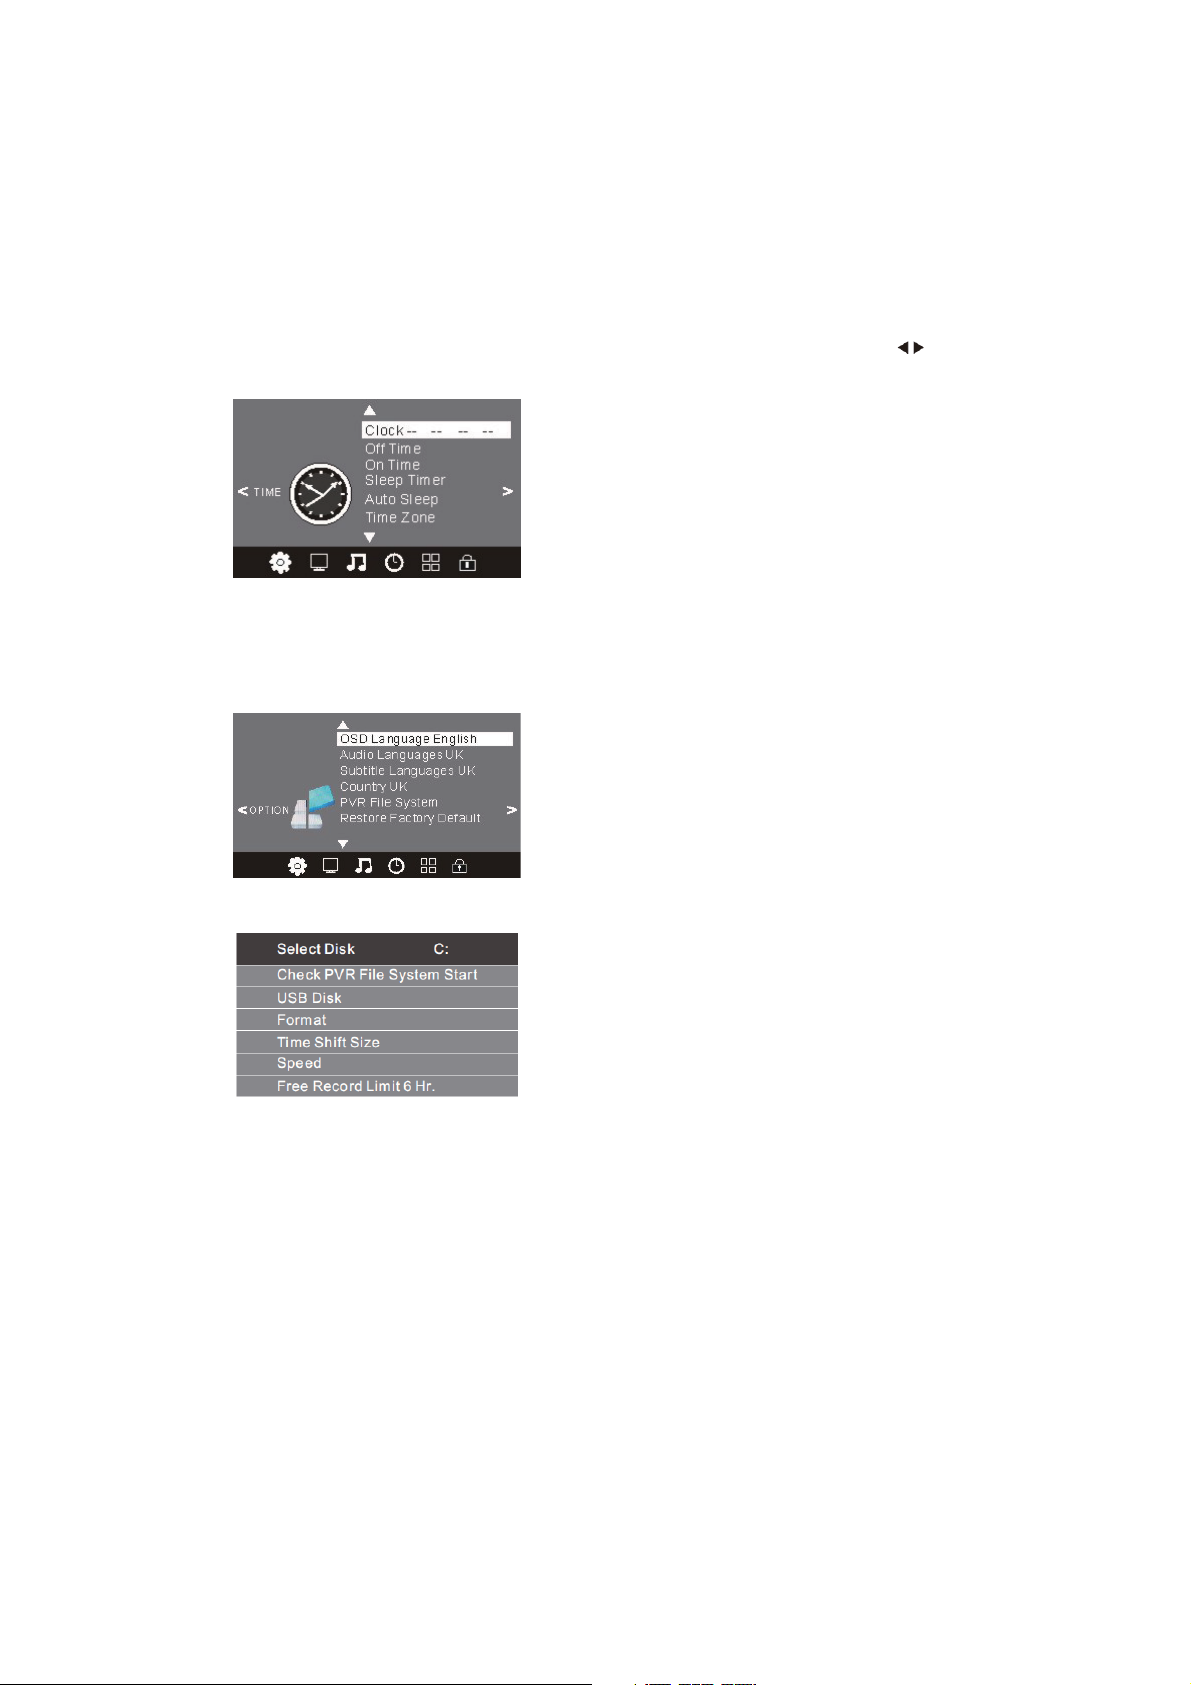
4.TIME MENU
The forth item of the menu i s the TIME MENU
You can adjust the clock, power on/off time,
sleep time etc Press to move, pres s OK to
adjust
Page 17

< >
< >
TIME
< >
_
+
Clo ck -- -- -- - -
Off Time
On Tim e
Sleep Timer
Auto Sleep
Time Zon e
NOTE:
The default pass word is 6 666.
Block program: Press to choose the
program ,press teletext green button to block
the program. If you want unblock the program,
pls enter the main menu , in put the pa ssword,
then press green butto n again.Parental
guidance: Press to cho ose rati ng.
NOTE:
Within 15 minutes ther e is no sign al, the TV
will auto sleep , if Auto Slee p is set ON. The
clock time can get from th e DTV syst em auto.
5.OPTION MENU
The fifth item of the MENU is the OPTION
MENU. You can adjust the Menu la nguage,
Audio language,Subtitle language etc.
OPTION
In PVR File sy ste m men u you c an se t up US B
disk for PVR .
Select D isk C :
Check PVR File System Start
USB Disk
Format
Time Shift Size
Speed
Free Record Limit 6 Hr.
NOTE:
Restore fa cto ry de fau lt wi ll cl ear a ll th e pro gra ms
and password.
6.LOCK ME NU
The sixth item of the menu i s the LOCK M ENU
You can lock system, set password, block prog ram
and set parental guida nce Once y ou set the lock
system on you can not sear ch the cha nnels or
change any programs.
LOCK
OSD Language English
Audio Languages UK
Subtitle Languages UK
Country UK
PVR File System
Restore Factory Default
Lock System
Set Password
Blo ck Prog ram
Parental Guidance Off
7.EPG Menu(Electronic Program
Guide).
The EPG menu is used to look a t what is be ing
broadcasted on DTV or Radio channel in the day.
To access the EPG menu, press th e EPG
botton,the followi ng menu will be displayed:
PRO GRAMM E GUIDE T IME
28 Apr
800 SZTVM01 No Information
801 SZTVM02
802 SZTVM03
803 SZTVM04
804 Date
OK
INFO
1.
Use to choose the programs , Press
INFO key, you can display the highlight program's
information.
Schedule
2.
Press the teletext yel low key, It can list
all the reminder sched ule, press to choose
the list, press red key to delete th e
schedule list, Press E PG to retu rn to EPG menu.
Sch edule Li st 04:55 28th Ap r Delete
Time D ate
3. Record
Press the red key ,It can se t the prog ram
to be recorded.
Remind
4.
Press the blue key to choo se one pro gram
and set up one reminder time, the TV screen will
skip to the choosed program in the reminder time
automatically.
04:39
No Information
No Information
No Information
No Information
ScheduleRecord INFO
DELETE
Program m e Title
Reminder setting
802 SZTVM03
08 Minute
05 Hour
Apr Month
28 Date
Once Mode
OK
Remind
INDEX
Chann el Nam e
BACK
Operation
04
P. 1 6
Page 18

8.PVR function
< >
1.Prepar e to re cor d the p rog ram
From OPTION MEN U ent er in to PV R Fil e
System In “OPTIO N MEN U”, ple ase
choose “check PVR File System”. Click
“OK”, until “checking”change into
“Success”.
Note: please check the term “speed”. If it
is “HD support”, that means the speed of
USB device is available for time shift and
record. If not, please format the device, to
make sure the device available. The default
“Free Record Limit” is 6 hour, if the space
on the disk is b ig en oug h. If t he sp ace i s not
big enough, the record time should be
shorter, depends on the room on the
device. During the “check PVR File
System” checking, please do not take any
other operation until it finished.
The recordings have to be done with TV PVR
system. It can on ly be p lay ed in t he sa me TV,
not in other k ind o f dev ice s (co mpu ter, D VD,
etc...) which doesn't be compatible with .TS.
Format.
See that in or der t o car ry ou t any k ind o f
recording, the TV will oblige you to format the
connected device to store the recording.
WARNING. WHEN YOU FORMAT, THE
EXTERNAL DEVICE WILL LOSE ALL THE
FILES AND INFORMATION YOU STORAGE
IN THE DEVICE.
From OPTION MEN U ent er in to PV R Fil e
System as below:
OSD Language Eng lish
Audio Languages
Subtitle Language
Cou ntry UK
OPTION
PVR File System
Restore Factory Default
Sele ct Dis k C:
Check PVR File System Sta rt
USB Disk
Format
Time S hift Siz e
Speed
Fre e Recor d Limit 6 H r.
Select Disk:select w hich dis c to save the
record file.
Sele ct Dis k
USB 0
Dis k C:
Check PVR File System: check if the PVR File
System set up in the USB device or not.
MENU
OK
Format:
File System Size
PVR F ile Sys tem Type H i Speed F S
PVR F ile Sys tem Siz e All
SD 10 4 Mins
HD 29 M ins
P. 1 7
MENU
File System Size
PVR F ile Sys tem Type FAT3 2
PVR F ile Sys tem Siz e All
SD 10 4 Mins
HD 29 M ins
OK
Page 19

(Suggest to format the format the device by
“High Speed Fs...”, which can speed up
the record.)
Format disk
Format disk
Warn ing! All d ata will be lost.
Sta rt Exit
Format disk
2.Record the program
As playing t he DT V sou rce , cho ose t he
channel and click “record”, the record
frame will p op up . Cli ck “record” again,
the record frame will disappear and the
“REC” icon still on t he le ft to p. It w ill
disappear until you click “stop”.
3.Play the record
In “USB”, the record prog ram w ill b e
saved in the folder “_MSTPVR” on the
device.
Do not unplug USB device.
Formatting,please wait
below menu appear after Format finish:
Sele ct Dis k C:
Check PVR File System Che cking
USB D isk Pas s
For mat Pas s
Time S hift Siz e All
Spe ed Chec king
Fre e Recor d Limit 6 H r.
Sele ct Dis k C:
Check PVR File System SUC CESS
USB D isk Pas s
For mat Pas s
Time S hift Siz e All
Spe ed HD sup port 20 48 KB/s
Fre e Recor d Limit 6 H r.
If you select the “Hi Speed FS ”format mode,
then you can change the ti me shift s ize:
Time S hift Dis k Size 5 12 MB
MENU
MENU
Time S hift Siz e
SB 14 M ins
HD 4 Min s
1. The USB storage size needs to be the
size between 4GB to 500GB.
2. Video may become pixelated when Video
bit rate is to o low.
3. Not all USB d evi ces a re co mpa tib le.
Below is a lis t of re com mended USB
drvies.Models that are not listed may be
compatible, but it is not guaranteed to work.
The USB support list are the same as
Tim esh ift f unc tio n ,se e pag e 21
Operation
04
P. 1 8
Page 20

9.Timeshift function
SUBPAGE SIZE MIX SUBTITLE
REC/REP
33
29
1.Prepar e to re cor d the p rog ram
This TV allows you to pause and record the
currently watched digital program to a USB
storage device, and to resume to the point
where it was paused.
NOTE:
Formatti ng a US B 2.0 s tor age d evi ce will
be needed. Save your original data
before for mat tin g. All t he da ta st ore d in
the USB devi ce wi ll be e ras ed af ter
formatting.
Sleep time r wil l be su spe nde d if it h ad
been set bef ore a cti vat ing t he Tim e Shi ft
function.
USB Drive Storage Format
Select to format the USB device and
allocate the amount of space for the Time
Shift function.
NOTE:
The format p roc ess w ill t ake a t lea st 2
minutes. Please do not turn off the power
or remove th e USB d evi ce du rin g
formatting.
During for mat tin g, a sp eed t est w ill b e
done on the US B dev ice . If it f ail s, it
means the USB device may not support
the Time Shif t fun cti on.
Record a paused DT V progr am to
USB stora ge devi ce
1. While in th e DTV i npu t sou rce , ins ert
USB storag e dev ice t o the U SB po rt on t he
side of your TV.
2. Press PAUSE 33 to start Time Shift
function. The TV program paused. The Time
Shift OSD appears, and starts recording.
3. Press STOP 29 to st op Tim e Shi ft
function and stop recording program.
Play Stop
FF Prev . Ne xtFB
Pause
NOTE:
Please do not unplug the USB storage
device whe n the Ti me Sh ift f unc tio n is
activated.
Approximately 4GB of memory buffers
about offer 140 minutes.
00:00:33/00:04:22
P. 1 9
Page 21

Time Shift limitations:
1. When the Tim e Shi ft fe atu re is a cti vat ed,
only the PLAY/PAUSE/STOP/FWD/REV/
VOL+/VOL -/M UTE k eys a nd so me ba sic
operation keys (ENTER/EXIT/navigation
keys) are available.
2. Video playback may not be smooth and
skip if USB re cor din g spe ed do es no t mee t
the minimum requirements .
3. Do Not remo ve US B dis k or sw itc h off the
power during Time Shift operations. It will
abort once the signal is lost.
4. Do Not remove the signal source during
Time Shift operations.
5. Do Not quickly and repeatedly change
operations between
PLAY/PAUSE/FWD/REV.
6. Sleep timer will be terminated if it had
been set bef ore Ti me Sh ift .
7. Video may become pixelated when Video
bit rate is to o low.
8. Not all USB devices are compatible, The
USB hard disk drive electricty should be
< 500MA.
Below is a lis t of re com men ded U SB dr vie s.
Models that are not listed may be
compatible, but it is not guaranteed to work.
Operation
9. This feature is not available for all digital
TV,such as scrambled or audio only
channels.
04
P. 2 0
Page 22

10.USB Player
Press sour ce ke y, and selsct USB in soure
list, pres s OK bu tto n to en ter t he US B men u.
Pause FF Prev . NextFB Stop
00:00:33/00:04:22
Info.
Repeat ALL
USB 2.0
PHO TO MUSIC M OVIE TE XT
Please make sure that the USB device have
plugged in the slot.There are four type media
item can be selected, such as photo, music,
Movie, and text. Select the type media item by
pressing , pres s OK b utt on to e nte r
the disk selection menu.
1/1
Ret urn C
Press the to sele ct th e rig ht di sk an d pre ss
OK to display me dia f ile s and f old er li st or
choose Return to back to the media type
selection menu.
Press to select the function icon, press OK
button to confirm the function.
Press or EXIT button to exit the control b ar.
NOTE:
You can adjust the audio track, or program in the
Info menu while Playing the video file.Choose the
Info icon an d pre ss OK c an di spl ay th e Inf o MEN U.
Sample1.ts
Resolution: 720x576
AudioTrack: 1/2
Subtitle : 1/1
Program: 1/6
Size: 30574 KBytes
Close
1/1
Return
Movies
Sample1.ts
Sample1.ts Sample2.ts
Select the media file by pressing or , then
the previe w fra me wi ll po p up. Pre ss th e but ton
to play the media f ile i n ful l scr een .Wh en th e
media file (photo,music, Movie, or text type) is
playing, press the OK or Info button can display
the control bar.
Resolution: 688x412
AudioTrack: 1/2
Sub title : 1/1
Pro gram: 1 /5
Siz e: 51145 7 KByte s
Sample3.ts Sample4.ts
P. 2 1
Page 23

05
Trouble shooting
Trouble phenomenon Symptom
Picture Audio
Snow Noise
Ghost
Interference
Normal Picture
No pict ure M ute
No colour Normal audio Colour control
Norma l aud io
Noise
Mute
Inspection Check
antenna position, direction
or connection
antenna position, direction
or connection
electronic equipment,car/
motorcycle,fluorescent light
Volume(ch eck i f mut e is
activate d or if t he au dio s yst em
connections are not correct)
Power cord i s not i nse rte d
Power swit ch is n ot op ene d
Contrast and brightness/volume
setup
Press standby key on the remote
control for inspecting
Trouble shooting
05
Pictu re
break ing up
No colo ur
Norma l aud io
or weak
Noise
retune channel
TVsystem
P. 2 2
Page 24

Specification
Colour system
Sound system BG, DK, I, L,L'
Video input
b/Pr
Y/P
PAL-B/G、I、D/K
SECAM- B/G、D/K、L、 L
SCART,
VGA, HDMI, USB.
480i/p, 576i/p,
720p, 1080i, 1080p
YP
Pr, AV,
b
'
HDMI
Power supply
Audio output 3W+3W
TV-Tunning System
Environment
conditions
Accessory
* The part specifications of this TV set provided here
Difierences may occur as product technology is updated.
Design and specifications are subject to change without notice.
480i/p, 576i/p,
DC 12V, 3A (Power adaptor supplied)
Auto Preset 400 CH
Working temperature:
+5 C - +35 C
Working humidity:
20% - 80%
Storage temperature:
-15 C - +45 C
Storage humidity:
5% - 90%
User manual
Remote control
Battery (x2)
Quick start guide
720p, 1080i, 1080p
are for reference only.
Scart input/output description
TV Source
ATV
SCART Out
ATV
P. 2 3
DTV
Other Source
DTV
ATV
Page 25

LCD-FERNSEHER
BEDIENUNGSANLEITUNG
Bitte lesen Sie die Bedienungsanleitung aufmerksam durch, bevor Sie Ihren Fernseher
benutzen. Bewahren Sie die Anleitungen für zukünftigen Nachschlagen auf.
MODELL
LET19C430
LET22C430
LET24C430
1
Page 26

Inhaltsverzeichnis
01
Willkommen S. 03
Wichtige Informationen S. 03
Sicherheitshinweise S. 04
Warn- und Vorsichtshinweise S. 05
Sicherheits- und Warnhinweise
02 Einleitung
Parameter S. 07
Standfuß montieren S. 09
Wandmontage S. 10
Frontblende S. 11
AV-Anschlüsse S. 11
Fernseher anschließen S. 13
Common Interface S. 14
03 Fernbedienung
Fernbedienung S. 15
04 Bedienungshinweise
Installation S. 17
05 Störungserkennung
Störungserkennung S. 30
Spezifikationen S. 31
2
Page 27

01 Sicherheits- und Warnhinweise
WILLKOMMEN
Vielen Dank, dass Sie sich für diesen 19/22/24-Zoll LED LCD-Fernseher entschieden haben. Diese Anleitung hilft Ihnen bei der
Einstellung und Bedienung Ihres Fernsehers.
Vergewissern Sie sich zunächst, dass alle Zubehörteile mitgeliefert wurden:
19" HD-Ready LED LCD-Fernseher
2 x AAA-Batterien für Fernbedienung
Bedienungsanleitung
Schnellanleitung
Nun können Sie beginnen!
WICHTIGE INFORMATIONEN
LESEN SIE ALLE ANLEITUNGEN VOR GEBRAUCH UND BEWAHREN SIE SIE FÜR SPÄTERES NACHSCHLAGEN AUF.
VORSICHT
STROMSCHLAGGEFAHR
NICHT ÖFFNEN
VORSICHT
ZUR VERMEIDUNG VON STROMSCHLAG ÖFFNEN SIE DAS GERÄTEGEHÄUSE NICHT. ES BEFINDEN SICH KEINE VOM
VERBRAUCHER WARTBAREN TEILE IM INNERN DES GERÄTS. WENDEN SIE SICH MIT PROBLEMEN UND FRAGEN ZUR
WARTUNG AN DEN KUNDENDIENST.
DER BLITZ IM GLEICHSEITIGEN DREIECK BEDEUTET, DASS IM GERÄT HOCHSPANNUNGSGEFAHR BESTEHT.
DAS AUFRUFUNGSZEICHEN IM GLEICHSEITIGEN DREIECK BEDEUTET, DASS WICHTIGE WARTUNGS- UND
BEDIENUNGSHINWEISE IN DER BEDIENUNGSANLEITUNG GEFUNDEN WERDEN.
22" Full HD 1080P digitaler LED
LCD-Fernseher
Fernbedienung
2 x AAA-Batterien
Bedienungsanleitung
Schnellanleitung
24" Full HD 1080P digitaler LED
LCD-Fernseher
Fernbedienung
2 x AAA-Batterien
Bedienungsanleitung
Schnellanleitung
VORSICHT: ZUR VERMEIDUNG VON STROMSCHLAG UND FEUER SETZEN SIE DEN FERNSEHER NICHT FEUCHTIGKEIT AUS.
REINIGEN SIE DAS GERÄT UND DEN BILDSCHIRM NICHT MIT SCHEUERMITTELN; DAS FÜHRT ZU KRATZERN.
BITTE BEACHTEN SIE: REPARIEREN SIE DAS GERÄT NICHT SELBST, DAS KANN ZU VERLETZUNGEN UND SCHÄDEN AM
GERÄT FÜHREN. WENDEN SIE SICH MIT WARTUNGS- UND REPARATURARBEITEN STETS AN DEN AUTORISIERTEN
KUNDENDIENST.
3
Page 28

SICHERHEITSHINWEISE
• Warnung: Zur Vermeidung von Feuer und Stromschlag öffnen Sie nicht das Gerätegehäuse. Es befinden sich
keine vom Verbraucher wartbaren Teile im Innern des Gerätes. Wenden Sie sich mit Wartungs- und
Reparaturarbeiten stets an den autorisierten Kundendienst.
• Warnung: Zur Vermeidung von Feuer und Stromschlag setzen Sie das Gerät nicht Regen oder Feuchtigkeit
aus.
• Setzen Sie Netzteil und Gerät nicht Spritzwasser oder Tropfwasser aus und stellen Sie keine mit Wasser
gefüllten Gegenstände (wie Vasen) auf dem Gerät ab.
• Schützen Sie das Gerät vor direkter Sonneneinstrahlung und Hitze (Heizkörper, Herd).
• Blockieren Sie nicht die Ventilationsöffnungen, sie werden zur Belüftung benötigt. Stellen Sie das Gerät nicht
auf einem Kissen, Sofa oder ähnlichen Flächen ab.
• Stellen Sie das Gerät nicht auf einem unstabilen Wagen, Aufsteller, Stativ, Tisch oder einer Halterung auf. Es
kann herunterfallen und Verletzungen und Schäden verursachen.
• Stellen Sie keine schweren oder scharfkantigen Gegenstände auf dem Gerät ab.
• Benutzen Sie nur das mitgelieferte Netzteil. Die Benutzung eines fremden Netzteils führt zum Verlust Ihrer
Garantieansprüche.
• Ziehen Sie nach der Benutzung den Netzstecker.
• Entsorgen Sie Batterien umweltgerecht.
• WARNUNG: Batterien oder Akkus dürfen nicht übermäßiger Hitze ausgesetzt werden (direkte
Sonneneinstrahlung, Feuer usw.).
• WARNUNG: Übermäßiger Schalldruck von Ohrhörern oder Kopfhörern kann zu Hörschäden führen.
• WARNUNG: Benutzen Sie nur Zubehörteile, die vom Hersteller empfohlen oder mitgeliefert wurden. Dieses
Gerät ist mit einem Netzteil ausgestattet, das zum vollständigen Abtrennen des Gerätes vom Stromnetz aus
der Steckdose abgezogen werden muss. Die Steckdose muss jederzeit frei zugänglich sein.
Dieses Symbol zeigt an, dass das Gerät nicht mit dem Hausmüll entsorgt werden darf. Zur Vermeidung von
Gesundheits- und Umweltschäden durch unkontrollierte Entsorgung muss das Gerät recycelt werden. Geben Sie das
Gerät bitte an einer Sammelstelle für Elektroaltgeräte ab oder wenden Sie sich an Ihren Fachhändler.
4
Page 29

WARN- UND VORSICHTSHINWEISE
Warnung
Vorsicht
Dieser Fernseher wird mit Hochspannung betrieben. Öffnen Sie nicht das Gerätegehäuse. Wenden Sie sich mit
Wartungs- und Reparaturarbeiten stets an den autorisierten Kundendienst.
Zur Vermeidung von Feuer und Stromschlag setzen Sie das Gerät nicht Regen oder Feuchtigkeit aus.
Führen Sie keine Fremdkörper in das Gerät ein, stoßen Sie es nicht stark an. Verschütten Sie keine Flüssigkeiten auf
Ihrem Fernseher.
Blockieren Sie nicht die Ventilationsöffnungen, sie werden zur Belüftung benötigt.
5
Page 30

Klemmen Sie das Netzkabel nicht unter dem Fernseher ein.
Stehen Sie nicht auf dem Fernseher, lehnen Sie sich nicht gegen den Fernseher, stoßen Sie ihn nicht an. Achten Sie
auch besonders auf Kinder. Der Fernseher kann schwere Verletzungen und Schäden verursachen, wenn er umfällt.
• Stellen Sie das Gerät nicht auf einem unstabilen Wagen, Aufsteller, Stativ, Tisch oder einer Halterung auf. Es
kann herunterfallen und Verletzungen und Schäden verursachen.
Bei längerer Nichtbenutzung des Fernsehers ziehen Sie bitte das Netzkabel ab.
Mindestabstände
Wird der Fernseher eingebaut, so achten Sie bitte auf die Mindestabstände. Hitzestau kann die Lebensdauer Ihres
Fernsehers verkürzen und ist gefährlich.
6
Page 31

02 Einleitung
VORSICHT
Nehmen Sie keine Veränderungen am Fernseher vor, nehmen Sie keine Einstellungen vor, die nicht in dieser
Bedienungsanleitung beschrieben sind. LED-Fernseher werden mit Hochspannung betrieben. Ziehen Sie vor dem
Reinigen stets den Netzstecker, dann wischen Sie den Fernseher mit einem trockenen, weichen Tuch ab. Ziehen Sie
während eines Gewitters den Netzstecker und das Antennenkabel ab, um Schäden zu vermeiden. Lassen Sie
Reparaturen nur von einem autorisierten Kundendienst durchführen.
INSTALLATION
• Stellen Sie den Fernseher vor direkter Sonneneinstrahlung geschützt auf.
• Dunkelheit und Reflektionen auf dem Bildschirm können zu einer Überforderung der Augen führen. Weiche
und indirekte Beleuchtung wird für komfortables Fernsehen empfohlen.
• Lassen Sie auf der Rückseite des Fernsehers ausreichend Platz zur Ventilation.
• Vermeiden Sie besonders warme Standorte, um einen Hitzestau im Gerät und vorzeitige Schäden zu
vermeiden.
• Decken Sie die Lüftungsöffnungen während des Betriebs nicht ab.
Ausstattungsmerkmale
1. Nutzbar als Fernseher oder PC-Monitor
2. Hohe Leuchtkraft, breiter Betrachtungswinkel
3. HDMI- und SCART-Anschluss
4. NICAM
Parameter
Bildschirm 19" / 22" / 24"
Spannungsversorgung DC 12 V, 3 A (Netzteil mitgeliefert)
Audio-Ausgangsleistung (Klirrfaktor 7 %) 2 x 3 W
Anschlüsse Analog RGB (PC) x 1
High-Definition Multimedia Interface (HDMI) x 2
Videoeingang x 1
Audioeingang x 2
USB-Port x 1
YPbPr x 1
Mini SCART x 1
Horizontale Auflösung (TV-Zeilen) Composite Videoeingang 350
YPbPr 400
7
Page 32

PC
VOREINSTELLUNGEN
1 800x600 60 37,88
2 640x480 60 31,47
3 1024x768 60 48,36
4 1280x1024 60 63,98
AUFLÖSUNG V. Freq. (Hz) H. Freq. (kHz)
8
Page 33

Standfuß montieren
1. Legen Sie den Fernseher mit dem Bildschirm auf eine flache Arbeitsfläche. Legen Sie ein Tuch unter, um den
Bildschirm zu schützen. Setzen Sie den Standfuß unten an.
2. Schrauben Sie den Standfuß von unten mit der Schraube fest an.
HINWEISE ZUR INSTALLATION
Stellen Sie den Fernseher vor direkter Sonneneinstrahlung geschützt auf. Dunkelheit und Reflektionen auf dem
Bildschirm können zu einer Überforderung der Augen führen. Weiche und indirekte Beleuchtung wird für komfortables
Fernsehen empfohlen.
Lassen Sie auf der Rückseite des Fernsehers ausreichend Platz zur Ventilation.
Vermeiden Sie besonders warme Standorte, um einen Hitzestau im Gerät und vorzeitige Schäden zu vermeiden.
9
Page 34

WANDMONTAGE
Dieser Fernseher kann wie folgt an der Wand montiert werden:
1. Legen Sie den Fernseher mit dem Bildschirm auf eine flache Arbeitsfläche. Legen Sie ein Tuch unter, um den
Bildschirm zu schützen.
2. Schrauben Sie die Halterung für den Standfuß unten am Fernseher ab (bewahren Sie den Standfuß für späteren
Gebrauch auf).
3. Schrauben Sie den Fernseher mit den vier vorgesehenen Schrauben an einer VESA-Wandhalterung (nicht
mitgeliefert).
10
Page 35

Fernbedienung
Frontblende
1 Sensor Fernbedienung
2 Status-LED:
BLAU: eingeschaltet
ROT: Stand-by-Modus
3 Funktionstasten
1
2
3
4
5
SOURCE
MENU
CH+/CH-
VOL+/VOL-
STANDBY
Menü der Eingangsquellen anzeigen.
Hauptmenü anzeigen.
Im TV-Modus schalten Sie mit CH+ oder CH- den Kanal aufwärts oder abwärts um.
Im MENÜ wählen Sie mit CH+ oder CH- einen Menüpunkt.
In Stand-by-Modus schalten Sie den Fernseher ein.
Lautstärke einstellen.
Im MENÜ stellen Sie den gewählten Menüpunkt ein.
11
Page 36

Anschlüsse Seite/Rückseite
AV
1
L/R AUDIO
2
DC Netzteil
3
YPbPr
4
HDMI2
5
HDMI1
6
USB
7
PC AUDIO
8
COMMON INTERFACE (CI)
9
SCART
10
VGA
11
ANTENNE
12
Eingang
Eingang
Eingang
Eingang
Eingang
Eingang
Eingang
Eingang
Eingang
Eingang
Eingang
Eingang
12
Page 37

FERNSEHER ANSCHLIEßEN
ANTENNE ANSCHLIEßEN
Schließen Sie die Antenne auf der Rückseite des Fernsehers am Anschluss ANT IN an.
SIGNAL VERBESSERN
Zur Verbesserung schlechter Bildqualität in bestimmten Bereichen benutzen Sie einen Antennenverstärker (nicht mitgeliefert).
PC AM FERNSEHER ANSCHLIEßEN
Sie können den Fernseher ebenfalls als Monitor für Ihren PC benutzen, der Anschluss erfolgt über ein VGA-Kabel (nicht mitgeliefert).
1 Lesen Sie in der Bedienungsanleitung Ihres Computers nach, ob dieser einen VGA-Anschluss hat.
2 Schalten Sie Fernseher und PC aus.
3 Schließen Sie ein D-Typ 15-Pin VGA-Kabel am VGA-Anschluss des PC und am Fernseher an. Ziehen Sie die Schrauben an und
schließen Sie ein Audiokabel (nicht mitgeliefert) am Audioeingang auf der Rückseite des Fernsehers an.
4 Schalten Sie erst den Fernseher und dann den PC ein.
5 Rufen Sie auf dem Fernseher oder mit der Fernbedienung den VGA-Modus auf.
6 Sie können den VGA-Modus zu einer anderen Auflösung umschalten, Helligkeit und Kontrast im Menü einstellen, bis Sie ein klares
Bild haben.
DVD-PLAYER ODER VIDEOREKORDER AM FERNSEHER ANSCHLIEßEN
Einen DVD-Player oder Videorekorder können Sie auf zweierlei Weise anschließen. Beide Geräte müssen zunächst ausgeschaltet sein.
1 Schließen Sie die AV DVD/VCR Ausgänge an AV IN des Fernsehers an.
2 Schließen Sie Audio L und R am Audioeingang (8) an. Drücken Sie SOURCE und stellen Sie den Eingangsmodus auf AV ein.
SCART-EINGANG
1 Schließen Sie das SCART-Kabel vom externen Gerät (DVD-Player, Digitalempfänger, Spielkonsole usw.) am SCART-Eingang des
Fernsehers an.
2 Drücken Sie SOURCE und stellen Sie den Eingangsmodus auf SCART ein.
3 Drücken Sie PLAY auf dem externen Gerät.
HDMI-EINGANG
1
Schließen Sie das HDMI-Kabel vom externen Gerät am HDMI-Eingang des Fernsehers an.
2 Drücken Sie SOURCE und stellen Sie den Eingangsmodus auf HDMI ein.
3 Sehen Sie die Bedienungshinweise in der Anleitung Ihres HDMI-Gerätes nach.
13
Page 38

COMMON INTERFACE
Der Schacht Common Interface (CI) dient der Aufnahme des Conditional Access (CA) Moduls und der Smartcard für Bezahlsender. Bitte
wenden Sie sich an Ihren Dienstanbieter für weitere Informationen. Bitte beachten Sie, dass CA Module und Smartcards von uns nicht
geliefert werden.
Warnung
• Schalten Sie den Fernseher aus, bevor Sie das Modul in den Common Interface Schacht einschieben.
1. Setzen Sie zunächst das CA Modul und dann die Smartcard im CI Schacht an der Seite des Fernsehers ein.
CI SLOT CI-Schacht
CAM CA-Modul
Smart Card Smartcard
2. Schalten Sie den Fernseher ein, die nachstehende Meldung wird angezeigt, wenn das CA-Modul erkannt wird. Warten Sie einen
Moment ab, bis die Karte aktiviert ist.
3. Drücken Sie MENU und dann zur Anzeige der CI-Informationen.
4. Detaillierte Informationen zur benutzten CI-Karte werden angezeigt.
5. Drücken Sie OK, um das Kartenmenü aufzurufen. Finden Sie detaillierte Anleitungen in der Bedienungsanleitung des Moduls.
6. Nach dem Abziehen des Moduls wird die nachstehende Meldung angezeigt.
14
Page 39

03 Fernbedienung
Batterien in die Fernbedienung einsetzen
1: POWER: Fernseher ein- oder ausschalten (Stand-by-Modus).
2: ZIFFERNTASTEN: Kanal direkt eingeben.
3: TV MENU: Menü anzeigen.
4: NAVIGATIONSTASTEN: Navigation im Menü.
5: CH. LIST: Kanalliste anzeigen.
6: VOL+/- : Lautstärke einstellen.
7: PIC: Bildmodus umschalten.
8: SLEEP: Sleeptimer einstellen.
9: FREEZE: Standbild.
10: EPG: Im DTV-Modus elektronische Programmzeitschrift
anzeigen.
11: FAV: Im TV- oder DTV-Modus Favoritenkanäle aufrufen.
12: TASTEN FÜR VIDEOTEXT: Siehe Informationen auf der
nächsten Seite.
13: MUTE: Stummschaltung.
14: AUDIO: Audiosprache des Fernsehprogramms wählen.
15: RECALL: Zum vorherigen Kanal umschalten.
16: SOURCE: Eingangsquelle wählen.
17: OK: Auswahl bestätigen.
18: EXIT: Rückkehr in das vorherige Menü oder Menü verlassen.
19: SOUND: Tonmodus umschalten.
20: CH+/CH-: zum vorherigen oder nächsten Kanal umschalten.
21: ASPECT: Bildformat einstellen.
22: TV/RADIO: Im DVB-Modus zwischen TV- und Radiokanälen
umschalten. Programminformationen anzeigen/verbergen.
23: TEXT: VIDEOTEXT aufrufen.
24: INFO: Im DTV-Modus Informationen zum aktuellen Kanal
anzeigen.
25: SUBTITLE: Im DTV-Modus Untertitelsprachen umschalten.
26. Im USB-Modus zur nächsten Datei springen.
27. Im USB-Modus zur vorherigen Datei springen.
28. REC/REP: Im DTV-Modus aktuelles Programm aufzeichnen oder
im USB-Modus Wiederholung.
29. Im USB-Modus Wiedergabe beenden.
30. Im USB-Modus Rücklauf.
31. Im USB-Modus Vorlauf.
32. Im USB-Modus Wiedergabe starten.
33. Im USB-Modus Wiedergabe unterbrechen (Pause), im
DTV-Modus Timeshift starten.
BITTE BEACHTEN SIE: Das Gerät schaltet sich nach 4 Stunden
automatisch in den Stand-by-Modus, wenn es nicht benutzt wird.
1. Öffnen Sie das Batteriefach.
2. Setzen Sie 2 AAA 1,5-V-Batterien mit korrekter Polarität ein, wie im Batteriefach aufgedruckt.
3. Schließen Sie das Batteriefach wieder. Tauschen Sie die Batterien aus, wenn die Reichweite der Fernbedienung nachlässt.
Bitte beachten Sie:
1) Benutzen Sie Alkali-Batterien.
2) Bei längerer Nichtbenutzung oder wenn die Batterien erschöpft sind, entnehmen Sie sie bitte aus der Fernbedienung.
15
Page 40

FERNBEDIENUNG
VIDEOTEXT
Videotext ist ein Informationssystem, das von einigen Sendern übertragen wird und wie eine Zeitung aufgebaut ist.
Hier haben Sie ebenfalls Untertitel für Hörgeschädigte (Kabelnetzwerke, Satellitenkanäle usw.).
Drücken Sie:
TEXT
SEITE WÄHLEN
UNTERSEITEN DIREKT AUFRUFEN
INDEX Inhaltsverzeichnis aufrufen (gewöhnlich Seite 100).
SUB PAGE Einige Seiten haben Unterseiten, die nacheinander angezeigt werden. Mit dieser
HOLD Mit dieser Taste halten Sie eine Seite, sie wird nicht umgeblättert.
REVEAL Versteckte Informationen anzeigen oder verbergen (Spielauflösungen).
LIST Mit den vier Farbtasten können vier Favoritenseiten markiert werden. In diesem
Sie haben folgende Funktion:
Mit dieser Taste rufen Sie den Videotext auf oder Sie verlassen ihn. Eine Liste mit
Menüpunkten wird angezeigt. Jede Seite hat eine 3-stellige Nummer. Wird kein
Videotext übertragen, so wird die Zahl 100 angezeigt, ansonsten bleibt der
Bildschirm leer (verlassen Sie diesen Kanal).
Mit 0 bis 9 und den Navigationstasten aufwärts/abwärts rufen Sie die Seite auf.
Beispiel: Für Seite 120 geben Sie 1-2-0 ein. Die Nummer wird oben links im Bild
angezeigt. Zum Aufrufen einer neuen Seite geben Sie die entsprechende Nummer
ein. Ist die gewählte Seite nicht vorhanden, so läuft die Seitenzahl weiter.
Die Farbtasten entsprechen den Farbmarkierungen unten auf der Seite und dienen
als Schnelltasten zum Aufrufen. Der farbige Bereich blinkt, wenn die Seite noch
nicht zur Verfügung steht.
Taste blättern Sie um oder halten Sie die Unterseite. Die Seitenzahl wird oben links
im Bild angezeigt.
Modus ist eine weitere Navigation mit den Farbtasten nicht möglich.
16
Page 41

04 BEDIENUNGSHINWEISE
Installation
Dieses Menü wird beim ersten Einschalten des Fernsehers angezeigt bzw. nachdem Sie das Gerät zu den Werkseinstellungen
zurückgestellt haben. Wählen Sie Ihre Sprache und das Land, damit wird die automatische Kanalsuche gestartet. Anschließend wird der
erste aufgefundene DTV-Kanal angezeigt.
1. KANALMENÜ
Das erste Menü ist das Kanalmenü (CHANNEL) (nur für TV- oder DTV-Quellen).
Hier können Sie Kanäle suchen und bearbeiten.
1) Automatische Suche:
Alle Kanäle werden automatisch gesucht (wählen Sie zwischen ATV und DTV).
17
Page 42

Drücken Sie zunächst zur Auswahl des Landes, dann drücken Sie OK, um die Suche zu starten.
BITTE BEACHTEN SIE:
Alle Kanäle ATV, DTV und Radio können gleichzeitig gesucht und eingestellt werden, wenn Sie als Tune Type DTV+ATV einstellen.
Nach der automatischen Suche werden alle aufgefundenen Kanäle gespeichert.
Der erste DTV-Kanal wird angezeigt.
2) DTV Manuelle Suche:
Sie können einen DTV-Kanal wählen und dann das Programm suchen.
Drücken Sie zur Kanalwahl, dann drücken Sie OK, um das Programm zu suchen.
BITTE BEACHTEN SIE:
Bad, Normal und Good steht für schlechte, normale und gute Signalstärke.
3) ATV Manuelle Suche:
Stellen Sie das Tonsystem zur Suche nach Analogkanälen ein, dann nehmen Sie die Feinabstimmung vor und speichern Sie den
gewählten Kanal.
18
Page 43

BITTE BEACHTEN SIE:
Drücken Sie die rote Videotexttaste zum Speichern eines manuell gesuchten Kanals.
4). Kanal bearbeiten:
Sie können Kanäle löschen, umbenennen, verschieben, überspringen und als Favoriten einstellen.
Löschen
Drücken Sie die rote Taste zum Löschen eines Kanals.
Umbenennen
Sie können nur ATV-Kanäle umbenennen.
Navigieren Sie zu dem gewünschten Kanal und drücken Sie die grüne Taste, um den Kanal umzubenennen.
Drücken Sie
Drücken Sie MENU, um die Bearbeitung zu beenden und drücken Sie EXIT, um das Menü zu verlassen.
Bitte beachten Sie: ATV-Kanäle können bis zu 5 Schriftzeichen haben, DTV-Kanäle bis zu 25 Schriftzeichen.
zur Auswahl der Schriftzeichen. Drücken Sie , um zu navigieren.
Verschieben
Mit den Navigationstasten wählen Sie den zu verschiebenden Kanal, dann drücken Sie die gelbe Taste. Mit den Navigationstasten
verschieben Sie den Kanal, mit OK bestätigen Sie.
Überspringen
Drücken Sie zur Auswahl des Kanals und drücken Sie die blaue Taste, um diesen Kanal zu überspringen. Rechts vom Kanal wird
angezeigt. Zur Anzeige des übersprungenen Kanals drücken Sie zunächst wieder die blaue Taste, um die Funktion aufzuheben.
Das Symbol erlischt.
Favoriten
Drücken Sie zur Auswahl des Kanals und drücken Sie FAV, damit wird rechts vom Kanal das Symbol angezeigt. Zur
Auswahl eines Favoritenkanals drücken Sie FAV. Zum Löschen des Kanals in der Favoritenliste drücken Sie FAV, damit erlischt das
Symbol .
Drücken Sie FAV zum Aufrufen Ihrer Favoritenkanäle.
5) CI-Informationen (optional)
19
Page 44

In diesem Menü zeigen Sie die Informationen auf Ihrer CI-Karte an.
2. BILDMENÜ
Das zweite Menü ist das Bildmenü (PICTURE). Hier stellen Sie Kontrast, Helligkeit usw. ein.
Mit OK bestätigen Sie Ihre Einstellung.
BITTE BEACHTEN SIE:
1). Tint (Hautfarbe) haben Sie nur für das NTSC-System.
2). Ihnen stehen vier Farbtemperaturen (Color Temperature) zur Verfügung: medium (mittel), warm, cool (kühl) und User
(benutzerdefiniert).
3). Screen (Bildschirm) steht Ihnen nur im PC-Modus zur Verfügung, hier stellen Sie die horizontal und vertikale Position, Größe und
Phase ein.
3. KLANGMENÜ
Das dritte Menü ist das Klangmenü (SOUND).
Hier stellen Sie die Klangeffekte wie Höhen, Bässe, Balance usw. ein.
Drücken Sie
zur Navigation und OK zur Einstellung.
Bitte beachten Sie:
Auto Volume (automatische Lautstärkeregelung) steht Ihnen nur zur Verfügung, wenn die Lautstärke des Eingangssignals zu hoch oder
das Signal verzerrt ist.
20
Page 45
4. ZEITMENÜ
Das vierte Menü ist das Zeitmenü (TIME). Hier stellen Sie Uhrzeit, Ein- und Ausschaltzeit, Sleeptimer usw. ein. Drücken Sie zur
Navigation und OK zur Einstellung.
BITTE BEACHTEN SIE:
Der Fernseher schaltet sich automatisch aus, wenn für 15 Minuten kein Signal anliegt, sofern Auto Sleep aktiviert ist. Die Uhrzeit kann
über den DTV-Kanal automatisch eingestellt werden.
5. OPTIONSMENÜ
Das fünfte Menü ist das Optionsmenü (OPTION). Hier stellen Sie die Menüsprache, Audio- und Untertitelsprache usw. ein.
Im Menü PVR File System stellen Sie das USB-Laufwerk für die PVR-Aufnahme ein.
BITTE BEACHTEN SIE:
Mit Restore Factory Default (Rückstellung zu den Werkseinstellungen) werden alle Kanäle und das Passwort gelöscht.
6. SPERRMENÜ
Das sechste Menü ist das Sperrmenü (LOCK). Hier sperren Sie das System, stellen Sie das Passwort ein, blockieren Sie Programme und
stellen Sie die Kindersicherung ein. Nach Aktivierung der Sperre können Sie den Kanal nicht mehr einstellen.
21
Page 46

BITTE BEACHTEN SIE:
Das werksseitig eingestellte Passwort lautet 6666.
Block Program (Kanal blockieren): Drücken Sie
Entsperren rufen Sie das Hauptmenü auf, geben Sie das Passwort ein und dann drücken Sie die grüne Taste erneut.
Parental Guidance (Kindersicherung): Drücken Sie
zur Auswahl des Kanal, dann drücken Sie die grüne Taste zur Blockierung. Zum
zur Auswahl der Bewertungsstufe.
7. EPG-Menü (Elektronische Programmzeitschrift)
Das EPG-Menü dient der Anzeige der Programmvorschau für DTV- und Radiokanäle des Tages.
Zum Aufrufen des EPG-Menüs drücken Sie EPG:
1.
INFO
Mit wählen Sie den Kanal, Drücken Sie INFO, um die Programminformationen zu markieren.
2 Planung
Drücken Sie die gelbe Taste, um die Planungsliste (Schedule) anzuzeigen, drücken Sie zur Auswahl der Liste und drücken Sie die
rote Taste
3. Aufnahme
zum Löschen der Planungsliste. Drücken Sie EPG, um in das EPG-Menü zurückzukehren.
22
Page 47

Drücken Sie die rote Taste, um die Aufnahme des Programms einzustellen.
4. Erinnerung
Drücken Sie die blaue Taste und stellen Sie eine Erinnerungszeit ein. Der Fernseher schaltet dann automatisch auf das gewählte
Programm um.
23
Page 48

8. PVR-Funktion
1. Vorbereitung der Aufnahme
Rufen Sie im Optionsmenü PVR File System auf, hier wählen Sie „Check PVR File System“. Drücken Sie OK, bis „Checking“ zu
„Success“ umschaltet.
Bitte beachten Sie: Überprüfen Sie den Punkt „Speed“ (Geschwindigkeit). Bei Einstellung auf „HD Support“ steht Ihnen das
USB-Speichermedium für Timeshift und Aufnahme zur Verfügung. Anderenfalls formatieren Sie bitte das Gerät. „Free Record Limit“ ist
standardgemäß auf 6 Stunden eingestellt, sofern die Speicherkapazität ausreichend ist. Anderenfalls ist die Aufnahmezeit kürzer.
Während der Überprüfung gemäß „Check PVR File System“ drücken Sie bitte keine weiteren Tasten.
Die Aufnahmen im PVR-System können nur auf diesem Fernseher wiedergegeben werden, nicht auf dem Computer, DVD-Player usw.),
der nicht mit dem TS-Format kompatibel ist.
Zur Aufnahme werden Sie von Fernseher aufgefordert, das angeschlossene Gerät zu formatieren.
WARNUNG. WÄHREND DER FORMATIERUNG DES EXTERNEN GERÄTS WERDEN ALLE AUFNAHMEN GELÖSCHT.
Rufen Sie PVR File System im Optionsmenü auf:
Select Disk (Laufwerk wählen): Wählen Sie das Laufwerk zur Aufnahme.
24
Page 49

Check PVR File System (PVR-Dateisystem überprüfen): Vergewissern Sie sich, dass das PVR-Dateisystem für das
USB-Speichermedium eingestellt ist.
Format:
25
Page 50

(Wir empfehlen, das Gerät mit „High Speed FS“ zu formatieren, wodurch sich die Aufnahme beschleunigt.)
Nach Beendigung der Formatierung erhalten Sie nachstehendes Menü:
Bei Auswahl von „Hi Speed FS“ können Sie die Timeshiftgröße einstellen:
2. Programm aufzeichnen
26
Page 51

Während der DTV-Wiedergabe wählen Sie den gewünschten Kanal, dann drücken Sie „Record“ zur Anzeige des Aufnahmemenüs.
drücken Sie ERNEUT „Record“, DAS Aufnahmemenü Erlischt und „REC“ wird oben links im Bild angezeigt. Das Symbol erlischt,
nachdem Sie die Stopptaste drücken.
3. Aufnahme wiedergeben
Im USB-Speichermedium wird das Programm im Ordner „_MSTPVR“ gespeichert.
1. Das USB-Speichermedium muss zwischen 4 GB und 500 GB groß sein.
2. Das Video kann verpixeln, falls die Bitrate zu niedrig eingestellt ist.
3. Nicht alle USB-Speichermedien sind kompatibel. Nachstehend finden Sie eine Liste der empfohlenen USB-Speichermedien. Nicht
gelistete Modelle sind möglicherweise kompatibel, das ist jedoch nicht garantiert.
Unterstützte USB-Speichermedien entsprechen der Timeshiftfunktion auf Seite 29.
27
Page 52

9. Timeshiftfunktion
1. Vorbereitung der Aufnahme
Mit diesem Fernseher können Sie das aktuelle Programm unterbrechen und auf einen USB-Speichermedium aufzeichnen, dann ab der
Unterbrechung weiter sehen.
BITTE BEACHTEN SIE:
• Das USB 2. 0 Speichermedium muss formatiert sein. Erstellen Sie vor der Formatierung Sicherheitskopien, da alle Daten gelöscht
werden.
• Der Sleeptimer wird während der Timeshiftfunktion deaktiviert.
USB-Laufwerk formatieren
Wählen Sie die Formatierung des USB-Speichermediums und ordnen Sie den Speicherplatz für die Timeshiftfunktion zu.
BITTE BEACHTEN SIE:
• Die Formatierung dauert etwa 2 Minuten. Schalten Sie das Gerät während dieses Zeitraums nicht aus und trennen Sie das
USB-Speichermedium nicht ab.
• Während der Formatierung wird für das USB-Speichermedium ein Geschwindigkeitstest durchgeführt. Schlägt dieser fehl, so kann das
USB-Speichermedium nicht für die Timeshiftfunktion benutzt werden.
Unterbrochenes DTV-Programm auf USB-Speichermedium aufzeichnen
1. Im DTV-Modus schließen Sie das USB-Speichermedium am USB-Port auf der Seite des Fernsehers an.
2. Drücken Sie PAUSE (33), um die Timeshiftfunktion zu starten. Das Fernsehprogramm wird unterbrochen. Das Timeshiftmenü wird
angezeigt und die Aufnahme beginnt.
3. Drücken Sie STOPP (29), um die Timeshiftfunktion und die Aufnahme zu beenden.
BITTE BEACHTEN SIE:
• Ziehen Sie das USB-Speichermedium während der aktivierten Timeshiftfunktion nicht ab.
• 4 GB Speicher puffern ca. 140 Minuten.
28
Page 53

Limitierungen der Timeshiftfunktion:
1. Bei aktivierter Timeshiftfunktion stehen Ihnen nur WIEDERGABE/PAUSE/STOPP/VORLAUF/RÜCKLAUF/VOL+/VOL-/MUTE sowie
einige allgemeine Funktionstasten (ENTER/EXIT/Navigation) zur Verfügung.
2. Die Videowiedergabe ist nicht gleichmäßig und kann springen, falls die USB-Aufnahmegeschwindigkeit nicht den
Mindestanforderungen entspricht.
3. Ziehen Sie das USB-Speichermedium nicht ab, schalten Sie das Gerät während der Timeshiftfunktion nicht aus. Bei Verlust des
Signals schaltet sich das Gerät aus.
4. Ändern Sie während der Timeshiftfunktion nicht die Signalquelle.
5. Schalten Sie nicht schnell zwischen WIEDERGABE/PAUSE/VORLAUF/RÜCKLAUF um.
6. Der Sleeptimer wird beendet, falls er eingestellt war.
7. Das Video kann verpixeln, falls die Bitrate zu niedrig eingestellt ist.
8. Nicht alle USB-Speichermedien sind kompatibel. Das USB-Laufwerk sollte wenigstens < 500 mA haben.
Nachstehend Liste mit empfohlenen USB-Laufwerken. Nicht aufgeführte Modelle sind möglicherweise kompatibel, das ist jedoch nicht
garantiert.
• SanDisk Extreme® Contour™ USB Flash Drive - 8GB SDCZ8-8192-E75
• SanDisk Extreme® Contour™ USB Flash Drive -16GB SDCZ8-016G-A75
• Kingston DataTraveler 410 USB 2. 0 Flash Drive - 8GB DT410/8GB
• Kingston DataTraveler 410 USB 2. 0 Flash Drive -16GB DT410/16GB
• OCZ Technology Rally2 USB 2. 0 Flash Drive - 4GB OCZUSBR2DC-4GB
• OCZ Technology ATV USB 2. 0 Flash Drive - 8GB OCZUSBATV-8GB
• OCZ Technology Rally2 USB 2. 0 Flash Drive - 8GB OCZUSBR2DC-8GB
• SAMSUNG-HM500JI-500G
9. Diese Funktion haben Sie nicht für alle digitalen Fernsehprogramme, wie verschlüsselte oder reine Audiokanäle.
10. USB-Player
Drücken Sie die Quellentaste und wählen Sie in der Liste der Quellengeräte USB, dann drücken Sie OK, um das USB-Menü aufzurufen.
29
Page 54

Ein USB-Speichermedium muss angeschlossen sein. Wählen Sie zwischen Foto, Musik, Movie und Text. Drücken Sie zu Auswahl,
dann drücken Sie OK.
Drücken Sie zur Auswahl des Laufwerks, dann drücken Sie OK zur Anzeige der Mediendateien und Ordner. Mit Return kehren Sie
zur Medienauswahl zurück.
Mit oder wählen Sie die Datei, das Vorschaufenster wird angezeigt. Drücken Sie zur Wiedergabe als Vollbild. Während
der Wiedergabe (Foto, Musik, Movie oder Text) drücken Sie OK oder INFO zur Anzeige der Leister mit den Steuerungssymbolen.
Drücken Sie zur Auswahl der Funktion und OK zur Bestätigung.
Drücken Sie oder EXIT, um die Leiste auszublenden.
BITTE BEACHTEN SIE:
Sie können den Audiotrack oder das Programm während der Videowiedergabe einstellen. Mit Info und OK zeigen Sie das Infomenü an.
30
Page 55

05 Störungserkennung
Problem
Bild Ton
verschneit
Schatten
Störungen
normales Bild
kein Bild
keine Farbe
gestört
normaler Ton
gestört
stummgeschaltet
stummgeschaltet
normaler Ton
Überprüfen
Antennenposition,
Ausrichtung oder
Anschluss
Antennenposition,
Ausrichtung oder
Anschluss
elektronische Geräte,
Fahrzeug/Motorrad,
Neonlicht
Lautstärke
(stummgeschaltet oder
Audioanschlüsse nicht
korrekt)
Kein Netzanschluss,
Gerät ausgeschaltet,
Kontrast und
Helligkeit/Lautstärke
einstellen.
Drücken Sie STANDBY
auf der Fernbedienung.
Farbe einstellen
Bild verschwindet
keine Farbe
normaler Ton oder
leise
gestört TV-System
Kanal neu einstellen
31
Page 56

Spezifikationen
Farbsystem PAL-B/G, I, D/K
SECAM- B/G, D/K L, L'
Tonsystem B/G, DK, I, L, L'
Videoeingänge
Y/Pb/Pr
HDMI
Spannungsversorgung
Audioausgang
Umweltbedingungen
Zubehör Bedienungsanleitung
*Einige der Spezifikationen nur als Referenz.
Abweichungen vom tatsächlichen Gerät nicht ausgeschlossen.
Änderung von Design und Spezifikationen vorbehalten.
SCART Eingang/Ausgang
TV-Quelle SCART-Ausgang
SCART, YPbPr, AV,
VGA, HDMI, USB.
480i/p, 576i/p, 720p, 1080i, 1080p
480i/p, 576i/p, 720p, 1080i, 1080p
DC 12 V, 3 A (Netzteil mitgeliefert)
2 x 3 W
Betriebstemperatur: +5°C - +35°C
Betriebsluftfeuchtigkeit: 20 % - 80 %
Lagertemperatur: -15°C - +45°C
Lagerluftfeuchtigkeit: 5 % - 90 %
Fernbedienung
Batterien (x2)
Schnellanleitung
ATV ATV
DTV DTV
Andere Quelle ATV
32
Page 57

Récepteur TV LCD
MANUEL DE
L'UTILISATEUR
Lisez attentivement ce manuel avant d'utiliser votre téléviseur et conservez ce manuel dans un
bon endroit pour toute référence ultérieure.
Modèle :
LET19C430
LET22C430
LET24C430
1
Page 58

Sommaire
01
Bienvenue P. 03
Informations importantes P. 03
Avis de sécurité P. 04
Avertissements et mise en garde P. 05
Avertissements et mesures de sécurité
02 Introduction
Principaux paramètres P. 07
Instructions d'assemblage du socle de base P. 09
Directives d'installation du support mural P. 10
Panneau avant P. 11
Lire les connexions AV P. 11
Connexion de votre téléviseur P. 13
Interface Commune P. 14
03 Télécommande
Télécommande P. 15
04 Utilisation
Guide d'installation P. 17
05 Dépannage
Dépannage P. 30
Spécification P. 31
2
Page 59

01 Avertissements et mesures de sécurité
BIENVENUE
Nous vous remercions d'avoir acheté ce téléviseur LCD LED 19"/22"/24". Ce guide va vous aider à régler et utiliser votre téléviseur.
Commencez par vérifier le contenu de votre boîte avec la liste des pièces ci-dessous :
Téléviseur LCD LED 19" HD Ready.
Télécommande et 2 piles AAA ;
Guide d'utilisation
Guide de démarrage rapide
Maintenant vous pouvez commencer !
INFORMATION IMPORTANTE
LISEZ ENTIÈREMENT CE MANUEL AVANT L'UTILISATION ET CONSERVEZ-LE POUR TOUTE RÉFÉRENCE ULTÉRIEURE
ATTENTION
RISQUES D'ELECTROCUTION
NE PAS OUVRIR
ATTENTION
AFIN DE REDUIRE LES RISQUE DE CHOC ELECTRIQUE, N'ENLEVEZ PAS LE COUVERCLE (OU LE PANNEAU ARRIERE).
AUCUNE PIÈCE RÉPARABLE PAR L’UTILISATEUR À L’INTÉRIEUR. POUR TOUT PROBLÈME, ADRESSEZ-VOUS AU SERVICE
D'ASSISTANCE CLIENT. IL Y A UN SYMBOLE DE FLÈCHE D'ÉCLAIR DANS UN TRIANGLE ; CE SYMBOLE INDIQUE QU'UNE
HAUTE TENSION EST PRESENTE À L'INTÉRIEUR. IL EST DONC DANGEREUX D'ÉTABLIR LE MOINDRE CONTACT AVEC LES
COMPOSANTS INTERNES DU PRODUIT.
IL Y A UNE MARQUE D'EXCLAMATION DANS UN TRIANGLE : CE SYMBOLE PRÉVIENT L'UTILISATEUR QUE DES DIRECTIVES
D'UTILISATION ET DE MAINTENANCE SONT FOURNIES AVEC CET APPAREIL.
Téléviseur numérique LCD LED 22" Full
HD 1080p
Télécommande
2 piles AAA
Guide d'utilisation
Guide de démarrage rapide
Téléviseur numérique LCD LED 24" Full
HD 1080p
Télécommande
2 piles AAA
Guide d'utilisation
Guide de démarrage rapide
ATTENTION : POUR RÉDUIRE LE RISQUE DE CHOC ÉLECTRIQUE ET D'INCENDIE, NE METTEZ PAS LE TÉLÉVISEUR PRÈS DES
SOURCES D'HUMIDITÉ. N'UTILISEZ PAS DE NETTOYANTS ABRASIFS QUI PEUVENT RAYER OU ENDOMMAGER L'ÉCRAN LCD.
ÉVITEZ TOUT CONTACT AVEC DES OBJETS SUSCEPTIBLES DE RAYER L'ÉCRAN LCD.
REMARQUE : L'ENTRETIEN DE L'APPAREIL PAR VOUS-MÊME N'EST PAS AUTORISÉ ET POURRAIT ENTRAÎNER DES
BLESSURES OU ENDOMMAGER LE PRODUIT. CONFIEZ TOUTE RÉPARATION AU SERVICE D'ASSISTANCE CLIENT.
3
Page 60

INSTRUCTIONS DE SÉCURITÉ
• Attention : Pour réduire le risque d'électrocution, ne déposez aucun panneau. Aucun des éléments internes ne
peut être réparé par l'utilisateur. Confiez l'entretien à un technicien qualifié.
• Attention : POUR REDUIRE LES RISQUES D'INCENDIE OU D'ELECTROCUTION, N'EXPOSEZ PAS CET
APPAREIL A LA PLUIE OU A L'HUMIDITE.
• N'exposez pas l'appareil et l'adaptateur au ruissellement ni à la projection d'eau, et ne placez aucun objet
contenant un liquide (tel qu'un vase) au dessus de l'appareil.
• Éloignez le produit de la lumière directe du soleil et de toute source de chaleur telle que radiateurs ou poêles.
• N'obstruez jamais les fentes d'aération. Les fentes et ouvertures sur l'unité sont prévues pour la ventilation.
Ces fentes ne doivent jamais être obstruées en plaçant l'appareil sur un canapé, un tapis ou toute autre surface
similaire.
• Ne placez pas cet appareil sur un chariot, un support, un trépied ou une table instable. L'appareil pourrait
tomber, causant des dommages ou des blessures.
• Ne placez jamais d'objets lourds ou tranchants sur le panneau ou le cadre.
• N'utilisez que l'adaptateur secteur fourni avec le produit. L'utilisation d'un autre adaptateur annule la garantie.
• Débranchez la prise de courant lorsque l'appareil n'est pas utilisé.
• Il faut tenir compte de la protection de l'environnement lors de l'élimination des piles.
• AVERTISSEMENT : Les piles (pile ou batterie ou bloc batterie) ne doivent pas être exposées à une chaleur
excessive telle que rayons du soleil, feu, etc.
• AVERTISSEMENT : L'utilisation d'un casque ou d'écouteurs avec un volume sonore trop fort peut causer une
perte auditive.
• AVERTISSEMENT : N'utilisez que des
accessoires spécifiés par le fabricant, le produit est alimenté par un adaptateur secteur, l'adaptateur secteur
est utilisé comme dispositif de débranchement, le dispositif de débranchement doit rester facilement
accessible.
Ce symbole indique que ce produit ne doit pas être mis au rebut avec les déchets ménagers et ce dans tous les pays
de l'Union Européenne. En aidant à la récupération séparée, vous aidez à garantir que les produits seront recyclés
d’une façon appropriée et ainsi à préserver les ressources naturelles et à protéger l’environnement et la santé
humaine. Ramenez donc cet appareil aux points de collecte appropriées ou retournez-le au revendeur auprès duquel
vous l'avez acheté. Ainsi il sera recyclé et contribue à préserver l’environnement.
4
Page 61

Avertissements et mise en garde
Avertissement
Attention
Des hautes tensions dangereuses existent à l'intérieur de cet appareil. Ne déposez pas le panneau de sécurité à
l'arrière du téléviseur. Pour toute réparation, veuillez faire appel à un technicien qualifié.
Pour prévenir tout risque d'incendie ou d'électrocution, n'exposez pas cet appareil à la pluie et à l'humidité.
N'introduisez pas d'objets étrangers par les fentes des panneaux du téléviseur. Ne renversez jamais de liquide sur le
récepteur du téléviseur
Ne bloquez pas les fentes d'aération du panneau arrière. L'aération est essentielle pour éviter que les composants
électriques ne tombent en panne.
Ne coincez pas le cordon d'alimentation sous le récepteur de télévision.
5
Page 62

Ne montez jamais sur le téléviseur, ne vous appuyez pas dessus et ne le poussez pas brusquement sur son socle.
Prêtez une attention particulière aux enfants. Risque de blessures graves en cas de chute.
Ne placez pas le téléviseur sur un chariot, une étagère ou une table instable. Le téléviseur risque de tomber et peut
provoquer des blessures graves et des dommages matériels importants.
Débranchez le téléviseur du secteur s'il ne va pas être utilisé pour une longue période.
Distances minimales
Si le téléviseur est placé dans un compartiment fermé, il faut veiller à respecter les distances minimales.
L'accumulation de chaleur réduit la durée de vie de service de votre téléviseur et peut aussi être dangereuse.
6
Page 63

02 Introduction
ATTENTION
N'altérez aucun composant à l'intérieur du téléviseur ou tout bouton de commande non mentionnés dans ce manuel.
Tous les téléviseurs LED sont des appareils de haute tension. Débranchez le téléviseur du secteur lorsque vous
nettoyez la poussière ou des gouttes d'eau sur le panneau LED ou l'enceinte du téléviseur ; essuyez le téléviseur
avec un chiffon doux et sec. Débranchez le téléviseur du secteur et le câble d'antenne pendant les tonnerres et les
éclairs pour éviter d'endommager votre téléviseur. Toutes les réparations de ce téléviseur ne doivent être effectuées
que par du personnel qualifié de service de télévision.
INSTALLATION
• Placez le téléviseur dans une pièce où la lumière ne frappe pas directement sur l'écran.
• L'obscurité totale ou une réflexion sur l'écran peut provoquer une fatigue visuelle. Un éclairage doux et indirect
est recommandé pour une visualisation confortable.
• Prévoyez suffisamment d'espace entre le téléviseur et le mur pour permettre la ventilation.
• Évitez les endroits trop chauds pour éviter tout dommage possible à l'enceinte ou une défaillance prématurée
des composants.
• Ne couvrez pas les fentes de ventilation lors de l'utilisation du téléviseur.
Caractéristiques principales
1. Utilisable comme écran télé, moniteur d'affichage ou écran pour PC ;
2. Grande luminance et large angle de la visualisation ;
3. Interface HDMI et péritel ;
4. NICAM ;
Données principales
Panneau 19" / 22" / 24"
Alimentation 12V CC, 3A (Adaptateur secteur fourni)
Puissance de sortie audio (THD 7%
(Taux de distorsion dynamique))
Bornes 1 Connecteur RVB analogique (PC)
Définition horizontale (lignes) Entrée vidéo composite >= 350
2 x 3 W
2 Interfaces HDMI (Interface Multimédia Haute définition)
1 Entrée vidéo
2 Entrées audio
1 Entrée USB
1 Connecteur YPbPr
1 Connecteur mini péritel
YPbPr >=400
7
Page 64

PC
MODE PRÉDÉFINI
1 800*600 60 37. 88
2 640*480 60 31. 47
3 1024*768 60 48. 36
4 1280*1024 60 63. 98
RESOLUTION V. Fréq. (Hz) H. Fréq. (KHz)
8
Page 65

Instructions d'assemblage du socle de base
1. Placez le téléviseur sur une surface plane avec l'écran orienté vers le bas. Utilisez un chiffon pour le protéger.
Localisez le bas du socle.
2. Fixez le bas en serrant les vis au bas du socle.
REMARQUES SUR L'INSTALLATION
Placez le téléviseur dans une pièce où la lumière ne frappe pas directement sur l'écran. L'obscurité totale ou une
réflexion sur l'écran peut provoquer une fatigue visuelle. Un éclairage doux et indirect est recommandé pour une
visualisation confortable.
Prévoyez suffisamment d'espace entre le téléviseur et le mur pour permettre la ventilation.
Évitez les endroits trop chauds pour éviter tout dommage possible à l'enceinte ou une défaillance prématurée des
composants.
9
Page 66

DIRECTIVES D'INSTALLATION DU SUPPORT MURAL
Ce téléviseur peut être accroché au mur en suivant la procédure suivante :
1. Placez le téléviseur LCD LED sur une surface solide. Mettez un matériau souple à l'avant de l'écran pour le
protéger contre tout dommage.
2. Retirez les vis de la partie inférieure du téléviseur, où le socle est fixé au téléviseur, et enlevez le socle (rangez le
socle dans un endroit sûr pour une utilisation ultérieure).
3. Utilisez les quatre vis fournies pour fixer le téléviseur sur un support mural (non inclus) par les quatre trous VESA
standard à l'arrière du téléviseur.
10
Page 67

Télécommande
Panneau frontal
1 Capteur de télécommande
2 Témoins
BLEU : ALLUMÉ.
ROUGE : VEILLE.
3 Touches.
SOURCE
1
2
3
4
5
MENU
CH+/CH-
VOL+/VOL-
VEILLE
Pour afficher le Menu Source.
Pour ouvrir le Menu principal.
En mode TV, appuyez sur CH+ ou CH- pour passer au canal suivant ou précédent.
Dans MENU, appuyez sur CH+ ou CH- pour sélectionner des éléments.
En mode veille, appuyez dessus pour allumer le téléviseur
Pour régler le niveau sonore.
Dans MENU, permet de régler l'élément sélectionné.
Prises arrières/latérales
11
Page 68

AV
1
Audio Gauche/Droite
2
Sources d'alimentation CC
3
YPBPR
4
HDMI2
5
HDMI1
6
USB
7
Audio PC
8
INTERFACE COMMUNE
9
(CI)
PERITEL
10
Entrée VGA
11
ANT
12
Entrée
Entrée
Entrée
Entrée
Entrée
Entrée
Entrée
Entrée
Entrée
Entrée
Entrée
Entrée
12
Page 69

CONNEXION DE VOTRE TV
RACCORDEMENT DE L'ANTENNE
Connectez votre antenne à l'arrière du téléviseur dans la prise ANT IN.
AMÉLIORER VOTRE SIGNAL
Pour améliorer la qualité de l'image dans une région de mauvaise réception, utilisez un amplificateur de signal (non fourni).
CONNECTEZ VOTRE PC AU TÉLÉVISEUR
Vous pouvez utiliser votre téléviseur comme un moniteur pour votre ordinateur personnel en le connectant avec un câble VGA (non
fourni).
1 Lisez le guide utilisateur de votre ordinateur et vérifiez qu'il dispose d'un connecteur VGA.
2 Arrêtez votre téléviseur et votre PC.
3 Branchez un câble d'interface VGA de type D à 15 broches au connecteur d'interface vidéo VGA du PC. Branchez l'autre extrémité du
câble au connecteur d'interface PC du téléviseur. Serrez les vis des connecteurs VGA et connectez le câble audio (non fourni) à la prise
d'entrée audio à l'arrière du téléviseur.
4 Allumez le téléviseur d'abord puis le PC.
5 Réglez le mode d'entrée vidéo sur VGA à l'aide de la touche du téléviseur ou de la télécommande.
6 Une fois l'image apparaît, s'il y a du bruit, changez la résolution du mode VGA, changez le taux de rafraîchissement ou réglez la
luminosité et le contraste dans le menu jusqu'à ce que l'image soit claire.
CONNECTER UN LECTEUR DVD OU UN MAGNÉTOSCOPE À VOTRE TV
Il y a deux manières pour connecter un lecteur DVD ou un magnétoscope à votre téléviseur. Assurez-vous que le téléviseur, lecteur DVD
ou le magnétoscope soient éteints avant de les connecter.
1 Connectez les sorties AV du lecteur DVD/magnétoscope à la prise AV IN de votre téléviseur.
2 Connectez les sorties audio AV L & R à l'entrée audio (8), appuyez sur la touche SOURCE du téléviseur pour définir le mode d'entrée
vidéo sur AV.
ENTRÉE PÉRITEL
1 Connectez le câble péritel de l'appareil externe (lecteur DVD, boîtier décodeur ou console de jeux) à la prise péritel du téléviseur.
2 Appuyez sur la touche SOURCE pour sélectionner le mode PÉRITEL.
3 Appuyez sur la touche PLAY de l'appareil externe.
Entrée HDMI
1
Connectez le câble HDMI de l'appareil à la prise HDMI du téléviseur.
2 Appuyez sur la touche SOURCE pour sélectionner le mode HDMI.
3 Reportez-vous au guide utilisateur de l'appareil HDMI pour avoir des informations sur son fonctionnement.
13
Page 70

INTERFACE COMMUNE
Le logement de l'interface commune (CI) est destiné à un module d'accès conditionnel (CA) et une carte à puce pour pouvoir regarder
des programmes télé et des services supplémentaires payants. Contactez votre prestataire de services d'interface commune pour obtenir
plus d'informations sur les modules et l'abonnement. Notez que les modules CA et les cartes à puce ne sont ni fournis ni des accessoires
en option.
Avertissement
• Teignez votre téléviseur avant d'insérer un module dans le logement d'interface commune.
1. Insérez correctement le CAM (module d'accès conditionnel), puis la carte à puce dans le logement CI qui se trouve sur le côté du
téléviseur.
CI SLOT LOGEMENT D'INTERFACE COMMUNE
CAM CAM (module d'accès conditionnel)
Smart Card Carte à puce
2. Allumez le téléviseur, le message ci-dessous s'affiche si un module CA est détecté. Attendez quelques instants jusqu'à ce que la carte
soit activée.
3. Appuyez sur la touche MENU puis appuyez sur la touche pour sélectionner l'option Informations CI.
4. Des informations détaillées sur la carte CI en cours d'utilisation seront affichées.
5. Appuyez sur OK pour accéder au menu de la carte. Reportez-vous au manuel d'utilisation du module pour régler les détails.
6. Lorsque le module est retiré, le message suivant apparaît sur l'écran.
14
Page 71

03 Télécommande
1: POWER (MARCHE) : Mise en marche ou sur veille du téléviseur.
2: TOUCHES CHIFFREES : Pour accéder directement aux chaînes.
3: TV MENU : Affichage du menu TV.
4: CURSEUR : Pour se déplacer parmi les options des menus.
5: CH. LIST : Affichage de la liste des chaînes.
6: VOL+/- : Réglage du volume sonore.
7: PIC : Pour passer au mode image.
8: SLEEP : Pour activer la minuterie d'arrêt du téléviseur.
9: FREEZE : Gel de l’image.
10: EPG : Affichage des informations sur le programme en cours et sur
le programme à venir en mode DTV.
11: FAV : Pour accéder à la liste des chaînes favorites en mode TV ou
DTV.
12: TOUCHES DE TELETEXTE : Voir page suivante.
13: MUTE : Pour couper ou rétablir le son.
14: AUDIO : Pour sélectionner les modes audio/langues proposés par
les programmes de télévision.
15: RECALL : Pour accéder à la chaîne regardée précédemment.
16: SOURCE : Sélection de la source d'entrée.
17: OK : Pour confirmer la sélection.
18: EXIT : Pour revenir au menu précédent ou quitter le menu.
19: SOUND : Pour changer le mode son.
20: CH+/CH- : Pour accéder aux chaînes suivantes ou précédentes.
21: ASPECT : Pour changer le rapport d'aspect de l'image.
22: TV/RADIO : En mode DVB, pour passer d’une chaîne de télévision
numérique à une station de radio et inversement.
Affichage/suppression des informations sur le programme.
23: TEXT : Pour afficher ou quitter le TELETEXTE.
24: INFO : Affichage des informations sur la chaîne regardée ou des
informations supplémentaires sur le programme lorsque le petit écran
EPG est affiché en mode DTV.
25: SUBTITLE : Pour changer de sous-titrage en mode DTV.
26. Pour passer au fichier suivant en mode USB.
27. Pour revenir au fichier précédent en mode USB. REC/REP : Pour
démarrer l’enregistrement du programme de télévision regardé en
mode DTV ou pour une lecture en boucle en mode USB.
29. Arrêt du lecteur multimédia en mode USB.
30. Pour effectuer un retour rapide en cours de lecture USB.
31. Pour avancer rapidement en cours de lecture USB.
32. Lecture du lecteur multimédia en mode USB.
33. Pause du lecteur multimédia en mode USB, différé en mode DTV.
REMARQUE : en l'absence de toute activité pendant 4 heures,
Insertion des piles dans la télécommande
l'appareil passe automatiquement en mode veille
1. Ouvrez le compartiment des piles.
2. Insérez 2 piles AAA 1,5 V en respectant les indications de polarité (+/-) des piles à l'intérieur du compartiment.
3. Remettez le couvercle du compartiment des piles en place. Remplacez par des piles neuves si le téléviseur présente les
symptômes suivants : Son fonctionnement devient instable ou capricieux. S'il arrive que le téléviseur ne réponde pas à la
télécommande.
Remarques :
1) Utilisation de piles alcalines conseillée.
2) Retirez les piles lorsqu'elles sont usées ou si la télécommande ne va pas être utilisée sur une période prolongée.
15
Page 72

TÉLÉCOMMANDE
TÉLÉTEXTE
Le télétexte est un système d'information diffusé par certaines chaînes, qui se consulte comme un journal. Il offre
également l'accès aux sous-titrages pour les personnes malentendantes ou qui ne sont pas familiers avec la langue
de transmission (réseaux câblés, chaînes satellites, etc.)
Appuyez sur :
TEXTE
SÉLECTION D'UNE PAGE
ACCÈS DIRECT AUX ÉLÉMENTS
INDEX Cela renvoie à la page sommaire (généralement la page 100).
SUB PAGE Certaines pages contiennent des sous-pages qui sont automatiquement affichées
HOLD Pour figer la page.
REVEAL Pour afficher ou masquer les informations cachées (solutions de jeux).
LIST L'utilisateur peut définir quatre pages préférées à être directement liées aux quatre
Vous obtenez :
Il est utilisé pour appeler ou quitter le mode télétexte. Le sommaire apparaît avec
une liste d'éléments qui peuvent être accédés. Chaque élément a un numéro de
page correspondante de 3 chiffres. Si la chaîne sélectionnée ne diffuse pas de
télétexte, l'indication 100 s'affiche et l'écran reste noir (dans ce cas, quittez le
télétexte et sélectionnez un autre canal).
Entrez le numéro de la page désirée à l'aide de touches 0 à 9 et haut/bas. Exemple:
page 120, tapez 120. Le numéro est affiché en haut à gauche, le compteur tourne,
puis la page est affichée. Répétez cette opération pour afficher une autre page. Si le
compteur continue à chercher, cela signifie que la page n'est pas transmise.
Sélectionnez un autre numéro.
Les touches de couleur sont comme elles sont affichées en bas de l'écran. Les 4
touches colorées permettent d'accéder aux rubriques ou aux pages
correspondantes. Les zones colorées clignotent lorsque la rubrique ou la page n'est
pas encore disponible.
successivement. Cette touche permet d'arrêter ou reprendre la sous-page.
L'indication apparaît en haut à gauche.
touches de couleur. Lorsque que le mode liste est activé, il n'est pas possible
d'utiliser la navigation Haut et Bas avec les touches de couleur. Les numéros des
pages préférées sont conservés et restaurés dans/de la mémoire non volatile pour
chaque canal par le logiciel du système.
16
Page 73

04 UTILISATION
Guide d'installation
Cet écran n'apparaît que lorsque le téléviseur est allumé pour la première fois ou lorsque les valeurs par défaut sont restaurés. Vous
pouvez choisir la langue et le pays, la recherche automatique des programmes. Une fois cet écran tourné, le téléviseur passe au premier
programme télé numérique.
1. MENU CANAL
Le premier élément du MENU est le Menu canal (pour la source TV ou DTV uniquement).
Ici, vous pouvez rechercher les chaînes et modifier les programmes.
1). Recherche automatique :
Pour rechercher toutes les chaînes automatiquement (vous pouvez sélectionner ATV et DTV)
17
Page 74

Appuyez sur
pour sélectionner d'abord le pays, puis appuyez sur la touche OK pour lancer la recherche automatique.
REMARQUE :
Toutes les chaînes, y compris ATV, DTV et radio peuvent être recherchées en une fois, si le type de recherche est DTV + VTT.
Toutes les chaînes mémorisées seront effacées après une recherche automatique.
Après la recherche automatique, le téléviseur se syntonise à la première chaîne de télévision numérique (DTV).
2). Recherche manuelle de chaînes numériques (DTV) :
Vous pouvez sélectionner un canal de télévision numérique (DTV), puis trouver le programme de ce canal.
Appuyez sur
REMARQUE :
Mauvais Normal Bon indique l'intensité du signal.
pour sélectionner le canal, puis appuyez sur OK pour rechercher les chaînes.
3). Recherche manuelle de programmes analogiques (ATV)
Vous pouvez changer le système de sonorisation pour rechercher les chaînes de télévision analogiques puis affiner les canaux
sélectionnés.
18
Page 75

REMARQUE :
Appuyez sur la touche télétexte rouge pour mémoriser les chaînes après la recherche manuelle.
4). Modifier un programme :
Vous pouvez supprimer, renommer, déplacer, ignorer, rendre favori tout programme.
Supprimer
Appuyez sur la touche télétexte rouge, le programme pointé par le curseur sera supprimé.
Renommer :
Vous ne pouvez renommer que les programmes ATV.
Déplacez le curseur sur le programme, appuyez sur la touche télétexte verte pour renommer le programme.
Appuyez sur pour choisir un caractère. Appuyez sur pour déplacer le curseur.
Appuyez sur la touche MENU pour quitter la modification, appuyez sur EXIT pour quitter le menu.
Remarque : Les noms des programmes ATV ne peuvent être que de 5 caractères, les noms des programmes DTV peuvent être de 25
caractères.
Déplacer
Utilisez les touches fléchées pour sélectionner la chaîne que vous souhaitez déplacer. Ensuite, appuyez sur la touche jaune pour
sélectionner la fonction Déplacer. Une fois activée, utilisez les touches fléchées pour se déplacer et appuyez sur OK pour confirmer.
Ignorer
Appuyez sur pour choisir le programme, appuyez sur la touche télétexte bleue pour ignorer ce programme, le symbole
apparaît sur le côté droit du programme. Choisissez le programme ignoré, appuyez à nouveau sur la touche bleue pour annuler ignorer,
le symbole va disparaître.
Favori
Appuyez sur pour choisir le programme, appuyez sur la touche FAV, le symbole apparaît sur le côté droit du programme.
Choisissez le programme FAV, appuyez à nouveau sur la touche FAV pour annuler FAV, le symbole disparaît.
Une fois votre groupe favori créé, vous pouvez appuyer sur la touche FAV pour accéder rapidement à votre programme favori.
5). Informations sur la CI : (en option)
19
Page 76

Ce menu peut afficher des informations de la carte de CI.
2. MENU IMAGE
Le second élément du Menu principal est le Menu Image. Ce menu permet de régler les paramètres de l'image tels que contraste,
luminosité, etc.
Appuyez sur OK pour se déplacer, appuyez sur OK pour régler.
REMARQUE :
1). Teinte n'est disponible qu'avec le système NTSC.
2). Il y a quatre modes de température des couleurs disponibles : moyen, chaud, froid, et personnalisé
3). L'écran est disponible en mode PC uniquement qui permet de régler la position horizontale, verticale, la taille et la phase.
3. MENU AUDIO
Le troisième élément du Menu principal est le Menu audio.
Ici vous pouvez régler l'effet sonore tel que les aigus, basses, balance, etc.
Appuyez sur
pour se déplacer, appuyez sur OK pour régler.
Remarque :
Volume automatique : uniquement disponible lorsque le volume du signal d'entrée est trop élevé ou présente une distorsion.
4. MENU TEMPS
Le quatrième élément du Menu principal est le Menu Temps ; vous pouvez régler l'heure, l'heure marche/arrêt, le temps de veille
automatique, etc.
Appuyez sur pour se déplacer, appuyez sur OK pour régler.
20
Page 77

REMARQUE :
Dans 15 minutes, il n'y aura pas de signal, la TV passe en veille automatiquement, si Veille automatique est activée. L'heure peut être
obtenue du système DTV automatiquement.
5. MENU OPTIONS
Le cinquième élément du Menu principal est le Menu Options. Vous pouvez choisir la langue des menus, la langue audio, la langue de
sous-titres, etc.
Dans le système de fichiers PVR, vous pouvez configurer le disque USB pour PVR.
REMARQUE :
La restauration des paramètres par défaut, efface tous les programmes et mot de passe.
6. MENU VERROUILLAGE
Le sixième élément du Menu principal est le Menu verrouillage. Vous pouvez verrouiller le système, définir un mot de passe, verrouiller
des programmes et définir le contrôle parental, après avoir activé le système de verrouillage, vous ne pouvez pas rechercher les chaînes
ou modifier les programmes.
21
Page 78

REMARQUE :
Le mot de passe par défaut est 6666.
Verrouillage de programmes : Appuyez sur pour choisir le programme, appuyez sur la touche télétexte verte pour verrouiller le
programme. Si vous voulez déverrouiller le programme, accédez au menu principal, entrez le mot de passe, puis appuyez sur la touche
verte. Contrôle parental : Appuyez sur
de choisir une classification.
7. Menu EPG (Electronic Program Guide) (Guide Electronique des Programmes)
Le Menu EPG est utilisé pour avoir une idée sur les programmes télé et radio de la journée.
Pour accéder au Menu EPG, appuyez sur la touche EPG, le menu suivant s'affiche :
1.
INFO
Utilisez pour choisir les programmes, appuyez sur la touche INFO, pour afficher les informations du programme mis en
surbrillance.
2 Programme
Appuyez sur la touche télétexte jaune pour lister tout le Programme, appuyez sur
pour supprimer la liste de programmes, appuyez sur EPG pour retourner au Menu EPG.
3.
Enregistrer
22
pour choisir la liste, appuyez sur la touche rouge
Page 79

Appuyez sur la touche rouge pour définir le programme à enregistrer.
4. Rappel
Appuyez sur la touche bleue pour choisir un programme et mettre en place une heure de rappel, le téléviseur passe automatiquement au
programme choisi à l'heure de rappel.
8. Fonction PVR
1. Préparer l'enregistrement d'un programme
Entrez dans le système de fichiers PVR dans le menu Options, choisissez "Vérifier le système de fichiers PVR". Cliquez sur "OK", jusqu'à
ce que "Vérifier" se transforme en "Réussi".
Remarque : sélectionnez le terme "Vitesse". S'il prend en charge "HD", cela signifie que la vitesse du dispositif USB peut supporter
l'enregistrement décalé (TimeShift). Dans le cas contraire, formatez le dispositif pour s'assurer qu'il la prendra en charge. La valeur par
défaut "Limite d'enregistrement" est 6 heures, si l'espace sur le disque est suffisant. Si l'espace n'est pas suffisant, le temps
d'enregistrement devrait être réduit en fonction de l'espace disponible sur le disque. Pendant le processus "Vérifier le système de fichiers
PVR", ne faites aucune opération jusqu'à ce qu'il soit terminé.
Les enregistrements doivent être faits avec le système TV PVR. Il ne peut être lu que dans le même téléviseur et non dans d'autres types
de dispositifs (ordinateurs, lecteurs DVD, etc.) qui ne sont pas compatibles avec Format TS.
Notez que, pour réaliser des enregistrements, le téléviseur vous obligera à formater le dispositif connecté pour stocker l'enregistrement.
AVERTISSEMENT : LORSQUE VOUS FORMATEZ UN DISPOSITIF EXTERNE, TOUS LES FICHIERS ET TOUTES LES
INFORMATIONS QUE VOUS AVEZ STOCQUÉES DANS LE DISPOSITIF SERONT PERDUS.
Dans le Menu Options entrez dans le système de fichiers PVR comme indiqué ci-dessous :
23
Page 80

Sélection de disque : sélectionnez le disque pour enregistrer le fichier d'enregistrement.
Vérifier le système de fichiers PVR : vérifiez si le système de fichiers PVR est défini dans le dispositif USB ou pas.
Formater :
24
Page 81

(Suggestions du format de formatage du dispositif en "FS grande vitesse ..." ce qui peut accélérer l'enregistrement.)
Le menu ci-dessous apparaît une fois le formatage terminé :
Si vous sélectionnez l'option mode de formatage "FS grande vitesse", vous pouvez modifier la taille de lecture décalée (TimeShift) :
2. Enregistrer le programme
25
Page 82

En cours de lecture de source DTV, choisissez le canal et cliquez sur "Enregistrer", l'écran d'enregistrement apparaît. Cliquez à nouveau
sur "Enregistrer", l'écran d'enregistrement disparaît et le symbole "REC" reste affiché dans le coin supérieur gauche. Il disparaîtra lorsque
vous cliquez sur "stop".
3. Lire l'enregistrement
Dans "USB", le programme enregistré sera sauvegardé dans le dossier "_MSTPVR" du dispositif.
1. La taille de stockage USB doit être entre 4 Go et 500 Go.
2. La vidéo risque de devenir pixélisée si le débit vidéo est trop faible.
3. Pas tous les dispositifs USB sont compatibles. Voici une liste des lecteurs USB recommandés. Les modèles qui ne sont pas listés
peuvent être compatibles, mais ce n'est pas garanti.
La liste de supports USB est la même que celle de la fonction Timeshift (lecture décalée), voir page 28
26
Page 83

9. Fonction Timeshift (lecture décalée)
1. Préparer l'enregistrement d'un programme
Ce téléviseur vous permet de faire une pause et d'enregistrer le programme numérique en cours dans un dispositif de stockage USB, et
de reprendre au point où il s'était arrêté.
REMARQUE :
• Le formatage d'un dispositif de stockage USB 2.0 serait nécessaire. Sauvegardez vos données avant de formater. Toutes les données
stockées dans le dispositif USB seront effacées après un formatage.
• La mise en veille automatique sera suspendue si elle a été réglée avant l'activation de la fonction TimeShift (lecture décalée).
Format de stockage du lecteur USB
Sélectionnez cette option pour formater le dispositif USB et pour allouer l'espace pour la fonction TimeShift (lecture décalée).
REMARQUE :
• Le processus de formatage prendra au moins 2 minutes. N'éteignez pas l'appareil et ne retirez pas le dispositif USB pendant le
formatage.
• Lors du formatage, un test de vitesse sera effectué sur le dispositif USB. S'il échoue, cela signifie que le dispositif USB peut ne pas
supporter la fonction TimeShift (lecture décalée).
Enregistrer une émission DTV (télévision numérique) mise en pause sur le dispositif de
stockage USB
1. En mode source d'entrée DTV, insérez le dispositif de stockage USB dans le port USB situé sur le côté de votre téléviseur.
2. Appuyez sur PAUSE (33) pour démarrer la fonction TimeShift (lecture décalée). Le programme TV en pause. L'OSD TimeShift apparaît,
et l'enregistrement démarre.
3. Appuyez sur STOP (29) pour arrêter la fonction TimeShift et arrêter l'enregistrement du programme.
REMARQUE :
• Ne débranchez pas le dispositif de stockage USB lorsque la fonction TimeShift est en cours.
• Environ 4 Go de mémoire tampon offre 140 minutes d'enregistrement.
27
Page 84

Limites du TimeShift :
1). Lorsque la fonction TimeShift est activée, seules les touches PLAY/PAUSE/STOP/FWD/REV/ VOL+/VOL-/MUTE et quelques touches
de fonctionnement de base (ENTRER / EXIT / navigation) sont disponibles.
2). La lecture vidéo peut ne pas être continue et peut présenter des sauts si la vitesse d'enregistrement USB ne répond pas aux
exigences minimales.
3). Ne retirez pas le dispositif USB et n'éteignez pas l'appareil pendant l'opération TimeShift. L'opération sera abandonnée dès que le
signal est perdu.
4). Ne retirez pas la source du signal lors de l'opération TimeShift.
5). Ne changez pas rapidement et de façon répétée les opérations entre PLAY/PAUSE/FWD/REV.
6). La mise en veille automatique sera terminée si elle avait été réglée en avant le TimeShift.
7). La vidéo risque de devenir pixélisée si le débit vidéo est trop faible.
8). Pas tous les dispositifs USB sont compatibles, le courant électrique des disques durs USB devrait être <500 mA.
Voici une liste des lecteurs USB recommandés. Les modèles qui ne sont pas listés peuvent être compatibles, mais ce n'est pas garanti.
• Clé USB Flash SanDisk Extreme® Contour™ - SDCZ8-8192-E75 8Go
• Clé USB Flash SanDisk Extreme® Contour™ - SDCZ8-016G-A75 16Go
• Clé USB 2.0 Flash Kingston DataTraveler 410 - DT410/ 8Go
• Clé USB 2.0 Flash Kingston DataTraveler 410 DT410/16Go
• Clé USB 2.0 Flash OCZ Technology Rally2 - OCZUSBR2DC-4Go
• Clé USB 2.0 Flash OCZ Technology ATV - OCZUSBATV-8Go
• Clé USB 2.0 Flash OCZ Technology Rally2 - OCZUSBR2DC-8Go
• SAMSUNG-HM500JI-500G
9). Cette fonctionnalité n'est pas disponible pour toutes les TV numériques, tels que les canaux brouillés ou audio seulement.
10. Lecteur USB
Cliquez sur l’icone de la source, et sélectionnez l’USB dans la liste, pressez le bouton OK pour entrer dans le menu USB.
Assurez-vous que le dispositif USB est inséré dans la fente. Il existe quatre types d'éléments multimédia qui peuvent être sélectionnés,
tels que photo, musique, film et texte. Sélectionnez l'élément multimédia en appuyant sur
de sélection de disque.
, appuyez sur OK pour accéder au menu
28
Page 85

Appuyez sur la touche pour sélectionner le bon disque et appuyez sur OK pour afficher les fichiers et dossiers multimédias ou
choisir Retour pour revenir au menu de sélection du type multimédia.
Sélectionnez le fichier multimédia en appuyant sur ou , pour afficher l'image de prévisualisation. Appuyez sur la touche
pour lire le fichier multimédia en plein écran. Lorsque le fichier multimédia (photo, musique, film, ou texte) est en cours de lecture,
appuyez sur la touche OK ou sur la touche Info pour afficher la barre de contrôle.
Appuyez sur
Appuyez sur ou EXIT pour quitter la barre de contrôle.
REMARQUE :
Vous pouvez régler la piste audio, ou programme dans le menu Info pendant la lecture du fichier vidéo. Choisissez l'icône Info et appuyez
sur OK pour afficher le Menu Info.
pour sélectionner l'icône de la fonction, appuyez sur la touche OK pour valider la fonction.
29
Page 86

05 Dépannage
Symptôme du problème
Vérification Inspection
Image Audio
Neige
fantôme
Interférence
Image normale
Pas d'image
Pas de couleur
Bruit
Audio
normal
Bruit
Son coupé
Son coupé
Audio
normal
position de l'antenne, direction
ou connexion
position de l'antenne, direction
ou connexion
équipements électroniques,
voiture / moto, lumière
fluorescente
Volume (vérifiez si muet est
activé ou si les connexions du
système audio ne sont pas
corrects)
Le cordon d'alimentation n'est
pas inséré. L'interrupteur
d'alimentation n'est pas ouvert.
Configuration du contraste,
luminosité/volume
Appuyez sur la touche standby
(veille) de la télécommande pour
inspection
Contrôle des couleurs
Rupture de l'image
Pas de couleur
Audio
normal ou
faible
Bruit Système TV
recherchez le canal
30
Page 87

Spécifications
Système de couleurs PAL-B/G, I, D/K
SECAM- B/G, D/K L, L'
Système audio B/G, DK, I, L, L'
Entrée vidéo
Y/Pb/Pr
HDMI
Alimentation
Sortie audio
Conditions
d'environnement
Accessoires
* Les spécifications de ce téléviseur ne sont fournies ici qu'à titre de référence.
Des différences peuvent apparaître car la technologie du produit est en amélioration continue.
La conception et les caractéristiques sont sujettes à modification sans préavis.
Description entrée/sortie péritel
Source TV Sortie PERITEL
Péritel, YPbPr, AV,
VGA, HDMI, USB.
480i/p, 576i/p, 720p, 1080i, 1080p
480i/p, 576i/p, 720p, 1080i, 1080p
12V CC, 3A (Adaptateur fourni)
3 W + 3 W
Température de fonctionnement : +5°C - +35°C
Humidité de fonctionnement : 20% - 80%
Température de stockage : -15°C - +45°C
Humidité de stockage : 5% - 90%
Guide d'utilisation
Télécommande
Piles (x 2)
Guide de démarrage rapide
ATV (télévision
ATV (télévision
analogique)
DTV (télévision
DTV (télévision
numérique)
Autre source ATV (télévision
analogique)
numérique)
analogique)
31
Page 88

TV LED
MANUALE DELL'UTENTE
Leggete attentamente questo manuale prima di utilizzare il vostro televisore e conservatelo in
un posto sicuro per future consultazioni .
MODELLO:
LET19C430
LET22C430
LET24C430
Page 89

Contenuti
01
Benvenuti P. 03
Informazioni Importanti P. 03
Avvisi di sicurezza P. 04
Avvisi e cautela P. 05
Sicurezza ed avvisi
02 Introduzione
Parametri principali P. 07
Istruzioni di assemblaggio della base di sostegno P. 09
Linee guida per l'installazione a muro P. 10
Pannello anteriore P. 11
Collegamenti AV supportati P. 11
Collegare il vostro televisore P. 13
Common interface P. 14
03 Telecomando
Telecomando P.15
04 Operatività
Guida all'installazione P. 17
05 Risoluzione dei problemi
Risoluzione dei problemi P. 30
Specifiche P. 31
2
Page 90

01 Sicurezza ed avvisi
BENVENUTI
Grazie per aver acquistato questo televisore LED LCD 19"/ 22”/24". Questa guida vi aiuterà ad impostare e ad iniziare ad utilizzare il
vostro televisore.
Per prima cosa, controllate il contenuto della confezione con la lista di controllo delle parti sottostante.
TV LCD LED 19" HD Ready.
Telecomando
2 x Batterie AAA
Manuale di istruzioni
Guida rapida all'avvio
Adesso potete iniziare!
TV LED LCD 22" Full HD 1080P Digital
Telecomando
2 x batterie AAA
Manuale di istruzioni
Guida rapida all'avvio
INFORMAZIONI IMPORTANTI
LEGGETE TUTTE LE ISTRUZIONI PRIMA DELL'USO E CONSERVATELO PER FUTURE CONSULTAZIONI.
CAUTELA
RISCHIO DI SHOCK ELETTRICO
NON APRIRE
CAUTELA
PER RIDURRE IL RISCHIO DI SHOCK ELETTRICI, NON RIMUOVETE IL COPERCHIO (O IL RETRO). ALL'INTERNO NON VI SONO
PARTI A CUI L'UTENTE POSSA FARE MANUTENZIONE DA SOLO. PER QUALUNQUE PROBLEMA, FATE RIFERIMENTO PER LA
MANUTENZIONE CALL CENTER. E' PRESENTE IL SIMBOLO DI UNA FRECCIA A FORMA DI FULMINE IN UN TRIANGOLO.
QUESTO SIMBOLO INDICA LA PRESENZA ALL'INTERNO DI ALTO VOLTAGGIO. E' PERICOLOSO AVERE QUALUNQUE TIPO DI
CONTATTO CON QUALUNQUE PARTE INTERNA DI QUESTO PRODOTTO
E' PRESENTE UN PUNTO ESCLAMATIVO IN UN TRIANGOLO: QUESTO SIMBOLO VI AVVISA CHE NEL PRODOTTO SONO
INCLUSE ISTRUZIONI IMPORTANTI PER L'USO E LA MANUTENZIONE.
TV LED LCD 24" Full HD 1080P Digital
Tel e co ma nd o
2 x batterie AAA
Manuale di istruzioni
Guida rapida all'avvio
3
Page 91

CAUTELA: PER RIDURRE IL RISCHIO DI INCENDI O SHOCK ELETTRICO, NON PONETE IL TELEVISORE VICINO A SORGENTI DI
UMIDITA'. NON UTILIZZATE DETERSIVI ABRASIVI CHE POSSANO GRAFFIARE O ROVINARE LO SCHERMO LCD. EVITATE IL
CONTATTO CON OGGETTI CHE POSSANO GRAFFIARE LO SCHERMO LCD.
NOTA: NON SIETE AUTORIZZATI AD EFFETTUARE DA SOLI LA MANUTENZIONE, POICHE' POTREBBE PORTARE A FERITE O A
DANNI AL PRODOTTO. FATE RIFERIMENTO PER LA MANUTENZIONE ALLA LINEA DI AIUTO DEL CLIENTE.
DICHIARAZIONE DI CONFORMITA’
Si dichiara che questo apparecchio TV mod. LET19C430,LET22C430,LET24C430
è stato fabbricato nell’ Unione Europea e risponde alle prescrizioni dell’ art. 1 del DM 26.03.92 ed a quelle dell’ art. 2 comma 1 del D.M.
28.08.95 n.548. Haier Europe Trading,
Via de Cristoforis, 12 - I 21100 Varese (Italy) VAT IT02607360126
4
Page 92

NOTIFICHE DI SICUREZZA
• Avviso: Per ridurre il rischio di shock elettrici, non rimuovete il coperchio (o il retro). Non vi sono parti a cui
l'utente possa fare manutenzione da solo all'interno. Per tutta la manutenzione fate riferimento a personale di
servizio qualificato.
• Avviso: per ridurre il rischio di shock elettrico, non esponete quest'unità a pioggia o umidità.
• Non esponete l'alimentatore e l'apparecchio all'acqua (gocciolamenti o schizzi), e nessun oggetto riempito con
liquidi, come i vasi, dovrebbe essere posizionato sull'apparecchio.
• Tenete il prodotto lontano dalla luce diretta del sole e da fonti di calore come radiatori o fornelli.
• Non bloccate le aperture di ventilazione. Gli slot e le aperture sull'unità devono ventilare. Le aperture non
devono mai essere bloccate posizionando il prodotto su cuscini, divani o altre superfici simili.
• Non posizionate l'unità su un carrello, sostegno, scaffale, tripode, braccio o tavolo instabile. L'unità potrebbe
cadere, causando danni.
• Non posizionate oggetti pesanti o affilati sullo schermo o sulla cornice.
• Utilizzate solo l'alimentatore AC incluso col prodotto. Utilizzare qualunque altro alimentatore annullerà la
garanzia.
• Scollegate l'alimentatore dalla presa quando l'unità non è in uso.
• Si deve fare attenzione agli aspetti ambientali perlo smaltimento delle batterie.
• AVVISO: Le batterie (batteria, batterie o pacco batterie) non devono essere esposte a calore eccessivo come
luce diretta del sole, fuoco o simili.
• AVVISO: L'eccessiva pressione acustica dalle cuffie può causare danni all'udito.
• AVVISO: Utilizzate solamente accessori aggiuntivi specificatamente forniti dal produttore. Il prodotto è fornito di
un alimentatore AC, che viene utilizzato come sistema di scollegamento. Il dispositivo di scollegamento
dev'essere prontamente accessibile.
Questo marchio indica che questo prodotto non dev'essere smaltito con la spazzatura casalinga in tutta Europa. Per
prevenire possibili danni all'ambiente o alla salute umana per lo smaltimento incontrollato, riciclate responsabilmente
per promuovere l'utilizzo sostenibile delle materie prime. Per gettare il vostro dispositivo usato, fate uso dei sistemi di
raccolta o contattate il rivenditore dove il prodotto è stato acquistato. Loro potranno ritirare il prodotto per riciclarlo in
modo sicuro per l'ambiente.
5
Page 93

AVVISI E CAUTELA
Avviso:
Cautela:
Sono utilizzati alti voltaggi nell'operatività del televisore. Non rimuovete il retro del cabinet dal teleuisore. Per la
manutenzione fate riferimento solo a personale di servizio qualificato.
Per prevenire il rischio di shock elettrico, non esponete il televisore a pioggia o umidità.
Non lasciate cadere o spingete oggetti negli slot e aperture del televisore. Non lasciate cadere alcun tipo di liquidi su
di esso.
Non bloccate i fori di ventilazione sul retro. Un'adeguata ventilazione è essenziale per prevenire guasti ai componenti
elettrici.
6
Page 94

Non bloccate il cavo di alimentazione sotto il televisore.
Non state vicino, non appoggiatevi, né spingete all'improvviso il televisore o il suo supporto. Fate particolarmente
attenzione ai bambini. Se dovesse cadere potrebbe causare serie ferite.
Non posizionate l'unità su un carrello, sostegno, scaffale o tavolo instabile. Se dovesse cadere potrebbe causare serie
ferite alle persone e danni al televisore stesso.
Quando il televisore non viene utilizzato per un lungo periodo di tempo, è consigliabile scollegare il cavo di
alimentazione dalla presa AC.
Distanze minime:
Se il televisore dev'essere integrato in un mobile o in uno spazio chiuso, devono essere mantenute le distanze minime.
Tra l’apparecchio e l’alloggiamento.Il calore nel mobile potrebbe ridurre la vita del vostro televisore e potrebbe essere
pericoloso.
7
Page 95

02 Introduzione
CAUTELA
Non maneggiate mai alcun componente all'interno del televisore, né altri controlli di regolazione non menzionati in
questo manuale. Tutti i televisori LED sono strumenti ad alto voltaggio. Quando pulite lo schermo LED o il CABINET, il
cavo di alimentazione dovrebbe essere scollegato dal suo alloggiamento, quindi asciugate il televisore con un panno
morbido e asciutto. Durante i temporali, scollegate il cavo di alimentazione e l'antenna per prevenire danni al
televisore. Tutte le riparazioni al televisore dovrebbero essere condotte da personale di manutenzione specializzato.
INSTALLAZIONE
• Posizionate il televisore in una stanza dove la luce non colpisca direttamente lo schermo.
• L'oscurità totale o i riflessi sullo schermo possono causare affaticamento oculare. Si raccomanda
un'illuminazione indiretta e soffusa per una visione confortevole.
• Lasciate abbastanza spazio tra il televisore e il muro per permettere la ventilazione.
• Evitate luoghi eccessivamente caldi per prevenire eventuali danni al cabinet o guasto prematuro dei
componenti.
• Non coprite le aperture di ventilazione quando utilizzate il televisore.
Caratteristiche principali
1. Utilizzabile come televisore, terminale video, monitor PC.
2. Alta luminosità, ampio angolo di visuale.
3. Interfaccia HDMI e SCART
4. NICAM;
Parametri principali
Schermo 19" / 22" / 24"
Alimentazione: DC 12V, 3A (alimentatore fornito)
Potenza in uscita audio (THD7%) 2x3W
Terminali Analogico RGB(PC)x1
High-Definition Multimedia Interface (HDMI) x 2
Ingresso video x 1
Ingresso video x 2
Ingresso USB x 1
YPbPr x1
Mini SCART x 1
Definizione orizzontale (Linea TV) Ingresso video composito>=350
YPbPr >=400
8
Page 96

PC
MODALITA' PRECONFIGURAZIONE
1 800*600 60 37. 88
2 640*480 60 31. 47
3 1024*768 60 48. 36
4 1280*1024 60 63. 98
Istruzioni di assemblaggio della base di sostegno
1. Posizionate il televisore con lo schermo rivolto verso il basso su una superficie piana. Utilizzate un panno per
proteggere lo schermo Posizionate il fondo sul sostegno.
2. Fissate il fondo stringendo saldamente le viti sul sostegno.
RISOLUZIONE V. Freq. (Hz) H. Freq. (KHz)
NOTE DI INSTALLAZIONE
Posizionate il televisore in una stanza dove la luce non colpisca direttamente lo schermo. L'oscurità totale o i riflessi
sullo schermo possono causare affaticamento oculare. Si raccomanda un'illuminazione indiretta e soffusa per una
visione confortevole.
Lasciate abbastanza spazio tra il televisore e il muro per permettere la ventilazione.
Evitate luoghi eccessivamente caldi per prevenire eventuali danni al cabinet o guasto prematuro dei componenti.
9
Page 97

LINEE GUIDA PER L'INSTALLAZIONE A MURO
Questo televisore può essere montato a muro come segue:
1. Posizionate il televisore LED LCD su una superficie stabile. Posizionate un panno morbido sulla parte anteriore
dello schermo per proteggerlo da qualunque danno.
2. Rimuovete le viti dalla parte inferiore del televisore, dove la base si collega al televisore, e rimuovete il sostegno
(Conservatelo per un uso futuro).
3. Utilizzate le quattro viti fornite per fissare il televisore su un braccio di sostegno a muro (non incluso) attraverso i
quattro fori standard VESA sul retro del televisore.
10
Page 98

Telecomando
Controlli del pannello anteriore
1. Sensore del telecomando.
2 Indicatori LED:
BLU: ACCESO.
ROSSO: STAND BY.
3 Tastierino
1
2
3
4
5
SORGENTE
MENU
CH+/CH-
VOL+/VOL-
STANDBY
Visualizza il menù delle sorgenti in ingresso.
Visualizza il Menù principale
In modalità TV, premete i tasti CH+ o CH- per andare al canale successivo o precedente.
In modalità MENU, premete CH+ o CH- per selezionare gli oggetti.
In modalità standby, accende il televisore.
Controllo del volume audio
In menù, regola l'oggetto selezionato.
STANDBY
11
Page 99

Prese sul retro/sul lato
AV
1
AUDIO L/R
2
Alimentazione DC
3
YpbPr
4
HDMI2
5
HDMI1
6
USB
7
AUDIO PC
8
COMMON IN INTERFACE(CI)
9
SCART
10
Ingresso VGA
11
ANT
12
Ingresso
Ingresso
Ingresso
Ingresso
Ingresso
Ingresso
Ingresso
Ingresso
Ingresso
Ingresso
Ingresso
Ingresso
12
Page 100

COLLEGARE IL VOSTRO
TELEVISORE
COLLEGAMENTO DELL'ANTENNA
Collegate l'antenna al retro del televisore nella presa ANT IN
MIGLIORARE IL SEGNALE
Per migliorare la qualità delle immagini in un'area con segnale basso, utilizzate un amplificatore di segnale (non fornito).
COLLEGARE IL PC AL TELEVISORE
Potete utilizzare il televisore come monitor per il vostro computer collegandolo con un cavo VGA (non fornito).
1 Leggete il manuale d'uso del vostro computer e controllate che abbia un connettore VGA.
2 Spegnete il televisore e il PC.
3 Collegate un cavo di interfaccia VGA tipo D a 15-pin al connettore interfaccia video VGA del computer. Collegate l'altra estremità del
cavo al connettore interfaccia PC sul televisore. Stringete le viti sul connettore VGA e collegate il cavo audio (non fornito) alla presa di
ingresso audio sul retro del televisore.
4 Accendete prima il televisore e poi il PC.
5 Premete il tasto sul televisore o sul telecomando per impostare l'ingresso video su VGA.
6 Una volta che viene visualizzata l'immagine, se ci sono disturbi, cambiate la modalità VGA in un'altra risoluzione, cambiate la
frequenza di aggiornamento o regolate la luminosità e il contrasto sul menù fino a che l'immagine risulta nitida.
COLLEGARE UN LETTORE DVD O UN VIDEOREGISTRATORE AL VOSTRO
TELEVISORE
Ci sono due modi per collegare un lettore DVD o un videoregistratore al vostro televisore. Assicuratevi che sia il televisore sia il lettore
DVD o il videoregistratore siano spenti prima di collegarli.
1 Collegate le uscite AV DVD/VCR nella presa in ingresso AV IN sul vostro televisore.
2 Collegate il cavo audio AV L & R all'ingresso audio (8) Premete il tasto SOURCE sul televisore per impostare la modalità di ingresso
video su AV.
Ingresso SCART
1
Collegate il cavo SCART dal dispositivo esterno (lettore DVD, Set-top box o console di videogiochi).
2 Premete il tasto SOURCE per selezionare la modalità SCART.
3 Premete il tasto PLAY sul dispositivo esterno.
Ingresso HDMI
1
Collegate il cavo dal dispositivo HDMI alla presa HDMI del televisore .
2 Premete il tasto SOURCE per selezionare la modalità HDMI.
3. Fate riferimento al manuale d'istruzioni del dispositivo HDMI per come utilizzarlo.
13
 Loading...